Chapter 13
Greenhouse Plans
THE PLANS IN THIS CHAPTER are geared for handy, do-it-yourself gardeners who have decided to build their own greenhouse. These designs can also serve as models if you choose to have your greenhouse constructed by a builder. There are plans here to suit a variety of needs, and many can be modified according to the materials you have on hand, your terrain or your home’s location, the space you have available, and how you will be using the structure.
Each greenhouse has a different style of foundation, and all, accordingly, require varying levels of skills to build — from the simplest structures such as a season extender and a PVC-framed hoop house to more complex greenhouses such as a lean-to structure and a slant-front insulated building. A number of the structures can be glazed in a variety of ways as well. Many of the projects incorporate polycarbonate glazing because it’s easy to acquire and install, but you may prefer glass or have access to acrylic or other material. You can also add lighting or plumbing — or modify systems — for a number of these greenhouses, or, in several instances, leave them out altogether for the simplest construction. The following plans are, in many instances, starting points. Combine them with your imagination and skills so that you can make your greenhouse the best for your garden.
For more information on foundations, building techniques, and glazing than is provided in the individual steps for each project, refer to chapters 7, 8, and 9.
Please Note
If a diagram is too small or hard to read, double-tap the image to open to fill the screen, and use the two-finger pinch-out method to zoom in. (These features are available on most e-readers.)
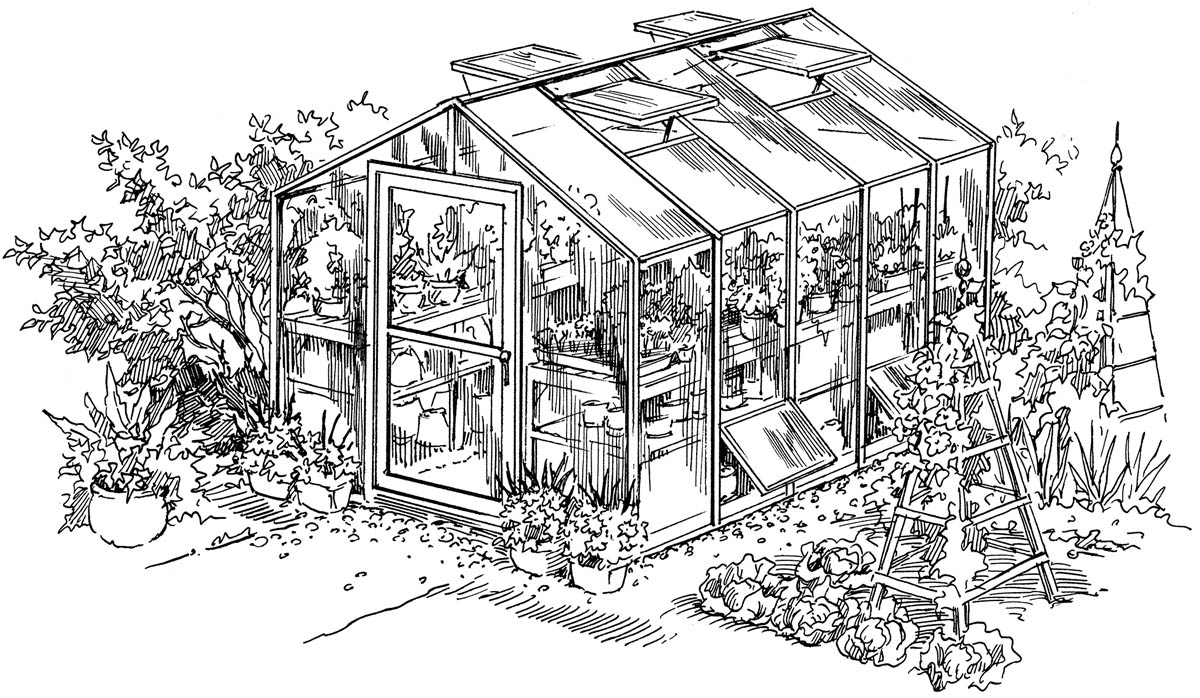
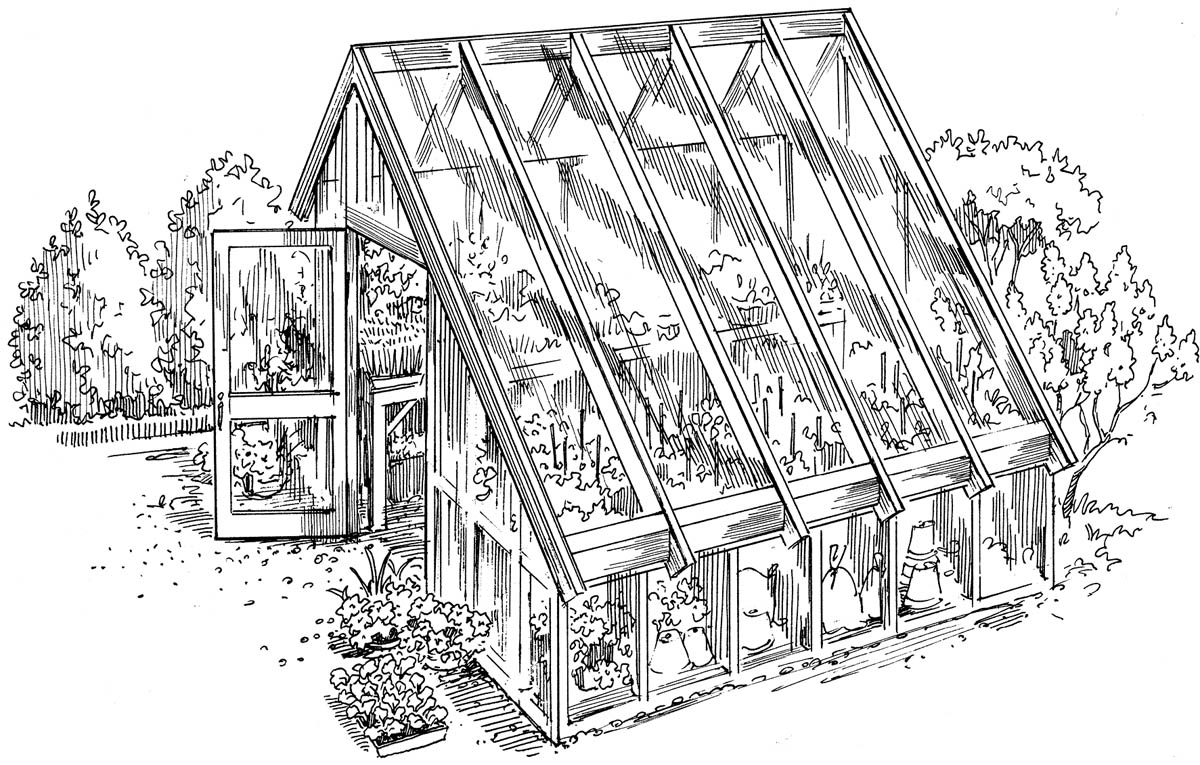
1. Basic Conventional Greenhouse
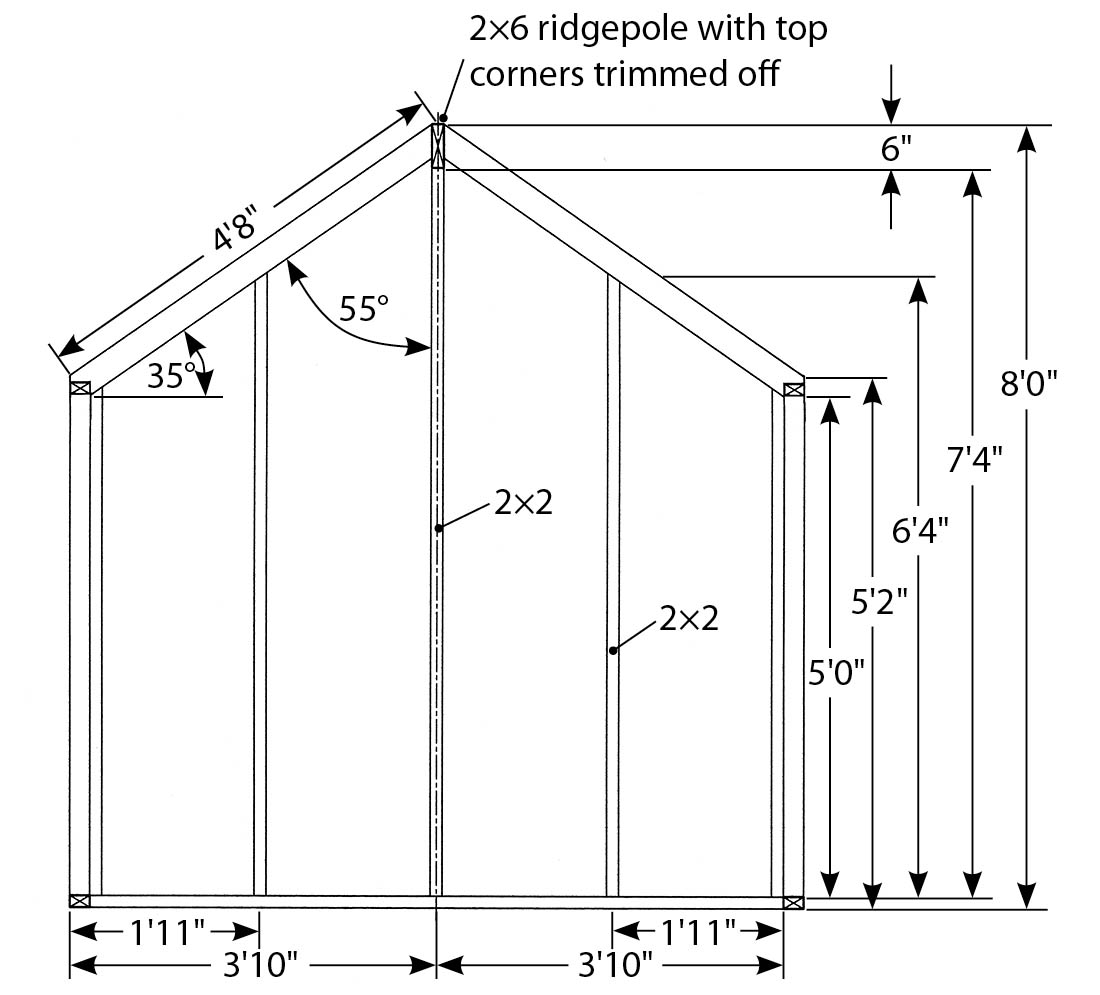
This 8-foot by 10-foot greenhouse is conventionally framed and intended to be glazed with 6 mm polycarbonate. The wood used for the frame comprises cedar or oak 2×2s with a 2×4 eave support and a 2×6 ridgepole. Glazing in the roof opens like windows to add ventilation.
The polycarbonate is simply screwed onto the surface of the frame and the seams between sheets are covered by cap pieces. In this greenhouse, all the joints are lapped for ease of construction (see information on lap joints in chapter 8).
CONSTRUCTING THE FOUNDATION
Materials
- Four 10' 2×10s
- Eighteen 3' 2×4s
- String
- Spare pieces of wood for batter boards
- A few bricks
- One 10' length of 2-inch schedule 40 PVC pipe
- One 2" 90-degree elbow
- One drain grate to fit 2" PVC pipe (to be flush-mounted)
- 11⁄2 cubic yards of concrete
- Scaffold nails
- Up to 3 yards of gravel or pea stone
Instructions
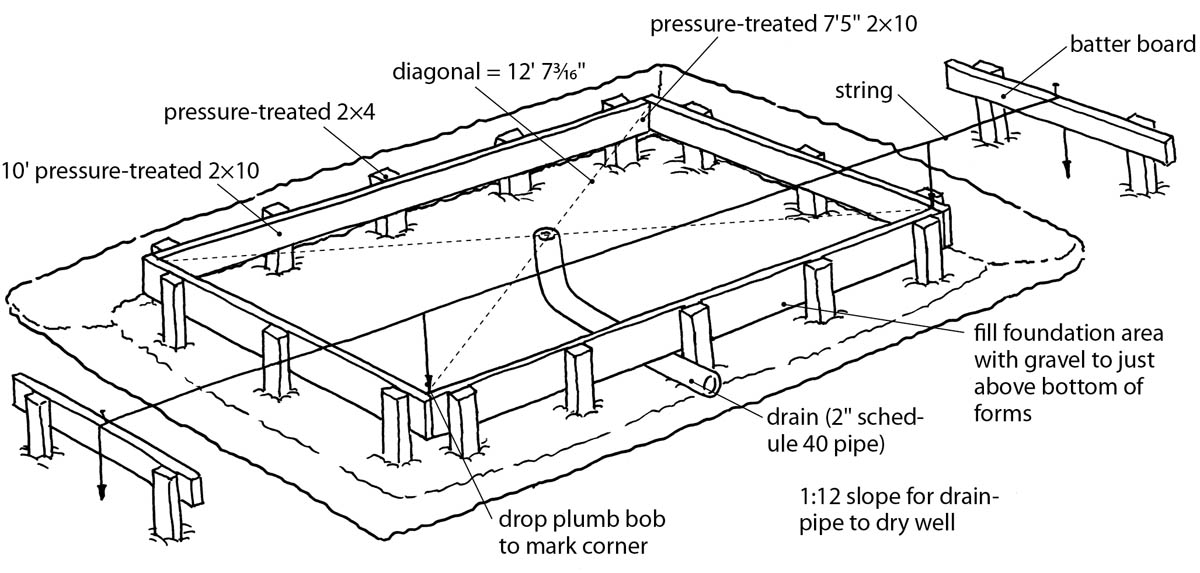
The foundation is a simple concrete slab with a drain hole running to a dry well. The water line enters through the side of the greenhouse, as does any wiring, so there is no need to set conduit or plumbing in the foundation.
STEP 1: Lay Out the Foundation
Please refer to chapter 8, Constructing a Concrete Foundation and Slab, for further information about building forms for a slab, obtaining concrete, and pouring a slab. Lay out the foundation using the method explained in chapter 8: Mark out an 8-foot by 10-foot rectangle with string and check the diagonals. Each diagonal should measure 12 feet 95⁄8 inches. Set batter boards at each corner and check the strings a second time to make sure everything is square.
STEP 2: Excavate for the Foundation
Excavate the area to a depth of 10 to 12 inches. Save the topsoil for another project.
STEP 3: Build Foundation Forms
Because the concrete will be only 6 inches thick, the forms can be made from 2×10s. Using batter boards and string, on the 10-foot side mark 11⁄2 inches out from the string in two spots about 6 inches from each end. At each spot hammer a stake into the ground. Then place another stake in the middle of the 10-foot side and then two more stakes between these three.
Using bricks to support the wood, position one of the 10-foot 2×10s so that its top edge is at grade level—that is, exactly where the top of the concrete slab will be. Nail the plank to the stakes and check that it’s perfectly level. Repeat this entire procedure on the opposite 10-foot side of the area. When you have the second plank in place, stretch a third 2×10 across the top of these two forms to ensure that both sides of the foundation are at the same height.
Cut the last two 2×10s to 8 feet 3 inches long. Nail these to the ends of the two long forms already in place to make the forms for the width of the greenhouse. Three scaffold nails in each will be easy to remove later. Brace the 8-foot 3-inch lengths with three or four stakes along each side.
Once the formwork is in place, check that everything is square and that the diagonals match.
STEP 4: Install the Drainpipe
Now, working carefully so that you do not disturb the formwork, set your drainpipe in the middle of the area. To find the middle, simply use strings from each corner across the diagonals and drop a plumb bob from their meeting place. Once you’ve determined the middle, use a long plank to find the grade level (the height of the concrete floor). Measure down about 3⁄4inch from this point to determine the grade level in the middle of the greenhouse (the slab will slope down toward the center).
Set the elbow directly in the middle of the greenhouse. Note that when you attach the pipe, you’ll need to allow at least a 1:12 slope (for each foot of pipe, the pipe slopes 1 inch) so that the water will drain through it away from the structure. Next, determine the length of the pipe between the elbow and the drain: Measure the amount of pipe that goes inside the elbow, the amount of pipe that goes inside the flush-mounted drain, and the distance from the top of the elbow to the drain and add together these measurements. Cut a piece of pipe to suit and dry-fit it between both the elbow and the drain. Dry-fit the remaining length of pipe (it will be about 9 feet) on the other side of the elbow, heading out of the greenhouse. After dry fitting all pipes, use pipe cement to glue together all pieces of the entire unit.
Because you’ll be pouring concrete around the drain, cover the drain top with duct tape to keep it from clogging. Use blocks or bricks to set the drain at the correct height and run the long side of the pipe out under the formwork.
STEP 5: Pour the Concrete
With the drain and formwork in place, fill the excavated 10-inch or 12-inch hole with gravel or pea stone to about 6 inches below the grade level. This will give the concrete slab a surface to “float” on and allows it to shrink and expand as needed without cracking. Rake the gravel until it’s level, then lay over it 6-inch wire mesh cut to within 4 inches of the forms and support it about 11⁄2 inches above the gravel by placing small stones beneath it. Make certain the mesh does not touch the formwork anywhere. Any area of contact will provide an opening for moisture to get to the steel and corrode it. Check the diagonals and the levels of all the forms one last time. The slab is now ready for the pour.
You’ll need 11⁄2 yards of concrete for the slab if the gravel is 6 inches below grade level. Follow the instructions in chapter 8 on leveling, screeding, floating, and edging poured concrete. (You’ll probably find that your drain has disappeared and needs to be located.) During this process, determine if you want the surface rough or smooth(remember, a smooth greenhouse floor tends to be slippery when wet).
Allow the slab to dry for an hour or so, then insert bolts into the wet concrete 1 inch in from the edge with 2 inches of the bolt protruding from the top of the slab. This will allow the bolt heads to be level with the top of the base plate of the greenhouse when the two are attached. If the day is warm and sunny, you might want to cover the slab with moist cloths so that it will dry more slowly.
BUILDING THE GREENHOUSE
Materials
FOR THE SIDE WALLS
- Four 10' 2×2s
- Twelve 5' 2×2s
- Two 1' 10" 2×2s for the opening windows
FOR THE END WALLS
- One 8' 2×2
- Four 6' 4" 2×2s
- Four 4' 8" 2×2 rafters
- One 3' 7" 2×6 header
- One 1' 2×2 ridge support
- One 10' 2×6 ridgepole
FOR THE FOUR SIDE-WALL VENTS
- Sixteen 1' 10" 2×2s
- Eight 3" hinges
- Screws for hinges and four barrel bolts, hooks and eyes, or any other hardware you want to use to latch vents
- Polycarbonate to cover the vents
FOR THE ROOF VENTS
- Sixteen 2' 1×2s
- Eight 3" hinges
- Screws for hinges and barrel bolts, hooks and eyes, or any other hardware you want to use to latch vents
- Polycarbonate to cover the vents
- Four 1' 10" 2×2 crosspieces
- Four 2' pieces of 1⁄2" by 3" stock for the lip of each roof vent
FOR THE DOOR
- Three 3' 1×4s
- Two 6' 8" 1×4s
- Three 3" hinges, a handle, and a barrel bolt
- Screws and 6 mm polycarbonate to cover the door
FOR THE GLAZING
- 300 square feet of 6 mm polycarbonate glazing (75 longitudinal feet of 4' polycarbonate panels)
Note: This type of polycarbonate is available in 48" and 72" widths, but 48" panels are easier to handle.
- One piece of 10' 1×4 trim to fit over the ridgepole
- U-shaped caps to fit over ends of polycarbonate panels
Instructions
You can build the sill plate and walls in a space off-site and bring them to the slab when it’s time to erect them. Once they’re erected, the ridgepole is set in place and the rafters are added.
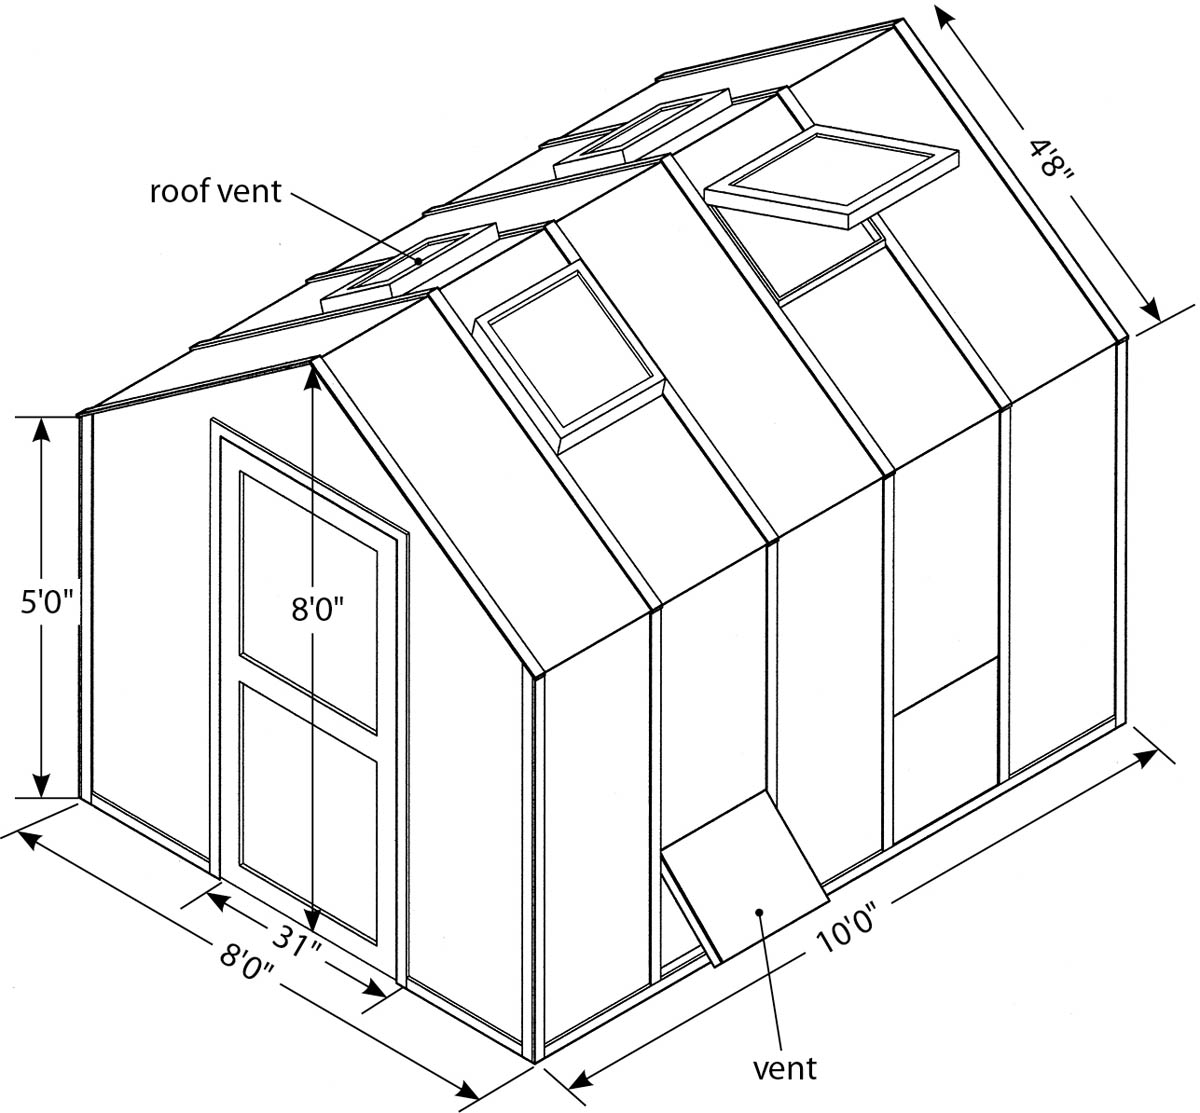
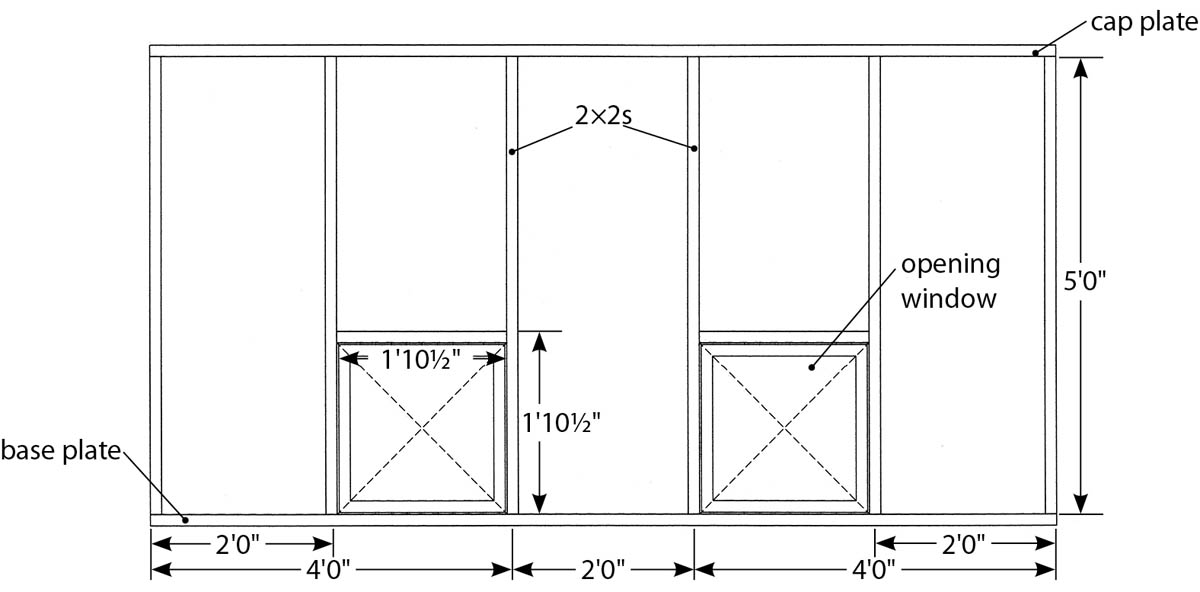
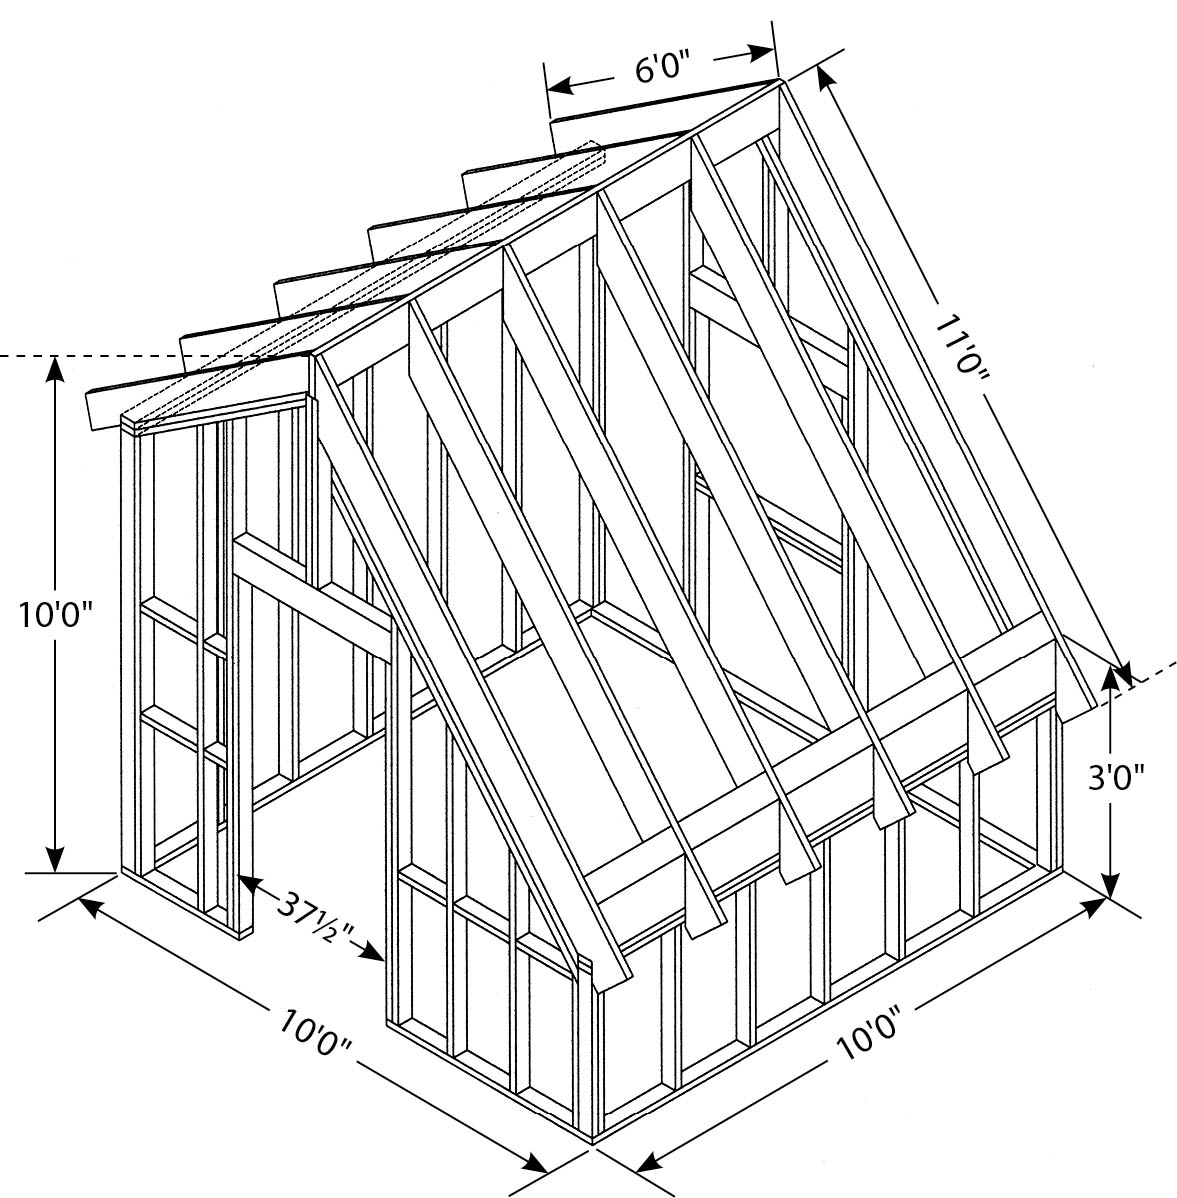
As shown in the following illustrations, the side walls will be 5 feet 2 inches tall (5 feet plus a cap plate) and the ridge of the roof will be 8 feet tall. Because the polycarbonate panels are 4 feet wide, the spacing of the support posts and rafters will be every 2 feet.
STEP 1: Build the Side Walls
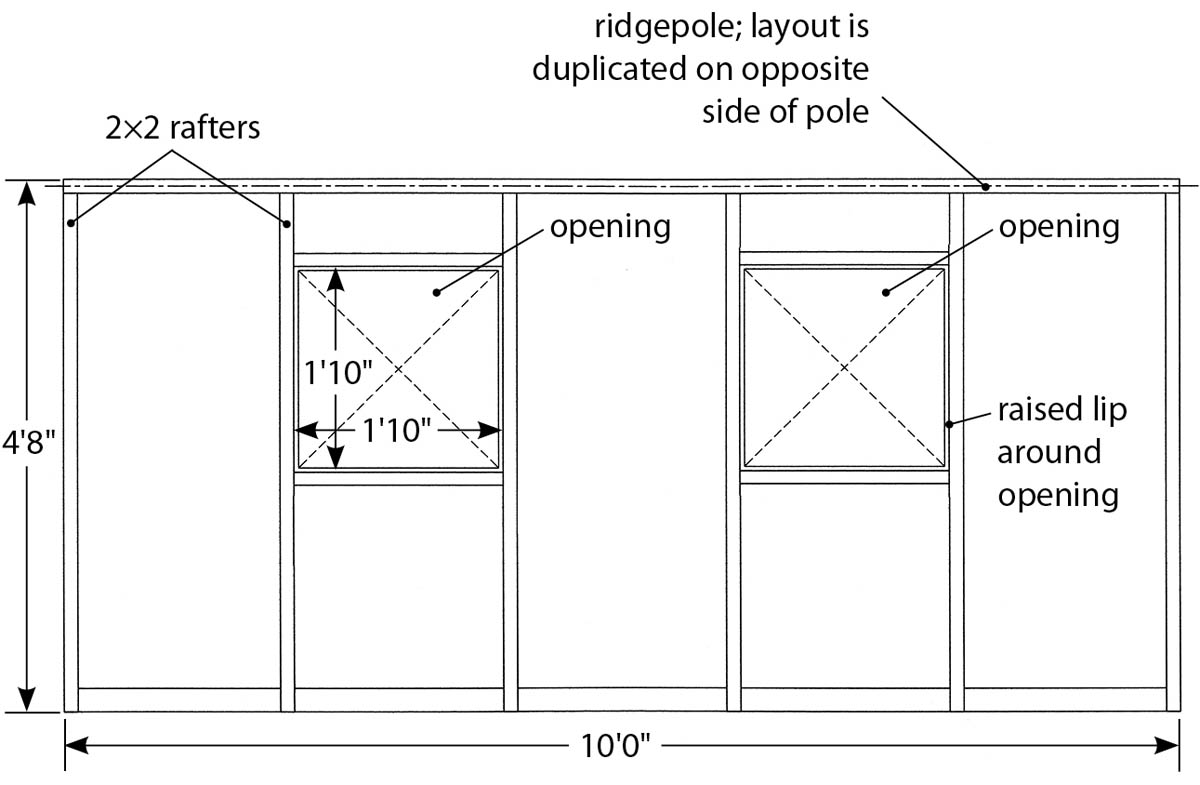
To build each 10-foot side wall, use one 10-foot cap plate and one 10-foot base plate with six 5-foot 2×2 studs between them. Put together all four 10-foot 2×2s and carefully mark out 2-foot intervals for the support pieces (which will be placed as shown in the following illustration). Depending on your skill level, you can cut lap joints where the supports will attach to the cap and base plates or you can drill a hole at the center of the longitudinal and at the bottom of the support post and insert a dowel to hold the pieces together. If you do use lap joints, you should use epoxy to join the parts. (See chapter 9, Using Epoxy, for more information on working with this material.) After construction, check the diagonals of each wall to ensure that everything is perfectly square.
STEP 2: Build the End Walls
The end walls require some careful laying out and measuring to ensure that they’ll fit. Each will be slightly narrower than 8 feet (7 feet 8 inches, to be exact) to fit inside the side walls (which are a full 10 feet long).When all four sides of the structure are erected, the entire greenhouse will fit perfectly on the 8-foot by 10-foot slab.
For the end wall without a door, cut two of the 8-foot 2×2s to measure 7 feet 8 inches each. These will be the base plates for your greenhouse. For the non opening end, mark the position for the 6-foot 4-inch support post 1 foot 11 inches in from each side. In the middle of the base plate, mark the location of the 8-foot 2×2 support. Because the polycarbonate is 4 feet wide, one piece will cover the distance from the side to the center line and two pieces will cover the entire end wall. (See the illustration at top right for this layout.)
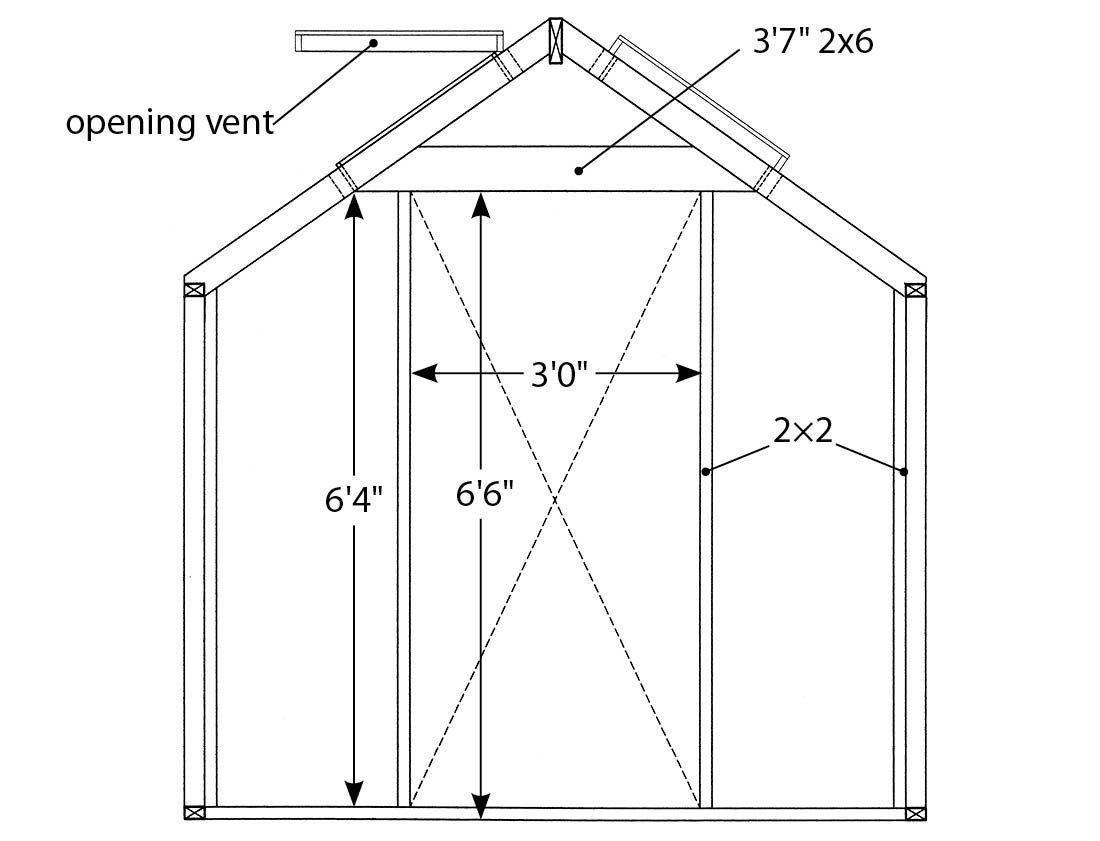
In the opposite end wall, the door will be 3 feet wide to ensure that you can get a wheelbarrow into the greenhouse (though you could make it 30 inches wide if you don’t plan on working with a wheelbarrow inside the structure). The two 6-foot 4-inch supports will hold up a 2×6 header. The 1-foot 2×2 should be cut to 6 inches to support the ridgepole.
Next, you’ll need to install the two roof rafters on each of the end walls. Each 4-foot 8-inch rafter must be cut to suit the angle of the roof — 55 degrees — and will butt up against the ridgepole. Measure this angle carefully. I find that the easiest way to do this is to lay the rafter on the wall when the wall is lying on the ground and mark the location of the center pole and the side wall. The other end of each rafter is cut to fit the side wall by making a 35-degree cut exactly 2 inches deep and then making a cut at 90 degrees to the 35-degree cut. Because the ridgepole won’t be placed until you get all pieces to the greenhouse site, on the non opening end wall you might want to tack a piece of scrap wood over the ends of the rafters to hold them and the support posts in place until you erect them. On the door-end wall, you won’t need this scrap brace because the door header supports the two rafters.
STEP 3: Assemble the Walls
Bring all four walls to the site and stand them up on the slab. You may need an extra pair of hands to help with this or bracing for the walls as you erect them. When you’ve set up the walls and made sure they are perfectly vertical and that the diagonals are equal (the walls are square), drill and bolt them together, first bolting the base plates to the sill plate. Recess the bolt heads so that they will not rub against the polycarbonate when it is installed.
STEP 4: Add the Ridgepole
After the walls are assembled, the ridgepole can be slotted into place. Before installing it, saw off the top corners. This will allow the polycarbonate to lie flat at the ridge when the glazing is installed over the pole.
STEP 5: Install the Rafters and Add the Roof-Vent Framing
The rafters are installed as shown in the following illustration. Each 4-foot 8-inch piece is both glued and screwed into place. With the rafters in place, the greenhouse should now be quite rigid.
Next, build the frame around each window opening on the roof. To do this, secure two 1-foot 10-inch 2×2s to frame each window. The lap joints in the rafters that will accept these 2×2 crosspieces should be cut prior to installing the rafters. The crosspieces can then simply be dropped into place. Next, glue and tack into place the 1⁄2-inch by 3-inch pieces that have been cut to fit around the openings. Make sure the corners have plenty of glue to prevent leaks.
STEP 6: Make Vents and Doors
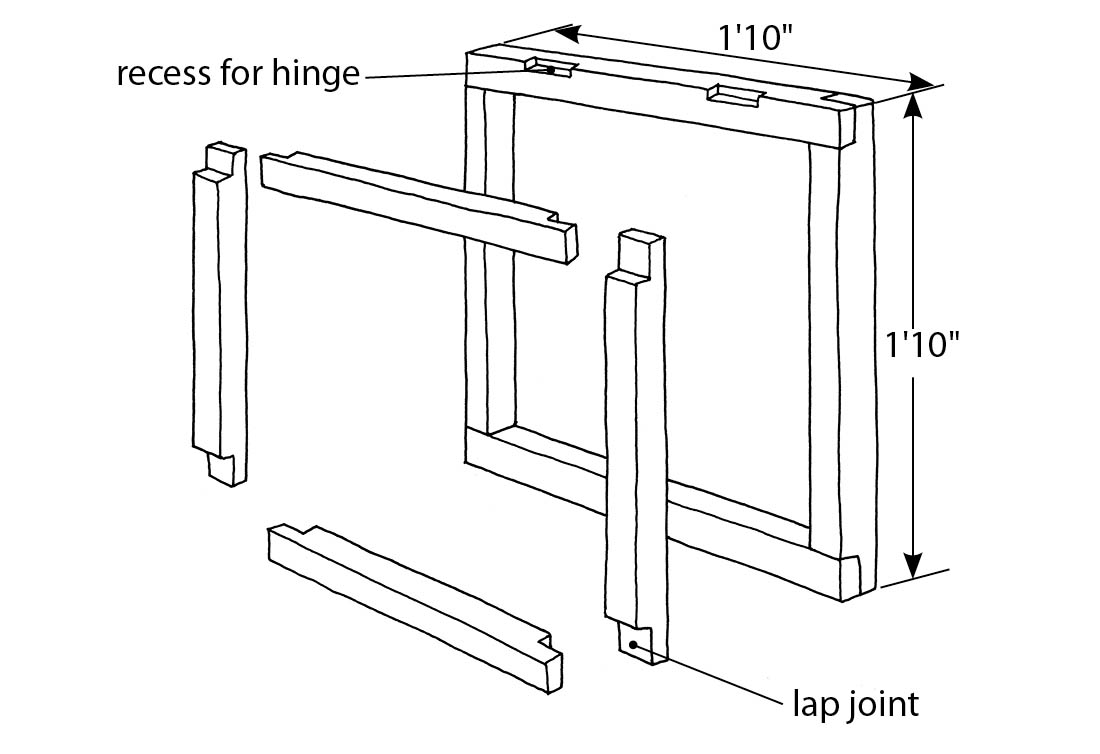
This greenhouse has four lower vents, four opening vents in the roof, and a single door. All are covered with polycarbonate, as are the walls. Construct the frame of each of the vertical vents in the side walls with 2×2s lap-jointed at each corner.
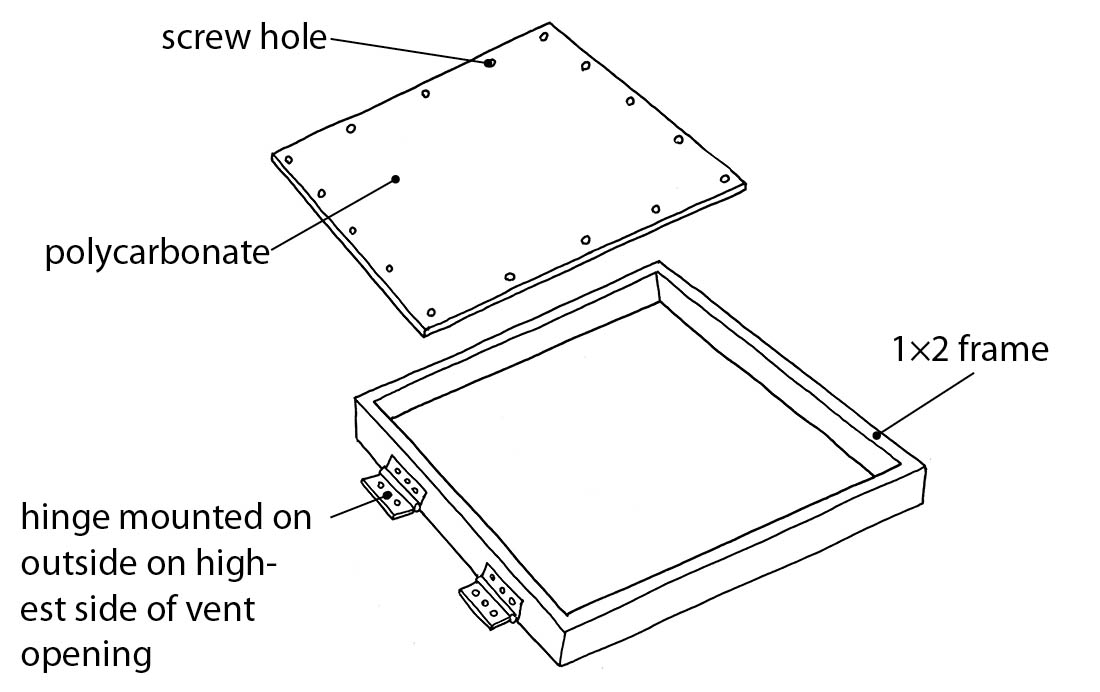
The roof vents are made with 1×2s glued together at the corners. The entire top surface of each vent is then covered with polycarbonate. Once built, each vent is attached to the roof framing. By making the roof vents light, you will be able to open them with solar-powered window openers. Set the 3-inch hinges into the frame 4 inches from the outer edge of the top of each vent and install the barrel bolt on the side opposite the hinges.
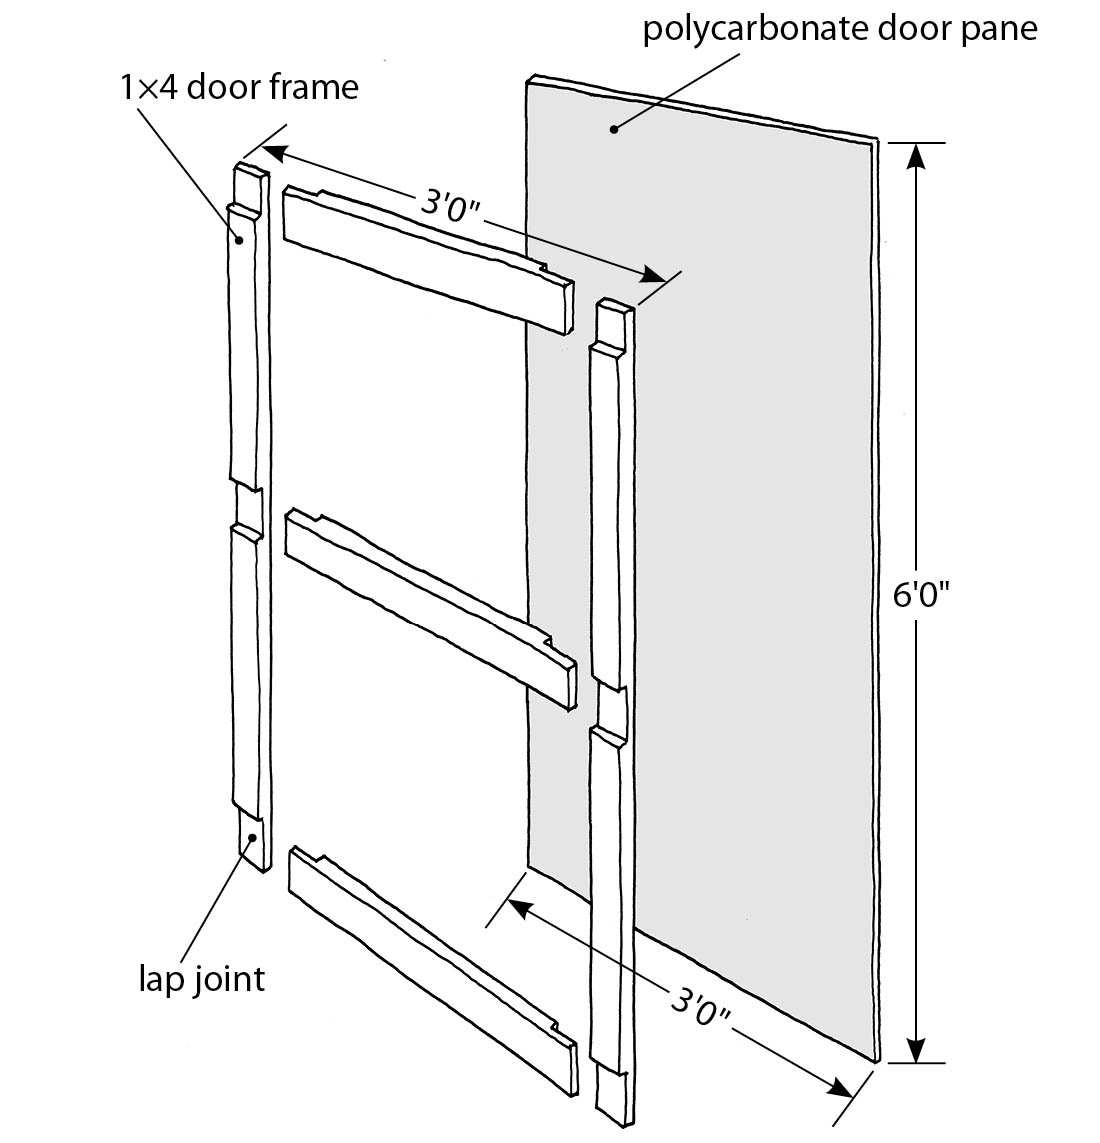
The door for this greenhouse has a simple design. Each joint is a lap joint glued and screwed together. When all the pieces are assembled, mount the door using three hinges and add a handle and a barrel bolt to keep it closed.
STEP 7: Install the Glazing
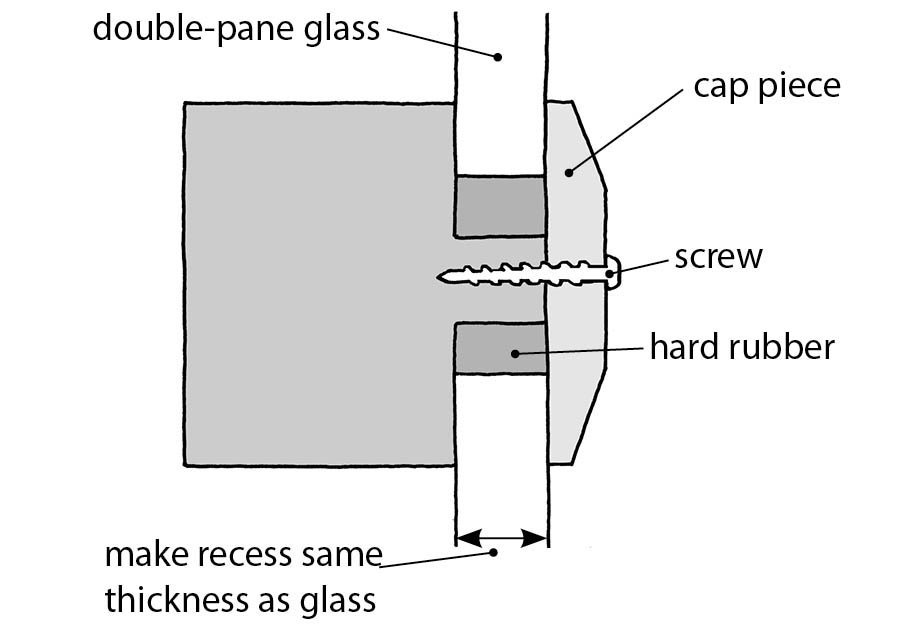
When the framing is finished, the greenhouse is ready for glazing. Install all glazing on caulking to minimize any leaks. Simply screw the 6 mm polycarbonate to the outside of the framing and cover the joint between panels with a cap piece. If you want to make the entire greenhouse more attractive, install cap pieces over the glazing at every support post.
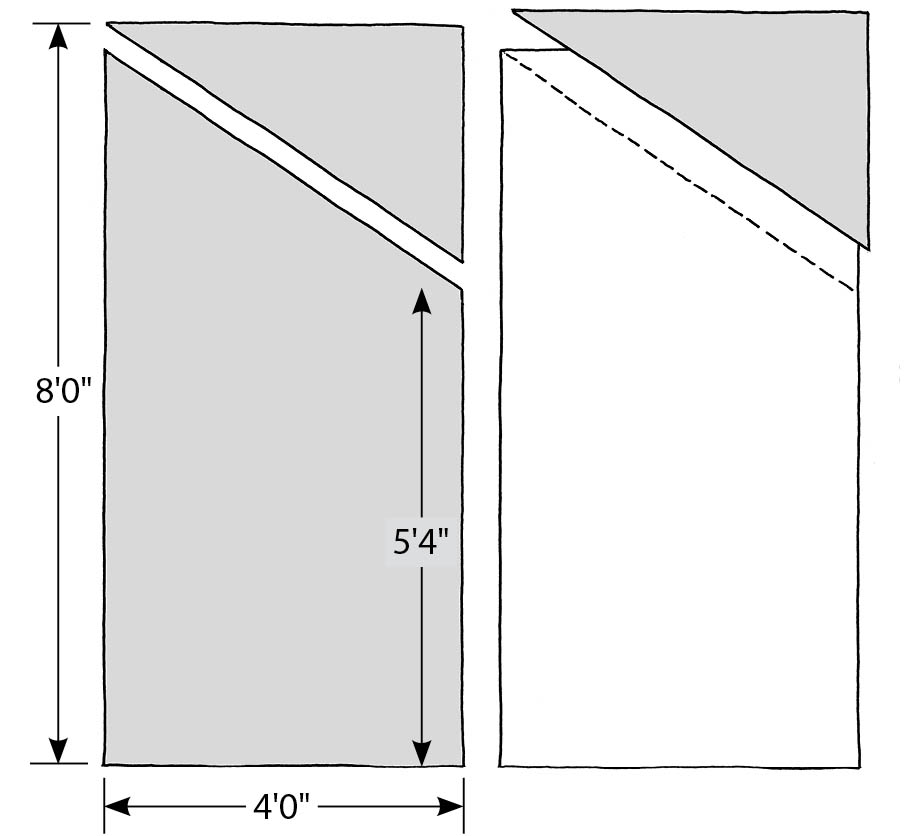
First glaze the vertical walls. For each side you’ll need two 4-foot by 5-foot 4-inch pieces and one 2-foot by 5-foot 4-inch piece. Cut out openings for the vents in the two larger pieces before you install the panels on the greenhouse. Each joint should be covered with a 1⁄4-inch by 2-inch by 5-foot 4-inch cap piece except around the window. For the end walls you’ll need two 4-foot by 8-foot pieces of polycarbonate. (To save on waste, you can make the rafter cut and then turn the polycarbonate so that the triangular shape becomes the rafter cut on the other side.)
The tops of all the side walls will be covered with the roof glazing, which is carried outward at the ends slightly to cover the side wall glazing. Note that with polycarbonate, the screws holding the cap strips in place can be drilled right through the glazing. Once you’ve set the cap piece in place and determined where the screw will be located, remove the strip and drill the hole in the glazing 1⁄8 inch larger than the hole in the strip to allow for expansion, then screw down the cap strip.
After you’ve covered the sides and end walls, you can install the glazing on the roof. Again, this is simply a matter of cutting the polycarbonate to size and screwing it in place. As with the sides, each joint should be covered with a cap strip. Cover the entire ridge on both sides with a piece of 1×4 trim cut to suit the angle of the roof and caulk along the middle.
VARIATIONS AND UPGRADES
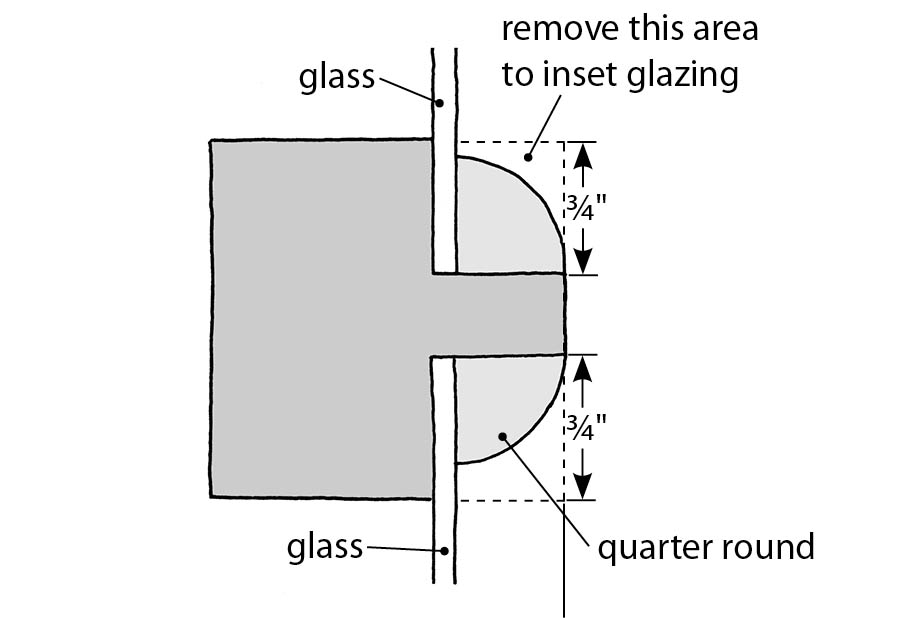
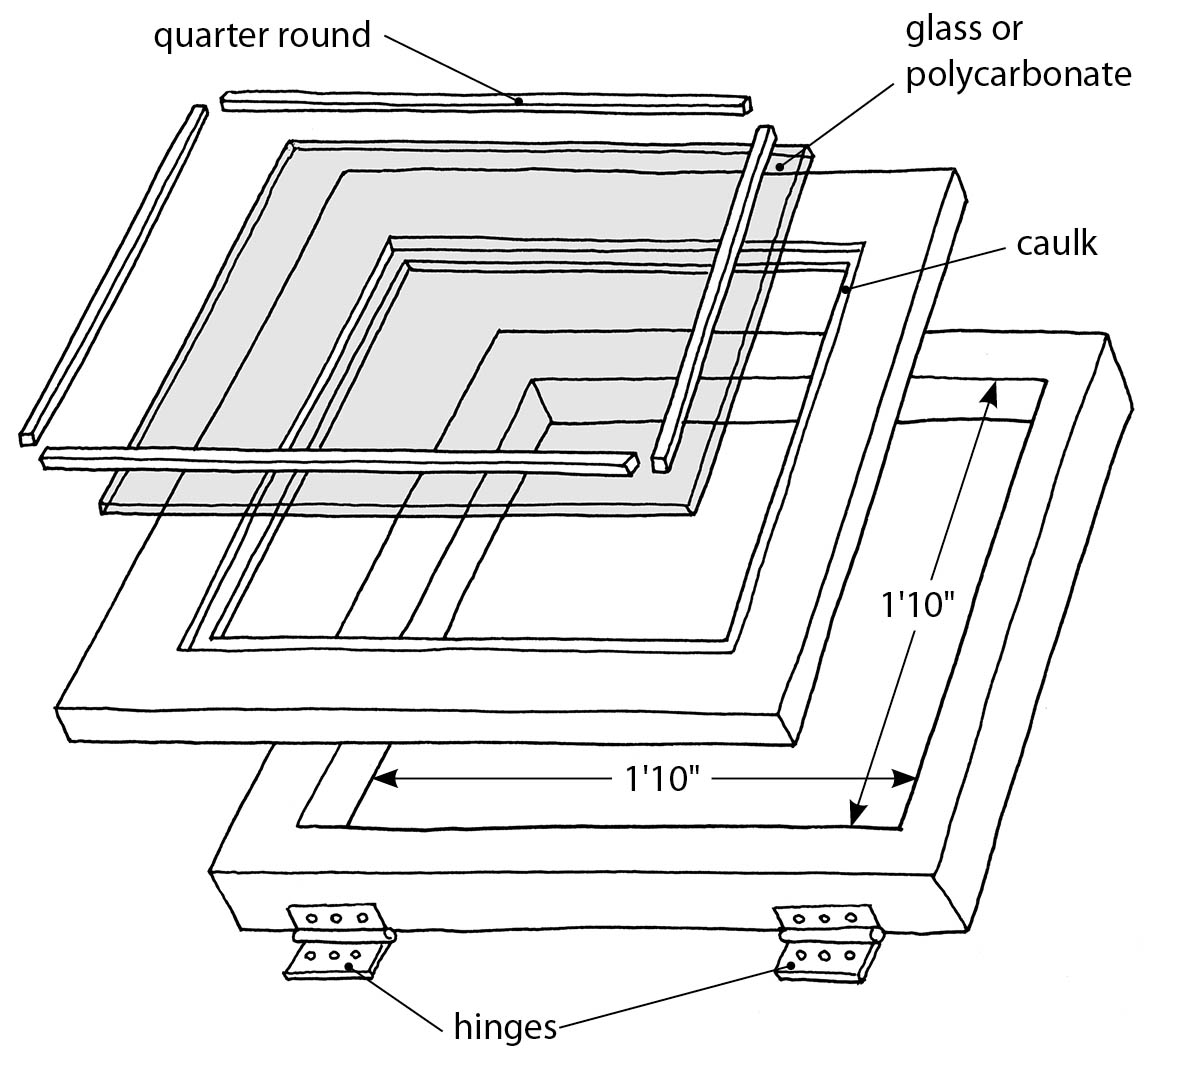
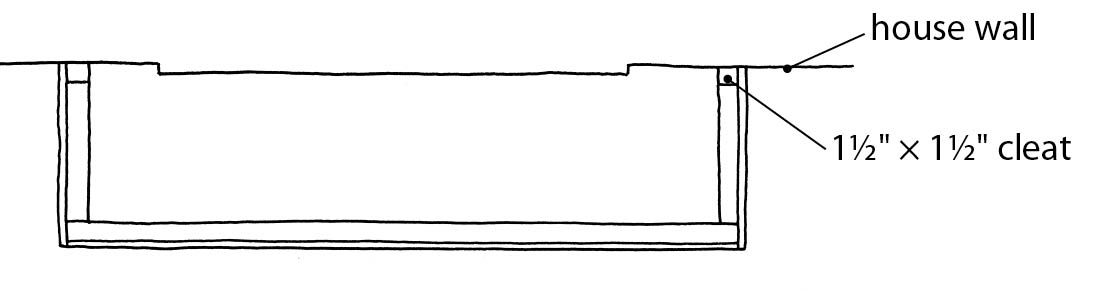
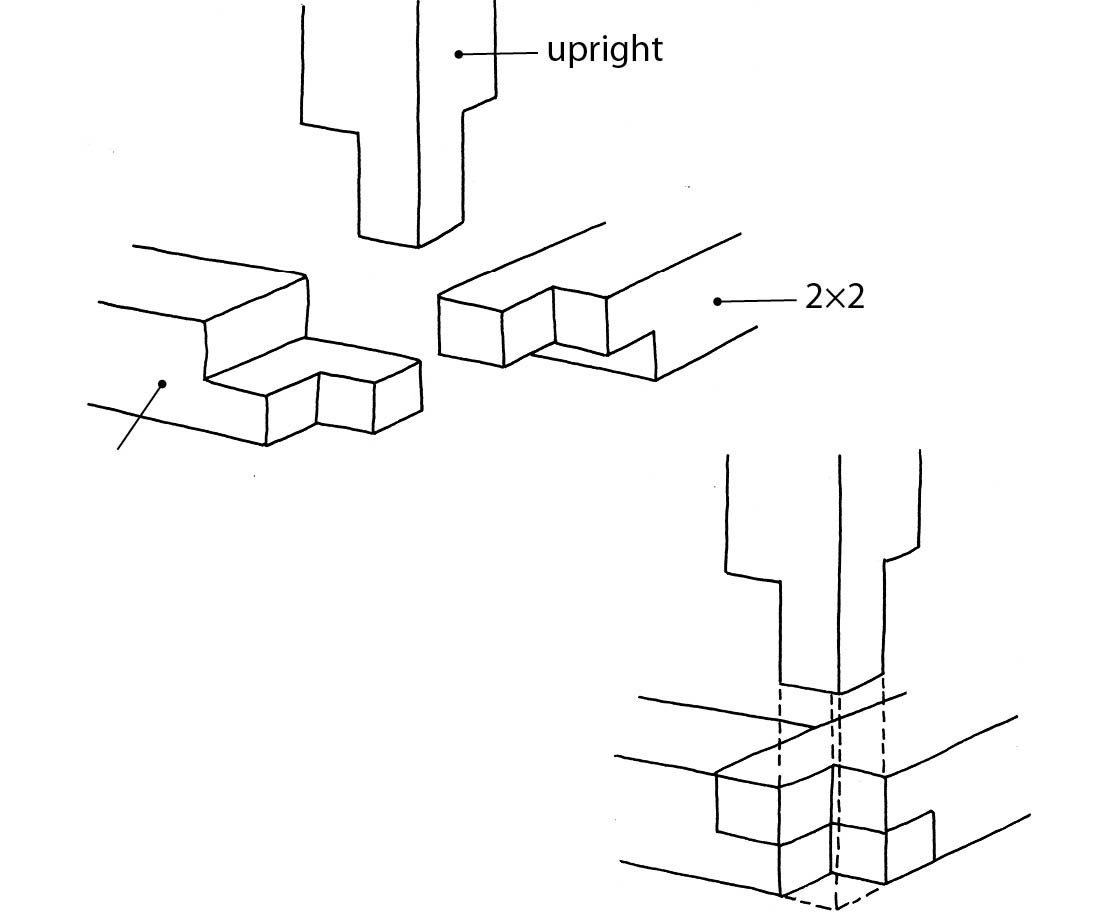
You can vary or upgrade this greenhouse quite easily. Simply switching to glass glazing makes it fancier and more substantial. If you decide to use glass, you should recess each pane into the greenhouse frame and use a trim piece to hold it in place. If you use glass, the largest piece should be 1 foot 11 inches by 5 feet 1 inch. The end wall will require some modification to ensure that the size of the panes to glaze it is reasonable. I would install a crosspiece to cut down on large pieces of glass. The illustrations below show how the 2×2 support posts should be cut to recess glass into the frame. Because the roof glazing will also need to be recessed into the greenhouse frame, you’ll have to modify the structure somewhat. See the illustration below for details on modifying roof vents. This style is much stronger than the style used for polycarbonate, which tends to rack and twist in the wind.
Other variations and upgrades are shifting to thicker polycarbonate, which adds greater insulation value; and installing stronger window and door frames or even a sliding door instead of a traditional swing door. You can also adjust the size of the greenhouse, increasing the length in 2- or 4-foot increments or making it wider and taller.
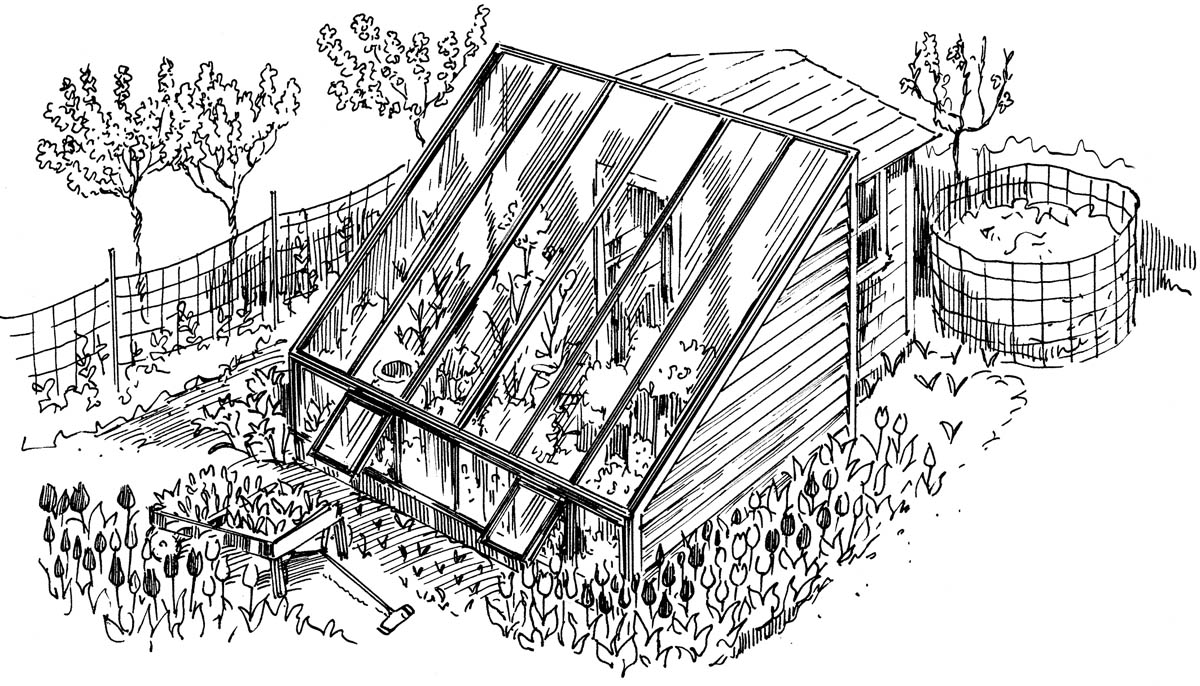
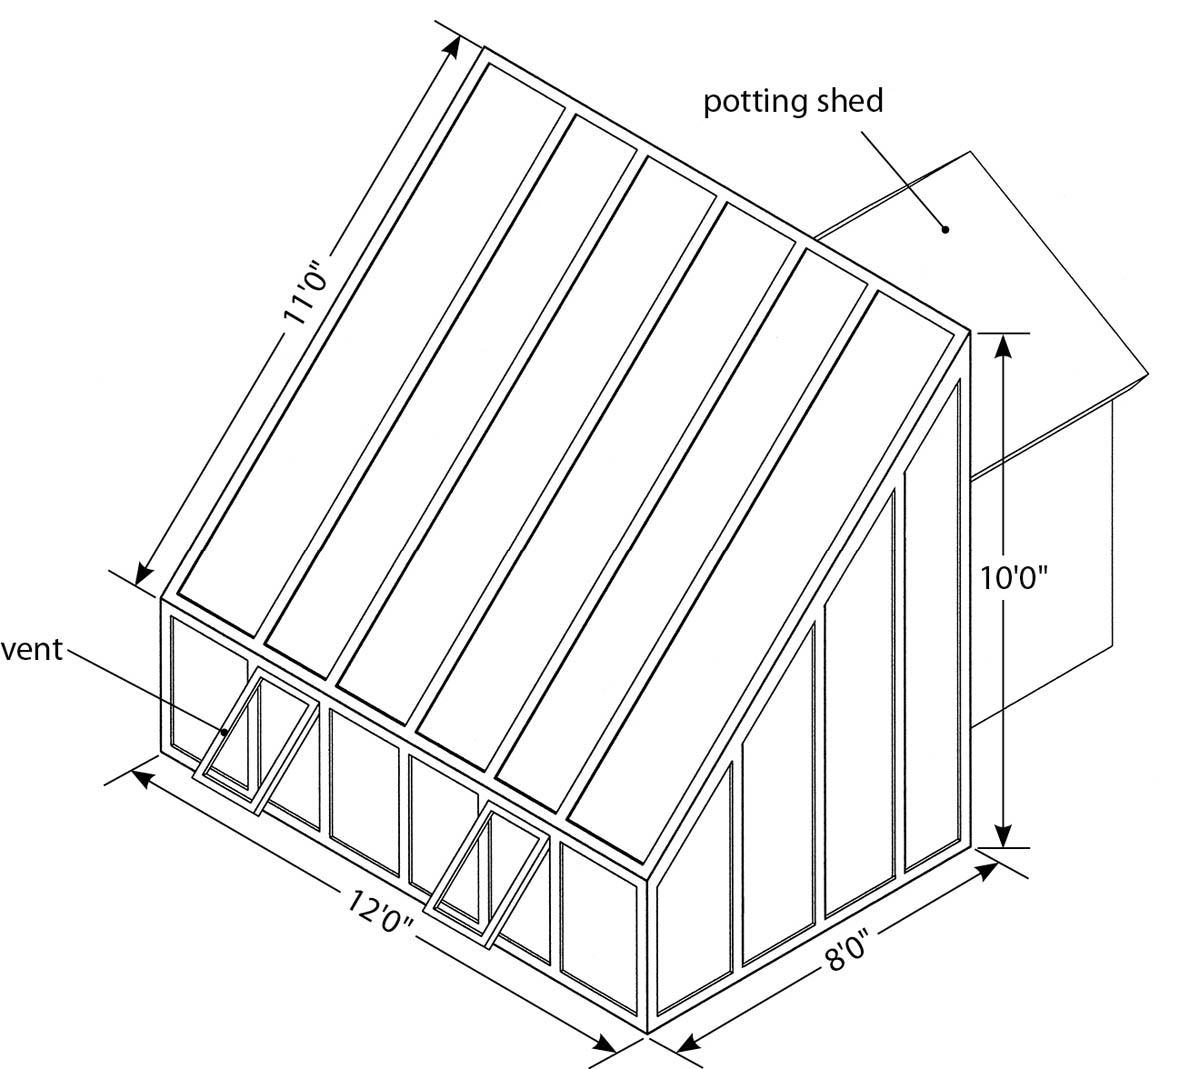
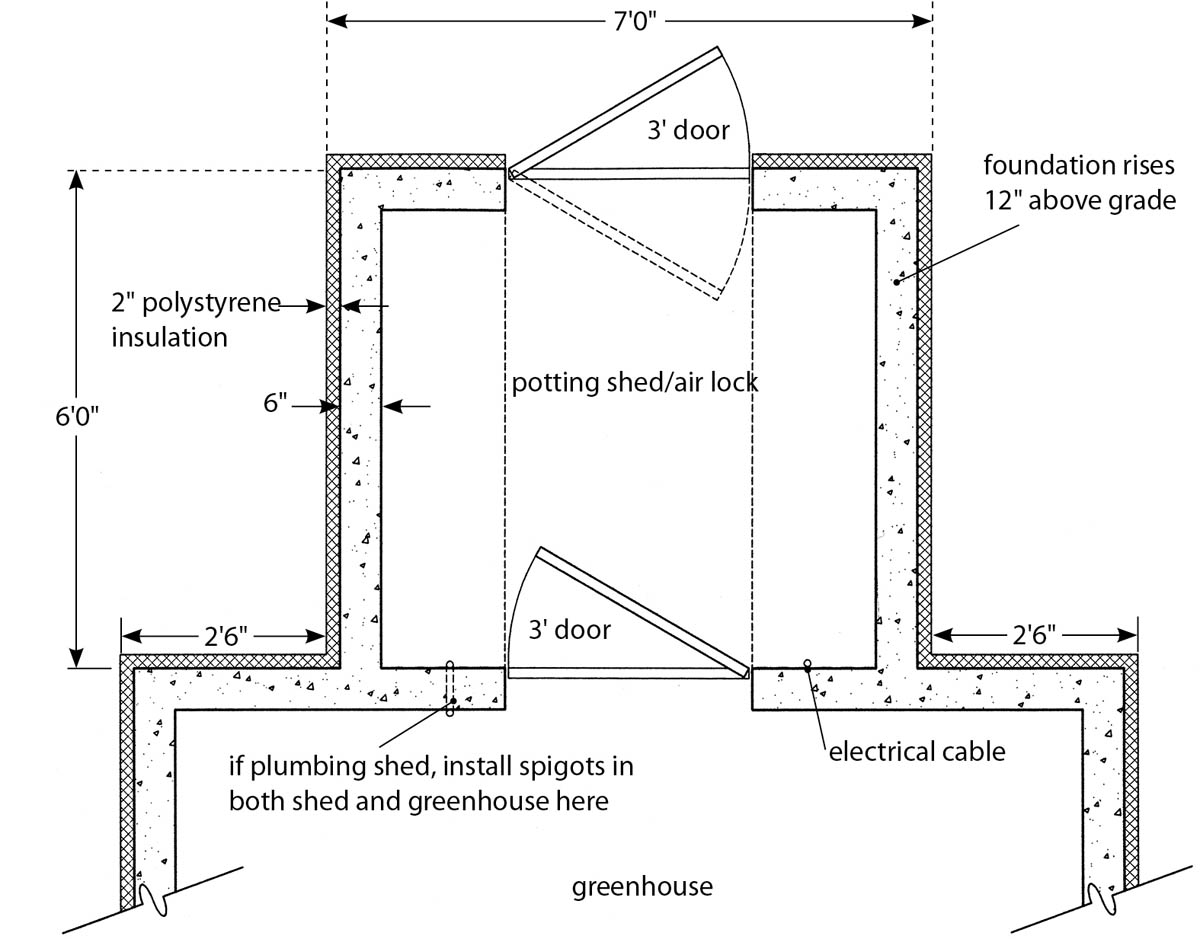
2. Slant-Front, Insulated Greenhouse with Attached Potting Shed
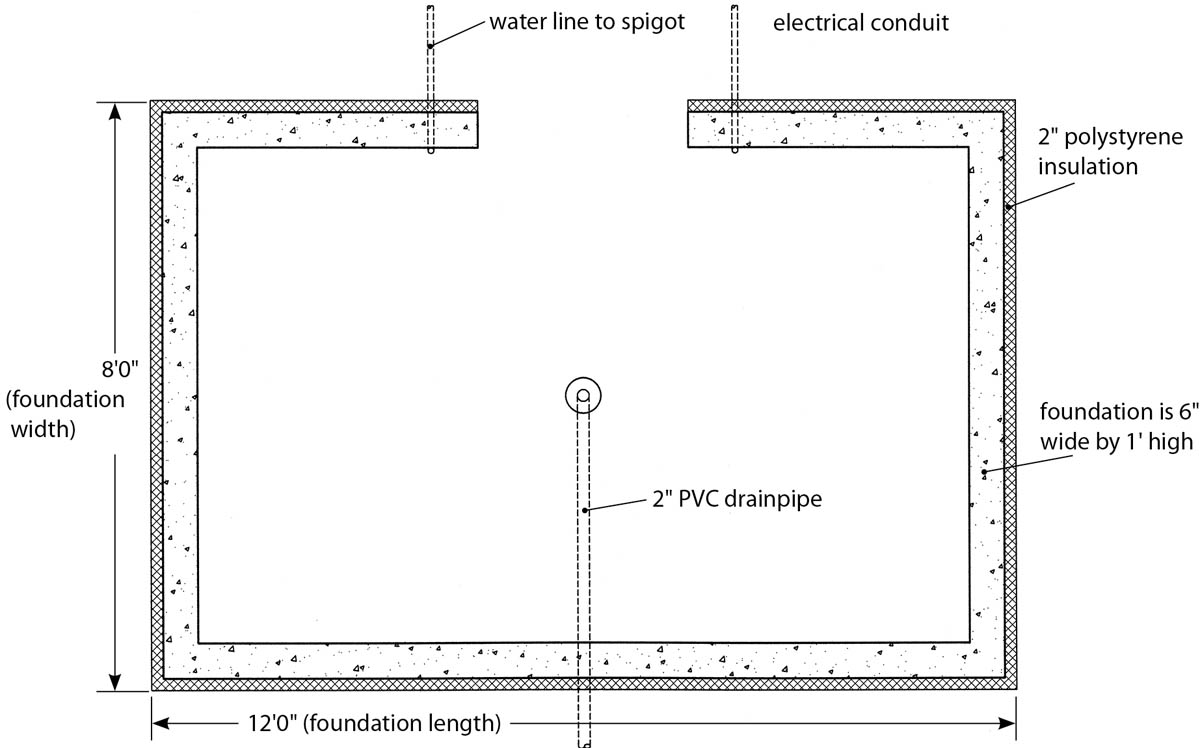
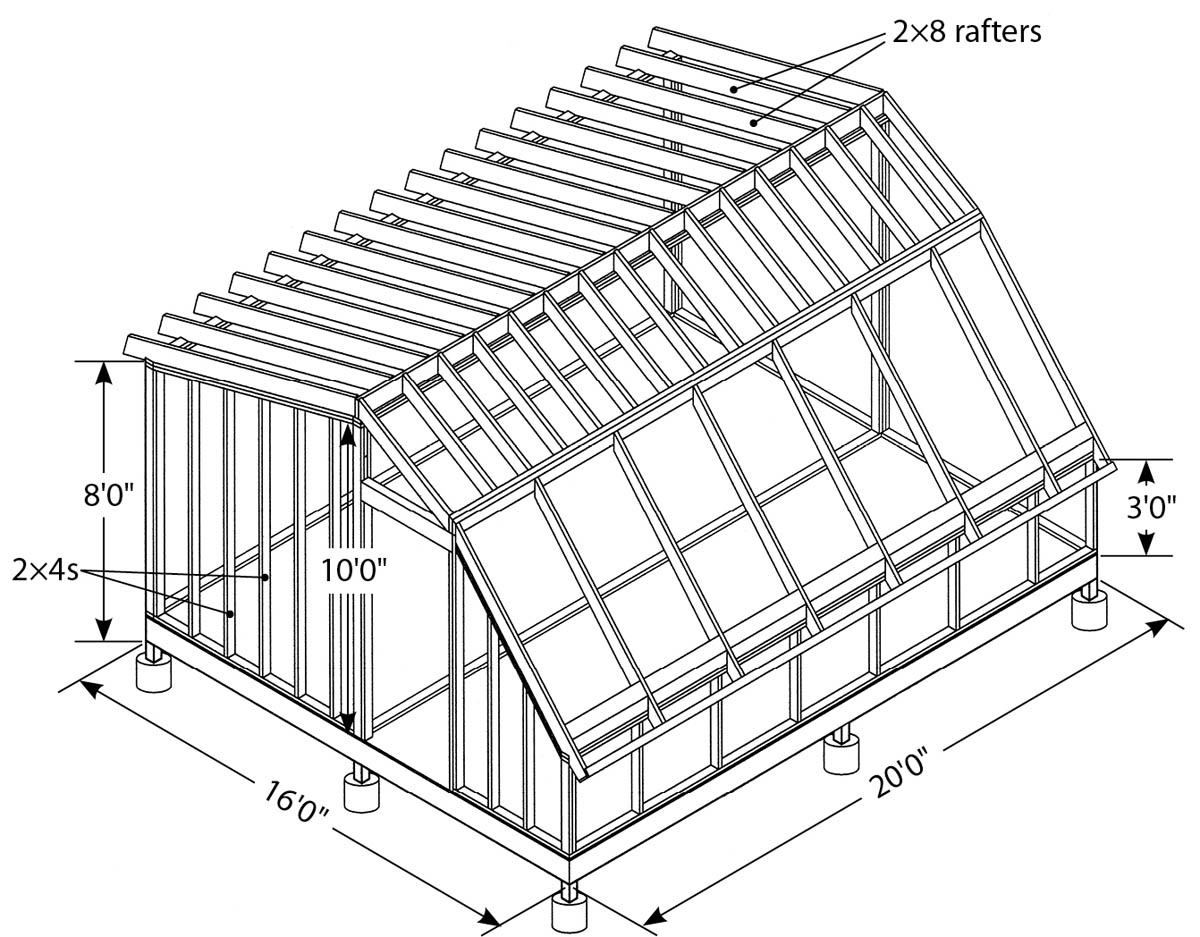
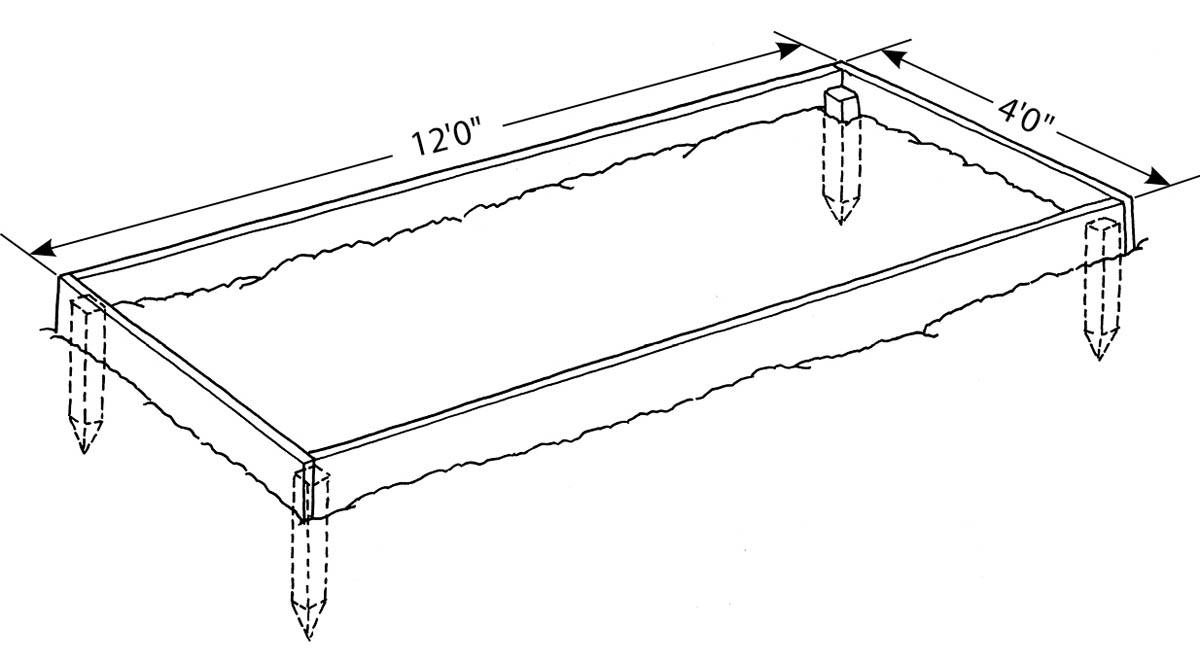
This greenhouse is a 12-foot by 8-foot freestanding building with a door in one end, a vertical rear wall with attached shed, and a sloped front. The vertical rear wall and both ends are insulated, and can be finished to match your home. In this project they are sheathed in CDX plywood (see chapter 6, Plywood Manufacturing and Grading) and are then sided with wood clapboards. The greenhouse has a low knee wall on all sides (glazed in the front) with opening windows or vents set into the front glazing. The rear windows and vents are set high in the back wall. It is designed for polycarbonate sheet glazing that runs from top to bottom on the slant roof.
The structure is built on a foundation set below the frost line, although it could just as easily be sited on a walled foundation or a simple lumber or pea stone base. It calls for a water supply, raised beds, and lighting in both the attached potting shed and the main greenhouse; thus, you’ll need to bring in a water line and an electrical line before pouring the foundation.
CONSTRUCTING THE FOUNDATION
Materials
- 2×4s and 3⁄8 or 1⁄2" plywood for forms totaling for the outer wall 40' in length by 4' in height and for the inner wall 36' in length by 4' in height
- 20 cubic feet (3⁄4 cubic yard) of concrete for the footing (if trench is 1' wide)
- 3 cubic yards of concrete for the foundation
- Scaffold nails
- Bolts, nuts, and washers for assembling formwork
- One 1' length of 1" hose for a water-line conduit
- One 1' length of metal electrical conduit
Note: This conduit typically comes in 10' lengths. Use the entire length if you have space in your electrical trench.
- One 10' length of 2" PVC drainpipe
- Twenty 2' by 8' panels of 2" rigid foam insulation
- 2 gallons of exterior cementlike covering such as Structural Skin from Conproco
- 11⁄2 cubic yards of pea stone
- Twelve 3⁄8 or 1⁄2" diameter bolts, each 6" long or 8" long
- 2" rigid foam insulation panels, 8' by 4' each
Instructions
The foundation is set below the frost line and has a low wall 12 inches above grade and 4 inches thick. This wall should be insulated with 2 inches of polystyrene before the foundation is backfilled. To avoid the pink of the insulation showing above grade and to protect it from damage from animals and machines such as string trimmers, coat the installed polystyrene with a cementlike material such as Structural Skin from Conproco.
STEP 1: Lay Out the Foundation
The first step is to lay out the foundation, using string and batter boards, as shown in the illustrations on here and as discussed in chapter 8 and project 1 .
STEP 2: Excavate the Foundation
This foundation is excavated deeper than for a simple slab and has around its perimeter a trench about 31⁄2 feet deep and at least 1 foot wide. The middle of the greenhouse foundation should be excavated to only 1 foot or so below grade.
STEP 3: Pour the Foundation Footings
First pour the footings at the bottom of the perimeter trench. These should be twice as wide as the walls will be. Carefully level the surface of the footings after they’ve been poured.
STEP 4: Build Foundation Forms
When the footings are completely dry (about a week after the concrete has been poured), you can set up the forms for the foundation itself. During this process, check the diagonals several times to make sure that the footings and the foundation of the greenhouse are exactly square. Any errors at this stage will be difficult to correct later and will affect the installation of glazing.
In building and erecting the forms, note that there will be a 371⁄2-inch-wide gap for a door in the knee wall. To allow for this, cut two 2×8s to the height of the knee wall and set them between the forms at the doorway. Use scaffold nails to hold them in place, and during the pour, remember not to pour any concrete in this area.
You will also need to set a 2-inch PVC pipe into the foundation wall for the water drain in the greenhouse. The illustration above shows the location of the drain and drainpipe in the foundation so that you can place the PVC pipe before the pour. Also note that on either side of the space for the door, there is a conduit for the electrical cable and for a 1-inch water pipe for a spigot. Both will come from the main house. Because you don’t yet know how long the pipe work will be inside or outside the greenhouse, for now simply install this conduit and add necessary extensions later.
STEP 5: Pour the Concrete for the Foundation
The entire foundation pour (taking into account that no concrete is needed for the door area) will require about 2 cubic yards of concrete. See chapter 8, Pouring a Slab, for information on pouring concrete and working it after the pour to ensure that it’s level and free of air bubbles. After it has been worked to completion, allow the foundation to dry for about an hour and then push 6- or 8-inch-long 3⁄8-inch or 1⁄2-inch bolts into the concrete 3 inches from each side until only 2 inches of each bolt protrudes from the surface. (Use a minimum of three bolts per side.) After the sill plate is installed, this will give you 1⁄2 inch of bolt showing for each 1⁄2-inch washer and nut.
A week or two after the pour, you can remove the formwork.
STEP 6: Add Insulation
Next, add 2-inch rigid foam insulation to the foundation wall. This type of insulation is available in 8-foot by 4-foot panels that have tongue- and-groove edges for a tight fit. Set each piece against the foundation wall and glue it in place with caulking. (Be sure you use a caulking that does not react with polystyrene.)
Once the insulation is in place, coat it to about a foot below grade level with a cementlike finishing material. Finally, backfill the foundation trench to grade level.
STEP 7: Prepare the Slab Area
Inside the greenhouse, tamp down the soil to 10 inches to 12 inches below grade and pour about 11⁄2 cubic yards of pea stone or gravel into the area. This will form the base for the concrete slab and enable it to drain easily. At this point the water, electrical, and drainpipes should stand about 6 inches above the final grade level. Remember to angle the drainpipe so that the slab can be sloped toward the drain, which will allow water to drain more easily from the greenhouse floor (see project 1). Set a flush-mounted drain on the top of the drainpipe (see chapter 8, Setting the Drainpipe, and project 1) and cover it with duct tape to prevent concrete from blocking the drain during the pour. If you’ve sloped the drainpipe, the drain will be 3⁄4 inch to 1 inch below the final grade level.
STEP 8: Pour the Slab
The final step for the foundation is to pour about 11⁄2 cubic yards of concrete for the greenhouse floor. As described in chapter 8 (Pouring the Concrete), screed, level, and trowel the concrete. Make sure that it’s even with the door sill and that the central drain is flush with the surface of the concrete, which is sloped slightly toward it.
BUILDING THE GREENHOUSE
Materials
FOR THE SILL PLATE
- Two 12' 2×8s and two 8' 2×8s
Note: A sill plate of pressure-treated lumber helps to keep insects away from the other wood in the greenhouse frame.
- Sill insulation (a thin layer of insulation that’s installed under the sill plate)
- 12 washers and 12 nuts (minimum) for the bolts in the sill plate
FOR THE REAR WALL
- Eighteen 10' 2×4 vertical supports
- One 10' 2×4 base plate
- Two 10' 2×4 top plates
- Three 8' by 4' sheets of 3⁄8" or 1⁄2" CDX plywood
- 8d and 16d galvanized nails
FOR THE END WALLS
- Fourteen 2×4 vertical supports cut from 3'6" to 10', as needed
- Two sheets of 3⁄8" or 1⁄2" CDX plywood
FOR THE FRONT WALL
- Eleven 3' 2×4 vertical supports
- One 12' 2×4 base plate
- Two 12' 2×4 top plates
FOR THE GLAZING
- Approximately 180 square feet of 8 mm twin-wall polycarbonate (three 11' by 4' panels plus three 3' by 4' pieces)
- Trim to hold the glazing in place
OTHER MATERIALS
- Caulking, screws or nails, hinges, locks
Instructions
With the foundation in place, you are ready to begin building the structure.
STEP 1: Install the Sill Plate
A 4-inch-wide foundation wall and 2 inches of insulation add up to a wall that’s 6 inches thick. To make the sill plate, use a 2×8 with the outer 11⁄2 inches of the plank routed at the bottom of its outer edge to form a drip edge.
Ideally, the sill plate is made from two 12-foot 2×8s with lap joints at the corners, but you can use shorter pieces if you join them with lap joints. Place the sill plate on top of the bolts and tap it with a mallet to mark the location of bolts you’ve set in the foundation. Before installing the sill plate, lay down a length of fiberglass sill insulation cut to 4 inches wide and install the sill plate on top of it after you’ve drilled holes for the bolts. Fasten the sill firmly using washers and nuts.
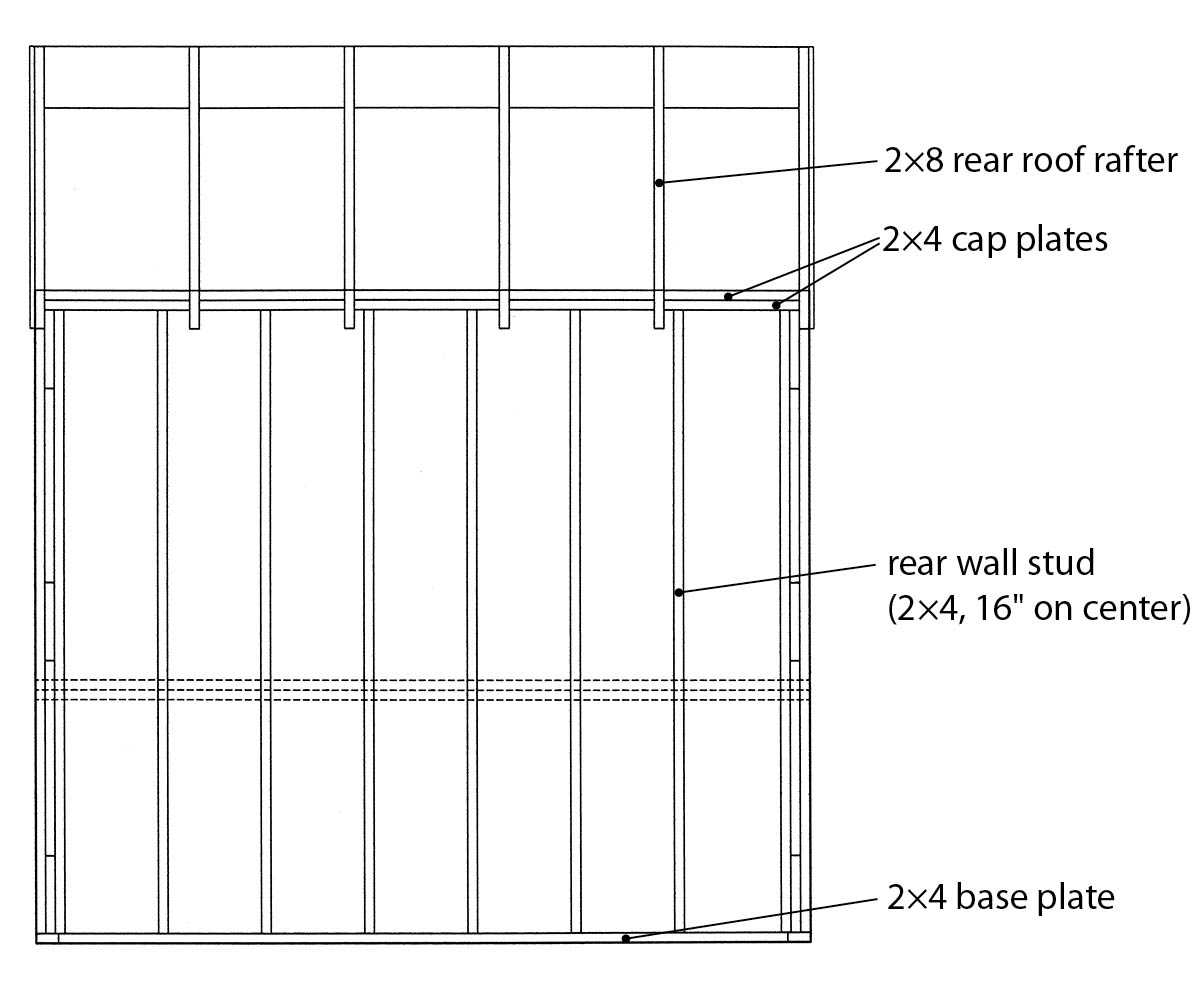
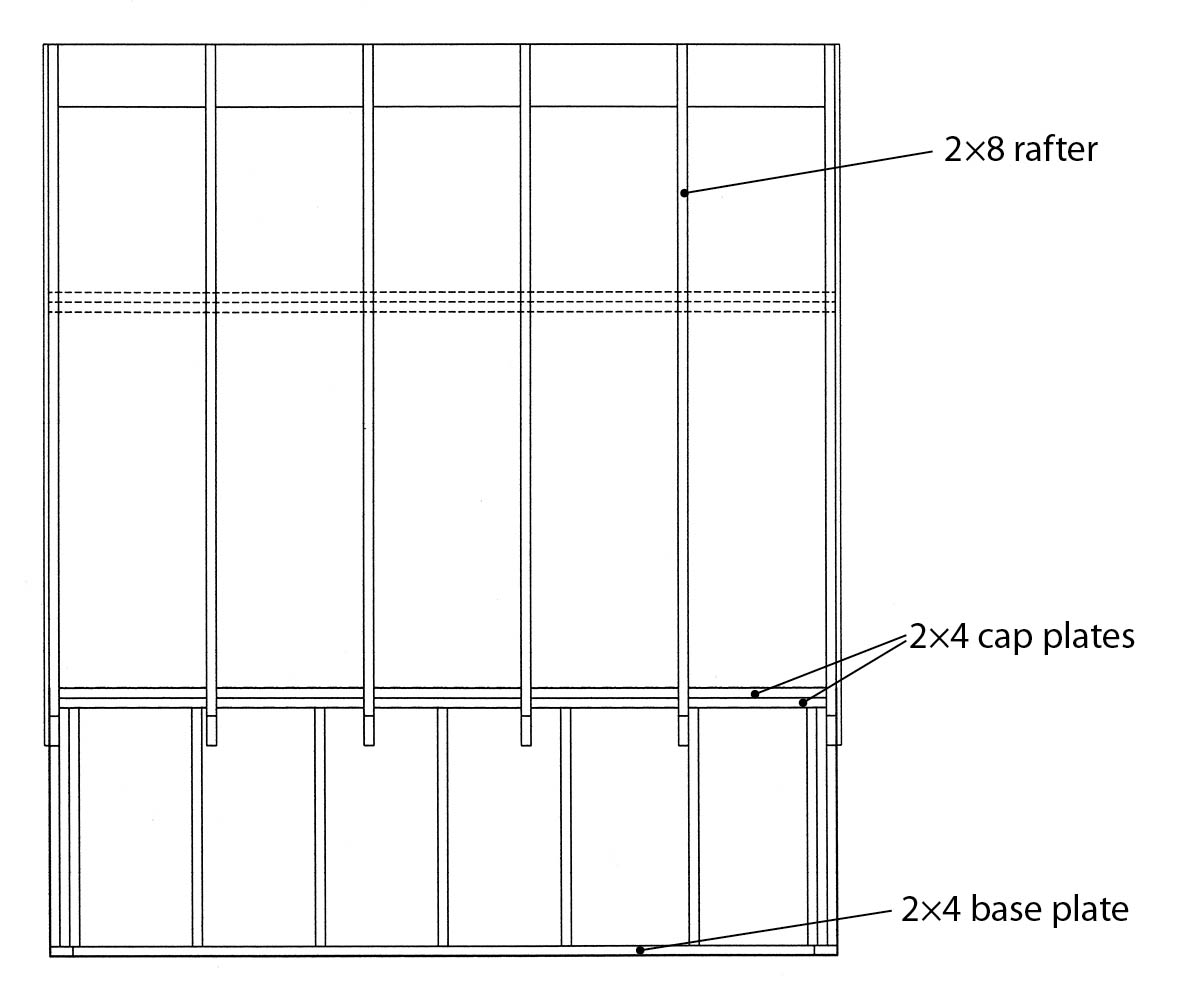
STEP 2: Build the Rear Wall
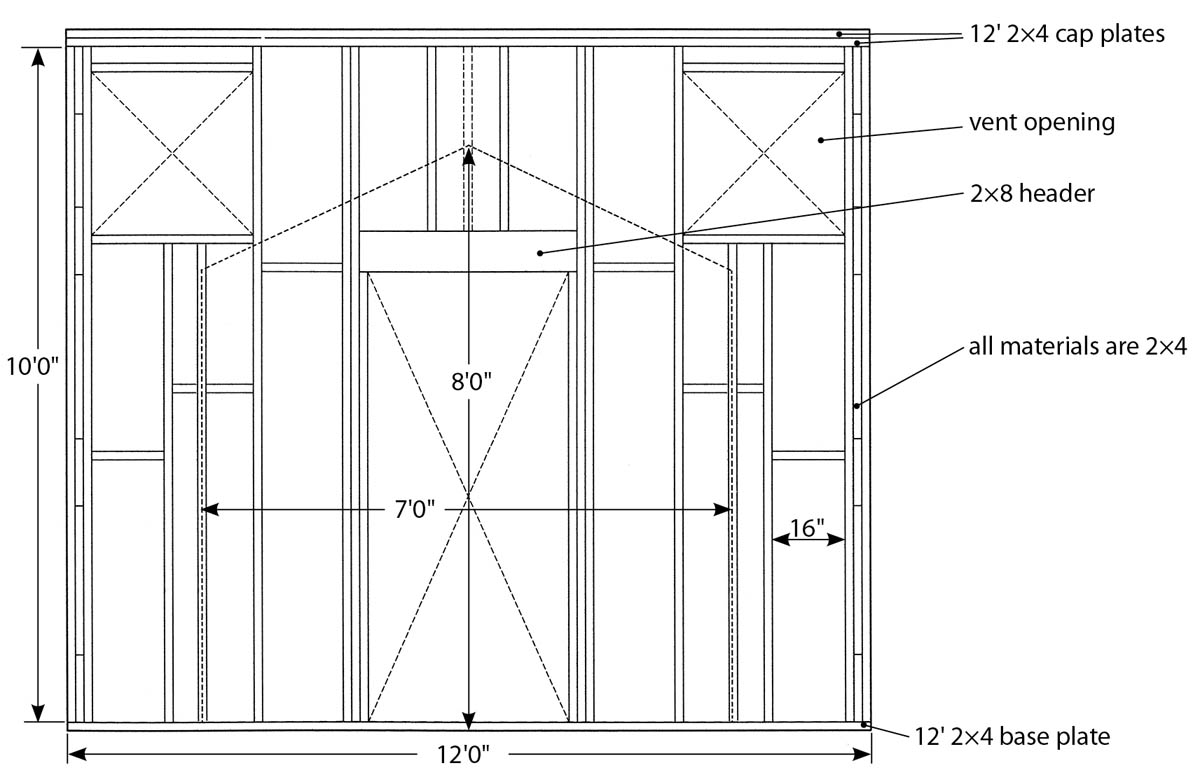
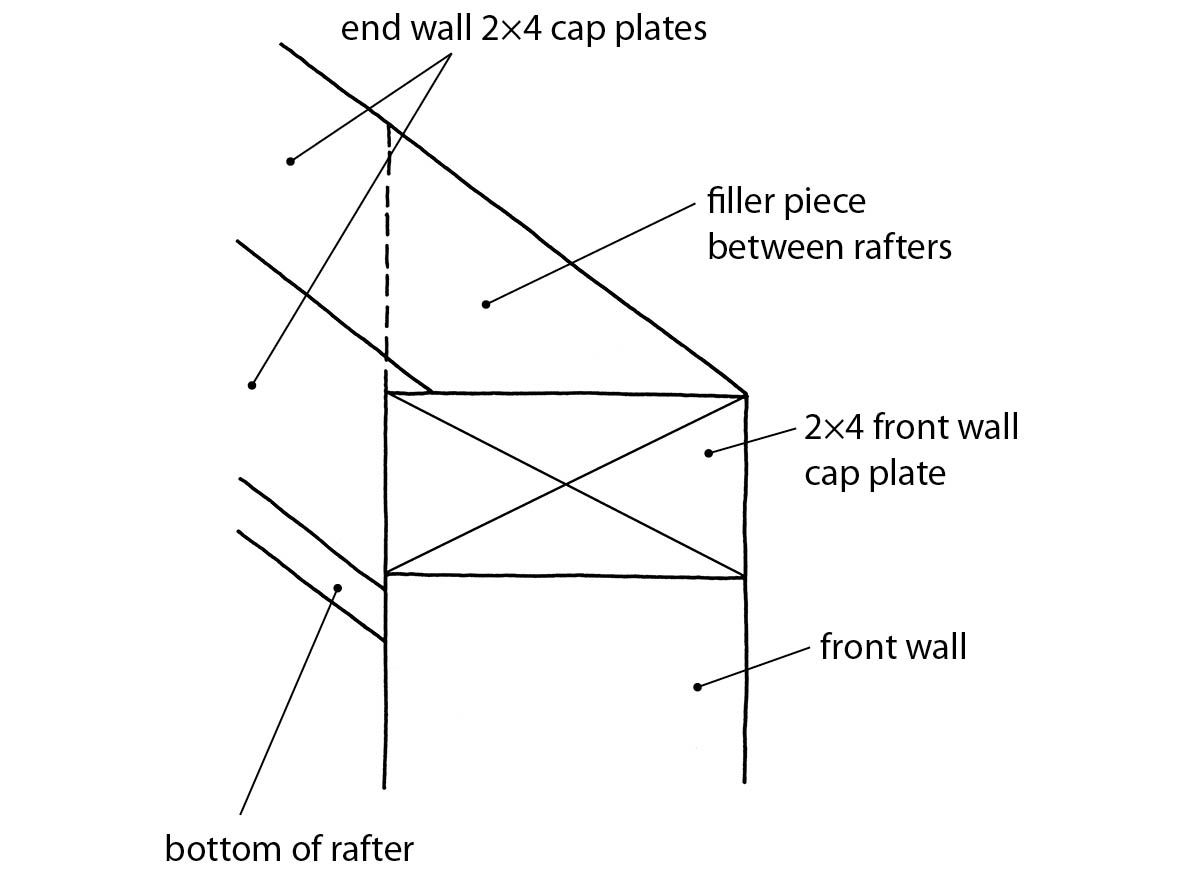
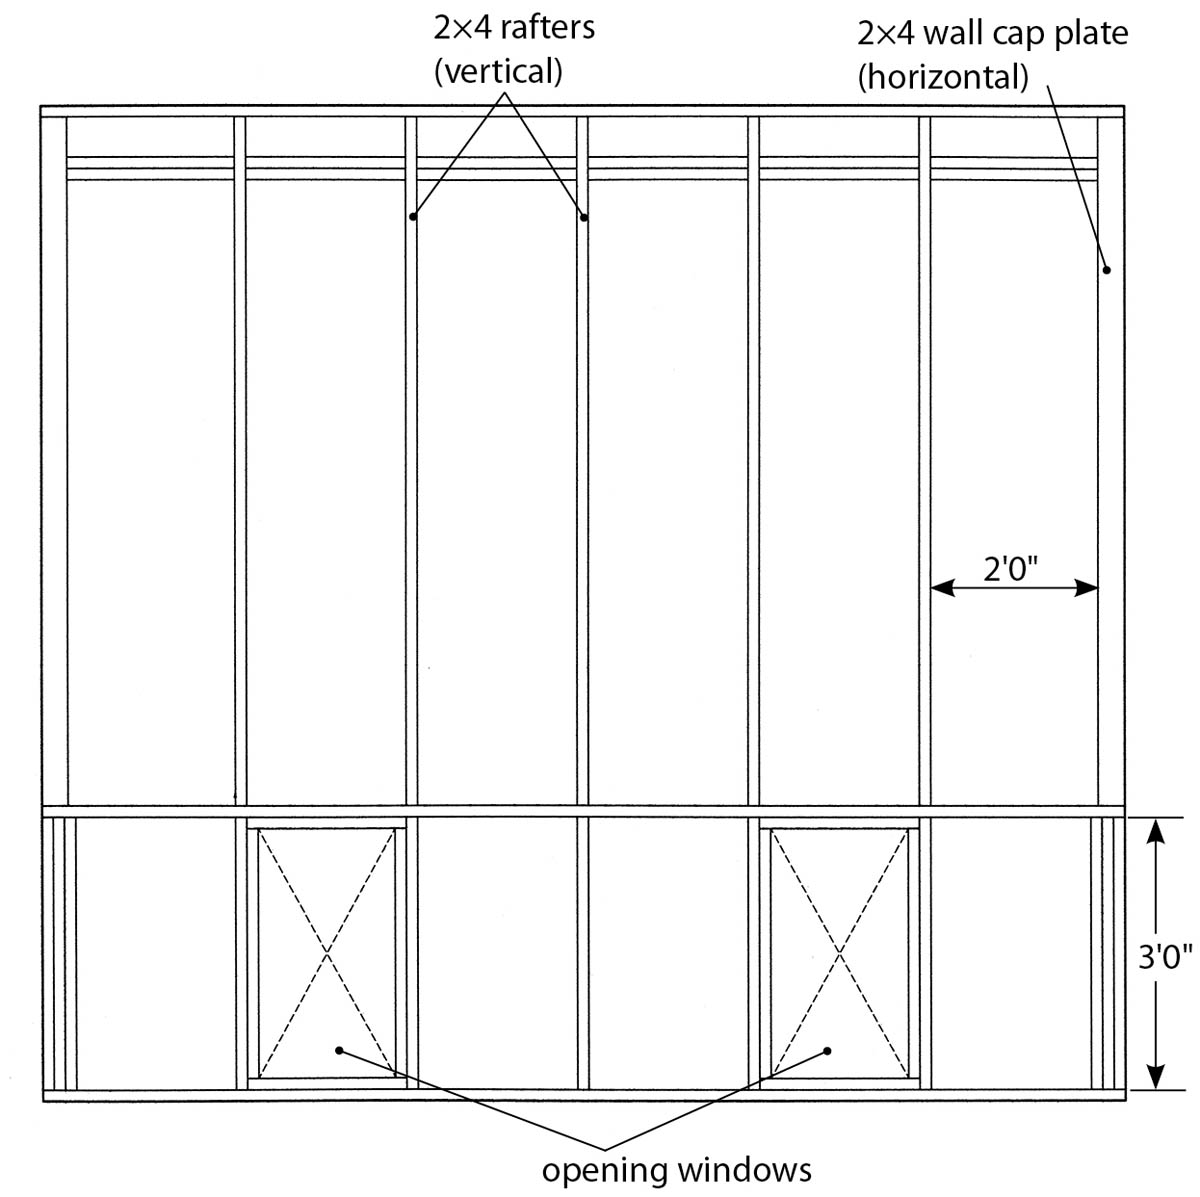
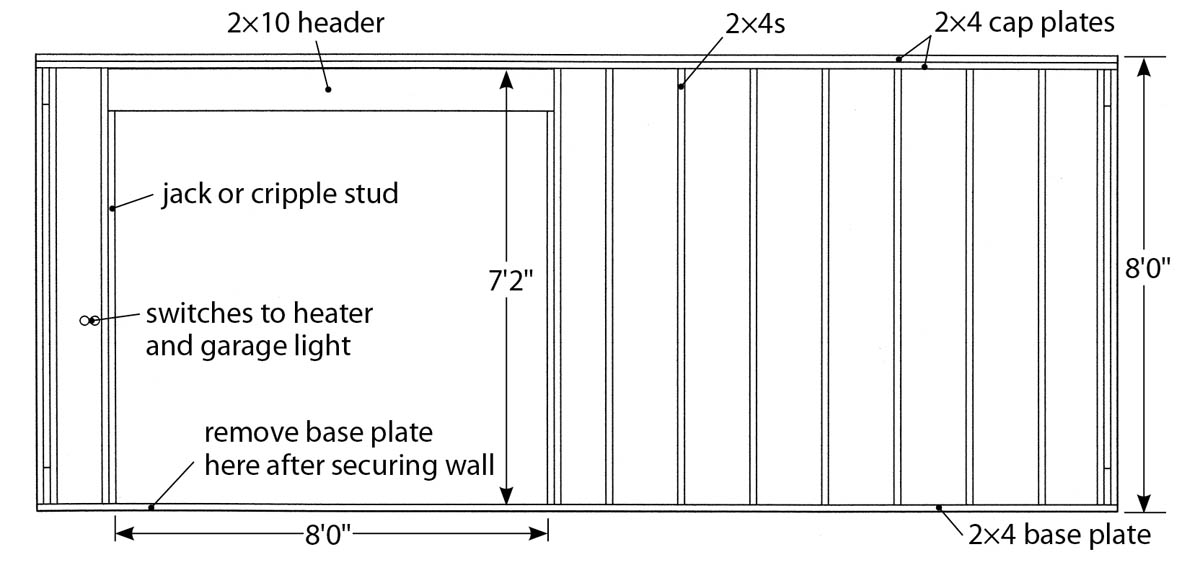
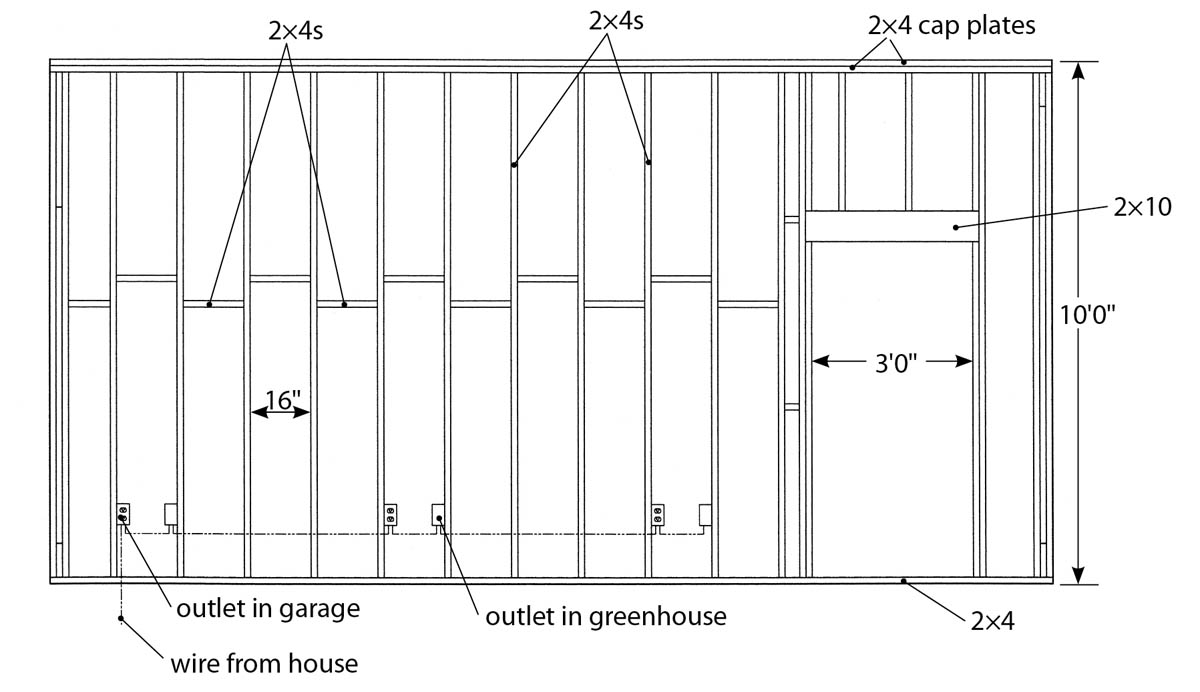
Refer to the illustration below for the rear-wall layout. To construct the wall, place the top and base plates on a flat surface and mark the location of the vertical posts 16 inches on center. The door will be 30 inches wide, which means that the rough opening will be 371⁄2 inches. Once the vertical supports are in place, use three 16d galvanized nails to fasten each support to the top and base plates. The wall has a second cap plate at the top and a second 2×4 mounted vertically to allow the rafters to be set up properly. (See top left of the illustration below.)
The illustration also shows where to install cross bracing to help prevent the vertical supports from bending. Frame out the vent openings as shown and nail the door header and framing in place to finish the wall. Before erecting it, you can sheath the wall with either 3⁄8-inch or 1⁄2-inch CDX water-resistant plywood to help stiffen the structure. Installing the plywood will make the wall fairly heavy, however, so if you don’have a crane or several strong friends, you can erect the frame work and then install the sheathing. You’ll address the window openings later.
STEP 3: Build the End Walls
The end walls of this greenhouse will also be insulated and with the rear wall will form a snug box for your plants.
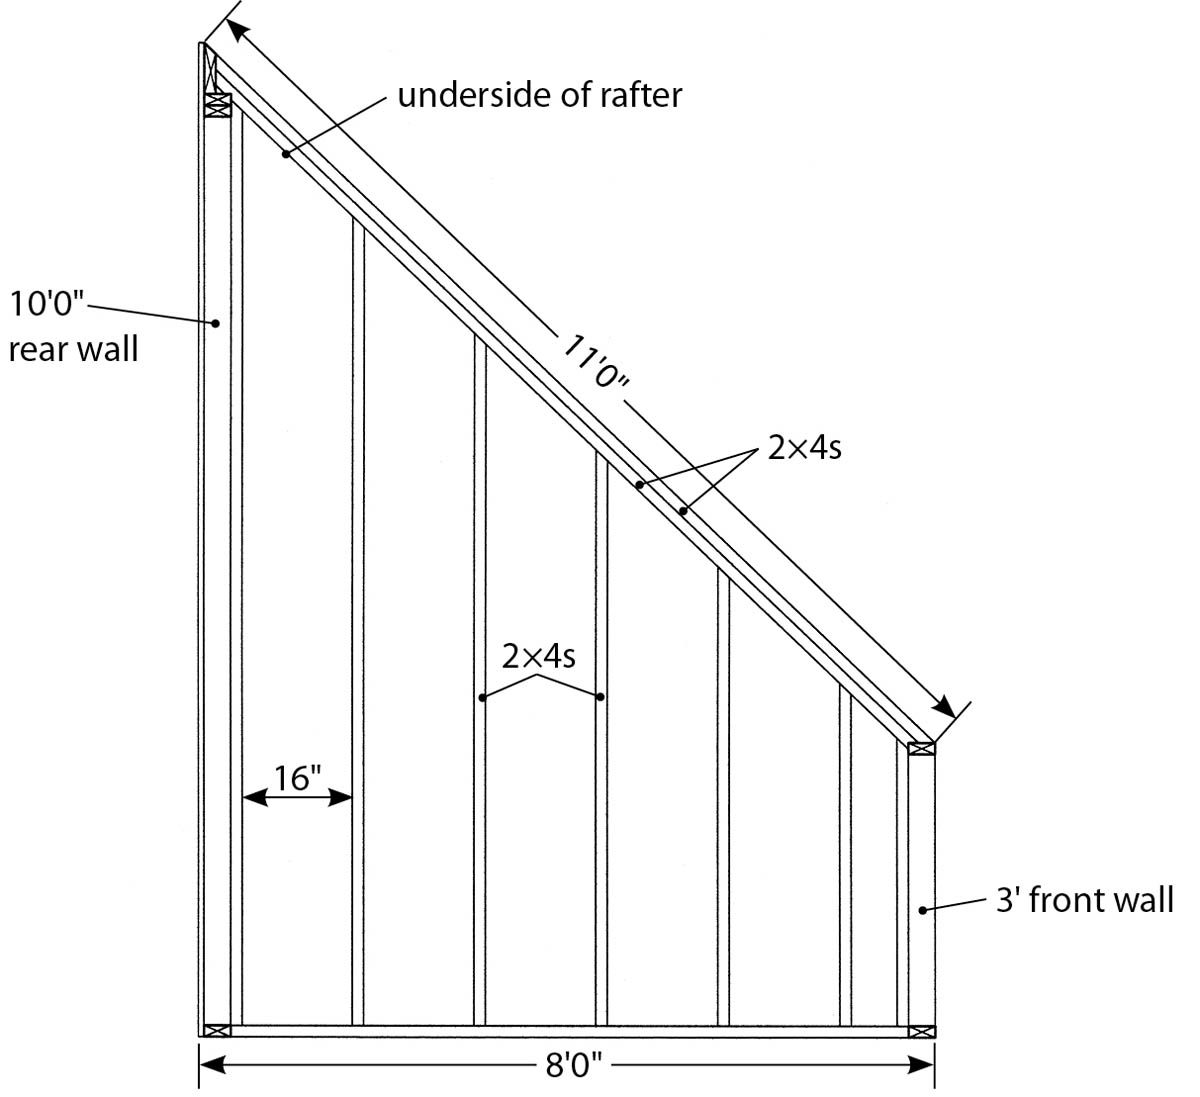
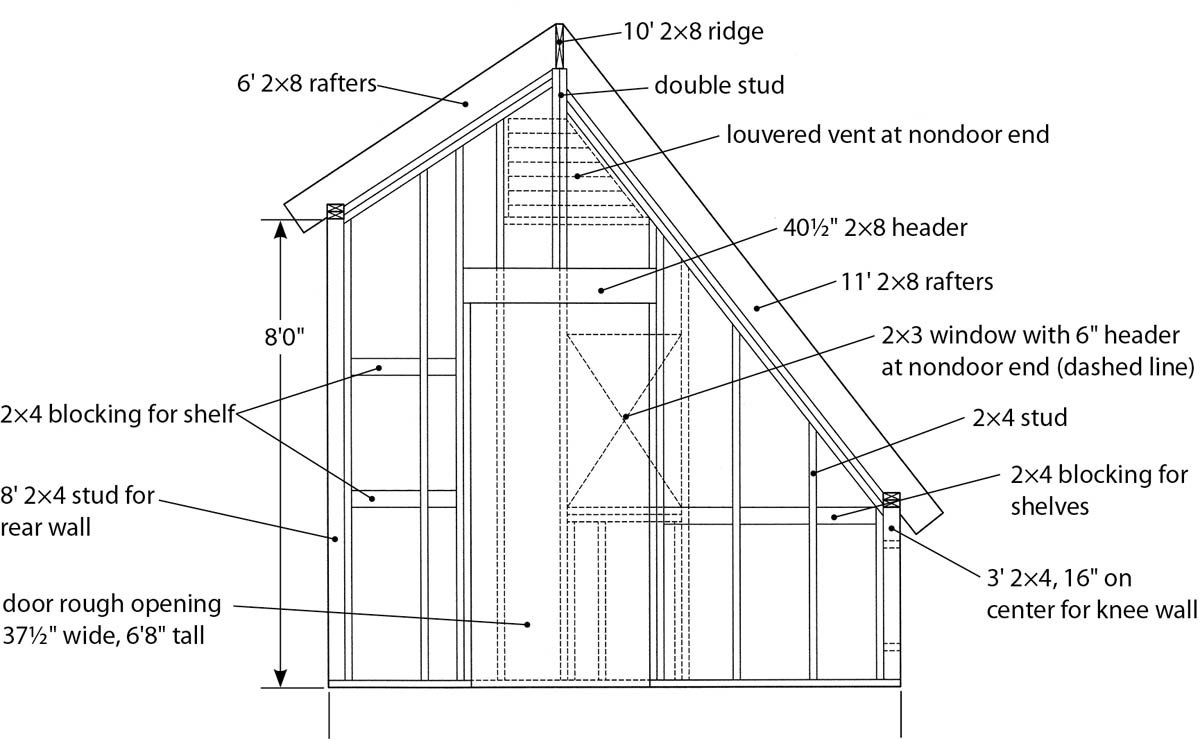
First cut two 8-foot base plates to 7 feet 4 inches each. These will fit inside the 10-foot front and back walls. On the base plates mark out the placement of the vertical studs 16 inches on center. Next, set one 10-foot 2×4 vertical at the end that will be at the back of the greenhouse and one 3-foot 2×4 vertical at the low front end of the sloped side, abutting the front knee wall. The end walls have double cap or top plates to tie the structure together and to set the top of the wall exactly level with the rafters.
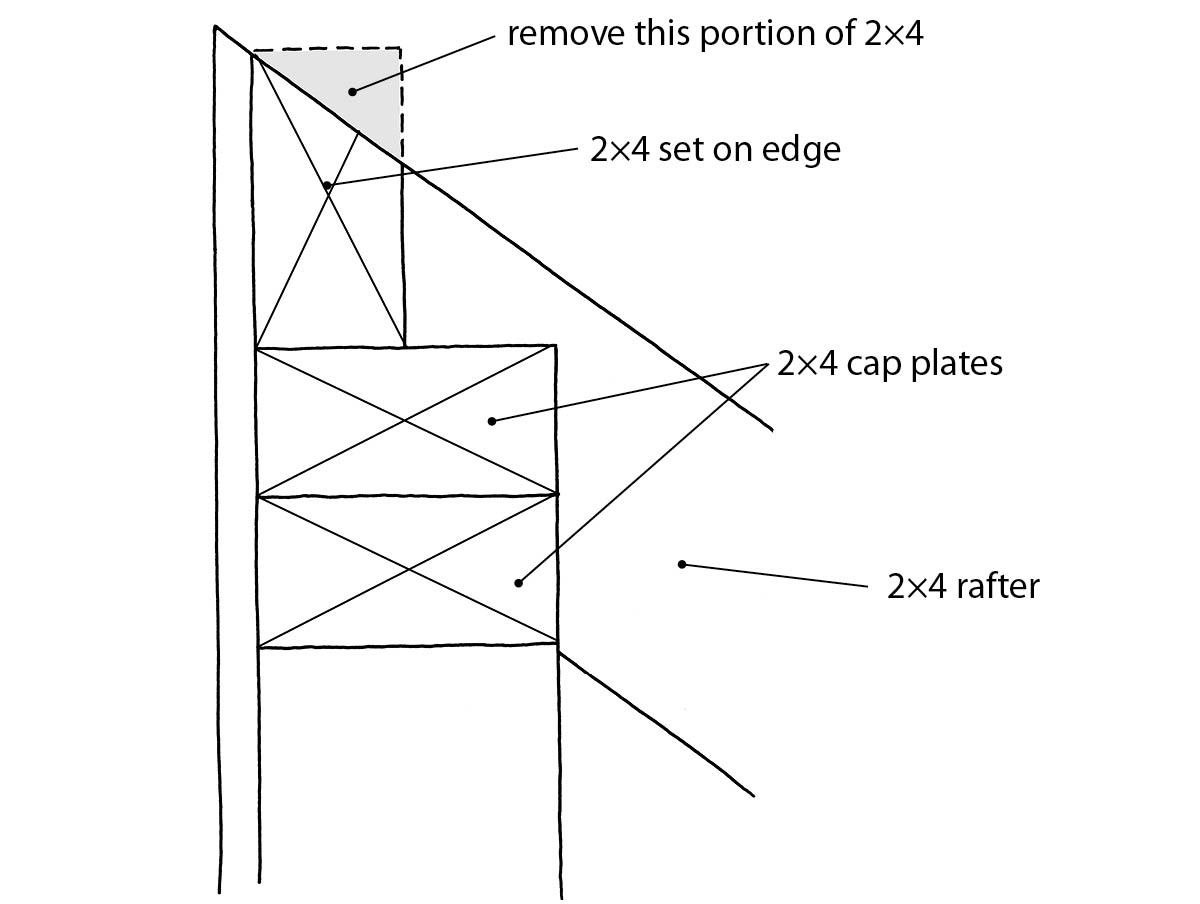
Nail one of the top plates in place and then cut, place, and fasten in place each vertical stud. Finally, add the second cap plate cut at an angle on both ends to form a smooth top to the wall from front to back. See the illustrations below for the layout of both end walls and the detail of the top of the ridge plate with two horizontal 2×4 cap plates and a vertical 2×4 cut to suit the angle of the roof. This 2×4 sits on top of the horizontal cap plates and fills the gap between the glazing and the vertical sheathing.
STEP 4: Build the Front Wall
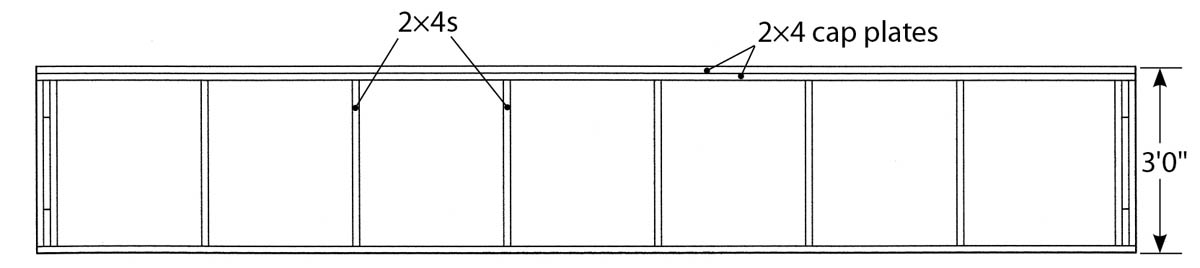
The front knee wall (only 3 feet tall) is fully glazed. Because the polycarbonate comes in 4-foot sheets, the front wall must have supports at 2-foot intervals. It will incorporate two windows. See the illustration below (bottom) for the layout of the front wall and rafters.
The only difference in this wall’s construction is that the vertical supports are placed 2 feet on center rather than the 16 inches on center used on the nonglazed walls. The glazing will be screwed on the outside of the frame and overlap the end walls slightly. At this stage, before erecting the frame, all the walls should be painted with an oil-based paint and top-coated to help prevent the wood from rotting. Remember that white paint has higher reflectivity, making the interior of the greenhouse much lighter. In addition, you can sheath the non glazed walls at this time.
STEP 5: Assemble the Walls
With the sill plate bolted in place, the walls can be nailed or screwed to the sill plate. You will probably need another pair of hands to erect the walls, or you can brace each as you erect it before erecting the next. Make sure that all the walls are perfectly vertical and the diagonals are equal (the walls are square) before you start sheathing (if you haven’t sheathed the nonglazed walls before now).
STEP 6: Install the Rafters
The rafters are added after the building is sheathed. Cut each rafter and nail or screw it in place. Be sure to paint all surfaces of the rafters before installation.
STEP 7: Install Glazing
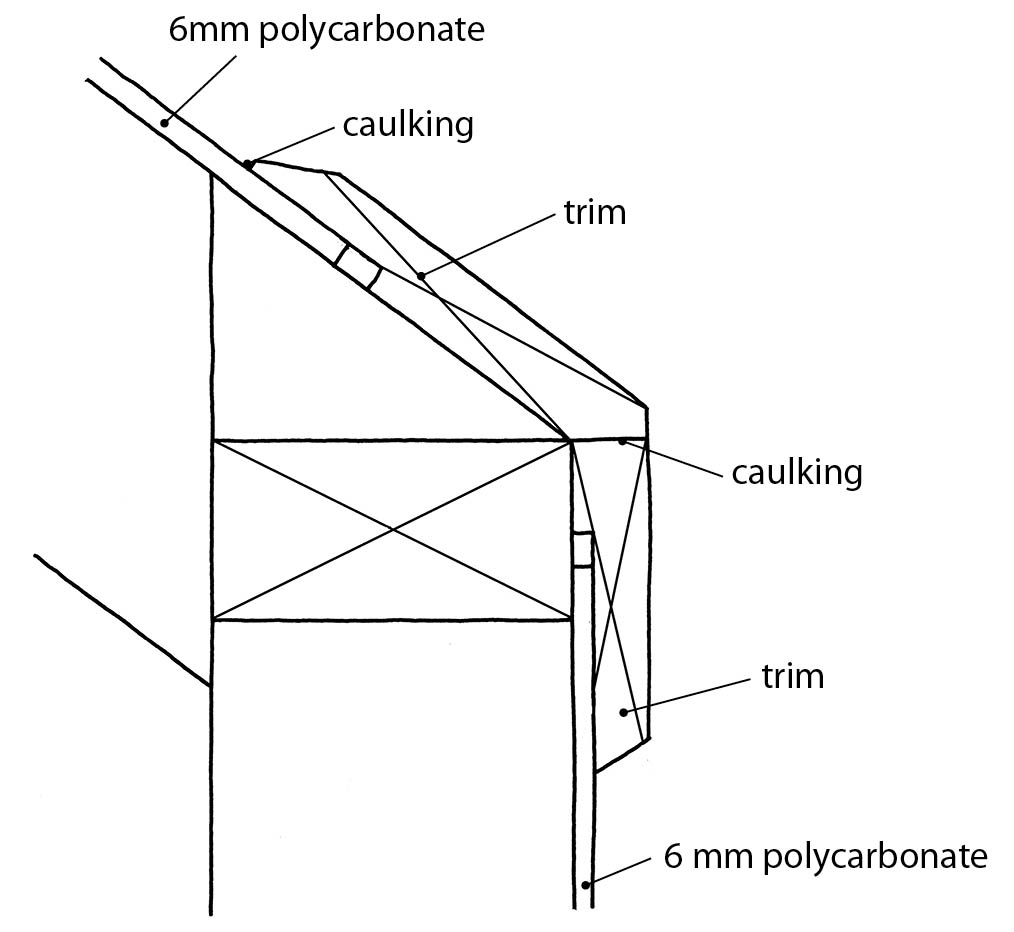
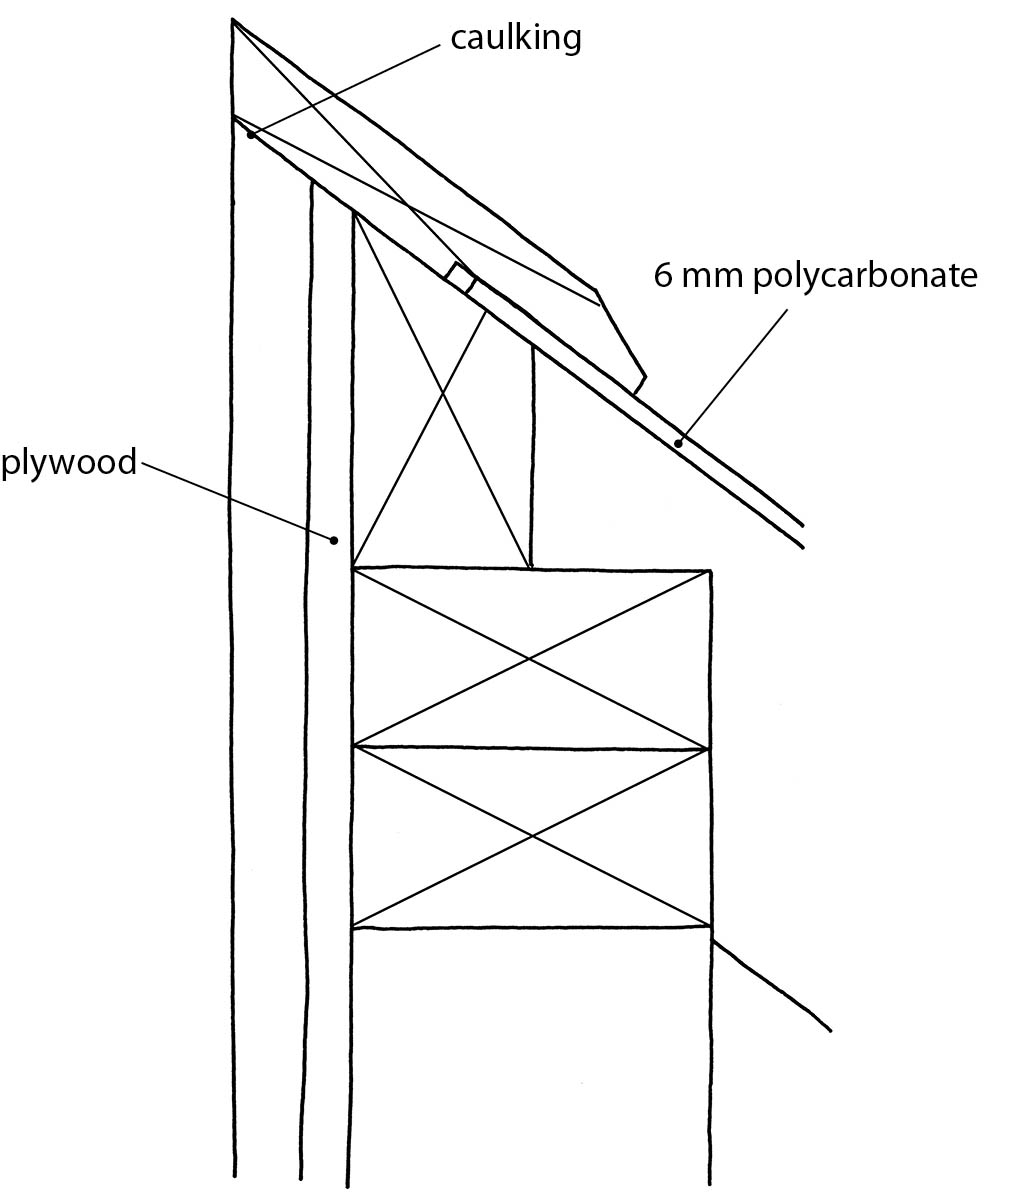
Installing glazing often requires two people, one inside the greenhouse and one outside. First, lay a bead of caulking on the first and third rafters and across the top and bottom of the rafters. With one person in the greenhouse and another outside, each polycarbonate sheet should be carefully lifted over the opening and lowered into place. Set it down carefully to ensure that it’s precisely positioned and the caulking forms a tight seal all around the polycarbonate. Set all three sheets in place and then screw trim or capping in place over the seams between the sheets. Remember to space screws about 12 inches apart and drill oversized holes in the caulking to allow for expansion. (See the illustration below and chapter 7 for more information on installing glazing.)
At the side walls and at the ridge, cover the edge of the caulking with 1×6 trim pieces cut to fit over the polycarbonate (see illustration below left). Remember to caulk any joints between the trim pieces and between the polycarbonate and trim to eliminate the chance of leakage.
STEP 8: Add Insulation
If you plan on heating this greenhouse, you can use thicker polycarbonate for the glazing and install insulation on the inside walls. Because a greenhouse is warm and moist, it is an ideal breeding ground for molds and fungi, so I don’t recommend that you use fiberglass batting for insulation. Instead use polystyrene or expanded foam insulation to keep the north wall warm. You can either fit it between the frame structure or cover the entire rear-wall framing with 43 sheets of foil-faced foam board. You will need another 4 sheets for the end walls. Tape the seams with either duct tape or foil-faced tape that’s made especially to cover seams for this kind of insulation.
STEP 9: Finish the Greenhouse Exterior
Probably because I live on the New England coast, I do like a shingled exterior. First cover the sheathing with a house wrap such as Tyvek and install shingles according to the instructions provided in chapter 9. You can paint the corner trim white and stain the shingles if you like.
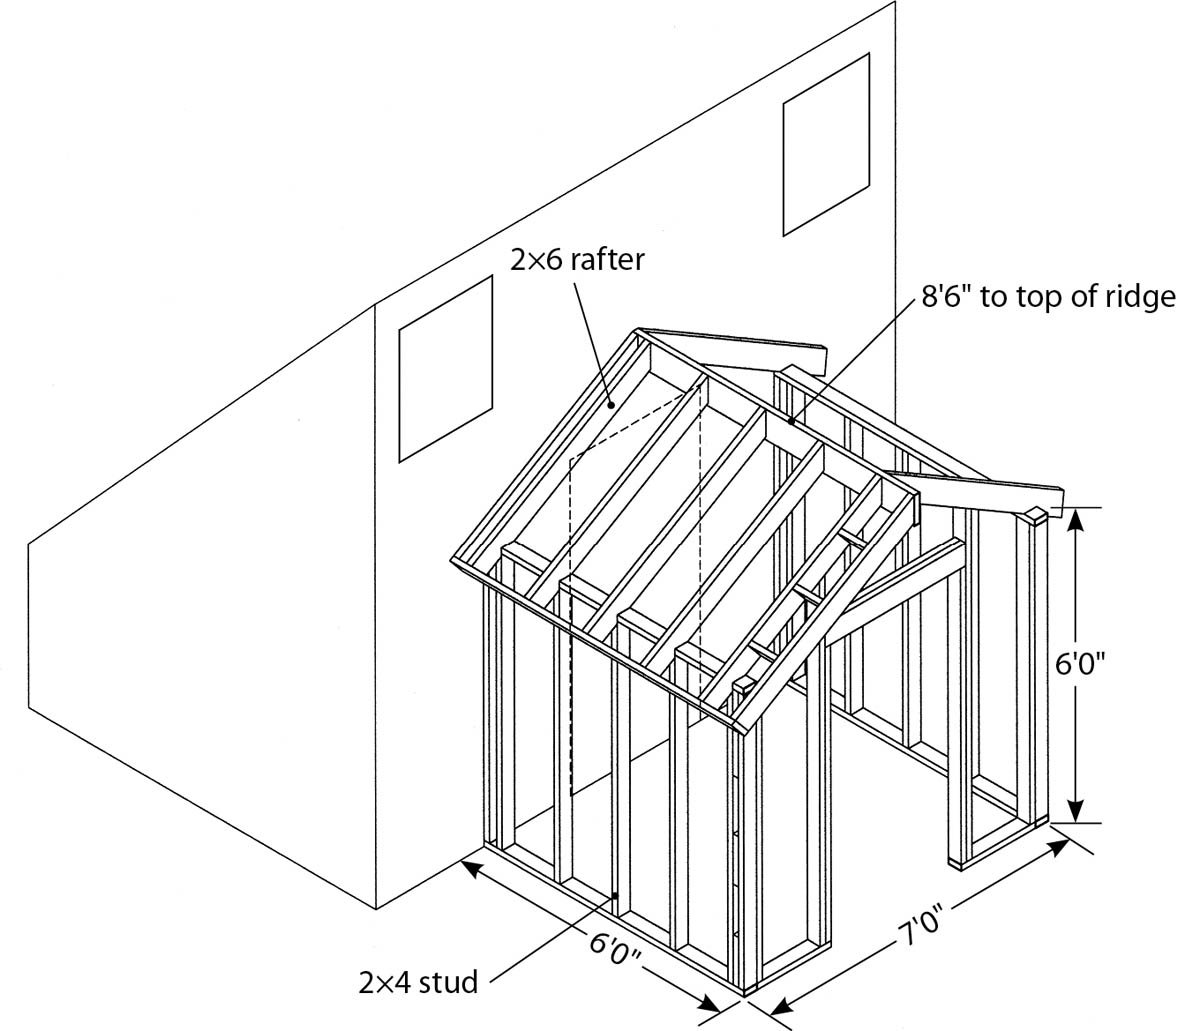
BUILDING THE POTTING SHED
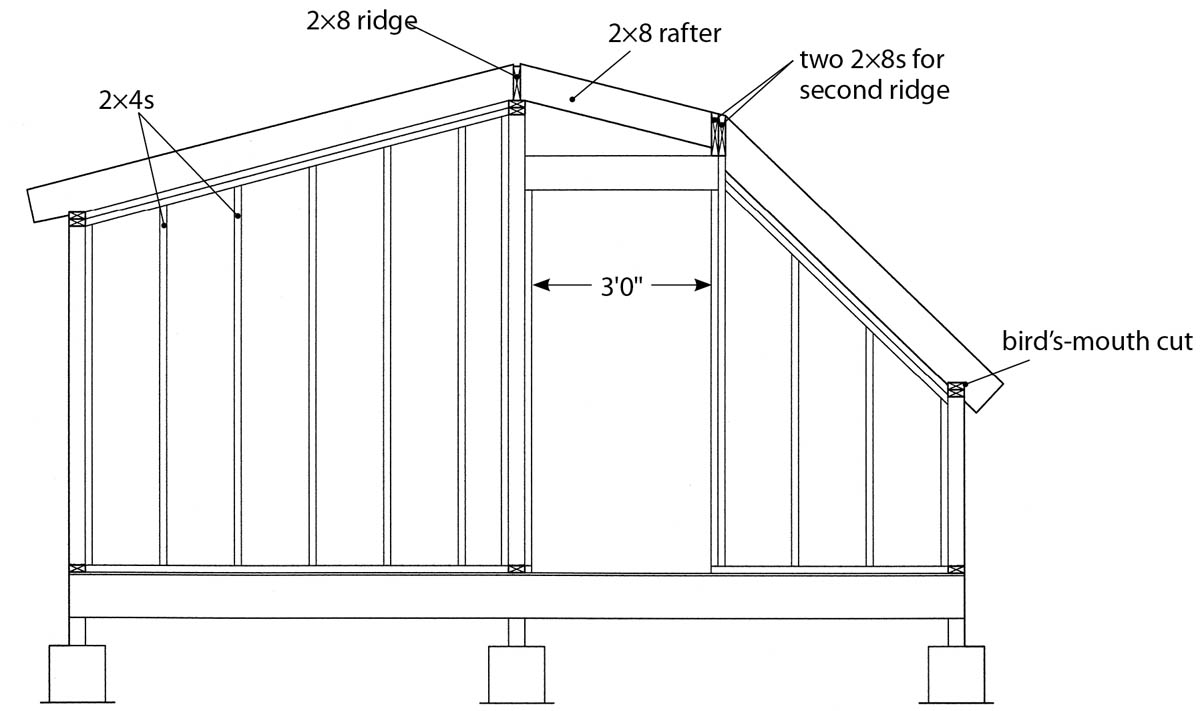
A substantial upgrade to this greenhouse is the addition of a potting shed/air lock at the back of the structure, with a door in one side and a lean-to-style roof. The drawback to this location, however, is that a wheelbarrow must be turned 90 degrees to maneuver it from the entry door into the greenhouse itself. For this reason, I’ve installed the door to the potting shed/air lock in the wall directly facing the greenhouse door. With both doors open, it’s easy to run a wheelbarrow in and out.
The addition of the potting shed requires that you pour a concrete slab for its base when you pour the greenhouse slab. As for the structure itself, you’ll have to install base plate bolts in the concrete while it’s still wet. If the shed is to have running water and electric lighting, you must run conduit for these before the concrete slab is poured, just as for the greenhouse slab.
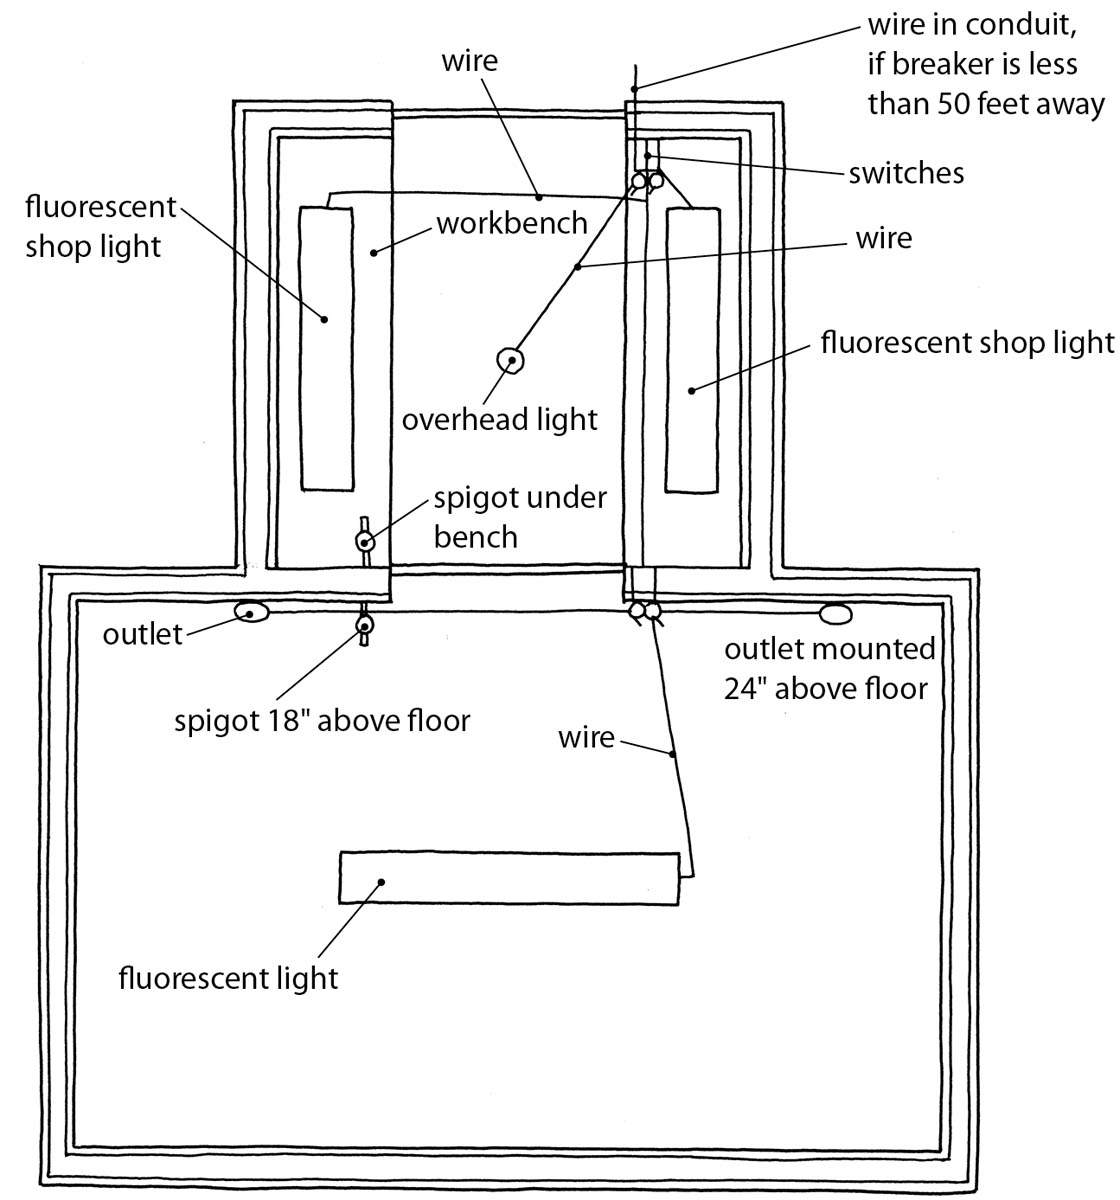
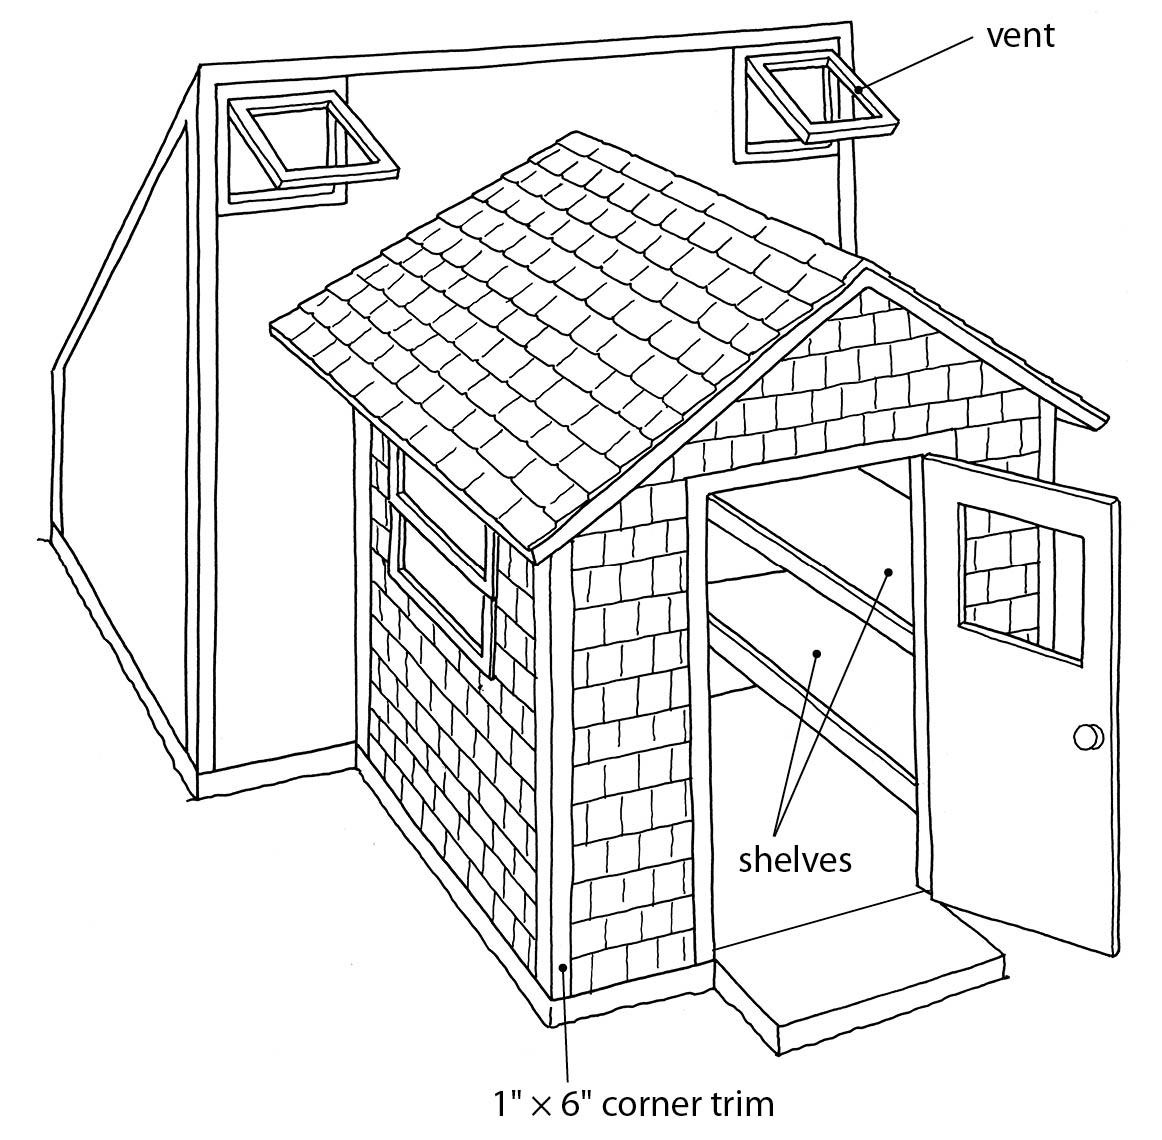
The details of the potting shed are shown in the illustrations below. With no window, it will remain warm, assuming that the greenhouse door will be left open while you work in the shed. You can, however, put a window behind each workbench on the side walls of the shed, as shown. The shed/air lock has two fluorescent lights over the work area, and if you plan on starting seeds there, you can install an outlet on the shed wall that’s shared with the rear wall of the greenhouse.
Materials
- Twenty-two 8' 2×4s for vertical supports
- Eight 6' 2×4 base and top plates
- Twelve 6' 2×6 rafters
- One 7' 2×6 ridgepole
- Miscellaneous 2×4 and 2×6 blocking
- Two 3" 2×6 header plates
- 5 sheets 3⁄8" or 1⁄2" CDX plywood for sheathing
Instructions
STEP 1: Build the Side Walls
Lay all four 6-foot base plates on a flat surface and mark out the placement of vertical supports for the walls. Each side will have six studs spaced 16 inches on center. Because the front wall will be made with extra blocking at the corners, the side-wall base plates should be cut to 5 feet 81⁄2 inches long. Each stud is cut to 5 feet 3 inches, making the side walls 5 feet 6 inches high. Nail each stud to the base plate with three 16d galvanized nails.
STEP 2: Build the Wall with Door
First lay out the top and base plates on a flat surface. Mark off the stud locations 16 inches on center. Next, nail the studs to the top and base plates using three 16p nails in each support. At the corners, you’ll have to add blocking and additional supports to which the interior sheathing can be attached.
The 3-foot-wide door requires two 6-foot 8-inch jacks to which the header is attached. The space between the header and the top plate can be filled with short 2×4s.
STEP 3: Assemble the Walls
Once the greenhouse is assembled and the rear wall sheathed, you can add the potting shed walls. Stand the side walls on the base and temporarily nail them to the back wall of the greenhouse while you check that they are vertical and square to the greenhouse, then nail or screw them in place.
Next, erect the door wall of the shed and screw or nail it in place. Check again that all walls are vertical and square.
Finally, sheathe the potting shed with 3⁄8-inch CDX plywood to match the back of the greenhouse.
STEP 4: Add Plumbing and Wiring (Optional)
Refer to chapter 10 for information on wiring and plumbing. If the shed is to be plumbed, you’ll have to install water lines and a drain prior to pouring the slab.
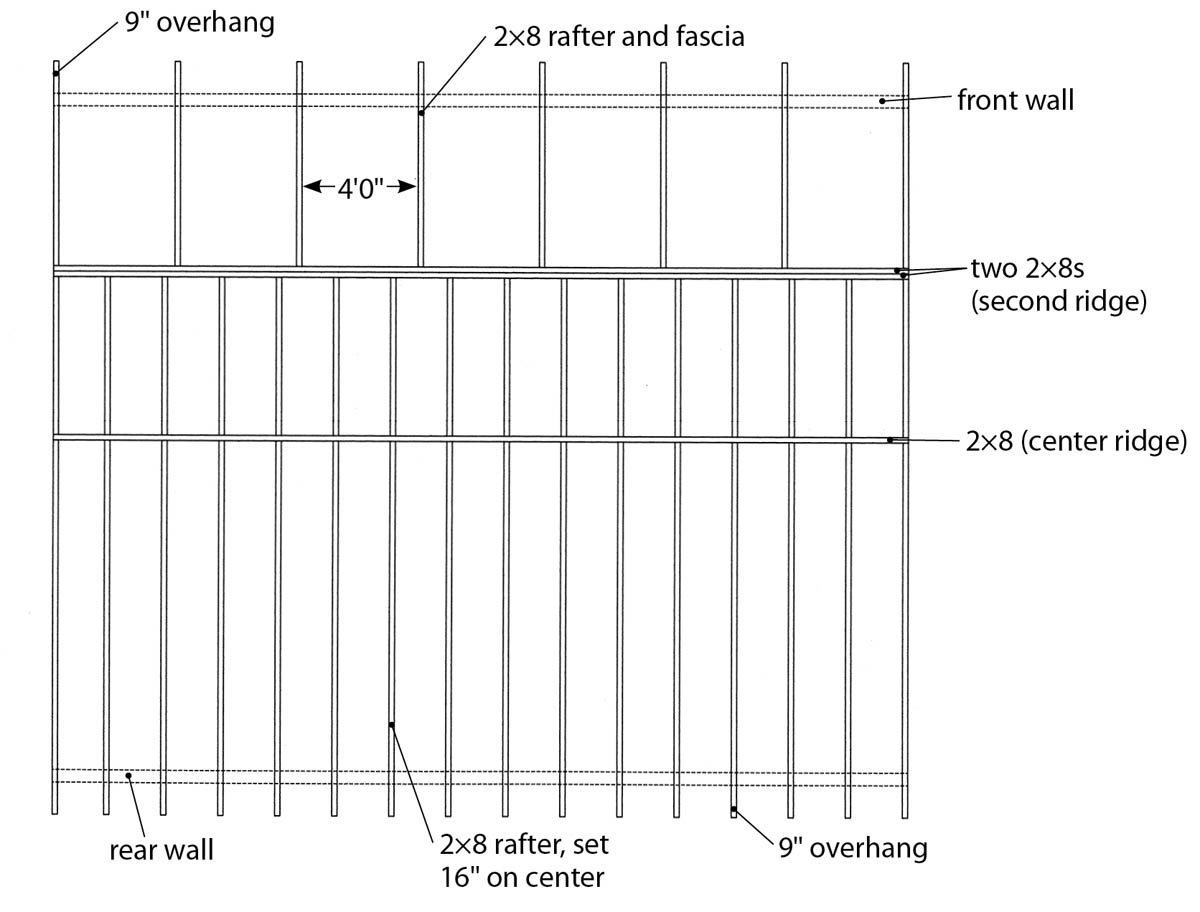
STEP 5: Install the Rafters
Locate the ridgepole between the back of the greenhouse and the opposite entry door wall of the shed.
The rafters are 2×6s cut to length and placed 16 inches on center. One end of each rafter is cut to fit flush against the ridgepole and the outer end of each has a bird’s-mouth cut. Nail or screw them in place. When the rafters are in place, add the rafter plate on the outside end of each rafter and the trim pieces (fascia boards), which cover the rafter plate and the ends of the eaves. If you add trim at this stage, remember to leave 1⁄2 inch above the rafter ends to cover the end of the plywood sheathing. Cut plywood to suit the eave over hang around the potting shed and nail it in place from underneath. Prime the trim and eave surfaces so they can be painted later.
STEP 6: Add Roofing
Now the roof can be sheathed with 3⁄8-inch or 1⁄2-inch CDX plywood cut to suit its shape. The ends of the plywood will be covered by the trim pieces that are screwed or nailed to the rafter plates. After the plywood is in place, tack roofing felt to the roof and tack flashing to the join between the potting shed roof and the greenhouse wall. Cover the flashing with roofing felt. (The vertical portion of the greenhouse wall will be covered with shingles or shakes, which will also cover the flashing.)
At the bottom of the roof, nail into place aluminum drip edge (this will protect the fascia board from dripping), then begin applying roofing shingles: Set the first row upside down along with the bottom edge of the roof, about 1⁄4 inch beyond the drip edge. Lay the second row of shingles right-side up with the slots falling in the middle of solid strips of the bottom upside-down row (the slots fall exactly halfway between the slots on the bottom row).Work up the roof until you come to the ridge. Cut shingles into thirds, bend them over the ridge, and nail them across the ridge, starting from the outside of the shed and ending at the greenhouse wall and flashing. If you really want to be sure that no water will enter the joint between the greenhouse wall and the potting shed roof, you can tack a second piece of flashing so that about an inch of the metal covers the shingle ends where they butt against the wall.
STEP 7: Sheathe the Structure
Sheathe the body of the shed with 3⁄8-inch or 1⁄2-inch plywood, then wrap it with Tyvek or a similar house wrap and nail in place the 1×4 corner trim. You can paint this trim with a white base coat or primer.
STEP 8: Finish the Exterior
Once the corner trim is in place, the structure should be shingled or
sided to match the greenhouse. Cover the trim with a final coat of paint and the job is done.
OTHER VARIATIONS AND UPGRADES
You can upgrade this greenhouse by using 34-inch patio glass for glazing instead of polycarbonate. You can also heat the greenhouse and use double-pane windows to increase the insulation value of the glazing. To increase light, glaze the end walls with polycarbonate.
This style of greenhouse could also be built directly against a house wall, making it one of the few types that can be either freestanding or attached. If you build it against a home, you’ll need to put vents in the roof glazing near the highest part of the greenhouse to enable hot air to escape.
The length of the greenhouse can easily be expanded in 4-foot increments and the width can be expanded up to 14 feet. Although the upgrade here calls for putting the potting shed at the back of the structure, there’s no reason why you couldn’t put it at one end.
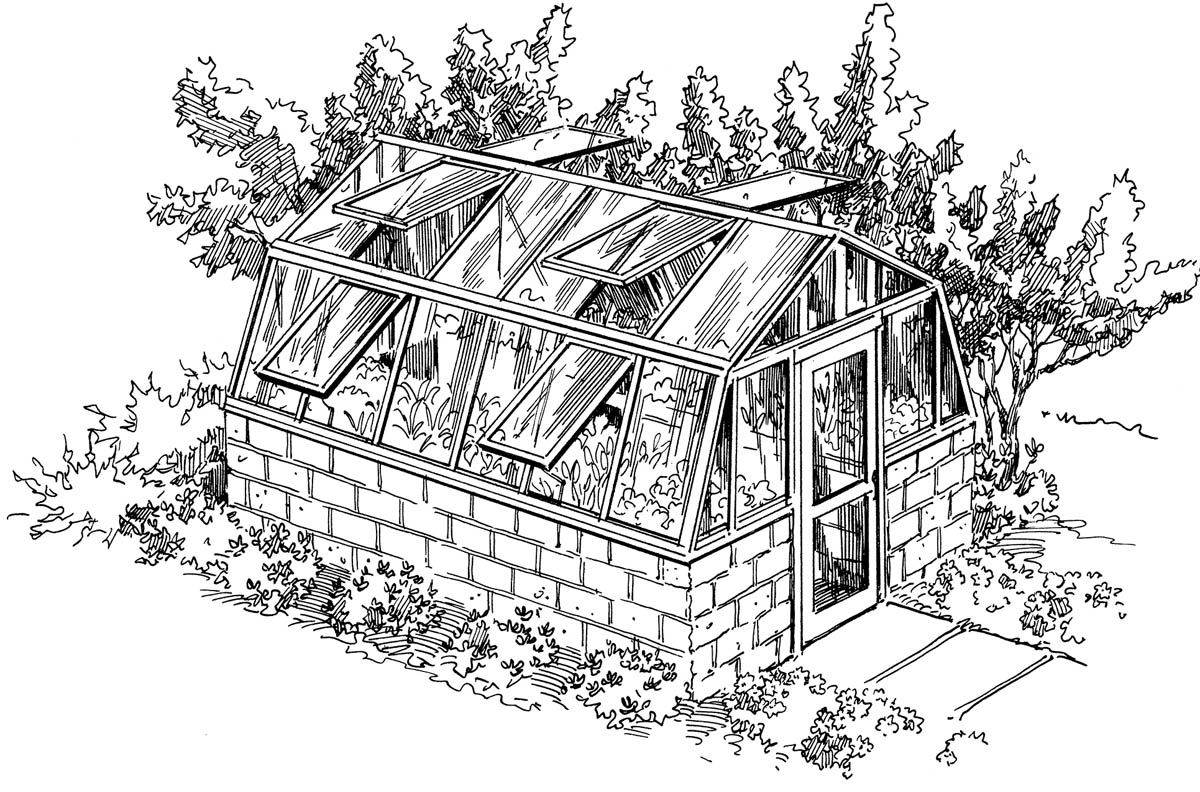
3. Slope-Sided Greenhouse
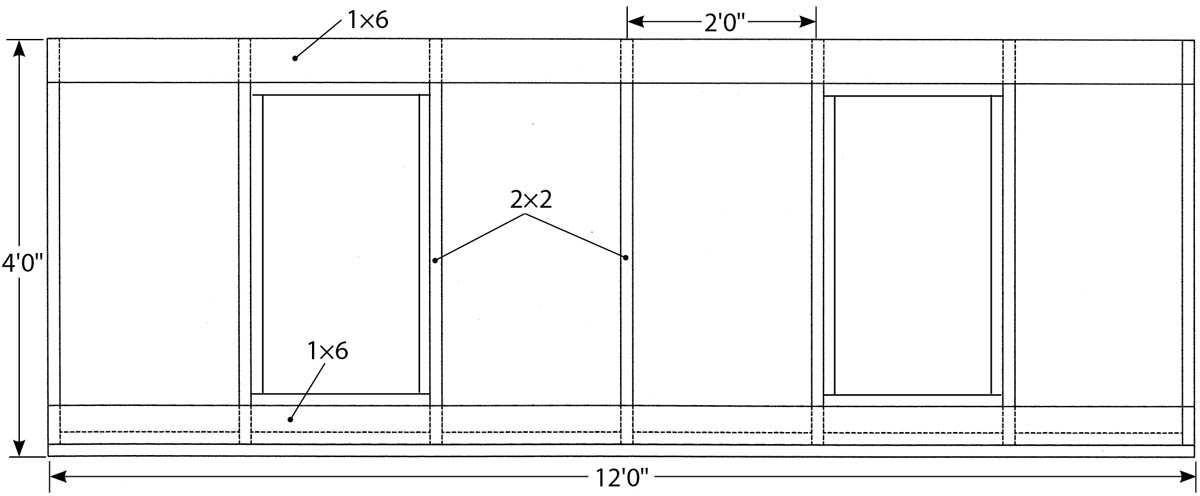
This slope-sided structure offers a large concrete-block base area but slightly less space at bench level than does a vertical-sided greenhouse. It also requires slightly more structural support because the roof loads are not vertically over the walls. To add this extra measure of support, the roof load is supported by roof trusses, which are attached to the walls and tied together with 1×4 or 1×6 longitudinals. In all, this is probably a less expensive form of construction than that of the vertical-sided greenhouse, and when it’s combined with fiberglass or polycarbonate glazing, costs are reduced even further.
If you decide to use glass for glazing, you should set the material into the supports and rafters, but fiber glass, like polycarbonate, can be screwed to the outside of the support structure.
CONSTRUCTING THE FOOTING, FOUNDATION, AND FOUNDATION WALLS
Materials
FOR THE FOUNDATION FOOTINGS FOR CONCRETE BLOCK WALLS (40' AT 18" WIDE BY 12" DEEP)
- 2.5 cubic yards of concrete
FOR THE FOUNDATION WALLS/RAISED BEDS
- 425 concrete blocks for a foundation set 12" below grade (for each row of block deeper than this, add 77 blocks; for example, if footings will extend deeper than the 3' frost line, you’ll need three more rows or 231 additional blocks)
- Mortar
- Fourteen 1⁄2" bolts, each 6" long
Instructions
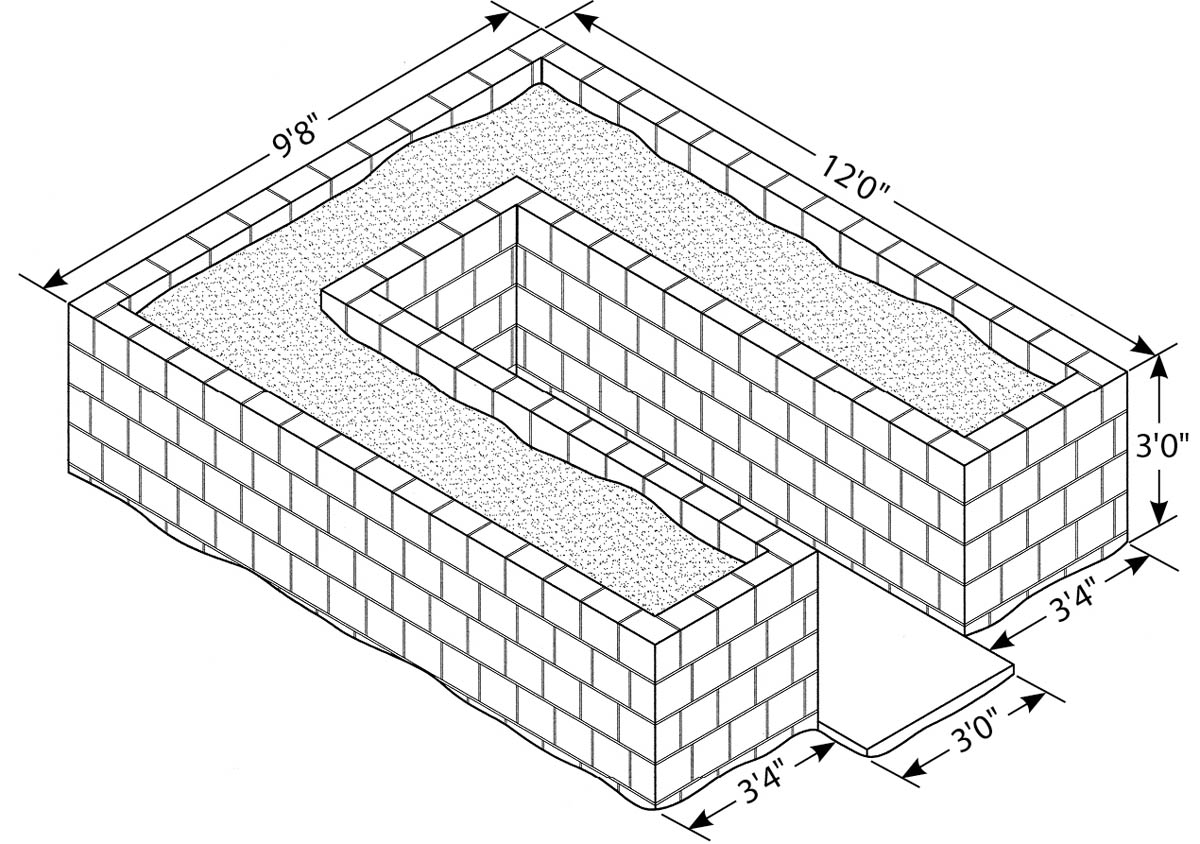
The walls and foundation are 36 inches above the concrete slab and are filled with good-quality loam, compost, sand, and manure.
STEP 1: Lay Out the Foundation
Use batter boards and string as explained in chapter 8 (Laying Out the Foundation) and project 1 and ensure that each wall is square.
STEP 2: Excavate the Foundation
Dig a perimeter trench for the footings. If you live in an area that doesn’t freeze, this can be 12 inches to 18 inches below grade. If the ground in your area freezes in winter, the trench should be 31⁄2 feet deep and at least 18 inches wide.
STEP 3: Pour the Foundation Footings
Pour the footings at the bottom of the perimeter trench. These should be twice as wide as the walls will be. Carefully level the surface of the footings after they have been poured.
STEP 4: Build the Foundation Walls/Raised Beds
The plans call for building foundation walls/raised beds on either side of the central walkway using concrete blocks and making the greenhouse full height. This design will cut down on the glazing required and will make the wooden frame of the greenhouse slightly lower than if the greenhouse was built on a conventional slab.
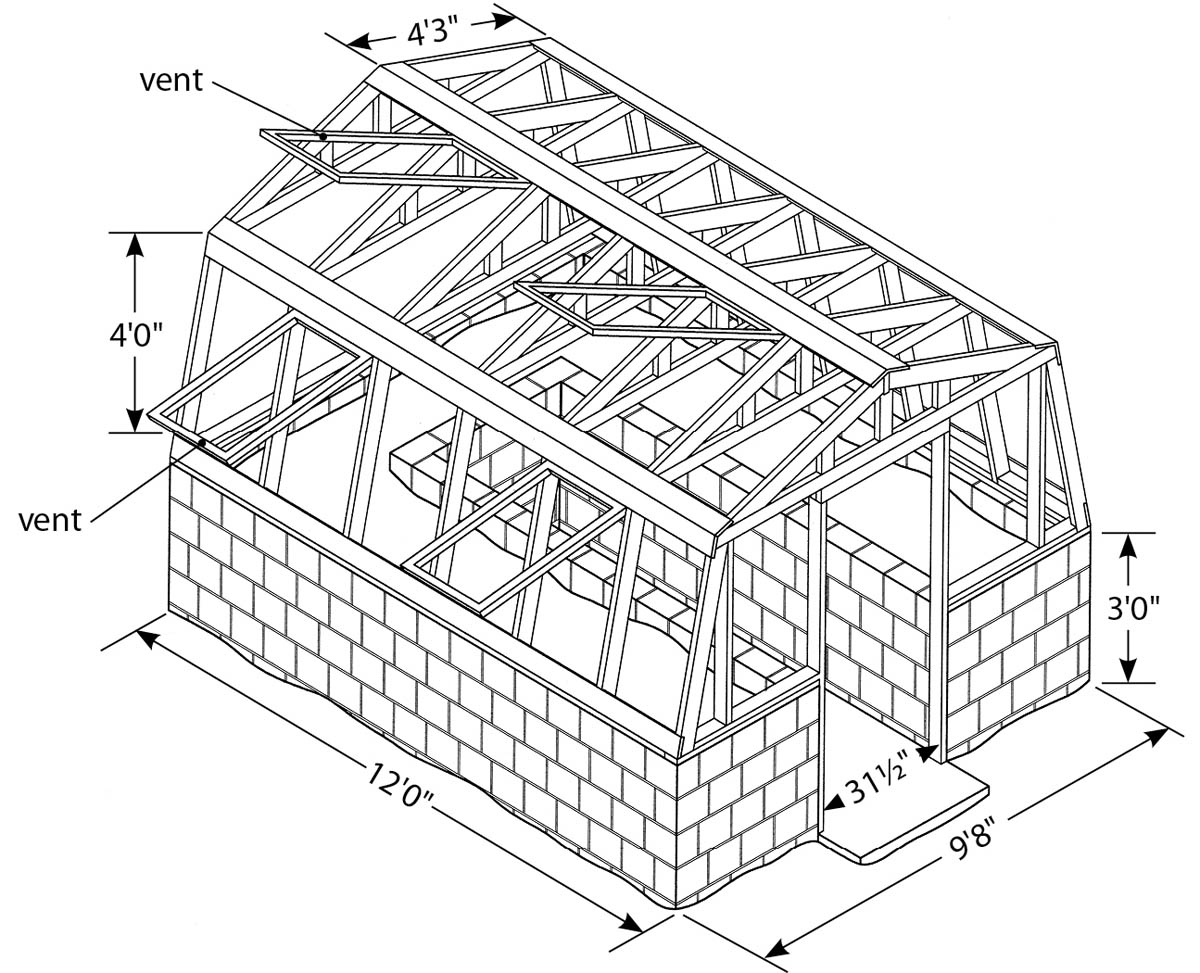
The greenhouse is 12 feet long and 9 feet 8 inches wide, allowing room for two 3-foot 4-inch-wide beds and a walkway that’s 3 feet wide. By making the doorway exactly 3 feet wide as well, you can build the walls without having to cut any blocks. This does require you to build the door as opposed to using a stock item. (See Building the Greenhouse, and specifically Install the Door.)
The raised beds are constructed using concrete blocks, as shown in the illustration at left. You can make the walls of this greenhouse from brick for a more attractive look, or stucco the blocks or use parging (see chapter 8) after the wall is built.
Build the walls with mortar as described in chapter 8, Finishing the Foundation, making sure to point both sides carefully. When the walls are built, fill the center holes of the concrete blocks with mortar about 14 inches from the top of the wall. After it has set for a half hour, place bolts in the wet mortar (one bolt approximately every 3 feet) to hold the sill plate in place. Be sure to leave 11⁄2 inches of bolt protruding from the concrete.
BUILDING THE GREENHOUSE
Materials
FOR THE SILL PLATE
- 34' of 2×4s
- 10 to 12 bolts, nuts, and washers to fasten greenhouse base plates to sill plate
FOR THE END WALLS
- 34' of 2×2s for the base plate (preferably oak, cedar, or teak)
- Two 6' 6” 2×2s for the door supports
- Two 6' 6” 1×2s plus one 33” by 1” by 2” piece for the door jamb
- One 36” 2×4 for the header
- Seven 4' 2×2s for the rafter truss supports
FOR THE SIDE WALLS
- Fourteen 4' 2×2 supports
- Four 12' 1×6 top and bottom plates
- Two 12' 2×2s cut to fit between the supports and with outer edges angled to match the slope of the side wall
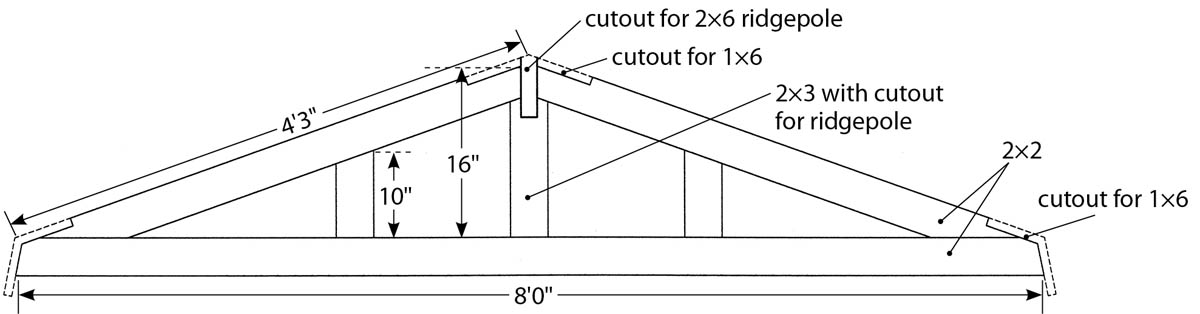
FOR THE RAFTERS
- Seven 8' 2×2s
- Fourteen 4' 3” 2×2s
- Seven 16” 2×3s
- Fourteen 10” 2×2s
FOR THE GLAZING
- Four 12' by 4' polycarbonate panels for the roof
- Four 12' by 4' polycarbonate panels for the side walls
- Four 6' by 4' pieces of polycarbonate for the end walls
- Four 4' by 13” triangle-shaped pieces for the corners of the end walls
FOR THE DOOR
- Two 6' 8” 1×4s
- Three 3' 1×4s
- One 6' 6” by 3” piece of polycarbonate for the door
ADDITIONAL MATERIALS
- Caulking, epoxy, stainless screws, cap pieces for glazing joints, hinges, window clasps
Instructions
With a door at one end, almost 75 percent of the space in this greenhouse can be used for growing.
STEP 1: Install the Sill Plate
Lay the base plate on top of the bolts in the concrete blocks and gently tap the wood with a mallet to mark the bolt holes. Install fiberglass sill insulation on top of the concrete blocks. Drill the holes in the sill plate, lap all corner joints, set the plate in place, and secure it to the bolts in the blocks with nuts and washers.
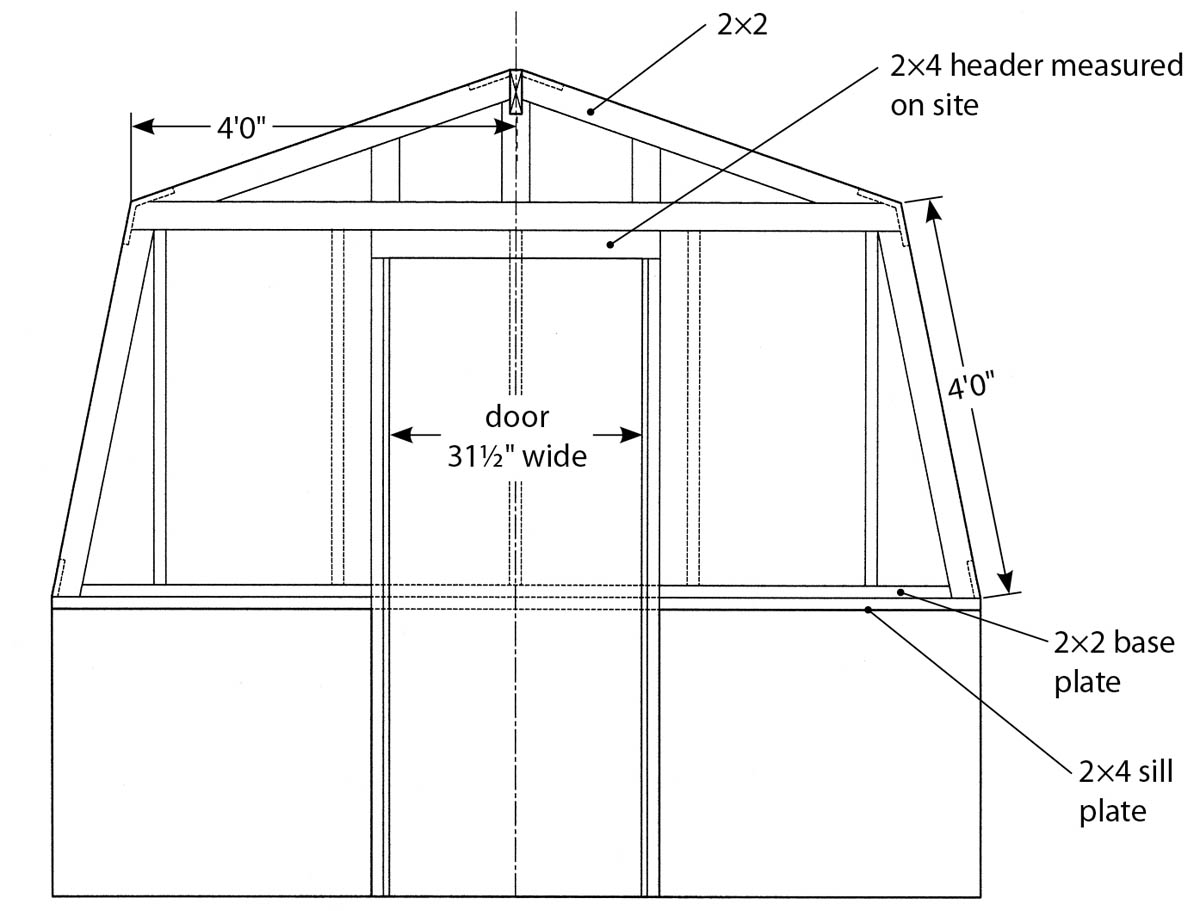
STEP 2: Build the End Walls
Refer to the illustration at right for end-wall construction details. For this greenhouse, it may be easier to build the end walls on the job because the roof truss must be installed to hold the wall together. Installing the roof truss requires that the door supports in the end wall with the door be installed accurately. Be sure to measure twice!
First, accurately position the door supports and set them on the ground or shop floor (if you’re building the walls off-site). Measure the sill plates bolted to the concrete blocks to determine the exact location of the base plates on either side of the door and glue and screw them in place onto the sill plate. (If you are building the walls off-site, you can screw the pieces together on the sill plate and glue them only when you’ve ensured that it all fits together properly on-site.)
Next, frame the door in the end wall that has one: The door frame uses 2×2 header supports and a 2×4 header. Note: Because the mortar thickness between the blocks may vary slightly, you should measure the thickness of the header at the job site and cut it to suit. Inside the door frame there is a 3⁄4-inch by 2-inch jamb, so the entire door width will be 311⁄2 inches (an odd size; plan on building your own door).
Build a roof truss and attach it to the top of the truss supports and door supports (or the three truss supports on the nondoor wall). If everything fits perfectly, apply caulking to the mortared wall on each side of the door frame and on top of the sill plate before gluing and screwing together the end wall.
STEP 3: Build the Side Walls
Build the side walls with supports spaced 24 inches on center. The top and base plates are 1×4s or 1×6s, as shown below. Join these plates to the supports with lap joints on either end of the supports. Before erecting the wall, cut the base plate to match the slope of the greenhouse walls and set it in between the wall supports before gluing and screwing it to the sill plate.
STEP 4: Install the Rafters
Unlike the greenhouses in the first projects in this chapter, this structure uses rafters (trusses) to actually support the roof. These can be made in the shop and brought to the job site. Each truss fits over the corresponding side-wall support. You’ll need to tack the rafters in place before adding the recessed 1×6s at the top of the side walls and at the center of the roof. By recessing these pieces into the rafters, the entire exterior of the greenhouse is even and ready for glazing.
STEP 5: Install the Glazing
Install the glazing on the 2-inch side-wall supports according to instructions in project 1, project 2 and chapter 7, holding the panels in place and covering their seams with long 1⁄2-inch by 2-inch battens. Remember to drill oversize holes for the glazing and to caulk each joint as described in chapter 7. The center ridge of the roof and roof corners should also be covered with battens — 1⁄2 inch by 4 inches or 1⁄2 inch by 6 inches — which should be caulked and screwed in place to cover any seams in the glazing.
STEP 6: Build the Vents
All the vents on this greenhouse are made of 2×2 lumber. Each vent is framed with lap joints at each corner and is joined with epoxy. When the roof and side walls are in place, carefully measure for the vents. In theory, all vents should be the same size, but in practice the trusses may be off by about 1⁄4 inch, causing vent sizes to vary a bit.
To prevent water from coming into the greenhouse, you can build the roof vents so that they have a slight overlap on the trusses. If you decide to do this, you’ll need to cut a 1⁄2-inch rabbet in the trusses on each side of the vent and make the vent 1⁄2 inch wider all around. Insert caulking or rubber sealant strips in this rabbet to prevent water from flowing into the greenhouse.
Another way to prevent water from coming through the roof vents is to overlap the glazing onto the trusses on either side of the vent. Caulking or rubber stripping can be laid under the glazing.
Glue together each vent and check that all are square before dry fitting each to make sure it fits properly. Once the vents are installed, attach hinges to the top of each and make sure they open as they should. Only when you are satisfied with the fit should you install the polycarbonate glazing.
STEP 7: Install the Door
The finished door is 6 feet 6 inches tall by 311⁄2 inches wide. The pieces of the door are joined with simple lap joints and are then glued and screwed. The entire door is covered with one piece of polycarbonate glazing cut for the door opening.
STEP 8: Finish the Walkway Floor
You can make the greenhouse floor any material that is comfortable to walk on. I use pea stone in one greenhouse and wood chips in another, but concrete and brick pavers are options too.
STEP 9: Prepare the Growing Beds
Fill the raised beds with good-quality loam, compost, manure, or a mix to suit the plants you want to grow. I made the raised bed in my heated greenhouse a hot bed for the first winter. As the compost continued decomposing, the bed sank. In the spring, I topped it with more screened loam and sand, which allows me to dig in it bare-handed knowing that I will never encounter a rock. Be sure to avoid walking on the growing beds so that the soil remains light and fluffy rather than compacted.
VARIATIONS AND UPGRADES
The entire greenhouse can be glazed with glass or fiber glass if desired. If you want to grow in winter, you can install double- or triple wall polycarbonate for greater insulation.
The raised beds can easily be converted to hot beds for winter growing: Simply dig out a bed and install a 24-inch-high pile of horse manure and compost mixed with straw or wood chips. Cover this with a 12-inch layer of screened loam and plant your seeds. The heat from the composting manure will keep plants growing all winter long. In the coldest months, cover the growing beds with spun fleece to keep the heat close to the plants.
Another upgrade is to apply insulation on the exterior of the blocks and coat the insulation with a cement like finishing material, but if you do this, be sure to install flashing between the base and sill plates, and remember to extend it out over the insulation.
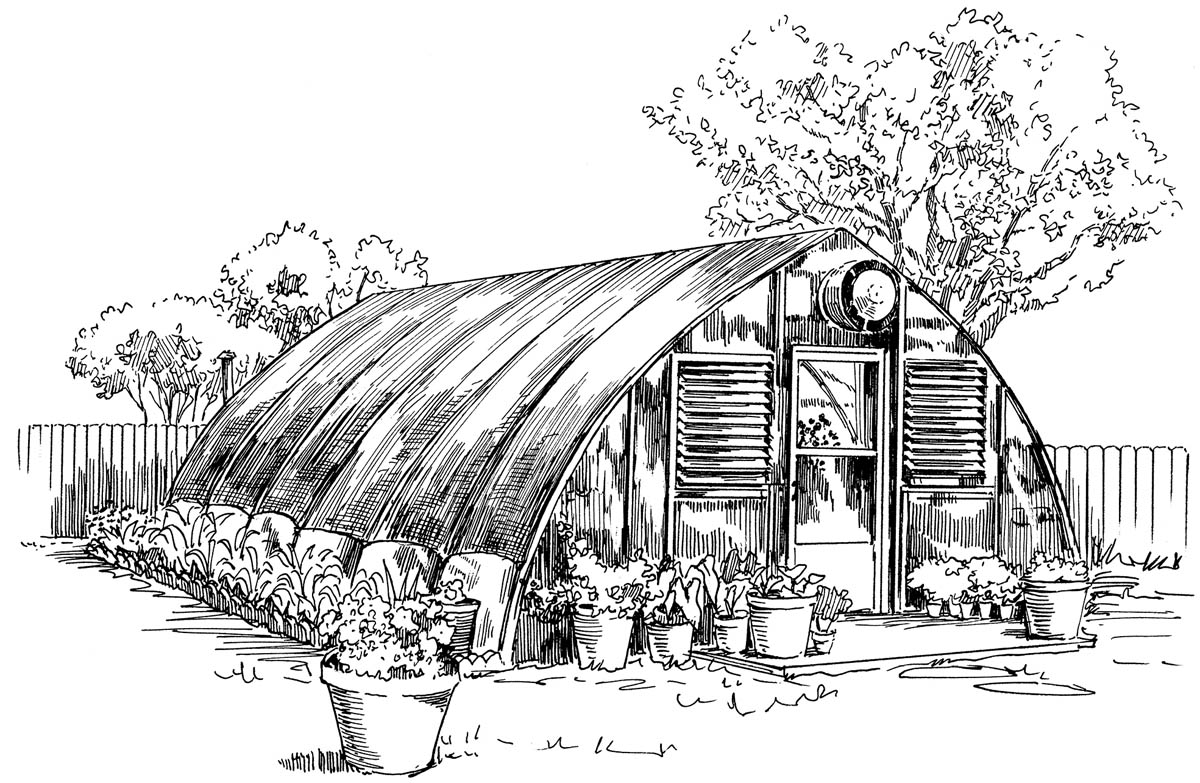
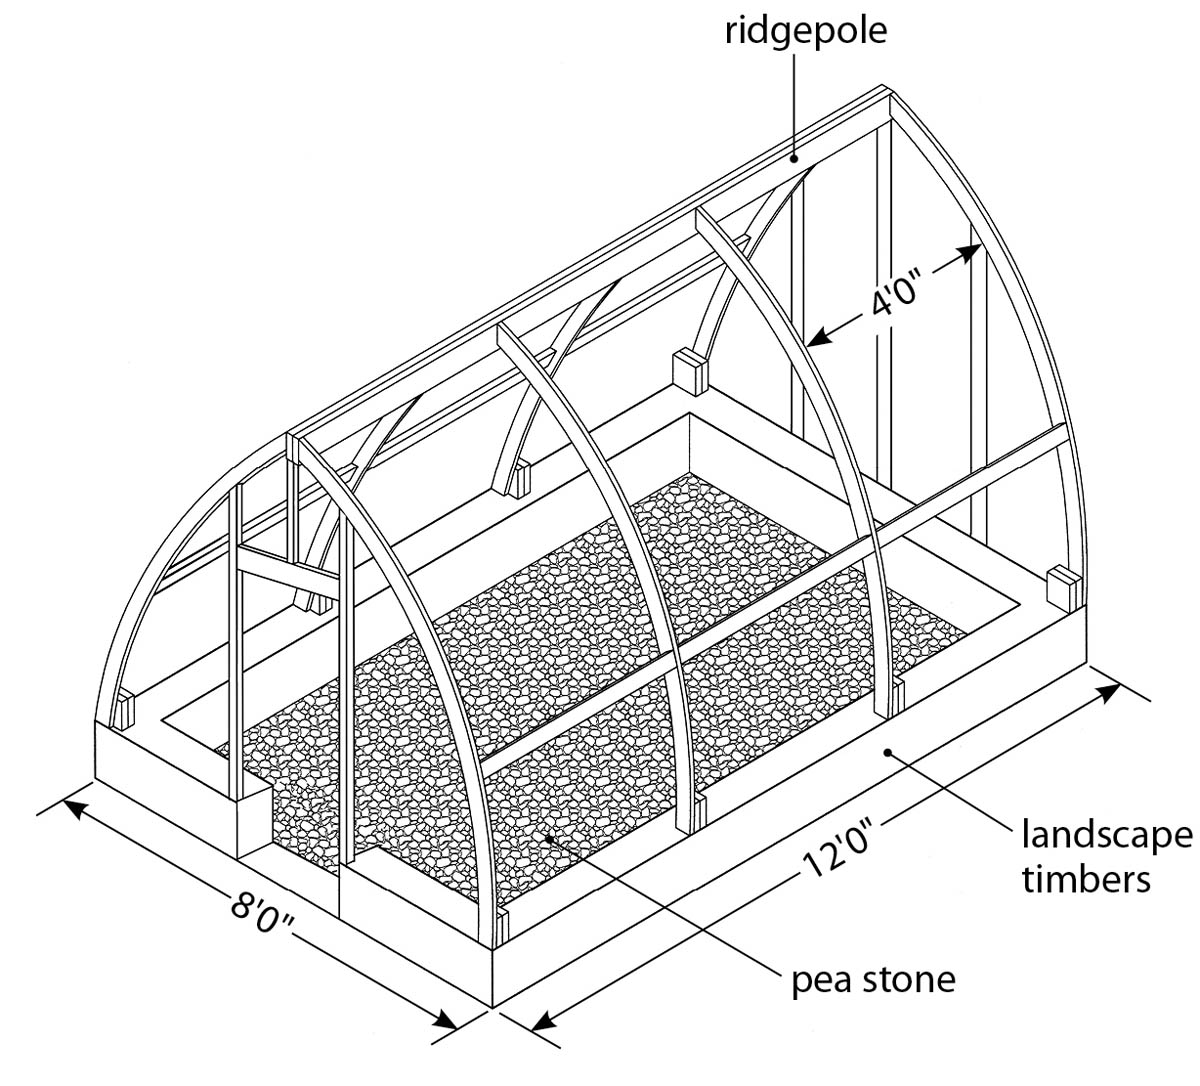
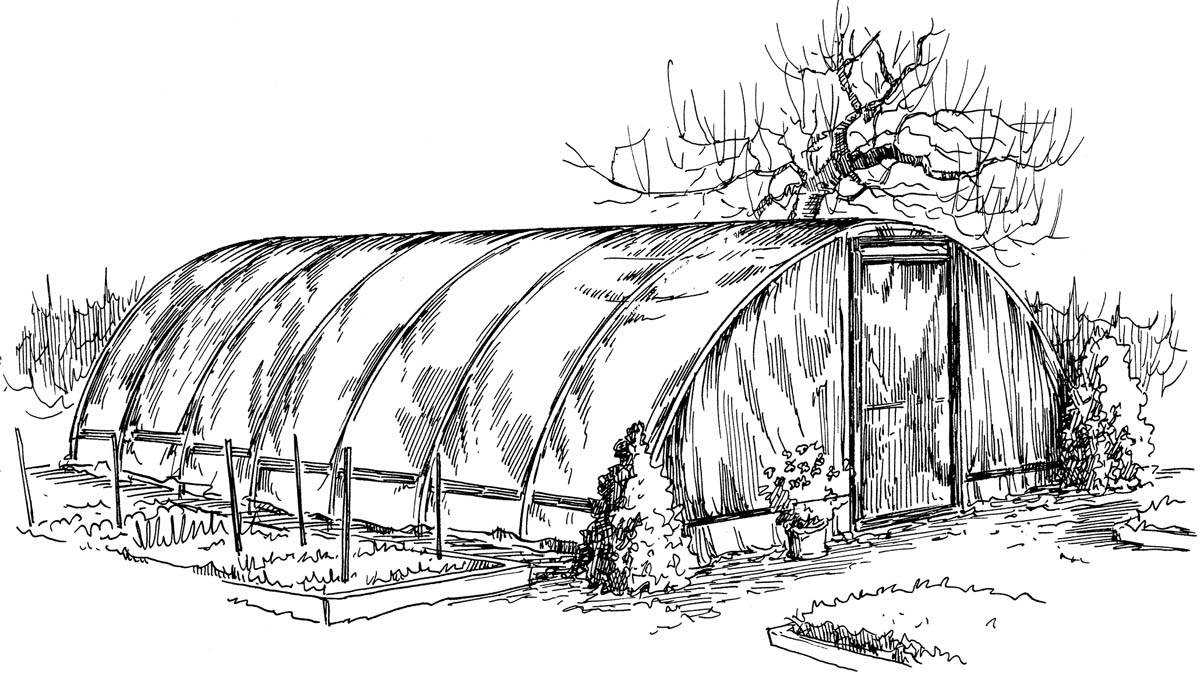
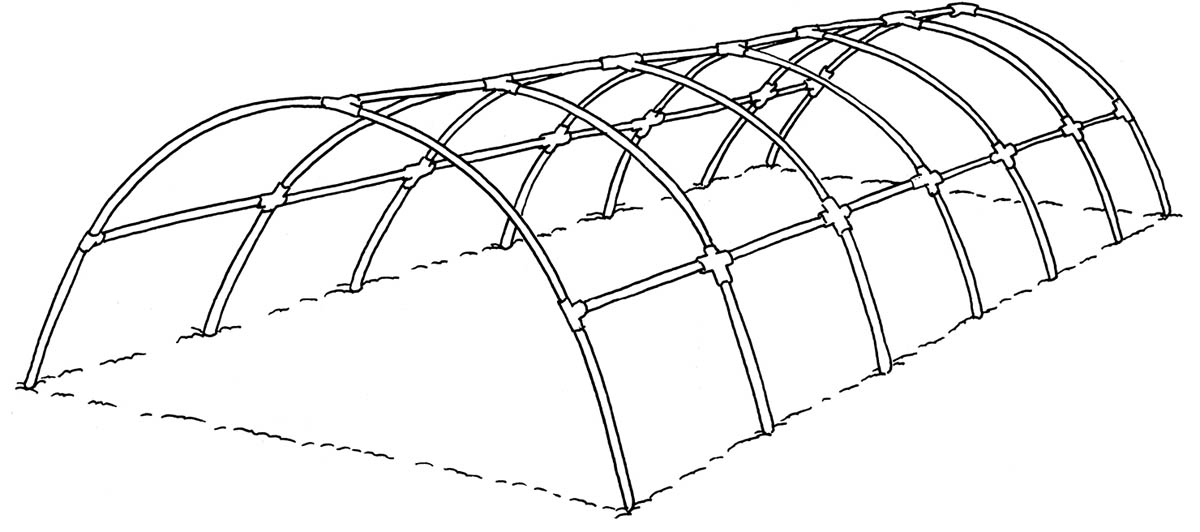
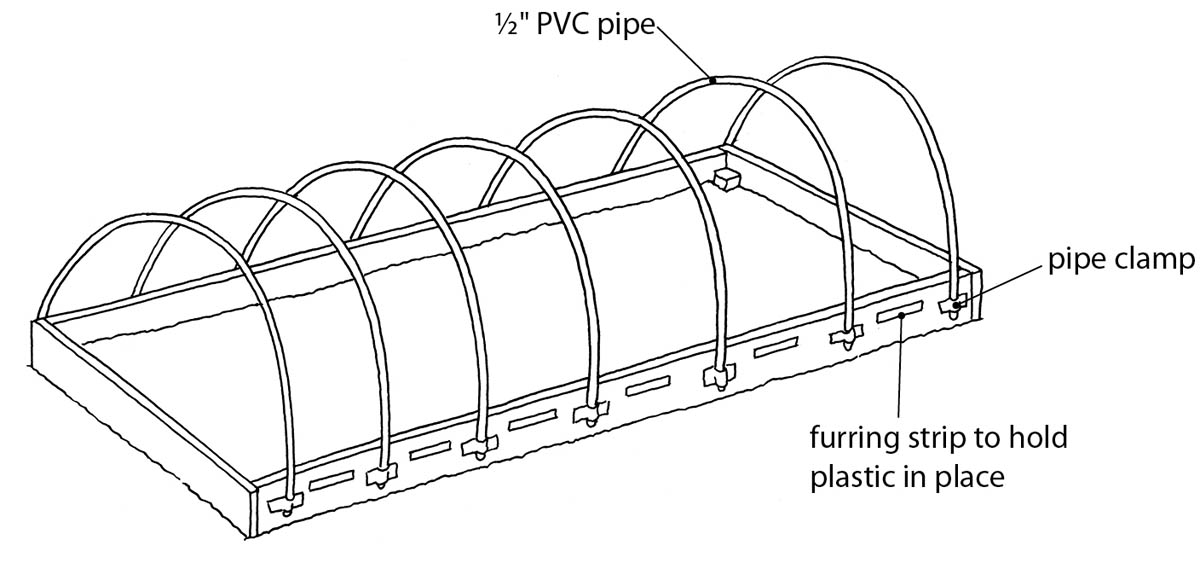
4. Gothic Arch Greenhouse
There are two points about this greenhouse that should be said right up front: The framework is slightly more complex than a conventional greenhouse because the arches are curved and, because of this arch shape, the glazing must be either thin polycarbonate or fiberglass, which makes the greenhouse slightly more expensive to heat. On balance, the foundation made of pea stone and landscape timbers is easy to construct.
CONSTRUCTING THE FOUNDATION
Materials
- Five 8' 8×8 landscape timbers
- Twelve to sixteen 18" pieces of rebar (enough to space them 2' apart on the landscape timbers
- 2 cubic yards of pea stone to fill enclosed greenhouse area
Instructions
This greenhouse is set on landscaping ties lap-joined together. The area inside the ties is filled with pea stone or gravel. Don’t use sand or crushed stone; both materials produce a great deal of dust when the area inside the greenhouse dries out.
Because landscaping ties can be installed quickly and removed easily, this type of foundation is ideal for a greenhouse structure that may eventually have to be moved. You can also use this greenhouse to cover a crop temporarily, moving it to another area once the crop is established.
STEP 1: Lay Out the Foundation
Mark out where you are going to locate your greenhouse, measure the diagonals to ensure that the lines are square, and set the landscape timbers around the area.
STEP 2: Join the Timbers
Make lap joints at each end of the timbers and pin together the timbers with either 8-inch spikes or pieces of rebar spaced 2 feet apart (see chapter 8, Constructing a Wooden Foundation).The long rebar can be driven through holes in the timbers and into the ground so the wood will not move.
Once the timbers are in place, measure the diagonals again to confirm that the rectangle you’ve just laid out is square.
BUILDING THE GREENHOUSE
Materials
FOR ARCHES METHOD 1
- 6 sheets of 1⁄2" CDX plywood
- One 12' 3×2 for the ridgepole
- 2×2 blocking to fasten the arches to the ridge and to the base plate (you can also use metal angle brackets)
FOR ARCHES METHOD 2
- Twenty 1×1 pine strips at least as long as half the exterior length of one of the greenhouse arches (about 9'4"). You’ll use two strips per arch — it’s helpful to have a few extra in case one or two snap.
- At least eighty 6" 1×3 pine blocks (six or seven per arch)
FOR ARCHES METHOD 3
- Laminate wood strips 1⁄8 or 1⁄10" by 2" (ten 1⁄8" strips or fifteen 1⁄10" strips per arch)
- Thirty-two pieces of 11⁄2" to 2" blocking
FOR THE END WALL WITH NO DOOR
- Polyethylene sheeting or polycarbonate or 2 sheets of 1⁄2" CDX plywood
FOR THE RIDGEPOLE
- Two 12' 1×4 plywood strips glued together
FOR THE END WALL WITH DOOR
- Two 2×2 supports (measure from the arch to the base plate 2'3" from each side)
- Two 6'6" 1×4s (for jacks)
- One 3' 1×4 (for the header)
- One 6'6" by 3' piece of 4 mm polycarbonate
FOR THE GLAZING
- 4 mm polycarbonate sheets or fiberglass or polyethylene sheeting
- 1⁄4" by 1" wood strips or 1⁄4" by 3⁄4" wood strips, depending on arch construction (to cover glazing seams)
OTHER MATERIALS
- A storm door
- Screws
- Epoxy
- Paint
- Door catches and hinges
- For method 3 of arch construction, polyethylene sheeting to prevent gluing arches to the building surface, clamps, and 10 to 20 blocks screwed to a laminating table
Instructions
This greenhouse measures 8 feet wide and 12 feet long and has an arch every 4 feet. In all, the greenhouse requires four arches. Once erected, these arches are fastened together with two 1×4 longitudinals on each side and a 2×4 center ridge. The arches are covered with thin sheets of polycarbonate caulked and screwed to each member. Alternatively, you can cover the arches with fiber glass or polyethylene sheeting.
There are three methods for building the arches; each one is outlined in the directions below.
STEP 1: Build the Arches
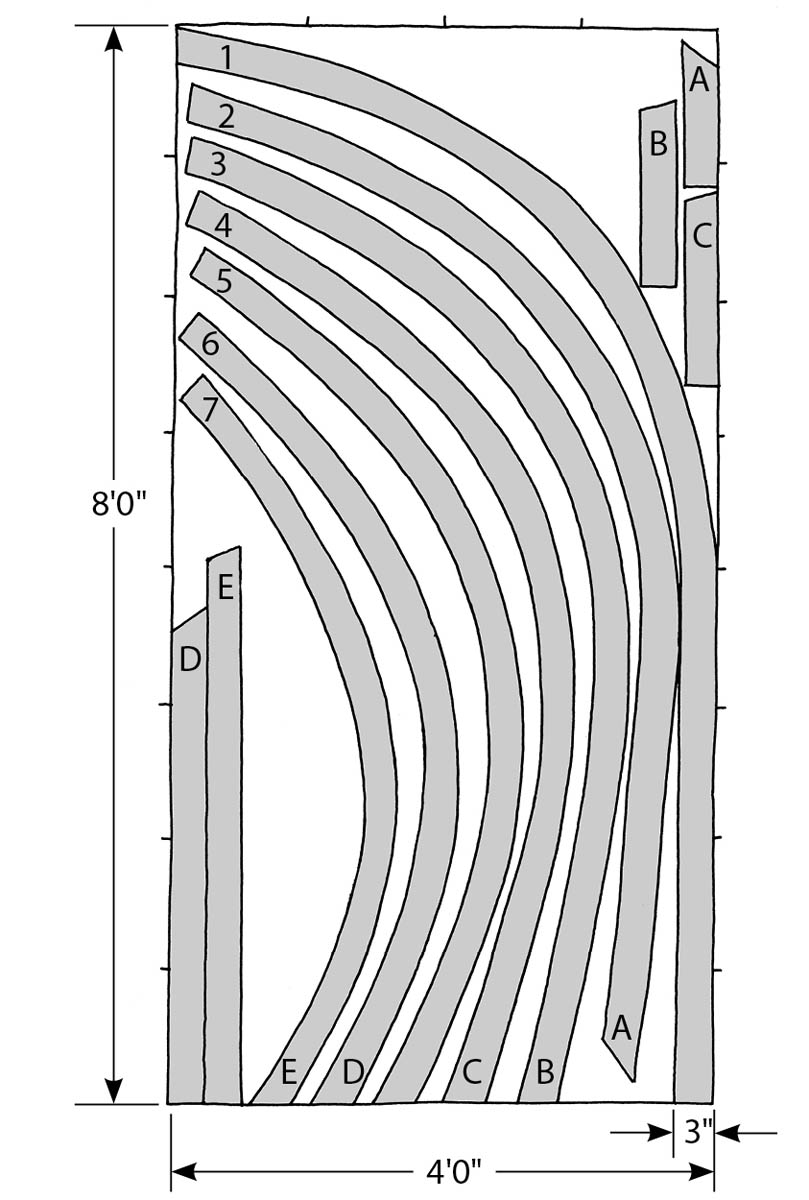
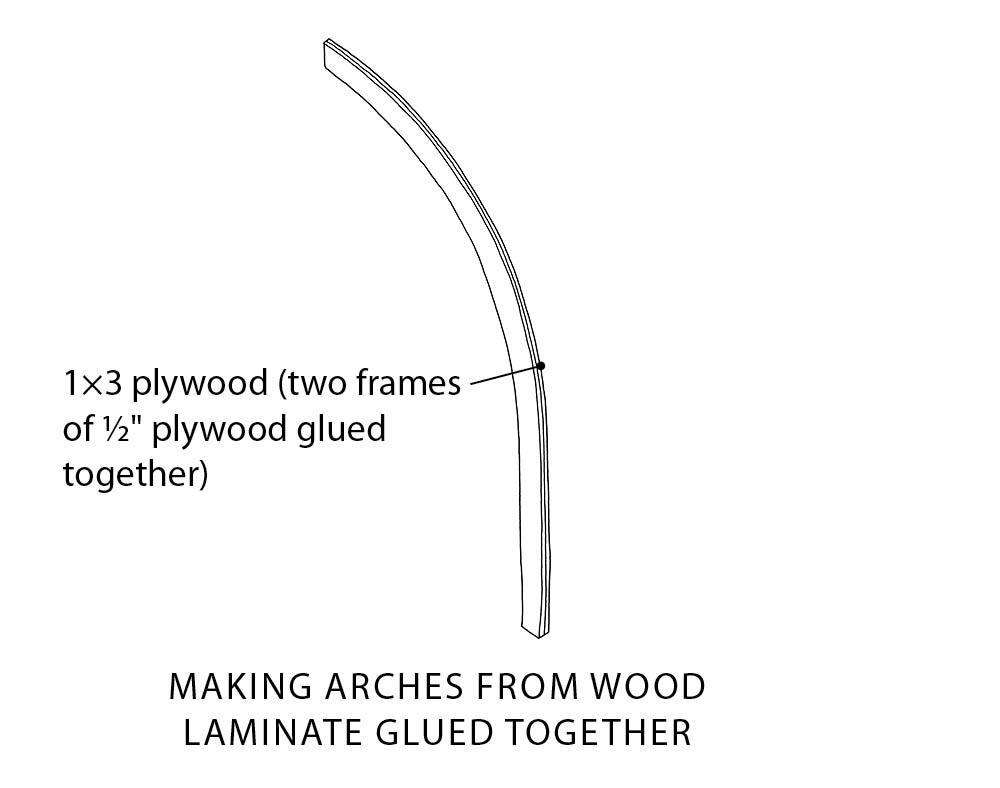
Method 1: Probably the simplest method is to lay two pieces of plywood on top of each other and cut out curves using a template (see the illustration below). In the figure, parts are numbered or lettered. Because you can get only one full arch from one sheet of plywood, the other arches are each made with two shorter lengths of wood. A single arch is strongest if made from two arch forms glued together with their joints widely separated. Note that the longest pieces, such as piece 1 in the illustration, should be glued to the shorter pieces, such as piece 7, so that the joints will be far apart.
To transfer the template, layer two sheets of plywood and mark on the top sheet a grid corresponding to the dimensions and example in the illustration. By measuring the distance and marking points using the illustration as a guideline, and connecting these points with the aid of a thin wooden batten, you can lay out the arches. Once they are drawn, simply cut the layers of plywood and glue together the pieces to produce a series of arches that are each 1 inch thick and 3 inches wide, as shown in the top illustration on below. (Smooth the edges of the glued plywood with a sander.)
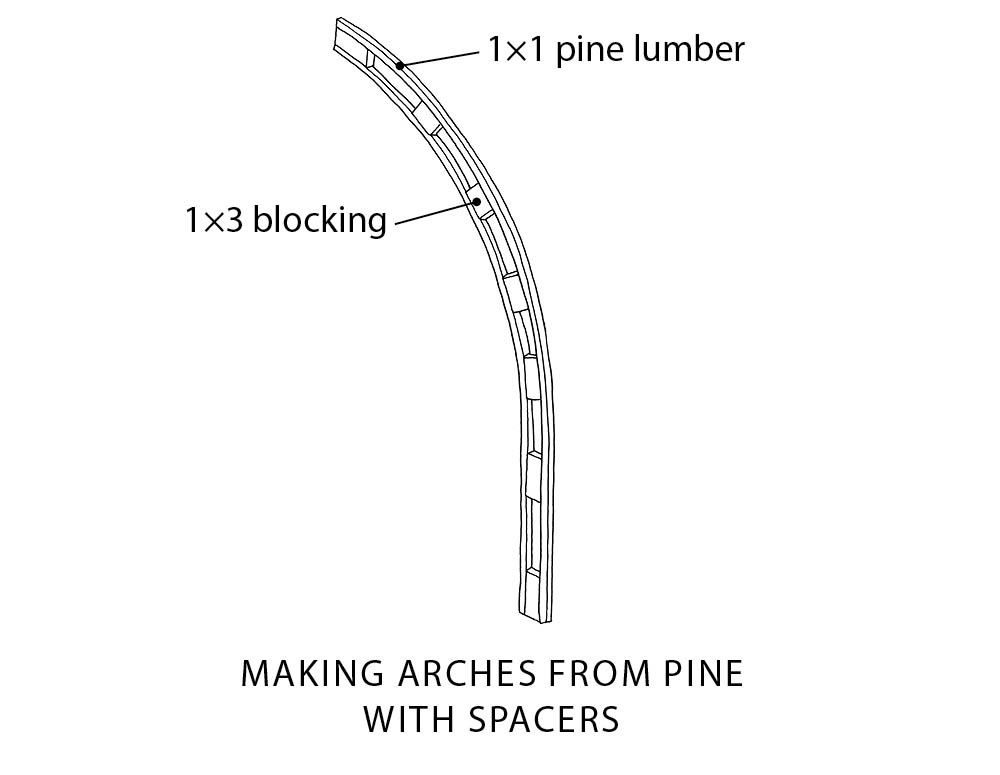
Method 2: Light weight polycarbonate or fiberglass glazing enables the arches to be made from flexible lengths of 1×1 pine that are bent into shape and joined at the ridge of the greenhouse. (See the middle illustration below.) To make the arch substantial, glue 6-inch 1×3 spacers to each bent arch and then glue another bent piece of 1×1 pine to the inside of the spacers. In addition to attaching the pine with glue, you can screw through the inner piece into the spacers to ensure that the arch is fastened and add more screws from the outside piece of bent pine into the spacers once the glue is dry.
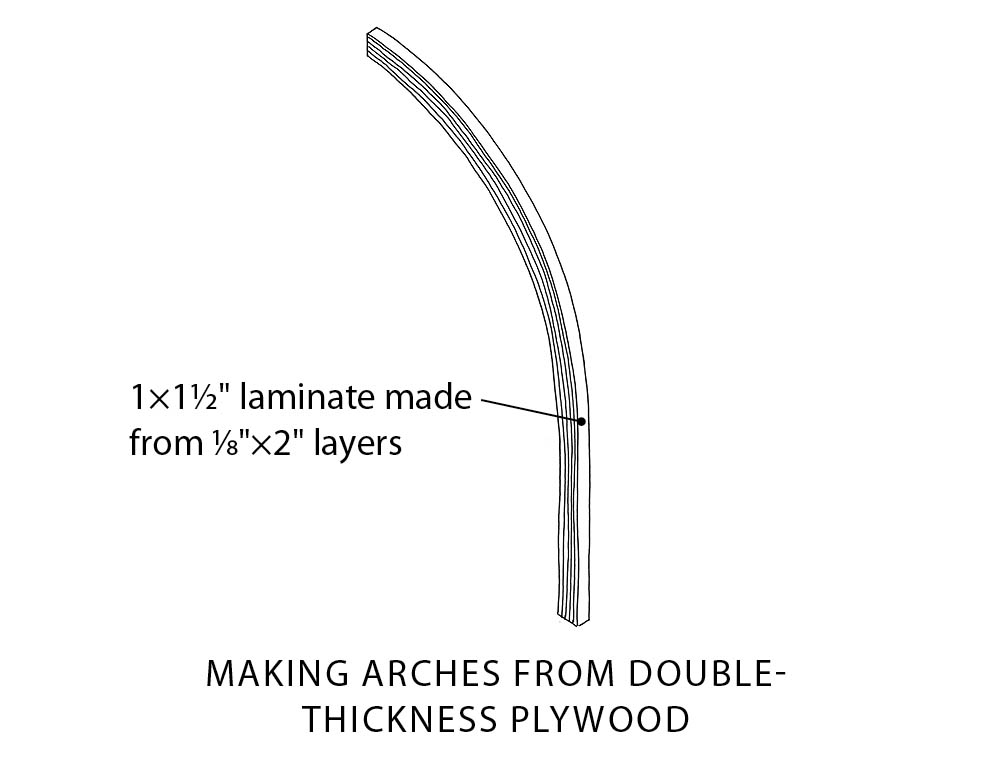
Method 3: If you are making a more upscale greenhouse to complement your home, the wooden arches can be made of 1⁄8-inch-thick laminate of mahogany (or another dark-colored wood) alternated with laminate of cedar (alight-colored wood), as shown in bottom illustration below. The laminates are glued together with epoxy. (See chapter 6 for more about epoxy.)
First, lay two sheets of plywood on the shop floor. Draw a single arch on the plywood and place wooden blocks around its outer edge. Screw these wooden blocks to the plywood; these blocks will hold the laminating veneers in place. Before you begin gluing, lay down a piece of polyethylene sheeting to catch the drips and to keep the arches from bonding to the floor and to the blocks. Press the first 2-inch-wide by 1⁄8-inch-thick piece of veneer against the wood blocks and clamp it in place without any epoxy. Paint the second piece of laminate with epoxy on one side and press it against the first piece, unclamping the first piece to add the second. If you have a professional staple gun, you can also staple the second layer to the first, but take care not to staple the laminate to the blocks.
Build up the layers of each arch, stapling and/or gluing the top layer to the ones already in place. On the final layer, staple through a doubled piece of polyethylene so that you can easily remove the staples after the glue has set up. You will need to build up the laminate to 11⁄2 to 2 inches thick, as shown in the figures above.
Once the glue has set, remove the arch from the blocks and clamps and sand it on both sides to get a smooth finish. Coat the finished wood with two layers of epoxy. When the epoxy has dried, sand it back lightly and apply two coats of UV-resistant varnish.
STEP 2: Erect the Arches
Note that you’ll have to choose your glazing material early to determine how far apart to space the arches. Polycarbonate and fiberglass come in 4-foot-wide sheets. For polycarbonate, you should space the arches 4 feet 1⁄4 inches apart to allow for a slight gap between the glazing at the seam. For fiberglass, space the arches 3 feet 111⁄2 inches apart to allow for an overlap of the material. For plastic sheeting, the arches can be spaced 4 feet on center.
This method of setting up the arches works best for those made using method 1: First, lay each arch on the ground to one side of the foundation and screw an L-shaped angle bracket to each half arch at the top where it meets its "partner" arch. These brackets will later be screwed to the ridgepole. With the bracing of both these and the long pieces that run the length of the greenhouse, the arches will be fixed firmly in place. Screw another bracket to the base of each arch to anchor each to the landscape timbers.
Next, prop the ridgepole in place with braces at either end and attach to it with screws first the arches for one side of the greenhouse, then those on the opposite side. An extra pair of hands is a great help with this. You may have to adjust the position of the greenhouse slightly to situate it squarely on the foundation before screwing the angle brackets at the base of the arches to the landscape timbers.
STEP 3: Build the End Walls
The end wall without the door can be solid plywood, polyethylene-covered, or polycarbonate-covered. If you do not want it to be a solid wall, support the ridgepole with a vertical 2×3 support or a 3-inch-wide post made from plywood strips laminated together. Make sure that the outer side of the support is flush with the end-arch plywood so that you can easily fasten polycarbonate or polyethylene sheeting over the entire end wall.
In the end wall with the door, the door opening should be 3 feet wide. The wall will require two supports running from the arch to the base or sill plate and centered 2 feet 3 inches from each side. Inside these supports, install two 6-foot 6-inch 1×4 jacks and fasten the 1×4 header on top of these.
The door itself can be made as shown in project 3: Use 1×4 lumber with lapped corner joints for the frame and cover it with polycarbonate. If you take the time to make two doors, you can cover one with screening for summer use. Instead of building a door, you can use a storm door purchased at a home center.
STEP 4: Install the Door
The door is installed using three 3-inch hinges fastened to the jacks. Set one hinge in the middle of the vertical door support and the other two hinges 12 inches in from either end. On the side opposite the hinges, you might want to install a barrel bolt or a padlock hasp to make sure the door stays shut.
STEP 5: Install the Glazing
Thin polycarbonate panels can be bent over the arches and screwed in place. Have a helper hold the panel vertically and check to see that the edges fall exactly on the arches. Secure the bottom of the first two panels to the base of the greenhouse using a 1⁄4-inch by 2-inch or 1⁄4-inch by 3-inch strip of wood. A vertical 1×2 strip can be screwed through this base strip into the center of the arch about 6 inches up from the bottom. The first 4 feet or so of the wall (from the bottom) is vertical, so it should be easy to install the polycarbonate and the flexible strip.
As the arch curves, you’ll need to bend the polycarbonate gently and screw the covering strip into place. This will take patience and care to ensure that the covering strip does not break. Work toward the center of the greenhouse, inserting screws every 9 to 12 inches.
If you want, you can caulk between the glazing layers, but you’ll find that this results in getting caulking on everything — your hands, gloves, tools, and screws. If you don’t caulk between the glazing sheets, consider installing the covering strips with a bead of flexible caulking between the glazing and the covering strip. If you don’t use either of these methods, you’ll need to caulk the joint between the glazing and the covering strip to keep out water. Alternatively, you can cover the arches with polyethylene sheeting, as you might cover a hoop house, holding the polyethylene sheeting in place either with flexible battens (as described above) or by tying string over the plastic to contain it when the wind blows.
STEP 6: Build a Vent
Because the roof of this greenhouse is curved, for this structure it would be easiest to make an opening vent for the back wall and a screened door for the front wall or to install a fan in the north wall to blow hot air out of the structure. If you choose to make a vent in the north wall, use two supports spaced 3 feet apart and a cross-piece to create a 3-foot by 3-foot opening. Make a vent cover using the same method employed to make the door and cover it with screening to keep out insects. With a screen door in place and the vent open, you should get plenty of cross ventilation.
VARIATIONS AND UPGRADES
If you take the time and expend the money to build the arches using mahogany and cedar laminates (method 3), consider mounting the greenhouse on a concrete foundation rather than on landscape timbers. (For construction how-to and foundation options, see chapter 8 and project 1 and project 2.) By adding more arches, you can lengthen the greenhouse. Another option is to add lighting and outlets and a water line as described in chapter 10.
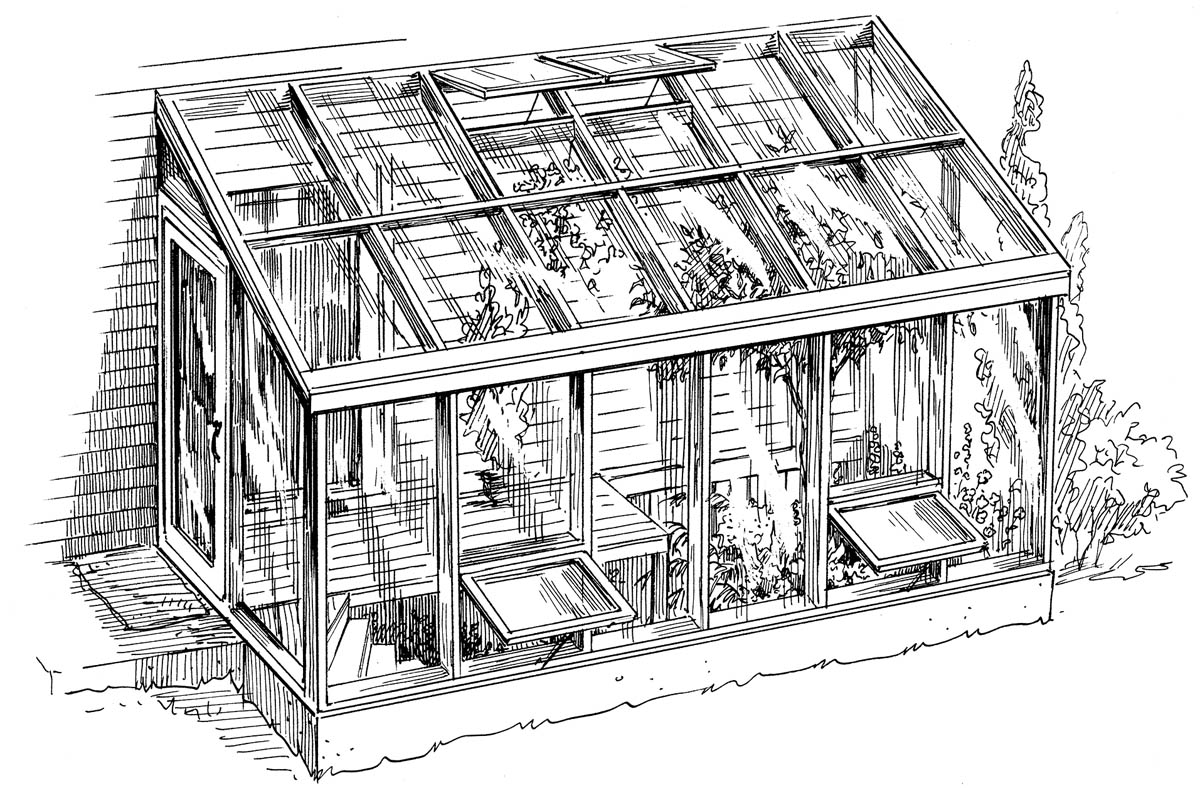
5. Lean-to Greenhouse
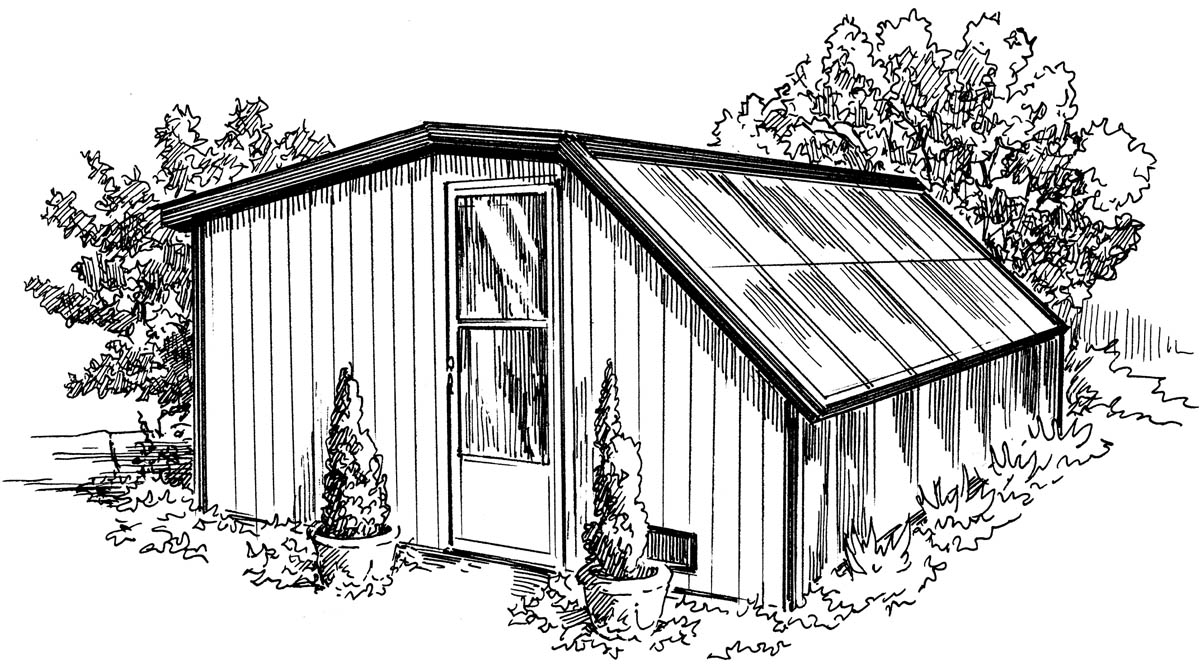
This 8-foot by 16-foot greenhouse is the simplest attached lean-to-style structure. The roofline can be adjusted to suit the building to which the greenhouse is attached. One word of warning: Do not attach the structure to a building where snow is likely to slide from a second-or third-floor roof on to the greenhouse, potentially damaging the glazing.
Like the other greenhouse projects in this chapter, this one can be glazed with polycarbonate panels, but because it’s a structure attached to your home, these plans call for using glass.
Because the foundation of the house to which this greenhouse is attached rises about 2 feet above grade, the structure will be excavated to become a partial pit greenhouse, which will enable you to keep taller trees in the greenhouse and allow for two growing levels, increasing the overall number of plants that will fit inside the structure.
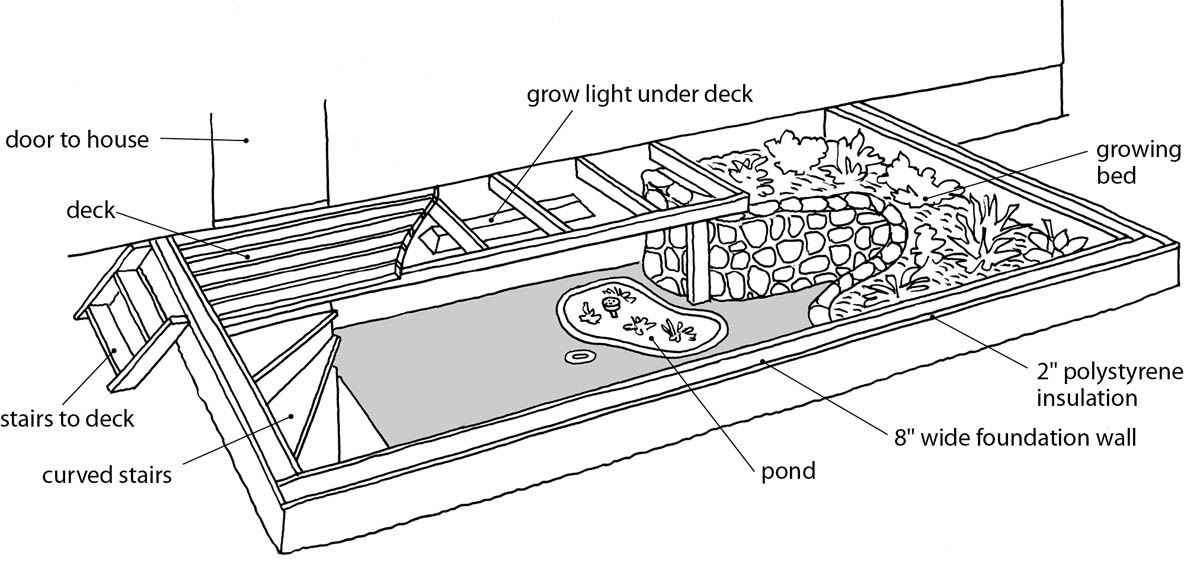
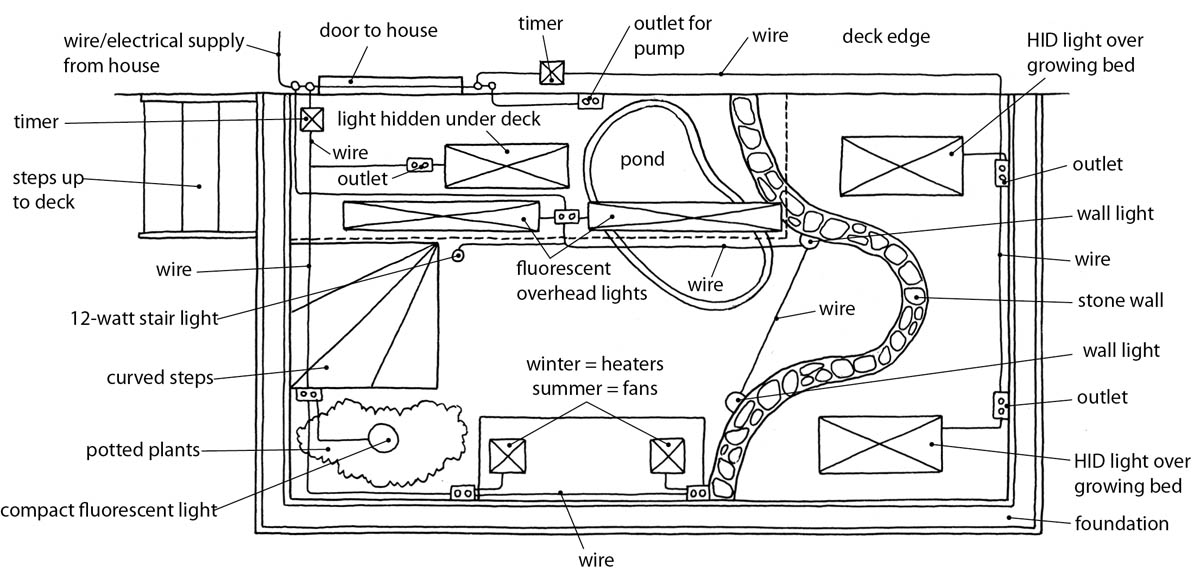
Because it’s attached to a home, it’s relatively easy to bring electrical power to the structure, allowing a full range of electrical equipment, including an electric heater, area lights, and plant lights. The greenhouse also has raised beds in one portion of the floor with grow lights over them. In another part of the greenhouse there is a small pond with its own filter and lighting, and near the deck that runs along the back of the greenhouse there is a potting table with lighting, a propagation mat, and a germination area. Stairs from the deck lead down to the greenhouse floor.
CONSTRUCTING THE FOUNDATION
Materials
- Concrete forms for a 16' by 8' foundation
- Snap ties to hold formwork together (one every 3-4 feet)
- 2×4 braces nailed to the forms and wedged into the ground at a 45-degree angle; one brace every 3-4 feet
- 11⁄2 cubic yards of concrete for footings
- 4 cubic yards of concrete for foundation walls
- 21⁄2 cubic yards of concrete for greenhouse floor
- Eight 2' by 8' lengths of 2" polystyrene insulation, each cut in half to accommodate a 4' foundation
- 32' of flashing
- Water and electrical conduit (if installing plumbing and electricity)
- Eleven 1⁄2-inch bolts, each 8" long
- 1.8 cubic yards of concrete for the slab (if the 14' by 7' by 6" greenhouse floor will be a slab)
- 2 yards of pea stone (if the floor will not be a slab; no drain is necessary if the floor is pea stone)
Instructions
Before you excavate a foundation close to your home, determine that you will not be running into any water or power lines (you can contact an organization called Dig Safe for help with this if you are excavating yourself; see Resources).
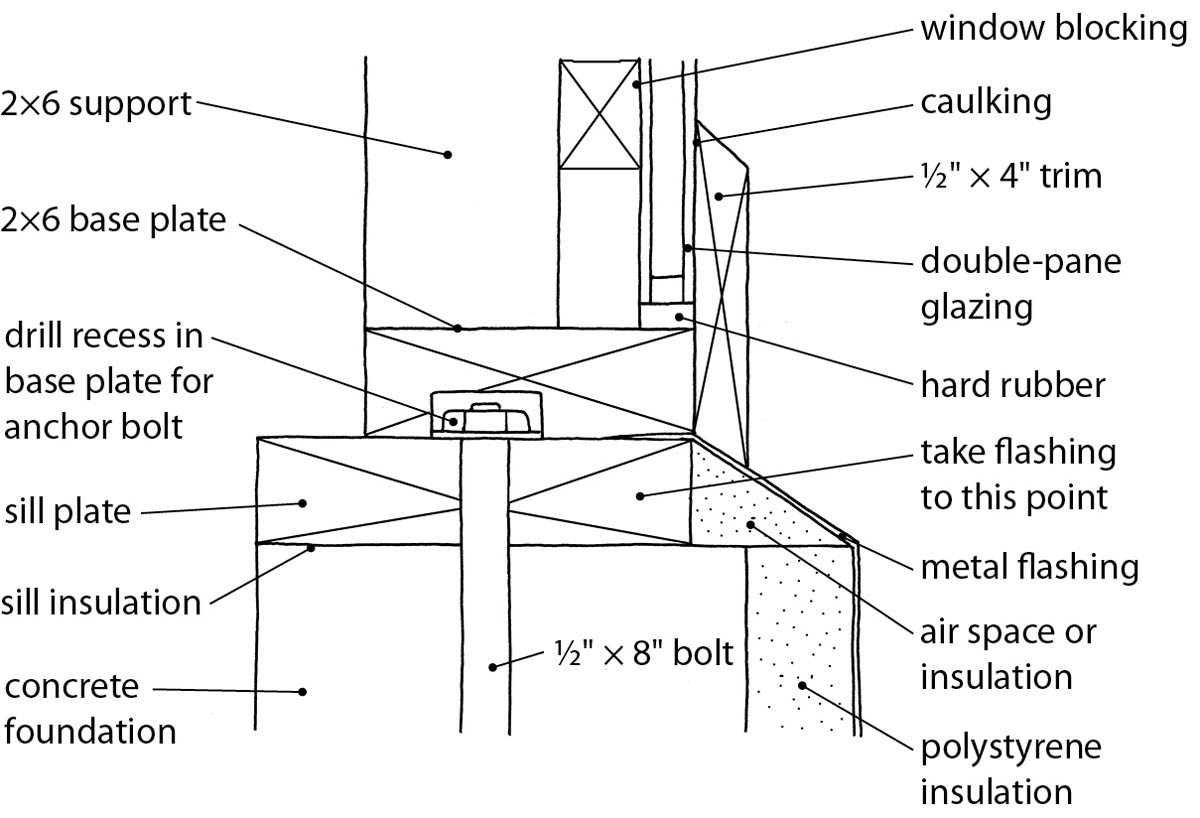
The foundation wall for this structure will be set below the frost line and will rise about 12 inches above grade. It should be insulated with 2 inches of rigid foam insulation, with flashing on the sill to protect the insulation. (See the project illustration above and the illustration below step 5 for views of the foundation.
STEP 1: Lay Out the Foundation
Using batter boards and string, mark out the greenhouse perimeter using the methods described in chapter 8 (Laying Out the Foundation) and project 1, making sure the greenhouse is square and aligned with the walls of the house onto which you’ll be building the structure.
You might also want to use furring strips to rough out the shape of the greenhouse to ensure that the ridgeline or side walls do not impinge upon any windows or doors in your home and that details such as trim and flashing can be easily added to the structure.
STEP 2: Excavate the Foundation
The foundation should be excavated to a depth of about 4 feet (to reach below the frost line), which will make the completed foundation wall a total of about 5 feet high (4 feet below grade plus 12 inches above grade) As for projects 2 and 3, along with digging the foundation, you should dig a trench4 to 5 feet deep for the footings. The footings will take up between 6 and 12 inches in the bottom of the trench, depending on the type of soil beneath the foundation (it may be slightly deeper on sandy soils than on hard clay or rock).
STEP 3: Build the Foundation Forms
The foundation will be 8 inches thick, so the forms will be set 8 inches apart. Make sure they are well braced before pouring concrete (one brace every 2 to 4 feet). Locate snap ties every 2 to 3 feet around the walls.
STEP 4: Install the Drainpipe
Because wiring and plumbing will come from the adjacent house, there is no need to allow for a wire conduit or water pipe through the foundation walls. A drain, however, should be installed in the greenhouse floor and roughly plumbed before the concrete is poured. (See chapter 8, Setting the Drainpipe, and project 1 for more information on installing a drainpipe and flush-mounted drain in a foundation before the pour.)
Before pouring the footings, install a 2-inch schedule 40 PVC drainpipe in the middle of the greenhouse. The pipe should slope 1 inch for every 12 inches of length and have an elbow at the inner end on which is mounted a drain, flush with the floor of the greenhouse. When you finish the slab for the concrete floor, make sure the floor slopes toward this central drain. Cover the drain grate with duct tape before pouring the concrete slab to prevent it from clogging.
STEP 5: Pour the Concrete Footings
First, pour the footings and, while they’re wet, insert in them 2-foot lengths of rebar to help secure the foundation walls to the footings. (This is important because there will be 4 feet of earth exerting pressure on the outer walls of the foundation.)
STEP 6: Pour and Insulate the Foundation
When the footings are completely dry (a week or two after they’ve been poured), pour the foundation. After you’ve carefully leveled the top of the foundation and it has set for an hour or so, insert the 1⁄2-inch bolts 3 to 4 feet apart—three in each end and five or six along the front of the greenhouse — to hold the sill plate in place, being sure to leave 2 inches of bolt showing to allow 11⁄2 inches for the sill plate and 1⁄2 inch for washers and nuts to secure the plate. Try not to put the bolts where the support posts will be located so that you’ll have easy access to them.
STEP 7: Remove the Forms and Insulate the Foundation
When the concrete has set, remove the forms and coat the foundation with foundation sealer before installing polystyrene insulation around it (the insulation should be level with the top of the concrete). You can apply an exterior, concrete like finishing material to the insulation, if desired. Coat the insulation to about 12 inches below grade before back filling the area.
STEP 8: Prepare the Pond Area
Before you can install the greenhouse floor, you must set up the pond where you want it and mark out the areas where the raised beds will be. Be sure to block off the raised bed areas so they won′t be filled with concrete when you pour the floor. The pond is a simple plastic model available at most home supply stores. Excavate the pond area 18 to 24 inches below the floor of the greenhouse, make a bed of sand in the hole, and set the pond on the sand. Before spreading pea stone or gravel to prepare the greenhouse floor for the concrete slab, make sure that you backfill completely to the pond sides.
STEP 9: Prepare and Pour the Greenhouse Floor
Spread 4 to 6 inches of gravel or pea stone on the greenhouse floor before pouring the 4-inch slab to the level of the flush-mounted drain and underside of the pond (see chapter 8 and project 1). In leveling, screeding, and troweling the floor after the pour, be sure it slopes toward the drain 1⁄8 inch to 1⁄4 inch every 12 inches. When pouring the floor, make sure that no concrete gets in the pond. To be sure the pond is absolutely clean before you introduce fish, remove it when the concrete is set up or when the greenhouse is finished and clean it thoroughly.
BUILDING THE GREENHOUSE
Materials
FOR THE SILL PLATE
- 32' of pressure-treated 2×8s, painted with an oil-based primer and a layer or two of latex paint
- Sill insulation
- 1⁄2-inch nuts and washers to attach the sill to the bolts in the concrete
- 32' of 6" copper or aluminum flashing
FOR THE END WALLS
- Six 2×6 wall supports (three at each end)
- Two 10' 2×8 rafters cut to accommodate the slope of the greenhouse
- Two 8' 2×8 base plates
- Two 6' 2×4s for door framing
- One 3' 2×8 for the door header
FOR THE FRONT WALL
- Five 2×6 wall supports
- Two 4' 2×8 upper window frame pieces
- Two 4' 2×6 lower window frame pieces
- 32' of 2×6s
- 8d galvanized nails or 3" screws
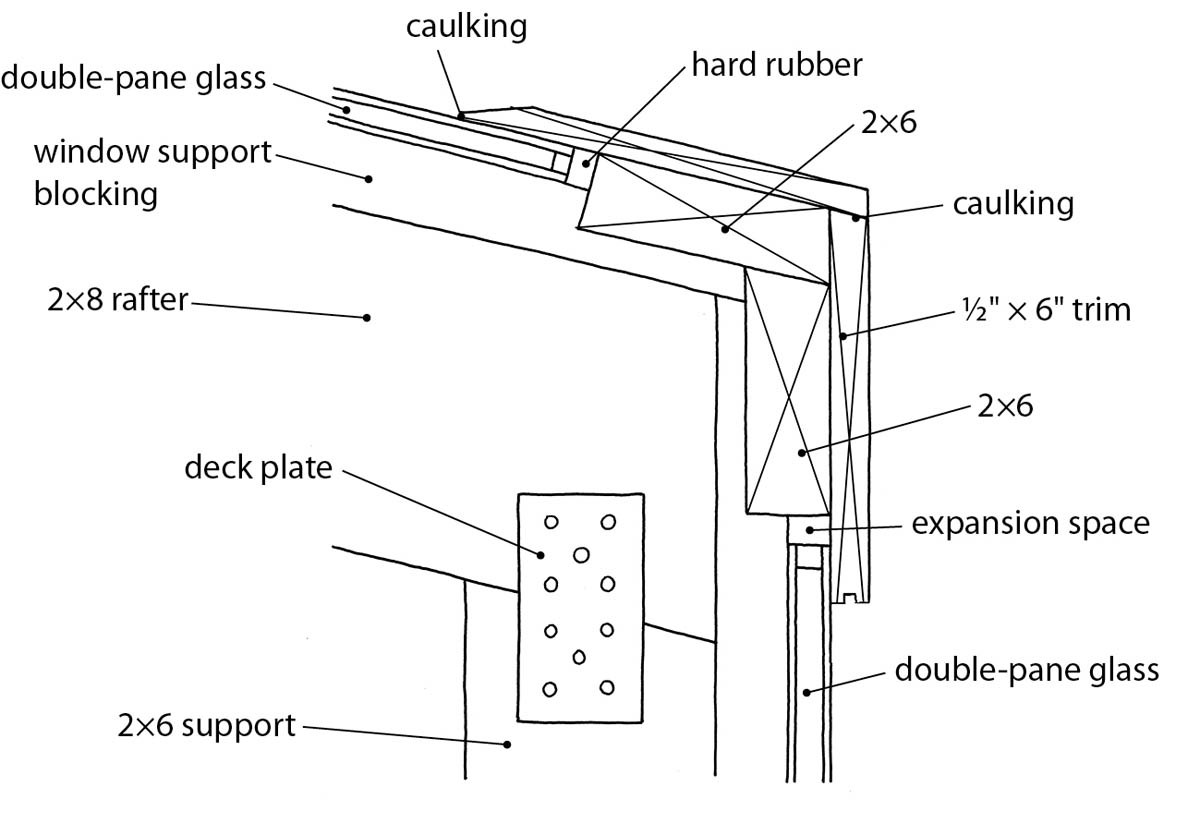
- Eight 2×4 flat deck plates
- One glass door, 3' wide
FOR THE BACK WALL
- One 16' 2×8 bolted to house wall
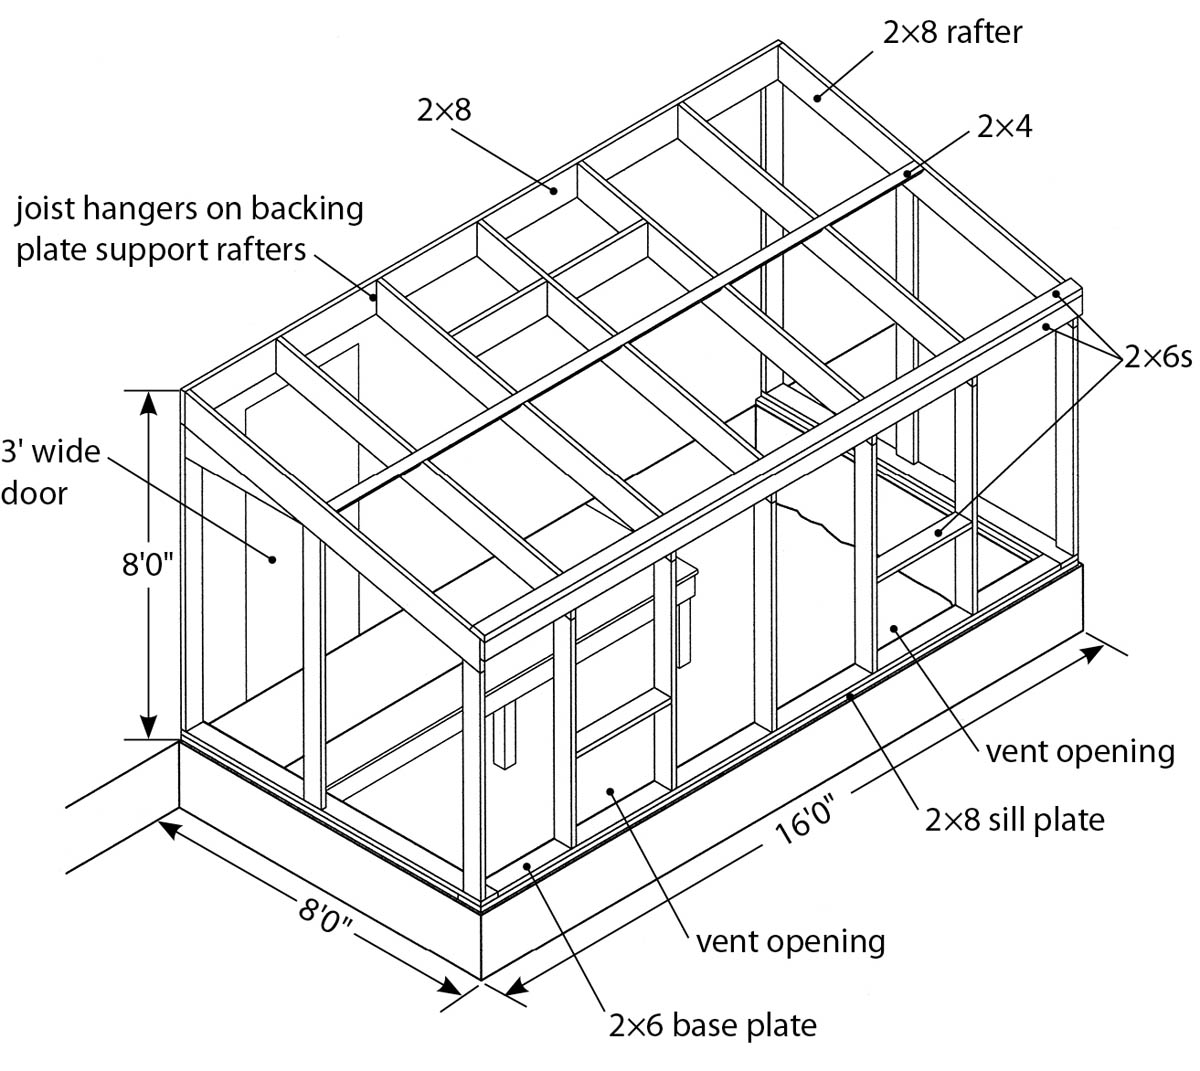
FOR THE RAFTERS
- Three 2×8s for rafters
- One 16' 2×4 or two 8' 2×4s (glazing supports to be installed in the rafters)
- Five joist hangers (U-shaped metal pieces that, once nailed in place, support a joist or rafter)
- Two 16' 2×6s
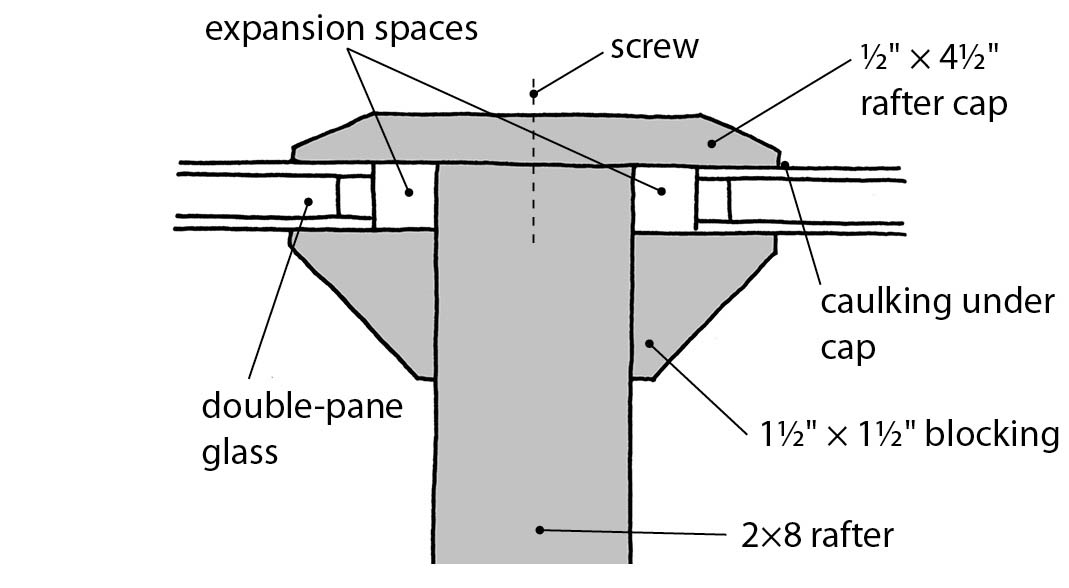
FOR THE GLAZING
- 4' panels of polycarbonate (double- or triple-insulated with U-shaped caps and bottom plates; measure lengths at the job site and order to suit)
- Cap pieces for glazing
FOR THE VENTS OR WINDOWS
- Lumber for two 4' by 2' vents (dimensions may change slightly as you build; measure for lumber at the job site).
Note: If you build the greenhouse against an existing wall, you may have to add blocking next to the wall to set the vent away from the wall so that it can open easily.
Instructions
Just as you made sure there was no house wiring or plumbing in the area where you planned to excavate the foundation, before building the greenhouse, make certain that there is no wiring or plumbing in the house wall to which you’ll be attaching the structure.
STEP 1: Install the Sill Plate
Refer to the illustration below step 3: Place the sill plate on top of the bolts in the foundation and tap with a mallet to mark the locations of the bolts on the plate. Because the sill is 71⁄2 inches wide and the foundation is 8 inches wide, there will be 1⁄2 inch of foundation showing on the outside of the building. Cut a lap joint at each corner of the sill plate, drill a 1⁄2-inch hole for each bolt, cover the area with fiberglass sill insulation, then set the sill plate back on the foundation, glue the lap joints, and secure the sill plate with nuts and washers.
Next, install 6-inch-wide copper or aluminum flashing, bending it to overlap the sill plate by an inch and the polystyrene foundation insulation by about 2 inches. The greenhouse base plate will cover the inner side of the flashing. When the base plate is installed, run a bead of caulking along the top of the flashing to prevent water from seeping through it.
STEP 2: Set the Backing Plate
This 2×8 sixteen-foot-long plate is installed on the house wall to hold the highest ends of the greenhouse rafters. You may need help to set it in place properly. Do not bolt it to the plywood wall and sheathing of the house wall. Instead, be sure you are bolting it to the studs in the wall or to the framing at the outer side of the floor joists.
First nail the plate in place with 8d nails, then drill holes for 3⁄8-inch or 1⁄2-inch lag bolts and screw bolts through the backing plate and into the wall joists or studs. Joists or studs are usually placed 16 inches on center, so if you can locate one, you should be able to measure and locate the others. Note that when the house is resheathed above the greenhouse, you will need to install flashing above this plate to ensure that water cannot get behind it.
At 4-foot intervals along this plate, nail joist hangers in place to support the rafters. If you are building the greenhouse against an exterior wall, install 3-foot 101⁄2-inch lengths of 2×8s between the joist hangers where the opening vents will be. This will give you 3 inches to allow the 2-inch-high vent to open against the wall.
STEP 3: Build the End Walls
The end walls are framed as shown in the project schematic at the beginning of this project. The supports are spaced at either end and in the middle of the 8-foot base plate. Hammer three 16p nails into each support. Measure from the backing plate to the top of the base plate (approximately 7 feet 5 inches) and nail that vertical to the wall. Repeat for the other end of the greenhouse.
STEP 4: Cut and Install the Rafters
Next, determine the slope of the roof. You might want to make it similar to the slope of the roof of your home, or you could make it drop 3 inches for each foot (so that over the 8-foot width, the roof will slope 2 feet). This means that the outer support will be approximately 5 feet 5 inches long. Toenail it to the base plate (to toenail is to fasten a piece of lumber to another by driving in a nail at an angle at the end of it) and brace it so that it’s vertical.
Now lay the house end of one rafter in the joist hanger. Slope it so that it rests on the outer support and mark this slope. (I like to nail the rafter to the support post temporarily so that it won’t move while I’m measuring.) You’ll need to cut the support post along this line to get the correct rafter slope. Before you cut anything, however, have a friend hold it in place and from the joist hanger, draw a line vertically about 2 inches from the wall. Cut the rafters on this line to ensure that their ends abut the wall, and cut the top of the support post to suit the sloped line that you drew.
Next, you’ll need to cut a recess in the end of all rafters for the 2×6 vertical face plate and the 2×6 roof plate. At the same time, cut the 2×4 glazing support in the middle of each rafter. Simply clamp all the rafters together and cut them at the same time.
Place a rafter in the joist hanger and attach it to the end-wall support. Use flat 2-inch by 4-inch or 2-inch by 6-inch deck plates on either side of the support to hold the rafter in place.
Measure the midpoint between the end-wall supports and install a vertical 2×8 support at this point. In the end wall with the door, install two 6-foot 71⁄2inch 2×4s as jacks to hold the header in place. Nail or screw them to the supports. You may have to cut the header on a slope to suit the slant of the rafters. If so, mark it off and cut it. Then nail or screw it into place above the door jacks.
STEP 5: Build the Front Wall
First, measure and cut the front-wall support posts to match the two end-wall support posts. Toenail these in place and brace them to ensure that they remain perfectly vertical. Each support post is assembled with a rafter and two deck plates, just as for the posts on the end walls.
Next, nail or screw in place the 16-foot 2×6 (it will fit into the recess you cut in the ends of each rafter; see the illustration above). Be sure to check your measurements carefully; even a slight misalignment can make it difficult to install glazing. The 2×6 that will serve as the roof plate running above the vertical front plate will have to be cut so that the outer end slopes to butt against the face plate.
With the face, roof plates, and rafters in place, the greenhouse frame is stable and rigid. Install the 2×4 glazing support and the window supports on their own 2×4 jacks. Insert the roof vent blocks between the rafters and add another block against the backing plate.
STEP 6: Install the Glazing
Installing either single-pane or double-pane glass requires certain construction modifications. To keep the double-pane glass flush with the top of the wooden rafters, you can install triangular strips of wood blocking to support the glass, as shown in the illustration below. These are 11⁄2 inches by 11⁄2 inches and are screwed to the 2×6 rafters to form a strong yet moderately light structure.
After placing strip caulking on each glass support, carefully lower the panes of glass into place. Two or three people may be needed for this step. Try not to bend the glass. Caulk the space between the glass and the wood using silicone caulking to ensure that no water can enter there and cover each rafter joint with a cap that’s screwed down to secure the wood in place.
For installation of side glazing, see the illustration under Installing Wall Glazing.
STEP 7: Build the Vents
All the vents on this greenhouse are made of 2×2 lumber. Each vent is framed with lap joints at each corner and joined with epoxy. If you plan on using glass for the vents, rabbet the 2×2 and set the window in it. Use caulking around the window and quarter round to hold the glass in place.
When the roof and end walls are in place, carefully measure the greenhouse before cutting vent lumber. To prevent water from coming into the greenhouse, construct the roof vents as shown in Making Overhead Windows (with an inside lip). Assemble each vent with glue and check that each is square after assembly.
Next, dry-fit the vents in the greenhouse roof, attach hinges, and make sure the vents open properly. So that each vent can be held open, attach a 1-inch by 1⁄8-inch perforated steel strip to the inside of the vent frame and set a headless screw in the frame. To hold the vent open, simply move one of the holes in the strip over the headless screw. You might want to bend the lower edge of the metal strip upward so that nobody can hit his or her head on it.
STEP 8: Build the Raised Beds
The raised beds in this greenhouse have stone walls that are 6 to 8 inches thick, though they could also be made of brick or concrete blocks. Each raised bed is filled with loam, manure, sand, and compost. The curved wall (see the illustration below) allows you to reach into the beds without walking on them. If you build the wall straight across your greenhouse, you’ll have difficulty reaching the back of the growing bed. With a high-intensity light over the top of the beds, plants can grow there year-round.
STEP 9: Install the Pond
The pond is set up with its own filter and fountain and requires only a water outlet somewhere nearby to top off the water lost through evaporation (which can happen quickly in the summer). I prefer to fill my pond from rainwater runoff, which the fish seem to like. Water from your municipal supply may be highly chlorinated and can affect the health of your fish. Once the pond is in place and set up, you can fill it with water and plants. A thorough aquarium book or your local pet store or garden center can provide information on keeping fish.
STEP 10: Install the Wiring
The greenhouse wiring is laid out according to the diagram below. Refer to chapter 10 for more information on installing an electrical system. The main lights are two waterproof fluorescent fixtures. (You can purchase these through FarmTek.) The greenhouse has three high-intensity discharge lights — two over the raised bed and one under the deck. All of these lights are operated on timers, can be raised and lowered as desired, and plug into near by water-resistant outlets. In addition, two outlets at the front of the greenhouse allow lights, heaters, and fans to be plugged is as needed in winter or summer. Above the potted plants, at the lower left of the diagram, a full-spectrum compact fluorescent light fixture is plugged into the outlet next to the stairs. There’s also a 12-watt light in a waterproof box over the stairs. This is dedicated to illuminating the steps any time light is needed there. Finally, there are two accent lights on the stone wall. All the outlets are serviced by a 30-amp GFI breaker in the main fuse panel of the house.
STEP 11: Install Plumbing
There is a single spigot under the deck to the left of the pond. Refer to chapter 10 for more information on installing plumbing in the greenhouse.
STORAGE SPACE
The area under the stairs can be used as storage space for small tools and other smaller materials. If required, it can be enclosed and secured to allow for safe storage of chemicals and pesticides. With such a crowded greenhouse layout, there is little room for storing potting soil, large tools, and extra pots. Consider adding a storage locker or small shed to the end wall to which the greenhouse stairs are built.
VARIATIONS AND UPGRADES
As for the Gothic arch greenhouse (project 4), the frame for this lean-to structure can be made using laminated beams to complement your home’s decor: If you have exposed beams in your home, you can build the lean-to greenhouse with laminated exposed beams coated with varnish or epoxy to protect them from moisture.
6. Greenhouse Built on Piers or a Deck
If the ground slopes sharply away from your home or if you live very close to the water and still want a greenhouse, you may have to build it on a deck or piers. This application is also useful if you want to have a greenhouse on a second or third floor. If you decide to use concrete for pilings, you’ll need to use fiber form tubes as forms.
This greenhouse was inspired by the southwest Ohio greenhouse of Yvonne Procuniar and her husband, Tim, built on a deck to help keep it warm when the ground freezes and to eliminate the need for a foundation. Their structure was featured in the Hobby Greenhouse Association’s magazine, HGA’s News, in spring 1999. In this greenhouse, the structure is divided into two parts. One part can store the family’s lawn tractor and tools, while the other half serves as a traditional greenhouse. Though the Procuniars included doors in each side of the structure, the design in this project incorporates a single door into the “garage” portion of the structure (suitable for only light garden vehicles) and a door through the central wall into the greenhouse. The garage also serves as an air lock to keep the greenhouse warmer in cold winters. In addition, while the Procuniars used metal siding on their structure, the design here incorporates plywood sheathing and siding.
SETTING THE PILINGS
Materials
STEP 1: Excavate the Holes for the Tubes
Make sure to excavate the nine holes below the frost line if you live in an area that experiences cold winters.
STEP 2: Place the Tubes and Pour the Concrete
Set the tubes in the holes, check that they are perfectly vertical, and fill them with concrete. When the mix has set, the tubes can be either left in place or stripped away. Backfill the holes around the tubes. Once the concrete has been poured, allow it to partially set and then insert a post support, post anchor, or post anchor block into the top of each pier. This is important if your area is exposed to high winds; the supports will allow the greenhouse to be firmly attached to the piers. It’s also important if you intend to build the deck from pressure-treated lumber, which can react with concrete; the post support limits contact between the concrete and the wood.
BUILDING THE GREENHOUSE
Materials
FOR THE BASE FRAME
- Nine 4×4 corner posts to support the frame (each post will sit on a post anchor secured to the concrete piling)
- Sixteen 2×8s spaced 16" on center for joists
- 20' of 2×8s for the front
- 20' of 2×8s to be attached to the center joist
- 20' of 2×8s for the back
- 56 joist hangers for 2×8s
- 16p nails
- 10 sheets of 1⁄2" CDX plywood for flooring
FOR THE FRONT WALL
- Three 20' 2×4s
- Eighteen 3' 2×4s
- Four 8" pieces of 2×4 blocking
- 21⁄2 sheets of 3⁄8" CDX plywood for sheathing
FOR THE REAR WALL
- Thirteen 2×4 studs spaced 16" on center
- Assorted lengths of blocking for spacing end walls
- Two 7' 1⁄2" 2×10 headers
- Two 2×4 jacks
- Three 20' 2×4s for top and bottom plates
- 16p nails
- Garage door to fit a rough opening 8' 11⁄2" by 6' 91⁄2"
- 4 sheets of 3⁄8" or 1⁄2" CDX plywood for sheathing
FOR THE MIDDLE WALL
- Fifteen 10' 2×4s
- Three 20' 2×4s for top and bottom framing plates
- Twelve 141⁄2" pieces of blocking
- Two 2×4 jacks
- Two 2×10s for door header, blocked out to a thickness of 31⁄2"
- Three 3' 2×4s spaced 16" on center (for wall above header)
- Assorted 2×4 blocking
- 16p nails
- Seven sheets per side of waterproof sheetrock or 1⁄2" CDX plywood for sheathing
FOR THE END WALLS
- Fourteen 2×4s (cut from 10' 2×4s)
- Two 2×4 jacks
- Two 2×8 headers blocked out to 31⁄2" wide
- One 16' 2×4 base plate
- Two 10' 2×4 headers cut to length for the garage side of the structure
- Two 2×4 headers cut to length for the greenhouse side of the structure
- Four sheets of 3⁄8" or 1⁄2" CDX plywood for sheathing
- One door, 3' wide
FOR THE ROOF
- Five pieces of 4' by 11' polycarbonate for greenhouse windows (take measurements at the job site)
- Eight 11' 4" 2×8 rafters
- Eighteen 10' 8" 2×8 rafters for the garage roof (spaced 16" on center)
- 20' of 2×8s for the front soffit
- 20' of 2×8s for the rear soffit
- 20' of 2×8s for the top ridge
- 40' of 2×8s for the lower ridge
- Seven sheets of 3⁄8" or 1⁄2" CDX plywood for roof sheathing
- Roofing felt
- Eight bundles of roof shingles
FOR THE RAMP
- Two 10' 2×8s cut to suit the ramp slope
- Two joist hangers
- Twenty-one lengths of pressure-treated decking, 3' each
OTHER MATERIALS
- Faced 31⁄2" fiberglass insulation to install between studs
Instructions
STEP 1: Build the Base Frame
The greenhouse is built on a 2-foot by 8-foot base frame anchored to nine pilings set deep into the ground. The illustration above shows how the floor platform is constructed using 2×8 joists set 16 inches on center. You could build the floor in sections and nail 1⁄4-inch plywood on the underside of the floor joists so that 8-inch-thick fiberglass insulation can be dropped between them. After you’ve added the insulation, nail 3⁄8-inch subflooring over the joists to seal in the insulation.
To make the structure frame, lay out the 20-foot front and back plates. If you can’t find 20-foot lengths of lumber, you’ll have to use a 12-foot and an 8-foot length or two 10-foot lengths. Mark out the joist locations 16 inches on center. Nail a joist hanger in the middle of each marked location. Set the planks vertically and place the 8-foot joists in the hangers. Nail each plank with three 16p nails and toenail the joist in place.
In each corner of the base, nail a 4×4 post with its top flush with the joist top. You’ll need a few friends to lift the frame on to the concrete posts and fasten the 4×4s to the post anchors.
STEP 2: Build the Front, Middle, and Rear Walls
The illustrations below show the front-, middle-, and rear-wall layouts. The front wall is 3 feet tall, the middle wall is 10 feet tall, and the rear wall is 8 feet tall. The rear wall has a single garage-style door and the middle wall has a regular door between the greenhouse and the storage portion of the structure. In this construction, the storage portion serves as an air lock to keep the greenhouse warmer during cold winter months and provides a place for potting soil that can easily be moved into the greenhouse part of the structure when needed. For summer use, there are windows in the lower front wall that can be opened for ventilation.
The front, middle, and rear walls are constructed of 2×4 pine or pressure-treated lumber spaced 16 inches on center. Lay the top and bottom plates on the greenhouse floor and mark off the support locations at 16-inch intervals. Nail the supports to the base and top plates as shown.
To frame out the garage door, cut the two jacks to size and nail them to the supports on either side of the door. Each header, made from 2×10s, is only 11⁄2 inches wide and the studs are 31⁄2 inches wide; you’ll have to add a 1⁄2-inch-wide piece of plywood between the headers to make them total 31⁄2 inches in width. When each wall is finished, lift the walls into place (with the help of an extra pair or two of hands). Brace them and check to see that they are perfectly vertical.
STEP 3: Build the End Walls
The end walls are also made of 2×4 pine or pressure-treated lumber spaced 16 inches on center. There is a door directly into the greenhouse. Although there are no windows in the greenhouse end walls or garage, you can install them if you so desire. The end walls are built in a manner similar to the front and rear walls: Lay out the walls on the floor and mark the height of the middle wall (measured at the job site) and the height of the front and rear walls (measured at the job site.) Also mark the heights of the supports, cut the supports, and nail them in place.
STEP 4: Install the Rafters and Sheathe the Roof
The illustration below shows the rafter layout. The rafters over the storage area are 2×8s spaced 16 inches on center. The rafters over the greenhouse are spaced 481⁄4 inches on center to allow for 4-foot-wide polycarbonate panels and mounting screws. Overhangs are 9 inches all around the greenhouse.
To install the rafters, measure the length of the structure at the ridgepole and mark each rafter to show where it will butt against the ridge-pole. Then, as described on Laying Out Rafters, measure down each rafter using your framing square and mark and make a bird’s-mouth cut. Check again that the structure’s walls are still square and vertical. Cut the rafters on both sides of the greenhouse garage before you nail them in place and then nail all rafters to the ridge and at the bird’s-mouth end. With the rafters in place, you can add the soffit to their ends.
The structure has a 9-inch overhang on each side. To achieve this, cut several 71⁄2-inch blocks, space them 16 inches apart on the outer rafters, and nail them to the rafter and to the wall.
Before nailing the sheathing to the roof, cover this eave with 1⁄4-inch plywood. Leaving out this step (as I have done) could result in squirrels getting inside the greenhouse and chewing away at the structure. Install roof sheathing by staggering the plywood panels. Add roofing felt over the sheathing and then shingle the roof with asphalt shingles.
STEP 5: Sheathe the Structure and Install Insulation
Sheath the structure with 1⁄2-inch or 3⁄8-inch plywood or even 1⁄2-inch oriented strand board. Then, so that you can work in the greenhouse in cold weather, install fiberglass batting insulation between the studs and waterproof sheetrock over the studs on the inside walls.
STEP 6: Install Glazing
To install the 4-foot-wide polycarbonate glazing, lay it on the rafters, tape it into place, and caulk between the sheets before screwing the cap plate in place over the glazing edges and the seam between the sheets. Cover the top and bottom of the glazing with U-shaped brackets to keep out moisture and dirt.
For a consistent look, instead of sheathing the eaves as described above, you might want to cut two pieces of 9-inch polycarbonate to trim them.
STEP 7: Install the Garage Door
The garage door should be installed by a professional. This service is usually included by the company through which you purchase the door. Install the end-wall door following the instructions included with it.
STEP 8: Install Electricity
Refer to chapter 10, Wiring, Plumbing, and Heating, for more specific information on installing electricity in the greenhouse. There are a number of outlets along the middle wall of the structure that serve both the greenhouse and the storage area. You can also add three or four shop lights in both the storage area and the greenhouse area for general lighting. Outlets can also be used for a fan or small heater.
STEP 9: Build Ramps
Of course, you’ll need to build a ramp or steps up to the door of the greenhouse. A ramp is preferable to allow a wheelbarrow into the structure should you not want to go through the garage door. You’ll need a ramp into the storage area as well so that larger equipment and materials can be moved into and out of it.
A 36-inch-wide ramp requires spacing the 2×8s upright about 30 inches apart. The ramp end at the garage should be cut vertically and dropped into two joist hangers nailed to the side of the base plate. If possible, also nail through the base plate into the ramp supports. Cut the other end of the 2×8s so that they lie flat on the ground.
Nail the 3-foot lengths of pressure-treated decking to the upright 2×8s. Consider building two smaller ramps to the garage door to suit the wheel span of your tractor instead of creating one wide ramp. If you decide to build a ramp the width of the garage door, you’ll need to space vertical 2×8s 20 to 24 inches apart and then nail decking to the uprights.
STEP 10: Finish the Exterior
You can cover the exterior sheathing with shingles or wood clapboards and trim, painted with several coats to protect against the elements.
VARIATIONS AND UPGRADES
In the Procuniar greenhouse, the subfloor is insulated with rigid foam insulation overlaid with plywood. The couple also insulated the middle wall between the storage area and the greenhouse as well as all the exterior walls with fiberglass batting and covered the frame walls with waterproof sheetrock. If you need more doors into the greenhouse than are provided in the plans here, you can follow the Procuniars’ lead: They installed three doors — a sliding door in the rear wall, a garage-style door on the right-hand wall, and a smaller door in the middle wall. For sheathing, instead of plywood and shingles or wood siding, you can use metal sheathing, as the Procuniars did.
7. Hoop House or High-Tunnel Greenhouse
Hoop houses are inexpensive and easy to build; the least-expensive high tunnel can be built from PVC water pipe. Each 10-foot section of pipe costs around $2, while pipe joints are usually around a dollar or two, so for less than $100 you can make your own plastic hoop-house frame.
My plastic hoop house runs the entire length of the garden because here in Rhode Island we get very cold winds off the Atlantic Ocean in springtime. By protecting plants in the plastic hoop house, I can ensure that their growth isn’t slowed by these winds.
The ends of my high tunnel are made of plywood on the north end and polycarbonate on the south end. A plywood end wall helps to give the structure some rigidity and provides a surface to which you can attach the polyethylene cover.
CONSTRUCTING THE FOUNDATION
Materials
- Twenty 30" lengths of rebar
Instructions
This type of greenhouse is anchored directly to the ground with rebar that’s inserted into the pipe frame at one end and into the ground at the other.
STEP 1: Install the Rebar
For a 14-foot-wide plastic hoop house, hammer the lengths of rebar into the ground 3 or 4 feet apart around the perimeter of the greenhouse space, leaving about 10 inches of rebar showing above ground.
BUILDING THE GREENHOUSE
Materials
FOR THE FRAME
- Twenty 10' lengths of 3⁄4" scedule 40 PVC pipe, each piece cut in half
- Seven 10' lengths of 3⁄4" PVC pipe cut into 3' lengths
- Thirty 4-way pipe joints
- Plastic pipe glue
- 60' of 2×8s or 2×10s plus pipe clamps (a wooden frame is built around the base of the pipe frame and the pipe clamps are used to fasten the pipe to the wood)
FOR THE END WALLS
- Four pieces of 3⁄8" 4×8 CDX plywood for the north end of the greenhouse
- Four 48" by 96" 6 mm polycarbonate panels for the south end
FOR THE GLAZING
- 100' roll of construction polyethylene plastic. Note: The plastic has a tendency to split along the folds over time.
- Furring strips for nailing polyethylene to side base pieces
FOR THE DOORS
- One old (or new) screen door with hinges and hasps
Instructions
This hoop house will be 30 feet long.
STEP 1: Build the Frame
Attach a 5-foot length of 3⁄4-inch schedule 40 PVC water pipe on each piece of rebar and glue one four-way joint to the top of each pipe. Add a second 5-foot length of pipe to the four-way joint (for 10 feet of pipe on each piece of rebar). With help, bend opposite pieces of pipe into the middle and attach them in arcs by gluing them to another four-way joint. Each piece of pipe will now form a 20-foot arc with three four-way joints.
Next, insert a 3-foot section into each arc to make a rigid grid of pipe. Last, along the base of each side of the structure, set a 10-foot 2×9 or 2×10 into a trench (about 4 inches deep) and clamp this to the pipes with pipe clamps and screws.
STEP 2: Build the End Walls
To make the end walls, first hold the plywood up to the pipe frame at the north end of the structure and mark on it the arc formed by the pipes. (To do this, stand the sheets of plywood against the end of the frame.)
You can also mark a half circle on four sheets of plywood placed on the ground: Hammer a nail into the plywood at the center. The greenhouse is 14 feet wide, so the radius will be 7 feet. Mark an arc and cut out the arc with a jigsaw. If you decide to make one of the end walls out of polycarbonate, you can use this arc as a template. If the winds are gusty where you live, you may have to reinforce the end walls by screwing them to four or five 2×4s of varying lengths. Using this method, however, may produce arches that are not exactly 14 feet wide and thus will not match the wall exactly.
STEP 3: Install the Polyethylene Sheeting
With the framework in place, the final job is to cover the entire frame with polyethylene. Simply unroll the polyethylene over the frame and staple it lightly to the baseboard. Next, cover the staples with long battens (furring strips) nailed into place. In warmer weather, the furring strips can be detached and lifted to allow air to enter the lower part of the greenhouse.
My experience has been that this structure will not stand up to 50-mile-per-hour winds but withstands any below this mark. Note that a heavy snowfall will weigh on the frame and cover, but it’s easy enough to walk inside the hoop house and push the snow from the sheet-
VARIATIONS AND UPGRADES
As mentioned above, you can cover the southern end wall of the greenhouse with polycarbonate instead of plywood to allow even more light in to the structure. Simply use the system described in step 2 to draw an arc on the polycarbonate that matches the arc of the greenhouse frame.
8. Window Greenhouse
Because window greenhouses are small, they heat up and cool down quickly, meaning the environment in them isn’t very stable. With this caveat in mind, however, if this is the only type of greenhouse that will work for your situation, it can add a great deal of pleasure to your gardening experience. In constructing the greenhouse, it’s best to build it so that the original window it covers cannot be closed. This will prevent the window greenhouse from overheating when it’s warm out or getting too cool on cold days. As with any attached greenhouse, a window greenhouse can supply additional heat and humidity to the room.
BUILDING THE GREENHOUSE
Materials
- Six 30" 2×2s for greenhouse mounting brackets
- One 2' 6" sheet of 1⁄2" plywood
- Nine 6' 2×2s for the frame
- Two 8' 2×2s for wall cleats
- Eight 24" 2×2s for shelf landings
- Two 48" 2×2s for top angle pieces
- Polycarbonate scraps (about 6' by 12" each) for shelving (to allow light to reach plants placed beneath shelves)
- 6 mm polycarbonate for the window: one 4' by 4' panel for the front, two 2' by 4' panels for the sides, and two 2' by 2' triangular panels and one 3' by 4' panel for the top
Instructions
STEP 1: Determine the Size of the Greenhouse
The first job is to measure the window to see how large your greenhouse can be. You can make the greenhouse either the same size as the window or bigger than the window. If the walls of your home are brick, concrete, or stone, make it the same size as the window; these surfaces are difficult to drill into if you make it larger. If you plan on installing a window greenhouse in an apartment building or rental home, you should first get the landlord’s permission. If the walls of your home are wood (clapboards, shingles), the greenhouse can easily be fastened to wood and can be larger than the window.
It’s best to make the structure no more than 18 inches wider than the window on either side to allow you to reach all shelves easily. As for depth, most people leaning through a window can reach out only 24 to 28 inches, so 28 inches should be your maximum depth. Because of security issues (it’s easy to break in to a greenhouse window), it’s best not to remove the house window it’s built upon.
STEP 2: Build the Frame
The construction of the greenhouse is shown in the illustrations below. In this case, the house window is 4 feet by 4 feet and the greenhouse is 2 feet deep, 6 feet wide, and 5 feet tall, with additional space in the sloped area at the top of the window.
First, make the base of the greenhouse: Fashion a support bracket from 2×2s — two cleats (to be fitted against the house), each made of two 24-inch-long pieces set at right angles. Next, make a 24-inch cross brace and fit it into the cleats. Glue and screw the cleats to the wall of the house, then cut a 2-inch by 4-inch piece of waterproof plywood and attach it top of the cleats. Varnish or paint the base at this stage.
Next, make the frame for the greenhouse: Cut two 24-inch 2×2s and two 72-inch 2×2s and glue together or epoxy these pieces. Check that this construction is square. Repeat the process for a second frame. These two frames, base and top, will be attached with uprights. The two uprights nearest the house are 72 inches and the two on the outside of the greenhouse are 60 inches. Notch these into the base and top frames and glued or epoxy them in place. Build all corners of the greenhouse frame with lap joints. At this point, you can also add cleats to support shelves. The positioning of the cleats (and thus the shelves) will depend on the height of your plants. In the illustration the pairs of cleats are set 1 and 2 feet above the greenhouse base.
To finish the basic structure, add the top 45-degree angle pieces; then, paint, stain, or varnish the greenhouse to suit your home’s decor.
STEP 3: Add the Shelves
Install glass, polycarbonate, or plywood shelves, cut to size, on the shelf-support cleats. Remember to keep taller plants at the back (house side) of the window greenhouse so that smaller plants in front can get adequate sunlight, even though this means you’ll have to remove the taller plants to reach the smaller ones.
STEP 4: Install the Glazing
Because a window greenhouse glazed with glass is very heavy, polycarbonate is the preferable glazing material for this type of structure. Cover the entire greenhouse with this glazing, overlapping the lower pieces with the upper ones to keep water from getting inside the structure. If you want, you can cover the corners of the polycarbonate with 1⁄8-inch by 1- or 11⁄2-inch strips of wood to hide the edges.
STEP 5: Mount the Greenhouse
Set the entire greenhouse on the wall brackets mounted in step 1. Screw the sides to the walls and the base to the bracket so that the greenhouse is rigid and fully supported.
VARIATIONS AND UPGRADES
Instead of using waterproof plywood for the bottom of the greenhouse, you can use marine-grade teak or oak-faced plywood that’s varnished or painted so that the surface is easy to keep clean. If you decide to use glass for glazing, insetting it into the wood imparts a cleaner look.
9. Garden Shed/Greenhouse
This 10-foot by 10-foot shed/greenhouse is a project my son David and I designed and completed together. The structure has an off-center ridge and glazing along the south side. Inside, high shelves hold plants at a suitable height for them to get plenty of sunlight, while under the shelving there’s plenty of space for storing greenhouse gear. At the back of the shed there’s a potting table along with more shelves for plants and gear. The air-intake vents for this greenhouse are in the front knee wall, while exhaust vents can be built high up in the back wall or on the end walls just under the ridge. The structure is glazed with polycarbonate. The door in the end wall is wide enough for a wheelbarrow or cart.
CONSTRUCTING THE FOUNDATION
Materials for a Slab Foundation
- Four 2×10s (for forms)
- Sixteen 24" 2×2 posts (to serve as verticals for the 2×10s)
- Two yards of gravel or pea stone
- Two yards of concrete
- Bolts for the sill plate
Materials for Four Piers
- Four fiber form tubes, each 8" in diameter
- Four deck post supports
- About 1⁄2 yard of concrete (for this small amount, you can use bags of concrete mix)
The greenhouse can be built on a concrete slab or on four piers (one at each corner). Refer to chapter 8 for specific information on constructing a slab and chapter 8 and project 6 for information on constructing piers or pilings.
STEP 1: Lay out the Foundation
With batter boards and string, mark out the greenhouse using the methods described in chapter 8 (Laying Out the Foundation) and project 1. In the process, make sure that the greenhouse is square.
STEP 2: Excavate for Piers or a Slab
For all four piers, excavate the holes below the frost line if you live in an area that has cold winters. For the slab, plan on making the slab about 6 inches thick and excavate 10 to 12 inches.
STEP 3: Build the Foundation Forms (for a Slab Foundation) or Place the Tubes
If building on a slab foundation, you’ll need only four 2×10s for the forms. To construct forms, hammer 2×2 posts into the ground at the corners and nail the 2×10s to them. Next, hammer 2×2 supports into the ground about every 2 feet around the outside of the forms. If your area freezes, fill the excavated site with 2 or 3 inches of gravel before pouring the concrete so that the slab can “float” on the stone (see chapter 8, Pouring a Slab, and project 1). If you’re installing piers, place the fiber form tubes in the excavated holes.
STEP 4: Pour Concrete
If you’re using fiber form tubes, refer to the box and chart, Concrete Amounts for Fiber Form Tubes for information on the amounts of concrete needed to fill them. After the concrete has been poured, when the mix has set, the tubes can be either left in place or stripped away. Backfill the holes around the tubes. When the concrete is partially set, insert into the top of each tube either J-bolts or deck post supports to keep the wood from contacting the concrete.
If you’re pouring a slab, refer to chapter 8 and project 1 and project 2 for information on smoothing, screeding, and troweling. After pouring the concrete and before it sets, install bolts in the slab near the edge to anchor the base plate of the walls. As described in chapter 7, sink the bolts so that 11⁄2 to 21⁄2 inches of each is visible.
There are no water pipes, drainpipes, or electricity in this shed so there is no need to place conduit before pouring the slab.
BUILDING THE SHED
Materials
FOR THE 10' BY 10' BASE STRUCTURE, FLOOR, OR DECK
- Eleven 10' 2×6s or pressure-treated 2×10s (depending on whether you will be building on a slab or piers)
- 2 sheets of 1⁄2" plywood or twenty 10' lengths of 1×6 decking (if building on piers, enough to cover a 10' by 10' base)
FOR THE REAR WALL
- Ten 8' 2×4s
- Three 10' 2×4s (one for the base plate and two for the cap plates)
FOR THE FRONT WALL
- Ten 3' 2×4s
- Three 10' 2×4s for base and cap plates (one for the base plate and two for the cap plate)
- Four 141⁄2" lengths of blocking for vent openings
- Spare blocking for two end studs (so that the side walls can be fastened to it)
FOR THE END WALLS
- Two 10' 2×4s for base plates (one for each wall)
- Four 10' 2×4s for top plates
- Four 6' 2×4s for top plates
- Eight 8' 2×4s for studs
- Six 10' 2×4s for supports
- Two 401⁄2" 2×8s for the door header
- Four 251⁄2" 2×6s for the windowsill and window header
FOR THE RAFTERS AND RIDGEPOLE
- Four 11' 2×8s
- One 10' 2×8
- One 10' 1×4 face trim piece for end of rafters
FOR THE SHEATHING
- 8 sheets 3⁄8" or 1⁄2" CDX plywood
- Shingles
FOR THE GLAZING
- 10' by 40" sheets of polycarbonate or glass to cover 100 square feet
FOR EACH VENT (KNEE WALL AND BACK WALL)
- Four 14 1⁄2" 2×2s
- Two pieces of plywood or polycarbonate to cover vents, 141⁄2" by 141⁄2" each
OTHER MATERIALS
- One standard-height exterior door, 3' wide
- One 2' by 3' window (double-pane if the shed will be insulated)
- Roofing felt and shingles for the rear of the roof
- 7 or 8 sheets of waterproof sheetrock (optional)
- Caulking, hinges, clasps, screws and nails, shelf brackets, and shingles or some other material to cover the exterior sheathing, if desired
Instructions
STEP 1: Build the Base
If you are building on a slab and will not be insulating the floor, there’s no need to build a base or deck. Simply build the walls directly onto the concrete slab, securing them in place with the bolts set in the concrete. For some insulating value on the floor of the shed, you can frame the 10-foot by 10-foot slab with 2×8s, then bolt 2×4 or 2×6 lumber blocks to the concrete and nail or screw the base frame to the blocks. (To increase the insulation value, fill the spaces between the 2×8s with rigid polystyrene or fiberglass batts.)
If you are building the greenhouse on piers, use pressure-treated 2×10s and nail 1⁄4-inch plywood under the base to secure the insulation in place.
STEP 2: Cover the Base
Cover the base (and insulation) with 1⁄2-inch-thick plywood or 1×6 decking fastened with 8d nails. Be aware that if you use decking, there will be a small space between planks — you can lose small items in them and they’ll create an air gap that may well prevent using the shed to grow plants in winter.
STEP 3: Build the Rear Wall
The rear wall is built as shown in the illustration below. Clamp together top and base plates and mark out placement of studs 16 inches on center. Using 16p nails, fasten the studs to the top and base plates, then nail 3⁄8-inch CDX plywood on the outside of the wall.
STEP 4: Build the Front Wall
The construction details of the front wall are shown in the bottom illustration. As you did for the rear wall, clamp together top and base plates and mark out placement of studs 16 inches on center. Using 16p nails, fasten the studs to the top and base plates, then fasten the blocking for the vent openings. Finally, nail 3⁄8-inch CDX plywood on the outside of the wall.
STEP 5: Build the End Walls
The end walls are built as shown in the illustration below. One end wall has a door, the other a window, but the two walls can be framed at the same time. First cut a stud to the height of the front wall but slope the top to correspond to the sloped top plate.
Next, assemble the door wall on a large flat surface: Lay out the base plate and mark out the locations of the studs 16 inches on center and the placement of the door. The rough opening for the door will be 371⁄2 inches wide and 6 feet 83⁄8 inches high. Set the stud you cut for the front wall at one end of the wall and lay studs in their determined spots. Dry-fit the header, jacks, ridgepole support, and blocking, and then nail together all pieces.
Finally, sheathe the door wall with 3⁄8-inch CDX plywood. Remember that the sheathing will have to cover the rafter, so make sure to allow an extra 8 inches above the top of the wall.
To assemble the window wall, proceed as above, laying out all pieces and marking stud placement and window header and sill placement. Cut all lumber and dry-fit it, then nail or screw together all pieces. As with the opposite wall, when you sheathe the window wall, allow for the rafter width at the top.
STEP 6: Erect the Walls and Add the Ridgepole
You’ll need an extra pair of hands for this job. Once the walls are in place, brace each so that it remains perfectly vertical. Check the diagonals to make sure that the building is square before you nail or screw together all four walls.
Set the 10-foot 2×8 ridgepole in place on top of the double stud at the center of the greenhouse.
STEP 7: Install the Rafters
Rafters are cut as shown in the illustrations above. Make one first and dry-fit it to be sure it’s sized correctly. Note that the end rafter will overlap the vertical support stud under the ridgepole and may need trimming. You may also find that the header needs a little trimming at the end rafter.
After any necessary adjustments, cut the other rafters. For the rear of the roof, each rafter is set 16 inches on center and for the front half of the roof, where the glazing will be located, they are set 3 feet 4 inches on center.
STEP 8: Finish the Rear Half of the Roof
Sheathe the back half of the roof with 3⁄8-inch plywood cover the plywood with roofing felt and then with roofing shingles. Finish the shingles at the ridge. Later, they will be covered with a trim piece.
STEP 9: Install Glazing
For the front glazing, cut polycarbonate panels to 3 feet 4 inches wide and 7 feet 4 inches long. (For precise measurements, measure at the job site.) Because there are only three pieces of glazing in this greenhouse, you can also order glass to cover the windows. When ordering glass or polycarbonate glazing, be sure to allow a 1⁄4-inch to 3⁄8-inch gap between panes so that you can screw cap pieces in place. The cap pieces should be 10 feet long and 2 inches by 1⁄2 inch. Refer to chapter 7 for information on installing polycarbonate or glass glazing.
For the roof glazing on the front half of the roof, rabbet a slot in the front trim so that it will cover the glazing, then run a bead of caulking along the top of the glass, set a trim piece in place, and nail or screw it down with finish nails. Run a bead of caulking along the back of this trim piece and nail another trim piece along the ridge of the structure, covering the top of the roof shingles and forming a watertight joint along the ridge.
STEP 10: Install the Door and Window
The greenhouse is now enclosed except for the window and door openings. To install the window, dry-fit it to ensure that it will sit in the opening. You may have to shim the window slightly on the inside to get it perfectly level. Once you are satisfied with the fit, nail or screw it in place.
To install the door, first measure the jambs and cut them to fit your rough opening. Slide the door into place and check that it is perfectly level. You may have to shim the sides slightly to ensure a perfect fit. Then, nail or screw it in place. Last, install the door handle.
STEP 11: Interior Sheathing
If you want, you can install waterproof sheetrock on the inside of the greenhouse (it’s best installed over fiberglass insulation). As with all sheetrock applications, the corners will require taping and joint compound before the walls can be primed and painted.
STEP 12: Finishing Details
You can use measured and cut remainders from job lumber for shelving cleats. If you sheetrock the interior, be sure to screw cleats to the studs in the walls. Add shelves for a place to store tools and display flowers in pots. Empty pots, potting soil, and heavy items can be stored under the workbench.
The exterior of the shed can be finished with shingles or clapboards.
VARIATIONS AND UPGRADES
Besides using glass for some or all of your glazing, you can enclose an area under a shelf to serve as a lockable cupboard for storing pesticides and other hazardous materials.
You can also install louvers at the top of the end walls to allow more heat to clear the structure, but you’ll need to measure them at the job site after the framing is completed. Building them is a job for an experienced craftsman: They can be made from thin 1⁄4-inch by 3-inch or 1⁄4-inch by 4-inch slats.
10. Multiuse Cold Frame
Materials
- Two 12' 2×8s or 2×10s
- Two 4' 2×8s or 2×10s
- Four 2' 4×4s
- 7' lengths of 1⁄2" PVC pipe placed 2' or 3' apart (for 2' spacing, use seven lengths; for 3' spacing, use five lengths)
- One piece of spun fleece, 8' by 16'
- Glass panes, no larger than 18" by 30" (with edges rounded so they aren’t sharp)
Instructions
I developed this frame to suit the changing seasons in the garden. Instead of moving plants from one frame to another, I simply move the frame. It consists of a basic raised growing bed that can be fitted with various covers, depending on the temperature and weather outside.
BUILDING THE FRAME
The first job is to set up the base. Because the frame will be used to grow food, it’s preferable not to use pressure-treated wood. You can protect the wood with epoxy and paint instead.
STEP 1: Construct the Frame
Mark out the frame and hammer the 4×4 posts into the ground at the corners. You can use 2×4s to construct the frame, but 2×8s or 2×10s are heavier, won’t rot as easily, and will support the weight of the various frame covers. Nail the 2×8s to the corner posts with 16p nails. You may need another support in the middle of the frame to keep it from bowing.
STEP 2: Add Brackets for Pipes That Will Form Hoops
At 2-foot intervals along the outside of the wood frame, attach pipe brackets. You can insert 1⁄2-inch PVC pipes into these brackets to form arches that will support a polyethylene or fleece cover. To keep the weight of the snow from pushing the PVC pipes inward and causing them to collapse, the brackets at the ends of the bed can be fastened so that pipes inserted in them will slope outward slightly.
STEP 3: Cut Pipes for a Fleece/Polyethylene Cover
For a 4-foot-wide bed, cut the pipes into 7-foot lengths. The hoops are covered with either spun fleece in summer to keep insects from getting to plants or with polyethylene in the fall to help extend the season. This hoop arrangement works best for low-growing plants such as lettuce, spinach, and root crops.
STEP 4: Modify the Frame with Glass Panes and Clips
On some beds I use panes of glass tipped toward each other to form a cloche. Although we might think of cloches as being small, round glass “lids” for plants — much like overturned jars — in English market gardens a cloche is a glass pane about 2 feet tall with a metal clip at the top. These cloches may run for several hundred yards and can be moved to less mature crops as they are needed. They can protect plants from deer that are raiding the garden and from wind and can keep plants a bit warmer. In the cloche shown here, the glass panes sit in the dirt just inside the edge of the cold frame. To support the glass, I use glass cloche clips made of aluminum that I purchased in England several years ago. You can make similar clips by running a 2×4 through a table saw to cut two grooves 1⁄8 inch wide (or the width of the glass you’re using). Make sure the grooves don’t meet in the middle. Doing so prevents the wood from splitting and allows an air gap at the top of the glass panes. After the grooves have been cut, saw the 2×4 into 4- or 6-inch lengths to create a number of clips that can you can place at the peak of the glass panes. If each pane of glass is 18 by 24 inches, you’ll use two clips for each section of the cloche. To close off the ends of the structure, simply lean two panes of glass against the frame and leaning panes and hold these in place with a stake in the ground. For air circulation when the weather is warm and dry, these end panes can be removed.
11. Potting Bench
When you have the space to make use of them, potting benches are very handy in the greenhouse. This one is designed to be 48 inches wide and 30 inches deep. It is made with a waterproof plywood or laminate top with a slot in it so that garbage can be swept off the surface. A shelf underneath provides room for pots, tools, and compost; and the back, made of Peg-Board, enables you to hang small tools.
BUILDING THE BENCH
Materials
- Four 3' 3×3s for corner posts
- Four 4' 2×3s for shelf supports
- Four 30" 2×3s for shelf supports
- One 48" by 30" piece of 3⁄8" plywood or a similar-size piece of laminate for the bench top
- One 48" by 30" piece of 3⁄8" plywood for the lower shelf
- 1⁄4" plywood to enclose the bench (optional)
- One 42" by 48" piece of Peg-Board or 3⁄8" plywood for the back of the bench
- Four 48" 2×3s to support the back
- Hinges, sink (optional), hose connections (optional), drain connections (optional), garbage pail, hooks (if installing a Peg-Board as the bench back)
Instructions
STEP 1: Build the Bench Frame
First, make the legs: Cut each 3×3 to the height of the bench (30 to 36 inches). On each, mark the height of the lower shelf 26 inches from the ground. Then, on each allow 2 inches for the width of the shelf support and mark this location. Cut a 11⁄2-inch-deep slot at the top of each leg to hold the end of the shelf support.
Next, make the shelf supports: Each 2×3 has a lap joint at both ends. Dry-fit the legs and supports, then glue all pieces together and clamp them until they are dry. Finally, measure the diagonals to ensure that the bench is square.
STEP 2: Add the Top and Back
Use two 2×3s to support the plywood or Peg-Board back: one as a cross brace just below the level of the top of the bench and one as a cross brace at the height of the bench.
VARIATIONS AND UPGRADES
You can modify the dimensions of the bench to any length or width to suit the space you have available. You can plumb the space and add a small, inexpensive stainless-steel sink to the bench; a sink and hose connection would allow you to wash vegetables before taking them into the house or to clean pots when repotting plants. You can even arrange the drain line from this sink so that water moves through it directly into the greenhouse growing beds instead of the greenhouse drain. By enclosing the underside of the bench, you can create a lockable space for storing not only potting soil and small tools, but some hazardous materials as well.