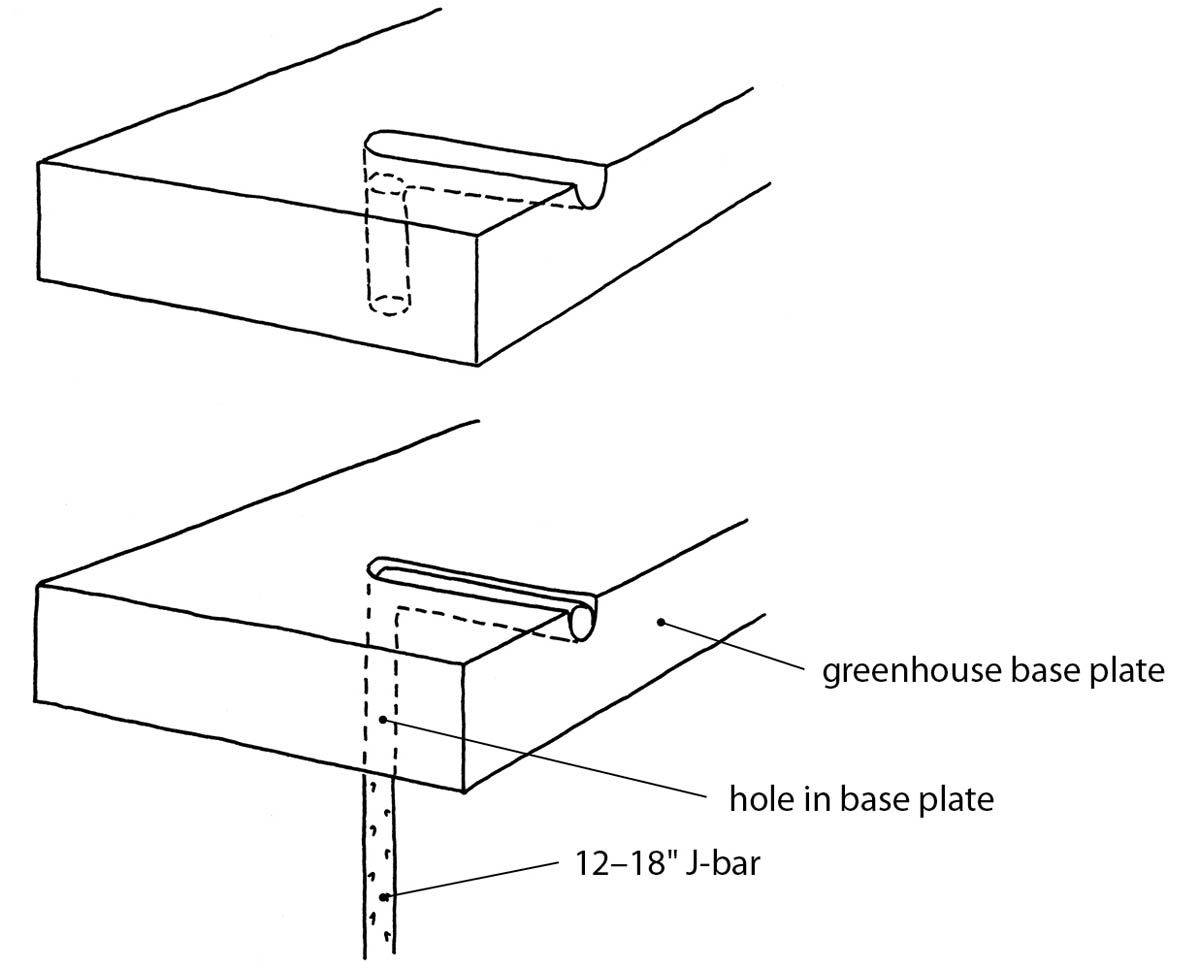
A simple greenhouse such as a hoop house can be anchored to the ground by securing the base plate to the ground via J-bars hammered into the soil.
A NUMBER OF GREENHOUSES are built on some form of foundation, slab, or base to anchor them and provide a level area on which to build. Other, less permanent greenhouses are sited directly on the ground and are anchored by reinforcing bars or U-shaped rods driven into the soil or they are set on wooden beams installed in the ground. Typically, greenhouses in areas where the ground freezes are built on a foundation, while those in areas where the ground does not freeze can be anchored to the ground.
Before installing a foundation with or without a slab, you must determine where the water line, electrical lines, and any drains will pass through the foundation wall. These items may have to be roughly installed before concrete is poured and construction begins. For example, you might decide that the greenhouse will have a center floor drain. Because the floor should slope slightly toward the drain in order for it to work optimally, a contractor (or you, if you are doing the work yourself) should keep this requirement in mind before work is begun. Likewise, if you intend to bring electrical lines into the greenhouse through an underground line, the conduit for the line must be built into the foundation.
This chapter first focuses on describing the various types of greenhouse foundations and masonry walls that can be constructed, then provides more detailed explanation of the building process for each.
Foundations can be made of a variety of materials: concrete, wood, brick, concrete block, rock, and even straw bales. Before you start building, you must determine what type of base or foundation is best for the greenhouse you want to construct and any requirements specific to your area (such as the depth the ground freezes to in the winter). If you plan on growing in the ground, your foundation may be simply a wooden perimeter of 4×4s either partially buried or lying on grade level. Other, more permanent or substantial options include a poured concrete footer with or without a poured or masonry knee wall and a poured concrete slab.
Using the ground itself is the least expensive option for a greenhouse base or foundation. This type works best if you are going to grow directly in the ground as opposed to on benches. Without a reliable anchoring system, however, a strong windstorm or hurricane is likely to damage or destroy the structure. A friend of mine placed a small hobby greenhouse on a growing bed and anchored it with bent metal rods hammered into the ground. In a gale the greenhouse blew off, leaving a trail of plastic and broken metal parts strewn across the neighbor’s property.
One quick and simple way to anchor a hoop house is to hammer short lengths of rebar deep into the ground and fit the pipes of the greenhouse frame over them.
Another method is to hammer the straight portion of J-shaped bars into the ground (these bars can be made by bending each piece of 3⁄8-inch rebar into a J) with the hook of the J bent over the base plate of the greenhouse. You may want to drill holes in the base plate of the structure to accept the J-bar so that the base plate doesn’t split or rout out a shallow strip in the wood for the hook of the J-bar. The number and spacing of these anchors will depend on how windy it is in your area, how solidly you want to anchor your greenhouse, and the size of the structure.
Another option is to cut 4×4 or 6×6 posts to suit the perimeter of your greenhouse and bury them to grade level so that your greenhouse can be bolted to them. Before you decide to use treated lumber, you should note that the chemicals used to preserve it are known to leach into the soil. This is true of both landscape timbers (whose ends have been soaked in preservative) and pressure-treated wood. (See Pressure-Treated Wood, for more information on using.) If you decide to build a wooden foundation of any kind for your greenhouse, use the somewhat safer ACQ (alkaline copper quaternary) or CA (copper azole) pressure-treated wood, both of which have replaced the banned CCA pressure-treated wood in most home centers. Or, to avoid the issue of leaching altogether, you can use cypress (available mostly in the South) or any of the naturally durable, rot-resistant woods discussed in chapter 6.
The best anchoring system involves digging a hole at each corner of the greenhouse (and in the middle if the structure is more than 8 feet long), setting a 6- or 8-inch-diameter fiber form tube (such as a Sonotube) about a foot to 18 inches into each hole, and filling it to grade level with concrete. (The amount of concrete required is so small that a few bags of ready-mix concrete should do the job.) While the concrete is still wet, embed a bolt in the center top of each filled tube. The greenhouse can then be safely bolted to these concrete pilings.
Some drawbacks to setting a greenhouse directly on the ground are that animals can easily tunnel under the sides; if you live in a colder climate, the ground inside the greenhouse will freeze just as it does outdoors; and you will need to install some form of walkway in the greenhouse between growing beds to avoid trudging back and forth in the dirt and mud. To help prevent animals from getting into your greenhouse, you can bury a row of hardware mesh or chicken wire at the edges of the structure.

A simple greenhouse such as a hoop house can be anchored to the ground by securing the base plate to the ground via J-bars hammered into the soil.
A simple poured-concrete footing about 4 inches to 6 inches wide is an easy greenhouse foundation to build and serves as a necessary base for a concrete or masonry greenhouse knee wall, which often extends from it. In areas where the ground freezes, you can set the footing below the frost line and erect a foundation wall to grade level or even higher. Some greenhouses are built with a 2- or 3-foot-high concrete, stone, or brick wall set on a footing or with a wall as high as the tops of the interior benches to enable out-of-sight under-bench storage. Remember that before you pour any concrete foundation and/or slab, you must locate and install your water line and drain line(s).
Poured-concrete posts (using fiber form tubes as molds) can serve as footers of sorts on which is set a deck or a wooden platform or beams that act as a base for the greenhouse (see project 6, Greenhouse Built on Piers or a Deck in chapter 13).
Adding a poured-concrete wall to the footing increases the expense of the foundation but gives your greenhouse a sense of permanence. In many cases a concrete foundation wall is simply an extension of the greenhouse footing and, like it, is usually 4 to 6 inches thick. It may extend anywhere from 6 inches above grade to the height of the benches installed in the structure, though higher walls are usually not left as exposed concrete but are instead covered with brick or stone to make them more attractive or are made entirely of masonry construction. If you plan on facing a poured-concrete footing and wall with brick, remember that the foundation will have to be stepped to create a shelf on which the brick face will rest (see the illustration in Constructing a Brick Foundation). This is an important consideration in building your forms and pouring the concrete. (For more information, see Masonry Foundations and Walls and Constructing a Brick Foundation.) By installing a greenhouse on a foundation wall, you can increase its overall height.
Make sure a foundation wall is well insulated before the area is backfilled. On my greenhouse I used 2 inches of polystyrene insulation on the walls, and the beds inside have yet to freeze. Just remember that polystyrene insulation requires flashing along the top to prevent water from getting down between the insulation and the concrete.
Some of the pluses of a foundation wall are that animals cannot get into the greenhouse, it’s a permanent and secure base for your greenhouse, and setting a greenhouse on a taller foundation wall increases headroom in the structure.
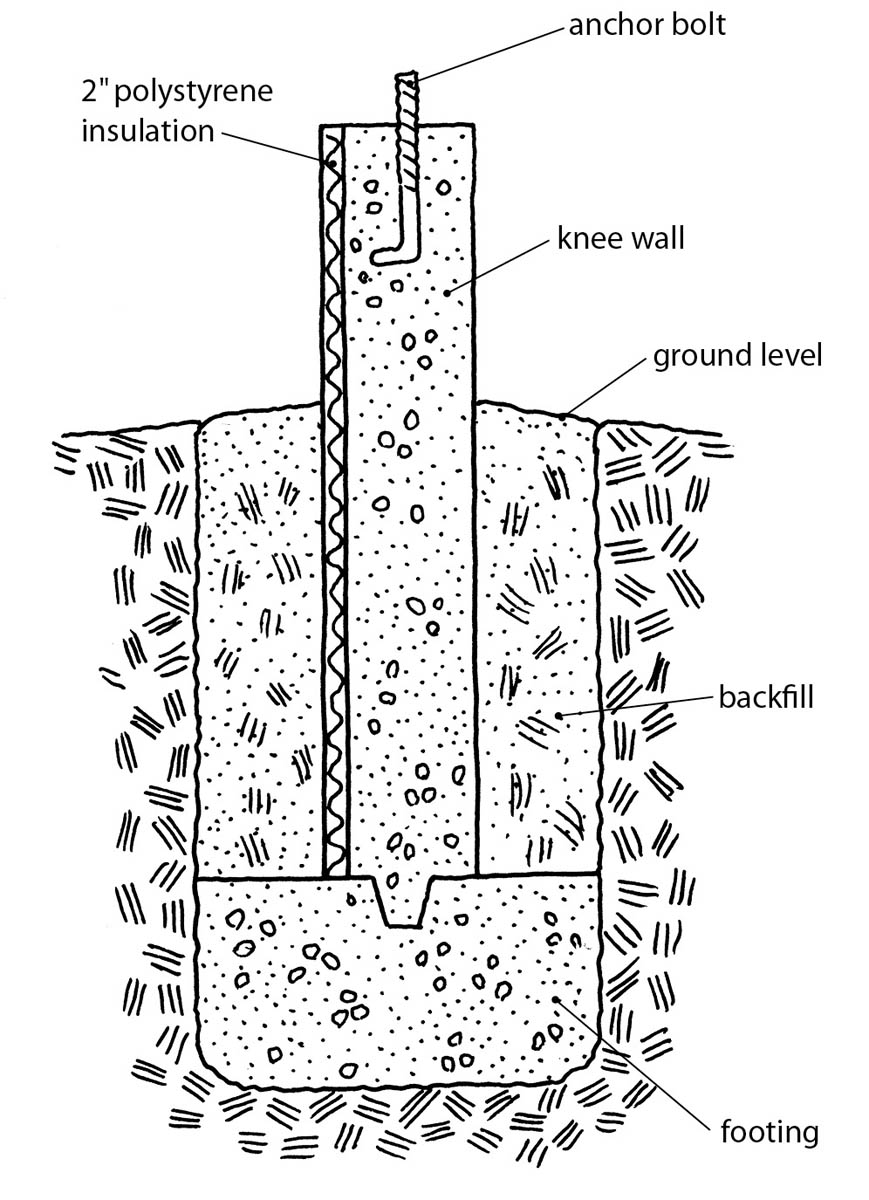
A concrete knee wall is poured as an extension of a concrete footing and, like the footing, is usually 4 to 6 inches thick.
| TUBE DIAMETER IN INCHES | CUBIC YARDS OF CONCRETE FOR 1 FOOT OF HEIGHT |
6 |
.007 |
8 |
.013 |
10 |
.020 |
12 |
.029 |
14 |
.04 |
16 |
.062 |
18 |
.065 |
20 |
.081 |
22 |
.098 |
24 |
.116 |
Thus, for a 4-foot-long fiber form tube 12 inches in diameter, you will need 4 × .029 = .116 cubic yard of concrete and if you have six supports in all you’ll need .69 yard of concrete. Such a small amount of concrete will probably not be available from a concrete supplier, meaning that you’ll probably have to mix it yourself. Many builders remove the tubes after the concrete has set, although they can be left in place. It depends on whether you want to look at concrete or cardboard until the cardboard rots off. Note that each concrete piling should have a post anchor for the wood sitting on top.
Concrete is composed of sand, Portland cement (a mixture of limestone and clay or marl), water, and aggregate (varying from fine to coarse — sand is a fine aggregate and gravel or crushed stone as large as 11⁄2 inches per piece is coarse). For a greenhouse base or concrete slab, sand or gravel is most often used as the aggregate. Mixed with these four basic materials are additives such as calcium chloride (which helps the concrete to cure more quickly), fiberglass strands (which help to bind the concrete when it is curing), and other materials to increase its strength or to help it to set in colder weather. The ratio of the three primary ingredients is one part cement, two parts sand, and three parts aggregate, with water added to obtain the desired consistency.
The function of water in the mix is to hydrate the ingredients and allow them to be worked. Too much water produces a sloppy mix that will pour easily but will take a long time to cure and will be weaker than a thicker mixture. The ideal mix is one that is close to the consistency of nutty peanut butter. When adding water, use enough to wet the mixture without leaving dry patches. If your dry mixture is perfectly dry, you’ll need about 6 gallons of water for each 94-pound bag of concrete; usually, however, the sand or aggregate may be a little wet, meaning you’ll need less water to get just the right mixture.
If you buy ready-mixed concrete or a bagged concrete mixture, there are five basic types, referred to as types 1 through 5. For a greenhouse, you’ll need type 1 unless the greenhouse foundation or base is being poured during winter, in which case type 3 will provide a faster set with some protection against colder weather.
If you’re not going to grow directly in the ground in the greenhouse, consider installing a poured-concrete slab either inside a poured footing and foundation wall or simply on its own as a base for your structure. Slabs are usually from 4 to 6 inches thick and are poured on a base of gravel to allow for easy drainage. They can also be insulated with rigid foam insulation or plastic. Typically, a slab will have bolts embedded around its perimeter to which the structure is attached.
Because greenhouses are fairly light structures, only the largest slabs are poured over reinforced bars (rebar). Whether or not you pour a footing with your slab depends on the weather in your region. Kevin Reed, of J.A.M. Construction Co., in Newport, Rhode Island, says that in the Northeast and in most colder parts of the country, an owner would be advised to install a knee wall or footing extending below the frost line to prevent shifting and cracking of the slab from frost heaves. “Typically, the knee wall would be about 4 or 6 inches thick and go down about 4 feet,” he said. “That would prevent any problems with frost. The knee wall, slab, and corners for a light structure are usually poured all at once, but for a larger structure, the knee wall would be poured first and then the slab is poured. The slab itself is about 6 inches thick and sits on a 6- to 8-inch bed of gravel. If you want to insulate the floor, use a 2-inch layer of rigid foam insulation between the gravel and the slab.”
Drains and conduits for electrical outlets should be installed before any gravel, rebar, or concrete is poured. If you are installing a small hobby-style greenhouse, installing a drain is not critical, but you might want to slope the floor slightly to let water drain out the door or to one side or the center (see Setting the Drainpipe and the illustration below).
Please note that if you intend to build a concrete block or masonry wall on your slab, you must decide before you pour it whether this wall will be built on the edge of the slab or 2 inches to 3 inches inside the edge. If the latter, the slab dimensions will have to be larger than the greenhouse that will be attached to the wall to allow for the wall to be set in from the edge of the slab.
Building a concrete slab involves excavating for the slab and building forms for the concrete. For more specifics on the preparation and construction process, see Constructing a Concrete Foundation and Slab.
You greenhouse wall doesn’t have to be made of concrete. It can also be constructed of blocks, bricks, fieldstone, or slate. Usually masonry walls are built on a poured footing, but alternatively you can pour a concrete half-thickness wall and face it with half-thick bricks or slate to give an attractive masonry look to a strong, smooth-topped wall.
Standard concrete blocks measure 75⁄8 inches by 155⁄8 inches by 75⁄8 inches — 8 inches by 8 inches by 16 inches when set in mortar, making it easy to lay out a wall in multiples of 8 inches. In your planning, remember that you can get half blocks and that each course must be leveled before adding the next one. If you want a thinner wall, you can also get blocks that measure 35⁄8 inches thick. If you plan on using these half-thickness blocks, however, you should not build a wall more than two or three courses high without adding some form of reinforcement to prevent the blocks from toppling. Other available concrete block sizes are 75⁄8 inches by 155⁄8 inches by 35⁄8 inches and sizes similar to those of an ordinary brick. Blocks are also available with rounded corners (known as bull nose) and with a double corner (known as concrete masonry units, with both ends square so that you don’t need to cut them). See Constructing a Mortared Block Foundation, for more on building a concrete block wall.
Mortar is made from Portland cement, sand, and water and comes in two types: A and B. Type A is stronger than type B and is the one to use for brick and stone walls. Typically, mortar is mixed on-site in a barrow, mortar box, or a mixer. As with concrete, it is critical to add the right amount of water to the mixture. If mortar is too runny, it will slide out of joints between block, brick, or stone. If it is too thick, it will not adhere properly to the wall material and the resulting wall will be weak.
If you are not skilled at mortaring concrete block, you can lay the blocks without using mortar between them. Once the blocks are in place, you can pour concrete into the voids in the blocks to solidify the wall (you can insert rebar in the holes in the blocks before pouring the concrete if the wall is high). For this type of application, the concrete should be as loose as possible (made with as much water as possible without becoming a sloppy mess) so that it will fill all the voids.
Another method involves coating the exterior of a dry-laid wall with a thin layer of concrete — a method known as parging. Generally, this thin material is reinforced with fiberglass and is applied in one or two coats, with each coat being about 1⁄4 inch thick. This method works well for walls that are only three or four courses high and that will not have to hold backfill. It does have one drawback, however: In areas where there are heavy frosts or severe weather, the wall may buckle or bend, though this doesn’t occur often beneath a structure as light as a greenhouse.
Bricks are baked blocks of different shale and clay mixtures. They come in many colors, shapes, and styles, but the basic size of a brick is 21⁄2 inches by 33⁄4 inches by 8 inches (although the dimensions may vary slightly as a result of the baking process). Those used for walls are called face brick because they have a side (or face) that is meant to be exposed. Face brick costs a little more than paving brick and is slightly more uniform in color. Face bricks are the best kind to use if you are building a brick knee wall for your greenhouse.
Other types of brick are building bricks (used for walls), fire bricks (used in fireplaces), glazed bricks (one or two faces are glazed white or some other color), and pavers (used for paving walkways).
You can pour a concrete knee wall for your greenhouse and face it with a brick veneer. Veneer bricks are only half the thickness of standard bricks and are set against the wall in mortar. This building method combines the strength of concrete with the attractiveness of a brick exterior wall.
You can also use stone to build the greenhouse knee wall. In fact, the entire back wall of one greenhouse I saw was built of mortared stone with a waterfall that ran into a pond at the base of the wall. While this is more than most people would want in their greenhouse, it gives you an idea of what can be done with a little imagination. If you decide on a stone knee wall for your structure, you will probably do best to hire a mason to build it. Be prepared for it to be expensive; stonework is time-consuming.
There are many types of stone that can be used for a knee wall. If possible, choose one that is indigenous to your area, rather than one that needs to be shipped from elsewhere (which, besides adding to the cost, might make it difficult to get more to match should you decide to expand the greenhouse or build another one). In New England, granite, Connecticut bluestone, slate, and many other varieties are easy to find. In fact, you can even use stone as the floor of your greenhouse, provided it is reasonably flat. (See Types of Floors, below.) When deciding on a mason for the job, make sure you see samples of his or her work before making your final choice and selecting the look you’re after. (A mortared wall, for instance, might be built with an inch or more of mortar visible around the stone or with no mortar at all visible.)
People have used adobe bricks, wood, old tires filled with sand or rubble, concrete-filled tin cans, straw bales, old telephone poles, and recycled building parts as foundation materials — especially on the north walls of greenhouses, where there may be no glazing and insulation value is important. If you don’t have a lot of money to spend, look around nearby; you can probably find materials for a foundation or wall without having to resort to the expense of concrete or brick. Use your imagination!
Straw bales can provide plenty of insulation for a temporary greenhouse. They can be stacked to form a wall and then staked to bind them together. Once coated with plaster or a mud mixture, they provide thick, solid insulation as a north wall. Filled tin cans or orange juice cartons filled with sand or concrete and buried to grade can serve as a solid foundation for a temporary greenhouse. Again, the use you intend for your greenhouse will also dictate which alternative materials will work as its foundation.
Sometimes an existing foundation on your property may be dedicated to a new use. The foundation for my cold greenhouse started life in the late 1920s as a garage foundation, with two tracks for the car wheels. I broke up the tracks, dug out the old oil-contaminated dirt, and built a greenhouse of recycled materials on the foundation, complete with beds filled with fresh loam.
A larger greenhouse (a 12-foot by 20-foot structure is substantial for a hobbyist) is likely to have, along with a poured foundation, a floor that is either a poured-concrete slab (see The Concrete Slab), a floor of brick or slate pavers laid in crushed bluestone or sand, or simply raked pea stone (a mix of stones that are 1⁄4 inch to 1⁄2 inch in diameter).
For specific information on pouring a concrete slab, see the following section, Constructing a Concrete Foundation and Slab. For creating a brick or slate floor, the first step is to lay the base, which can be either sand or crushed bluestone. I prefer crushed bluestone because it packs down hard and forms an almost impenetrable layer against weeds. The base should be 3 to 4 inches thick. Lay the material and tamp it down using a heavy flat-ended tamper — a 4-foot length of heavy log will do in a pinch, although you can make a tamper by mounting a heavy piece of lumber on the end of a pole with a hand-grip circumference. The point is to produce a surface that is well compacted and firm. Next, wet the bluestone to help compact it. On top of the bluestone, distribute a layer of sand 1 to 2 inches thick. The bricks, slate, or stone will be laid onto this surface, allowing you to adjust the grade level without disturbing the bluestone base. If the floor is fashioned of brick or stone, brush sand into the cracks between the bricks or stones and then water everything down again. You will probably have to brush more sand into the cracks after you have watered it, until the cracks between the individual bricks or stones are filled.
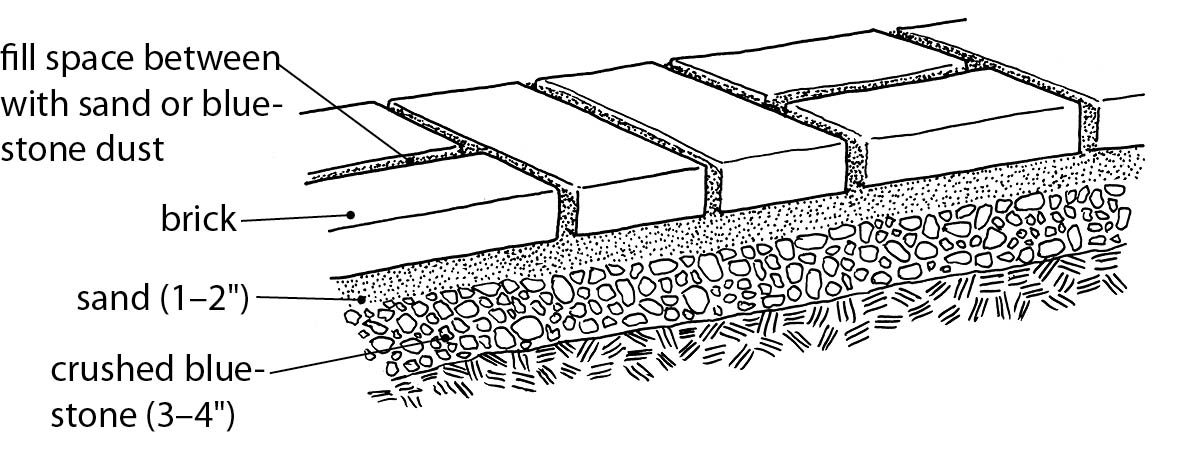
As a base for a brick, stone, or slate greenhouse floor, first layer crushed bluestone 3 to 4 inches thick, then add 1 to 2 inches of sand. After the floor material is placed, fill spaces with sand or bluestone dust.
A pea stone floor, unlike a concrete slab, does not require installation of a drain because water drains easily right through the stone. Pea stone, like bricks and flat stones, is also added on top of crushed bluestone in a 3- to 4-inch layer. If you install benches in the greenhouse, you will have to either pour a small concrete base for each bench or dig through the pea stone to rest the benches on the firm foundation of the bluestone base.
Following are basic step-by-step instructions for building a greenhouse foundation and/or slab made of concrete. As with all building projects, to ensure optimal results, before undertaking any aspect of the construction, it’s important to work out specifically what you are going to do and when you are going to do it and to have the materials on-site ready for use. You may also need people to help mix and pour concrete, set rebar, and level the concrete after the pour. Make sure that they are ready to go before any work starts.
Before beginning the foundation installation, you must carefully mark the dimensions of the foundation and ensure that it is perfectly square. If the foundation is slightly out of plumb, your greenhouse will be slightly out of plumb, which means it will be difficult to install glazing. In the case of glass and plastic panels, glazing is perfectly square. You’ll want to make the least number of adjustments at the glazing stage of building.
The first step in laying out a foundation is to decide where the four corners will be located. Choose and stake the location for one corner. In one direction from this corner, lay a 3-foot length of wood. Perpendicular to it and meeting at the corner lay a 4-foot length of wood. Between the ends of these two lengths, set a 5-foot length of wood as a diagonal. This will give you a 3-4-5 triangle that will be square (see the top illustration below). The two perpendicular sides form the first corner of your greenhouse.
Now measure along one side of the greenhouse from the corner edge of the 4-foot length of wood. Let’s assume this side will be 8 feet. Hammer a stake in the ground 8 feet from the first stake and use the 3-4-5 triangle to square this corner. If your greenhouse will be 12 feet long, measure 12 feet from each corner and hammer in stakes. Now check the diagonals between the stakes (see the center illustration below). For the foundation to be perfectly square, the diagonal measurements should be equal. If they are not, you will need to adjust the stakes until they are. Once the diagonals are equal, check all the other measurements (length and width) again to ensure that you have not inadvertently shortened one side.
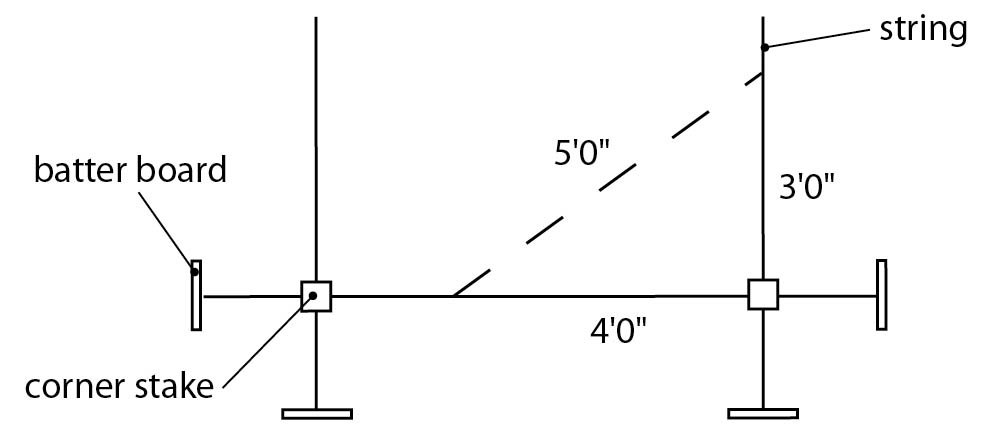
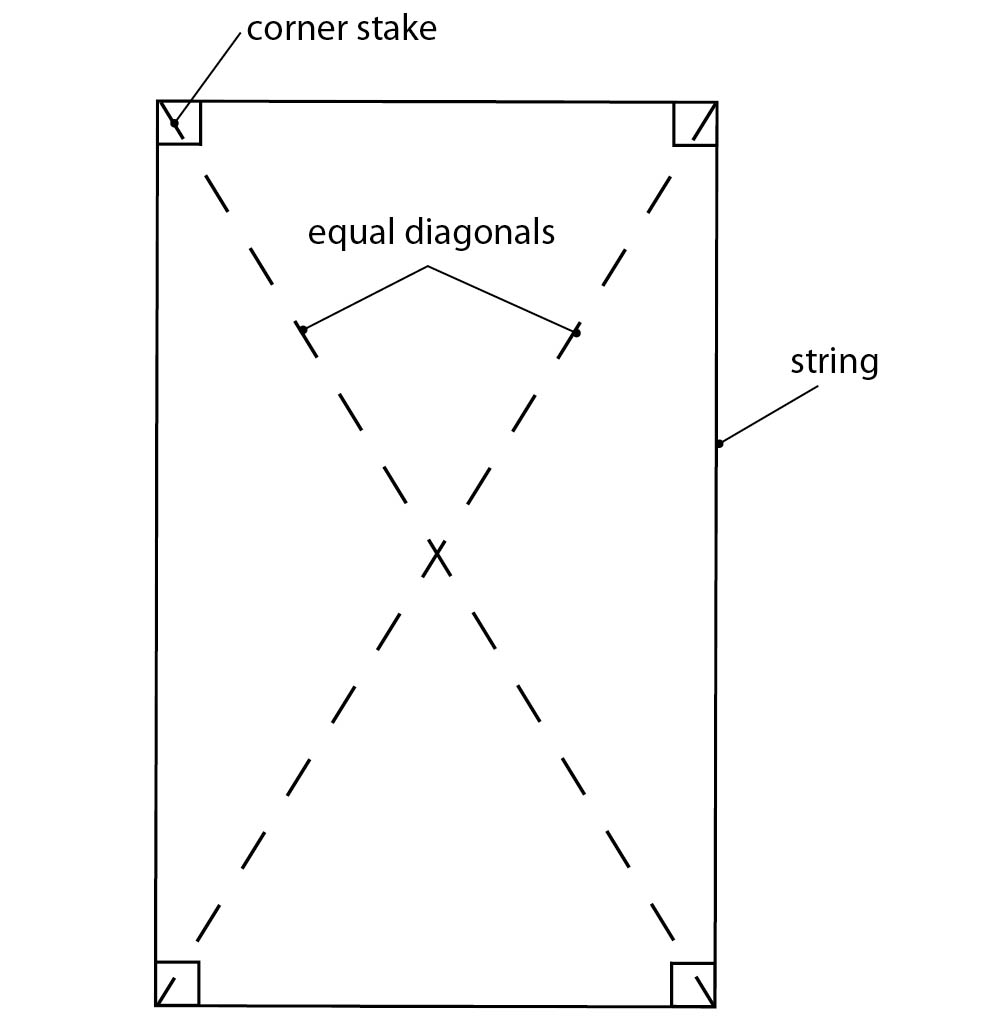
After you’ve established the site for your foundation, stake out rough corners and check that your diagonals are equal by measuring a 3-4-5 triangle.
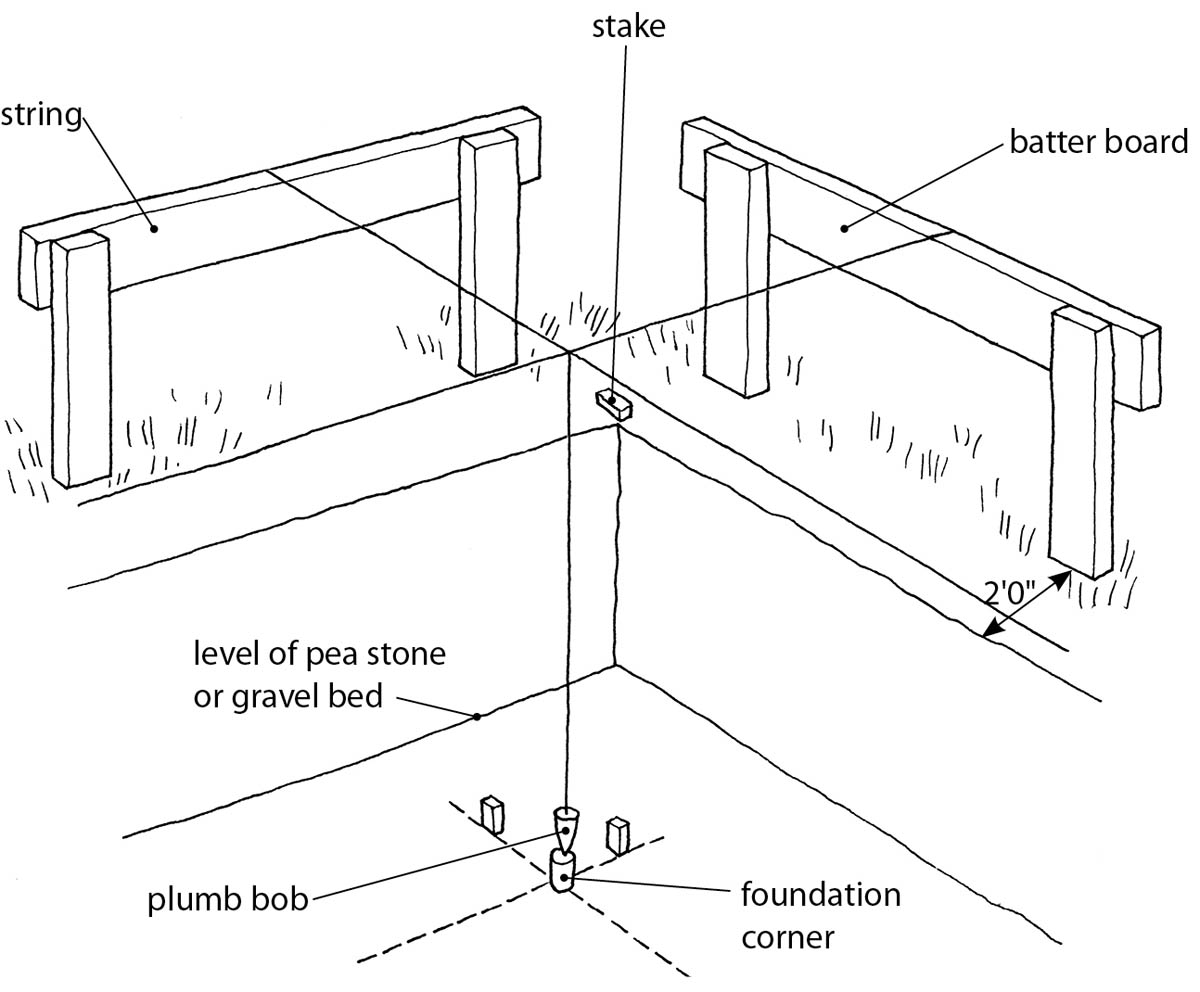
Place batter boards at the corners of your foundation and attach string to them to help in ensuring that your diagonals remain square during the excavation and after.
Next, on each side of the foundation outline you’ll have to place batter boards — that is, boards located a few feet outside of the margins of the foundation. Attach string to these to mark the outline of the foundation, which will allow the foundation to be excavated while the measurements you’ve determined are kept accurate. You’ll need a pair of stakes and a crossbar screwed to each batter board. I prefer to use 2×4s as stakes and a 1×6 or 2×6 as a crossbar. This produces a sturdy batter board that allows the string to be pulled fairly tight.
The batter boards are set up as shown in the illustrations at top right and bottom right, hammered into each corner about 2 feet from the corner stakes, with the location of the string marked by hammering a nail or making a saw cut in the batter board. You can also use a second string attached to the batter boards to mark the inner edge of your foundation.
Tie a length of mason’s twine across opposing batter boards to delineate one side of the foundation. Make sure the line passes directly over two of the stakes.
You’ll need two helpers for this step: Tie a length of string perpendicular to the first string, between batter boards, to delineate one corner of the foundation. From the corner, measure 4 feet along the first string you tied and make a mark on the string. From the same corner, measure 3 feet along the second string. While one helper holds the end of a tape measure on the 4-foot mark on the first string, the second helper holds the other end of the tape measure diagonally on the 3-foot mark on the second string. This diagonal should be 5 feet. If it’s not, adjust the second string on the batter board until you’ve once again established a 3-4-5 triangle, which will allow you to rough out the rectangle. Attach and adjust the remaining two strings the same way, forming the other corners of the foundation. When you have the rectangle marked out, make sure you check the diagonals. They should be exactly the same. If they aren’t, adjust the strings until they are.
Depending on the type of foundation that you intend to install — footing and foundation wall, slab alone — the depth of the area to be dug may vary considerably. Following are measurements to be used as guidelines for digging for both a slab and a slab with a knee wall.
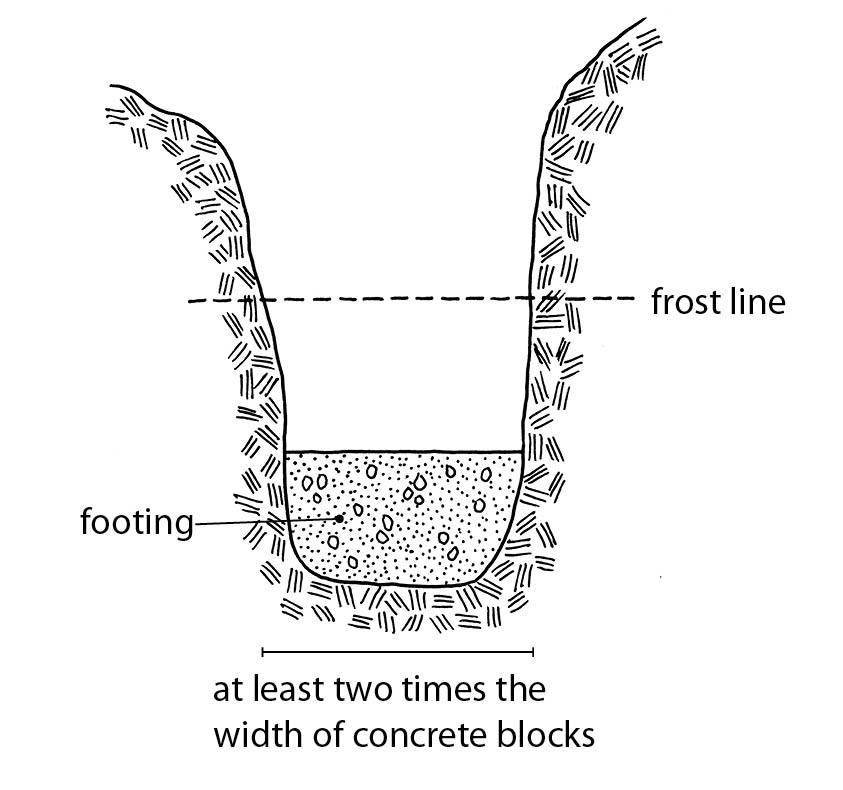
The footing, poured first, serves as a base for the forms and poured knee wall. Depending on local zoning, you may be required to install concrete reinforcing bars (rebar) upright in the footing. The concrete knee wall is poured around the bars to tie together the knee wall and the footing.
If you’re constructing a slab foundation, the top of the finished slab should be at or maybe an inch or two above ground level. Making it a bit higher than ground level allows water to drain off easily. A slab that is above ground level should be 4 to 6 inches thick in total (depending on the size of your greenhouse) with 6 to 8 inches of gravel beneath it. To accommodate these measurements, you should excavate 10 to 14 inches below grade.
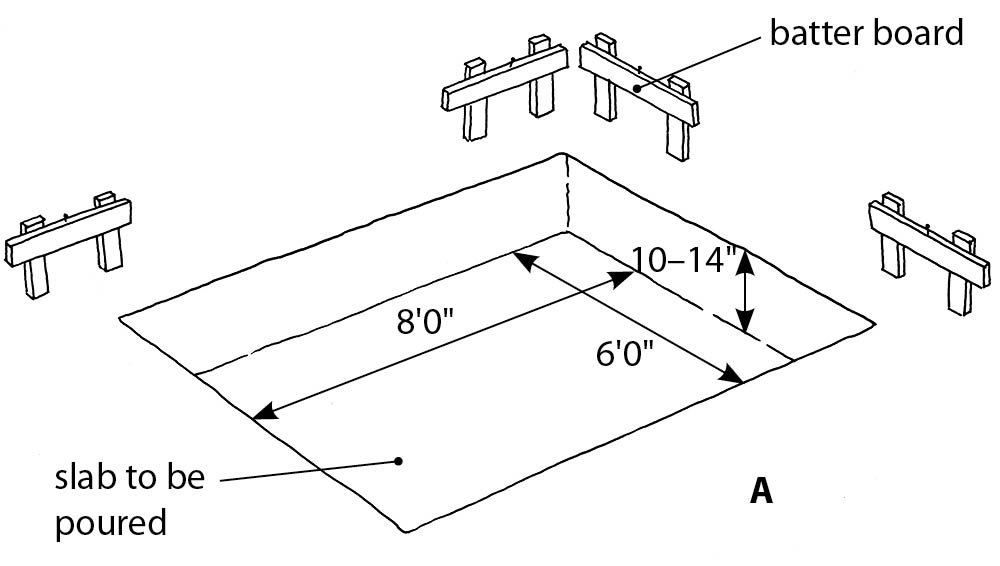
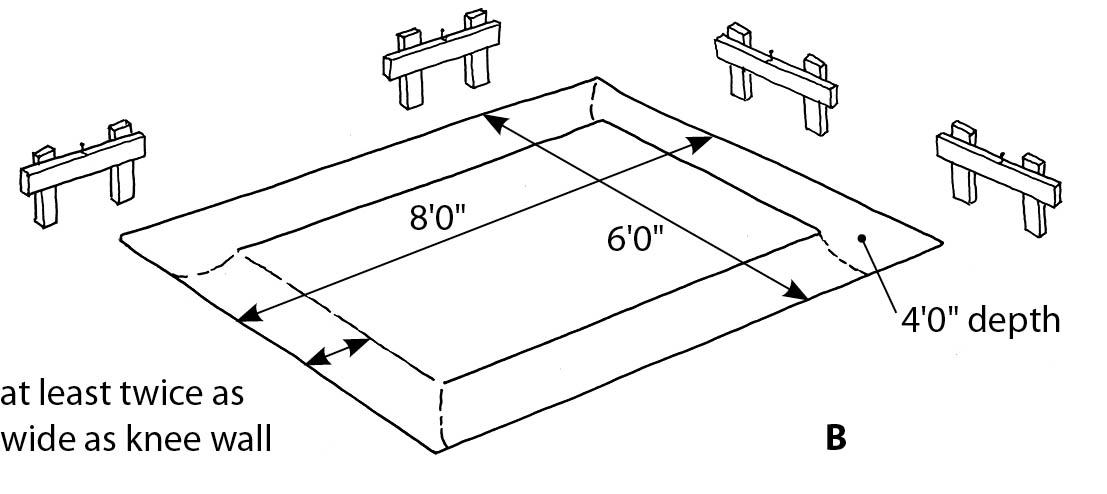
Excavation for a slab foundation (A) and for a footing and knee wall (B). For the slab, the excavation extends down a foot or so, which will later be filled with up to 6 inches of gravel or pea stone. The 4- to 6-inch-thick slab is poured on top of the gravel. For the footing and knee wall, excavate a trench. This will extend below the frost line, up to 3 feet in colder areas.
If your region’s winter temperatures require that you install a foundation below the frost line, you will need to excavate a trench around the perimeter of the greenhouse to the depth of about 4 feet. A backhoe can usually finish this work in an hour. This trench will be twice as wide as the knee wall, although it is usually made even wider (typically, the width of the backhoe bucket) to allow a worker to get into the trench and set up forms after a preliminary footing has been poured. The footing will also hold the concrete slab in place without the need for formwork. Note that the knee wall may extend to the level of the top of the slab or may rise as high as 4 feet above the slab, depending on the type of greenhouse you are going to build.
When excavating the foundation, remember to place the topsoil in a pile separated from the subsoil. If you plan to grow plants in beds directly in the greenhouse floor without pouring a slab, you can reuse the topsoil. If a contractor does the job for you, ask him to keep the subsoil and topsoil separate.
Figure about 4 to 6 hours to excavate the foundation for a 10-foot by 12-foot greenhouse. This should allow enough time for a backhoe to set up and dig the area. Be aware, though, that this time may increase if the excavator encounters large rocks or ledge. Ask the excavator for a cost estimate and compare it to the cost of doing the job yourself.
Wet concrete is runny stuff. In order to pour it successfully, you’ll need to contain it inside formwork, which is removed after the concrete is set. Commercial operators use the same forms from job to job; they oil the inside of the wood to prevent the forms from sticking to the concrete. If you make the forms yourself, you can disassemble them and reuse them as lumber in another part of the job where they won’t be seen. For example, if you are building a custom greenhouse with an insulated north wall, you might reuse the lumber from the forms for this wall.
Note that if water lines, drainpipes, and electrical conduits are to pass through the foundation walls and the slab, you’ll need to drill holes in the forms for the piping. After you install the piping through the hole, you must determine how you’ll remove the form with the pipe set in the concrete. One way to do this is to drill the hole for the conduit or pipe and then cut a vertical slot the width of the hole from the hole to the edge of the board. The wood that you cut from the slot can be temporarily nailed in place to hold the concrete and removed later.
The forms for a slab foundation should be tall enough to reach from the bottom of the excavation to grade level or an inch or two above it (depending on how much above grade level your slab will rise — usually from 2 to 14 inches). For one slab foundation, I made forms from recycled 2×8s and held them in place with stakes driven into the ground on the outside of the planks. It did the job and I was able to use the planks elsewhere afterward. If the forms don’t need to be tall, it is relatively easy to use planking like this.
The type of forms you construct varies according to the thickness of the slab you will pour, but usually 2×10s on all four sides suffice for a slab up to 6 inches thick. If the formwork is to extend below the frost line, you’ll need forms that are at least 4 feet high and will possibly want to pour a footer to provide a flat base for the forms before setting them up.
It’s important that the formwork be absolutely level or that it slope consistently about 1⁄8 inch per foot from side to side to allow water to drain off the slab. If you slope it slightly toward the doorway, you can simply brush the water out the door. As shown on above and in Setting the Drainpipe, if you install a drain in the floor, set it 1⁄2 to 1 inch below grade and float the wet concrete to slope toward the drain. Note that if your forms are out of plumb and you count on using as a guide for leveling your slab a line that you mark on the inside of the formwork, the resulting slab will not be level. What’s more, during a pour, concrete often splashes on such a line, obscuring it and making it very difficult to use as a guide.
If the formwork is to be more than 20 inches high, it is more economical to use 1⁄2-inch plywood rather than planks or lumber to build. Attach 2×4s every 16 inches to the outside of the plywood to support it and brace plywood forms with 2×4s to ensure that the plywood does not bulge under the weight of the foundation’s cement. Cement is heavy — about 180 to 200 pounds per cubic foot, depending on aggregate type and moisture content — so tall forms must be substantial.
As we mentioned before, if you plan on pouring a slab in addition to the knee wall, the forms might be set up only around the outside perimeter of the wall and everything can be poured in one go. Otherwise, you’ll need forms for both the inside and the outside faces of the knee wall.
If you have multiple forms for the entire greenhouse foundation (sometimes they are made in 4-foot lengths), they should be tied together, and if they are more than 30 inches tall, they should be braced so that the weight of the cement doesn’t cause them to collapse. For added strength on taller forms, you should install rods (also called snap ties) across the foundation and run some rebar in the center of the form channel, though rebar is not altogether necessary for a greenhouse, which is much lighter than a habitable structure. Check local building codes for the final word. Rebar may be required, especially in earthquake-prone areas. You can forgo snap ties if you fasten the forms together with short 2×4s across the top of the formwork. In my experience, however, these nailed braces seem to be located right where you want to pour or trowel the wet concrete.
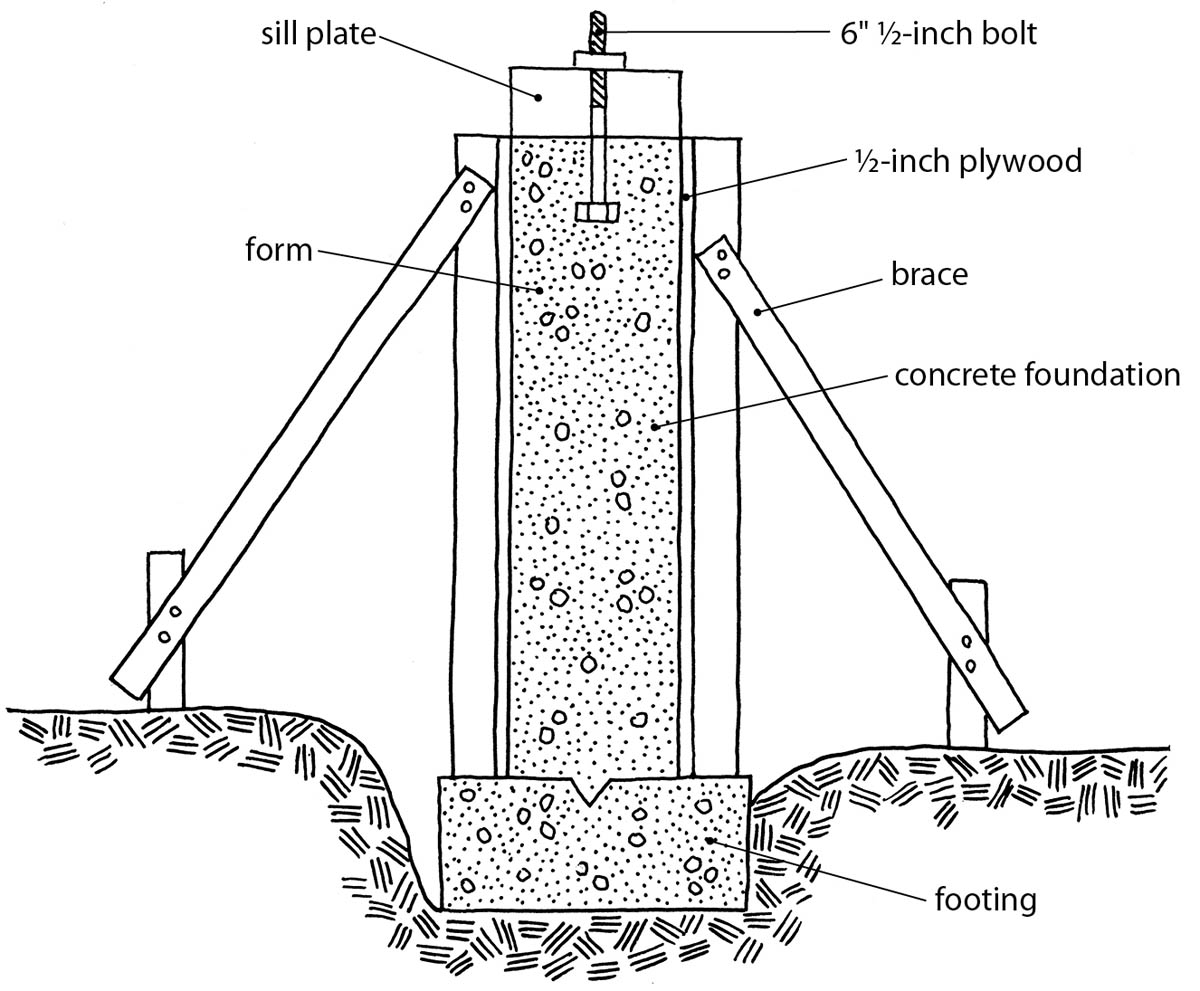
The 4-foot by 8-foot forms for a knee wall are braced with short pieces of lumber driven into the ground behind them. When in doubt, add more bracing. Wet concrete is heavy and you don’t want the forms to collapse.
If you are building a greenhouse on a rocky surface that requires specially cut forms, you will save a considerable amount of money if you do it yourself. As already pointed out, for most forms, you can use ordinary plywood and lumber or pressure-treated lumber and incorporate the material into the greenhouse structure once the building starts.
It should take 2 to 4 hours to set up formwork for a 8-foot by 12-foot greenhouse footing and another 2 to 4 hours to pour the cement. Often the slab and the knee wall are poured as one piece, especially if the foundation is for a smaller greenhouse.
There are three ways to get concrete: Order ready-mixed concrete from a supplier, rent a mixer and mix your own, or buy bags of dry ingredients to which you add water and then mix.
Concrete can be ordered from a supplier ready mixed by the cubic yard. To determine how much yardage you’ll need, measure the length, width, and height of your foundation in feet, multiple the three figures (length × width × height) and divide the result by 27 to get cubic yards. Most suppliers will deliver a minimum of 5 cubic yards (or charge for the full 5 if you order less).
If you decide to order the concrete, you must completely prepare the site for the pour: Formwork must be in place and you must provide access to the site for a large heavy truck. If your site is inaccessible, you may have to hire what is known as a boom truck to pump the wet concrete mixture to the greenhouse excavation. These trucks can cost $1,000 to $2,000 per day. You could organize a wheelbarrow brigade to move concrete to the site, but this means the truck will have to wait while the concrete is moved and you may get charged extra for waiting time. Note: When ordering concrete, order an additional 10 percent to ensure that you have enough to finish the job, but be aware that ordering too much often results in concrete being dumped at the job site. Measure carefully so that you accurately determine your needs!
A less expensive option if you need a smaller amount of concrete is to rent or buy your own concrete mixer and prepare the stuff yourself. An electric or gas-powered mixer can cost under $500, or you can get one from your local rental store for less than $100 a day. Be aware, however, that you may need a truck to get the mixer from the store to your site. Of course, you also need to know how to make concrete. (See What Is Concrete?)
Another option for small jobs is to buy pre-mixed bags of concrete, pour the mix into a wheelbarrow, add the required amount of water, and stir with a hoe or shovel. In my experience, this is the most expensive way to get concrete. If your job is larger, it is much less expensive to purchase the ingredients separately as opposed to premixed. In addition, making your own is time-consuming and the concrete is often not mixed properly. The most cost-effective method is to buy or rent a mechanical mixer. The time saved, not to mention the wear on your back, is significant as well.
To make concrete from separate ingredients, mix one 94-pound bag of Portland cement, 21⁄2 cubic feet of coarse builder’s sand (do not use beach sand), and 3 to 4 cubic feet of aggregate. To this mixture add from 5 to 6 gallons of water. Add the water carefully to avoid making the concrete too wet and sloppy. If it’s too wet, the mixture will slump, or sag, and will dry with an uneven surface. A shovelful of concrete should stay on the shovel when you lift it. If it runs off the edge, it is too wet. To correct a too wet, sloppy mix, simply add more sand and Portland cement in the appropriate proportions. Note: When you have finished mixing the cement, remember to hose off the mixer so the cement doesn’t have a chance to set up on it. Hardened cement can be removed from a mixer by lightly tapping the metal casing with a hammer.
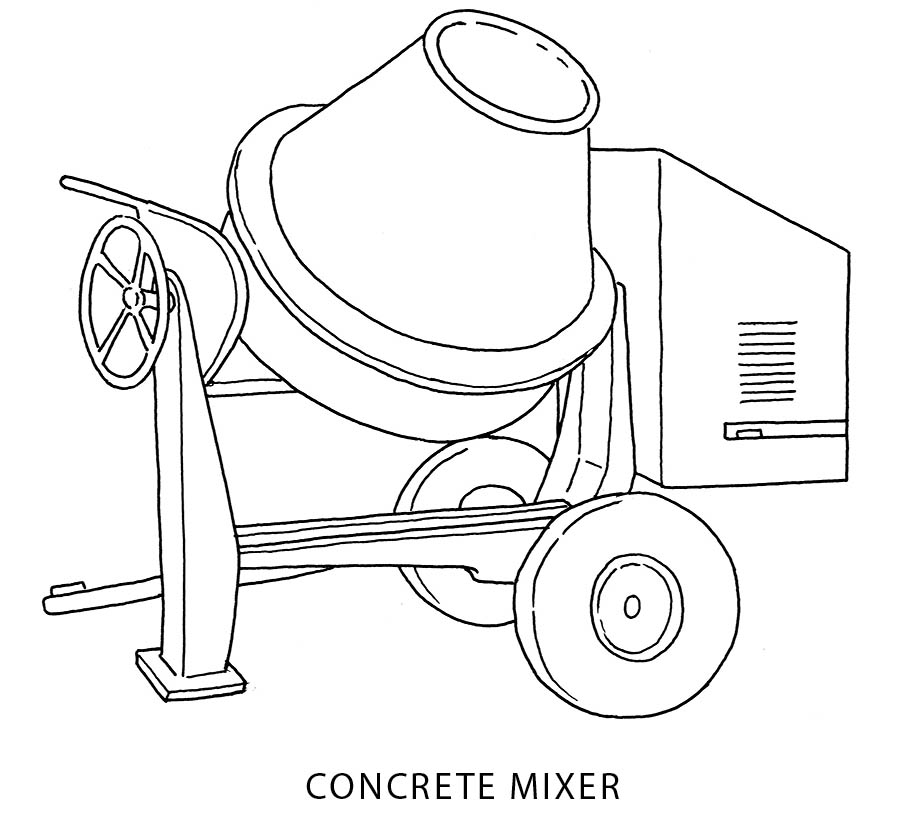
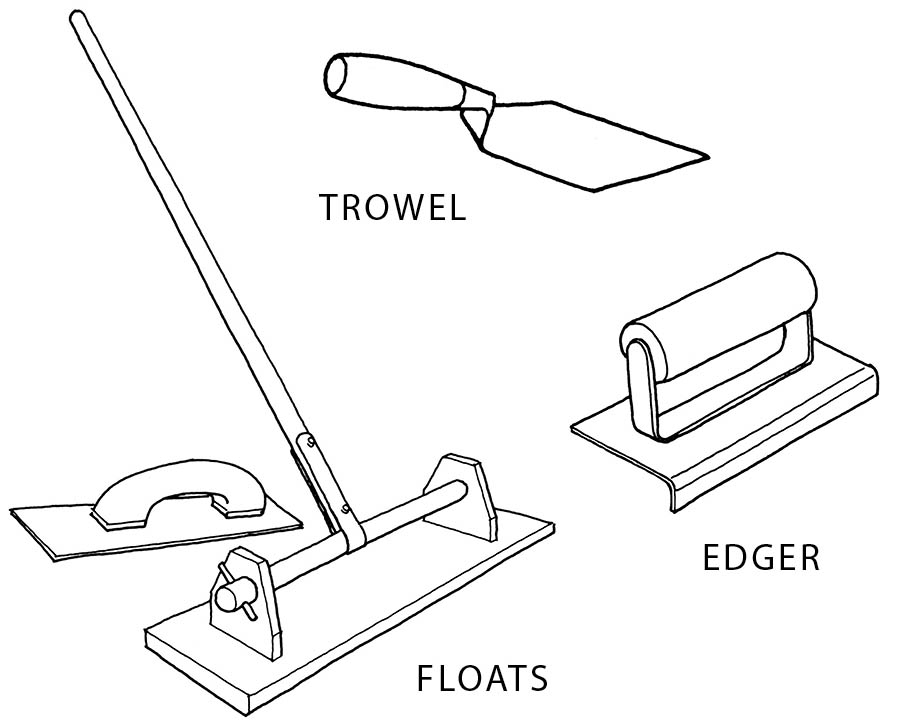
For a commercial greenhouse installer, the job of excavating the hole, setting up forms, and pouring concrete is relatively easy, though these services may be expensive. Of course, you can do the work yourself, but pouring the concrete can be the trickiest part of the whole process.
When the concrete is poured, it should be consolidated or compacted while wet to make sure that all air spaces and holes have been eliminated: If you are doing the work at the pour, drive a concrete bar, a hoe, or a spade into the substance until you hit the bottom of the form, then work it up and down to settle the mix. After this process, carefully level the surface of the concrete using a trowel. This will ensure that the greenhouse structure can sit on the foundation without any gaps. (If you do have gaps between the foundation and the greenhouse after you install the sill plate on the sill insulation, you can fill them with spray foam insulation, available at any hardware store.) Let the concrete set for a half hour or so before going over the top again to ensure that it is perfectly level. After this time, much of the water in the concrete will come to the surface. In addition, during this time the concrete may slump (if it is going to) or an air bubble may pop on the surface, making it necessary to level it.
After the concrete has set for an hour and it is still damp, you can insert in it the bolts that will be used to hold the greenhouse to the foundation. The sill plate or bottom plate of a prefabricated greenhouse may be predrilled for bolts, so you’ll have to take spacing measurements from these holes and space the foundation bolts precisely. If the greenhouse is custom and you plan on using a 2×6 or 2×8 sill plate in your construction, space the bolts 2 to 3 feet apart, pushing them into the top of the foundation and leaving 11⁄2 inches to 21⁄2 inches of bolt exposed above the concrete. In the future, you’ll thread each of these bolts with a washer and nut to anchor the greenhouse to the foundation. If you intend to recess the bolt into the sill plate, leave only 11⁄2 inches of the bolt exposed.
Poured concrete should be allowed to cure in the forms for at least a week before you remove the forms and begin building, but if you can leave it longer, do so. Concrete continues to cure for a long time after it has hardened. While it is curing, it is best to cover the concrete with damp sacking or plastic sheeting to keep it moist. Note that the strength of the concrete is affected by the temperature at which it cures. In general, it takes concrete much longer to cure in cooler temperatures, and pouring concrete in temperatures below freezing is not recommended.
In colder areas, it will be very beneficial to insulate your greenhouse foundation wall. Typically a poured wall for a greenhouse will be 4 inches to 8 inches wide, which allows for using 1-inch-thick rigid polystyrene foam insulation around the outside of the foundation and a 2×8 or 2×10 sill plate. If you live in a really cold region, you might want to use 2-inch thick insulation. If you are assembling a kit or premade greenhouse, you can still use insulation, but you’ll need to cover the top with flashing that extends from the top of the sill plate over the outside of the insulation.
Polystyrene insulation comes in 1-, 2-, or 4-inch-thick 2-inch by 8-inch panels. Before the foundation is backfilled, paint the knee wall with black tar waterproofing and install the polystyrene against this material, which will hold the insulation in place. Then cover the insulation above grade to about a foot below grade with a gray, cementlike coating such as Structural Skin from Conproco (see Resources). This will prevent it from being damaged by animals or tools that might bang against it and keep it from breaking down in the weather. It also helps to eliminate pink or blue foam chips on the ground outside the greenhouse. Trowel the coating onto the polystyrene, then smooth it to a final finish. Attach reinforcing mesh to joints between foam panels before covering with this material to ensure that the covering doesn’t crack in these spots when dry. Some insulation coatings are also fiber reinforced.
The coating I used has lasted more than 12 years with only one small area of damage where an animal tried to burrow into the greenhouse. The covering is easily patched where it is necessary.
Foundation costs will vary according to the cost of the concrete, but the calculation is simple, allowing you to plug in your own numbers and come up with a fairly accurate price for your part of the country.
The following cost estimate is for an 8-foot by 10-foot greenhouse with footings that are 18 inches wide poured 1 foot below the frost line; foundation walls that extend 2 feet above grade level; and a slab floor with a drain, electrical conduit, and water line.
First, calculate the volume of the footing (the length of the footing all the way around the foundation × the width of the footing × the depth of the footing): 36 linear feet × 18 inches × 12 inches.
Remember not to mix feet and inches; convert inches to feet: 36 × 1.5 × 1 = 54 cubic feet. Divide 54 by 27 (the number of cubic feet in a square yard) to arrive at 2 cubic yards, which is the amount of concrete needed for the footing.
Next, calculate the wall volume (length × width × height). The walls are 4 feet high and 6 inches thick, from the top of the footing to sill plate: 4 × .5 × 36 linear feet = 72 cubic feet. Divide 72 by 27 to arrive at 2.67 cubic yards.
Finally, calculate the volume of the slab. It will be 7 feet wide by 9 feet long by 6 inches thick: 7 × 9 × .5 = 31.5 cubic feet. Divide this by 27 to get cubic yards: 31.5 ÷ 27 = 1.2 cubic yards.
To determine the total amount of concrete for the job, add together the amounts you’ve determined: 2 + 2.7 + 1.2 = about 6 cubic yards. Call a local concrete supplier to find out how much concrete mix costs per yard and multiply this figure by 5 to arrive at a final cost.
To reach a total cost for the pour, factor in the cost of formwork (which can be reused in construction), rebar, anchors for the greenhouse, and any associated piping, including electrical conduit from the hardware store or home center. These costs vary and may add only a few dollars to your total depending on how many conduits you need.
A slab is the simplest concrete foundation to make for a greenhouse, but it may move or crack if you live in an area of heavy winter frosts. To help prevent cracking or moving, before you pour the concrete lay down a bed of gravel or crushed stone at the bottom of the excavation. This bed will help the area around the greenhouse to drain, effectively keeping water away from the concrete pad. Because the gravel moves, it also eases the expansion of the concrete slab, allowing it to “float” as the ground freezes and thaws, thereby preventing cracking. A gravel base can be between 4 inches and 6 inches thick. (See Insulation below for more information on options for insulating between the gravel and the pad.)
As Kevin Reed suggests, to further prevent any shifting in the slab floor and to keep the slab from breaking should it shift, lay wire mesh 6 inches on center before pouring the slab. Reed says, “The mesh comes in 4×8 sheets and is easy to handle and manipulate. We set it on small stones to keep it off the gravel and to allow the concrete to flow around it.” Note that the mesh should be 1 to 3 inches from the edges of the slab to prevent any metal from protruding from the finished slab.
If you are building a slab foundation and you live in an area where winters are very cold, you might want to insulate beneath it. After the hole for the foundation is excavated, deposit a layer of sand or crushed stone at the bottom and tamp it down to provide a smooth, even surface for insulation. Next, lay rigid foam insulation directly on the sand or crushed stone, making sure to butt the panels together tightly. You may even tape them to keep them in place when the concrete is poured. Try not to step or walk on the panels during this process; your weight could break them. After the panels are laid, creating a flat surface, you can install the wire mesh on top of them.
Note that after you have poured the concrete for the slab, you cannot step into the concrete at all to screed or smooth it; all work must be done from the edges of the slab to avoid disturbing the insulation. Once the concrete has hardened, you can strip away the forms and install insulation around the edges of the slab before backfilling the area. This ensures that the concrete slab is “floating” completely on insulation, which helps to prevent heat loss from the bottom and sides. Insulating the slab in this manner is very helpful if you intend to use under-floor radiant heating to keep the greenhouse floor warm. When the greenhouse is completed, avoid driving into the structure or introducing other exceptionally heavy weight to the slab to keep the insulation beneath it and on the sides from breaking.
If you are to install a drain in the slab, use a flush-mounted shower-style drain that is set about a 1⁄2 inch or 1 inch below the top of the concrete and then slope the concrete down to the level of the drain. A 1⁄2-inch slope for a 10-foot-wide greenhouse and a 1-inch slope for a 20-foot-wide greenhouse ensures that the greenhouse floor will not collect puddles. Remember to cover the drainpipe with duct tape or a similar material when pouring the concrete so the drain doesn’t become plugged. At the other end of the drainpipe you can install a dry well — that is, a hole filled with gravel to give draining water a place to go. (See The Dry Well.) If you don’t install a dry well, make sure that the drainpipe is sloped sufficiently, about 1⁄4 inch per foot is adequate, to allow water to run away from the greenhouse — preferably not onto your neighbor’s property!
If you are mixing concrete in a mixer, do so at the job site and tip it straight into the formwork. If you have concrete delivered, the truck will simply back up to the site and run the concrete into the formwork. Make sure you don’t disturb the rebar or mesh when pouring, and work the concrete to remove air pockets or bubbles.
After the pour, the next job is to remove excess concrete and level the slab. This process, known as screeding, involves using a straight board, usually a 2×6 or a 2×8 set on edge. The lower edge is pulled across the wet concrete in a sawing motion to level the top while the other end of the board rests on the forms on the perimeter of the slab. Effective screeding is another reason why the formwork must be completely level.
As the screed board is moved across the concrete, some concrete may build up in front of it. That’s fine. The excess will fill any hollows as the board travels along the forms.
Be extra careful if you have installed a central drain. To accommodate the slope toward the drain, one end of the screed board is placed on the drainpipe and the other end rides on the forms. This keeps the entire greenhouse slab sloping slightly toward the center drainpipe.
If you intend to build a brick wall on your slab, note that the bricks may be set at the edge of the slab or 1 or 2 inches inside, with the edge of the slab outside of the wall sloped slightly away from the wall to allow water to drain off it.
When screeding is finished, the slab will have a slightly ridged surface. From here you have two choices. If your greenhouse is large, the slab is “floated”: A wooden float is moved over the concrete to smooth the surface by removing bumps and voids, pushing any lumps below the surface and compacting the concrete. Floating a slab is usually done when a slight roughness is desired in the final concrete surface.
If you want a very smooth hard surface for your greenhouse floor, you will need to trowel the slab. To get the smoothest surface, you should let the concrete dry slightly until it has hardened enough so that water ceases rising to the surface of the slab. If there is water on the surface, it should be squeegeed off or allowed to evaporate before the concrete is troweled. To trowel effectively, press the tool against the surface of the concrete and work in a large sweeping motion, gradually smoothing the concrete. Try not to dig the trowel into the concrete or you’ll have to go back over it to get it level and smooth. If the slab is large, some masons walk backward through the concrete smoothing it as they go (not an option if you’ve used polystyrene insulation beneath it); others build staging over the job and kneel or lie on it. If your slab is not too large, you can set a board over it with the board ends resting on two concrete blocks on either side of the slab and, making sure it will hold your weight without bending or breaking, kneel on it to trowel. If you sign your name or write your initials and the date in the corner of the slab with a trowel, forever after people will know that you did the foundation work.
As the concrete cures, insert anchor bolts into the edges of the slab to serve as fasteners to hold down the greenhouse if it is to be mounted directly on the slab. If you don’t insert bolts while the concrete is wet, you’ll have to drill into the hardened concrete later to fix the greenhouse structure to the slab, which can lead to cracks and breakage on the edges of the slab.
When inserting anchor bolts, take care to place them where they will not interfere with studs or glazing supports. Some builders prefer to set the anchor bolts on a footing and foundation wall with only 11⁄2 inches showing so that they can be recessed into the wooden sill plate, though it’s also possible to set the bolts with 21⁄2 inches exposed and secure them on top of the sill plate. Note that if you’ll be fastening them on the top of the sill plate, you’ll need to make sure they aren’t located where you’ll be installing studs and supports. If your greenhouse has a base plate on top of the sill plate, you can hide the tops of bolts under the base plate.
Another way to install a sill plate is to insert the bolts into a 2-inch by 8-inch plate and push the sill plate down into the concrete so that its surface is level with the top of the concrete, as shown in the illustration below. This should be done just after the concrete is screeded and before the concrete starts to harden. After pushing the plate into the concrete, the edges of the foundation wall will probably need to be reworked to make them smooth. Note that pressure-treated wood reacts chemically to contact with concrete and, as a result, can rot very quickly. Because of this, it’s preferable to make this embedded plate out of a durable wood such as cedar.
Remember that if you are planning to build a kit greenhouse, the bolt location may be predetermined by existing holes in the greenhouse base. In such a case, you’ll have to use the base plate of the greenhouse as a template to locate and mark the bolt positions. You may want to support the base plate slightly above the concrete and use it to hold the top of the bolts in position.
If you intend to build a concrete block or brick wall around the edge of the slab, you must insert metal brick ties into the wet concrete to help anchor the blocks or bricks and then add more ties as you build the wall. As mentioned above, typically, a brick wall will be set either right at the edge of the slab or 1 or 2 inches inside the edge of the concrete slab, with the edge of the slab outside of the wall sloped slightly to allow water to run off.
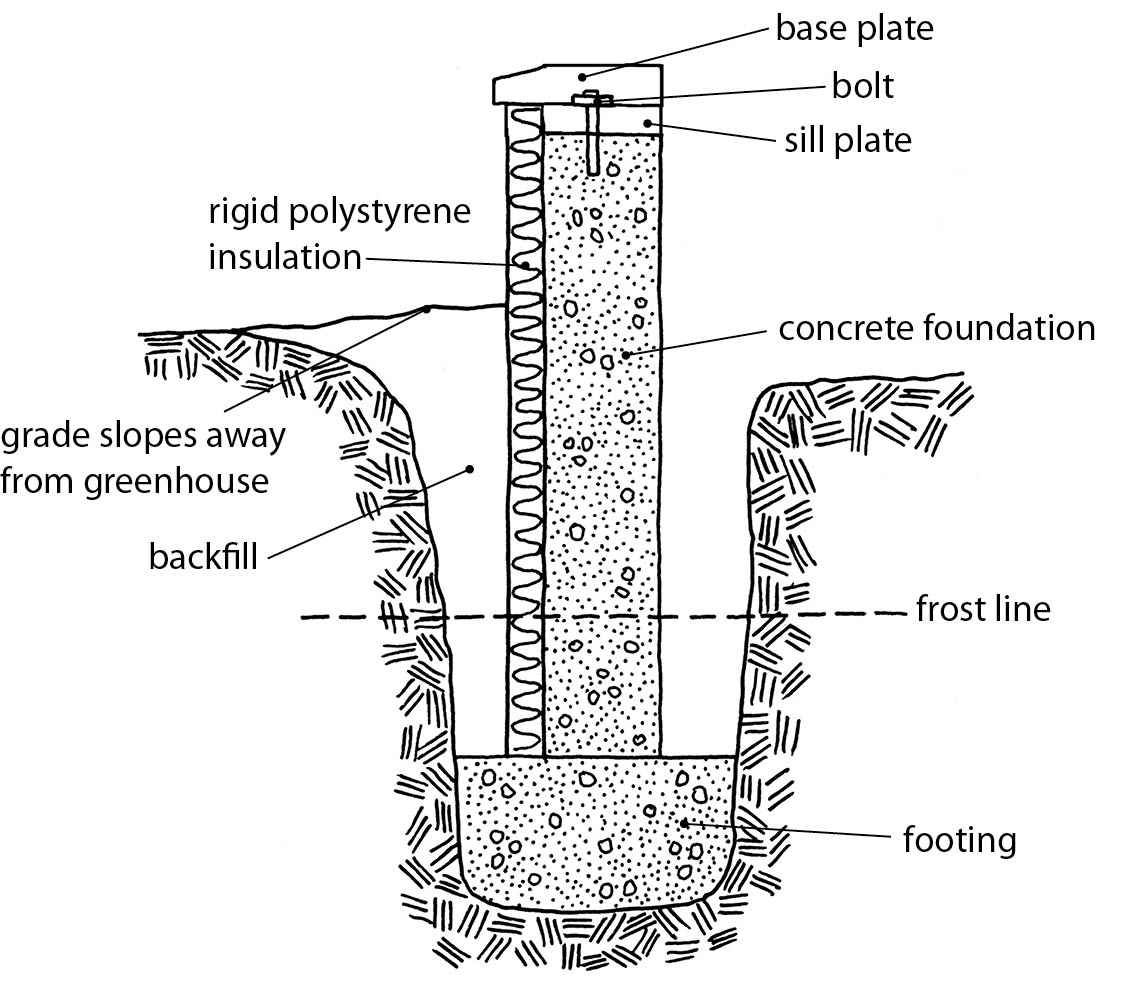
A footing and foundation wall is insulated before being backfilled. You can set the sill plate into the concrete to ensure that your structure will sit solidly on the foundation.
To give the slab a finished look, you should go around the edge with an edger or a pointed edging trowel, which rounds off the concrete corners and helps to prevent them from breaking.
Once the slab has been finished, cover it with plastic or damp sacks and leave it for several days to a week to allow it to harden slowly and cure. Do not walk on it until it is hard. Stepping on the slab before it has hardened can lead to cracks, chips, and marks in the surface.
Once the slab or slab and foundation wall has been poured and is hardened, you can begin the work of finishing the foundation. This may mean that you (or your contractor) will need to build an above-grade knee wall using concrete blocks, brick, or stone (if you have not poured a concrete wall). Even in the case of having poured a concrete knee wall, you may now need to surface it with brick or stone veneer. Along with referring to the following information, see Masonry Foundations and Walls, for suggestions on ways to finish a concrete foundation.
Mortar consists of Portland cement, sand, and water (see What Is Mortar?). Adding hydrated lime to the mixture produces stucco, which is used to coat the exterior surfaces of poured concrete or concrete block walls to waterproof them and give them a consistent, finished look that will not deteriorate and will retain its color without requiring any painting. You can also add plasticizers to make the stucco more workable and pigments to color the material. The amount of hydrated lime added varies according to the coat of stucco to be applied (scratch coat, brown coat, or finish coat). The material can be purchased premixed, however, much like concrete.
Stucco must be applied on a roughened wall; if you have a smooth concrete surface as a result of contact with forms, stucco will not adhere to it. You should rough up the surface with a wire brush or a scoring tool before applying the surfacing material. If your formwork was coated with oil, this will also make it difficult for the stucco to adhere to the concrete. In this case, you might have to pressure-wash the wall with soap and water to get rid of the oil residue.
To apply stucco, use a plastering trowel and smear the first coat (called a scratch coat) over the wall 1⁄4 inch to 3⁄8 inch thick. Apply the coat with some force to ensure that it sticks. Before it hardens, scratch the surface with a special saw-tooth-edged trowel to give the second coat a good base to which to adhere. Allow it to dry thoroughly, then wet it down before the next coat is applied.
The second coat, known as the brown coat, should also be applied using a trowel, about 1⁄4 inch to 3⁄8 inch thick. It is then smoothed before it too is scratched so that the third and final coat can be applied.
The third coat, known as the finish coat, is applied after the brown coat has dried thoroughly. If possible, start and finish the entire coating job in one day to eliminate any joints (places where you stopped troweling one day and started again the next). Once the final coat is in place, there are varying techniques to obtain different finishes. Wearing a rubber glove, you can apply hand or finger textures on the wet final coat, or you can use a hard bristle or wire brush for a different finish texture. To produce a smoother texture, use a large sponge or a wooden float on the wet surface. Try different techniques on a small test piece of concrete or a small corner of the wall to see which you like best before applying a technique to the whole project.
If you decide to make your foundation from concrete blocks, you’ll still need to lay a footing similar to one for a concrete foundation wall: a concrete base twice as wide as the wall. A footing provides stability and a flat base on which to build the concrete-block wall. Concrete blocks offer a reasonably inexpensive and fast way to build a greenhouse knee wall if you don’t want to pour concrete, but to some, concrete block is less attractive than brick or plain or surfaced poured concrete.
If you decide to build a concrete-block wall, you should plan the wall to accommodate the overall length of the individual blocks. Essentially, the dimensions of your greenhouse will be dictated by the length of the concrete blocks. This means that for a custom greenhouse, you will use multiples of the block length to determine its dimensions, which will allow you or the builder to construct the wall without cutting or breaking blocks.
Standard concrete blocks are 75⁄8 inches wide by 75⁄8 inches tall by 155⁄8 inches long. Adding a 3⁄8-inch layer of mortar between the blocks makes each 8 inches by 8 inches by 16 inches once positioned. It is not too difficult to design your greenhouse to suit this unit to eliminate the need to cut blocks. For example, locate the door 32 or 48 inches from the corner rather than 36 or 38 inches. Purchase 75⁄8-inch-long half-blocks to use in every other course ending at the door opening. If you plan to build a greenhouse from a kit, make sure that door openings in the kit suit the use and location of the concrete blocks.
The mortar most commonly called for in construction with concrete blocks is type M: 1 part Portland cement, 4 parts sand, and 1⁄2 part hydrated lime or 1 part type 2 masonry cement, 1 part Portland cement, and 6 parts sand. Type M is specifically recommended for foundations and belowground applications. Other types of mortar are type S, type N, and type O. Types M and N are the best for brickwork. (For more information, see What Is Mortar?)
The first step in building a concrete-block wall is to mark out where the blocks will be laid. Snapping a chalk line is the best way to enable you to lay the blocks straight. The line can be placed 2 inches to 3 inches inside the edge of the concrete slab, but you can also set the bricks right at the edge of the slab. Determine where you’ll place your blocks before the slab is poured because if the slab is built to the same dimensions as the greenhouse, you’ll have no choice but to build the wall at the edge of the slab.
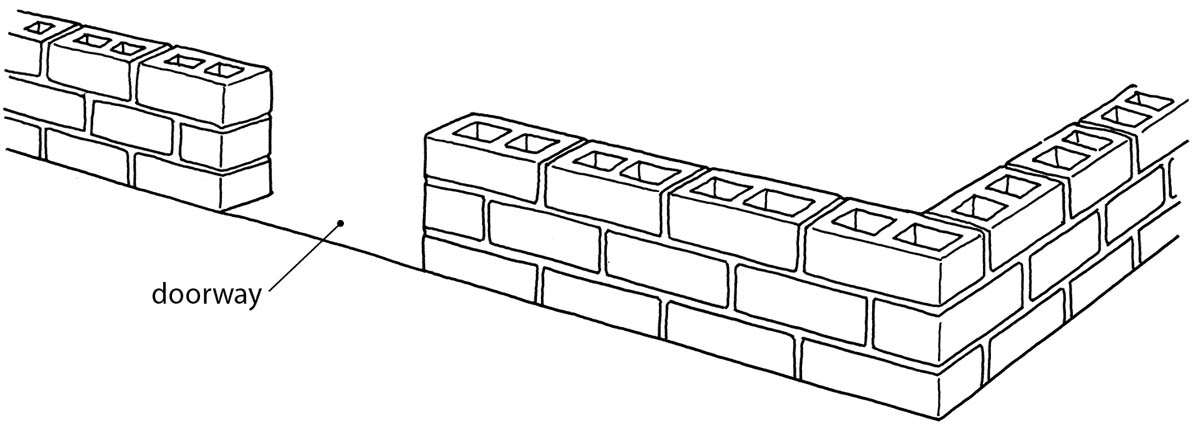
A mortared concrete-block wall is first built up at the corners and is then filled in, with a space left for the door. This space can be 371⁄2 inches wide to allow for two 3⁄4-inch jambs or 39 inches wide to allow for two 2×4s on either side of the opening.
Next, put down a mortar bed on which the blocks will be laid. Note: Do not apply mortar too far in advance of setting blocks. Doing so will allow the mortar to dry out, making it less likely to adhere properly to the blocks. The mortar bed should be 8 to 10 inches wide and about 1⁄2 inch to 1 inch thick. When you set the blocks into it, you will compress the mortar to about 3⁄8 inch. Set the corner block in the mortar and tap it down carefully until it is lined up with your strings or chalk line. Use a level to make sure the block is perfectly horizontal and vertical on the top and sides. Every other block will be lined up according to this first corner block, so you’ll need to be sure it’s positioned perfectly.
Then put a trowel full of mortar on each of the two vertical ends of the second block and push the block down into the mortar bed to align it with the corner block. Be aware that if your mortar is dry or not well applied, it may fall from the end of the block as you set and align it. As you lay the second and third blocks, try not to move the blocks already in place, however easy it is to do so.
After you have set the first four or five blocks, check them with a level to be sure they are straight. This first row of blocks is the most important and should be laid very carefully. If it is not straight and level, the next layers will probably not be level either. Work from the corners toward the middle of the wall. If you doubt the accuracy of your eye, place string lines across the face of the wall to ensure that the courses of block are going up straight. Use the level frequently to make sure that the wall remains true. First build four or five courses of blocks on the corners, then stretch a string between each corner to help you keep the middle blocks level when you lay them.
If the wall is curving or leaning or if the mortar is seeping out from between the blocks, stop and figure out what you are doing wrong. It may be that your mortar mix is too runny. It should be the consistency of thick, gritty peanut butter. If it’s too dry, it won’t adhere to the blocks very well. If it’s too wet, it will run out from between the blocks. If some mortar squishes out from between the blocks, after you’ve tapped them down to level them, wipe it off flush with the blocks.
Experienced builders can put up most of a tall wall in a day, but until you gain experience, don’t build more than a few courses at a time. Be sure you check that the wall is straight and level before leaving the mortar to harden.
When the mortar has become hard enough to just press a thumb into it, it should be tooled or pointed: All the joints should be sloped or made concave or V-shaped to allow rainwater to run off the blocks. Use a diamond-shaped trowel held at a slight angle to cut the mortar into a slight slope, or if you prefer a concave or V-shaped joint, slide a special pointing tool along the line of mortar.
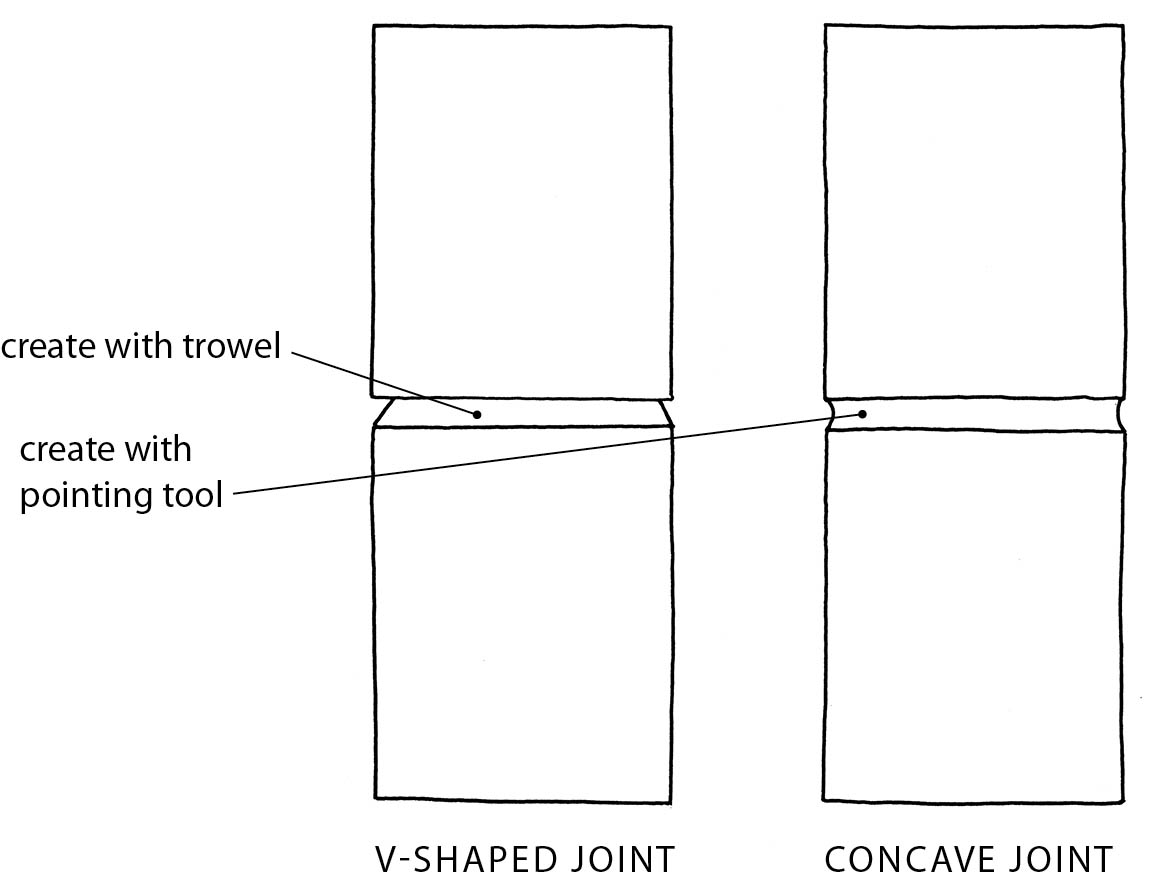
V-shaped or concave joints made in the slightly dry mortar allow rainwater to run off the blocks.
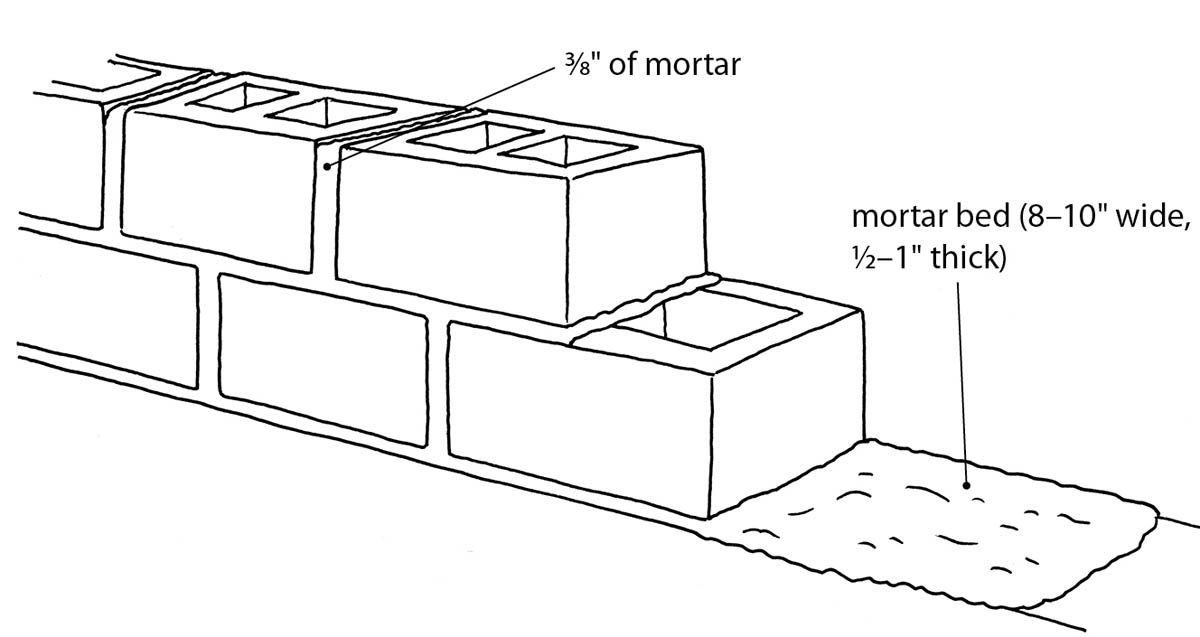
The mortar bed for the beginning of a concrete-block wall should be 8 to 10 inches wide and 1⁄2 to 1 inch thick.
Install anchor bolts in the top of a concrete wall by filling one of the hollow cores in the concrete block with mortar and inserting the bolt into the mortar while it’s still wet. Fill the holes in the blocks about halfway with crumpled paper to hold the mortar in place while it sets.
An alternative to laying a concrete-block wall with mortar is dry-laying a wall using concrete blocks and then filling the voids in the blocks with poured concrete. An important consideration in this type of building is the dimensions of the blocks: They will not be the same as they are if you mortar the blocks in place (because you will not be able to count the mortar in between the blocks). For a novice builder, however, this method is a very easy way of building a strong wall. After the wall is finished, you can coat it with stucco or parge it (see Dry-laid Block with Reinforced Parging).
You can use brick veneer on a concrete or block foundation to improve its appearance or you can build a low foundation wall of solid brick. Generally a brick veneer is started just below grade level on a step in the concrete wall known as a brick shelf. If you plan on building a wall entirely of brick, the wall is usually started on a footing poured into the ground below the frost line. Another possible combination is a poured footing with a concrete-block wall to just below grade with a brick wall built above the grade.
If you want a fancy foundation wall or if you’ll be facing a poured concrete or concrete-block foundation, you should use face brick, which is of higher quality than common brick. There are a number of other types of brick that you could use, some designed for paving, others for ornamental work. Make sure that you ask for the right type of brick for your project. Remember that a standard brick measures 21⁄4 inches by 33⁄4 inches by 8 inches. Allow 3⁄8 inch of mortar between courses and sides to determine the dimensions that will work for your wall so that you won’t have to cut brick.
Because freezing and thawing are virtually the only things that affect brickwork, you must be sure that you are using the right type of mortar mix, that the joints are made properly, and that the wall is flashed and caulked properly. You should install flashing at any point on the wall that is penetrated by an opening or capped with the sill plate. Flashing is simply a piece of metal or lead sheeting that is placed under the mortar layer 1 inch to 2 inches in from the outer edge of the brick and extends 3⁄4 inch to 11⁄2 inches beyond the bricks. It is usually bent downward to allow moisture to run off its surface. A well-laid brick foundation wall will keep most of the rain out of the greenhouse.
The outer face of the mortar should be tooled or pointed to a concave surface, which will prevent water from getting into the joint. After the foundation wall is completed, you might want to apply some form of sealer to the bricks to help prevent moisture from penetrating the wall. Any brick or concrete sealer painted on either side of the bricks will help to provide resistance to rain (on the outside) and sprayed water (on the inside).
If you decide to make your entire foundation wall of brick (as opposed to facing a concrete wall with brick veneer), for a small greenhouse the wall can be the width of one row of bricks (called a single-wythe wall). But if the greenhouse size is to be larger, the wall must be more substantial: Two walls parallel to each other with an inch between each, known as a two-wythe wall, may be required. The base of your greenhouse will give you a good idea as to which type of wall you’ll need. A base that is less than 4 inches wide requires one wythe. If the greenhouse base is 6 inches to 8 inches wide, you should plan on two wythes. A good mason will give you a better idea of how wide your wall should be.
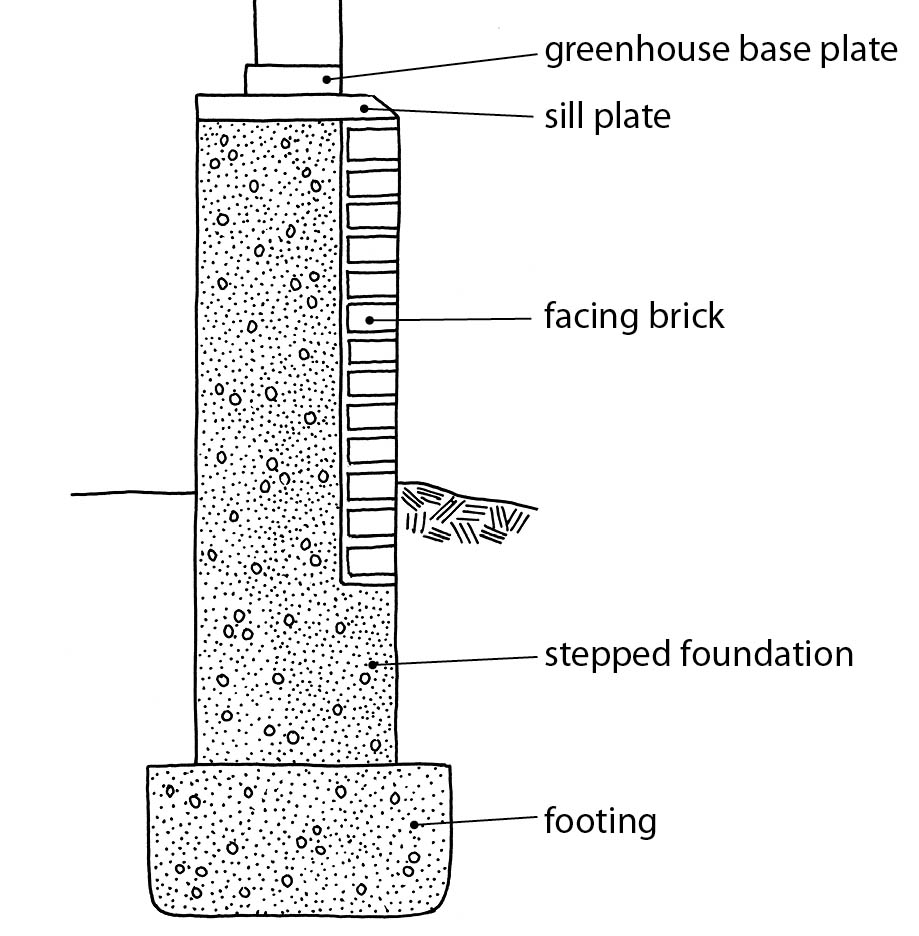
This concrete foundation has a step to allow application of brick facing, or brick veneer, on the knee wall. The concrete carries the load of the greenhouse while the brick face adds a pretty touch.
Course: Each level or row of bricks
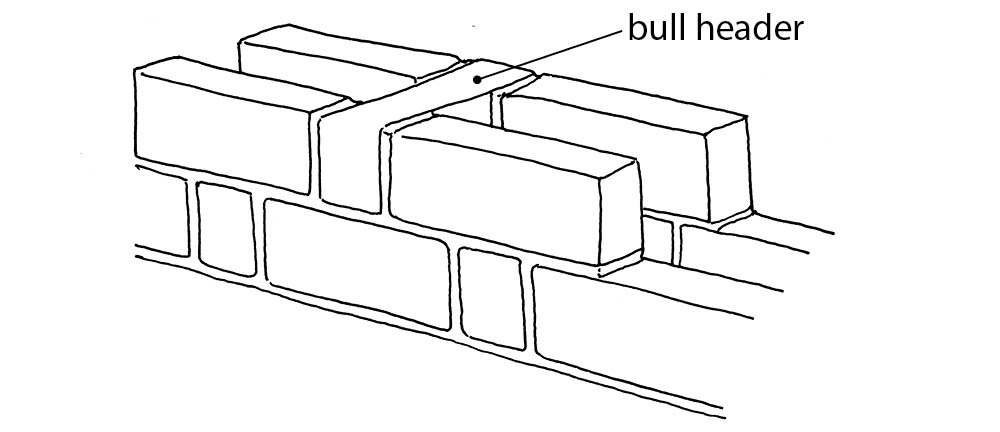
Header: A brick that bridges the gap between the two sides or wythes of the wall. A bull header is a brick standing on its side between the two sides of the wall. A brick that is not used to tie together both sides of the wall but is set like a header is known as a blind header.
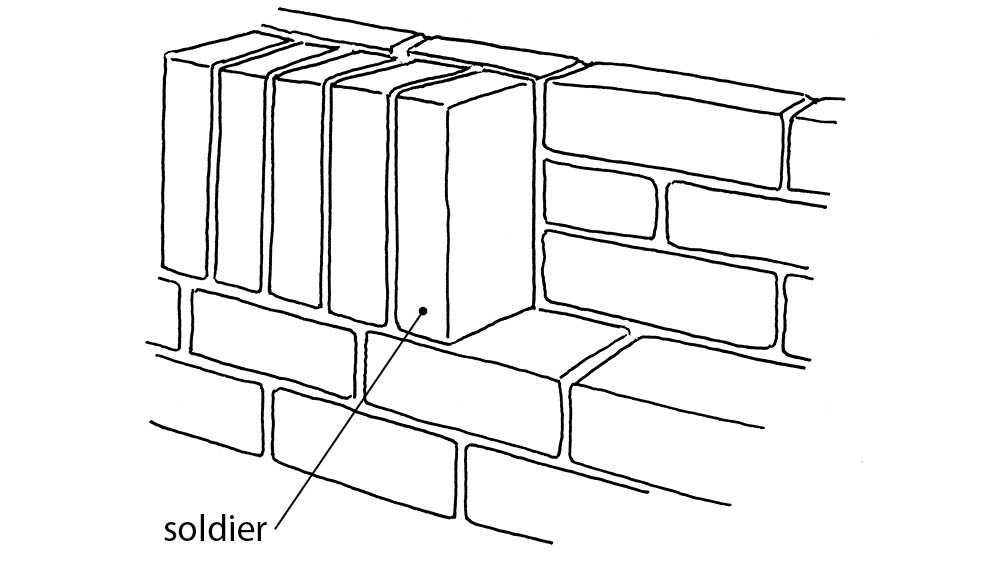
Soldier: A brick that is set on end with the narrow face out. If the wide face is out, it is known as a sailor. This type of application is most often used for decorative applications.
Flashing: Sheeting made of lead or tin that is used to divert rain and snow from a wall or other surface. Flashing should be used around all windows, doors, and other openings in a brick wall and beneath the mortar layer where it meets the sill plate.
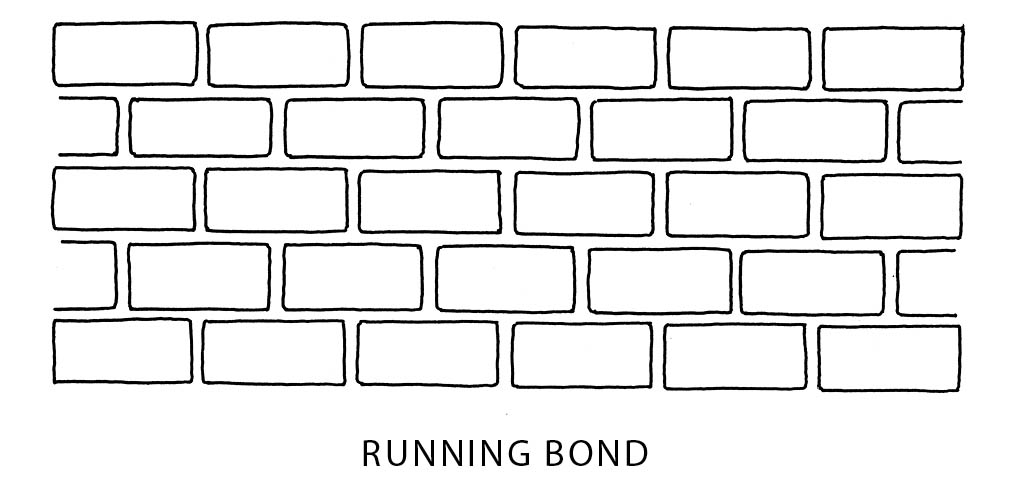
Bond: The pattern used in a brick wall. Common bond, running bond, English bond, Flemish or Dutch bond, running bond, and stack are some of the most common. Each pattern gives the wall structural strength and ties together both sides.
A greenhouse foundation wall is a good project for learning to lay brick. Most greenhouse knee walls are only five or six courses high — not so high that an amateur can get too far along without being able to correct any mistakes, even if they require dismantling the work to correct them.
If you want to lay a brick foundation wall properly, it’s very important, as with a concrete-block wall, that each course be kept perfectly level. The first step in achieving this is learning how to handle the trowel. A trowel should be held with your thumb on the top, which makes it easier to pick up mortar and lay it on the bricks or the foundation. If you hold the trowel with your thumb wrapped around it, it is difficult to turn your wrist to apply the mortar in the right place. If you hold the trowel in your right hand, work from left to right.
First deposit a 3⁄4-inch layer of mortar three to five bricks long on top of the concrete slab to form a mortar bed. Trim the mortar from the front face of the slab and then lay the first brick at a corner. Tap this brick into place and check it with your level to make sure it’s perfectly level and square with the greenhouse corner. “Butter” the next brick on the end and set it against the first placed brick, ensuring that there is a good bond between the mortar and the brick. It’s important that you don’t move the first brick as you lay the second one. Typically, a beginner does not sufficiently butter the end of the second brick, meaning there’s not enough mortar between the bricks to fill the joint. Pushing mortar into the joint from above makes for a weak joint that allows moisture into the wall. It’s better to rebutter the brick and lay it again.
When laying a brick wall, as with a concrete-block wall, it’s best to build the corners first and stretch a mason’s twine between them to ensure that each course is straight and level. Work carefully and lay the bricks tight, with about 3⁄8 inch to 1⁄2 inch of mortar between each. If you’ve been careful in your greenhouse design and dimensions, you may not have to cut bricks. If you do need to cut a brick, however, there are several ways to do it. You can score around the brick with a brick set, then rap the brick along the cut line on each face. A brick may have flaws that cause it to break in places other than the cut line, however; if this occurs, either discard the brick or chip away the damaged part until you get the half-brick that you need.
A more accurate and foolproof method for cutting brick is to use a masonry saw or an old circular saw fitted with a masonry blade. I’ve used this method when laying a brick path. I had to cut bricks as the path narrowed from ten bricks across to eight or seven. Be aware that cutting a brick using a masonry blade creates lots of dust and flying debris, so you’ll need to wear a dust mask and eye protection.
When you’ve finished laying a course or two in your wall and the mortar is still plastic, tool or point the joints of the brick so that they shed rain. (See Making a Mortar Bed and Laying the Block and the illustration here.)
To butter a brick, place about half a trowel of concrete on the end of the brick. Then, using the trowel, cut off the concrete edges at about a 30-degree angle on all four sides of the brick. Now you will have a short, pyramid-like pile of mortar on the end of the brick. Push this pile of mortar against the previously set brick and the mortar will squish to fill the entire joint. Use the trowel to lop off any mortar that has been squeezed out of the joint beyond the edge of the brick. Butter each brick before pushing it against the previous one. If you don’t get enough mortar between the bricks, lift away a brick, scrape off any mortar, and butter it again before laying it in place. Don’t try to push more mortar into the brick because doing so creates a weak joint.
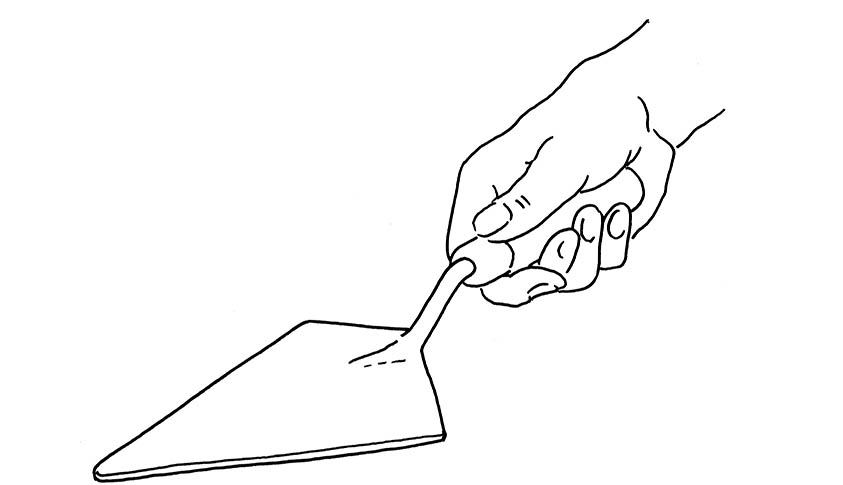
Holding a trowel with your thumb on top makes it easier to pick up mortar and lay it on a brick.
For an old-fashioned, rustic look, you can want to build a stone foundation for your greenhouse. Stonework is an enormous subject and working with stone requires a great deal of skill. The first step is to decide what type of stone you want to use. Visit a local landscaper to see what’s available. A landscaper or mason can also advise you on the best type of wall for your area and the best way to construct it. Though I offer a basic overview here to help you understand the process, if you decide you want a stone foundation and/or wall, you should talk to a qualified mason. These and stone veneer work are not usually jobs to be taken on by an amateur.
Building a stone foundation is much more difficult than building with brick. For a start, stones come in many sizes and are not uniform. Second, a greenhouse requires a low stone wall with a top that is flat and smooth. Laying a stone veneer on a concrete wall requires even more skill. No matter which route you take — full stone wall or veneer — the result will tend to be quite thick and massive and you may well end up with a good-size stone shelf inside the perimeter of the greenhouse.
If you plan to build with stone, you (or the mason) should inspect each rock carefully, looking for a flat side that can be used for the outside face of the wall. The theory is to build with smaller rocks around larger ones so that there is no gap in the face of the wall. A stone wall can be dry-laid or built with mortar that either shows or doesn’t show (giving it a dry-laid look).
The top of a stone foundation or wall should be impervious to water. This can be accomplished by finishing the wall with a mortar cap to smooth and level the surface. A stone wall can serve as a good heat-retaining rear wall of a passively heated greenhouse set into a hill. Such a wall can be up to 4 or 5 feet tall. If you decide to build a wall of this nature, you may want to insulate the exterior face to ensure that it stays warm after it has been heated by the sun.
Of course, if you want a really fancy greenhouse, you could build a stone wall with a fireplace in it and a flue that circulates through the wall to retain more heat. Or you could build a stone wall with ornamental features such as a waterfall built directly into it.
In general, a wooden foundation is most often made of pressure-treated wood, but I don’t like to use pressure-treated wood where vegetables are going to be grown in the ground. The chemicals may leach into the soil and can potentially be absorbed by vegetables; the deeper the timbers extend into the soil, the more leaching can occur because of increased exposure of the soil to the wood’s chemicals. (See Pressure-Treated Wood in chapter 6, for more on this.) Remember, too, that a wooden foundation, like other kinds, will shift with heavy frost and freezing. If you do decide to use wood as a foundation material, you may have to install it below the frost line. Animals can also tunnel under a wooden foundation at ground level.
If want an easy method of building a foundation without the hassle of pouring concrete or using cement blocks or bricks, you can lay down landscape timbers to suit the size of your greenhouse and set the greenhouse on top of them. The advantages of this method are that it is fast and easy and you can buy the timbers at most home and garden centers. The disadvantage is that you’ll have to use treated lumber.
If you decide to use this method, place 8×8 timbers in a shallow trench so that the tops of the timbers are level with the ground. You may want to lay two or three timbers one above the other in a deeper trench so that the foundation is set farther down in the ground. In this case, the two timbers should be attached by drilling 1⁄2-inch-diameter holes through both timbers and hammering rebar through the holes. The length of your rebar will, of course, depend on the number of 8-inch-thick landscape timbers you are using.
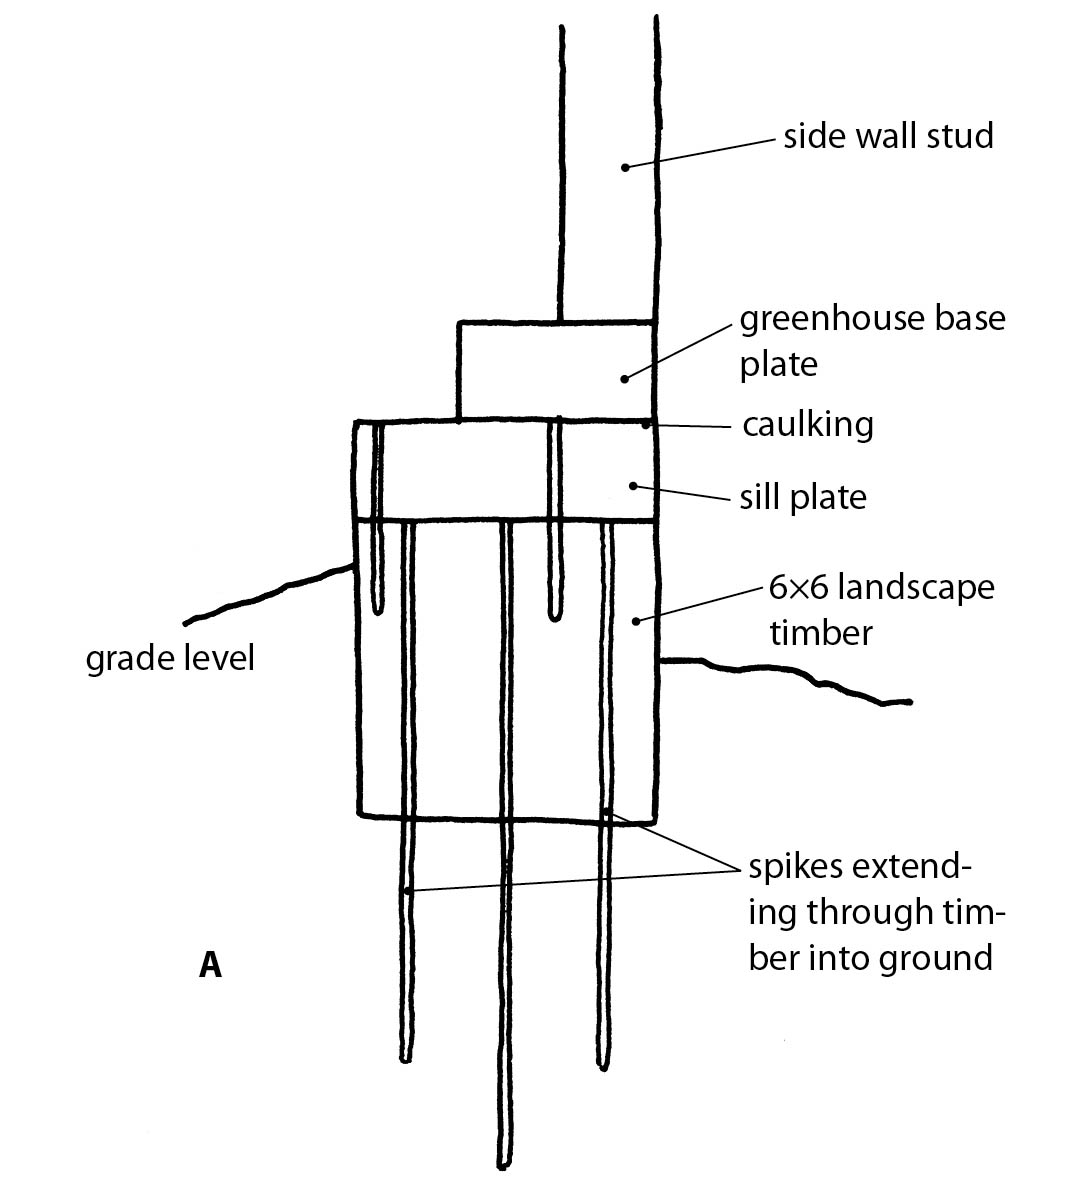
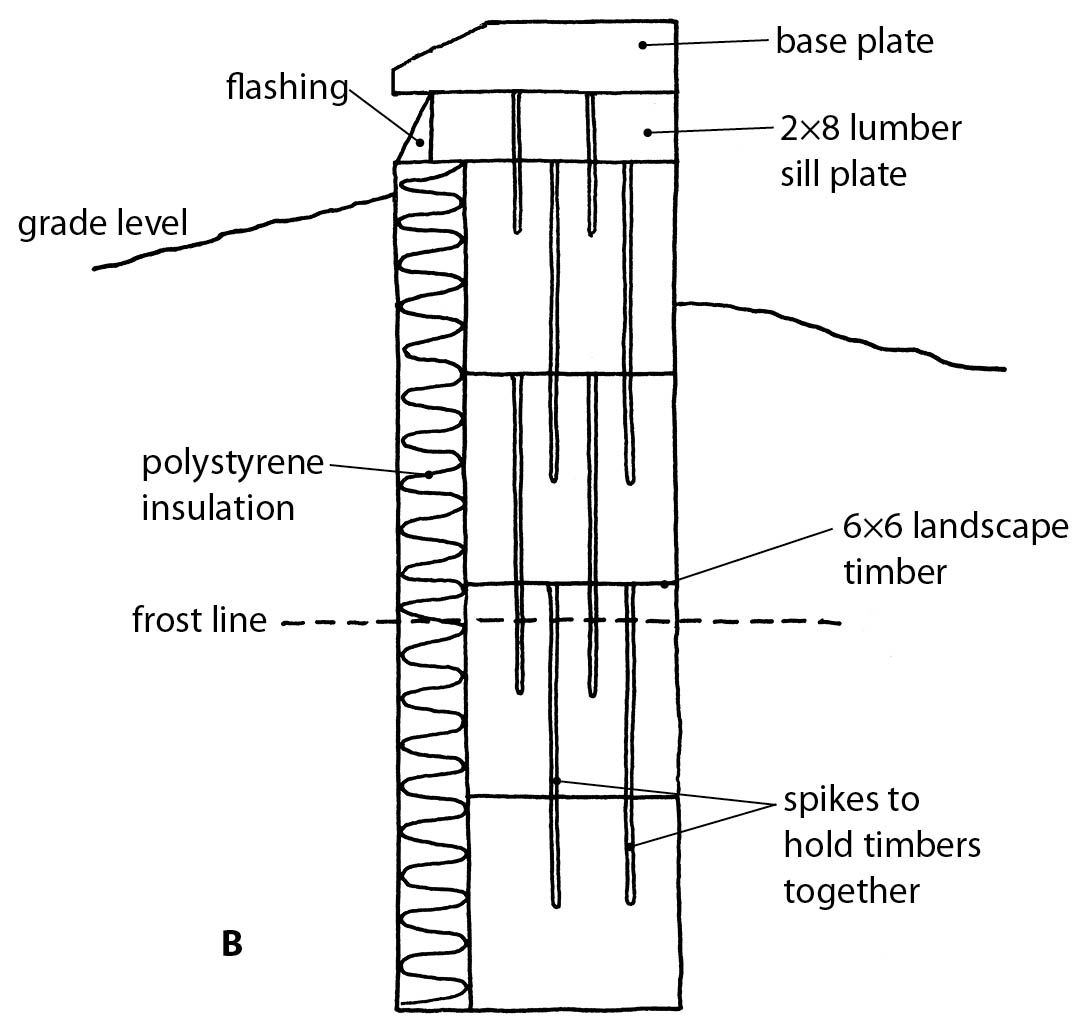
For an easy-to-construct foundation, you can use 8x8 landscape timbers buried in a trench and pinned together (A). For areas where the ground freezes, install layers of timbers (B) deeper in the ground to avoid heaving with freeze-and-thaw cycles.
Corner joints can be made quite simply by cutting lap joints and pinning the two timbers with rebar as described above. A lap joint is a section cut from the corner of the wood so that it will lie flush with the wood meeting it at 90 degrees. If your landscape timber is 8 inches thick, to mark where the lap joint will be cut, measure 8 inches from the end of the wood and mark a line across the wood 4 inches in toward the center of the timber on both sides. Next, draw a line from the tops of the 4-inch lines to the end of the timber and across the face of the end to mark the piece that will be removed. You can cut it out with a handsaw or a chain saw. Mark in the same way the timber that will be joined with the first. Fit together the two timbers, drill two or three holes through the lap, and pin the two together with rebar. If you are building a timber wall that is three or four timbers high, drill and pin all the corners at once rather than doing them individually.
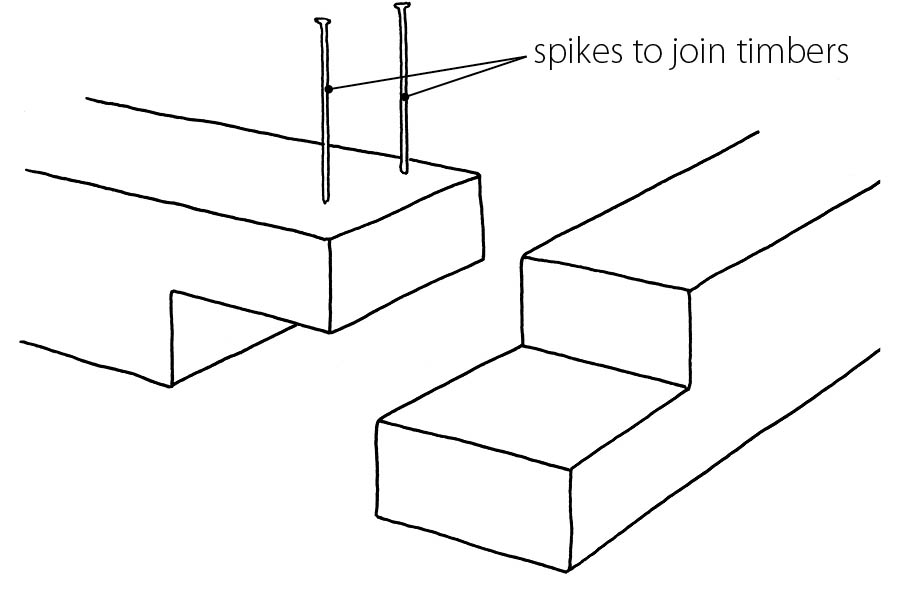
Lap joints create a secure fit at the corners.
The sill plates of the greenhouse will be fastened on top of the landscape timbers and are best attached using 16d galvanized nails or 3-inch galvanized or stainless decking screws. Caulk before laying the sill plate to ensure that there are no spaces between the lumber and the sill. With the sill plate in place, you can build your greenhouse on top of the wooden foundation using any of the methods described and illustrated in chapter 9.