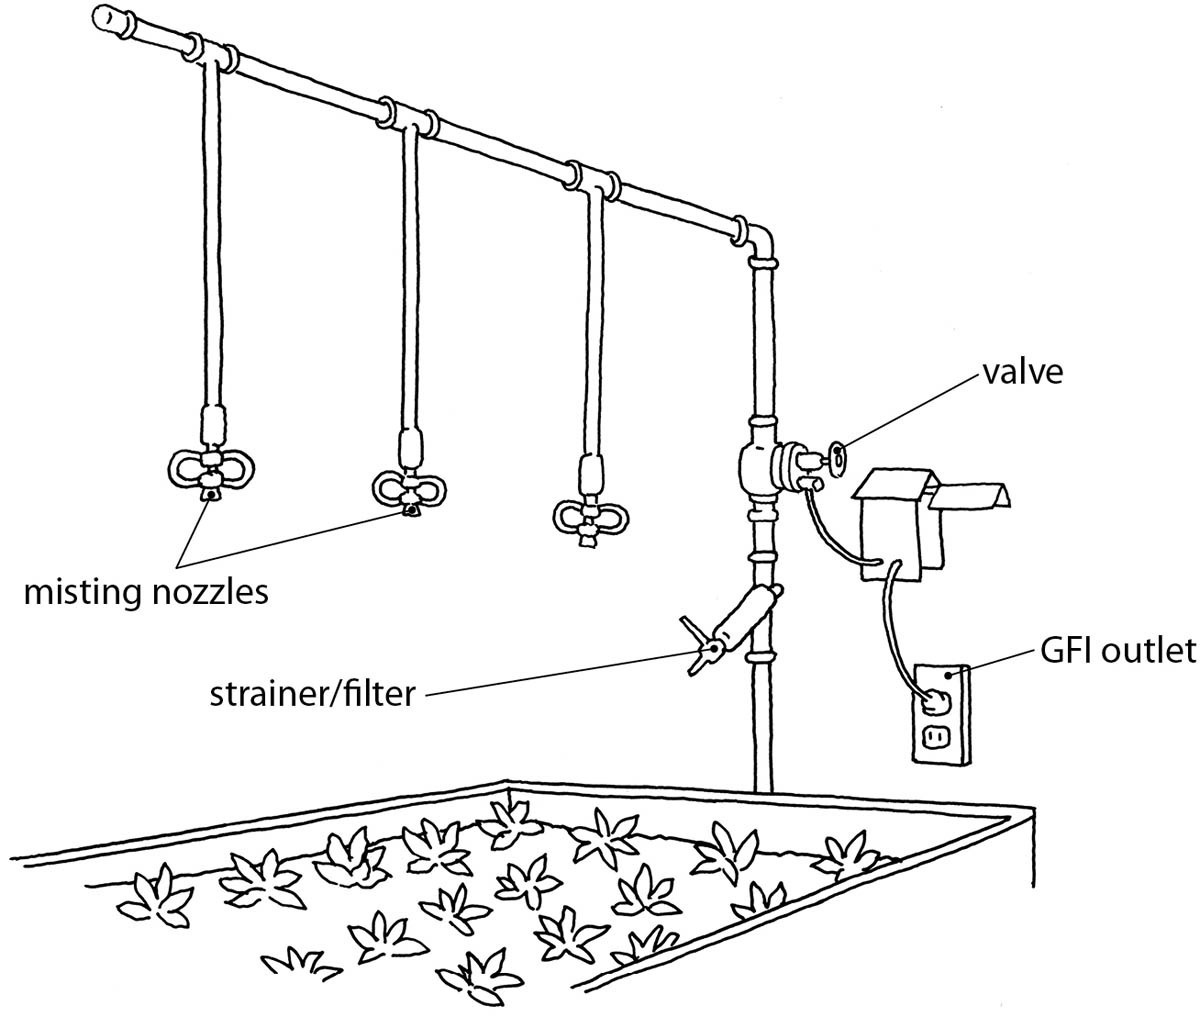
The elements of a misting system include misting nozzles, a filter, valves, and, of course, a GFI outlet.
PLANTS, LIKE MOST PEOPLE, don’t care much for variation in their immediate surroundings. They dislike extremes of temperature and moisture; thus, ventilation, cooling, and heating systems are an essential part of any greenhouse operation if you want to grow plants year-round. These systems maintain a reasonably constant greenhouse temperature and humidity, but they manage only part of the environment. Maintenance of water, lighting, and soil (through the use of insecticides and possibly fungicides, for example) also plays a part. Keeping the plant environment stable is a major consideration in owning a greenhouse. Without a controlled environment, plants may dry out or freeze, they may grow poorly because they are being fed chlorinated water or are not getting enough light, or they might be overrun by insects.
To create a beneficial environment in your greenhouse, you can set up ventilation, cooling, heating, lighting, and misting systems. Some of these may be precise and automated — such as thermostatically controlled cooling and heating systems, automatic spray and misting controls, and electric or gas heaters with thermostats — while others, such as solar-powered vent openers, portable foggers, heat sinks, and nighttime blinds are less precise and rely on less automated methods of operation.
While some of these systems will be in service year-round, the operation of others will be determined by the climate in your area, seasonal changes, and differences in temperature and light from day to night. For example, if you live in a climate with great variations in temperature from summer to winter, you will probably switch from a summer cooling system to a winter heating system sometime during the fall, and vice versa, using only sprinklers and a watering system year-round. Of course, whatever systems you employ, you’ll need to add a large dose of TLC to keep everything growing well during the entire year.
Year-round you’ll need access to water in your greenhouse to water the plants. Soil moisture must be maintained at a fairly constant level because most plants do not fare well in a desert environment or in soil that swings wildly from bone dry to wet and back again. I find that I need to water the plants in growing beds about once a day during the dog days of summer, but this tapers to once or twice a week during fall and early winter. If you have any doubts as to how often you should water your plants, use a moisture meter to check soil moisture levels. You’ll find that plants in pots need frequent watering during summer, but in winter the pots should be allowed to dry out almost completely between waterings.
Maintaining moisture levels means that you’ll either have to tote water into the greenhouse almost every day during the growing season or install an underground water line to the greenhouse and a spigot in the structure (which can add considerably to the expense of building, especially if certain requirements are specified in the local zoning code). To avoid any varying of moisture, you may want to install an automatic watering system, a sprinkler system, or a misting system. To supply water to a greenhouse, some people run a garden hose from an outdoor spigot to the greenhouse, but this works only as long as the hose does not freeze, and, as has happened to me a number of times, you always run the risk of the hose breaking and leaking.
To install a water line, you’ll need to dig a trench from the house to the greenhouse for either copper or plastic water pipe, depending upon the type required by your zoning code. If you live in a part of the country that experiences freezing temperatures, pipe should be set below the frost line (approximately 3 feet in most areas) to ensure that it will not freeze during the coldest winters. If you use plastic pipe, lay sand in the bottom of the trench and cover the pipe with sand so it will not be damaged by stones in the fill for the trench. (See chapter 10, Installing the Water Line to the Spigot for more information.)
When planning the design for your greenhouse, you should determine the location of spigots and outlets.
Once the line is installed, it must be plumbed into the house line. At either end there should be a valve to allow you to turn off the water should the line burst or leak (see Installing the Water Line to the Spigot, for information on these valves). At the greenhouse end there should also be a nonreturn valve to ensure that any chemicals that are used with a hose-end sprayer cannot get back into the house water line.
Of course, chemicals from the house line can also be harmful to what you grow in the greenhouse. For instance, most municipal household water is highly chlorinated, which can be harmful to plants, restricting their growth. For under $50, however, you can purchase a water filter such as the Chlorgon filter sold by Charley’s Greenhouse and Garden (see Resources), which will remove chlorine from municipal water. If you want to be certain that you have removed all chlorine from the water, you can install a water purifier system at the house end of the line. Of course, if you tote water to the greenhouse, you can let the water sit overnight to allow the chlorine to evaporate, but this method of watering usually requires many buckets; it is either impractical or impossible to fill enough extra containers for overnight chlorine evaporation.
To avoid the problem of chlorinated water, I prefer to use roof runoff water for plants in my greenhouse rather than water from a water line. I’ve shortened several downspouts and installed collecting tanks under them. One 60-gallon tank of runoff water will maintain the needs of the plants in my 28-foot by 14-foot greenhouse for ten days to two weeks if I water every other day. In summer, this may not be enough water, but because a heavy shower can easily fill the water tank, I look forward to thunderstorms in July and August. The only drawback to this system is that the tank attracts mosquito larvae and must be treated regularly with granules of Bacillus thuringiensis subspecies israelensis to eliminate them.
To use the water in the tank, I either pump it into the drip irrigation system using a small, electrically powered pump (a fishpond pump is suitable) or I dip from the tank with a watering can. Some collecting tanks have a small spigot at the bottom to allow you to drain off water into a watering can or bucket as required, but when I raised my tank to accommodate such a spigot, I found that once the tank was a foot or two off the ground, it had the potential to topple over. With water weighing about 8 pounds per gallon, I didn’t want to contend with the possibility of 480 pounds of water falling on children playing nearby. In addition, leaves falling into the tank via the gutter downspout tended to clog the spigot. While dipping water with a watering can is the most tedious way to bring moisture to plants, it does enable me to target specific areas that are in need of moisture.
When planning the design for your greenhouse, you should determine the location of spigots and outlets because these often dictate where your water line passes through the foundation. (See Installing the Water Line to the Spigot.) In addition, if you are going to be washing pots in the greenhouse, you might want to install a sink or tub. Its location will also help to determine where to run the incoming water line and where to put the greenhouse drain.
You may not think about using a misting system in a small greenhouse, but it can help keep plants cool during summer and contribute to their growth. The primary application for misting systems, however, is for plants that are being propagated. Misting the leaves of these plants keeps them from respiring too much, allowing starter plants and cuttings time to grow roots before the leaves shrivel. Through the process of evaporation, misting and fogging systems can also be used to lower the temperature of the surrounding air as long as the humidity is low.
Misting systems are usually installed on the underside of the roof of a greenhouse or on poles that situate the misting heads just above the plantlets. From these, water vapor drifts down over the plants just as rain would. Most such systems have misting nozzles, and unlike fogging systems (see Fogging Systems, below), which are connected to a water reservoir, are connected by pipes to a water line. In general, misting systems are less expensive to install than foggers and clog up less often. Nozzles cost from $2 to $5 each and water piping costs a few dollars for a 10-foot length.
If you do invest in a misting system for propagating plants, remember that you’ll also need to keep temperatures around the plants fairly high (72°F–80°F) to ensure that the plantlets will grow roots, and you’ll have to keep the air circulating around the plants to avoid fungal problems.
The elements of a misting system include misting nozzles, a filter, valves, and, of course, a GFI outlet.
Fogging systems spray smaller particles of water than do misting systems, injecting a fine fog of water into the air. Both can be used for cooling and both provide moisture to help reduce heat stress on growing plants. Although a fogging system is not that important for growing vegetables, it is helpful for growing orchids and tropical plants, which prefer a great deal of humidity. Fogging systems can cost from $100 to well over $1,000, depending on the size of the greenhouse and the amount of moisture you want to pump into the air. Small, portable foggers with a 2- to 5-gallon-per-day output can cost as little as $100 to $300, while larger foggers, which use an installed water line and several outlets throughout a large greenhouse, can cost $2,000 or $3,000. The water tank on a portable fogger must be kept filled for the unit to work properly. For most automatic fogging or misting systems, you will need a water line and electricity in the greenhouse.
Most foggers work by raising the water pressure from normal tap level pressure to several hundred pounds per square inch (psi). At this pressure, the water is atomized and sprays out of the machine like a cloud of water vapor. A high-pressure fogger with a large number of outlets may use up to 1 gallon of water per minute, although a smaller fogger for a greenhouse that is about 300 square feet may only use one tenth that amount.
If you use a built-in system, you’ll also need a humidistat, and probably a timer to regulate the flow of moisture. You should fog or mist only early in the day to ensure that the plants are kept moist during the day but can dry out before night. If they are fogged or misted at night, when there is no warmth to dry them or no air circulating, they could succumb to disease. You may also want to install a filter in the water line to eliminate heavy metals and chlorine in the water system. In areas that have high calcium deposits in the water, you can install a calcium inhibitor filter for under $20.
Unfortunately, a greenhouse prevents rainwater from moistening the soil around plants. Because studies have shown that plants benefit tremendously from a constant source of moisture, with some plants watered in this way putting on huge amounts of growth when compared to plants that are watered only regularly, having the means to keep beds moist at all times is a real plus. A drip irrigation system keeps the soil moist, can be directed at particular plants, does not wet the leaves of plants, and allows for adding fertilizers to the water at any time.
The beauty of a drip irrigation system is that the water can be directed very precisely to each plant’s root zone.
The system is quite simple. A hose is connected to a regular water outlet and special pressure-compensating drippers or emitters are fitted into smaller tubes joined to the main hose.
Each dripper is placed on the soil near a plant or on the soil surface of a potted plant, where it emits a constant drip of moisture. Note that to avoid the problem of the first emitter soaking the first few plants in line before the last plant gets any water, you must buy pressure-compensating emitters or drippers. The system can be designed to turn on or off by a timer.
Drip irrigation systems are not very expensive. Charley’s Greenhouse and Garden sells a kit for under $150 that can water up to 55 plants and larger, 100-plant kits for under $200. Most drip irrigation systems work at pressures from 0.5 to 2 gallons per hour and can be easily attached to your home water line. (Large commercial greenhouses may use 5 gallons per hour.) If you want, you can also install chlorine, sediment (which tends to clog the emitters), and carbon filters at the hose end of the water line. Some systems also have in-line filters that allow you to add fertilizer tablets to feed plants automatically. As long as the pressure is maintained in the line, you could attach a pump to a standing water tank, though you’d need to experiment a bit to get the right pressure and make sure that the pump doesn’t burn out by trying to force water through the system.
The beauty of a drip irrigation system is that the water can be directed very precisely to each plant’s root zone. Special emitters are designed for potted plants, and you can put ground emitters and pot emitters on the same line. If you garden exclusively in hanging baskets, simply place your drip irrigation system high in the greenhouse and use short, small-diameter tubing to feed water to an emitter in each basket. Note that drip irrigation systems are separate from misting and fogging systems.
Soaker or “leaky” hoses are a practical way to water in-ground beds. These porous hoses are made of recycled rubber material and can be connected to your home’s water line. Usually buried in the bed from 4 to 6 inches deep or placed on the soil’s surface and covered with mulch, soaker hoses are fed by a hose connected to the main water line. Having used them in my raised beds, I find that they water a strip of soil about 12 to 18 inches wide, depending on how long the water is left on. This means that for a 4-foot-wide bed, you will need two hoses placed about 10 to 15 inches away from the edge of the bed. While they worked reasonably well, I found that the beds at the farthest end of the extensive system received less water than the ones nearest to the water outlet.
Remember to remove the hoses from a bed before digging in it! I have stuck a fork through one on a number of occasions. (To repair a soaker hose, simply cut the hose, trim the two ends square, and reconnect them using a hose-repair connector.) It eventually became such a chore pulling the hoses out of the beds each spring before I could dig over the winter rye that I gave up on using them outdoors and now use them only in the greenhouse.
While the actual hose in a soaker hose system costs only a few cents per foot, the cost of other necessary parts, though only a dollar or two each, can add up. With the required one or two garden hoses, T-joints, L-joints, and connectors, you can end up spending $200 by the time your system is complete. I recommend that you carefully plan your soaker hose system and locate each joint and connector unit before you start so that you’ll have to make only one journey to the hardware store.
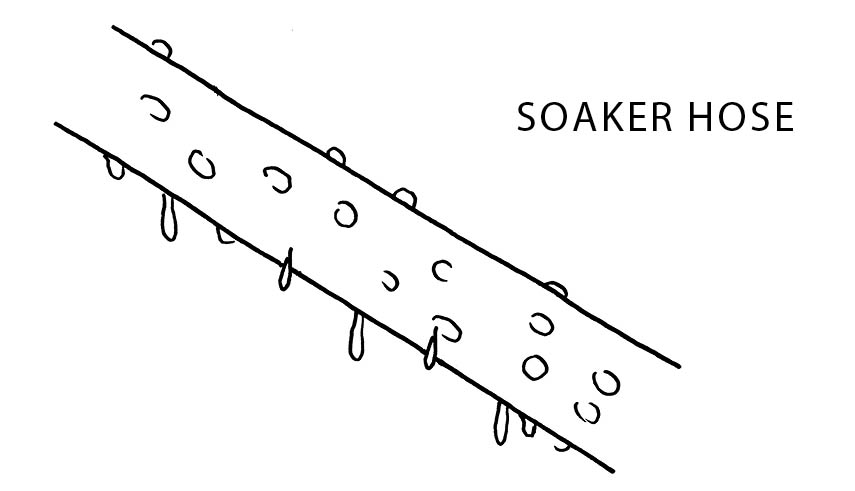
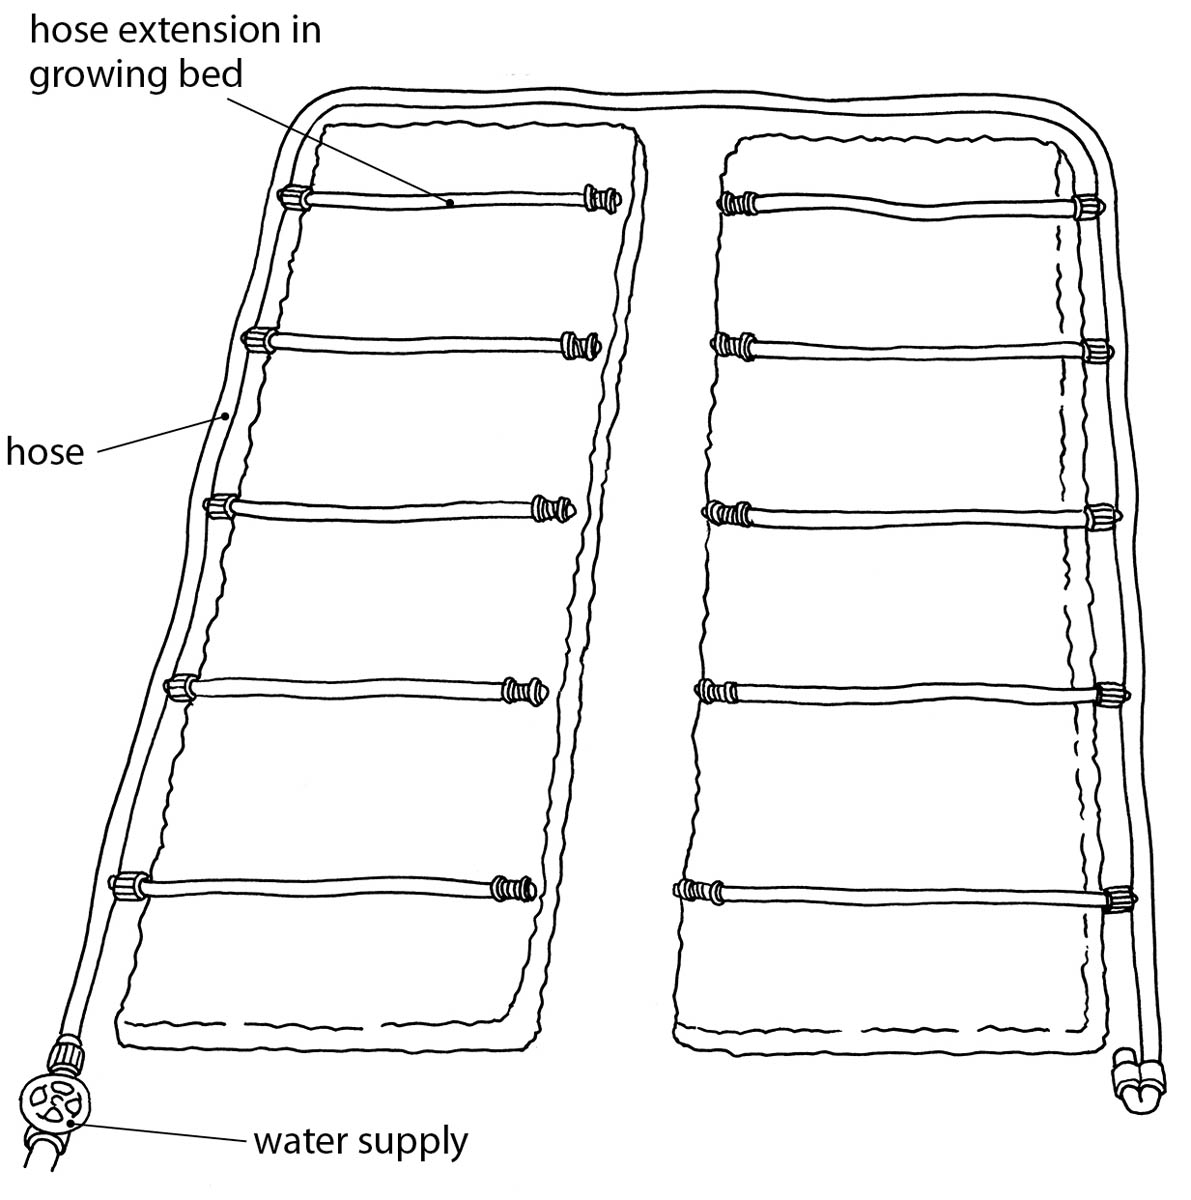
A soaker hose layout for a cool greenhouse
Have you ever wondered why plants you see in garden centers each spring are short and stocky and look like they are ready to grow fantastically well in your garden while your greenhouse plants are long and leggy? You may be surprised to learn that part of the reason is lighting. The right wavelength and amount of light are critical to growing the healthiest plants (though even the right lighting will probably not produce the short, stocky plants grown by commercial growers because many of these are also sprayed with chemicals to contribute to stockier growth).
Without light, photosynthesis — a plant’s conversion of sunlight to carbohydrates (complex sugars) — cannot occur. Sunlight, along with supplemental lighting, drives photosynthesis. Without the right amount of light, a plant may not flower or set fruit, but with just the right amount, a plant is triggered to react — for instance, flowering at a certain time of the year.
Plants grown from seed, such as impatiens, may need up to 20 hours of sunlight in one day in order to germinate; certain onions require a long day length (up to 14 hours of daylight, equivalent to the daylight in midsummer) to set bulbs; and spring-flowering plants bloom in reaction to warming temperatures and increased day length. At the other end of the scale, some plants, such as chrysanthemums and Christmas cacti, react to shortening days to flower, and poinsettia will grow red leaves only when the day length is less than 12 hours. Commercial greenhouse operators adjust lighting to achieve the desired day length in order to trigger certain reactions, known as photoperiodic responses, and home gardeners can use these techniques to grow flowers out of season.
There are a number of scenarios in which plants will require supplemental lighting in the greenhouse: In spring and fall, when plants are still actively growing, you may need supplemental lighting, and if you plan to keep your plants growing through the winter or want to grow warm-weather plants during colder seasons, you will need plenty of supplemental lighting. This could take the form of a few fluorescent lights or might involve a more complex system of high-intensity lighting on tracks to illuminate an entire growing bed.
When setting up any electricity in the greenhouse, remember always to install any on/off switches in a watertight box to protect them should they inadvertently get wet, and always put all greenhouse circuitry on a ground fault interrupter breaker to ensure that it will quickly trip should water permeate the system. In addition, all light fixtures should be rated for outdoor use. Take care not to get water on light fixtures or hot bulbs, which may explode if water contacts them.
The first step in lighting your greenhouse is to install lights so that you can see your way around if you want to work inside at night. Usually this means hanging 4-foot fluorescent lights from the ridge of the greenhouse directly over the central walkway. These lights should be waterproof and are best operated from a switch at the door. (The FarmTek catalog has reasonably priced waterproof lights for around $25 each; see Resources.) Most shop fluorescent lights are not waterproof, meaning that if you install them, you must take extra care not to spray them when watering in the greenhouse. Remember always to install any on/off switches in a watertight box, however, to protect them should they inadvertently get wet, and always put all greenhouse circuitry on a ground fault interrupter (GFI) to ensure that the breaker will trip quickly should water permeate the system (See chapter 10, Ground Fault Interrupter Breakers, for more information).
The second step in greenhouse lighting is to determine where you will be performing various gardening tasks so that lighting can be placed accordingly. For example, you might want a bright light over the potting bench and another over the quarantine area to allow you to inspect for insects.
Finally, there is the consideration of supplemental lighting for your plants. Remember to determine each lighting circuit before wiring begins (see Locating Outlets) and immediately after you have decided where everything will go in the greenhouse.
Determining exactly how much light your plants need depends on the distance between the fixtures and the plants, the type of lights, and the type of plants you are growing. Fluorescent lights must be very close to the plants (almost touching the leaves of seedlings, for example) to help them achieve the best growth. Because of this proximity, however, the lights’ reflectors tend to block out natural sunlight. The lights and reflectors should therefore be designed to be raised and lowered as necessary. I use fluorescent lights in my germination chamber (see A Germination Chamber or Seed-Starting Box, for an illustration) to give seedlings a strong start. You can make your own germination chamber under a greenhouse bench, or grow other plants under a bench with supplemental lighting. The best type of fluorescent lights are the more expensive, twisted tubes developed especially for gardeners (grow lights) and sold under such names as Nurture-lite and Floralight. After years of starting seeds, however, I’ve found that regular inexpensive shop light fixtures with cool white fluorescent tubes will do the job, provided the plants are moved out of the germination area within 4 to 6 weeks. Ordinary cool white fluorescent tubes tend more toward the blue end of the spectrum with some red wavelengths, which helps seedlings and foliage plants grow but doesn’t do much to promote flowering. A cool white light and a warm white light in the same fixture give a pretty good imitation of the entire natural light spectrum. When my plantlets are about 3 inches tall, I transplant them to larger pots and move them from the germination chamber into the main greenhouse, where additional lights supplement natural daylight.
You can also consider where you locate plants under fluorescent tubes. I’ve been told that light is stronger in the middle of the tubes than at the ends, although in my propagation chamber it doesn’t seem to make a difference. I’ve also been told that the tubes should be changed annually, which seems to be an unnecessary expense. I use my fluorescent tubes for two or three years before changing them. Using fluorescent growing lights for only two to three months at the start of each season probably means you don’t have to change the bulbs each season.
Other types of lighting, such as halide, mercury vapor, and sodium lighting, can be located farther way from plants, but they also have large reflectors that can block natural light, a problem you can circumvent by installing lights and reflectors that can be raised and lowered as required. For a hobby gardener, this small adjustment can save a great deal of energy.
When considering a lighting system, you will need to decide whether the light will supplement natural lighting (in other words, you will raise and lower the reflectors and turn the lights off and on) or whether your plants will be in a totally controlled environment, with all their lighting supplied artificially. If you decide on the latter system, you can probably do without a greenhouse and grow everything in your basement. (See chapter 10 for more information on installing plant and task lighting.)
Warning: If you use supplemental lighting, you will need to be extremely careful when watering plants. Do not get water on the light fixtures or on hot lightbulbs, which can cause the bulbs to explode. If you can, purchase fixtures with protective glass over the bulbs. You should also make sure that all fixtures are watertight or are rated as outdoor fixtures and that all circuits are to code and fitted with a GFI breaker.
Because lighting is so important, it behooves the greenhouse gardener to understand a little about light quality and quantity before investing in a lighting system. First, not all lightbulbs (or lamps, as bulbs are called in the lighting trade) are created equal. Some emit light oriented toward the blue end of the light spectrum, while others operate at the red end of the spectrum — that is, the wavelength of the light emitted by the bulb is different depending on the type of bulb. For example, metal halide lights tend toward the blue (ultraviolet) end of the spectrum and high-pressure sodium lights tend toward the red (infrared) end.
Light that plants use best is in the visible range — typically from around 380 nanometers to 720 nanometers. Light at the blue, or ultraviolet, end of the spectrum tends to promote plant growth and helps to keep plants compact. Because natural light has plenty of light from the blue end of the spectrum, it results in the growth of leafy green plants. Using a light from the red, or infrared, end of the spectrum will help to bring plants into bloom faster and promote flowering. In the middle of the visible spectrum are the violet, blue, green, and yellow bands that help to promote strong plant growth by maximizing the absorption of sunlight to promote photosynthesis.
For the greenhouse grower, finding a lightbulb that emits the right wavelength of light can help to promote either growth or fruiting. But how do you find the best bulb for your purpose? Experts express the quality of light in several different ways. As discussed in chapter 7, which focuses on greenhouse glazing, photosynthetically active radiation (PAR) is a measure of how much light transmits through the glazing to drive photosynthesis. We can also use this figure to describe light from lightbulbs, but other terms are used more effectively.
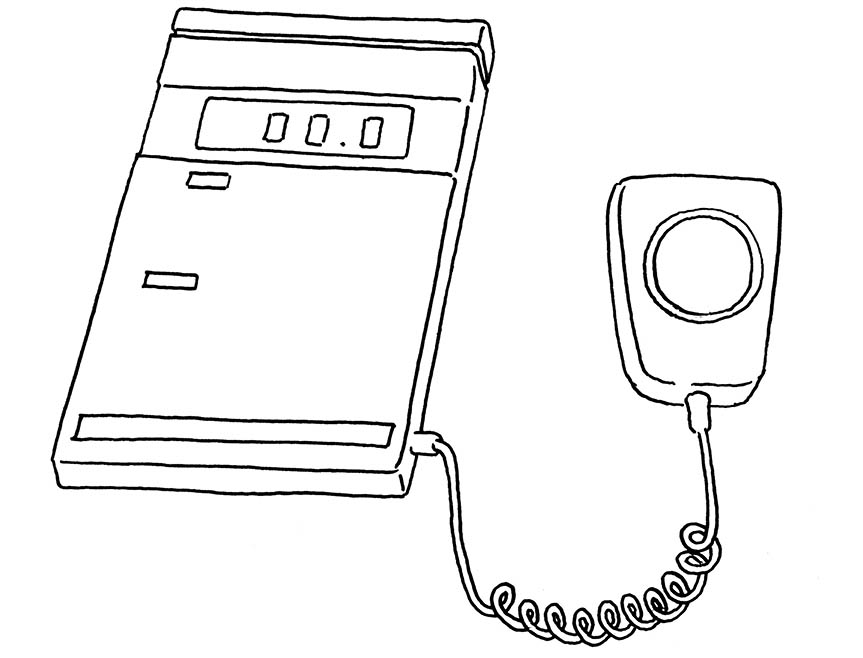
A digital light meter measures foot-candles to determine how much light is shining on a particular area.
Lumen is the light output from a bulb or other light source. A look at the packaging for a typical lightbulb tells you how many lumens that bulb produces. For example, a 60-watt tungsten bulb — one that you might use in a lamp in your home — emits 820 to 840 lumens.
Foot-candles measure how many lumens are shining on a particular area — one foot-candle is equivalent to one lumen per square foot — and can be measured with a simple foot-candle light meter, or photometer, such as the Gossen Mavolux, which is used by commercial growers. For about $30 through Charley’s Greenhouse and Garden (see Resources), home gardeners can purchase a photometer that measures foot-candles. Some photometers come with a booklet listing how many foot-candles are required by various plant species.
For healthy plant growth, you should use an incandescent light specially made for growing plants.
Holding a plant light meter above shelves, upper and lower benches, and even in-ground beds will provide information to help you determine which plants will grow best in those locations: For example, Cattleya orchids need 3,000 foot-candles (full sun is 5,000 foot-candles) and should grow best on the top shelf in the greenhouse; phalaenopsis orchids require 1,500 foot-candles and may do best on a middle shelf; and begonias and ferns, requiring about 800 foot-candles each, will prosper most on lower benches. Properly placing plants according to foot-candle requirements prevents sunburned leaves and helps them avoid spindly growth. A light meter can also tell you how far from plants grow lights should be positioned in order to provide the right number of foot-candles for blooming and fruiting.
Illumination intensity is a measure of the number of foot-candles that actually hit a surface. For example, if a 60-watt lightbulb is shining 820 lumens over a 1-square-foot surface, the illumination intensity is 820 lumens per square foot. If you have two 60-watt lights shining on the same surface from the same distance, the illumination intensity is 1,640 lumens/square foot. (In the metric system, a lux is one lumen per square meter and can be calculated by dividing the number of foot-candles by 10.76.)
Light levels may also be expressed in terms of radiant flux, radiant emittance, irradiance, and quantum flux density. Radiant flux is measured in watts and is the energy emitted by a light source over a period of time. Radiant emittance is measured in watts per square meter and is the amount of light emitted over 1 square meter. Irradiance is the amount of energy received by 1 square meter of surface (but this measure is rarely used by nonprofessionals.)
If you want to grow only a few plants, a simple incandescent lamp such as the ones you use every day in your home can do the job. Use the highest intensity your budget can afford (taking into account the cost of the unit and the cost to run it), with a 100-watt lamp as the minimum. Because incandescent lamps generate a great deal of heat and tend to dry out the soil fairly quickly, you will have to place the lamps at a distance from the plants (usually at least 18 inches, but the actual distance will vary according to the amount of light you want the plant to receive) to avoid burning them, and check the soil-moisture levels frequently. Note that incandescent lamps provide light from the red end of the spectrum, which tends to promote flowering.
An incandescent lamp is suitable for starting seedlings but does not do much for plant growth. For healthy plant growth, you should use an incandescent light specially made for that purpose. You can also purchase incandescent fixtures (grow lights) that allow you to change the lightbulbs to either full-spectrum fluorescents or high-intensity discharge lighting without resorting to new and more expensive fixtures. FarmTek sells such fixtures for $20 to $30. These incandescent lights emit much of their light at the blue end of the spectrum, helping to maintain foliage growth. They are, however, much more expensive than regular incandescent lights.
Holding a plant light meter above shelves, upper and lower benches, and even in-ground beds will provide information to help you determine which plants will grow best in those locations.
If you want to start seedlings or grow a greater number of plants, you’ll probably need to use fluorescent lamps. Cool, white, workshop-style fluorescent lights are quite inexpensive (a few dollars a tube) and emit light toward the blue end of the spectrum. There are also warm white fluorescent lights that emit more toward the red end, and full-spectrum lights, although these tend to be more expensive. By using a cool white tube and a warm white tube in the same fixture, you can obtain a reasonably balanced light for much less than the cost of a full- or balanced-spectrum tube. A typical 4-foot-long, two-tube fixture emits enough light to start two flats of seedlings, each 11 inches by 22 inches long, if the fixture is placed about 2 inches over the tallest plants. Once the plants are about 3 inches high, they should be transplanted and placed under stronger, more balanced lights.
The minimum bulb wattage you should use in your workshop light fixtures is 40 watts. Be aware that shop lights have weaker ballasts (transformers containing capacitors to start the light) that tend to burn out more quickly than more expensive fluorescent light fixtures. This usually means that they give out less light and that the light level tends to weaken over time. In general, more expensive light fixtures emit more foot-candles per tube than do shop light fixtures. Measuring the light levels of a number of different types of tubes 12 inches from the light source yielded the following readings (by way of comparison, direct sunlight in a Rhode Island August measured 825 foot-candles):
If you don’t have space for 4-foot fluorescent lights, you can buy high-output fluorescent lamps (known as full-spectrum compact fluorescents, or CFL bulbs) that fit into an ordinary lightbulb socket. Such bulbs encompass the full light spectrum but tend to be expensive when compared to conventional incandescent bulbs (from $20 to $100 per bulb). CFL bulbs use between 55 and 95 watts of power and have a life of about 10,000 hours.
You can also consider spiral fluorescent plant lights that cost from $10 to $15 apiece. These lights are also full spectrum, have a low heat output, and use a lot less energy (about 25 to 30 watts each). But again, they must be placed close to the plant to optimize their light output. The color rendering index (CRI) can help you find the full-spectrum bulb to meet your needs. A CRI value of 100 is the same as natural sunlight. The nearer the index number is to 100, the more like sunlight the bulb will be. Most compact fluorescents have a CRI between 70 and 90, with some as high as 95.
Two examples of incandescent growing lights, which are conducive to plant growth. Remember to purchase fixtures that allow switching the bulbs from full-spectrum fluorescents to high-intensity discharge lighting.
This high-output fluorescent lamp produces low heat so, it can be placed close to plants.
A compact fluorescent light
If you decide to go beyond the basic fluorescent and incandescent light systems, you may want to consider high-intensity discharge lights (HID), which run from a ballast. The two main types of HID lights are high-pressure sodium (HPS) and metal hallide (MH). HPS lights are used most effectively where you want to supplement natural daylight. They tend to emit light from the red end of the spectrum, which makes them efficient at encouraging plants to flower. Metal halide lights tend toward the blue end of the spectrum and complement sodium lights. They can also ease your fuel bill somewhat if you plan on heating the greenhouse during nighttime hours because they generate a great deal of heat. When using HID lights, the lower wattages — up to 250 watts — work best if placed 1 to 2 feet above the plants. Higher wattages should be located farther away from the plants to avoid leaf burn. (For example, a 1,000-watt fixture should be placed about 3 feet above the plant.) A small, 100- to 250-watt HID light will illuminate an area about 4 square feet (2 feet by 2 feet), while a 1,000-watt fixture will light an area about 64 square feet (8 feet by 8 feet). The cost of these lightbulbs ranges from $20 to $80 each or even higher, depending on power output. Remember, though: One drop of water on the glass may cause the lightbulb to explode.
Sodium lights are used to induce heat-loving plants such as tomatoes and corn to grow during seasons with short nights. Keeping the lights on for up to 18 hours continually helps the plants to set fruit during winter. In this kind of light and with no insects to plague them, the plants thrive, although they must be hand-pollinated. Growing corn and tomatoes in this way, however — that is, under lights in the middle of winter — is expensive and the results are not as good as those obtained during summer. After experimenting with lighting my greenhouse plants, I’ve found that here in Rhode Island, I can keep the previous year’s tomato plants going until late February, when I’m able to pick one large tomato every few days. Without more light, however, the yield gradually falls off. I’ve picked the last fruit on February 26, at which time the plants appeared weak, with few leaves.
You can also buy convertible light fixtures that allow you to start seedlings with sodium vapor bulbs and convert to metal halide bulbs once the plants are established.
HPS lights are used most effectively where you want to supplement natural daylight.
In addition to lighting the greenhouse, if your greenhouse has an insulated wall on its north side, you can also install a reflective mylar film there to reflect even more light onto your plants. For example, garden catalogs and centers may sell shiny film on rolls (a bit like rolls of wrapping paper) or a reflective, foil-faced bubble insulation called TekFoil that can be used in this way. You can also use insulated foam board or rigid insulation with aluminum facing to both insulate and reflect more light onto the plants.
Most lighting fixtures come with reflectors to direct the lighting toward the plants. Be aware, however, that reflectors may block natural sunlight from reaching your plants, requiring that you keep plant lights on longer to provide the necessary cumulative light plants need. Some of the large lights may both illuminate an 8-foot-by-8-foot bed and block natural sunlight from reaching the plants. This problem can be solved by installing the reflector so that it can be raised out of the way during the day and lowered at night, when the light is turned on.
Once you have familiarized yourself with the various types of lights available, you can determine which you are going to use in your greenhouse. The following diagram shows a 10-foot by 16-foot greenhouse that incorporates growing beds throughout and a small seed-starting area in the rear left corner. In this corner germination chamber is installed a bank of four fluorescent shop lights. Each fluorescent light holds two 40-watt tubes (either twisted fluorescents or cool white tubes), adding up to 320 watts illuminating the 4-foot by 4-foot area. Because the germination chamber will be used only at certain times of the year, this bank of lights has its own on/off switch. In the large growing area (the rest of the greenhouse), over the growing beds there are four HID lights, each using 400 watts of power and illuminating a 4-foot by 4-foot area. These HID units are used in winter from 4:00 p.m. to about 10:00 p.m. and from 6:00 a.m. to about 8:00 a.m., but may not be used at all during summer. Refer to chapter 10 to learn how to calculate the amperage of these lights to see whether they can all be installed on one circuit or if two circuits are required. (Also see chapter 10 for more information on creating a wiring layout diagram that includes locations of lights.)

This lighting plan for a greenhouse shows outlets at both ends of the structure, four HID lights over the growing beds, fluorescent lights over the walkway for general lighting, and outlets for a heat mat and tools. All fixtures and outlets are waterproof.
Besides controlling the water and light in your greenhouse environment, you’ll have to control the temperature and air movement. The glazing on the structure allows sunlight to enter but prevents heat from escaping, which means that temperatures can change dramatically in the greenhouse in a very short time. During the summer months, heat will build to such a level inside that plants will wilt and can eventually die. When I have inadvertently left the windows and doors closed in the greenhouse in summer, temperatures in the structure soared to 140°F.
To counter this, you’ll need to install some method for allowing the heat to escape — some form of ventilation. This can be as simple as configuring a roof vent that can be manually controlled or involve more complex vents that open automatically at a preset temperature or vents that allow hot air to be expelled by electrical fans controlled by a thermostat. Cooling can also be accomplished by a thermostatically controlled fan that circulates air within the structure or by a misting system or evaporative cooler that lowers the temperature of plants in regions where or times of the year when humidity is low.
But while you may want heat to escape during the day, at certain times of the year you may need to either heat the greenhouse at night or devise some method of retaining within the structure the heat generated during the day. Here we explore the methods and issues around heating and cooling a greenhouse to maintain an optimum temperature for the kinds of plants you want to grow and when you want to grow them.
To lower the temperature fast in an overheated greenhouse, open all the windows and doors and spray water throughout the structure. As the water evaporates from the floor and from the leaves of the plants, the plants are cooled.
On sunny days in summer a greenhouse is prone to overheating and must be cooled. The simplest and most common method is simply to vent the hot air out of the greenhouse by opening doors, windows, or roof vents. The problem with this system, however, is that these openings are often not large enough to allow heat to escape, or they may suffice on windy days but not on calm ones. Opening windows and vents also requires a person to do the job, which means that you must be attentive to the weather and the greenhouse when plants are in it to avoid having the plants cooked on a hot, sunny day. (Conversely, you must remember to close what you’ve opened: If you leave the windows open at night, animals may get inside the greenhouse and eat your plants and set up housekeeping.) To avoid any chance of cooked plants, venting systems should be automated.
If you do not have an automatic vent opener or a fan system in your greenhouse, you should shade the structure. One way you can achieve this is by locating the greenhouse where it will be shaded by deciduous trees in summer. Yet sun-loving plants don’t grow well in the shade of trees all day; you must get at least 4 hours of direct sunlight into your greenhouse every day.
Other ways of shading a greenhouse are applying water-soluble paint directly to the glazing or using shade cloth, canvas or fiberglass, or bamboo matting over the top of the structure. You can even provide shade in the form of a fast-growing vine. One year I used a passionfruit vine for shade by training it out of a roof window in the greenhouse and letting it cover the glazing on top. As a bonus, the flowers were visible and the vine even bore some fruit. The drawbacks were that the shade the vine offered was not immediate and in fall, when I cut back the vine, the roof glazing required a good cleaning.
Any shade cloth or premade covering imparts more control and offers immediate results. You can purchase them in different densities or use movable shades. A word of caution applies when installing any shade cloth or covering: Do not walk on the greenhouse roof. It may seem strong enough to bear your weight, but looks can be deceiving. Don’t take that chance.
Note that when installing any shade cloth or covering, do not walk on the greenhouse roof, even if it seems strong enough to bear your weight.
The light-blocking ability of shading is measured in terms of the percentage of light it allows through. For example, some shades allow 75 percent of the available sunlight to enter the greenhouse, while others block up to 75 percent of the sunlight (allowing 25 percent of available light to enter). Be sure you read the label or specs correctly before buying shading materials. In most cases, gardeners living in hotter parts of the country need shading rated to block higher percentages of light. Professional growers use shading to optimize the growth of the plants in which they specialize.
Shading Paint. Shading paint is an old-fashioned material still used by plenty of gardeners. I think it can look a little sloppy, however, and it tends to wear off over time, especially during a wet summer. Its advantage is that the paint can be thinned to give just the right amount of shading.
Reflective Shading. This is a shading material that reflects light away from the greenhouse. It is best used where and when there is great exposure to sunlight but is most effective used outside the greenhouse, on top of the glazing.
Shade Cloths. Some shade cloths roll up like blinds and others fold to allow you to adjust the amount of shading in the greenhouse. Knitted green or black polyethylene shade cloth, which can be purchased from greenhouse suppliers, is sold in various levels of density that block as little as 25 percent of light to as much as 75 percent of light. Shade Rite polyethylene cloth is available in various densities ranging from 30 to 90 percent. The cost varies from around 10 cents to 25 cents per square foot, depending on the density.
ACF Greenhouses (see Resources) offers a knitted polyethylene shade fabric that blocks 50 to 60 percent of available sunlight. The fabric is 12 feet wide and costs a few dollars per linear foot. The same company offers tie-downs for shade fabric — which you’ll need if you don’t want to find your shading in the neighbor’s yard as soon as the wind gets up!
Shade cloths are much more effective when installed on the outside of the greenhouse, where they can keep heat from building up inside the structure. If installed inside, solar heat tends to build up between the shading and the greenhouse glazing. In fact, some sources suggest that the shading will be up to 40 percent more effective when installed 3 or 4 inches above the greenhouse glazing. Installing shading with a gap between it and the glazing allows air to pass between the two surfaces and keeps the glazing cooler. On the other hand, shade cloths on the outside of the greenhouse can be blown around by the wind and may be damaged or moved in the process, which will render them ineffective.

Shade cloth is available in different woven densities to block from 25 percent to 75 percent of available light.
Other Shade Options. You can, of course, install blinds outside the greenhouse, but these move a great deal in the wind and the aluminum ones may leave marks on the outside of the greenhouse. In addition, aluminum blinds are more expensive than shade cloth (they can cost dollars per square foot as opposed to cents per square foot for cloth). If you use blinds, they’re probably best installed on the inside of the greenhouse, where they can be used to block sunlight in summer and keep the structure a little warmer in winter. Inside installation, however, does allow heat to build up between the blinds and the glazing.
When deciding what type of ventilation system to use, ask the following questions: How much air do you need to move? Where do you want to move it? How do you want to move it? Remember that air leaving the greenhouse must be replaced with new air from outside. This means that you must install an intake vent (or window) as well as an exhaust vent.
As mentioned in the previous chapter, in winter the additional advantage of an attached greenhouse is that it can be vented into the home. My heated lean-to greenhouse is adjacent to the wall of my studio. In winter, I open the window and door to the greenhouse and allow the warm, moist air into the house. On a sunny winter day, this air is 70°F to 80°F, which allows me to turn off the studio heating system, thereby saving the cost of a good deal of energy. An attached conservatory or solar greenhouse can be used for the same purpose, supplementing dry, winter indoor air with moist, warm air. At night, however, unless the greenhouse or conservatory is heated on its own, you will need to close it off from the house in order to avoid using your home heating system to keep the greenhouse warm. If the greenhouse must be kept warm at night, look to installing its own heating system so that your home system doesn’t run continuously in an effort to warm the greenhouse space. (For information on methods to heat a greenhouse in winter see Controlling the Greenhouse Environment in Winter.)
How Large Should Vents Be?. To my knowledge there are no hard-and-fast rules for sizing greenhouse windows or vents. I suggest that the vents (both intake and exhaust) be at least 25 percent of the total glazed area. Your greenhouse will stay cooler if you increase this area to 30 percent. Others suggest that intake vents (usually located near the floor; see Where Should Vents Be Located? below) and exhaust vents each be equal to at least 10 percent of the floor area. Charley’s Greenhouse and Garden, a gardening catalog and Internet company, recommends that roof vents be equal to at least 20 percent of the floor area. As for the vents themselves, they should be sized so that the greenhouse neither cools excessively nor overheats — an area equal to between 20 and 25 percent of the floor or glazed area accomplishes this. If this percentage cannot be reached with vents alone, opening the greenhouse door or using a screened door and running an exhaust fan will get rid of extra heat. If you fit vents or other openings with insect screens, the area taken up by vents should be increased by about 20 percent to allow for the restricted airflow through the screen.
Where Should Vents Be Located?. Because hot air rises, exhaust vents should be placed high on an end wall or, in the case of my cold greenhouse, at the apex or ridge of the roof. In many store-bought hobby greenhouses, exhaust vents are set over the door or may be part of the door.
Intake vents are often also located high, but I prefer to position them in the glazing nearer the floor so that the cool air can pass over or circulate through the leaves of the plants in growing beds. Air passing through plants such as peppers, tomatoes, roses, orchids, and other ornamentals helps to prevent disease and mildew from disfiguring and potentially killing them.
Locating intake vents close to the ground does, however, pose a problem. Unless they are screened, insects, birds, and other animals can enter the greenhouse through them. Once, a groundhog came into my greenhouse through a low vent opening and I had a terrible job trying to get it out. Along with screening these openings, hinging these windows at the bottom (so that they open from the top) makes it more difficult for animals to access them (though a determined animal can navigate this arrangement). Screens of metal hardware mesh (half-inch mesh should do the job) and closing the vents at night are the only surefire ways to prevent pests from entering your greenhouse.
In a relatively inexpensive hoop-style greenhouse, the polyethylene plastic covering may be stapled to a thin wooden furring strip or a large-diameter bamboo pole at the sides. On hot days, this furring strip or pole can be raised to open the cover at ground level and allow fresh air to cross the growing beds, but this method offers no protection against animals and insects.
Making Vent Openings Watertight. If they are not installed properly, vents or windows will leak and allow rainwater to drip into the greenhouse. When I had to design a watertight vent for my greenhouse, I took a page from my boat designing experience and fashioned it after the hatch on a boat. (See Making Overhead Windows for illustrations of overhead roof vents and information on building them.) In the vent I designed, the inner lip projects upward from the inside of the opening and the vent lid closes down around this lip to make a tight seal. This seal can be made even tighter, preventing rain and snow from entering, by installing foam-rubber caulking around the top of the inner lip. An automatic vent opener can be set to determine the temperature at which the vents are opened (see Automatic Solar Vent Openers).
Vertical vents are built in a similar way: They are hinged at the top or bottom and butt against an inner flange intended to stop water and air from flowing through the vent when it’s closed. Animal-control vertical intake vents are hinged at the bottom and are secured with chains to prevent the cover from opening all the way and falling to the ground.
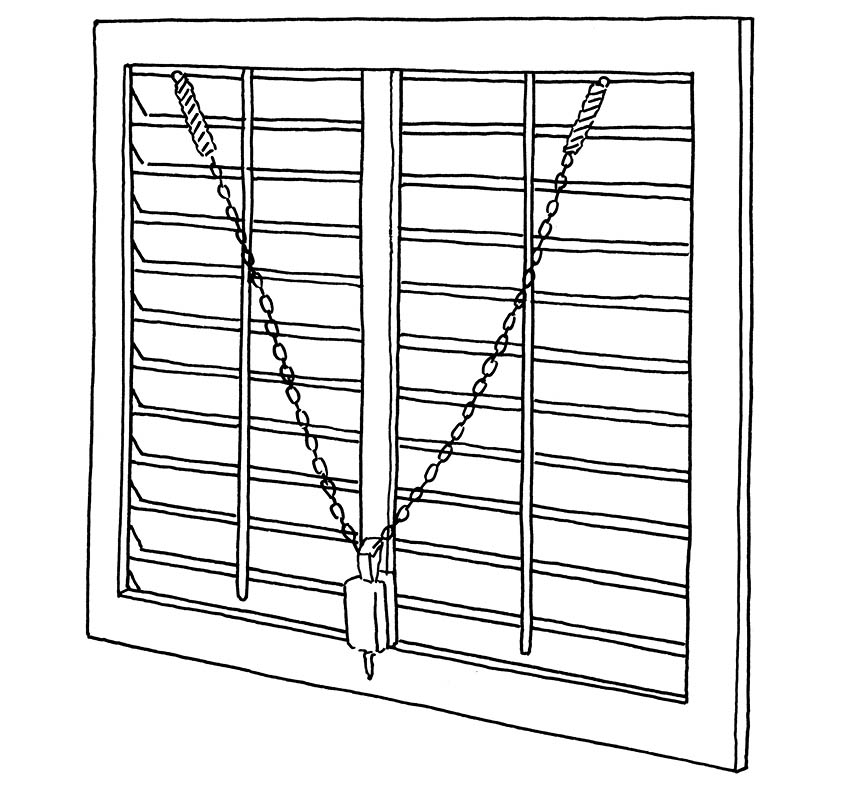
A vertical vent is one way to encourage air circulation in the greenhouse, though it will allow in cold air during winter.
Louvered Doors or Windows In southern climates, where winter temperatures don’t get too cold, a glass-louvered door allows air to move into the greenhouse at any time. Such a door, however, is not a good idea in the North; on days that are very cold, frigid air can enter the greenhouse through louvers that seal poorly. A louvered vent that you can seal by taping plastic sheeting over it during the coldest months of winter is a good way of maintaining cooler air in the greenhouse during summer.
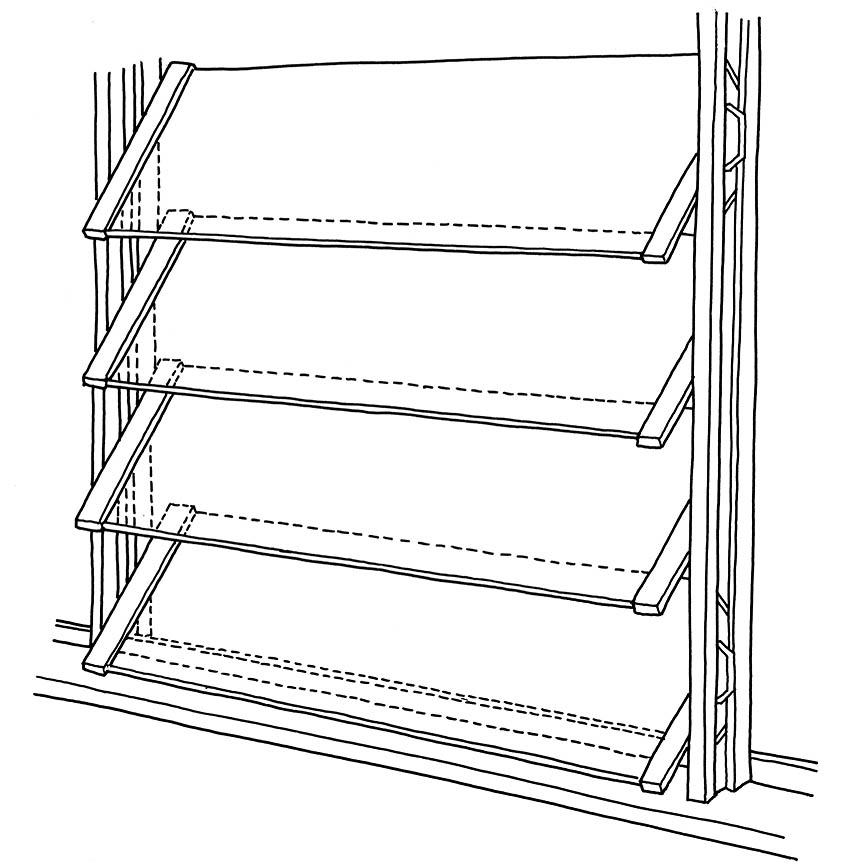
A louvered window is another good option to allow air into the greenhouse at all times, including winter.
Automatic Solar Vent Openers. There are a number of solar vent openers available. Most have a cylinder filled with liquid that expands as surrounding temperatures rise, forcing a ram out of the cylinder, which opens the vent. As temperatures cool and the liquid contracts, the ram drops back into the cylinder, pulling the vent shut. These simple devices come in several forms, and are rated to open vents of varying weights. The direct-acting cylinder can handle vents weighing up to 15 pounds. A heavy-duty, scissors-action auto-vent from Bayliss is capable of lifting vents weighing up to 35 pounds.
Be aware, however, that solar vent openers don’t function at precise temperatures. They can be adjusted to open at a specific temperature, but it takes a lot of fiddling to get the adjustment just right. This means that your greenhouse may be vented at a temperature that is not precisely what you’d like it to be. These vent openers also wear out over time; monitor them and remove them during exceptionally cold spells to make sure that the greenhouse heating system doesn’t cause them to open. For more precise vent control, you should turn to an electrically operated ventilation system.
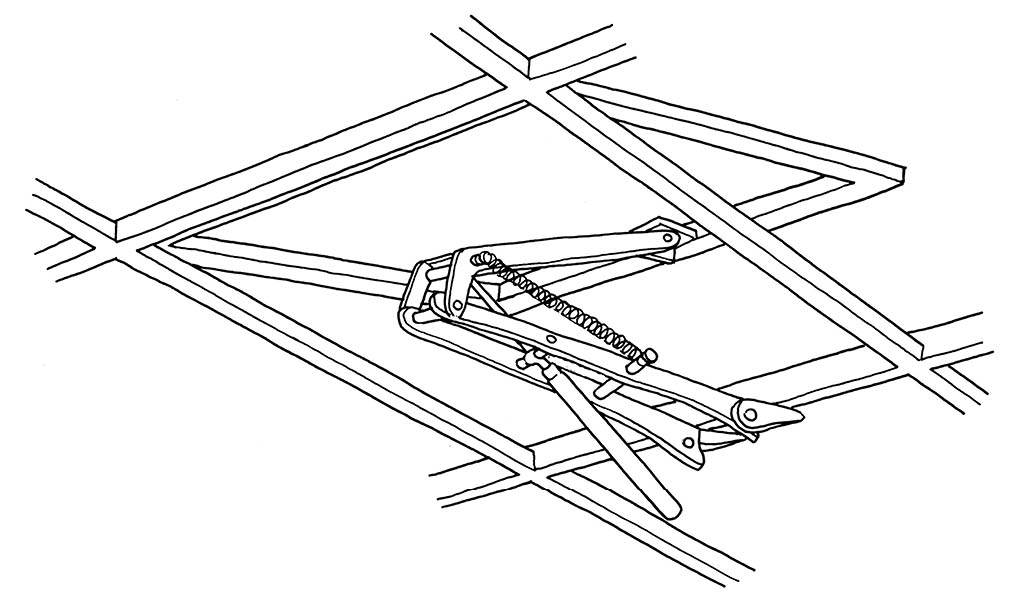
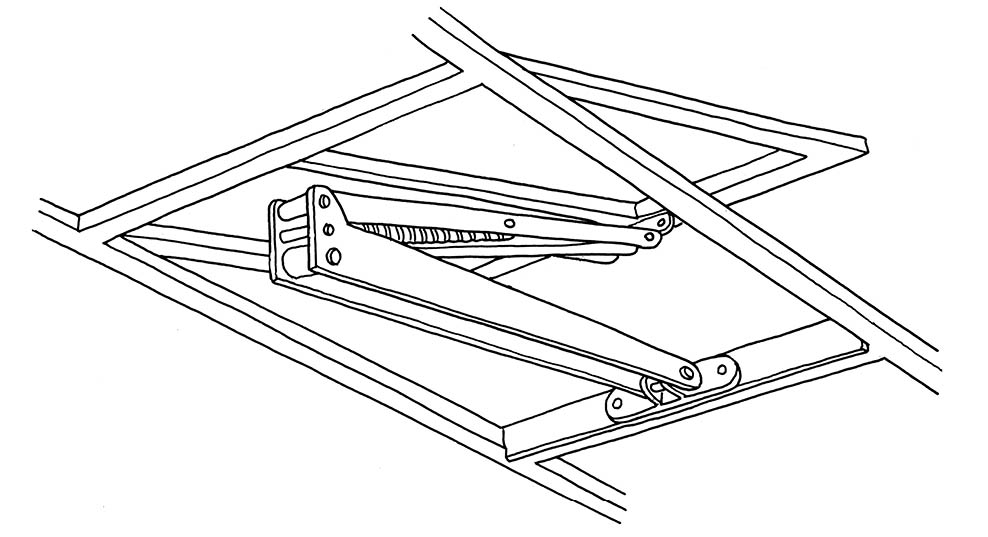
Two examples of automatic solar vent openers
When your greenhouse is closed up, circulating the air will help to keep mold and mildew from growing on your plants. This is accomplished by positioning fans inside the structure. Commercial growers usually situate fans high in the apex of the roof at either end of the greenhouse, where they are out of the way and can move a large amount of air. Hobby growers can use smaller fans for the same purpose. Because these fans are electrically powered, you should consider their location when determining where to locate electrical outlets and switches.
Vent Fans. Vent fans can be used to blow air into the greenhouse or “push” air from it — but as a heating and air-conditioning expert once told me, air doesn’t push very well; it is more easily pulled. For this reason, a vent fan should be located where, as long as a vent is open elsewhere in the structure, it can pull air from the space and send it outside. Ideally, the intake vent should be open on the end or side of the greenhouse, opposite the fan, to allow air to flow across the entire space.
Vent fans should be operated by a thermostat and should have shutters mounted on the outside to prevent cold air from flowing into the greenhouse when the fan is not running. Most shutters operate simply by being blown open when the vent fan is on. Vent fans can cost from $100 to $400 depending on their size and capacity. Of course, you can design your own system by installing a fan that is turned on by a thermostat inside the greenhouse.
When purchasing a fan, you should look at the amount of air it can move measured in cubic feet per minute, its weight, and the noise level it generates (you don’t want to wake the neighborhood every time it operates). If you are concerned about power consumption, also be aware of the amperage draw of the fan. Bigger fans use more power than smaller fans, and because the cost to run a fan for long periods can substantially increase your electric bill, this cost should be built into your greenhouse operating budget. I find it ideal to have a less powerful fan running for longer periods, rather than a high-powered fan that cycles on and off. A high-powered fan requires high amperage to overcome inertia each time it kicks on, and uses more power when running. Once a fan is running, its power consumption drops from that used to start it; thus, keeping a less powerful fan running for longer periods lowers your overall electric bill.
If you want to get even more sophisticated, you can control the speed at which the fan operates: Rather than a fan starting up and dropping the temperature quickly, it can start slowly and increase speed to lower the temperature more gradually. A fan can also run at a slower speed to maintain a constant temperature, instead of running at high speed for a short time to cool the temperature, then turning off to allow the heat level to build up before turning on again. These kinds of systems are newly developed, however, and often required computer-aided controls.
Another way to more precisely control the greenhouse temperature is to use a thermostatically operated shutter control. This control ensures that the shutter covering a fan closes tight on cold days and opens only when the fan runs, rather than blowing open every time the greenhouse door is slammed.
Thermostat for Vent Fans. Electrically operated fans must be controlled by a thermostat to enable you to maintain an optimal greenhouse temperature. Ideally, the thermostat should be waterproof because it is likely to get wet when you spray plants in the greenhouse. Because a fan thermostat should be turned on when the greenhouse temperature rises and a heater thermostat is turned on when the temperature drops, the two will be wired differently. (See chapter 10 for more on wiring a greenhouse for various systems.)
Automatic Solar-Powered Fans. As I have mentioned, when it came time to vent my greenhouse, I turned to my boat design experience. After completing one project on my boat, I found I had an unused Nicro Marine solar vent. I realized that this 7-inch circular fan with a solar cell in the middle of the fan body would serve perfectly installed in my greenhouse. When the sun is out (and the greenhouse is being heated), the fan runs. When there is no sun, no solar power is available and the fan doesn’t operate. This fan fits into a 4Δ-inch hole that can be cut into an overhead panel. When my fan died of old age, it was a simple job to replace the entire unit. Interestingly, I suggested to the former owner of Nicro (now owned by Actuant Recreational Group, Inc.) that these products be offered to greenhouse gardeners, and I now see that they are indeed available from some greenhouse suppliers (see Charley’s Greenhouse and Garden, Resources).
This Nicro-Marine solar vent is operated from a 7-inch fan that runs automatically on solar power. Originally used in marine applications, it’s perfect for a greenhouse setting.
Winter is a stressful time for plants. In many parts of the country it is a cold, dry season with little humidity in the air. In others, it is a chilly, wet season. Is it any wonder that perennial plants go dormant at this time of year? You may want to grow greenhouse plants in winter to bring a few blooms into the dreary days, or perhaps you want to grow vegetables out of season rather than buy supermarket produce. Or winter may provide you with a break from gardening chores and during this season you simply need to keep plants warm enough to prevent them from freezing (though some plants such as rhubarb and strawberries need to freeze to help them set fruit the following season) and give them time to rest. Any of these reasons requires that, in addition to providing extra light and moisture to reduce dryness if you decide to keep plants growing (see Water in the Greenhouse and Lighting and Electricity in the Greenhouse), you’ll also need to generate heat in your greenhouse.
Given that winter in some parts of the country can be five to seven months long, providing a warm environment for your plants can be an expensive undertaking, but there are ways to limit the costs. The first is to understand how heat is transmitted and use that knowledge to increase the efficiency of the greenhouse environment. The second is to use a combination of the least expensive methods to maintain heat at a level that plants can accept and to install some form of heat storage device to help keep heating costs under control.
It’s important to remember that there are a number of ways to achieve heat in the greenhouse. For instance, if you live in a very cold area, you may have to heat the soil in the greenhouse to keep plants going. This can be accomplished by installing soil heating cables in the beds, or by running warm water pipes through the soil below the level of plant roots, or simply by locating a compost pile under a bed.
Before installing a heating system, you must determine how much heat you need, the difference between the temperature outside of the greenhouse and that inside the structure, and the type of heating system you want.
Heat in a greenhouse is lost in four ways: radiation, convection, conduction, and infiltration or exfiltration (cold air coming into the greenhouse or heat escaping from it through cracks around doors and other openings). Only a small amount of heat may be lost by each, but added together, they significantly lower the overall temperature inside the structure. You must choose a way or ways to make up for this lost heat so that the overall heat available remains balanced:
heat lost = solar heat (from the daytime) + additional heat provided (from greenhouse heat source[s])
Obviously, reducing the amount of heat lost from the greenhouse lowers the cost of supplying heat to balance what is lost, which lowers the overall cost of operating a greenhouse.
You can calculate precisely the heat lost through convection, radiation, conduction, and infiltration or exfiltration and can also specifically determine the amount of solar heat generated on a clear day, which will allow you to determine the amount of additional heat you must supply, but these calculations are long and tedious. Most people prefer to use a quick and easy formula, and one of the simplest is offered by the catalog and Internet company Charley’s Greenhouse and Garden:
(wall area + roof area) × temperature differential between outside and inside of greenhouse (inside temperature – outside temperature) × 1.1 = the number of required British thermal units (BTU)
For my lean-to greenhouse, the wall area is 270 square feet and the roof area is 280 square feet. The outside temperature in winter averages about 20°F and I keep the interior of the greenhouse at about 55°F. This gives a temperature differential of 35 degrees. (Note that if you grow tropical plants, you’ll want to keep a higher greenhouse temperature.) Thus:
(280 + 270) × 35 × 1.1 = 21,175 BTU
According to the calculation directions, because my heated greenhouse has double-pane glass throughout, I can subtract 30 percent from the overall BTU required to heat my greenhouse. (You can also subtract 30 percent if it is a lean-to greenhouse against a heated wall, as in the case of a greenhouse attached to a house.)
21,175 BTUs – 6,352.5 = 14,822.5 total BTU required
Considering that I have heated the greenhouse for a number of years with an 18,000-BTU portable propane heater and that the opening windows are only single-pane glass, the number resulting from these calculations is fairly accurate.
Now that you’ve determined how many BTU you must provide to heat your greenhouse, let’s look more closely at the four ways in which heat can be lost from a structure so that you can minimize these and perhaps lower your overall heating costs.
Radiation Losses. Radiation is the flow of heat from a body or source without the necessity of a medium for its transfer. In our case, greenhouse glazing either absorbs this radiated heat, reflects it, or transmits it (the most desirable option). Radiation losses occur when heat travels through space (e.g., the sun’s heat is diminished as it is radiated to us through space). In winter the weather report might say that radiational cooling will take place on a clear cold night — that is, objects on earth are giving up heat to colder air.
Convection. Convection is the circular flow of air prompted by a temperature differential or nonuniformity. For example, hot air rises from a heater because colder air is drawn in at the bottom, which in turn is heated and rises from the heater.
Conduction. Conduction is the movement of heat through an object or material or from one medium to another. In a greenhouse, heat is transferred from the interior to outside by conduction through the frame and glazing of the structure.
Infiltration or Exfiltration. Cracks in the seals around the edges of greenhouse glazing, windows left slightly ajar, cracks under doors — all of these openings allow cold air to enter the greenhouse (infiltration) and warm air to escape from the greenhouse (exfiltration). Usually, following the rules of convection, warm air escapes from openings high in the greenhouse, drawing cooler air in through openings lower down, typically from under doors or through low vents or windows that haven’t been closed or sealed.
Reducing the amount of heat lost from the greenhouse lowers the cost of supplying heat to balance what is lost, which lowers the overall cost of operating a greenhouse.
While each instance of infiltration or exfiltration may not amount to the loss of more than a percent or two of the volume heat in the greenhouse, the cumulative effect can be quite substantial. Therefore, it behooves you to make your greenhouse as airtight as possible, to use high R-value material for glazing, and to supplement insulation to north walls to provide added protection on cold winter nights. This extra insulation can take the form of straw bales stacked against the wall or clear bubble insulation or a layer of IR (infrared radiation) film over the greenhouse and additional layers of polyester fleece inside the greenhouse (a method used by many commercial growers). Just adding IR film or bubble insulation can reduce heating costs by about 10 to 20 percent. It is also possible to add window insulation to opening south-side windows and sections of rigid foam insulation cut to fit windows on the north side. When building a greenhouse with heating costs in mind, it also pays to use a less conductive building material such as wood rather than aluminum or steel. More expensive greenhouses often have thermal breaks (an insulating material is placed between two conducting materials) built into the structure to cut down on heat loss.
Along with determining exactly how much heat to provide in your greenhouse and how to prevent heat loss, you must decide how to save or store any solar heat gained. Passive systems such as a solar wall or a rock or water heat collection and storage systems are inexpensive to install and store heat without requiring any action on your part. Yet these systems take up a great deal of space, allow great fluctuations in greenhouse temperature, and may be unreliable in very low temperatures or on cloudy days. An active system such as a propane or electric heater needs less space but requires a thermostat and the expense of electricity or gas to keep it operating.
Some gardeners use a combination of several types of heating. For example, a growing bed may be set up as a hot bed, with a black-painted concrete wall adjacent to it, rock storage or water tanks set behind it for heating, and a supplementary electric or propane heater provided for the days when the sky is cloudy or temperatures are very low. These combination systems reduce heating costs by spreading the heat load over several devices and provide backup should there be a power outage or should temperatures really plummet. Note, however, that the amount of heat you can store in rocks or water is limited unless you have a very large system (see the following section on Passive Heating Systems).
Certainly, a more sophisticated active heating system can be installed to precisely monitor and maintain an even temperature in the greenhouse. Such a system may incorporate a heating unit powered by electricity, propane, or natural gas and operated by a thermostat that electronically reads the greenhouse temperature at all times. It may also have an emergency backup system in case the power goes off or the main system develops a fault. Such a system can be wired to a computer or a phone line to inform you instantly if the heater has gone off and if temperatures are dropping to levels at which plants will be harmed.
For the hobby greenhouse owner, the type of heating system installed is likely to be determined by money and space available, the amount of work entailed for installation, ease of operation, and a consideration of the extremes in temperature that plants can endure.
Once a passive heating system has been installed, it requires little or no work to do its job. Such systems do keep the greenhouse warm, although with a greater temperature fluctuation than may be desirable. In fact, passive systems may allow greenhouse temperatures to fluctuate by 50 degrees or more in a 24-hour period.
Most passive systems rely on sunlight to gather warmth during the day and then radiate stored heat back into the greenhouse at night. (The hot bed is the one exception to this; it maintains a constant temperature until the material in the bed decomposes sufficiently.)
There are two main types of passive solar storage media: water and rock or stone. To be moderately efficient, rock systems must take up huge amounts of space. A water system also requires a great deal of space, but not quite as much as rock. As we’ve learned, instead of using solar heat, a hot bed, much like a compost pile, uses the heat generated by the decomposing matter within the bed.
Water Storage Tanks. If your greenhouse is big enough, you can use water storage to heat it. This involves installing water-filled 55-gallon drums that have been painted matte black or a large plastic or fiberglass tank (which you can find on the Internet as an aquaculture or agriculture tank). The water in the drums or tanks is heated by sunlight during the day, and because of its mass, it slowly radiates this heat into the greenhouse at night. My experience is that in the area immediately around the drums or tank, temperatures do not fall below freezing at night after a day’s sunlight has heated the water. Yet a water system should not be considered a complete replacement for an active heating system. A full day of sun exposure in the greenhouse heats the water in a large tank only a few degrees. While this may be enough to ward off freezing, it is not enough to promote plant growth and to keep the entire greenhouse heated.
Keeping the areas farthest from the drums warm is problematic; I found a considerable temperature differential between the beds next to the drums and those farthest away, despite the fact that I ran fans to circulate air. Another drawback to this system is that plants do not like to grow next to a black surface; exhibiting phototropism, they lean away from it toward lighter surfaces.
In addition, by design the water storage system is not as efficient as it could be. The greatest amount of heat is released from water when it thaws or turns to steam. Comparatively, then, using water as a mass that releases stored heat does not take advantage of its greatest potential as a heat-releasing material.
The most serious drawback of the system is that the tanks can freeze in the winter after a few days without direct sunlight. It takes a fair amount of heat and sunlight to unfreeze a large tank of water, and while it is thawing, cold air comes off the tank and affects your plants. Installing a small, electrically powered water heater (such as a large aquarium heater that costs under $ 100) in each of the tanks or drums can eliminate freezing, but operating this heater continuously during the coldest part of the winter can become expensive.
Certainly, you can position a large water tank near the middle of the greenhouse, well away from freezing walls. This system works best for a circular-style greenhouse, such as a geodesic dome. You might even us the tank for fish such as tilapia, koi, carp, goldfish, crayfish, or even trout (if you keep the water moving), and you can water plants with waste water from the fish tank (it’s high in nutrients) and recycle the used water back into the tank after it has filtered through the soil drains into a sump. A tank of this kind, however, results in water evaporation in the greenhouse, which leads to large amounts of condensation and moisture on the plants. With low greenhouse temperatures and lots of moisture, your plants can grow gray mold and rapidly die in spite of circulating air.
Another way of using water to heat your greenhouse involves building a solar water heater mounted to one side of the structure. But again, it works only when the sun is out. This unit comprises a large insulated box with copper tubing inside. The interior is painted black and the copper pipes absorb solar radiation. Antifreeze is circulated through the solar water heater and into a heat exchanger located inside the water tank. It’s important to note that if the antifreeze line develops a leak so that the solution enters the water, any fish or animals in the tank will die. By keeping the water moving through the solar heater, a great deal can be heated very quickly. This system can be backed up by a wood-fired stove or a small furnace that heats a fin tube water pipe that circulates around the greenhouse and through the tank heat exchanger.
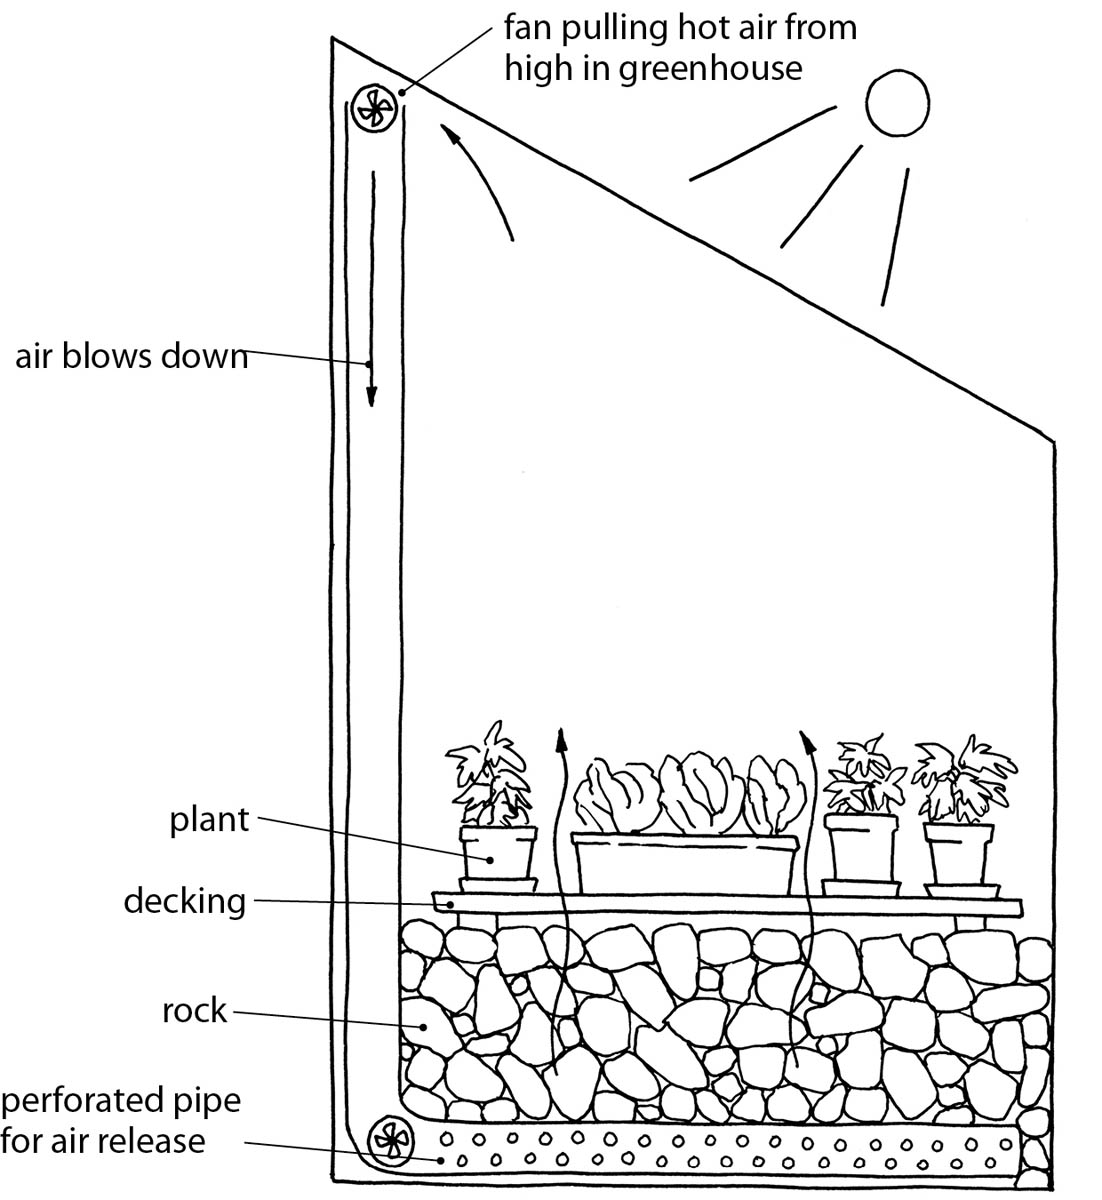
Rock Heat Storage. This system traps and stores heat using moderately sized rocks (fist-sized or a bit bigger) in an insulated rock bin. When the sun is shining, hot air is blown through the storage medium. The major drawback to this system is the volume of rock needed for effective heating:3 to 4 cubic feet for every square foot of south-facing greenhouse glazing. When I investigated installing a rock heat system in my heated greenhouse, I found that for the 280-square-foot space, I needed 280 × 3 = 840 cubic feet of rock. In order to accommodate such a large quantity, I’d have to locate a 3- to 4-foot-deep bed of rocks beneath an insulated greenhouse floor. The cost of the medium, however, was reasonable: less than $100 a ton for a few tons of rock. (One ton of rocks is roughly equivalent to the amount that fits into the bucket of a backhoe.)
One other problem posed by this system is that in order to get the full benefit of it, a fan is required to blow air constantly through the greenhouse, sending heated air into the rock pile when the sun is shining and taking heat from the pile at night or on overcast days. Should there be a power outage, then, the heat stored in the rock is virtually useless.
It’s possible to make a rock system more efficient by passing heated water pipes through the medium to maintain heat levels — but if you are installing heated pipes, it might be superfluous to bother with the rocks. Like water storage devices, this passive system raises and lowers the greenhouse temperature by only a few degrees and may not ward off freezing.
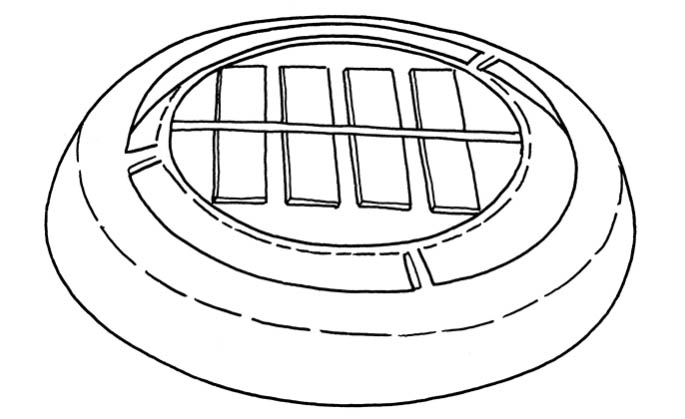
Heat from a rock heating system is produced and circulated in a greenhouse.
Remember that electricity and water do NOT mix.
Hot Beds. As described in chapters 1 and 2, a hot bed uses decomposing manure or compost to keep the soil warm beneath growing plants. (Any odor is eliminated by a 12-inch layer of garden soil on top of the compost.)
Hot beds are simple to build and operate and require very little work to maintain once the plants are growing. To set up a hot bed, remove all the soil from your growing bed to a depth of 3 or 4 feet and refill the excavated area with a mixture of horse manure, fertilizer-free lawn clippings, wood chips, leaves, and other vegetable compost material to within 1 foot of the maximum bed height. Top the bed with a 1-foot layer of sifted loam, then seed or plant the bed with bedding plants. It’s important to note that moving such volumes of compost and manure is backbreaking work.
As the organic matter decomposes, the temperature of the core of the hot bed will rise to about 160°F, which usually takes from 4 to 6 weeks. It will remain at this temperature for about 2 months before gradually cooling down to about 80°F, warm enough to keep plants growing for a long time after they’ve stopped growing outdoors.
I’ve used a hot bed to grow cool-season vegetable plants such as broccoli, greens, and leeks almost to maturity before winter fully sets in (from October to January). In January and February I harvested these plants at close to full size, with the warmth of the bed preventing them from freezing or dying.
One way to create a hot bed without the labor of digging is to heat the bed with buried heating cables. Note that heating cables can be expensive to operate, however, depending on how much electricity costs in your area, and seem to give limited results.
In orangeries of old, water pipes were run through growing beds to keep them warm. If you have a water heating system in or near your greenhouse, this may be an option for you, although you will have to monitor the water temperature carefully.
If you want to germinate or propagate plants, a waterproof, rubber warming mat or cables located on the growing bench are one of the most effective and controllable options for delivering heat. This method is also a useful and cost-saving way to keep tropical plants growing and blooming in an otherwise cool greenhouse. (See Local Heating Devices.)
Systems that require energy sources other than the sun — that is, electricity, gas, oil, coal, wood pellets, and wood — are known as active heating systems. These systems offer control, allowing you to adjust the temperature and the time during which the heater will run. They can also raise the greenhouse temperature much higher than that of any solar storage system. With an active system, you might not need to change the thermostat setting for the course of the winter, but you have the option of turning the heat up a notch or two on a very cold night. Almost all active systems are expensive to run, however; if you plan on installing one, spend time increasing the greenhouse’s insulation.
Electrical Heating. Electricity, easy to use and clean, is one of the most common methods of heating the home greenhouse when the sun is not available. If your greenhouse is wired for electricity, you can plug a heater into a wall outlet. Electrical heating systems are not cheap to run, however, especially if your greenhouse is not well insulated. If you plan to implement this type of system, you’ll also need to determine what temperature you’ll maintain inside the greenhouse. Too much heat may cause the vents to open, allowing heat to escape, while too little heat may cause plants farthest from the heater to freeze unless you install another energy-consuming fan to circulate air around the greenhouse.
During the coldest months of the winter I set my electric heater at 50°F — high enough to keep the plants from freezing and the citrus trees from losing their leaves but not so high that I’m warming the place too much or incurring enormous bills. Ten years of heating the greenhouse has shown me that this temperature is the best compromise to keep the greenhouse warm without it costing an arm and a leg to heat it. If you don’t have warm-weather plants in your greenhouse, you can allow the temperature to drop to about 40°F at night, though a temperature that’s any lower may mean that some areas of the greenhouse will freeze while the space nearest the heater (or thermostat) stays warm.
You can also use an electric heater to heat the entire greenhouse. Gardening companies such as FarmTek offer a variety of heaters with prices ranging from $50 to $2,000. There are 220-volt and 110-volt heaters available; you’ll need to consult an electrician to determine whether you can install a 220-volt line to the greenhouse. You probably already have a 220-volt line in your home (many cooking stoves and air conditioners work on 220 volts), so running such a line to the greenhouse for a heater may not be an impossibility. Remember, however, that electric heating can be expensive without good insulation. (See chapter 10 to find out more about insulating your greenhouse.)
In my opinion, the best type of electric heater for the greenhouse is a ceramic disk heater such as the Pelonis furnace. It’s portable and can be set under a bench so that the heater’s built-in thermostat can react to the temperature in the lowest part of the greenhouse or can be moved to the potting shed when the greenhouse is watered. (Turn off the electricity and remove the heater from the greenhouse until you have finished watering, and protect the heater from drips or condensation until the greenhouse has dried out.) It is not very expensive to run, provided you make sure that heat losses in the greenhouse are minimized.
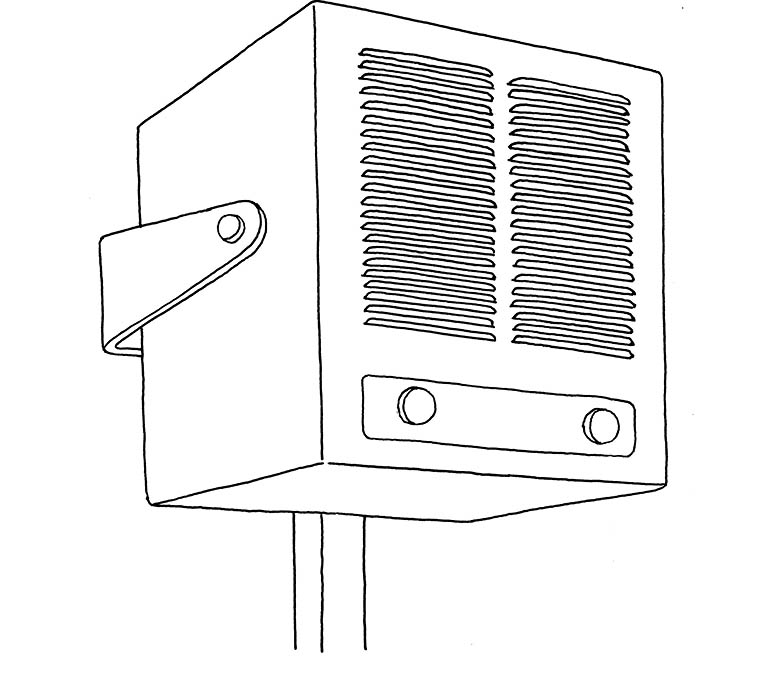
A modine-type electric heater, operating on 220 volts, is permanently installed in a greenhouse. You’ll also need to install an automatic thermostat with such a heater. Below you can see the type of airflow produced from a heater mounted near the ceiling, depending on the type of benches you have.
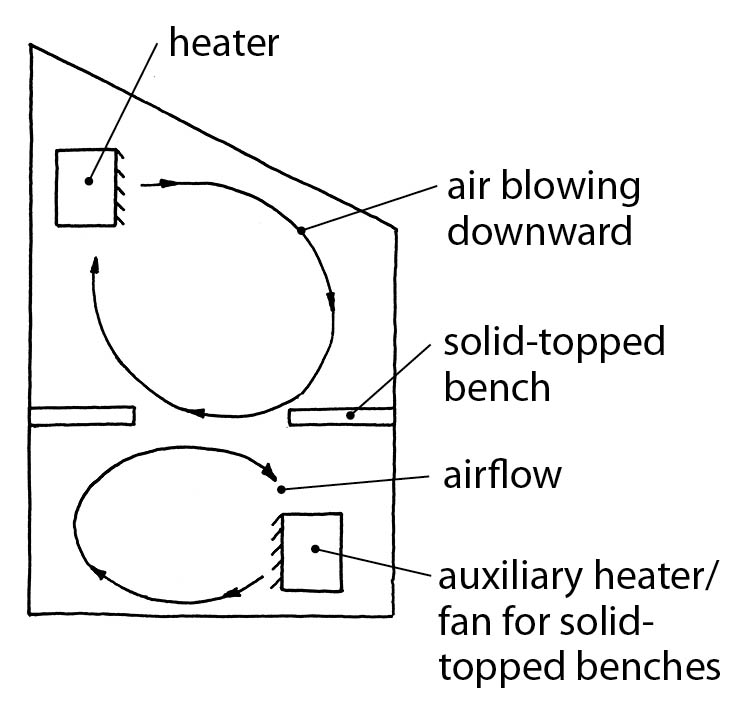
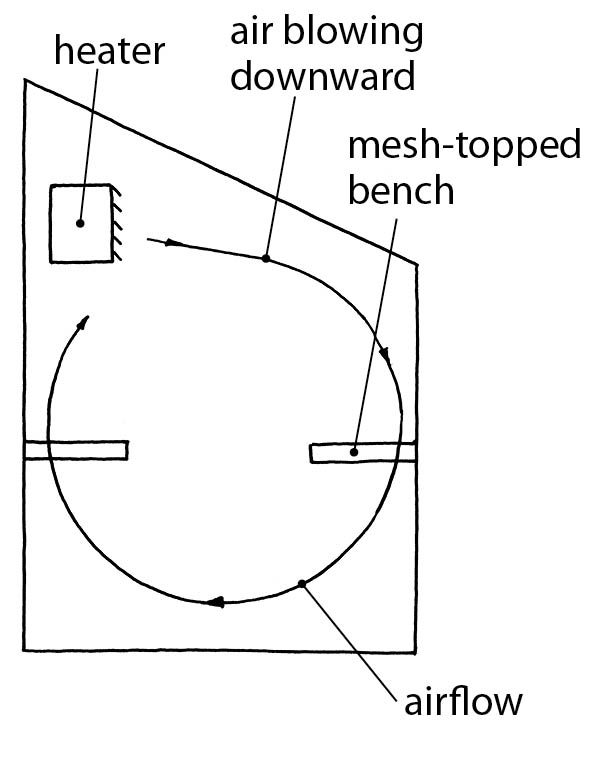
Wood-Burning Stoves. There are several types of wood-burning heating systems on the market that are suitable for greenhouse use. Simplest is a wood-burning unit in the greenhouse with a flue that extends out of the structure. This requires that you regularly tote logs into the greenhouse to fill the stove. Heat radiates from the stove and flue. Running the flue from one end of the greenhouse to the other may provide more heat, but be aware that this is a potential fire hazard: Creosote builds up in the flue, which requires frequent cleaning to prevent fire.
Larger greenhouses may be heated with a 55-gallon drum stove that can take a 3-foot log. These wood-burning stoves do give off a lot of heat, but the smoke they produce must be vented out of the greenhouse via a chimney. Smaller hobby greenhouses can be heated with a regular wood-burning stove, but the heat from these is very dry and, if blown directly into the greenhouse, can quickly dry out plants and soil, especially in winter’s low-humidity conditions.
This type of system might work best if you have a large water tank in the greenhouse. The humidity from the tank might temper the dry heat from the wood-burning stove. Without any humidity source, however, unless a fan circulates air around the greenhouse, you’ll find that there is a hot zone next to the stove where plants are dried out quickly, an area where the temperature is just about right, and the remaining area of the greenhouse in which temperatures stay fairly cool. The major drawback of a woodstove for greenhouse heating, however, is that the unit needs constant feeding, which means that the greenhouse door will be opened frequently as you haul in wood, each time causing heat to be lost. In addition, dragging cold logs into the greenhouse and allowing them to warm up before you put them on the fire can introduce unwanted insects. Finally, because even large logs take only an hour or so to burn on the coldest nights, the fire in a stove can go out without a night feeding, causing the death of all your plants. As a backup system, though, a wood-burning stove can prevent the loss of all your plants should you experience a power outage.
Some wood-burning stoves come equipped with blowers that turn on when a stove is heated to a certain temperature. These can help to efficiently distribute the stove’s heat. I’ve found that these fans are a good way to warm the greenhouse just before dawn after a very cold night, when the stove has burned through most of the wood during the night and the greenhouse is fairly cool. By stoking the fire with smaller pieces of wood and opening the damper as much as possible, you can quickly raise the greenhouse temperature.
Better than a woodstove in the greenhouse itself is an outdoor wood-burning furnace. In this setup, the furnace heats water that is circulated around the greenhouse through finned tubing, keeping the entire building warm. You can also run heating pipes through an insulated concrete floor slab to keep the greenhouse floor warm throughout the winter. Outdoor furnaces are available from a number of companies and can also be fueled by propane or oil. FarmTek sells a line of outdoor furnaces made by Royall in prices ranging from $5,000 to $14,000. These sit on legs above the ground and can handle logs up to 5 feet in length.
There are a number of factors that make an outdoor furnace an attractive choice for heating the greenhouse: Wood never has to come into the greenhouse, you don’t have to go in and out of the greenhouse to load the stove, the stove’s heat is not concentrated at one end of the greenhouse when the fire is left for the night, there is no chance of carbon monoxide gas accumulating, and some systems can operate up to 72 hours without refilling. In addition, according to the Environmental Protection Agency, an efficient and clean wood-burning stove has very little negative impact on the environment. One drawback: the cost of plumbing the furnace to the greenhouse and the location of a bulky outdoor furnace shed near the greenhouse.
In addition to the cost of the unit itself and of plumbing it to the greenhouse, you may have to install a slab for the furnace to sit on and you will have to purchase other parts for plumbing such as piping, a heat exchanger, a high-volume pump, an insulated water line, and various valves and insulation.
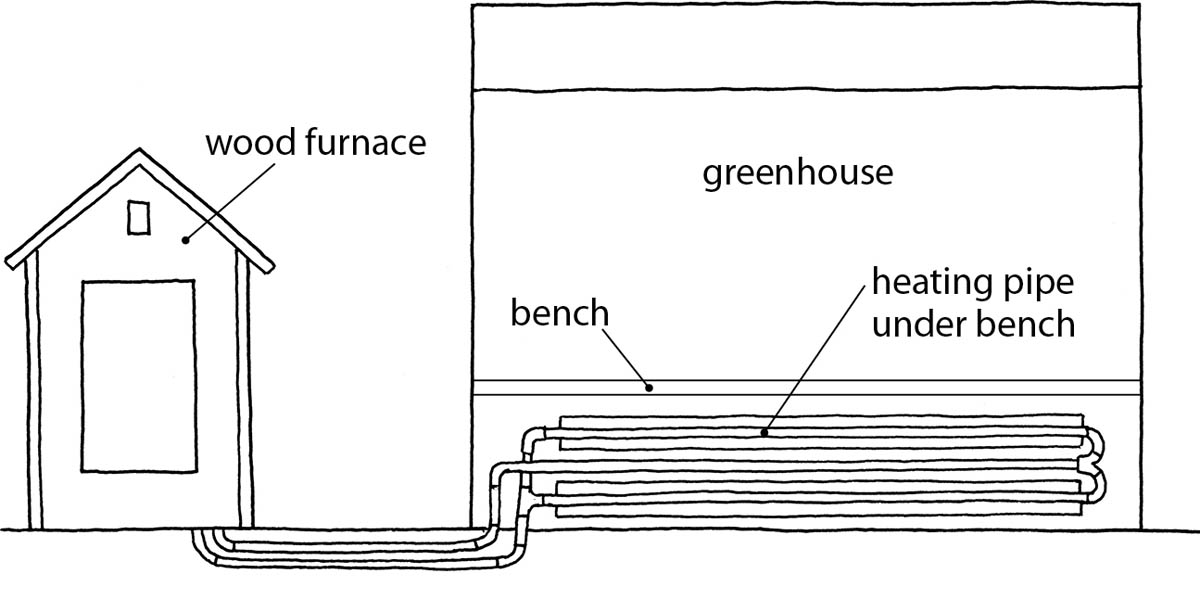
An outdoor furnace allows you to heat with wood without having to tote wood into the greenhouse or contend with the kind of drying that can occur with a woodstove inside the structure. The furnace heats the water in pipes that circulate around the greenhouse.
Coal Stoves. A coal stove heating system has drawbacks that are similar to those of a wood-stove system. While they can emit a great deal of heat and can be closed down to burn slowly overnight, they do need to be filled and watched to make sure that the heat level in the greenhouse remains fairly constant. Another negative is that you must find a place to store the coal before using it. A woodpile can be stacked anywhere, but a coal pile leaves a mess that should be contained in a bin of some kind. In addition, you’ll have to find a place to safely dispose of the coal ashes.
Pellet Stoves. Another alternative for heating a greenhouse is a pellet stove, but while the cost of the stove itself is fairly reasonable, the cost of the pellets is quite high compared to that of wood or coal. With the stove come the familiar problems of filling it and keeping it going overnight. There are some automatic-feed pellet stoves, but they are quite expensive.
Liquified Propane Gas (LPG) or Natural Gas (CNG). Gas greenhouse heaters are moderately safe and reliable and most are available to run on either propane (LPG) or natural gas (CNG) — the only marked difference between the two sources is that propane has a slightly higher heat output. When looking for a greenhouse heater, try to find one that does not have a pilot light if the heater is going to be located in a drafty area. The pilot-light versions that run without electricity, however, can save your plants if there is a power outage during a winter snowstorm. Two drawbacks of which you should be aware: Propane leaks can kill your plants and a unit without proper ventilation or air intake can result in burning up all the oxygen in the greenhouse, making the space hazardous to you and others who enter it.
I have been using a portable under-bench propane heater for more than ten years with no difficulty, however. It’s a specially designed greenhouse heater from Southern Burner Co., in Chickasha, Oklahoma (see Resources), that has worked effectively all along, although I did have to replace the control unit when it ceased working after the heater had been left unused for the entire summer. Requiring no electricity, it’s controlled by a pilot light and comes with a thermostat that I set at 55°F. With a supply of twin 40-pound propane cylinders located against a wall outside the greenhouse, the system works on its own, requiring no outside power source. This particular heater is available as a vented or nonvented unit, though the vented unit is better, exhausting combustion gases outside the greenhouse. If you install a similar unit, you’ll need to install an air line leading from outside into the greenhouse somewhere near the heater. I don’t worry about getting this stove wet when I water, but the control unit should be protected. (I’ve cut off the top of a gallon milk jug and, after making a couple of notches in it for gas lines, inverted it over the control unit to cover it.) Of course, during the coldest two months of the year (late January to early March) I do have to change the propane about once a week.
Many greenhouse vendors offer several propane heaters, some of which look like they could be used in your home as well as in the greenhouse. They come in sizes as small as 5,000 BTU and as large as 25,000 BTU. When deciding which type to purchase, note the heater’s gas consumption, the amount of BTU it produces, and where it can be located. If you are growing gas-sensitive plants such as orchids and other tropicals, you should install a vented heater with an electronic ignition so that the pilot light cannot give off fumes that might harm your plants. For less sensitive plants such as citrus, fig, and banana trees, you can install a non-vented heater, but both types require a rodent-protected air vent to allow air into the heater combustion chamber. If you do not provide an air intake, the heater will burn all the oxygen in the greenhouse, which could kill you and could lead to sickly plants.
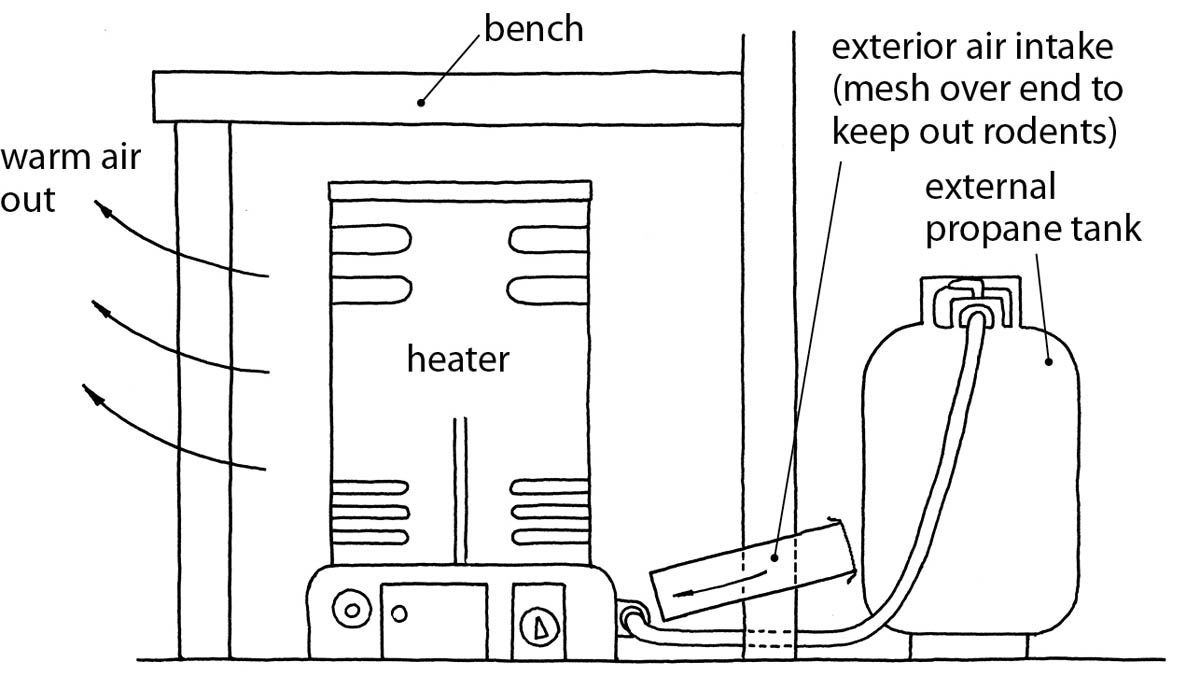
A handy, portable under-bench propane heater with a built in thermostat can be a very cost-effective and safe way to heat a structure.
Backup Heating Systems. In England, where winters are not as extreme as they are in the northern parts of North America, kerosene and paraffin heaters are popular. These make effective backup units, but are not suitable for continued long-term use unless they are certified. For a while, I used a British-style kerosene heater (one with a lighted wick) in the greenhouse, but the kerosene tended to add moisture to the air and this extra moisture made an ideal breeding ground for Botrytis (gray mold). If you decide to use a kerosene heater as a supplemental or main heater, buy high-quality kerosene that burns with a cleaner flame than ordinary kerosene.
Local Heating Devices. If you decide that you’re going to propagate plants or bring on new seedlings, you’ll need some form of additional heating in a local area where the plants will be germinating, such as a workbench. A source for this heating can be a small, clear plastic tent or similar enclosure over the bench with heating cables or a waterproof heat mat beneath it.
For a localized heating system, large commercial operations use heating pipes and electrical cables that run underneath a bench to warm the plants sitting on it. For your smaller operation you can purchase a waterproof propagation mat that sits under a seeding or propagation tray and can keep it at the desired temperature. These mats come in sizes ranging from 22 inches by 14 inches to 22 inches by 96 inches and cost about $40 for the smallest size to about $140 for the largest.
For grand-scale seed starting, mats are available in sizes ranging from 11 inches by 22 inches for one seed tray to 11 inches by 25 feet. Standard lengths are 8, 10, 12, 16, 20, and 25 feet and their cost is from $4 to $6 per foot. The wattage of these mats varies with their length and generally costs about the same as a lightbulb per foot of mat.
You can also build a simple heated germination box or propagation chamber in a small area of the greenhouse (see chapter 11 for more information on building a germination chamber). In most cases, a single lightbulb is all that is required to keep a propagation chamber warm enough for plantlets to take root.
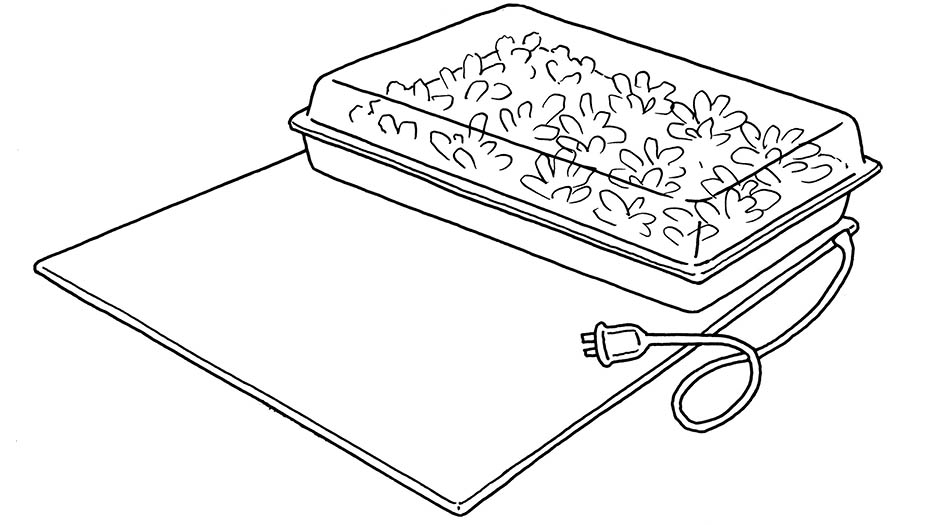
A seedling propagating mat provides localized heat for starting plants. Sizes range from 22 inches by 14 inches to 22 inches by 96 inches.
Underslab Heating. In some garages and commercial work spaces, heating cables or tubes that carry hot water are installed under or within the concrete slab foundation to keep the slab warm so that it can radiate heat. There is no reason why this type of heating system could not be used in a greenhouse, although it may be expensive to install and operate.
Using hydroponics to grow plants gives you ultimate control over greenhouse growing conditions, from the medium the plants grow in and how much daylight the plants receive to the exact formula for plant nutrients. The simplest method of growing hydroponically is to put a growing medium into a pot and once or twice a day add plant nutrient solution. The most complex method involves using computer-controlled pumps to automatically flush plant roots with nutrient solution as often as required for maximum growth. This does show to what extent a grower can control the entire plant environment. Growing in this manner keeps unwanted organisms from entering the greenhouse and keeps growing tables clean of dirt and potting soil.
In hydroponic growing, plants are set in a well-drained, inert (sometimes called soilless) material that can be polystyrene balls, expanded clay pellets, gravel, pea stone, perlite, vermiculite, rock wool, or coconut fibers. Plants might also be started in potting soil and then transplanted to the growing medium.
Once in the medium, they’re watered with a nutrient solution. Two of the most common, made by General Hydroponics, are Floragro and Florabloom, with their use depending on whether you want your plants to grow or flower. The company also manufacturers kits with both solutions so that you can start relatively inexpensively. Other products from this company are intended for hard-water areas or for mixing to grow specific plants. Because the solution is concentrated, it must be diluted according to package instructions, then poured into the aggregate and allowed it to drain. Most nutrient solutions are listed as having many trace elements, but you’ll need to check the specific product you choose to see exactly what’s in the solution before you buy it. As it passes through the aggregate, it wets the plant roots, with enough moisture staying in the medium to keep the roots just damp until the next watering. The solution can be collected and reused several times.
You can grow almost any plant hydroponically, but fast-growing plants such as lettuce, tomatoes, peppers, herbs, and greens are most often grown in this way.
For my homemade hydroponic growing facility, I installed a gutter throughout the greenhouse that held expanded clay balls. A small hole in a 5-gallon bucket located on a shelf near the ceiling of the greenhouse allowed the nutrient solution to run into the sloping, aggregate-filled gutter, where it wet the roots of each plant. At the end of the system was a second 5-gallon bucket, which collected the solution after it had run through the gutters. This pail contained a small fish-tank pump and an automatic shutoff valve. When the lower pail was full, the solution was pumped back to the upper bucket, ready for reuse. I turned on the pump when I went out to the greenhouse in the morning and did the same thing in the evening to circulate the solution. The water could be heated automatically to keep it moderately warm. This system produced a supply of fresh hydroponic lettuce and herbs. The biggest problem I found with growing hydroponically was that when I harvested plants, the roots pulled out so many clay balls from the gutter that I was constantly replacing them.
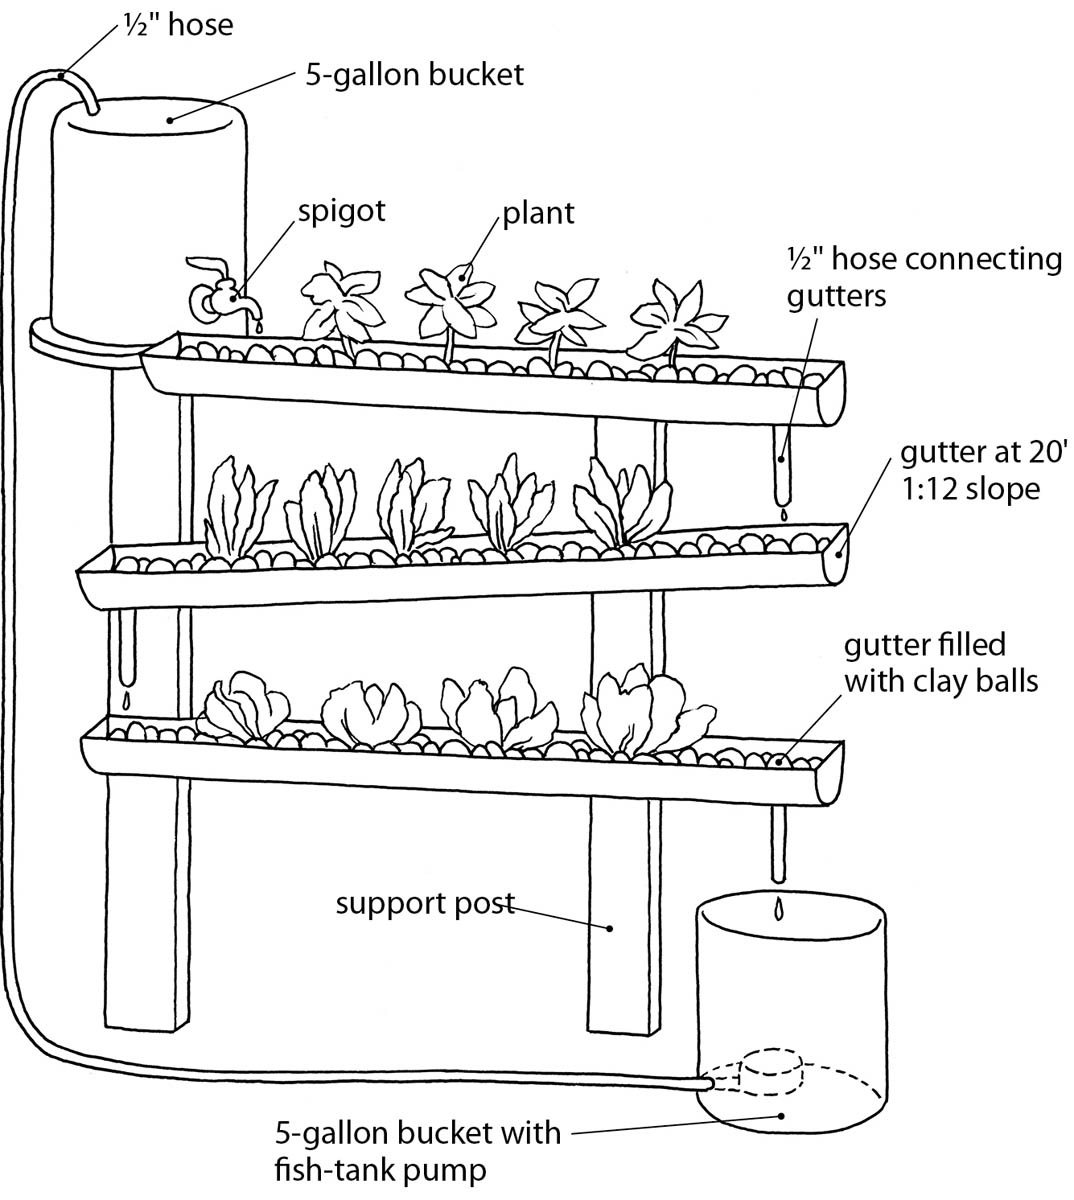
This simple homemade hydroponic system comprises a gutter system, two 5-gallon buckets, clay balls as aggregate in the gutters, and a fish-tank pump.
Of course, you can create a much more elaborate hydroponic system than my simple gutter-growing method. You can devote an entire greenhouse to growing vegetables and flowers hydroponically. In fact, you can purchase specialized sloped growing tables in which the nutrient solution flows into the higher end and out the low end, where it is collected for the next application. You can also adjust the nutrient solution to suit the particular plants that you want to grow. For example, for those plants that like a more acidic soil, you can make the nutrient mix slightly more acidic, and for those that like a lot of nitrogen, you can adjust the solution accordingly. All of these additives can be purchased from a hydroponic supplier.
Along with the hydroponic system’s reputation for an insect-free, controlled greenhouse environment, the vegetables produced from such a system often command high prices at supermarkets and other outlets should you decide to sell your produce.
I prefer to garden organically and to use organic controls to eliminate pests in the greenhouse, but because plants “under glass” are spaced much more closely than plants outdoors and there is no wind to blow insects from their leaves and buds, you may well have to resort to sprays at some point.
If you decide to spray pesticides to control insects in your greenhouse, read the labels very carefully and make sure that you conform to all the application requirements. Always store unused insecticides well away from any area that a child may have access to. In addition, note which insecticides are most harmful to humans; I prefer not to use these in my greenhouses, where I spend so much time.
Store unused insecticides well away from any area a child may have access to.
The only spray that I use in a greenhouse is Safer’s insecticidal soap — and I try to avoid spraying it on plants such as herbs that I plan to eat. If weather permits, I first take an infected plant outdoors and spray it with plain water. Using this method, you might find that you don’t need an insecticide at all; spraying the plant with the fine mist of a hose is often good enough to remove aphids and most whiteflies. Hanging sticky yellow cards in the greenhouse can also help control whitefly and aphid infestations.
Avoiding overzealous use of insecticides may mean coexisting with some pests. I know there are some insects in my greenhouse and that I’m never going to get rid of them completely — and for me, this is acceptable.
A greenhouse also offers a totally controlled, largely enclosed environment for the release of beneficial insects that can take care of pests. I once released 3,000 ladybugs (the smallest amount I could purchase) into the greenhouse to control aphids, and even today, seven years later, there are a few dozen ladybugs wandering around inside, doing their job of helping to keep down the pest population.