CHAPTER 1
SMALL WOUND
REPAIR
For the Pre-Hospital Care Provider (PHCP), mastery of small wound repair techniques is of reat importance in a field setting. From the laceration caused by an ax while chopping wood to an avulsion caused by an exploding mine, the ability to clean and close a wound properly can ensure quicker recovery of the patient with fewer associated complications. The traumatized site, if not treated early, can quickly develop into a life-endangering infection. Cosmetic distortion and reduced usage of the wound site can result from an open wound where tissues are left to heal with no proper surgical intervention (Photo 1). The PHCP can cause all three of these debilitating patient conditions to occur as a result of poor surgical practice.
The use of surgical tools and techniques used in small wound repair is not difficult to master. The basic manual skills—such as cutting, clamping, grasping, ligation, and tying—become second nature with a little practice.
CUTTING
Tissues are cut cleanly and perpendicular to their surfaces to promote healing. When skin is to be cut, it is first stretched taut, and the scalpel blade is held at a 90-degree angle to the surface of the skin to ensure a clean cut (Ill. 1). If the skin is held loosely or the PHCP hesitates, a jagged wound may result (Ill. 2). Cuts heal better if they are made parallel to wrinkle lines and across the lines of muscle pull (Ills. 3 and 4). For fine work and cutting of skin, the scalpel is the best tool (Ill. 5). When holding a #15 blade like an ink pen, the PHCP is ready for most cutting situations (Ill. 6).
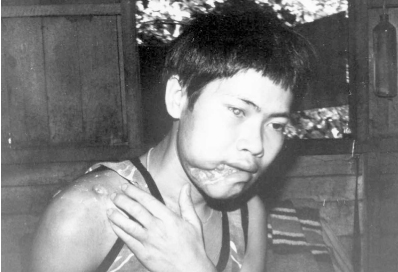
Photo 1: This 27-year-old Burmese patient was shot by soldiers through the right shoulder, striking the right cheek and fracturing the jawbone. The right eye was also injured. After five days of transport, he reached a dispensary. Due to a lack of medical resources, the wounds were allowed to heal as found. Even limited wound repair could have reduced the cosmetic distortion and possibly returned some function to the lower jaw. (Photo courtesy of Hugh Wood.)
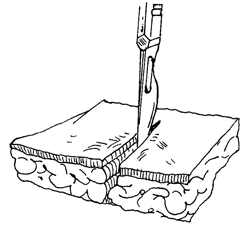
Illustration 1: Proper scalpel positioning for cutting of the skin.
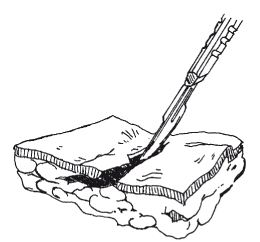
llustration 2: When cutting the skin, a jagged wound can result from poor technique.
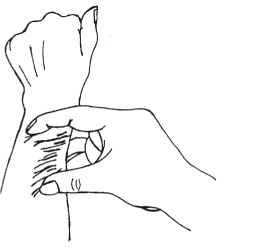
Illustration 3: Establishing the natural flow of wrinkle lines in the arm.
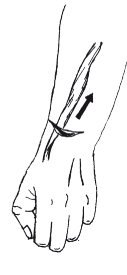
Illustration 4: Cutting across the line ofmuscle pull.
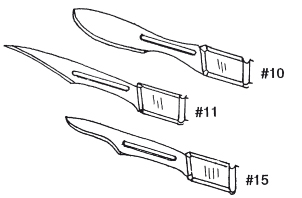
Illustration 5: Common examples of scalpel blades.
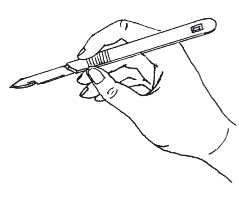
Illustration 6: The "ink pen" hold for a scalpel.

Illustration 7: Common examples of medical scissors.
Scissors are used for cutting and dissecting the deeper tissues under the skin. Surgical scissors come in a variety of configurations. For the PHCP, the curved Metzen baum and more heavily curved Mayo scissors will be satisfactory for most cutting needs. A small pair of iris and suture scissors are also useful (Ill. 7).
Blunt-pointed scissors are used when cutting in the wound. This reduces the accidental trauma of pointed blades stabbing surrounding tissue. The blunt points will allow the scissors to expose tissue by their spreading action.
Scissors cut by crushing. Therefore, dull scissors are dangerous, as they traumatize tissue.
CLAMPING
During suturing, it is important to visualize all aspects of the wound. This is difficult to do if the wound continually fills with blood. Clamping the vessel closed to stop hemorrhage into the wound is an easy way to maintain a dry field in which to work.
When clamping a vessel, the PHCP must be careful not to include surrounding tissue. Clamping crushes tissue and can also kill it, which may interfere with the healing of the wound. It is best to use the clamp with its concave side toward the tissue.
Clamps, as well as scissors, are best held with the thumb and ring finger pushed only partially into the rings of the instrument. The index finger is used to stabilize the instrument (Ills. 8 and 9).
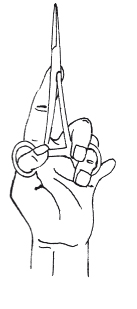
Illustration 8: The thumb and ring finger are pushed only partially into the rings of medical instrument.
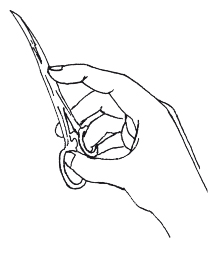
Illustration 9: The index finger is used to stabilize a clamp.
GRASPING
Forceps are used for grasping. The fine-toothed Adson and the larger DeBakey allow the PHCP to hold tissue for exploration of the wound (Ills. 10 and 11).
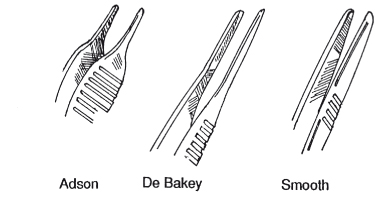
Illustration 10: Commonly used forceps.
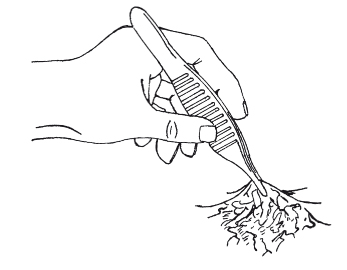

Illustration 11: Exploring a wound site with forceps. Forceps can grasp tissue to expose the wound, or their spring tension can be used to push tissue aside for explo ration.
LIGATURE
Ligature is a critical technique for the PHCP who must stop life-endangering hemorrhage or needs a dry field in which to work. The bleeding artery or vein is first clamped. As the vessel is lifted and exposed, a fine absorbable suture (3-0 or 4-0) is tied below the clamp (Ill. 12). Once the PHCP has added an additional knot or two, the vessel is unclamped to check for leakage (Ill. 13).
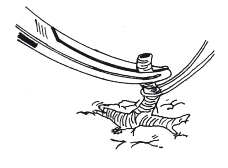
Illustration 12: Ligature of vessel. A clamp has been applied and the vessel is about to be tied off.

Illustration 13: The ligature is secured;the vessel is now checked for leakage.

Illustration 14: The double-clamp, double-ligature technique.
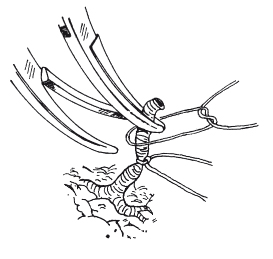
Illustration 15: The first ligature is in place and the second is being applied.
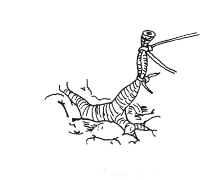
Illustration 16: The secured “bleeder.”
With larger vessels or persistent bleeders, a doubleclamp, double-ligature technique is used. Two clamps are applied, and the first ligature is applied under the lowest clamp (Ill. 14). Once this is secured, a second ligature is applied under the remaining clamp (Ill. 15). The last clamp is then removed to check for leakage (Ill. 16). When tightening the ligature, care should be taken not to cut the vessel in half.
TIES
There are several suture ties that would be applicable for PHCP usage. The instrument tie is probably the most useful because it helps conserve the length of the suture when several stitches are used (Ills. 17 through 26).
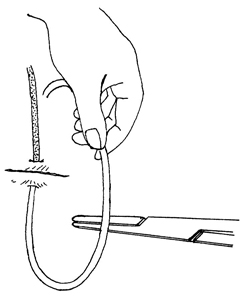
Illustration 17: The instrument tie. The square knot is used and is always doubled.
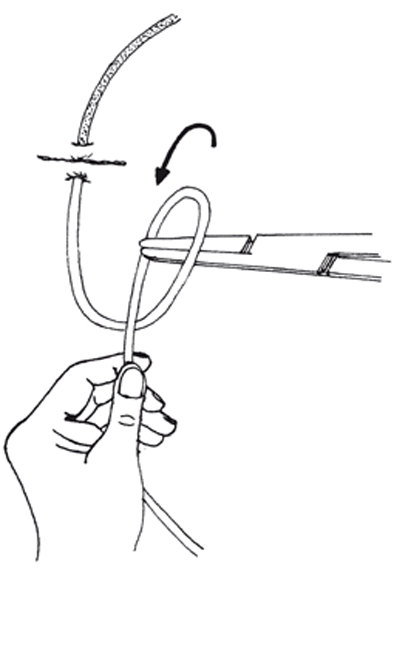
Illustration 18
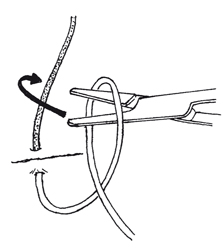
Illustration 19
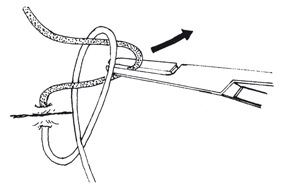
Illustration 20

Illustration 21
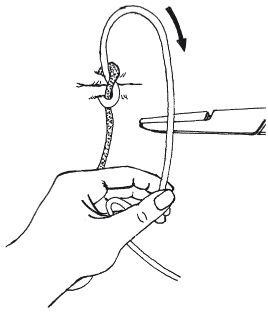
Illustration 22
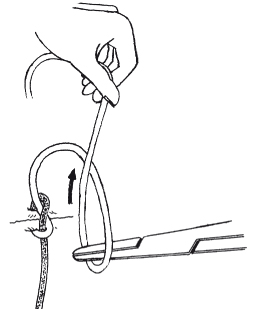
Illustration 23
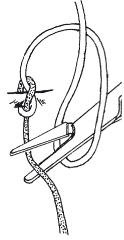
Illustration 24
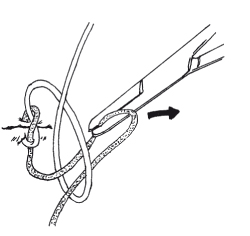
Illustration 25
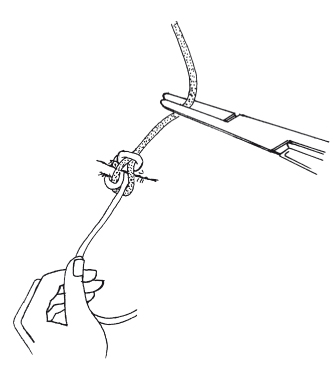
Illustration 26
CLOSING THE WOUND
Suturing a wound closed is not simply a matter of “stitching” loose flesh together. For a wound o heal properly, attention must be given to the appropriate time to close a wound, debridement, mechanical cleansing, proper suture selection, and precise suture placement.
Timing for Wound Closure
Wound closure timing is categorized as primary closure,delayed primary closure, and healing by secondary intention (Ill. 27).
Primary closure of an open wound is the direct suturing of a clean wound in which there is no significant concern for infection. Primary closure is generally indicated if the wound has been satisfactorily debrided and mechanically cleaned, and it is less than 6 hours old. 1
In delayed primary closure, the wound is 6 to 12 hours old, which allows significant bacterial growth in the wound. The wound is left open and loosely packed with dressings. In 3 to 5 days, the wound will develop enough resistance to infection that closing it should not lead to complications (Ill. 28). 2 During World War I, it became common practice for Allied surgeons to treat ballistic wounds with debridement, wound excision, and delayed primary closure at 3 to 5 days after primary surgery (Ills. 29 through 33). 3

Illustration 27: Adapted from work found in Wound Care (Butterworth-Heinemann Limited, U.K., 1986, pg. 33) by Stephen Westaby.
Primary closure—Direct suturing of a wound that is less than 6 hours old.
Delayed primary closure—The wound is first seen 6 to 12 hours after injury. It is left open and closed in 3 to 5 days.
Healing by secondary intention—The wound is first seen 12 hours after injury. It is left open and closes by contraction and epithelisation.
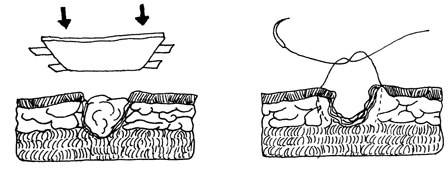
Illustration 28: Delayed primary closure of a wound. The wound is packed loosely and then closed in 3 to 5 days.
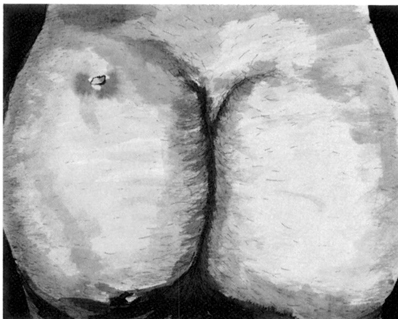
Illustration 29: High-velocity bullet wound to the left buttock. The wound has left small entry and exit holes. The underlying damaged muscle tissue along the bullet path has now become susceptible to gangrene. The entry and exit wounds as well as the anticipated line of incision are cleaned, shaved, and dried, and an antiseptic is applied.
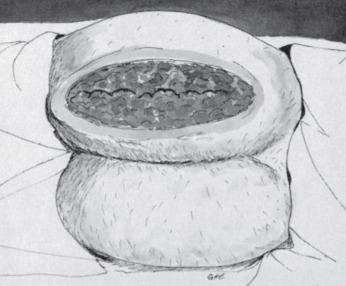
Illustration 30: To remove the dead and damaged muscle tissue, the buttock has been incised along and down to the depth of the bullet path. All nonvisible muscle tissue is now debrided and the open wound cleaned thoroughly.

Illustration 31: The wound is covered with dry, bulked dressing. It is not packed tightly, as this will restrict the flow of bacterial-laden inflammatory exudate.
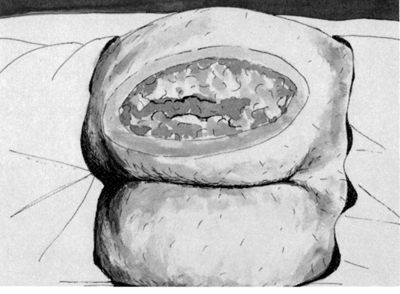
Illustration 32: With the wound left open and given proper dressing care, swelling and drainage will begin to isappear. The muscle tissue will take on a more normal color, and the wound site should be free of infection.
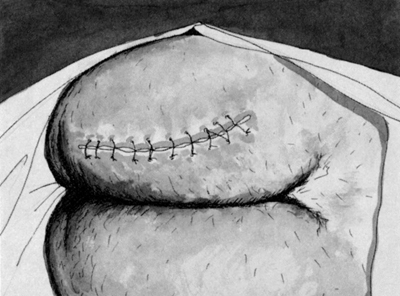
Illustration 33: Delayed primary closure of the wound after 3 to 5 days.
Healing by secondary intention is called for in wounds over 12 hours old. 4 The wound is left open and allowed to close itself by contraction and epithelization. This approach to wound care is indicated for the heavily contaminated wound with tissue loss and established infection. Wounds of this nature often require skin grafts at a later date by a skilled surgeon.
It must be remembered that even if a wound is not to be closed immediately, it should still be debrided and cleansed completely to promote proper healing. An infected wound is always a contraindication to wound closure, regardless of the length of time since the wound was inflicted. Further intervening factors that determine whether wound closure is appropriate are the health of surrounding tissue, general health of the patient, and degree of satisfactory blood supply to the affected area.
Debridement
When the decision has been made to suture a wound closed, a procedure for converting a contaminated wound to a clean one must be implemented first. Debridement of a wound, along with mechanical cleansing, is the most important step in decontaminating a traumatic wound (Photo 2).
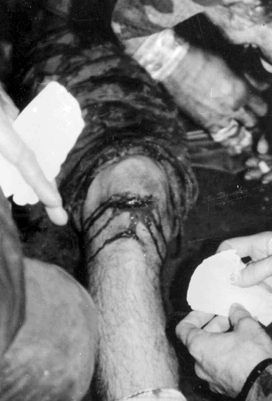
Photo 2: Laceration and abrasion to the right knee as a result of a fall upon rocks. Even minor wounds such as this one, if not debrided and cleaned properly, can quickly incapacitate a soldier due to infection. (Photo courtesy of D.E. Rossey.)
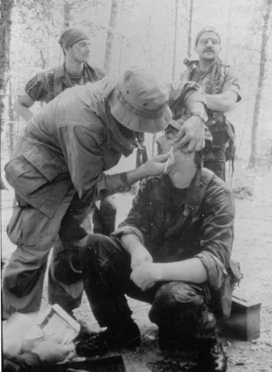
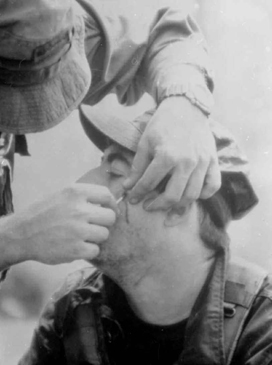
Photos 3 and 4: This PHCP is using a surgical probe to locate the position of a 5.56mm bullet fragment. Small syringe needles (e.g., 25 gauge) can also be used. The needles are inserted through the skin at different angles until the foreign body is located. If this fragment had been left in place, the wound would probably have abcessed. (Photos courtesy of D.E. Rossey.)
Debridement has two main goals: 1) to remove tissue contaminated by bacteria and foreign bodies (Photos 3 and 4), and 2) to remove permanently devitalized tissue (see Photo 20 in Chapter 2).
The dead or dying skin, muscle, and fat that is left in the wound act as a culture medium for both aerobic and anaerobic organisms. These devitalized structures quickly become infected and also inhibit the body’s ability to fight infection by hindering the movement of white cells. The traumatized wound should be debrided as soon as possible to prevent the establishment of infection and its spread to healthy tissue. Antibiotics are not a replacement for debridement but an adjunct to it.
Determining what tissue should be debrided is based upon identifying the demarcation between compromised and healthy tissue. Guidelines in determining tissue viability are color, consistency, and the ability to bleed. Viable tissue will be reddish in color, firm in consistency, and fed with an adequate blood supply. Healthy muscle will contract when stimulated by a cutting blade.
Skin is generally more resistant to infection than other tissues due to its good blood supply. This allows the PHCP to be conservative in the debridement of skin. The debridement oftentimes can be restricted to only a narrow margin on the edges of the wound.
Unlike skin, muscle must be removed more aggressively. Dead muscle is a perfect medium for the development of gas gangrene. Any discolored, bruised, or noncontractile muscle must be excised totally, and all pockets must be laid open so the wound is saucered and able to drain freely.
Specialized tissue, such as nerves and tendons, presents a special problem because these structures do not have the degree of regenerative power that other structures have. When these structures become contaminated, high-pressure irrigation followed by removal of fragments that are not viable is the best course of action.
The procedure of debridement is usually best carried out with a scalpel. A scalpel gives precision and avoids a crushing action if scissors become dull. Effective debridement is dependent upon exposure of the wound, so incisions made at either end by the PHCP may be necessary to explore into deep wounds. Repetitive saline irrigation and sponging are also integral parts in the debridement process because irrigation loosens and flushes away contaminants while keeping tissues moist.
Mechanical Cleansing of the Wound
In conjunction with debridement, mechanical cleansing of the wound is necessary to ensure proper asepsis. Mechanical cleansing is a simple procedure of using hydraulic force and scrubbing the wound with an antiseptic solution in order to physically remove contaminants and destroy microorganisms.
Joseph Lister, a surgeon who lived in Glasgow during the 1800s, is credited with discovering antiseptic surgery. 5 His use of chemicals to kill bacteria was a cornerstone in his work, and some feel that his selection of the antiseptic phenol resulted from its use in deodorizing the putrefying sewers of his time. Today, a mild solution of Betadine is the antiseptic of choice for cleaning a wound. When Betadine is used, the PHCP needs to be attentive to the patient who is allergic to iodophor products. Also, high concentrations of Betadine can be toxic to healthy issue and retard healing. Phisohex is effective when Betadine is not available or cannot be used.
When the PHCP begins cleaning the wound, it is best to wear a pair of sterile gloves, which are discarded and replaced with a new pair once the wound is ready for suturing. Aggressive scrubbing is important, as is high-pressure irrigation in traumatic wounds (a large syringe can be used in the field for high-pressure irrigation). However, care must be taken not to further traumatize wounded tissue or surrounding healthy tissue.
Once the wound site has been cleaned, draping the wound for suturing is of particular importance in the field. Draping decreases the chance of infection by providing a sterile barrier (field) in which to work. Without a surgical drape over the wound, the ends of suture would drag through contaminated areas and the PHCP’s sterile gloves would quickly become dirty from contact with surrounding tissue. Commercial drapes are available that are disposable and have precut holes. Sterile towels work just as well when clamped together on the corners (see Photo 7).
Suture Selection
Suture is broadly classified as either absorbable or nonabsorbable. Absorbable suture is used to close muscle and subcutaneous tissue and to ligate blood vessels. Absorbable suture is broken down over time by the body and therefore is useful for tissues that lie deep and cannot be reached later in order to remove the suture. Catgut is the old traditional absorbable suture; however, synthetic sutures such as Dexon and Vicryl are preferred by many due to their more predictable rate of breakdown, greater tensile strength, and decreased tendency to cause inflammation.
Suggested Suture Size Usage For Related Anatomical Areas
| Skin | Subcutaneous tissue and muscle | |
| Face | 6-0nylon | 4-0,5-0dexon,vicryl |
| Scalp | 4-0nylon | 3-0,4-0dexon,vicryl |
| Trunk | 4-0nylon | 3-0,4-0dexon,vicryl |
| Extremities | 4-0nylon | 4-0dexon,vicryl |
| Hands,feet | 5-0,4-0nylon | 5-0,4-0dexon,vicryl |
| Mucous membranes |
5-0,4-0dexon,vicryl |
Illustration 34: Adapted from work found in Emergency Medicine: A Comprehensive Review (An Aspen Publication, Rockville, MD, 1983, p. 142) by Thomas Clarke Kravis and Carmen Germaine Warner. The chapter, written by Davis Cracroft, is titled “Minor Lacerations and Abrasions.”
Nonabsorbable sutures are used in the closure of skin and approximation of lacerated tendons. Multifilament (woven) nonabsorbable sutures, such as silk and cotton, are often left on the shelf because monofilament nonabsorbable nylon or polypropylene are usually chosen. The single strand of a monofilament suture does not provide places for bacteria to hide (as does multifilament suture) and is therefore used when the possibility of infection is high. The main drawback of monofilament suture is that it does not handle as well or hold its knot as well as multifilament suture.
Sutures range in size from the very large #5 to the barely visible 12-0 filaments. Suggested suture size for body locations is given in Illustration 34.
Precise Suture Placement
Once it has been determined that the timing is appropriate for closure and the wound has been prepared properly (cleaned, debrided, and anesthetized), attention turns to precise suture placement (Ills. 35 through 38).
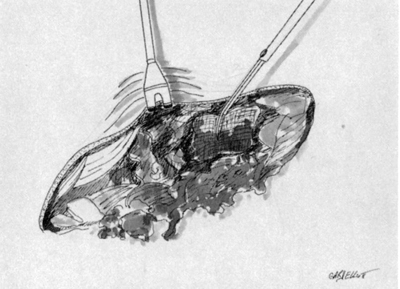
Illustration 35: Closing the wound. A) Mechanical cleansing.
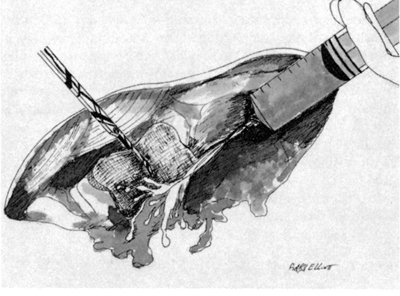
Illustration 36: B) Irrigation.
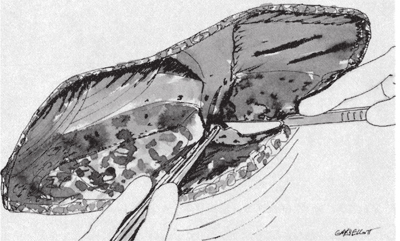
Illustration 37: C) Debridement.
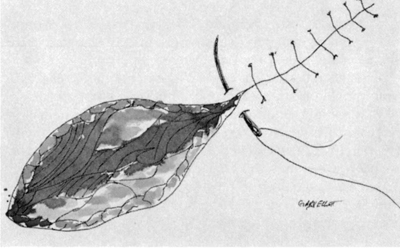
Illustration 38: D) Suturing.

Illustration 39: A) Correct alignment of wound layers. The two deepest sutures should be absorbable. B) Suture being drawn too tight has resulted in overlapped skin. Failure to place a suture has resulted in dead space.
A wound is sutured closed to obliterate space, stop hemorrhage, and provide physical strength to the separated tissue surfaces during the healing process. Special care must be taken to align the various layers of the wound in close apposition (mucosa to mucosa, muscle to muscle, and skin to skin) so that a minimal amount of new connective tissue will be required to restore structural integrity as well as to prevent the creation of dead spaces and overlapped skin (Ill. 39). If dead spaces are left, they will fill with serum or blood, which will provide a fertile round for infection. Jagged wound edges must be “trimmed up” to remove devitalized tissue and ensure proper tissue alignment (Ill. 40).

Illustration 40: Adapted from work found in Emergency Medicine: A Comprehensive Review (An Aspen Publication, Rockville, MD, 1983, p. 149) by Thomas Clarke Kravis and Carmen Germaine Warner. The chapter, written by Davis Cracroft, is titled “Minor Lacerations and Abrasions.”

Illustration 41: Proper suture bite, tension, and tissue alignment.
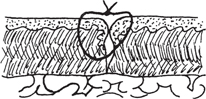
Illustration 42: Suture tied too tightly, resulting in rolled-under edges.
Particular attention must be given to the tightness of the suture tie, the size of the tissue bite,” and the distance between sutures. The suture tension should be just enough to approximate the edges (Ill. 41). When the suture is tied too tight, the wound edges are inverted, making the suture line fine in appearance, but rolledunder edges will heal weakly by secondary intention (Ill. 42).
A “bite” of tissue that is too close to the edge may tear out, whereas a bite that is too wide can make alignment of the edges difficult. Too many sutures can lead to tissue strangulation. Conversely, too few can result in tissue edges that are not brought close to each other throughout the wound (Ill. 43).
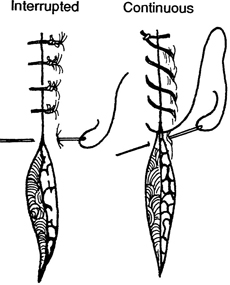
Illustration 43: Proper suture spacing. The interrupted suture closure is the standard for wound closure. The continuous running closure can be threaded rapidly and thus is useful in emergency situations where numerous closures have to be made quickly.
Proper positioning of the suture needle in the needle holder will assist the PHCP in correct suture placement. A suture needle held perpendicular to the needle holder works well in limited space as the needle holder is rotated on its axis. It is the position for general-purpose work. Placing the plane of the needle curve parallel to the needle handle is useful in sewing layers parallel to the surface in deep wounds. Grasping the needle near the end (toward the suture) is suitable for soft tissue, as it allows maximum needle length to be inserted through the tissue. This action allows for reduced incidence of needle slippage. Grasping the needle near the point may be necessary if increased driving force is needed to pierce tough tissue.
The PHCP will develop an “eye” for the procedure that has as a goal a wound with a uniform wound line with no wrinkled tissue at the edges. For best results when closing the wound, the PHCP should remember the following:
- Appose the various layers accurately.
- Tie the suture with minimum tension.
- Use the finest practical suture size.
- Double the square knot.
Suture Removal
Correct timing for suture removal is dependent upon the patient’s healing powers. If the patient’s overall health is good, removal of the suture at the earliest appropriate time will help prevent the “railroad track” scarring associated with suture that has been left in place too long (usually past the fourteenth day of wound closure). If there is uncertainty as to whether the wound will hold up if the sutures are removed, alternating sutures can be removed and the wound rechecked in a few days. A general guide for timing suture removal is given in Illustration 44.
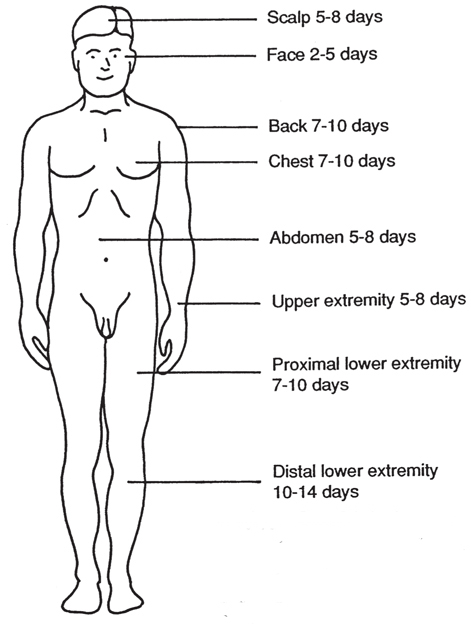
Illustration 44: General timing for suture removal. Adapted from work found in Emergency Medicine: A Comprehensive Review (An Aspen Publication, Rockville, MD, 1983, p. 143) by Thomas Clarke Kravis and Carmen Germaine Warner. The chapter, written by Davis Cracroft, is titled “Minor Lacerations and Abrasions.”
When removing a suture, it may be necessary to lift it with forceps before cutting. The suture is cut close to the skin (see Photo 18). The goal of the technique is to prevent surface material from being dragged into the track once occupied by the suture (see Photo 19).
Wound Drains
The application of a wound drain is not usually a step in suturing a wound closed. The PHCP will be confronted with deep puncture and penetrating wounds, and for that reason he would be lacking in his patient care skills if he were not able to employ the use of a drain.
Wound drains are used to remove fluid or pus from cavities or abscesses. In the 1800s, the English surgeon Lawson Tait was quoted as saying, “When in doubt, drain.” 6 Failure to use a drain to remove pus was considered negligent in his time, where in that preantibiotic period the drain was often life-saving.
Drains are most effective when placed in a deep wound with a narrow opening, which needs to heal from below first. But use of a drain is not hazard-free. Since it is a foreign body in an infected area, it can allow microorganisms to enter the wound. This can be compounded by dirty, moist, long-standing dressings.
One of the most commonly used drains is the Penrose (Photo 5). It is a pliable, flat rubber tube that varies in length. The Penrose drain is an overflow drain and as such should be placed as deep in the wound as possible. To secure the drain, it is sutured to the wound’s edge and a safety pin placed in the exposed end to prevent it from slipping into the wound (Ill. 45). When the drain becomes clogged, it is generally better to simply replace it with a new one rather than try to open the obstructed drain.

Photo 5: Penrose drain.
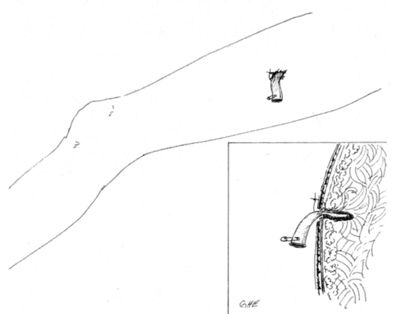
Illustration 45: Proper use of the Penrose drain. It has been placed deep in the wound and sutured to the wound edge, and it has a safety pin in place.
When drainage has stopped or slowed dramatically, the PHCP can consider removal of the drain. In determining whether or not to remove the drain, first loosen it and slowly advance it further into the wound cavity. If no further drainage is found deeper in the wound and the wound cavity has shrunk to just larger than the drain, it is probably appropriate to remove it.
A CASE STUDY
In the following series of photographs (Photos 6 through 19), a PHCP closes a laceration to the left thigh. The 34-yearold patient was in good health with no pertinent medical history (i.e., allergies). The wound was inflicted by a sharp blade. Efforts to close the wound were begun approximately 10 minutes after the laceration had occurred.
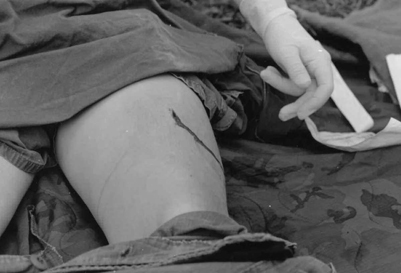
Photo 6: Laceration to the left thigh.
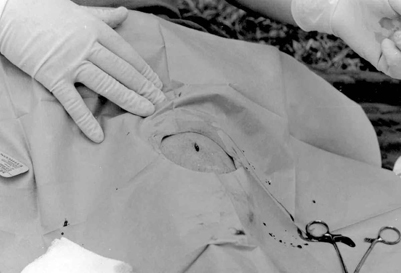
Photo 7: The wound has been cleaned with sterile water and Betadine. No debridement was needed due to a clean cut. The wound has been anesthetized with Lidocaine. The operating area is draped, providing the PHCP with a sterile area in which to work.
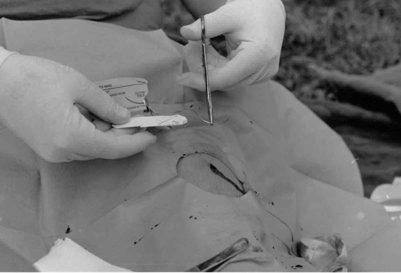
Photo 8: Suture being removed from its dispenser.
Photo 9: The first suture in place. Note how the needle is held in the needle holder.


Photo 11: The square knot is doubled.
Photo 12: Cutting the suture end.
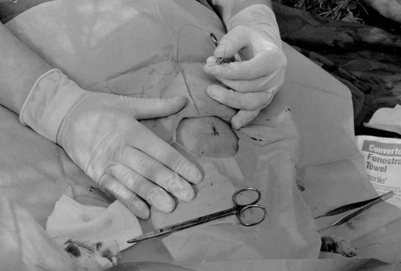
Photo 13: First suture in place. The wound has been cleaned up and is ready for the second suture.
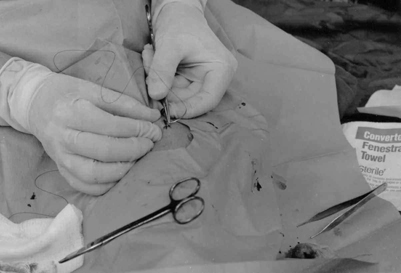
Photo 14: Note use of palm hold and positioning of the needle holder close to the needle point. This is necessary in order to pierce the tough thigh skin. The PHCP is using his right thumb and index finger to locate the needle point, thus ensuring proper suture bite.

Photo 15: Second suture in place. The site is cleaned and ready for the final suture.

Photo 16: Final suture being threaded. Note proper suture bite.

Photo 17: Neosporin ointment has been applied to the wound site and the wound is bandaged.
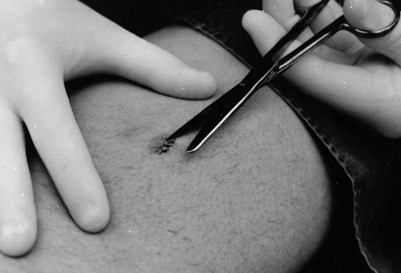
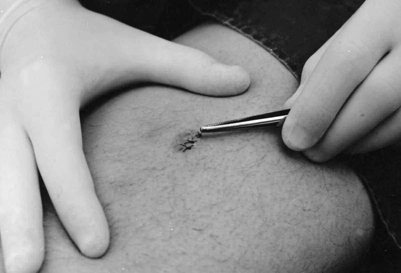
Photos 18 and 19: After 7 days, the sutures are being removed. The wound healed without complications and the scar was minimal.
1 Thomas Clarke Kravis and Carmen Germaine Warner, Emergency Medicine (Rockville, MD: Aspen Systems Corporation, 1983), p. 138.
2 Ibid. p. 138.
3 G.J. Cooper and J.M. Ryan, “Interaction of penetrating missiles with tissues: Some common misapprehensions and implications for wound management,” British Journal of Surgery. 1990, p. 609.
4 Thomas Clarke Kravis and Carmen Germaine Warner, Emergency Medicine (Rockville, MD: Aspen Systems Corporation, 1983), p. 138.
5 Warren H. Cole and Robert Elman, Textbook of General Surgery (New York, NY: Appleton-Century-Crofts, Inc.,1948), p. 24.
6 Stephen Westaby, Wound Care (St. Louis, MO: The C.V.Mosby Company, 1986), p. 40.