provided a general overview of the web design environment. Now that we’ve covered the big concepts, it’s time to roll up our sleeves and start creating a real web page. It will be an extremely simple page, but even the most complicated pages are based on the principles described here.
In this chapter, we’ll create a web page step-by-step so you can get a feel for what it’s like to mark up a document with HTML tags. The exercises allow you to work along.
This is what I want you to get out of this chapter:
- Get a feel for how markup works, including an understanding of elements and attributes.
- See how browsers interpret HTML documents.
- Learn how HTML documents are structured.
- Get a first glimpse of a style sheet in action.
Don’t worry about learning the specific text elements or style sheet rules at this point; we’ll get to those in the following chapters. For now, just pay attention to the process, the overall structure of the document, and the new terminology.
A Web Page, Step-By-Step
You got a look at an HTML document in Chapter 2, How the Web Works, but now you’ll get to create one yourself and play around with it in the browser. The demonstration in this chapter has five steps that cover the basics of page production:
Step 1: Start with content. As a starting point, we’ll write up raw text content and see what browsers do with it.
Step 2: Give the document structure. You’ll learn about HTML element syntax and the elements that set up areas for content and metadata.
Step 3: Identify text elements. You’ll describe the content using the appropriate text elements and learn about the proper way to use HTML.
Step 4: Add an image. By adding an image to the page, you’ll learn about attributes and empty elements.
Step 5: Change how the text looks with a style sheet. This exercise gives you a taste of formatting content with Cascading Style Sheets.
By the time we’re finished, you’ll have written the document for the page shown in Figure 4-1. It’s not very fancy, but you have to start somewhere.

We’ll be checking our work in a browser frequently throughout this demonstration—probably more than you would in real life. But because this is an introduction to HTML, it’s helpful to see the cause and effect of each small change to the source file along the way.
Launch a Text Editor
In this chapter and throughout the book, we’ll be writing out HTML documents by hand, so the first thing we need to do is launch a text editor. The text editor that is provided with your operating system, such as Notepad (Windows) or TextEdit (Macintosh), will do for these purposes. Other text editors are fine as long as you can save plain-text files with the .html extension. If you have a visual web-authoring tool such as Dreamweaver, set it aside for now. I want you to get a feel for marking up a document manually (see the sidebar “HTML the Hard Way”).
This section shows how to open new documents in Notepad and TextEdit. Even if you’ve used these programs before, skim through for some special settings that will make the exercises go more smoothly. We’ll start with Notepad; Mac users can jump ahead.
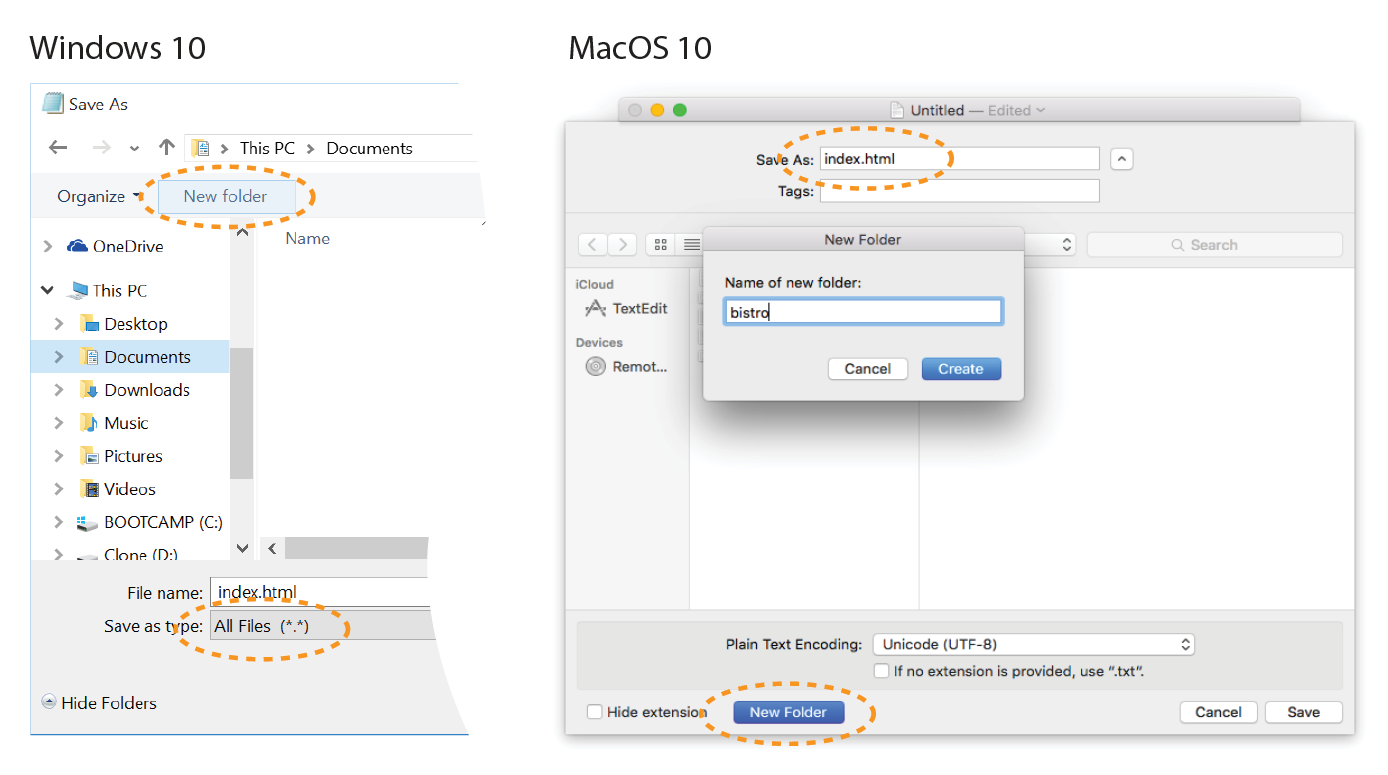
Creating a New Document in Notepad (Windows)
These are the steps to creating a new document in Notepad on Windows 10 (Figure 4-2):

- Search for “Notepad” to access it quickly. Click on Notepad to open a new document window, and you’re ready to start typing. 1
- Next, make the extensions visible. This step is not required to make HTML documents, but it will help make the file types clearer at a glance. Open the File Explorer, select the View tab, and then select the Options button on the right. In the Folder Options panel, select the View tab again. 2
- Find “Hide extensions for known file types” and uncheck that option. 3
- Click OK to save the preference 4, and the file extensions will now be visible.
Creating a New Document in TextEdit (macOS)
By default, TextEdit creates rich-text documents—that is, documents that have hidden style-formatting instructions for making text bold, setting font size, and so on. You can tell that TextEdit is in rich-text mode when it has a formatting toolbar at the top of the window (plain-text mode does not). HTML documents need to be plain-text documents, so we’ll need to change the format, as shown in this example (Figure 4-3):
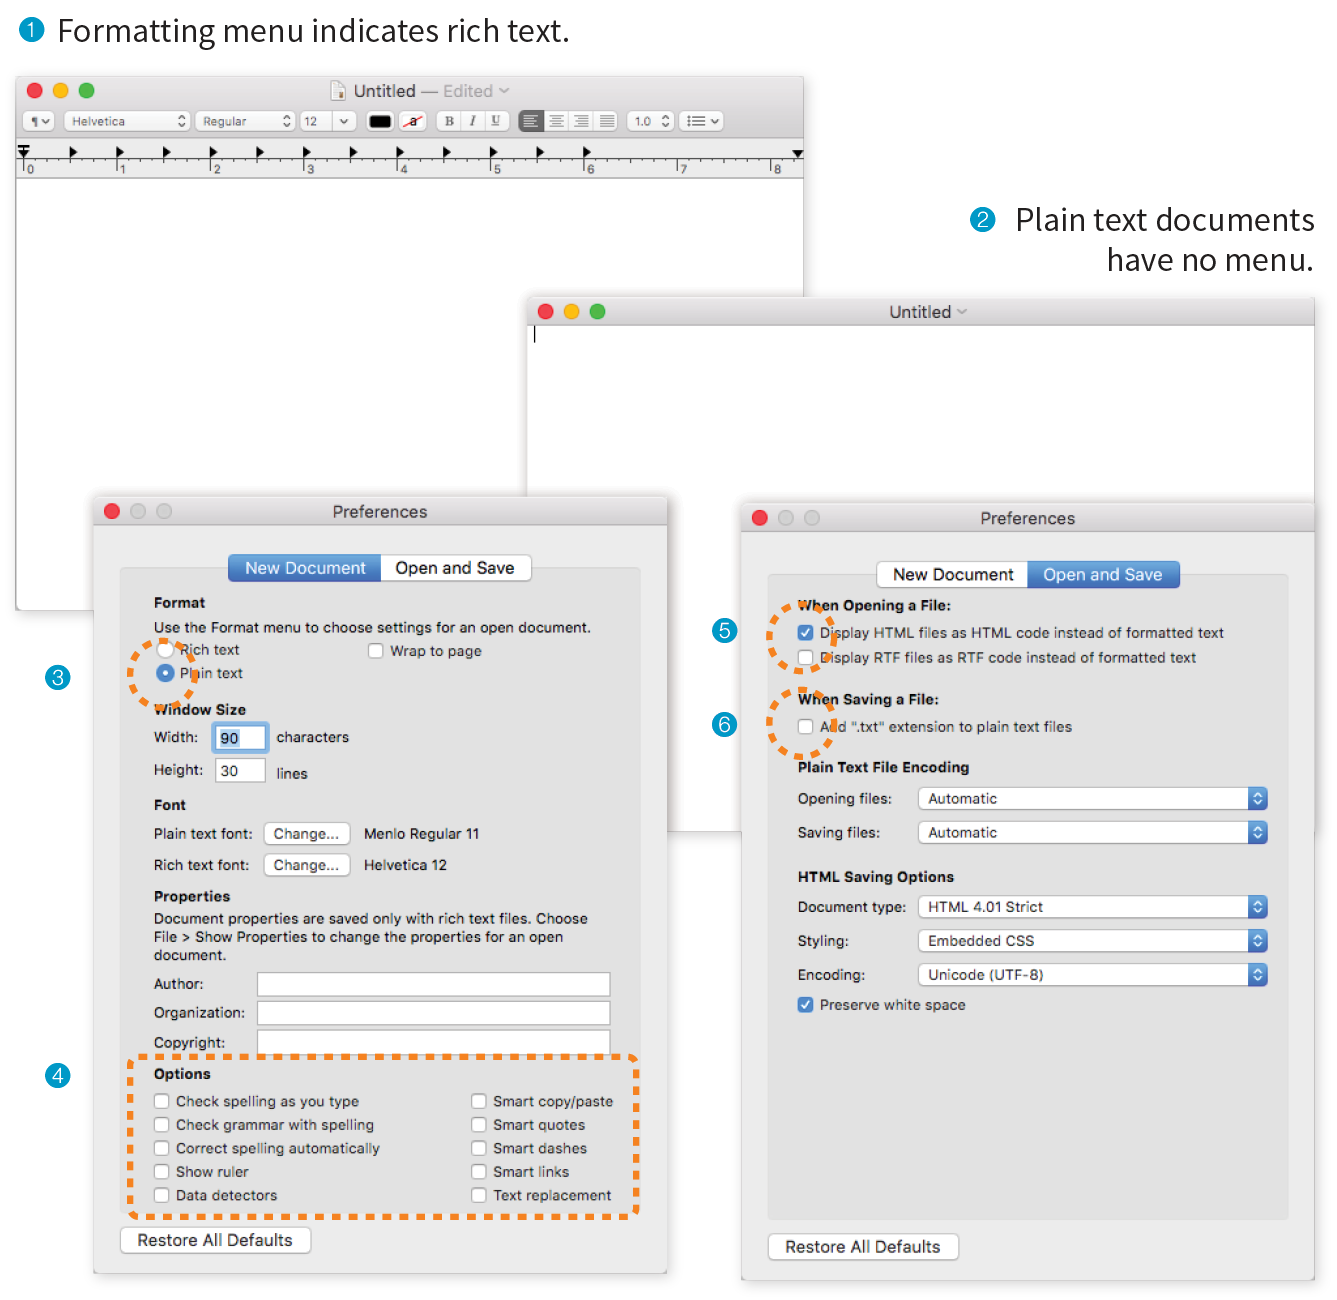
- Use the Finder to look in the Applications folder for TextEdit. When you’ve found it, double-click the name or icon to launch the application.
- In the initial TextEdit dialog box, click the New Document button in the bottom-left corner. If you see the text formatting menu and tab ruler at the top of the Untitled document, you are in rich-text mode 1. If you don’t, you are in plain-text mode 2. Either way, there are some preferences you need to set.
- Close that document, and open the Preferences dialog box from the TextEdit menu.
- Change these preferences:
On the New Document tab, select Plain text 3. Under Options, deselect all of the automatic formatting options 4.
On the Open and Save tab, select Display HTML files as HTML Code 5 and deselect “Add ‘.txt’ extensions to plain text files” 6. The rest of the defaults should be fine.
- When you are done, click the red button in the top-left corner.
- Now create a new document by selecting The formatting menu will no longer be there, and you can save your text as an HTML document. You can always convert a document back to rich text by selecting when you are not using TextEdit for HTML.
Step 1: Start with Content
Now that we have our new document, it’s time to get typing. A web page is all about content, so that’s where we begin our demonstration. Exercise 4-1 walks you through entering the raw text content and saving the document in a new folder.
Exercise 4-1. Entering content
Learning from Step 1
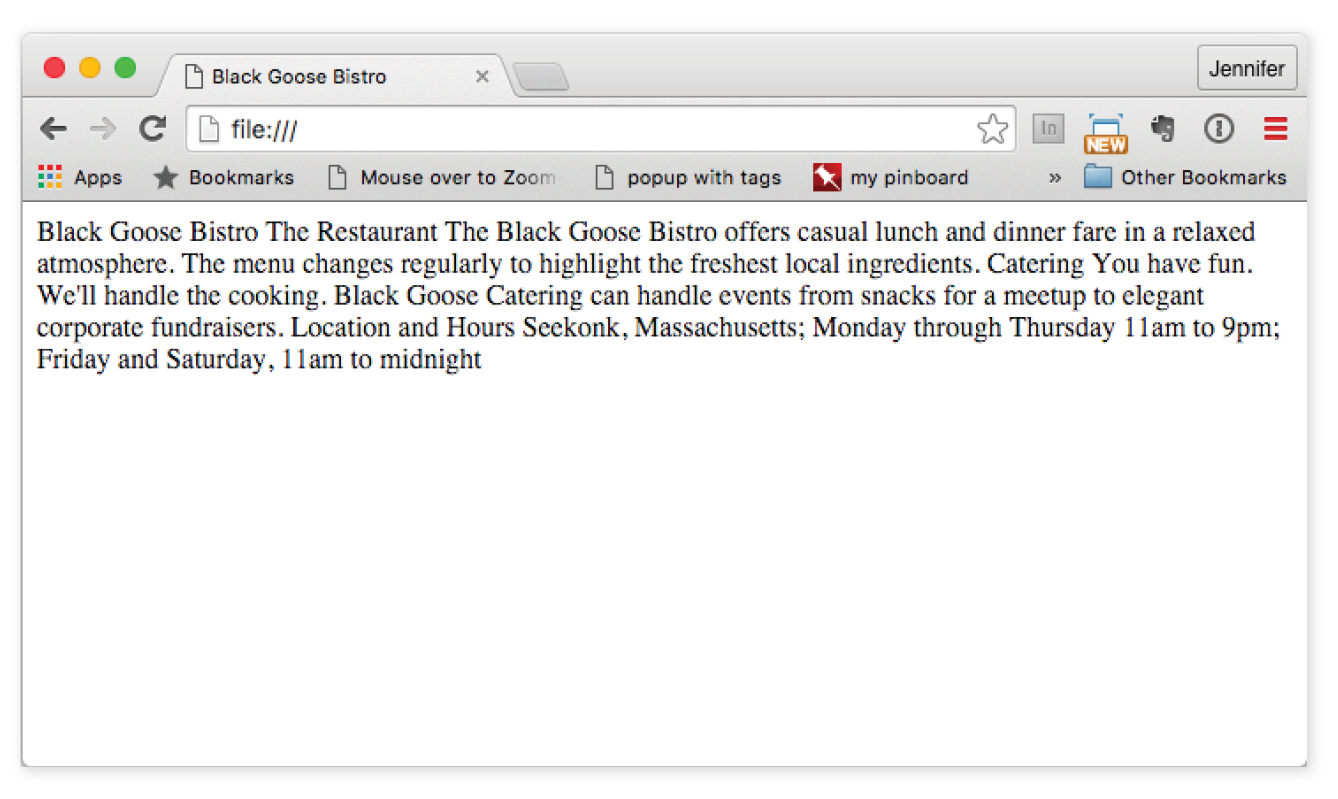
Our page isn’t looking so good (Figure 4-5). The text is all run together into one block—that’s not how it looked when we typed it into the original document. There are a couple of lessons to be learned here. The first thing that is apparent is that the browser ignores line breaks in the source document. The sidebar “What Browsers Ignore” lists other types of information in the source document that are not displayed in the browser window.
Second, we see that simply typing in some content and naming the document .html is not enough. While the browser can display the text from the file, we haven’t indicated the structure of the content. That’s where HTML comes in. We’ll use markup to add structure: first to the HTML document itself (coming up in Step 2), then to the page’s content (Step 3). Once the browser knows the structure of the content, it can display the page in a more meaningful way.
Step 2: Give the HTML Document Structure
We have our content saved in an HTML document—now we’re ready to start marking it up.
The Anatomy of an HTML Element
Back in Chapter 2 you saw examples of elements with an opening tag (<p> for a paragraph, for example) and a closing tag (</p>). Before we start adding tags to our document, let’s look at the anatomy of an HTML element (its syntax) and firm up some important terminology. A generic container element is labeled in Figure 4-6.
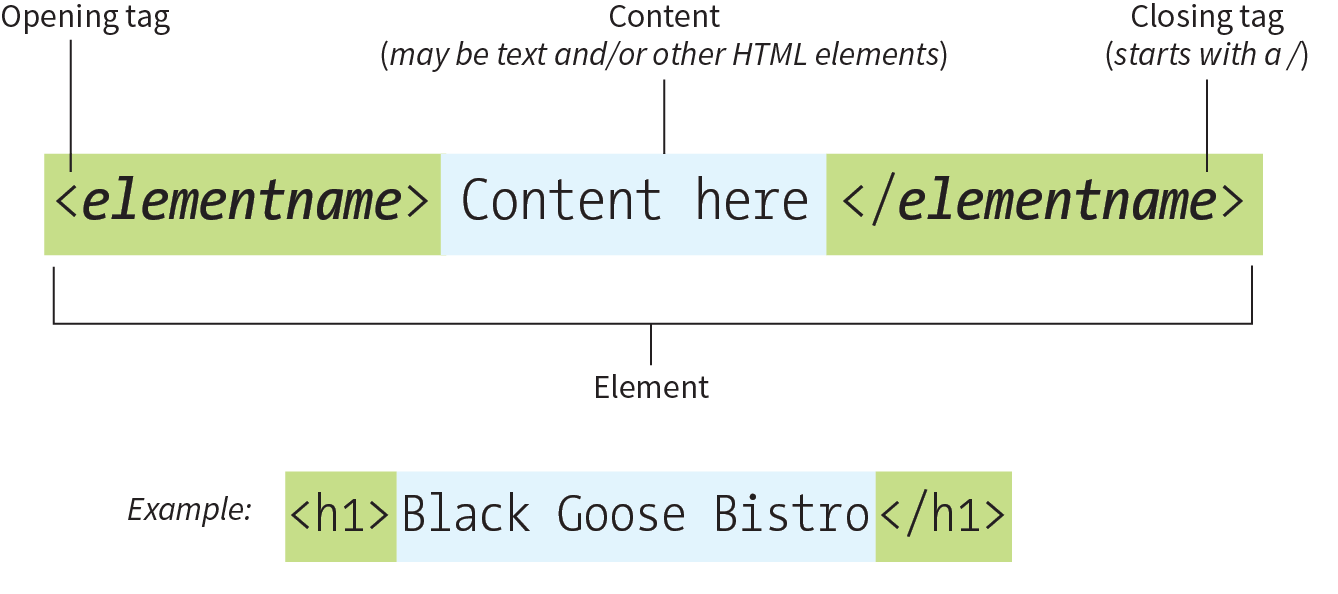
Elements are identified by tags in the text source. A tag consists of the element name (usually an abbreviation of a longer descriptive name) within angle brackets (< >). The browser knows that any text within brackets is hidden and not displayed in the browser window.
The element name appears in the opening tag (also called a start tag) and again in the closing (or end) tag preceded by a slash (/). The closing tag works something like an “off” switch for the element. Be careful not to use the similar backslash character in end tags (see the tip “Slash Versus Backslash”).
The tags added around content are referred to as the markup. It is important to note that an element consists of both the content and its markup (the start and end tags). Not all elements have content, however. Some are empty by definition, such as the img element used to add an image to the page. We’ll talk about empty elements a little later in this chapter.
One last thing: capitalization. In HTML, the capitalization of element names is not important (it is not case-sensitive). So <img>, <Img>, and <IMG> are all the same as far as the browser is concerned. However, most developers prefer the consistency of writing element names in all lowercase (see Note), as I will be doing throughout this book.
Note
There is a stricter version of HTML called XHTML that requires all element and attribute names to appear in lowercase. HTML5 has made XHTML all but obsolete except for certain use cases when it is combined with other XML languages, but the preference for all lowercase element names has persisted.
Basic Document Structure
Figure 4-8 shows the recommended minimal skeleton of an HTML document. I say “recommended” because the only element that is required in HTML is the title. But I feel it is better, particularly for beginners, to explicitly organize documents into metadata (head) and content (body) areas. Let’s take a look at what’s going on in this minimal markup example.

- I don’t want to confuse things, but the first line in the example isn’t an element at all. It is a document type declaration (also called DOCTYPE declaration) that lets modern browsers know which HTML specification to use to interpret the document. This DOCTYPE identifies the document as written in HTML5.
- The entire document is contained within an html element. The html element is called the root element because it contains all the elements in the document, and it may not be contained within any other element.
- Within the html element, the document is divided into a head and a body. The head element contains elements that pertain to the document that are not rendered as part of the content, such as its title, style sheets, scripts, and metadata.
- meta elements provide document metadata, information about the document. In this case, it specifies the character encoding (a standardized collection of letters, numbers, and symbols) used in the document as Unicode version UTF-8 (see the sidebar“Introducing Unicode”). I don’t want to go into too much detail on this right now, but know that there are many good reasons for specifying the charset in every document, so I have included it as part of the minimal document markup. Other types of metadata provided by the meta element are the author, keywords, publishing status, and a description that can be used by search engines.
- Also in the head is the mandatory title element. According to the HTML specification, every document must contain a descriptive title.
- Finally, the body element contains everything that we want to show up in the browser window.
Are you ready to start marking up the Black Goose Bistro home page? Open the index.html document in your text editor and move on to Exercise 4-2.
Exercise 4-2. Adding minimal structure
Not much has changed in the bistro page after setting up the document, except that the browser now displays the title of the document in the top bar or tab (Figure 4-9). If someone were to bookmark this page, that title would be added to their Bookmarks or Favorites list as well (see the sidebar “Don’t Forget a Good Title”). But the content still runs together because we haven’t given the browser any indication of how it should be structured. We’ll take care of that next.
Step 3: Identify Text Elements
With a little markup experience under your belt, it should be a no-brainer to add the markup for headings and subheads (h1 and h2), paragraphs (p), and emphasized text (em) to our content, as we’ll do in Exercise 4-3. However, before we begin, I want to take a moment to talk about what we’re doing and not doing when marking up content with HTML.
Mark It Up Semantically
The purpose of HTML is to add meaning and structure to the content. It is not intended to describe how the content should look (its presentation).
Your job when marking up content is to choose the HTML element that provides the most meaningful description of the content at hand. In the biz, we call this semantic markup. For example, the most important heading at the beginning of the document should be marked up as an h1 because it is the most important heading on the page. Don’t worry about what it looks like…you can easily change that with a style sheet. The important thing is that you choose elements based on what makes the most sense for the content.
The purpose of HTML is to add meaning and structure to the content.
In addition to adding meaning to content, the markup gives the document structure. The way elements follow each other or nest within one another creates relationships between them. You can think of this structure as an outline (its technical name is the DOM, for Document Object Model). The underlying document hierarchy gives browsers cues on how to handle the content. It is also the foundation upon which we add presentation instructions with style sheets and behaviors with JavaScript.
Although HTML was intended to be used strictly for meaning and structure since its creation, that mission was somewhat thwarted in the early years of the web. With no style sheet system in place, HTML was extended to give authors ways to change the appearance of fonts, colors, and alignment using markup alone. Those presentational extras are still out there, so you may run across them if you view the source of older sites or a site made with old tools. In this book, however, I’ll focus on using HTML the right way, in keeping with the contemporary standards-based, semantic approach to web design.
OK, enough lecturing. It’s time to get to work on that content in Exercise 4-3.
Exercise 4-3. Defining text elements

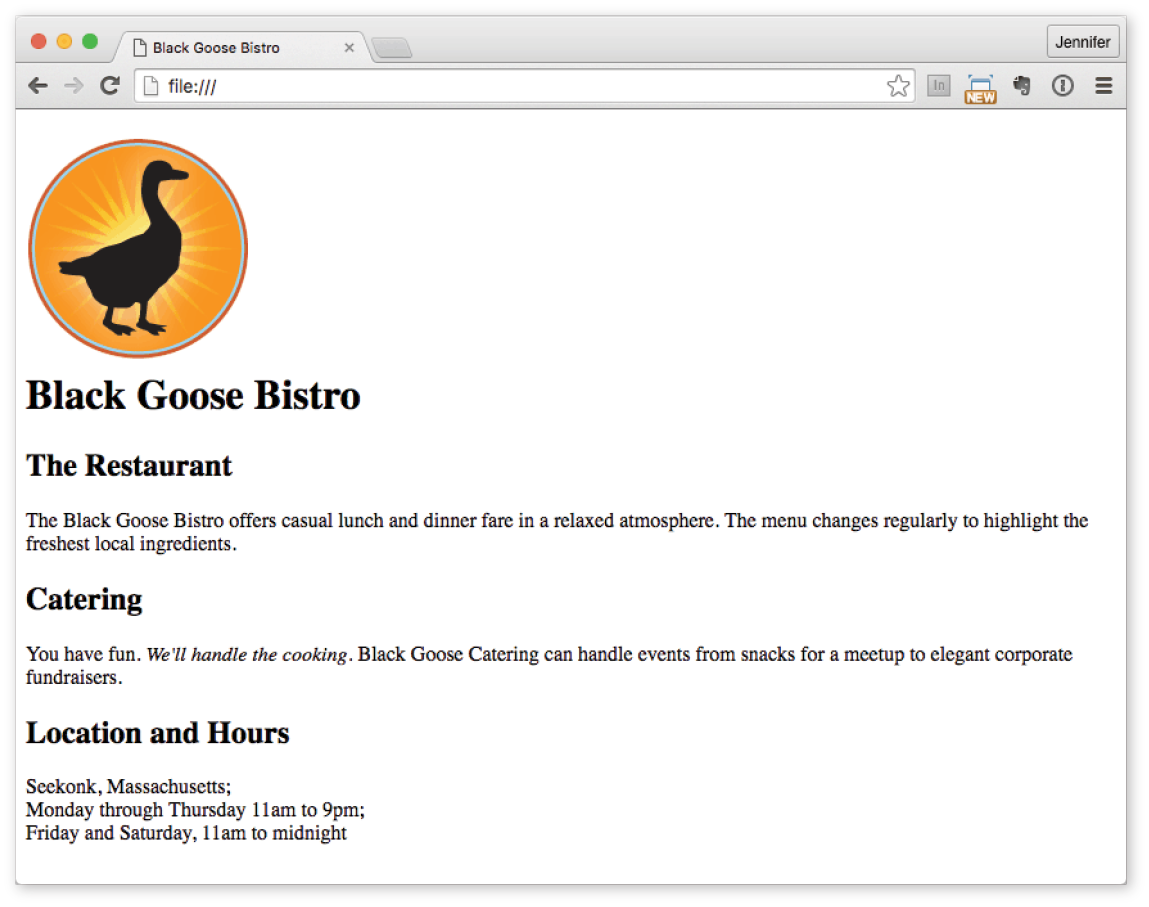
Now we’re getting somewhere. With the elements properly identified, the browser can now display the text in a more meaningful manner. There are a few significant things to note about what’s happening in Figure 4-10.
Block and Inline Elements
Although it may seem like stating the obvious, it’s worth pointing out that the heading and paragraph elements start on new lines and do not run together as they did before. That is because by default, headings and paragraphs display as block elements. Browsers treat block elements as though they are in little rectangular boxes, stacked up in the page. Each block element begins on a new line, and some space is also usually added above and below the entire element by default. In Figure 4-11, the edges of the block elements are outlined in red.

By contrast, look at the text we marked up as emphasized (em, outlined in blue in Figure 4-11). It does not start a new line, but rather stays in the flow of the paragraph. That is because the em element is an inline element (also called a text-level semantic element or phrasing element). Inline elements do not start new lines; they just go with the flow.
Default Styles
The other thing that you will notice about the marked-up page in Figures 4-10 and 4-11is that the browser makes an attempt to give the page some visual hierarchy by making the first-level heading the biggest and boldest thing on the page, with the second-level headings slightly smaller, and so on.
How does the browser determine what an h1 should look like? It uses a style sheet! All browsers have their own built-in style sheets (called user agent style sheets in the spec) that describe the default rendering of elements. The default rendering is similar from browser to browser (for example, h1s are always big and bold), but there are some variations (the blockquote element for long quotes may or may not be indented).
If you think the h1 is too big and clunky as the browser renders it, just change it with your own style sheet rule. Resist the urge to mark up the heading with another element just to get it to look better—for example, using an h3 instead of an h1 so it isn’t as large. In the days before ubiquitous style sheet support, elements were abused in just that way. You should always choose elements based on how accurately they describe the content, and don’t worry about the browser’s default rendering.
We’ll fix the presentation of the page with style sheets in a moment, but first, let’s add an image to the page.
Step 4: Add an Image
What fun is a web page with no images? In Exercise 4-4, we’ll add an image to the page with the img element. Images will be discussed in more detail in Chapter 7, Adding Images, but for now, they give us an opportunity to introduce two more basic markup concepts: empty elements and attributes.
Empty Elements
So far, nearly all of the elements we’ve used in the Black Goose Bistro home page have followed the syntax shown in Figure 4-6: a bit of text content surrounded by start and end tags.
A handful of elements, however, do not have content because they are used to provide a simple directive. These elements are said to be empty. The image element (img) is an example of an empty element. It tells the browser to get an image file from the server and insert it at that spot in the flow of the text. Other empty elements include the line break (br), thematic breaks (hr, a.k.a. “horizontal rules”), and elements that provide information about a document but don’t affect its displayed content, such as the meta element that we used earlier.
Figure 4-12 shows the very simple syntax of an empty element (compare it to Figure 4-6).

Attributes
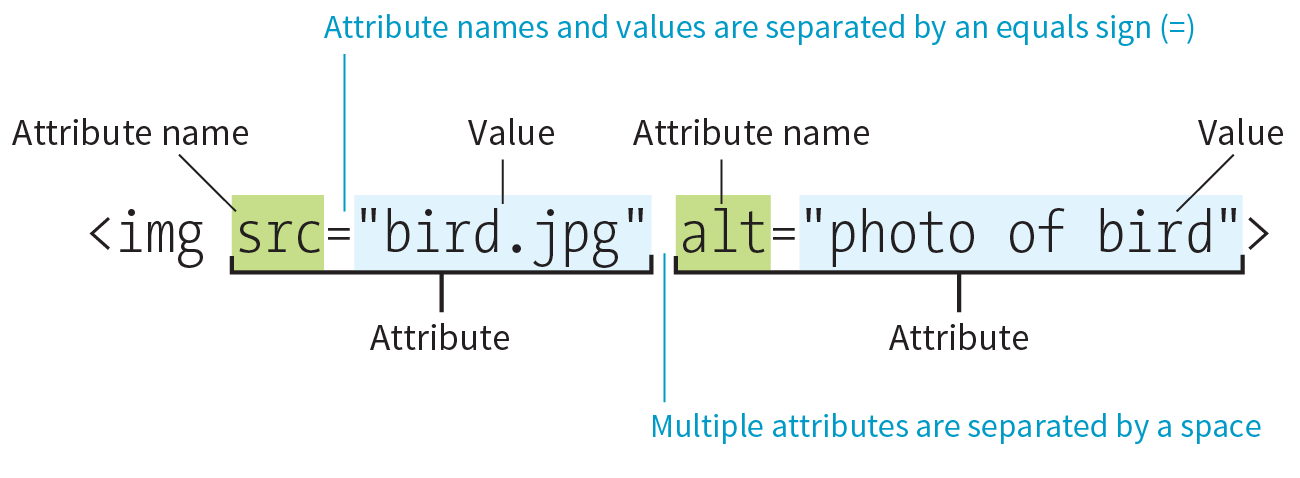
Let’s get back to adding an image with the empty img element. Obviously, an <img> tag is not very useful by itself—it doesn’t indicate which image to use. That’s where attributes come in. Attributes are instructions that clarify or modify an element. For the img element, the src (short for “source”) attribute is required, and specifies the location (URL) of the image file.
Attributes are instructions that clarify or modify an element.
The syntax for an attribute is as follows:
attributename="value"
Attributes go after the element name, separated by a space. In non-empty elements, attributes go in the opening tag only:
<elementattributename="value">
<elementattributename="value">Content</element>
You can also put more than one attribute in an element in any order. Just keep them separated with spaces:
<elementattribute1="value"attribute2="value">
Figure 4-13 shows an img element with its required attributes labeled.
Here’s what you need to know about attributes:
- Attributes go after the element name in the opening tag only, never in the closing tag.
- There may be several attributes applied to an element, separated by spaces in the opening tag. Their order is not important.
- Most attributes take values, which follow an equals sign (=). In HTML, some attribute values are single descriptive words. For example, the checked attribute, which makes a form checkbox checked when the form loads, is equivalent to checked="checked". You may hear this type of attribute called a Boolean attribute because it describes a feature that is either on or off.
- A value might be a number, a word, a string of text, a URL, or a measurement, depending on the purpose of the attribute. You’ll see examples of all of these throughout this book.
- Wrapping attribute values in double quotation marks is a strong convention, but note that quotation marks are not required and may be omitted. In addition, either single or double quotation marks are acceptable as long as the opening and closing marks match. Note that quotation marks in HTML files need to be straight ("), not curly (”).
- The attribute names and values available for each element are defined in the HTML specifications; in other words, you can’t make up an attribute for an element.
- Some attributes are required, such as the src and alt attributes in the img element. The HTML specification also defines which attributes are required in order for the document to be valid.
Now you should be more than ready to try your hand at adding the img element with its attributes to the Black Goose Bistro page in Exercise 4-4. We’ll throw a few line breaks in there as well.
Exercise 4-4. Adding an image
Step 5: Change the Look with a Style Sheet
Depending on the content and purpose of your website, you may decide that the browser’s default rendering of your document is perfectly adequate. However, I think I’d like to pretty up the Black Goose Bistro home page a bit to make a good first impression on potential patrons. “Prettying up” is just my way of saying that I’d like to change its presentation, which is the job of Cascading Style Sheets (CSS).
In Exercise 4-5, we’ll change the appearance of the text elements and the page background by using some simple style sheet rules. Don’t worry about understanding them all right now. We’ll get into CSS in more detail in Part III. But I want to at least give you a taste of what it means to add a “layer” of presentation onto the structure we’ve created with our markup.
exercise 4-5. Adding a style sheet
We’re finished with the Black Goose Bistro page. Not only have you written your first web page, complete with a style sheet, but you’ve also learned about elements, attributes, empty elements, block and inline elements, the basic structure of an HTML document, and the correct use of markup along the way. Not bad for one chapter!
When Good Pages Go Bad
The previous demonstration went smoothly, but it’s easy for small things to go wrong when you’re typing out HTML markup by hand. Unfortunately, one missed character can break a whole page. I’m going to break my page on purpose so we can see what happens.
What if I had neglected to type the slash in the closing emphasis tag (</em>)? With just one character out of place (Figure 4-17), the remainder of the document displays in emphasized (italic) text. That’s because without that slash, there’s nothing telling the browser to turn “off” the emphasized formatting, so it just keeps going (see Note).
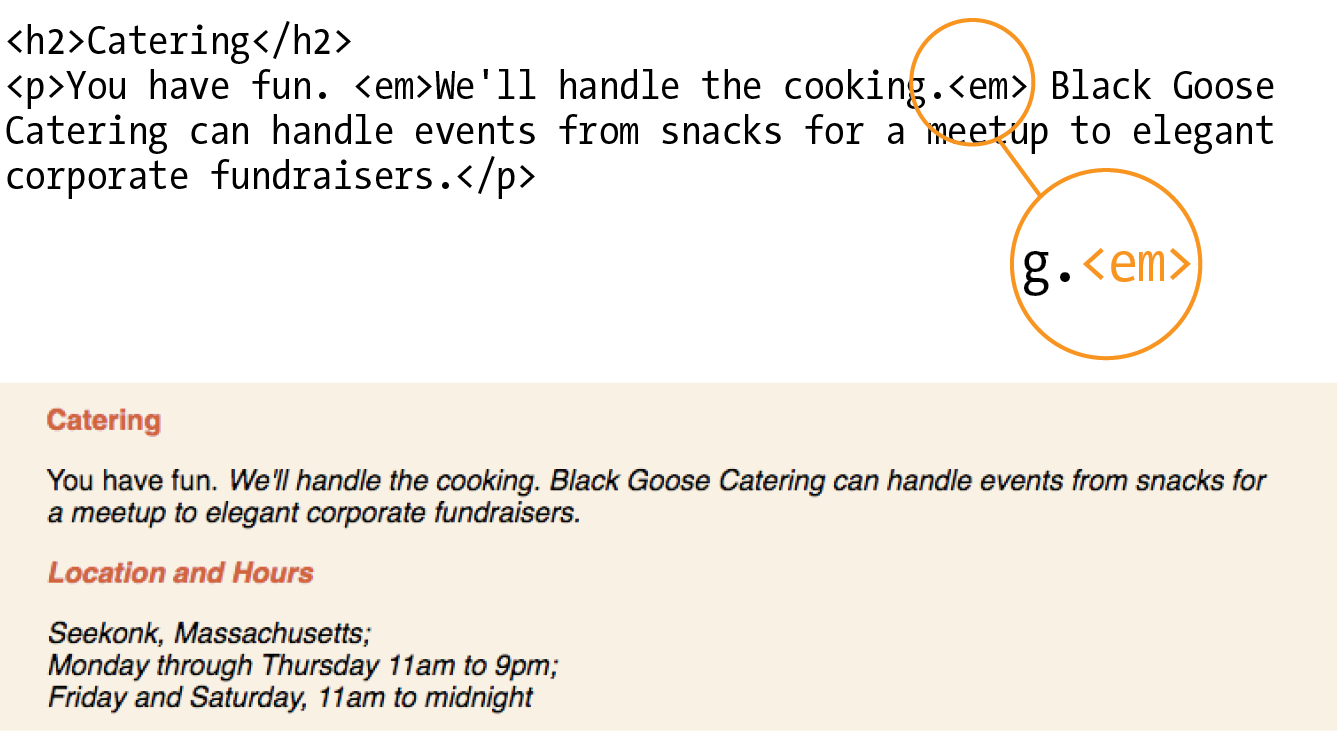
NOTE
Omitting the slash in the closing tag (or even omitting the closing tag itself) for block elements, such as headings or paragraphs, may not be so dramatic. Browsers interpret the start of a new block element to mean that the previous block element is finished.
I’ve fixed the slash, but this time, let’s see what would have happened if I had accidentally omitted a bracket from the end of the first <h2> tag (Figure 4-18).
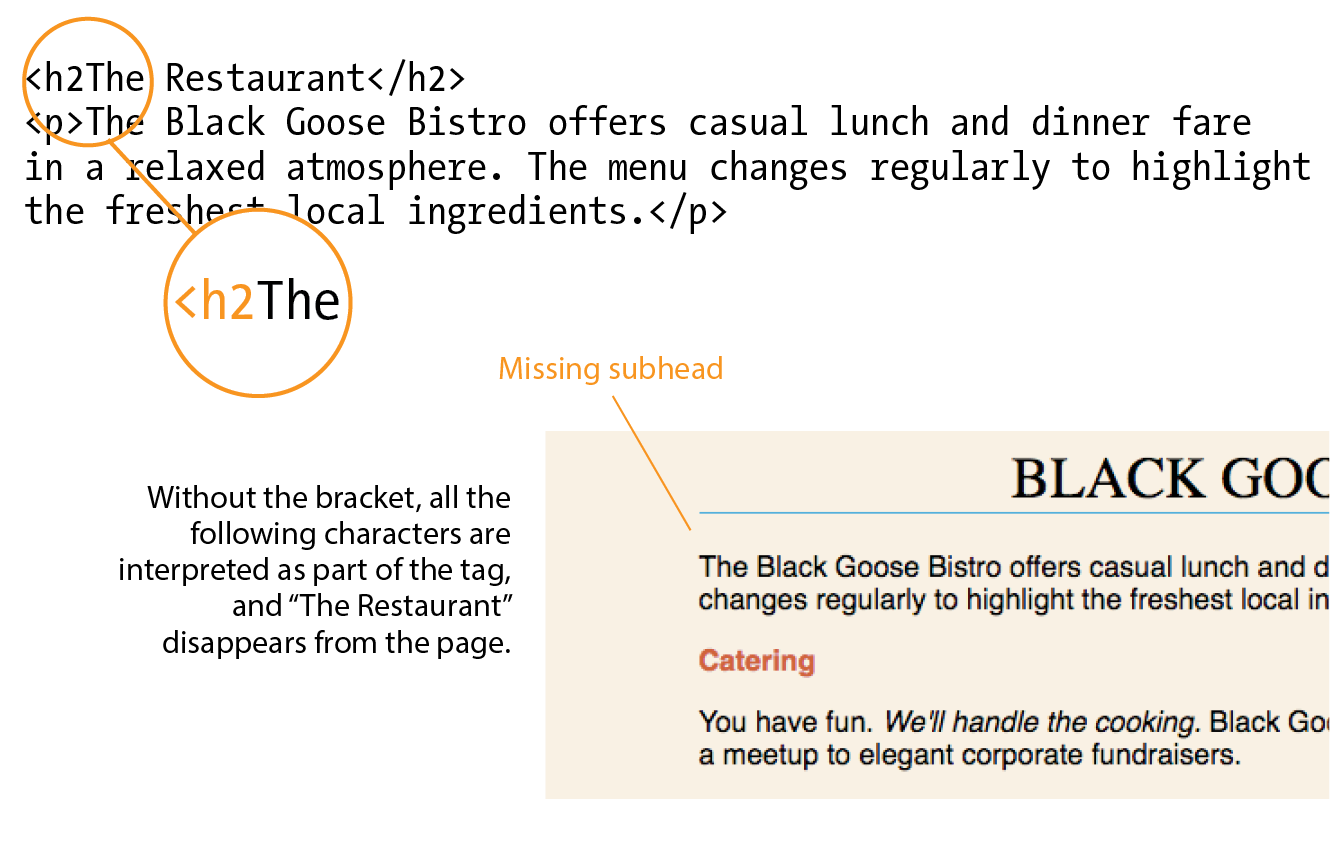
See how the headline is missing? That’s because without the closing tag bracket, the browser assumes that all the following text—all the way up to the next closing bracket (>) it finds—is part of the <h2> opening tag. Browsers don’t display any text within a tag, so my heading disappeared. The browser just ignored the foreign-looking element name and moved on to the next element.
Making mistakes in your first HTML documents and fixing them is a great way to learn. If you write your first pages perfectly, I’d recommend fiddling with the code to see how the browser reacts to various changes. This can be extremely useful in troubleshooting pages later. I’ve listed some common problems in the sidebar “Having Problems?” Note that these problems are not specific to beginners. Little stuff like this goes wrong all the time, even for the pros.
Validating Your Documents
One way that professional web developers catch errors in their markup is to validate their documents. What does that mean? To validate a document is to check your markup to make sure that you have abided by all the rules of whatever version of HTML you are using. Documents that are error-free are said to be valid. It is strongly recommended that you validate your documents, especially for professional sites. Valid documents are more consistent on a variety of browsers, they display more quickly, and they are more accessible.
Right now, browsers don’t require documents to be valid (in other words, they’ll do their best to display them, errors and all), but anytime you stray from the standard, you introduce unpredictability in the way the page is handled by browsers or alternative devices.
So how do you make sure your document is valid? You could check it yourself or ask a friend, but humans make mistakes, and you aren’t expected to memorize every minute rule in the specifications. Instead, use a validator, software that checks your source against the HTML version you specify. These are some of the things validators check for:
- The inclusion of a DOCTYPE declaration. Without it the validator doesn’t know which version of HTML to validate against:
- An indication of the character encoding for the document.
- The inclusion of required rules and attributes.
- Non-standard elements.
- Mismatched tags.
- Nesting errors (incorrectly putting elements inside other elements).
- Typos and other minor errors.
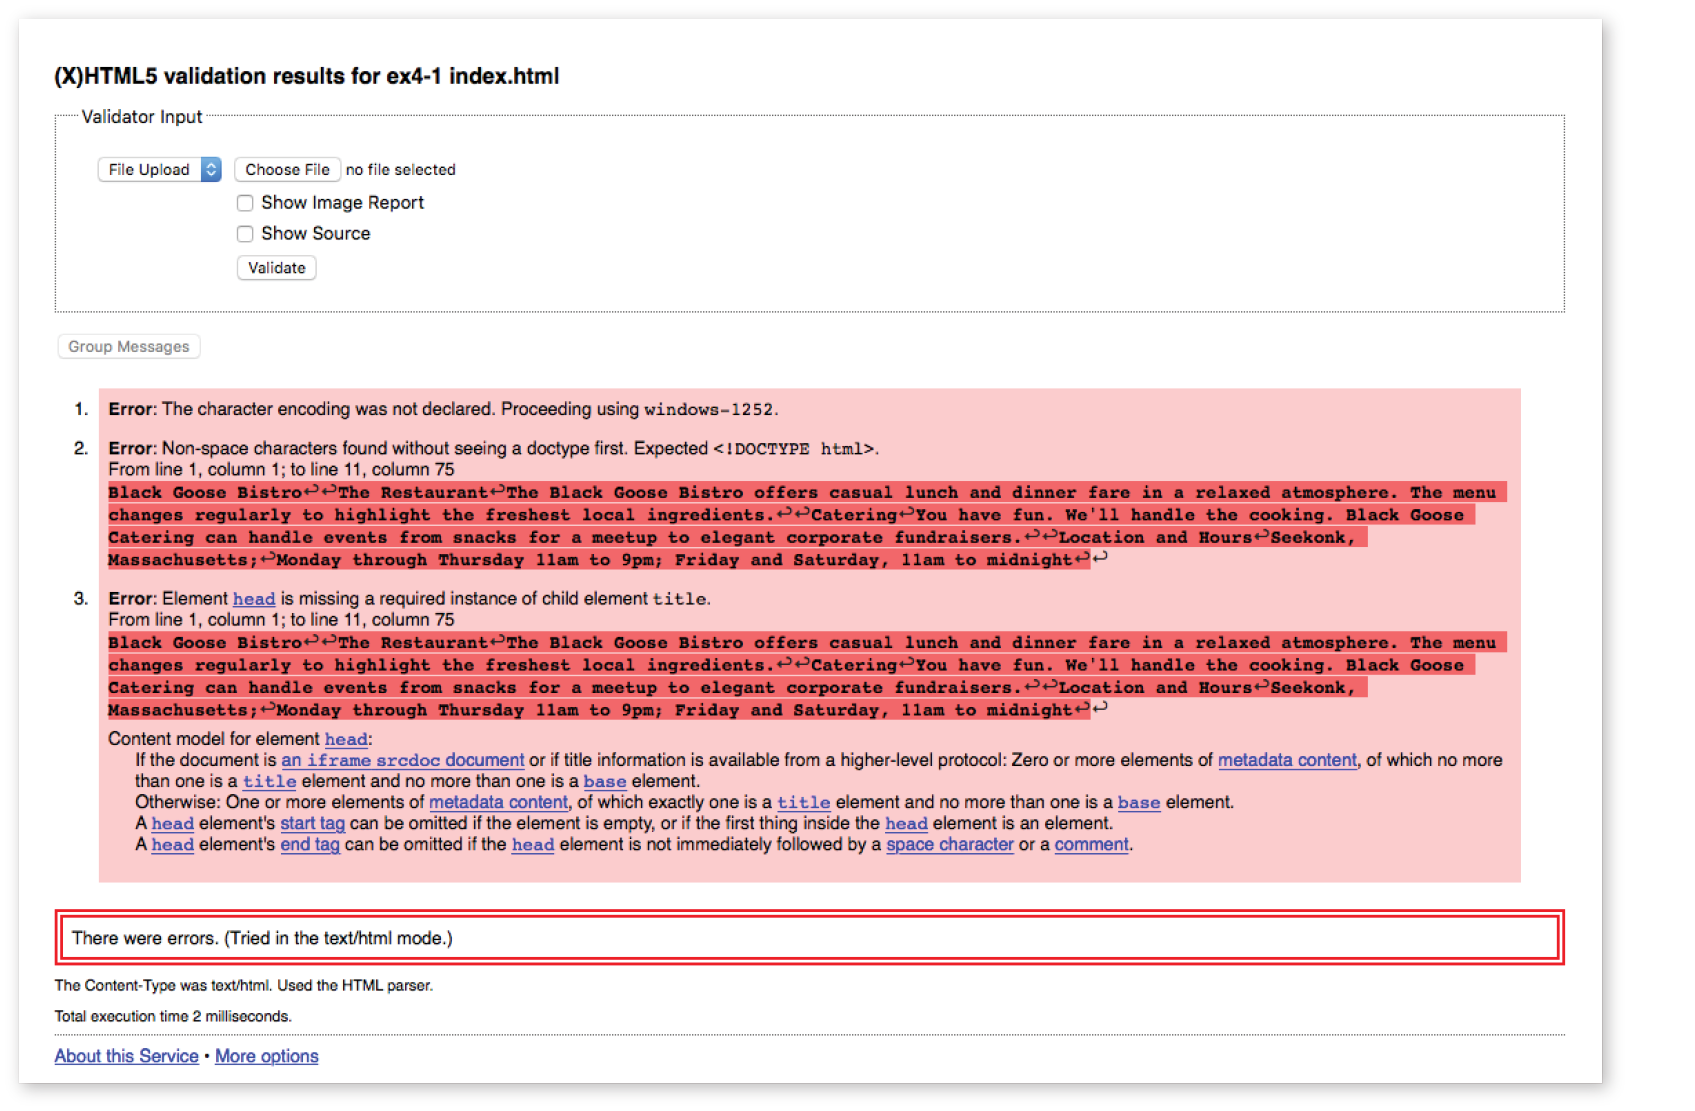
Developers use a number of helpful tools for checking and correcting errors in HTML documents. The best web-based validator is at html5.validator.nu. There you can upload a file or provide a link to a page that is already online. Figure 4-19 shows the report the validator generates when I upload the version of the Bistro index.html file that doesn’t have any markup. For this document, there are a number of missing elements that keep this document from being valid. It also shows the problem source code and provides an explanation of how the code should appear. Pretty darned handy!
Built-in browser developer tools for Safari and Chrome also have validators so you can check your work on the fly. Some code editors have validators built in as well.
Test Yourself
Now is a good time to make sure you understand the basics of markup. Use what you’ve learned in this chapter to answer the following questions. Answers are in Appendix A.
- What is the difference between a tag and an element?
- Write out the recommended minimal markup for an HTML5 document.
- Indicate whether each of these filenames is an acceptable name for a web document by circling “Yes” or “No.” If it is not acceptable, provide the reason:
a. Sunflower.html
Yes
No
b. index.doc
Yes
No
c. cooking home page.html
Yes
No
d. Song_Lyrics.html
Yes
No
e. games/rubix.html
Yes
No
f. %whatever.html
Yes
No
- All of the following markup examples are incorrect. Describe what is wrong with each one, and then write it correctly.
<img "birthday.jpg"><em>Congratulations!<em><a href="file.html">linked text</a href="file.html"><p>This is a new paragraph<\p>
- How would you mark up this comment in an HTML document so that it doesn’t display in the browser window?
product list begins here
Element Review: HTML Document Setup
This chapter introduced the elements that establish metadata and content portions of an HTML document. The remaining elements introduced in the exercises will be treated in more depth in the following chapters.
