I got started in web design in early 1993—pretty close to the start of the web itself. That’s a quarter of a century ago (gasp!), but I still distinctly remember the first time I looked at a web page. It was difficult to tell where the information was coming from and how it all worked.
This chapter sorts out the pieces and introduces some basic terminology. We’ll start with the big picture and work down to specifics.
The Internet Versus the Web
No, it’s not a battle to the death, just an opportunity to point out the distinction between two words that are increasingly being used interchangeably.
The internet is an international network of connected computers. No company owns the internet; it is a cooperative effort governed by a system of standards and rules. The purpose of connecting computers together, of course, is to share information. There are many ways information can be passed between computers, including email (POP3/IMAP/SMTP), file transfer (FTP), secure shell (SSH), and many more specialized modes upon which the internet is built. These standardized methods for transferring data or documents over a network are known as protocols.
The web (originally called the World Wide Web, thus the “www” in site addresses) is just one of the ways information can be shared over the internet. It is unique in that it allows documents to be linked to one another via hypertext links—thus forming a huge “web” of connected information. The web uses a protocol called HTTP (HyperText Transfer Protocol). That acronym should look familiar because it is the first four letters of nearly all website addresses, as we’ll discuss in an upcoming section.
The web is a subset of the internet. It is just one of many ways information can be transferred over networked computers.
Serving Up Your Information
Let’s talk more about the computers that make up the internet. Because they “serve up” documents upon request, these computers are known as servers. More accurately, the server is the software (not the computer itself) that allows the computer to communicate with other computers; however, it is common to use the word “server” to refer to the computer as well. The role of server software is to wait for a request for information, and then retrieve and send that information back as quickly as possible.
There’s nothing special about the computers themselves…picture anything from a high-powered Unix machine to a humble personal computer. It’s the server software that makes it all happen. In order for a computer to be part of the web, it must be running special web server software that allows it to handle HyperText Transfer Protocol transactions. Web servers are also called HTTP servers.
There are many server software options out there, but the two most popular are Apache (open source software) and Microsoft Internet Information Services (IIS). Apache is freely available for Unix-based computers and comes installed on Macs running macOS. There is a Windows version as well. Microsoft IIS is part of Microsoft’s family of server solutions.
Every computer and device (router, smartphone, car, etc.) connected to the internet is assigned a unique numeric IP address (“IP” stands for “Internet Protocol”). For example, as I write this, the computer that hosts oreilly.com has the IP address 199.27.145.64. All those numbers can be dizzying, so fortunately, the Domain Name System (DNS) was developed to allow us to refer to that server by its domain name, “oreilly.com”, as well. The numeric IP address is useful for computer software, while the domain name is more accessible to humans. Matching the text domain names to their respective numeric IP addresses is the job of a separate DNS server. If you think of an IP address as a telephone number, the DNS server would be the phonebook.
It is possible to configure your web server so that more than one domain name is mapped to a single IP address, allowing several sites to share a single server.
A Word About Browsers
We now know that the server does the servin’, but what about the other half of the equation? The software that does the requesting is called the client. People use desktop browsers, mobile browsers, and other assistive technologies (such as screen readers) as clients to access documents on the web. The server returns the documents for the browser (also referred to as the user agent in technical circles) to display.
The requests and responses are handled via the HTTP protocol, mentioned earlier. Although we’ve been talking about “documents,” HTTP can be used to transfer images, movies, audio files, data, scripts, and all the other web resources that commonly make up websites and applications.
It is common to think of a browser as a window on a computer monitor with a web page displayed in it. These are known as graphical browsers or desktop browsers and for a long time, they were the only web-viewing game in town. The most popular desktop browsers as of this writing include Edge and Internet Explorer for Windows, Chrome, Firefox, and Safari, with Opera and Vivaldi bringing up the rear.
These days, however, more than half of web traffic comes from mobile browsers on smartphones and tablets such as Safari on iOS, Android and Chrome browsers on Android devices, Opera Mini, and a myriad of other default and installable mobile browsers (see en.wikipedia.org/wiki/Mobile_browser for a complete list). Navigating the web on a touch screen is the new normal.
It is also important to keep alternative web experiences in mind. Users with impaired sight may be listening to a web page read by a screen reader (or simply make their text extremely large). Users with limited mobility may use assistive technology such as joysticks or voice commands to access links and enter content. The sites we build must be accessible and usable for all users, regardless of their browsing experiences.
The web is also finding its way onto smart TVs and gaming systems, where users access our pages with TV remotes or Xbox controllers. You never know where the web will pop up next!
The reality is that pages may look and perform differently from browser to browser. This is due to varying support for web technologies, varying device capabilities, and the users’ ability to set their own browsing preferences. It is the most challenging aspect of designing and developing for our medium.
Web Page Addresses (URLs)
Every page and resource on the web has its own special address called a URL, which stands for Uniform Resource Locator. It’s nearly impossible to get through a day without seeing a URL (pronounced “U-R-L,” not “erl”) plastered on the side of a bus, printed on a business card, or broadcast on a television commercial. Web addresses are fully integrated into modern vernacular.
Some URLs are short and sweet. Others may look like crazy strings of characters separated by dots (periods) and slashes, but each part has a specific purpose. Let’s pick one apart.
The Parts of a URL
A complete URL is generally made up of three components: the protocol, the site name, and the absolute path to the document or resource, as shown in Figure 2-1.
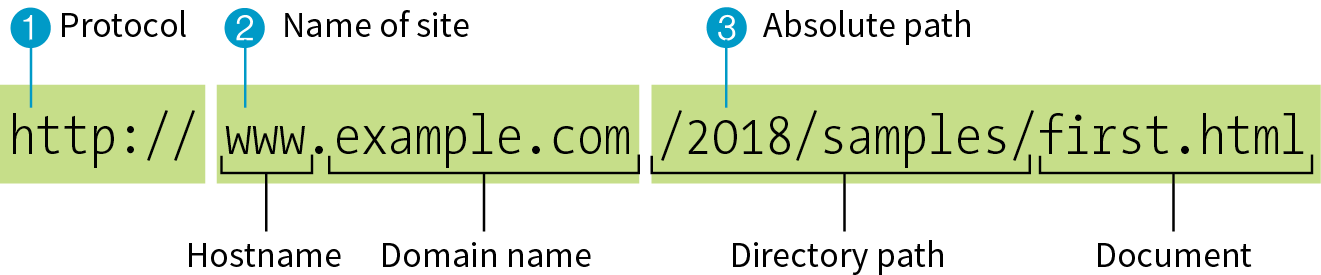
1 http://
The first thing the URL does is to define the protocol that will be used for that particular transaction. The letters “HTTP” let the server know to use HyperText Transfer Protocol, or get into “web mode.” You may also see a URL begin with https://, which I explain in the “HTTPS, The Secure Web Protocol” sidebar.
2 www.example.com
The next portion of the URL identifies the website by its domain name. In this example, the domain name is “example.com.” The “www.” part at the beginning is the particular hostname at that domain. The hostname “www” has become a convention, but is not a rule. In fact, sometimes the hostname may be omitted. There can be more than one website at a domain (called subdomains). For example, there might also be “development.example.com,” “clients.example.com,” and so on.
3 /2018/samples/first.html
This is the absolute path through directories on the server to the requested HTML document, first.html. The words separated by slashes are the directory names, starting with the root directory of the host (as indicated by the initial /). Because the internet originally comprised computers running the Unix operating system, our current way of doing things still follows Unix rules and conventions, hence the / separating directory names.
To sum it up, the URL in Figure 2-1 says it would like to use the HTTP protocol to connect to a web server on the internet called “www.example.com” and to request the document first.html, located in the samples directory, which is in the 2018 directory.
Simplified URLs
Obviously, not every URL you see is so lengthy. To get to O’Reilly’s site, you’d expect to type oreilly.com instead of http://www.oreilly.com/index.html. Here’s why that works.
Skipping the protocol
Because nearly all web pages use the HyperText Transfer Protocol, the http:// part is often just implied. This is the case when site names are advertised in print or on TV, as a way to keep the URL easy to remember.
Additionally, browsers are programmed to add http:// automatically as a convenience to save you some keystrokes. It may seem like you’re leaving it out, but it is being sent to the server behind the scenes.
When we begin using URLs to create hyperlinks in HTML documents in Chapter 6, Adding Links, you’ll learn that it is necessary to include the protocol when making a link to a web page on another server.
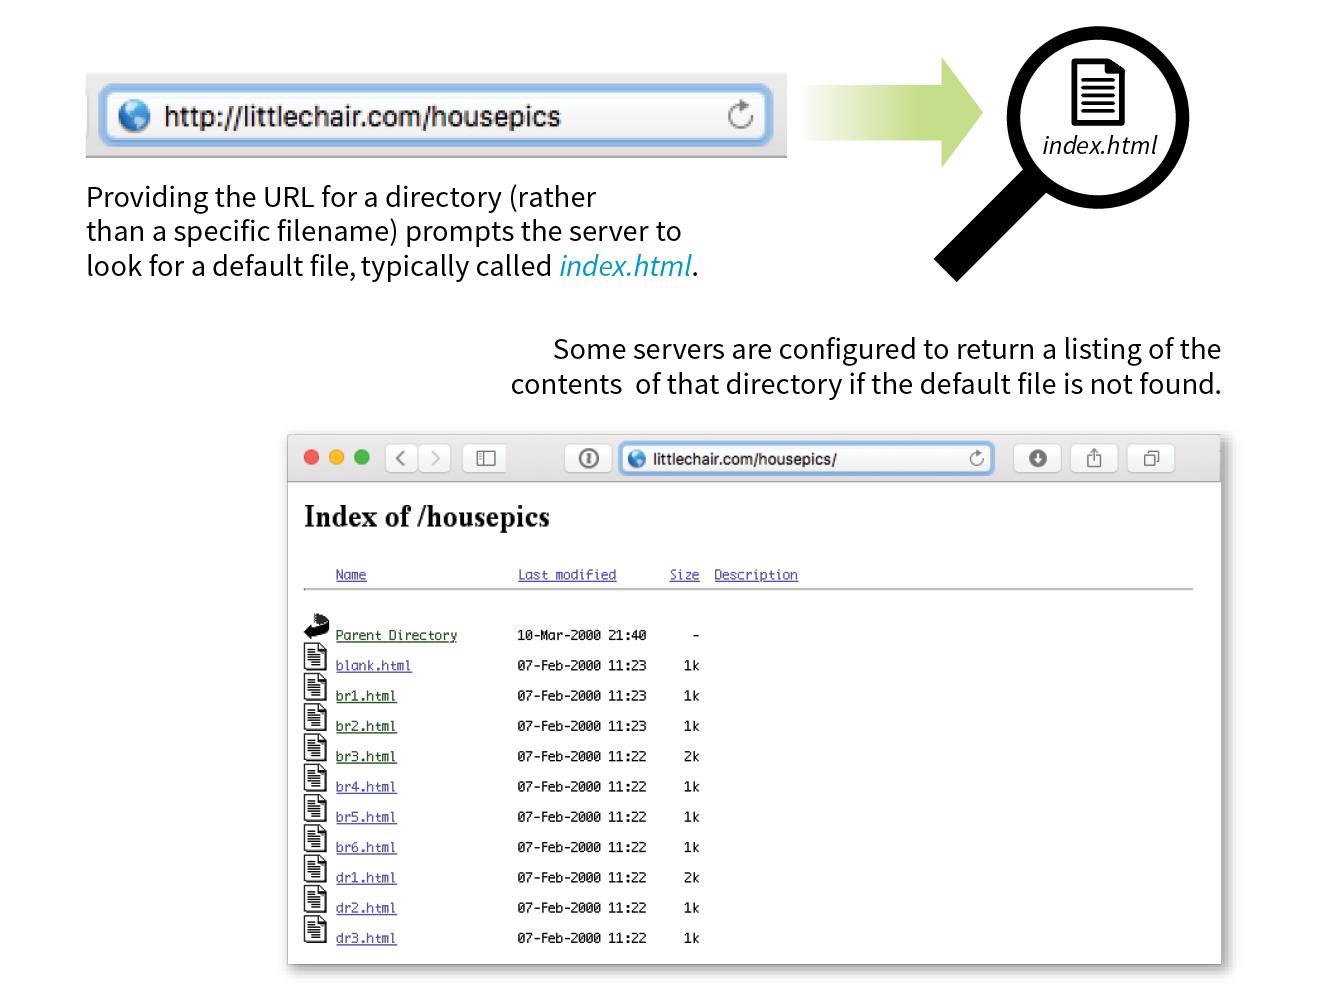
Pointing to default files
Many addresses do not include a filename, but simply point to a directory, like these:
http://www.oreilly.com
http://www.jendesign.com/resume/
When a server receives a request for a directory name rather than a specific file, it looks in that directory for a default document, typically named index.html. So when someone types the previous URLs into his browser, what he’ll actually see is this:
http://www.oreilly.com/index.html
http://www.jendesign.com/resume/index.html
The name of the default file (also referred to as the index file) may vary, and depends on how the server is configured. In these examples, it is named index.html, but some servers use the filename default.htm. If your site uses server-side programming to generate pages, the index file might be named index.php or Default.aspx. Just check with your server administrator or the tech support department at your hosting service to make sure you give your default file the proper name.
Another thing to notice is that in the first example, the original URL did not have a trailing slash to indicate it was a directory. If the slash is omitted, the server checks to see if the request is a file or a directory. If it is a directory, the server asks the browser to send the request again with a slash. In the end, the slash is included for directories, even if it isn’t included the first time it is entered (see Performance Tip).
The index file is also useful for security. Some servers (depending on their configuration) display the contents of the directory if the default file is not found. Figure 2-2 shows how the documents in the housepics directory are exposed as the result of a missing default file. One way to prevent people from snooping around in your files is to be sure there is an index file in every directory. Your server administrator may also add other protections to prevent your directories from displaying in the browser.
The Anatomy of a Web Page
We’re all familiar with what web pages look like in the browser window, but what’s happening “under the hood”?
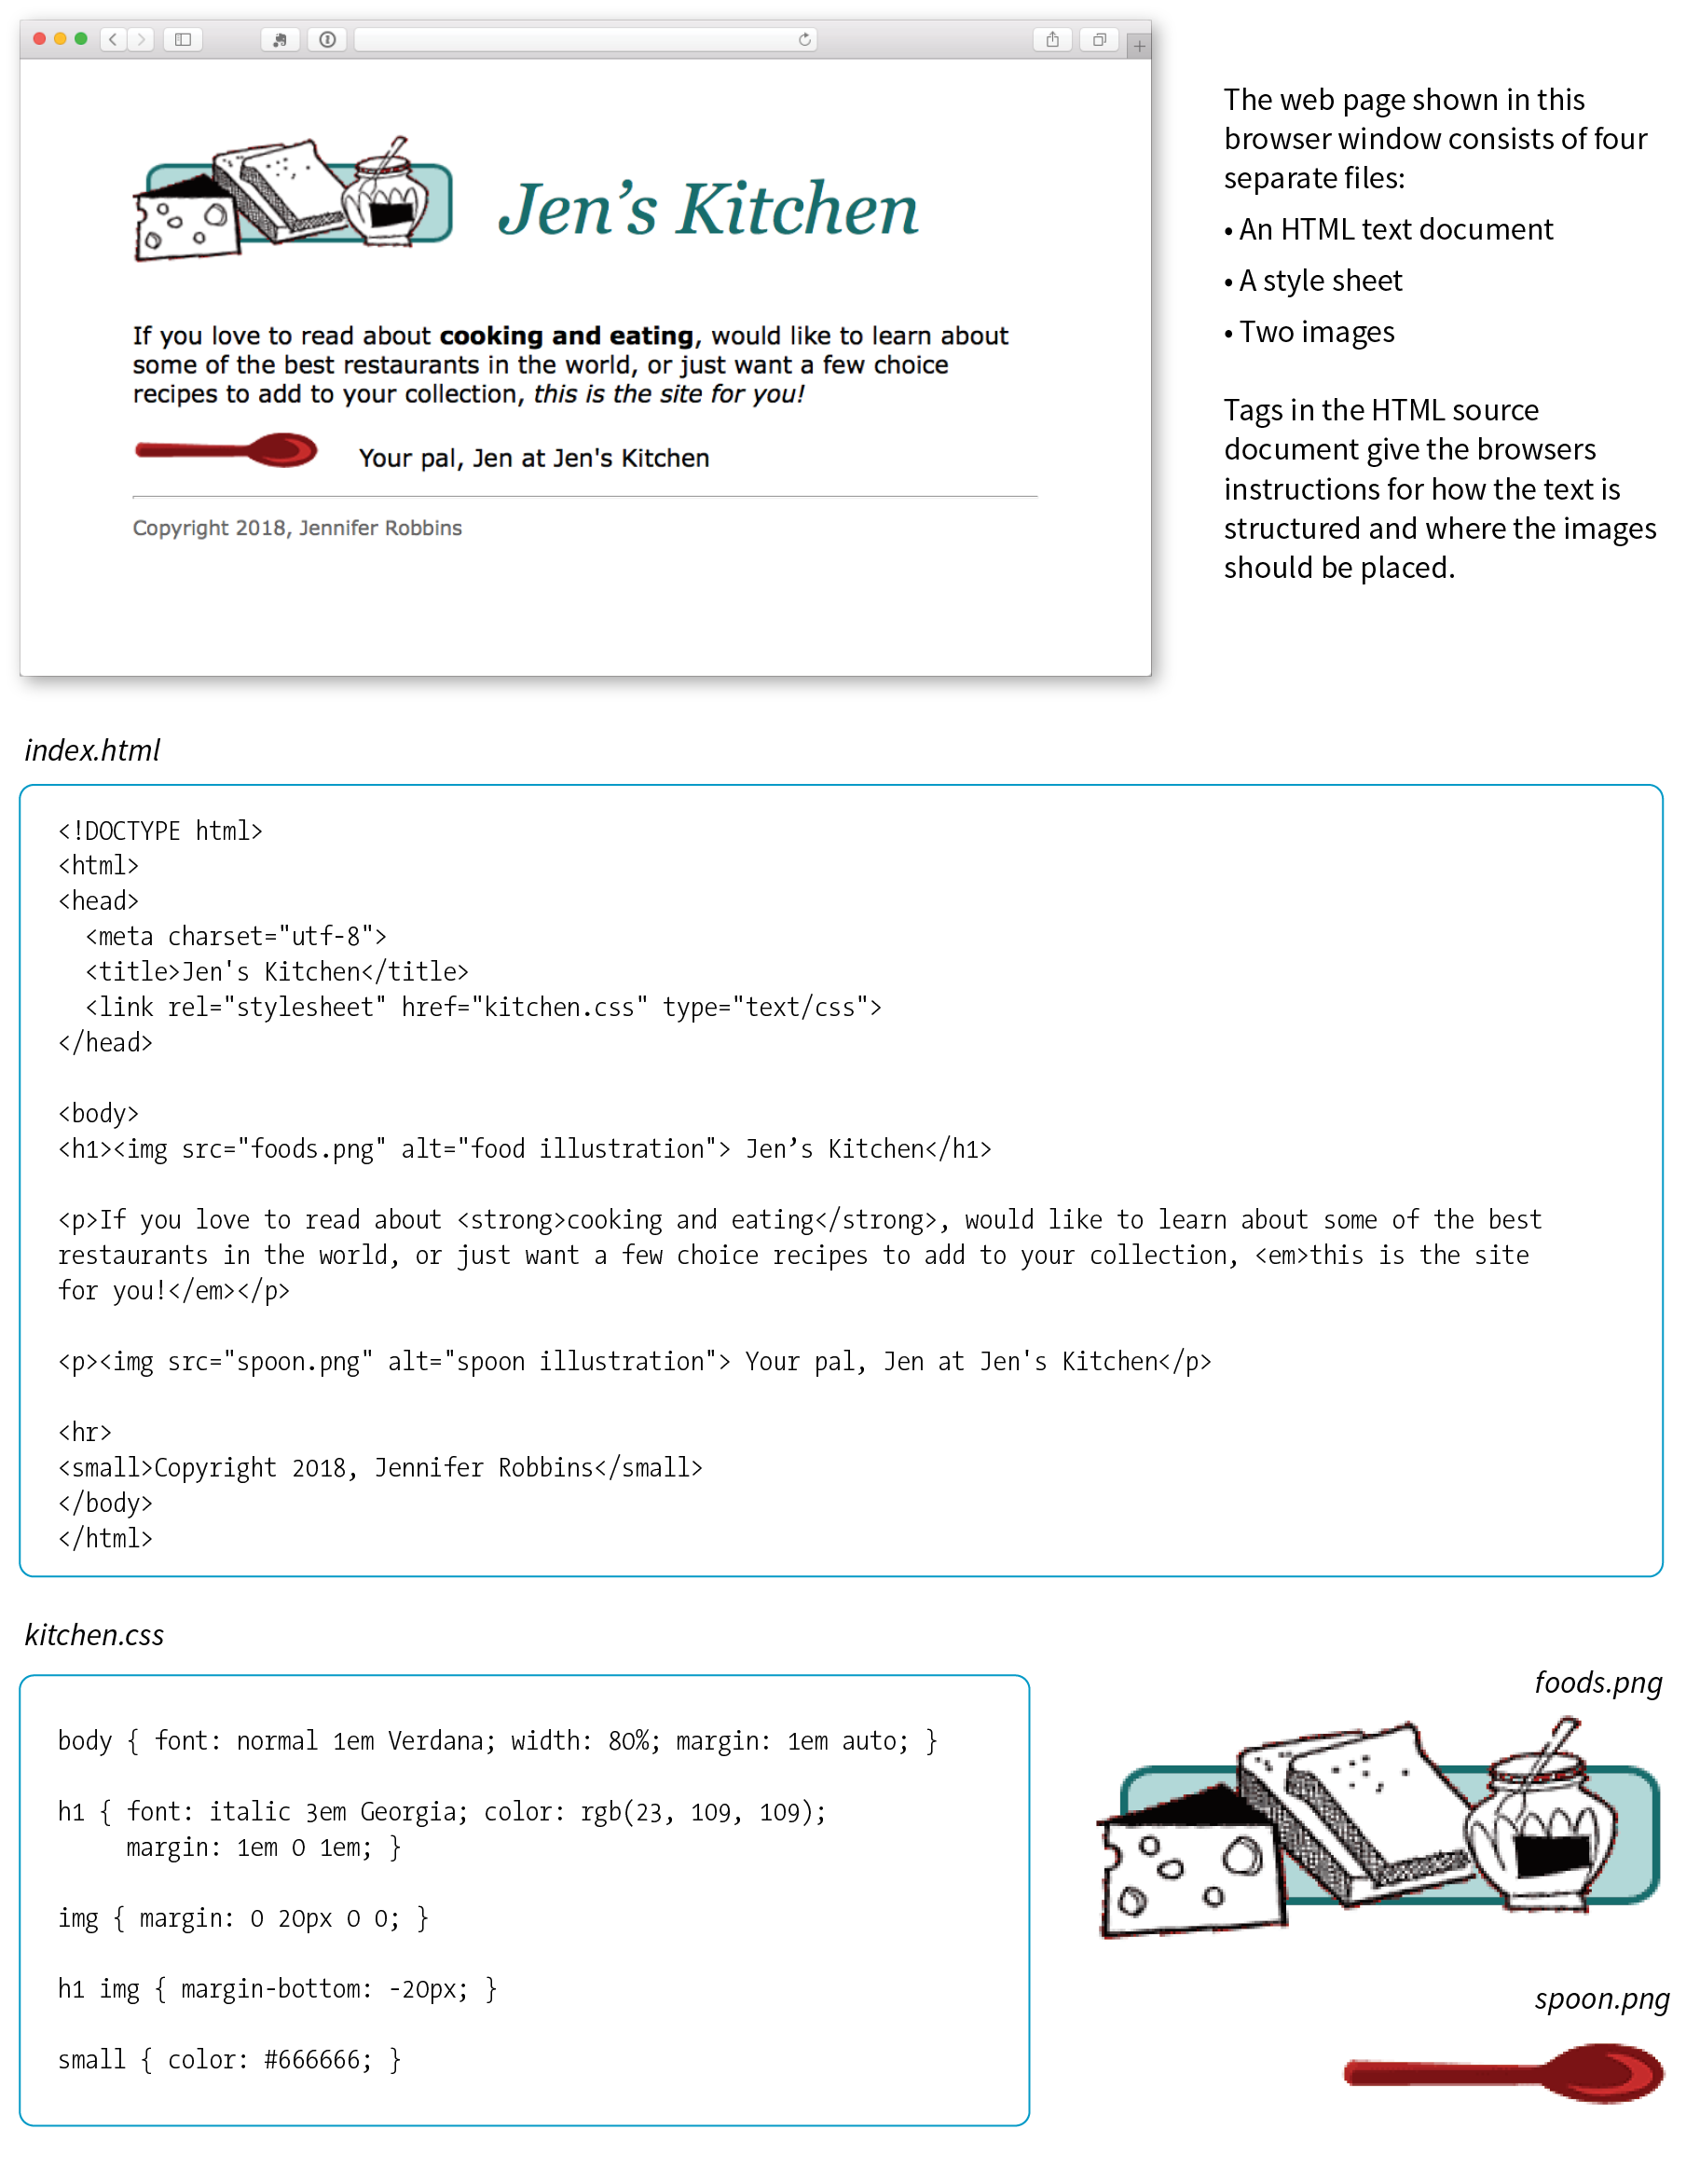
At the top of Figure 2-3, you see a minimal web page as it appears in a graphical browser. Although you see it as one coherent page, it is actually assembled from four separate files: an HTML document (index.html), a style sheet (kitchen.css), and two graphics (foods.png and spoon.png). The HTML document is running the show.
HTML Documents
You may be as surprised as I was to learn that the graphically rich and interactive pages we see on the web are generated by simple, text-only documents. The text file behind the scenes is referred to as the source document.
Take a look at index.html, the source document for the Jen’s Kitchen web page. You can see that it contains the text content of the page plus special tags (indicated with angle brackets, < and >) that describe each element on the page.
Adding descriptive tags to a text document is known as “marking up” the document. Web pages use a markup language called HyperText Markup Language, or HTML for short, which was created especially for documents with hypertext links. HTML defines dozens of text elements that make up documents such as headings, paragraphs, emphasized text, and of course, links. There are also elements that add information about the document (such as its title), media such as images and videos, and widgets for form inputs, just to name a few.
You can view the source for any web page. Exercise 2-1 gives you some prompts and pointers.
The version of HTML we use today is HTML5. There have been several versions of HTML since its birth in 1989, and a few that are still in use today. There is a complete history of HTML, all its versions, and an overview of what makes HTML5 unique in Appendix D, From HTML+ to HTML5.
exercise 2-1. View source
WARNING
Keep in mind that while learning from others’ work is fine, stealing other people’s code is poor form (or even illegal). If you want to use code as you see it, ask for permission and always give credit to those who did the work.
A Quick Introduction to HTML Markup
You’ll be learning the nitty-gritty of markup in Part II, so I don’t want to bog you down with too much detail right now, but there are a few things I’d like to point out about how HTML works and how browsers interpret it.
Read through the HTML document in Figure 2-3 and compare it to the browser results. It’s easy to see how the elements marked up with HTML tags in the source document correspond to what displays in the browser window.
First, you’ll notice that the text within brackets (for example, <body> and <strong>) does not display in the final page. The browser displays only what’s between the tags—the content of the element. The markup is hidden. The tag provides the name of the HTML element—usually an abbreviation such as “h1” for “heading level 1,” or “em” for “emphasized text.”
Second, you’ll see that most of the HTML tags appear in pairs surrounding the content of the element. In our HTML document, <h1> indicates that the following text should be a first-level heading; </h1> indicates the end of the heading. Some elements, called empty elements, do not have content. In our sample, the <hr> tag indicates an empty element that tells the browser to “insert a horizontal rule here” as a thematic divider.
Because I was unfamiliar with computer programming when I first began writing HTML, it helped me to think of the tags and text as “beads on a string” that the browser interprets one by one, in sequence. For example, when the browser encounters an open bracket (<), it assumes all of the following characters are part of the markup until it finds the closing bracket (>). Similarly, it assumes all of the content following an opening <h1> tag is a heading until it encounters the closing </h1> tag. This is the manner in which the browser parses the HTML document. Understanding the browser’s method can be helpful when troubleshooting a misbehaving HTML document.
Where Are the Pictures?
Obviously, there are no pictures in the HTML file itself, so how do they get there when you view the final page? You can see in Figure 2-3 that each image is a separate file. The images are placed in the flow of the text with the HTML image element (img), which tells the browser where to find the graphic (its URL). When the browser sees the img element, it makes another request to the server for the image file, and then places it in the content flow.
The browser also sends requests to the server for style sheets (like kitchen.css), JavaScript files (.js), and other embedded media like audio and videos. The browser software (or more specifically, its rendering engine) brings the separate pieces together into the final page.
The assembly of the page generally happens in an instant, so it appears as though the whole page loads all at once. Over slow connections or if the page includes huge graphics or media files, the assembly process may be more apparent as images lag behind the text. The page may even need to be redrawn as new images, fonts, and style sheets arrive (although you can construct your pages in such a way that prevents this from happening).
Adding a Little Style
I want to direct your attention to one last key ingredient of our minimal page. Near the top of the HTML document there is a link element that points to the style sheet document kitchen.css. That style sheet includes a few lines of instructions for how the page should look in the browser. These are style instructions written according to the rules of Cascading Style Sheets (CSS). CSS allows designers to add visual style instructions (known as the document’s presentation) to the marked-up text (the document’s structure, in web design terminology). In Part III, you’ll get to know the power of Cascading Style Sheets.
Figure 2-4 shows the Jen’s Kitchen page without (top) and with (bottom) the style instructions. Browsers come equipped with default styles for every HTML element they support, so if an HTML document lacks custom style instructions, the browser will use its own. That’s what you see in the screenshot on the top. Even just a few style rules can make big improvements to the appearance of a page.

Adding Behaviors with JavaScript
To make elements on the page do something, you use a scripting language called JavaScript (see Note). There are no scripts on the Jen’s Kitchen page because I thought it best to keep things simple this early in the book, but know that JavaScript is an essential ingredient in modern websites.
Whereas HTML provides the structure and the CSS style sheet alters how things look, JavaScript adds a behavior component that controls how things work. Scripts may be standalone files on the server (with the .js suffix) or be written out right in the document. They may be triggered to run immediately when the page loads or be triggered by something the user does, like click or hover on an element or enter something in a form field.
You’ll get a basic introduction to JavaScript in Part IV of this book.
Putting It All Together
- To wrap up our introduction to how the web works, let’s trace a typical stream of events that occurs with every web page that appears on your screen (Figure 2-5). Request a web page by either typing its URL (for example, http://jenskitchensite.com) directly in the browser or by clicking a link on a page. The URL contains the information needed to target a specific document on a specific web server on the internet. In this case, it points to the default file (index.html) in the top directory.
- Your browser sends an HTTP request to the server named in the URL and asks for the specific file. The request also includes information about what languages the user can read and what types of files the browser can accept. If the URL specifies a directory (not a file), it is the same as requesting the default file in that directory.
- The server looks for the requested file and issues an HTTP response in the form of an HTTP header. The header includes information about the file, like the last modified date, the length of the file, and its Content-Type (for example, an .html file has the content type “text/html”).
- If the page cannot be found, the server returns an error message. The message typically says “404 Not Found,” although more hospitable error messages may be provided. Other error types are possible as well (see the sidebar “HTTP Status Codes”).
- If the document is found, the server retrieves the requested file and returns it to the browser. If the site is dynamic, the server assembles the page from stored data before returning it to the browser.
- The browser parses the HTML document. If the page contains images (indicated by the HTML img element) or other external resources like scripts or style sheets, the browser contacts the server again to request each resource specified in the markup.
- The browser inserts each image in the document flow where indicated by the img element, applies styles, and runs scripts. And voilà! The assembled web page is displayed for your viewing pleasure.
I should note that I’ve depicted a traditional and simplified scenario here to tell you how web pages are put together. These days, it is common for web pages to be generated from content management systems (CMSs) that keep content in databases and use templates to assemble the data into pages on the fly. In that case, in Step 3b, there is a more complicated process of assembling the file from various parts rather than just handing off an existing file.

Test Yourself
Let’s play a round of “Identify That Acronym!” The following are a few basic web terms mentioned in this chapter. Answers are in Appendix A.
|
1. |
HTML |
______ |
a. |
Home of Mosaic, the first graphical browser |
|
2. |
W3C |
______ |
b. |
The location of a web document or resource |
|
3. |
CERN |
______ |
c. |
The markup language used to describe web content |
|
4. |
CSS |
______ |
d. |
Matches domain names with numeric IP addresses |
|
5. |
HTTP |
______ |
e. |
A protocol for file transfer |
|
6. |
IP |
______ |
f. |
Protocol for transferring web documents on the internet |
|
7. |
URL |
______ |
g. |
The language used to instruct how web content looks |
|
8. |
NCSA |
______ |
h. |
Particle physics lab where the web was born |
|
9. |
DNS |
______ |
i. |
Internet Protocol |
|
10. |
FTP |
______ |
j. |
The organization that monitors web technologies |