by Mat Marquis
In this chapter, I’m going to introduce you to JavaScript. Now, it’s possible you’ve just recoiled a little bit, and I understand. We’re into full-blown “programming language” territory now, and that can be a little intimidating. I promise, it’s not so bad!
We’ll start by going over what JavaScript is—and what it isn’t—and discuss some of the ways it is used. The majority of the chapter is made up of an introduction to JavaScript syntax—variables, functions, operators, loops, stuff like that. Will you be coding by the end of the chapter? Probably not. But you will have a good head start toward understanding what’s going on in a script when you see one. I’ll finish up with a look at some of the ways you can manipulate the browser window and tie scripts to user actions such as clicking or submitting a form.
What Is JavaScript?
If you’ve made it this far in the book, you no doubt already know that JavaScript is a programming language that adds interactivity and custom behaviors to our sites. It is a client-side scripting language, which means it runs on the user’s machine and not on the server, as other web programming languages such as PHP and Ruby do. That means JavaScript (and the way we use it) is reliant on the browser’s capabilities and settings. It may not even be available at all, either because the user has chosen to turn it off or because the device doesn’t support it, which good developers keep in mind and plan for. JavaScript is also what is known as a dynamic and loosely typed programming language. Don’t sweat this description too much; I’ll explain what all that means later.
First, I want to establish that JavaScript is kind of misunderstood.
What It Isn’t
Right off the bat, the name is pretty confusing. Despite its name, JavaScript has nothing to do with Java. It was created by Brendan Eich at Netscape in 1995 and originally named “LiveScript.” But Java was all the rage around that time, so for the sake of marketing, “LiveScript” became “JavaScript.” Or just “JS,” if you want to sound as cool as one possibly can while talking about JavaScript.
JS also has something of a bad reputation. For a while it was synonymous with all sorts of unscrupulous internet shenanigans—unwanted redirects, obnoxious pop-up windows, and a host of nebulous “security vulnerabilities,” just to name a few. There was a time when JavaScript allowed less reputable developers to do all these things (and worse), but modern browsers have largely caught on to the darker side of JavaScript development and locked it down. We shouldn’t fault JavaScript itself for that era, though. As the not-so-old cliché goes, “with great power comes great responsibility.” JavaScript has always allowed developers a tremendous amount of control over how pages are rendered and how our browsers behave, and it’s up to us to use that control in responsible ways.
What It Is
Now we know what JavaScript isn’t: it isn’t related to Java, and it isn’t a mustachioed villain lurking within your browser, wringing its hands and waiting to alert you to “hot singles in your area.” Let’s talk more about what JavaScript is.
JavaScript is a lightweight but incredibly powerful scripting language. We most frequently encounter it through our browsers, but JavaScript has snuck into everything from native applications to PDFs to ebooks. Even web servers themselves can be powered by JavaScript.
As a dynamic programming language, JavaScript doesn’t need to be run through any form of compiler that interprets our human-readable code into something the browser can understand. The browser effectively reads the code the same way we do and interprets it on the fly.
JavaScript is also loosely typed. All this means is that we don’t necessarily have to tell JavaScript what a variable is. If we’re setting a variable to a value of 5, we don’t have to programmatically specify that variable as a number; that is, 5 is a number, and JavaScript recognizes it as such.
Now, you don’t necessarily need to memorize these terms to get started writing JS, mind you—to be honest, I didn’t. This is just to introduce you to a few of the terms you’ll hear often while you’re learning JavaScript, and they’ll start making more and more sense as you go along. This is also to provide you with conversation material for your next cocktail party! “Oh, me? Well, I’ve been really into loosely typed dynamic scripting languages lately.” People will just nod silently at you, which I think means you’re doing well conversationally. I don’t go to a lot of cocktail parties.
What JavaScript Can Do
Most commonly we’ll encounter JavaScript as a way to add interactivity to a page. Whereas the “structural” layer of a page is our HTML markup, and the “presentational” layer of a page is made up of CSS, the third “behavioral” layer is made up of our JavaScript. All of the elements, attributes, and text on a web page can be accessed by scripts using the DOM (Document Object Model), which we’ll be looking at in Chapter 22, Using JavaScript We can also write scripts that react to user input, altering either the contents of the page, the CSS styles, or the browser’s behavior on the fly.
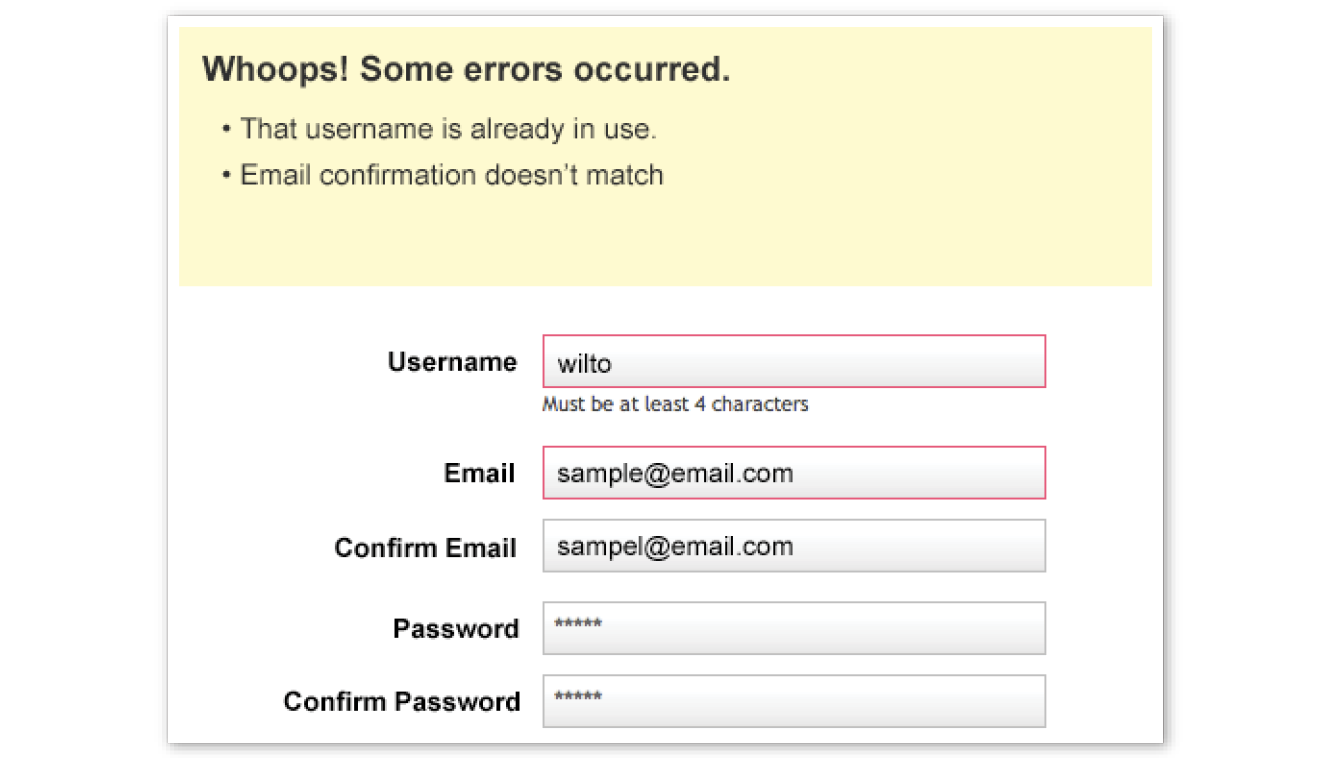
You’ve likely seen this in action if you’ve ever attempted to register for a website, entered a username, and immediately received feedback that the username you’ve entered is already taken by someone else (Figure 21-1). The red border around the text input and the appearance of the “sorry, this username is already in use” message are examples of JavaScript altering the contents of the page. Blocking the form submission is an example of JavaScript altering the browser’s default behavior. Ultimately, verifying this information is a job for the server—but JavaScript allows the website to make that request and offer immediate feedback without the need for a page reload.
In short, JavaScript allows you to create highly responsive interfaces that improve the user experience and provide dynamic functionality, without waiting for the server to load up a new page. For example, we can use JavaScript to do any of the following:
- Suggest the complete term a user might be entering in a search box as he types. You can see this in action on Google.com (Figure 21-2).

- Request content and information from the server and inject it into the current document as needed, without reloading the entire page—this is commonly referred to as “Ajax.”
- Show and hide content based on a user clicking a link or heading, to create a “collapsible” content area (Figure 21-3).

- Test for browsers’ individual features and capabilities. For example, one can test for the presence of “touch events,” indicating that the user is interacting with the page through a mobile device’s browser, and add more touch-friendly styles and interaction methods.
- Fill in gaps where a browser’s built-in functionality falls short, or add some of the features found in newer browsers to older browsers. These kinds of scripts are usually called shims or polyfills.
- Load an image or content in a custom-styled “lightbox”—isolated on the page with CSS—after a user clicks a thumbnail version of the image (Figure 21-4).
This list is nowhere near exhaustive!

Adding JavaScript to a Page
As with CSS, you can embed a script right in a document or keep it in an external file and link it to the page. Both methods use the script element.
Embedded Script
To embed a script on a page, just add the code as the content of a script element:
<script>… JavaScript code goes here
</script>External Scripts
The other method uses the src attribute to point to a script file (with a .js suffix) by its URL. In this case, the script element has no content:
<script src="my_script.js"></script>
The advantage to external scripts is that you can apply the same script to multiple pages (the same benefit external style sheets offer). The downside, of course, is that each external script requires an additional HTTP request of the server, which slows down performance.
Script Placement
The script element can go anywhere in the document, but the most common places for scripts are in the head of the document and at the very end of the body. It is recommended that you don’t sprinkle them throughout the document, because they would be difficult to find and maintain.
For most scripts, the end of the document, just before the </body> tag, is the preferred placement because the browser will be done parsing the document and its DOM structure:
<!DOCTYPE html>
<html lang="en">
<head>
<meta charset="utf-8">
</head>
<body>
…contents of page…
<script src="script.js"></script>
</body>
</html>
Consequently, that information will be ready and available by the time it gets to the scripts, and they can execute faster. In addition, the script download and execution blocks the rendering of the page, so moving the script to the bottom improves the perceived performance.
However, in some cases, you might want your script to do something before the body completely loads, so putting it in the head will result in better performance. For example, Modernizr (the feature detection tool discussed in Chapter 19, More CSS Techniques) recommends its script be placed in the head so the feature detection tests can be run up front.
The Anatomy of a Script
There’s a reason why the book JavaScript: The Definitive Guide by David Flanagan (O’Reilly) is 1,100 pages long. There’s a lot to say about JavaScript! In this section, we have only a few pages to make you familiar with the basic building blocks of JavaScript so you can begin to understand scripts when you encounter them. Many developers have taught themselves to program by finding existing scripts and adapting them for their own needs. After some practice, they are ready to start writing their own from scratch. Recognizing the parts of a script is the first step, so that’s where we’ll start.
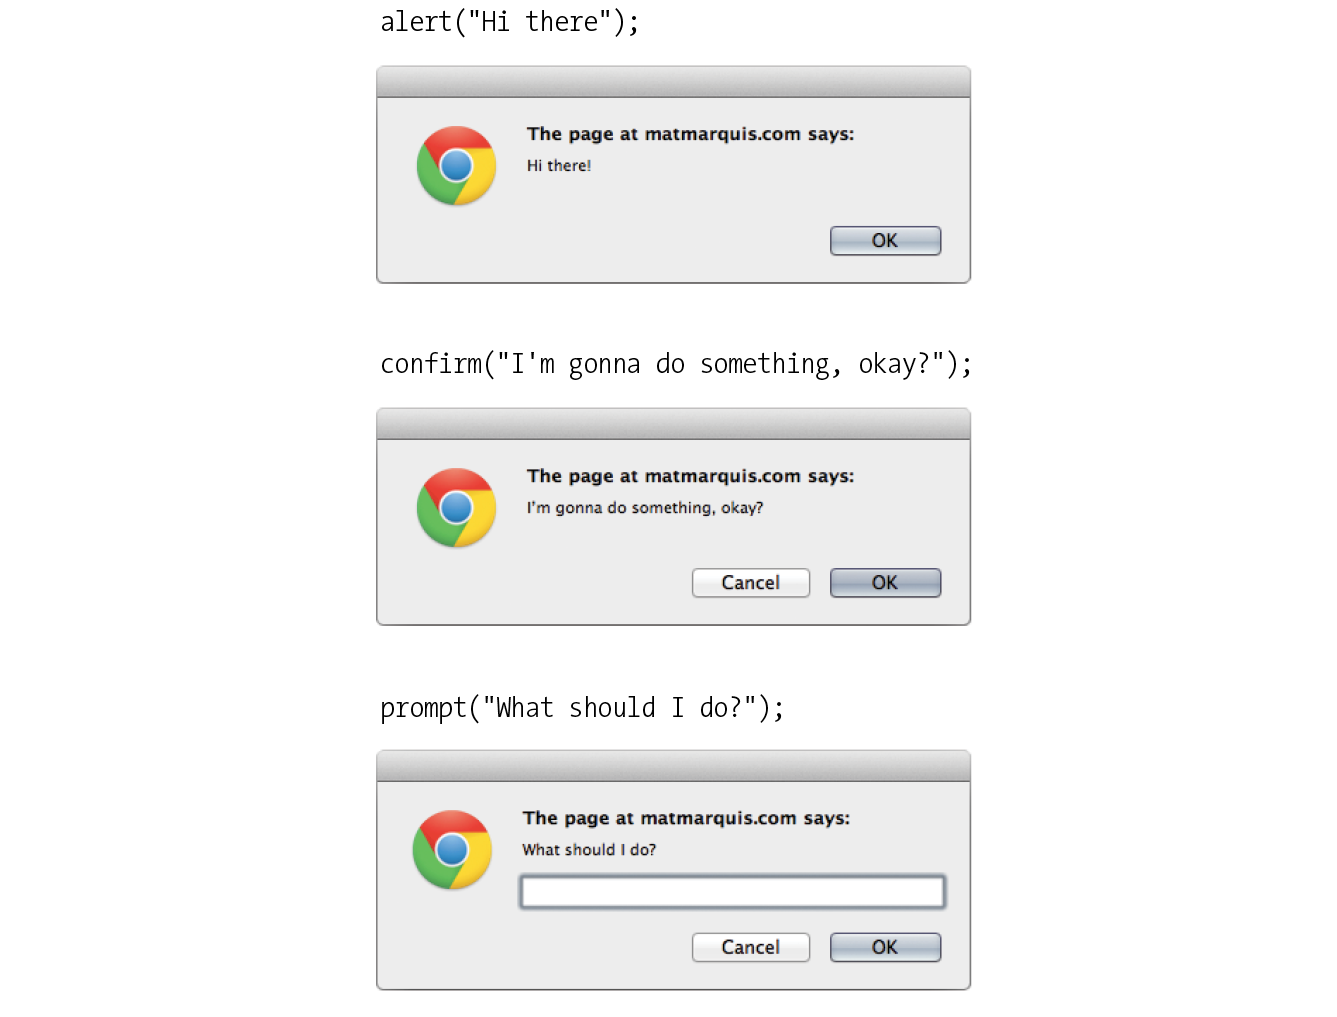
Originally, JavaScript’s functionality was mostly limited to crude methods of interaction with the user. We could use a few of JavaScript’s built-in functions (Figure 21-5) to provide user feedback, such as alert() to push a notification to a user, and confirm() to ask a user to approve or decline an action. To request the user’s input, we were more or less limited to the built-in prompt() function. Although these methods still have their time and place today, they’re jarring, obtrusive, and—in common opinion, at least—fairly obnoxious ways of interacting with users. As JavaScript has evolved over time, we’ve been afforded much more graceful ways of adding behavior to our pages, creating a more seamless experience for our users.
In order to take advantage of these interaction methods, we have to first understand the underlying logic that goes into scripting. These are logic patterns common to all manner of programming languages, although the syntax may vary. To draw a parallel between programming languages and spoken languages: although the vocabulary may vary from one language to another, many grammar patterns are shared by the majority of them.
By the end of this section, you’re going to know about variables, arrays, comparison operators, if/else statements, loops, functions, and more. Ready?
The Basics
There are a few common syntactical rules that wind their way though all of JavaScript.
It is important to know that JavaScript is case-sensitive. A variable named myVariable, a variable named myvariable, and a variable named MYVariable will be treated as three different objects.
Also, whitespace such as tabs and spaces is ignored, unless it’s part of a string of text and enclosed in quotes. All of the character spaces added to scripts such as the ones in this chapter are for the benefit of humans—they make reading through the code easier. JavaScript doesn’t see them.
Statements
A script is made up of a series of statements. A statement is a command that tells the browser what to do. Here is a simple statement that makes the browser display an alert with the phrase “Thank you”:
alert("Thank you.");
The semicolon at the end of the statement tells JavaScript that it’s the end of the command, just as a period ends a sentence. According to the JavaScript standard, a line break will also trigger the end of a command, but it is a best practice to end each statement with a semicolon.
Comments
JavaScript allows you to leave comments that will be ignored at the time the script is executed, so you can provide reminders and explanations throughout your code. This is especially helpful if this code is likely to be edited by another developer in the future.
There are two methods of using comments. For single-line comments, use two slash characters (//) at the beginning of the line. You can put single-line comments on the same line as a statement, as long as the comment comes after the statement. It does not need to be closed, as a line break effectively closes it.
// This is a single-line comment. Multiple-line comments use the same syntax that you’ve seen in CSS. Everything within the /* */ characters is ignored by the browser. You can use this syntax to “comment out” notes and even chunks of the script when troubleshooting.
/* This is a multiline comment.Anything between these sets of characters will be
completely ignored when the script is executed.
This form of comment needs to be closed. */
I’ll be using the single-line comment notation to add short explanations to example code, and we’ll make use of the alert() function we saw earlier (Figure 21-5) so we can quickly view the results of our work.
Variables
If you’re anything like me, the very term “variables” triggers nightmarish flashbacks to eighth-grade math class. The premise is pretty much the same, though your teacher doesn’t have a bad comb-over this time around.
A variable is like an information container. You give it a name and then assign it a value, which can be a number, text string, an element in the DOM, or a function—anything, really. This gives us a convenient way to reference that value later by name. The value itself can be modified and reassigned in whatever way our scripts’ logic dictates.
The following declaration creates a variable with the name foo and assigns it the value 5:
var foo = 5;
We start by declaring the variable by using the var keyword. The single equals sign (=) indicates that we are assigning it a value. Because that’s the end of our statement, we end the line with a semicolon. Variables can also be declared without the var keyword, which impacts what part of your script will have access to the information they contain. We’ll discuss that further in the section “Variable Scope and the var Keyword” later in this chapter.
You can use anything you like as a variable name, but make sure it’s a name that will make sense to you later. You wouldn’t want to name a variable something like data; it should describe the information it contains. In our earlier very specific example, productName might be a more useful name than foo. There are a few rules for naming a variable:
- It must start with a letter or an underscore.
- It may contain letters, digits, and underscores in any combination.
- It may not contain character spaces. As an alternative, use underscores in place of spaces, or close up the space and use camel case instead (for example, my_variable or myVariable).
- It may not contain special characters (e.g., ! . , / \ + * =).
You can change the value of a variable at any time by redeclaring it anywhere in your script. Remember: JavaScript is case-sensitive, and so are those variable names.
Data types
The values we assign to variables fall under a few distinct data types:
Undefined
The simplest of these data types is likely undefined. If we declare a variable by giving it a name but no value, that variable contains a value of undefined.
var foo;
alert(foo); // This will open a dialog containing "undefined".
Odds are you won’t find a lot of use for this right away, but it’s worth knowing for the sake of troubleshooting some of the errors you’re likely to encounter early on in your JavaScript career. If a variable has a value of undefined when it shouldn’t, you may want to double-check that it has been declared correctly or that there isn’t a typo in the variable name. (We’ve all been there.)
Null
Similar to undefined, assigning a variable of null (again, case-sensitive) simply says, “Define this variable, but give it no inherent value.”
var foo = null;
alert(foo); // This will open a dialog containing "null".
Numbers
You can assign variables numeric values.
var foo = 5;
alert(foo); // This will open a dialog containing "5".
The word foo now means the exact same thing as the number 5 as far as JavaScript is concerned. Because JavaScript is loosely typed, we don’t have to tell our script to treat the variable foo as the number 5. The variable behaves the same as the number itself, so you can do things to it that you would do to any other number by using classic mathematical notation: +, -, *, and / for plus, minus, multiply, and divide, respectively. In this example, we use the plus sign (+) to add foo to itself (foo + foo).
var foo = 5;
alert(foo + foo); // This will alert "10".
Strings
Another type of data that can be saved to a variable is a string, which is basically a line of text. Enclosing characters in a set of single or double quotes indicates that it’s a string, as shown here:
var foo = "five";
alert( foo ); // This will alert "five"
The variable foo is now treated exactly the same as the word five. This applies to any combination of characters: letters, numbers, spaces, and so on. If the value is wrapped in quotation marks, it will be treated as a string of text. If we were to wrap the number 5 in quotes and assign it to a variable, that variable wouldn’t behave as a number; instead, it would behave as a string of text containing the character “5.”
Earlier we saw the plus sign (+) used to add numbers. When the plus sign is used with strings, it sticks the strings together (called concatenation) into one long string, as shown in this example.
var foo = "bye"
alert(foo + foo); // This will alert "byebye"
Notice what the alert returns in the following example when we define the value 5 in quotation marks, treating it as a string instead of a number:
var foo = "5";
alert( foo + foo ); // This will alert "55"
If we concatenate a string and a number, JavaScript will assume that the number should be treated as a string as well, since the math would be impossible.
var foo = "five";
var bar = 5;
alert( foo + bar ); // This will alert "five5"
Booleans
We can also assign a variable a true or false value. This is called a Boolean value, and it is the lynchpin for all manner of advanced logic. Boolean values use the true and false keywords built into JavaScript, so quotation marks are not necessary.
var foo = true; // The variable "foo" is now true
Just as with numbers, if we were to wrap the preceding value in quotation marks, we’d be saving the word true to our variable instead of the inherent value of true (i.e., “not false”).
In a sense, everything in JavaScript has either an inherently true or false value. For example, null, undefined, 0, and empty strings (" ") are all inherently false, while every other value is inherently true. These values, although not identical to the Booleans true and false, are commonly referred to as being “truthy” and “falsy.” I promise I didn’t make that up.
Arrays
An array is a group of multiple values (called members) that can be assigned to a single variable. The values in an array are said to be indexed, meaning you can refer to them by number according to the order in which they appear in the list. The first member is given the index number 0, the second is 1, and so on, which is why one almost invariably hears us nerds start counting things at zero—because that’s how JavaScript counts things, and many other programming languages do the same. We can avoid a lot of future coding headaches by keeping this in mind.
So, let’s say our script needs all of the variables we defined earlier. We could define them three times and name them something like foo1, foo2, and so on, or we can store them in an array, indicated by square brackets ([ ]).
var foo = [5, "five", "5"];
Now anytime you need to access any of those values, you can grab them from the single foo array by referencing their index number:
alert( foo[0] ); // Alerts "5"
alert( foo[1] ); // Alerts "five"
alert( foo[2] ); // Also alerts "5"
Comparison Operators
Now that we know how to save values to variables and arrays, the next logical step is knowing how to compare those values. There is a set of special characters called comparison operators that evaluate and compare values in different ways:
|
== |
Is equal to |
|
!= |
Is not equal to |
|
=== |
Is identical to (equal to and of the same data type) |
|
!== |
Is not identical to |
|
> |
Is greater than |
|
>= |
Is greater than or equal to |
|
< |
Is less than |
|
<= |
Is less than or equal to |
There’s a reason all of these definitions read as parts of a statement. In comparing values, we’re making an assertion, and the goal is to obtain a result that is either inherently true or inherently false. When we compare two values, JavaScript evaluates the statement and gives us back a Boolean value depending on whether the statement is true or false.
alert( 5 == 5 ); // This will alert "true"
alert( 5 != 6 ); // This will alert "true"
alert( 5 < 1 ); // This will alert "false"
Equal versus identical
The tricky part is understanding the difference between “equal to” (==) and “identical to” (===). We already learned that all of these values fall under a certain data type. For example, a string of “5” and a number 5 are similar, but they’re not quite the same thing.
Well, that’s exactly what === is meant to check.
alert( "5" == 5 ); // This will alert "true". They're both "5".
alert( "5" === 5 );
/* This will alert "false". They're both "5", but they're not the same data type. */
alert( "5" !== 5 );
/* This will alert "true", since they're not the same data type. */
Warning
Be careful not to accidentally use a single equals sign, or you’ll be reassigning the value of the first variable to the value of the second variable!
Even if you have to read through this part a couple of times, understanding the difference between “equal” and “identical to” means you’ve already begun to adopt the special kind of crazy one needs to be a programmer. Welcome! You’re in good company.
Mathematical operators
The other type of operator is a mathematical operator, which performs mathematical functions on numeric values (and, of course, variables that contain numeric values). We touched briefly on the straightforward mathematical operators for add (+), subtract (-), multiply (*), and divide (/). There are also some useful shortcuts you should be aware of:
|
+= |
Adds the value to itself |
|
++ |
Increases the value of a number (or a variable containing a number value) by 1 |
|
-- |
Decreases the value of a number (or a variable containing a number value) by 1 |
if/else statements
if/else statements are how we get JavaScript to ask itself a true/false question. They are more or less the foundation for all the advanced logic that can be written in JavaScript, and they’re about as simple as programming gets. In fact, they’re almost written in plain English. The structure of a conditional statement is as follows:
if( true ) { // Do something.
}It tells the browser “if this condition is met, then execute the commands listed between the curly brackets ({ }).” JavaScript doesn’t care about whitespace in our code, remember, so the spaces on either side of the ( true ) are purely for the sake of more readable code.
Here is a simple example using the array we declared earlier:
var foo = [5, "five", "5"];
if( foo[1] === "five" ) { alert("This is the word five, written in plain English.");
}Since we’re making a comparison, JavaScript is going to give us a value of either true or false. The highlighted line of code says “true or false: the value of the foo variable with an index of 1 is identical to the word ‘five’?”
In this case, the alert would fire because the foo variable with an index of 1 (the second in the list, if you’ll remember) is identical to “five”. It is indeed true, and the alert fires.
We can also explicitly check if something is false by using the != comparison operator, which reads as “not equal to.”
if( 1 != 2 ) { alert("If you're not seeing this alert, we have bigger problems than JavaScript.");
// 1 is never equal to 2, so we should always see this alert.
}I’m not much good at math, but near as I can tell, 1 will never be equal to 2. JavaScript says, “That ‘1 is not equal to 2’ line is a true statement, so I’ll run this code.”
If the statement doesn’t evaluate to true, the code inside the curly brackets will be skipped over completely:
if( 1 == 2 ) { alert("If you're seeing this alert, we have bigger problems than JavaScript.");
// 1 is not equal to 2, so this code will never run.
}That covers “if,” but what about “else”?
Lastly—and I promise we’re almost done here—what if we want to do one thing if something is true and something else if that thing is false? We could write two if statements, but that’s a little clunky. Instead, we can just say, “else, do something…else.”
var test = "testing";
if( test == "testing" ) {alert( "You haven't changed anything." );
} else {
alert( "You've changed something!" );
}
Changing the value of the test variable to something else—anything other than the word testing—will trigger the alert “You’ve changed something!”
Exercise 21-1 gives you a chance to write a bit of JavaScript yourself.
Exercise 21-1.
English-to-JavaScript translation
Loops
There are cases in which we’ll want to go through every item in an array and do something with it, but we won’t want to write out the entire list of items and repeat ourselves a dozen or more times. You are about to learn a technique of devastating power, readers: loops.
I know. Maybe I overstated how exciting loops can be, but they are incredibly useful. With what we’ve covered already, we’re getting good at dealing with single variables, but that can get us only so far. Loops allow us to easily deal with huge sets of data.
Say we have a form that requires none of the fields to be left blank. If we use the DOM to fetch every text input on the page, the DOM provides an array of every text input element. (I’ll tell you more about how the DOM does this in the next chapter.) We could check every value stored in that array one item at a time, sure, but that’s a lot of code and a maintenance nightmare. If we use a loop to check each value, we won’t have to modify our script, regardless of how many fields are added to or removed from the page. Loops allow us to act on every item in an array, regardless of that array’s size.
There are several ways to write a loop, but the for method is one of the most popular. The basic structure of a for loop is as follows:
for( initialize the variable; test the condition; alter the value; ) {
// do something
}
Here’s an example of a for loop in action:
for( var i = 0; i < 2; i++ ) { alert( i ); // This loop will trigger three alerts, reading "0", "1", and "2" respectively.
}
That’s a little dense, so let’s break it down:
for()
First, we’re calling the for() statement, which is built into JavaScript. It says, “For every time this is true, do this.” Next we need to supply that statement with some information.
var i = 0;
This creates a new variable, i, with its value set to zero. You can tell it’s a variable by the single equals sign. More often than not, you’ll see coders using the letter “i” (short for “index”) as the variable name, but keep in mind that you could use any variable name in its place. It’s a common convention, not a rule.
We set that initial value to 0 because we want to stay in the habit of counting from zero up. That’s where JavaScript starts counting, after all.
i <= 2;
With i <= 2;, we’re saying, “for as long as i is less than or equal to 2, keep on looping.” Since we’re counting from zero, that means the loop will run three times.
i++
Finally, i++ is shorthand for “every time this loop runs, add one to the value of i” (++ is one of the mathematical shortcut operators we saw earlier). Without this step, i would always equal zero, and the loop would run forever! Fortunately, modern browsers are smart enough not to let this happen. If one of these three pieces is missing, the loop simply won’t run at all.
{ script }
Anything inside those curly brackets is executed once for each time the loop runs, which is three times in this case. That i variable is available for use in the code the loop executes as well, as we’ll see next.
Let’s go back to the “check each item in an array” example. How would we write a loop to do that for us?
var items = ["foo", "bar", "baz"]; // First we create an array.
for( var i = 0; i < items.length; i++ ) {
alert( items[i] ); // This will alert each item in the array.
}
This example differs from our first loop in two key ways:
items.length
Instead of using a number to limit the number of times the loop runs, we’re using a property built right into JavaScript to determine the “length” of our array, which is the number of items it contains. .length is just one of the standard properties and methods of the Array object in JavaScript. In our example, there are three items in the array, so it will loop three times.
items[i]
Remember how I mentioned that we can use that i variable inside the loop? Well, we can use it to reference each index of the array. Good thing we started counting from zero; if we had set the initial value of i to 1, the first item in the array would have been skipped. The result of our for loop example is that each item in the array (the text strings foo, bar, and baz) gets returned after each loop and fed to an alert.
Now no matter how large or small that array should become, the loop will execute only as many times as there are items in the array, and will always hold a convenient reference to each item in the array.
There are literally dozens of ways to write a loop in JavaScript, but this is one of the more common patterns you’re going to encounter out there in the wild. Developers use loops to perform a number of tasks, such as the following:
- Looping through a list of elements on the page and checking the value of each, applying a style to each, or adding/removing/changing an attribute on each. For example, we could loop through each element in a form and ensure that users have entered a valid value for each before they proceed.
- Creating a new array of items in an original array that have a certain value. We check the value of each item in the original array within the loop, and if the value matches the one we’re looking for, we populate a new array with only those items. This turns the loop into a filter of sorts.
Functions
I’ve introduced you to a few functions already in a sneaky way. Here’s an example of a function that you might recognize:
alert("I've been a function all along!");
A function is a bit of code for performing a task that doesn’t run until it is referenced or called. alert() is a function built into our browser. It’s a block of code that runs only when we explicitly tell it to. In a way, we can think of a function as a variable that contains logic, in that referencing that variable will run all the code stored inside it. Functions allow code to be reused any time it is referenced so you don’t need to write it over and over.
The structure of a function:
function() {
}
All functions share a common pattern (Figure 21-6). The function name is always immediately followed by a set of parentheses (no space), then a pair of curly brackets that contains their associated code. The parentheses sometimes contain additional information used by the function called arguments. Arguments are data that can influence how the function behaves. For example, the alert() function we know so well accepts a string of text as an argument, and uses that information to populate the resulting dialog.

There are two types of functions: those that come “out of the box” (native JavaScript functions) and those that you make up yourself (custom functions). Let’s look at each.
Native functions
Hundreds of predefined functions are built into JavaScript, including these:
alert(), confirm(), and prompt()
These functions trigger browser-level dialog boxes.
Date()
Returns the current date and time.
parseInt("123")
This function will, among other things, take a string data type containing numbers and turn it into a number data type. The string is passed to the function as an argument.
setTimeout(functionName, 5000)
Executes a function after a delay. The function is specified in the first argument, and the delay is specified in milliseconds in the second argument (in the example, 5,000 milliseconds, which equals 5 seconds).
There are scores more beyond this as well. Note that names of functions are case-sensitive, so be sure to write setTimeout instead of SetTimeout.
Custom functions
To create a custom function, we type the function keyword followed by a name for the function, followed by opening and closing parentheses, followed by opening and closing curly brackets:
function name() { // Our function code goes here.
}Just as with variables and arrays, the function’s name can be anything you want, but all the same naming syntax rules apply.
If we were to create a function that just alerts some text (which is a little redundant, I know), it would look like this:
function foo() {
   alert("Our function just ran!");
  // This code won't run until we call the function 'foo()'
}
We can then call that function and execute the code inside it anywhere in our script by writing the following:
foo(); // Alerts "Our function just ran!"We can call this function any number of times throughout our code. It saves a lot of time and redundant coding.
Arguments
Having a function that executes the exact same code throughout your script isn’t likely to be all that useful. We can “pass arguments” (provide data) to native and custom functions in order to apply a function’s logic to different sets of data at different times. To hold a place for the arguments, create a variable name (or a series of comma-separated names) in the parentheses after the name of the function at the time the function is defined.
For example, let’s say we wanted to create a very simple function that alerts the number of items contained in an array. We’ve already learned that we can use .length to get the number of items in an array, so we just need a way to pass the array to be measured into our function. We do that by supplying the array to be measured as an argument. In the code, I’ve defined a new function named alertArraySize() and created the variable arr that holds a place for the argument. That variable will then be available inside the function and will contain whatever argument we pass when we call the function.
function alertArraySize(arr) {
alert(arr.length);
}
When we call that function, anything we include between the parentheses after the function name (in this case, test) will be passed to the argument with the arr placeholder as the function executes. Here we’ve defined the variable test as an array of five items. We’ve passed that variable to the function, and now that array gets plugged in and the length is returned.
var test = [1,2,3,4,5];
alertArraySize(test); // Alerts "5"
Returning a value
This part is particularly wild and incredibly useful.
It’s pretty common to use a function to calculate something and then give you back a value that you can use elsewhere in your script. We could accomplish this using what we know now, through clever application of variables, but there’s a much easier way.
The return keyword inside a function effectively turns that function into a variable with a dynamic value! This one is a little easier to show than it is to tell, so bear with me while we consider this example:
function addNumbers(a,b) {
return a + b;
}
We now have a function that accepts two arguments and adds them together. That wouldn’t be much use if the result always lived inside that function, because we wouldn’t be able to use the result anywhere else in our script. Here we use the return keyword to pass the result out of the function. Now any reference you make to that function gives you the result of the function—just like a variable would:
alert( addNumbers(2,5) ); // Alerts "7"
In a way, the addNumbers() function is now a variable that contains a dynamic value: the value of our calculation. If we didn’t return a value inside our function, the preceding script would alert undefined, just like a variable that we haven’t given a value.
The return keyword has one catch. As soon as JavaScript sees that it’s time to return a value, the function ends. Consider the following:
function bar() {
return 3;
alert("We'll never see this alert.");
}
When you call this function by using bar(), the alert on the second line never runs. The function ends as soon as it sees it’s time to return a value.
Variable Scope and the var Keyword
There are times when you’ll want a variable that you’ve defined within a function to be available anywhere throughout your script. Other times, you may want to restrict it and make it available only to the function it lives in. This notion of the availability of the variable is known as its scope. A variable that can be used by any of the scripts on your page is globally scoped, and a variable that’s available only within its parent function is locally scoped.
JavaScript variables use functions to manage their scope. If a variable is defined outside a function, it will be globally scoped and available to all scripts. When you define a variable within a function and you want it to be used only by that function, you can flag it as locally scoped by preceding the variable name with the var keyword:
var foo = "value";
To expose a variable within a function to the global scope, we omit the var keyword and simply define the variable:
foo = "value";
You need to be careful about how you define variables within functions, or you could end up with unexpected results. Take the following JavaScript snippet, for example:
function double( num ){
total = num + num;
return total;
}
var total = 10;var number = double( 20 );
alert( total ); // Alerts 40.
You may expect that because you specifically assigned a value of 10 to the variable total, the alert(total) function at the end of the script would return 10. But because we didn’t scope the total variable in the function with the var keyword, it bleeds into the global scope. Therefore, although the variable total is set to 10, the following statement runs the function and grabs the value for total defined there. Without the var, the variable “leaked out.”
As you can see, the trouble with global variables is that they’ll be shared throughout all the scripting on a page. The more variables that bleed into the global scope, the better the chances you’ll run into a “collision” in which a variable named elsewhere (in another script altogether, even) matches one of yours. This can lead to variables being inadvertently redefined with unexpected values, which can lead to errors in your script.
Remember that we can’t always control all the code in play on our page. It’s very common for pages to include code written by third parties, for example:
- Scripts to render advertisements
- User-tracking and analytics scripts
- Social media “share” buttons
It’s best not to take any chances on variable collisions, so when you start writing scripts on your own, locally scope your variables whenever you can (see the sidebar “Keeping Variables Out of the Global Scope”).
This concludes our little (OK, not so little) introductory tour of JavaScript syntax. There’s a lot more to it, but this should give you a decent foundation for learning more on your own and being able to interpret scripts when you see them. We have just a few more JavaScript-related features to tackle before we look at a few examples.
The Browser Object
In addition to being able to control elements on a web page, JavaScript also gives you access to and the ability to manipulate the parts of the browser window itself. For example, you might want to get or replace the URL that is in the browser’s address bar, or open or close a browser window.
In JavaScript, the browser is known as the window object. The window object has a number of properties and methods that we can use to interact with it. In fact, our old friend alert() is actually one of the standard browser object methods. Table 21-1 lists just a few of the properties and methods that can be used with window to give you an idea of what’s possible. For a complete list, see the Window API reference at MDN Web Docs (developer.mozilla.org/en-US/docs/Web/API/Window).
Events
JavaScript can access objects in the page and the browser window, but did you know it’s also “listening” for certain events to happen? An event is an action that can be detected with JavaScript, such as when the document loads or when the user clicks an element or just moves her mouse over it. HTML 4.0 made it possible for a script to be tied to events on the page, whether initiated by the user, the browser itself, or other scripts. This is known as event binding.
In scripts, an event is identified by an event handler. For example, the onload event handler triggers a script when the document loads, and the onclick and onmouseover handlers trigger a script when the user clicks or mouses over an element, respectively. Table 21-2 lists some of the most common event handlers. Keep in mind that these are also case-sensitive.
|
Table 21-2. Common events. |
|
|
Event handler |
Event description |
onblur |
|
onchange |
|
onclick |
The mouse clicks an object. |
onerror |
|
onfocus |
|
onkeydown |
|
onkeypress |
|
onkeyup |
|
onload |
A page or an image is finished loading. |
onmousedown |
|
onmousemove |
|
onmouseout |
|
onmouseover |
The mouse is moved over an element. |
onmouseup |
|
onsubmit |
|
There are three common methods for applying event handlers to items within our pages:
- As an HTML attribute
- As a method attached to the element
- Using addEventListener()
In the upcoming examples of the latter two approaches, we’ll use the window object. Any events we attach to window apply to the entire document. We’ll be using the onclick event in all of these as well.
As an HTML Attribute
You can specify the function to be run in an attribute in the markup, as shown in the following example:
<body onclick="myFunction();"> /* myFunction will now run when the user clicks anything within 'body' */
Although still functional, this is an antiquated way of attaching events to elements within the page. It should be avoided for the same reason we avoid using style attributes in our markup to apply styles to individual elements. In this case, it blurs the line between the semantic layer and behavioral layers of our pages, and can quickly lead to a maintenance nightmare.
As a Method
This is another somewhat dated approach to attaching events, though it does keep things strictly within our scripts. We can attach functions by using helpers already built into JavaScript:
window.onclick = myFunction; /* myFunction will run when the user clicks anything within the browser window */
We can also use an anonymous function rather than a predefined one:
window.onclick = function() {
/* Any code placed here will run when the user clicks anything within the browser window */
};
This approach has the benefit of both simplicity and ease of maintenance, but does have a fairly major drawback: we can bind only one event at a time with this method.
window.onclick = myFunction;
window.onclick = myOtherFunction;
In the example just shown, the second binding overwrites the first, so when the user clicks inside the browser window, only myOtherFunction will run. The reference to myFunction is thrown away.
addEventListener
Although a little more complex at first glance, this approach allows us to keep our logic within our scripts and allows us to perform multiple bindings on a single object. The syntax is a bit more verbose. We start by calling the addEventListener() method of the target object, and then specify the event in question and the function to be executed as two arguments:
window.addEventListener("click", myFunction);
Notice that we omit the preceding “on” from the event handler with this syntax.
Like the previous method, addEventListener() can be used with an anonymous function as well:
window.addEventListener("click", function(e) {
});
This was just a brief introduction, so I recommend getting more information on addEventListener() at the “eventTarget.addEventListener” page on the MDN Web Docs (developer.mozilla.org/en/DOM/element.addEventListener).
Putting It All Together
Now you have been introduced to many of the important building blocks of JavaScript. You’ve seen variables, data types, and arrays. You’ve met if/else statements, loops, and functions. You know your browser objects from your event handlers. That’s a lot of bits and pieces. Let’s walk through a couple of simple script examples to see how they get put together.
Example 1: A Tale of Two Arguments
Here’s a simple function that accepts two arguments and returns the greater of the two values:
greatestOfTwo( first, second ) {
if( first > second ) {
return first;
} else {
return second;
}
}
We start by naming our function greatestOfTwo. We set it up to accept two arguments, which we’ll just call “first” and “second” for want of more descriptive words. The function contains an if/else statement that returns first if the first argument is greater than the second, and returns second if it isn’t.
Example 2: The Longest Word
Here’s a function that accepts an array of strings as a single argument and returns the longest string in the array. It returns the first occurrence of one of the longest strings (in case they are of the same length).
longestWord( strings ) {
var longest = strings[0];
for( i = 1; i < strings.length; i++ ) {
if ( strings[i].length > longest.length ) {
longest = strings[i];
}
}
return longest;
}
First, we name the function and allow it to accept a single argument. Then, we set the longest variable to an initial value of the first item in the array: strings[0]. We start our loop at 1 instead of 0 since we already have the first value in the array captured. Each time we iterate through the loop, we compare the length of the current item in the array to the length of the value saved in the longest variable. If the current item in the array contains more characters than the current value of the longest variable, we change the value of longest to that item. If not, we do nothing. After the loop is complete we return the value of longest, which now contains the longest string in the array.
Learning More About JavaScript
Now that you’ve seen the basic building blocks and a few simple examples, does it whet your appetite for more? Here are a few resources to take you to the next step:
JavaScript Resources at MDN Web Docs
(developer.mozilla.org/en-US/docs/Web/JavaScript)
The folks at MDN Web Docs have assembled excellent tutorials as well as thorough documentation on all the components of JavaScript. It’s a great site to visit when you’re just starting out, and it is likely to be a go-to reference even after you have years of experience.
JavaScript for Web Designers by Mat Marquis (A Book Apart)
I can say a lot more in a book than in a chapter, so if you’re looking for a little more depth in a beginner-level manual, I wrote this book for you.
Learning JavaScript by Ethan Brown (O’Reilly)
For a deeper dive into JavaScript, this book will take you to the next level.
Why not see how you’re doing with JavaScript so far with Exercise 21-2 and a quick quiz? In the next chapter, you’ll see how we use these tools in the context of web design.
Exercise 21-2. You try it
- Let’s try out our script before we go too much further. Below where you defined the function and the variable, enter . Now save the page and reload it in your browser (Figure 21-7).
var originalTitle = document.title;
function showUnreadCount( unread ) {document.title = originalTitle + unread;
}
showUnreadCount(3);
Figure 21-7. Our title tag has changed! It’s not quite right yet, though. - Our script is working, but it’s not very easy to read. Fortunately, there’s no limit on the number of strings we can combine at once. Here we’re adding new strings that wrap the count value and the words “new messages” in parentheses (Figure 21-8).
var originalTitle = document.title;
function showUnreadCount( unread ) {document.title =
originalTitle + "(" + unread + " new messages!)";}
showUnreadCount(3);

Figure 21-8. Much better!
Test Yourself
We covered a lot of new material in this chapter. Here’s a chance to test what sunk in. You will find the answers in Appendix A.
- Name one good thing and one bad thing about linking to external .js files.
- Given the following array
var myArray = [1, "two", 3, "4"]write what the alert message will say for each of these examples:
alert( myArray[0] );alert( myArray[0] + myArray[1] );alert( myArray[2] + myArray[3] );alert( myArray[2] – myArray[0] );
- What will each of these alert messages say?
var foo = 5;foo += 5;
alert( foo );
i = 5;i++;alert( i );var foo = 2;alert( foo + " " + "remaining");
var foo = "Mat";var bar = "Jennifer";if( foo.length > bar.length ) {alert( foo + " is longer." );} else {alert( bar + " is longer." );}alert( 10 === "10" );
- Describe what this does:
for( var i = 0; i < items.length; i++ ) { } - What is the potential problem with globally scoped variables?
- Match each event handler with its trigger.
|
a. |
1. The user finishes a form and hits the submit button. |
|
b. |
2. The page finishes loading. |
|
c. |
3. The pointer hovers over a link. |
|
d. |
4. A text-entry field is selected and ready for typing. |
|
e. |
5. A user changes her name in a form field. |