by Mat Marquis
Now that you have a sense for the language of JavaScript, let’s look at some of the ways we can put it to use in modern web design. First, we’ll explore DOM scripting, which allows us to manipulate the elements, attributes, and text on a page. I’ll introduce you to some ready-made JavaScript and DOM scripting resources, so you don’t have to go it alone. You’ll learn about polyfills, which provide older browsers with modern features and normalize functionality. I’ll also introduce you to JavaScript libraries that make developers’ lives easier with collections of polyfills and shortcuts for common tasks.
Meet the DOM
You’ve seen references to the Document Object Model (DOM for short) several times throughout this book, but now is the time to give it the attention it deserves. The DOM gives us a way to access and manipulate the contents of a document. We commonly use it for HTML, but the DOM can be used with any XML language as well. And although we’re focusing on its relationship with JavaScript, it’s worth noting that the DOM can be accessed by other languages too, such as PHP, Ruby, C++, and more. Although DOM Level 1 was released by the W3C in 1998, it was nearly five years later that DOM scripting began to gain steam.
The DOM gives us a way to access and manipulate the contents of a document.
The DOM is a programming interface (an API) for HTML and XML pages. It provides a structured map of the document, as well as a set of methods to interface with the elements contained therein. Effectively, it translates our markup into a format that JavaScript (and other languages) can understand. It sounds pretty dry, I know, but the basic gist is that the DOM serves as a map to all the elements on a page and lets us do things with them. We can use it to find elements by their names or attributes, and then add, modify, or delete elements and their content.
Without the DOM, JavaScript wouldn’t have any sense of a document’s contents—and by that, I mean the entirety of the document’s contents. Everything from the page’s doctype to each individual letter in the text can be accessed via the DOM and manipulated with JavaScript.
The Node Tree
A simple way to think of the DOM is in terms of the document tree as diagrammed in Figure 22-1. You saw documents diagrammed in this way when you were learning about CSS selectors.
<!DOCTYPE html>
<html>
<head>
<title>Document title</title>
<meta charset="utf-8">
</head>
<body>
<div>
<h1>Heading</h1>
<p>Paragraph text with a <a href="foo.html">link</a> here.</p>
</div>
<div>
<p>More text here.</p>
</div>
</body>
</html>
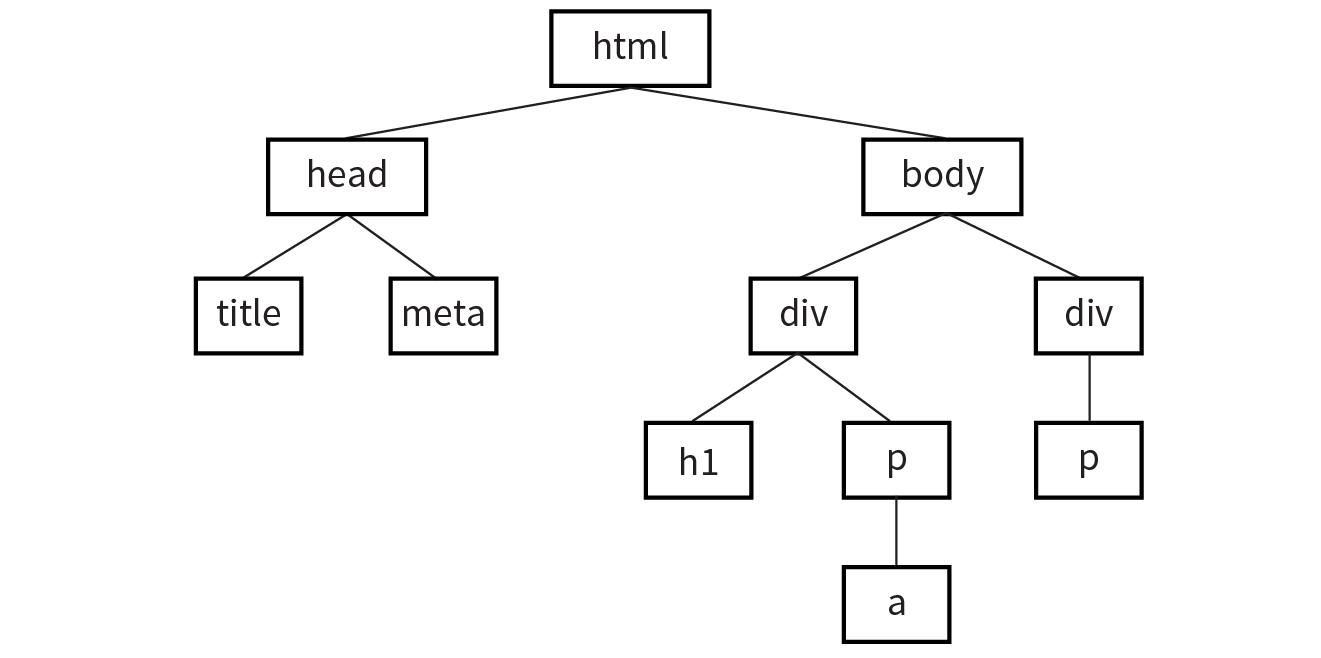
Each element within the page is referred to as a node. If you think of the DOM as a tree, each node is an individual branch that can contain further branches. But the DOM allows deeper access to the content than CSS because it treats the actual content as a node as well. Figure 22-2 shows the structure of the first p element. The element, its attributes, and its contents are all nodes in the DOM’s node tree.

The DOM also provides a standardized set of methods and functions through which JavaScript can interact with the elements on our page. Most DOM scripting involves reading from and writing to the document.
There are several ways to use the DOM to find what you want in a document. Let’s go over some of the specific methods we can use for accessing objects defined by the DOM (we JS folks call this “crawling the DOM” or “traversing the DOM”), as well as some of the methods for manipulating those elements.
Accessing DOM Nodes
The document object in the DOM identifies the page itself, and more often than not will serve as the starting point for our DOM crawling. The document object comes with a number of standard properties and methods for accessing collections of elements. This is reminiscent of the length property we learned about in Chapter 21, Introduction to JavaScript. Just as length is a standard property of all arrays, the document object comes with a number of built-in properties containing information about the document. We then wind our way to the element we’re after by chaining those properties and methods together, separated by periods, to form a sort of route through the document.
To give you a general idea of what I mean, the statement in this example says to look on the page (document), find the element that has the id value “beginner”, find the HTML content within that element (innerHTML), and save those contents to a variable (foo):
var foo = document.getElementById("beginner").innerHTML;
Because the chains tend to get long, it is also common to see each property or method broken onto its own line to make it easier to read at a glance. Remember, whitespace in JavaScript is ignored, so this has no effect on how the statement is parsed.
var foo = document
.getElementById("beginner")
.innerHTML;
There are several methods for accessing nodes in the document.
By element name
getElementsByTagName()
We can access individual elements by the tags themselves, using document.getElementsByTagName(). This method retrieves any element or elements you specify as an argument.
For example, document.getElementsByTagName("p") returns every paragraph on the page, wrapped in something called a collection or nodeList, in the order they appear in the document from top to bottom. nodeLists behave much like arrays. To access specific paragraphs in the nodeList, we reference them by their index, just like an array.
var paragraphs = document.getElementsByTagName("p");
Based on this variable statement, paragraphs[0] is a reference to the first paragraph in the document, paragraphs[1] refers to the second, and so on. If we had to access each element in the nodeList separately, one at a time…well, it’s a good thing we learned about looping through arrays earlier. Loops work the exact same way with a nodeList.
var paragraphs = document.getElementsByTagName("p");
for( var i = 0; i < paragraphs.length; i++ ) {
// do something
}
Now we can access each paragraph on the page individually by referencing paragraphs[i] inside the loop, just as with an array, but with elements on the page instead of values.
By id attribute value
getElementById()
This method returns a single element based on that element’s ID (the value of its id attribute), which we provide to the method as an argument. For example, to access this particular image
<img src="photo.jpg" alt="" id="lead-photo">
we include the id value as an argument for the getElementById() method:
var photo = document.getElementById("lead-photo");
By class attribute value
getElementsByClassName()
Warning
This is a relatively new method for accessing DOM nodes. Although is available in the current versions of modern browsers, it will not work in IE8 or below.
Just as it says on the tin, this allows you to access nodes in the document based on the value of a class attribute. This statement assigns any element with a class value of “column-a” to the variable firstColumn so it can be accessed easily from within a script:
var firstColumn = document.getElementsByClassName("column-a");
Like getElementsByTagName(), this returns a nodeList that we can reference by index or loop through one at a time.
By selector
querySelectorAll()
Warning
isn’t supported in IE7 or below.
querySelectorAll() allows you to access nodes of the DOM based on a CSS-style selector. The syntax of the arguments in the following examples should look familiar to you. It can be as simple as accessing the child elements of a specific element:
var sidebarPara = document.querySelectorAll(".sidebar p");
or as complex as selecting an element based on an attribute:
var textInput = document.querySelectorAll("input[type='text']");
querySelectorAll() returns a nodeList, like getElementsByTagName() and getElementsByClassName(), even if the selector matches only a single element.
Accessing an attribute value
getAttribute()
As I mentioned earlier, elements aren’t the only thing you can access with the DOM. To get the value of an attribute attached to an element node, we call getAttribute() with a single argument: the attribute name. Let’s assume we have an image, stratocaster.jpg, marked up like this:
<img src="stratocaster.jpg" alt="electric guitar" id="lead-image">
In the following example, we access that specific image (getElementbyId()) and save a reference to it in a variable (“bigImage”). At that point, we could access any of the element’s attributes (alt, src, or id) by specifying it as an argument in the getAttribute() method. In the example, we get the value of the src attribute and use it as the content in an alert message. (I’m not sure why we would ever do that, but it does demonstrate the method.)
var bigImage = document.getElementById("lead-image");
alert( bigImage.getAttribute("src") ); // Alerts "stratocaster.jpg".
Manipulating Nodes
Once we’ve accessed a node by using one of the methods discussed previously, the DOM gives us several built-in methods for manipulating those elements, their attributes, and their contents.
setAttribute()
To continue with the previous example, we saw how we get the attribute value, but what if we wanted to set the value of that src attribute to a new pathname altogether? Use setAttribute()! This method requires two arguments: the attribute to be changed and the new value for that attribute.
In this example, we use a bit of JavaScript to swap out the image by changing the value of the src attribute:
var bigImage = document.getElementById("lead-image");
bigImage.setAttribute("src", "lespaul.jpg");Just think of all the things you could do with a document by changing the values of attributes. Here we swapped out an image, but we could use this same method to make a number of changes throughout our document:
- Update the checked attributes of checkboxes and radio buttons based on user interaction elsewhere on the page.
- Find the link element for our .css file and point the href value to a different style sheet, changing all the page’s styles.
- Update a title attribute with information on an element’s state (“this element is currently selected,” for example).
innerHTML
innerHTML gives us a simple method for accessing and changing the text and markup inside an element. It behaves differently from the methods we’ve covered so far. Let’s say we need a quick way of adding a paragraph of text to the first element on our page with a class of intro:
var introDiv = document.getElementsByClassName("intro");
introDiv[0].innerHTML = "<p>This is our intro text</p>";The second statement here adds the content of the string to introDiv (an element with the class value “intro”) as a real live element because innerHTML tells JavaScript to parse the strings “<p>” and “</p>” as markup.
style
The DOM also allows you to add, modify, or remove a CSS style from an element by using the style property. It works similarly to applying a style with the inline style attribute. The individual CSS properties are available as properties of the style property. I bet you can figure out what these statements are doing by using your new CSS and DOM know-how:
document.getElementById("intro").style.color = "#fff";
document.getElementById("intro").style.backgroundColor = "#f58220";
//orange
In JavaScript and the DOM, property names that are hyphenated in CSS (such as background-color and border-top-width) become camel case (backgroundColor and borderTopWidth, respectively) so the “–” character isn’t mistaken for an operator.
In the examples you’ve just seen, the style property is used to set the styles for the node. It can also be used to get a style value for use elsewhere in the script. This statement gets the background color of the #intro element and assigns it to the brandColor variable:
var brandColor = document.getElementById("intro").style.backgroundColor;
Adding and Removing Elements
So far, we’ve seen examples of getting and setting nodes in the existing document. The DOM also allows developers to change the document structure itself by adding and removing nodes on the fly. We’ll start out by creating new nodes, which is fairly straightforward, and then we’ll see how we add the nodes we’ve created to the page. The methods shown here are more surgical and precise than adding content with innerHTML. While we’re at it, we’ll remove nodes, too.
createElement()
To create a new element, use the aptly named createElement() method. This function accepts a single argument: the element to be created. Using this method is a little counterintuitive at first because the new element doesn’t appear on the page right away. Once we create an element in this way, that new element remains floating in the JavaScript ether until we add it to the document. Think of it as creating a reference to a new element that lives purely in memory—something that we can manipulate in JavaScript as we see fit, and then add to the page once we’re ready:
var newDiv = document.createElement("div");
createTextNode()
If we want to enter text into either an element we’ve created or an existing element on the page, we can call the createTextNode() method. To use it, provide a string of text as an argument, and the method creates a DOM-friendly version of that text, ready for inclusion on the page. Like createElement(), this creates a reference to the new text node that we can store in a variable and add to the page when the time comes:
var ourText = document.createTextNode("This is our text.");
appendChild()
So we’ve created a new element and a new string of text, but how do we make them part of the document? Enter the appendChild() method. This method takes a single argument: the node you want to add to the DOM. You call it on the existing element that will be its parent in the document structure. Time for an example.
Here we have a simple div on the page with the id “our-div”:
<div id="our-div"></div>
Let’s say we want to add a paragraph to #our-div that contains the text “Hello, world!” We start by creating the p element (document.createElement()) as well as a text node for the content that will go inside it (createTextNode()):
var ourDiv = document.getElementById("our-div");
var newParagraph = document.createElement("p");
var copy = document.createTextNode("Hello, world!");
Now we have our element and some text, and we can use appendChild() to put the pieces together:
newParagraph.appendChild( copy );
ourDiv.appendChild( newParagraph );
The first statement appends copy (that’s our “Hello, world!” text node) to the new paragraph we created (newParagraph), so now that element has some content. The second line appends the newParagraph to the original div (ourDiv). Now ourDiv isn’t sitting there all empty in the DOM, and it will display on the page with the content “Hello, world!”
You should be getting the idea of how it works. How about a couple more?
insertBefore()
The insertBefore() method, as you might guess, inserts an element before another element. It takes two arguments: the first is the node that gets inserted, and the second is the element it gets inserted in front of. You also need to know the parent to which the element will be added.
So, for example, to insert a new heading before the paragraph in this markup
<div id="our-div">
<p id="our-paragraph">Our paragraph text</p>
</div>
we start by assigning variable names to the div and the p it contains, and then create the h1 element and its text node and put them together, just as we saw in the last example:
var ourDiv = document.getElementById("our-div");
var para = document.getElementById("our-paragraph");
var newHeading = document.createElement("h1");
var headingText = document.createTextNode("A new heading");
newHeading.appendChild( headingText );
// Add our new text node to the new heading
Finally, in the last statement shown here, the insertBefore() method places the newHeading h1 element before the para element inside ourDiv.
ourDiv.insertBefore( newHeading, para ); replaceChild()
The replaceChild() method replaces one node with another and takes two arguments. The first argument is the new child (i.e., the node you want to end up with). The second is the node that gets replaced by the first. As with insertBefore(), you also need to identify the parent element in which the swap happens. For the sake of simplicity, let’s say we start with the following markup:
<div id="our-div">
<div id="swap-me"></div>
</div>
And we want to replace the div with the id “swap-me” with an image. We start by creating a new img element and setting the src attribute to the pathname to the image file. In the final statement, we use replaceChild() to put newImg in place of swapMe.
var ourDiv = document.getElementById("our-div");
var swapMe = document.getElementById("swap-me");
var newImg = document.createElement("img");
// Create a new image element
newImg.setAttribute( "src", "path/to/image.jpg" );
// Give the new image a "src" attribute
ourDiv.replaceChild( newImg, swapMe ); removeChild()
To paraphrase my mother, “We brought these elements into this world, and we can take them out again.” You remove a node or an entire branch from the document tree with the removeChild() method. The method takes one argument, which is the node you want to remove. Remember that the DOM thinks in terms of nodes, not just elements, so the child of an element may be the text (node) it contains, not just other elements.
Like appendChild(), the removeChild() method is always called on the parent element of the element to be removed (hence, “remove child”). That means we’ll need a reference to both the parent node and the node we’re looking to remove. Let’s assume the following markup pattern:
<div id="parent">
<div id="remove-me">
<p>Pssh, I never liked it here anyway.</p>
</div>
</div>
Our script would look something like this:
var parentDiv = document.getElementById("parent");
var removeMe = document.getElementById("remove-me");
parentDiv.removeChild( removeMe );
// Removes the div with the id "remove-me" from the page.
For Further Reading
That should give you a good idea of what DOM scripting is all about. Of course, I’ve just barely scratched the surface of what can be done with the DOM, but if you’d like to learn more, definitely check out the book DOM Scripting: Web Design with JavaScript and the Document Object Model, Second Edition, by Jeremy Keith and Jeffrey Sambells (Friends of Ed).
Polyfills
You’ve gotten familiar with a lot of new technologies in this book so far: new HTML5 elements, new ways of doing things with CSS3, using JavaScript to manipulate the DOM, and more. In a perfect world, all browsers would be in lockstep, keeping up with the cutting-edge technologies and getting the established ones right along the way (see the sidebar “The Browser Wars”). In that perfect world, browsers that couldn’t keep up (I’m looking at you, IE8) would just vanish completely. Sadly, that is not the world we live in, and browser inadequacies remain the thorn in every developer’s side.
I’ll be the first to admit that I enjoy a good wheel reinvention. It’s a great way to learn, for one thing. For another, it’s the reason our cars aren’t rolling around on roundish rocks and sections of tree trunk. But when it comes to dealing with every strange browser quirk out there, we don’t have to start from scratch. Tons of people smarter than I am have run into these issues before, and have already found clever ways to work around them and fix the parts of JavaScript and the DOM where some browsers may fall short. We can use JavaScript to fix JavaScript.
Polyfill is a term coined by Remy Sharp to describe a JavaScript “shim” that normalizes differing behavior from browser to browser (remysharp.com/2010/10/08/what-is-a-polyfill). Or, as Paul Irish put it, a polyfill is
A shim that mimics a future API providing fallback functionality to older browsers.
There’s a lot of time travel going on in that quote, but basically what he’s saying is that we’re making something new work in browsers that don’t natively support it—whether that’s brand-new technology like detecting a user’s physical location or fixing something that one of the browsers just plain got wrong.
There are tons of polyfills out there targeted to specific tasks, such as making old browsers recognize new HTML5 elements or CSS3 selectors, and new ones are popping up all the time as new problems arise. I’m going to fill you in on the most commonly used polyfills in the modern developer’s toolbox as of the release of this book. You may find that new ones are necessary by the time you hit the web design trenches. You may also find that some of these techniques aren’t needed for the browsers you need to support.
HTML5 shim (or shiv)
Note
If you don’t need to support IE8 and earlier, you don’t need an HTML5 shim.
You may remember seeing this one back in Chapter 5, Marking Up Text but let’s give it a little more attention now that you have some JavaScript under your belt.
An HTML5 shim/shiv is used to enable Internet Explorer 8 and earlier to recognize and style newer HTML5 elements such as article, section, and nav.
There are several variations on the HTML5 shim/shiv, but they all work in much the same way: crawl the DOM looking for elements that IE doesn’t recognize, and then immediately replace them with the same element so they are visible to IE in the DOM. Now any styles we write against those elements work as expected. Sjoerd Visscher originally discovered this technique, and many, many variations of these scripts exist now. Remy Sharp’s version is the one in widest use today.
The shim must be referenced in the head of the document, in order to “tell” Internet Explorer about these new elements before it finishes rendering the page. The script is referenced inside an IE-specific conditional comment and runs only if the browser is less than (lt) IE9—in other words, versions 8 and earlier:
<!--[if lt IE 9]>
<script src="html5shim.js"></script>
<![endif]-->
The major caveat here is that older versions of Internet Explorer that have JavaScript disabled or unavailable will receive unstyled elements. To learn more about HTML5 shim/shiv, try these resources:
- The Wikipedia entry for HTML Shiv (en.wikipedia.org/wiki/HTML5_Shiv)
- Remy Sharp’s original post
(remysharp.com/2009/01/07/html5-enabling-script)
Selectivizr
Note
If you don’t need to support IE8 and earlier, you don’t need Selectivizr.
Selectivizr (created by Keith Clark) allows Internet Explorer 6–8 to understand complex CSS3 selectors such as :nth-child and ::first-letter. It uses JavaScript to fetch and parse the contents of your style sheet and patch holes where the browser’s native CSS parser falls short.
Selectivizr must be used with a JavaScript library (I talk about them in the next section). The link to the script goes in an IE conditional comment after the link to the library .js file, like so:
<script type="text/javascript" src="[JS library]"></script><!--[if (gte IE 6)&(lte IE 8)]>
<script type="text/javascript" src="selectivizr.js"></script>
<noscript><link rel="stylesheet" href="[fallback css]" /></noscript><![endif]-->
Because we’re forgoing the native CSS parser here, we may see a slight performance hit in applicable browsers. See the Selectivizr site (selectivizr.com) for more information.
Picturefill (A Responsive Image Polyfill)
Picturefill enables support for the picture element, srcset and sizes attributes, and features related to delivering images based on viewport size and resolution (also known as responsive images, as discussed in Chapter 7, Adding Images). It was created by Scott Jehl of Filament Group and is maintained by the Picturefill group.
To use Picturefill, download the script and add it to the head of the document. The first script creates a picture element for browsers that don’t recognize it. The second script calls the Picturefill script itself and the async attribute tells the browser it can load Picturefill asynchronously—that is, without waiting for the script to finish before loading the rest of the document.
<head>
<script>
// Picture element HTML5 shiv
document.createElement( "picture" );
</script>
<script src="picturefill.js" async></script>
</head>
On the downside, browsers without JavaScript that also do not support the picture element will see only alt-text for the image. Download Picturefill and get information about its use at scottjehl.github.io/picturefill/.
JavaScript Libraries
Continuing on the “you don’t have to write everything from scratch yourself” theme, it’s time to take on JavaScript libraries. A JavaScript library is a collection of prewritten functions and methods that you can use in your scripts to accomplish common tasks or simplify complex ones.
There are many JS libraries out there. Some are large frameworks that include all of the most common polyfills, shortcuts, and widgets you’d ever need to build full-blown Ajax web applications (see the sidebar “What Is Ajax?”). Some are targeted at specific tasks, such as handling forms, animation, charts, or math functions. For seasoned JavaScript-writing pros, starting with a library is an awesome time-saver. And for folks like you who are just getting started, a library can handle tasks that might be beyond the reach of your own skills.
The disadvantage of libraries is that because they generally contain all of their functionality in one big .js file, you may end up forcing your users to download a lot of code that never gets used. But the library authors are aware of this and have made many of their libraries modular, and they continue to make efforts to optimize their code. In some cases, it’s also possible to customize the script and use just the parts you need.
jQuery and Other Libraries
As of this writing, the overwhelmingly dominant JavaScript library is jQuery (jquery.com). Chances are, if you use a library, it will be that one (or at least that one first). Written in 2005 by John Resig, jQuery has found its way into over two-thirds of all websites. Furthermore, if a site uses a library at all, there is a 97% chance that it’s jQuery.
It is free, it’s open source, and it employs a syntax that makes it easy to use if you are already handy with CSS, JavaScript, and the DOM. You can supplement jQuery with the jQuery UI library, which adds cool interface elements such as calendar widgets, drag-and-drop functionality, expanding accordion lists, and simple animation effects. jQuery Mobile is another jQuery-based library that provides UI elements and polyfills designed to account for the variety of mobile browsers and their notorious quirks.
Of course, jQuery isn’t the only library in town. Others include MooTools (mootools.net), Dojo (dojotoolkit.org), and Prototype (prototypejs.org). As for smaller JS libraries that handle specialized functions, because they are being created and made obsolete all the time, I recommend doing a web search for “JavaScript libraries for _____________” and see what is available. Some library categories include the following:
- Forms
- Animation
- Image carousels
- Games
- Information graphics
- Image and 3-D effects for the canvas element
- String and math functions
- Database handling
- Touch gestures
How to Use jQuery
It’s easy to implement any of the libraries I just listed. All you do is download the JavaScript (.js) file, put it on your server, point to it in your script tag, and you’re good to go. It’s the .js file that does all the heavy lifting, providing prewritten functions and syntax shortcuts. Once you’ve included it, you can write your own scripts that leverage the features built into the framework. Of course, what you actually do with it is the interesting part (and largely beyond the scope of this chapter, unfortunately).
As a member of the jQuery Mobile team, I have a pretty obvious bias here, so we’re going to stick with jQuery in the upcoming examples. Not only is it the most popular library anyway, but they said they’d give me a dollar every time I say “jQuery.”
Download the jQuery .js file
To get started with jQuery (cha-ching), go to jQuery.com and hit the big Download button to get your own copy of jquery.js. You have a choice between a production version that has all the extra whitespace removed for a smaller file size, or a development version that is easier to read but nearly eight times larger in file size. The production version should be just fine if you are not going to edit it yourself.
Copy the code, paste it into a new plain-text document, and save it with the same filename that you see in the address bar in the browser window. As of this writing, the latest version of jQuery is 3.2.1, and the filename of the production version is jquery-3.2.1.min.js (the min stands for “minimized”). Put the file in the directory with the other files for your site. Some developers keep their scripts in a js directory for the sake of organization, or they may simply keep them in the root directory for the site. Wherever you decide put it, be sure to note the pathname to the file because you’ll need it in the markup.
Add it to your document
Include the jQuery script the same way you’d include any other script in the document, with a script element:
<script src="pathtoyourjs/jquery-3.2.1.min.js"></script>
And that’s pretty much it. There is an alternative worth mentioning, however. If you don’t want to host the file yourself, you can point to one of the publicly hosted versions and use it that way. One advantage to this method is that it gets cached by the browser, so there’s a chance some of your users’ browsers already have a copy of it. The jQuery Download page lists a few options, including the following link to the code on Google’s server. Simply copy this code exactly as you see it here, paste it into the head of the document or before the </body> tag, and you’ve got yourself some jQuery!
<script src="https://ajax.googleapis.com/ajax/libs/jquery/3.2.1/→jquery.min.js"></script>
Get “ready”
You don’t want to go firing scripts before the document and the DOM are ready for them, do you? Well, jQuery has a statement known as the ready event that checks the document and waits until it’s ready to be manipulated. Not all scripts require this (for example, if you were only firing a browser alert), but if you are doing anything with the DOM, it is a good idea to start by setting the stage for your scripts by including this function in your custom script or .js file:
<script src="pathtoyourjs/jquery-3.2.1.min.js"></script>
<script>
$(document).ready(function(){ // Your code here
});</script>
Scripting with jQuery
Once you’re set up, you can begin writing your own scripts using jQuery. The shortcuts jQuery offers break down into two general categories:
- A giant set of built-in feature detection scripts and polyfills
- A shorter, more intuitive syntax for targeting elements
(jQuery’s selector engine)
You should have a decent sense of what the polyfills do after making your way through that last section, so let’s take a look at what the selector engine does for you.
One of the things that jQuery simplifies is moving around through the DOM because you can use the selector syntax that you learned for CSS. Here is an example of getting an element by its id value without a library:
var paragraph = document.getElementById( "status" );
The statement finds the element with the ID “status” and saves a reference to the element in a variable (paragraph). That’s a lot of characters for a simple task. You can probably imagine how things get a little verbose when you’re accessing lots of elements on the page. Now that we have jQuery in play, however, we can use this shorthand:
var paragraph = $("#status");
That’s right—that’s the id selector you know and love from writing CSS. And it doesn’t just stop there. Any selector you’d use in CSS will work within that special helper function.
You want to find everything with a class of header? Use $(".header");.
By the element’s name? Sure: $("div");.
Every subhead in your sidebar? Easy-peasy: $("#sidebar .sub");.
You can even target elements based on the value of attributes: $("[href='http://google.com']");.
But it doesn’t stop with selectors. We can use a huge number of helper functions built into jQuery and libraries like it to crawl the DOM like so many, uh, Spider-men. Spider-persons. Web-slingers.
jQuery also allows us to chain objects together in a way that can target things even CSS can’t (an element’s parent element, for example). Let’s say we have a paragraph and we want to add a class to that paragraph’s parent element. We don’t necessarily know what that parent element will be, so we’re unable to target the parent element directly. In jQuery we can use the parent() object to get to it:
$("p.error").parent().addClass("error-dialog");
Another major benefit is that this is highly readable at a glance: “find any paragraph(s) with the class ‘error’ and add the class ‘error-dialog’ to their parent(s).”
But What If I Don’t Know How to Write Scripts?
It takes time to learn JavaScript, and it may be a while before you can write scripts on your own. But not to worry. If you do a web search for what you need (for example, “jQuery image carousel” or “jQuery accordion list”), there’s a very good chance you will find lots of scripts that people have created and shared, complete with documentation on how to use them. Because jQuery uses a selector syntax very similar to CSS, it makes it easier to customize jQuery scripts for use with your own markup.
Big Finish
In all of two chapters, we’ve gone from learning the very basics of variables to manipulating the DOM to leveraging a JavaScript library. Even with all we’ve covered here, we’ve just barely begun to cover all the things JavaScript can do.
The next time you’re looking at a website and it does something cool, view the source in your browser and have a look around for the JavaScript. You can learn a lot from reading and even taking apart someone else’s code. And remember, there’s nothing you can break with JavaScript that can’t be undone with a few strokes of the Delete key.
Better still, JavaScript comes with an entire community of passionate developers who are eager to learn and just as eager to teach. Seek out like-minded developers and share the things you’ve learned along the way. If you’re stuck on a tricky problem, don’t hesitate to seek out help and ask questions. It’s rare that you’ll encounter a problem that nobody else has, and the open source developer community is always excited to share the things they’ve learned. That’s why you’ve had to put up with me for two chapters, as a matter of fact.
Test Yourself
Just a few questions for those of you playing along at home. If you need some help, peek in Appendix A for the answers.
- Ajax is a combination of what technologies?
- What does this do?
document.getElementById("main") - What does this do?
document.getElementById("main").getElementsByTagName("section"); - What does this do?
document.body.style.backgroundColor = "papayawhip" - What does this do? (This one is a little tricky because it nests functions, but you should be able to piece it together.)
document
  .getElementById("main")
    .appendChild(
      document.createElement("p")
        .appendChild(
          documentCreateTextNode("Hey, I'm walking here!")
        )
); - What is the benefit of using a JavaScript library such as jQuery?
- Access to a packaged collection of polyfills
- Possibly shorter syntax
- Simplified Ajax support
- All of the above