This chapter focuses on assertions. Assertions mark boundaries, but they don’t consume
characters—that is, characters will not be returned in a result. They are
also known as zero-width assertions. A zero-width assertion doesn’t match a character, per se, but
rather a location in a string. Some of these, such as ^ and $, are
also called anchors.
The boundaries I'll talk about in this chapter are:
The beginning and end of a line or string
Word boundaries (two kinds)
The beginning and end of a subject
Boundaries that quote string literals
To start, I’ll use RegExr again, but this time, for variety, I’ll use the Safari browser (however, you can use any browser you like). I’ll also use the same text I used last time: the first 12 lines of rime.txt. Open the Safari browser with http://gskinner.com/regexr and copy the first 12 lines of rime.txt from the code archive into the lower box.
As you have seen a number of times already, to match the beginning of a line or string, use the caret or circumflex (U+005E):
^
Depending on the context, a ^
will match the beginning of a line or string, sometimes a whole document.
The context depends on your application and what options you are using
with that application.
To match the end of a line or string, as you know, use the dollar sign:
$
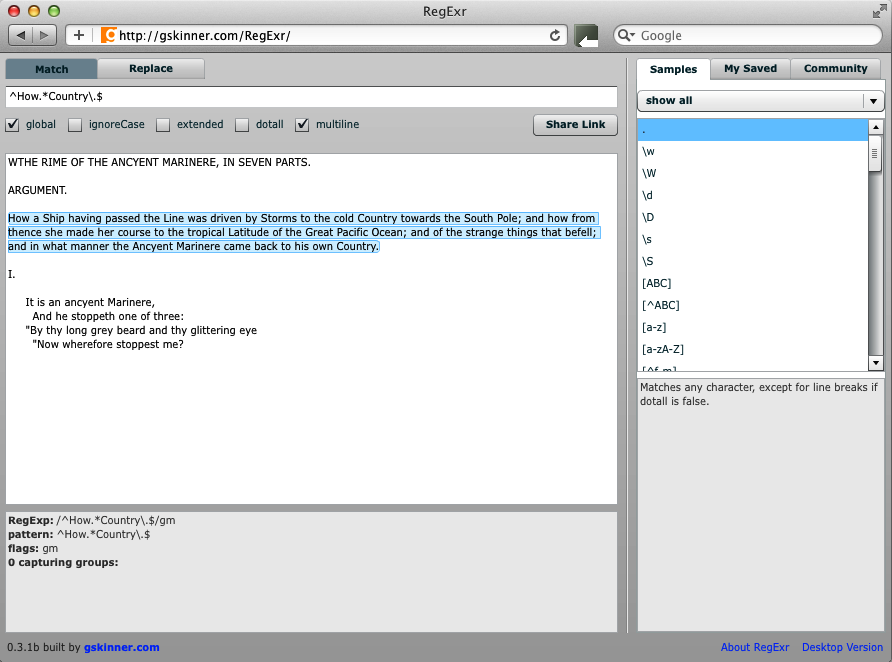
In RegExr, make sure that multiline is checked. global is checked by default when you open RegExr, but you can leave it checked or unchecked for this example. When multiline is not checked, the entire target is considered one string.
In the upper text box, enter this regular expression:
^How.*Country\.$
This will match the entire line beginning with the word How. Notice that the period or dot at the end is preceded by a backslash. This escapes the dot so that it is interpreted as a literal. If it was not escaped, what would it match? Any character. If you want to match a literal dot, you have to either escape it or put it in a character class (see Chapter 5).
If you uncheck multiline, then what happens? The highlighting is turned off. With it unchecked and dotall checked, enter:
^THE.*\?$
and you’ll see that it matches all the text.
The dotall option means that the dot will match newlines in addition to all other characters. Uncheck dotall, and the expression matches nothing. However, the following:
^THE.*
will match the first line. Click dotall again,
and all text is matched again. The \?$
is not required to match to the end of the text.
You have already seen \b used
several times. It marks a word boundary. Try:
\bTHE\b
and it will match both occurrences of THE in
the first line (with global checked). Like, ^ or $,
\b is a zero-width assertion. It may
appear to match things like a space or the beginning of a line, but in
actuality, what it matches is a zero-width nothing. Did you notice that
the spaces around the second THE are not highlighted?
That is because they are not part of the match. Not the easiest thing to
grasp, but you’ll get it by seeing what it does and does not do.
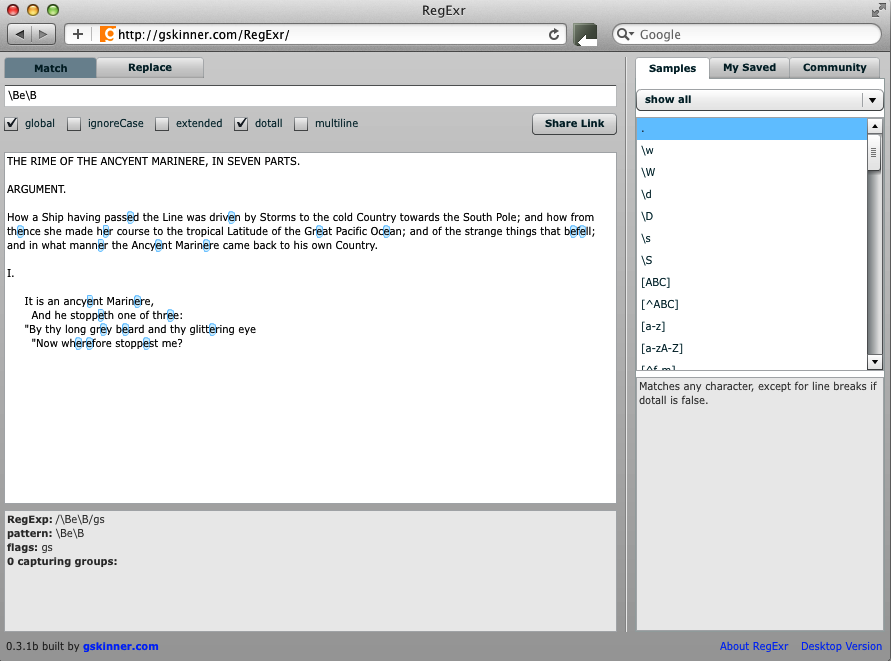
You can also match non-word boundaries. A non-word boundary matches locations that are not equivalent to a word boundary, like a letter or a number within a word or string. To match a non-word boundary, give this a spin:
\Be\B
and watch what it matches (see Figure 3-2). You’ll see that it matches a lowercase e when it is surrounded by other letters or non-word characters. Being a zero-width assertion, it does not match the surrounding characters, but it recognizes when the literal e is surrounded by non-word boundaries.
In some applications, another way for specifying a word boundary is with:
\<
for the beginning of a word, and with:
\>
for the end of the word. This is an older syntax, not available in
most recent regex applications. It is useful in some instances because,
unlike \b, which matches
any word boundary, this syntax allows you to match
either the beginning or ending of a word.
If you have vi or vim on your system, you can try this out with that editor. Just follow these steps. They’re easy even if you have never used vim before. In a command or shell window, change directories to where the poem is located and then open it with:
vim rime.txt
Then enter the following search command:
/\>
and press Enter or Return. The forward slash (/) is the way you begin a search in vim.
Watch the cursor and you’ll see that this search will find the ends of
words. Press n to repeat the search. Next
enter:
/\<
followed by Enter or Return. This time the search will find the
beginning of words. To exit vim, just type ZZ.
This syntax also works with grep. Since the early 1970s, grep like sed has been a Unix mainstay. (In the 1980s, I had a coworker who had a vanity license plate that said GREP.) Try this command from a shell prompt:
grep -Eoc '\<(THE|The|the)\>' rime.txt
The -E option indicates that you want to use extended regular expressions
(EREs) rather than the basic regular expressions (BREs) which are used by grep by default. The -o option
means you want to show in the result only that part of the line that
matches the pattern, and the -c option
means only return a count of the result. The pattern in
single quotes will match either THE,
The, or the as whole words.
That’s what the \< and \> help you find.
This command will return:
259
which is the count of the words found.
On the other hand, if you don’t include the \< and \>, you get a different result. Do it this
way:
grep -Eoc '(THE|The|the)' rime.txt
and you will get a different number:
327
Why? Because the pattern will match only whole words, plus
any sequence of characters that contain the word. So
that is one reason why the \< and
\> can come in handy.
Similar to the ^ anchor is the
following, a shorthand that matches the start of a
subject:
\A
This is not available with all regex implementations, but you can get it
with Perl and PCRE (Perl Compatible Regular
Expressions), for example. To match the end of a subject, you can use
\A’s companion.
\Z
\z
pcregrep is a version of grep for the PCRE library. (See Technical Notes to find out where to get it.) Once installed, to try this syntax with pcregrep, you could do something like this:
pcregrep -c '\A\s*(THE|The|the)' rime.txt
which will return a count (-c) of
108 occurrences of the word the (in
three cases) which occur near the beginning of a line, preceded by
whitespace (zero or more). Next enter this command:
pcregrep -n '(MARINERE|Marinere)(.)?\Z' rime.txt
This matches either MARINERE or Marinere at the end of a line (subject) and is followed by any optional character, which in this case is either a punctuation mark or the letter S. (The parentheses around the dot are not essential.)
You’ll see this output:
1:THE RIME OF THE ANCYENT MARINERE,
10:     It is an ancyent Marinere,
38:       The bright-eyed Marinere.
63:       The bright-eyed Marinere.
105:     "God save thee, ancyent Marinere!
282:     "I fear thee, ancyent Marinere!
702:     He loves to talk with Marineres
The -n option with pcregrep gives you the line
numbers at the beginning of each line of output. The command line options
of pcregrep are very similar to those of
grep. To see them, do:
pcre --help
You can use these sequences to quote a set of characters as literals:
\Q
and
\E
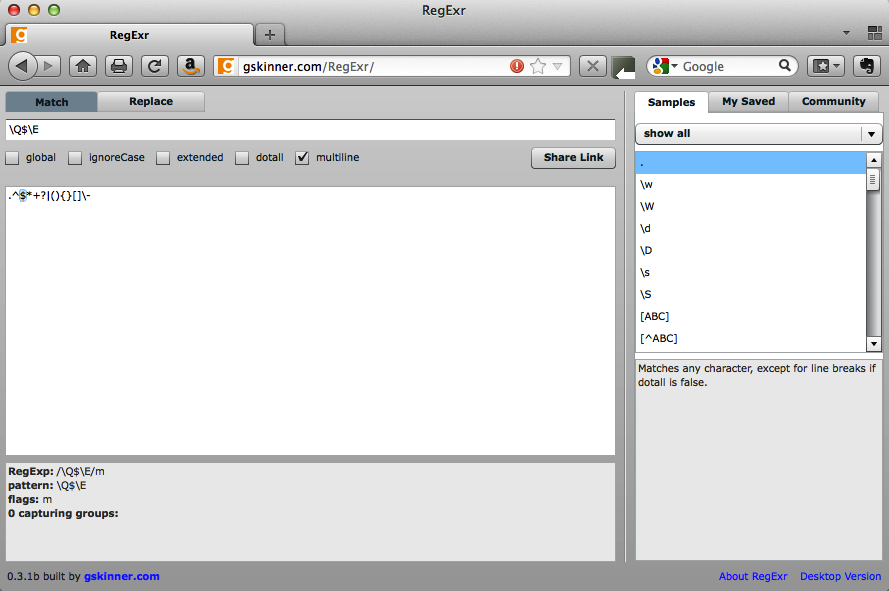
To show you how this works, enter the following metacharacters in the lower box of RegExr:
.^$*+?|(){}[]\-These 15 metacharacters are treated as special characters in regular expressions, used for encoding a pattern. (The hyphen is treated specially, as signifying a range, inside of the square brackets of a character class. Otherwise, it’s not special.)
If you try to match those characters in the upper text box of RegExr, nothing will happen. Why? Because RegExr thinks (if it can think) that you are entering a regular expression, not literal characters. Now try:
\Q$\E
and it will match $ because
anything between \Q and \E is interpreted as a literal character (see Figure 3-3).
(Remember, you can precede a metacharacer with a \ to make it
literal.)
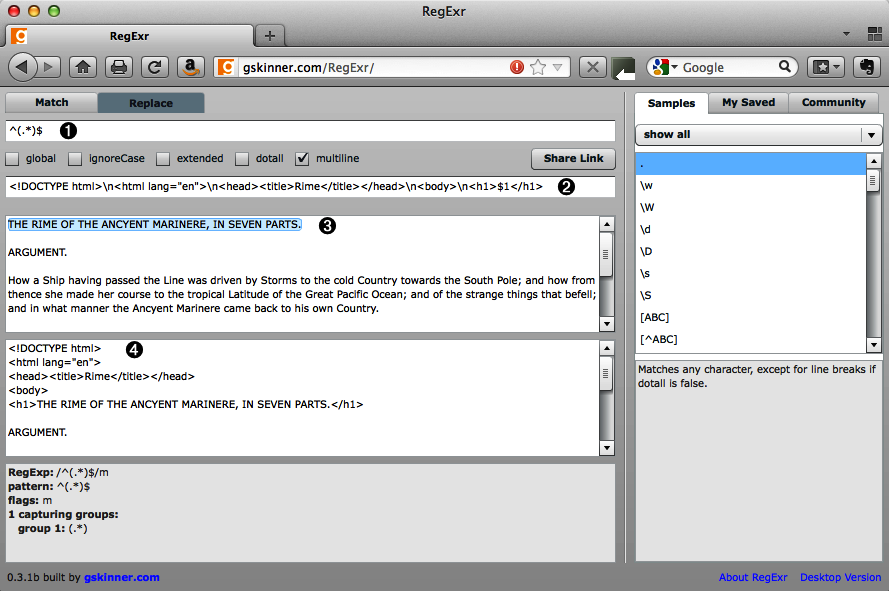
In RegExr, uncheck global and check multiline, click the Replace tab, and then, in the first text box (marked number 1 in Figure 3-4), enter:
^(.*)$
This will match and capture the first line of text. Then in the next box (marked number 2), enter this or something similar:
<!DOCTYPE html>\n<html lang="en">\n<head><title>Rime</title></head>\n<body>\n
    <h1>$1</h1>
As you enter the replacement text, you’ll notice that the subject text (shown in the box marked number 3) is changed in the results text box (marked number 4), to include the markup you’ve added (see Figure 3-4).
RegExr does well to demonstrate one way to do this, but it is limited in what it can do. For example, it can’t save any results out to a file. We have to look beyond the browser for that.
On a command line, you could also do something similar to what
we just did in RegExr with sed, which you saw in
the last chapter. The insert (i)
command in sed allows you to insert text
above or before a location in a document or a string. By the way, the
opposite of i in sed is
a, which appends text below or after a location.
We’ll use the append command later.
The following command inserts the HTML5 doctype and several other tags, beginning at line 1:
sed '1 i\
<!DOCTYPE html>\
<html lang="en">\
<head>\
<title>Rime</title>\
</head>\
<body>

s/^/<h1>/
s/$/<\/h1>/
q' rime.txt
The backslashes (\) at the
end of the lines allow you to insert newlines into the
stream and not execute the command prematurely. The backslashes in front
of the quotation marks escape the quotes so that
they are seen as literal characters, not part of the command.
When you run this sed command correctly, this is what your output will look like:
<!DOCTYPE html>
<html lang="en">
<head>
<title>The Rime of the Ancyent Mariner (1798)</title>
</head>
<body>
<h1>THE RIME OF THE ANCYENT MARINERE, IN SEVEN PARTS.</h1>
These same sed commands are saved in the file top.sed in the example archive. You can run this on the file using this command:
sed -f top.sed rime.txt
You should get the same output as you saw in the previous command. If you want to save the output to a file, you can redirect the output to a file, like so:
sed -f top.sed rime.txt > temp
In addition to showing the result on the screen, this redirect
part of the command (> temp) will save the output to
the file temp.
Let’s try to accomplish this same thing with Perl. Without explaining everything that’s going on, just try this:
perl -ne 'print "<!DOCTYPE html>\
<html lang=\"en\">\
<head><title>Rime</title></head>\
<body>\
" if $. == 1;
s/^/<h1>/;s/$/<\/h1>/m;print;exit;' rime.txt
Compare this with the sed command. How is it similar? How is it different? The sed command is a little simpler, put Perl is a lot more powerful, in my opinion.
Here is how it works:
The
$.variable, which is tested with the if statement, represents the current line. The if statement returns true, meaning it passes the test that the current line is line 1.When Perl finds line 1 with if, it prints the doctype and a few HTML tags. It is necessary to escape the quote marks as in sed.
The first substitution inserts an h1 start-tag at the beginning of the line, and the second one inserts an h1 end-tag at the end of the line. The m at the end of the second substitution means that it uses a multiline modifier. This is done so that the command recognizes the end of the first line. Without m, the $ would match to the end of the file.
The print command prints the result of the substitutions.
The exit command exits Perl immediately. Otherwise, because of
-noption, it would loop through every line of the file, which we don’t want for this script.
That was a lot of typing, so I put all that Perl code in a file and called it top.pl, also found in the code archive.
#!/usr/bin/perl -n

if ($ == 1) {
print "<!DOCTYPE html>\
<html lang=\"en\">\
<head>\
<title>The Rime of the Ancyent Mariner (1798)</title>\
</head>\
<body>\
";
s/^/<h1>/;
s/$/<\/h1>/m;
print;
exit;
}
Run this with:
perl top.pl rime.txt
You get a similar output as in the previous command, though it is formed a little differently. (You can redirect the output with >, as with sed.)
The next chapter covers alternation, groups, and backreferences, among other things. See you over there.
How to use anchors at the beginning or end of a line with
^or$How to use word boundaries and non-word boundaries
How to match the beginning or end of a subject with
\Aand\Z(or\z)How to quote strings as literals with
\Qand\EHow to add tags to a document with RegExr, sed, and Perl
vi is a Unix editor developed in 1976 by Sun cofounder Bill Joy that uses regular expressions. The vim editor is a replacement for vi, developed primarily by Bram Moolenaar (see http://www.vim.org). An early paper on vi by Bill Joy and Mark Horton is found here: http://docs.freebsd.org/44doc/usd/12.vi/paper.html. The first time I used vi was in 1983, and I use it nearly every day. It lets me to do more things more quickly than with any other text editor. And it is so powerful that I am always discovering new features that I never knew about, even though I’ve been acquainted with it for nearly 30 years.
grep is a Unix command-line utility for searching and printing strings with regular expressions. Invented by Ken Thompson in 1973, grep is said to have grown out of the ed editor command
g/re/p(global/regular expression/print). It was superseded but not retired by egrep (or grep -E), which uses extended regular expressions (EREs) and has additional metacharacters such as |, +, ?, (, and ). fgrep (grep -F) searches files using literal strings; metacharacters like $, *, and | don’t have special meaning. grep is available on Linux systems as well as the Mac OS X’s Darwin. You can also get it as part of the Cygwin GNU distribution (http://www.cygwin.com) or you can download it from http://gnuwin32.sourceforge.net/packages/grep.htm.
PCRE (http://www.pcre.org) or Perl Compatible Regular Expressions is a C library of functions (8-bit and 16-bit) for regular expressions that are compatible with Perl 5, and include some features of other implementations. pcregrep is an 8-bit, grep-like tool that enables you to use the features of the PCRE library on the command line. You can get pcregrep for the Mac through Macports (http://www.macports.org) by running the command
sudo port install pcre. (Xcode is a prerequisite; see https://developer.apple.com/technologies/tools/. Login required.)