Face-Offs
The offensive face-off gives coaching staffs and players their only opportunity to implement static set plays, like those that occur in football. Teams should prepare their plays off ice first and then work to integrate these face-off plans into their practices. Once a month, take time in practice to run through what you want the players to do at each face-off dot. Doing this takes time and tends to slow the pace of practice, but roughly 60 face-offs occur in a game, which means 60 times to win or lose possession of the puck, so the effort is worth the time. In addition to all players going through the face-offs, the centers must work on the skill of taking the draw. Not much time is needed for a coach to do 50 reps with a center before or after practice, focusing on his technique. Centers should work on winning draws on the forehand, on the backhand, by tying up, and at times by touching the puck through to catch the opposition by surprise. Make sure that one of your coaches becomes an expert at teaching these face-offs skills. High-level hockey has changed in this area of the game. When Ryan Walter began to play in the NHL as a center man, both centers tried to cheat laterally by adjusting the position of their skates to their advantage. Today, the requirement that skates face north–south has changed the way that center men try to generate an advantage. The center should get his skates as close to the center dot as possible, forcing him to hold the stick in a lateral position instead of straight out in front of him. This lateral stick positioning maximizes the center man’s leverage and positioning to win the face-off.
In the past many coaches taught their players to never turn the bottom hand on the stick because doing so was telling their opponent which way they would be drawing the puck. Turning the bottom hand is another way to increase the power and leverage needed to win face-offs. Most face-offs are won by powering under the opponent’s stick or obstructing the opponent’s stick with your own and kicking the puck back to your players. Few face-offs are won by chopping at the puck or picking the puck out of the air.
Face-off strategies in the defensive zone tend to be a little more conservative. The goal is still to win possession of the puck, but not losing the draw directly to the opponent is primary. To accomplish this strategy, the face-off tactics change as well. During his playing career, Ryan took many face-offs against Mark Messier. We like the face-off move that Mark used, so we will call this one the Messier. Instead of going directly after the puck, Mark’s first move was directly toward his opponent’s stick, interfering with his ability to win the face-off. Mark would then draw the puck directly back to secure puck possession for his team. Many players use this tactic but did not have Mark’s level of success, and here is why. Mark had a trick. He would elevate his bottom hand, thereby extending the amount of stick that he could reach toward his opponent’s stick. This maneuver allowed Mark to generate maximum interference against his opponent’s ability to win the face-off.
Understanding the strategy of face-offs and teaching the skill of winning face-offs will create more control for your team and help elevate the confidence of your players. Increased confidence comes from increased preparation. Continuously practicing the tactics and skill of your team’s face-offs will pay off in a big way.
If your team is playing at an advanced level, start to rotate each winger through face-off technique practice as well. Preparing your wingers to be better than average on winning face-offs allows your center men to be much more aggressive on their draws. This type of extra preparation pays off when your center is kicked out of the face-off circle on the penalty kill and the winger replaces him.
Consider having a face-off play book that includes responsibilities as well as diagrams illustrating the execution patterns. Some teams have developed a DVD or USB sticks to give to the centers, who much like a quarterback in football need to know the formation and how to set up. This video should have dialogue and a clear illustration of the plays. Because of the clarity and camera angle, a good method is to collect plays from NHL, college, and junior games and edit the material down for your players.
Finally, depending on the age of your group, you may want to have the centers pick the option for their line for that night or come to you with a play they think will work. This type of player ownership can be effective; the players will definitely focus if they choose the play because they want it to work.
Have face-off plays for all face-off dots and for specific game situations. The way that a team lines up five on five is much different from how they line up for four-on-four and three-on-three situations. Don’t forget power-play five on four, four on three, and five on three; penalty-kill four on five, three on four, and three on five; and late-game pulled-goaltender plays defensively and offensively. Over the course of my NHL career across three teams and seven head coaches, we implemented many face-off set plays, but they tended to be drawn from the following categories.
Offensive zone face-offs are an opportunity to create a scoring chance off a set play. Even if teams lose the draw, they can still recover possession and get a shot or chance. Many sophisticated offensive face-off alignments have been developed over the years, but the alignments discussed here cover the basics of offensive zone strategy and provide enough options for teams at every level. You may want to challenge your staff to come up with a set play of their own, but don’t overwhelm your team with too many choices.
Offensive Zone: Won Draws
In the offensive zone, winning the draw and maintaining possession are critical. This section describes various set plays off won draws. A team cannot run all of them every night. Having some variance is important, but as with all systems of play, execution is the key to success. Give the team one play to run for every game; that way they will become used to all the setups so that later in the year they can adjust on the spur of the moment. In addition, having variety in plays from game to game keeps the opposition off balance and forces them to have to react in coverage. Make the opposition coaches work to figure out what you are running and how to cover that setup.
- DEEP POSSESSION
For a number of reasons, an offensive center might call a face-off play in which he actually helps his opponent win the face-off back toward the corner of the offensive zone (see figure 12.1). The tactic behind this deceived loss is to have both wingers positioned and ready to press the defender when he wins the draw back to the corner. This quick and unexpected pressure often turns over the puck and therefore creates its desired effect, which is puck possession and a possible scoring chance or play on the net. Off the turnover, the player with the puck may decide to make a quick play to the net or take the puck behind the net and come out the other side. This strategy should be used only once or twice a game or if the center is struggling to win draws against a particular opponent (giving that player a strategy to gain possession while losing the draw).

Figure 12.1 Deep possession face-off.
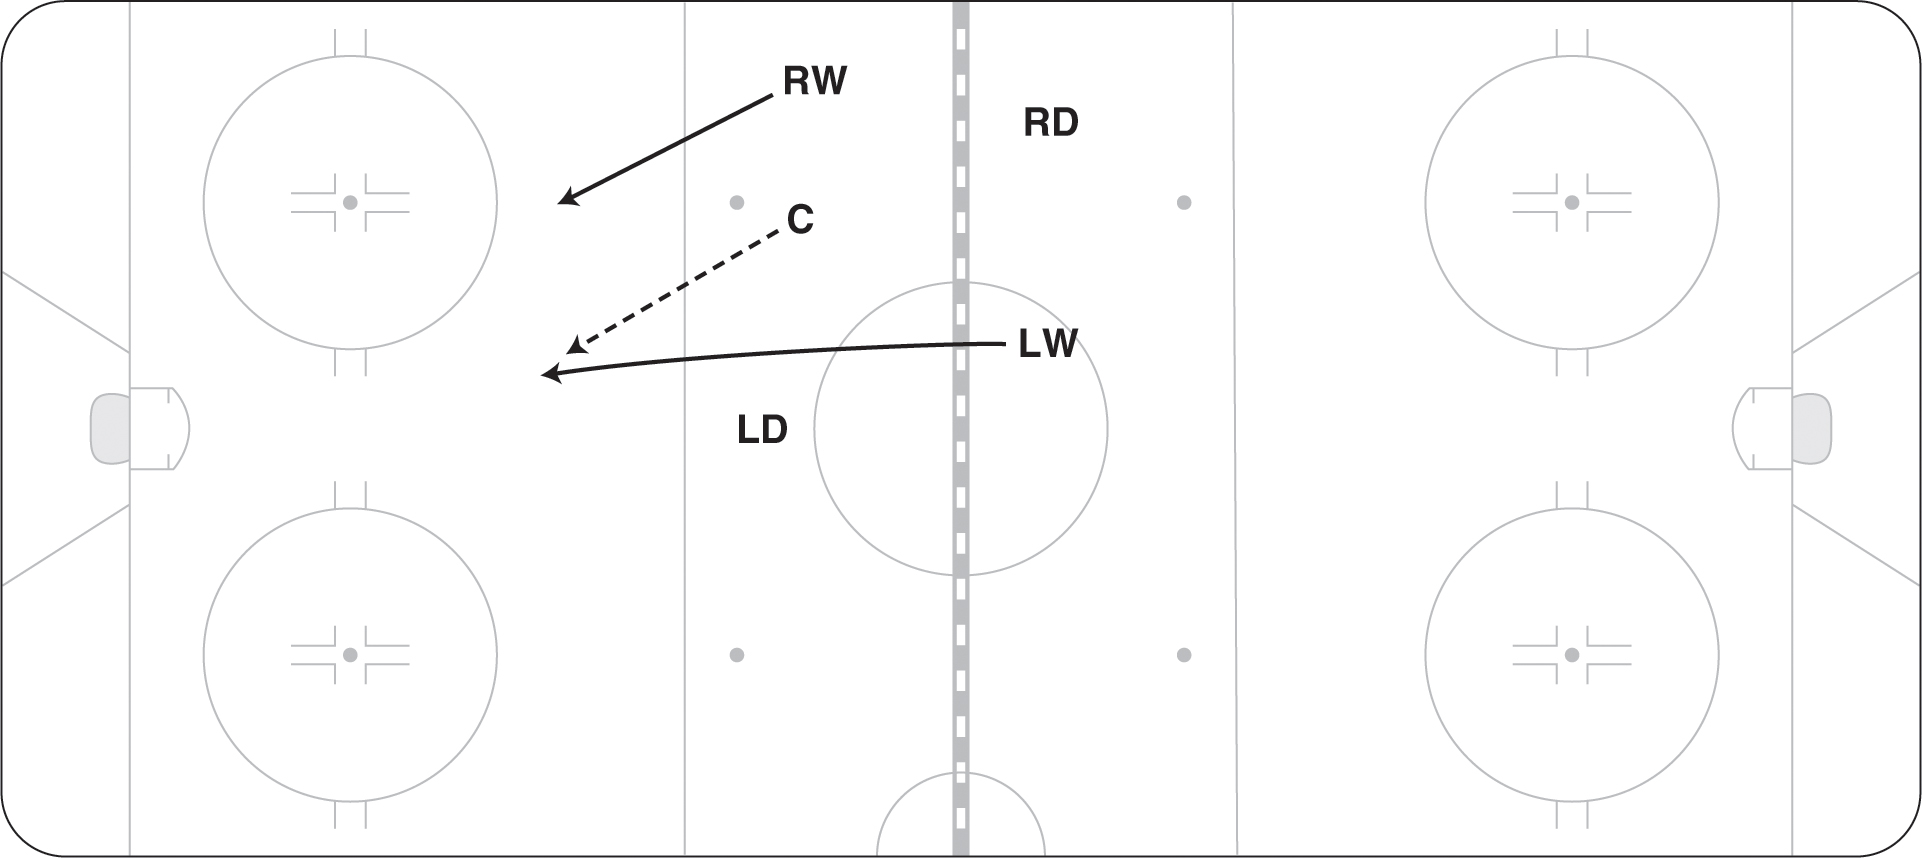
- INSIDE WINGER DRAW
This face-off starts with the direct intent to win the face-off back to the offensive defenseman. As defending players scramble to front or block the shooting lane of the offensive defenseman, the inside winger (RW) skates above the circle and out to the side boards (see figure 12.2). The center and LW must go hard to the net. The offensive defenseman’s goal is to pull the puck toward the middle of the ice and fake a slapshot. As defenders react to this deception, the defenseman passes the puck laterally to the inside winger, who ends up with a clear shot toward the net through traffic. One variation is for C to drive the net and then push back to get open in the higher slot area. RW can now pass to C.
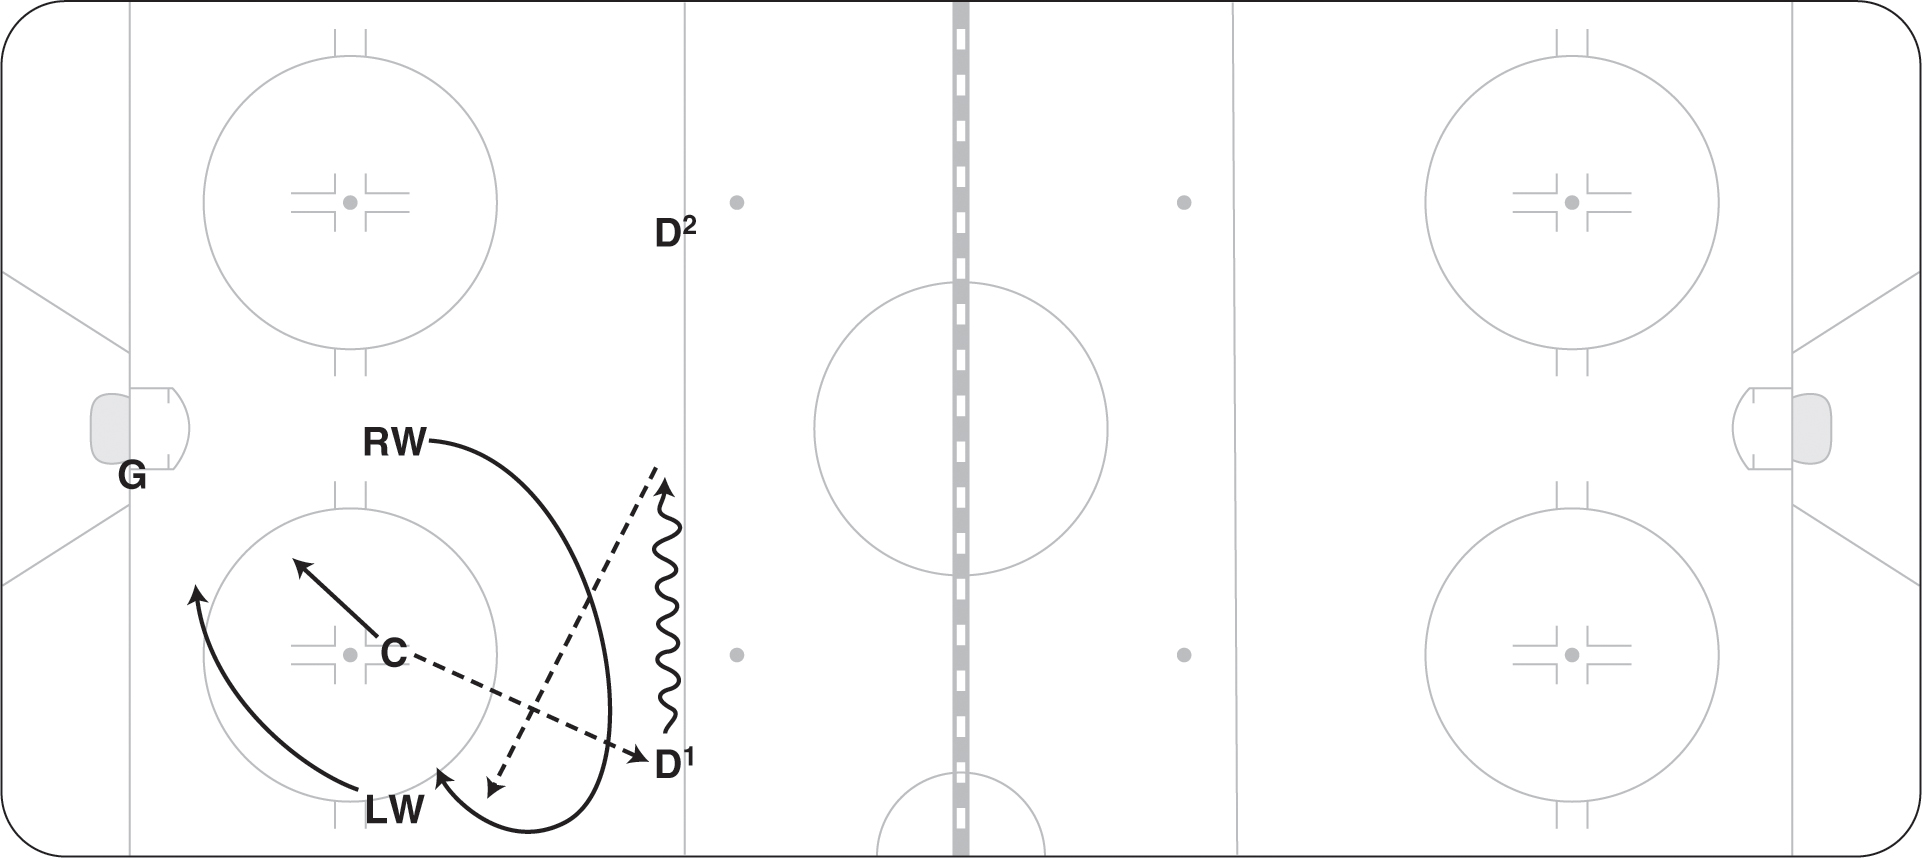
Figure 12.2 Inside winger face-off.
- ROLL OUT
This offensive face-off alignment works well against teams who press hard toward both defensemen off the face-off. As the two wingers press the D, the roll-out alignment gives a great pass and shot option. Off a won draw to D1, the two wingers (RW and LW) change positions (see figure 12.3). The center drives to the front of the net. D2 drives wide; D1 backs across the blue line, fakes a shot, and passes to LW, who has found the soft ice (high and lateral from D1). LW now has the option of shooting through traffic or passing to RW or D2.

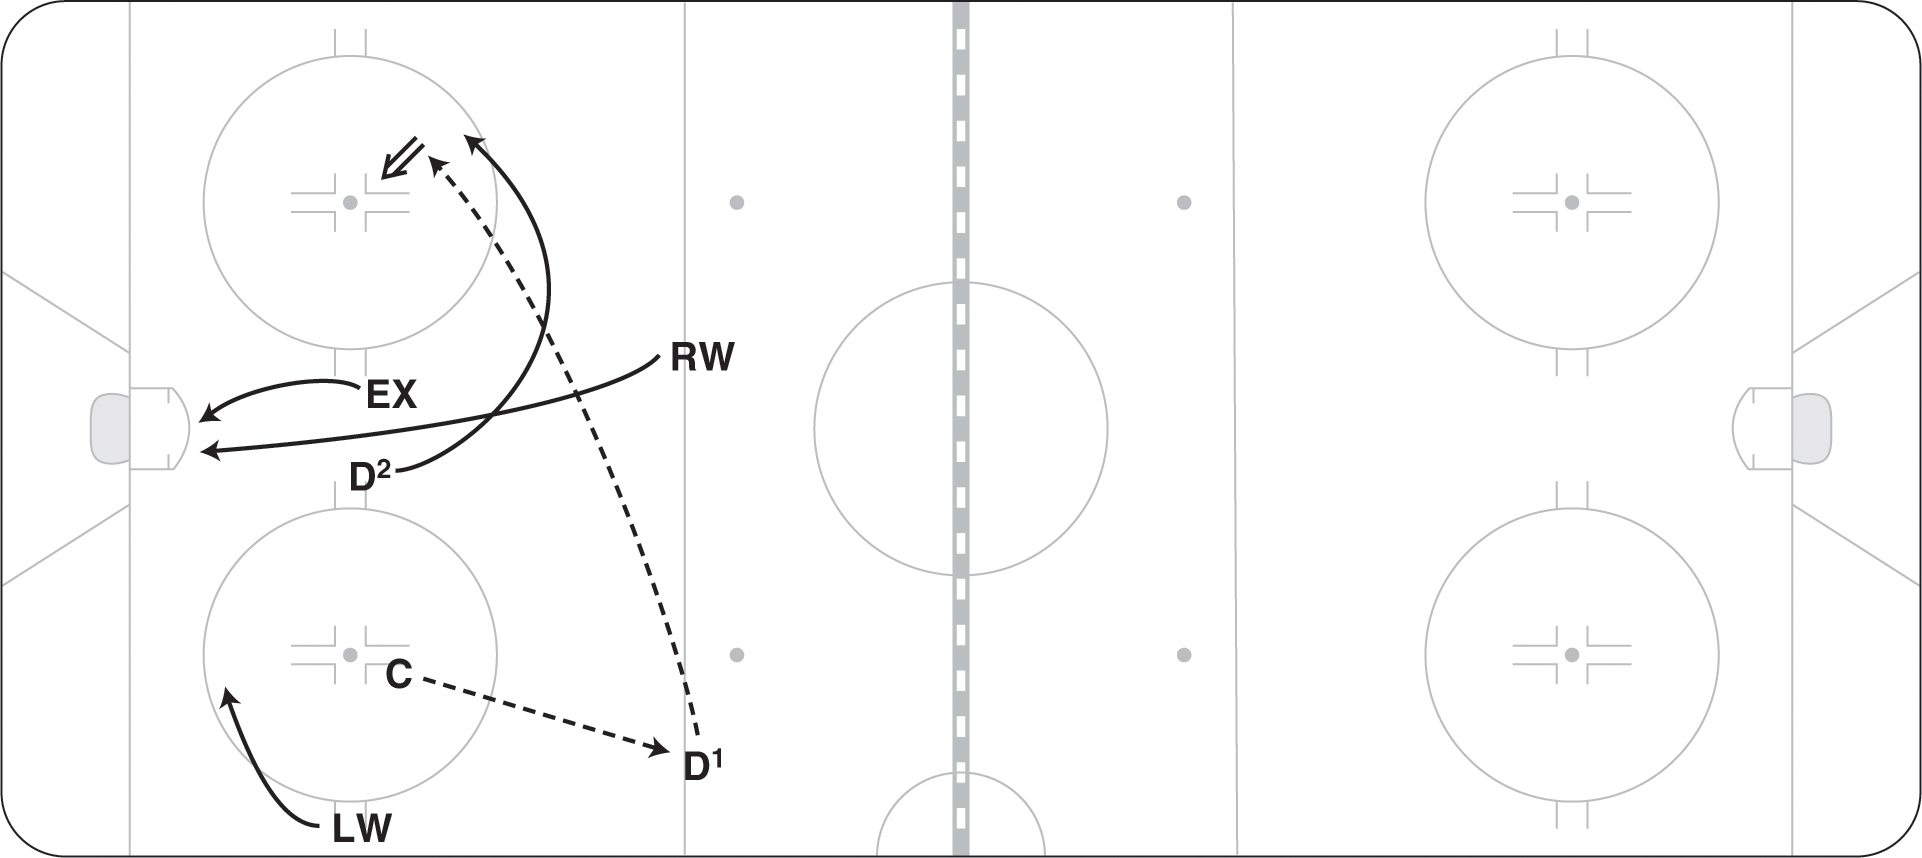
- END AROUND
Much like the inside-out draw, this alignment uses the inside winger moving to the boards (see figure 12.4). Instead of a high option, it creates an opportunity to take the puck to the net low. This face-off also starts with the direct intent to win the face-off back to the offensive defenseman, but the puck doesn’t make it back and lies in the space right behind the center. The inside winger (RW) pulls or draws back toward the boards and in doing so grabs the puck and goes around the pile. As RW moves toward the back of the net, he may either take the puck to the net or pass to C or LW, who attempts to get open.

Figure 12.4 End around face-off.
- OFF-SIDE SHOT
Some face-offs are not always won directly or completely back to the point. When the center senses that he is going to tie up the opponent’s stick and win puck possession with his feet, then this simple alignment is effective. In this face-off alignment, the two wingers typically switch positions, unless the boards-side winger is already shooting off his strong side. The center looks to win possession of the puck in the space just slightly behind him (see figure 12.5). This allows the boards-side winger to step laterally toward the net and place a quick shot on net through traffic. Sometimes in this situation the center only has to tie up his opponent and leave the puck in the space behind him, which allows the winger to step into the shot.
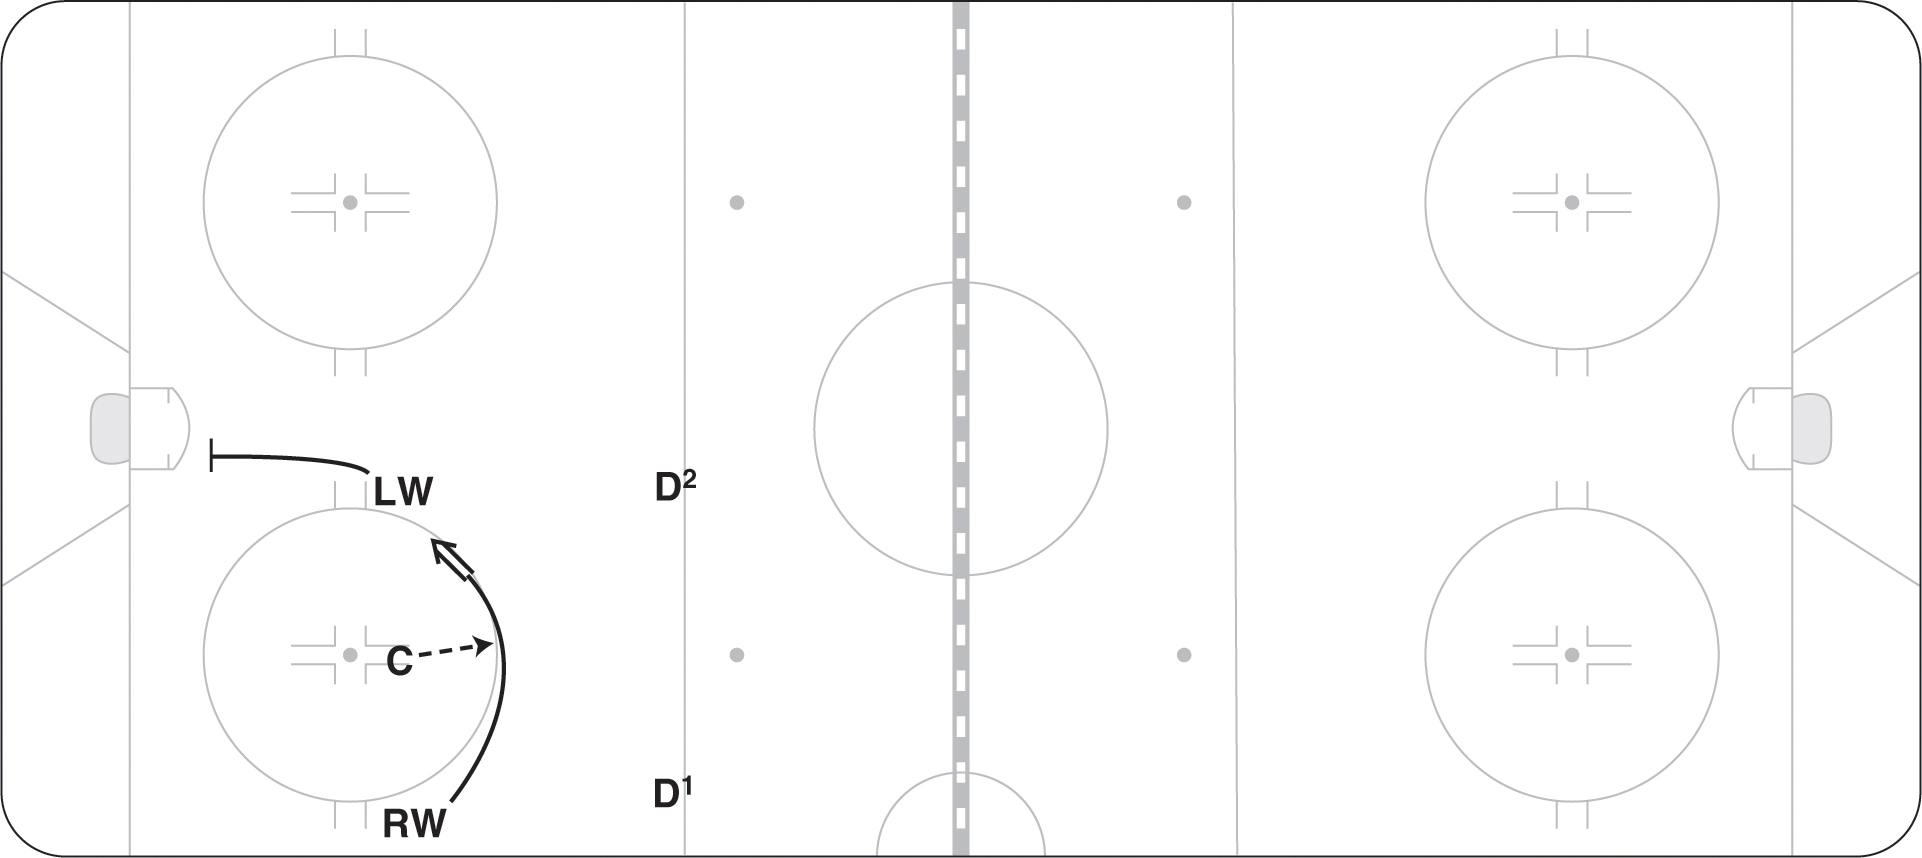
Figure 12.5 Off-side shot face-off.
- SAN JOSE SLIDE
This offensive face-off alignment works well when your team is trying to change things up. It is another play that creates a lot of confusion for the defensive team. The center draws the puck back to D1, who moves quickly down the boards as he receives it (see figure 12.6). RW, who is on the boards, rolls over the top of the circle and sets up on the far post (the back door), taking the defender with him. LW also goes to the net, giving the defenseman an option to pass to the net at any time. As D1 moves down the boards, C makes it look as if he is going to the net and then moves back a couple of steps into a soft area in the high slot, where he is open for a one-timer pass from D1. The reason that C will be open is that the opposing center will probably go after D1. This movement off the face-off creates confusion in coverage for the defensive team.

- FOUR UP
Like a football team that is behind in a game with little time left on the clock, at times the team may be looking for a simple Hail Mary type play. With a four-up face-off alignment, both wingers are on the inside and one D is down on the boards-side hash marks (see figure 12.7). This alignment gives the center many options, making it hard for the defending team to cover. Some defending teams try to shoot the puck out past the one defenseman on the blue line; guard against that happening by having the inside winger slightly back and in the lane. The four-up face-off allows the center to tap the draw ahead and then pass to one of the two wingers in front, draw the puck back to D1 for a screen shot, or steer the puck to the boards for D2 to shoot or to pass to D1. This alignment is often used when seconds are left on the clock at the end of periods or the end of games because it results in a quick play on net with numbers in front.
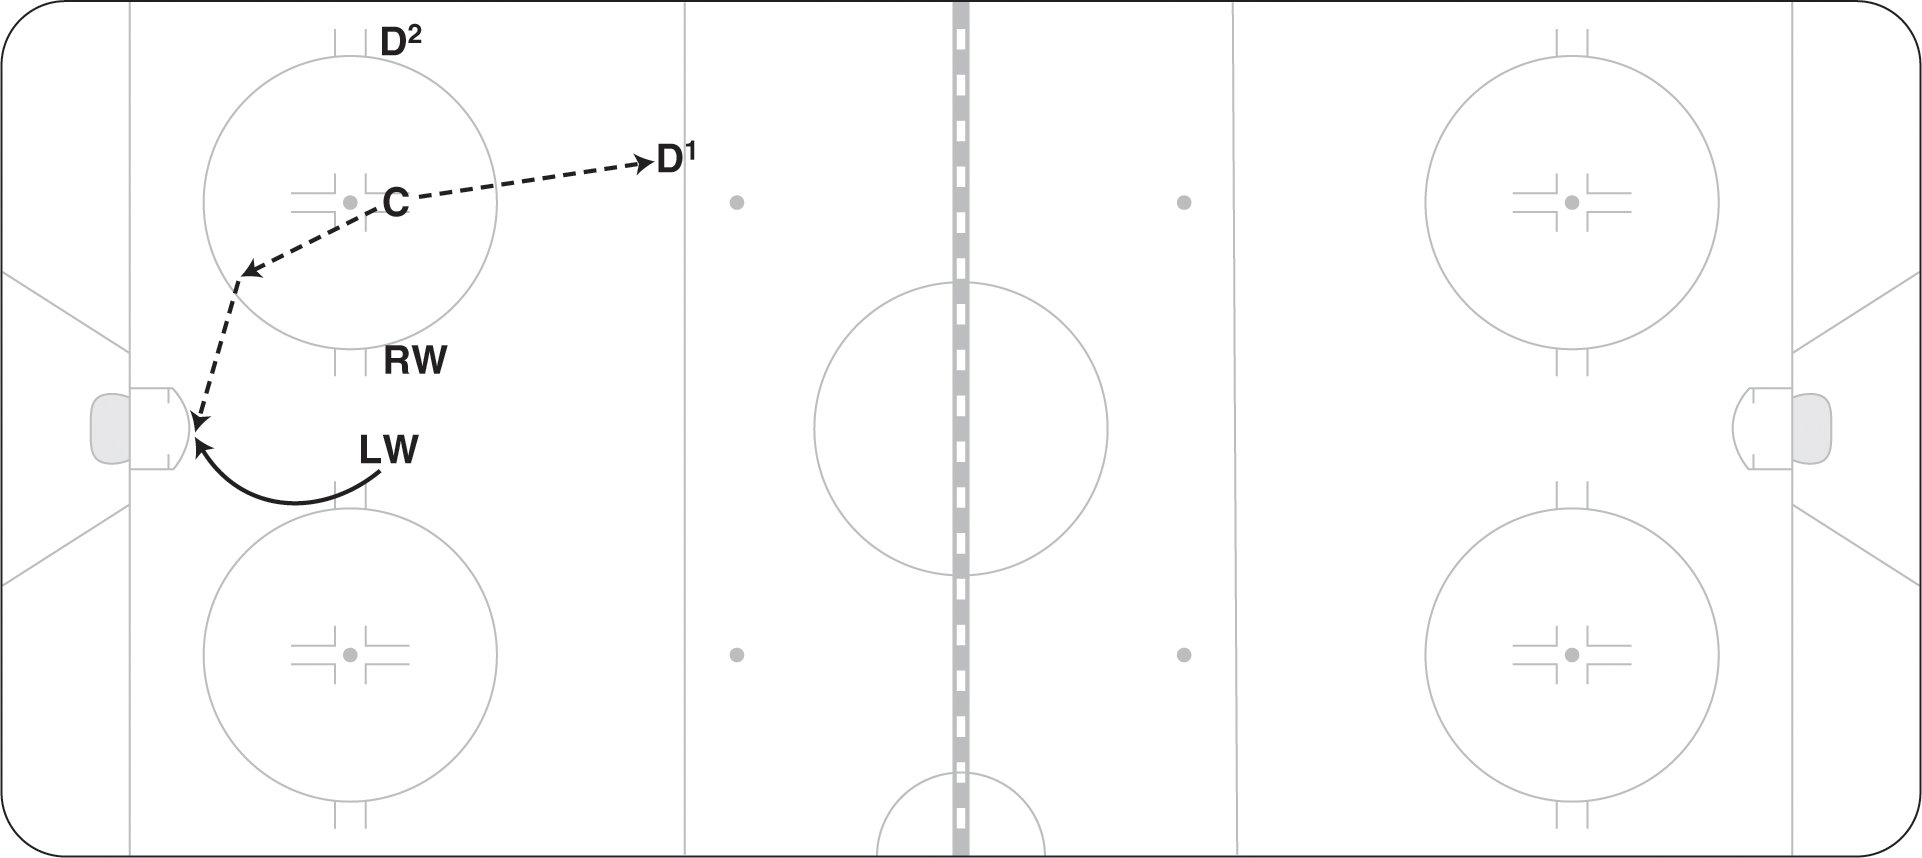
Figure 12.7 Four up face-off.
- TIE-UP FOR POSSESSION
At times, centers just look to create possession of the puck for their team. Possession is often best obtained not by trying to win the puck but by blocking or tying up the stick of the opposing center (see figure 12.8). If the offensive center can obstruct the stick of the defending center long enough, both offensive wingers can attack the face-off circle to try to win puck possession. This strategy is often referred to as scrambling the puck. When one center is dominating the other, the player who is constantly losing the draw can try to tie up the other center to increase the odds of his team getting the puck.

Figure 12.8 Sometimes centers tie up and look for help from their wingers.
- OVER UNDER
This simple face-off alignment works equally well at all levels of the game. On either side of the offensive zone, the inside or middle winger skates behind the center man (over the puck) as the boards-side winger skates hard toward the net (under the puck.) This action gives the center maximum support in retaining possession of the puck (see figure 12.9).

Figure 12.9 Over under face-off option one.
Although the over under is a simple process after the inside (over) winger gains possession of the puck, he can generate many scoring options. By drawing the defenseman lined up on the board with him toward the net, the boards-side winger creates separation and more space for the (over) winger to make plays. The first goal of this winger with the puck is to shoot it on net (see figure 12.9). Another simple option for the winger with the puck is to fake the shot and pass back to the center man, who slides into an open slot position (see figure 12.10).

Figure 12.10 Over under face-off option two.
A simple third scoring option off the over under face-off alignment has the boards-side winger not drive the net, but instead skate behind the net to receive the puck and open up many other behind-the-net options, which include jamming the puck on net, passing to the center man sliding into the slot, and passing back to the defensemen to activate a shot through maximum traffic (see figure 12.11).

Figure 12.11 Over under face-off option three.
Players should be prepared to win the draw and set up offensive plays as described, but they should also know what to do when the center loses the draw. If players are ready to react and they understand how they are going to pressure the opposition to recover the puck, they will be much more successful in doing so. Listed here are strategies to regain possession and essentially initiate a forecheck.
- DOUBLE PRESS
When the C loses the draw, he moves to a high position in the slot (see figure 12.12). RW shoots through on the inside of the circle and pressures the defenseman getting the puck. RW must make sure that the D doesn’t turn quickly up the strong side. He forces the defenseman to go into pressure by pushing him out the wide side. LW also jumps quickly to take away the wide side of the net and any D-to-D passes. D1 is ready to pinch on any pass to the opposing winger on the far boards. D2 stays in mid-ice as the safety.

Figure 12.12 Double press off lost draw.
- 1-2-2 FORCE
On the lost draw, RW pressures hard into the corner, forcing the defenseman around the net or to pass to his partner (see figure 12.13). On any D-to-D passes, RW moves across either behind or in front of the net and forces. C is ready to take away plays up the right boards and takes away the mid-ice seam as the puck moves to the wide side. LW takes away the far boards. D1 and D2 stay in mid-ice and react to any passes up the middle.

Neutral Zone Face-Offs
At one time, many coaches, especially European coaches, gave little thought to draws in the neutral zone. Their feeling was that they were not important and didn’t lead to anything. Most times their players would line up and halfheartedly take the draw. Now almost all coaches realize the importance of winning the face-off and gaining puck possession. Because of the change in emphasis on neutral zone draws, many new strategies have evolved to create a quick attack off this face-off or to apply forechecking pressure when the draw is lost.
Neutral Zone: Won Draws
Only a few face-off plays create an offensive advantage in the neutral zone. Opponents will press with one or two players off a lost face-off in the neutral zone, taking away passing lanes or closing ice, so having a plan with the puck is crucial. These actions tend to emulate neutral zone regroup options for moving the puck up ice. Described here are seven face-off plays from the center-ice and blue-line face-off dots.
- CENTER ICE, THREE OPTIONS
C draws the puck back to D1, who passes to D2 (see figure 12.14). C swings away and builds up speed. RW stretches to the far blue line. LW slants in to the middle of the blue line. D2 has the option to pass up to RW on the stretch, to LW in the mid-ice seam, or to C wide. D2 may also skate the puck to the red line and dump it in for C on the wide side.

- HIGH DEFLECTION
This face-off play also takes place at the center circle. After C wins the draw, he moves above the red line (see figure 12.15). Both wingers go out to the top corner of the blue line. D1 passes to D2, who looks to pass to C for a quick chip into the corner for RW. D1 may also pass to RW, who chips the puck behind the defense for C to pick up. This play is a good one to start the game and apply quick forechecking pressure against the opponent.
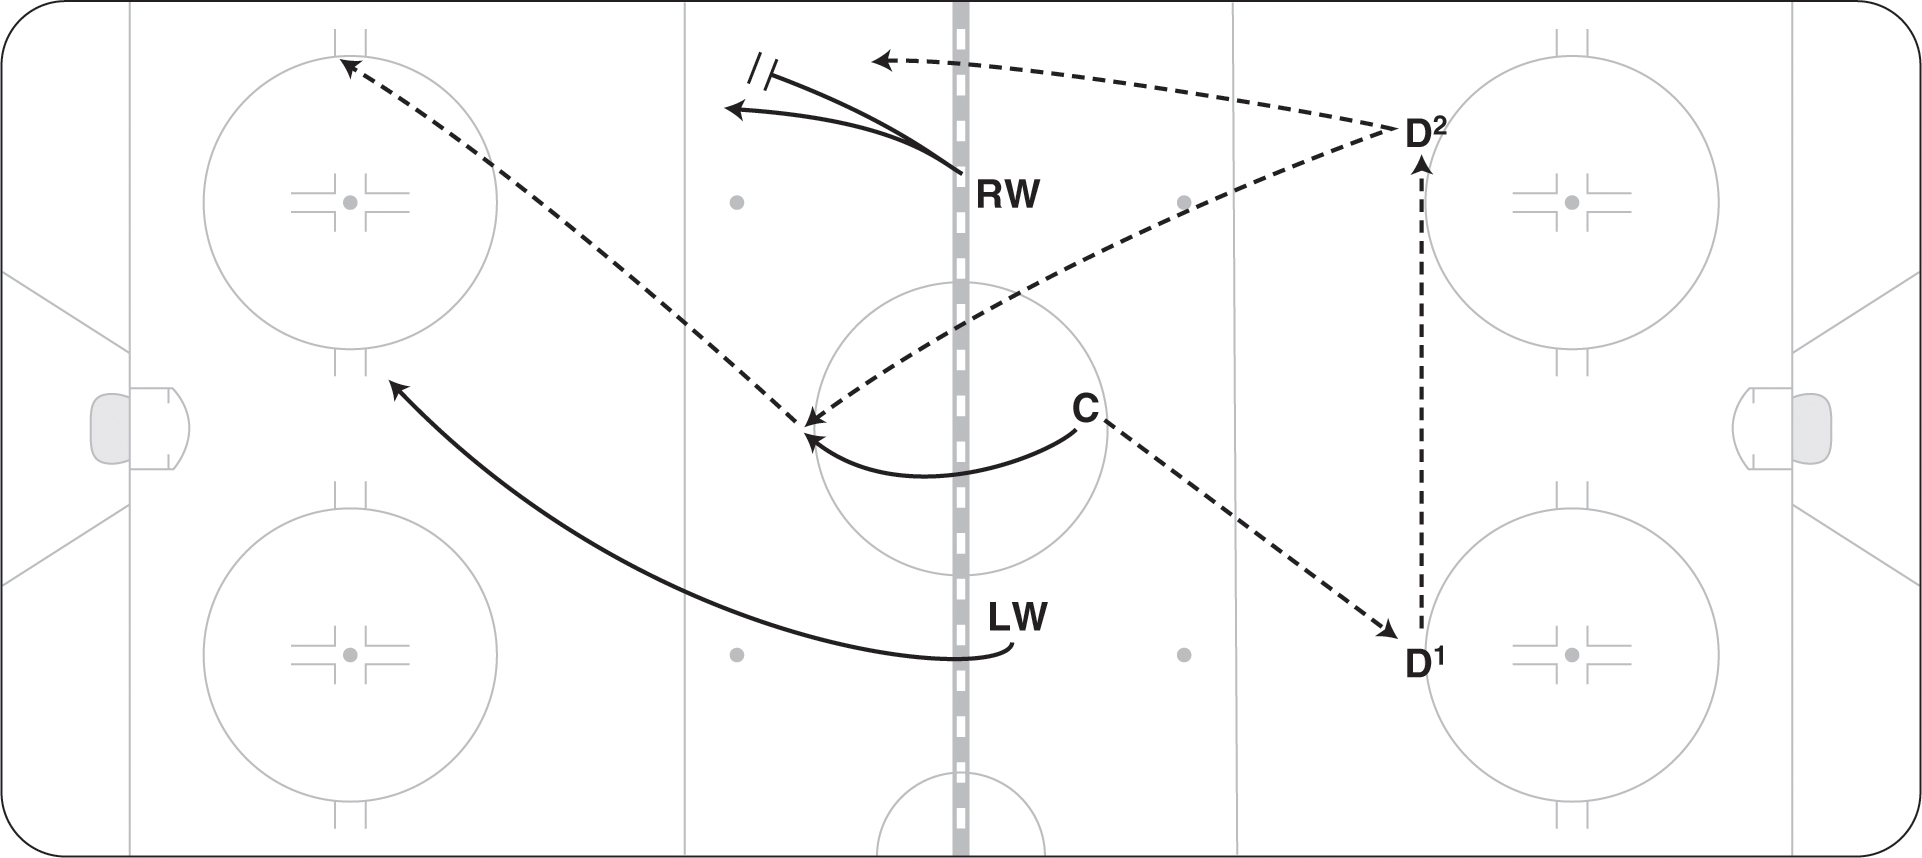
Figure 12.15 High deflection face-off.
- FORWARD BACK
LW drops back for the draw and LD is up (see figure 12.16). C pushes the puck to the left side. Anticipating the draw, LW shoots through the hole and looks to skate or chip the puck by the opposing defenseman. RW also jumps quickly with LW.
- WEAK-SIDE SLANT
This face-off takes place at the defensive blue line. C draws the puck back to D1, who passes to D2 (see figure 12.17). D2 skates to mid-ice. LW picks or screens the player inside so that D2 has more time with the puck. RW goes hard to the corner of the far blue line. D2 banks the puck to the high blue-line area for RW to skate to. C jumps up through the middle to create a potential two on one on the opposing defenseman.

Figure 12.17 Weak-side slant face-off.
- CENTER SLASH
C wins the puck back, and D2 passes to D1 (see figure 12.18). RW reads clear possession and sprints to the far blue line. C blocks the opposing C and then sprints through the middle lane. LW stays wide and low for a cross-ice support pass. D2 drops to support D1. D1 has pass options to C or RW sprinting to the far blue line and, if neither is open, has the wide pass back to LW.

Figure 12.18 Center slash face-off.
- CENTER SWING-AWAY
Off a won draw, C swings away from the D-to-D pass (see figure 12.19). LW sprints toward the boards and RW fills the middle lane. D2 may pass to LW or RW, but the main option is to get the puck wide to C, who has built up a lot of speed.
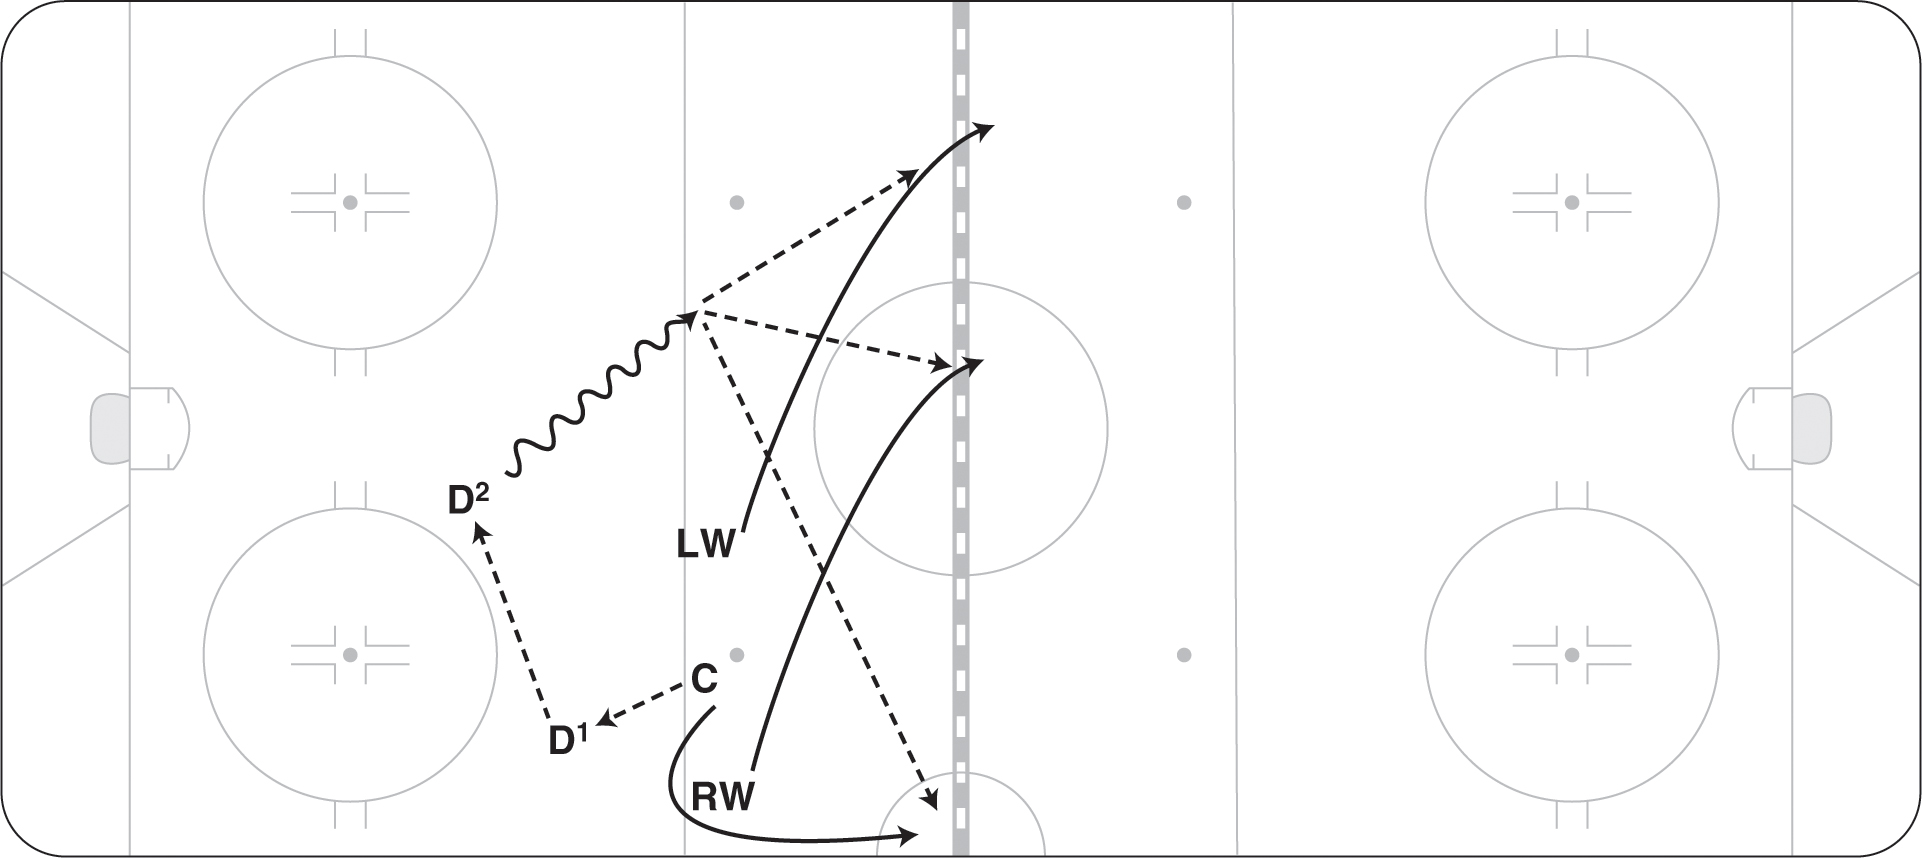
Figure 12.19 Center swing-away face-off.
- HARD RIM
This face-off is used in leagues with touch icing when the team desperately needs to get possession in the offensive zone and create a quick scoring chance. There is a risk of icing the puck. C draws the puck back to D1, who quickly shoots it hard along the boards into the far end (see figure 12.20). LW races to the puck, trying to beat the opposing D. After LW gets the puck, he bumps it behind the net to RW, who then looks to bring it to the net.

Figure 12.20 Hard rim to gain possession off a neutral zone draw.
Neutral Zone: Lost Draws
To regain possession of the puck off a lost draw, these strategies may be used on any of the five neutral zone face-off circles. In most situations, this sets up a team’s neutral zone forecheck.
- DOUBLE PRESS
When the draw is lost, both wingers move quickly to pressure the opposing defense (see figure 12.21). C locks the mid-ice area, preventing any passes to the other team’s center. D1 and D2 are ready to take away passes up the boards and to move up quickly to pinch on the pass.

Figure 12.21 Double press on lost draw.
- BOARDS-SIDE PRESS
On the lost draw, the boards-side winger (LW) forces the defense to pass the puck across the ice, into traffic (see figure 12.22). C locks the middle. RW takes away the far boards. D1 and D2 keep a tight gap in mid-ice.

Figure 12.22 Boards-side press on loss.
- INSIDE-OUT PRESS
When the draw is lost, C quickly moves up between the two opposing defensemen and angles the puck carrier to the outside (see figure 12.23). As C forces the play to the right, RW takes away the boards and any passes to that winger. LW locks the middle. D1 is ready to get any chip plays in behind RW. D2 plays mid-ice while being aware of passes to the wide side.
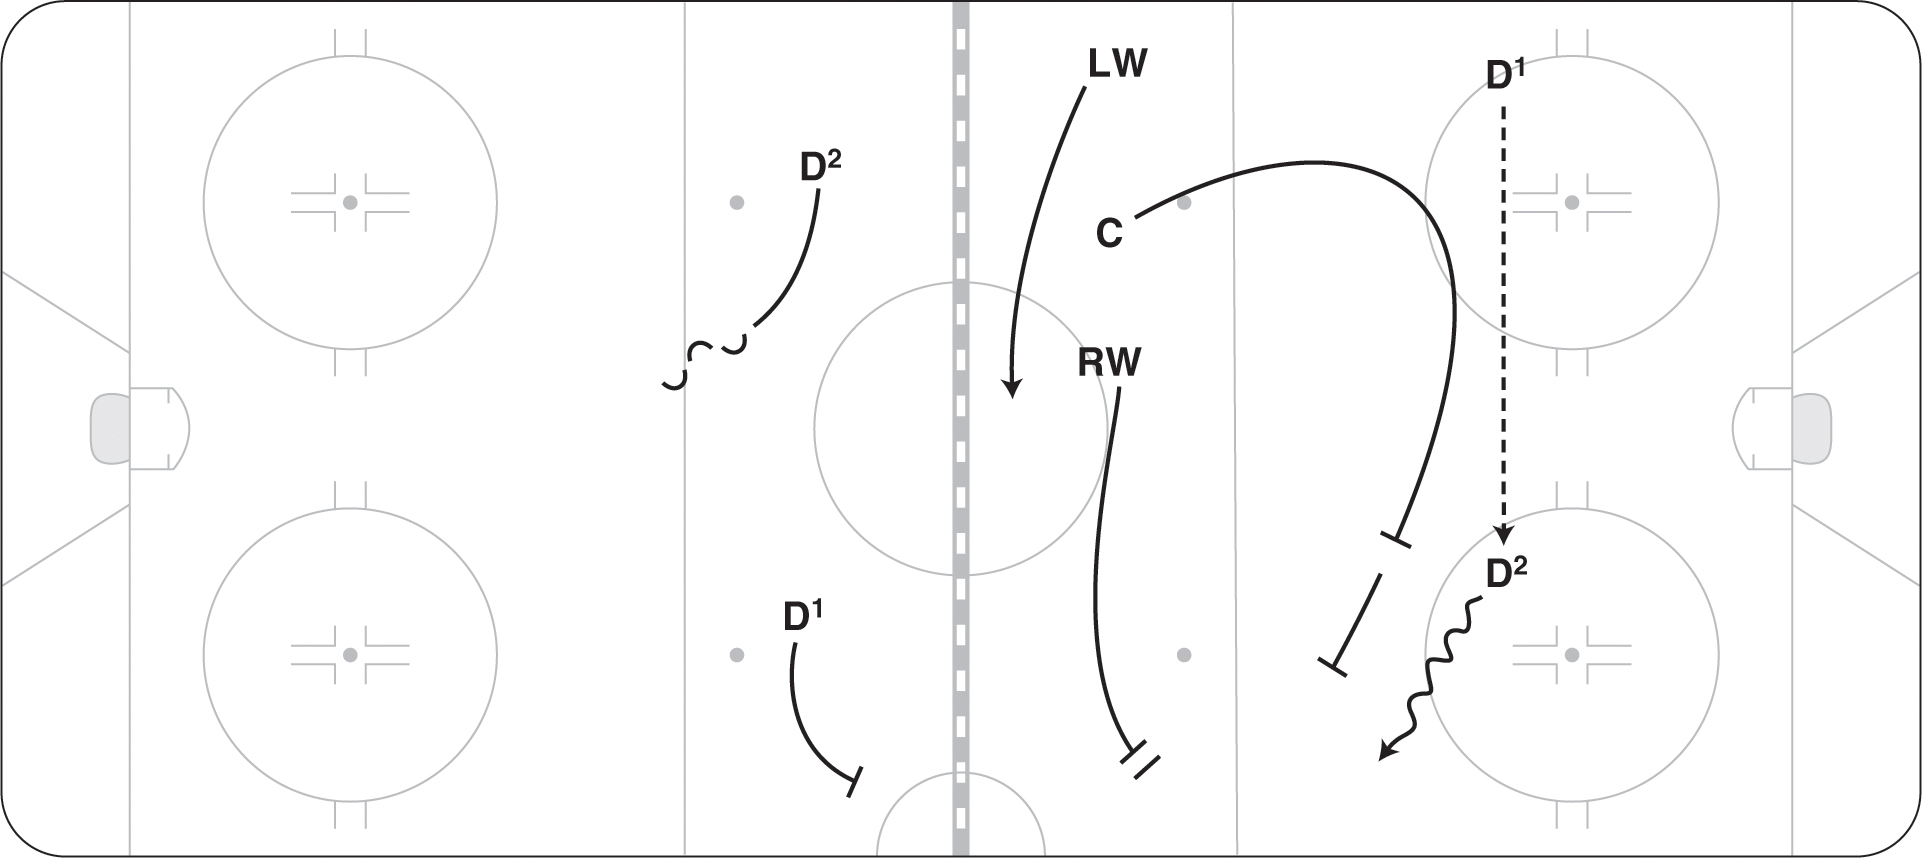
Figure 12.23 Inside-out press on lost face-off.
Winning a face-off in the defensive zone results in an opportunity to break out and go on the attack. Losing the face-off in the defensive zone forces a team to defend and essentially go into defensive zone coverage until a turnover happens. We discuss both situations and provide strategies for each.
Defensive Zone: Won Draws
Described here are seven plays that teams can use when they win the draw in the defensive zone. Teams should practice breaking out on a won draw from both sides of the ice. The option used will depend to a degree on how the opposition forechecks and what you believe your team can execute. The final two options in this section, the breakaway and quick-change plays, are trick plays that might be used only a couple times a year. They can be used at any time of the game but generally are saved for moments when you are down by a goal, because each of them includes a degree of risk. The rate of successfully completing these plays is much lower than for the others provided, but if your opponents are not ready, you may catch them by surprise
- SPIN AND UP STRONG SIDE
If the opposition forechecks with their boards-side winger hard and takes away the pass to D2, then D1 goes back for the puck and spins off pressure, moving the puck up to LW on the strong-side boards. Before reversing the puck or spinning off, D1 must first carry the pressure to make the opposition think he is going behind the net. C supports low, and RW moves across to support (see figure 12.24). D1 may also bank the puck off the boards or glass into the neutral zone, and both wingers can race to that area. This play will surprise teams who pinch their defense and may result in a two on one.

Figure 12.24 Spin and up strong side defensive zone draw.
- REVERSE TO CENTER
Again, the opposition team pressures hard with the boards-side winger. D1 goes back for the puck and carries the pressure, trying to gain the back of the net. Knowing that he will not make it, he reverses the puck to C. Depending on pressure, D2 supports the front of the net or moves to the wide side, ready for a D-to-D pass. D2 should stay in front whenever D1 is under heavy pressure. LW moves back to support the boards, and RW moves across the ice in support (see figure 12.25).

Figure 12.25 Reverse to center face-off in the defensive zone.
- D-TO-D SHORT POST
Off a won draw, D1 gets the puck and makes a short pass to D2 at the near post (see figure 12.26). From the near post, D2 skates behind the net and reads options to rim the puck, make a direct pass to the winger or center in mid-ice, or possibly execute a return pass to his partner.

Figure 12.26 D-to-D short post face-off.
- BUMP TO PARTNER
If the opposition forechecks with only one player, D1 quickly bumps the puck to D2, who releases to the wide side of the net in anticipation of the D-to-D pass. When D2 moves out to the wide side, he should try to be turned around facing up ice and ready for the pass when it arrives. RW moves out to the boards, and LW comes across through the high slot. C supports low (see figure 12.27).
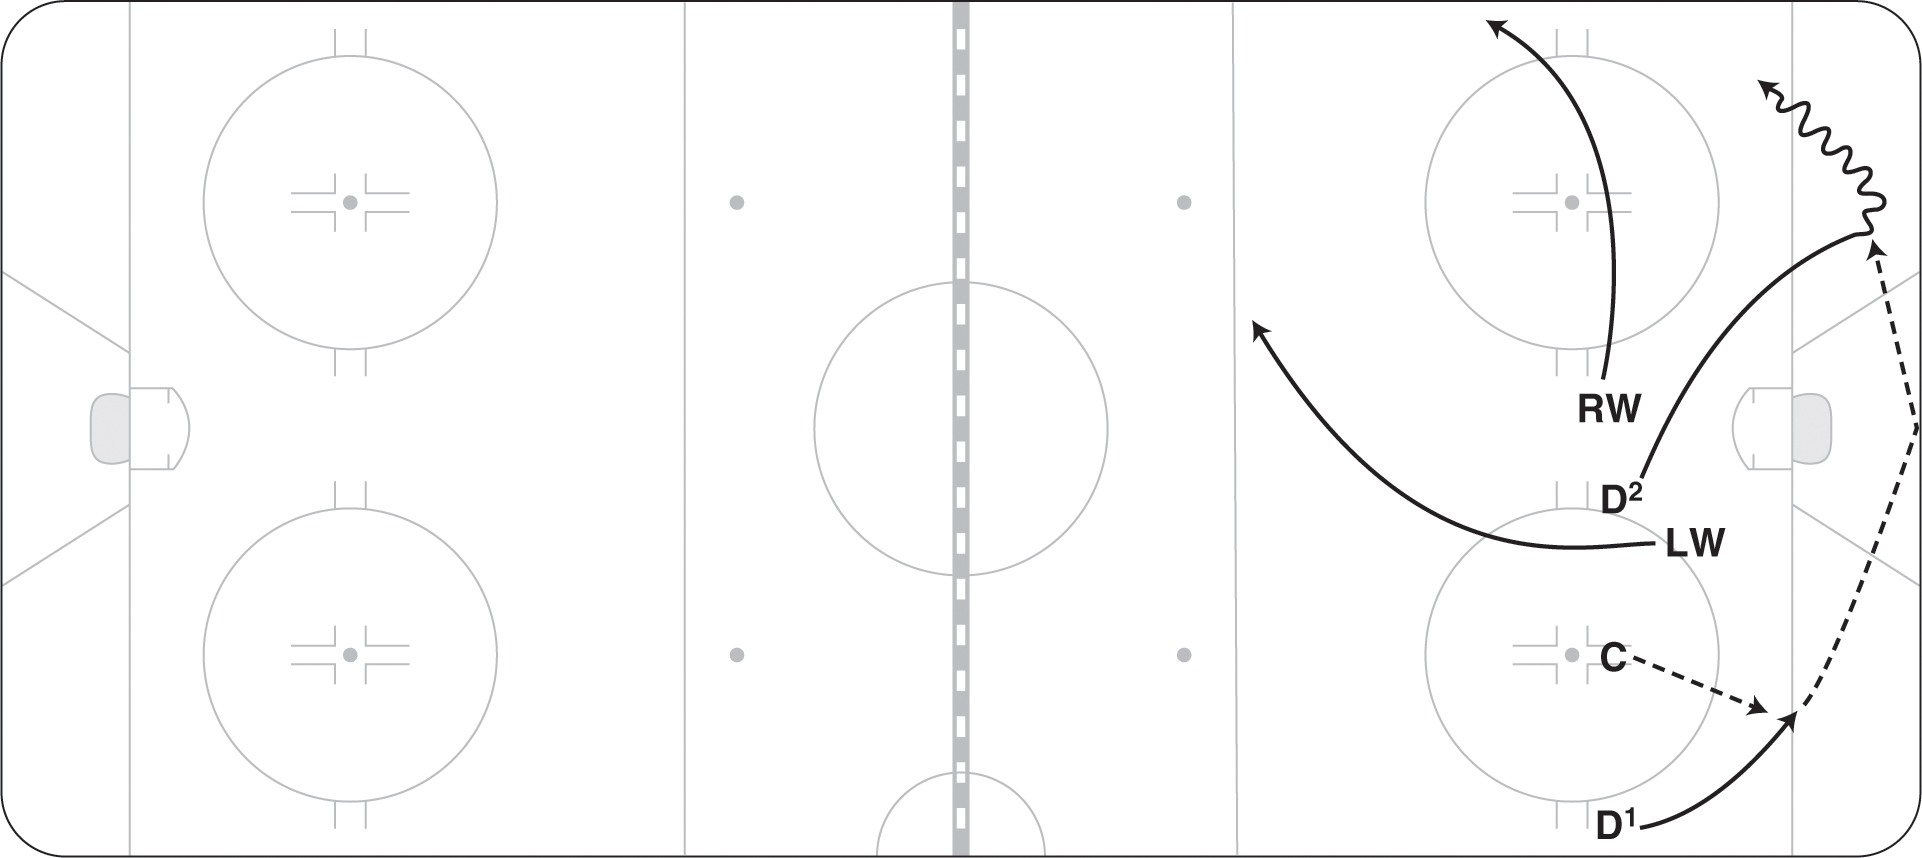
Figure 12.27 Bump to partner face-off.
- WIDE RIM
This play can be used to catch the opposition off guard or late in a game when you are up or down by a goal. C wins the draw back to D1, who rims the puck (the Ds may switch sides before the draw to make the rim play easier). RW goes out to the point and then slants across to support LW (see figure 12.28). LW must get to the corner of the blue line before the opposing D. LW has the option to skate with the puck and go through the neutral zone or chip to RW if the opposing defenseman stays in the zone and pinches.

Figure 12.28 Wide rim defensive zone face-off.
- BREAKAWAY PLAY
C draws the puck back to D1, who quickly skates around the net (figure 12.29). D2 screens to give D1 time to make a play. RW goes hard to the opposing defenseman as if he were going to cover the D. LW slides out to the boards, calling for the pass. RW slants to the center-ice circle. D1 lays or lofts the puck out to RW for a breakaway. RW should have a breakaway because the opposing defense will not have time to react. In leagues that have touch icing, the worst-case scenario is that RW gets the puck in the offensive zone. For automatic icing, the worst-case scenario is that the face-off will come back into your zone.

Figure 12.29 Breakaway play face-off.
- QUICK-CHANGE PLAY
This surprise play should be practiced and used at key moments of the game or season. After opposing teams know you use it, they may watch for it and be able to react quicker. This play might be used once or twice a year as a trick play when a team is down by a goal with the face-off in their own zone. C draws the puck back to D1 (see figure 12.30). RW goes hard to the opposing defenseman as if he were going to cover the D. RW then goes by the D and onto the bench. One forward is waiting at the opposite end of the bench and quickly heads out to the far blue line. LW goes to the boards for a pass. D1 fakes a pass to LW and passes to the new forward at the far blue line.

Defensive Zone: Lost Draws
Teams may use two variations of alignments in their defensive zone. Outlined here are the responsibilities for each player when the face-off is lost. Five across is the most common alignment, in which all players are set to defend; D back gives you an offensive advantage if you win the draw, but it requires some quick adjustments if you lose.
- FIVE ACROSS
This common setup is generally used for 80 percent of all defensive zone draws. When C loses the draw, he stays with the other team’s center (see figure 12.31). RW shoots through on the inside of the circle and pressures the point. LW moves out to the high slot and is ready to go after the other D if a pass is made. D1 and D2 stay with their forwards. Five across has become the NHL standard defensive zone face-off alignment. The only variation is that D2 will be a few steps back with some teams so that he can break out quicker when the draw is won. All five players have clear assignments and can adjust off this positioning.

Figure 12.31 Five across is an effective way to pressure off lost draws in the defensive zone.
- D BACK
Some teams like to have a D directly behind the center on the draw for an easy breakout (see figure 12.32). If you lose the face-off in this setup, C stays with the other center. RW pressures the boards point, and D1 takes the forward he was lined up against. LW moves into the high slot, ready to pressure the other defenseman if a pass is made. D2 steps up quickly and takes the inside forward.

Figure 12.32 D back face-off.
Power-Play Face-Offs
Winning or tying up and getting possession on power-play draws are crucial. If the other team clears the puck, the power-play unit generally needs 20 seconds to get set up again, which is both frustrating and tiring. Described here are three ways to get possession and set up. Players and coaches should also try to recognize what the penalty-killing unit is trying to do if they win the draw; by doing so, you may be able to regain possession even though you lost the draw.
- TRADITIONAL ALIGNMENT
When C wins or ties up on the draw, both wingers move in to push the puck back to the Ds. On lost draws, RW shoots through to the corner and puts pressure on the opposing D. LW takes away the D-to-D penalty-kill clear or assists RW in the corner. C reacts to apply pressure and support RW and LW (see figure 12.33). Although you would like to win all draws because gaining possession on the power play is so important, you may want to tell the center to tie up his opponent and allow the wingers to help. The odds of getting possession are better.

- DOUBLE UP OUTSIDE
In this setup, two forwards are on one side to provide an extra player to try to get puck possession. RW and LW line up along the boards. On a draw when the puck is loose, RW screens and LW pulls the puck back to D1. D2 always lines up in a position that blocks the lane for the opposing center to shoot the puck down the ice immediately off the draw. In this example, if the opposing center is a left shot, then D2 would need to play back a step (see figure 12.34). On lost draws, LW shoots through to the corner and ties up the opposing defenseman. RW comes in to get the loose puck.

Figure 12.34 Double up outside look on power play face-off.
- DOUBLE UP INSIDE
In this setup, two forwards are now on the inside, D1 is on the boards, and D2 is back on the blue line (see figure 12.35). On a draw when the puck is loose, RW and LW move in to get the puck back to D2. RW initially lines up in a position that blocks the lane for the opposing center to shoot the puck down the ice immediately off the draw. In this example, if the opposing center is a left shot, then RW would need to play back a step. On lost draws, RW shoots through to the corner and ties up the opposing defenseman. LW comes in to get the loose puck. At times off this draw, LW will be open at the net when the puck is loose in the face-off circle. If RW gets the puck when it is loose in the circle, he can make a quick play to LW.

Figure 12.35 Double up inside look on power play face-off.
Penalty-Kill Face-Offs
Because the face-off is such an important part of the penalty kill, it was covered in depth in chapter 10 on penalty kills. As mentioned in that chapter, gaining possession on special teams is important. Penalty-killing units want to frustrate the power play by making them go back down the ice 200 feet (61 m) to get the puck and start a breakout. More face-off options are presented in the Face-Offs and Penalty Kills section in chapter 10, but here are two common strategies to use after winning draws in the defensive zone.
- CORNER BUMP
In this situation, when C wins the draw, LW drops down to the wide corner (figure 12.36). D1 bumps the puck over to LW, who clears the puck. D2 should screen the opponent’s inside winger to provide time for LW to get the puck and shoot it down the ice.

- RIM CLEAR
It is best if the Ds switch sides to give the boards-side defenseman the ability to shoot the puck around the boards hard (see figure 12.37). C tries to win the draw back to the corner or tie up his opponent and allow the puck to sit in behind. D1 (who is now a left shot) moves in quickly and rims the puck hard on the boards or the glass.

Figure 12.37 Rim clear penalty kill face-off.
In this section, we cover face-off strategies for four-on-four play and late-game pulled-goaltender situations. Although four-on-four face-offs aren’t common in a game, the team needs to be prepared, especially because overtime at most levels uses four-on-four play to decide the game. Pulled-goaltender situations also don’t happen often, but good execution of face-offs can be critical in getting that tying goal.
Four-on-Four Face-Offs
We outline one offensive and two defensive alignments for four-on-four situations. On lost draws, coverage is much more difficult when teams are four on four because the center is often tied up taking the face-off and can’t get out to the opposing defenseman. Having the D take the draw is a strategy that should be considered.
- FOUR ACROSS
The center tries to win the draw back to D1 or D2. If the draw is lost, F2 must resist the temptation to go out to the boards-side defenseman and stay in the slot (see figure 12.38). The center battles to get out to pressure the strong-side defense. If the puck is passed D to D, then F2 moves out in the shooting lane. D1 picks up the opposing center. D2 takes the inside forward. This alignment is the more traditional one used in a team’s defensive zone, but it does result in problems for the center getting out quickly.

Figure 12.38 Four across on face-off when playing four on four.
- D TAKES THE DRAW
This sound defensive alignment is not commonly used because the defense has to practice taking face-offs. Have D1 take the draw and D2 line up beside the other team’s remaining forward (see figure 12.39). On a lost draw, D1 and D2 take the other team’s forwards, and F1 and F2 go to the opposing defensemen. If the opposition lines up with three up on the draw, then D1 should look at shooting the puck through for F1 and F2 to go two on one.
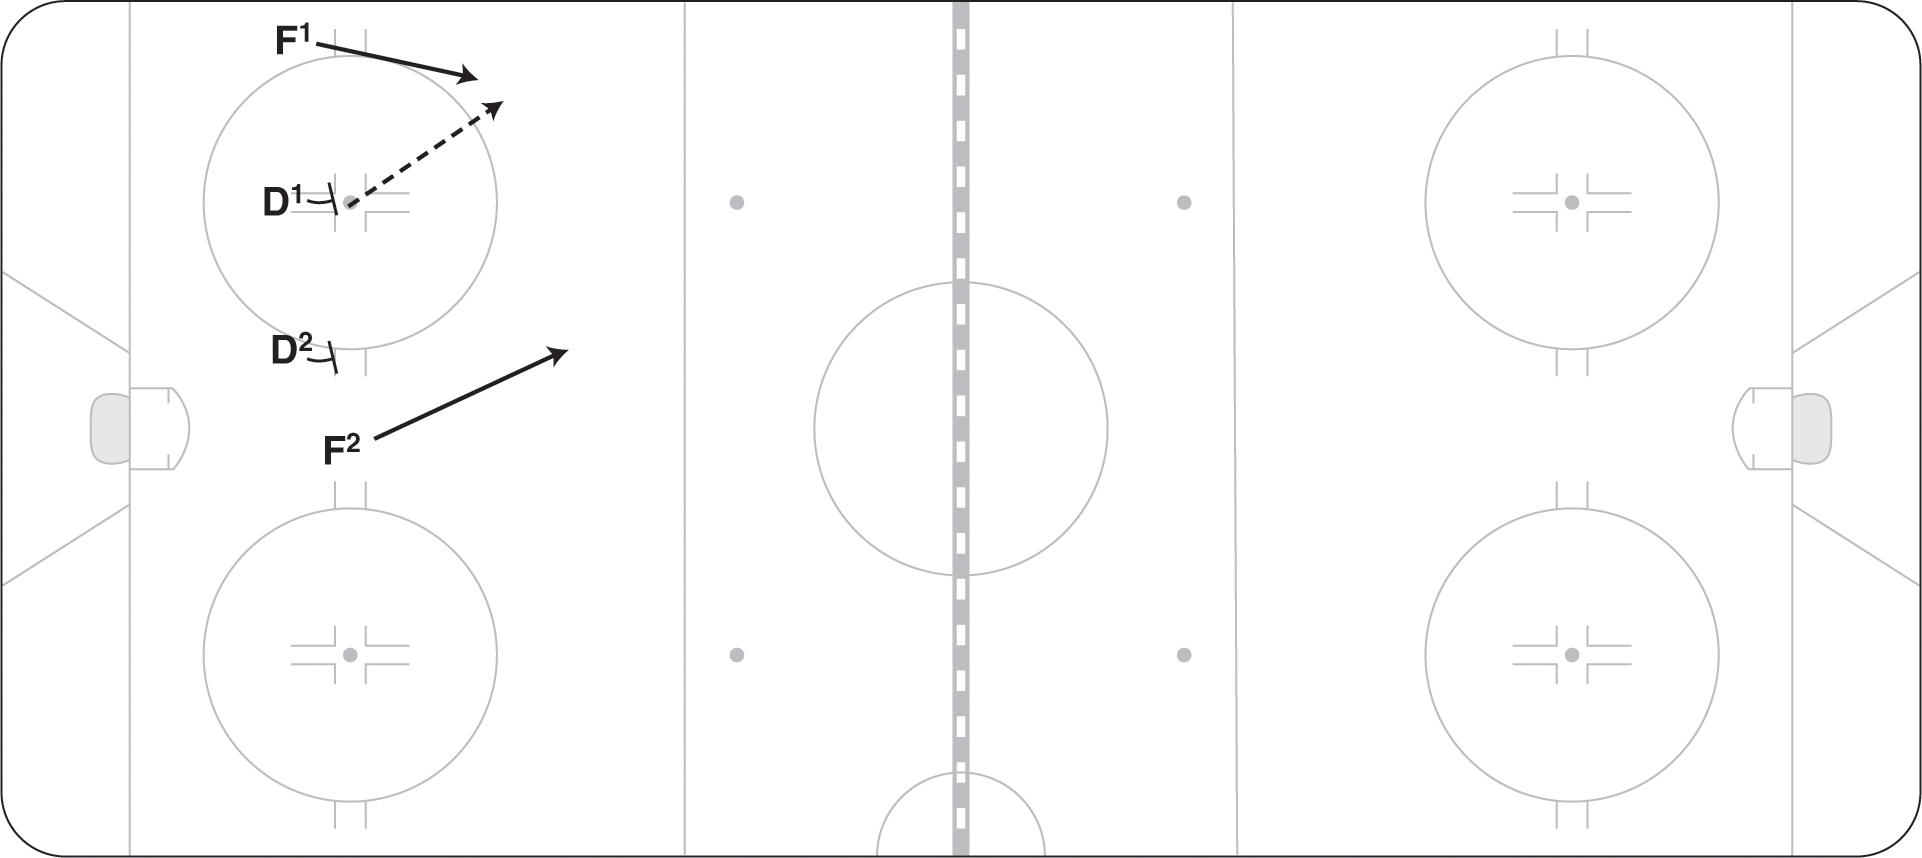
Figure 12.39 Using the defense to take the four on four face-off.
- BOARDS-SIDE ROLL
After winning the face-off in four-on-four situations, teams should make it difficult for the opposition by having a wide option. C takes the draw and wins it back to D1 on the boards (see figure 12.40). D1 lines up a few steps back from the hash marks on the boards side. D1 has the option to shoot with F2 at the net or pass to D2 for a one-timer shot. D1 and D2 should switch sides, making it easier for them to shoot.

Figure 12.40 Boards-side roll offensive face-off play.
The excitement ratchets upward when a team pulls the goaltender for an extra attacker. Usually, this occurs in the last minute of the game, and the strategy should be to create a chance right off the draw. The play doesn’t have to be complicated, but all players need to know what option is being executed. Here are a few strategies.
- INSIDE-OUT PLAY
C wins the draw or leaves the puck in behind him. LW, C, and EX (extra forward) drive the net (see figure 12.41). RW swings to the outside and takes the puck or receives it from D1. C pops out into the slot. RW looks to make a play to C, back to D1, to the front of the net, or to D2 on the back side.

Figure 12.41 Pulled goaltender inside-out face-off play.
- D SLIDE PLAY
RW is back for the draw, and D2 is up on the inside of the circle (see figure 12.42). C draws the puck back to D1. RW goes to the net. EX (extra forward) goes to the net. D2 slides out and is ready for a one-timer shot (in this example, D2 is a left shot). D1 may shoot at the net or pass to D2 for a quick shot.
- DOUBLE OPTION
Two forwards line up on the inside (see figure 12.43), and one is on the boards (this player must be a left shot). C can draw the puck to the boards so that EX (extra forward) can take a quick shot, or the center can tap the puck ahead and make a quick play to the net for LW and RW.

Figure 12.43 Double option face-off play with bulled goaltender.