Preserving evokes deep-rooted, almost primeval feelings of self-sufficiency and survival, of gatherer and hunter, for this is how our ancestors stayed alive. These days, this all sounds more than a little extreme, but unquestionably a home with a good store of homemade preserves will generate a feeling of warmth and confidence.
I admit that at times I can get quite carried away thinking of how I can fill shapely jam jars, of the glistening grains of sugar, of the neroli-like perfume of Seville oranges…But I’ve also found that it pays to be aware of a small amount of cold, hard science, and to be familiar with some basic but important practical techniques. Once you understand why food goes bad, and how it can be prevented from doing so, your jam, jelly, and chutney making can reach new levels of success. Don’t worry, you don’t need a chemistry degree…
The simple fact is that any fresh food, unless it is treated in some way, will inevitably decay and become unsuitable for consumption. There are four meddlesome elements that cause spoilage in foods — enzymes, bacteria, molds/fungi, and yeasts — but if the cook intervenes to prevent or arrest their progress, most foods can be safely kept for extended periods of time.
Microorganisms are generally viewed as undesirable, and if present in sufficient numbers, they make food a health hazard. In certain conditions, all microorganisms will flourish and increase. Some nonharmful microorganisms are deliberately brought into play in food production, of course — mold in blue cheeses, and yeasts in beer and bread making, for example — but it is the harmful microorganisms that concern us in preserves making.
Good food hygiene is the first step in stopping the spoilers. It is essential that all food be handled with care and all utensils, equipment, and work surfaces be spotlessly clean, so as few microorganisms as possible are present to start with.
The use of high temperatures is the second way to defeat the tricky foursome — hence, cooking is an integral part of many preserving processes. They may thrive in warmth, but they cannot take real heat.
High concentrations of sugar, acid, alcohol, or salt also kill these undesirables, or at the very least make it hard for them to flourish, and nearly all the preserving techniques in this book rely on large quantities of these ingredients to create conditions hostile to enzymes and microorganisms.
The final line of defense involves excluding the air these spoilers need to thrive. This is why well-sealed jars and bottles are essential, and why oil is another important preserving medium.
Enzymes are not actually organisms, but proteins found in all living things, animal or vegetable, and they perform a huge variety of roles. From a culinary point of view, it’s important to know that enzymes remain active long after food has been harvested, and they function as catalysts for change, triggering and speeding up chemical processes. Enzymes trigger deterioration, for instance, by sparking off changes in tissue that in turn provide a fertile environment for the growth of microorganisms. The discoloring of cut or damaged fruit or vegetables is also caused by enzyme action. However, if the exposed surface comes into contact with an acid or alkali, the discoloration will slow down. This is why prepared produce is often rubbed with lemon juice or plunged into lightly salted water.
Enzymes increase their activity at temperatures between 84° and 122°F and will begin to be destroyed at temperatures above 140°F. Their action is also halted at temperatures below freezing but will increase again when warmth returns.
So small that they are only visible under a microscope, bacteria are the most ancient and widespread form of life on earth. Bacteria increase rapidly at temperatures between 68° and 104°F. They become dormant in the freezer and are destroyed at or near 212°F — the boiling point of water. Bacterial spoilage of food is sometimes difficult to detect, and although most bacteria are harmless — some even useful — some cause food to rot and become foul smelling, and their toxins are harmful to health. It is therefore vital not to take any shortcuts with preserving procedures, and to follow all instructions carefully to avoid any form of bacterial contamination.
The spores of molds and fungi are present in the air around us and will take root in almost any food. Initially, they produce fine threads, then the characteristic gray-green, cottony bloom. Molds and fungi are dormant at 32°F and thrive at temperatures between 50° and 100°F, and their spoiling activities decrease from 140° to 190°F, which is why cooking is an efficient way to get rid of them. A bit of mold on the top of an open jar of jam should not be scooped off and ignored; as they grow, some molds produce mycotoxins that can be harmful if eaten.
The yeasts found in foods are generally not harmful to health but can cause spoilage. Most species are quickly destroyed at 140°F and above and are inactivated by cold. Some grow in food containing as much as 60 percent sugar, and badly covered or half-used jars of jam stored in a warm kitchen are prime sites for yeasts to begin to ferment. The gases produced may cause the preserve to pop when the lid is removed.
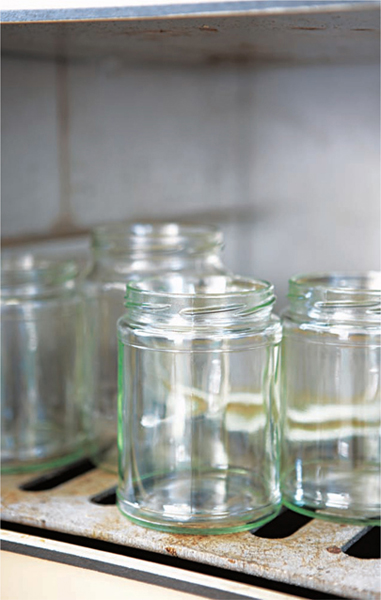
Proper potting and sealing is one of the main pillars of good preserves making. If done incorrectly, it can ruin a batch of otherwise perfect preserves. These days, some form of glass vessel with a secure seal is generally used. To reduce the risk of bacterial contamination, it is important to sterilize the container and fully fill or “jam-pack” it with your preserves.
Any microorganism lurking in the container you put your preserves into has the potential to grow and contaminate, which is why it is essential to use sterile jars. There are three simple ways to sterilize jars: you can immerse them in a pan of water and bring to a boil; wash them in very hot and soapy water, rinse thoroughly, then dry them in a very low oven; or simply put them through a hot dishwasher cycle.
Whichever method you choose, only clean the jars shortly before they are to be used and make sure they are dry. This minimizes the time in which the jars might pick up new contaminants. Also, all hot preserves should be poured into warm jars (this helps to prevent the temperature from dropping before the seal is applied), so you might as well use them before they have cooled down from the drying process.
I like to reuse jars and bottles whenever possible. As well as keeping costs down, it gives me a wide variety of shapes and sizes to choose from. However, reused jars should always be cleaned both inside and outside, then very carefully examined to make sure they are not damaged in any way. Cracks or chips are ideal breeding grounds for bacteria and can also shed tiny splinters of glass that could cause injury if swallowed.
Old labels on reused jars should be fully removed. I find the best way of attacking this job is to fully immerse the jars in a pan of cold water, bring to a simmer, and simmer for 10 minutes. I then let the jars cool and, when cool enough to handle, rub off the label with the blunt side of a knife. Tamper-resistant seals and labels on lids can be removed in the same way.
If you do want to buy jars, they are available from specialty shops and are generally sold in certain sizes that comply with the requirements for commercially produced preserves. If you are using an assortment of old jars, you can measure their capacity in volume (just fill them with water, then pour the water into a measuringcup).
Before you start making preserves, you should check the recipe to see how many jars you will need so you can have them ready. Thankfully, almost all jars share just two or three lid sizes, so lids can often be mixed and matched between various jars and bottles.
Having packed your preserves, the next vital thing is to seal the jars as quickly as possible to prevent entry of oxygen and airborne microorganisms. For hot sweet preserves, chutneys, and relishes, this can be done with a twist-on lid. Pickles and vinegar preserves should always be sealed with vinegar-proof twist-on lids.
I like to seal fruit cheeses by pouring melted food-grade paraffin wax over the surface, giving a really traditional finish to the filled pots. The easiest way to melt the wax is to place it in a heatproof bowl (I keep one especially for this) and stand it in a pan of gently simmering water until the wax is liquid.
Twist-on lids The metal twist-on lids that come with most jars are very easy to use and create a good tight seal. Generally, these days, most lids have a plasticized lining that is suitable for use with both sugar- and vinegar-based preserves. Avoid the use of unlined metal lids with vinegar preserves because they will corrode and spoil the preserves. For the best possible results, I recommend always using new lids, even with reused jars. Previously used lids are still an option, but you must make sure they are not damaged in any way and they should be sterilized by boiling in a pan of water for 10 minutes before use.
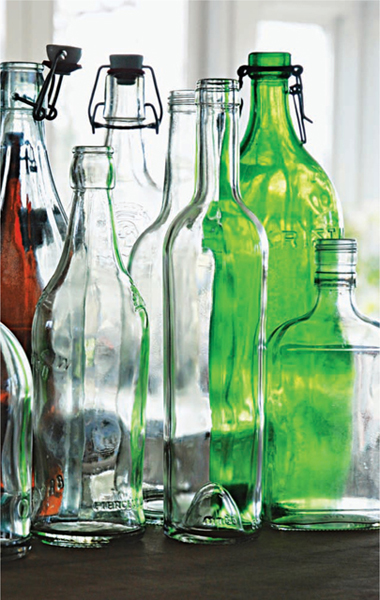
I stash away old bottles of various shapes and sizes to use when making cordials, fruit liqueurs, and flavored vinegars and oils. Vinegar bottles with twist-on lids are excellent for flavored vinegars, cordials, and fruit syrups, while small, interesting-shaped spirit bottles are jolly useful for fruit liqueurs and make attractive gifts.
A good range of bottles can be purchased from specialty shops, including old-fashioned preserving bottles with a swing-top lid fastening. I particularly like using these nice-looking bottles; made from toughened glass, they are easy to use, the lid is attached, and they can be used time and time again. All bottles, lids, and corks should be sterilized by boiling for 10 minutes in a pan of water before use.
Careful potting and sealing at the correct temperature for the particular preserve is important for the keeping quality.
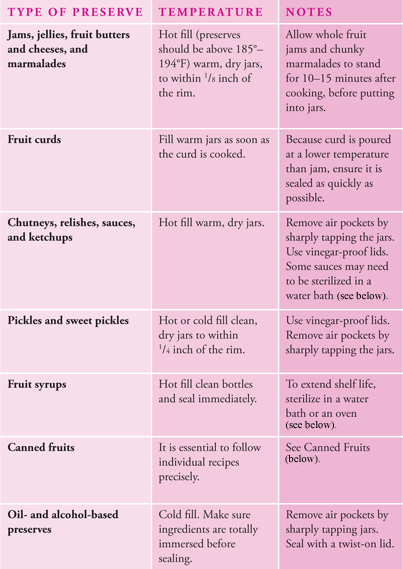
MORE INFORMATION ON WATER BATH STERILIZATION.
MORE INFORMATION ON OVEN STERILIZATION.
MORE INFORMATION ON CANNED FRUITS.
Use self-adhesive labels with plenty of space to record what the preserve is and when it was made. Plain labels can be used, but there are lots of attractive labels on the market designed especially for preserves making. If you’re adept on the computer, you can even design your own. Don’t try to stick a label on a hot jar — the glue will melt and it will fall off. Wait until jars are cold before labeling.
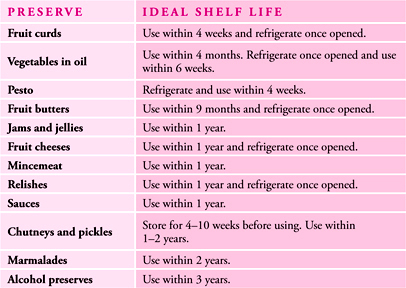
Preserves with a good seal should last a long time, although the texture and color may well deteriorate. Nonetheless, I’d be the first to admit that a murky jar of some old concoction discovered during a larder clear-out will have little appeal — and there is always an underlying concern that it might have gone bad. The chart below contains guidelines for safekeeping and pleasant eating. (Chutneys, pickles, and marmalades, by the way, improve with a maturing period so shouldn’t be eaten straight away.)
Once preserves are opened, look after them. Replace lids securely and keep the preserves in a cool place because, once the seal on a jar or bottle is broken, the contents are vulnerable and can be recontaminated by microorganisms.
In a cool, dry, dark place These conditions apply to the storage of all preserves. Few houses these days have good old-fashioned larders or cellars, so you may find the best place to keep your preserves is in the garage or shed.
Most of the ingredients needed for preserving are in general use in a busy kitchen. It is, however, worth considering their different characteristics.
A concentration of over 60 percent sugar in preserves creates an environment that is hostile to microorganisms. Sugar can also be combined with vinegar in sweet-and-sour preserves such as chutneys and sauces. The sugar you use not only affects the cooking process, but also influences the final flavor of your preserves.
Granulated sugar Available in pure white or golden, unrefined varieties, this is a good basic, inexpensive sugar that will work well in almost any of the recipes in this book. It has medium-coarse grains, so it takes a little longer to dissolve than superfine sugar but is less likely to stick to the bottom of the pan and burn. Granulated sugar is produced from sugar beets, but an intensive refining process is involved. If you’d prefer an unrefined sugar, which will retain its natural golden color and delicate caramel flavor, choose one derived from sugarcane. I use both unrefined and refined granulated sugar. Unrefined sugar is ideal for marmalades and with strong-flavored fruits such as black currants, but I prefer a refined white sugar for more delicate fruits and berries, for jellies and curds, and for flavored liqueurs.
Coarse sugar This is more costly than granulated sugar. It’s by no means essential for good preserves, but the big, chunky crystals dissolve slowly, need less stirring, and are less likely to stick to the bottom of the pan. They also produce less froth or scum.
Brown sugar Using unrefined Demerara or muscovado sugar in a jam or chutney — either wholly or in combination with a lighter sugar — changes the color and taste. These dark sugars are not highly processed and are full of natural molasses flavor. They can overpower delicate ingredients but are wonderful when used with citrus fruit in marmalades or with vinegar and spices in savory chutneys and pickles.
Honey This can be used to add another layer of flavor to preserves, although it cannot entirely replace the sugar as it burns very easily. Replace 10 to 15 percent of the total sugar in a recipe with honey and add it when the sugar has dissolved.
Vinegar has been used for centuries to preserve everything from onions to eggs, and foods preserved in this medium are generally referred to as being pickled. The word vinegar comes from the medieval French vin-aigre, meaning “sour wine.” It is produced by a double fermentation of some form of fruit or grain. The first fermentation is brought about by yeasts turning sugar into alcohol, as in the production of wine, beer, and cider. The second fermentation involves bacteria turning the alcohol into acetic acid, thereby creating vinegar.
In order to preserve successfully, the acetic acid content of vinegar must be at least 5 percent — check the label. This level of acidity creates an environment in which few microorganisms can survive. The harsh flavor of vinegar can be mitigated by the addition of sugar and/or spices, while the choice of vinegar itself will also have a considerable effect on the final taste of your pickles.
Malt vinegar Produced from fermented barley, malt vinegar is inexpensive and has been the backbone of traditional pickling for many years. It has a very strong taste that some people love, but I often find it a bit too aggressive. Nevertheless, in a really hearty, well-spiced chutney or pickle, it can give precisely the right robust bass note of flavor, and it’s a stalwart favorite for pickled onions. The color in dark malt vinegar comes from the addition of caramel — pure, distilled malt vinegar is colorless.
Wine vinegars Derived from grapes, red and white wine vinegars are more expensive than malt vinegar but have a finer, more delicate flavor. I like to use them for pickling ingredients such as nasturtium pods, where I don’t want the pods’ fiery bite swamped by vinegar.
Cider vinegar This is sweeter and fruitier than wine vinegar and my choice for seasonal chutneys, pickles, and relishes. Specialty stores sell an excellent range of cider vinegars, and if you live in cider apple country, you may well find some excellent local varieties.
High concentrations of salt are, of course, inimical to yeast, bacteria, and molds, which is why this ingredient is so important in many preserving methods. Salt is also crucial for enhancing flavor. In addition, it is often used in the preparation of foods prior to pickling, where it draws out excess water, which would otherwise dilute and spoil the preserves (see PICKLES, CHUTNEYS & RELISHES).
Sea salt This is produced by evaporating seawater. You can buy unrefined, natural flaky types, such as Maldon or Halen Môn, which are lovely sweet-tasting ingredients. They are also much more expensive than other salts, so while you might be happy to use them for seasoning, you may think it rather extravagant to use them in large quantities for dry-salting or pickling. A relatively inexpensive fine-grained sea salt, available from health food stores or supermarkets, is what I use most often in preserving. It’s certainly the most suitable type for dry-salting vegetables for pickling, as it will coat them well. However, like many fine-grained, free-flowing salts, some fine sea salts contain an anticaking agent, so do check labels before you buy.
Rock salt Generally the cheaper alternative to sea salt, this is mined from underground mineral deposits. It may also be sold as kitchen salt or table salt. Some are highly processed, purified, and treated and taste correspondingly harsh. I don’t use salts like this in preserving, as they can affect the final quality of the preserves. However, coarse, additive-free rock salts are available and make a good alternative to sea salt.
Alcohol is a very useful preserving medium, but to function effectively, it must be in the form of a spirit that is at least 40 percent alcohol (80 proof). Gin, vodka, rum, brandy, and whiskey are all suitable. Gin is a tried-and-tested favorite with fruits such as damson plums, while pitted cherries will make a splendid liqueur when steeped in brandy. Colorless eau-de-vie (brandy or flavorless alcohol that has not been aged) is an ideal base for more delicate or subtle ingredients. Wines, fortified wines, and cider can be used for preserving but need to be combined with other preservative ingredients, such as sugar, or with sterilizing methods, such as canning.
An effective means of sealing out oxygen, oil is a useful and potentially delicious part of many savory preserves. The oil will be an integral part of the finished preserves, and as it will have taken on flavor from the preserved food, you might want to use it to enhance other dishes. So I’d advise always using the best you can afford.
Olive oil This is extracted by grinding olives to a paste and then pressing with large millstones. Extra-virgin refers to olive oil with very low acidity, which is completely unrefined and taken from the first pressing of the olives. It’s considered to be the very best type. However, it is expensive and often powerfully flavored, and I rarely use it in preserves. Virgin olive oil has a little more acidity but is also unrefined and will have a good flavor. It is much more affordable and is my choice for most oil-based preserves. Anything labeled “pure” olive oil, or just “olive oil,” will be a blend of refined and unrefined oils. Less exciting, they are still perfectly acceptable to use.
Sunflower oil Light in color, almost flavorless, and much less expensive than olive oil, a good-quality sunflower oil is useful when you don’t want the taste of the oil to intrude on the preserves. It can also be blended with other, more robustly flavored oils (see below).
Canola oil Golden in color and nutty in flavor, this is extracted from the tiny, jet-black seeds of Brassica napus, a member of the mustard family. It contains less saturated fat than any other oil, is high in omega-3s, and is a good source of vitamin E. I like to use it for flavored oils.
Hempseed oil Cold-pressed hempseed oil is vivid green in color and has a very strong nutty flavor. Alone, it would be overpowering for many ingredients, but 10 to 15 percent blended with sunflower oil creates a well-flavored oil.
Equipping yourself for preserving will not entail a second mortgage. You probably already have most of the equipment you need in your kitchen. Here is a very quick run-through of essentials and useful items.
Preserving pan This is almost an essential item — but a large, wide, heavy-bottomed stockpot could stand in. Preserving pans do have the advantages of sloping sides, which maximize evaporation, a pouring lip, and a strong carrying handle. Go for a robust stainless steel preserving pan with a capacity of about 9 quarts. This should be large enough for most jamming and chutney sessions. Your pan must be deep enough to contain the rapid rise in liquid that occurs when jam comes to a full rolling boil. It is useful to buy one with a calibrated volume measure on the inside of the pan, which allows you to see by how much your ingredients have reduced.
Wooden spoons These need to be big and long handled. If possible, keep one especially for jam and one for chutney making (they will become impregnated with fruity and vinegary juices respectively).
Candy thermometer This is not expensive and will help you to check that your preserves have reached the right temperature for setting up, as well as giving you an accurate guide to temperature when canning.
Slotted spoon For skimming scum or fishing out fruit pits.
Sieves A couple of sieves are useful for puréeing fruit.
Paper coffee filters For straining small quantities of fruit vinegar or liqueur.
Food mill Great laborsaving tool for puréeing fruits and removing skins and seeds simultaneously. Useful when making fruit butters and cheeses.
Jelly strainer bag, or cheesecloth, and stand These are essential for straining the juice from cooked fruit when making jellies. Purpose-made jelly strainer bags and stands are available from specialty shops. Or you can improvise, using an upturned stool with a double thickness of cheesecloth tied to each leg to form a bag. Jelly strainer bags and cheesecloth can be reused, even though they become stained by fruit dyes. Before use (even when new), they should be scalded by placing in a pan of water and bringing to a boil.
Spice infuser Not essential, but an alternative to tying spices in cheesecloth for spicing vinegars and chutneys.
Measuring cups and spoons One or two calibrated, heat-resistant measuring cups are indispensable for measuring ingredients and pouring preserves into jars. A set of measuring spoons is also very useful for spices and seasonings.
Funnel A wide-necked pouring funnel can prevent spillages when filling jars but is not essential — a steady hand and a good pouring pitcher are often easier.
Accurate kitchen scales Very important for preserving success.