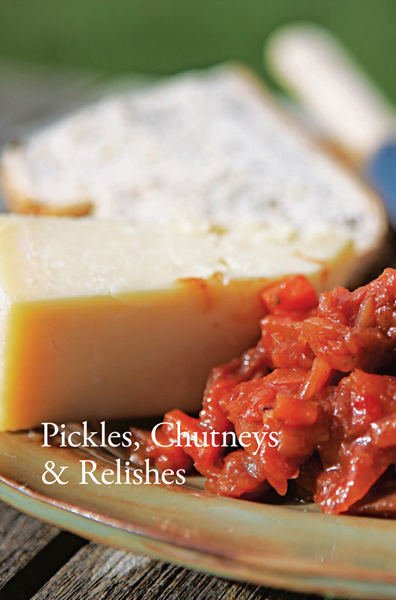
Time for vinegar vapors to fill the air! This chapter is a little sharper than the last one — and full of recipes that feature piquancy, bite, and spice. These sweet-sour preserves are generally inexpensive and easy to make. There are only a few guidelines to follow — you don’t have to worry about pectin or acid, for instance, as in jam making. Their uses extend far beyond cold meat and ploughman’s lunches. They can be stirred into soups; added to meaty stews, curries, or tagines; served with smoked or marinated fish; and, of course, combined with other ingredients to make great sandwiches and picnic food. No home should be without them! Often lumped together, pickles, chutneys, and relishes are actually distinctly different and not prepared in the same way.
Clear pickles These are an age-old way of preserving vegetables or fruits, which are usually left raw or only lightly cooked, and kept whole or in large pieces. Pickles rely predominantly on vinegar and salt for keepability, though sugar, honey, spices, and herbs can all be added for extra flavor. After SALTING, the ingredients are rinsed and drained before being packed into jars and fully covered with plain or spiced vinegar. Pickled onions are the classic example of this type of preserve.
Sweet pickles Made from fruits and vegetables, again in relatively large pieces, and lightly cooked in sweetened vinegar, these are often flavored with spices such as ginger, cloves, and allspice. In some recipes — piccalilli, for instance — the vinegar syrup is thickened with cornstarch to make a light sauce. The cooked produce is packed in warm jars and the vinegar syrup is reduced and poured over the fruit to cover.
Chutneys Authentic Indian chutneys are usually fresh preparations served with spicy foods. The Western interpretation of a chutney is rather different: rich, highly spiced, sweet-sharp preserves, based on vegetables and fruits that are chopped small and cooked for a long time to create a spoonable consistency and mellow flavor. They often feature dried fruit too, which contribute natural sugar and textural contrast.
Relishes Somewhere between pickles and chutneys, these are made from diced or chunkily cut fruit and vegetables, but they are cooked for a shorter time than a chutney. They can be spicy, sweet, or sour (or all three), may be eaten soon after making; and should be kept in the fridge once opened.
Pickles, chutneys, and relishes customarily rely on vinegar or a mix of vinegar, salt, and/or sugar to preserve tender, young vegetables and fruit. Highly flavored spices or herbs are added to augment the final flavor, but their often fiery potency will mellow as the preserve matures.
Salt plays a very important role in the making of pickles, chutneys, and relishes and, indeed, can be used as the sole preservative, as in PRESERVED LEMONS. However, it’s more usually employed as a general flavor enhancer and in the preparation of vegetables and fruit prior to pickling. It may be sprinkled straight on the ingredients (this is known as dry-salting) or made into a brine (wet-salting), in which the ingredients are immersed and left for 12 to 24 hours. The salt firms up the vegetables and removes excess water which would otherwise dilute the vinegar and cause the pickles to turn moldy. Dry-salting is ideal for watery vegetables such as cucumbers and summer squash, and for very crisp pickles, whereas brine is less harsh and can be used for less juicy produce. A fine-grained salt is essential for dry-salting, as it will adhere closely to the surface of the ingredient, but any good-quality salt can be used in a brine (MORE INFORMATION ON DIFFERENT TYPES OF SALT).
To make brine For a good all-purpose brine, allow 1 heaping tablespoon of salt per cup of water (a lighter brine is more appropriate for small ingredients such as nasturtium seeds). Simply dissolve the salt in the water and the brine is ready to use. The prepared ingredients should be covered with the brine and left overnight or for up to 24 hours before being drained, dried, packed, and pickled in jars. Many old recipes call for the brine to be “strong enough to float an egg"; you will find this ratio will do just that.
To dry-salt Layer your cut-up vegetables on a shallow dish, sprinkling fine salt over each layer. As in brining, the vegetables are left overnight or for up to 24 hours. After a few hours, you will see water being drawn from the vegetables. After salting, the ingredients need to be rinsed in very cold water (to keep them crisp), drained well, and patted dry before being pickled.
Your pickles, chutneys, and relishes will only be as good as the vinegar you use. If vinegar is the main preserving ingredient, it’s important to use a good-quality variety with at least 5 percent acetic acid content (you should find this information on the bottle). Beyond that, there are no hard-and-fast rules as to the type of vinegar you should go for — it’s very much a matter of taste (MORE INFORMATION ON DIFFERENT TYPES). However, a translucent vinegar gives a better appearance in a clear pickle. The vinegar used for pickling is almost always spiced. You can buy ready-spiced pickling vinegars, commonly based on malt vinegar. However, I prefer to make my own at home, so I can choose the type of vinegar and the precise spice mix.
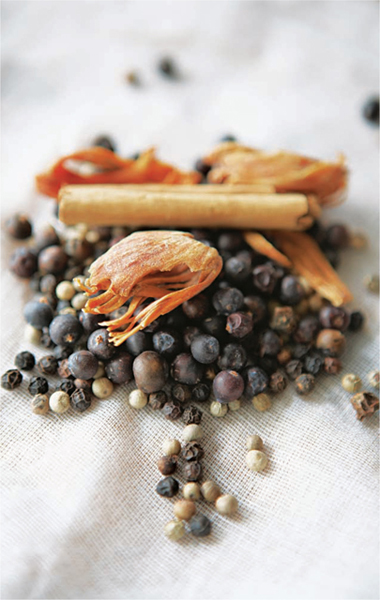
Spices are essential to give fiery bite, flavor, and aroma to pickles, chutneys, and relishes. Whole spices are used for pickles — ground ones produce a cloudy result — but either whole or freshly ground spices can be used for chutneys and relishes. Whole spices should be tied in a cheesecloth bag or enclosed in a tea or spice infuser so they can be easily removed after cooking.
To make a cheesecloth spice bag, cut a piece of cheesecloth, about 8 inches square, put the spices in a heap in the middle, and gather up the edges of the cheesecloth to form a little sack. Tie the bag with string so that the spices are loosely but securely held in.
A pickling spice blend can be bought ready-made but you’ll get a much fresher flavor if you make your own — I combine equal quantities of cinnamon stick, whole cloves, mace blades, and whole allspice and a few peppercorns and allow ½ to 1 ounce of this mix for every 4 cups of vinegar. I like to add a good tablespoonful of Demerara sugar and a couple of fresh bay leaves when I brew up the spice. The mix can be kept in an airtight jar for at least 1 year and used as required. Other spices such as fresh or dried chiles, and fennel, dill, or celery seeds can also be added to bring a different range of flavors to your pickles.
Always check the sell-by date on your spices and be ruthless about getting rid of any that are past their best. Once they reach a certain age, they’ll lose the aroma and flavor you need. If you are using ground spice in a recipe, it is always worth taking the time to grind your own because, once ground, spices lose their pungency amazingly quickly. Give whole spices a light toasting in a dry frying pan, then grind as finely as possible in a mortar and pestle or a spice or coffee grinder. Prepare the spices in small quantities and don’t keep the mix for more than a week or two.
Vegetables and fruits, which will make up the bulk and body of your preserves, should be young, firm, and as fresh as possible. Almost any produce can be used, though soft berries are generally better in jams and jellies. I’ve made pickles, chutneys, and relishes with just about everything else! Apples, gooseberries, pears, plums, summer squash, and tomatoes (ripe or green) form the base of most chutneys. For most recipes they should be peeled, washed, and well drained before being chopped, diced, or left whole. Cut away any bruised or damaged flesh.
Pickles are very easy to make and their success relies quite simply on good preparation of the raw ingredients, a well-spiced vinegar, and an adequate maturing period.
1. After brining or salting your prepared fruit or vegetables, rinse and drain them well.
2. To prevent bruising, don’t pack the produce too tightly into the jars.
3. Pack in an attractive way to within 1 inch of the top of the jar, leaving enough room for the contents to be completely covered with vinegar.
4. Always use STERILIZED JARS and vinegar-proof lids.
5. Use cold vinegar for crisp pickles and hot vinegar if a softer texture is required.
6. Store your pickles in a cool, dark, dry place for at least 1 month before using.
Don’t rush your chutney making, for a good chutney will take several hours to make. The end result will be more than worthy of the time you’ve spent.
1. Use a stainless steel pan and wooden spoon — other materials may react with the vinegar and cause discoloration.
2. Cut fruit and vegetables into small, even-sized pieces — this is time-consuming but really crucial in achieving a good final texture.
3. Long, slow cooking in an open pan is essential for the chutney to become rich, smooth, and mellow.
4. Toward the end of cooking, stir frequently so the chutney doesn’t stick to the bottom of the pan.
5. The chutney has reached the right consistency when you can draw a wooden spoon across the bottom of the pan and see a clear line for a few seconds before the chutney comes together again.
6. Fill jars to within ¼ inch of the top and cover with vinegar-proof lids. Poorly covered chutney will dry out and shrink in the jar.
7. Store chutneys in a cool, dark, dry place and let them mature for at least 8 weeks before using.
Season: May to July
Made with the reddish green stalks of main-crop or field rhubarb, this relish is quick and easy, involving much less cooking than a chutney would require. It is light, very fruity, and not too sweet. Delicious with curries, oily fish, chicken, and cheese and in sandwiches, it’s a versatile addition to the larder.
Rhubarb, by the way, is very easy to prepare, but do take care to always remove the leaves, as they are poisonous.
Makes five 8-ounce jars
For the spice bag
2 ounces fresh ginger, bruised
2 cinnamon sticks, snapped in half
6 cloves
2½ cups granulated sugar
7 tablespoons cider vinegar
2¼ pounds rhubarb (untrimmed weight)
¾ cup raisins
First, make your spice bag by tying up the ginger, cinnamon sticks, and cloves in an 8-inch square of cheesecloth.
Put the sugar, vinegar, 7 tablespoons of water, and the spice bag into a preserving pan. Heat gently to dissolve the sugar and allow the spices to release their flavors into the syrup. Remove from the heat and set aside to infuse for about 20 minutes.
Meanwhile, trim and wipe the rhubarb stalks and chop into ¾- to 1-inch chunks.
Add the rhubarb and raisins to the spiced syrup. Cook gently for 15 to 20 minutes, until the mixture is thick but the rhubarb is still discernible as soft chunks. Remove from the heat; pour into warm, sterilized jars; and seal with vinegar-proof lids (SEE POTTING, PACKING AND SEALING). Use within 1 year.
P.S. To bruise the ginger for the spice bag, simply whack it gently with a rolling pin or similar blunt object.
Gooseberries will stand in quite readily for the rhubarb in this recipe. For the spice bag, try using a mix of traditional Indian spices: 1 teaspoon yellow mustard seeds and ½ teaspoon each of fennel, cumin, nigella, and fenugreek seeds.
Season: late summer to autumn
The beauty of this recipe is that it is so very simple. Moreover, you can turn up the heat or cool it down to suit your mood by the variety of the chile pepper you use. In the late summer and autumn, look for hot fruity habaneros, rich mild poblanos, tiny hot Thai chiles, or flaming jalapeños to use in this sizzling jelly relish. I like to use red bell peppers, as they are symbolic of the heat, but, of course, there’s no reason why you can’t use yellow, orange, or green, or a mixture of all four.
Use this punchy jelly with cream cheese, smoked mackerel, rice dishes, and crispy stir-fried vegetables.
Makes five 8-ounce jars
1 pound, 10 ounces red bell peppers
3½ ounces jalapeños or other chiles
2 ounces fresh ginger, peeled
1½ cups cider vinegar
5 cups granulated sugar blended with 2 teaspoons pectin powder
¼ cup freshly squeezed lime juice (1 to 2 limes)
1 teaspoon salt
Start by slicing both the bell peppers and the chiles in half lengthwise and removing the fibrous tissue and countless seeds. Make sure you wash your hands after handling chiles and avoid touching your eyes for awhile, as the chile oil will burn them. Finely chop the peppers, chiles, and ginger by hand or in a food processor. Place in a large pan, add the vinegar, and slowly bring to a simmer. Add the sugar mixture, lime juice, and salt, stirring until the sugar has dissolved and the mixture begins to boil.
Boil for 4 to 6 minutes, and then remove from the heat. Allow to cool for 5 minutes, then pour into clean, sterilized jars and seal with vinegar-proof lids (SEE POTTING, PACKING AND SEALING). Use within 1 year.
P.S. If you find the pepper pieces rise to the top of the jar as you pot the jelly, let the jars cool to room temperature, then give them a quick swirl — the pepper pieces will redistribute and remain well suspended in the cooling jelly.
Season: May to August
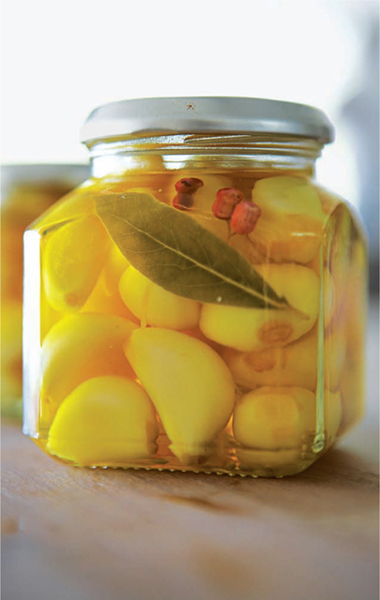
Garlic is the strongest-tasting member of the Allium family, and the moodiest too. It can change character considerably depending on how it is treated. Left whole and cooked slowly, it is gentle and soft. Chopped up, it will release a little more of its pungent aroma, while crushed to a paste it attains the strong, sometimes bitter flavor that makes it notorious.
When pickled, it remains crisp to the bite, but the flavor becomes really quite mellow — you can eat the cloves straight from the jar. I like to slice the pickled garlic cloves finely and scatter them over salads, serve them whole as antipasti, or nestle lots of them around a slowly roasting joint of lamb.
Garlic grows well — not just in the vegetable patch, but also in containers, tubs, and even flower borders, where it can help ward off aphids. New season’s bulbs, with their soft white or purplish pink skins, are mild and sweet — and much better for pickling than older, drier-skinned garlic, which can be bitter.
Makes five 4-ounce jars
1 pound, 2 ounces new season’s garlic bulbs
1 teaspoon fennel seeds
About 12 peppercorns (black, white, or pink)
4 to 6 bay leaves
¾ cup plus 2 tablespoons cider vinegar
¼ cup granulated sugar
Good pinch of saffron threads
Bring a large pan of water to a boil. Plunge the garlic in for a mere minute, to help loosen the outer skins. Remove from the water, drain, and pat dry.
Have ready 3 warm, STERILIZED JARS. Break the garlic bulbs into individual cloves. Peel the cloves and pack them into the jars, dropping in the fennel seeds, peppercorns, and bay leaves as you go.
Put the vinegar, sugar, and saffron into a pan. Bring to a boil and boil for a couple of minutes. Pour the hot vinegar over the garlic, then seal the jars with vinegar-proof lids (SEE POTTING, PACKING AND SEALING). Use within 1 year.
P.S. There are two main types of garlic, hardneck and softneck. Hardnecks produce a flowering spike — or scape — which is usually snapped off to encourage the plant to put its energy into the bulb. These scapes have a delicate, fresh garlic flavor and can be used chopped up in salads or to make a green and garlicky pesto.
Season: June to early July
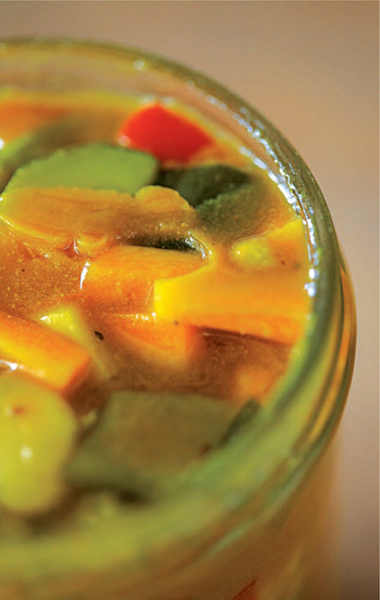
Tall, willowy, feathered sweet Florence fennel, with its creamy-white, bulbous bottom, has to be one of the most alluring vegetables to grow in the garden. It’s not easy to cultivate in every soil, but if it likes your particular situation, you should be able to grow plenty to use with gay abandon in the summertime, with some left over to preserve for later in the year.
It’s only really worth making this pickle if you have a supply of freshly harvested bulbs when they are pale green and tender. All too often, the imported stuff is yellow and coarse. You have to discard much of the outer bulb, and it certainly isn’t worth the expense or trouble of pickling.
This lovely light pickle is delicious with smoked or oily fish and in winter salads. It nearly always makes an appearance at our Boxing Day lunch.
Makes three to four 8-ounce jars
Salt
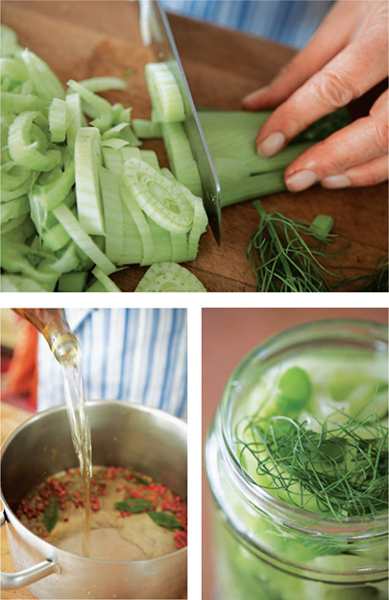
2¼ pounds fennel bulbs, trimmed and thinly sliced, a few feathery fronds reserved
4¼ cups cider vinegar
½ ounce peppercorns (black, white, or pink)
⅓ cup granulated sugar
Grated zest of 1 unwaxed lemon
3 or 4 bay leaves
1 teaspoon celery or fennel seeds
3 to 4 tablespoons olive, hempseed, or canola oil
Pour about 10 cups of water into a large pan, salt it well, and bring to a boil. Add the sliced fennel and blanch for no more than 1 minute. Drain in a colander, cool under cold water, then drain and pat dry.
Put the vinegar, peppercorns, sugar, lemon zest, bay leaves, and celery or fennel seeds into a saucepan. Bring to a boil and continue to boil for about 10 minutes, until the liquid reaches a syrupy consistency. The vinegar vapors will create quite a pungent atmosphere in the kitchen.
Pack the fennel into wide-necked, STERILIZED JARS, lacing a few fennel fronds between the slices. Remove the vinegar syrup from the heat and carefully pour it over the fennel. You may well find all the spices remain at the bottom of the pan. If this happens, distribute them between the jars, poking the peppercorns and bay leaves down through the fennel slices. Pour sufficient oil into each jar to seal the surface. Seal the jars with vinegar-proof lids (SEE POTTING, PACKING AND SEALING). Use within 1 year.

Season: June to August
I love the sweet, earthy flavor of beets and I hate to see it swamped in strong-tasting vinegar, as so often happens. This light preserve is quite a different proposition: roasting the young roots really concentrates their robust flavor, while the sharp pungency of horseradish adds a liveliness to the sweet beet. Serve this summery relish alongside smoked mackerel. It’s also fantastic in sandwiches with cold meats.
Makes four 8-ounce jars
For the roasted tomato purée
2¼ pounds tomatoes
2 teaspoons sea salt
4 garlic cloves, peeled and sliced
¼ cup olive oil
2¼ pounds young, small beets, trimmed
Olive oil, for drizzling
1¼ cups granulated sugar
⅔ cup red wine vinegar
2 tablespoons balsamic vinegar
1 large red onion, peeled and finely chopped
2 ounces freshly grated horseradish root (or pickled horseradish, see below)
Preheat the oven to 350°F. For the tomato purée, halve the tomatoes and place them, skin side down, on a baking sheet. Sprinkle with the salt, garlic, and olive oil. Roast for 1 hour on the bottom shelf of the oven, then remove. Press through a sieve or pass through a food mill to remove the skins and seeds — you’ll end up with about 1¼ cups of intensely flavored purée.
Meanwhile, put the beets into a baking dish and drizzle with a little olive oil. Roast, above the tomatoes, for 1 to 1½ hours (longer if necessary), until the skins are blistered, blackened, and loosened. Let cool a little before peeling. You’ll find the skins will slide off easily. Coarsely grate the beets (a food processor makes this job easy).
Put the sugar, vinegars, onion, and horseradish into a large saucepan; bring to a boil and cook for 5 minutes. Stir in the tomato purée and cook for a couple minutes more. Finally, add the grated beets and cook for about 10 minutes, until thickened. Transfer to sterilized jars and seal with vinegar-proof lids (SEE POTTING, PACKING AND SEALING). Use within 1 year. Refrigerate once opened.
P.S. It’s easy to pickle horseradish root. Just grate enough fresh root to fill a jam jar, sprinkle with 1 teaspoon of salt and 1 teaspoon of sugar, top up with cider vinegar, and seal with a lid. Use in sauces, dressings, and soups, and serve with roast beef.
Season: June to October
This is essentially Hugh Fearnley-Whittingstall’s classic Glutney, or River Cottage chutney, which first appeared in The River Cottage Cookbook. The fruit and vegetable chopping is time-consuming, but important. Whizzing everything up in a food processor would give a very different, sloppy-textured result.
Makes twelve to thirteen 8-ounce jars
For the spice bag
2 ounces fresh ginger, bruised
12 cloves
2 teaspoons black peppercorns
1 teaspoon coriander seeds
2¼ pounds summer squash, peeled (if need be) and diced
2¼ pounds green tomatoes or tomatillos, peeled and diced
1 pound, 2 ounces cooking apples, peeled, cored, and diced
1 pound, 2 ounces onions, peeled and diced
3 cups golden raisins
2½ cups light brown sugar
2½ cups cider vinegar or white wine vinegar
2 teaspoons dried chile flakes (optional) Pinch of salt
Make your spice bag by tying up the spices in an 8-inch square of cheesecloth. Put this into a preserving pan with all the other ingredients and bring slowly to a boil, stirring occasionally. This will take awhile, as there will be lots in the pan, but don’t hurry it.
Let the mixture simmer, uncovered, for 2½ to 3 hours — maybe even a bit more. You do not have to hover, hawk-eyed, over the pan, but do keep an eye on it and stir regularly to ensure it doesn’t burn. It’s ready when it is glossy, thick, rich in color and well reduced — but with the chunks of fruit and vegetables still clearly discernible. It is thick enough if, when you draw a wooden spoon through it, the chutney parts to reveal the bottom of the pan for a few seconds.
Pot the chutney while warm in STERILIZED JARS. Pack down with the back of a spoon to remove any air pockets. Seal with vinegar-proof lids (SEE POTTING, PACKING AND SEALING). Store in a cool, dark place for a couple of months to mature before using. Use within 2 years.
For each variation, use 2½ cups of light brown sugar, 2½ cups of cider vinegar or white wine vinegar, a pinch of salt, and 2 teaspoons of dried chile flakes (if using) and follow the basic method.
For the spice bag
2 teaspoons yellow mustard seeds
2 teaspoons black peppercorns
2 ounces fresh ginger, bruised
3 pounds, 6 ounces rhubarb, trimmed and chopped
2¼ pounds cooking apples, peeled, cored, and diced
1 pound, 2 ounces onions, peeled and diced
2½ cups dried figs, chopped and soaked overnight in the juice of 3 large oranges with the grated zest of 2 oranges
3½ ounces crystallized ginger, chopped
For the spice bag
2 ounces fresh ginger, bruised
2 teaspoons yellow mustard seeds
2 teaspoons black peppercorns
2¼ pounds plums, quartered and pitted
1 pound, 10 ounces pears, peeled, cored, and diced
1 pound, 10 ounces cooking apples, peeled, cored, and diced
1 pound, 2 ounces shallots, peeled and diced
1½ cups pitted prunes, coarsely chopped
For the spice bag
2 ounces fresh ginger, bruised
1 teaspoon cloves
1 teaspoon cumin seeds
1 teaspoon coriander seeds
2 teaspoons black peppercorns
1 pound, 2 ounces unsulfured dried apricots, chopped, soaked overnight, and drained
2¼ pounds summer squash, peeled (if need be) and diced
1 pound, 2 ounces cooking apples, peeled, cored, and diced
1 pound, 2 ounces onions, peeled and diced
1½ cups pitted dates, chopped
1½ cups raisins
For the spice bag
2 teaspoons peppercorns
12 cloves
2 cinnamon sticks
2¼ pounds peeled and deseeded pumpkin, diced
2¼ pounds quince, peeled, cored, and diced
1 pound, 10 ounces cooking apples, peeled, cored, and diced
1 pound, 10 ounces red onions, peeled and diced
3 cups raisins
2 ounces freshly grated horseradish root
Season: late July to September
After the vibrant trumpets of nasturtium flowers fade, you’ll find underneath the foliage the knobbly green seed pods of the plant. They have a hot, peppery flavor and, when pickled, develop a taste very similar to that of true capers (the pickled flower buds of the Mediterranean Capparis plant). Collect the seed pods on a warm, dry day when all the flowers have wilted away. Gather only the green ones (sometimes they are red-blushed) and avoid any that are yellowing, as these will be dull and dry. The pods can also be used fresh to spice up salads or as an ingredient in PICCALILLI.
These feisty little pickled nasturtium seed pods are great in fish dishes and in herby, garlicky sauces. Try them in tartar sauce or add them to salads, especially with tomatoes. In fact, use them just as you would capers.
Makes two 4-ounce jars
2½ teaspoons salt
3½ ounces nasturtium seed pods
A few peppercorns (optional)
Herbs, such as dill sprigs, tarragon sprigs, or bay leaves (optional)
About 1 cup white wine vinegar
Make a light brine by dissolving the salt in 1¼ cups of water. Put the nasturtium seed pods into a bowl and cover with the cold brine. Let stand for 24 hours.
Drain the seed pods and dry well. Pack them into small, STERILIZED JARS with, if you like, a few peppercorns and herbs of your choice. Leave room for ⅜ inch of vinegar at the top. Cover the pods with the vinegar and seal the jars with vinegar-proof lids (SEE POTTING, PACKING AND SEALING). Store in a cool, dark place for a few weeks before eating. Use within 1 year.
P.S. To make nasturtium tartar sauce, simply mix 7 tablespoons of mayonnaise with 2 to 3 finely chopped green onions or 1 ounce of finely chopped white part of a leek, 1 tablespoon of coarsely chopped nasturtium capers, 1 heaping tablespoon of finely chopped parsley, a squeeze of lemon juice, and salt and pepper to taste. Serve the sauce with simple grilled or fried white fish; hot or cold salmon or trout; or a salad of freshly cooked baby beets, young fava beans, and arugula or other salad greens.
Season: July to September
This is a wonderful way to use up an abundance of cucumbers, be they long and uniform green, or the short, knobbly-skinned type. It’s also very quick and easy to make if you use a food processor. This is not a true preserve, as the cucumbers are not brined and the pickle is very light, but it will keep well in the fridge for a couple of weeks in a sealed container.
I love this sweet condiment with all manner of salads and in sandwiches, but it’s especially delectable with hot-smoked trout or salmon.
Makes two 12-ounce jars
2¼ pounds cucumbers
3 small onions, red or white
1 tablespoon chopped dill (optional)
1¼ cups granulated sugar
1 tablespoon salt
¾ cup plus 2 tablespoons cider vinegar
Using the slicing blade of a food processor or a very sharp knife, very finely slice the cucumbers. Peel the onions and slice them very thinly. Combine the cucumbers, onions, and dill, if using, in a large bowl.
Mix the sugar, salt, and vinegar and pour over the cucumbers and onions. Let stand overnight for the sweet and sour flavors to mix and mingle or, if this isn’t possible, let stand for at least 3 hours before serving. Pack into a large airtight container or wide-necked jam jars. Store in the fridge and use within 2 weeks.
Creamy-white English winter celery makes a lovely sweet pickle, or you can use the more common green celery. Follow the recipe above, replacing the cucumber with 2¼ pounds of celery. Run a potato peeler lightly down the stalks to remove any tough ribs, then cut into sticks about 1½ inches long (for crudités or dips) or chop into ½- to ¾-inch chunks. Use sweet, mild red onions and season the pickle with celery salt and 1 teaspoon of caraway seeds. As celery does not contain as much water as cucumber, add ¾ cup plus 2 tablespoons of water to the vinegar and sugar mixture.

Season: August
This traditional sweet vegetable pickle, Indian in origin, is the ultimate August preserve for me. The time to make it is when garden produce is at its peak and there is ample to spare. You can use almost any vegetable in the mix, but make sure you include plenty of things that are green and crisp. The secret of a really successful piccalilli is to use very fresh vegetables and to take the time to cut them into small, similar-sized pieces.
The recipe first treats the vegetables to a dry-brining, which helps to keep them really firm and crunchy, then bathes them in a smooth, hot mustard sauce.
Makes three to four 8-ounce jars
2¼ pounds washed, peeled vegetables — select 5 or 6 from the following: cauliflower or romanesco cauliflower, green beans, cucumbers, zucchini, green or yellow tomatoes, tomatillos, carrots, small silver-skinned onions or shallots, peppers, nasturtium seed pods
3 tablespoons fine salt
¼ cup cornstarch
5 teaspoons ground turmeric
5 teaspoons ENGLISH MUSTARD POWDER
1½ tablespoons yellow mustard seeds
1 teaspoon crushed cumin seeds
1 teaspoon crushed coriander seeds
2½ cups cider vinegar
¾ cup granulated sugar
2 tablespoons honey
Cut the vegetables into small, even bite-size pieces. Place in a large bowl and sprinkle with the salt. Mix well, cover the bowl with a tea towel, and leave in a cool place for 24 hours, then rinse with ice-cold water and drain thoroughly.
Blend the cornstarch, turmeric, mustard powder, mustard seeds, cumin seeds, and coriander seeds to a smooth paste with a little of the vinegar. Put the rest of the vinegar into a saucepan with the sugar and honey and bring to a boil. Pour a little of the hot vinegar over the blended spice paste, stir well, and return to the pan. Bring gently to a boil. Boil for 3 to 4 minutes to allow the spices to release their flavors into the thickening sauce.
Remove the pan from the heat and carefully fold the well-drained vegetables into the hot, spicy sauce. Pack the pickle into warm, sterilized jars and seal immediately with vinegar-proof lids (SEE POTTING, PACKING AND SEALING). Leave to mature (if you can) for 4 to 6 weeks before opening. Use within 1 year.
Season: August to September
Runner beans are a bit of a love-or-hate vegetable and are often scorned in favor of other green beans. I do sympathize with those who don’t eat them — we’ve all been served rubbery, graying old runners at some time or another and they’re no fun at all. However, young tender green runner beans are altogether different, and this recipe is just perfect for these guys. It has been eaten and enjoyed by nearly everyone who has walked into my kitchen, so I hope that reproducing it here will convert a few more bean haters. I think pickled beans are great alongside cold meats and salads.
Use a couple of jars that are at least 5 inches high — taller, if possible — so that the beans can show off their length.
Makes two 12-ounce jars
2¼ pounds young runner beans
Salt
1¼ cups cider vinegar or white wine vinegar
1½ cups granulated sugar
1 teaspoon ground allspice
1 teaspoon coarsely ground black pepper
6 juniper berries (optional)
Start by trimming the ends off the runner beans. If the beans are young and tender, there should be no need to string them. Cut the beans into lengths about ¼ inch less than the height of the jar you are using.
Bring a pan of lightly salted water to a boil. Add the beans and cook until tender; this should take 5 to 8 minutes.
Meanwhile, put the vinegar, sugar, 7 tablespoons of water, the allspice, ground pepper, and juniper berries, if using, into a pan over low heat, stirring until the sugar has dissolved. Bring to a boil and boil for a couple of minutes. Drain the runner beans, immediately add them to the spiced vinegar, and simmer for 4 to 5 minutes. Strain the vinegar mixture into a small saucepan.
Pack the beans, upright, into warm, STERILIZED JARS; kitchen tongs and a knife are useful for doing this. Return the spiced vinegar to a boil, then pour it over the tightly packed beans. Cap immediately with vinegar-proof lids (SEE POTTING, PACKING AND SEALING).
Store in a cool, dark place for several weeks to allow the pickle to mature. Use within 1 year.
Season: late August to September
Dark-skinned with a bluish bloom, small oval damson plums are very tart and well flavored, which makes them wonderful for preserving. This is a straightforward recipe that keeps the fruit whole and tender. I love warming cinnamon and allspice in the mix, but you can use any spices you fancy, or even a good tablespoonful of ready-made pickling spice (SEE VINEGAR). These sweet spiced damsons are a lovely addition to any buffet table and splendid with cold poultry.
Makes four 12-ounce jars
2½ cups cider vinegar
1 (2-inch) piece of cinnamon stick
1 teaspoon allspice berries
Juice and finely grated zest of 1 orange
2¼ pounds firm, ripe damson plums or any other small, tart variety of plum
3¾ cups granulated sugar
Put the vinegar, cinnamon, allspice berries, and orange juice and zest into a pan and bring to a boil. Boil for 4 to 5 minutes, then strain and allow to cool.
Prick each plum with a needle or skewer (this will prevent them from splitting). Add the fruit to the cool spiced vinegar in a clean pan. Bring slowly to a simmer, then simmer very, very gently for 10 to 15 minutes, until the plums are just tender. Using a slotted spoon, lift out the plums and pack them into warm, STERILIZED JARS.
Return the spiced vinegar to the heat, add the sugar, and stir until dissolved. Boil for several minutes to reduce and thicken. Pour this hot spiced syrup over the plums and seal immediately with vinegar-proof lids (SEE POTTING, PACKING AND SEALING). Store in a cool, dark place. These pickled damsons are best kept for 6 to 8 weeks before eating. Use within 1 year.
You can use the same method to pickle firm cherries or green gooseberries. Rhubarb, cut into 2-inch chunks, can also be dealt with in this way — but add the sugar with the rhubarb, as it will help keep it whole.
Season: August to December
I love pickled fruits and always look forward to opening a jar to serve with cold poultry and ham. Small, hard pears are ideal for use in this recipe, and it’s a very good way to deal with a barrel-load of them. If you stick with the basic quantities of sugar and vinegar, this recipe can easily be adapted for use with other fruits and different spices (see the variations below).
Makes two to three 16-ounce jars
1¼ cups cider vinegar or white wine vinegar
2 cups granulated sugar
1 ounce fresh ginger, bruised
1 (2-inch) piece of cinnamon stick
1 teaspoon allspice berries
2¼ pounds small, firm pears
1 teaspoon cloves
Put the vinegar, sugar, ginger, cinnamon, and allspice berries into a large pan over low heat, stirring until the sugar has dissolved, then bring to a boil. Turn down the heat to a simmer.
Meanwhile, start peeling the pears, keeping them whole and with stems attached. Stud each pear with 2 or 3 cloves and add to the hot vinegar. Simmer the pears very gently for 15 to 25 minutes, until they are tender but not too soft. Remove with a slotted spoon and pack them into warm, STERILIZED JARS.
Bring the spiced vinegar syrup to a boil and boil for 5 minutes, then strain it over the pears. Cover the jars with vinegar-proof lids (SEE POTTING, PACKING AND SEALING). Keep for at least 1 month before using. Use within 1 year.
Different spices can be used — try cardamom and coriander, with a flake or two of dried chile.
Pickled peaches Plunge 2¼ pounds of peaches into a pan of boiling water for 1 minute, then remove. Immerse them in cold water briefly, then peel. Proceed as for the pear recipe, but simmer the peaches for only 3 to 4 minutes.
Pickled crab apples Prick 2¼ pounds of crab apples all over with a needle or skewer (this will prevent the skins bursting). Use well-colored ornamental varieties.

Season: September to November
A good pickled onion is perhaps the doyen of the preserves cupboard — but how do you like yours? Crisp or soft, sweet or sour, mildly spiced or chile hot? The beauty of this recipe is that it can be used to make your onions (or shallots) just the way you like them. I like mine sweet, so I use honey in this recipe, but you could dispense with honey or sugar altogether if you like a really sharp pickle. I also go for cider vinegar, rather than the more traditional malt, because the flavor is less aggressive. The blend of spices used here suits me nicely, but you could also use coriander, cumin, or celery seeds — or any other spice you fancy. If you want crisp onions, use cold vinegar; if you like them soft, heat the vinegar first.
Makes one 24-ounce jar
2¼ pounds small pickling onions
3 tablespoons fine salt
2½ cups vinegar (cider, malt, or wine)
7 tablespoons honey, or ¾ cup sugar
½ ounce fresh ginger, lightly bruised
2 teaspoons allspice berries
2 or 3 mace blades
2 teaspoons yellow mustard seeds
1 teaspoon black or white peppercorns
1 cinnamon stick
2 dried chiles (optional)
2 bay leaves
Using scissors, snip the top and the rooty bottom off the onions. Place in a large bowl and cover with boiling water. Count steadily to 20 (no more). Drain the onions and plunge into cold water. You will find the skins will peel off easily.
Put the peeled onions into a shallow dish. Sprinkle with the salt, cover, and let stand overnight. Meanwhile, pour the vinegar into a pan and add the honey or sugar, ginger, and spices (not the bay leaves). Cover and bring to a boil. Remove from the heat and allow to infuse overnight.
Strain the spiced vinegar. Rinse the onions in very cold water, then drain and pack into a STERILIZED JAR, adding the bay leaves as you go. Pour in the vinegar (reheating it first if you want softer onions) and seal with a vinegar-proof lid (SEE POTTING, PACKING AND SEALING). Let mature for 6 to 8 weeks before using. Use within 1 year.
Use shallots instead of onions and 1¼ cups each of red wine vinegar and white wine vinegar. Prepare as above, then pack the shallots into the jar along with 1 ounce of sliced fresh ginger, 1 teaspoon of coriander seeds, and a couple of fresh mint sprigs.
Season: October to January
Spices, onions, and a traditional malty ale give this robust, pub-style chutney plenty of character, while the natural sugars in the root vegetables help sweeten it. It is delicious served with farmhouse Cheddar, crusty bread, and a pint or two.
Makes five to six 8-ounce jars
14 ounces onions, peeled and finely sliced
9 ounces rutabaga, peeled and chopped into ¼-inch pieces
7 ounces carrots, peeled and chopped into ¼-inch pieces
9 ounces apples, peeled, cored, and chopped into 2½-inch pieces
5 ounces cauliflower, broken into tiny florets
2 fat garlic cloves, peeled and crushed
⅔ cup pitted dates, finely chopped
½ cup plus 1 tablespoon tomato paste
1½ cups Demerara sugar
¼ cup dark muscovado sugar
1 cup malt or cider vinegar
2 heaping tablespoons ENGLISH MUSTARD POWDER
2 heaping teaspoons ground ginger
1 heaping teaspoon ground mace
1 heaping teaspoon salt
½ teaspoon ground black pepper
1 pint traditional ale, bitter, or stout (not lager)
Put all the ingredients except the ale into a large pan with 2¼ cups of water. Mix well, then place over low heat and bring to a gentle simmer, stirring until the sugar has dissolved. Cook for about 1 hour — the vegetables and fruit will begin to soften and the juices will thicken and reduce.
Take the pan off the heat and add half of the ale. Return to the heat and continue to cook for 30 minutes, by which time the mixture should be deep red-brown in color. Add the remaining ale and cook for a further 30 minutes. By now the vegetables and fruit should be tender but still retain their shape and a bit of crunch.
Remove from the heat and spoon into warm, STERILIZED JARS, making sure there are no air pockets. Seal with vinegar-proof lids (SEE POTTING, PACKING AND SEALING). Store for 4 to 6 weeks before opening. Use within 2 years.
Season: autumn to winter
The Italians use fiery-hot mustard oil to add a bit of passion to their classic fruit preserve mostardo di cremona. However, mustard oil is pretty well impossible to purchase in this country, so I have used mustard seeds and powder to pep up the dried figs in my own interpretation of the dish. Serve it with hot or cold meat, with oily fish dishes, or with cheese in sandwiches.
Makes three 8-ounce jars
4 cups dried figs
Finely grated zest and juice of 2 large grapefruit
1 heaping tablespoon yellow mustard seeds
1 cup granulated sugar, or ⅔ cup honey
¼ cup ENGLISH MUSTARD POWDER
7 tablespoons cider vinegar or white wine vinegar
Cut each fig into 4 or 6 pieces — it’s easiest to do this using scissors. Place the figs in a bowl and add the grapefruit zest and mustard seeds. Measure the grapefruit juice and add water if needed to reach 2 cups plus 2 tablespoons of liquid. Pour over the figs. Cover and let stand overnight.
Put the figs and juice into a heavy saucepan. Heat gently until simmering, then add the sugar or honey. Stir until dissolved.
Meanwhile, blend the mustard powder with the vinegar, add to the simmering figs, and stir well. Simmer, uncovered, for 20 minutes, stirring occasionally, to reduce and thicken.
Remove the pan from the heat. Spoon the mostardo into warm, sterilized jars and seal with vinegar-proof lids (SEE POTTING, PACKING AND SEALING). Store for 1 month before opening. Use within 1 year.
Dried apricots, apples, or pears, or a good mix of them all, can be used in place of figs. For a stronger, hotter mostardo, use black mustard seeds instead of the milder yellow seeds. Orange, lemon, or lime juice can replace the grapefruit juice. So you see, you can really make this recipe your very own.
Season: winter
Onions are one of the most versatile ingredients in the culinary world, but they are not often given the chance to be the star of their own show. A recipe like this puts that right. Long, slow cooking turns a panful of red, white, or yellow onions into a fantastic rich sauce-cum-jam that’s brilliant served with sausages and mashed potatoes, and a heap of other dishes too. Try it with cheese on toast or with cold meat in sandwiches, or stir a spoonful into a creamy pumpkin soup.
Makes four 8-ounce jars
7 tablespoons olive oil
4½ pounds onions, peeled and finely sliced
1 cup Demerara sugar
7 tablespoons red currant jelly
1¼ cups cider vinegar
¼ cup balsamic vinegar
1 heaping teaspoon salt
½ teaspoon ground black pepper
Heat the oil in a large pan over medium heat and add the onions. Lower the heat, cover the pan, and cook over low heat, stirring occasionally, for 30 to 40 minutes, until the onions are collapsed and beginning to color.
Add the sugar and jelly. Increase the heat and continue to cook, stirring more frequently, for about 30 minutes, until the mixture turns a dark, nutty brown and most of the moisture has been driven off.
Take off the heat and allow to cool for a couple of minutes before adding the vinegars (if you add vinegar to a red-hot pan, it will evaporate in a fury of scorching steam). Return to the heat and cook rapidly for another 10 minutes or so, until the mixture becomes gooey and a spoon drawn across the bottom of the pan leaves a clear track on the bottom for a couple of seconds.
Remove from the heat and season with the salt and pepper. Spoon into warm, sterilized jars and seal with vinegar-proof lids (SEE POTTING, PACKING AND SEALING). Use within 1 year.
P.S. Marmalade is customarily made from citrus fruit; this marmalade is the exception to the rule. It takes its origins from the French, where historically the name marmalade was used to describe fruit that was cooked for a very long time until it was reduced to a thick purée.

Season: November to March
Preserved lemons have a strong association with Middle Eastern and North African cuisines, and their unique zesty, salty yet mellow flavor permeates many of the traditional meat and couscous dishes of those regions. Strips of preserved lemon can also be added to salads, soups, and dressings, or mixed with olives and other appetizers. They are exceptionally easy to prepare, and I like to make them around the turn of the year when the new season’s lemons from Spain and Italy are in the shops.
Makes two 12-ounce jars
2¼ pounds small, ripe, unwaxed lemons
½ cup good-quality sea salt
1 teaspoon black or pink peppercorns
3 to 4 bay leaves
1 teaspoon coriander seeds (optional)
Wash the lemons in cold water and pat them dry. Set 4 of them aside — these will be squeezed and their juice poured over the salted lemons.
Using a sharp knife, partially quarter the remaining lemons lengthwise by making two deep cuts right through the fruit, keeping them intact at one end. Rub a good teaspoonful of salt into the cut surfaces of each lemon. Pack the fruit chock-a-block into sterilized, wide-necked jars (SEE POTTING, PACKING AND SEALING), sprinkling in the remaining salt, and the peppercorns, bay leaves, and coriander seeds (if using) as you go.
Squeeze the juice from the reserved lemons and pour over the salted lemons. They must be completely covered. You can top up the jars with a little water if necessary. Seal with a vinegar-proof lid (SEE POTTING, PACKING AND SEALING). Leave for at least 1 month to allow the lemon rinds to soften before opening.
To use, remove a lemon from the jar and rinse it well. Scoop out and discard the flesh (or purée it for use in dressings) and use the salted rind whole, chopped, or sliced. Make sure the lemons in the jar remain covered with liquid and, once opened, keep the jar in the fridge. Use within 1 year.