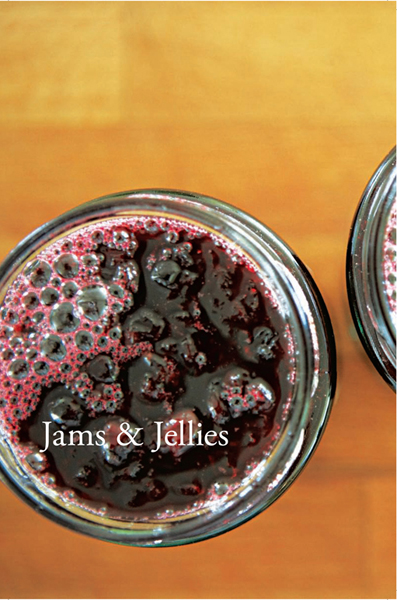
This is the sweetest chapter in the book, where you will meet what I call the “sugar set” — in other words, recipes that rely purely on a high concentration of sugar to keep spoiling at bay. Sugar-based recipes form a broad and extensive branch of the preserving tree, and they are also the most familiar and perhaps widely used type of preserves. Here you will find out just how essential sugar is as a preserving ingredient and how, by means of various preserving techniques, it can be used to transform a host of fresh produce into goodies that can be safely stored away for the future. The different types of sugar-based preserves that I make at home are as follows.
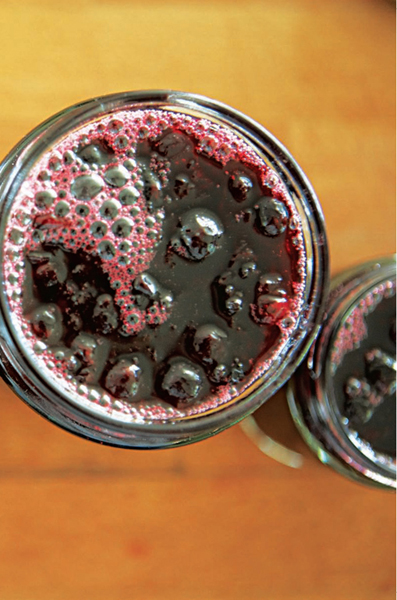
Jams Without doubt, jams are the most familiar of all the sweet preserves. They are simply mixtures of lightly softened fruit and sugar, boiled together until they gel into a mass.
Marmalades Although originally referring to a type of quince jam (marmelo being the Portuguese word for quince), the term marmalade is now universally understood to mean a bittersweet preserve made from citrus fruit. Marmalades are made in a similar way to jams, but the hard citrus peel needs long, slow cooking to soften it before sugar is added.
Conserves Made with whole fruit that has been steeped in sugar before cooking to draw out the juices, a conserve is similar to a jam but often has a slightly softer set. Commercially, the word conserve is often used to describe a posh jam with a high fruit content.
Fruit spreads and fridge jams These are relatively low in sugar and usually made with added pectin to help them set. In general, they still have a softer, looser set than traditional jams. Providing they are sealed when still over 195°F, they will keep for 9 to 12 months. However, once opened, they must be kept in the fridge as they do not contain sufficient sugar to prevent them from spoiling at cool larder temperature.
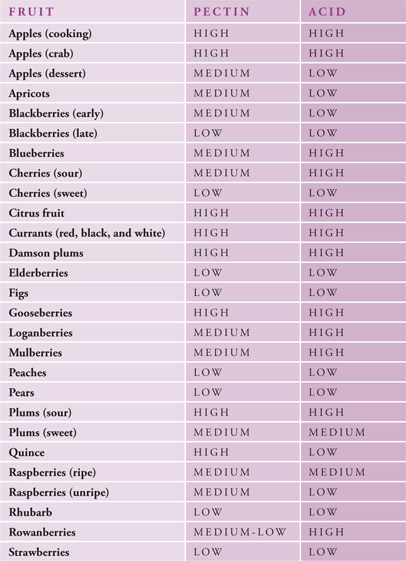
Jellies Clear, translucent, and smooth (no fruity bits), fruit jellies are the jewels of the pantry. They are made by boiling strained fruit juice with sugar. They are best made with fruits high in both pectin and acid, such as apples, crab apples, gooseberries, and red currants — either on their own or in combination with other, lower-pectin fruits (see the PECTIN AND ACID CONTENT CHART). The basic fruit juice and sugar mixture can also be used as a base for herb or flower jellies.
Fruit butters So called because they spread as soft as butter, these are made by boiling cooked, sieved fruit pulp with sugar. They are lower in sugar than traditional jams and will not keep as well. For this reason, they are best potted in smallish jars, which can be consumed in a relatively short time, and stored in the fridge once opened.
Fruit cheeses These dense, solid preserves are similar to fruit butters in that they are made by boiling sieved fruit pulp with sugar. However, they are cooked for longer and taste richer and fruitier. You could make a cheese with almost any fruit, but because of the large quantity required, recipes usually favor prolific orchard, stone, and hedgerow fruits, such as apples, quince, damson plums, or crab apples. Fruit cheeses are normally packed in straight-sided jars or molds so the preserves can be turned out whole and sliced.
Fruit curds These are not true preserves, being very low in sugar, but creamy mixtures of butter, eggs, sugar, and an acidic fruit pulp or juice. To prevent the eggs from curdling, they are cooked very gently in a double boiler or in a bowl over a pan of boiling water. Curds are best eaten within 3 to 4 weeks, so they are usually made in fairly small quantities.
Mincemeats Again, these are not true sugar preserves, as alcohol plays its part in the process too. Mincemeats are mixtures of dried fruit, apples, spices, citrus zest, sugar, suet (sometimes), and alcohol. They are traditionally made in the autumn when the new season’s apples are crisp and juicy, then kept for a couple of months to mellow and mature in time to make mince pies for Christmas.
Fruit leathers These rely on drying, as well as sugar, to preserve the fruit. A lightly sweetened purée is slowly dried in a low oven (or, in suitable climates, under the sun), producing a thin, pliable sheet. Fruit leathers store well for several months.
Candied fruits This is a generic term for fruits preserved by being steeped in sugar for a period of time. The sugar penetrates the fruit flesh, replacing some of the natural juices. Different types include glacé fruits, which are coated with a clear sugar syrup, and crystallized fruits, which are rolled in grains of sugar.
In jam, jelly, and marmalade making, four ingredients are necessary to produce the magic result known as a set — i.e., the right wobbling, spreadable consistency. These are fruit, pectin, acid, and sugar. Getting to know them will help to ensure success.
All fruit for preserves making should be dry, as fresh as possible, and slightly underripe. Overripe, wet fruit contains less pectin and acid and makes poor-quality preserves. If you find yourself snowed under with produce during a particularly good cropping season, remember that most fruits, including Seville oranges, can be frozen and used later in the year quite successfully. Bear in mind that the pectin content reduces a little with freezing, so sometimes extra pectin may need to be added.
With the exception of the citrus family, I like to use local fruits in the recipes for this chapter. There are, of course, a whole host of imported exotics at our disposal these days, but buying these in the quantities required for jam making can be expensive. In any case, with the abundance of homegrown fruits available to us, it’s hardly necessary.
Pectin is a natural substance found in all fruit (and some vegetables) in varying quantities (see the FRUIT PECTIN AND ACID CONTENT CHART). When combined with acid and sugar, it takes on a gumlike consistency — which is why it’s essential in achieving a good set. Concentrated in cores, pith, skins, and seeds, it is released from the cell walls as the fruit is cooked. Pectin levels are at their highest in slightly underripe fruit and will decrease as the fruit ripens, or if it is frozen.
Fruit with lots of pectin will produce a jam or jelly that sets easily, while those containing lower amounts may well need a bit of help. This can come from other high-pectin fruits added to the mix (as with blackberry and apple jelly, for instance). Alternatively, extra pectin can be added in the form of a PECTIN STOCK or commercially produced liquid or powdered pectin (usually extracted from apples or citrus fruit).
How to test for pectin If you follow THE CHART, you shouldn’t need to test for pectin. However, if you’re using a fruit not covered here, there is a simple way to check the pectin levels. Add 1 teaspoon of the cooked fruit juice to 1 tablespoon denatured alcohol (or gin or whiskey, as these work too). Shake gently and leave for a minute or two. Juice from a pectin-rich fruit will form a firm clot. If the juice forms several small clots, this indicates a medium pectin content. Juice that remains fairly liquid signifies a low pectin level.
Homemade pectin stock A pectin-rich stock is easily made from certain fruits. The procedure is much the same as the early stages of jelly making.
Combine 2 pounds 4 ounces red currants, gooseberries, or coarsely chopped (but not peeled or cored) sour cooking apples with 2 cups of water. Bring to a simmer and cook gently for 45 minutes to 1 hour, until the fruit is soft. Strain through a JELLY STRAINER BAG. The resulting pectin stock will keep for up to 4 weeks in the fridge. To keep it longer, either freeze it (but allow for a reduction in strength when using) or sterilize it.
To sterilize, bring the juice to a boil; pour into hot, sterilized preserving jars; and seal immediately. Immerse the jars in a pan of hot water with a folded tea towel on the bottom. Heat the water until boiling, then boil for 5 minutes. Remove the jars carefully and store in a cool, dry place.
To use the stock, stir 4½ to 9 tablespoons of it (depending on the fruit) into every pound of low-pectin, softened fruit before sugar is added.

Acid is naturally found in fruit and is essential for clear, bright, well-set preserves. It draws pectin out of the fruit, enabling the setting point to be reached quickly without lengthy cooking, which would darken the jam. Acid also helps prevent crystallization of the sugar. Levels of acid vary in different fruits (see CHART) and are lower in overripe fruit. Lemon, gooseberry, or red currant juice is sometimes added to low-acid fruit jams. It should be added before the fruit is cooked, so it can get to work on drawing out the pectin. If you’re making jam with a low-acid fruit, such as strawberries or rhubarb, add 1 tablespoon of lemon juice, or 4½ tablespoons of red currant, gooseberry, or apple juice, per pound of fruit.
Sugar is the fourth vital ingredient for jam making and the one that actually preserves the fruit and keeps it from spoiling. In order to do this, the proportion of sugar in preserves needs to be 60 percent or higher. Boiling the fruit and sugar mixture drives off water, which helps the sugar content reach this crucial level. Sugar also enhances the flavor of sharp, acidic fruits such as black currants and gooseberries. See KEY PRESERVING INGREDIENTS, for in-depth information on different types of sugar.
Providing the proportion of ingredients is correct, your jam or jelly should set once it has been sufficiently cooked. There are three simple methods you can use to check if the setting point has been reached. Remove the jam from the heat while testing (it will lose water as it cooks and may then set too firmly). If the setting point has not been reached, return to a boil, cook for a further couple of minutes, then test again.
Crinkle or saucer test Drop a little jam onto a cold saucer (I put one in the fridge when I start making jam). Allow to cool for a minute, then push gently with your fingertip. If the jam crinkles, the setting point has been reached.
Dollop test Dip a clean wooden spoon into the jam, hold it up over the pan, twirl it around a couple of times, then let the jam drop from the side of it. If the jam doesn’t run freely off the spoon but falls away in small dollops, the setting point has been reached.
Temperature test Place a CANDY THERMOMETER into the jam when it has reached a rolling boil. When it reads 220°F, the setting point has been reached. Pectin-rich fruits will set a degree or two lower.
This checklist will help to ensure success every time:
1. Always use fresh, dry, slightly underripe fruit. Prepare and pick over according to type; i.e., hull strawberries, pit plums, top and tail gooseberries, shred citrus peel. Wash the fruit only if necessary and dry it well.
2. Simmer the fruit gently in a large, uncovered pan before adding the sugar. This softens the fruit and helps draw out the pectin. Soft fruits, such as raspberries and strawberries, will not need added water, but tougher-skinned or semihard fruits, such as currants, gooseberries, plums, apples, and citrus fruit, will.
3. Make sure that the fruit skins are well softened before sugar is added. Once the sugar is in, the skins will not soften further, no matter how long you cook them. Citrus peel for marmalade takes 1½ to 2 hours to soften.
4. Adding a little butter or cooking oil (2 teaspoons per pound of fruit) at the same time as the sugar helps prevent any scum from forming.
5. After adding the sugar to the fruit or juice, stir it over gentle heat to ensure it is completely dissolved before the mixture begins to boil. Adding the sugar before the jam boils helps to hold the fruit in whole or chunky pieces. Warming the sugar in a low oven will speed up the dissolving process but is not strictly necessary.
6. Once the sugar is dissolved, cook the jam, without stirring, at a full rolling boil, i.e., when the surface is covered by a mass of foamy bubbles that don’t recede when stirred. Time your cooking from the point at which the rolling boil begins. Don’t stir at this stage — it cools the jam, so it would take longer to reach the setting point.
7. Test for the setting point, using ONE OF THESE METHODS, when the foamy bubbles have subsided and the surface of the boiling jam appears glossy and heavy.
8. When the setting point is reached, remove the pan from the heat. To remove scum, stir the jam (always in the same direction so as not to introduce too much air) until it has dispersed. Alternatively, skim off scum with a slotted spoon. (Scum, by the way, is nothing to worry about — it’s just air bubbles created by the intense cooking process.)
9. Allow jams with large pieces of fruit and thick-cut marmalades to cool for 10 to 12 minutes before potting. This allows the mixture to thicken slightly so that the fruit, when potted, should remain well distributed throughout the jar.
10. Pour into clean, STERILIZED JARS while the preserves are still very hot (always above 185°F). Seal with suitable lids and, once cool, store in a cool, dry place.
You will need to prepare the fruit in the SAME WAY AS FOR JAMS, but there are different watchpoints for jelly making:
1. Soften the fruit by simmering it very gently for 45 to 60 minutes. With juicy fruits, like strawberries, raspberries, red currants, and blackberries, allow ½ to ⅔ cup of water per pound of fruit. For plums, allow 1 cup per pound, and for black currants 1½ cups per pound. Apples, quince, and hard fruits should be just covered with water.
2. Strain the cooked fruit pulp through a JELLY STRAINER BAG for at least 2 hours or overnight; this helps make the jelly clear.
3. If you can’t resist squeezing or poking the bag to extract more juice, be prepared for your jelly to be cloudy.
4. Allow 1 pound of sugar for every 3 cups of juice. Bring the juice slowly to a boil and add the sugar only when boiling. This helps to keep your jelly clear and bright; the longer the sugar is cooked, the more the jelly will darken. Boiling time will be somewhere between 5 and 15 minutes, depending on the type of fruit used.
5. Test for the setting point in THE SAME WAY as for jam.
6. Skim the jelly and pour into jars as quickly as possible.
Season: mid-January to February
The bitter Seville orange is the most traditional and arguably the finest marmalade fruit of all. Only available for a few short weeks starting in mid-January, this knobbly, often misshapen orange has a unique aromatic quality and is very rich in pectin. However, you can use almost any citrus fruit to make good marmalade — consider sweet oranges, blood oranges, grapefruit, limes, clementines, kumquats, or a combination of two or three (see my suggested VARIATIONS).
There are two basic ways of making marmalade. My first choice is the sliced fruit method, which involves cutting the raw peel into shreds before cooking. I find this technique produces a brighter, clearer result. However, the whole fruit method, in which the fruit is boiled whole before being cut up, is easier and less time-consuming. It tends to create a darker, less delicate preserve — but that, of course, might be exactly what you want. I’ve given you both methods here.
Makes five to six 12-ounce jars
2¼ pounds Seville oranges
⅓ cup lemon juice
10 cups Demerara sugar
Scrub the oranges, remove the buttons at the top of the fruit, then cut in half. Squeeze out the juice and keep to one side. Using a sharp knife, slice the peel, pith and all, into thin, medium, or chunky shreds, according to your preference. Put the sliced peel into a bowl with the orange juice and cover with 10 cups of water. Let soak overnight or for up to 24 hours.
Transfer the whole mixture to a preserving pan, bring to a boil, then simmer slowly, covered, until the peel is tender. This should take approximately 2 hours, by which time the contents of the pan will have reduced by about one-third.
Stir in the lemon juice and sugar. Bring the marmalade to a boil, stirring until the sugar has dissolved. Boil rapidly until the SETTING POINT is reached, 20 to 25 minutes. Remove from the heat. Let cool for 8 to 10 minutes — a little longer if the peel is in very chunky pieces — then stir gently to disperse any scum. Pour into warm, sterilized jars and seal immediately (SEE POTTING, PACKING AND SEALING). Use within 2 years.
Makes five 12-ounce jars
2¼ pounds Seville oranges
⅓ cup lemon juice
10 cups granulated sugar
Scrub the oranges, remove the buttons at the top, and put the whole oranges into a preserving pan with 10 cups of water. Bring to a boil, then simmer, covered, for 2 to 2½ hours, until the orange skins are tender and can be pierced easily with a fork.
When cool enough to handle, take the oranges out. Measure and keep the cooking water — you should have about 7 cups. Bring it up to this amount with more water if you have less, or boil to reduce if you have more.
Cut the oranges in half and remove the seeds with a fork, flicking them into a bowl. Strain any juice from the seeds back into the cooking water, then discard the seeds.
Meanwhile, cut up the orange peel and flesh into thick, medium, or thin shreds. Put the cut-up fruit into the strained cooking liquid. Add the lemon juice and sugar and bring to a boil, stirring until the sugar has completely dissolved. Bring to a rolling boil and boil rapidly until the SETTING POINT is reached, 10 to 15 minutes.
Let cool for 10 to 12 minutes — a little longer if you’ve cut the peel into very chunky pieces — then stir gently to disperse any scum. Pour into warm, sterilized jars and seal immediately (SEE POTTING, PACKING AND SEALING). Use within 2 years.
You can use both methods for making many other delicious marmalades:
Lemon marmalade with honey Use 2¼ pounds of lemons instead of oranges, and omit the extra lemon juice. Replace 1¼ cups of the sugar with ¾ cup of honey, adding it at the same time.
Three-fruit marmalade Use a mixture of grapefruit, lemons, and sweet oranges to make a total of 2¼ pounds of fruit.
Ruby red marmalade Both pink grapefruit and blood oranges make wonderful marmalades, though I prefer to use the sliced fruit method for these fruits. Add 3 tablespoons of lemon juice to every pound of fruit.
Seville and ginger marmalade Replace 1¼ cups of the sugar with 9 ounces of chopped crystallized ginger, adding it along with the sugar.
Whiskey marmalade Add ¼ cup of whiskey to the marmalade at the end of cooking.
P.S. Don’t limit marmalade to the breakfast table, for its traits and qualities can be well used in other culinary ways. I like to replace candied peel in fruitcakes with a tablespoonful or two of marmalade, and I always add some to my CHRISTMAS MINCEMEAT. Marmalade makes a marvelous glaze for oven-baked ham, as well as sweet-and-sour chicken or pork dishes. Best of all, 3 or 4 tablespoonfuls will make a glorious golden topping for a good old-fashioned steamed pudding.
P.P.S. For generations, marmalade makers have cooked up the mass of seeds found inside citrus fruits in the belief that they are full of pectin. However, most of the pectin is actually found in the citrus peel, and I rely purely on this for the setting power in my marmalades.
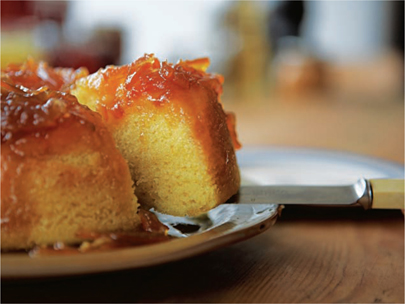
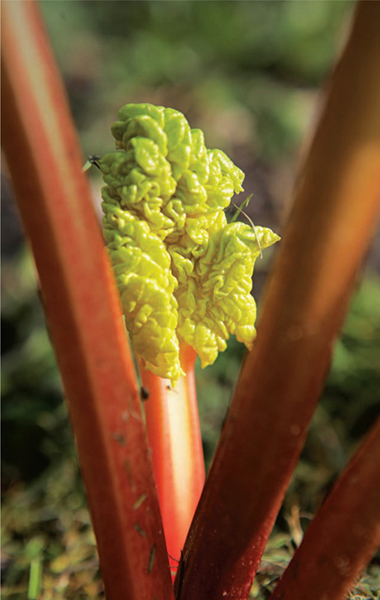
Season: mid-January to late March
Early or forced rhubarb has been produced in West Yorkshire since the 1870s, as growers discovered that the heavy clay soil and cold winter climate suited the plant (a native of Siberia). Sequestered in dark sheds, carefully cultivated rhubarb crowns send forth slender, bright pink stems much more delicate in flavor than the thick green shafts of outdoor-grown rhubarb that appear later in the year.
This is one of my favorite ways to capture the earthy flavor of rhubarb. It’s a plant that contains very little pectin, so the jam definitely requires an extra dose. The shortish boil time helps to preserve the fabulous color of the stems. I like to add a little Seville orange juice, but juice from sweet oranges works well too.
This light, soft jam is good mixed with yogurt or spooned over ice cream, or you can warm it and use to glaze a bread and butter pudding after baking.
Makes six 8-ounce jars
2¼ pounds early rhubarb (untrimmed weight)
4½ cups granulated sugar blended with 2 teaspoons pectin powder
7 tablespoons freshly squeezed Seville or sweet orange juice
Wipe and trim the rhubarb and cut into ¾- to 1-inch chunks. Pour a layer of sugar into the bottom of a preserving pan, then add a layer of rhubarb. Repeat, continuing until all the sugar and rhubarb are used, finishing with a layer of sugar. Pour the orange juice over the top. Cover and let stand for at least an hour or two — preferably overnight. This draws the juice from the rhubarb, and the resulting syrup helps keep the rhubarb chunks whole when boiled.
Gently bring the mixture to a boil, stirring carefully without crushing the rhubarb pieces. Boil rapidly for 5 to 6 minutes, then test for the SETTING POINT.
Remove from the heat and let rest for 5 minutes before pouring into warm, STERILIZED JARS. Seal immediately (SEE POTTING, PACKING AND SEALING). Use within 1 year.
Add 4 ounces of chopped crystallized ginger to the rhubarb, omitting the orange juice. Sharper-tasting main-crop rhubarb can also be used for this recipe — try adding a few young angelica leaves or a handful of fragrant rose petals.
Season: late May to June
I welcome the first tiny gooseberries that appear in the month of May, just as the first boughs of elderflowers are beginning to show. The berries are picked when small, almost as a thinning process, allowing their brothers and sisters to fill out and mature on the bush. But these early green goddesses are full of pectin, sharp, and tart, and make a divine jam. The fragrant elderflowers add a flavor that will remind you, when the days are short and dark, that summer will come again.
Makes six to seven 8-ounce jars
2¼ pounds young gooseberries
About 8 heads of elderflower
5 cups granulated sugar
Top and tail the gooseberries (it’s easiest to do this with a pair of scissors) and put into a preserving pan with 2 cups of water. Check the elderflower heads for any insects, then place on top of the gooseberries. Cook gently until the berries are soft but still hold their shape. Remove the elderflowers.
Add the sugar. Stir carefully, so as not to break up the fruit, until the sugar has dissolved, then bring to a full rolling boil and boil for 9 to 10 minutes. Test for the SETTING POINT.
Remove from the heat, let rest for 10 minutes, then pot and seal (SEE POTTING, PACKING AND SEALING). Use within 1 year.
Use this recipe for later-season gooseberries, without the elderflower. The fruit will be sweeter and the jam will have a soft pink color.
P.S. To make a quick and easy piquant gooseberry sauce to go with mackerel, add a little cider or balsamic vinegar to warmed gooseberry jam (with or without elderflower). Let the flavors mix and mingle before spooning over broiled or grilled fish.
Season: May to August
After a dismal result with my strawberry jam at the 2007 Uplyme and Lyme Regis Horticultural Show, I decided to get my act together and work out a recipe that I could rely on to get me that much-coveted first prize next time. My kitchen soon took on the appearance of a strawberry jam factory, with coded batches piled just about everywhere. I thought I’d nearly made the grade on batch three, but the tweaking for batch four caused mayhem in the jam pan. However, batch five seemed to come alive from the moment the lemon juice was added, and I knew it was going to be just right — bright in color, with some soft whole fruit and, of course, that wonderful, intense strawberry taste.
Strawberries are low in pectin. Using sugar with added pectin helps to attain a lovely set and a flavor that isn’t too sickly sweet. Use freshly picked, dry fruit — not too big, or they’ll blow to bits when the jam is bubbling away. However, if you’re using very small fruit, make sure they’re not too hard and seedy.
Makes five to six 8-ounce jars
2¼ pounds strawberries, hulled, large ones halved or quartered
2½ cups granulated sugar
2¼ cups granulated sugar blended with 1 teaspoon pectin powder
⅔ cup lemon juice
Put 7 ounces of the strawberries into a preserving pan with 1 cup of the plain granulated sugar. Crush to a pulp with a potato masher. Place the pan over gentle heat and, when the fruit mixture is warm, add the rest of the strawberries. Bring to a very gentle simmer, agitating the bottom of the pan with a wooden spoon to prevent the fruit from sticking. Simmer for 5 minutes to allow the strawberries to soften just a little.
Add the remaining 1½ cups plain granulated sugar and the sugar/pectin mixture. Stir gently to prevent the sugar from sticking and burning on the bottom of the pan. When the sugar has dissolved, add the lemon juice. Increase the heat and, when the mixture reaches a full boil, boil rapidly for 8 to 9 minutes. Then test for the SETTING POINT.
Remove from the heat and, if the surface is scummy, stir gently until the scum has dispersed. Pot and seal (SEE POTTING, PACKING AND SEALING). Use within 1 year.
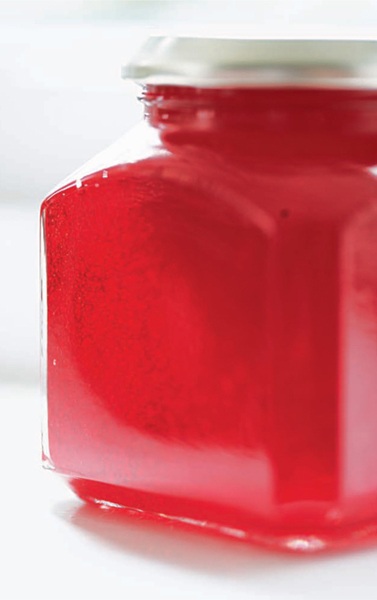
Season: June to mid-July
Red currants make a superb and very versatile jelly. The red currant season is short, just a few weeks in midsummer, so make sure you don’t miss it. If you haven’t time to make your jelly straight away, you can pick the currants and freeze for later.
This is an endlessly useful jelly. A classic condiment to accompany roast lamb or game, it can also be used to enhance the flavor of gravies, casseroles, and piquant sauces. It makes an excellent glaze for fresh fruit tarts too.
Makes three to four 8-ounce jars
2¼ pounds red currants
Granulated sugar
You don’t have to top and tail the currants, or even take them off their stems. Simply wash them, put into a preserving pan with 1¾ cups of water, then simmer until they are very soft and have released all their juice. This will take about 45 minutes. Strain through a JELLY STRAINER BAG or cheesecloth for several hours or overnight. Do not poke, squeeze, or force the pulp through the bag or you’ll get cloudy jelly.
Measure the juice, put it into the cleaned preserving pan, and bring to a boil. For every cup of juice add 1 cup of sugar, adding it only when the juice is boiling. Stir until the sugar has dissolved, ensuring the sides of the pan are free of undissolved sugar crystals. Then boil rapidly for about 8 minutes, or until the SETTING POINT is reached.
Remove from the heat and stir to disperse any scum, then pour into warm, STERILIZED JARS AND SEAL. Tap the jars to disperse any air bubbles caught in the jelly. Use within 1 year.
Add a couple of tablespoonfuls of chopped fresh mint to the jelly for the last 2 to 3 minutes of boiling.
P.S. Red currant jelly is the core ingredient of Cumberland sauce, a traditional partner to baked ham and game. Just add ¼ cup of port, the grated zest of 1 orange and 1 unwaxed lemon, 1 teaspoon cayenne pepper, a pinch or two of ENGLISH MUSTARD POWDER, and perhaps a pinch of ground ginger to 10 tablespoons of red currant jelly.
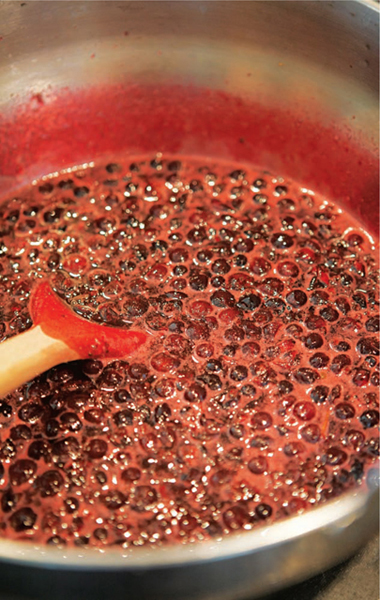
Season: June to August
In my jam company days, when we would produce nearly fifteen thousand jars of preserves each week, my mum would still bring me jars of her homemade black currant jam. Sometimes I wondered if I needed another jar in the house, but I always enjoyed it immensely — black currant jam is an all-time favorite, with a flavor that is rarely rivaled. It’s also very easy to make. The key is to ensure that the black currants are softened sufficiently before the sugar is added, or the skins will toughen and be unpleasantly chewy.
Use this in all the usual jammy ways with bread, toast, pancakes, yogurt, rice pudding, cakes, tarts, and, of course, scones and clotted cream.
Makes eight to ten 8-ounce jars
2¼ pounds black currants
5 cups unrefined sugar
Pick over the black currants, removing any stems, twiggy bits, or damaged fruit (the dry, shriveled bit at one end is the remains of the flower and need not be removed).
Put the currants into a preserving pan with 2½ cups of water. Place over low heat and slowly bring to a simmer. Simmer for 15 to 20 minutes, until the fruit is soft but not disintegrated into a pulp.
Add the sugar and stir until it has dissolved. Then bring quickly to a full rolling boil. Boil hard for 5 minutes. Remove from the heat and continue to stir gently for a couple of minutes to reduce the temperature. Test for the SETTING POINT.
Let the jam cool a little and make sure the currants aren’t bobbing above the surface when you pour it into warm, sterilized jam jars before sealing (SEE POTTING, PACKING AND SEALING). If they are, let the jam cool a little longer, and if they really won’t submerge, then bring the jam back to a boil and boil for a couple minutes more. Use within 1 year.
P.S. The bittersweet leaves of the black currant bush can be used as a substitute for tea. Simply infuse the leaves in boiling water, steep for 10 minutes, then serve sweetened with a little honey.
Season: June to October
Hugh Fearnley-Whittingstall, whose recipe this is, thinks the secret of success is to pick the raspberries on a hot, dry day, aiming for a good mixture of ripe and almost-ripe fruit, then to make the jam immediately to capture the full flavor of the berries.
The light boiling and lower-than-normal quantity of sugar produce a loose, soft-set jam with a fresh, tangy flavor. Low-sugar jams of this type are often called FRIDGE JAMS. In fact, as long as it is capped when still above 195°F, this preserve will keep well in the pantry. However, once it is opened, you must keep it in the fridge. It won’t last long after opening — maybe 2 or 3 weeks — but as it tastes so very, very good, this is unlikely to be a problem. It’s one of those things you’ll find yourself eating straight from the jar, maybe in the middle of the night!
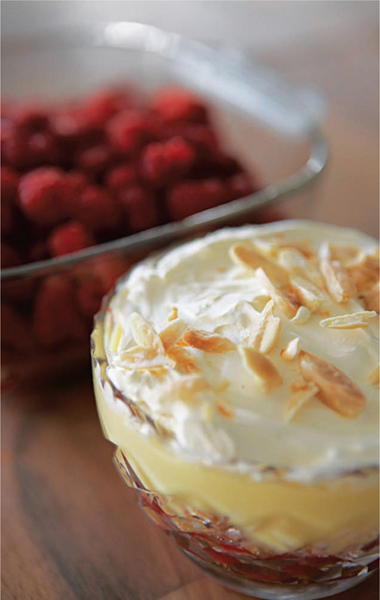
This light, soft jam is fantastic in cakes or sherry trifles or stirred into creamy rice puddings. Best of all, layer it with toasted rolled oats, cream, Drambuie, and honey for a take on Cranachan, the traditional Scottish dessert.
Makes seven 8-ounce jars
3 pounds, 6 ounces raspberries
3¾ cups granulated sugar blended with 1½ teaspoons pectin powder
Start by picking over the raspberries very carefully and discarding any leaves or stems. Put half of the fruit into a preserving pan and use a potato masher to coarsely crush it. Add the remaining fruit and sugar (the mixture will look mouthwateringly good).
Stir over low heat to dissolve the sugar. Bring to a rolling boil, then boil for exactly 5 minutes. (If you prefer a firmer jam, continue boiling at this stage for a further 2 to 3 minutes.) Remove from the heat, stirring to disperse any scum.
It is important TO POUR AND CAP this low-sugar jam quickly, but you must allow it to cool just a little first (give it 5 to 6 minutes) to prevent all those little raspberry seeds from rushing to the top of the jar, leaving you with half a jar of raspberry jelly and half a jar of raspberry seeds. Use within 1 year.
Flavorful ripe strawberries give very good results with this simple recipe too. Hull the strawberries, halve or quarter larger ones, and continue as above.
Season: August to September
Plums make a lovely jam and are rich in pectin and easy to prepare, so this is a great recipe for beginners. Just make sure the plums are tender and their skins well softened before adding the sugar. If not, the sugar hardens the skins and they’ll be tough in the finished jam; they will also float to the top of the jar.
Makes ten 8-ounce jars
3 pounds, 6 ounces plums (NOTES TO THE U.S. EDITION)
6¼ cups granulated sugar
Halve and pit the plums. Crack open a few of the pits using a nutcracker and extract the kernels. Put these into a bowl and cover with boiling water. Let stand for a minute or so, then drain them and rub off the reddish brown skins. The kernels will add a lovely almondlike flavor to the jam.
Put the plums, skinned kernels, and 1¾ cups of water into a preserving pan. Bring to a simmer and cook gently until the fruit is tender and the skins soft — this should take about 20 minutes but depends on the variety and size of plum.
Add the sugar and stir until dissolved. Bring to a boil and boil rapidly until the SETTING POINT is reached, usually 10 to 12 minutes. Remove from the heat. If the fruit is bobbing about at the surface, it’s probably not cooked well enough (the sugar is heavier than the plums, and the jam must cook sufficiently for the fruit to absorb the sugar). If this happens, boil for a further 2 to 4 minutes.
Pot the jam and seal (SEE POTTING, PACKING AND SEALING). Use within 1 year.
Replace some of the water with freshly squeezed orange juice and/or add 2 cinnamon sticks. Another nice twist is to add ¾ cup of chopped walnuts to the jam toward the end of the boiling time.
Season: late summer to autumn
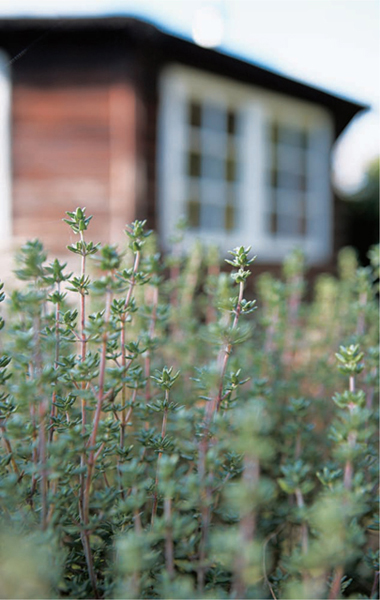
The aromatic essences of fresh herbs and flowers can be captured beautifully in a jelly. These preserves are great to have in the kitchen, as they add a sweet piquancy to all kinds of food, simple and rich. Cooking apples and crab apples are both ideal choices for the basic jelly. Excellent sources of pectin and acid, they nevertheless have gentle flavors that will not overwhelm the herbs.
Serve mint jelly with lamb, sage with fish, basil with poultry or game, parsley with ham, and rose-petal jelly (see below) with wafer-thin, buttered bread. Any herb jelly will also be delicious with soft cheeses, pâtés, and terrines.
Makes four to five 8-ounce jars
3 pounds, 6 ounces cooking apples
1 medium bunch of sage, rosemary, mint, tarragon, thyme, or basil
7 tablespoons cider vinegar
Granulated sugar
Coarsely chop the apples, discarding any bad parts, but don’t peel or core them. Place in a preserving pan with the herbs, reserving half a dozen small sprigs to put into the jars. Barely cover the apples with water. Bring to a boil, then simmer gently, covered, for 45 minutes to 1 hour, until the fruit is very soft. Pour the contents of the pan into a JELLY STRAINER BAG or piece of cheesecloth suspended over a bowl and leave to drip for at least 2 hours, or overnight.
Measure the strained juice. For every cup of juice, measure out 1 cup of sugar. Return the juice to the cleaned-out pan and add the vinegar. Heat to a boil, then add the sugar and stir until dissolved. Increase the heat and boil rapidly for 10 to 12 minutes, until the SETTING POINT is reached. Remove from the heat and skim with a slotted spoon to remove any scum.
Pour into small, warm, STERILIZED JARS, adding an herb sprig to each. Cover and seal (SEE POTTING, PACKING AND SEALING). Use within 1 year.
For stronger-flavored jellies, you can add 3 to 4 tablespoons of freshly chopped herbs after removing the jelly from the heat. Allow to cool for 10 minutes before potting. For exquisite rose-petal or dandelion jelly, add 1 ounce of scented petals instead of herbs. The above method can also be used to make quince jelly, replacing the apples with quince and leaving out the herbs.
Season: late August to September
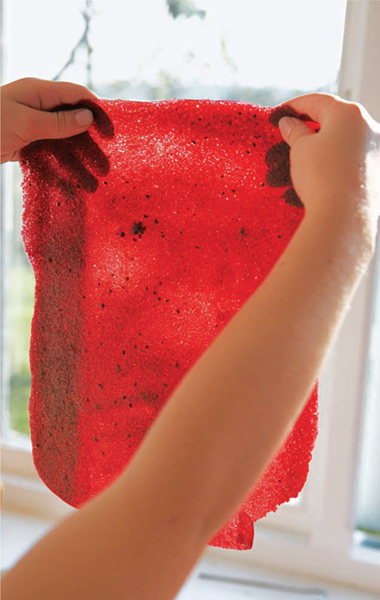
Fruit leathers are thin, pliable sheets of dried, sweetened fruit purée with a flexible consistency like leather. To be truthful, I had always avoided making them, thinking they sounded complicated. But in a spirit of experimentation, I decided to try some out. They were a revelation. I discovered how easy it is to create these strong, semitransparent sheets, and how versatile they are. They are fun to use and eat — you can cut them, roll them, fold them, and pack them away. Light and easy to carry, they’re full of fruity energy, so they’re great for lunch boxes or long walks. Snip off pieces to dissolve gently into fruit salads, or save them for the festive season when their translucent, jewel-like colors will look gorgeous on the Christmas tree.
Makes two 10 by 12-inch sheets
1 pound, 2 ounces blackberries
1 pound, 2 ounces peeled, cored, and chopped cooking apples (2–3 large apples)
Juice of 1 lemon
7 tablespoons honey
Preheat the oven to a very low setting — I use 140°F (approximately). Line two baking sheets, measuring about 10 by 12 inches, with parchment paper.
Put the blackberries, apples, and lemon juice into a pan. Cook gently until soft and pulpy, about 20 minutes. Press the mixture through a sieve or food mill into a bowl; you should have about 1½ pounds of fruit purée. Add the honey and mix well.
Divide the purée between the two baking sheets. Spread it out lightly with the back of a spoon until the purée covers each sheet in a thin, even layer.
Put the baking sheets in the oven for 12 to 18 hours, until the fruit purée is completely dry and easily peels off the parchment. Roll up the leather in parchment or waxed paper and store in an airtight container. Use within 5 months.
There is no end to the possible variations here — you can turn any fruit into a leather. All you need to do is create a smooth, thick purée with your chosen fruit before drying it out. Try plums, spicing the purée with a little cinnamon; or peaches, infusing them with a few honeysuckle blossoms as they cook. For a savory leather, use half apples and half tomatoes seasoned with 2 teaspoons of SOUPER MIX or celery salt.
Season: late August to January
When I made preserves for a living, I tried all kinds of curds, from orange to passion fruit, but none of them was ever quite as popular as the good old-fashioned lemon variety. I didn’t think I could improve on it until recently, when I came across an old recipe for an apple-y lemon curd. I tried it out, and I now prefer it even to a classic straight lemon curd — it’s like eating apples and custard: softly sweet, tangy, and quite, quite delicious.
Makes four 8-ounce jars
1 pound Granny Smith apples, peeled, cored, and chopped
Finely grated zest and juice of 2 unwaxed lemons (you need 7 tablespoons strained juice)
½ cup plus 1 tablespoon unsalted butter
2¼ cups granulated sugar
¾ cup plus 2 tablespoons beaten eggs (4 or 5 large eggs)
Put the chopped apples into a pan with 7 tablespoons of water and the lemon zest. Cook gently until soft and fluffy, then either beat to a purée with a wooden spoon or run through a food mill.
Put the lemon juice, butter, sugar, and apple purée into a double boiler or heatproof bowl over a pan of simmering water. As soon as the butter has melted and the mixture is hot and glossy, pour in the eggs through a sieve, then whisk with a balloon whisk. If the fruit purée is too hot when the beaten egg is added, the egg will curdle. One way to guard against this is to check the temperature of the purée with a candy thermometer — it should be no higher than 130° to 140°F when the egg is added. If your curd does curdle, take the pan off the heat and whisk vigorously until smooth.
Stir the mixture over low heat, scraping down the sides of the bowl every few minutes, until thick and creamy. This will take 9 to 10 minutes; the temperature should reach 180° to 183°F on a candy thermometer. Immediately pour into warm, STERILIZED JARS AND SEAL. Use within 1 month. Once opened, keep in the fridge.
To make gooseberry curd, replace the apples with gooseberries. If you’d like a traditional, pure lemon curd, leave out the apples, increase the lemon juice to ¾ cup plus 2 tablespoons (4 to 5 lemons) and add the grated zest of 2 or 3 more lemons.
Season: September to October
The months of September and October allow us to reap the berried treasure of the hedgerows — a seasonal activity that is not without its dangers, as many wild fruits are guarded by all sorts of thorns, prickles, and entangling stems. However, with a little common sense and determination you should be able to overcome these country hurdles, and the basketful of fruit you bring home will be a just reward.
At the heart of all the best hedgerow jellies is the crab apple (Malus species). The pectin in this often scarred and scabby pomaceous fruit lends the setting power that many hedgerow berries lack. Crab apples produce a stunning pink jelly when used on their own, too.
For this recipe, you can use crab apples, rosehips, hawthorn berries, blackberries, elderberries, or rowanberries (mountain ash berries). Usually, I go for about 50 percent crab apples with a combination of two or three different berries. If I’ve gathered rosehips or rowanberries, however, I prefer to use them on their own, blended only with crab apple (see the VARIATIONS).
Makes about six 8-ounce jars
2¼ pounds crab apples (or cooking apples)
2¼ pounds mixed hedgerow berries (see above)
About 5 cups granulated sugar
Pick over your fruit, removing the stems and leafy bits and rinsing the berries if necessary. Don’t peel or core the apples (the peel and core are excellent sources of pectin); just chop them coarsely. Place all of the prepared fruit in a saucepan with 5 cups of water. Bring gently to a simmer, and simmer until the fruit is soft and pulpy. Remove from the heat.
Have ready a JELLY STRAINER BAG or piece of cheesecloth and turn the contents of the pan into it. Leave to drip overnight. The jelly will turn cloudy if you squeeze the juice through, so just let it drip at its own pace.
The next day, measure the juice — you will probably have about 5 cups, though this will depend on the berries used. For every cup of juice, allow 1 cup of sugar. Put the juice into a large pan and bring slowly to a boil. Add the sugar as it just comes to a boil and keep stirring until the sugar has dissolved. Then boil rapidly, without stirring, for 9 to 10 minutes until the SETTING POINT is reached. Skim the jelly and pot and seal as quickly as possible (SEE POTTING, PACKING AND SEALING). Use within 1 year.
These are some of my favorite takes on the hedgerow jelly idea. In each case, follow the HEDGEROW JELLY METHOD AND QUANTITIES; i.e., always use 1 cup of sugar for each cup of strained fruit juice.
Spicy crab apple jelly Use crab apples alone and add a few cloves and a couple of cinnamon sticks when the fruit is being cooked. This all-time classic hedgerow jelly is equally at home on thinly sliced hot buttered toast or as an accompaniment to succulent cold roast pork or turkey.
Rosehip and apple jelly Use 1 pound, 2 ounces of rosehips, first chopped in a food processor, and 3 pounds, 6 ounces of crab or cooking apples. Rosehips from the wild rose or dog rose seem to have a better flavor than those from cultivated roses. However, some garden varieties of rose also produce cookable hips — notably Rosa rugosa. If you want to harvest rosehips from your garden, do not deadhead your roses. Excellent with roast pork.
Rowan jelly Use 2¼ pounds of rowanberries (mountain ash berries) and 2¼ pounds of crab apples. Add the juice of 1 lemon before adding the sugar. For a really aromatic jelly, add a bunch of sage or thyme when the fruit is softening. Rowan jelly is lovely served with game.
Blackberry and apple jelly Use 2¼ pounds of blackberries and 2¼ pounds of apples. This is a nostalgic teatime treat for me, as I remember how good my grandmother’s blackberry and apple jelly always tasted on wafer-thin slices of buttered bread.
P.S. Hedgerow jelly, or any other well-colored jelly, can be used as a natural coloring for glacé icing. Just a teaspoonful or two will be sufficient to give your icing a wickedly deep hue that will be sure to liven up your cakes.
Season: September
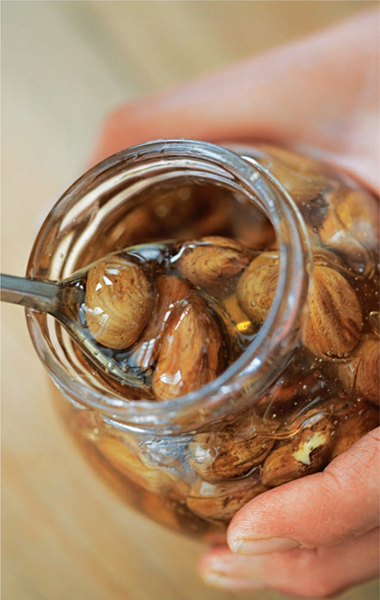
You’ve got to be quick to beat the squirrels to the hazelnuts each autumn. Once you have found some, it’s important to store them carefully. Even with their shells on, they have a tendency to dry out and shrivel up, but preserving them in honey will keep them fresh and fragrant for ages. Use wild hazels that you have gathered yourself, or filberts, which are simply a cultivated form of hazelnut.
Spoon your honeyed hazels over plain yogurt, chocolate ice cream, porridge, or muesli.
Makes about three 4-ounce jars
1 pound, 2 ounces hazelnuts or filberts
1 cup pale honey
Start by inviting your friends round for a nut-cracking evening (they’ll come the first year, but maybe not the next). Crack all the nuts and remove the kernels.
Heat a frying pan over low heat. Toast the shelled nuts in batches for 4 to 5 minutes, jiggling and shaking the pan to make sure they don’t burn. Remove from the heat and allow to cool.
Pack the nuts into STERILIZED JARS, adding 1 tablespoon of the honey at every third or fourth layer. Continue until the jars are chock-a-block full, making sure that the nuts are well covered in honey. Seal securely with a lid (SEE POTTING, PACKING AND SEALING) and store in a cool, dry, dark place. Use within 1 year.
P. S. Pale honey is runny, while dark honey is thick and opaque, but apart from this there is no real difference between the two types — it’s just down to the feeding ground for the bees. Borage honey, a speciality of east Yorkshire, is one of the clearest honeys you will ever come across, whereas clover honey is favored for its creamy, thick texture and floral flavor. All honey, with the exception of heather honey, will eventually become cloudy as a result of the natural process of crystallization. If you find this happens and you want your honey to be runny again, then just stand the jar in a bowl of hot water for a few minutes until it is liquid honey again.

Season: September to October
The term mincemeat originated in the fifteenth century, when chopped meat was preserved with a combination of dried fruit, sugar, and aromatic spices. During the seventeenth century, suet replaced the meat and has been used ever since. This recipe is a departure on several fronts: it uses fresh fruit as well as dried, and it contains no suet. In fact, it contains very little fat (only the oil in the walnuts). The result is light and fruity, but with all the rich, warm spiciness of a traditional mincemeat. If you can’t find russet apples, any good eating apple can be used.
Makes four 12-ounce jars
2¼ pounds plums
Finely grated zest and juice of 2 to 3 oranges (you need ¾ cup plus 2 tablespoons juice)
1 pound, 2 ounces russet apples, peeled, cored, and chopped into ⅜-inch cubes
1¼ cups currants
1¼ cups raisins
1¼ cups golden raisins
⅓ cup orange marmalade
1¼ cups Demerara sugar
¼ teaspoon ground cloves
2 teaspoons ground ginger
¾ of a whole nutmeg, grated
¼ cup ginger wine or cordial (optional)
¾ cup chopped walnuts
¼ cup brandy or sloe gin
Wash the plums, halve and pit them, then put them into a saucepan with the orange juice. Cook gently until tender, about 15 minutes. Purée in a blender or press through a sieve. You should end up with about 3 cups of plum purée.
Put the purée into a large bowl and add all the other ingredients, except the brandy or gin. Mix thoroughly, then cover and let stand for 12 hours.
Preheat the oven to 250°F. Put the mincemeat in a large baking dish and bake, uncovered, for 2 to 2½ hours. Stir in the brandy or gin, then spoon into warm, STERILIZED JARS, making sure there aren’t any air pockets. SEAL and store in a dry, dark, cool place until Christmas. Use within 1 year.
You can vary this recipe, but keep the fresh fruit purée to around 3 cups and the total amount of dried fruit to 4 cups or 1¼ pounds. For an apple, pear, and ginger mincemeat, replace the plums with Granny Smith apples, the russet apples with firm pears, and ⅔ cup of either of the raisins with 3½ ounces of crystallized ginger. You could also exchange the walnuts for almonds and add a couple of teaspoonfuls of ground cinnamon.

Season: late September to October
A fruit cheese is simply a solid, sliceable preserve — and the princely quince, with its exquisite scent and delicately grainy texture, makes the most majestic one of all. It can be potted in small molds to turn out, slice, and eat with cheese. Alternatively, you can pour it into shallow trays to set, then cut it into cubes, coat with sugar, and serve as a sweetmeat.
A little coarsely chopped quince cheese adds a delicious fruity note to lamb stews or tagines — or try combining it with chopped apple for a pie or crumble.
Makes about 2¼ pounds
2¼ pounds quince
2½ to 3¾ cups granulated sugar
Food-grade paraffin wax, for sealing
Wash the quince. Coarsely chop the fruit but don’t peel or core it. Place in a large pan and barely cover with water. Bring to a simmer and cook until soft and pulpy, adding a little more water if necessary. Let stand for several hours.
Press the contents of the pan through a sieve or run through a food mill. Weigh the pulp and return it to the cleaned-out pan, adding an equal weight of sugar. Bring gently to a boil, stirring until the sugar has dissolved, then simmer gently, stirring frequently, for an hour and a bit until really thick and glossy. It may bubble and spit like a volcano, so do take care. The mixture is ready when it is so thick that you can scrape a spoon through it and see the bottom of the pan for a couple of seconds before the mixture oozes together again.
If you’re using small dishes or straight-sided jars, brush them with a little glycerine. This will make it easy to turn out the cheese. If you’re using a shallow baking pan or something similar, line it with parchment or waxed paper, allowing plenty of overhang to wrap the finished cheese.
When the cheese is cooked, pour it into the prepared molds or jars. To seal open molds, pour melted food-grade paraffin wax over the hot fruit cheese. Jars can be sealed with lids (SEE POTTING, PACKING AND SEALING). Cheese set in a shallow tray should be covered with parchment or waxed paper and kept in the fridge.
For optimum flavor, allow the quince cheese to mature for 4 to 6 weeks. Use within 1 year.
Season: October to December
1 first made this deliciously sweet preserve while staying at a farm on Dartmoor. Melissa, who lived at the farm, came to help with the laborious job of peeling the chestnuts, and we whipped through them in no time. Adding honey to the jam seemed entirely appropriate, since that’s what Melissa means in Greek.
I like to spoon chestnut jam into meringue nests and top with cream. Or stir a spoonful or two into chocolate mousse, or dollop it on vanilla ice cream before drizzling with hot chocolate sauce. This preserve also makes a lovely filling for chocolate cakes, and, of course, it can be enjoyed simply spread on crusty bread.
Makes four 8-ounce jars
2¼ pounds sweet chestnuts
2 cups granulated sugar
1 teaspoon vanilla paste or extract
¼ cup honey
¼ cup brandy
The first task is to remove the leathery shells and skins from the chestnuts. Use a sharp knife to make a nick in the top of each chestnut. Plunge them into a pan of boiling water for 2 to 3 minutes — sufficient time to soften the shell but not let the nuts get piping hot and difficult to handle. Remove the pan from the heat. Fish out half a dozen or so chestnuts and peel off their coats. With luck, the thin brown skin under the shell will peel away too. Continue in this way until all are peeled.
Put the chestnuts into a clean pan and add water to just cover the chestnuts. Bring to a boil and simmer for 25 to 30 minutes, until tender. Drain, but keep the cooking liquid.
Purée the chestnuts with ½ cup of the cooking liquid in a food processor or using a handheld blender.
Pour a further 6 tablespoons of the cooking liquid into a pan and add the sugar. Heat gently until dissolved. Add the chestnut purée, vanilla paste or extract, and honey. Stir until well blended. Bring to a boil, then cook gently for 5 to 10 minutes, until well thickened. Take care, as it will pop and splutter and may spit. Remove from the heat and stir in the brandy. Pour into warm, sterilized jars and seal immediately (SEE POTTING, PACKING AND SEALING). Use within 6 months. Store in the fridge once opened.
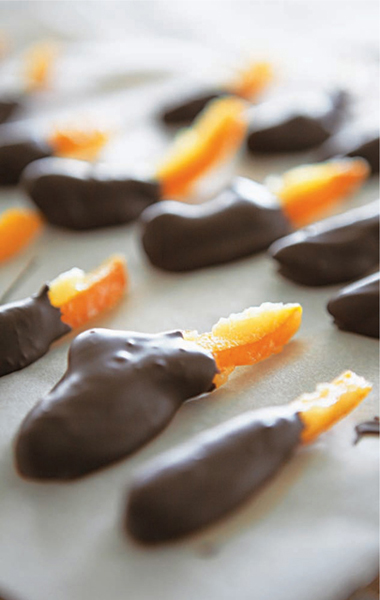
Season: anytime
I like to make several batches of these sweets in November or early December. A dozen or so, wrapped in cellophane, are a charming gift. Needless to say, you don’t need to stop at oranges: lemon and grapefruit peel work equally well, and you can use milk chocolate, dark chocolate, or white chocolate for dipping. The corn syrup is optional, but does prevent the sticks from becoming too hard. It is best to keep the candied sticks in an airtight container and only dip them in chocolate shortly before you want them.
Makes about 100 sticks
4 or 5 large oranges
2½ cups granulated sugar
1 tablespoon corn syrup (optional)
7 ounces good dark chocolate
Scrub the oranges, then remove the peel in quarters. To do this, cut through the peel with a sharp knife, going right around the orange, starting and finishing at the stem end, then repeat at a right angle to the first cut. Remove the peel, with the attached pith, from the fruit. Weigh out 9 ounces of peel and cut it into slices measuring about ¼ by 2 inches.
Put the orange peel slices into a large pan and cover with 8 cups of cold water. Bring to a boil and simmer for 5 minutes. Drain and return to the pan with 4 cups of cold water. Bring to a boil and simmer, covered, for 45 minutes. Add the sugar and stir until dissolved (it won’t take long). Simmer, covered, for 30 minutes. Remove from the heat and let stand for 24 hours.
Bring the pan to a boil again. Add the corn syrup, if using, and boil gently, uncovered, for 30 minutes, or until all the liquid has evaporated and the orange sticks are coated with bubbling orange syrup. Remove from the heat and allow to cool. Using a pair of tongs (or your fingers), carefully remove the orange sticks and place on a wire rack with a tray underneath to catch the drips. Leave in a warm place for 24 hours, or place in a very low oven at approximately 140°F for 2 to 3 hours to dry.
Break the chocolate into pieces, put into a heatproof bowl over a pan of simmering water, and leave until melted. Remove from the heat. Dip one half of each orange stick in the melted chocolate and place on a sheet of parchment or waxed paper to dry.
Before dipping, the sticks will keep well for 3 to 4 months. Once they have their chocolate coating, they are best eaten within 3 weeks.
Season: September to November
Autumn is the season for apples. For centuries, the apple crop has been important, and the apple tree cherished and celebrated for its fruit. Wassailing is an English West Country tradition when, on Twelfth Night of old (January 17), country folk toast and drink to the health of the largest and most prolific apple tree in the orchard for a healthy, fruitful crop the coming season.
The sharp and bittersweet qualities of cider give this old-fashioned apple butter a special flavor. It’s a sensational fruity spread to daub over hot buttered toast or crumpets.
Makes four to five 8-ounce jars
3 pounds, 6 ounces cooking apples
2½ cups dry or medium cider
Granulated sugar
½ teaspoon ground cloves
½ teaspoon ground cinnamon
There is no need to peel or core the apples. However, if you are using windfalls (and this is a very good recipe in which to do so), cut away any damaged or bruised bits. Chop the apples into fairly big pieces (each into about 8). Place in a large pan with the cider and 2½ cups of water. Cook gently until soft, then remove from the heat.
Push the apple mixture through a sieve or use a food mill to reduce it to a purée. Measure the volume of fruit pulp and return it to the cleaned-out pan, adding ⅔ cup of sugar for every cup of fruit pulp. Add the cloves and cinnamon. Slowly bring to a boil, stirring until the sugar has dissolved, then boil rapidly for 10 to 15 minutes, until the mixture begins to splutter and is thick and creamy.
Remove from the heat and pour immediately into warm, sterilized jars (it’s best to use small jars, as this low-sugar preserve has a relatively short shelf life once opened), then seal immediately (SEE POTTING, PACKING AND SEALING). Use within 1 year. Store in the fridge once opened.
Blackberries make a beautiful fruit butter. Follow the above method using 2¼ pounds of ripe blackberries, 1 pound, 2 ounces of cored and peeled cooking apples, and 7 tablespoons of lemon juice; use ½ cup plus 1 tablespoon of sugar for every cup of fruit pulp.
Season: anytime
This is a wonderful, frugal recipe that complements some of the other fruity preserves in the book because it uses the apple scraps and citrus skins that would normally be destined for the compost heap or bin. These skins are full of flavor and rich in pectin, so it’s a shame not to use them. For the cost of a bag of sugar (and a bit of your time), you can transform them into a really fruity, marmalade-flavored jelly. It functions nicely as an emergency breakfast preserve when your last jar of marmalade has been eaten and the seasonal Sevilles haven’t yet arrived in the shops.
Makes about five 4-ounce jars
1 pound, 2 ounces apple cores and peel
1 pound, 2 ounces citrus fruit peel (unwaxed lemon, orange, grapefruit and/or lime), cut into about ⅜-inch shreds
Granulated sugar
Juice of 1 orange, lemon, or grapefruit (optional)
Put the apple cores and peel and the citrus peel into a saucepan. Add sufficient water to cover (you’ll probably need about 6 cups). Bring to a simmer and cook slowly for 45 to 60 minutes — this softens the fruit and releases the valuable pectin. Turn the fruit into a JELLY STRAINER BAG or piece of cheesecloth and leave overnight to drip.
Measure the strained liquid and allow 1 cup of sugar for every cup of juice. Return the juice to the pan and add the orange, lemon, or grapefruit juice, if using. Bring to a boil, then add the sugar. Stir until dissolved, then boil rapidly, without stirring, until the SETTING POINT is reached, about 10 minutes or so.
Remove from the heat and stir, always going in the same direction, until all the surface bubbles have disappeared. Pour into warm, STERILIZED JARS and either swivel or tap the side of the jars to remove any remaining bubbles. Seal in the usual way (SEE POTTING, PACKING AND SEALING). Use within 1 year.