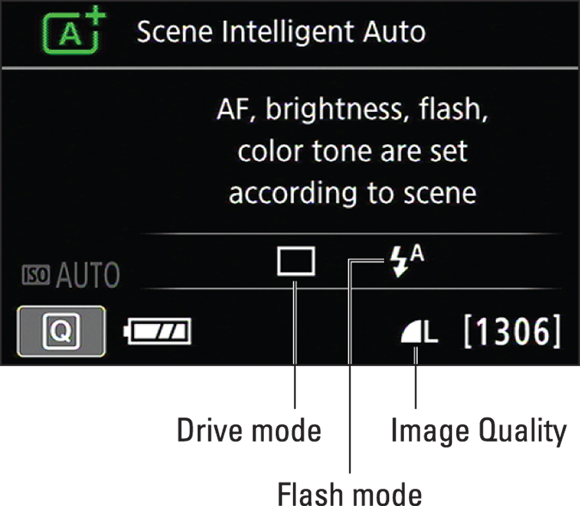
In Scene Intelligent Auto and Flash Off modes, the camera tries to figure out what type of picture you want to take. If you don’t want to rely on the camera to make that judgment, you can choose from various scene modes because they’re designed to capture specific scenes using traditional recipes.
Choosing a scene mode
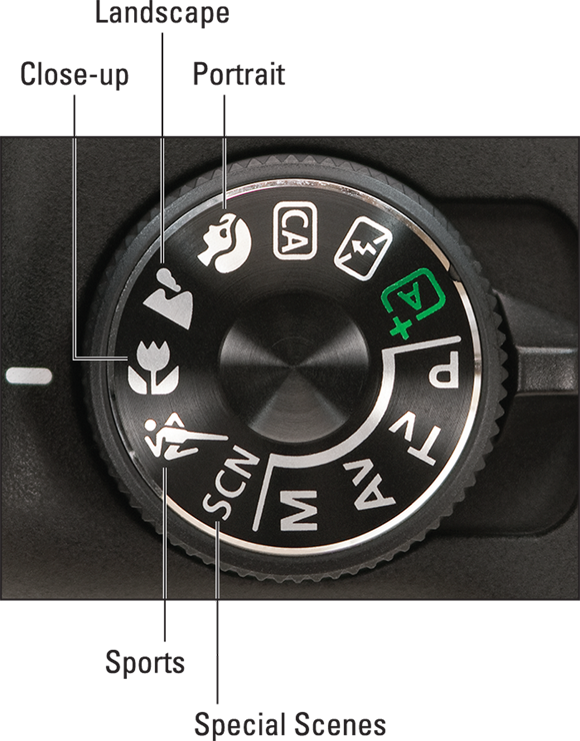
To select a scene mode, turn the Mode dial to the icon that represents the type of picture you want to take. Figure 3-7 labels the icons that represent each mode.
As for the actual picture-taking process, everything works pretty much as outlined in the steps in the first section of this chapter. You do need to be aware of a few variations on the theme, which we spell out in the upcoming sections detailing each scene mode.
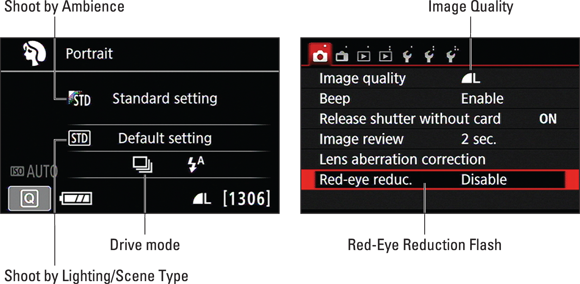
After you select a scene mode, the Shooting Settings screen displays information similar to what you see on the left in Figure 3-8. The exact information varies according to the scene mode; the figure shows the screen for Portrait mode.
Depending on the scene mode, you may be able to adjust the following settings:
- Shoot by Ambience: This option, available in all the scene modes except HDR Backlight Control, enables you to play with image colors and request a darker or brighter exposure on your next shot. The section “Taking a look at the Shoot by Ambience options,” later in this chapter, explains your choices. Look for the setting marked by the little triangle symbol, as labeled on the left in Figure 3-8; adjust the option via the Quick Control screen.
- Shoot by Lighting or Scene Type: This option, also labeled in the figure, is available only in Portrait, Landscape, Close-up, and Sports modes. It manipulates color and is primarily designed to eliminate color casts that can occur in some types of lighting. Check out “Eliminating color casts with Shoot by Lighting or Scene Type,” later in this chapter, for details. Again, this setting is accessed by the Quick Control screen.
- Drive mode: The icon representing this setting appears in the area labeled on the left in Figure 3-8. Close-up, Landscape, Night Portrait, Handheld Night Scene, and HDR Backlight Control modes set the Drive mode to Single (one shot per shutter-button press) by default. Portrait and Sports modes use the Continuous Drive mode. You can switch to any other Drive mode, however; see Chapter 2 for details.
- Flash: For Handheld Night Scene mode, you can enable or disable flash via the Quick Control screen. For other modes that permit flash, you don’t have control over whether the flash fires, but you can enable or disable Red-Eye Reduction flash via Shooting Menu 1 (refer to the right screen in Figure 3-8).
- Image Quality: You can change this setting, which controls resolution and file type, only via Shooting Menu 1. Chapter 2 explains the impact of that setting. If you’re unsure of which option to choose, stick with the default (Large/Normal). The symbol next to the menu item should look like the one shown in Figure 3-8 — the L with the smooth arc beside it. Note that you can’t use the Raw Image Quality setting for the HDR Backlight Control and Handheld Night Scene modes.
These same controls are available from the Quick Control screen in Live View mode.
Portrait mode
 Portrait mode is designed to produce the classic portraiture look featured in Figure 3-9: a sharply focused subject against a blurred background. In photography lingo, this picture has a short depth of field.
 One way to control depth of field is to adjust an exposure control called aperture, or f-stop setting, so Portrait mode attempts to use an f-stop setting that produces a short depth of field. But the range of f-stops available to the camera depends on the lens and the lighting conditions, so one picture taken in Portrait mode may look very different from another. Additionally, the amount of background blurring depends on a couple other factors, all covered in Chapter 5. In other words, your mileage may vary.
Along with favoring an f-stop that produces a shorter depth of field, Portrait mode results in a slightly less sharp image, the idea being to keep skin texture soft. Colors are also adjusted to enhance skin tones. A few other facts to note:
- Drive mode: The Drive mode is set to Continuous by default, which means that the camera records a series of images in rapid succession as long as you hold down the shutter button. This technique comes in handy if your subject can’t be counted on to remain still for very long — a toddler or pet, for example. But you have the option of changing to any of the other Drive modes. See Chapter 2 for details.
Flash: The flash fires if the camera deems extra lighting is needed. For outdoor portraits, this can pose a problem: Flash generally improves outdoor portraits, and if the ambient light is very bright, the camera may not think you need flash. You can switch to Creative Auto mode or one of the advanced exposure modes to take control of flash firing.
If the camera does pop up the flash, you can enable or disable Red-Eye Reduction flash via Shooting Menu 1.
- Autofocusing: The camera locks focus when you press the shutter button halfway, typically selecting the closest object that falls under one of the focus points (or within the Area Frame, in Live View mode).
Landscape mode
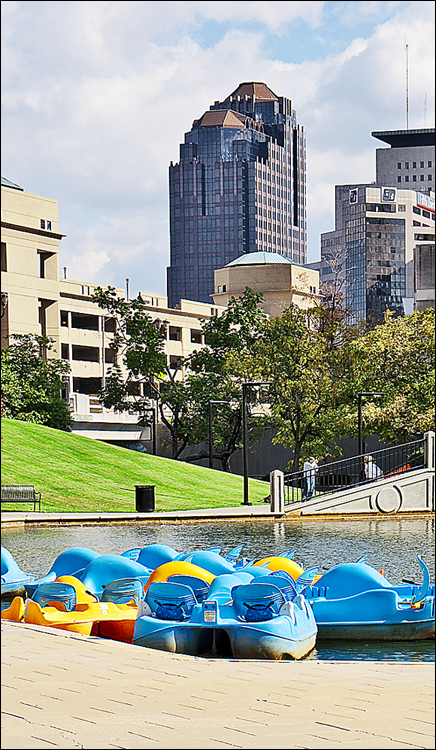
 Landscape mode, designed for capturing scenic vistas, city skylines, and other large-scale subjects, produces a large depth of field. As a result, objects both close to the camera and at a distance appear sharply focused, as in Figure 3-10.
Like Portrait mode, Landscape mode achieves its depth-of-field goal by manipulating the aperture (f-stop) setting. Consequently, the extent to which the camera can succeed in keeping everything in sharp focus depends on your lens and the available light. To fully understand this issue and other factors that affect depth of field, see Chapters 4 and 5.
Whereas Portrait mode tweaks the image to produce soft, flattering skin tones, Landscape mode results in sharper, more contrasty, photos. Color saturation is increased as well, and blues and greens appear especially bold.
Other critical settings work as follows:
- Drive mode: The default setting is Single, which records one image for each press of the shutter button. As with the other scene modes, you can switch to any of the other Drive modes if you prefer. See Chapter 2 for an explanation of your options.
- Flash: The built-in flash is disabled, which is typically no big deal. Because of its limited range, the flash is of little use when shooting most landscapes, anyway. But for some still-life shots, such as of a statue at close range, a flash may prove helpful. Try switching to Creative Auto mode, detailed later in this chapter, if you want to use flash.
- Autofocusing: Focus locks when you press the shutter button halfway. Focus usually is set on the nearest object that falls under one of the nine autofocus points (viewfinder photography) or Area Frame (Live View mode).
Close-up mode
 Switching to Close-up mode doesn’t enable you to focus at a closer distance to your subject than normal, as it does on some non-SLR cameras. The close-focusing capabilities of your camera depend entirely on the lens you use. (Your lens manual should specify the minimum focusing distance.)
Choosing Close-up mode does tell the camera to try to select an aperture (f-stop) setting that results in a short depth of field, which blurs background objects so that they don’t compete for attention with your main subject. Julie took this creative approach to capture the orchid in Figure 3-11, for example. As with Portrait mode, though, how much the background blurs varies depending on a number of factors, all detailed in Chapter 5.
For greater background blurring, move the subject farther from the background, use a telephoto lens (or zoom to the longest focal length your lens offers), and get closer to the subject. Also keep in mind that objects in front of your subject may also appear blurry with a very short depth of field.
As far as color, sharpness, and contrast, the camera doesn’t play with those characteristics as it does in Portrait and Landscape modes. So in that regard, Close-up mode is the same as Scene Intelligent Auto and Flash Off modes.
These other settings apply to Close-up mode:
- Drive mode: The Drive mode is set to Single by default, so you record one photo each time you fully press the shutter button. However, you can use any of the other options you prefer. Don’t know how those work? Chapter 2 explains.
- Flash: Flash is set to Auto, so the camera decides whether the picture needs the extra light from the flash. If the camera enables the flash, you can turn Red-Eye Reduction flash on or off via Shooting Menu 1.
- Autofocusing: When you press the shutter button halfway, the camera locks focus, usually on the nearest object (or the Area Frame, in Live View mode). If you have trouble focusing, first make sure that you’re not too close up. Remember, every lens has a minimum close-focusing distance.
Sports mode
 Sports mode results in a number of settings that can help you photograph moving subjects, such as the soccer player in Figure 3-12. First, the camera selects a fast shutter speed, which is needed to stop motion. Shutter speed is an exposure control that you can explore in Chapter 4.
Colors, sharpness, and contrast are all standard in Sports mode, with none of the adjustments that occur in Portrait and Landscape modes.
Other settings to note include the following:
- Drive mode: To enable rapid-fire image capture, the Drive mode is set to Continuous by default. This mode enables you to record multiple frames with a single press of the shutter button. To find out about other Drive mode options, see Chapter 2.
- Flash: Flash is disabled, which can be a problem in low-light situations but also enables you to shoot more quickly because the flash needs time to recycle between shots. In addition, disabling the flash permits a faster shutter speed; when the flash is on, the maximum shutter speed is 1/200 second, which may not be fast enough to freeze quickly moving subjects. (See Chapter 2 for details about flash and shutter speeds.)
Autofocusing: The AF mode is set to AI Servo, which is designed for moving subjects. When you press the shutter button halfway, the camera establishes focus on whatever is at the center of the frame. But if the subject moves, the camera attempts to refocus up to the moment you take the picture. For this feature to work correctly, you must adjust framing so that your subject remains within the autofocusing brackets.
If you’re using Live View, it’s vital that you have Continuous AF enabled. Otherwise, you should manually focus when shooting action
 For this feature to work correctly, you must adjust framing so that your subject remains within the autofocus brackets.
The other critical thing to understand about Sports mode is that whether the camera can select a shutter speed fast enough to stop motion depends on the available light and the speed of the subject itself. In dim lighting, a subject that’s moving at a rapid pace may appear blurry even when photographed in Sports mode. And the camera may need to increase light sensitivity by boosting the ISO setting, which has the unhappy side effect of creating noise, a defect that looks like grains of sand.
Special Scene mode
 Special Scene mode has six scenes: Kids, Food, Candlelight, Night Portrait, Handheld Night Scene, and HDR Backlight Control.
To access any of the submodes, choose a method:
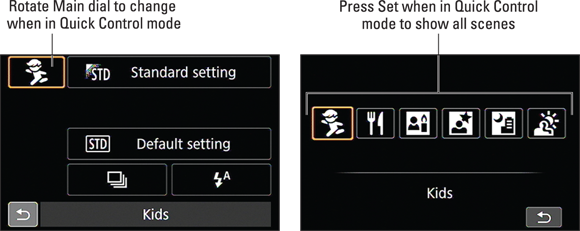
- Set the Mode dial to Special Scene mode (SCN) and then press the Quick Control button. Rotate the Main dial to scroll through the three special scenes, as shown on the left of Figure 3-13.
- Press the Set button to call up a display with all six scenes (see the right of Figure 3-13). Then select the scene of your choice by tapping it or using the left or right cross keys to highlight it. Press the Set button again to lock in your choice.
Here’s a rundown of these modes:
- Kids: This is a great scene mode to use if you want to photograph kids. Much like Sports mode, Kids mode works best for active children at play.
- Food: Use this mode to photograph your tastiest dishes. This mode is reminiscent of Close-up mode.
- Candlelight: This mode is available only when you’re using the viewfinder. Use this mode when photographing people or other subjects lit by candles.
- Night Portrait: As its name implies, this mode is designed to deliver a better-looking portrait at night (or in a dimly lit environment).
- Handheld Night Scene: This mode is designed to produce a sharper picture when you handhold the camera in dim lighting.
- HDR Backlight Control: When a scene contains both very dark and very bright areas, the camera has a difficult time recording the entire range of brightness values. That’s where this mode comes in.
Modifying scene mode results
With certain scene modes, you can play around a little with color, sharpness, contrast, and exposure through the Shoot by Ambience and Shoot by Lighting or Scene Type features.
 The keywords here are play around a little. These features don’t give you anywhere near the level of control as the advanced exposure modes (P, Tv, Av, and M) or even as much as Creative Auto mode, explained at the end of this chapter. But they do offer an easy way to start exploring your creative possibilities and begin thinking about how you want to record a scene.
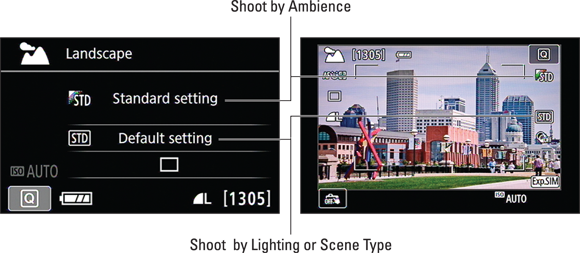
Our only beef with these two features is that they aren’t presented in the most user-friendly fashion, especially for the novice photographer — heck, even for the advanced photographer. For starters, the feature names don’t give you a lot of information about what you can accomplish by using them. And the displayed names of the default settings — shown on the Shooting Settings screen and Live View display in Figure 3-14 — are Standard and Default. Well, that’s helpful, huh? Then again, if it weren’t for confusing stuff like this, you might not need our input, so we probably shouldn’t complain.
At any rate, here’s a quick explanation of each feature:
- Shoot by Ambience: With this option, you can affect the color, exposure, contrast, and sharpness of your pictures. This option is available in all the scene modes. You also can use it in Creative Auto mode, explained later in this chapter.
- Shoot by Lighting or Scene Type: This option — available in Portrait, Landscape, Close-up, Sports, and Kids modes — is designed to remove unwanted color casts that can occur if the camera can’t properly compensate for the color of the light source. (For example, the red glow of candlelight may cause skin colors to look too red.)
 When checking the effects of Shoot by Ambience and Shoot by Lighting or Scene Type in Live View, set the Creative Filter to Off to isolate the effect you see displayed on the monitor to ambience or lighting.
The next two sections give you an idea of what you can accomplish with these options. Following that, you can find step-by-step instructions for using them on your next shot.
Taking a look at the Shoot by Ambience options
For Shoot by Ambience, you can choose from these settings:
- Standard: Consider this the off setting. When you select this option, the camera makes no adjustment to the characteristics normally produced by your selected scene mode.
- Vivid: Increases contrast, color saturation, and sharpness.
- Soft: Creates the appearance of slightly softer focus.
- Warm: Warms (adds a reddish-orange color cast) and softens.
- Intense: Boosts contrast and saturation (color intensity) even more than the Vivid setting.
- Cool: Adds a cool (blue) color cast.
- Brighter: Lightens the photo.
- Darker: Darkens the photo.
- Monochrome: Creates a black-and-white photo, with an optional color tint.
All of these adjustments are applied in addition to whatever adjustments occur by virtue of your selected scene mode. For example, Landscape mode already produces slightly sharper, more vivid colors than normal. If you add the Vivid Shoot by Ambience option, you amp things up another notch. Vivid, Soft, Warm, Intense, and Cool are not available when you shoot in Food or Candlelight mode.
In addition, you can control the amount of the adjustment through a related setting, Effect (another less-than-clear feature name, if you ask us). You can choose from three Effect levels. The level name and its effect depend on the adjustment you choose. Most Effects have Low, Standard, and Strong settings. Darker and Brighter have Low, Medium, and High settings. In the case of the Monochrome setting, you can switch from a black-and-white image to a monochrome image with a warm (sepia) or cool (blue) tint.
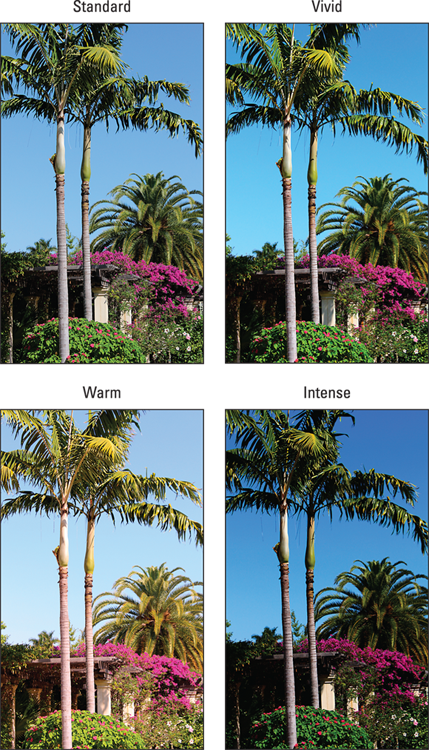
As a quick example of the color effects you can create, Figure 3-15 shows the same subject taken at four different Shoot by Ambience settings. Julie took all these pictures in the Landscape scene mode. For the three variations — Vivid, Warm, and Intense — she applied the maximum level of adjustment, setting the Effect option to Strong.
Although the color effects are entertaining, we think you’ll get more use out of the Brighter and Darker settings, as they give you a way to overrule the camera’s exposure decisions. For example, in the left image in Figure 3-16, the exposure of the background was fine, but the flower was overexposed. So Julie set the Shoot by Ambience option to Darker, set the Effect option to Medium, and shot the flower again.
Eliminating color casts with Shoot by Lighting or Scene Type
This option might be better named Eliminate Color Cast because that’s what it’s designed to do: Remove unwanted color casts that can occur when the camera makes a white balance misstep.
Chapter 6 explains white balance fully, but in short, it has to do with the fact that every light source emits its own color cast — candlelight, a warm hue; flash, a slightly cool hue; and so on. The camera’s White Balance setting is the mechanism that compensates for the color of the light so that colors in the scene are rendered accurately. Normally, the camera uses automatic white balancing, and things turn out just fine. But if a scene is lit by different types of light, the camera sometimes gets confused, and colors may be out of whack.
In the advanced exposure modes, you deal with color casts by changing the White Balance setting; again, Chapter 6 shows you how. You can’t access the White Balance setting in the scene modes, but in Portrait, Landscape, Close-up, Sports, and Kids modes, you can use the Shoot by Lighting or Scene Type option to tell the camera to balance colors for a specific light source.
You can choose from the following settings:
- Default: Colors are balanced for the light source automatically.
- Daylight: For bright sunlight.
- Shade: For subjects in shade.
- Cloudy: For shooting under overcast skies.
- Tungsten Light: For incandescent and tungsten bulbs; not available for Landscape scene mode.
- Fluorescent Light: For subjects lit by fluorescents (although this may not be suitable for some compact-fluorescent lights — try tungsten if you get bad results). Also not available for Landscape mode.
- Sunset: Helps capture brilliant sunset colors, especially when you’re shooting into the sun. (P.S.: Don’t aim the lens directly at the sun or look through the viewfinder directly into the sun. You can damage the camera and hurt your eyes.)
Adjusting (and previewing) the Shoot By settings
The two Shoot By options together determine your final photo colors and exposure. So being able to preview the possible combinations of settings without having to take a bunch of shots to experiment would be great, yes?
Well, luckily, you can enjoy that advantage in Live View mode. As you vary the Shoot by Ambience and Shoot by Lighting or Scene Type settings, the Live View display updates to show you how the subject will be rendered. (Note that the Live View preview isn’t always 100-percent accurate, especially in terms of image brightness, but it’s fairly close.)
The following steps explain how to select the Shoot By settings in Live View mode. (Remember that you can always preview and select the options and then switch back to viewfinder shooting to take the picture if you prefer.) Canon recommends that you set the Shoot by Lighting or Scene Type option first, so that’s how the steps flow.
The Shoot by Lighting or Scene Type options are available in the Portrait, Landscape, Close-up, and Sports modes only. So to try out the following steps, set the camera to one of those modes and then follow these instructions:
 Press the Live View button to shift to Live View mode.
Compose the shot.
 Shift to the Quick Control mode.
You can get there by tapping the Q icon in the upper-right corner of the screen or by pressing the Quick Control button, shown in the margin here.
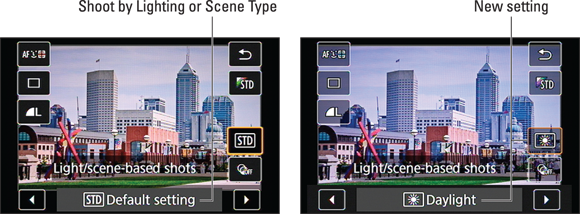
Select the Shoot by Lighting or Scene Type option, as shown on the left in Figure 3-17.
You can tap the setting or use the cross keys to select it. The name of the current setting is shown along the side of the screen. Descriptive text appears at the bottom. For example, on the left side of Figure 3-17, the Default (no adjustment) setting is selected, and you’re reminded that it’s a light- or scene-based setting.
Rotate the Main dial to cycle through the settings.
This setting is designed to remove unwanted color casts from a scene. But there’s nothing preventing you from using the option to add a slight cast to the scene if your heart desires. You may like the effect of making your subject look a little warmer or cooler, and again, you can see the results of each setting on the camera monitor. What impact any setting has on your subject depends on the actual lighting conditions. In the right image in Figure 3-17, choosing the Daylight option made colors bluer, for example.
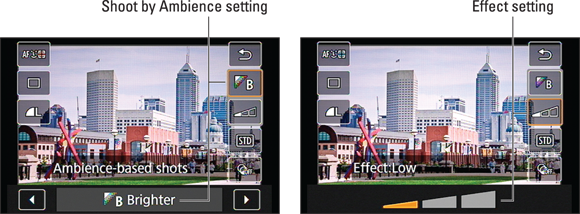
Select the Shoot by Ambience option, labeled in Figure 3-18.
You can either tap the icon to select it or use the cross keys to highlight it. By default, the Standard setting is used.
Rotate the Main dial to change the Shoot by Ambience setting.
Or, again, you can tap the arrows on either side of the setting name at the bottom of the screen.
As soon as you rotate the dial, you see the impact of the newly selected ambience setting on the scene. For example, on the left side of Figure 3-19, the preview shows the result of changing from the Standard setting to the Brighter setting. In addition, the Effect setting, which determines the level at which the adjustment is applied, becomes available. We labeled this option on the right side of Figure 3-19.
Select the Effect setting and rotate the Main dial to set the level of the adjustment.
Again, either use the cross keys to highlight the setting or just tap the icon. You then can choose from Low (one notch on the little gauge), Standard or Medium (medium impact, represented by two notches), or Strong (three notches).
Yes, this is clunky in Live View. Very clunky. It’s easy to forget that, having selected an ambience setting, you have to select the effect icon beneath it and then rotate the Main dial to alter the strength. It would be so much easier to press Set somewhere in this process and see an ambience-based settings screen pop up so you don’t forget anything. But you can’t.
You’re now ready to take the picture. Again, you can exit Live View mode if you prefer; the settings you dialed in stay in force for both Live View and viewfinder shooting until you change them.
If you already know what settings you want to use, you can get the job done more quickly by staying out of Live View mode and just using the Quick Control screen to dial in both options.


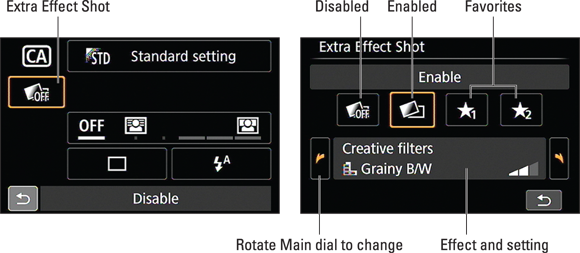
 Creative Auto mode, represented on the Mode dial by the letters CA, offers a bit more control over the look of your pictures than is possible in the scene modes or Auto and Flash Off modes. You can also enable the Extra Effect Shot setting, which we will explain shortly. If you check the monitor after taking a shot and don’t like the results, you can make the following adjustments for your next shot:
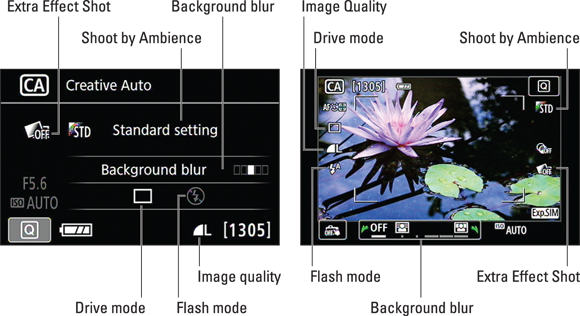
 Auto: The camera fires the flash automatically if it thinks extra light is needed to expose the picture.
 On: The flash fires regardless of the ambient light.
 Off: The flash doesn’t fire.