Chapter 8
ISE Profiling
Abstract
This chapter will take you through the configuration of the profiling subsystem that can be used to provide extra context to make AuthZ decisions. We’ll cover recommended settings for different NAD types to account for feature support within different platforms and best practices for those features. The inner workings of profiling “certainty” will be covered as well as child policies, custom profiling, and example AuthZ rules.
Keywords
profiling
NAD
AuthZ
Introduction
Profiling is the process of taking one or more attributes known about a device, such as MAC OUI or HTTP User-Agent, and using those attributes to determine what that device is (printer, access point, workstation, phone, etc.). Once ISE knows, or has a rough idea, AuthZ policies can be used to determine the level of network access a device should have. Authorization rules could use MAB and a known profile to support devices like printers that might not support 802.1x but still need to be network connected. They could also be used along with 802.1x to steer specific clients to a different location, that is, moving employee mobile devices to a specific mobile device VLAN.
In any deployment, moving toward a fully automated wired access layer is going to rely on some form of profiling in order to determine how devices (especially ones without dot1x support) should be treated. Lucky for us, ISE ships with a lot of profiles out of the box and has the ability to update them via the Profiler Feed Service provided by Cisco. New profiles will be downloaded when they are available and merged into your rules. There are some caveats that are important to make note of though:
1. Unless you take them into account, new rules from the Feed Service will generally take precedence over rules you create. This can result in devices reprofiling and not gaining network access.
2. When creating custom profiling rules, do your best to avoid editing anything that is Cisco provided. Once edited, feed profiler updates can’t be merged into the changed rule.
Previously you would have needed to edit rules to change the value of “Create an Identity Group for the Policy” in order to create an Identity Group that can be used in AuthZ rules. With the introduction of logical profiles, however, you can add groups into these profiles without breaking their ability to be updated by the Feed Service.
When creating your own rules, be sure to either prepend or append something unique to your site to the rules. It makes it easy to identify which rules you have made and reduces any issues that may surface if Cisco ever introduces new rules through the Feed Service that use the same name.
Setting up profiling
The first thing to do to get ISE profiling your endpoints is to verify that the service is turned on and assigned to the proper node (more about that in Chapter 2). Go to Administration → Deployment → Choose Your PSN → Profiler Configuration tab. The table given in the following has the basic recommended settings depending on your access layer switches. If you have a mixed environment containing more than one category, enable all relevant sensors.
* It’s our view that profiling with NetFlow is a great way to DoS your policy nodes and you should generally avoid this unless you have extraordinary reasons.
There are differences between these switch models because of the support (or lack thereof) for a feature called “Device Sensor.” Switches/WLCs that support this feature are able to glean CDP/LLDP/DHCP (and in the case of a WLC, HTTP User-Agent) about clients and then send that information to ISE and send that data back in RADIUS packets. Without Device Sensor, ISE must use SNMP to poll devices and gather information about clients before it is able to accurately profile a device.
Obviously the configuration of profiling is a critical part and while not complex there are multiple technologies that get used and they all provide important info. One technology not working correctly might be the difference between a smooth deployment and one with lots of end-user/executive complaints. If you haven’t already, now is the time to check out Chapter 7 and verify that your devices are properly configured with the settings outlined there. Those configurations have been tested in numerous real-world environments and provide the optimal settings for profiling.
Profiling basics
Profiling rules basically work by matching a “minimum certainty factor.” This factor is a relatively arbitrary number that determines how certain we are that conditions are met, and that this is in fact the correct profile to match for the physical device. Conditions include the following:
• OUI
• CDP characteristics
• LLDP characteristics
• DHCP characteristics
• Browser User-Agent
• Information gathered via SNMP gets
• NMAP information
• NetFlow ports used
When conditions are met, one of two things may happen. Either the certainty factor is matched or an NMAP scan is executed. If NMAP shows that SNMP is open, an SNMP get may be executed on the device with the SNMP strings configured globally for profiling. The global default is “public” but you can add additional strings under Administration → System → Settings → Profiling.
Profiling rules are also hierarchical in that some profiles will not be matched if others are not matched first. If you look at the Apple device profile at the time of this writing, if the OUI of the device shows that it was manufactured by Apple, then the device is determined to be an Apple device. There are then subprofiles that can further determine if it’s an iPad, iPhone, iPod, or Apple TV (for those who like Netflix™). The subprofiles will match to determine if the iPad is an iPad by looking for DHCP or HTTP information to identify the DHCP hostname or the HTTP User-Agent as an iPad physical device.
In the case two possible profiling policies are matched, the one with the higher certainty factor that is matched is selected. If certainty factors are the same, the lower alphabetical order is selected. Keep in mind that a subpolicy match can occur only if the device has been matched into the parent policy. Assuming the following structure:
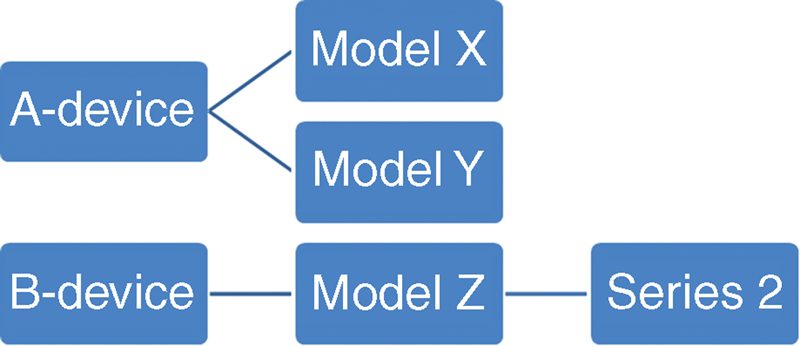
If a device has been profiled into the Model Y group but should be in the Series 2 group, it will never move over if it wouldn’t match both the B-Device and Model Z parent groups.
It is possible to get into a chicken-and-the-egg scenario with profiling and it is something you should watch out for when creating your own rules or creating authorization (AuthZ) policies using Cisco-provided rules. Let’s assume that you have created a new profiler condition for WidgetGroup-Device using the attribute check “dhcp-class-identifier CONTAINS ‘Widget Group’ and based a new Identity Group + AuthZ rule off of that profile. When you plug one of these devices into your network, it will just sit there. See the problem? Your rule depends on info gleaned from DHCP but that info can be obtained only by authorizing that device for network access, which ISE will not do because the device is still unknown. There are a couple of fixes here, but the best one is to add another condition to your profiling rule that checks for the OUI of “WIDGETGROUP, INC” and increments the certainty factor enough to allow the device to match that rule and thus be allowed onto the network. You will want to build your profile policies so that they generally start off matching generic attributes (matching things like OUI that ISE will always have) and then moving to more exact attributes such as CDP, LLDP, and HTTP User-Agent. Cisco’s own “Cisco-Device” profile demonstrates this quite well.
After any device has its profile change, either because of a Feed Service update or because a manual update and that change would impact the authorization level, ISE will issue a CoA for the device so that its network access can be updated. There is a global CoA type defined under Administration → System → Settings → Profiling and by default it is set to No CoA, which means that ISE will do nothing if device’s profile changes. What you have this set to in your environment will largely depend on how you use profiling, device churn, impact of a possible profiling change, and how much time you wish to spend managing profile policies. In an environment with lots of devices being brought on daily and a low business impact if something were to incorrectly profile, then you could set this to “Reauth” so that ISE will tell the device on the edge to reauthenticate and have new policy apply to it. In a very static environment and/or one where a device having its network access changed could be business impacting, you may want to leave the default setting to none. You also have the option of overriding the global setting in each profile, permitting you to do CoAs or not do CoAs for a subset of devices without having that setting impact your entire deployment. Changing this setting will not impact the “Cisco Provided” status of the rule, so you can safely do it without worrying you won’t get new changes from the Feed Service.
A common use case for profile-specific CoA settings might be for devices that aren’t 802.1x aware and authenticated via MAB. In an environment with a lot of consumer electronics this could be things such as game consoles, smart TVs, and Blu-Ray players, and these devices might initially end up in a dead-end or guest VLAN that wouldn’t permit them access to anything until they are profiled. Changing the CoA type in their profiles to “Port Bounce” can allow those devices to detect network changes and smoothly move over without any effort on the user’s part.
In the global settings for profiling there is another option that will be important to understand and possibly critical to your environment’s performance/success: Endpoint Attribute Filtering (EAF). When EAF is enabled in ISE, only attributes actively used in profiling or for internal reasons are kept in the database and all others are discarded. The advantage is that there is less information that needs to be synced to PSNs—an important factor to consider if you have PSNs that are across any WAN or other high-latency links. Keeping EAF has its own advantages and that is because all attributes ISE learns about (and supports) are kept, because it is easier to find unique values that can be used to initially/further profile a device type.
A more advanced profiling function within ISE is the use of “exception actions” to take some action on a device if a condition is met within the profile policy. Simply put, it’s an “exception” to the current set of rules within its current policy. These actions are rarely used and typically rely on information gleaned from NetFlow data (which if you will remember from above is also rarely used and should be used cautiously) to identify actions that are not normal to a device group and move the device into a different VLAN or apply different policy to it. For example, a hospital has developed a profile policy for some of their medical devices that they know to communicate only to two different IP addresses. They could create a condition and policy rule that check for any communication to different addresses and immediately quarantine the device since it is doing something it shouldn’t. Similarly, using a game console as an example, exception actions could be used to move a device from a profile that would use MAB to authenticate to one that would require 802.1x if traffic outside the normal of a game console was detected (TOR, SSH, Torrents, etc.). In both cases exception actions can be used to quickly isolate, and potentially correct, devices that are a possible threat to the network.
The final important feature in profiling is the concept of “logical” profiles. Logical profiles allow you to take any existing profiling policies and join them together into a single container which can then be referenced in AuthZ rules. From a purely management perspective this is nice because it lets us take something like Figure 1.

And turn it into this (Figure 2).

Now this may not seem like a huge change but taking that change over just a handful of AuthZ rules will result in a much easier-to-read policy. The second advantage is an important one because it relates to your ability to get updated profiles from Cisco. In order to add identity profiles to AuthZ rules like Figure 1 the profile must be configured to create a matching Identity Group. This is fine for profiles you create or for Cisco-provided ones that come with that enabled by default but it’s a problem for provided profiles that do not have that set. Once you change the “Create an Identity Group for the Policy” setting in a Cisco-provided policy, the policy is considered “Administrator Modified” and will no longer get updates from Cisco. This might not be an issue for a seldom-changing policy but for something like the “Microsoft-Workstation” or “Apple-Device” policies it could prevent you from getting important updates. You can still get those updates but it would require you to deploy a fresh ISE instance and then manually compare your profiling rules, not exactly a sustainable change. Logical profiles would let us pick any of those policies, without impacting their ability to update, and still use them in AuthZ rules. Basically we get the best of both worlds.
Profiling custom devices
So where does that leave us? Well, let’s write our own policy! Each policy is composed of two parts: conditions and actions taken based on those conditions. Continuing on our WidgetGroup example from before, we’re going to use the information in the following tables to construct our own profiling policy and then two child policies:
Widget Group Phone
| Attribute | Value |
| OUI | WIDGETGROUP, INC |
| dhcp-class-identifier | Widget Group |
| LLDP Attributes | T |
| CDP Attributes | P |
Widget Group Workstation
| Attribute | Value |
| OUI | WIDGETGROUP, INC |
| dhcp-class-identifier | Widget Group |
| User-Agent | WG-Internet-Browser |
The first thing we want to do is create the conditions under Policy → Policy Elements → Conditions → Profiling that we will use in our parent and child policies. Click “Add” and begin going through the attributes above and creating rules for them. Your final set should look something like Figure 3:

As you can see, we’ve followed the standard naming convention that Cisco uses out of the box for rules but we’ve added our own “_WG” to the end of each rule like we talked about at the beginning of this chapter.
Next we want to create the first profiling policy that we will use. Go to Policy → Profiling and click Add. We’ll name our first policy simply “WidgetGroup-Devices-WG,” leaving the default certainty factor of 10 alone, not creating an Identity Group, no parent policy (since we are a new parent), and leaving the CoA settings to use the global defaults. In the rules area we are going to want to add the OUI and DHCP rules we created previously (select from library) and have each of them increase the certainty factor by 10. This covers new devices by letting us profile them solely off their OUI and also increases their certainty if we have DHCP info.
Once that is done, you are going to go through the process two more times, one for each of the other device policies we will create. The minimum certainty factors for both child policies will be 40; we’ll create Identity Groups for both and make sure that the parent policy is set to the first rule we created above. Follow the previously established naming conventions and add the relevant rules we created (each increasing the certainty factor by 40) to each policy. When you are completed, you should have three policies that look like Figure 4:

If you scroll down to the bottom of the menu on the left, you should also see your “WidgetGroup-Devices-WG” policy and expanding it will show you the two child policies.
Example AuthZ
Using profiling information in AuthZ rules is extremely easy; profiles are added via the Identity Group’s area or as logical profiles in the other conditions section. As discussed previously, the first is useful only if you have identity profiles created for your profiling policies but it’s quick and simple. The second takes a little bit more work but logical profiles are the recommended method since they provide more flexibility, are easier to read, and prevent you from needing to make changes to Cisco-provided profiling policies. Figure 5 shows both examples, the top being the default Cisco IP Phones AuthZ and the bottom being the Non Cisco IP Phones rule but modified slightly to show that a logical profile is in use.

Device example—iPhone
Let’s look at some real-world devices and see what they look like to ISE and which attributes are used to profile them correctly.
The iPhone policy is a child policy of Apple-Device and thus before we can worry about iPhone-specific conditions we need to match the generic Apple ones first. Figure 6 shows us what that Apple policy looks like OOTB.
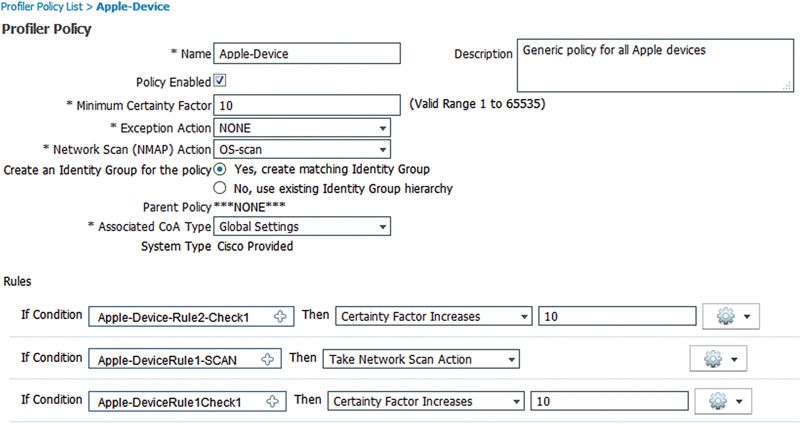
We can see here that this policy has a minimum certainty factor of 10 and that either “Apple-DeviceRule1Check1” or “Apple-Device-Rule2-Check1,” if matched, will increase the certainty to that minimum threshold so our device would be tagged as an Apple-Device. The former condition checks the OUI of the device and if it contains the word “Apple,” then bumps us up 10 while the latter condition uses AnyConnect attributes sent during VPN authentication1 to do the same. The middle option tells ISE to also then run a NMAP scan on the device (assuming you have that profiler turned on) that was profiled just as an Apple-Device so that some additional information can be gleaned from it and used to place it correctly into the subpolicies.
Now that our hypothetical device is tagged as an Apple-Device we’ll start looking at the Apple-iPhone conditions in Figure 7.
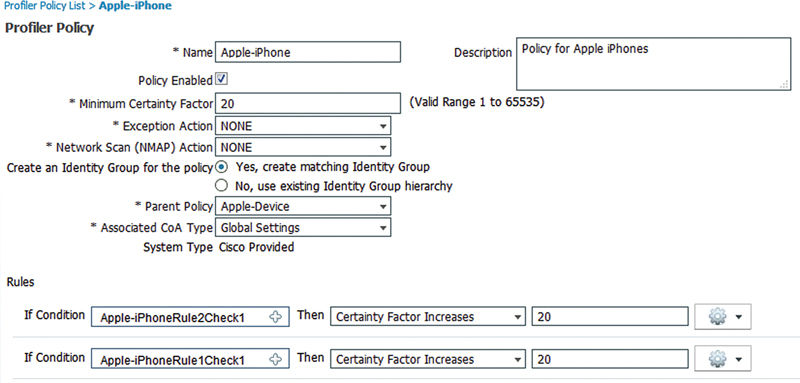
Other than bumping our certainty factor to 20 and having a parent policy, the Apple-iPhone policy is very similar to the more generic one. Our two conditions will check both the DHCP hostname and the HTTP User-Agent to see if they contain “iPhone” and if so bumping the certainty factor up 20 which, since we already matched a 10 from the Apple-Device policy, pushes our “Total Certainty Factor” to 30 and our device is now correctly classified.
If we look at a (slightly condensed/edited) screenshot of a sample iPhones attribute (Figure 8), we should be able to see what was used to determine the device’s profile policy.
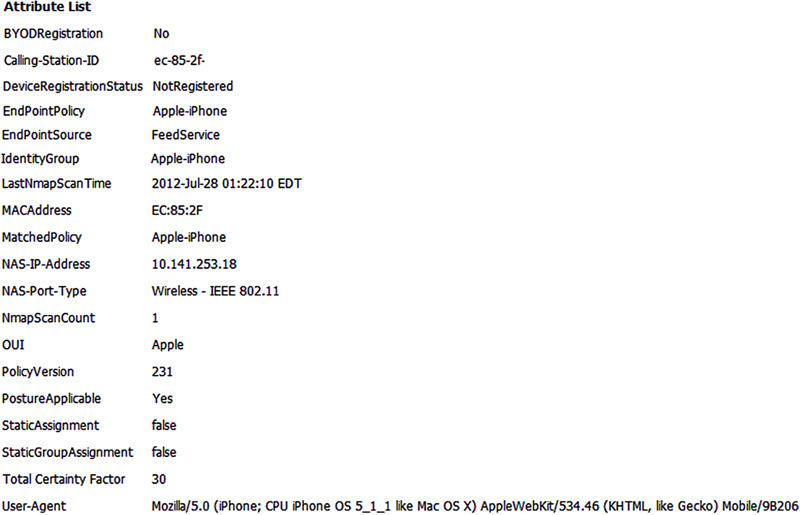
We can see here that the device’s OUI variable contained the word “Apple” and that HTTP User-Agent information contained the word “iPhone” “which, in total,” correctly bumped our Total Certainty Factor to 30.