Chapter 2
ISE Clustering and Basic Setup
Abstract
This chapter talks about cluster sizing and hardware requirements as well as basic installation steps. Secure Sockets Layer (SSL) certificate setup for the cluster will be discussed in depth because it’s a critical component of the product and will impact end users if done incorrectly. We’ll also talk about the different licensing levels of Identity Services Engine (ISE) and what each one provides as well as migration paths between license levels.
Keywords
sizing
setup
certificates
SSL
licensing
Introduction
You’re ready to start building your Identity Services Engine (ISE) environment; that’s great. You’ll need to figure out how large a cluster you need to deploy and what sized nodes in order to support your environment. We say you need a cluster of ISE servers because while you technically can install ISE in a stand-alone fashion, almost every organization is going to need redundancy for authentication so nearly everyone is going to install at least two ISE nodes.
ISE can be installed on both hardware appliances and VMware virtual machines (VMs). At the time of this writing there a few different models of hardware appliances you can use.
From the old legacy NAC server hardware you may use:
• NAC-3315
• NAC-3355
• NAC-3395
These systems are end of sale and are not recommended and not discussed in detail.
For newer Unified Computing System (UCS)-based hardware there are two models that are available:
• SNS-3415
• SNS-3495
For details of their specific hardware please refer to the ISE 1.4 hardware installation guide located at http://bit.ly/1LVSkst.
For convenience there are Open Virtual Appliances (OVAs) of comparable hardware configuration for both SNS models when ISE is deployed in VMware. In the following section the hardware and VMware versions may be interchangeable for scalability.
ISE requires the following VMware disk performance:
• 50 MB/s write
• 300 MB/s read
The following types of disks are supported in VMware environments:
• Local disk
• Fiber Channel (FC)/Fiber Channel over Ethernet (FCOE)
• Internet Small Computer System Interface (iSCSI)
As to what releases of VMware are supported platforms, at the time of this writing ESXi 5.x is supported.
Sizing and preparation
When selecting hardware (size and quantity) for deployment, you’re going to need to understand how high you need to scale the cluster, which is based on how many concurrent active endpoints you’re going to have and how you will install the ISE personas. Let’s address personas first.
ISE servers are allocated with roles in the cluster. An ISE node in a cluster may have only a single persona, or it may have more than one persona. The personas include:
• Administration
• Monitoring
• Policy
• Platform Exchange Grid (pxGrid)
The Administration persona is the persona that provides for the administrative graphical user interface (GUI) for the IT guy to login to and deploy ISE policy and integrate the ISE software into the environment. There may be up to two ISE servers with the Administration persona, there must be one. They’re set primary/secondary roles but will not automatically failover by default.1
The Monitoring persona is the persona in the ISE cluster that receives logging data from all other nodes, and stores it for retrieval in monitoring and reporting. There may be up to two ISE servers with the Monitoring persona in the cluster and a cluster must always have at least one monitor node. If there are two, they are set in primary/secondary roles and will automatically failover if one node goes down.
The Policy persona is the persona in the ISE cluster that does the real work of ISE. The policy node is the RADIUS server, provides web pages for guest login, and holds the self-service websites, the Sponsor portal and My Devices portal. There may be up to 40 policy nodes in an ISE cluster.
pxGrid is a feature of ISE that allows for third-party applications to integrate with and share information with ISE. The pxGrid persona is what would be the point of contact(s) for any pxGrid clients you may choose to deploy. In keeping with other APIs it’s normally a good idea to assign this role to your monitor nodes but like other personas it can be assigned to any server you wish as well as dedicated nodes.
To determine how many and of what persona you need to build, you need to first determine how to scale your ISE deployment.
The most important factor to evaluate when determining how many ISE nodes you’re going to need is the number of concurrent active endpoints that are on line at one time. When we say concurrent endpoints, we mean devices that have been authenticated and are maintaining an authenticated session with a switch or wireless controller or VPN concentrator.
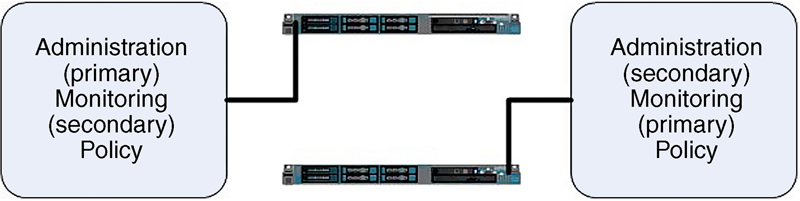
If you’re going to have no more than 5000 active concurrent endpoints, you may use 2 SNS-3415 servers, each with all 3 personas. This would be characterized as a small deployment.
• Host: ISE1—SNS-3415: Admin (primary), Monitoring (secondary), Policy
• Host: ISE2—SNS-3415: Admin (secondary), Monitoring (primary), Policy
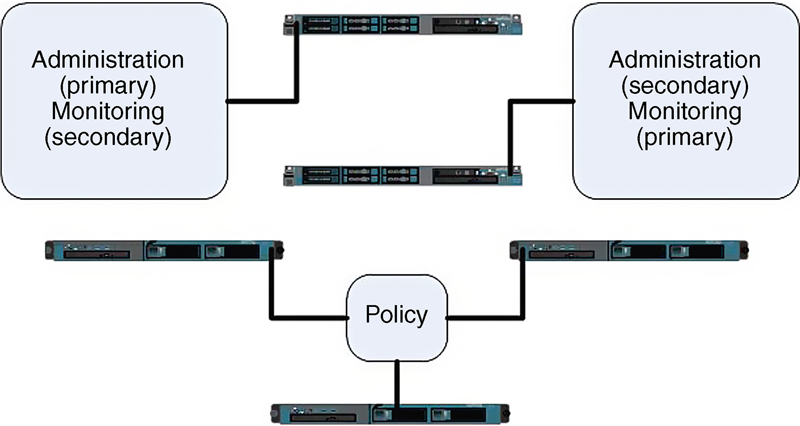
For more concurrent active endpoints up to 10,000 you have a couple of options. You should most likely set up nodes with the Administration and Monitoring personas, and then some nodes dedicated for policy. With Administration and Monitoring personas being co-resident on two nodes you can have up to five dedicated policy nodes.2 The specific number of policy nodes would be depend on your redundancy requirements.
• Host: ISE1—SNS-3495: Admin (primary), Monitoring (secondary)
• Host: ISE2—SNS-3495: Admin (secondary), Monitoring (primary)
• Host: ISE3—SNS-3415: Policy
• Host: ISE4—SNS-3415: Policy
• Host: ISE5—SNS-3415: Policy
An important thing to keep in mind is the following scalability requirements when procuring ISE policy nodes. When a server is dedicated as a policy node these are the maximum concurrent authenticated endpoints per-node:
• SNS-3415: 5000
• SNS-3495: 20,000
For deployments that are larger than 10,000 concurrent active endpoints, you will need nodes that are dedicated for administration, monitoring, and policy where no nodes have coresident personas (every node has a single persona).
• Host: ISE1—SNS-3495: Admin (primary)
• Host: ISE2—SNS-3495: Admin (secondary)
• Host: ISE3—SNS-3495: Monitoring (primary)
• Host: ISE4—SNS-3495: Monitoring (Secondary)
• Host: ISEx—Policy
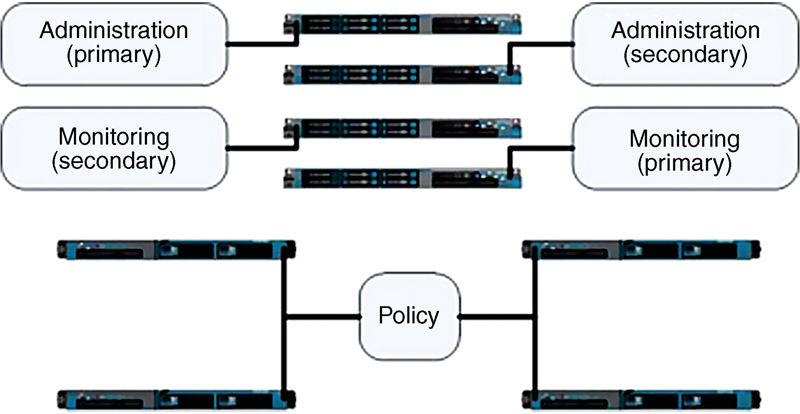
In the fully distributed ISE cluster you may have up to 40 ISE policy nodes and scalability to 250,000 concurrent active authenticated endpoints.
Another important variable in designing your ISE implementation is placement of your ISE nodes in an enterprise that has multiple data centers. It is absolutely a best practice to distribute your ISE nodes across data centers if you have redundant data centers available. ISE replication occurs with Transmission Control Protocol (TCP) and can definitely handle wide area network (WAN) speeds and interconnects. When ordering ISE you should consult with the Cisco ISE Authorized Technology Partner (ATP)-certified partner about what the ISE cluster bandwidth requirements are. They will have a bandwidth calculated provided by Cisco to assist you with identifying any bandwidth requirements. The most important factor when designing multisite ISE nodes is typically latency. ISE nodes should not be separated by WAN links that exceed 200 ms round trip latency in normal operation. This typically excludes single ISE clusters being distributed between North America and Asia-Pacific, but the specifics of your deployment may be different.
If your network security requirements stipulate that a firewall must be between your ISE nodes, that is supported but do take care to ensure that the required ports are open between your ISE nodes. Here is the port reference: http://bit.ly/1I0amW8.
Server/node deployment
When you have determined how many ISE nodes you’re going to need, let’s set about building some.
Here are the pieces of information you’re going to need before you get started:
• Hostname3
• IP address
• Subnet mask
• Default gateway
• Domain Name System (DNS) suffix
• Name servers (up to three of them)
• Network Time Protocol (NTP) servers (up to three of them)
• Time zone4
• SSH (enabled yes/no)
• Administrator username
• Administrator password
Once you’ve got the above-mentioned information and ISE server stood up, either from OVA deployment or from spinning up a server fresh out of the box, type “setup” at the initial login prompt to go through the initial setup wizard.
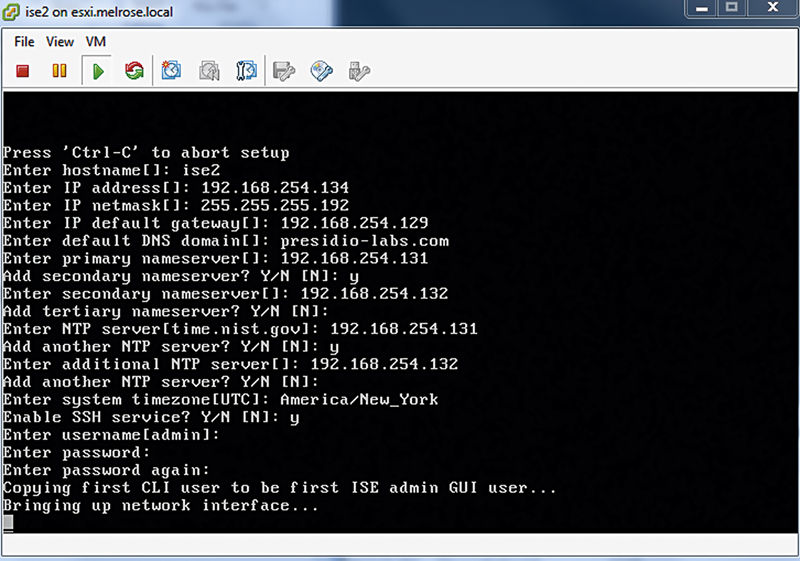
Once you’ve input that information, ISE will proceed to check if the network configuration is correct. The system will attempt to ping its default gateway, DNS, and NTP servers. If any of those fail, ISE will give you an opportunity to fix an issue. If you need to restart the wizard, just hit “Ctrl + C” and it will bring you back to the login prompt.
If everything succeeds, ISE will then install VMware tools if VMware hardware is detected. Once VMware tools are deployed, the ISE installation process is checked to see if the performance of the disk I/O is sufficient. If your VMware hardware is like my lab environment (not totally fit for production), ISE will display an error kind of like what is seen in the following figure:
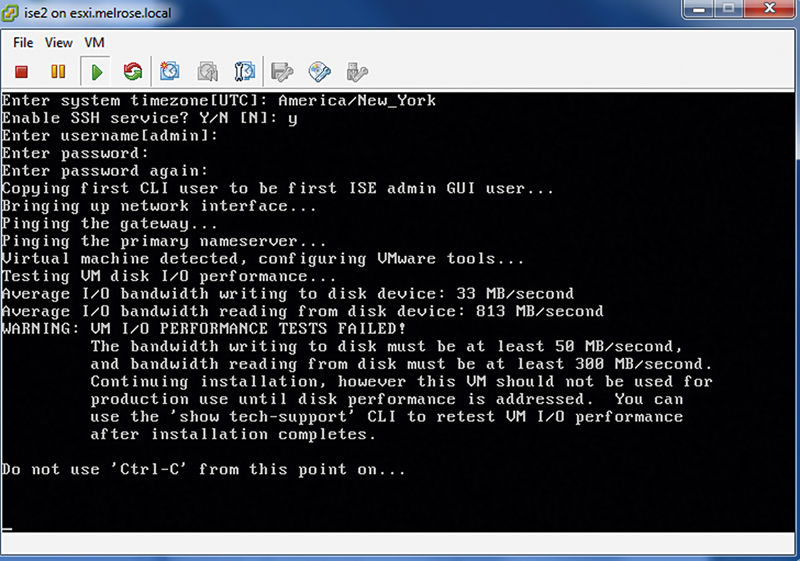
If you’re installing in the lab like me, feel free to disregard and move on. If this is for production, do follow-up and ensure you have adequate VMware performance. Your user community will thank you later.
Now that you have the setup script done, this is a good time to run and grab lunch. ISE will now install on your server and this process can take 30 min or so.
After you’re done with your lunch, it is time to get into the ISE system.
Point your browser to the hostname or IP of the ISE server with either Internet Explorer (IE) or Firefox. Chrome is not supported for ISE administration at the time of this writing. I find that ISE user interface (UI) works best when you use the Firefox, and the fewest bugs are in the extended support release (ESR) update channel.
The username will be the Admin username you configured during the initial setup wizard on the command-line interface (CLI).
Before you get into ISE policy, it’s a good idea to get through a few things. First, you want to integrate each ISE node into a cluster. To join the ISE nodes together there are a few things that need to be done:
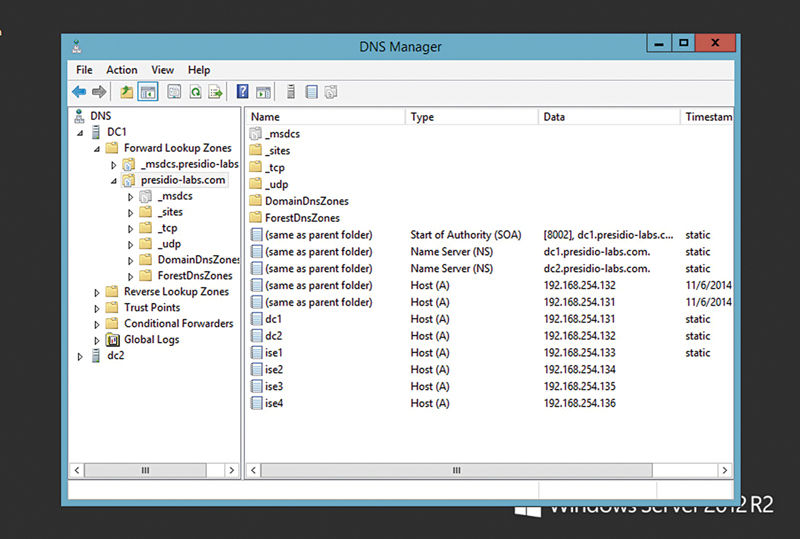
1. ISE nodes must be added to DNS so they may resolve each other forward and reverse.
2. The ISE Admin node must have certificate trust to all other nodes (preferably mutual trust).
If you’re using Microsoft Active Directory (AD) as your DNS server, the configuration could look something like this (I have four nodes in my lab: ise1, ise2, ise3, ise4).
Certificates
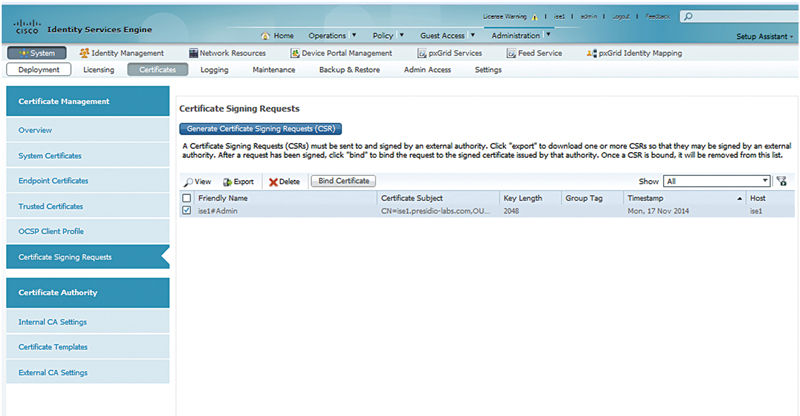
Next you need to issue your ISE node certificates. The easiest way to do this is to create Certificate Signing Request (CSR) on each of them. To do that, click Administration → System → Certificates → Certificate Signing Requests.
You’ll notice that there are a few different types of certificates under the Usage menu:
1. Multi-Use
2. Admin
3. Extensible Authentication Protocol (EAP)
4. Portal
5. pxGrid
6. ISE Root CA
7. Online Certificate Status Protocol (OCSP)
To start with, we need an Admin-type certificate (which could easily be used for EAP and Portal also).
Select the node type Admin and the ISE node you’re on. And fill out the form with subject information you wish to include.5
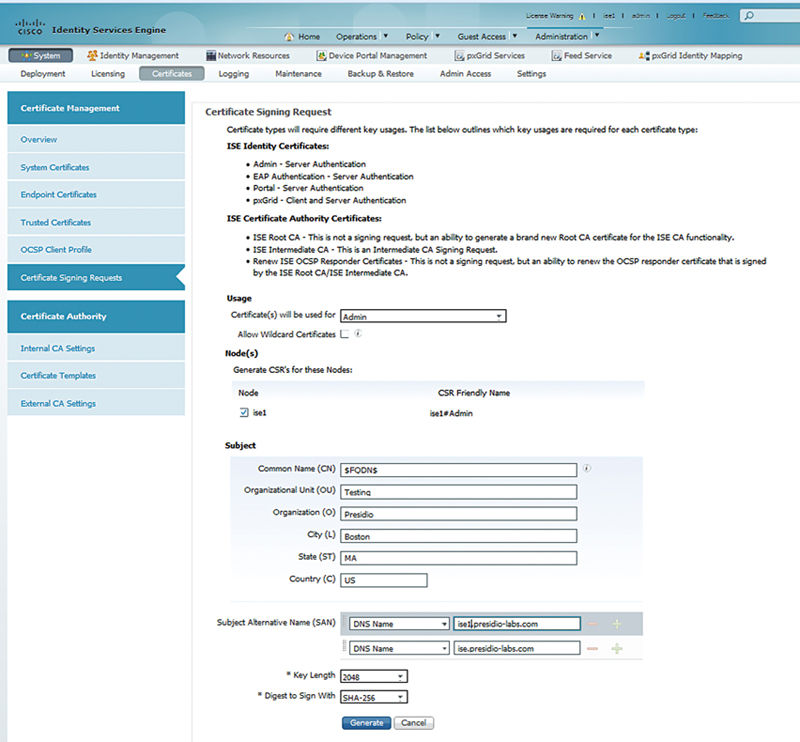
Take note that Subject Alternative Names (SANs) are available for various uses including custom portal configurations and Canonical Names (CNAMEs).6
For non-wildcard certificates the fully qualified domain name (FQDN) must be in the common name of the certificate but should that be long, it may be useful to add a shorter name for logging into the primary Admin node. For example, it’s commonly recommended that customers make a DNS CNAME record of ise.fqdn.com pointing to the primary Admin node, and if the certificate of the primary Admin node also has ise.fqdn.com included, then there is no certificate error.
Once you’ve clicked “Generate,” you’re prompted to export the certificate.
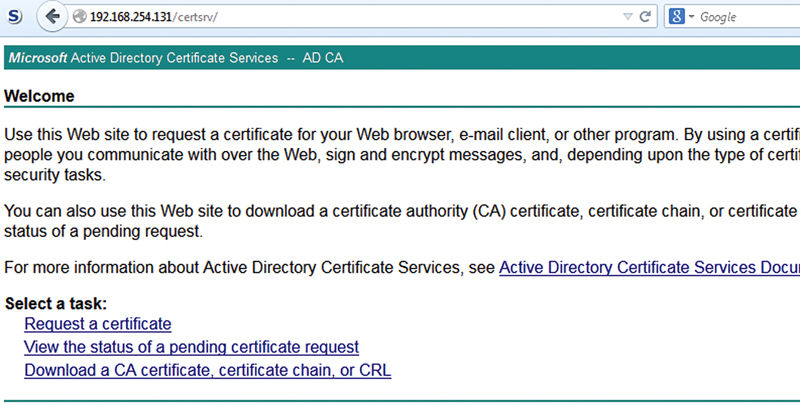
Export the CSR and open it in your favorite text editor and save it to your local machine. Generating CSRs for all your ISE nodes at the same time and having them signed by a CA is a good way to save yourself some time. ISE has no preference what CA you use, GoDaddy, Verisign, Thawte, or a CA in your AD. For most ISE features the type of certificate required is the same exact certificate used by standard web servers. If you’re going to use the certificate you’re generating for web authentication with third-party devices, it’s recommended you use a trusted internet certificate authority. If you’re relying on the certificate for EAP authentication with only company-owned Windows clients, you could use an internal certificate authority like the one provided by Microsoft. I like to use the certsrv website available as the web enrolling role in the Windows Server CA role.
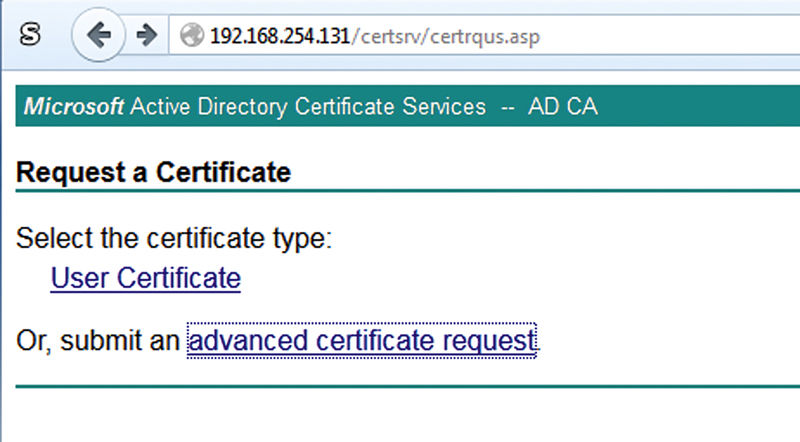
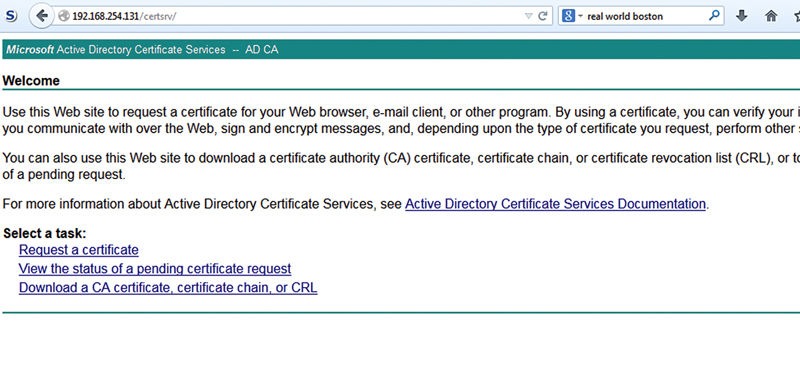
Browse to the CA website. And click “Request Certificate”.
Select Advanced Certificate Request:
Select “Web Server” as your certificate template and paste your CSR into the “Saved Request” field and click Submit:

Select Base 64 Encoded and Download Certificate.
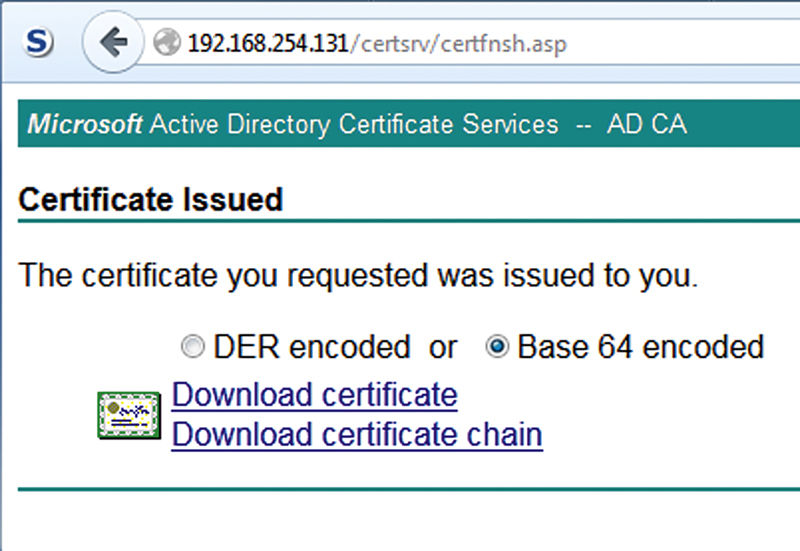
The certificate will be named “certnew.cer” when you download. Be sure to give it a logical name before requesting your next certificate. Once you’ve got your certificate named properly, go and repeat the certificate request process for each of your other other ISE nodes.
When you have fully downloaded all your certificates, it’s time to log back into each of your ISE nodes; go back into the “Certificate Signing Requests” page. Select the CSR saved and click “Bind Certificate”.
Select your certificate file and click Submit. You’ll be warned that the application will be restarted when you change the Admin certificate; click “Yes.” Complete this task for all your ISE nodes you’re going to be integrating into your cluster at this point.
Next, you’ll want to import the CA certificate of the PKI the certificates you’re using were generated from. This allows the ISE cluster to trust nodes as they are joined to the cluster.
ISE comes with the major public CA certificates installed but if you’re using another CA, public or internal, you’ll need to download the CA certificate. In a Microsoft CA go back to the CA website and click “Download CA Certificate, Certificate Chain, or CRL”.
Select Download CA Certificate (it will save again as certnew.cer so give it a meaningful name).
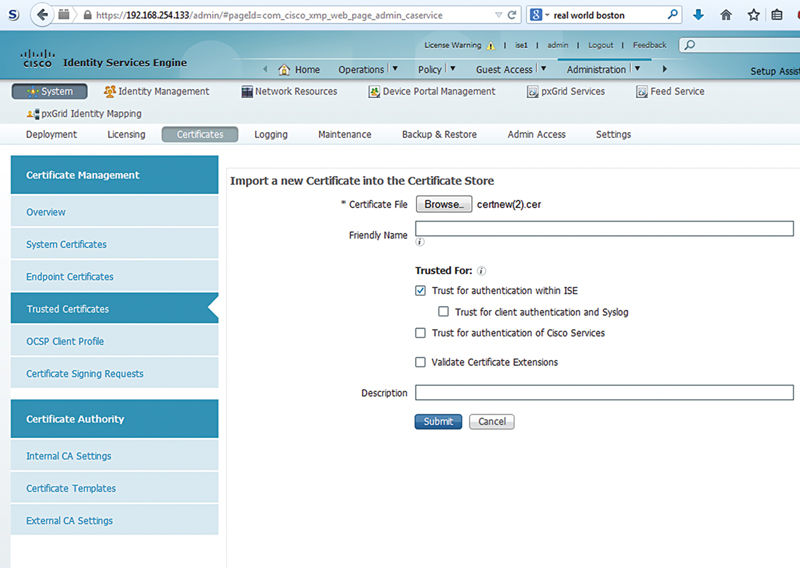
Then browse in ISE Administration → System → Certificates → Trusted Certificates.
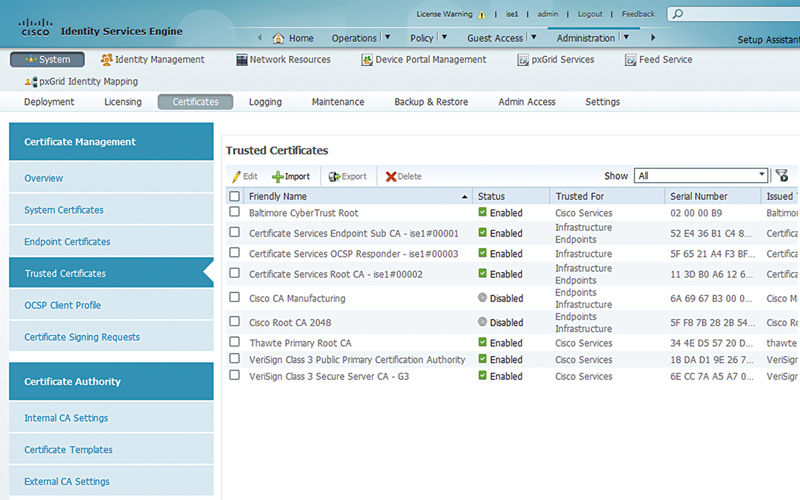
Select Import, and select your CA file. Ensure that “Trust for Authentication within ISE” is selected.7
Cluster configuration
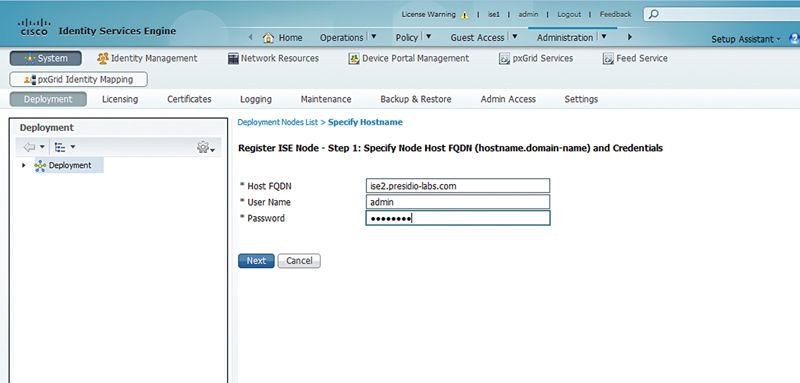
Now that you’ve done that, you’re ready to register another ISE node to your cluster:
Browse: Administration → System → Deployment
Select: Register → Register ISE Node
Enter the FQDN of the ISE node you want to join and the username/password.
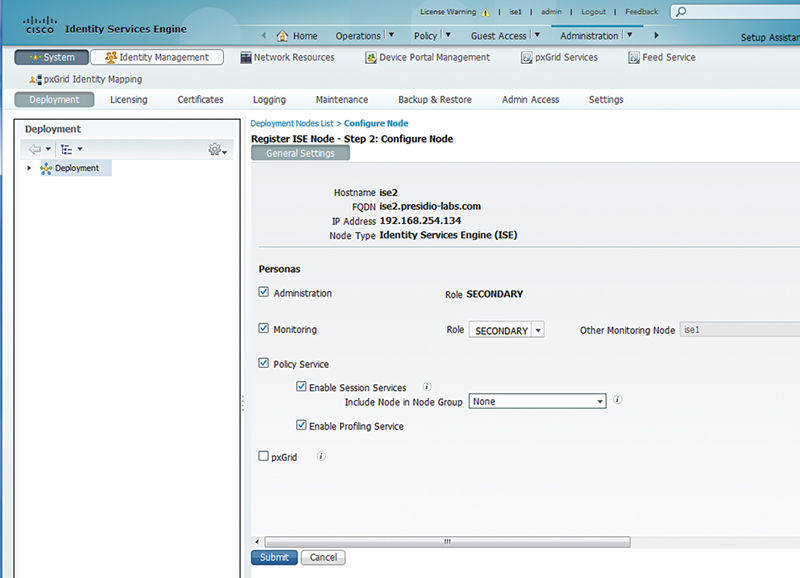
You’re now given an opportunity to assign personas to the ISE node. In this case we’ll take the defaults since we’re going to have a two-ISE-node deployment.
The secondary ISE node will replicate the database (DB) from the primary Admin node and a green check box will appear next to it in the deployment page; after this, it restarts its services. This typically will take about 15 min. This again may be a nice chance to take a coffee break.
Once it’s back up, you’ll have something like this on the Deployment page:
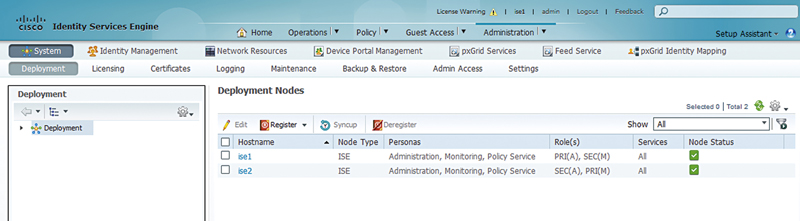
Before making the nodes do any heavy lifting it’s recommended to always wait for the “Node Status” to go green indicating that all services are started and replication has completed. Once the primary and secondary Admin nodes are configured in a cluster it is typically time to install their licenses.
If you run into a situation where you are trying to integrate ISE nodes into a cluster and you’re unable to join them, there are a few common things to check before you call our friends at TAC:
• Double-check your network, virtual local area network (VLAN) configuration, if the nodes are able to ping each other and that there are no missing firewall rules between the nodes.
• Be sure that your ISE nodes are resolvable to both forward and reverse in DNS and that there are no spelling errors in their hostname.
• Be sure NTP is functioning and synced.
• Validate that the primary Admin node has the trusted CA chain installed from the CA used to issue the ISE nodes their server certificates on the HTTP service.
Replication optimization
While you’re deploying ISE nodes if they’re going to be in different data centers across WAN links you’ll want to ensure that you have the “Endpoint Attribute Filter” feature configured. This is under: Administration → System → Settings → Profiling.
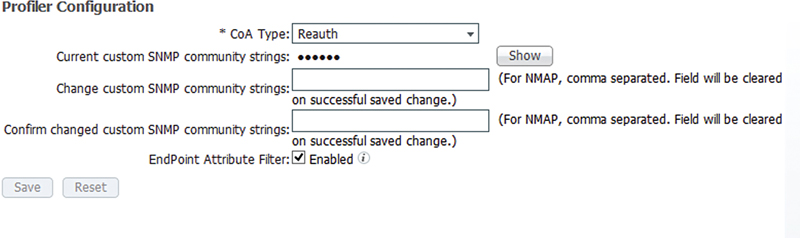
The purpose of this is to allow ISE to delay replication of endpoint profiling attributes that are not used in the actual implementation of ISE policy. Unchecked, all profiling information of every client is replicated in real time. Checked, ISE will replicate only profiling data in real time that is required for the implementation of policy.
If you aren’t deploying ISE across WAN links and you’re inclined to replicate all profiling data in real time, feel free to leave this box unchecked.
Licensing
ISE licensing is deceptively simple. There are several different kinds of licenses:
• VM node
• Evaluation
• Base user
• Plus user
• Apex user
• Mobility
• Mobility upgrade
Yes we did say that seven license types are actually simple. Let’s break them down one at a time:
• VM node licenses are simply right-to-use (RTU) licenses you must purchase when you create ISE VMs and integrate them into your cluster. This is not a license you are required to install but you’re required to procure as part of the ISE licensing agreement.
• Evaluation licensing is the licensing that comes with your ISE installation. When you install a new ISE node, it comes with a 100 user license valid for base, plus, and apex that will expire in 90 days.
• Base user license provides the basic functionality in ISE. This includes basic MAB, 802.1x authentication, Web authentication, TrustSec, and MACsec. At the time of this writing these licenses are perpetual.
• Plus user licensing includes some additional features that are not necessarily included in base. This includes Bring Your Own Device (BYOD) (NSP/CA) functionality, Endpoint Protection Service, pxGrid, and device profiling. When a device uses one of these functions in an authorization rule, a plus license is consumed along with a base license.
• Apex user license includes the most advanced features offered by ISE. These features include posture assessment and MDM integration. When a device uses one of these functions in an authorization rule, an apex license is consumed along with plus and base licenses.
• The mobility license is simply a stock keeping unit (SKU) available to provide the Apex level of functionality in ISE for VPN and wireless-only deployments but would not allow ISE functionality on a wired network. Mobility upgrade licensing can be applied to an existing ISE deployment with the mobility licensing to add wired support. These are rare.
The user-type licenses—base, plus, and apex—are consumed by ISE with concurrent authorized users. Specifically ISE will consume the license based on RADIUS accounting transactions. Once a user is authorized, and the NAD sends an accounting start message, the license is consumed based on what features were used during the device authorization. The license is released when ISE receives a RADIUS accounting stop message from the NAD.8
In any case, you have presumably already had your licenses ordered and have them in hand to install. The licenses are either PDF files or physical paperwork that have Product Authorization Keys (PAK) provided by Cisco. Go to the Cisco License portal9 and start the process of registering them. The portal will ask you to provide a few things:
• PAK you’re trying to register
• Primary Admin Unique Device Identifier (UDI)
• Secondary Admin UDI (optional)
• Accept End User License Agreement (EULA)
• End user contact information (if the person registering the license is not the end user)
The UDI information is unique information to the node (whether hardware or software). The information can be displayed on the license page of the node by browsing: Administration → System → Licensing.
Then scrolling to the bottom to see this.
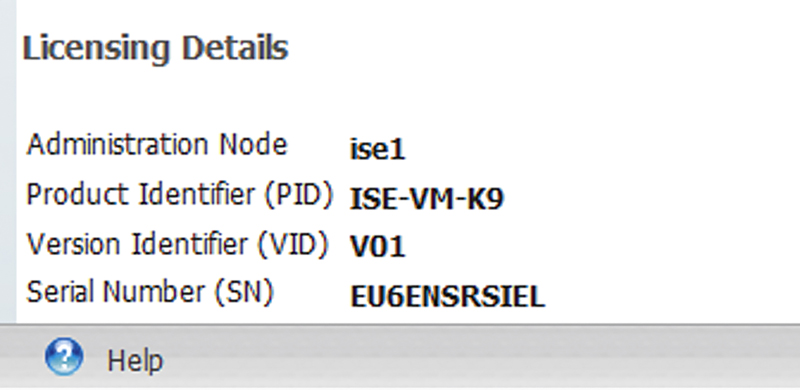
The ISE UDI is the combination of the Product ID (PID), Version ID (VID), and Serial Number (SN) of the node. You can also accomplish the same task by issuing the following command on the CLI: show udi.
While technically adding the secondary Admin node’s UDI is optional to the creation of license files, because the licenses are tied to nodes, should you have to promote the secondary Admin to primary (in the case of a catastrophic node failure) and you don’t want to have to immediately relicense the cluster, adding the secondary UDI during the licensing process is recommended.
Patching
Before we get deep into the configuration, we think it’s crucial to make sure you’re running the most recent patch of ISE.
This can be counterintuitive for some old school network guys. When it comes to selecting IOS software, for years it paid off to be a laggard and only use versions of software that had been around for a while and leaving the latest and greatest release for those who have hard feature requirements or were adventurous. Those who wanted stable environments stuck with old code. In our experience with ISE the opposite may be true and the newer versions can provide a lot of stability especially when it comes to deployments with some of the more advanced ISE features. This comes down to the fact that newer mobile devices and third parties you end up integrating into can have a high feature velocity and it’s helpful for ISE to be able to keep up with those device’s behaviors. We recommend organizations not get beyond a few months back on patches. It’s not always critical to be on the latest ISE version, but keeping up with patches buys you a lot.
First download the latest patch from Cisco Connection Online (CCO).
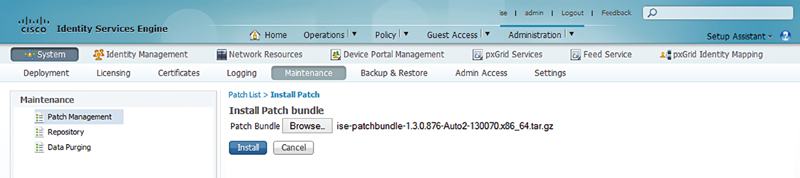
To actually apply patches it’s pretty straightforward. In the primary Admin node browse: Administration → System → Maintenance → Patch Management
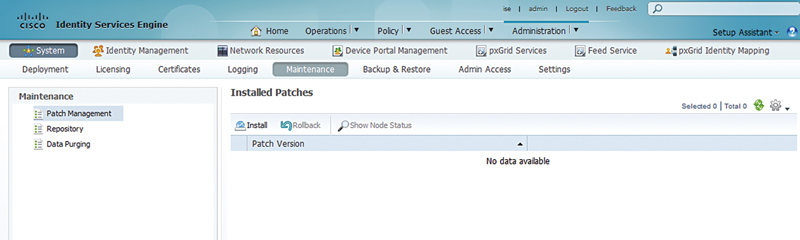
Click the “Install” button and browse to the file you downloaded. The file will be uploaded to ISE primary Admin node. The cryptographic checksum will be first run by ISE and given to you so that you can validate against what’s on CCO so you can be sure that don’t have a bad file.
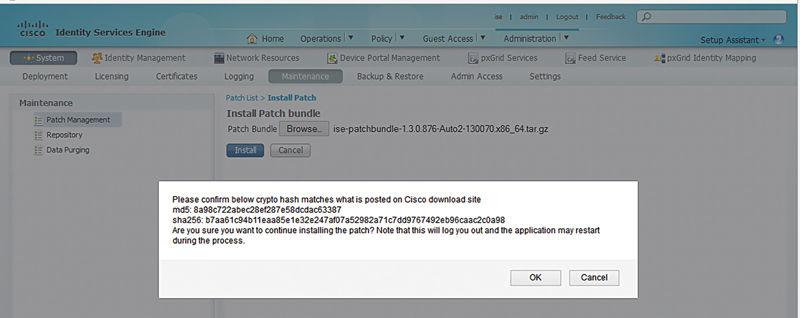
When you click “OK,” ISE will first install the patch on the primary Admin node. First, you’re going to be logged out. Then the ISE services on this node restart, and depending on what the patch is doing to the server it may even reboot. You won’t get any warning either way but don’t be surprised if the server does reboot. Once the primary Admin node is patched, ISE will deploy the patch on each node in the cluster in alphabetical order. This would typically be a great time to go get a cup of coffee or take a lunch break depending on the size of your cluster.10
After the first one is done you can log back into primary Admin node, browse back to the “Patch Management” page, and select your patch number and “Show Now Status.” This will tell you which nodes have the patch installed on them and which ones do not. ISE doesn’t have much of a progress indicator so your patience is required here; if a node reboot is not required, it can take about 10 min per node but if a reboot is required, the patch process takes much longer. Monitor the console of your ISE nodes if possible to see the progress of the node booting.
As you deploy patches on your cluster you’ll also want to be aware that each patch to a particular version of ISE is cumulative, in that when patch 2 comes out, it has all the fixes that patch 1 had. If you skip a patch, because maybe you went on vacation or none of the caveats fixed interest you, that’s not a big deal.
Backups
Once you’ve patched ISE, the last thing you should do as part of the basic cluster setup is to enable scheduled backups. The first thing you need to do to configure ISE backups is to configure a repository. A repository in this case is a directory typically11 hosted off the ISE environment that you can use for a few things including backups.12
Browse to the Repository Configuration page, which is Administration → Maintenance → Repository, and add a new one.
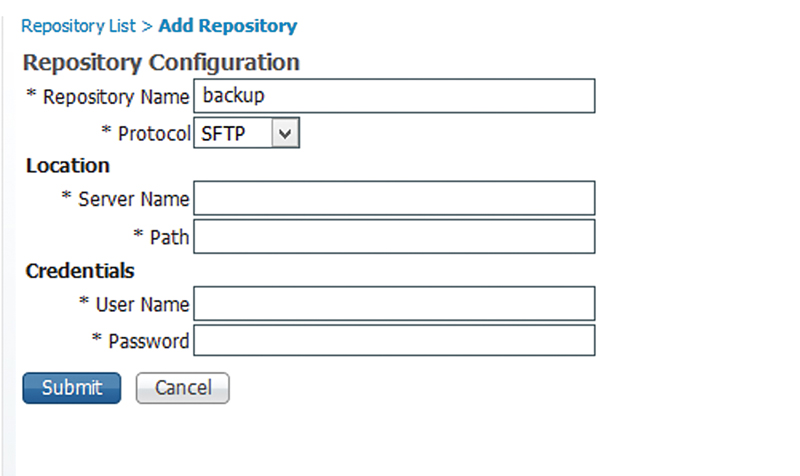
Give your repository a name and select the protocol you’d like to use. The protocol is the file transfer method that you’re going to use to copy your backup files. These include:
• FTP
• SFTP
• TFTP
• NFS
• HTTP
• HTTPS
Then select the server name, path, and login credentials for your remote server.
I recommend you use SFTP or FTP with my preferred method being SFTP for security. If SFTP is unavailable or inconvenient, an FTP repository will work just fine for you.
If you select SFTP, you need to manually add the SSH server host keys on the CLI of the ISE server before you can use them. You can do that through the following command:
crypto host_key add host 192.0.2.1
where 192.0.2.1 is the IP address of your SFTP server.
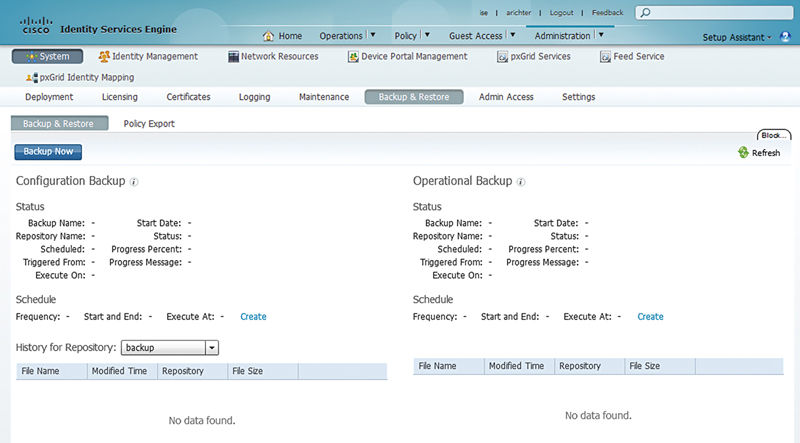
Once you have your repository configured, you need to set up the schedule your backups will happen. To do that you need to browse to the backup configuration menu, which is Administration → System → Backup & Restore.
When you get there, you’ll notice that there are two options for your backups. These include:
• Configuration Backup
• Operational Backup
The “Configuration Backup” option includes all the configuration of the ISE primary Admin node and the CLI information that is saved. This includes the following:
• All ISE policy
• ISE identity store configuration
• Local ISE identities and profiles
• Certificates issued by ISE
• ISE CA certificate information13
• Portal customizations
Without going into extraordinary minutia it includes everything on the primary Admin node but will specifically exclude logging or troubleshooting information you may see in the “Operations” menu.
To configure the backup schedule click “Create”.
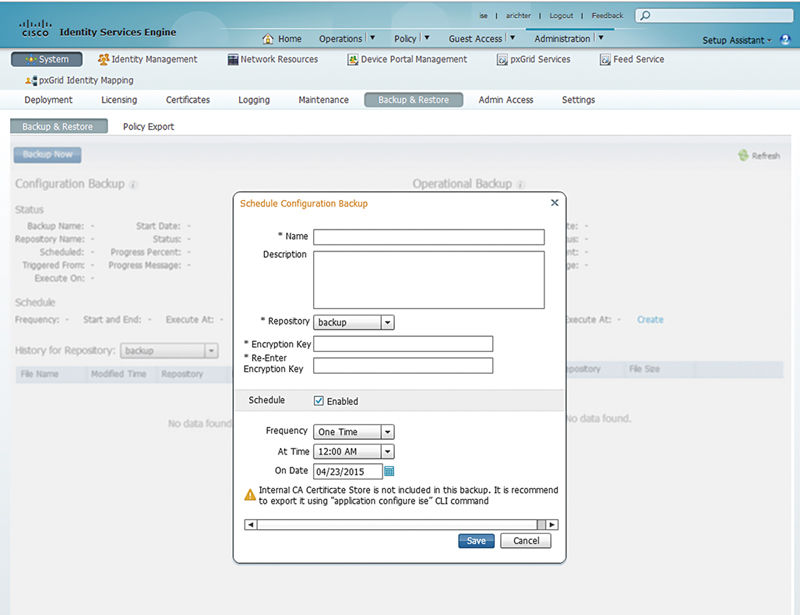
You’ll then be prompted to specify the following:
• Name: This becomes the prefix for the backup file
• Description: Optional
• Repository destination
• Encryption key
• Enable/disable schedule
• Frequency (daily, weekly, monthly, one time)
• Time: Time of day on primary Admin node the backup occurs
• Day in the frequency the backup occurs: In case of weekly what day of the week; in the case of monthly, what day of the month it should occur
The “Operational Backup” configuration includes the ISE authorization logs you would see in the Operations menu and any additional troubleshooting data available there. This would include no actual ISE configuration.
So how often should one back up one’s ISE cluster? That’s a great question and it broadly depends on your specific configuration.
As to “Configuration Backup” weekly or monthly is sufficient depending on how often you change configuration. If you feel that you will rarely change your configuration and your profiling configuration is solid, then monthly ISE configuration backups should be sufficient. If you are often changing your ISE configuration or are often finding high turnover of profiled devices, then weekly ISE backups are probably appropriate.
With “Operational Backup” it’s a little more complicated (but the configuration is exactly the same). The first question you may ask when determining how long you should keep your ISE backups is the following: Do I care about losing historical log data? If you don’t care about losing historical log data (and you have no regulatory requirement to keep it), then back up the operational data infrequently or not at all. If you need to maintain you operational data with the ISE servers, then you need to determine how often you should back up the information. First examining how large your ISE cluster will scale in terms of endpoints will help you determine how often your logs are rolled on your primary monitor node per how much disk space it has. The ISE hardware installation guide in the VMware section (http://bit.ly/1LVSVdu) describes how many endpoints a cluster may manage and the interval at which the logs are lost.
At the time of this writing with ISE 1.4 if you had 10,000 endpoints and 600 GB of disk space, you may be able to keep your ISE logs for 378 days. This may seem like a really long time but you need to weigh this on the risk of what it may mean to your deployment to lose logs. For example, if you choose to back up only your small ISE deployment yearly running 3415 VMware OVAs (with 600 GB of disk space) because you have no risk of running out of disk space, it’s possible that you may lose many months of data if the datastore is lost in the VMware cluster. If you choose to back up the data monthly, the risk of datastore loss is mitigated if you choose to back up your operational data more often.
If you choose to send your ISE operational logs to an external server via syslog, then there may be little reason to back up your ISE operational logs because in that case any ISE authorization logs may be backed up when your syslog server is backed up.14
Lastly, if you’re working with Cisco TAC and want to quickly send them a copy of your authentication and authorization configurations without having to do a full server configuration backup, you have the option of sending a simple XML file of your AuthC and AuthZ policies. You can do this from the link available on the AuthC and AuthZ policy pages and browsing: Administration → System → Backup & Maintenance → Policy Export.
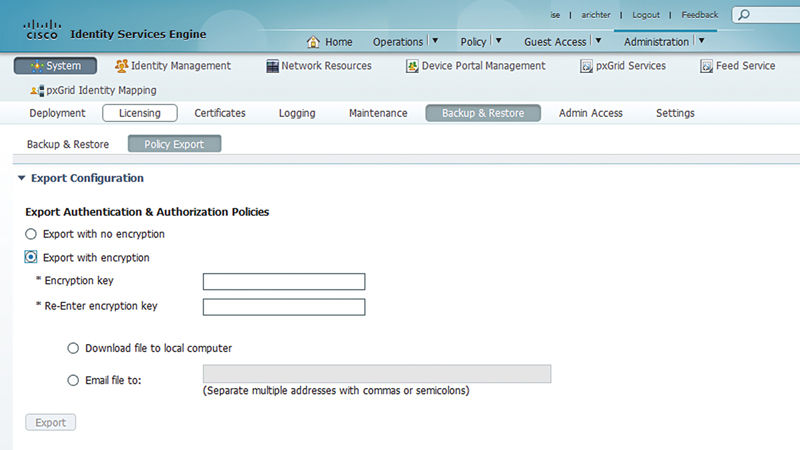
You’re prompted to configure the backup with or without an encryption key. Then you’ll be asked to either download the file locally or send it directly from the ISE server.
If you are convinced that there is an AuthC or AuthZ issue with the ISE configuration, then you can proactively send this to the TAC; otherwise send it only when a TAC engineer asks for it.
Active directory
The last thing I often do when performing the basic setup tasks while building an ISE cluster is to join the nodes to the AD. Joining AD will be critical later when creating ISE policy where AD authentication or authorization is required, or if you’d like to use a domain account to login and administer ISE.
To start, browse to the AD integration portion of the ISE Admin UI Administration → Identity Management → External Identity Services. Select Active Directory.
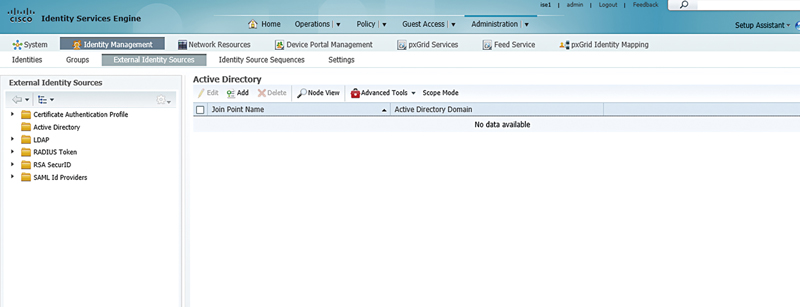
Click “Add”.
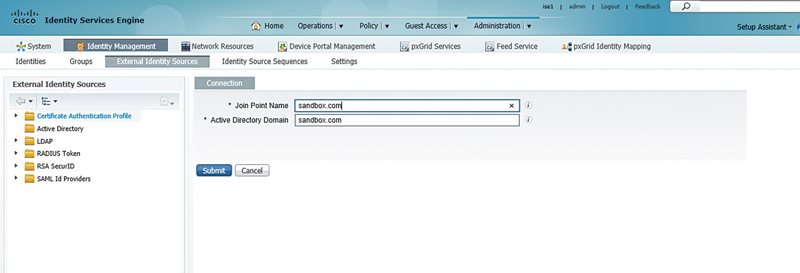
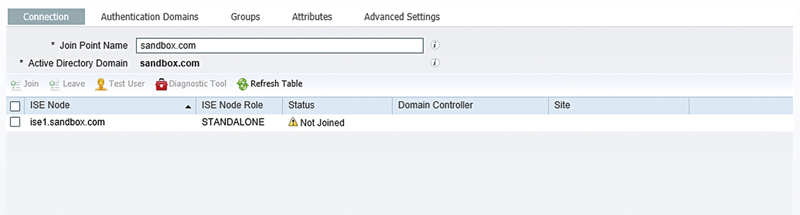
Fill out what you’d like the name of the AD will be in ISE where it says “Join Point Name.” This field is cosmetic in that it will be what shows up in the policy menus. The AD domain is the actual domain you wish to join.15
At this point you’ll see that you have an AD integration available in ISE, but none of your nodes are joined so the integration isn’t actually usable yet. To join ISE to AD you need to select your ISE nodes and click the “Join” button.
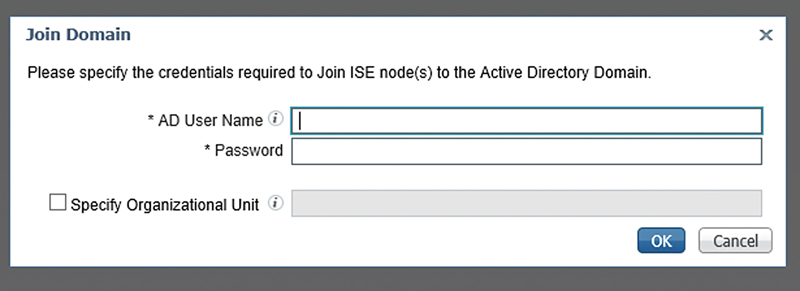
At this point you’ll be promoted to provide an AD credential to join the ISE nodes to AD. The credential used here is used to create machine accounts that ISE will use to actually perform authentications. The credential you provide to create these accounts is not saved by ISE once you’re done joining the nodes to AD so typically you wouldn’t need to use a service account.
If you want to join ISE to a specific Organizational Unit (OU), you would also specify that here. This would typically be because you have policy in place where the default OU would be unacceptable.
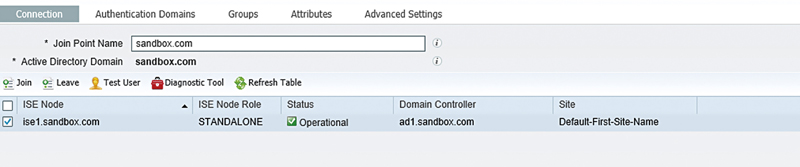
Once you put in your credentials, presuming you’ve set up your cluster as we’ve directed so far, it should just join AD without substantial issue.
If you have issues joining the ISE nodes to AD, there are a couple of common situations to look out for:
• The hostname of the node is greater than 15 characters.
• ISE is not resolvable by AD.
• The time is offset if not synced.
AD/ISE integration issues are generally pretty readily solvable. You’ll notice once your nodes are integrated that you can see which domain controller the ISE node is actually communicating with and which site in AD sites and services ISE is utilizing.16
The last thing that we normally do when configuring an AD/ISE integration is to select the security groups that I’m planning on using in the ISE policy.
To do this click the “Groups” menu in your AD integration.

Then click “Add” and “Select from Active Directory.” This will bring up a new box where you can search the domain for the groups you’d like to use.
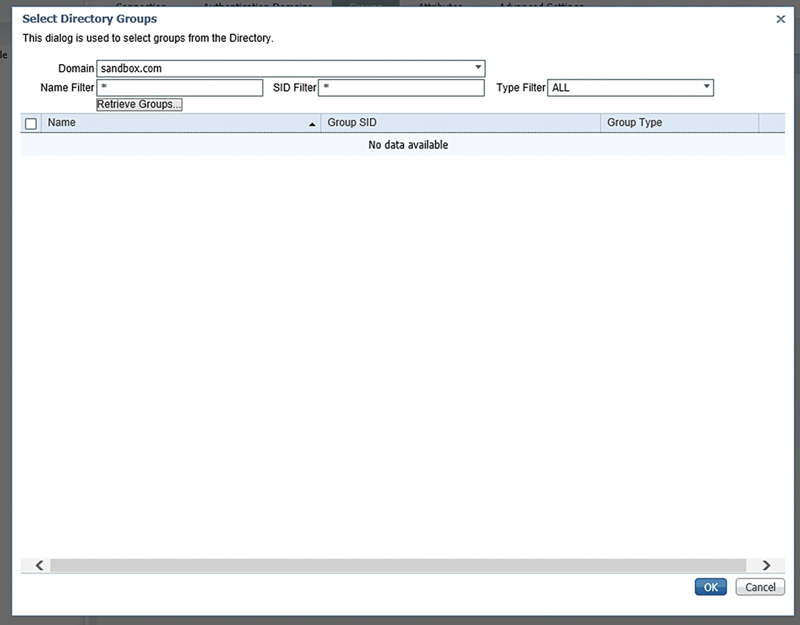
The easiest way I find is to use the “Name Filter” box and search the AD for the group name you’d like to use. The filter does allow for the use of wild card and I’ll search for the built-in domain accounts and select “Retrieve Groups”.
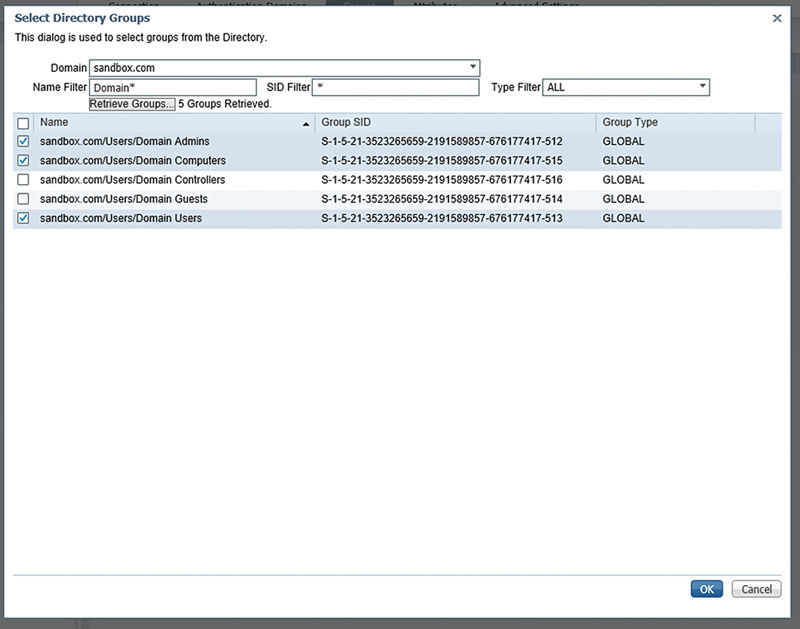
You’ll see I’ve selected a few of the groups there that I may use in policy later and I’ll click “OK.”
You’ll be brought back to the AD integration page and you’ll see that the groups are listed there in the group list.
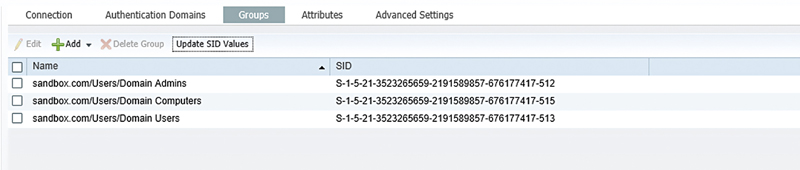
At this point, be sure you save because if you don’t, those groups will be lost if you happen to browse away.
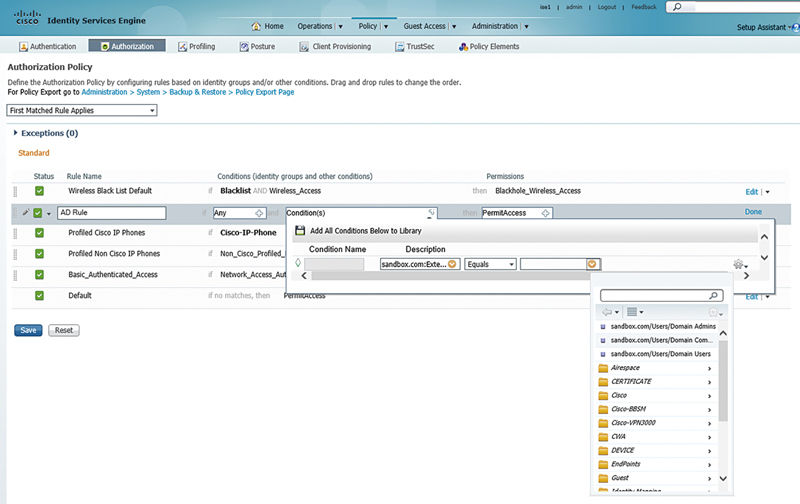
If you’re wondering why you don’t see any AD groups in your policy menus, it’s likely because you haven’t selected the groups in the AD integration.
There are a variety of advanced things that you could look to do as in your deployment in the integration to AD. First, it’s not uncommon for organizations to have multiple ADs for architectural, security, or historic reasons. If this is the case for your organization, you have a couple of choices:
1. ISE supports integrating directly into multiple ADs at the same time. This is often the preferred way of deploying ISE if you have the ability of joining ISE to the separate directories.17
2. ISE supports cross-domain authentication if the multiple ADs support full trusting. In this case you would integrate ISE into a single AD and then search for the other ADs through the domain that you’ve joined and authenticate and authorize through it.18
If you’re inclined to use the Machine Access Restrictions (MAR) feature in ISE, the default aging time is 5 h.19 Under the Advanced Settings tab this can be changed.

We recommend, in the case you need to use MAR, that the aging time be increased to a more reasonable time-out.