Chapter 13
BYOD Designs
Abstract
This chapter is the partner chapter to the one before it; here we’ll be covering methods of authenticating noncorporate/BYOD devices with ISE. We start with PEAP since it is probably the most “common but we’ll also discuss using EAP-TLS and web authentication (CWA) to handle users’ BYOD needs. Finally we’ll finish up with methods of onboarding BYOD devices to the network to ease configuration needed by users.
Keywords
BYOD
PEAP
CWA
onboarding
Now that we’ve beaten to death how to implement authentication and authorization for corporate devices, let’s look into some options for our design in configuring authentication/authorization for BYOD devices.
Looking at configuring high-fidelity authentication for BYOD is definitely an important goal, but typically the fidelity becomes slightly less critical for some organizations depending on the level of access and the sensitivity of connectivity in the case of BYOD.
Here are some common suggested configuration designs (obviously your design may differ, but these are common ones I’ve seen in the field):
• PEAP user authentication
• EAP-TLS user authentication (ISE-issued certificate)
• Web authentication
Each of these designs have their own advantages and disadvantages to weigh in your configuration. We’ll be weighing them each, one at a time.
User PEAP
For PEAP user authentication, this is exactly what we said you should not use in your design for corporate device access. If we ensured that corporate devices do not use PEAP user authentication, any other device that authenticates with PEAP (which is the default EAP type for most mobile devices) will connect and match your BYOD policy.
The advantage of this design is twofold. First, it is a very simple authorization rule to configure. Second, it’s also very easy to connect mobile devices with this method because PEAP with MS-CHAPv2 is the default connectivity methodology for both Apple iOS and Google Android devices.
The disadvantage to this configuration is that it does not provide for very secure authentications compared to other methodologies. The user behavior is that any certificate that ISE presents, users will click accept to allow their username/password credentials to be passed to the RADIUS server. Accepting the certificate of your corporate RADIUS server is not a big deal, but if a malicious RADIUS server of a malicious wireless network is presented, you can be sure that a bunch of your users are going to accept it. If user credentials are not that sensitive to your company, or you are not prepared to exercise any control over the devices joining the network, this is the method for you.
The authorization rule for this configuration looks something as given in the screen shot.

BYOD EAP-TLS
A more advanced implementation would be to utilize EAP-TLS to the mobile devices your users have and to require them to authenticate to your network via certificates rather than simple username/password authentication. This design provides for some advantages; first, EAP-TLS authentication provides for cryptographically more secure authentication from the client perspective because we can also have ISE install the authentication settings into the client along with the certificate; we can ensure that the root CA is deployed to the client so that the client will properly trust the ISE server. This provides for a more secure method of operation for your clients as well as also provides the convenience of not having password rotation interrupt wireless authentications.1
The disadvantage to this configuration is again twofold. It is much more complicated to deploy than the generic PEAP user authentication methodology. When we deploy certificates, there are many moving parts that we need to ensure work properly. Since we have ISE deploy certificates to mobile endpoints it’s important to note that there is a compatibility matrix that must be taken into account for your design. ISE supports the vast majority of mobile device operating systems and platforms for certificate deployment but not all. The following is supported:
• Apple iOS
• Google Android
• Microsoft Windows
• Apple OSX
Without getting into specifics, there are version requirements that do change from time to time. While typically the latest releases are supported shortly after their release from the manufacturer, there are generally minimum required versions. Please consult that compatibility matrix to be sure that versions supported at the time of your deployment are acceptable to you.
There are a few mobile platforms that aren’t supported with ISE certificate deployment at the time of this writing:
• Microsoft Windows Mobile and Surface (ARM)
• Nook
• Amazon Fire
If your implementation requires support for the above platforms, you probably need to look at another design.
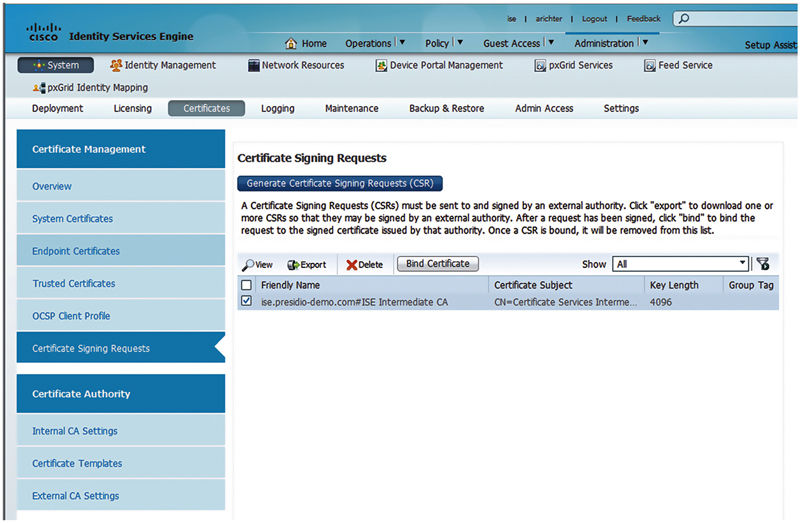
In any case, let’s get into the steps required to implement certificate provisioning through ISE. The first step is to configure your CA and for our example we’re going to configure ISE to be a subordinate CA to an AD CA. To do this we need ISE to generate a Certificate Signing Request (CSR) for a subordinate certificate authority certificate: Administration → System → Certificates → Certificate Signing Requests.
You’ll see there is a big button labeled “Generate Certificate Signing Request.” Press it.
Inside the generate CSR page you’ll see, again, that there are a few settings for Usage. In this case, because we want to make ISE a subordinate to the corporate root CA we’ll select “ISE Intermediate CA” and click “Generate.”2
The CSR will be generated and you’ll be prompted if you’d like to export the certificate.

Select Export.
Download that CSR you’ve created and then upload it in your CA for signature. If you have a Microsoft CA, like most of us, browse into the certificate UI and request a certificate.
Paste the contents of the CSR into the field.
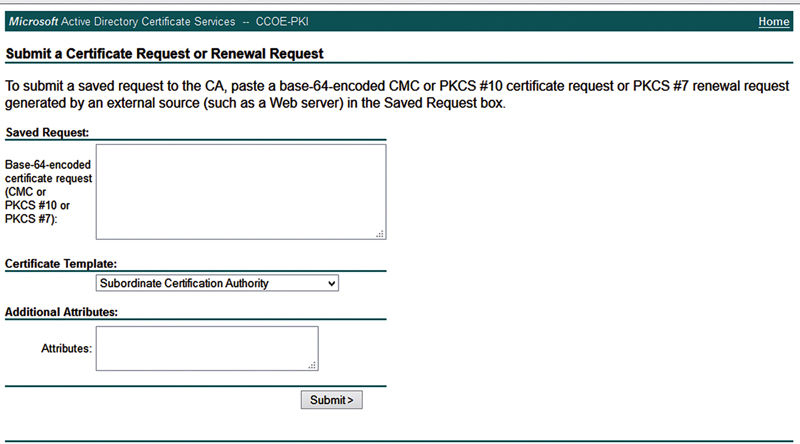
Select “Subordinate Certificate Authority” as the certificate template type. Click Submit.
You’ll be prompted to download the certificate. Download it as a Base 64 encoded file. The file name of the certificate will be “certnew.cer”.

When you browse back to the CSR window in ISE, you’ll see that there is a “Bind Certificate” button available. Select the CSR and click Bind Certificate.3
Browse to the certificate file and then click Submit.
The last thing you’ll want to do to set up your ISE CA is to configure a certificate template. The certificate template will define all the subject fields in the certificates you’re looking to deploy along with key size and validity period.
Subject fields are things like Common Name, Organization, City, State, and Country. You should fill these out and consider using one of the fields as a way to identify the certificate you’re using as BYOD-type certificate. In our case we’ll specify the OU of the certificate as BYOD and also show you how this can be used later. The common name is automatically filled with the username used in the authentication to get to the Native Supplicant Provisioning (NSP) portal (either EAP or CWA).
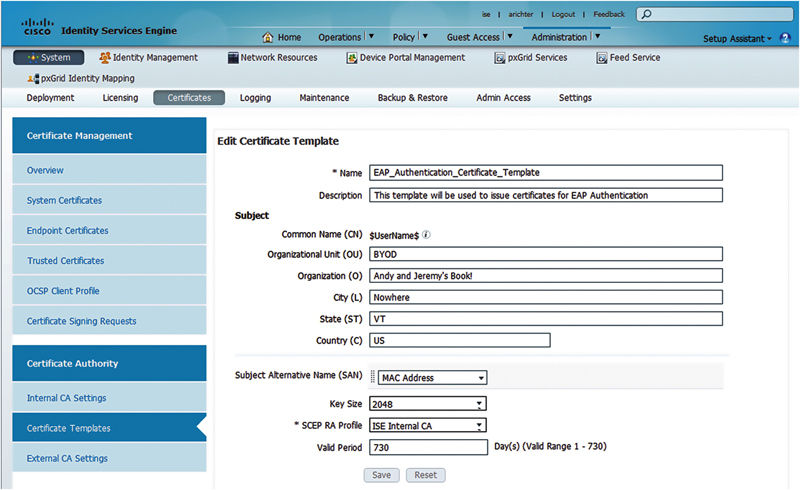
It’s highly recommended you leave the defaults for key size and validity period. The key size default of 2048 is broadly compatible and considered sufficiently secure. If you reduce the key length, you may be susceptible to cryptographic attacks, and larger key lengths are not compatible with some supplicants (Apple iOS). In this case we’ve just edited the default template but feel free to create your own rather than edit the default.
At this point, when you issue certificates from your ISE CA, the certificates will be from your ISE subordinate CA. You’re asking yourself, “How do I do that now?” Great question!
ISE can issue certificates through a process called “NSP.” What NSP does is it allows ISE to push a supplicant configuration down to an end device. This supplicant configuration could technically be for wired or wireless connections but in reality, its is most commonly deployed for wireless connectivity.
If you had an external SCEP CA you were inclined to use rather than the ISE CA, this is where you would configure it.
Through NSP you can have the supplicant configured for a few different EAP methods including EAP-TLS, PEAP, or EAP-FAST but, for our purposes, the only one that will also have ISE issue a certificate is EAP-TLS.
NSP works by redirecting the clients to a web portal. The web portal can be deployed in two different ways:
• Single SSID method: This is where an SSID is configured for 802.1x. When a device connects to the SSID and authenticates with a username/password credential (most typically with PEAP), the device is set to redirect to the NSP portal for certificate/supplicant provisioning. Once this is complete, ISE will send a CoA asking the client to reauthenticate. Because the supplicant was configured for EAP-TLS the client will then reconnect and authenticate with EAP-TLS. Presumably the AuthZ policy allows for full network access without the need for further provisioning (unless you’re doing posture, which isn’t all that common for BYOD).
• Dual SSID method: In this case you have two different SSIDs. One is unencrypted with MAC filtering and RADIUS NAC configured. The other one is 802.1x authenticated (presumably encrypted with WPA2/AES). The open SSID is configured with a CWA portal for authentication and after the user is web authenticated they’re asked to perform the NSP operation. As part of that NSP the supplicant is configured to connect to the 802.1x-secured SSID with EAP-TLS.
There are advantages and disadvantages to each of these methods. The single SSID method is generally simpler and works well when you’re using typical mobile devices such as iOS or Android devices (OSX also works fine). With this you’re not relying on additional SSIDs that may be dedicated to provisioning and you’re not asking the supplicant to have to make a service-impacting change as part of the onboarding task. The issue with the single SSID method is that Windows is often less cooperative when asking it to join the SSID when it’s likely that the SSID will present a certificate as part of the PEAP authentication that isn’t in the trusted store. If you use a certificate from a public CA, this can be easier on Windows devices. If you anticipate onboarding lots of Windows systems, single SSID method is probably not your preferred method. If you’re going to be doing mainly iOS or Android devices, single SSID is definitely the preferred method.
When using the dual SSID method, you don’t have to worry about the EAP certificate in use because you can use a publically trusted certificate tagged for your CWA portal. This means that the onboarding method can be more secure if you’re worried about certificate trust issues. This makes the Windows process a little easier. The challenge is that you’re going to rely on the supplicant to change SSIDs once NSP is complete. This has two caveats to remember. First, on your WLC you need to have “fast SSID change” enabled; otherwise the WLC will not allow your client to gracefully change from one SSID immediately to another.4 The next issue is that iOS will not automatically change SSIDs and requires manual intervention by the end user (they’re going to have to manually change their own SSID). If you’re going to be onboarding a lot of iOS devices, it’s not recommended to use the dual SSID method.5
One other aspect of this design that is not always brought up is that the single and dual SSID methods are not necessarily mutually exclusive. You could configure them both and recommend the users onboard whichever way they are more comfortable or whatever works better for their platform. The issue with this is that it could be more confusing for your users and you may be able to provide them better support by using only one of them and giving them clear guidance. If you’re unsure which one will work better for you, then you should definitely test both out.
First, we’ll go through the configuration of the single SSID method and then add on the dual SSID method afterwards. We’ll assume that you have an 802.1x SSID setup similar to the example provided in the NAD example.
First, we’re going to authorize a person who’s authenticating via 802.1x with PEAP and a username/password and is a member of domain users.

The users will be provided an authorization result that sends them to a NSP web redirection.
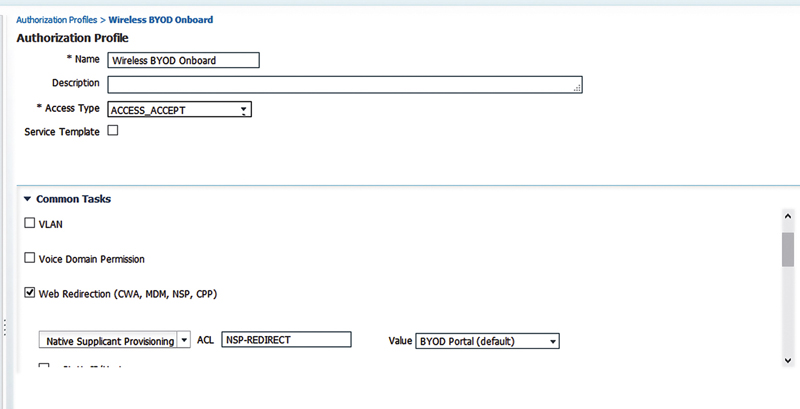
That NSP web redirection requires two attributes:
• An airspace ACL that will govern the web redirection
• A specific BYOD portal to be used (I’ve used the default, but feel free to customize)6
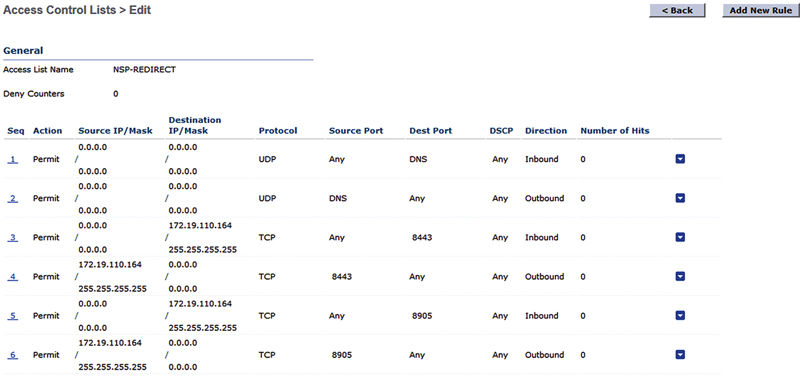
The ACL here is a little different from a regular guest ACL because NSP uses an additional protocol as part of the device onboarding. NSP uses TCP 8443 as the web port for the operation but it also uses TCP 8905 for the actual onboarding traffic.
There are a few pieces of configuration that are available in the portal’s configuration:
• You can have the device added to an endpoint identity group (MAC address group). This can then be referenced in the authorization policy.
• By default devices are added to the “RegisteredDevices” group and are purged every 30 days.7
• You may require acceptance of an AUP.
• You can potentially configure what page the client is redirected to on successful provisioning.8
• You may enable a device support page. This page is useful when you’re troubleshooting client onboarding issues because it can provide information to the administrator about the client NSP session including browser agent, IP, MAC, policy node, and failure reason.
Once you’ve done that, we need to configure the NSP operation itself. First, we need to go into the Client Provisioning results in client provisioning: Policy → Policy Elements → Results → Client Provisioning → Resources.
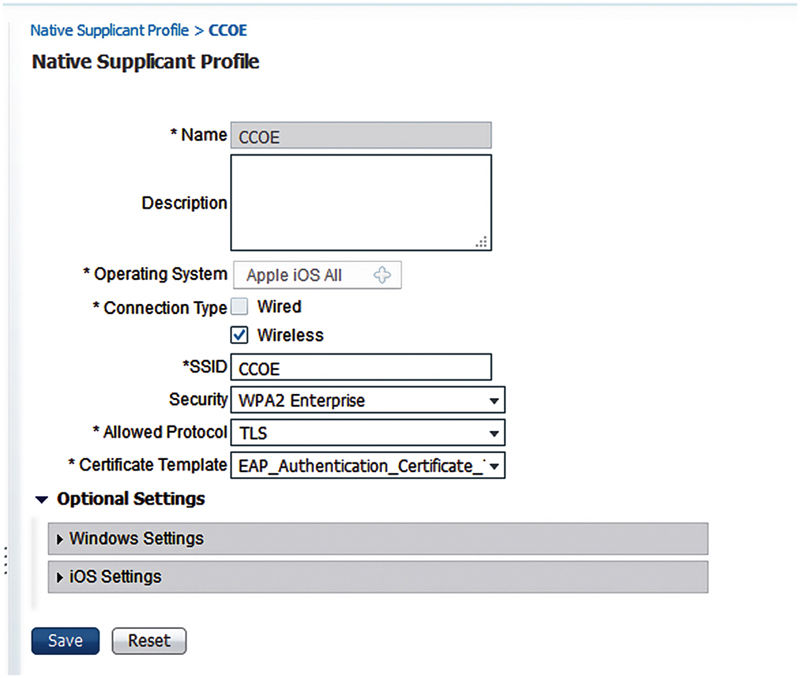
We need to do two things here. First, we need to configure a supplicant provisioning profile. This profile is the SSID settings we want to push down. Click Add and give the profile the configuration you’re inclined to have.
Once you’ve added the supplicant configuration profile, you’ll need to download any required wizards for either Windows or OSX. These NSP wizards are required for those operating systems to perform the NSP actions. To enable them go back to “Resources” and select Add “Agent resources from Cisco.com”; this will let you download the wizards straight from the Cloud. Download the appropriate wizards for Windows or OSX for your version of ISE.
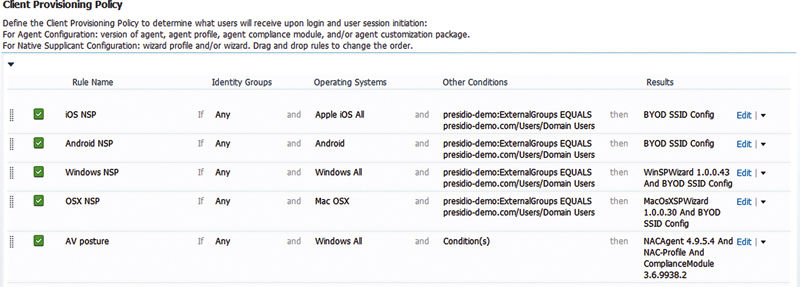
Now that you have the required Client Provisioning results we can go in and actually configure your client provisioning policy.
That web portal will detect their OS through profiling of the device browser and initiate the NSP operation differently depending on what kind of OS is requesting the supplicant configuration:
• Apple OSX uses an application provisioned by the ISE node.9
• Apple iOS uses the native XML configuration profile functionality.
• Windows uses a Java-based wizard.10
• Android requires the download of an application to perform the configuration.
You need to create a provisioning policy per operating system that specifies both the NSP profile with your SSID settings and also a wizard where relevant. You can also configure other conditions; typically I include AD group membership where possible but it’s not required.
For Windows, iOS, or OSX the configuration for provisioning of supplicants is done at this point.
If you’re using Android, there is an additional step you’ll need to take to make this work. You noticed that we said that Android requires an application to perform the configuration, and that application isn’t listed as a wizard in our client provisioning policy. That’s because the application is actually provisioned from the Google Play store, the store native to Android where you get your apps. To enable this, we’ll need to adjust our ACL to allow access to the Google Play store.
The easiest way to do this is to go back into our WLC and add a DNS-based rule to our NSP-REDIRECT ACL.11 Hover over the blue drop down next to your ACL and select “Add-Remove URL”.
Once in the URL List, add the URL for Google Play store which is “play.google.com” at the time of this writing.

The way this works is that the WLC will snoop DNS requests looking for requests going to play.google.com and whitelist up to 20 IP addresses for those transactions dynamically. This is generally sufficient for the client to download the application from Google Play.12
At this point you’re ready to actually onboard a device but not so fast. You still need AuthC and AuthZ rules that you will use after you’re done onboarding to gain network access. Those rules should have a couple of important attributes:
• The AuthC rule should be sure to identify the common name as the user identity.
• The AuthZ rule should identify with a high fidelity that these devices are who they say they are when we provide them network access.
The easiest way to create the AuthC rule that gives you the behavior you’re looking for here is to utilize the fields that we created in the certificate template earlier on. For example, the issuers of the certificates we create are all going to have the Common Name ISE in them, so we can identify the certificates that are issued to BYOD devices by ISE by just checking for that field.
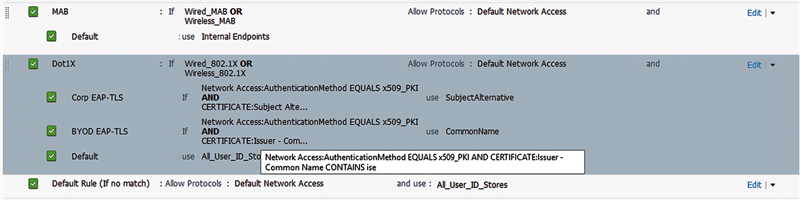
The exact conditions are as follows:
• Authentication Method = x509
• Issuer Common Name Contains ise
If both of those conditions are met, then ISE will use the common name in the certificate for the identity field so we can then use the username in AuthZ to validate that the AD user is still authorized.
The specifics of the authorization rule that you would typically use are a little more complicated because we do want to ensure that the authorization result being provided is correct for these users and devices.

The conditions have the following attributes:
• Wireless dot1x
• External Group membership = Domain users
• IdentityAccessRestricted = False
• AuthenticationMethod = PKI
• Certificate Subject Issuer Contains ise
This provides us pretty specific functionality here:
• First, we’re making sure we have the correct medium and access methodology with wireless dot1x.
• Next we’re going to make sure that the object we’re checking is a user in a proper group.
• By checking “IdentityAccessRestricted = False” we’re making sure that the user is not otherwise disabled in AD.
• Then we’re going to be sure that we’re authenticating with a certificate.
• Lastly we’re making sure that the certificate template we’re using is from the ISE CA because no other sensible certificate that we can validate ourselves we’d see in the wild may have their issuer set as “ISE.”
With those rules configured, now we’re ready to actually start onboarding devices onto your LAN.
The dual SSID design for NSP onboarding provides similar functionality but instead of relying on a single dot1x SSID, we have a separate open unencrypted SSID that we will use for onboarding and configure the end client to join the dot1x-encrypted SSID with EAP-TLS once we have gone through the NSP process. There are some basic pieces of configuration both on the WLC and in ISE we need to do to make this work.
On the WLC we need to have enabled “Fast SSID change” under Controller → General. This is important because when we have the client switch from the unencrypted SSID to the encrypted SSID, we need the controller to allow this change with minimal disruption. Otherwise the settings for the WLC and WLAN are the same as a typical guest SSID with ISE.
Inside ISE you need to configure a CWA guest page for sponsored guest login (or self-service if you are inclined). There are a couple of pieces of configuration to adjust to make this a NSP page also.
First, be sure that the ISS of the guest portal page is configured to allow authentication from the external identity source that your corporate users use. If this is AD, this will work by default since the Guest_Portal_Sequence includes all AD join points. If you are using LDAP, you’ll need to be sure you add that manually.
Once you’ve validated your ISS, you need to check a single box. Scroll down to “BYOD Settings”.
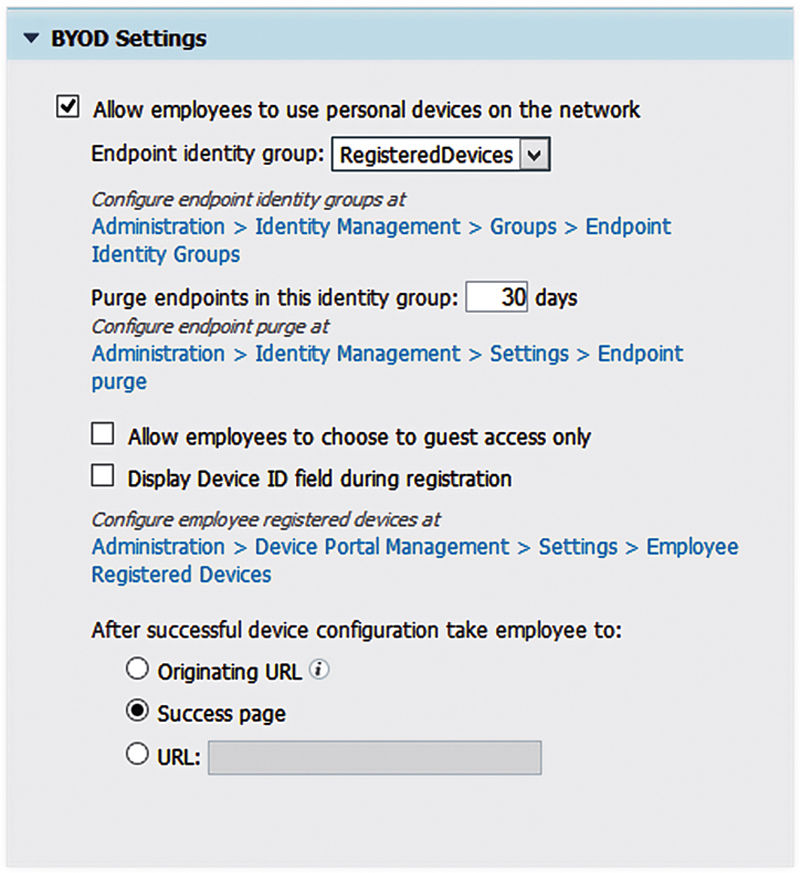
And check “Allow employees to use personal devices on the network.” Once you check this, you’ll see that a BYOD flow is enabled in this portal. When a person logs in with an employee credential, they will automatically be delivered to the NSP BYOD flow.
At this point you need to be sure you’ve configured the Client Provisioning rules and results just the same way you’d configure them for single SSID NSP design and the client will have a certificate provisioned to the end device and the supplicant configured for EAP-TLS.
Web authentication for BYOD access
Lastly, if you are providing BYOD access to employee devices and you’re disinclined to provide them access with encryption on a WLAN, it’s possible to have them use the guest SSID with their employee credential and not require BYOD. ISE provides ways for this to happen relatively gracefully, more gracefully than a guest SSID controlled with Prime or Wireless Control System (WCS) created guest users.
Typically when we go into an organization where the employees are using the guest SSID, the guest credentials are static, haven’t been changed in years, and are known by everyone. In this situation if an employee is fired, or an employee was violating the web terms of service, it can be difficult to identify the end user of the device.
The configuration for this is also very simple. There are two steps. First, make sure the authentication in the guest portal allows for authentication to the identity store that is used by employees. Like I mentioned before, the default “Guest_Portal_Sequence” allows for AD authentication.
Second, you need an AuthZ rule that allows for employees to successfully be allowed on the LAN. This is what a typical AuthZ policy looks like when I’m deploying it.

The bottom rule is the rule that allows devices to use the web splash page. Then either users who have successfully authenticated as guests (and are using their registered endpoint identity group) or those who can be identified by an AD group membership are allowed to connect to the guest LAN.
Obviously in this case the employees may be provided a different AuthZ result, providing them access to potentially some internal resources (active sync maybe) while providing true guests nothing. That’s entirely up to you and your specific deployment but this design will allow both guests and employees to directly log in to the guest splash page and gain access.