Chapter 10
Deployment Strategies
Abstract
This chapter will cover methods for taking a non-ISE network and starting from the ground up to deploy ISE throughout your organization. Since the process can be complex and/or organization like to divide the process between wired and wireless, each media type is covered individually using best practices for the different media types. We start with wired first, covering the pilot phase and moving from there to monitoring, low impact, and then fully enforcing authentication. A similar process is covered for wireless but adjusted to take into account that wireless typically already has 802.1x built-in/enabled.
Keywords
deployment
low impact
monitor
enforcing
It would be nice if we could assume that every network we work on every day is net new and doesn’t otherwise have anyone currently connected on it. In that case, we wouldn’t have to deal with any whiney end users until we’re done configuring the network for their use. Unfortunately this is not our reality and almost all the time we have to implement a technology it’s into an existing environment that has operational users that we need to be sensitive to. ISE is no different than any other technology in this regard. If you’re evaluating or seeking to deploy ISE in your environment, you’re going to have to do it in a manner that does not disrupt your current users’ work flow, or at least minimally disrupts your users while you implement the desired network access restrictions. There are definitely techniques that can be employed to make this process smooth. We’ll break these down between implementing wired networks and implementing wireless networks separately because from a technical perspective they tend to function distinctly but the process from a logical standpoint can happen at the same time. We’ll start with wired networks.
Wired ISE deployment broadly breaks down into several phases:
1. Planning/design
2. Pilot
3. Implement monitor mode
4. Implement enforcement mode
5. Network operation/enhancement
ISE deployments around existing wired networks can become challenging because it may be presumed that a great number of devices currently connected to your wired infrastructure do not have an 802.1x supplicant and we may not have a complete inventory of the types of devices deployed. This is why we deploy monitor mode first. Let’s define monitoring and enforcement for clarity:
• Monitor mode: A configuration where ISE will allow any device connecting to the network unrestricted access
• Enforcement mode: A configuration where ISE will enforce network policy on unknown or unwanted devices restricting them from accessing sensitive or internal corporate resources
Understanding the definitions of each of these is important and there are a couple of points you should be aware of. First, just because something is in monitor mode does not mean that ISE does not control the function of the port. In the monitor mode deployment as we’re going to detail below, ISE will control interfaces where authentication is configured, but ISE will allow any MAC address onto the network without restriction.1
Enforcement means that unknown devices2 which connect to the network are restricted from network access. That restriction can take many forms including dACL restrictions or some kind of web authentication. Some of the following is purposefully vague because the enforcement mode is a relatively small part of the effort you will put in.
Getting the network into monitor mode is possibly the most challenging part of a wired ISE implementation. There are a few ways of doing this but we’ll detail the method that we’ve found to be most effective.
Let’s first go through the behavior of devices on modern networks with ISE authentication. Devices will be either authenticated with 802.1x or utilizing MAB functions. We may typically assume that devices that are corporate domain member PCs are going to be doing 802.1x. In the long term, devices that are doing 802.1x authentication are easy to manage because we don’t necessarily need additional information about them (outside of their authentication behaviors) to properly apply network policy. Devices using MAB are the ones that do not have supplicant configurations for 802.1x for any number of reasons. Reasons may include:
• They are embedded devices that don’t support 802.1x, for example, older printers, scanners, and non-Cisco APs.
• They are corporate domain member PCs that are not configured properly.
• They are PCs owned by contractors that perform required duties on site but the devices are not corporate assets.
• The device is rogue and should not be attached to the corporate network.
Without an absolute inventory of the first three sets of those devices (obviously you won’t have an inventory of rogue devices), it may be very challenging to write ISE policy where when you deploy it you can go straight to enforcement mode without accidentally restricting access to users who may need access to resources that were not in production to your knowledge.
From an operational perspective, because none of those devices will typically have an 802.1x supplicant enabled by default, they connect to a switchport, and if it’s enabled for ISE control, the authentication process that ISE will attempt to utilize is MAB. This is where the exact behavior of ISE is useful to understand. We’re going to take a step back and do a little review of some key concepts that are required for monitor mode:
• In the ISE configuration provided in Chapter 7, each edge switchport will allow both dot1x and MAB. If dot1x is not utilized by the endpoint, the switchport will attempt to authenticate the endpoint in ISE with MAB.
• When profiling is enabled with the “RADIUS” probe on an ISE policy node, every MAC address that is sent to ISE is added to the Endpoint Identity store inside ISE.
With that in mind, when you go through the AAA process of an endpoint that is presented to ISE with “RADIUS” profiling enabled, every AuthC operation will succeed in a typical ISE authentication policy.

That doesn’t necessarily mean that every endpoint will be permitted network access; it just means that the AAA process will then move on to the AuthZ ruleset to determine if the endpoint is permitted, denied, and if any additional attributes are sent to a switch in the event of a successful authorization. This is where we can manipulate network permissions to achieve a successful monitor mode.
In the authorization ruleset, if we create a rule that matches just “Wired_MAB,” we will match any possible MAC address that is learned by the ISE profiler.

In the case above, we would achieve monitor mode for all wired connections; we also wouldn’t have the capability of restricting what would or would not be in monitor mode. Obviously this will not scale because you would have no ability to bring segments of your network piece by piece from monitor mode to some type of enforcement. The easiest way to manipulate what is and is not in monitor mode is by creating a group of switches that are in monitor mode and a group of switches that are in enforcement mode. This way you need to only manipulate which group a switch is a member of to change its enforcement (monitor mode) behavior.
Groups of switches (or any network device) are created by browsing: Administration → Network Resources → Network Device Groups.
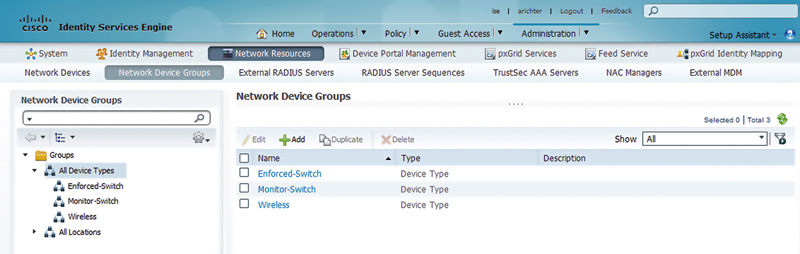
Most typically you will want to create a couple of different groups of device types. In this case we’ve created the following:
• Enforced-Switch: A group for switches that should perform some kind of network access enforcement
• Monitor-Switch: A group of switches that should be in monitor mode
• Wireless: A group for WLCs (not relevant for this section but since you are here why not create it)
You can then set the switch’s group membership under the Network Device configuration.
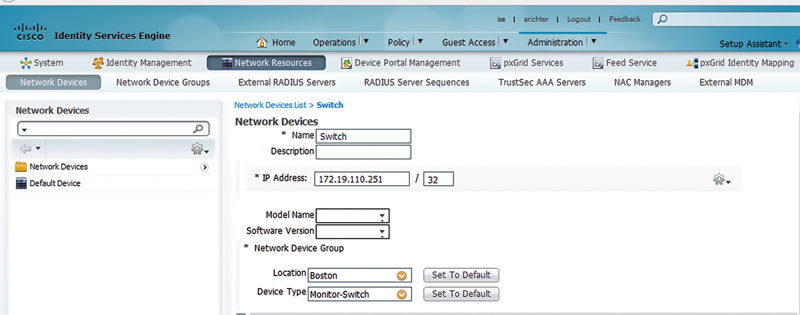
In this case our switch is set to be a member of the “Monitor-Switch” group. Now we can create an authorization policy that takes advantage of the network device groups we created.
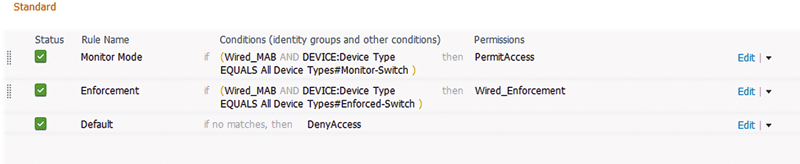
With that policy we can change how that switch authorizes devices centrally in ISE without any change in the actual end switch configuration. In this case all that is required for authentication to have the enforcement action is to change the switch configuration inside ISE.
The advantage of this type of configuration in monitor mode is that the level of effort to bring devices between monitor mode and enforcement is really easy. You also can perform reporting very easily based on network device group or authorization profile.
The behavior of this is also pretty low impact, so low impact that typically when we work with customers to bring them from monitor mode to enforcement, it can be done during business hours. Once we’ve run reports on a particular switch and found that there are no longer devices that require monitor mode for authorization, we can change the switch’s membership to enforcement mode. When you change the switch’s membership, it does not change the authorization of any existing switch authentication session to active. It simply changes the behavior for any further authorizations that are initiated by the switch.
Earlier in this chapter we said that getting into monitor mode was more challenging than enforcement. This is simply because the initial configuration of ISE control of edge switchports is typically service impacting to clients, at least briefly. Going from monitoring to enforcement mode, because it will not impact sessions that are established with ISE, is not itself service impacting. Let’s talk about why this happens and what to expect on common devices.
When you’re deploying ISE in monitor mode on a switch, here are the typical steps to follow. First, configure the switch (in ISE) as a network device in the monitor mode group. Then configure all the global parameters on the edge switch, RADIUS servers, AAA, device sensor, etc. Lastly, on the edge switchports that should be controlled with ISE, apply the authentication parameters required for the edge. That last step is where clients can experience a brief network outage. This outage is caused when the switch is suddenly asked to authenticate the edge client when it did not require authentication before. For a regular PC, when this happens, you might see a couple of pings lost if doing a continuous ping, but it’s not an extended outage.
If your network has IP phones deployed on it, it’s important to remember that a simple “monitor mode” rule result like the previous example is not going to allow a phone to connect on the voice VLAN. For it to get assigned to the voice VLAN it will need to be profiled such that we can provide the phone the authorization result containing the voice domain permission. This means, functionally, the phones will not, and cannot, be using the monitor mode rule; they’ll have to be profiled. This may sound scary, but if you’ve tested profiling policies in advance, the risk that this does happen is pretty low. In any case, you should expect to see phones reregistering to the Cisco Unified Communications Manager (CUCM) or rebooting when you apply the authentication configuration to edge switchports.
If you are deploying ISE on switchports that have wireless APs on them, there are a few things to keep in mind. First, if you’re using FlexConnect APs that have local switching configured at the AP, you should not deploying ISE on the edge switchport that connects to the AP. FlexConnect APs are best deployed with switchport that are set as trunks, and the authentication commands require that the switchport is in access mode. If you’re deploying APs in standard local mode where all WLANs are fully tunneled back to the WLC, there is not an issue with authenticating the edge port that connects APs. During the initial configuration of authentication on the switchport, like a regular PC, a small amount of traffic loss should be expected while the MAC address of the AP is authenticated and authorized against ISE. Typically this packet loss is enough to cause the AP to deregister from the WLC. During this time the AP is unavailable to service wireless clients.3 In the case of APs, because they don’t require access to the voice VLAN, the monitor mode rule will function for them if profiling fails initially.
The last common device to deal with in deploying monitor mode is printers. These are typically the problem children of ISE monitor mode. Printers typically have a very lazy OS that runs them, lazy in that they normally don’t send data to the network gratuitously; rather they sit there idle and wait for a job to be sent their way from either an edge client or a print server. As mentioned in Chapter 3 for MAB to function an edge device has to send the NAD a packet so that the switch can learn the port’s MAC address and then that MAC can be sent to ISE for authorization. Well, in the case of a printer, if it does not ever send any information gratuitously and simply waits for something to connect to it, the ISE cannot authorize that port. Once the printer is made to send something (anything really) to the network, either it will profile properly or it can use the monitor mode rule. Because of this behavior, it’s pretty common to have to reboot some number of printers in an office. When a printer is rebooted, the printer will have to do some of the following: require an IP via DHCP, or connect to an NTP server, or ARP for its own default gateway. Once it’s done any of these, ISE will learn its MAC address and the port may become authorized. As part of any ISE monitor mode deployment it’s important to run around and briefly test all the printers and be prepared to reboot them should they not immediately function.
Given all the potential things that can lose connectivity with the network while going into monitor mode, it should be pretty clear that in nearly every case it’s important to do the monitor mode implementation during a maintenance window. You’ll want someone onsite who has familiarity with how to make sure edge devices are generally functioning after you deploy monitor mode. This is not meant to scare anyone here because once you’ve pinged all your printers when you configure your switch for monitor mode, you’re generally done. Devices that have any feature that does a keep alive will come back only pretty quickly.
Once you’re into monitor mode, the day after your implementation you’re going to want to spend some quality time reviewing your authorization logs and run report to see what is actually hitting your monitor mode authorization profile. These devices will have full network access on the data domain VLAN but if your goal is to get into a deployment with some level of enforcement you’ll want to find out what kinds of devices are utilizing the monitor mode AuthZ profile. Reasons they may be using the monitor mode authorization profile may include:
• They are corporate assets that should be using 802.1x but for whatever reasons their supplicants are not configured as such. These would typically need to be repaired by support staff.
• They are devices that are not matching a profile configured. This may be because of the following reasons:
• The profiler probes are not functioning properly. This would mean you would troubleshoot device sensor, IP helpers, or SNMP integration between ISE and the NAD.
• Devices are not providing information that you were anticipating having. This may include DHCP information where in reality the devices are statically addressed.
• The endpoint profile was not actually configured for use in the authorization ruleset.
• The device is an authorized noncorporate asset that would function in an enforcement scenario. This may be an onsite contractor who would not require access to internal corporate resources. These can typically be ignored.
• The device is malicious or rogue or otherwise not authorized to be connected to the network. In the case of these devices you would typically want to revoke their access if you’re going to be in monitor mode for a while.
The next obvious thing you’re going to ask yourself is “how long should I be in monitor mode?” In all honesty every deployment is different and there are lots of factors that can go into how long you stay in monitor mode. They can include:
• The level of effort involved in remediating devices that are hitting the monitor mode authorization profile but should not. This could be because there is a significate technical challenge that needs to be surmounted around implementing 802.1x supplicants, or just the sheer number of devices that need to be evaluated.
• The volume of staff resources dedicated to remediating devices. If it’s no one’s job to evaluate what is utilizing monitor mode, it’ll be impossible to move to enforcement.
• The level of urgency around moving to enforcement. If there is no regulatory requirement around moving to enforcement mode, then taking one’s time may be entirely acceptable.
When I look back on my ISE deployments, I have customers who experience monitor mode broadly differently in the amount of time they were in monitor mode. My maniac coauthor, Jeremy, completely skipped monitor mode and went directly to enforcement because he has an incredible handle on what devices were on his network—and has absolutely no regard for human life (Andy’s right, it was pretty crazy—J.W.). Most people are in monitor mode between a week and a month. Some users may decide that they don’t actually need to advance to enforcement because in monitor mode endpoint profiling and auditing provides them sufficient network visibility to meet their requirements.
The actual act of moving to enforcement mode involves just going into the network device inside ISE and changing its device-type group membership. When you do this, any new device connecting to the network will be subject to enforcement action if they don’t match one of the other authorization policies above. That being said, if there are any active sessions on the switch when you change the device group membership, the active sessions will not be impacted, even if they’re currently using the “monitor mode” authorization result. Any new sessions that are initiated from the NAD in question will then be subject to enforcement if the authorization doesn’t otherwise match one of the authorization conditions above.
Now that we’ve talked about the mechanics of what monitor mode is actually, we actually need to think about what we can do for an enforcement mechanism. There are a few really good options for enforcement that ISE provides for us that we’re going to talk about. It’s possible that your environment may use more than one of these depending on your requirement and as you think about how you want your environment to behave do keep an open mind because when you really analyze, the functionality provided by any of them may change your mind from your initial instinct. Although there are possibly more, the following are the three most common enforcement types:
1. You can provide a dACL that restricts access to internal resources but provides the customer unfettered internet access. This would involve creating a dACL that restricts access to RFC1918 network and any network that your company happens to own and then permits connectivity to anything else. This is transparent to users as the ACL is applied and internet access is granted while quietly restricting access to internal devices.
2. Configure a CWA page that requires the user to log in to gain access to network resources. This lets you provide differentiated access between user types (guest vs. AD) and lets you apply different network restrictions based on who the user is. You may also gain additional profiling information from this CWA based on the browser user agent and web kit from the web authentication.
3. You could provide a dACL that allows the endpoint to obtain an IP address but nothing else. This type of authorization allows the device to obtain no network access other than DHCP. Allowing the client to obtain an IP address lets us gain profiling information about the client without allowing them to gain access to any significant network resources.
There are a few other enforcement mechanisms that are optional, more of a second tier. They’re valid design options but typically are problematic at scale, don’t provide flexibility, or may not provide a great end user experience:
1. If you have a dedicated “guest”-type VLAN configured in your closets, you can do a VLAN override for unknown devices to that VLAN.4 This can help you provide path separation for wired guest-type users where you feel that VLAN segmentation is more appropriate. The issue for this is that it may be more difficult to provide ISE with DHCP profiling information if device sensor is not available. Also, if a device is first connected to the network and does not initially have a profile determined in ISE, in this case it will be assigned to the guest VLAN. If the device is then properly profiled once it’s connected to the network for some time, ISE will have to CoA the session and change the device’s VLAN. This VLAN change means the client will have to change subnets. This CoA can be service impacting in a couple of ways. If it’s done with a port bounce, the switch interface will be “shut/no shut” by ISE which will allow the client to obtain a new address. But this could obviously take some time and will be intrusive to whatever the endpoint is. If there are multiple devices connected to that port (like a phone), the other devices will lose connectivity to and could potentially reboot (in the case of the phone). If a “reauth”-type CoA is done, the whole port is left up but there will be no way for the client to know that its VLAN was just changed and without manual intervention the client will not be functional in the network until it obtains a valid address for its VLAN.5
2. If you’re inclined to entirely deny network access to endpoints, you can create an authorization policy that has an “access-reject” result. This will provide the endpoint no network access. We typically don’t use this because it’s preferable to at least allow the endpoint to obtain an IP address so we can gain some additional profiling information.
We’d like to point out that as you go through and design your ISE policy, all of the options listed above are not mutually exclusive. Depending on how you deploy your NAD groups you could have a variety of styles of enforcement across your organization to suit different security needs and corporate cultures of each subgroup in your company. That being said, start with one and add additional ones if you find that the need suits you.
Wireless
Transitioning an enterprise wireless network from a pretty wide open design to a more enforced configuration is a much different animal from a wired environment. This is because we start out doing wired networks presuming that most devices in a corporate LAN do not do 802.1x by default or have not been required to yet. There is also often no logical differentiation in network access on edge networks beyond VLANs that often do not have ACLs associated with their switched virtual interfaces (SVIs). Wireless networks, by a few aspects of their nature, are a completely different animal:
1. Wireless networks use SSIDs to different use cases. These use cases are the same ones we’ve been discussing (guest, secure access, mobile device data offload, etc.).
2. Wireless devices’ use of 802.1x is far more common in organizations than it is on wired network access. This is for a pretty simple reason; it’s easier to install 802.1x on an SSID than a switch with a bunch of printers.
3. There is an expectation of network segmentation that typically does not exist on wired networks. This is, in my opinion, because wireless networks do not have really specifically physical limitations (you can get to them in the parking lot depending on your build’s specific configuration); people expect to have their access tailored or restricted. If you plug into a corporate network from your office, people often expect to have really broad unrestricted access.
If you’re looking to deploy ISE into an existing wireless network, it’s often because you’re looking to implement increased controls on the devices and who connects to your network. As such, you need to understand what use cases you’re working with and what level of differentiation you’re looking to do. Here are a couple of very common examples:
1. A corporate 802.1x wireless network has been using PEAP/MS-CHAPv2 authentication with a Microsoft Network Policy Server (NPS) for the past several years. The corporation now wants to provide differentiated access based on what type of device is connecting (corporate owned vs. BYOD).
2. A company’s guest network uses a static username and password that has been widely distributed. This makes the username/password hard to control and you cannot be sure that the guest network is not exclusively used for guests.
Both of these use cases can be addressed by ISE but they have a common thread. In many wireless network implementations, without having done some amount of due care, the network administrator may open the network up for use cases that were not originally intended. Let’s break down the issues above a couple of ways.
The first problem, a network where unrestricted user PEAP/MS-CHAPv2 is used, is a really tough one we’ve found. We can walk into an organization and when we ask how many mobile devices are connecting to a WLAN, the network administrator may look at me sheepishly and have no idea how many or what types of devices are connecting to the secure corporate SSID. We also find no shame in this. For many years simple PEAP-based authentication designs were popular because they were straightforward to implement and almost all the devices that were connecting to the Wi-Fi network were corporate-owned Windows XP systems. When we started deploying networks like these, there was no such thing as iOS or Android and OSX was not popular at all in the enterprise outside of marketing departments (and even then it wasn’t ubiquitous). Typically these networks are deployed with RADIUS servers that don’t support profiling. We most commonly see these being Cisco ACS or Microsoft NSP.
So where to start? Well, there a couple of recommended steps you should take. First, configure your wireless controller(s) to use ISE for its RADIUS server and configure your RADIUS AuthC and AuthZ policy to use PEAP for authentication just like it’s configured on the legacy RADIUS server implementation. The reason this is the first step is because often times you may not have any idea exactly how many non-Windows mobile devices are associating with your wireless network. When you integrate ISE into the SSID, you will be able to enable device profiling and report on how many devices are joining the network that are not Microsoft Windows. Call the following: “Finding out how large your BYOD problem is.” This doesn’t mean you really know how many noncorporate devices are joining your network, because it won’t account for things such as corporate/authorized OSX or mobile devices. Administrations normally will have a good idea of how many of those are to be expected. In a small/medium-sized network, if you are expecting 500 Windows PCs and a handful of OSX PCs but you end up seeing 400 iPhones being profiled, you’ll understand the scale of the “BYOD problem” your organization has. What you do about this entirely depends on your security requirements in your organization, and the scale of the issue you discover but there are a few possible stances that organizations normally take.
It’s entirely plausible that you find that there are actually very few mobile devices that are determined to be unauthorized on the WLAN. While your organization may choose to deal with these at a future date, if there is not a large problem, it may be possible to deal with this with “policy.” Policy in quotes means that users are reminded that putting nonauthorized devices on the corporate network is a violation of corporate policy. In that case they may voluntarily disconnect their iPhones from the Wi-Fi and that could be the end of it.
If there are a decent number6 of devices out there, and your organization requires segmentation of mobile devices, it’s entirely possible and reasonable that steps from an ISE network access policy be taken to gather more information as to what devices are authorized versus the number that are actually unauthorized in a manner that provides greater fidelity than simple device profiling. Typically this would entail implementing a higher-fidelity authentication methodology on corporate-controlled devices, like the ones discussed in Chapters 12 and 13. You can implement EAP-Chaining or EAP-TLS or machine-only PEAP on corporate-authorized devices for wireless network access while leaving traditional PEAP enabled. This could include deploying AnyConnect via System Center Configuration Manager (SCCM), or changing the supplicant configuration of domain member systems with GPO.
This way, once you have your strong authentication method of choice deployed for authorized systems, when you run a report on what is connecting and authorizing with your legacy PEAP AuthZ rule, you’ll know that because they used PEAP they were mobile devices.
This is, in our opinion, the best part of the implementation—when we’ve used network policy to match different sets of devices. You have a few choices here at this point. Typically if you want to maintain Wi-Fi access for employee BYOD mobile devices, you can do that a few different ways:
• Create an AuthZ result that gives them an ACL that restricts them from accessing internal resources that mobile devices should not require access to.
• Create an AuthZ result that does a VLAN override on their airspace interface to put them on a guest-type VLAN where they have restricted access to internal resources.
• Create a NSP BYOD configuration with single SSID deployment for them and force them onboard. Then grant them a level of access like the above two examples.
If you configure the network restrictions in such a way that maintains access to resources that users reasonably expect and may be reasonably granted (active sync and internet), they likely won’t even notice that they’ve had their access curtailed.
If you determine that you don’t want any nonauthorized device to have any access to corporate Wi-Fi, then it’s entirely reasonable to deny them access entirely to any resources including active sync and the internet. Once you have your corporate-authorized devices using a strong authentication methodology, you can simply disable or remove the legacy PEAP authorization rules you had configured. Once this is done, presumably any mobile device connecting with a user credential using PEAP/MS-CHAPv2 would simply hit the default authorization rule.7
The second problem described above is far simpler to deal with in general. Let’s break down the problem and understand its ramifications first. In organizations who have guest networks with static credentials it’s extremely common for virtually all of the employees to have put the credentials to memory when they want to put their personal device, or their kid’s device, or any miscellaneous device around on that guest network. The issue with this is that, typically, the guest wireless network is explicitly slated for the guest users and employees are not guests.
We often hear from IT managers that they don’t care at all if employees use the guest network; their concern is that guests don’t get access to the corporate network. While preventing guests from accessing the corporate network is obviously important there is a serious case to be made around preventing employees from using the guest network.
First, guest network connections often do not have as robust web filtering implemented as a corporate network connection will. Categories of websites like social media are often liberally allowed on guest networks in many organizations while they are greatly restricted on the corporate LAN. Also, web security devices may be well suited to log what user is accessing what website on a corporate LAN; such devices typically don’t exist on a guest network. As such, your users are easily going to be circumventing your corporate web policy by simply changing to the guest SSID and using it to access the internet.
A similar issue with employees using a guest network frequently with corporate PCs is that, if your guest network isn’t implemented with web security filtering (Intrusion Prevention System (IPS), Advanced Malware Protection (AMP), etc.), if they use a corporate PC to check a website that is otherwise disallowed on the corporate network, they may inadvertently become infected with a virus or malware. Once they’re done checking ESPN, they’ll change back to the corporate LAN to continue doing their work. Once they bring the virus back to your corporate LAN, the virus could easily spread inside your network since the virus has just bypassed all your strong perimeter defenses.
So how do you deal with this? We recommend simply implementing a captive portal on a guest network and requiring a sponsored login. To help restrict how the credentials are used we recommend implementing guest users via sponsorship with a couple of broad parameters:
1. Enforce guest user and endpoint lifetimes to something sensible for how long a guest may be around your organization. If guests are typically around only for 2–4 days, then don’t allow a guest user or endpoint to be created for more than a week. If a guest happens to be around for more than a week, it’s entirely reasonable to ask them to obtain a new account.
2. Restrict who the sponsor users are who have authorization to create users. Look toward users who can conveniently and centrally manage guest users. These types of people include front desk staff, office managers, IT helpdesk, or administrative assistants. If you provide these users the ability to create and manage guest accounts, the likelihood you’ll have broad use of single credentials by all your employees becomes much lower.
The implementation of this design typically doesn’t require much more than simply announcing that this will become the company policy/process at date X and then simply implementing CWA web authentication on your guest SSID on that date and removing the legacy username/password.