Chapter 18
ISE Administration
Abstract
This chapter covers setting up administration of the ISE as well as an overview of the available external APIs that are provided. Administration can be granular, allowing delegation of permissions to administrative users without having to give them full access to all parts of ISE. APIs permit organizations to expand ISE functionality or to tie ISE into existing systems/workflows to better meet their needs.
Keywords
API
RBAC
ERS
pxGrid
You’ve got the basics of ISE set up but chances are you won’t be the only one using it. Even if you are the primary user, wouldn’t you rather log in with your directory password? Administering ISE is an important step in your deployment since doing it wrong could make tracking changes more difficult at best and at worse potentially lead to a compromised ISE infrastructure.
Authenticating to ISE
By default users are authenticated against an internal store and during setup a single user, “admin” by default, is created that has access to both the CLI and GUI of ISE. This user will always be there and cannot be deleted from the GUI. You can delete the user from the CLI but you need to have another administrator account to do that and you can’t delete your own user account so you shouldn’t be able to be left without at least one CLI administrator account. Typically you would select the same identity store, like Active Directory, that you are authenticating your users against. Doing this sets the default identity source seen during login to that external source but it also means that you can select “internal store”; so if you have issues with your external directory or need to log in as the local admin user, you still can.1
The password policies that you define apply only to local administrators but they, mostly, span both GUI and CLI users. Settings such as custom denied words and lock out emails apply only to GUI users and password history is limited to one past password for CLI users but everything else applies to both. Since these policies apply only to local administrators it’s likely that they will end up only applying to the admin user created during setup and in that case it’s recommended to not lock the accounts after a number of login attempts and instead suspend the account or disable the “Suspend or Lock Account with Incorrect Login Attempts” option entirely. Locking the account is OK for the GUI since an externally authenticated admin can log in and unlock the local admin but if you have only a single CLI admin and that account gets locked you need to boot off the ISE ISO and reset the CLI admin’s password in order to log in again. If you have a system running vulnerability scans, it can quickly lock you out from your entire CLI deployment when testing for default password, something this author knows all too well!
Besides there being different users for the different ISE interfaces there are also two types of users/groups for the ISE GUI—internal and external. Internal implies that the user or group is local to ISE only and is the default state when you click “Add” for either of those two objects. External implies that the user or group is linked to an external identity source in some way. A user can only be internal or external; when you create or edit an existing one, you will see a checkbox that lets you designate the account as “External.” You could do this if you wanted your users to use their AD/RSA/LDAP credentials to log in but the downside is that you still manually need to create the accounts in ISE each time a new person comes on. If we look at the options for groups, we can see that by default they are marked as “internal” but that we can actually check both the “internal” and “external”–type boxes at the same time. This means that we can assign local users we create in ISE to the group as well as tie the local ISE group to a group in (in this case) Active Directory.
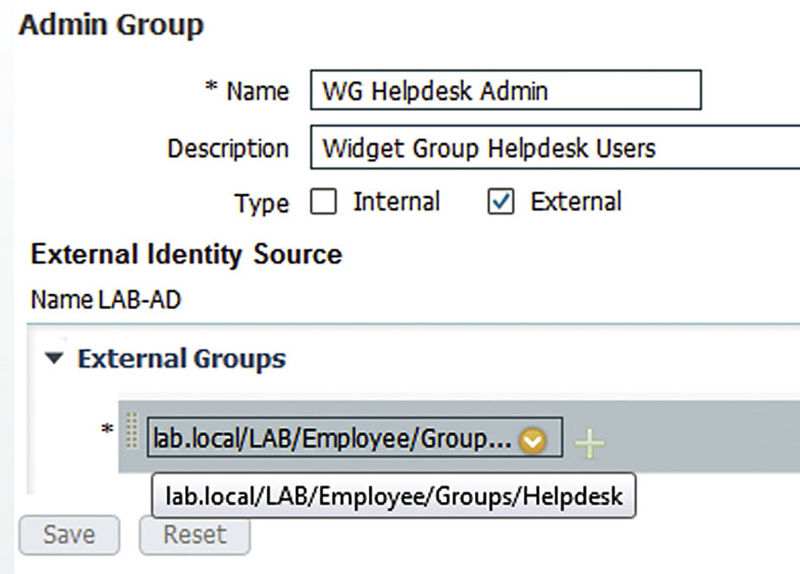
Here we have created an external-only group and, since we selected a configured Active Directory source as our administration identity source, we were able to select a group that we had previously configured.2 The big advantage here is that, assuming our account creation process handles it, we don’t need to worry about provisioning access to new Helpdesk employees as they join us. When they log in, ISE validates that they are part of a configured group and grants them access. You won’t see them listed in the Admin Users section but their username will show on all audit records so you don’t lose anything.
You can’t configure any of the built-in groups to be external only; they will always have the internal checkbox enabled.
RBAC
Once you have the authentication portion covered, we have to talk authorization—just like user access. Permissions for GUI users are broken down into menu access and data access; both need to line up in order to be effective. A user with menu access for the endpoint identities area but no access to the data won’t see anything. Likewise, a user with access to the endpoint data but no menu access won’t be able to access the location to see the data they have access too. Combining these two types of access defines a role and that is the “R” in RBAC (role-based access control). ISE provides a set of RBAC policies by default that should cover most common organizations. The Helpdesk role grants the ability to look at the Home and Operations areas with the exception of the “Download Logs” and “Endpoint Protection Services” areas but provides no data access so users can’t look at endpoints/users/administrators within ISE. The Policy Admin role grants access over user/endpoint data as well as the policy-relevant UI areas but prevents the administrator from making system-level changes. In total there are 11 default RBAC groups that an administrator could have in order to control their access.
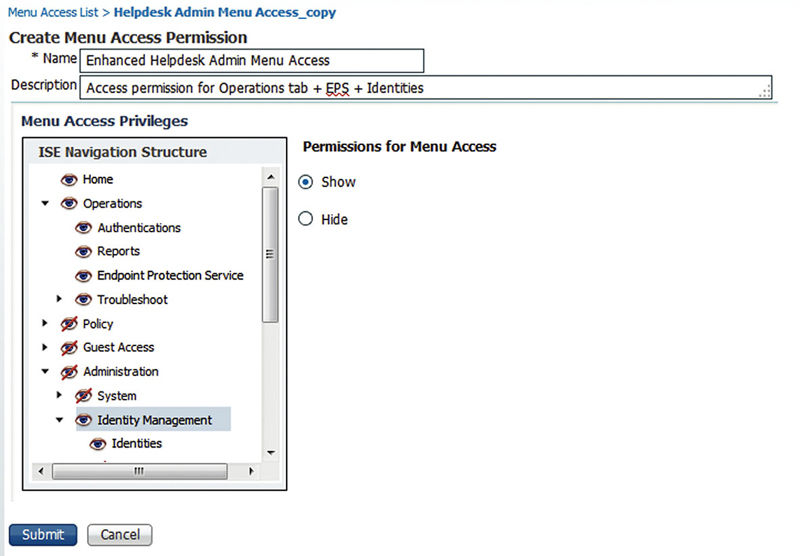
Hopefully you won’t need to make changes or additions to the RBAC area, but what if you do? Let’s add a new set of permission for our Helpdesk to give them a bit more access so they can look at endpoints and utilize EPS. The first thing we want to do is duplicate the current “Helpdesk Admin Menu Access” permission so we can edit it without having to edit the default permissions. Go to Administration → System → Admin Access → Authorization → Permissions → Menu Access; check the box next to the above permission and then click the “Duplicate” button. ISE will bring us to a new area where it has duplicated the permissions and lets us edit them. First, you will want to give it a recognizable name and description so you (or someone else) will know what’s different about it. Next in the Menu Access Privileges frame, change the status of the following from Hide to Show:
• Operations → Endpoint Protection Service
• Administration → Identity Management
• Administration → Identity Management → Identities
Your result should look like this:
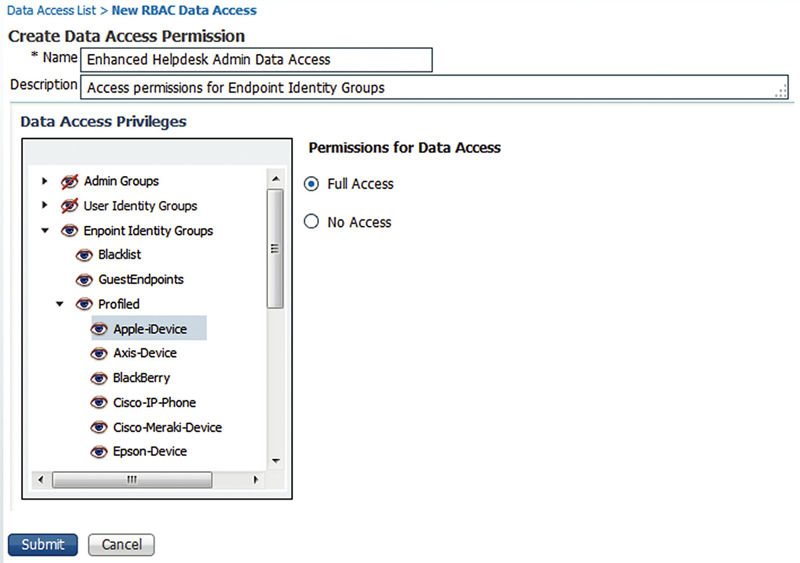
Submit the change and then go to the Data Access section. Now since the default Helpdesk Admin RBAC group doesn’t have access to any data areas you will notice that there isn’t a corresponding “Helpdesk Admin Data Access” permission prebuilt. We’ll need to create a new one which is very similar to the duplicate process we just did. Click “Add,” name the permission, and give it a good description. Next go to the “Endpoint Identity Groups” node and all of its subnodes and change their access to “Full Access”; unfortunately there isn’t an easy way to mark all subnodes as “Full Access” from the top but if you haven’t made many Endpoint Identity Group changes (which you shouldn’t have since you are utilizing Logical Profiles right?) it should be a quick task. If you have made a number of changes, then you could duplicate the “Identity Admin Data Access” permission and then set all of the User Identity groups listed to “No Access.”
An important note is that ISE currently does not provide the capability to give administrative users read-only permission over data. This means that expanding access for a group like your Helpdesk to allow them to do basic troubleshooting of client profiling issues by looking at endpoint identities will also give them the ability to delete one or all endpoints in the system.
Your final Data Access Permission should look like this:
Save it and then go to the Policy area. Here we will map Admin Groups to their respective menu/data/both access permissions. The default policies show off the built-in RBAC policies as well as different ways to use menu/data permissions; looking at the External RESTful Services (ERS) examples you can see that it’s possible to even just assign data permissions with no access to menu items. Like the access side of ISE where we build components and then join them into a policy to provide access, we need to do that same thing with the RBAC components we just created. We’ll insert a new policy into the existing ones and then start filling in our values. Name can be anything you want, the Admin Groups will be one or more Admin Groups you want to grant access, and Permissions will be the menu and data permissions we customized.3
Your resulting policy line should look something like this:

Now when users in the WG Helpdesk Admin group log in, they will have access to EPS actions as well as endpoint identity information. Since administrative policy’s gets aggregated there is another way we could have gone about this; create an EPS group and an endpoint identity group, assign our users to those groups, create EPS and endpoint identity specific menu/data permissions, and then assign the EPS menu access/endpoint group the endpoint data/menu access. Technically that fits a little bit better into the RBAC way of thinking but it has a disadvantage in that it’s hard to tell at a glance what access a single user would have. Add to that possibly nested groups within your external identity source and you can get a pretty complicated setup going on. Our recommendation would be to keep things role based like we initially designed for most deployments unless you have good reason too or if you have some sort of Identity and Access Management (IAM) system that can easily tell you who has what access.
API
ISE has three APIs available for you to use—Representational State Transfer (REST), ERS, and pxGrid. Programming with them is out of scope for the book, and probably could be a book in and of itself, but we’ll hit on each one so you are better prepared to deal with them. There are some similarities between each one but overall each API specializes in a specific type of action so it would be worthwhile to align your API choice with your goal. For in-depth descriptions and examples check out the ISE API Reference Guide.
Monitoring REST API
The REST API is the simplest one of the three to utilize/query and is enabled OOTB with ISE.4 Queries are simply HTTPS GET requests to specific URLs and ISE sends back the response in basic XML. You can technically use HTTP PUT but that is really only for special cases.
The REST API is open to any local administrative user but since data being queried is something that you have access to through the UI anyway it isn’t an issue. If you are using Active Directory or some other external source, then any administrators you have set up won’t be able to log in, a good or bad thing depending on how you look at it.
Ability wise there isn’t a whole lot you can do through this API but you can perform CoA actions, retrieve session information, and get some basic troubleshooting info such as failure reasons.
External RESTful API
Also called the ERS API, this API is more complex than the Monitoring REST API but also provides more capabilities. ERS allows you to perform many endpoint, user, and group operations safely via the API because data goes through the same validation steps as it does when it’s done via the GUI. This basically means that you don’t need to worry about incorrect API calls causing damage, a little extra piece of mind. By default this API is disabled so if you want to use it you need to go to Administration → System → Settings → ERS Settings and enable it for at least your PAN5.
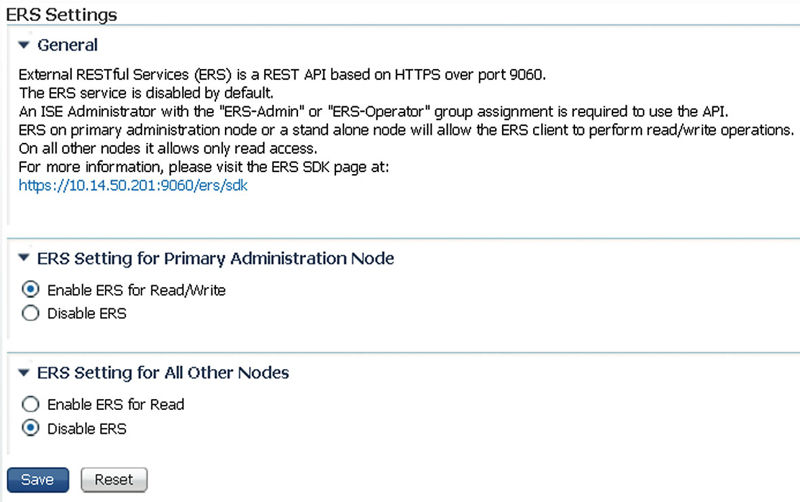
If you want to run read-only queries against your other nodes, then you can enable that here as well. As noted on that page, you will need to be in the “ERS Admin” or “ERS Operator” groups in order to utilize the API, so we do have some separation between different users of the API:
• ERS Admin: Can perform all API operations
• ERS Operator: Can perform only read-only operations
Also notice the reference in the previous image to https://<PANIP>/ers/sdk. That takes you to a bunch of documentation about the API including some basic setup, how to perform all the available actions in the API, example use cases, and even a Java-based demo application. Heed the warnings in those pages however; most of the examples don’t perform proper certificate verification and should never be deployed as they are in a production application without changes to fix that.
Once ERS is enabled, you actually need to assign users to those groups; even Super Admins aren’t permitted to use the API by default. The “admin” user cannot use the ERS API at all either; this prevents people from “just using the admin account because it’s easier” and opening themselves up to any security issues down the road. If you are using ERS, you will need to have/create at least one new account to utilize it.
ERS groups are set to be internal only OOTB and while you can technically set them to be “External” as well and add users, those users will not work. As seen in the next image, we can create users and assign them to multiple Admin Groups which would allow a user to be both a GUI administrator and an ERS API administrator.
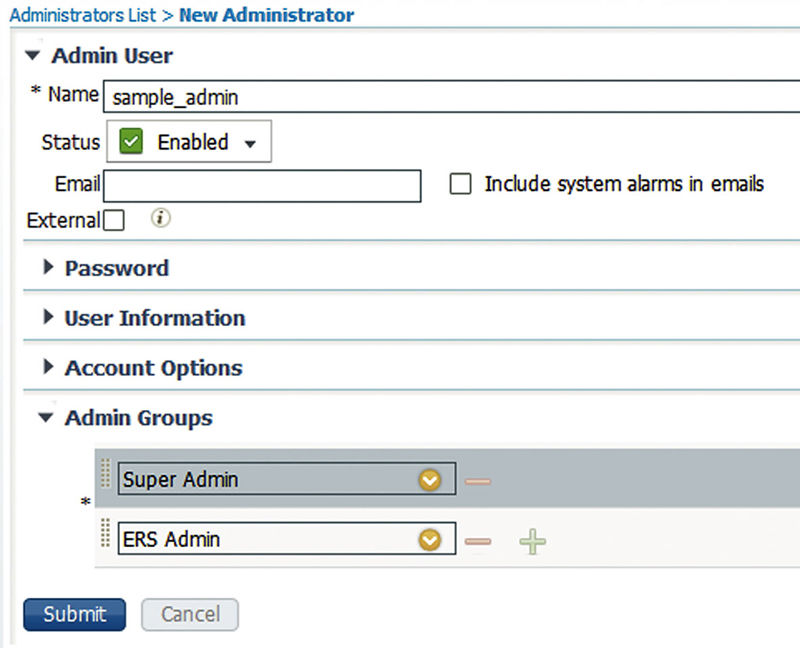
If you are planning on using ERS though, we highly recommend dedicated API users for your applications that have only ERS-level access. Multiple accounts might be more work on the front-end but better auditability and separation of privilege are always a good thing!
The other side of ERS is the Guest component and it requires separate configuration than the rest of the ERS API. You still need to enable ERS globally like we did under Administration → System → Settings → ERS Settings but the user will need to be added to a User Identity group that will have access to a Guest Sponsor group that has ERS enabled. That means for user creation we’ll actually create a local network access user and not an administrative user. Now technically you could ERS enable an existing Sponsor group but like previously stated, privilege separation is always a good thing. We’re going to create a new Sponsor group just for ERS usage, a new User Identity group that will be assigned to that Sponsor group, and finally our Guest ERS API user.
First let’s create our new User Identity group; go to Administration → Identity Management → Groups and click “Add” and create a new group with a fitting description like this.
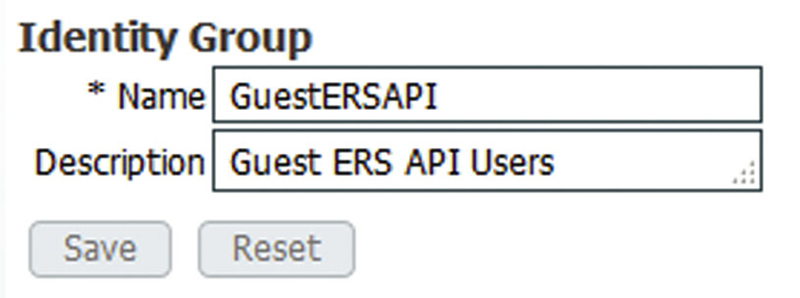
Once we have that group created we’ll want to create our Sponsor group that will be ERS enabled. Go to Guest Access → Configure and then go to “Sponsor Groups.” If you already have a group you want to use as a template, then you can click that group and select “Duplicate” or start fresh with a brand new group; we’ll do the latter so click “Create”.

More info about creating/editing Sponsor groups can be found in Chapter 9 but here you can see our new group and we’ve added the “GuestERSAPI” User Identity group we just created. Settings for this group can be whatever you would like but they should align with what your ERS application will be doing. If you are going to be only creating users one at a time, you can safely disable the “Import” and “Random” guest creation permissions.
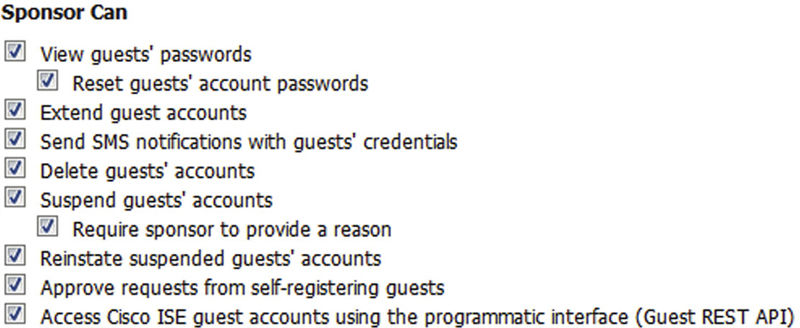
The last piece for the ERS Sponsor group is that we need to enable the API. Ensure that the very last checkbox is checked so that the user we’re about to create will be able to perform the needed actions.
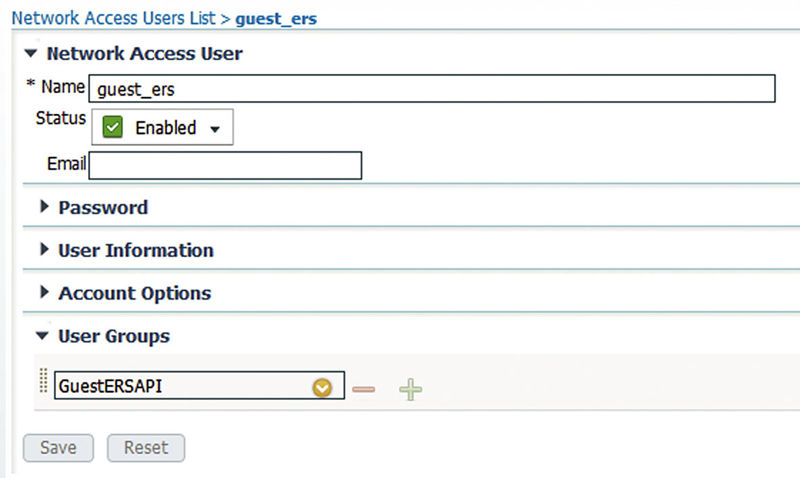
Our last step will be to create our Guest ERS API user so go to Administration → Identities and click “Add.” Create your user like you normally would but make sure you add them to the group we created in the first step of this process. The next image shows the user we created for this example.
From here you will want to reference the ISE API guide or the previously mentioned software development kit (SDK) so that you can start programming your own applications!
pxGrid
The final option for getting data out of ISE is also the newest, pxGrid. This is more than just an API and is really a data exchange mechanism that is meant to share different types of data across a wide range of systems. A typical example using an IPS and ISE would be that separately the IPS has no knowledge of the users on machines and ISE has no knowledge of the actions a user is taking. By exchanging information the IPS is able to correlate users to events it sees and then take action on those events by telling ISE to quarantine the user until actions are taken to remediate the issue. With many pxGrid systems in place all sharing information it allows those systems to concentrate on what they do best while still gaining other valuable context about what they are doing at the same time. ISE plays an important role in pxGrid because of what it provides—user data and network control. Not every device may have data ISE wants but chances are almost any pxGrid device is going to want identity data from ISE.
Setup wise it’s a little bit more complicated than the other APIs. You need to enable and assign the pxGrid role to one or two nodes in your deployment before you are able to use it. You can do this from Administration → System → Deployment and then clicking on the nodes you want to enable the service on. In simple, single- or dual-node deployments the choice is pretty simple but in a distributed deployment which nodes should have the pxGrid role? Technically any of them can be, but we recommend that you use one or two of your PSNs to house the role since those nodes are already open to end users and integration with other systems should be easier.
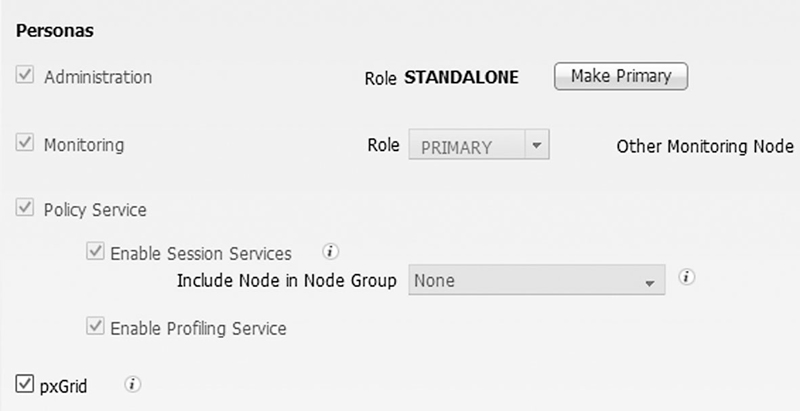
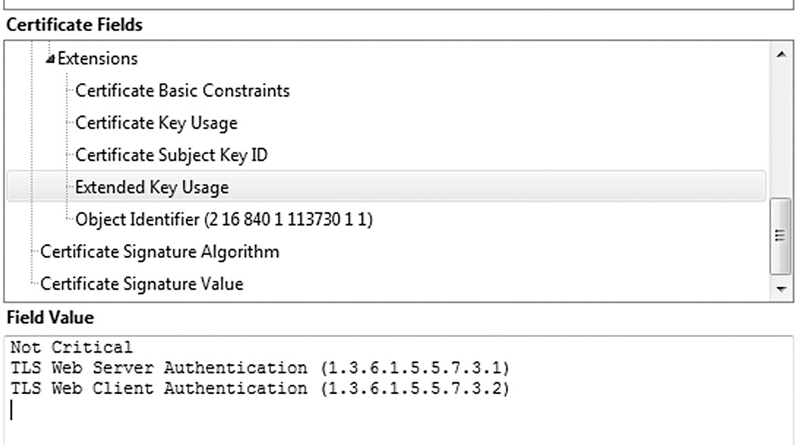
pxGrid handles authentication via certificates so you need to have a certificate that is bound to the pxGrid service. After enabling the pxGrid persona ISE will try and utilize the certificate that is already assigned to the nodes you selected but if you have multiple certificates on your pxGrid node(s) then you may have to manually select which certificate you want or possibly even generate a new one. The important thing to note is that the pxGrid certificate must have both the “Server Authentication” and “Client Authentication” usage values in order to be used6.
Once you have the certificates squared away, you should be able to see the client screen under Administration → pxGrid Services. There won’t be anything here at first but once you start to tie applications to it they will begin to show up.
Unfortunately going into application development with pxGrid is complex and probably an entire book on its own. Cisco provides a wealth of information at their Developer site and there is an excellent guide on configuring the pxLog application from Cisco as well.
Cisco pxGrid Developer site: http://bit.ly/1LOU0oD
pxLog example application: http://bit.ly/1PhjKKO