MORE THAN 2.3 BILLION ACRES (913 million ha) of North America can’t be used efficiently to grow anything other than grass, and all farms have areas that aren’t really suitable for crops. We can’t eat this grass, but our sheep sure can.
Sheep are really efficient at converting grass into meat. For the shepherd who is interested in low input and high profit, grass is the key to success. In the low-input, pasture-based system, sheep have their lambs on the pasture in late spring, and the lambs grow to market age on the abundance of grass during the summer. The lambs can then be sold in the late summer or early fall, about the time the pastures begin to give out. This means that you don’t need to carry the animals through the winter on hay and grain.
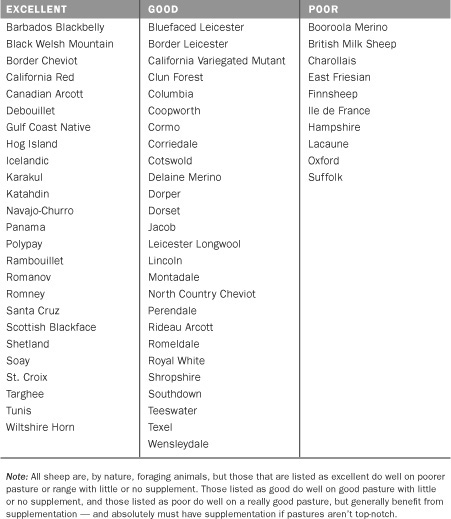
Sheep are among the best grazing animals in the world. Even breeds with “poor” foraging abilities are still good grazers, but they need high-quality, tame pastures — they won’t do well on rough, native pastures without supplemental feed. Breeds that are excellent foragers produce nicely on those rougher pastures.
For all shepherds, regardless of the breed they choose to raise, pasture should be the cornerstone of their operation. In fact, we think of ourselves as grass farmers, capturing solar energy in the grass of our pastures and converting it to a product (food and fiber) with our sheep. To be successful, a grass farmer must learn to manage pasture for both the plants’ and the animals’ needs. Even on very small parcels of land, a shepherd can use managed grazing to provide the bulk of feed for a small flock of sheep. By adopting the techniques discussed below, grass farmers can be stewards of their environment: erosion from cropland is up to 300 times greater than the erosion that comes off a well-sodded pasture, and grasslands capture more atmospheric carbon than do croplands.
FORAGING CAPABILITIES

A pasture is simply an area of land where forage plants (grasses, legumes, and forbs, such as dandelions) grow. Pastures may also include brush and trees and are generally classified as one of two types: tame pasture, which is an improved and seeded pasture, or native pasture, which consists of whatever plants naturally grow in the area.
Tame pastures, as a rule of thumb, are capable of much higher levels of production per acre, but some native pastures produce remarkably well without the cost of developing a tame pasture. Generally, tame pastures are found in areas of high rainfall or in irrigated fields in arid areas. Native pastures run the gamut from the lowland to the hilly and from unimproved pastures in the humid East to the dry rangelands of the arid West.
Carrying capacity (which is sometimes referred to as stocking rate) is a measure of how many animals a farm can support over the course of the year. Carrying capacity depends on many factors, including these:
 Type of soil (rock, sand, clay, and so on)
 Plant species that are growing
 Amount and timing of annual precipitation
 Availability of irrigation water
 Temperature
 Fertility of the soil
 Lay of the land (hill, marsh, level)
 Whether lambs, ewes with lambs, or dry ewes will be run on it
 Whether any supplemental feed (hay or grain) will be purchased
Some shepherds estimate that an acre of really good tame pasture can support four sheep during the year. Rougher, native pasture may not even be capable of carrying one, so take a good look at the condition of your acreage before you bring your sheep home. It is better to keep too few for the first year until you see how your pasturage holds up.
True grasses, legumes, and forbs are considered forage plants. True grasses, such as timothy, brome, bluestem, fescue, orchard grass, and even corn, are monocotyledons (monocots), or plants that initially grow from a single leaf. The legumes, such as alfalfa, clover, and bird’s-foot trefoil, start growing from two leaves and are called dicotyledons (dicots). Another difference between monocots and dicots is the root system: typically, monocots have a more fibrous, shallow root system and dicots have a thicker taproot, which looks something like a carrot and reaches much deeper into the soil.
Forbs are basically weeds. Most often they are dicots, though a few are monocots. One of the great things about keeping sheep is that they relish most forbs (when other livestock species avoid them). In fact, sheep are considered the perfect “biocontrol” for leafy spurge, one of the most serious noxious weeds spreading throughout North America.
Ideal pasture is a mixture of grasses, legumes, and forbs — not a monoculture of one kind of plant. The diversity of plants provides a more balanced diet for longer periods during the growing season under a wider variety of weather conditions. In tame pastures the planting mix is usually 60 percent grass to 40 percent legumes. If you’re planning to seed a new pasture or reseed an existing one, it’s also a good idea to have a variety of both cool-season and warm-season plants. Cool-season plants perform well in spring and fall, and warm-season plants do well in the heat of summer. For sheep, the shorter sod-type grasses and legumes, such as bluegrass and white clover, are ideal because they don’t trample down as much.
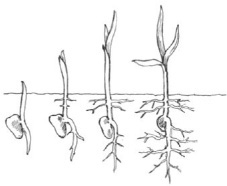
Plants that sprout with a single leaf are monocots. Most grasses are monocots. They tend to have a shallower and more fibrous root mass than dicots.
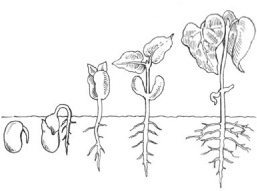
Plants that sprout with two leaves are dicots. Most legumes are dicots and have a deeper taprooted mass than monocots.
Deciding which kinds of grasses and legumes to plant if you’re establishing pasture depends on the factors mentioned above. But it’s usually better — and cheaper — to see what kinds of grasses your pasture will grow when the sheep are put on it. So many seeds are in the ground that when your grazing is managed, they have a chance to germinate and grow. Your county Extension agent, or staff from your area office of the USDA Natural Resources Conservation Service, is an excellent resource for information on which forage plants grow best locally. Online sources that are particularly valuable for learning about forage crops are the Forage Information System at Oregon State University and the Samuel Roberts Noble Foundation’s “Plant Image Gallery” (see pages 406–07 for Web addresses).
Just like animals, plants need to eat and drink. Most of their “food” is absorbed through the roots, though a small amount can be absorbed through leaves. They require nutrients like nitrogen, phosphorus, potassium, calcium, and magnesium. The true grasses have to get all their nutrients from the soil, but the legumes can acquire part of their nitrogen from air molecules that are trapped in the soil through a process known as nitrogen fixation.
Nitrogen fixation by Rhizobium depends on several factors. First, the soil has to have some of this beneficial bacterium living in it or, in the case of a new pasture seeding, the seeds have to be inoculated with bacteria. Second, the soil has to be healthy enough to support the bacteria. Soil that is low in organic matter may not support the bacteria very well, and soil that has been treated with strong chemical fertilizers, pesticides, and herbicides may not support them at all.
PLANTS AND THEIR U.S. PASTURE AREAS
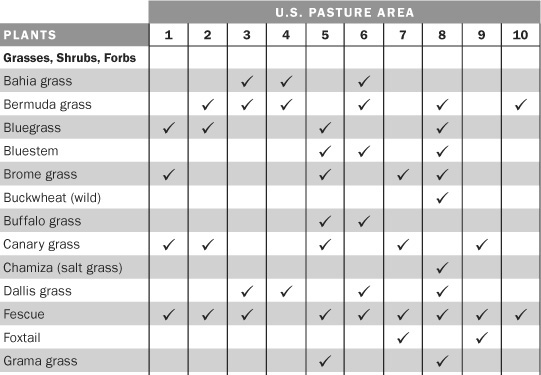
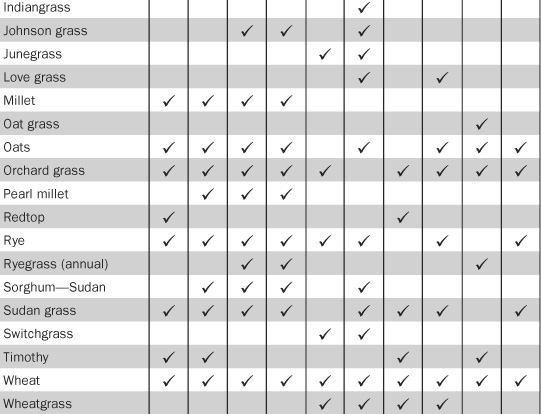
U.S. PASTURE AREAS
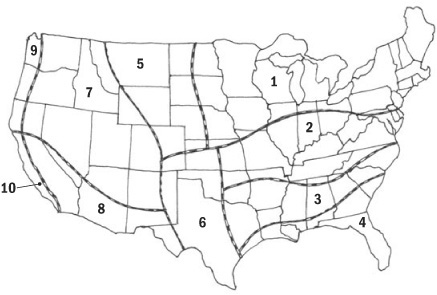
This map shows the ten generally recognized pasture areas in the United States; the numbers correspond to the information given in the table above. Some plants may be widely adapted to grow in a given area or they may grow there only under limited circumstances or when you are using selected varieties. For example, white clover shows up in all ten areas, but in arid environments it will grow only in subirrigated areas. (Redrawn from M. E. Ensminger and R. O. Parker, Sheep and Goat Science, 5th ed. Danville, IL: Interstate Printers & Publishers, 1986, p. 405.)
Deciding what kinds of fertilization program to implement for pasture optimization requires soil tests or plant-tissue tests or both. Soil tests are a little less expensive than plant-tissue testing (ask your county Extension agent about soil-testing availability), but plant-tissue testing is more accurate. If you do opt to use chemical fertilizers (such as ammonium sulfate), several light applications during the year are far better for soil health and soil organisms than one large application. Natural soil amendments such as compost and green manure actually enhance soil health.
In humid environments, the fertilizer that usually provides the most bang for the buck is some kind of calcium supplement (lime being the most familiar). Soil in areas of high rainfall suffers from leaching, or movement of nutrients down through the soil to depths that plants can’t access, and calcium leaches quickly. In some areas of the United States, certain micronutrients are also in short supply in the soil, and you need to either boost their levels in the soil or make sure you’re supplying them to your flock in a supplemental trace mineral product. Again, your county Extension agent should know about soil deficiencies in your area. (See chapter 6 for more about feeding minerals and the Resources section for some books that provide additional information on composting, soil amendments, and so on.)
If a pasture has become overgrown with brush and excess weeds or if, on the other hand, it has developed large bare spots and eroded places, it may require rejuvenating.
When the problem is overgrowth of brush and weeds, you have several options.
 Get a breed of sheep that’s considered an excellent forager and/or get some goats. (When it comes to taking out really overgrown brush, goats are the superior animal — but they are even more difficult to fence than the most challenging sheep.) By continuing to strip growth off brush, sheep will eventually kill it.
 If you’re intending to go with a breed that doesn’t rate as highly on foraging capabilities, you may need to do some mechanical clipping or mowing right away.
 If you opt to mechanically clip brush or weeds, keep in mind that by optimizing the timing of your clipping, you can have a big impact on the success of your labors.
 Clip weeds just as they begin to flower but before the seed heads have opened.
 Clip brush in the early spring, while the sap is running.
Carrying around some pasture seed in your jacket pocket whenever you walk through the pasture and simply tossing handfuls on the bare places can help rejuvenate bare spots. Another trick is to feed bales of hay right on the bare spots during the winter — the hay gets stomped into the ground and protects the soil surface, enabling seeds to germinate and grow better.
Another technique that can rejuvenate a pasture or just increase the diversity of plants found in it is frost seeding. As the name implies, frost seeding requires seed to be spread during the spring, when the nights are cold enough to frost but the days are warm enough to thaw the soil surface. This freeze-thaw action allows planting of the seeds at a shallow level, where they are most likely to germinate.
To frost seed, broadcast it thinly over the pasture. If the pastures are large, use a tractor-drawn broadcast seeder; for smaller pastures, use a handheld version. The technique works really well with legume seeds — it is a great method for increasing the diversity and percentage of legumes in an older pasture where they have become too thinly populated.
Understanding how forage plants grow helps you get the most out of your pasture. Growth takes place primarily at the plant’s basal growth point, which is just above the soil surface. Initially, plant growth is relatively slow, but as the leaves reach above the basal growth point, things really speed up. Then, as the plant reaches maturity, growth slows down again because the energy that had been used for growth switches to flower and seed production.
This is a typical S-type curve that represents the growth of most living organisms. Note how growth begins somewhat slowly, then in the middle period speeds up, and then finally slows down and tapers off. (Modified from André Voison, Grass Productivity, Covelo, CA: Island Press, 1988, p. 12.)
Forage plants store extra energy in their roots when they’re growing quickly (the steep part of the S-curve). This stored energy can be used later to jump-start new growth after the leaves have been grazed down or to make the first spurt of spring growth after the winter dormancy. Their ability to recover quickly after grazing makes the forage plants valuable, but don’t be deceived into thinking that leaves can be continuously removed without injury. In fact, if the leaves are grazed off repeatedly, a plant keeps drawing on the energy stored in its roots to grow new leaves until the energy supply is exhausted and the plant dies.
The traditional approach to grazing has been to put animals in a pasture at the beginning of the season and let them stay there until they run out of feed. This approach is called set stocking, and it results in simultaneous overgrazing and undergrazing of plants in the same pasture.
The reason set stocking causes overgrazing and undergrazing at the same time is because critters are sort of like kids in a candy store. When they’re set stocked, they eat what they like the most and ignore the “flavors” they don’t like. Some plants are constantly being grazed, whereas others aren’t touched. Interestingly, the result of both overgrazing and undergrazing is the same: the plants lose energy and don’t perform at their peak potential. Ultimately, both scenarios can kill the plants.
By using managed grazing (which you may also see referred to as rotational grazing, management-intensive grazing, or planned grazing), you control the flock’s access and grazing time, thereby obtaining peak plant performance; this, in turn, results in peak animal performance. The trick to this is to subdivide your pasture into smaller pieces, known as paddocks, and to time your flock’s movements through the paddocks according to how the grass is growing.
Managed grazing is a complex skill that takes time to master, but the payoff is well worth the effort. Finding a mentor who uses managed grazing — even if it’s a cattle grazier — will hasten the learning process. Many states now have organized grazing groups, which your county Extension agent can help you find. The local office of the USDA Natural Resources Conservation Service can also be a valuable place to learn about managed grazing, and it may be able to help provide cost-share funding for installing needed fencing and watering systems.
Some forage plants, such as alfalfa, can’t stand the pressure of the continuous grazing that occurs in a set-stocked pasture, but they can survive hard grazing for short periods. Alternating paddocks allows these plants to compete. In fact, all desirable forage plants grow much better when they are grazed hard and then given a period of rest.
You’ll also find that managed grazing gets your sheep to eat better than they would on a set-stocked pasture. Sheep prefer not to feed continually in the same place. They like fresh pasture that hasn’t been walked on, and managed grazing keeps them on fresh pasture regularly.
Timing the flock’s movements. The key to managed grazing is time! There are ideal points for beginning and ending grazing (or mechanical clipping if the grass is getting too long but you’re not ready to bring the flock back around). By controlling your flock’s access to pasture through carefully timed movement, you can maintain growth between points C and B (see illustration on facing page).
Animals should be moved from a paddock before they’ve grazed off 50 to 60 percent of its forage, because most forage plants reach their maximum vigor and growth when no more than 60 percent of their leaf surface is removed during any grazing period. For example, if the sheep enter a paddock when the forage is 6 inches (15 cm) high, then they should be removed while at least 2.5 inches (6 cm) is left standing.
The last time-related issue to consider is the rest period. After you move a flock to another paddock, the one you’re leaving needs enough time to grow back to the starting height. The rest period varies by season. In early spring it may be as short as 7 to 10 days; in the height of summer, it may take 45 days.
During the spring, when the grass is growing rapidly, you can move the flock through the paddocks quickly and don’t need to worry about taking the full 50 to 60 percent of the forage each time. Just let the flock lightly graze 20 to 30 percent, then move them to the next paddock. Then in the latter part of the growing season, when the rest period is getting longer, slow down their movements between paddocks so they take the full 60 percent.
How well you can control these time factors depends primarily on how many paddocks you have available.
Paddock numbers. How many paddocks do you need? As paddock numbers increase, the time spent in each paddock decreases and the possible rest time before the paddock is regrazed increases. So, the answer is: as many as you can reasonably create. At the very minimum, shoot for four paddocks. Eight is even better, and 12 provides lots of flexibility and control through all kinds of conditions.
In the past, because of added expense and labor, fences for paddocks were often neglected, but with today’s modern electric fencing, there’s really no excuse not to create subdivided paddocks. These barriers don’t have to be as heavy or as high as perimeter fences — they also don’t need to be predator- or dog-proof. In fact, they can be created with temporary polywire and step-in posts. (See more about fencing on pages 116–122.)
PADDOCK NUMBERS VERSUS GRAZING PERIOD
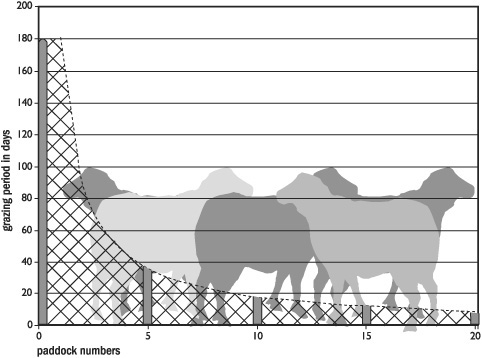
As the number of paddocks in a field increases, the time spent in each paddock, or grazing period (in days), decreases. For example, if a field is grazed for 180 days with all animals placed in at the beginning and removed at the end of the 180-day period, the grazing period is 180 days. Divide that field into two paddocks, and the grazing period drops to 90 days in each.
Orchards are a special class of pasture and are one of the favorites on small farms in humid areas. The sheep can make use of the shade in summer, and if a little care is exercised to prevent them from getting too much windfall fruit at a time, they can also make good use of the fruit.
The flock should never be turned into an orchard with unlimited access to the fruit. The sudden change in their diet can cause bloat and other health problems, some of which may be deadly. As a rule of thumb, if there are fewer than half a dozen pieces of fruit lying around per animal in the flock, you’ll see no problems. If the orchard floor is full of fruit, then pick up some and take it away. Gradually increase the amount you leave for the sheep over a week or so, because as they become accustomed to the fruit, they can eat quite a lot without adverse effects.
By subdividing the orchard with temporary electric fencing, as you would any other pasture, you can limit access to the amount of fruit the sheep can get at each helping and control the grazing as you would in any other paddock. On our Minnesota farm, we had a 1-acre (0.4 ha) apple and plum orchard that we subdivided into three paddocks with temporary fencing during the spring and fall.
Apples that are in good shape when they hit the ground can be stored and doled out well into the winter. If you opt to lamb in winter or early spring, you may be able to save them until lambing and give them to the ewes as treats in the lambing pens.
If you decide to graze an orchard, you need to think about the trees as well as the sheep. Any newly planted trees, and dwarf trees, must be completely protected by a rigid fence or the sheep will inevitably eat them. Even with larger trees, you’ll find an occasional sheep with goatlike habits, standing on its hind legs and nibbling the branches and leaves. Sheep that spend a long time in the orchard will start chewing on the bark of the trunks and can do a lot of damage if you don’t protect the trees, but if you’re treating the orchard as a paddock — or several paddocks — and moving the sheep through quickly, this isn’t a problem.
There are a couple of ways to protect your trees:
 Wrap the trunks with several layers of chicken wire or a single layer of rabbit wire. Use baling twine or wire to secure these temporary cages to the trees — don’t permanently attach them or you’ll damage the trees. If you want to do the work only once, use three T-posts formed in a triangle about 6 inches (15 cm) away from a trunk and construct a “fence” of wire mesh around the tree. These fences can stand for years.
 Another temporary solution is to make “manure tea” from sheep droppings and paint it on the trunks, but this needs to be repeated after it rains.
There are two basic kinds of fence you need to consider — the perimeter fence and interior fences. Because they serve different purposes, they are quite different beasts.
If you buy an old farm, the fences and buildings will probably need repairs. You can work on the buildings after you get the sheep, but the perimeter fences should be in good shape before you bring home your first sheep. Sheep quickly learn to jump sagging fences and to crawl through loose strands of barbed wire. One loose sheep in the neighborhood (and there’s usually more than one) can be quite a problem, and sheep in a garden, especially if it happens to be a neighbor’s garden, can be disastrous.
If you wait until sheep have the jumping habit, they may continue to jump the fence after it is repaired. One jumper can set a bad example and should be either sold or slowed down by temporary clogging. To clog, attach a piece of wood to one front ankle with a strap — it gets in the way just enough to prevent most jumpers from doing their thing.
Again, the best policy is to have at least your perimeter fences up, tight, and ready to do their job before your sheep arrive. The investment in time, money, and effort will more than pay for itself in sound sleep.
Fencing is a unique skill that takes time to master and is a book-length subject in its own right. There isn’t enough space in this book to do the topic justice, so if this is going to be your first fencing project, then I strongly recommend that you check out Gail Damerow’s Fences for Pasture and Garden. Gail has done a really great job on the topic in her book and includes all the information you’ll need on selecting materials, using the proper tools, construction tricks and techniques, and maintenance requirements. (See Resources.)
For perimeters, the fence should be at least 48 inches (1.2 m) tall and tight, with only small spaces between the fencing material. This type of an arrangement can be constructed from barbed wire, wooden rails, woven wire, and smooth electric wire (in either high- or low-tensile varieties), or a combination of several types.
Barbed-wire fencing. Invented in the mid-1800s, barbed wire had its place in history, but today, in the age of high-quality electric-fencing technology, barbed wire is the least desirable choice for containing sheep. For obvious reasons, you will find barbed wire difficult and unpleasant to use, and animals that get caught up in a barbed-wire fence can hurt themselves badly. Another problem with barbed wire is that making an effective perimeter requires at least six, and preferably eight, strands of wire and that’s a lot. By the time you build a barbed-wire sheep fence, you’ve spent a whole lot of money.
THREE TYPES OF FENCING FOR SHEEP
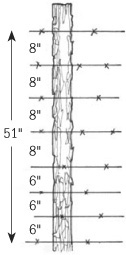
barbed wire
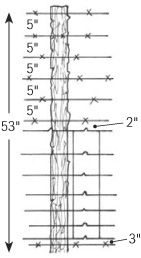
fencing and barbed wire
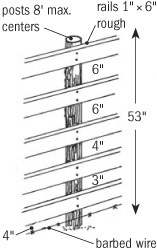
board fence with barbed wire at base
Wooden rail fences. An attractive option that can be constructed to keep sheep in, rail fences are unfortunately inefficient at keeping predators out. A barbed wire or electric wire can be run at the bottom of a rail fence to enhance predator control. Rail and other styles of wooden fencing should be constructed with the boards on the inside of the fence, so the sheep won’t loosen them. Posts also need to be close together, which is part of the reason that rail fences are the most expensive type of fence.
Woven-wire fences. The most common type of perimeter fence for holding sheep, at least for the bottom half, is woven wire. (The woven wire is usually combined with either barbed or electric wires at the top and bottom.) This type of fencing keeps the sheep in and helps keep predators out. It comes in different weights and styles, including a high-tensile version that isn’t damaged by ice, as is the common galvanized wire. High-tensile wire should last for 30 years or more and has the added benefit of being lighter, which is nice on the old bones when you’re building a lot of fence. The up-front cost pays for itself over the long haul. Woven wire needs to be stretched taut to perform correctly.
Smooth-wire electric fences. Smooth-wire electric fences are gaining popularity for all types of livestock operations. These fences are relatively easy to construct and do the job well. For sheep, a smooth-wire electric perimeter fence should probably be at least five strands tall — and the sheep must be trained to respect the electric wire before they’re first let out.
Because wool acts as an insulator, it’s easiest to train your sheep to electric fencing right after they’re sheared, but if you have no other choice than to train fully fleeced sheep, wet them down so their wool no longer acts as an insulator. Once the sheep receive a good shock, they will avoid the fence. Training is best done initially in a small pen that is well secured by panels or regular sheep fence surrounding the electric wire.
High-tensile wire can be stretched very tight without breaking, and the stretching creates an attractive fence. Low-tensile wire contains less carbon, which makes the wire softer and more prone to breakage. The low-tensile wires should actually be left with a little slack in them, so if animals run into the fence, it has some give — almost like an elastic band. The slack gives the low-tensile-wire fencing less eye appeal than the high-tensile variety, but it’s quicker and easier to install. The smooth wire for electric fencing that you find in regular farm-supply stores, hardware stores, and outlet/discount lumber facilities is generally low-tensile galvanized.
Temporary fences. Polywire and step-in plastic or fiberglass posts, or polynet, can be used to construct temporary fencing. Polywire is an electro-plastic twine that consists of strands of wire twisted with strands of polyethylene fibers. Actually, electroplastic fencing is available in a wire style, a cord style, and a tape style, and there are a variety of types on the market that vary by weight, size, color, and number of strands. Polywire (in all its varieties) doesn’t last forever, but the better-quality brands last much longer than the cheaper brands found in discount stores. In our experience, the cheap kinds become virtually useless in 3 to 5 years, whereas the better brands last about 10 years.
THREE STYLES OF TEMPORARY ELECTRIC FENCING
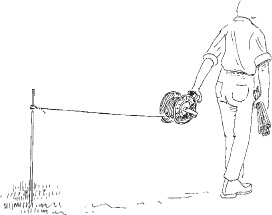
stringing single line wire
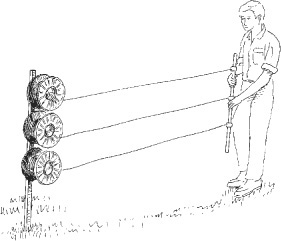
reel support post
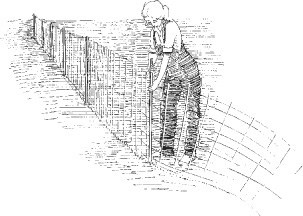
installing electroplastic net
Polynet is a great temporary fence alternative for sheep, especially if you want to move them into an area that isn’t well fenced on the perimeter. We always “mowed the lawn” in Minnesota — where lawns need mowing at least once a week in the summer — with some of our ewes and lambs in a polynet enclosure. These fences have built-in posts.
Soft steel cable is another alternative that’s especially attractive for semipermanent installations, such as lanes and permanent paddock subdivisions. This type of cable costs about the same as polywire or polynet, and it conducts electricity better. However, it kinks and breaks more easily if you take it down and put it up often.
Fences are only as good as the posts that hold them up, so it’s worth getting the right kinds of posts for the job. Permanent fences can be constructed by using wooden posts, metal T-posts, or a combination of the two.
Unless you happen to be blessed with an abundance of black locust or Osage orange trees on your land, it’s probably best to buy your posts. These two species of trees make almost indestructible fence posts that are known to last for decades without any treatment whatsoever. No other North American trees can compete. If you do want to try cutting your own posts from other species, you’ll have to cut, debark, dry, and treat them with chemicals if you want them to last for a long, long time.
When you purchase posts, look for ones that have been pressure treated. The chemical that seems to offer the most protection with the fewest negative side effects is chromated copper arsenate (CCA). No one knows exactly how long a CCA post lasts, but some of these posts have been in the ground since the 1930s and are still doing their job — so your posts will probably outlast you. A note on safety: Although CCA is one of the least toxic preservatives used to treat posts, it’s still a good idea to wear gloves when working with treated posts because some people are allergic to the chemical. Please be aware that if you want to be certifiably organic, you cannot use chemically treated posts.
Metal T-posts. Metal T-posts can be driven directly into the ground with a fence-post driver; just don’t get your hand between the driver and the post. I can attest to the fact that this is a very painful place for your thumb — and in my case it earned me a cast for six weeks. In spite of that caveat, T-posts are really great. When building a smooth-wire electric fence, attach the wire to the T-post with a plastic insulator.
Fiberglass and plastic posts. Posts that are made of fiberglass or plastic come in a step-in style (our strong preference) or a pound-in style. These posts are great for temporary fences. Fiberglass posts are readily available at farm-supply stores, but sunlight breaks down the fiberglass particles, so after a time you pick up painful fiberglass splinters. High-quality plastic posts are available from several of the catalog suppliers listed in the Resources section.
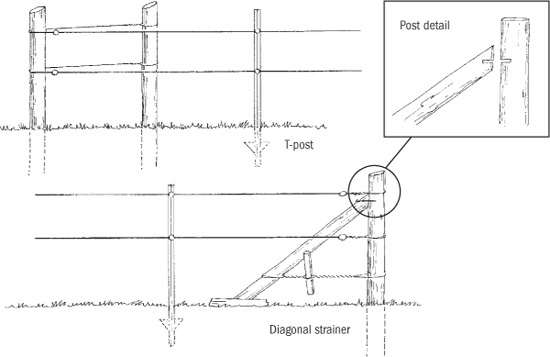
Corner posts are important for sturdy fence construction, especially on permanent fences. These are the most common styles of corner bracing.
(Redrawn from David Pratt, “Grounding Electric Fences,” Livestock and Range Report #914, fall 1991)
With the exception of really small enclosures, all permanent fences need to be constructed with well-braced and sturdy corners and ends. A good corner or end post is made with a wooden post that is at least 6 inches (15 cm) in diameter and braced by another wooden post that is at least 4 inches (10 cm) in diameter. For small enclosures, you can get away with unbraced 4- to 6-inch posts, as long as they’re deeply buried. Small enclosures can also be constructed with just T-posts, and T-posts make good corners and ends for temporary fences.
There are things that you’ve got to have to call yourself a shepherd: you, your sheep, some land, and some fences. Everything else — buildings, handling systems, farm equipment, and all the other odds and ends you think you might need to raise sheep — can be done without! That’s right — you don’t have to have a single building, you can get by without any handling structures, and you don’t need a whole bunch of fancy equipment. Don’t get me wrong — some facilities can make life easier for you and the sheep, and others become absolute necessities if you choose an intensive management approach, like winter lambing. But if your heart’s set on sheep, you can have them without having to spend a small fortune on fancy facilities.
So deciding what’s really necessary and important on your operation is a matter of choice. The choices are based on your goals. When deciding what you need, keep in mind the following questions:
 What’s your style of farming? (Are you trying to make a living as a commercial shepherd, or do you want to keep a dozen sheep for fun and mowing services?)
 How’s your financial health? (Do you have an outside job or a big trust fund, or are you relying on your sheep to make a profit?)
 How much time can you spend caring for your sheep? (Is your outside job 10 hours per week or 50? Do you have other obligations that will keep you away from the flock at certain times?)
On a sheep farm, barns generally meet two needs: storage for feed and supplies and a place for winter lambing. Therefore, whether you need any buildings at all depends primarily on the time of year you’ll be lambing.
For small flocks that lamb in late spring or early summer on pasture, no buildings are necessary. Grain and minerals for a small flock can be stored in large plastic or metal trash cans, which keep moisture and pests (for example, bugs and rodents) out. Remember that if feed is stored in cans, the lids must be fastened very securely. If the sheep gain unfettered access to feed, over-consumption can be fatal; keep the cans securely lidded and out of the sheep’s reach. Hay for a small flock can be stored under a tarp. Some folks who do pasture lambing use portable temporary structures or tepees.
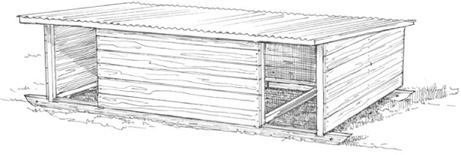
Portable structures provide flexibility and inexpensive shelter for sheep and lambs on pasture. Because sheep use the shelter only in bad weather, up to six ewes and their lambs can share one shelter.
This small sheep and lambing shed holds 30–36 ewes. It can be convenient for small-flock owners and even works well for larger flocks that are lambing on pasture. It has a separate room for feed and supply storage, as well as lambing pens, a creep-feeder area, and an open area for sheep to feed at a feed rack. (This shed is based on USDA plan #5919, which can be ordered from your county Extension agent or from the Superintendent of Documents, Government Printing Office, Washington, D.C.)
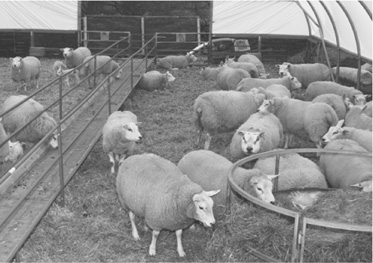
Hoop houses provide relatively inexpensive housing, as well as other advantages, such as improved air circulation and easy cleaning.
For large flocks that lamb on pasture, a small sheep and lambing shed comes in handy as a place to store feed and supplies and as a place to take care of sick or hurt animals. This type of structure provides flexibility for the shepherd. A design for a small lambing shed is available from the USDA plan service; this design works well for small- to medium-sized flocks that will be lambing during inclement weather.
Old farm buildings can often be remodeled to meet a shepherd’s needs, and inexpensive, alternative types of buildings are also gaining acceptance. For example, shepherds are beginning to use “hoop” houses (which are like a greenhouse made with plastic sheeting) or straw-bale structures instead of a conventional building. (Whether you’re thinking of constructing a new building or adapting an old one, check the Resources section for more information.)
A jug is a pen that’s used for one ewe and her lamb. Ewes lambing for the first time may be nervous or confused because of their lack of experience or underdeveloped maternal instincts; they should be alone in the jug with their lambs for at least 3 days until they become accustomed to the nursing lambs. Mature ewes may need to be alone with their lambs for only 1 day. After you’re confident that the ewe has bonded with her lamb, she can be sent to a pen with other ewes and their new lambs. The size of the groups depends on the age of the lambs. The older the lambs, the larger the group can be.
Some shepherds have their ewes lamb in the jug, while others use it immediately after the ewes have lambed. Ewes prefer a larger area for the actual lambing, where they can walk around freely before labor. One advantage of lambing in a jug as opposed to lambing on pasture is that it provides a confined space if help is needed for a difficult birth. In addition, good light is available for watching the ewe’s progress. However, lambing in jugs means that the bedding will be wet, and that can lead to chilling unless you promptly clean out the bedding and replace it. Because of the trend toward larger sheep, recommendations for jug size have been increasing. The larger pen is definitely better if you want to have the ewe confined in the jug for lambing.
The jug allows the ewe and lamb to bond without distraction, keeps the lamb from getting separated from its mother, and protects the lamb from being trampled by other sheep or becoming wet and chilled. Ordinarily, the new family is penned together for up to 3 days so they can be easily observed and treated if complications arise. Do not allow dogs or strangers to approach
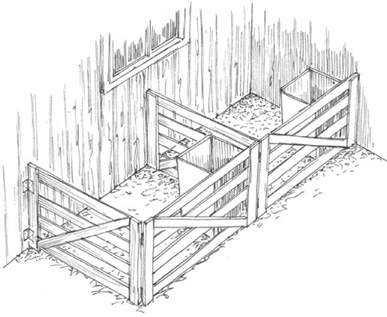
Lambing jugs are absolutely essential if you’ll be lambing indoors in the winter, but one or two of these small pens may even come in handy for pasture-lambing operations. In addition, they’re convenient for nursing any sick or injured animals.
the jug area, especially with nervous ewes. Frightened or nervous ewes can quickly turn a serene, protective environment into a “lamb blender,” with fatal results.
If the ewe lambs outside, it is not difficult to get her to the jugs nearby. Carry the lamb slowly, close to the ground so she can see it and follow. Since lambs do not ordinarily fly, the ewe will instinctively look for the lamb on the ground. If the lamb is raised more than a foot or so off the ground, the ewe may “lose” it and run back to where she dropped it. If this happens, you will need to go back and begin again. If the lamb calls out to the ewe along the way, she will normally follow readily. There are commercial “lamb cradles” and “lamb slings” available, which allow you to carry the newborn lamb inches off the ground as if it were a suitcase. Using these devices has the advantage of being easier on your back, with less distraction to the ewe from your humped-over appearance. From the ewe’s viewpoint, it will appear that the lamb has suddenly begun to follow you, and she will instinctively follow it.
Consider the lambing-barn environment. A healthy barn is clean, dry, and free of drafts but not warm. Drafty or warm barns can cause pneumonia in young lambs and sometimes in ewes. A closed barn without proper ventilation allows ammonia from fecal decay and urine to build up, which can irritate eyes and lungs, predisposing an animal to pneumonia and respiratory disease.
There are two approaches to maintaining a healthy barn environment. In the first method, the barn is cleaned out each day and a small amount of lime and fresh bedding are placed on the floor. The second approach is called the deep-bedding method, and it’s the one we prefer when any animals are kept in a barn. It not only provides a good environment for the critters, it cuts down on daily chores. (See box, “Maintaining a Healthy Barn Environment: The Deep-Bedding Method,” on page 128.)
Handling facilities are a wonderful resource for shepherds with small flocks and an absolute necessity for large flocks. They allow you to gather, sort, perform medical procedures, and shear your flock with a minimum of aggravation and with less chance of injury to you or your sheep. These facilities don’t have to be extravagant to be effective, but if you do invest in them, you’ll be happy you did.
Well-designed handling facilities consist of a gathering pen, a forcing pen, chutes, and sorting pens. All pens should be designed so that there are no sharp corners or right angles, and they should have at least one gate that is wide enough to drive a vehicle or tractor into. Long, rectangular pens with curved ends work better than circular pens, though either design will do.
Handling facilities can be either purchased as prefabricated panels that are connected to each other or permanently constructed on-site. The prefabricated models have the advantage of being portable, relatively lightweight, and flexible to meet changing needs (you can always buy more panels as your flock size increases), but they are rather expensive. The type that is constructed on-site doesn’t provide the same degree of flexibility, but it can be constructed for less cash outlay, especially if you use recycled building materials.
The gathering pen should be large enough to accommodate all the sheep you’ll ever have at one time, with lots of room to spare. We keep water tanks and salt blocks in gathering pens, and feed treats there, so the animals are accustomed to going right in. When we need to catch them, we simply place some treats out, wait until everybody’s in and chomping happily, and then close the gate behind them. In a home-constructed system, the gathering pen can be made out of woven wire, seven strands of smooth wire, or rails. A good size for gathering pens is 5 to 6 square feet (about 0.5 m2) per mature sheep and 3 to 4 square feet (about 0.3 m2) per feeder lamb. If the gathering pen is 12 feet (3.7 m) wide or narrower, you can reach sheep on either side of you with a crook when you’re standing in the center. Typically, the outer walls of all pens are 3½ to 4 feet (1 to 1.3 m) tall.
The forcing pen is used to confine smaller groups and, when necessary, to force them into chutes. For small flocks, forcing pens can also be used for collecting sheep for shearing or for placing them in sheep chairs for hoof trimming. The forcing pen should have solid sides and for on-site construction can be made out of plywood, metal, or boards. The forcing pen should be heavy duty, because the pressure of the sheep against the sidewalls can break down a poorly constructed wall.
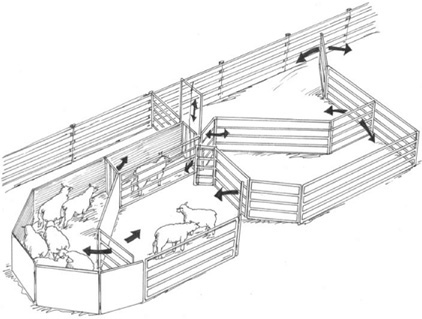
Good handling facilities can make your life a lot easier or even hasslefree. This design has several different holding pens for sorting animals and gates that move in either direction. If you place water tanks and salt or treats in holding pens on a regular basis, the sheep will be motivated to move in and out of the pens and are then fairly easy to catch in the pens when you need to work with them.
Chutes are used for medical treatment and sorting. A chute should also have solid walls, and it should be narrow enough to ensure that the sheep enter in single file. Gates can control ingress and egress from the chutes. For small flocks, a 15- to 20-foot-long (4.5 to 6.1 m) chute is adequate; owners of large flocks (more than 150 head) can benefit from increasing the chute length to 15 feet (4.5 m) per hundred animals. Like the forcing pen, chutes should be solid sided, but a 4-inch (10 cm) gap at the bottom allows air to circulate through the chute. The sidewalls of chutes can be 3 feet (0.9 m) high for most sheep, though for especially tall breeds, increasing the height of the walls slightly may be advisable.
Sorting gates and pens are designed to ease the job of dividing the sheep into groups. For example, running the flock through the system when it’s time to wean the lambs allows quick separation of ewes and lambs. The sorting gates should be lightweight and easy to use but strong enough to stop oncoming animals. Although gates can be made of wood, wooden gates are heavier and slower than steel or aluminum gates. The sorting pens can be constructed like the gathering pen, but internal fences that separate sorting pens can often be shorter — say, 3 feet (0.9 m) tall, which allows you to cross between two pens by hopping the fence.
For larger flocks, incorporating a scale into the handling facilities may be advantageous. Scales allow you to track production, assess feeding programs, and ensure honesty in transactions. A good scale built for use in a handling system is expensive, running in the thousands of dollars.
For small flocks, lambs can be weighed by making a sling out of plastic or burlap and using a hanging scale. Though hanging scales are economical, they are really practical only for weighing younger lambs. Some hanging scales are capable of handling the weight of larger animals, but for the shepherd, getting a full-grown ewe into a sling and then onto the scale is about as easy a job as Atlas had, lifting the weight of the world. It may be possible, but it’s probably not something you really want to do.
Restraining devices make it easier on you to handle sheep for medical purposes and foot trimming. For a very small flock — say, less than a dozen animals — you can probably get by without any restraining devices, but as the number of animals increases, the value of these tools increases exponentially. These devices run the gamut from high-dollar turning cradles that can be built into a handling facility to inexpensive gambrel restrainers.
Turning cradles and freestanding tilt tables are well suited to larger operations. In fact, with prices that run around $1,000, they’re impractical for smaller flocks. But the sheep chair, a really nifty invention that hasn’t been around as long as turning cradles or tilt tables, serves the same purpose for smaller flocks. Sheep chairs take advantage of the fact that sheep can’t right themselves when they’re on their rump (the same position that’s used for shearing). The chair hangs over the edge of a panel and adjusts to fit all sizes of sheep comfortably. Best of all, at less than $100, it is a viable option for shepherds who have smaller flocks.
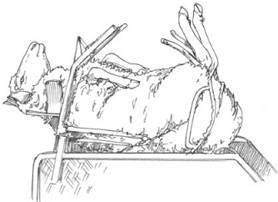
A turning cradle, or tilt table, is commonly used for foot trimming and veterinary procedures but is somewhat pricey for a small flock.
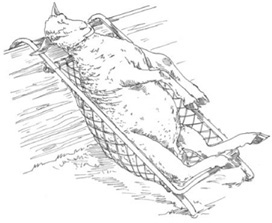
A more economical approach to restraint for small-flock owners than the turning cradle, the sheep chair immobilizes the sheep when it is “sitting,” which makes giving shots and trimming feet surprisingly easy.
A gambrel restraint is a plastic device that was invented in New Zealand. At less than $20, this is the least expensive restraining device and is a good one for owners of really small flocks. The gambrel restraint controls an animal by immobilizing its front legs. The bad news is that this restraining method can be tedious if you’re doing something to a bunch of sheep at the same time: for example, pregnancy checking the whole flock.
The only special feeding equipment that you really need for small flocks is a few rubber feed pans for feeding grain and treats and a slightly larger rubber pan for water. These pans are readily available from farm-supply stores and catalogs, are nearly indestructible, and are really inexpensive. If the water freezes in a pan during the winter, just turn it over and stomp on it.
As flock size increases, you can invest in a variety of specialized feed equipment that makes it easier for you to feed and more equitable for the less-assertive sheep in your flock. There are many designs for feed troughs and self-feeders. The Sheep Housing and Equipment Handbook of the MidWest Plan Service is a good source for plans (see Resources, page 403).
Creep feeders provide the opportunity for lambs to enter and eat all they want, but ewes cannot enter because of the size of the openings. The creep should be sheltered, with good, fresh water provided daily, and it should be well bedded with clean hay or straw. The heavy stems of alfalfa that are left uneaten in the ewes’ hayrack make good creep bedding. If the creep is in the barn, it should be well lighted, because that is the lambs’ preference, and they will eat better. Hanging a reflector lamp 4 or 5 feet (1.2 to 1.5 m) above it will attract the lambs. They can start using the creep when they are about 2 weeks old.
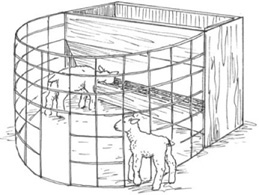
Creep feeders allow lambs to enter and get extra feed, while keeping larger animals out. This inexpensive design comes from the MidWest Plan Service (see Resources) and is fairly inexpensive to make.
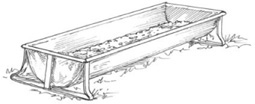
Using a feed trough for grain saves feed and cuts down on parasite problems. Feed troughs can be made at home or bought in a store and, happily, don’t cost a fortune.
A shepherd doesn’t have to have any tractors, planters, harvesters, or other heavy farm equipment. We have a small older tractor with a hydraulic bucket, a tiny manure spreader that is pulled behind an old three-wheeler, and a couple of small carts that also go behind the three-wheeler. Our most-used tool is a large two-wheel wheelbarrow. Our total equipment investment is under $6,000, and the tractor is a luxury!
Tractors and implements are expensive, require lots of maintenance, and depreciate in value. Over time, they may become worthless piles of rusted metal, parked along a fence line or off in the woods. Instead of purchasing farm equipment, you can lease machinery when you really need it or contract with a neighbor to do the work for you.