LET’S FACE IT: looking at line after line of crochet instructions can be pretty mind-blowing. If you don’t understand the terminology, it is difficult, if not impossible, to see what is supposed to happen on each round. But reading a line of crochet text is like reading a recipe. If you take time to understand the abbreviations (c = cup, T = tablespoon, t = teaspoon; ch = chain, dc = double crochet) and common techniques (sauté, dice; join, fasten off), you will get a sense of the construction without actually cooking (or stitching).
Like computer code, crochet instructions are meant to be interpreted bit by bit, line by line. (Or so I’m told. I have no clue about computer code.) What this means in our world of crochet is that crochet instructions use more-or-less standardized abbreviations for common terms, with punctuation marks to tell us when to pause, repeat, and continue, where to put each stitch, and what to do at the end of each round.
In this book, all standard stitches are defined in the glossary (page 264), and for ease of use, any special stitches or techniques are included at the beginning of each pattern.
For many crocheters, charts are the perfect alternative to line-byline instructions. Crochet charts offer a visual representation of the crocheted fabric; the chart looks like what you are stitching. It shows the shape of the finished item, which stitches are used, and the relationship of stitches to each other.
Each stitch or group of stitches has its own symbol, and each symbol bears a resemblance to the stitch itself. Once you learn the symbol for the common stitches, it’s like reading a book. If you know  stands for “double crochet,” and
  stands for “chain,” when you see
  , you’ll know it means “make 5 double crochet stitches in the chain-3 space.” Using charts and text together can usually clear up any ambiguity about where or how to create a stitch.
It is worth learning to read charts as your primary means of understanding a pattern, or at the very least as an adjunct to understanding line-by-line instructions.
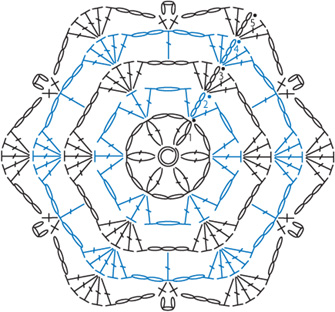
Note the sliding loop symbol in the center. Rounds alternate black and blue for ease of reading.
Poke, Wrap, Pull: You Can Do It!
Relax. You can do this! If you can hold the hook in one hand and yarn in the other, insert the hook somewhere, wrap the yarn over the hook, and pull it through whatever is on your hook, you can crochet anything.
Poke, wrap, and pull: It’s the combination of these three moves, in infinite variations, that creates crochet. Turn to the glossary (page 264) for basic stitch instructions. Start with some of the simpler motifs (labeled Quick & Easy), and take your time. Remember to breathe. Relax your shoulders. Ask experienced crocheters for help when you get stuck. Soon you’ll be crocheting anything you choose!
[ LEFTIES ARE SPECIAL ]
Ah, the trials and tribulations of being left-handed! Scissors don’t cut, the ergonomic computer mouse at work doesn’t fit your hand, and crochet patterns assume you crochet with your right hand. It’s lucky you are smart enough to know that usually when a crochet pattern says “right,” you think “left,” and vice versa. If you need to flip the images in the book for a better perspective, look at them in a mirror or scan the page and flip it on the vertical axis. You’ll do just fine!
While there are several different ways to begin a flat piece in the round, only two methods are needed for these patterns.
The chain ring, which most crocheters are familiar with, creates a sturdy, small circle with a set diameter around which to stitch your motif. The circle can be made as large as necessary to create an open center and to accommodate many stitches. On the other hand, it may not be a good choice if you want to have a very tight, closed center; there’s a limit to how small it can be.
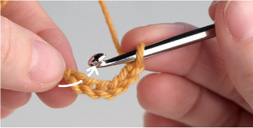
1. Beginning with a slip knot on your hook, chain the number of times indicated. Slip stitch into the first chain to form a ring.
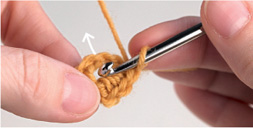
2. Work the first round’s stitches into the ring, rather than into the individual chain stitches that form the ring.
An alternative to the chain ring is the sliding loop. Some crocheters are familiar with the magic loop method of beginning a round; the sliding loop offers an extra measure of security for the tail. The sliding loop offers a variable diameter for the center ring, and it can accommodate quite a few stitches while still allowing the center to be closed tightly. It may take a few tries before the sliding loop becomes second nature, but it’s well worth the effort.
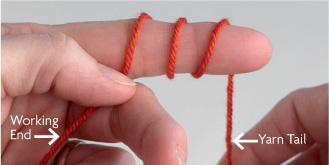
1. Wrap yarn clockwise around the non-dominant index finger two times to form a ring. (That’s the left index finger for right-handers and the right index finger for left-handers.)
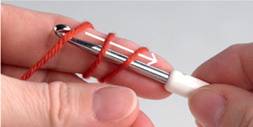
2. Holding the yarn tail between thumb and middle finger, insert the hook into the ring, grab the working end of the yarn, and pull it through the ring.
3. Chain the number of times required to begin the first round. Drop ring from finger.
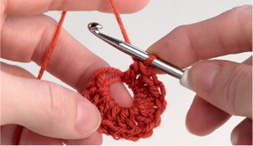
4. Work additional stitches into the ring to complete the first round.
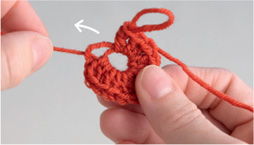
5. Before joining the first round, gently pull the beginning tail to partially cinch up the ring. You’ll find that one of the ring’s two strands tightens, while the other does not.
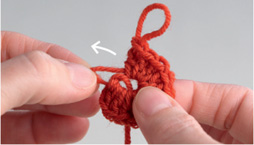
6. Now gently tug the tightened ring until you see the other strand getting smaller.
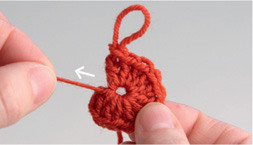
7. When that second strand is as tight as you want it, pull the tail again to close the ring. Some yarns stick more than others, but if you take care not to pull too hard on the tail at first, you can easily tighten both strands, one at a time. For some more slippery yarns, you may find that your initial tug on the tail tightens both loops.
When beginning a new round, most patterns instruct you to chain the appropriate number and then work the next stitch. Because crochet stitches are formed below the hook, this build-up chain (sometimes referred to as a turning chain, even when no turning is involved) allows the hook to reach the right height to work the first stitch of the next round.
The number of chains needed depends on the height of the stitch: 1 chain stitch for single crochet, 2 chain stitches for half double crochet, 3 chain stitches for double crochet, and so on. Many times, this chain replaces the actual stitch; the pattern will indicate if this is so.
If the new round begins with the yarn not already tethered to the current work, such as when you are starting a new color, there is no real reason to start the round with a chain. Because the hook can be held at any height you choose, you can just finish off the old color and begin stitching the round with the new yarn. While there’s no universally accepted name for this type of stitch — because, after all, it’s just a plain stitch — I think of it as a standing stitch. Standing stitches have the benefit of creating a perfectly invisible start to a new round.
Beginning with a slip knot on the hook and, treating that knot as an existing stitch, work the first stitch of the round in the regular way.
SINGLE CROCHET
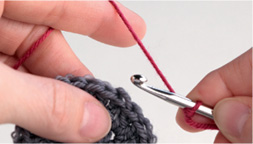
Insert the hook into the first stitch and pull up a loop, yarn over, and pull through 2 loops on hook.
DOUBLE CROCHET
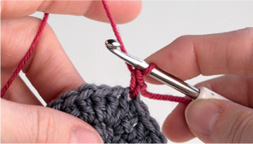
Make a yarn over before inserting the hook, and then proceed as you would for an ordinary double crochet stitch.
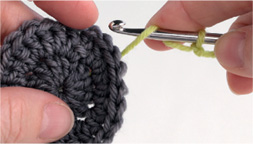
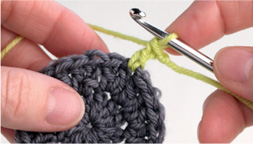
With this method, you’ll end up with a small knot just to the side of the first stitch; either hide it on the wrong side when weaving in your ends, or unknot it after you’ve joined the round.
Wrap the yarn around the hook from back to front to simulate a slip knot and any initial yarnovers: two times for single crochet, three for double crochet, and four for treble. In all cases, the first wrap will be dropped.
SINGLE CROCHET
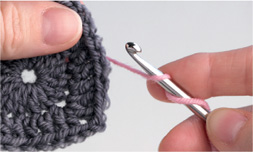
Insert the hook into the first stitch and pull up a loop, *yarn over and pull through 2 loops on hook.
DOUBLE CROCHET
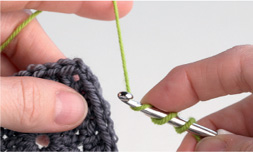
For double crochet, repeat from *. Note that the extra wrap you made in the first step serves as the yarn over you’re accustomed to making for a double crochet stitch.
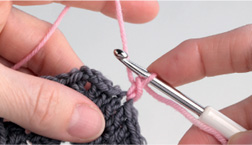
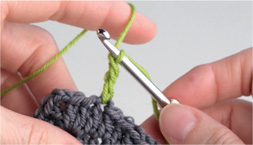
Let go of the remaining tail and unwrap it from around the hook, allowing it to hang loose at the back of the work. The top of the first crochet will be incomplete at this point.
When one round is complete, the last stitch must be joined to the first stitch to connect the stitches before beginning the next round. There are three types of end-of-round joins used in this book.
SLIP-STITCH JOIN
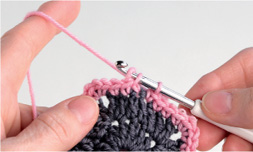
This is the most common join used in crochet. Simply insert the hook into the first stitch, yarn over, and pull through all the loops on the hook.
SHIFTING-END-OF-ROUND JOIN
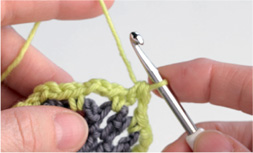
A single, half double, or double crochet is sometimes used as a joining stitch to move the end of the round to the right (or to the left, for left-handed crocheters). The joining stitch is used in place of a chain or chains to allow the new round to begin in the center of that space.
Since this join creates a completely invisible end to the round, it’s the best choice for the final join of the last round of the shape.
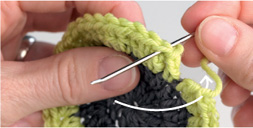
1. Complete the last stitch, but do not join it to the first stitch.
2. Cut the yarn, leaving at least a 4" (10 cm) tail, and pull up the loop on the hook until the yarn tail comes through the stitch.
3. Thread the tail onto a tapestry needle, and insert under both loops of the V at the top of the first stitch of the round; pull the yarn tail through. If you begin the round with a slip knot, you’ll be working over it.
4. Insert the needle from top to bottom back down into the V at the top of the last stitch of the round, and weave in the end.
WITH SLIP KNOT
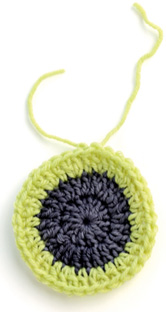
Logic dictates that for every piece of yarn used, two ends need to be secured. The best methods are invisible on the right side of the fabric, yet secure enough to ensure that the ends don’t work themselves out with handling. The ends may be worked in as the piece is stitched or woven in after it is complete, using a variety of methods. It’s fine to use a combination of methods, depending on what works best with the crocheted fabric. If you work over the tail while you are stitching, leave a bit of loose tail so you can go back later and weave it in the opposite direction for greater security.
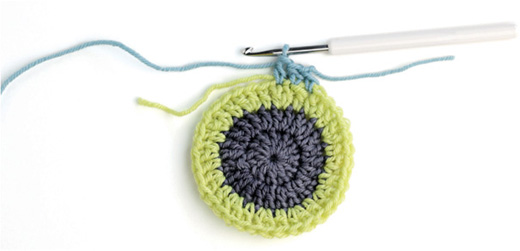
Working over a tail as part of the stitching
[ HIDING THOSE ENDS ]
• Don’t skimp on tail length — leave at least 4 inches (10 cm) to work with. Thicker yarn needs even longer tails.
• Weave in more than one direction — clockwise, counterclockwise, diagonally, horizontally, vertically.
• Weave in on the wrong side of the same color as the tail whenever possible.
Attitude Adjustment
Admittedly, this is not exactly a technique, but it might be the most important tip for weaving in ends. Instead of letting the Fear and Dread of Multiple Ends keep you from using all the colors of yarn you desire, think of the task as just another important step in making the best possible project you can. Consider the satisfaction you get from a just-mown lawn. The mowing itself might not be exciting, but the joy of turning a shaggy patch of grass into a tidy yard is worth the work. Play a mental game to see how many different and inventive ways you can hide the tail. Take pride in the tidiness and colorfulness of your amazing work!
Keep in mind the structure of the motifs and the fabric they will create when put together. Some motifs are lacy, while others are fairly solid, and yet others are three-dimensional. Many motifs have multiple characteristics. A fabric made of very thick, solid pieces might not be comfortable made into a garment because of its weight and lack of drape, though the same fabric might make a very comfy afghan. Just be sure that afghan is not too heavy to lift!
A motif with large open areas might work as a lovely lacy scarf, but it might be too holey and unstructured when combined with other similar motifs in a heavy yarn. In addition to the fiber used, the weight and diameter of the yarn and the hook used can create quite diverse looks for the same motif. Here is Motif 17 (see page 70) stitched in an assortment of yarns, beginning for comparison’s sake with the Shelridge Farm double-knitting-weight wool used to stitch all the book’s motifs.
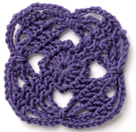
Dk weight: wool
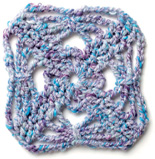
Worsted weight: slubbed cotton/acrylic/nylon/elastic
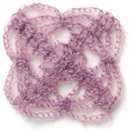
Dk weight: kid mohair/silk/metallic

Size 10 crochet thread: cotton
You will be happiest with your finished work if you choose a yarn that is well suited to your project. Natural fibers like wool, cotton, and alpaca — and blends using those fibers — work well for motif-based crochet because they can be blocked to hold their shape. Soft, flowing yarns like silk and bamboo may not hold their shape as well as wool. Acrylic and other fibers will work also, although care must be taken when blocking to avoid ruining the fabric. Generally speaking, use the best-quality yarn you can afford. If you are spending hours stitching, it’s worth the expense to be happy with the result!
Why Gauge Matters
Gauge is the number of stitches and rounds over a specified length. With motifs worked in the round, the gauge is most often given as the finished measurement of the motif over all rounds. Many crocheters simply ignore gauge and stick to projects where fit doesn’t matter. Nevertheless, gauge is an important piece of information. Of course, matching gauge in a pattern is important in order to make sure the project comes out to be the desired size. Matching gauge with a particular yarn ensures that the fabric you are making is similar in drape and appearance to the sample project. It is also a way to know that you will have enough yarn to finish the project.
Multicolored yarns may present a challenge when working motifs. Since part of the beauty of the motif is the way the combinations of stitches form shapes, any color shading that interferes with our ability to see those patterns will be less than successful. This interference is more likely to occur with yarns that have sudden color changes and relatively short stretches of color.
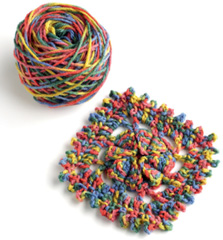
Short color-change yarn can obscure the motif.
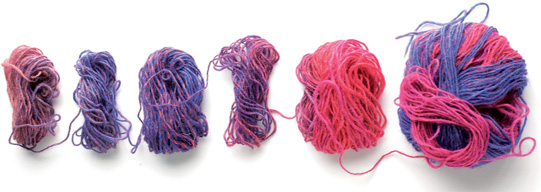
Before committing to a variegated yarn, study the yarn and make several swatches to ensure that the results will be intended. When working with a new ball of multicolored yarn, hand-wind the yarn into a center-pull ball, even if it already comes in a center-pull hank. That way, you can see how the colors progress: in what order the color changes and the lengths.
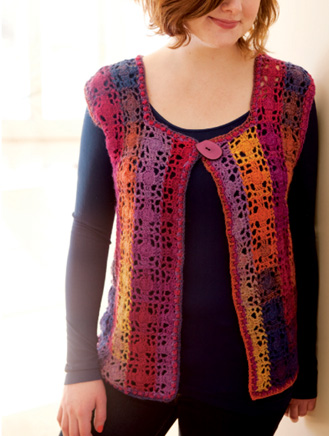
The Poet Vest (page 245)
You may even discover a color hidden in the middle of the ball that wasn’t apparent before you went exploring!
The Poet Vest uses a yarn that has long lengths of color that shade gradually from one color to the next. The size of the motifs was kept small to allow each motif to remain a single color. Careful attention to the order of stitching the blocks and their arrangement yields a fabric that optimizes the beautiful colorwork inherent in the yarn.
[ TIP ]
Hand-wind balls to see how the yarn’s color progresses before you stitch (see Hand-Winding Center-Pull Balls, below).
Yarns with longer color changes have design potential.
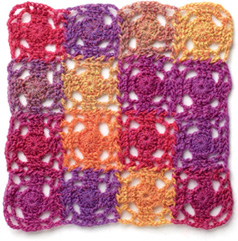
An alternative to optimizing the shading feature of a yarn is to create intentional randomness in the color arrangement. Even this seeming randomness, though, may take some planning to prevent unwanted pooling of colors. In the example below, the motifs were worked up to the last round, then a sufficient amount of yarn was pulled out to complete the motif.
The partial motifs were then placed in the desired arrangement and the final rounds worked with a join-as-you-go (JAYGo) method (see page 35) to complete the fabric.
Hand-Winding Center-Pull Balls
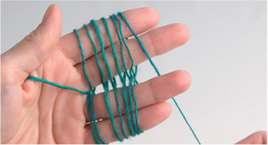
Hold the tail of the yarn in the crook of your thumb so that it rests on the back of your hand. Wrap the yarn several times in a figure 8 around your fingers, taking care that the strands lie parallel on your fingers.
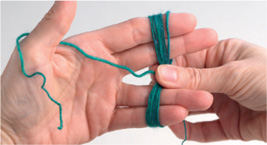
With your other hand, pinch the yarn where it crosses itself and then pull it from your fingers.
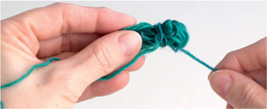
Keeping the tail free throughout, fold this little skein of yarn in half and begin wrapping additional yarn around it, taking care not to wrap too tightly. Continue wrapping yarn in various directions to create a ball; wrapping over the fingers prevents the yarn from getting too tight.
Color is a major component — perhaps the major component — in the success of a motif-based project. Color is powerful. Perhaps the colors on the cover of this book were the first thing to catch your eye and make you want to pick it up. Color is also very personal; we each perceive color differently and have different emotional responses to certain colors.
Volumes have been written on color theory; they are much more complete and in-depth than I need be. If you like, take time to study the tenets and terminology of color theory. Whether you follow the “rules” or go with your instincts, the most important thing to understand is that there is no “right” or “wrong” in choosing colors. Nevertheless, a few basic guidelines might help you select an appealing mix of colors for your project.
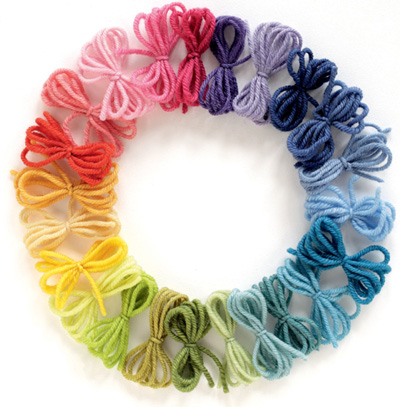
Choosing Colors without Theory
 Go outside. If you pay attention, you’ll see that Mother Nature has a plethora of beautiful color combinations.
 Look at projects others have made and choose colorways that appeal to you. Browse the Internet for a huge selection!
 Select a painting you like, and choose yarn colors based on that painting.
 Use online tools, such as Adobe’s Kuler or myPantone.
 Visit the paint section of your local home improvement store to see what color combinations are popular.
Experimenting with analogous colors . . .
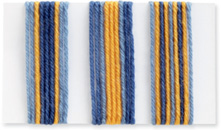
complementary colors . . .
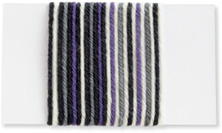
dark and light . . .
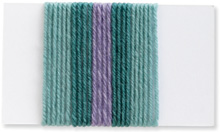
and the golden mean (see Classic Grannies).
The success of a colorway depends not just on hue (color) but on the value (darkness/lightness) and saturation (how much color or dye it has) of the colors, and on the proportions of the colors used.
Lighter values pop relative to darker values, but it is not always easy to determine color value just by looking. One way to determine value is to make a gray-scale photocopy (or a gray-scale scan or digital picture) of the yarns. Colors with lighter values will show up as light gray, while the darker values will appear black. If the yarns seem to be the same color on the gray-scale image, they are the same value.
Colors may be chosen to appear in equal amounts or in different proportions. You can test your ideas before stitching by wrapping the yarn around a piece of white cardboard. Wrap each color several times around a small piece of white cardboard, trying different color combinations and using more or less of some colors. See how different colors look when they are placed next to each other.
Nothing beats swatching to work out the best colorway for your project.

[ TIP ]
Try stitching the same motif over and over again, changing colors in different rounds, and in different orders.
You may follow the directions in this book to re-create the motifs shown exactly, but chances are that you will find yourself wanting to expand on these offerings. You may add rounds to make a shape bigger, or use elements of a design to go in a different direction to create your own custom-designed motif. Along the way, you’ll need to know a few things about creating shapes.
Circles, triangles, squares, hexagons, and octagons are formed by placing increases at equidistant points to create corners around a center point. A circle, of course, has no corners. Thus, its increases are evenly spaced around the center ring. Increases for triangles are made in three evenly spaced locations, for squares in four locations, and so on. The more corners or points a shape has, the closer to circular it appears, so an octagonal piece with rounded corners may appear more round than octagonal. Even hexagonal pieces may appear round. It’s just a matter of semantics and how you choose to attach that shape to others around it.
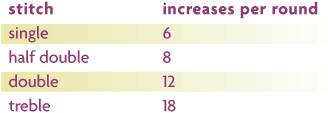
The number of stitches you need to increase on each round to keep the piece flat — not ruffled with too many stitches nor cupped with too few — depends on the height of the stitches in each round. It all has something to do with geometry, circumference, and π, but you really don’t have to know the details. What you do need to know is this: if all the stitches are the same height, follow these rules of thumb to determine how many total stitches need to be increased on each round:
The Golden Mean
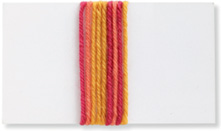
The golden mean refers to a mathematical concept, which in this context says there is a universally appealing proportion of about two-thirds to one-third. If you are using two colors for your project, make about two-thirds of it in one color and the remaining third in the other color.
For a three-color piece, make about one-third of the total in the first color, then divide the remaining two-thirds in three again, using the second color for one-third of that two-thirds (that is, 2/9), and the remaining color for the final two-thirds of the two-thirds (4/9). To use even more colors, make further subdivisions of that last two-thirds, using increasingly smaller amounts of the additional colors.
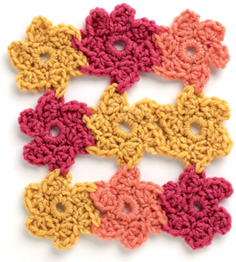
If the rounds contain stitches of different heights, or special stitches like popcorns and bobbles, you may need to play with the guidelines somewhat to figure out the correct proportions for your situation.
Not all motifs maintain the same shape throughout. A piece that begins as a circle can become a square. Hexagons can become circles. It’s all a matter of what the stitches are and how they are grouped. Even color can be used to make a motif appear a different shape than it really is.
It can be tempting to make a motif bigger by adding more rounds. This is a fine thought, but beware of a pitfall: as motifs grow beyond six rounds or so, the corners may not seem as crisp as they did on the first few rounds and may actually skew. This happens because each stitch is not always placed directly in line with the stitch below it. If skewing is a problem, it may be ameliorated by adjusting the corners to make them asymmetrical and thus get the sides of the shape back on track.
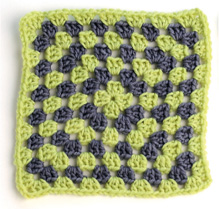
SKEWED
On this large square the corners appear to be twisting to the left.
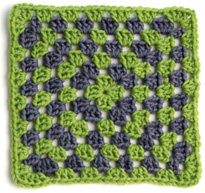
NOT SKEWED
The problem was solved by substituting (4 dc, ch 2, 2 dc) for the called-for (3 dc, ch 2, 3 dc) corners. This substitution may not be required for every round; you’ll have to experiment.
[ WAVES AND CURLS ]
Although most shapes are designed to lie flat, sometimes they start to misbehave. Try any combination of the following on one or more rounds to solve the problem.


Arranging pieces to create a fabric can be as much fun as the stitching and as easy as placing squares next to each other. Chances are, however, that you will want an arrangement that is a bit more interesting than that! The shape of the individual motifs and the type of finished product you are trying to create will help determine the arrangement and attachment of motifs. Think of all the different ways mosaic tiles can be arranged to create a picture, and you’ll start to imagine some of the possibilities for motif-based crochet.
Pieces can be joined along all adjacent sides, at the corners only, or with some combination of the two, as these pictures show. Motifs may touch at the corners, be aligned in straight rows and columns, or be offset by a half-drop or some other arrangement. Different sizes and styles of motifs can be used together.
Try mixing geometric shapes like triangles, squares, and hexagons. Consider using half or quarter motifs to fill in spaces. And don’t forget to use negative space — open air or the absence of a motif — as an effective design element.
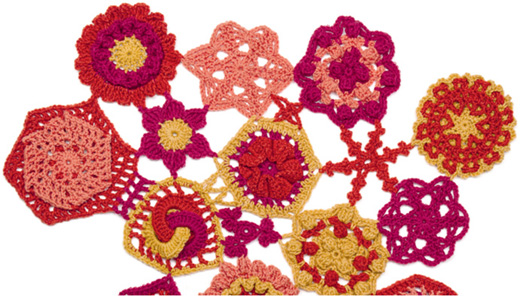
This join uses the first two rounds of Motif 73 as a filler.
Some motif arrangements make use of filler motifs, smaller motifs that join to existing motifs and fill in empty spaces left between larger motifs. These fillers are both decorative and functional, adding stability to the larger fabric.
The design of the filler motif should complement the motifs they join. Often a filler is made from the first round or two of the main motif, perhaps with additional chain corners added to reach out to the main motifs.
Other times a fraction of a motif is what you need. A half hexagon can fit into the edges of a hexagonal afghan to create straight sides. You’ll find examples of partial motifs in Motifs and Joins, but you can make your own partial motif to fit your needs.
To do so, you will work back and forth in rows, and these stitches will not be squeezed into place, as they are when worked in the round. They’ll try to spread out and you might find yourself wondering why you have five-eighths of a circle instead of a true half circle. To correct this tendency, create your partial motif with 1 to 3 stitches fewer per round than you might expect.
Plan a pleasing design ahead of time so that you don’t have to stitch all the pieces, rip out, and rearrange.
Think of the motifs as puzzle pieces that can be colored and arranged as you choose. Use graph paper and colored pencils to sketch color arrangements, or use a black-and-white photocopier to play with shape arrangements. You can make photocopies of the motif stitch charts, cut them out, and color them with markers or colored pencils. If you don’t have access to a printer or photocopier, just trace a motif, then cut out multiple copies and color them.
If you are willing to stitch several motifs — one of each colorway and/or shape that you plan to use — you can be even more accurate in your planning. Photograph or scan each motif individually to create a digital image of the motif. Print out one or more color copies of the motif(s), then cut them out to form a paper motif in the shape of the original.
Free-form
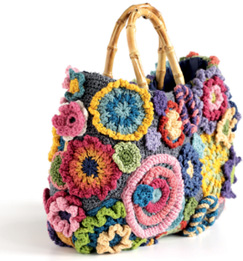
Free-form crochet is extremely popular, and for good reason. In free-form, you can follow your every whim, stitch any stitch in any direction, change colors, and allow yourself to break any self-imposed rules about what is right. Motifs are perfect for free-form crochet! Use just a round or two of any motif, or use the whole thing. Add additional rounds, even asymmetrical ones, to get your motif to fit with others. Save your “oops” motifs — those hexagons with only five corners — as free-form fodder. In free-form, it doesn’t matter if your square is lopsided!
Even black-and-white photocopies can help you visualize your final piece.
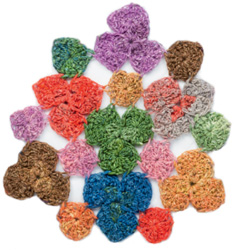
Now that you have colorful puzzle pieces, it’s time to play! Experiment with arranging the pieces by shape and color until you have a pleasing arrangement. Make additional paper motifs if necessary to get the number you need of each color. Once you are satisfied with your design, tape the pieces together to form a pattern template, or just take a picture or draw a sketch of the finished paper project.
You can even plan exactly which stitch to join in by looking carefully at your copied image. Can you identify the individual stitches on your paper pattern? You may find it easier to see if you use a black marker to add crochet stitch symbols (see inside back cover) on each pattern piece. Now, use a highlighter or colored pencils to mark the stitches that will be joined. Refer to your template as you work — and join — the motifs.
Irish Crochet
Traditional Irish crochet uses a steel hook, fine thread, and a variety of flower-and leaflike motifs. These motifs are joined with a crocheted mesh created with a combination of slip-stitch, single crochet, and double crochet stitches. You do not need to stitch traditional patterns to borrow these techniques.
For a modern variation of Irish crochet, use cotton crochet thread to make a number of motifs of your choice — they don’t have to be flowers or leaves. If you like, you may join some of the motifs to each other using the method of your choice. Cut out a paper or cloth template of the fabric shape you are trying to create. Pin the shapes in place, stretching each motif out to its full size. If you are using a cloth template, you may choose at this point to baste the shapes in place on the fabric. Using the same thread, begin filling the open spaces in the template with a crocheted mesh that joins the shapes to each other; take care to keep the motifs stretched out. When the mesh is complete, remove the pins or basting from the template, and block the finished piece. The Cottage Lamp Shade uses this technique.
For an even easier Irish crochet lookalike, simply create a mesh fabric in the size and shape of your choice (using any yarn or thread), then sew completed motifs onto the mesh in whatever design you wish.
