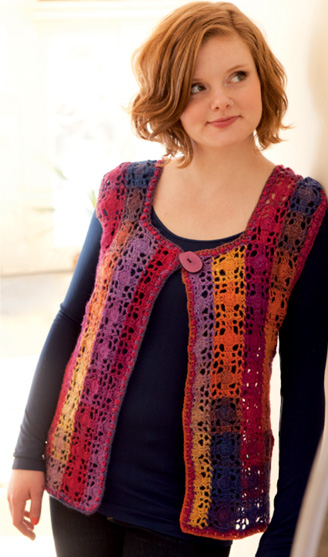
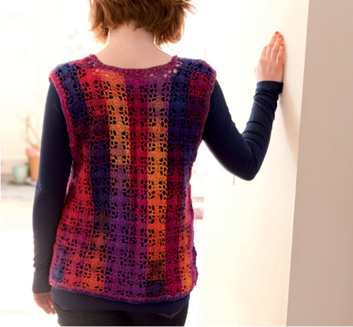
Long color changes in the yarn combine with simple JAYGo squares to create this unique vest. The stitching is easy-peasy, but read through all the instructions before beginning to gain a better understanding of the overall construction. If you like, omit the button and button loop and use a lovely shawl pin to close the front.
Sizes
Women’s Small (Medium, Large, X-Large, XX-Large); sample shown in size Medium
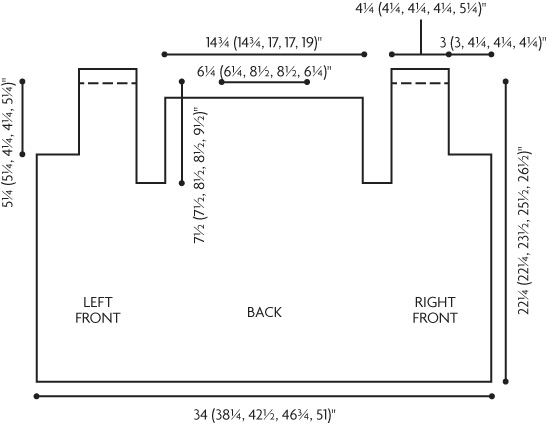
Finished Bust: 34 (38¼, 42½, 46¾, 51)"/86 (97, 108, 119, 130) cm
Finished Length: 22¼ (22¼, 23½, 25½, 26½)"/57 (57, 60, 65, 67) cm
Yarn
Wisdom Yarns Poems Sock, 75% superwash wool/25% nylon, 3.5 oz (100 g)/459 yds (420 m), 3 (3, 4, 4, 5) balls #955 Tropical Sunset
Hook
D/3 (3.25 mm) hook or size you need to obtain correct gauge
Gauge
Rounds 1–3 = 21/8" (5.5 cm), blocked
Other Supplies
One 1" (2.5 cm) button
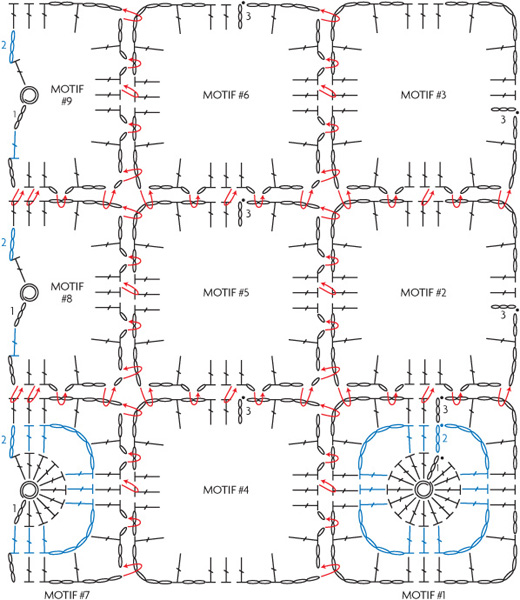
Begin with a sliding loop.
Rnd 1 Ch 3 (counts as dc), 15 dc in ring, join with slip st to top of ch-3 — 16 dc.
Rnd 2 Ch 3 (counts as dc), dc in next 2 dc, *ch 5, skip 1 dc**, dc in next 3 dc; rep from * around, ending last rep at **, join with slip st to top of ch-3.
Rnd 3 Ch 3 (counts as dc), dc in next 2 dc, *ch 2, (dc, ch 5, dc) in next ch-space, ch 2**, dc in next 3 dc; rep from * around, ending last rep at **, join with slip st to top of ch-3. Fasten off.
Begin with sliding loop.
Row 1 Ch 3 (counts as dc), 10 dc in ring, turn — 11 dc.
Row 2 Ch 3 (counts as dc), dc in next 2 dc, *ch 5, skip 1 dc, dc in next 3 dc; rep from * once more, turn.
Row 3 Ch 3 (counts as dc), dc in next 2 dc, *ch 2, (dc, ch 5, dc) in next ch-space, ch 2, dc in next 3 dc; rep from * once more. Fasten off.
BACK
Make one square (Motif #1). Make a second square through Rnd 2, then join to Motif #1 as follows:
Rnd 3 Ch 3 (counts as dc), dc in next 2 dc, *ch 2, (dc, ch 5, dc) in next ch-space, ch 2, dc in next 3 dc, rep from * once more, ch 2, dc in next ch-space, ch 3; joining to Motif #1, flat join in first corner space, ch 2, dc in same space, ch 1, flat join in adjacent space, ch 2, dc in next 2 dcs, flat join to adjacent dc, dc in next dc, ch 1, flat join, ch 1, dc in next ch-space, ch 2, flat join, ch 3, dc in same space, ch 2, join with slip st to top of ch-3.
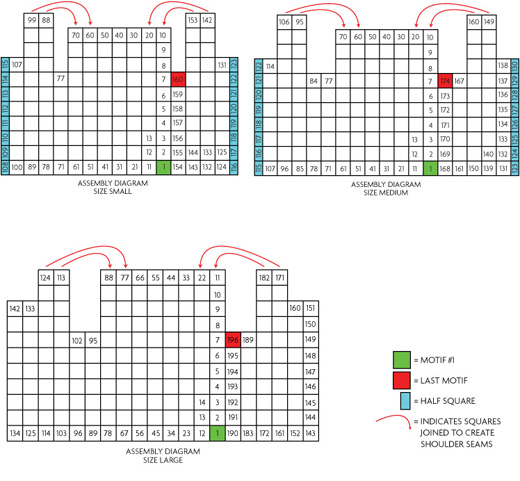
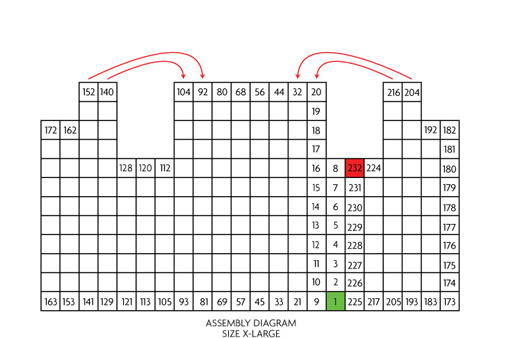
Referring to assembly diagram for your size (pages 249–250), continue in this manner to join additional squares in a column as indicated. Beginning again at lower edge of garment, join next square to Motif #1 as follows:
Rnd 3 Ch 3 (counts as dc), dc in next 2 dc, *ch 2, (dc, ch 5, dc) in next ch-space, ch 2, dc in next 3 dc, rep from * once more, ch 2, dc in next ch-space, ch 3, flat join in 2nd corner space of previous motif, ch 2, dc in same space, ch 1, flat join in adjacent space, ch 2, dc in next 2 dcs, flat join to adjacent dc, dc in next dc, ch 1, flat join in adjacent space, ch 1, dc in next ch-space, ch 2, flat join in adjacent corner space, ch 3, dc in same space, ch 2, join with slip st to top of ch-3. Fasten off.
Join next motif to two previous motifs as follows:
Rnd 3 Ch 3 (counts as dc), dc in next 2 dc, ch 2, (dc, ch 5, dc) in next ch-space, ch 2, dc in next 3 dc, ch 2, dc in next ch-space, ch 3; joining to last complete motif worked, flat join in first corner space, ch 2, dc in same space, ch 1, flat join to next adjacent space, dc in next 2 dcs, flat join to adjacent dc, dc in next dc, ch 1, flat join to next adjacent space, ch 1, dc in next ch-space, ch 2, flat join to adjacent corner space, ch 1; joining to Motif #2, flat join in corner ch-space, ch 2, dc in same ch-space of current motif, ch 1, flat join to adjacent space, ch 1, dc in next 2 dc, flat join, dc in next dc, ch 1, flat join, ch 1, dc in next space, ch 2, flat join to adjacent corner space, ch 3, dc in same ch-space, ch 2, join with slip st to top of ch-3. Fasten off.
Referring to assembly diagram for your size, continue in this manner to join motifs in order, working from the lower edge of the body, until you reach the end of the first ball of yarn, ending with a complete motif. (Do not change yarns in the middle of a motif.)
Notes: The vest body is worked in columns from the lower edge upward, beginning at the right underarm or right back. There are no seams. Motifs are joined as you work the final round of each square, creating a single fabric. Left front shoulders are joined to left back shoulders and right front shoulders are joined to right back shoulders as you work. The assembly diagrams show the order in which the motifs are worked and joined; refer to the one for your size frequently (see Assembly Diagrams below).
Motifs are joined to previous ones at corner ch-5 spaces, ch-2 spaces, and the center dc of each 3-dc group along the edge. Half motifs (if applicable) are joined at corner ch-5 spaces, ch-2 spaces, the center dc of the 3-dc group along the long edge, and in the first and last 2 dc along each short edge.
Instructions are given so that the color sequence in the garment remains as close to the way it appears in the yarn as possible. Read Starting a New Ball (page 248) for a better understanding of color changes.
Note: Before continuing, read this entire section.
Begin hand-winding a center-pull ball (see page 20) with the new yarn. As you are winding and you come to a section of yarn that is the same color as the last square worked on the vest, break the yarn. Set aside the hand-wound ball, and resume working the vest with the main ball of yarn. Note that some of the squares may be very similar colors; work in good light to make a good comparison of colors. If you use all of this ball of yarn, repeat with the hand-wound ball to make another color match.
Knots in the yarn or the inability to color-match on the last ball of yarn may require a shift in the color sequence. Make these transitions at the beginning of a vertical column if possible, but don’t worry too much if that is not possible. One or two color shifts will not be noticeable in the overall garment.
Continue working joined motifs as necessary to complete all squares through Motif #87 (94, 112, 139, 152). Join next square to previous square and to Motif #70 (70, 88, 104, 116). Continue working Left Front through Motif 98 (105, 123, 151, 165). Join next motif to two previous squares and to Motif #60 (60, 77, 92, 104).
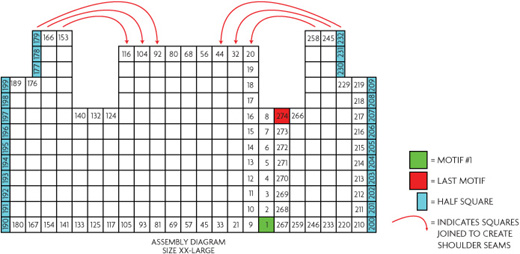
For XX-Large only: Work through Motif #176, then work two Half Motifs (177 and 178). Join next Half Motif to two previous squares and to half of Motif #92.
Continue working Left Front as shown in the assembly diagram through the Left Front edge.
The first series of motifs for the Right Front is worked independently of the Back and Left Front.
Work motifs or half motifs #116–153 (123–167, 143–189, 173–224, 200–266) as indicated on diagram, joining the next series of motifs to previous Right Front motifs, working Right Front, and joining shoulders as indicated on assembly diagram.
The final strip of squares joins the Right Front to the Back. Join Motif #154 (168, 190, 225, 267) to Motif #1 and Motif 143 (161, 183, 217, 259). Work remaining motifs according to the assembly diagram, joining each to the Back, the previous motif, and the Right Front.
Sc3tog (single crochet 3 stitches together) (Insert hook into next st and pull up a loop) three times, yarn over and pull through all 4 loops on hook.
Spike dc Yarn over, insert hook into stitch or space indicated, yarn over, pull up a loop to level of current round, (yarn over and pull though 2 loops on hook) two times.
Block body.
Note: Read all instructions before proceeding.
With RS facing, join yarn at lower edge of left underarm.
Rnd 1 Ch 1, sc evenly around, using the following guidelines: Place 1 sc in each dc; place 2 sc in each ch-space; place 2 sc in side of each row-end dc on Half Squares (where applicable); place 1 hdc in each center hole of Half Squares (where applicable); place extra scs in upper and lower front corners as necessary to allow edge to lie flat; join with slip st to first sc.
Rnd 2 Ch 1, sc in same space, *insert hook into next st and pull up a loop, (yarn over and pull through 1 loop) three times, yarn over and pull through both loops on hook, skip 1 st, sc in next st; rep from * around, omitting last sc, join with slip st to first st. In order to allow edging to lie flat at corners and to end at the end of a repeat, omit skipped sts as necessary at corners of Left and Right Fronts and skip additional sts as necessary at interior corners. Edging may be slightly rippled along straight edges at this point.
Rnd 3 Ch 1, *Spike dc in st below next sc, sc in next st; rep from * around, placing 3 sts in each corner of Left and Right Fronts, and working sc3tog at interior corners, join with slip st to first st. Fasten off.
Work as for Body Edging around each armhole opening.
With RS facing, join yarn on Right Front edge 5 sts below corner stitch. Ch 1, sc in same st and in next st; * do not turn; sc in left side of sc just made (the stitch just created has a vertical left leg); rep from * until loop is long enough to reach around button, slightly stretched; sc in same st and in next st on Right Front edge. Fasten off.
Sew button opposite button loop. Weave in ends. Block.