Rnds 1 and 4 A
 Rnds 2 and 5 B
  Rnds 3 and 6 C
QUICK & EASY 36
Rnds 1 and 4 A Rnds 2 and 5 B Rnds 3 and 6 C
This square is perfect for beginning crocheters. It can serve as the basis for many variations in color, textured stitches, and shape.
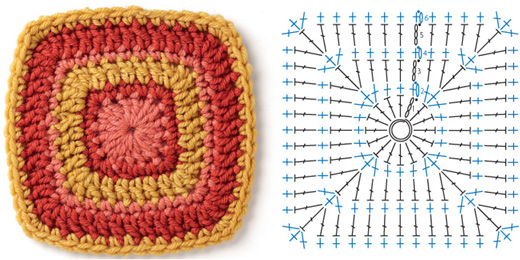
SQUARE: 4" (10 CM)
Begin with sliding loop.
Rnd 1 Ch 3 (counts as dc), 15 dc in ring, join with slip st to top of ch-3 — 16 dc.
Rnd 2 Ch 1, sc in same st, *sc in next 2 dc, 3 sc in next dc, sc in next dc; rep from * around, omitting last sc, join with slip st to first sc.
Rnd 3 Ch 3 (counts as dc), *dc in next 3 sc, 3 dc in next sc, dc in next 2 sc; rep from * around, omitting last dc, join with slip st to top of ch-3.
Rnd 4 Ch 1, sc in same st, *sc in next 4 dc, 3 sc in next dc, sc in next 3 dc; rep from * around, omitting last sc, join with slip st to first sc.
Rnd 5 Ch 3 (counts as dc), *dc in next 5 sc, 3 dc in next sc, dc in next 4 sc; rep from * around, omitting last dc, join with slip st to top of ch-3.
Rnd 6 Ch 1, sc in same st, *sc in next 6 dc, 3 sc in next dc, sc in next 5 dc; rep from * around, omitting last sc, join with slip st to first sc. Fasten off.
[ SC/DC ]
The concept behind this family is basic: alternating rounds of double crochet and single crochet. But look what can happen with this simple concept! From nicely striped squares to three-dimensional ruffles, the mind boggles at the possibilities, especially when you add in all the connection options available. Smooth straight edges are great for seaming, of course, but don’t stick with the expected; try a zigzag seam or other fancy connection. Try JAYGo before you reach the final round, or a complex filler motif.
37 Rnds 1 and 3 A Rnds 2, 4, and 6 B Rnd 5 C
Longer post stitches and spike stitches add an overlay of color on this variation.

SQUARE: 3½" (9 CM)
FPdc (front post double crochet) Yarn over, insert hook from front to back to front around post of stitch indicated and pull up a loop, (yarn over and pull through 2 loops on hook) two times.
FPtr (front post treble crochet) (Yarn over) two times, insert hook from front to back to front around post of stitch indicated and pull up a loop (yarn over and pull through 2 loops on hook) three times.
Spike sc Insert hook into stitch or space one or more rounds below next stitch and pull up a loop to level of current round, yarn over and pull through both loops on hook.
Begin with sliding loop.
Rnd 1 Ch 3 (counts as dc), 15 dc in ring, join with slip st to top of ch-3 — 16 dc.
Rnd 2 Ch 1, sc in same st, *3 sc in next dc, sc in next dc, FPdc in next dc, sc in next dc; rep from * around, omitting last sc, join with slip st to first sc.
Rnd 3 Ch 3 (counts as dc), dc in next sc, *3 dc in next sc, dc in next 5 sts; rep from * around, omitting last 2 dc, join with slip st to top of ch-3.
Rnd 4 Ch 1, sc in same st, *Spike sc in next corner st of Rnd 2, skip 1 dc, sc in next 2 dc, Spike sc in same corner st of Rnd 2, sc in same dc and in next dc, Spike sc in same corner st of Rnd 2, skip 1 dc, sc in next dc, FPtr around post of FPdc from Rnd 2, skip dc behind last st, sc in next dc; rep from *, omitting last sc, join with slip st to first sc.
Rnd 5 Ch 1, sc in same sc, *ch 1, skip 1 sc, sc in next sc, ch 1, skip 1 sc, (sc, ch 1, sc) in next sc, (ch 1, skip 1 sc, sc in next sc) three times; rep from * around, omitting last sc, join with slip st to first sc, slip st in next space.
Rnd 6 Ch 1, *(working over ch-1 space, Spike sc in free sc from Rnd 4, ch 1, skip 1 sc) two times, sc in next space, Spike sc in corner st from Rnd 4, sc in same space, (ch 1, skip 1 sc, Spike sc in next free st from Rnd 4) two times, ch 1, skip 1 sc, FPtr around post of FPtr from Rnd 4, ch 1, skip 1 sc; rep from * around, join with slip st to first sc. Fasten off.
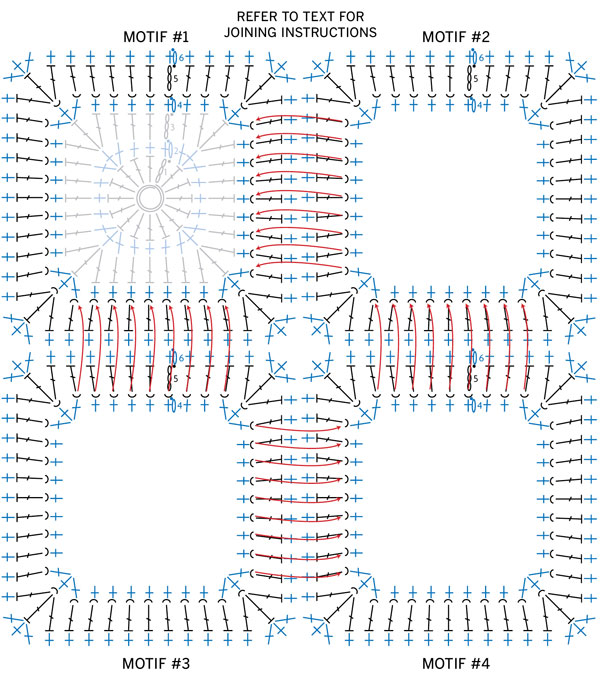
Motif 36
You might think a plain square like this means a plain join. You could, of course, just stitch the squares together or use a single crochet seam. Instead, why not try a JAYGo join that happens on the next-to-last round? This allows the edges of the motif to curl inward (intentionally!) to create a three-dimensional connection. You may find yourself experimenting with this technique on other I-thought-they-were-plain shapes.
Rnds 1–4 Work as for Motif 36 (page 110).
Rnd 5 (Joining Rnd) Work as for Motif 36, placing all sts into the front loops only. Beginning with the second motif, join the current motif to previous motif(s) in every stitch along the side edges, leaving the 3 dcs in the corner of each motif unjoined, as follows in the instructions below.

Rnds 1, 3, and 4 A or B Rnds 2 and 5 C Rnd 6 A
With WS together and RS of current motif facing, yarn over, insert hook through both front and back loops of current motif and through the free Rnd-4 loop of previous motif, yarn over and pull up a loop, (yarn over and pull through 2 loops) two times to complete dc; continue in this manner across the edge.
When all adjacent stitches are joined, continue working Rnd-5 dcs into the front loops only.
Note: If you prefer not to have the outside (nonjoined) edges pop up toward the front, work those edges into both loops on Round 5.
Rnd 6 Work as for Motif 36. Fasten off.
FEATURES:
 JAYGo
JAYGo
Connection on next-to-last round
Connection in adjoining stitches
Stitching through two motif layers
3-D appearance
38 Rnds 1, 3, and 5 A Rnds 2, 4, and 6 B
Here’s another way post stitches can be used to create a color pattern that lies on top of a background. Following the tips for keeping motifs flat (Creating Shapes and Waves and Curls), try making this one even larger by adding rounds of flat background stitches and dimensional post stitches.
FPdc (front post double crochet) Yarn over, insert hook from front to back to front around post of stitch indicated and pull up a loop, (yarn over and pull through 2 loops on hook) two times.
FPdtr (front post double treble crochet) (Yarn over) three times, insert hook from front to back to front around post of designated stitch and pull up a loop, (yarn over and pull through 2 loops on hook) four times.
Partial FPdtr (partial front post double treble crochet) (Yarn over) three times, insert hook from front to back to front around post of designated st and pull up a loop, (yarn over and pull through 2 loops on hook) three times.
Begin with sliding loop.
Rnd 1 Ch 3 (counts as dc), 15 dc in ring, join with slip st to top of ch-3 — 16 dc.
Rnd 2 Ch 1, sc in same st, *3 sc in next dc, sc in next dc, FPdc in next dc**, sc in next dc; rep from * around, omitting last sc, join with slip st to first sc.
Rnd 3 Ch 3 (counts as dc), dc in each st around, placing 3 dc in each corner st, join with slip st to top of ch-3.
Rnd 4 Ch 1, sc in same st, *FPdtr around post of FPdc 2 sts back and 2 rnds below, skip dc behind st just made, sc in next dc, (sc, FPdc, sc) in corner dc, sc in next dc, FPdtr around post of FPdc 2 sts ahead and 2 rnds below, skip dc behind st just made, sc in next 3 dc; rep from * around, omitting last sc, join with slip st to first sc.
Rnd 5 Rep Rnd 3.
Rnd 6 Ch 1, sc in same st, sc in next 3 dc, *FPdtr in corner FPdc 2 rnds below, skip dc behind st just made, 3 sc in next dc, FPdtr in same corner FPdc 2 rnds below, skip dc behind st just made, sc in next 4 dc, Partial FPdtr in FPdtr 2 sts back and 2 rnds below, Partial FPdtr in FPdtr 2 sts ahead and 2 rnds below, insert hook into next st and pull up a loop, yarn over and pull through 3 loops on hook to dtr2tog, ** sc in next 4 dc; rep from * around, ending last rep at **, join with slip st to first sc. Fasten off.
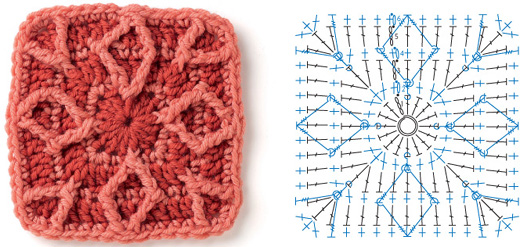
SQUARE: 4" (10 CM)
39 Rnds 1, 3, 5, and 6 A Rnds 2 and 4 B
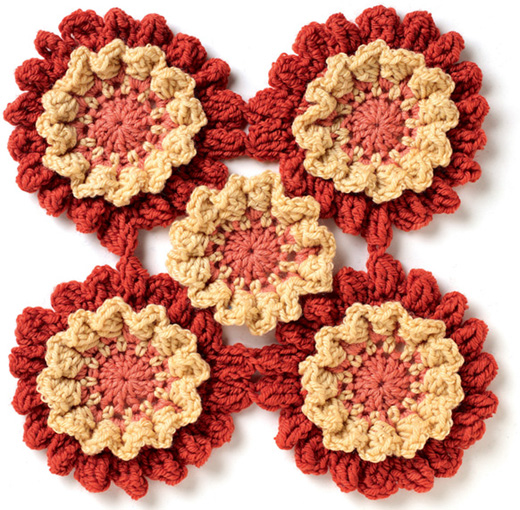
Unless you examine this one closely, you’d never know this is another variation of Motif 36! This one has evenly spaced increases, three-dimensional texture on Round 4, and petal-like clusters on the final round.
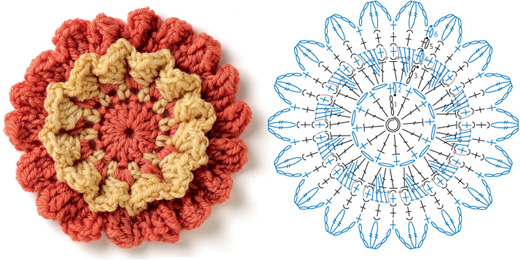
CIRCLE: 4¼" (11 CM)
BLsc (back loop single crochet) Work 1 single crochet into the back loop only.
FLsc (front loop single crochet) Work 1 single crochet into the front loop only.
FLtr2tog (front loop treble 2 stitches together) Work tr2tog into the front loops only.
Tr2tog (treble crochet 2 together) (Yarn over) two times, insert hook into indicated stitch or space and pull up a loop, (yarn over, pull through 2 loops) two times, (yarn over) two times, insert hook into same stitch or space and pull up a loop, (yarn over, pull through 2 loops) two times, yarn over and pull through all 3 loops on hook.
Begin with sliding loop.
Rnd 1 Ch 3 (counts as dc), 11 dc in ring, join with slip st to top of ch-3 — 12 dc.
Rnd 2 Ch 1, sc in same st, *ch 1, sc in next dc; rep from * around, join with sc to first sc.
Rnd 3 Ch 3 (counts as dc), 2 dc in space formed by joining sc, 3 dc in each space around, join with slip st to top of ch-3.
Rnd 4 Ch 1, FLsc in same st, *(hdc, 3 dc) around post of same dc, skip 1 dc, FLsc in next 2 dc; rep from * around, omitting last FLsc, join with slip st to first sc.
Rnd 5 Working into sts from Rnd 3, ch 1, BLsc in same st, *sc in next dc, BLsc in next 2 dc; rep from * around, omitting last BLsc, join with slip st to first sc.
Rnd 6 Ch 1, sc in same st, *ch 3, FLtr2tog in next st, ch 3, sc in next st; rep from * around, omitting last sc, join with slip st to first sc. Fasten off.
Motif 39
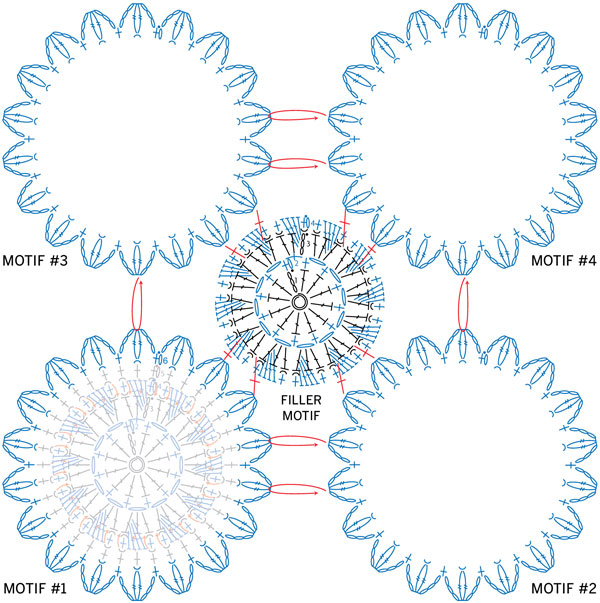
As we’ve seen before, connecting circular shapes in a grid pattern creates large spaces that need to be filled. Using just a portion of the main motif as a filler can be a wonderful way to create a coordinated fabric.
Referring to chart for joining locations, work four complete motifs, joining motifs on Round 6 with a flat join to tops of clusters.
FEATURES:
JAYGo
Flat join
Filler motif
Connection in adjoining stitches
3-D appearance
Rnds 1 and 3 A Rnds 2 and 4 B Rnds 5 and 6 C
Work Rnds 1 and 2 of Motif 39, then join the filler to the completed motifs on Rnd 3, using a single crochet join between the double crochet stitches, as follows:
Rnd 3 Ch 3 (counts as dc), 2 dc in space formed by joining sc, dc in next space, sc join to adjacent motif, 2 dc in same space, sc join to next point of adjacent motif, (3 dc in each of next 2 spaces, dc in next space, sc join to next motif, 2 dc in same space, sc join to next point of motif) three times, 3 dc in next space, join with slip st to top of ch-3. Fasten off.
Rnd 4 Work as Rnd 4 of Motif 39.
40 Rnd 1 A Rnds 2 and 4 B Rnds 3, 5, and 6 C
The fretwork look of this motif comes from using chain-spaces to open up the double crochet rounds. Single crochet rounds worked into these chain-spaces add color without overwhelming the lacy look.
Dc2tog (double crochet 2 together) Yarn over, insert hook into indicated stitch or space and pull up a loop, yarn over, pull through 2 loops, yarn over, insert hook into same stitch and pull up a loop, yarn over and pull through 2 loops, yarn over and pull through all 3 loops on hook.
Begin with sliding loop.
Rnd 1 Ch 3 (counts as dc), dc in ring, ch 1, *2 dc in ring, ch 1; rep from * four more times, join with slip st to top of ch-3 — 12 dc and 6 spaces.
Rnd 2 Ch 1, sc in each st and space around, join with slip st to first sc.
Rnd 3 Ch 5 (counts as dc and ch 2), *dc2tog over next 2 dc, ch 2**, dc in next dc, ch 2; rep from * around, ending last rep at **, join with slip st to top of first dc, slip st in next space.
Rnd 4 Ch 1, 3 sc in each space around, join with slip st to first sc — 12 sc-groups made.
Rnd 5: Placing dcs in between each group of 3-sc, ch 6 (counts as dc and ch 3), dc in same space between last sc and first sc, *ch 2, skip next 3 sc, dc in next space between 2 sc groups, ch 2, skip next 3 sc**, (dc, ch 3, dc) in next space between 2 sc groups; rep from * around, ending last rep at **, join with slip st to 3rd ch of ch-6.
Rnd 6: Ch 1, 5 sc in next space, 3 sc in next 2 spaces, *5 sc in next ch-3 space, 3 sc in next 2 spaces; rep from * around, join with slip st to first sc. Fasten off.
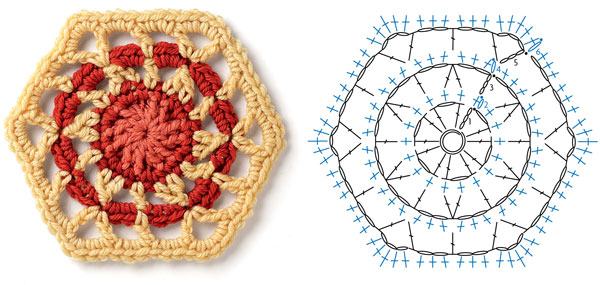
HEXAGON: 4¼" (11 CM)
41 Rnd 1 A Rnds 2, 4, and 6 B Rnds 3 and 5 C
Take the combination of double crochet groups alternating with chain-spaces in a different direction with this snowflake-like motif.
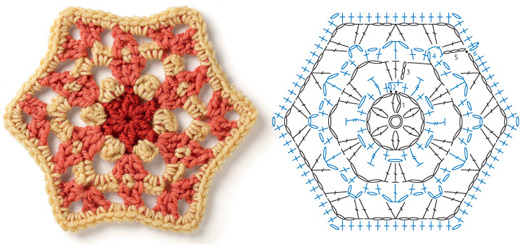
HEXAGON: 5" (12.5 CM)
Dc2tog (double crochet 2 together) Yarn over, insert hook into indicated stitch or space and pull up a loop, yarn over, pull through 2 loops, yarn over, insert hook into same stitch and pull up a loop, yarn over and pull through 2 loops, yarn over and pull through all 3 loops on hook.
Partial dc (partial double crochet) Yarn over, insert hook into stitch or space indicated and pull up a loop, yarn over and pull through 2 loops on hook.
Begin with sliding loop.
Rnd 1 Ch 2 (counts as Partial dc), Partial dc in ring, yarn over and pull through all 3 loops on hook to dc2tog, ch 2, *dc2tog in ring, ch 2; rep from * four more times, join with slip st to top of first cluster, slip st in next space — 6 clusters and 6 spaces.
Rnd 2 Ch 1, (sc, tr, sc) in same space, *ch 1, (sc, tr, sc) in next space; rep from * around, join with sc to first sc.
Rnd 3 Ch 3 (counts as dc), 2 dc in space formed by joining sc, ch 3, 3 dc in next space; rep from * around, ch 1, join with hdc to top of ch-3.
Rnd 4 Ch 1, (sc, ch 1, sc) in space formed by joining hdc, *ch 1, skip 1 dc, dc in next dc, ch 1, skip 1 dc**, (sc, ch 1, sc, ch 3, sc, ch 1, sc) in next space; rep from * around, ending last rep at **, (sc, ch 1, sc) in next space, join with dc to first sc.
Rnd 5 Ch 3 (counts as dc), (dc, ch 3, 2 dc) in space formed by joining dc, *ch 2, dc2tog over next 2 spaces, ch 2**, (2 dc, ch 3, 2 dc) in next space; rep from * around, ending last rep at **, join with slip st to top of ch-3.
Rnd 6 Ch 1, sc in each st around, placing 2 sc in each ch-2 space and (2 sc, ch 1, 2 sc) in each corner space, join with slip st to first sc. Fasten off.