INTRODUCTION TO
PEOPLE
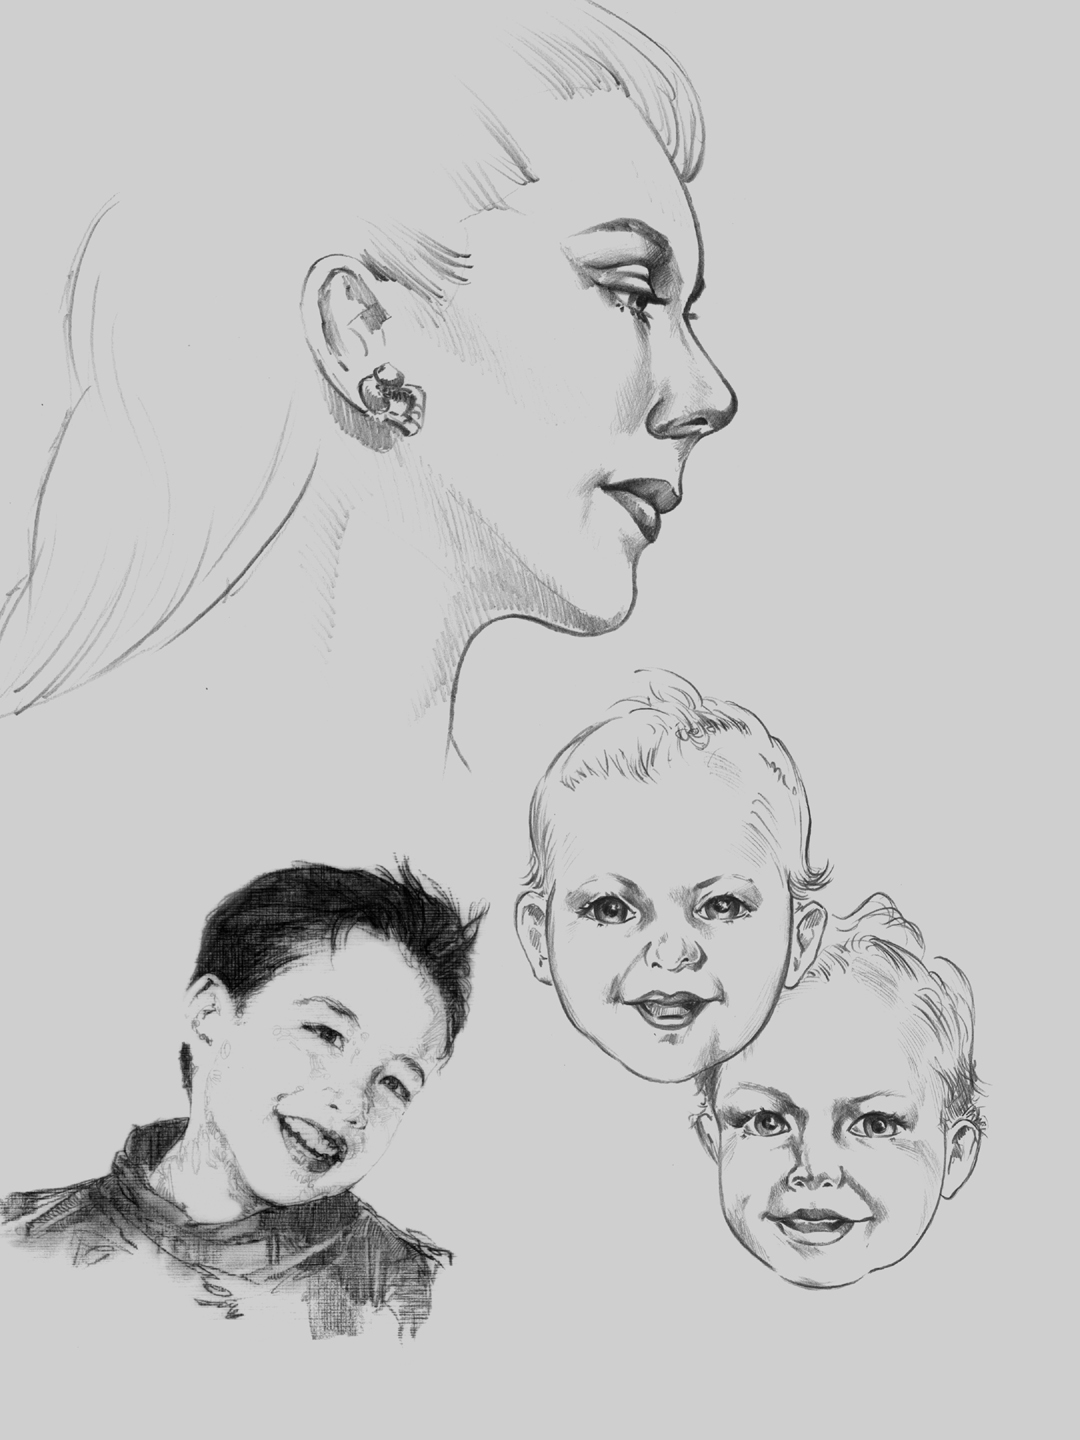
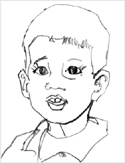
A good starting point for drawing people is the head and face. The shapes are fairly simple, and the proportions are easy to measure. And portraiture is also very rewarding. You can feel a great sense of satisfaction when you look at a portrait you’ve drawn and see a true likeness of your subject, especially when the model is someone near and dear to you. So why not start with children?
DRAWING A CHILD’S PORTRAIT
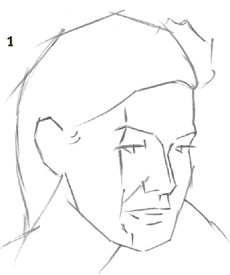
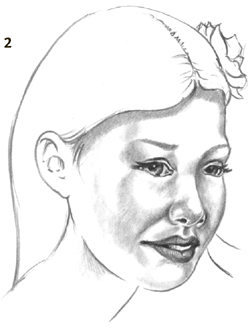
Once you’ve practiced drawing features, you’re ready for a full portrait. You’ll probably want to draw from a photo, though, since children rarely sit still for very long! Study the features carefully, and try to draw what you truly see, and not what you think an eye or a nose should look like. But don’t be discouraged if you don’t get a perfect likeness right off the bat. Just keep practicing!
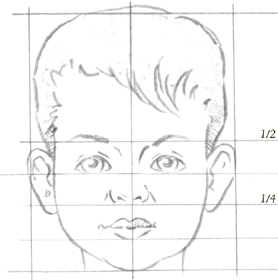
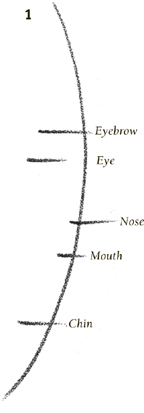
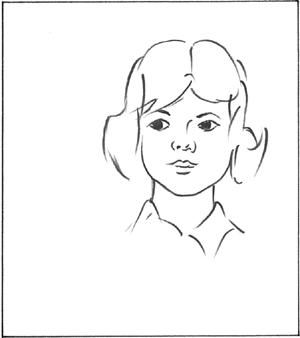
Understanding a Child’s Proportions Draw guidelines to divide the head in half horizontally; then divide the lower half into fourths. Use the guidelines to place the eyes, nose, ears, and mouth, as shown.
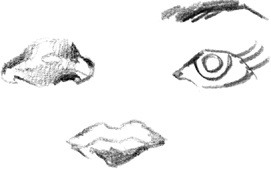
Separating the Features Before you attempt a full portrait, try drawing the features separately to get a feel for the shapes and forms. Look at faces in books and magazines, and draw as many different features as you can.
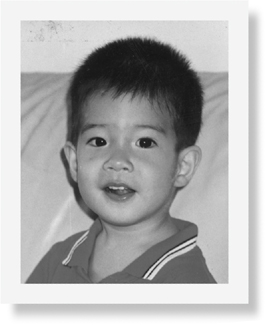
Starting with a Good Photo When working from photographs, some artists prefer candid, relaxed poses over formal, “shoulders square” portraits. You can also try to get a closeup shot of the face so you can really study the features.

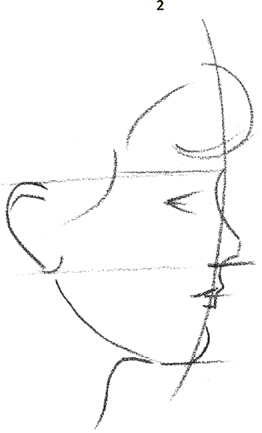
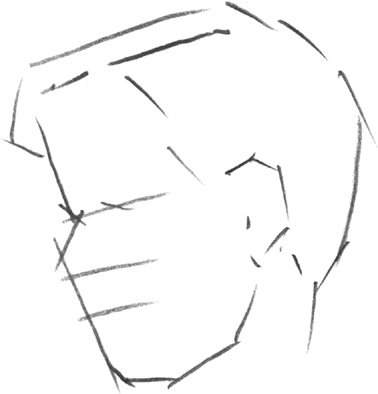
Sketching the Guidelines First pencil an oval for the shape of the head, and lightly draw a vertical center line. Then add horizontal guidelines according to the chart at the top of the page, and sketched in the general outlines of the features. When you are happy with the overall sketch, carefully erase the guidelines.
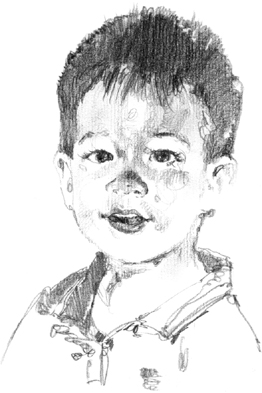
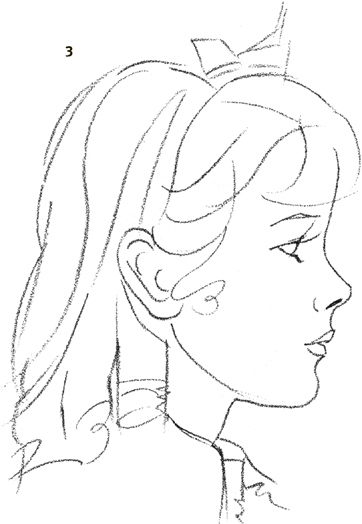
Finishing the Portrait With the side of my pencil, start laying in the middle values of the shadow areas, increasing the pressure slightly around the eye, nose, and collar. For the darkest shadows and the straight, black hair, use the side of a 2B and overlap your strokes, adding a few fine hairs along the forehead with the sharp-pointed tip of my pencil.
COMMON PROPORTION FLAWS
Quite a few things are wrong with these drawings of this child’s head. Compare them to the photo at left, and see if you can spot the errors before reading the captions.
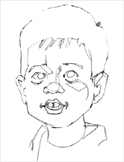
Thin Neck
The child in the photo at left has a slender neck, but not this slender! Refer to the photo to see where his neck appears to touch his face and ear.
Not Enough Forehead
Children have proportionately larger foreheads than adults do. By making the forehead too small in this example, I’ve added years to the child’s age.
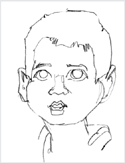
Cheeks Too Round
Children do have round faces, but don’t make them look like chipmunks. And be sure to make the ears round, not pointed.
Sticks for Eyelashes
Eyelashes should not stick straight out like spokes on a wheel. And draw the teeth as one shape; don’t try to draw each tooth separately.
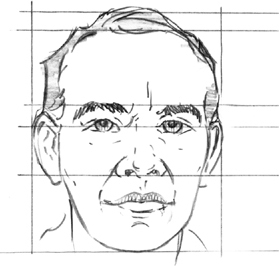
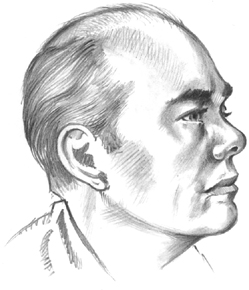
An adult’s head has slightly different proportions than a child’s head (see page 122 for more precise adult proportions), but the drawing process is the same: sketch in guidelines to place the features, and start with a sketch of basic shapes. And don’t forget the profile view. Adults with interesting features are a lot of fun to draw from the side, where you can really see the shape of the brow, the outline of the nose, and the form of the lips.
Art by William F. Powell
Focusing on Adult Proportions Look for the proportions that make your adult subject unique; notice the distance from the top of the head to the eyes, from the eyes to the the nose, and from the nose to the chin. Look at where the mouth falls between the nose and the chin and where the ears align with the eyes and the nose.
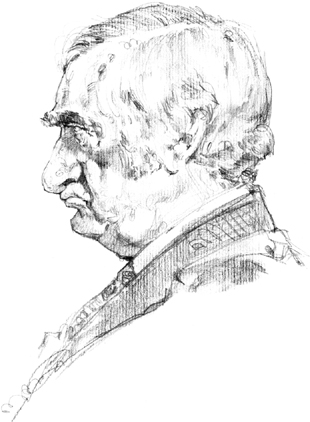
Drawing the Profile Some people have very pronounced features, so it can be fun to draw them in profile. Use the point and the side of an HB for this pose.
EXPRESSING EMOTION
Drawing a wide range of different facial expressions and emotions can be quite enjoyable, especially ones that are extreme. Because these are just studies and not formal portraits, draw loosely to add energy and a look of spontaneity, as if a camera had captured the face at just that moment. Some artists don’t bother with a background, as they don’t want anything to detract from the expression. But do draw the neck and shoulders so the head doesn’t appear to be floating in space.
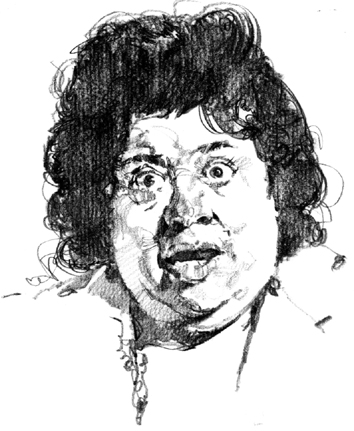
Depicting Shock When you want to show an extreme expression, focus on the lines around the eyes and mouth. Exposing the whole, round shape of the iris conveys a sense of shock, just as the exposed eyelid and open mouth do.
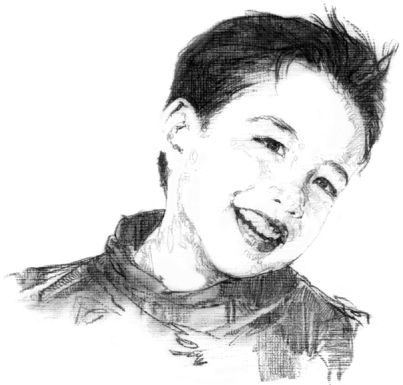
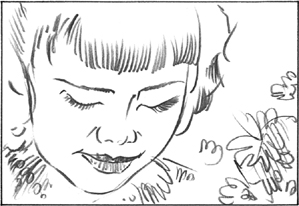
Portraying Happiness Young children have smooth complexions, so make the smile lines fairly subtle. Use light shading with the side of your pencil to create creases around the mouth, and make the eyes slightly narrower to show how smiles pull the cheek muscles up.
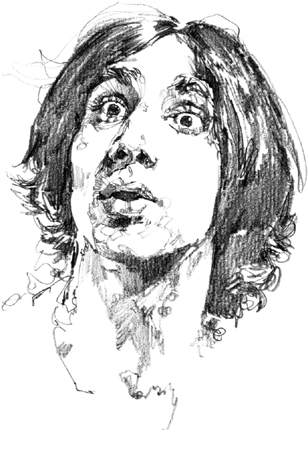
Showing Surprise Here a lot of the face has been left white to keep most of the attention on the eyes and mouth. Use the tip of the pencil for the loose expression lines and the side for the mass of dark hair.
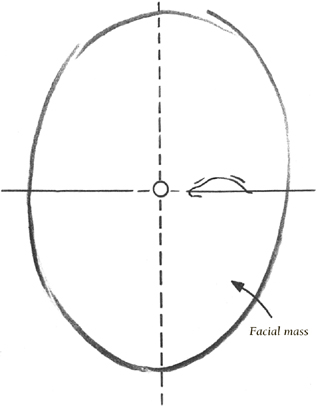
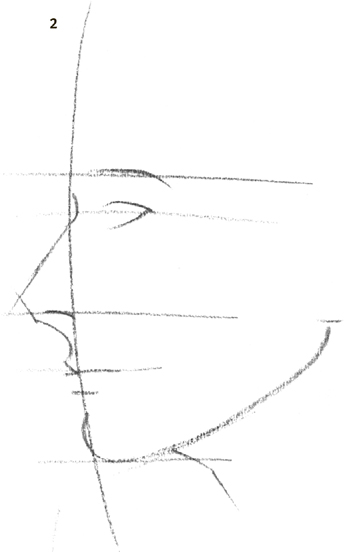
Learning proper head proportions will enable you to accurately draw the head of a person. Study the measurements on the illustration at right. Then draw a basic oval head shape, and divide it in half with a light, horizontal line. On an adult, the eyes fall on this line, usually about one “eye-width” apart. Draw another line dividing the head in half vertically to locate the position of the nose.
Placing Facial Features The diagram below illustrates how to determine correct placement for the rest of the facial features. Study it closely before beginning to draw, and make some practice sketches. The bottom of the nose lies halfway between the brow line and the bottom of the chin. The bottom lip rests halfway between the nose and the chin. The length of the ears extends from brow line to the bottom of the nose.
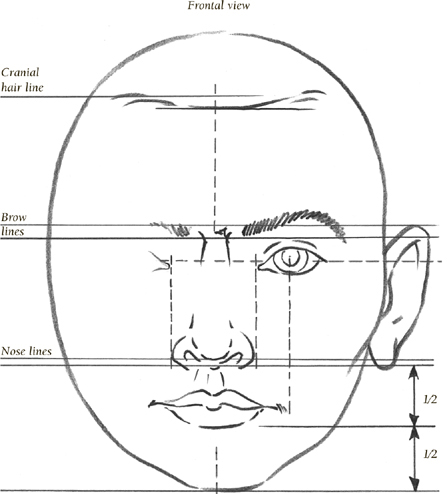
The bottom lip rests halfway between the nose and the chin.
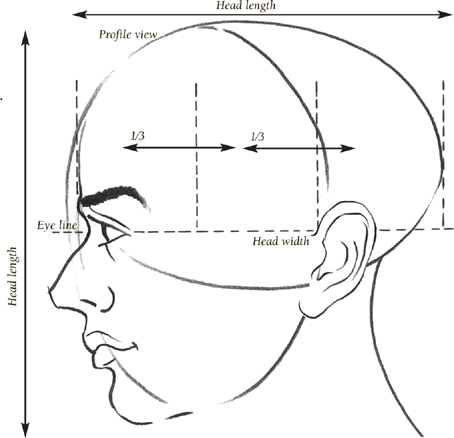
Looking at Profile Proportions The horizontal length of the head, including the nose, is usually equal to the vertical length. Divide the cranial mass into thirds to help place the ear.
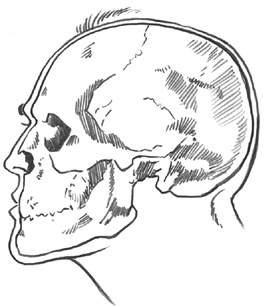
Skull inside human head
Recognizing Bone Structure The drawing above illustrates how the skull “fills up” the head. Familiarizing yourself with bone structure is especially helpful at the shading stage. You’ll know why the face bulges and curves in certain areas because you’ll be aware of the bones that lie underneath the skin.
Three-quarter view of skull
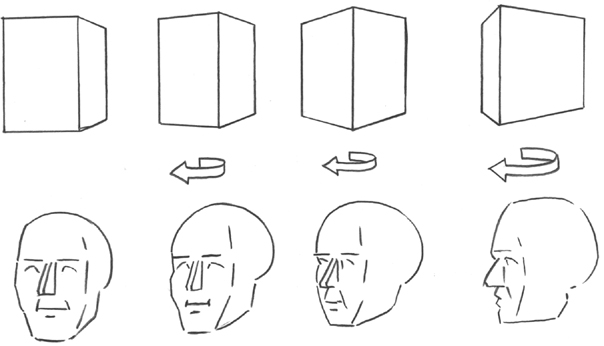
The boxes shown here correlate with the head positions directly below them. Drawing boxes like these first will help you correctly position the head. The boxes also allow the major frontal and profile planes, or level surfaces, of the face to be discernable. Once you become comfortable with this process, practice drawing the heads shown on this page.
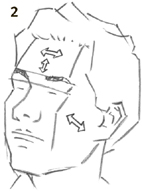
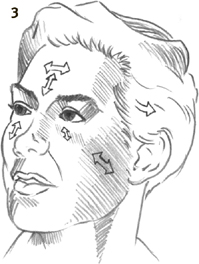
Your shading strokes should follow the arrow directions to bring out the contours of the face.

Keep all guidelines very light so they won’t show in your actual drawing.
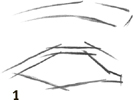
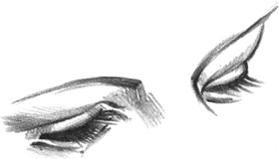
The eyes are the most important feature for achieving a true likeness. They also reveal the mood or emotion of the person you are drawing. Study and practice the diagrams showing how to block in frontal and profile views of eyes. Notice that with the profile, you don’t begin with the same shape as with the frontal view.
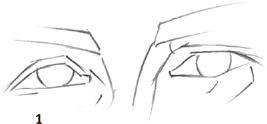

Even if the rest of the features are correct, if the eyes aren’t drawn correctly your drawing won’t look like your subject.
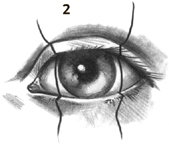
A person’s eyes are rarely symmetrical. Look for the subtle differences in each eye to achieve a real likeness.
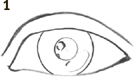
Outside eye contours (front)
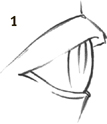
Outside eye contours (profile)
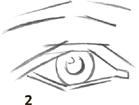
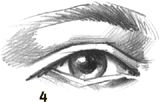
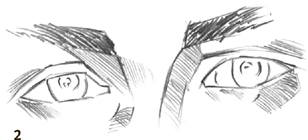
Pay particular attention to the highlights in the eye. They bring life and realism to the drawing.


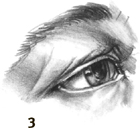
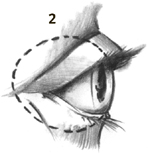
A three-quarter angle view can generate a totally different mood, especially if the eyes aren’t completely open.
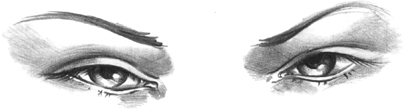
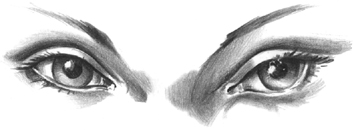
Eyebrows also play an important part of facial expression. They can be bushy or thin, arched or straight. Study your subject’s eyebrows carefully.
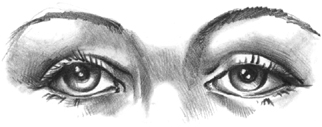
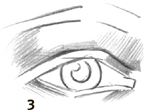
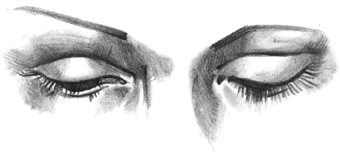
Shading the Eyes Shade delicately around the eyes, but make your strokes dark enough to show the eyes’ depth and indentation into the face. Very sharp pencils are best for filling in the creases and corners around the eye. These tiny areas (which don’t get much light) should be very dark, gradually getting lighter as you shade away from the eye to bring out the contours of the face.
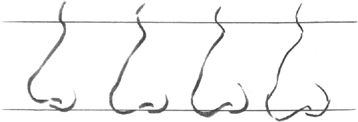
Noses can be easily developed from simple straight lines. The first step is to block in the overall shape, as illustrated by the sketches below. Smooth out the corners into subtle curves in accordance with the shape of the nose. (A three-quarter view can also be drawn with this method.) Then, once you have a good preliminary drawing, begin shading to create form.
Profile view
Frontal view
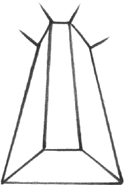
Upward view
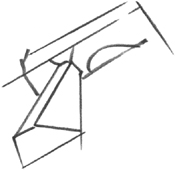
Upraised three-quarter view

The tip of the nose usually slants upward.
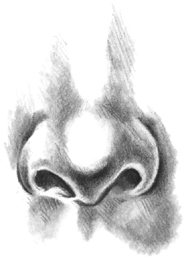
Shading the Nostrils The nostrils enhance the personality of the nose, as well as the person. Make sure the shading inside the nostrils isn’t too dark or they might draw too much attention. Men’s nostrils are generally angular, while women’s nostrils are more gently curved. Observe your subject closely to ensure that each feature of your drawing is accurate.
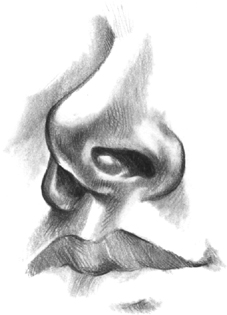
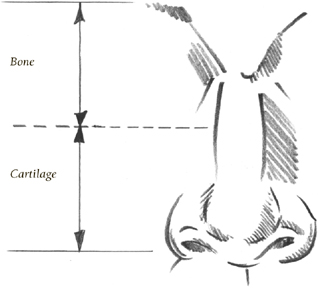
The lower portion of the nose is made of cartilage, while the upper portion is supported by bone. The tip of the nose also usually has a slight ball shape.
Process of an aging nose
Observing Aging The diagram to the right illustrates how the nose changes as a person ages. In many cases, the tip begins to sag and turn downward. All of these details are important for producing a realistic work.
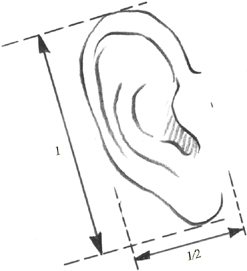
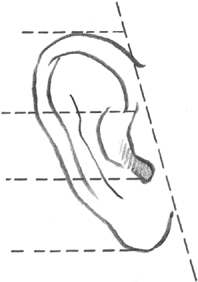
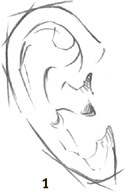
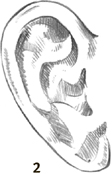
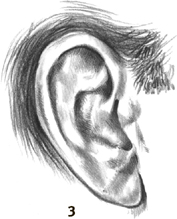
Rendering Ears Ears usually connect to the head at a slight angle. To draw an ear, first sketch the general shape, and divide it into thirds, as shown above. Sketch the “ridges” of the ear with light lines, studying where they fall in relation to the division lines. These ridges indicate where to bring out the grooves in the ear; you should shade heavier inside them.
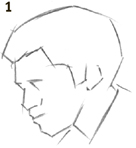
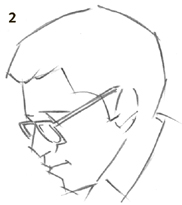
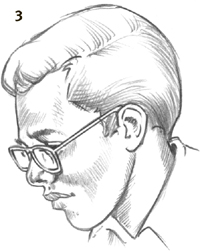
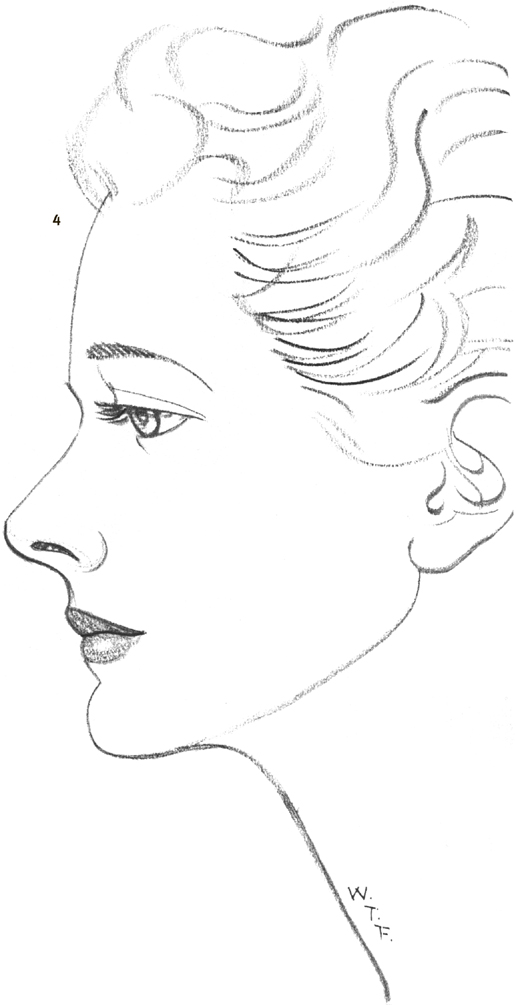
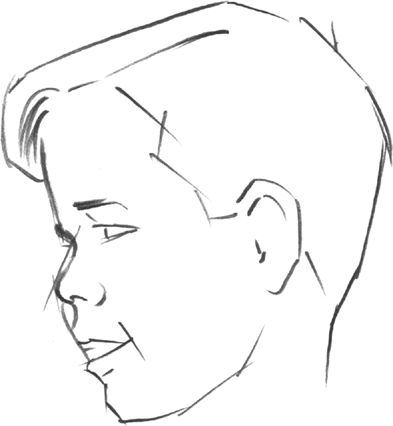
Once you have practiced drawing the facial features separately and have memorized the proportions, you can combine your skills to draw the entire head. Start with a simple rendering that has minimal shading, such as the profile shown here.

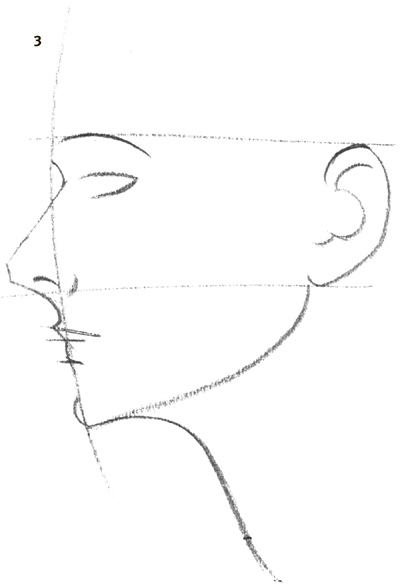
A pencil sharpened to a chisel point is used to create the broad strokes for the hair.
Establishing Proportions As shown in step 1, use an HB pencil to block in the proportion guidelines. Then carefully sketch the basic shapes of the features, as shown in steps 2 and 3. To make your lines smooth and fresh, keep your hand loose, and try to draw with your whole arm rather than just your wrist. Check your proportions before continuing.
Finish the drawing by refining the shapes, suggesting the hair, and adding minimal shading to the lips and nose with a 2B or 4B pencil.
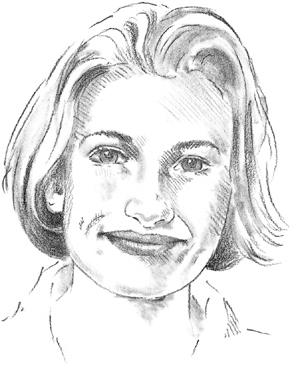
When you are ready to progress to more detailed drawings, try working from a photo. A black-and-white photo will allow you to see all the variations in value, which will be helpful when shading your subject.

Drawing from a Snapshot In this photo, you can see the subject’s delicate features, smooth skin, and sparkling eyes. But you should also to try to capture the features that are unique to her: the slightly crooked mouth, smile lines, and wide-set eyes. Note also that you can barely see her nostrils. It’s details like these that will make the drawing look like the subject and no one else.
Step One Start with a sharp HB charcoal pencil and very lightly sketch the general shapes of the head, hair, and shirt collar. (Charcoal is used for this drawing because it allows for very subtle value changes.) Then lightly place the facial features.
Step Two Begin refining the features, adding the pupil and iris in each eye, plus dimples and smile lines. At this stage, study the photo carefully so you can duplicate the angles and lines that make the features unique to your subject. Then begin adding a few shadows.
Step Three As you develop the forms with shading, use the side of an HB charcoal pencil and follow the direction of the facial planes. Then shape a kneaded eraser to a point to lift out the eye highlights, and use a soft willow charcoal stick for the dark masses of hair.
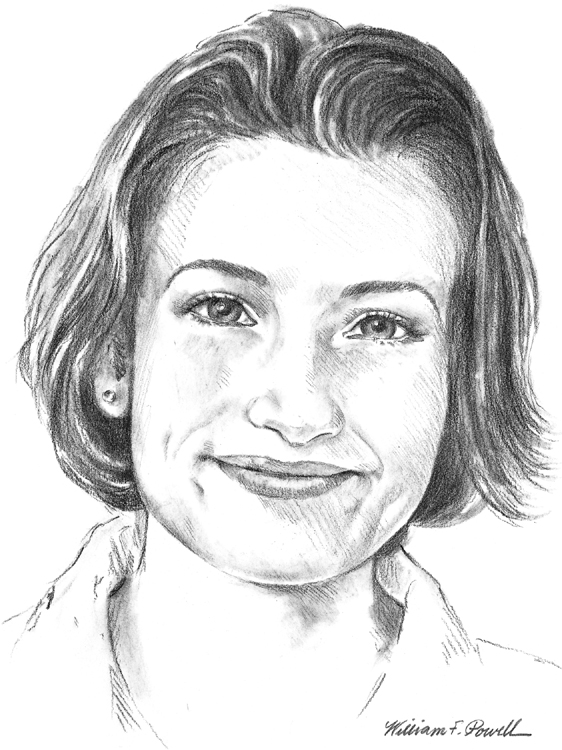
Step Four Continue building up the shading with the charcoal pencil and willow stick. For gradual blends and soft gradations of value, rub the area gently with your finger or a blending stump. (Don’t use a brush or cloth to remove the excess charcoal dust; it will smear the drawing.)
These profiles include a new element: clothing. When drawing clothing, the goal is to make it appear natural. It should not look as if it has been pasted onto the subject as an afterthought. Therefore you should always include the clothing in the block-in stage.
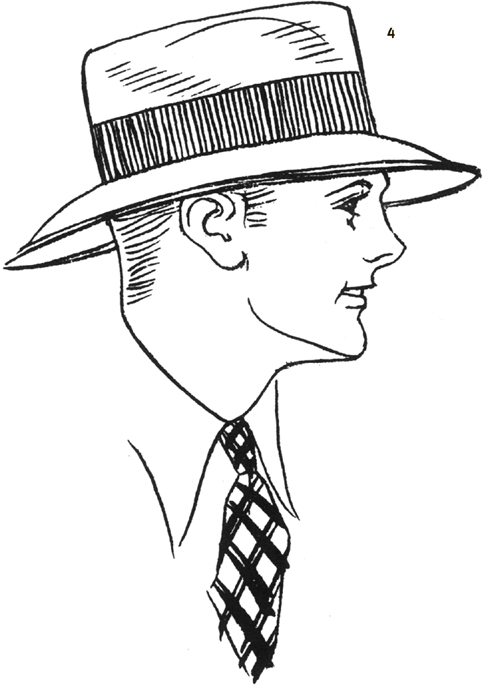
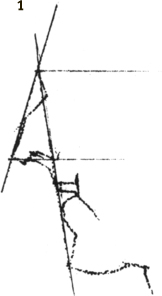
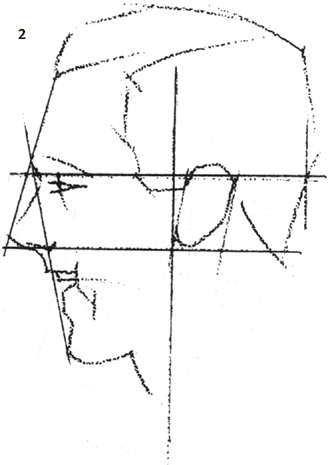
Blocking in Guidelines In step 1, sketch the basic proportions for the features, adding the hat in step 2. Remember that the hat fits around the head; it doesn’t sit on top of it. In addition, the top of the hat will be slightly higher than the top of the head, and the top of the ear will be covered by the rim of the hat.
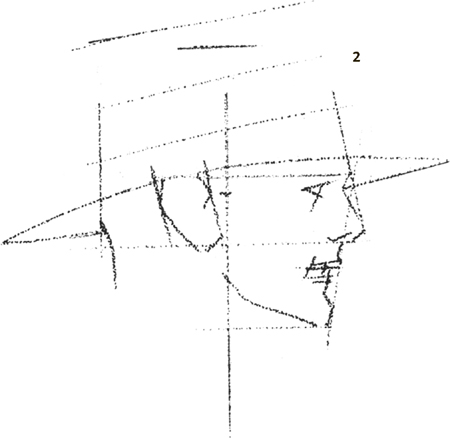
Sketch your guidelines right through the hat; they can be erased later.
Focusing on Male Features Compare this subject’s masculine features with the women subjects’ feminine features on the previous pages. Notice that this subject has a stronger jaw, sharper nose and forehead, and thinner lips.

Clothing should enhance your subject, not draw attention away from it.
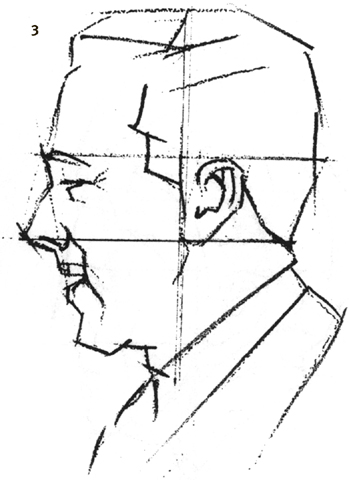
Suggesting the Body Although the man’s head is in profile, note that his body is turned slightly forward. This is apparent because the tie and collar are fully visible. It’s also important to know that you can use just a few simple lines to suggest the clothing.
This man is slightly older than the subject on the opposite page; the wrinkles along his face are an obvious indication. Also notice that he is turned completely at profile, so the view of the tie, shirt, and jacket are different.
Starting Simply As usual, draw the block-in lines in step 1. Build the features on these lines. In step 2, draw the rest of the head and begin to refine the features. Keep checking your proportions before continuing. In step 3, add the outline of the collar, tie, and jacket.

To create the slicked-back effect of the hair, draw all the strokes in the same direction, as shown.
A smile usually creates lines around the mouth and rounds out the cheeks. Notice how the eye is affected also.
Adding the Final Touches For the final details, such as the hair and shading on the tie, you can use a charcoal or a brush and black India ink. (Before using brush and ink on your drawing, you might want to practice making different types of strokes on a piece of scrap paper.) Finally add a few “smile lines” around the mouth.
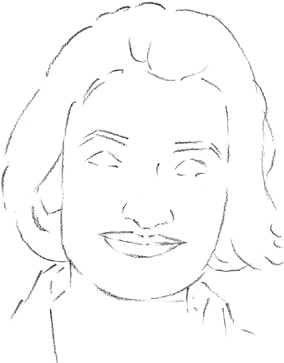
The youth of children is brought out with a delicate approach. Simple renderings like these require minimal shading to create the appearance of smooth skin.
Placing the Features In step 1, begin with a very simple block-in method, using a curved line and horizontal strokes to determine placement of the eyebrow, eye, nose, mouth, and chin. In step 2, sketch in the features, along with the outline of the hair. Study your model to make sure that your proportions are correct.
Remember that children generally have smooth, round features.
Add a suggestion of clothing so the head doesn’t appear to be floating in the middle of the paper.
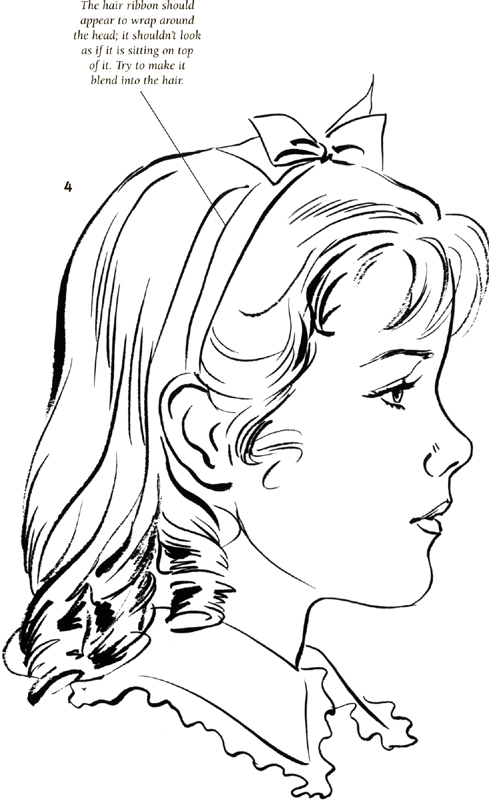
The hair ribbon should appear to wrap around the head; it shouldn’t look as if it is sitting on top of it. Try to make it blend into the hair.
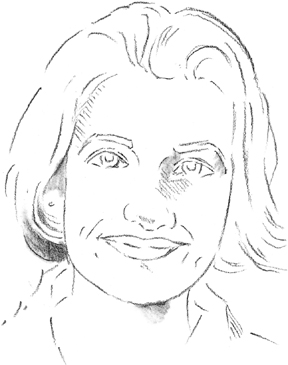
A black felt-tip marker is used for the final drawing.
Refining Details In step 3, refine the features and suggest the waves and curls with loose strokes. In the final rendering, develop the features, making your strokes bold and definite. Note that you don’t have to draw every strand of hair; just a few lines are enough to indicate the hair style.
This drawing of a young boy uses a slightly different block-in method than was used in the previous exercise. The outline of the entire head shape is sketched first, along with the proportion guidelines. Of course, you can use whichever method you prefer.
Step One Lightly sketch the overall head shape with short, quick strokes. This may be tricky because the head is not at a complete profile—but you can do it! Observe your subject closely; notice that a portion of the right cheek is visible, along with the eyelashes of the right eye.
Step Two Begin to darken and smooth your block-in lines into more refined shapes. As you work, keep checking your proportions.
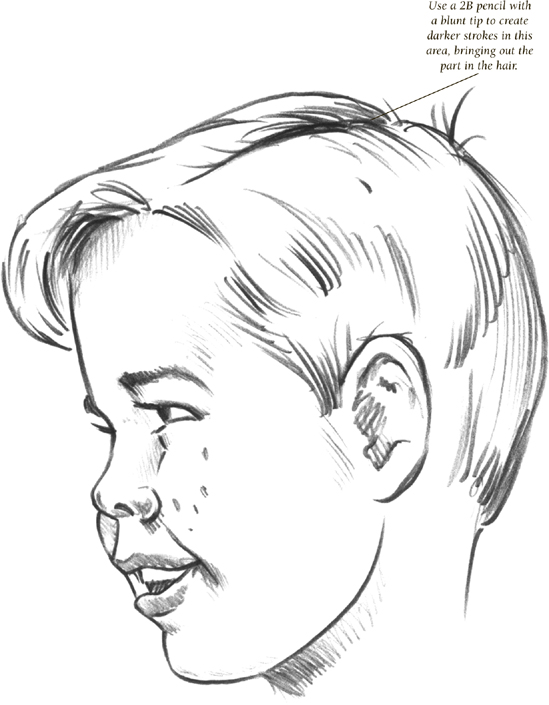
Use a 2B pencil with a blunt tip to create darker strokes in this area, bringing out the part in the hair.
Add some spots along the cheek to suggest freckles.
Step Three As you reach the final, develop the form by shading within the smile lines, under the chin, below the hairline, and inside the part of the hair.
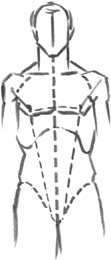
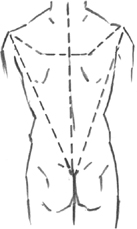
The human body is challenging to render; therefore it’s important to start with a quick drawing of the basic skeletal structure. The human skeleton can be compared to the wood frame of a house; it supports and affects the figure’s entire form.
Frontal view
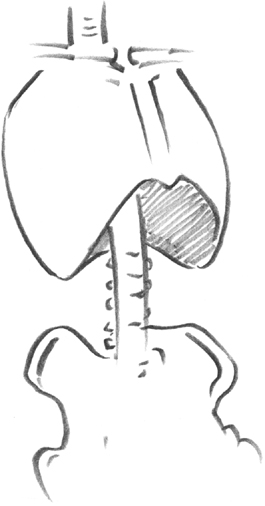
Torso forms into triangle shape
Drawing the Torso The frontal view illustrates the planes of the body, which are created from the skeleton’s form. In men’s bodies especially, the torso forms a triangle shape between the shoulder blades and the waist. In women’s torsos, the triangle shape is generally less pronounced, and their bodies can even resemble an inverted triangle. In other words, the widest part of the body may be at the hips. (Refer to the diagram on page 134.)
Basic skeletal structure

Skeletal structure inside body
The muscles also affect the body’s form. You might want to study human muscular structure to gain further insight into shading the contours of the body.
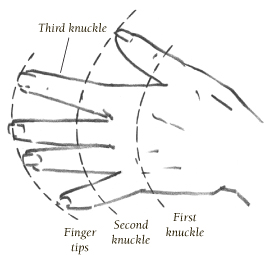
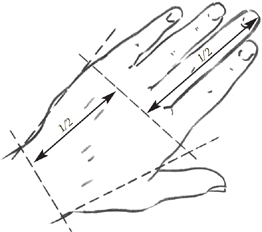
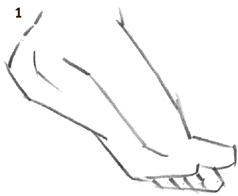
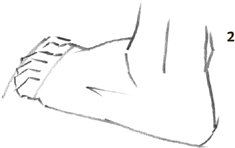
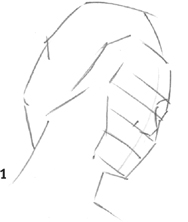
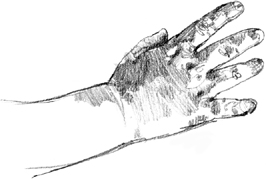
Hands and feet are very expressive parts of the body and are also an artistic challenge. To familiarize yourself with hand proportions, begin by drawing three curved lines equidistant from each other. The tips of the fingers fall at the first line, the second knuckle at the middle line, and the first knuckle at the last one. The third knuckle falls halfway between the finger tips and the second knuckle. The palm, coincidentally, is approximately the same length as the middle finger.
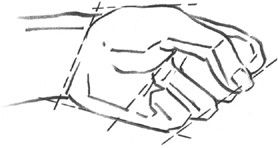
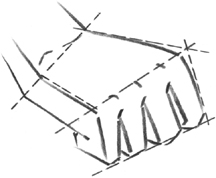
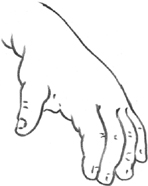
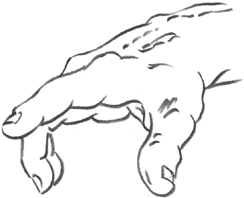
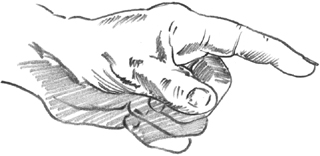
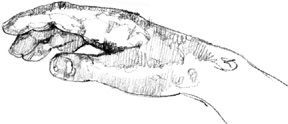
Drawing Hands Every time a finger bends at the knuckle, a new plane is created. Picture the three-dimensional shape of the hand in various positions. This will help you correctly draw the hand.
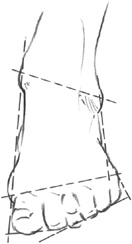

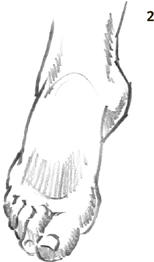
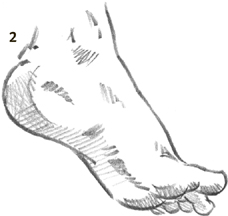

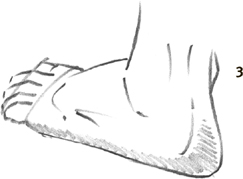
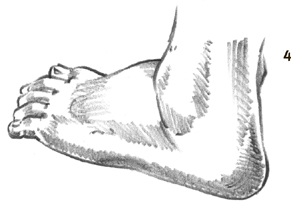
Drawing Feet Follow the steps shown to draw the feet. Block in the shape in two parts: the main part of the foot and the toes. Once you’ve drawn a good outline, add minimal shading so you don’t call too much attention to the feet.
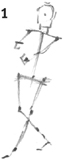
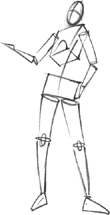
To draw the human figure from head to toe, it helps to know something about the framework on which it’s built. Many art classes have students draw people as skeletons—which is good practice in visualizing how all the parts fit together. You don’t have to try that exercise; the simple drawings on page 132 will suffice. But do start with simple stick figure sketches of the skull, shoulders, rib cage, and add the arms and legs. Then once you have the proportions right, you can flesh out the forms.
CAPTURING ACTION
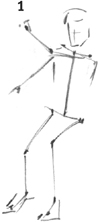
Remember that a gesture drawing is a quick, rough sketch that illustrates a moment of an action. (See page 15.) The idea is just to capture the gesture—it isn’t about trying to get a likeness. Give yourself 10 minutes to draw the entire figure engaged in some sport or full-body activity, working either from life or from a photo. Set a timer and stop when the alarm goes off. Working against the clock teaches you to focus on the essentials and get them down on paper quickly.
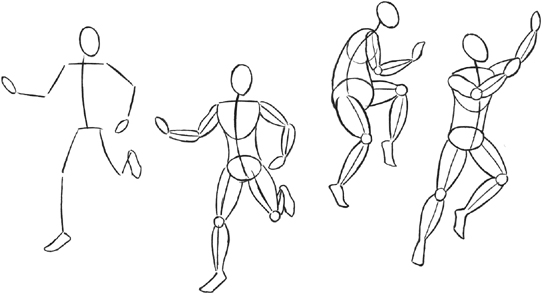
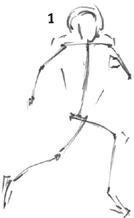
Developing Gesture Drawings Start with a simple stick figure to catch the motion; then add circles and ovals and flesh out the forms.
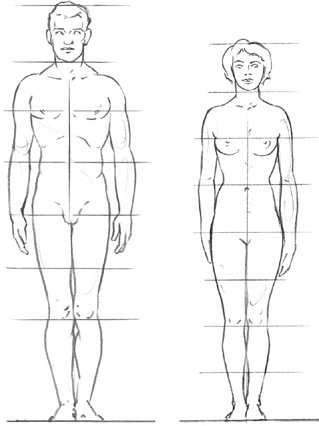
Sketching the Adult Form The average adult is 7-1/2 heads tall, but artists often draw adults 8 heads tall to add stature. The adult male has wide shoulders and narrower hips, whereas the adult female has narrower shoulders and wide hips. Notice that the midpoint is at the hips, not the waist, and that the fingers reach to mid-thigh. Refer to this chart to help you draw the correct proportions.
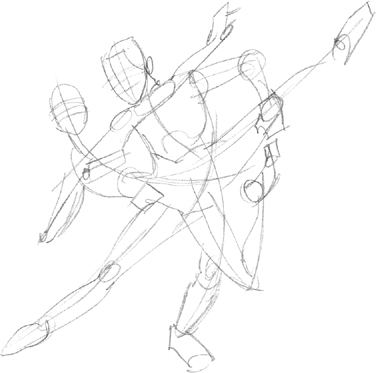
Suggesting Movement First sketch in diagonal center lines for the arms and legs, adding ovals and circles for the heads and joints. Then rough in the general outlines.
Blocking in Shadows To keep the feeling of free movement, don’t draw perfectly refined lines and shadows. Instead, focus on making delicate outlines for the dancers, and quickly lay in broad, dark strokes for their clothing.
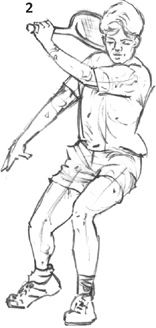
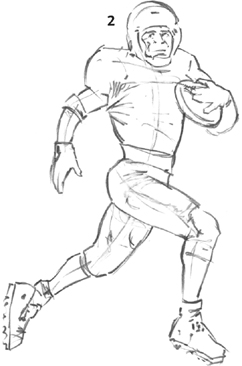
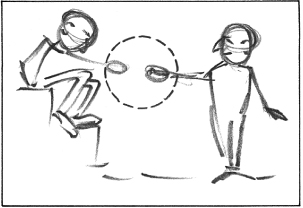
One of the best subjects for action drawings are sports figures. Although many artists thoroughly enjoy watching the games, they rarely draw from life; some would much rather work from photos that have stopped the action for them! Begin by drawing the action line; then build the rest of the figure around that line, paying careful attention to the way the body maintains its balance. It wouldn’t do to have an athlete appear to be about to fall over!
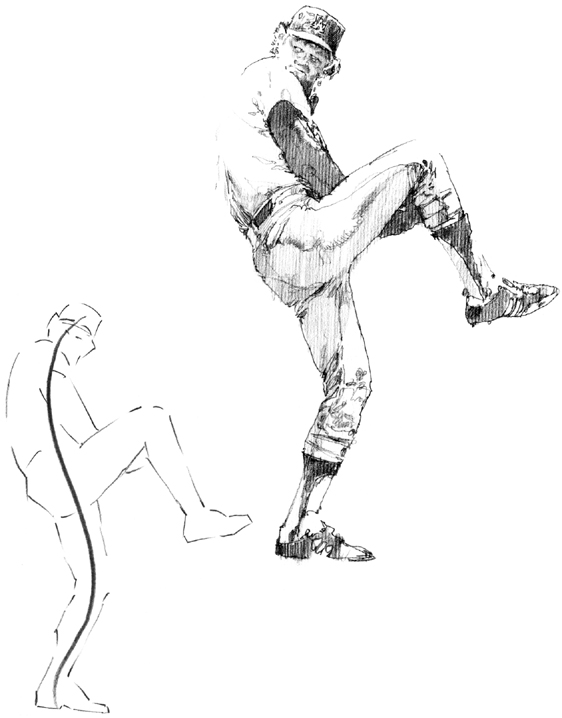
Winding Up Baseball pitchers balance for a moment on one leg, just before throwing the ball. Here draw an S-curve for the action line, to show the way the opposing top and bottom curves keep the player balanced.
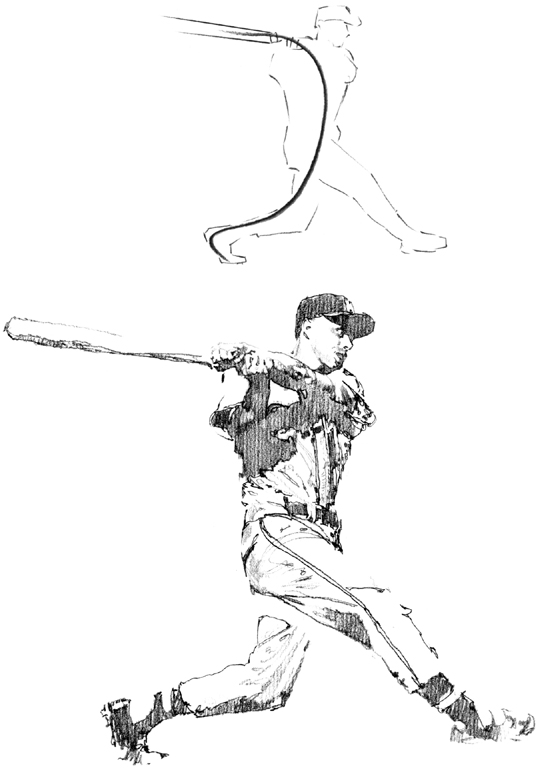
Swinging Batters balance on both legs, swinging the bat through in a complete semi-circular motion. This modified C-curve (an extra turn was added for the foot) catches the full range of the player’s movement.
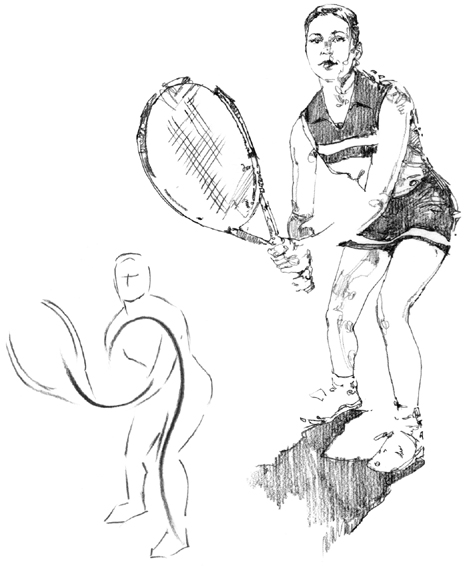
Preparing the Return Even when a player has paused, there is still a line of action—in this case, two. This woman is crouching and actively holding her racket poised, so draw separate action lines for her body and her arm.
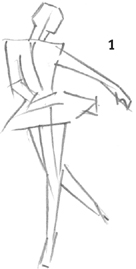
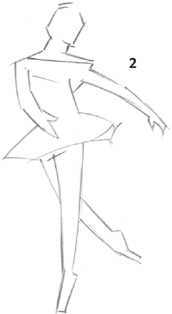
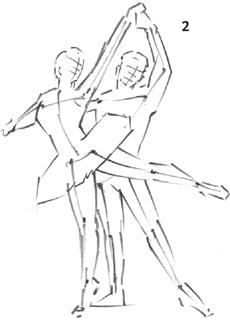
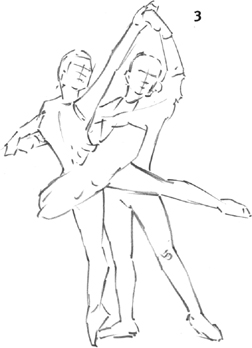
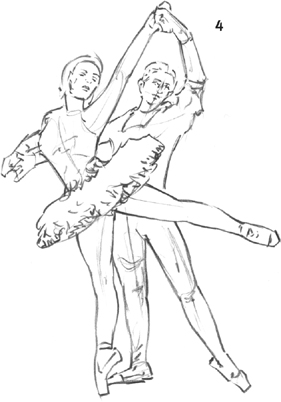
Before drawing this ballerina, lightly sketch the center line of balance, as well as the action line representing the shape of her spine. Start out with straight lines to lay out her body parts in correct proportion, eventually smoothing out the lines in accordance with her body contours.
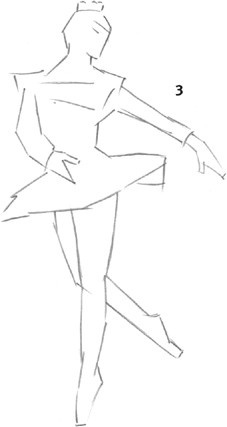

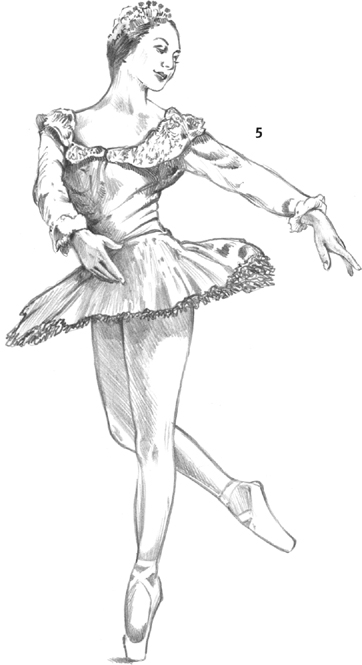

Drawing the Hands The position of this subject’s hands also enhances her serene, graceful mood. Just as the ballerina appears delicate, so should the shading you apply on both her skin and costume. In other words, keep your shading minimal.

Face Detail When you reach the stage of drawing the dancer’s facial features, it’s important that her expression corresponds with the feeling of her pose.
Notice that the line of action can be the same or two figures in different poses. This is illustrated in the sketches of the tennis players below.

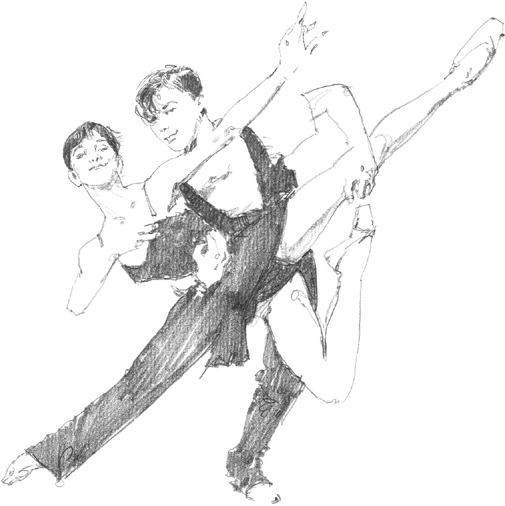
Combining Two Figures in Action Try combining two figures together in an action pose, such as these ballet dancers. Once you’ve blocked in one figure, use it as a reference for blocking in the other one. Remember that you want the figures to appear as part of the same drawing, and not like two people drawn separately and then placed together. It’s important to develop the shading for both figures at the same time.

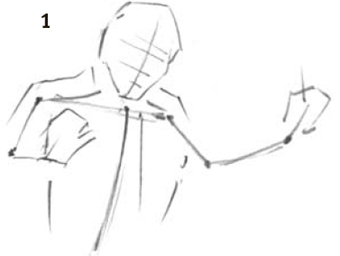
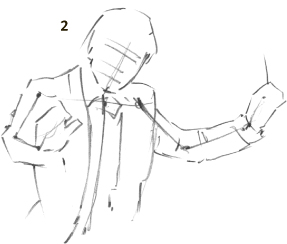
Depicting Partial Figures Partial figures, like the conductor, are another challenge. In drawings like these, pay particular attention to the angles of the arms, shoulders, and head—they determine the pose and mood of the person.

Children are a joy to watch, and they make charming drawing subjects. If you don’t have children of your own to observe, take a sketchpad to the beach or a neighborhood park, and make quick thumbnail sketches of kids at play. Sometimes it actually helps if you don’t know your subject personally, because that way you see from a fresh and objective point of view.
MAKING QUICK SKETCHES
Children are more free and flexible in their expressions, gestures, poses, and movements than their inhibited elders are. To make sure you don’t overwork your drawings of children, do speed sketches: Watch your subject closely for several minutes; then close your eyes and form a picture of what you just saw. Next open your eyes and draw quickly from memory. This helps you keep your drawings uncomplicated—just as children are. Try it; it’s a lot of fun!

Exploring a Toddler’s Proportions Toddlers are approximately 4 heads tall, which makes their heads appear disproportionately large.

Establishing a Child’s Proportions By about age 10, most children are closer to adult proportions, standing about 7 heads tall.

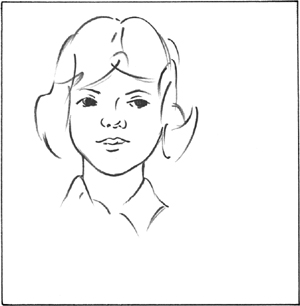
Showing Her Age This girl has a charming expression as she shyly shows off her artwork. She is young, but not a toddler, so her head and legs are more in proportion to her body than they are in a younger child.
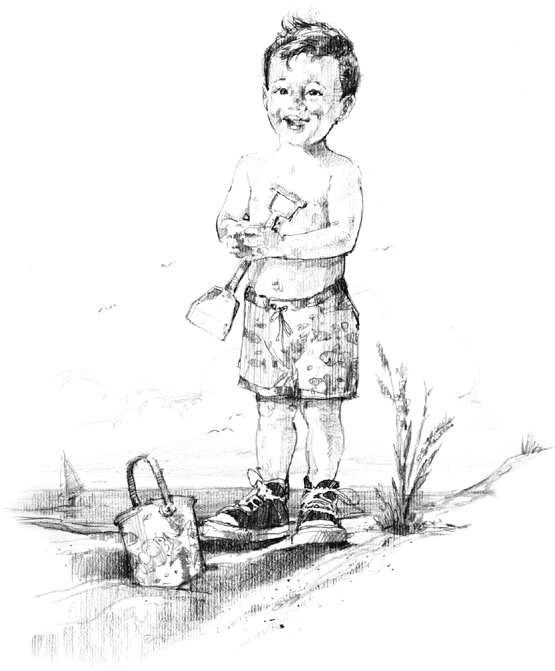
Practicing Proportions This little guy is a perfect example of a toddler: 4 heads tall, square body, and chubby legs and hands. His shoes are a little too big for his feet, which is exactly the way they are drawn. And to show that this was a bright summer day, he is shaded in only lightly, with pure white left for the areas in full sun.
Staging To make sure they were the center of attention, these two youngsters were placed right up front, so they dwarf the background scenery.
DRAWING THE DIFFERENCES
Of course, there’s more to drawing children than making sure they are the right number of heads tall. Their facial proportions are different from an adult’s (see pages 120 and 121), and they have pudgier hands and feet with relatively short fingers and toes. They often have slightly protruding stomachs, and their forms in general are soft and round. Keep your pencil lines soft and light when drawing children, and your strokes loose and fresh.
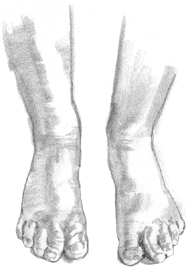
Studying Hands and Feet Study these drawings of children’s hands and feet; then compare them to your own. Children’s fingers are short and plump, with an almost triangular shape. Their feet are soft and fleshy, with a predominantly square shape.
Creating a good composition is important in any drawing; therefore, let your subject(s) guide you. It’s not necessary to place the main subject directly in the center of your composition. For example, the eyes of the girls below are looking in different directions, which determines where the girls are positioned.
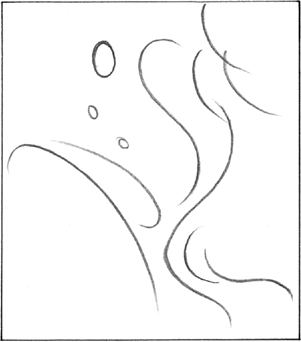
Practicing Curvatures Curved lines are good composition elements—they can evoke harmony and balance in your work. Try drawing some curved lines around the paper. The empty areas guide you in placing figures around your drawing.
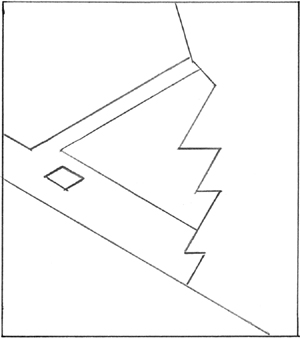
Producing Sharp Angles Sharp angles can produce dramatic compositions. Draw a few straight lines in various angles, and make them intersect at certain points. Zigzagging lines also form sharp corners that give the composition an energetic feeling.
Zooming In Intentionally drawing your subject larger than the image area, as in this example, is also a unique composition. While part of the image may be cut off, this kind of close-up creates a dramatic mood.
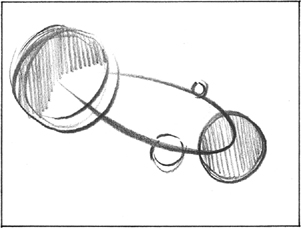
Combining Multiple Subjects You can create a flow or connection between multiple subjects in a composition by creatively using circles and ellipses.
The compositions above and below illustrate how arm position, eyesight direction, and line intersection can guide the eye to a particular point of interest. Using these examples, try to design some of your own original compositions.

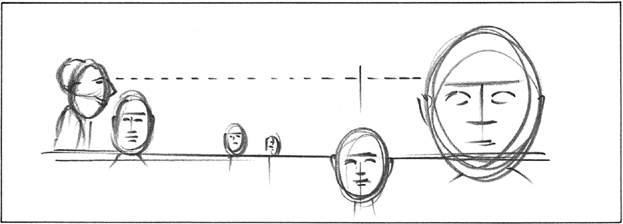
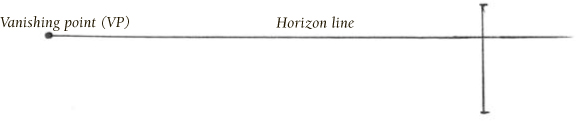
Knowing the principles of perspective allows you to draw more than one person in a scene realistically. As when you’re drawing a building (see page 97), first establish the horizon line and the vanishing points. Any figures drawn along these lines will be in proper perspective. Study the diagrams at right and below to help you.
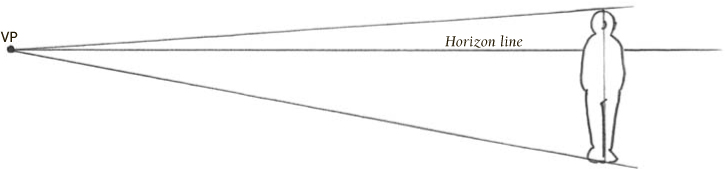
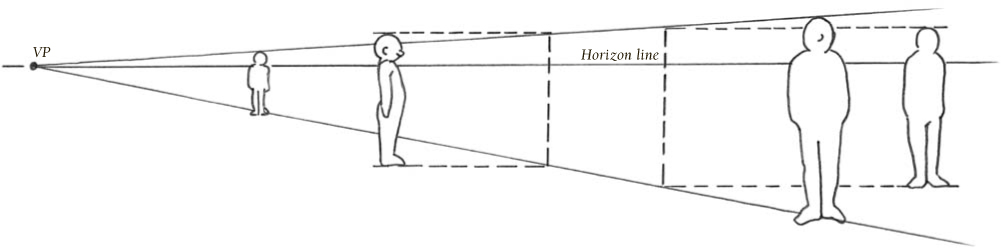
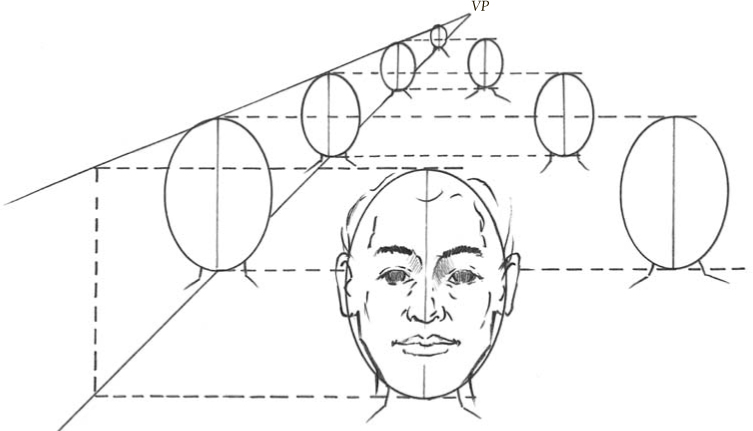
Altering Size and Depth Try drawing a frontal view of many heads as if they were in a theater. Start by establishing your vanishing point at eye level. Draw one large head representing the person closest to you, and use it as a reference for determining the sizes of the other figures in the drawing.
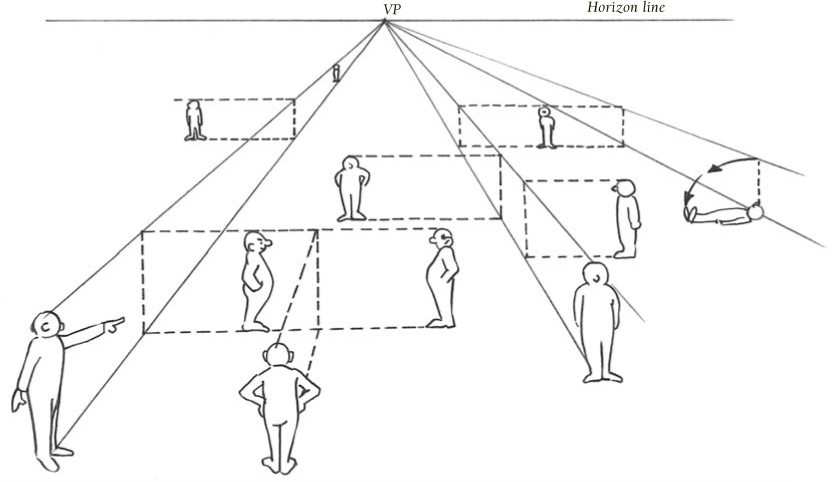
Drawing Full Figures The technique illustrated above can be applied when drawing entire figures, shown in the diagram at right. Although all of these examples include just one vanishing point, a composition can even have two or three vanishing points. (See pages 8–9.)