Bulky Weight
Möbius Cowl
Designed by Andrea Lyn Van Benschoten
A cowl is a great way to enjoy the warmth of a scarf without the extra length. The texture of back-loop stitches adds additional twist to the Möbius design.
- Finished Measurements: Approximately 24" (61 cm) in circumference and 8" (20.5 cm) wide
- Yarn: Lion Brand Wool-Ease Thick & Quick Prints, 80% acrylic/20% wool, 87 yds (80 m)/5 oz (141 g), Color 501 Sequoia
- Crochet Hook: US N/13 (9 mm) or size you need to obtain correct gauge
- Gauge: 8 stitches and 4 rows = 4" (10 cm) in double crochet
- Other Supplies: Yarn needle
Crocheting the Cowl
- Chain 17.
- Row 1: Dc in 2nd ch from hook and in each ch across, turn. You now have 15 dc.
- Rows 2–41: Ch 3 (counts as dc), BLdc in each st across, turn.
Finishing
- With WS facing, fold top right corner to bottom left corner, working through double thickness of last row and foundation ch, slip st in each st across short side. Weave in ends. Turn RS out.
Button-Flap Cape
Designed by Patricia Colloton-Walsh
Made with a bulky-weight yarn, this cape is a one-size-fits-most! Worked in the round from the top down, it features a button-down flap, which adds interest to the design. Appropriate for beginning to intermediate crocheters, this project is perfect for a quick gift.
- Finished Measurements: Approximately 20" (51 cm) around at neck edge, 58" (147 cm) around at bottom edge, and 11" (28 cm) long
- Yarn: Brown Sheep Burly Spun, 100% wool, 132 yds (121 m)/8 oz (226 g), Color 181 Prairie Fire
- Crochet Hook: US S (19 mm) or size you need to obtain correct gauge
- Gauge: 5 stitches and 3 rows = 4" (10 cm) in double crochet, blocked
- Other Supplies: Split stitch marker, yarn needle, two 11⁄2" (3.8 cm) buttons
Crocheting the Cape
- Chain 30. Place marker in first chain. Being careful not to twist chain, join with a slip st in first chain to form a circle.
- Rnd 1: Ch 1, sc in each ch around, join with slip st to top of ch-2. You now have 30 sts.
- Rnd 2: Ch 3 (counts as dc here and throughout), dc in same st, *dc in next st, 2 dc in next st; repeat from * to last st, 2 dc in last st, join with slip st to top of ch-3. You now have 46 sts.
- Rnd 3: Ch 3, dc in each st around, join with slip st to top of ch-3.
- Work now progresses in rows.
- Row 4: Ch 3, dc in next 2 dc, 2 dc in next dc, *dc in next 3 dc, 2 dc in next dc; repeat from * to last 2 sts, dc in next 2 sts, turn. You now have 57 sts.
Crocheting the Flap
- Row 1: Ch 5 loosely, dc in 3rd ch from hook, dc in next 2 ch, dc in each st across Row 4, turn.
- Row 2: Ch 3 (counts as dc), dc in each dc across. Fasten off.
Finishing
- Edging: With RS facing, join yarn to the bottom corner of cape, *ch 3, slip st in next st, repeat from * around lower edge of cape, around corner of flap, up the side and across the top of flap. Fasten off. Weave in ends. Block and pull out or pin the ch-3 edging loops at the bottom of the cape as it dries. Sew top edge of flap to cape at base of ch-3 loops. Sew two buttons to cape underneath flap, using ch-3 loops as buttonholes.
Ribbed Wristlets
Designed by Janet M. Spirik
This pattern uses double crochet, single crochet, and front post double crochet. It’s a great stash buster as it only uses about three ounces (85 g) of bulky-weight yarn. The pattern is fairly simple and works up very quickly.
- Finished Measurements: 6"–7" (7"–8")/15–18 (18–20) cm wrist circumference
Note: The gloves will stretch over the wide part of the hand, so base size on wrist measurement.
- Yarn: Lion Brand Tweed Stripes, 100% acrylic, 144 yds (132 m)/3 oz (85 g), Color 206 Woodlands
- Crochet Hook: US G/6 (4 mm) or size you need to obtain correct gauge
- Gauge: 13 stitches and 14 rows = 4" (10 cm) in ribbed pattern
- Other Supplies: Yarn needle, two 1" (2.5 cm) buttons, sewing needle, coordinating thread
Crocheting the Wristlet (make 2)
- Chain 24 (26). Being careful not to twist chain, join with slip st to first ch to form a circle.
- Rnd 1: Ch 3 (counts as dc), dc in each ch around, join with slip st to top of ch-3. You now have 24 (26) dc.
- Rnd 2: Ch 1, sc in same st, FPdc in next dc, *sc in next dc, FPdc in next dc; repeat from * around, join with slip st to first sc. You now have 12 (13) FPdc and 12 (13) sc.
- Rnd 3: Ch 1, sc in same st, FPdc in next st, *sc in next sc, FPdc in next st; repeat from * around, join with slip st to first sc.
- Repeat Rnd 3 until piece measures 5" (12.5 cm) or desired length from cuff to thumb.
Working the Thumb Opening
- Rnd 1 (thumb opening): Ch 1, sc in same st, FPdc in next st, ch 5, skip 6 sts, *sc in next sc, FPdc in next st; repeat from * around, join with slip st to first sc.
- Next Rnd: Ch 1, sc in same st, FPdc in next st, (sc, dc) three times in next ch-5 space, *sc in next sc, FPdc in next st; repeat from * around, join with slip st to first sc.
Continuing the Hand
- Next Rnd: Ch 1, sc in same st, FPdc in next st, *sc in next sc, FPdc in next st; repeat from * around, join with slip st to first sc. You now have 12 (13) FPdc and 12 (13) sc.
- Repeat the previous round until glove measures 2" (5 cm) from thumb opening to the top of wristlet. Fasten off. Weave in ends.
Making the Decorative Band (make 2)
- Ch 4, leaving a long tail for sewing.
- Row 1: Sc in 2nd ch from hook and in next 2 ch, turn. You now have 3 sc.
- Row 2: Ch 1, sc in each sc across, turn.
- Repeat Row 2 until band measures 5" (12.5 cm) from beginning. Fasten off.
Assembling the Wristlet
- With yarn needle, sew end of each band about 1⁄2" (13 mm) up from the wrist edge and centered under the thumb opening. With sewing needle and thread, sew buttons on the opposite edge of the band and to the wristlet. Be sure to lay your gloves side by side with the thumbholes facing, then fold the band to the outside edge, so you have a right and left glove.
November Mittens
Brenda K. B. Anderson
These chunky mittens feature a ribbed cuff, and the hand can be lengthened or shortened for a custom fit. The addition of a strap attached with steampunk-style buttons makes this classic mitten very up-to-date.
- Finished Measurements: 8" (20.5 cm) in circumference and 103⁄4" (27.5 cm) inlength, or as desired
- Yarn: Knit Picks Swish Bulky, 100% superwash merino wool, 137 yds (126 m)/3.5 oz (100 g), Brindle Heather
- Crochet Hook: US K/101⁄2 (6.5 mm) or size you need to obtain correct gauge
- Gauge: 12 stitches and 12 rows = 4" (10 cm) in pattern
- Other Supplies: Two stitch markers, yarn needle, four ⅞" (22 mm) buttons, sewing needle and coordinating thread
Notes:
- The ribbed cuff is worked back and forth in rows and then slipstitched to form a tube. The body of the mitten is then worked in a spiral from the ribbing up to the top.
- Right and left mittens are the same, except that the button straps are stitched onto opposite sides.
- You will need to unravel your gauge swatch in order to have enough yarn to complete these mittens.
Crocheting the Cuff (make 2)
- Chain 7.
- Row 1: Working into the back bump of the chains, slip st in 2nd ch from hook, slip st in next 2 ch, sc in next 3 ch, turn. You now have 6 sts.
- Row 2: Ch 1, BLsc in next 3 sts, BLslip st in next 3 sts, turn.
- Row 3: Ch 1, BLslip st in next 3 sts, BLsc in next 3 sts, turn.
- Repeat Rows 2 and 3 thirteen more times.
- Hold ribbing with crochet hook on the RS of your work as though you are about to work another row; fold first row of ribbing up in front so that short edges of ribbing are aligned; insert hook into back loop of foundation ch and through back loop of the next stitch on the previous row, yo and pull loop through both stitches and through loop on hook to slipstitch layers together; continue to slip st layers together across row. Do not fasten off. Turn ribbing inside out so that the slip-st row is on the inside. RS is now facing.
Crocheting the Mitten Body
- Rnd 1: Ch 1, work 20 sc evenly spaced around top edge of ribbing tube; do not join. Place marker at the first st of the round and move up as you work the rounds. You now have 20 sts.
- Rnds 2 and 3: BLsc into each st around.
- Rnd 4: (BLsc in next 3 sts, 2 BLsc in next st) five times. You now have 25 sts.
- Rnd 5: (BLsc in next st, 2 BLsc in next st, BLsc into next 3 sts) five times. You now have 30 sts.
- Rnd 6: (BLsc in next 9 sts, 2 BLsc in next st) three times. You now have 33 sts.
- Rnds 7–11: BLsc into each st around.
- Rnd 12: BLsc in next 12 sts, skip next 9 sts (for thumb opening), BLsc in next 12 sts. You now have 24 sts, not including thumb.
- Rnds 13–22: BLsc in each st around.
- Rnd 23: (BLsc in next 2 sts, BLsc2tog) six times. You now have 18 sts.
- Rnd 24: BLsc into each st around.
- Rnd 25: (BLsc2tog, BLsc in next st) six times. You now have 12 sts.
- Rnd 26: (BLsc2tog) six times. You now have 6 sts.
- Fasten off, leaving an 8" (20.5 cm) tail. Using yarn needle, thread yarn tail through the front loop of the remaining 6 sts and gather tightly to close top of mitten. Weave in ends.
Crocheting the Thumb
- Rnd 1: Pull up a loop of yarn in any st at thumbhole, BLsc in each of the 9 skipped sts, adding 1 st at thumb crotch. (Let the beginning yarn tail dangle on the outside of your work. Later you can use it to stitch closed any small holes that occur.) You now have 10 sts.
- Rnds 2–6: BLsc into each st around.
- Rnd 7: (BLsc2tog) five times. You now have 5 sts.
- Fasten off, leaving an 8" (20.5 cm) tail. Using yarn needle, thread yarn tail through the front loop of the remaining 5 sts and gather tightly to close top of thumb. Weave in ends.
Crocheting the Button Strap (make 2)
- Ch 8, making sure that the 8th ch st is loose enough to get your hook into it later.
- Rnd 1: Sc in 2nd ch from hook and in next 5 ch, 3 sc in last ch; working on opposite side of foundation ch, sc in next 6 ch, 3 sc in last chain of foundation chain. Do not join.
- Rnd 2: Sc in next 7 sc, 3 sc in next sc, sc in next 8 sc, 3 sc in next sc, slip st to next sc. Fasten off.
Finishing
- Weave in ends. Use yarn tail to stitch closed the small hole between the thumb and the hand. Secure button straps in place (at wrists of mittens) by stitching a button to each end through both thicknesses.
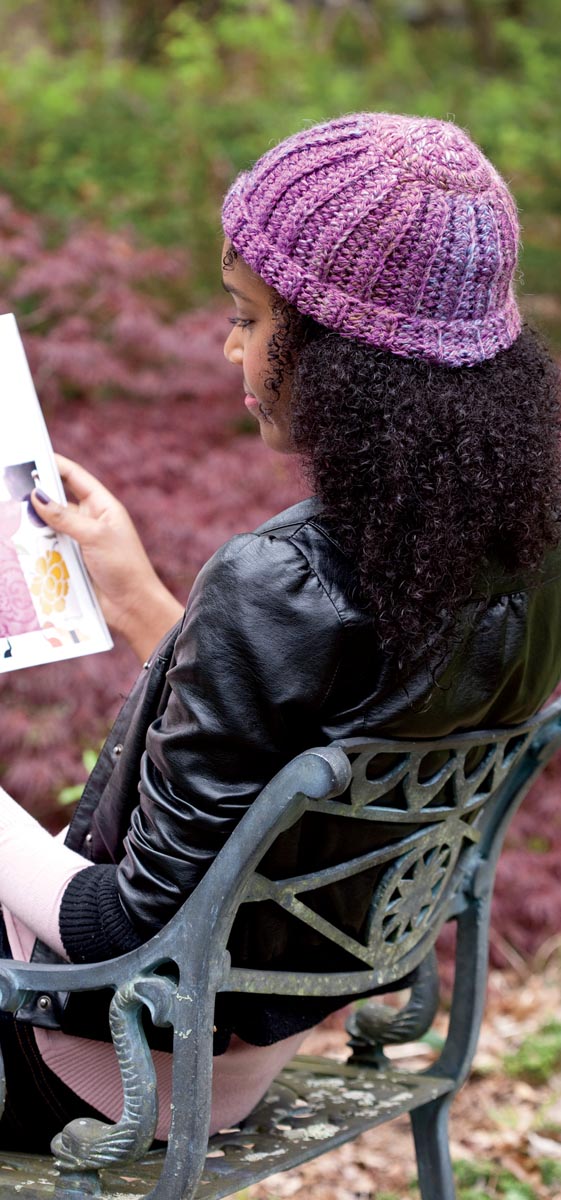
Quinby
Designed by Sara Kay Hartmann
Quinby is a classic watchcap constructed with a twist. You’ll crochet a circle and make a long chain, then work back-loop ribbing sideways around the circle, joining as you go. This results in a totally seamless project. A change of yarn changes the look, making Quinby a great pattern for men and women.
- Sizes and Finished Measurements: To fit adult head size 22"–23"/56–58 cm, approximately 20" (51 cm) in circumference
- Yarn: Yarn Bee Andes Alpaca, 85% acrylic/15% alpaca, 102 yds (93 m)/3 oz (85 g), Color 730 Damson
- Crochet Hook: US J/10 (6 mm) or size you need to obtain correct gauge
- Gauge: 12 stitches and 7 rows = 4" (10 cm) in ribbed pattern
- Other Supplies: Locking stitch marker, yarn needle
Crocheting the Crown
- Chain 4, slip st in first ch to form a ring.
- Rnd 1: Ch 3 (counts as dc here and throughout), 11 dc in ring, join with slip st to top of ch-3. You now have 12 dc.
- Rnd 2: Ch 3, dc in same st, 2 dc in each st around, join with slip st to top of ch-3. You now have 24 dc.
- Rnd 3: Ch 3, 2 dc in next dc, *dc in next dc, 2 dc in next dc; repeat from * around, join with slip st to top of ch-3. You now have 36 dc. Do not fasten off.
Crocheting the Body
- Setup Row: Ch 24. Beginning in 3rd ch from hook, work 1 BLhdc in each ch across, pm in final hdc. You now have 22 hdc.
- Working counterclockwise around the crown, skip first dc of the crown, slip st to 2nd dc, turn.
- Row 1: Work 1 BLhdc into marked hdc (move marker to BLhdc just made) and in each hdc across, turn.
- Row 2: Ch 2, work 1 BLhdc in each BLhdc across, skip 1 crown dc, slip st into next dc, turn.
- Repeat Rows 1 and 2 seventeen times more.
- Final Row: Working through double thickness in back loops of last row and in front loops of foundation ch, slip st in each pair of sts across.
Finishing
- Fasten off. Weave in ends.
Men’s Snow Sports Headband
Designed by Nancy Brown
An alpaca-blend headband will keep your favorite man’s ears warm while he’s skiing, sledding, skating — or during any other wintertime outdoor activity. This one is crocheted from the center back and seamed, then edged on both sides.
- Finished Measurements: Approximately 20" (51 cm) in circumference, unstretched, and 5" (12.5 cm) wide at widest point
- Yarn: Bernat Alpaca Natural Blends, 70% acrylic/30% alpaca, 120 yds (110 m)/3.5 oz (100 g), Color 93040 Ebony
- Crochet Hook: US J/10 (6 mm) or size you need to obtain correct gauge
- Gauge: 12 stitches and 8 rows = 4" (10 cm) in half double crochet
- Other Supplies: Yarn needle
Pattern Essentials
BLhdc2tog: Yo, draw up a loop in back loop of next st, yo and draw up a loop in back loop of next st, yo and draw through all 5 loops.
Join yarn with sc: Make a slip knot on hook, insert hook in st, yo, pull up a loop, yo, draw through both loops.
Crocheting the Headband
- Beginning at center back, ch 9.
- Row 1: BLhdc in 2nd ch from hook and in each ch across, turn. You now have 8 sts.
- Rows 2 and 3: Ch 1 (does not count as a st on next rows), BLhdc in each st across, turn.
- Row 4: Ch 1, BLhdc in first st, 2 BLhdc in next st — increase made, BLhdc in each st across, turn. You now have 9 sts.
- Row 5: Ch 1, BLhdc in each st to last 2 sts, 2 BLhdc in next st, BLhdc in last st, turn. You now have 10 sts.
- Rows 6 and 8: Repeat Row 4.
- Rows 7 and 9: Repeat Row 5. You now have 14 sts at the end of Row 9.
- Rows 10, 12, and 14: Ch 1, BLhdc in first st, BLhdc2tog, BLhdc in each st across, turn.
- Rows 11, 13, and 15: Ch 1, BLhdc in each st to last 3 sts, BLhdc2tog, BLhdc in last st, turn. You now have 8 sts at the end of Row 15.
- Rows 16–26: Work even.
- Row 27: Repeat Row 5. You now have 9 sts.
- Row 28: Repeat Row 4. You now have 10 sts.
- Rows 29 and 31: Repeat Row 5.
- Rows 30 and 32: Repeat Row 4. You now have 14 sts at the end of Row 32.
- Rows 33, 35, and 37: Repeat Row 11.
- Rows 34, 36, and 38: Repeat Row 10. You now have 8 sts at the end of Row 38.
- Rows 39 and 40: Work even, ending with Row 40 at top edge of headband. With RS of headband facing and working through double thickness of last row and foundation ch, slip st in each st across for back seam, ending at bottom edge of headband. Do not fasten off.
Working the Bottom Edging
- With RS facing, ch 1, sc in each row-end st around; join with slip st in first sc. Fasten off.
Working the Top Edging
- With RS facing, join yarn with sc (see Pattern Essentials) in end of row to the left of back seam, sc in each row-end st around; join with slip st in first sc. Fasten off. Weave in ends.
Felted Clutch
Designed by Patricia Colloton-Walsh
This felted clutch is versatile and can be embellished before or after felting. Because this is felted, the crocheting can be done looser than usual. This is a perfect pattern for a novice crocheter and pattern reader.
- Finished Measurements: Approximately 10" (25.5 cm) wide and 8" (20.5 cm) tall
- Yarn: Brown Sheep Lamb’s Pride Bulky, 85% wool, 15% mohair, 125 yds (114 m)/4 oz (113 g), Color 191 Kiwi
- Crochet Hooks: US N/13 (10 mm) or size you need to obtain correct gauge and US J/10 (6 mm) for flower (optional)
- Gauge: Approximately 10 stitches and 6 rows = 4" (10 cm) in pattern before felting
- Other Supplies: Locking stitch marker, yarn needle, one 1" (2.5 cm) button (optional)
Crocheting the Clutch
- Chain 60. Being careful not to twist the chain, join with a slip st in first ch to form a circle. Place marker at the first st of the round and move it up as you work the rounds.
- Rnd 1: Ch 1, sc in each ch around, join with slip st to first sc. You now have 60 sts.
- Rnd 2: Ch 1, BLsc in each sc around, join with slip st to first sc.
- Rnds 3–8: Repeat Rnd 2.
- Rnd 9: Ch 1, *BLsc in next 8 sc, BLsc2tog; repeat from * around, join with slip st to first sc. You now have 54 sts.
- Rnds 10–12: Repeat Rnd 2.
- Rnd 13: Ch 1, *BLsc in next 7 sc, BLsc2tog; repeat from * around, join with slip st to first sc. You now have 48 sts.
- Rnd 14: Repeat Rnd 2.
- Rnd 15: Ch 1, *BLsc in next 8 sc, ch 8, skip 8 sc, BLsc in next 8 sc; repeat from * once more, join with slip st to first sc.
- Rnd 16: Ch 1, BLsc in every sc and 8 sc in each ch-space around, join with slip st to first sc.
- Rnd 17: Ch 1, slip st in each st around. Fasten off.
Finishing
- Weave in ends. Sew or crochet the bottom seam closed. Turn the bag inside out. From the inside of the bag, flatten the bottom seam and form triangles at the base’s edges. Sew a small seam with the yarn at the base of the triangles (about 1" [2.5 cm] in length) to square off the bottom of the bag. Felt (see page 275) the bag to desired size.
Crocheting the Flower (optional)
- Leaving a 6" (15 cm) sewing length, ch 2.
- Rnd 1: 6 sc in 2nd ch from hook, join with slip st to first sc, pm. You now have 6 sts.
- Rnd 2: Ch 2 (counts as hdc), hdc in same st, 2 hdc in next 5 sts, join with slip st to top of ch-2. You now have 12 sts.
- Rnd 3: *Ch 3, slip st in next st; repeat from * around, ending with ch 1, join with hdc to first ch.
- Rnd 4: *Ch 5, slip st in next space; repeat from * around, join with slip st to top of first ch. Fasten off.
- Sew flower to clutch with decorative button in the center, if desired.
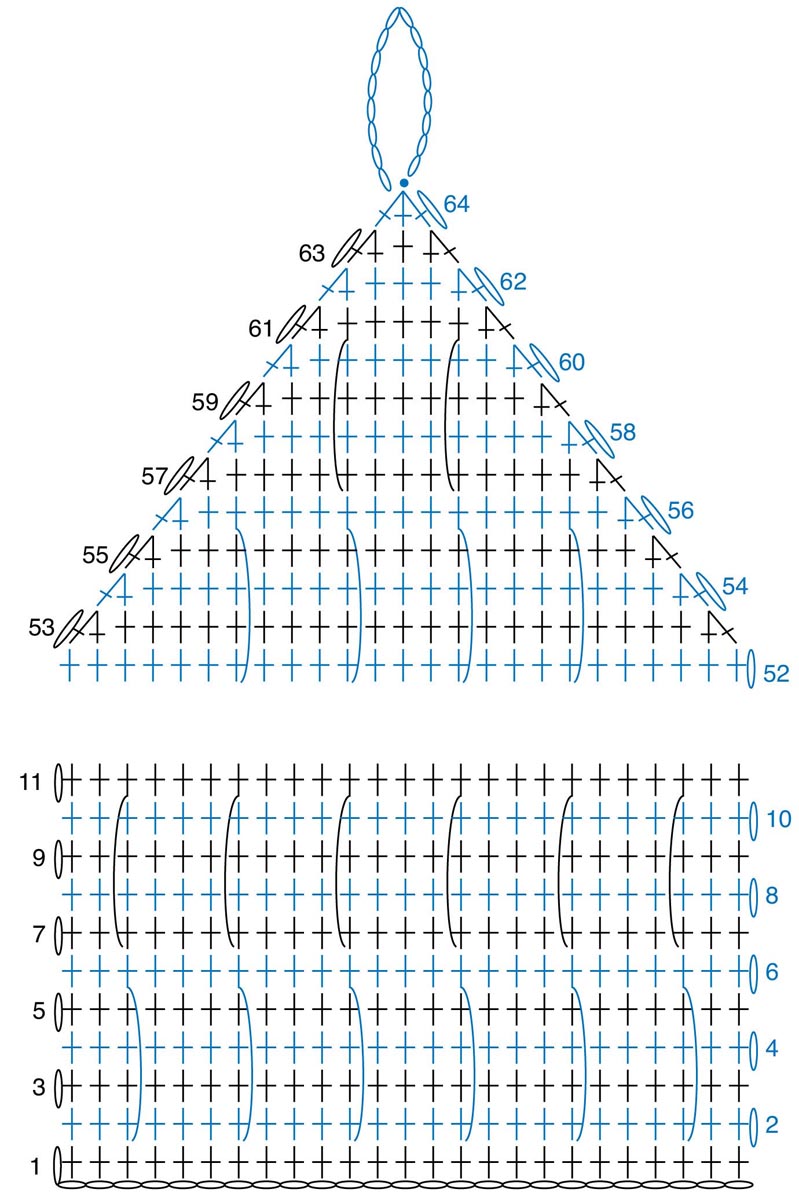
Handpainted Shoulder Bag
Designed by Reneé Rodgers
This clever pattern makes effective use of the color changes in handpainted yarn by utilizing a spike stitch, which allows the color to be more fully revealed in the fabric. The bulky-weight yarn creates a sturdy purse that will carry whatever you need in style.
- Finished Measurements: Approximately 11" (28 cm) wide and 9" (23 cm) tall excluding strap
- Yarn: Brown Sheep Lanaloft Bulky Handpaint, 100% wool, 160 yds (146 m)/7 oz (198 g), Color LL222 Precious Stones
- Crochet Hook: US K/101⁄2 (6.5 mm) or size you need to obtain correct gauge
- Gauge: 10 stitches and 12 rows = 4" (10 cm) in pattern
- Other Supplies: Yarn needle, one 11⁄2" (3.8 cm) button
Pattern Essentials
Spike st: Insert hook in next sc 4 rows below, yo and pull up a loop, yo and pull through both loops on hook to complete sc, skip st behind spike st in previous row.
Crocheting the Bag
See chart below.
- Chain 26.
- Row 1 (WS): Sc in 2nd ch from hook and in each ch across, turn. You now have 25 sc.
- Rows 2–5: Ch 1, sc in each st across, turn.
- Row 6 (RS): Ch 1, sc in next 2 sc, spike st 4 rows below, *sc in next 3 sc, spike st 4 rows below; repeat from * four times, sc in last 2 sc, turn.
- Rows 7–10: Ch 1, sc in each sc across, turn.
- Row 11: Repeat Row 6.
- Rows 12–51: Repeat Rows 7–11 eight times.
- Row 52: Ch 1, sc in each sc across, turn.
- Rows 53–55: Ch 1, sc2tog, sc in each sc across to last 2 sc, sc2tog, turn. You now have 19 sc at the end of Row 55.
- Row 56: Ch 1, sc2tog, sc in next sc, spike st 4 rows below, *sc in next 3 sc, spike st 4 rows below; repeat from * two more times, sc in next sc, sc2tog, turn. You now have 17 sc.
- Rows 57–60: Ch 1, sc2tog, sc in each sc across to last 2 sc, sc2tog, turn. You now have 9 sc at the end of Row 60.
- Row 61: Ch 1, sc2tog, spike st 4 rows below, sc in next 3 sc, spike st 4 rows below, sc2tog, turn. You now have 7 sc.
- Rows 62 and 63: Repeat Row 57. You now have 3 sc.
- Row 64: Ch 1, sc3tog, ch 15, slip st to base of chain. Fasten off.
Crocheting the Strap
- Chain 91.
- Row 1: Sc in 2nd ch from hook and in each ch across, turn. You now have 90 sc.
- Rows 2 and 3: Ch 1, sc in each sc across, ch 1, turn. Fasten off at end of Row 3.
Assembling the Bag
- With RS facing, fold up 8" (20.5 cm) from the beginning edge. Sew the sides together using yarn and a yarn needle. Turn RS out. Sew the button in place opposite button loop. Sew the strap onto the sides of the bag on the WS. Weave in ends.
Fuzzy Tea Cozy
Designed by Melinda A. Sheehan
This fuzzy and thick cozy will keep your tea warm through several book chapters or a long conversation with a friend. The circles are dyed with food colors and attached to the cozy with coordinating buttons.
- Finished Measurements: 11" (28 cm) wide and 10" (25.5 cm) tall after felting
- Yarn: Bartlettyarn Maine Wool, 100% wool, 200 yd (183 m)/4 oz (113 g), Color 209 Oatmeal
- Crochet Hook: US K/101⁄2 (6.5 mm) or size you need to obtain correct gauge
- Gauge: 18 stitches and 8 rows = 5" (12.5 cm) in double crochet before felting
- Other Supplies: Yarn needle, assorted food colors, seven ⅝" (16 mm) buttons, sewing needle, coordinating sewing thread
Crocheting the Cozy (make 2)
- Chain 43.
- Row 1: Dc in 4th ch from hook and in each ch to end, turn. You now have 41 dc.
- Row 2: Ch 3 (counts as dc), BLdc in each st across, turn.
- Rows 3–9: Repeat Row 2.
- Row 10: Ch 3 (counts as dc), dc2tog, BLdc in each st to last 2 sts, dc2tog, turn. You now have 39 dc.
- Rows 11–17: Repeat Row 10. You now have 25 dc.
- Row 18: Ch 1, sc2tog, sc in each st to last 2 sts, sc2tog. You now have 23 dc. Fasten off.
Finishing
- Felt the cozy to desired size (see page 275). While still wet, gently stretch to block it, then dry flat. Once dry, single crochet the edges of the two pieces together. Cut one length of yarn 36" (91 cm) long and set aside for sewing the cuff in place. Use the remaining yarn to crochet decorative circles.
Crocheting the Large Circle
- Begin with adjustable ring (see page 271). Ch 3 (counts as dc), 17 dc in ring, join with slip st to top of ch-3. Fasten off.
Crocheting the Medium Circle
- Begin with adjustable ring. Ch 2 (counts as hdc), 17 hdc in ring, join with slip st to top of ch-2. Fasten off.
Crocheting the Small Circle
- Begin with adjustable ring. Ch 1, 15 sc in ring, join with slip st to top of first sc. Fasten off.
Dyeing the Sewing Yarn and Circles
- Cover working area with paper towels or a plastic tablecloth. Soak the 36" (91 cm) piece of yarn and circles in a solution of one part white vinegar to three parts water for 30 minutes. While pieces are soaking, in separate microwavable containers mix 1 teaspoon (5 mL) vinegar and desired number of drops of food colors with 1⁄2 cup (118 mL) boiling water. After 30 minutes, gently squeeze out excess vinegar solution from each piece and submerge them in the various dye baths. Place each dye bath in the microwave and cook on high for 1 minute. Use tongs to lift the pieces out of the dye to check for color saturation. Continue to microwave pieces in 30-second intervals until desired color is reached. Rinse pieces in tepid water until water runs clear; dry flat.
Finishing
- Fold up the cuff to desired height and use the dyed length of the yarn to loosely stitch it in place. Arrange circles on front of cozy, with a single button in the center of each circle. With sewing needle and coordinating thread, sew buttons and circles onto cozy in desired pattern.
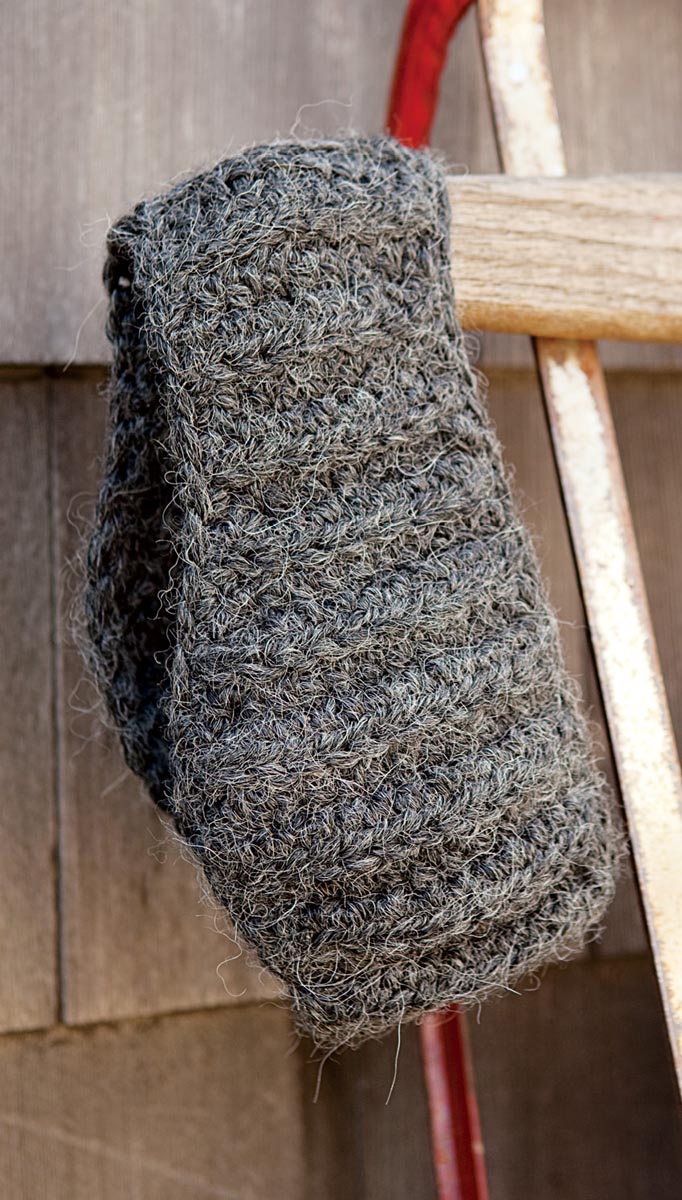
Spike & Loopy, Felted Twins
Designed by Janet Brani
Spike and Loopy are twins! They share the same “mama skein” but have very different hairstyles. These felted vessels are fun to make and take just a couple of hours to crochet. The only thing better than a one-skein project is getting two projects from one skein.
- Finished Measurements:
- Spike: 31⁄2" (9 cm) in diameter and 5" (12.5 cm) high
- Loopy: 4" (10 cm) in diameter and 31⁄2" (9 cm) high
- Yarn: Brown Sheep Lamb’s Pride Bulky, 85% wool/15% mohair, 125 yds (114 m)/4 oz (113 g), Color M-10 Cream
- Crochet Hook: US L/11 (8 mm) or size you need to obtain correct gauge
- Gauge: 8 stitches and 8 rounds = 4" (10 cm) in single crochet before felting
- Other Supplies: Yarn needle
Crocheting Spike
- Begin with an adjustable ring (see page 271).
- Rnd 1: Ch 1, 6 sc in ring, join with slip st to first sc, turn. You now have 6 sc.
- Rnd 2: Ch 1, 2 sc in each sc around, join with slip st to first sc, turn. You now have 12 sc.
- Rnd 3: Ch 1, (2 sc in next 3 sc, sc in next sc) three times, join with slip st to first sc, turn. You now have 21 sc.
- Rnd 4: Ch 1, (2 sc in next sc, sc in next 2 sc) seven times, join with slip st to first sc, turn. You now have 28 sc.
- Rnd 5: Ch 1, BLsc in each st around — this creates a ridge at the base of the bowl, join with slip st to first sc, turn.
- Rnds 6–17: Ch 1, sc in each st around, join with slip st to first sc, turn. Do not turn at end of Rnd 17.
Making the Spikes
- Rnd 18: *Ch 6, slip st in 2nd ch from hook and in next 4 ch, slip st in next 2 sc in Rnd 17, ch 7, slip st in 2nd ch from hook and in next 5 ch, slip st in next 2 sc in Rnd 17, ch 8, slip st in 2nd ch from hook and in the next 6 ch, slip st in next 2 sc in Rnd 17; repeat from * four times; ch 7, slip st in 2nd ch from hook and in next 5 ch, slip st in next 2 sc in Rnd 17, ch 8, slip st in 2nd ch from hook and in the next 6 ch, slip st in next 2 sc in Rnd 17 — 14 spikes made. Fasten off. Weave in ends.
Finishing
- Felt (see page 275) tightly, shape, and dry.
Crocheting Loopy
- Begin with an adjustable ring (see page 271).
- Rnd 1: Ch 1, 6 sc in ring, join with slip st to first sc, turn. You now have 6 sc.
- Rnd 2: Ch 1, 2 sc in each sc around, join with slip st to first sc, turn. You now have 12 sc.
- Rnd 3: Ch 1, (2 sc in next 3 sc, sc in next sc) three times, join with slip st to first sc, turn. You now have 21 sc.
- Rnd 4: Ch 1, (2 sc in next sc, sc in next 2 sc) seven times, join with slip st to first sc, turn. You now have 28 sc.
- Rnd 5: Ch 1, (2 sc in next sc, sc in next 3 sc) seven times, join with slip st to first sc, do not turn. (Note that the Spike bowl did turn at this point in the pattern.) You now have 35 sc.
- Rnd 6: Ch 1, BLsc in each st around — this creates a ridge at the base of the bowl, join with slip st to first sc, turn.
- Rnds 7–12: Ch 1, sc in each st around, join with slip st to first sc, turn.
- Rnd 13: Ch 1, (sc in next 5 sc, sc2tog) five times, join with slip st to first sc, do not turn. You now have 30 sc.
Making the Loops
- Rnd 14: (Ch 8, slip st in the next sc, ch 10, slip st in the next sc, ch 12, slip st in the next sc) 10 times, for a total of 30 loops. End with a slip st at the base of the first loop. Fasten off and weave in tails.
Finishing
- Felt (see page 275) tightly, shape, and dry.