Super-Fine Weight
JoAnn’s Scarf
Designed by Marcia Sommerkamp
This scarf was stitched for a friend who is an avid sock knitter, so the material was obvious! Easy enough for a beginner and soft enough to double and loop through, this makes a great gift idea for men or women.
- Finished Measurements: 84" (213.5 cm) long and 41⁄2" (11.5 cm) wide
- Yarn: Berroco Comfort Sock, 50% super fine nylon/50% super fine acrylic, 447 yds (412 m)/3.5 oz (100 g), Color 1816
- Crochet Hook: US E/4 (3.5 mm) or size you need to obtain correct gauge
- Gauge: 11 stitches and 6 rows = 2" (5 cm) in pattern
- Other Supplies: Yarn needle
Crocheting the Scarf
- Chain 26.
- Row 1: Sc in 2nd chain from hook, dc in same st; *ch 1, skip next 2 ch, (sc, dc) in next ch; repeat from * across to last 3 sts, ch 1, skip 2 ch, sc in last ch, turn.
- Row 2: Ch 1, (sc, dc) in first st, ch 1, *(sc, dc) in next sc, ch 1; repeat from * across, ending with sc in last sc, turn.
- Repeat Row 2 for pattern to desired length.
Finishing
- Fasten off. Weave in ends. Block lightly.
Switchback Scarf
Designed by Ryan Hollist
The innovative color effect in this scarf is created by crocheting with alternating ends of the skein, and the switchback design emphasizes the varying colors. The extra-long length is great for wrapping!
- Finished Measurements: Approximately 130" (330 cm) long and 3" (7.5 cm) wide
- Yarn: Noro Taiyo Sock, 50% cotton/ 17% wool/17% nylon/16% silk, 459 yds (420 m)/3.5 oz (100 g), Color 06
- Crochet Hook: US D/3 (3.25 mm) or size you need to obtain correct gauge
- Gauge: 20 stitches and 9 rows = 4" (10 cm) in double crochet; exact gauge is not essential
- Other Supplies: Yarn needle
Crocheting the Scarf
Note: When switching strands, rotate the work so that the strand is being picked up with the same side facing that was last worked.
- With Strand 1, make an adjustable ring (see page 271).
- Row 1 (RS): Ch 2 (does not count as st), 9 dc in ring, close ring, dc in beg ch-2 space, dc in first dc, work 6 fdc, ch 2, sc in bottom of fdc just made, drop Strand 1 to be picked up later.
- Row 2: With RS facing, join Strand 2 with a slip st in ch at base of second fdc, 2 dc in the first 9 dc of Row 1, dc in next 7 dc, (dc, ch 2, sc) in next dc.
- Row 3: With Strand 2, turn, skip sc and ch-2 space at end of last row, 5 dc in next dc, dc in next 7 dc, (dc, ch 2, sc) in next dc, drop Strand 2 to be picked up later.
- Row 4: Pick up Strand 1, turn, 2 dc in side of sc 2 rows below (insert hook under outside “leg” loops of sc), working across sts of previous row, 2 dc in next 5 dc, dc in next 7 dc, (dc, ch 2, sc) in next dc.
- Row 5: With Strand 1, turn, skip sc and ch-2 space at end of last row, 5 dc in next dc, dc in next 7 dc, (dc, ch 2, sc) in next dc, drop Strand 1 to be picked up later.
- Row 6: Rotate work, pick up Strand 2, 2 dc in side of sc 2 rows below (insert hook under outside “leg” loops of sc), working across sts of previous row, 2 dc in next 5 dc, dc in next 7 dc, (dc, ch 2, sc) in next dc.
- Repeat Rows 3–6 until scarf is desired length, ending with Row 4 of pattern.
- Row A: With Strand 1, turn, skip sc and ch-2 space at end of last row, 7 dc in next dc, skip next dc, slip st in next dc. Fasten off Strand 1. Weave in end.
- Row B: Rotate work, pick up Strand 2, turn, 2 dc in side of sc 2 rows below, working across sts of previous row, 2 dc in next 7 dc; working across 2 rows below, slip st in second dc from last slip st made. Fasten off Strand 2. Weave in end.
“Practice Makes Perfect” Scarf
Designed by Beth Graham
Tunisian simple stitch worked in subtly variegated shades of blue and purple combines with a picot edge to make this light and romantic scarf, which can also be worn as a shawlette.
- Finished Measurements: Approximately 60" (152.5 cm) long and 71⁄2" (19 cm) wide
- Yarn: Dream in Color Smooshy Sock Yarn, 100% superfine Australian merino wool, 450 yds (411 m)/4 oz (113 g), Color 230 Deep Seaflower
- Crochet Hooks: US H/8 (5 mm) afghan hook or size you need to obtain correct gauge and crochet hook one size smaller
- Gauge: 20 stitches and 17 rows = 4" (10 cm) in pattern on afghan hook
- Other Supplies: Yarn needle
Crocheting the First End of the Scarf
- With afghan hook, ch 3. Pick up loops in 2nd and 3rd chain from hook (3 loops total on hook). Work return row as for Tunisian simple stitch (TSS) (see page 274).
- Row 1 (Increase Row): Pick up loop in second vertical bar as usual for TSS (2 loops on hook); pick up loop in the space before next vertical bar (3 loops on hook); pick up loop in each st to end of forward row; work return row. Note: The extra stitch created in the space between vertical bars makes a small eyelet along the edge of the fabric.
- Row 2: Work even in TSS.
- Repeat Rows 1 and 2 until you’ve completed 70 rows, or until scarf is approximately 71⁄2" (19 cm) wide, unblocked.
Crocheting the Back of the Scarf
- Row 1: Pick up loop in second vertical bar (2 loops on hook); pick up loop in space before next vertical bar (3 loops on hook); skip next bar and pick up loop in following vertical bar (4 loops on hook); continue picking up loops normally to end of forward row; work return row. Note: Row 1 maintains the eyelet edging established in the first part of the scarf without increasing stitches.
- Row 2: Work even in TSS.
- Repeat Rows 1 and 2 for 110 rows, or until total length of scarf is approximatley 43" (109 cm), unblocked.
Crocheting the Second End of the Scarf
- Row 1 (Decrease Row): Pick up loop in second vertical bar (2 loops on hook); pick up loop in the space before the next vertical bar (3 loops on hook); skip next bar and pick up loop in following vertical bar (4 loops on hook); continue picking up loops normally to end of forward row; work return row until 3 loops remain on hook, yo and draw through all 3 loops. Note: The extra loop made between vertical bars on the forward row continues the established eyelet effect, while the last step of the return row decreases the row by 1 st.
- Row 2: Work even in TSS.
- Repeat Rows 1 and 2 until 3 sts remain, ending with Row 1.
- Last Row: Bind off TSS (see page 274). Do not fasten off.
Crocheting the Border
Note: As you look along the edge of the scarf, notice that the edge stitches have created a V effect that mimics a single crochet stitch. You will treat these Vs like single crochet stitches for the purposes of the border. For example, when border instructions say “sc in back loop of each edge st,” you will create a single crochet in the back loop of the V.
- With RS facing and smaller crochet hook, ch 1, 3 sc in same space as last bound-off st, sc in back loop of each edge st across, 3 sc in corner edge st, sc across to next corner, 3 sc in corner st, sc in next eyelet, tight picot-3, *sc in next edge st, sc in next eyelet, tight picot-3 (see page 274); repeat from * to end of scarf, 3 sc in corner st, sc across to first sc, join with slip st to first sc. Fasten off.
Finishing
- Weave in ends. Wet block to shape.
Simply Elegant Scarf
Designed by Annalee Rose
This lovely double-layered scarf, suitable for a winter bride, features an open crochet pattern worked in the round. Beads are incorporated in a random pattern using the hook method.
- Finished Measurements: Approximately 48" (122 cm) long and 5" (12.5 cm) wide
- Yarn: Swans Island Organic Fingering Yarn, 100% merino wool, 580 yds (530 m)/3.5 oz (100 g), Color 111 Natural
- Crochet Hooks: US K/101⁄2 (6.5 mm) or size you need to obtain correct gauge and steel US 10 (1.15 mm) for beading
- Gauge: 4 shells and 6 rounds = 4" (10 cm) in shell pattern
- Other Supplies: Approximately 300 (about 15 g) size 6° opaque ivory luster seed beads, yarn needle
Pattern Essentials
Shell: (2 dc, ch 1, 2 dc) in same st.
Hooking beads: To place a bead with the hook method, pick up a bead with the small steel hook. Slip the loop from working larger hook, pick up the loop with the small hook, slide one bead onto the loop, reinsert larger hook and continue with the stitch.
Crocheting the Scarf
- Loosely ch 40; being careful not to twist the chain, join in a ring with a slip st to first ch.
- Foundation Rnd: Ch 1, sc in each ch around, join with a slip st to first sc. You now have 40 sc.
- Rnd 1: Ch 3 (counts as dc), (dc, ch 1, 2 dc) in same st, *skip next 3 sc**, shell in next st; repeat from * around, ending last repeat at **, join with slip st to top of ch-3.
- Rnd 2: Placing beads randomly using the hook method, slip st in next st, slip st in ch-1 space, ch 3, (dc, ch 1, 2 dc) in same space, *skip 4 dc, shell in next ch-1 space; repeat from * around, join with slip st to top of ch-3. Repeat Rnd 2 until piece measures 48" (122 cm) or desired length from beginning.
- Finishing Rnd: Ch 1, sc in same st, sc in each dc around, skipping over each ch-1 space, join with slip st to top of first sc. You now have 40 sc. Do not fasten off.
Finishing
- Edging: To close up the end, line up rows of the stitch pattern and slip st through both top loops of matching sc pairs, placing a bead in every other stitch. Join with a slip st to first st. Fasten off.
- Matching the pattern rows along the length to avoid twisting the scarf, join yarn and work edging across other end, working through the bottom loops of foundation chain. Fasten off. Weave in ends. Lightly block.
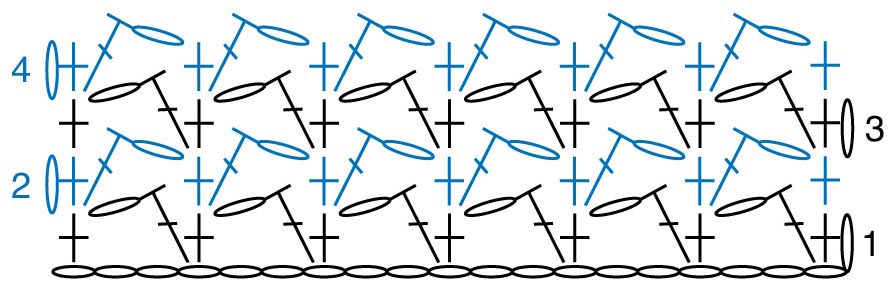
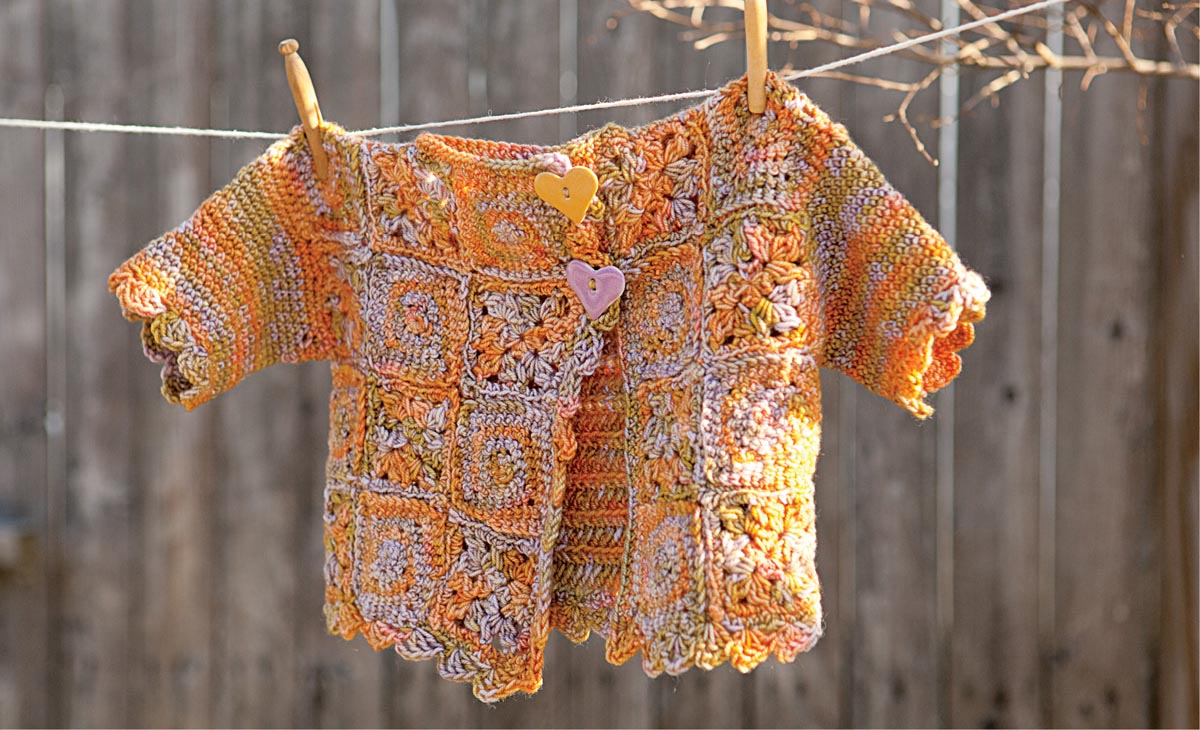
Autumn Camouflage Scarf
Designed by Janet Brani
The simple change from single crochet to treble and back creates a camouflage pattern with this autumn-hued sock yarn. The five button-on flowers can be scattered across the treble rows, or grouped tightly together to form one large flower embellishment.
- Finished Measurements: 68" (172.5 cm) long and 51⁄2" (14 cm) wide
- Yarn: Zitron Trekking XXL, 75% superwash wool/25% nylon, 459 yds (420 m)/ 3.5 oz (100 g), Color 470
- Crochet Hook: US E/4 (3.5 mm) or size you need to obtain correct gauge
- Gauge: 20 stitches and 20 rows = 4" (10 cm) in single crochet
- Other Supplies: Five 3⁄4" (19 mm) buttons or size needed to snugly button through treble crochet rows
Crocheting the Scarf
- Chain 26.
- Row 1: Sc in 2nd chain from hook and in each chain across, turn. You now have 25 sc.
- Rows 2–12: Ch 1, sc in each sc across, turn.
- Rows 13–15: Ch 4 (counts as tr), skip first st, tr in each st across, turn.
- Row 16: Ch 1, sc in each st across, turn.
- Repeat Rows 2–16 thirteen more times, then work Rows 2–12 once more. Fasten off and weave in ends.
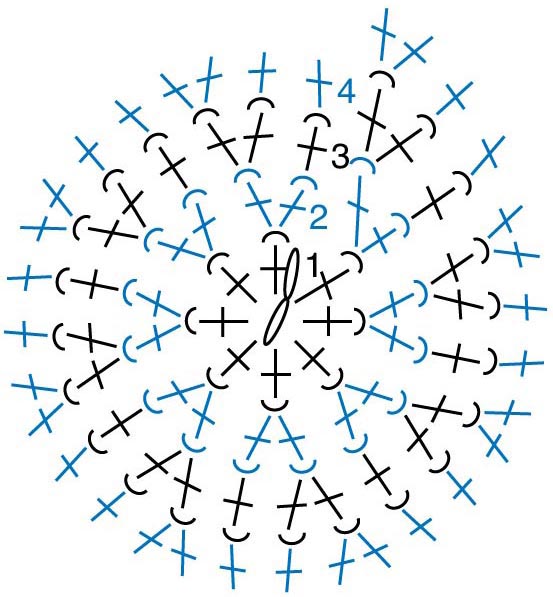
Crocheting the Flower Embellishments (make 5)
- Chain 4.
- Rnd 1: 11 dc into 4th ch from hook (beginning ch counts as first dc), join with slip st to top of beginning ch-4.
- Rnd 2: Ch 1, sc in same st, *(hdc, 2 tr, hdc) in next dc**, sc in next dc; repeat from * around, ending last repeat at **, join with slip st to first sc. You now have six petals. Fasten off. Weave in ends.
Finishing
- Sew each flower loosely to a button. Arrange four flowers in a circle around the fifth flower on the end treble section. Push buttons between stitches to secure.
Easy-to-Wear Cowl
Designed by Edie Eckman
It’s amazing what one can do with a few simple stitches and a skein of lovely variegated yarn. This colorful striped cowl is worked mostly with chain stitches and single crochet, with the occasional double crochet.
- Finished Measurements: Approximately 28" (71 cm) circumference and 12" (30.5 cm) deep
- Yarn: Noro Silk Garden Sock, 40% lamb’s wool/25% silk/25% nylon/10% kid mohair, 328 yds (300 m)/35 oz (100 g), Color S302
- Crochet Hook: US G/6 (4 mm) or size you need to obtain correct gauge
- Gauge: 16 stitches or 8 repeats and 12 rows = 4" (10 cm) in Chain-Stitch pattern
- Other Supplies: Yarn needle
Pattern Essentials
Chain-Stitch Pattern
Chain a multiple of 4 plus 2.
Row 1: Sc in 2nd ch from hook, *ch 1, skip 1 ch, sc in next ch; repeat from * across, turn.
Row 2: Ch 5 (counts as dc and ch 2), sc in next space, *ch 5, sc in next space; repeat from * across, ch 2, dc in last sc, turn. You now have 24 ch-spaces.
Row 3: Ch 1, sc in first dc, ch 1, skip 1 space, sc in next space, *ch 1, sc in next space; repeat from * across, turn.
Row 4: Ch 1, sc in first sc, sc in next space, *ch 1, sc in next space; repeat from * to last sc, sc in last sc, turn.
Row 5: Ch 1, sc in first sc, ch 5, sc in next space; repeat from * across, ending ch 5, sc in last sc, turn.
Row 6: Ch 3 (counts as dc), sc in next space, *ch 1, sc in next space; repeat from * across, end dc in last sc, turn.
Row 7: Ch 1, sc in first dc, *ch 1, sc in next space; repeat from * across, end ch 1, sc in top of turning ch, turn.
Repeat Rows 2–7 for pattern.
Crocheting the Cowl
- Chain 48.
- Row 1: Work Row 1 of Chain-Stitch pattern. You now have 24 sc and 23 ch-1 spaces.
- Continue in Chain-Stitch pattern until piece measures approximately 27" (69 cm), ending with Row 4 of pattern. Fold cowl in half so that foundation chain is above last row worked. The Joining Row will be worked into next row and into ch-spaces formed by foundation chain and Row 1 of cowl.
- Joining Row: Ch 1, sc in first sc, ch 2, sc in first space of foundation chain, ch 2, sc in next space of current row, *ch 2, sc in next space of foundation chain, ch 2, sc in next space of current row; repeat from * across, ending with last sc in last sc. Do not fasten off.
Crocheting the Edging
- Row 1: Working along edge of cowl, ch 1, sc in same st, ch 1, sc in edge of next ch-space; continue to (ch 1, sc) evenly along edge, spacing sts to allow edging to lie flat without bunching or rippling; end by joining with sc to first sc.
- Row 2: Ch 1, sc in space formed by joining sc, ch 1, *sc in next space, ch 1; repeat from * around, join with slip st to first sc. Fasten off.
- Join yarn to opposite edge of cowl and work the edging. Weave in ends.
Sea Breeze Shawlette
Designed by Kristen Stoltzfus
This lacy half-moon-shaped cover-up is quick to make and easy to wear. It features an optional, amigurumi-like flower pin that can be used as a corsage or shawl closure. The yarn is easy to care for, too.
- Finished Measurements:
31" (79 cm) from tip to tip, 13"/ 33 cm wide at center back
- Yarn: Kraemer Yarns Saucon Sock, 44% cotton/43% acrylic/13% nylon, 430 yds (393 m)/3.5 oz (100 g), Color Y5030 Turquoise
- Crochet Hook: US E/4 (3.5 mm) or size you need to obtain correct gauge
- Gauge: First 10 rows = 4" (10 cm) in diameter
- Other Supplies: Yarn needle, pins for blocking, pin back for flower
Pattern Essentials
Beg shell: (Ch 3, dc, ch 2, 2 dc) in same st.
Shell: (2 dc, ch 2, 2 dc) in same st.
Beg V-st: (Ch 6, dc) in same st.
V-st: (Dc, ch 3, dc) in same st.
Crocheting the Shawlette
See charts on pages 50 and 51.
- Row 1: Ch 4 (first 3 ch count as dc), work 10 dc in 4th ch from hook, turn. You now have 11 dc.
- Row 2 (RS): Ch 5 (counts as tr and ch 1), tr in same st, ch 1, (tr, ch 1) two times in next 4 dc, (tr, ch 1) three times in next dc, (tr, ch 1) two times in next 4 dc, (tr, ch 1, tr) in last dc, turn. You now have 23 tr and 22 ch-1 spaces.
- Row 3: Ch 5 (counts as dc and ch 2), *sc in next tr, ch 2, dc in next tr**, ch 2; repeat from * across, ending last repeat at **, turn. You now have 12 dc and 11 sc.
- Row 4: Beg shell in first dc, (ch 2, shell in next dc) across, turn. You now have 12 shells.
- Row 5: Slip st in next dc and in ch-2 space, beg shell in same space, (ch 3, shell in next shell) across, turn.
- Row 6: Slip st in next dc and ch-2 space, beg V-st in same space, (ch 3, sc in next space, ch 3, V-st in next shell space) across, turn. You now have 12 V-sts.
- Row 7: Slip st in V-st, ch 1, sc in same space, (ch 9, sc in next V-st) across, turn. You now have 11 ch-spaces.
- Row 8: Slip st in first space, ch 3, dc in same space, (ch 2, 2 dc) three times in same space, [(ch 2, 2 dc) four times in next space] across, turn. You now have 88 dc.
- Row 9: Slip st in next dc and ch-2 space, ch 6 (counts as tr and ch 3), tr in next ch-2 space, (ch 3, tr in next ch-2 space) across, turn. You now have 43 tr.
- Row 10: Beg V-st in first tr, (ch 2, sc in next tr, ch 2, V-st in next tr) across, ending with last V-st in 4th ch of beginning ch-7, turn. You now have 22 V-sts and 21 sc.
- Row 11: Slip st in V-st, ch 1, sc in same space, (ch 7, sc in next V-st) across, turn. You now have 21 ch-spaces.
- Row 12: Slip st to center of first ch-7 space, beg shell in same space, (ch 3, shell in next space) across, turn. You now have 21 shells.
- Row 13: Slip st in next dc and ch-2 space, beg shell in same space, (ch 4, shell in next shell) across. You now have 21 shells.
- Rows 14–30: Repeat Rows 6–13 twice. Repeat Row 6 once more. Do not turn or fasten off.
Crocheting the Edging
- Working across the neck edge, sc in side of last V-st, work (ch 2, sc) evenly across neck edge, join with slip st in 3rd ch of first V-st. Fasten off.
Finishing
- Weave in ends. Mist with water and pin, stretching fabric slightly to open up lace pattern. Let dry completely.
Crocheting the Flower (optional)
Crocheting the Flower Base
- Rnd 1: Leaving a long end for sewing, ch 2, work 8 sc in 2nd ch from hook; do not join. Work in a spiral.
- Rnd 2: Working in back loops only, sc in each sc around, increasing by working 2 sc in 1 sc as often as needed to keep the work flat; do not join.
- Repeat Rnd 2 until circle measures 2" (5 cm) in diameter; slip st in next sc, do not fasten off.
Crocheting the Petals
- Ch 1, turn, working first in both loops around edge and then in free front loops of circle, (sc, ch 3, sc) in first sc, skip next sc, *(sc, ch 3, sc) in next sc, skip next sc; repeat from * around, join with slip st down through center. Fasten off.
- Weave in the nonsewing end. With yarn needle threaded on sewing end, sew to pin back. Use as a corsage or as closure to shawlette.
Secret Garden Shrug
Designed by Erica Jackofsky
The Secret Garden Shrug is worked side to side in rows, and the sleeve sections are seamed together. A change in stitch pattern and hook size allows the back portion of the shrug to expand, and the openness and elasticity of the stitch allows for aggressive blocking to accommodate wider shoulders. The sample shown was not blocked to its full potential.
- Finished Measurements:
- Finished circumference of cuffs: 91⁄4" (111⁄2", 121⁄2")/23.5 (29, 32) cm
- Finished width: 251⁄2" (291⁄2", 291⁄2")/65 (75, 75) cm
- Finished back depth: 14" (171⁄4", 19")/35.5 (44, 48.5) cm
- Yarn: Noro Kureyon Sock, 70% wool/30% nylon, 459 yds (420 m)/3.5 oz (100 g), Color S188
- Crochet Hooks: US G/6 (4 mm) and US E/4 (3.5 mm) or sizes you need to obtain correct gauge
- Gauge: With smaller hook, 22 stitches and 20 rows = 4" (10 cm) in Woven Stitch pattern; with larger hook, 21 stitches and 7 rows = 4" (10 cm) in Rope Stitch pattern
- Other Supplies: Yarn needle
Pattern Essentials
Woven Stitch Pattern
Chain an even number of sts.
Row 1: Sc in 2nd ch from hook, *ch 1, skip 1 ch, sc in next ch; repeat from * across, turn.
Row 2: *Ch 1, sc in next ch-1 space; repeat from * across, turn.
Repeat Row 2 for pattern.
Rope Stitch Pattern
Chain a multiple of 2 plus 1 sts.
Row 1: Dc in 4th ch from hook, ch 1, dc in same ch, *skip next ch, (dc, ch 1, dc) in next ch; repeat from * across to last ch, dc in last ch, turn.
Row 2: Ch 3 (counts as dc), *(dc, ch 1, dc) in next ch-1 space, repeat from * across to last st, dc in top of turning ch, turn.
Repeat Row 2 for pattern.
Crocheting the First Cuff
- Using smaller hook, ch 52 (64, 70).
- Work in Woven Stitch pattern until cuff measures 21⁄2" (3", 3")/ 6.5 (7.5, 7.5) cm) from beginning.
Crocheting the Back
- Change to larger hook.
- Row 1: Ch 3 (counts as dc), *(dc, ch 1, dc) in next ch-1 space; repeat from * across, dc in last ch-1 space, turn.
- Beginning with Row 2, work in Rope Stitch pattern for 35 (40, 40) rows.
Crocheting the Second Cuff
- Change to smaller hook.
- Row 1: Ch 1, *sc in next ch-1 space, ch 1; repeat from * across to last st, sc in top of turning ch, turn.
- Row 2: *Ch 1, sc in next ch-1 space; repeat from * across, turn.
- Beginning with Row 2, work in Woven Stitch pattern until cuff measures 21⁄2" (3", 3")/6.5 (7.5, 7.5) cm from beginning. Fasten off. Weave in ends.
Finishing
- Block shrug to match your desired proportions.
- Thread a needle with yarn. Lay the piece on a flat surface with the WS facing up. Seam together the side sections of cuffs.
Autumn Leaves Shawlette
Designed by Lindsey Stephens
This romantic triangular shawlette can double as a scarf. The stitch pattern is open and airy, and the motifs resemble hearts or butterflies. The fabric of the shawl may look crinkled as you crochet, but it will smooth out with blocking.
- Finished Measurements: 51" (129.5 cm) wide and 23" (58.5 cm) deep, blocked
- Yarn: Juniper Moon Farm Findley, 50% merino wool/50% silk, 798 yds (730 m)/3.5 oz (100 g), Color 09 Bittersweet
- Crochet Hook: US D/3 (3.25 mm) or size you need to obtain correct gauge
- Gauge: Swatch = 5" (12.5 cm) wide and 21⁄2" (6.5 cm) tall after blocking
- Other Supplies: Four locking stitch markers, yarn needle
Pattern Essentials
Dc pm: Make 1 dc, then place marker in dc just made.
Large Shell: (3 dc, ch 1, dc, ch 1, 3 dc) in same st.
Shell: (3 dc, ch 3, 3 dc) in same st.
Sc pm: Make 1 sc, then place marker in sc just made.
Crocheting the Swatch
- Chain 34.
- Row 1 (WS): Sc in 2nd ch from hook and in each ch across. You now have 33 sc.
- Row 2: Ch 4 (counts as dc and ch 1), 3 dc in same st, skip 3 sc, sc in next sc, *skip 3 sc, large shell in next sc, skip 3 sc, sc in next sc; repeat from * to last 4 sts, skip 3 sc, (3 dc, ch 1, dc) in last sc, turn. You now have 3 large shells and 2 partial large shells.
- Row 3: Ch 1, sc in first dc, ch 3, dc in next sc, *ch 3, sc in center dc of next shell, ch 3, dc in next sc; repeat from * two more times, ch 3, sc in 3rd ch of ch-4, turn. You now have 8 ch-3 spaces.
- Row 4: Ch 1, sc in first sc, *large shell in next dc, sc in next sc; repeat from * across, turn. You now have 4 shells.
- Row 5: Ch 6 (counts as dc and ch 3), *sc in center dc of next shell, ch 3, dc in next sc**, ch 3; repeat from * across, ending last repeat at **, turn.
- Row 6: Ch 4 (counts as dc and ch 1), 3 dc in first dc, sc in next sc, *large shell in next dc, sc in next sc; repeat from * two more times, (3 dc, ch 1, dc) in 3rd ch of ch-6, turn.
Crocheting the Shawl Pattern
See chart below.
- Chain 34.
- Row 1 (WS): Sc in 2nd ch from hook and in each ch across, turn. You now have 33 sc.
- Row 2 (RS): Ch 1, sc in first sc, *skip 3 sc, (3 dc, ch 1, dc, ch 1, dc pm, ch 1, 3 dc) in next sc, skip 3 sc, sc in next sc; repeat from * three more times, turn. You now have 12 ch-1 spaces.
- Row 3: Ch 7 (counts as tr and ch 3), dc in first sc, *ch 3, sc in marked dc, remove marker, 3 sc in next ch-1 space, sc in next dc, ch 3**, dc in next sc; repeat from * across, ending last repeat at **, (dc, ch 3, tr) in last sc, turn. You now have 10 ch-3 spaces.
- Row 4: Ch 1, sc in first st, shell in next dc, sc pm, ch 5, skip 3 sc, sc in next sc, shell in next dc, sc in next sc, ch 5, skip 3 sc, sc pm, shell in next dc, sc pm, ch 5, skip 3 sc, sc in next sc, shell in next dc, sc in next sc, ch 5, skip next 3 sc, sc pm, shell in next dc, sc in 4th ch of beg ch-7, turn.
- Row 5: Moving each marker up to the dc made in that marked sc across, ch 6 (counts as dc and ch 3 here and throughout), sc in first ch-3 space, ch 3, dc in next sc, *ch 3, sc in next ch-3 space, ch 3, dc in next sc; repeat from * across, turn.
- Row 6: Note: As you come to each marker on this row, remove it from the previous row and replace it in the designated st. Ch 4 (counts as dc and ch 1 here and throughout), 3 dc in first dc, sc in next sc, (3 dc, ch 1, dc, ch 1, dc pm, ch 1, 3 dc) in next marked dc, sc in next sc, *large shell in next dc, sc in next sc; repeat from * to marker, (3 dc, ch 1, dc, ch 1, dc pm, ch 1, 3 dc) in next marked dc, sc in next sc, (3 dc, ch 1, dc, ch 1, dc pm, ch 1, 3 dc) in next marked dc, sc in next sc, **large shell in next dc, sc in next sc; repeat from ** to marker, (3 dc, ch 1, dc, ch 1, dc pm, ch 1, 3 dc) in marked dc, sc in next sc, (3 dc, ch 1, dc) in last dc, turn.
- Row 7: Ch 1, sc in first dc, ch 3, dc in next sc, ch 3, sc in marked dc, remove marker, 3 sc in next ch-1 space, sc pm in next dc, ch 3, dc in next sc, ch 3, *sc in center dc of next large shell, ch 3, dc in next sc, ch 3; repeat from * to marker, sc in marked dc, remove marker, 3 sc in next ch-1 space, sc pm in next dc, ch 3, dc in next sc, ch 3, sc in marked sc, remove marker, 3 sc in next ch-1 space, sc pm in next dc, ch 3, dc in next sc, ch 3, ** sc in center dc of next large shell, ch 3, dc in next sc, ch 3; repeat from ** to marker, sc in marked dc, remove marker, 3 sc in next ch-1 space, sc pm in next dc, ch 3, dc in next sc, ch 3, sc in last dc, turn.
- Row 8: Ch 1, sc in first sc, shell in next dc, sc pm in marked sc (moving up marker from last row), ch 5, skip 3 sc, sc in next sc, shell in next dc, * sc in next sc, shell in next dc; repeat from * to marker, sc in marked sc, remove marker, ch 5, skip 3 sc, sc pm in next sc, shell in next dc, sc pm in next marked sc (moving up marker from last row), ch 5, skip 3 sc, sc in next sc, shell in next dc, **sc in next sc, shell in next dc; repeat from ** to next marker, sc in marked sc, remove marker, ch 5, skip 3 sc, sc pm in next sc, shell in next dc; sc in last sc, turn.
- Repeat Rows 5–8 eleven more times; do not cut yarn.
Crocheting the Edging
- Row 1: Work shawl body Row 5, removing markers.
- Row 2: Ch 1, sc in first dc, *shell in next sc, sc in next dc; repeat from * across.
- Row 3: Repeat edging Row 1.
- Row 4: Repeat edging Row 2. Fasten off.
Finishing
- Block to finished measurements and weave in ends.
Flower Power Purse
Designed by Judith Durant
There’s no end to the fun you can have choosing yarn and buttons for this purse. And while it’s not the quickest project to stitch, it’s very easy and very portable.
- Finished Measurements: Approximately 17" (43 cm) in circumference and 5" (12.5 cm) tall
- Yarn: Cascade Yarn Heritage, 75% superwash merino wool/25% nylon, 437 yds (400 m)/3.5 oz (100 g), Color 5627
- Crochet Hook: US E/4 (3.5 mm) or size you need to obtain correct gauge
- Gauge: 22 stitches and 18 rounds = 4" (10 cm) in double crochet
- Other Supplies: Thirty locking stitch markers, yarn needle, thirty 1⁄2" (13 mm) shank buttons, sewing needle, coordinating sewing thread
Crocheting the Flowers (make 30)
See chart below.
- Chain 6; join with slip st to first ch to form a ring.
- Rnd 1: Ch 3 (counts as dc), 23 dc in ring, join with slip st to top of ch-3. You now have 24 dc.
- Rnd 2: Ch 1, sc in same st, FLsc in next 23 dc, join with slip st to first sc.
- Rnd 3: Ch 1, sc in first st, *(hdc, dc, tr) in next st, (tr, dc, hdc) in next st, sc in next st; repeat from * around, omitting last sc, join with slip st to first sc. Fasten off. Weave in ends.
Crocheting the Bag
- Begin with an adjustable ring (see page 271).
- Rnd 1: Work 12 dc into ring.
- Rnd 2: Ch 3 (counts as dc), dc in same st, 2 dc in each dc around, join with slip st to top of ch-3. You now have 24 dc.
- Rnd 3: Ch 3 (counts as dc), dc in same st, *dc in next st**, 2 dc in next dc; repeat from * around, ending last repeat at **, join with slip st to top of ch-3. You now have 36 dc.
- Rnd 4: Ch 3 (counts as dc), dc in same st, *dc in next 2 dc**, 2 dc in next dc; repeat from * around, ending last repeat at **, join with slip st to top of ch-3. You now have 48 dc.
- Rnd 5: Ch 3 (counts as dc), dc in same st, *dc in next 3 dc**, 2 dc in next dc; repeat from * around, ending last repeat at **, join with slip st to top of ch-3. You now have 60 dc.
- Rnds 6–9: Continue in this manner, working 1 more dc between the increases on each rnd, until you have 7 dc between the increases. You now have 108 dc.
- Rnd 10: Ch 3 (counts as dc), dc in same st, dc in next 53 dc, 2 dc in next dc, dc in next 53 dc, join with slip st to top of ch-3. You now have 110 dc. Mark this rnd.
- Rnds 11–27: Ch 3 (counts as dc), dc in each dc around, join with slip st to top of ch-3.
- Rnd 28: Ch 1, starting in first st, *sc in next 9 dc, sc2tog; repeat from * around; join with slip st to first sc. You now have 100 sts.
- Rnd 29: Ch 1, starting in first st, *sc in next 8 dc, sc2tog; repeat from * around; join with slip st to first sc. You now have 90 sts. Do not fasten off.
Crocheting the Strap
- Row 1: Ch 1, sc in first 10 sts, turn. You now have 10 sts.
- Row 2: Ch 1, sc in each sc across, turn.
- Repeat Row 2 until strap measures 16" (40.5 cm) or desired length. Join with slip st to 10 sts directly opposite beg 10 sts. Weave in ends.
Attaching the Flowers
- Mark the first st of Rnd 13 (3 rnds above marked rnd); mark every 9th st in this rnd. You now have 10 marked sts.
- Mark the 5th st of Rnd 19; mark every 9th st after this marked st around. You now have 20 marked sts.
- Mark the first st of Rnd 17; mark every 9th st after this marked st. You now have 30 marked sts.
- Use sewing needle and thread to sew one button to each marked st and “button” one flower to each. Note: Because the flowers tend to curl in on themselves, the sample shows flowers attached with WS facing out.
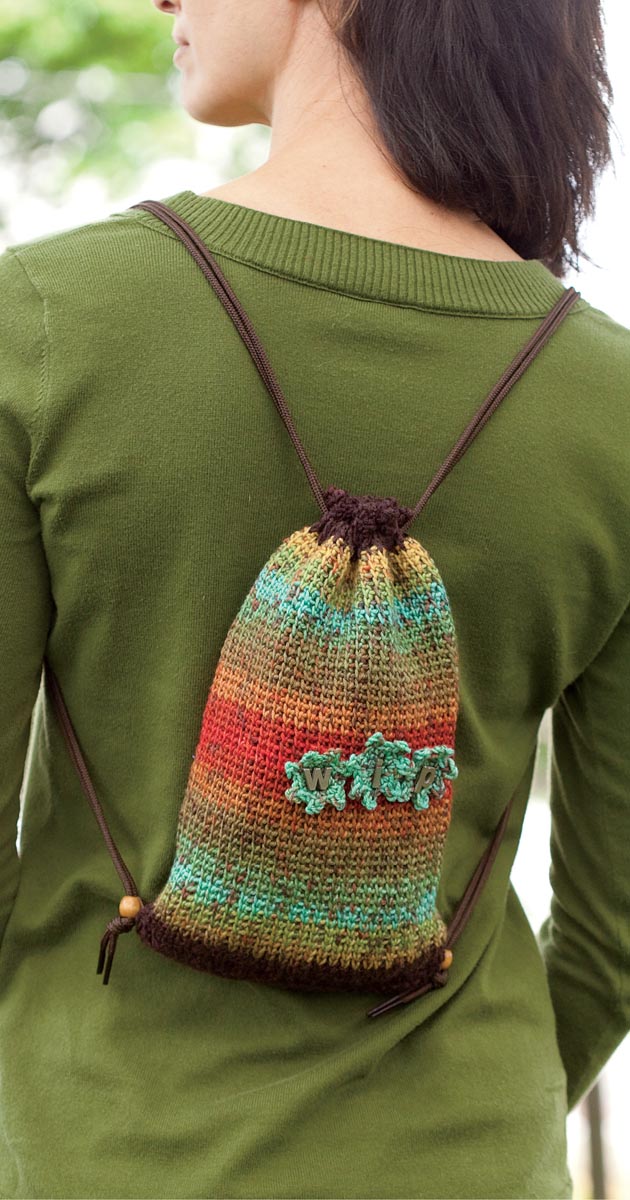
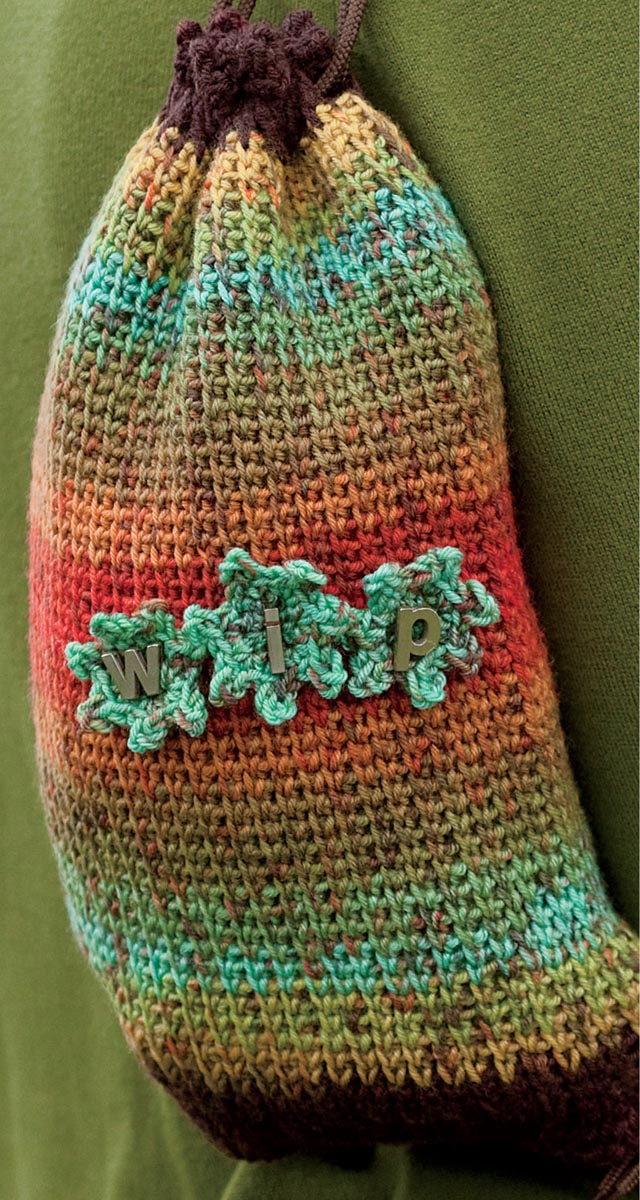
WIP Project Bag
Designed by Janet Brani
Take your latest WIP (work in progress) on the road! Perfectly sized for one-skein projects, this drawstring bag carries like a backpack. Though the stitch looks like Tunisian crochet or knitting, it’s simply done with half double crochet in the round, splitting the stitches. The bag intentionally begins and ends with the dark brown portion of the color repeat. There’s enough yarn in the skein to make I-cord straps if you prefer.
- Finished Measurements: Approximately 61⁄2" (16.5 cm) wide and 11" (28 cm) tall
- Yarn: Zitron Unisono, 100% superwash wool, 330 yds (302 m)/3.5 oz (100 g), Color 1210
- Crochet Hook: US D/3 (3.25 mm) or size you need to obtain correct gauge
- Gauge: 16 stitches and 22 rows = 4" (10 cm)) in half double crochet split stitch
- Other Supplies: Locking stitch marker, yarn needle, one set of 60" (152.5 cm) shoelaces, two 10 mm wooden pony beads, three alphabet letters or other embellishment such as buttons or beads, blocking board and pins, fabric for lining (optional)
Pattern Essentials
Split st: Split stitches are worked into the middle of the stitch (between vertical bars) rather than the top loops of the stitch. This creates a denser fabric and a knitted look. Because you’re working in the round with RS always facing, you’ll always insert the hook between the two vertical bars on the face of the hdc stitch below.
Crocheting the Bag
- Chain 24.
- Rnd 1: 2 hdc in 2nd ch from hook (place marker in first hdc), 2 hdc in next ch, hdc in next 19 ch, 2 hdc in next ch, 4 hdc in last ch (rounding the corner); working on opposite side of foundation ch, 2 hdc in next ch, hdc in next 19 ch, 2 hdc in next ch, work 2 hdc in last ch, do not join. You now have 54 hdc.
- Rnd 2: Work an hdc split st in marked hdc (first hdc of Rnd 1), then work a hdc split st in each hdc around.
- Repeat Rnd 2 until 10" (25.5 cm) from beginning — it is not necessary to mark or count rows. To end, make a sc split st in next 3 hdc and then slip st in top of next 3 sts. Do not fasten off or turn.
Crocheting the Drawstring Mesh
- Chain 4 (counts as tr), work a tr split st in each st around, join with slip st to top of ch-4.
Crocheting the Picot Edge
- Chain 1, *sc in next 3 tr, tight picot-3 (see page 274); repeat from * around, join with slip st to first sc. Fasten off. Weave in ends.
Finishing
- The slight skew created when working in the round can be easily corrected when blocking. Completely wet the bag and squeeze out excess water. Tug the bag into shape against the skew and pin it to a blocking board.
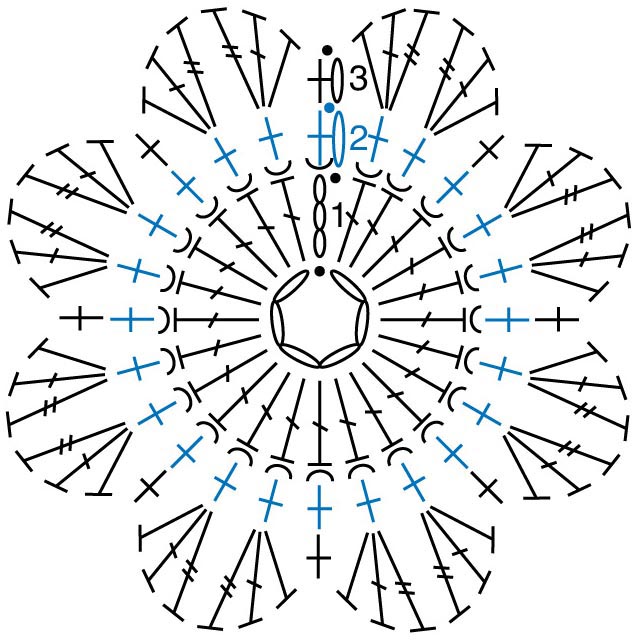
Crocheting the Flowers (make 3)
- Begin with an adjustable ring (see page 271).
- Rnd 1: Ch 1, 7 sc in ring, join with slip st to first sc.
- Rnd 2: Ch 1, (sc, tight picot-3, sc) in each st around. You now have seven petals.
- Tighten the adjustable ring, fasten off, and weave in the ends.
Finishing
- Sew the flowers to the bag in a row with the letters WIP as shown (or use button centers if you prefer). Thread the shoelaces through the top mesh, working one lace from the left side fully around and back out the same slot, and one lace from the RS around and out the same slot. Sew a wooden pony bead to each bottom corner of the bag, thread the lace ends through the beads, and tie a knot close to the beads. Sew beaded ends to lower corners of bag.
- Line the bag if desired.
Resources
Laces used in the sample are Kiwi Outdoor 60" (152.5 cm) Round Brown, product #2121. Shorter laces can be used if you don’t want to use the bag as a backpack.
The metal WIP letters are Alphabet Ribbon Charm alphabets by Making Memories, product #25778.
Tunisian Pouch
Designed by Laura Hontz
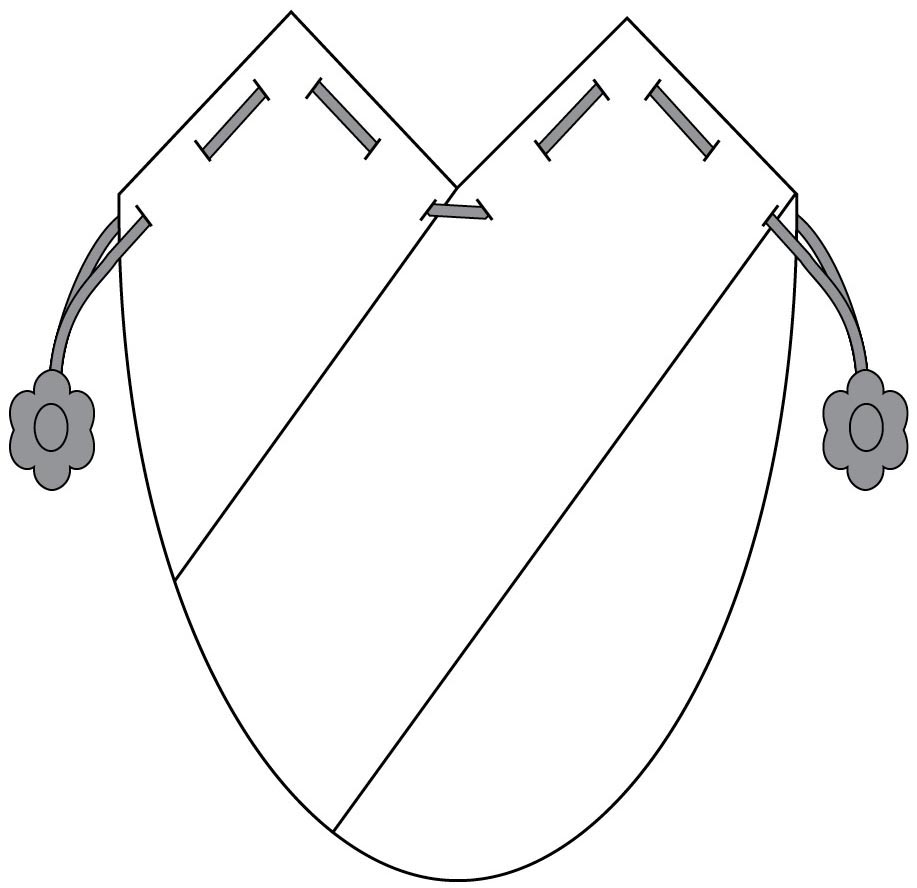
Unique construction makes this little purse stand out from the rest. Four pieces of Tunisian crochet are joined together and topped off with a lovely scalloped edge above the drawstring. Crocheted flowers finish the ends of the drawstrings.
- Finished Measurements: Approximately 101⁄2" (26.5 cm) circumference and 6" (15 cm) deep
- Yarn: Patons Stretch Socks, 41% cotton/39% wool/13% nylon/7% elastic, 239 yds (218 m)/1.75 oz (50 g), Color 31222 Spearmint
- Crochet Hook: US F/5 (3.75 m) afghan hook or size you need to obtain correct gauge
- Gauge: 15 stitches = 21⁄2" (6.5 cm) in Tunisian simple stitch
- Other Supplies: Yarn needle
Crocheting the Strips (make 4)
- Chain 15. Work in Tunisian simple stitch (TSS) (see page 274) until piece measures 6" (15 cm).
- Bind off as follows: Skip first vertical bar, sc under each vertical bar across. Fasten off.
Assembling the Pieces
- Arrange strips as shown in diagram below.
- Thread the yarn needle with a long piece of yarn. Beginning at center where all pieces meet and with WS together, use whipstitch and sew A to B, then B to C, then C to D, and D to A. This forms the bottom of the bag.
- Next, with WS together, line D up along the side of A and slip st the edges together. Next, line A up along the side of B and slip st the edges together. Line B up along side of C and slip st the edges together, and finally line C up with D and slip st the edges together. The top edge of the bag will have four triangles.
Trimming the Top Edge
- With WS facing, join yarn at top edge of bag.
- Rnd 1 (WS): Ch 1, sc in same st and in each st around, working a multiple of 4 sts, join with slip st to first sc.
- Rnd 2: Ch 2 (does not count as st), hdc in same st and in each st around, join with slip st to first hdc, turn. Note: Turning at the end of this and the next round forms holes for the drawstring.
- Rnd 3 (RS): Ch 2 (does not count as hdc), hdc in same st and in next 2 hdc, ch 1, skip 1 st, *hdc in next 3 sts, ch 1, skip 1 st; repeat from * around, join with slip st in first hdc, turn.
- Rnd 4: Ch 2 (does not count as st), hdc in each st and space around, join with slip st to first hdc.
- Rnd 5: Ch 1, sc in same st, skip 2 sts, *5 dc in next st, skip 2 sts; repeat from * as evenly as possible around, join with slip st in first sc. Fasten off.
Crocheting the Flowers and Drawstrings (make 2)
- Rnd 1: Make adjustable ring (see page 271), ch 2 (does not count as st), 12 dc in ring, join with slip st in top of first dc, pull loop tight.
- Rnd 2: Ch 1, BLsc in first st, ch 3, skip 1 dc, *BLsc in next dc, ch 3, skip 1 dc; repeat from * around, join with slip st to first sc. You now have 6 spaces.
- Rnd 3: (Sc, hdc, dc, 2 tr, dc, hdc, sc) in each space around, join with slip st to first sc.
- Ch 120. Fasten off.
Finishing
- Weave ends without flower through Round 3 of top edge trim, each drawstring threaded through the opposite way from the other. Tie chain end to opposite flower ends and secure. Weave in all ends on bag and drawstrings.
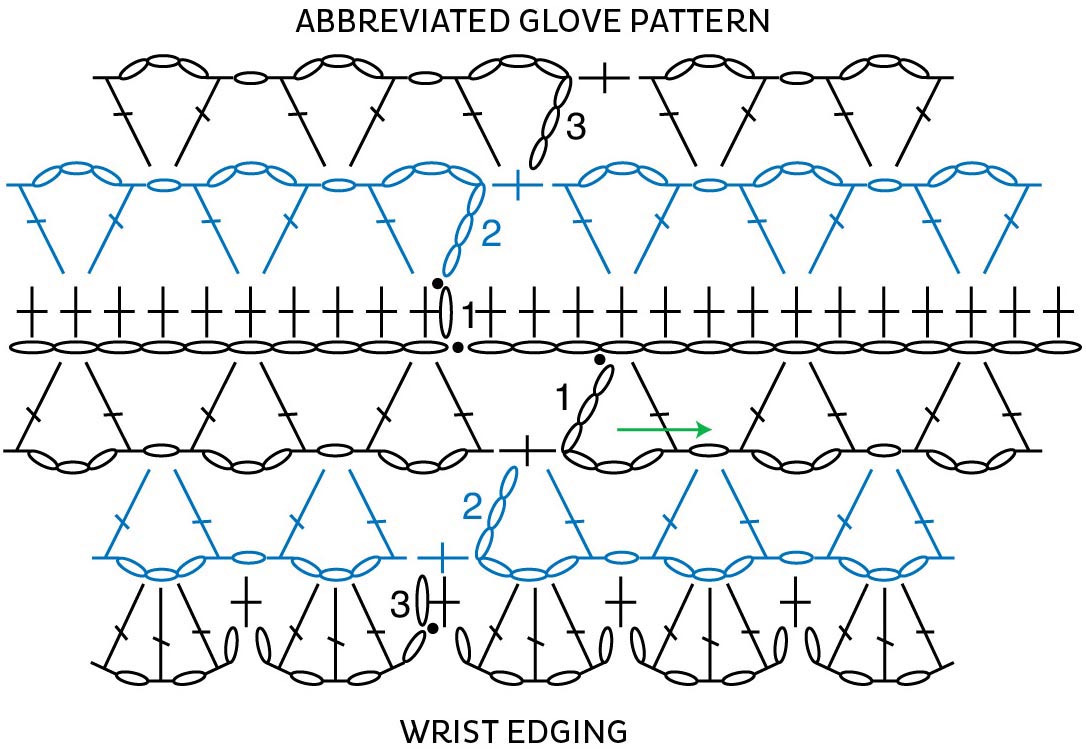
Shell Stitch Fingerless Gloves
Designed by Gail Tanquary
These gloves are crocheted with a post stitch and shell stitch design on the back of the hand and plain double crochet on the palm. After finishing the cuff, join to work in the round and shape a thumb gusset — no sewing required!
- Finished Measurements: 7" (18 cm) circumference and 91⁄2" (24 cm) long
- Yarn: Crystal Palace Sausalito, 80% merino wool/20% nylon, 198 yds (181 m)/1.75 oz (50 g), Color 8108 Mediterranean
- Crochet Hook: US D/3 (3.25 mm) or size you need to obtain correct gauge
- Gauge: 18 stitches and 10 rounds = 4" (10 cm) in double crochet
- Other Supplies: Yarn needle, two 3⁄4" (19 mm) buttons
Pattern Essentials
Shell: (2 dc, ch 2, 2 dc) in same st.
Crocheting the Right Glove
- Chain 34.
- Row 1: Hdc in 3rd ch from hook and each ch across, turn. You now have 32 hdc.
- Row 2: Ch 2 (counts as hdc), hdc in each hdc across, turn.
- Rows 3 and 4: Repeat Row 2.
- Work now progresses in rounds.
- Rnd 5: Ch 3 (counts as dc here and throughout), dc in next 3 hdc, 2 dc in next hdc, dc in next 7 hdc, 2 dc in next hdc, dc in next 6 hdc, 2 dc in next hdc, dc in next 7 hdc, 2 dc in next hdc, dc in last 4 hdc, join with slip st to top of beg ch-3. You now have 36 sts.
- Rnd 6: Ch 3, dc in next 2 dc, (FPdc in next st, skip 2 dc, shell in next dc, skip 2 dc) twice, FPdc in next dc, dc in next 20 dc; join with slip st to top of beg ch-3.
- Rnd 7: Ch 3, dc in next 2 dc, (FPdc in next FPdc, shell in center of next shell) twice, FPdc in next FPdc, dc in next 20 dc; join with slip st to top of beg ch-3.
- Rnds 8–14: Repeat Rnd 6.
Shaping the Thumb Gusset
- Rnd 1: Ch 3, dc in next 2 dc, (FPdc in next st, shell in center of next shell) twice, FPdc in next FPdc, dc in next 5 dc, (2 dc in next dc) twice, dc in each dc to end of rnd, join with slip st to top of beg ch-3.
- Rnd 2: Ch 3, dc in next 2 dc, (FPdc in next st, shell in center of next shell) twice, FPdc in next FPdc, dc in next 5 dc, 2 dc in next dc, dc in next 2 dc, 2 dc in next dc, dc in each dc to end of rnd, join with slip st to top of beg ch-3.
- Rnd 3: Ch 3, dc in next 2 dc, (FPdc in next st, shell in center of next shell) twice, FPdc in next FPdc, dc in next 5 dc, 2 dc in next dc, dc in next 4 dc, 2 dc in next dc, dc in each dc to end of rnd, join with slip st to top of beg ch-3.
- Rnd 4: Work as established through third FPdc, dc in next 5 dc, 2 dc in next dc, dc in next 6 dc, 2 dc in next dc, dc in each dc to end of rnd, join with slip st to top of beg ch-3.
- Rnd 5: Work as established through third FPdc, dc in next 5 dc, 2 dc in next dc, dc in next 8 dc, 2 dc in next dc, dc in each dc to end of rnd, join with slip st to top of beg ch-3.
- Rnd 6: Work as established through third FPdc, dc in next 5 dc, 2 dc in next dc, dc in next 10 dc, 2 dc in next dc, dc in each dc to end of rnd, join with slip st to top of beg ch-3.
- Rnd 7: Work as established through third FPdc, dc in next 6 dc, skip 12 sts of thumb gusset, dc in each dc to end of rnd, join with slip st to top of beg ch-3.
- Rnds 8–11: Work as established through third FPdc, dc in each dc and ch around, join with slip st to top of beg ch-3. Fasten off.
Crocheting the Left Glove
- Rnds 1–5: Work as for right glove.
- Rnd 6: Ch 3, dc in next 19 dc, (FPdc in next dc, skip 2 dc, shell in next dc, skip 2 dc) twice, FPdc in next dc, dc in next 3 dc, join with slip st to top of beg ch-3.
- Rnd 7: Ch 3, dc in next 19 dc, (FPdc in next FPdc, shell in center of next shell) twice, FPdc in next FPdc, dc in next 3 dc, join with slip st to top of beg ch-3.
- Rnds 8–14: Repeat Rnd 7.
Shaping the Thumb Gusset
- Rnd 1: Ch 3, dc in next 12 dc, (2 dc in next dc) twice, dc in next 5 dc, (FPdc in next st, shell in center of next shell) twice, FPdc in next FPdc, dc in next 3 dc, join with slip st to top of beg ch-3.
- Rnd 2: Ch 3, dc in next 12 dc, 2 dc in next dc, dc in next 2 dc, 2 dc in next dc, dc in next 5 dc, (FPdc in next st, shell in center of next shell) twice, FPdc in next FPdc, dc in next 3 dc, join with slip st to top of beg ch-3.
- Rnd 3: Ch 3, dc in next 12 dc, 2 dc in next dc, dc in next 4 dc, 2 dc in next dc, dc in next 5 dc, work in established pattern to end of rnd, join with slip st to top of beg ch-3.
- Rnd 4: Ch 3, dc in next 12 dc, 2 dc in next dc, dc in next 6 dc, 2 dc in next dc, dc in next 5 dc, work in established pattern to end of rnd, join with slip st to top of beg ch-3.
- Rnd 5: Ch 3, dc in next 12 dc, 2 dc in next dc, dc in next 8 dc, 2 dc in next dc, dc in next 5 dc, work in established pattern to end of rnd, join with slip st to top of beg ch-3.
- Rnd 6: Ch 3, dc in next 12 dc, 2 dc in next dc, dc in next 10 dc, 2 dc in next dc, dc in next 5 dc, work in established pattern to end of rnd, join with slip st to top of beg ch-3.
- Rnd 7: Ch 3, dc in next 13 dc, skip next 12 dc of thumb gusset, dc in next 6 dc, work in established pattern to end of rnd, join with slip st to top of beg ch-3.
- Rnds 8–11: Ch 3, dc in each dc and ch to next FPdc, work in established pattern to end of rnd, join with slip st to top of beg ch-3. Fasten off.
Crocheting the Button Loops
- Join yarn at inside corner of cuff opening (Rnd 5 of glove). Ch 5, slip st at outside corner of cuff opening, turn. Ch 1, 7 sc in ch-space, slip st in same st as beginning of chain. Fasten off. Repeat for other glove.
Finishing
- Weave in ends. Sew buttons opposite button loops.
Astra Gloves
Designed by Jana Whittle
These fingerless gloves are worked in a shell pattern; they have a cuff and are accented with a scalloped edge along the fingers. Originally designed to fit the average woman’s hands, directions are also included for smaller or larger versions. One skein of yarn can make two pairs of gloves.
- Sizes and Finished Measurements:
- Small (child or small woman): 6" (15 cm) wrist circumference and 6" (15 cm) long
- Medium (average woman): 7" (18 cm) wrist circumference and 7" (18 cm) long
- Large (average man): 8" (20.5 cm) wrist circumference and 8" (20.5 cm) long
- Yarn: Knit One Crochet Too Crock-O-Dye, 65% superwash wool/20% nylon/15% silk, 416 yds (380 m)/3.5 oz (100 g), Color 798 Currant
- Crochet Hook: US D/3 (3.25 mm) or size you need to obtain correct gauge
- Gauge: 6 shells and 12 rounds = 4" (10 cm)
- Other Supplies: Two stitch markers, yarn needle
Pattern Essentials
Shell: (Sc, ch 3, 3 dc) in same st.
Crocheting the Cuff (make 2)
- Row 1: Ch 13, sc in 2nd chain from hook, sc in each chain across, turn. You now have 12 sc.
- Row 2: Ch 1 (does not count as first st, here or throughout), BLsc in each sc across.
- Rows 3–36 (44, 52): Repeat Row 2 until piece measures approximately 51⁄2" (61⁄2", 71⁄2")/14 (16.5, 19) cm.
- Fold so that top edge of Row 36 (44, 52) meets bottom of the foundation row. Slip st in both Row 36 (44, 52) and foundation row through back loops to form the cuff.
Crocheting the Hand
- Rnd 1: Ch 1, sc in each row-end st along top edge of cuff, join with slip st to top of first sc, turn. You now have 36 (44, 52) sc.
- Rnd 2: Ch 1, shell in first sc, skip next 3 sc, *shell in next sc, skip 3 sc; repeat from * around, join with slip st in first sc, turn. You now have 9 (11, 13) shells.
- Rnd 3: Ch 3 (does not count as st, here or throughout), shell in ch-3 space of first shell, *shell in ch-3 space of next shell; repeat from * around, join with slip st to first sc of first shell, turn.
- Rnds 4 and 5: Repeat Rnd 3.
- Rnd 6 (gusset): Repeat Rnd 3, do not slip st to join, shell in the ch-3 space of turning chain; join with slip st in first sc of first shell, turn. You now have 10 (12, 14) shells.
- Rnds 7–9 (7–10, 7–11): Repeat Rnd 3.
Crocheting the Thumb
- Rnd 10 (11, 12): Ch 3, shell in first ch-3 space of first shell, shell in next ch-3 space of next shell, pm, skip next 6 (8, 9) shells, pm, (shell in ch-3 space of next shell) 2 (2, 3) times, join with slip st to first sc of first shell, turn. You now have 4 (4, 5) shells.
- Rnd 11 (12, 13): Ch 3, shell in ch-3 space of first shell, *shell in ch-3 space of next shell; repeat from * around, join with slip st to first sc of first shell. Fasten off.
Finishing the Hand
- Rnd 10 (11, 12): Join yarn with slip st in first marked st, shell into marked st, remove marker, shell into ch-3 space of next shell (the first of the 6, [8, 9] skipped shells), *shell into ch-3 space of next shell; repeat from * around to next marker, shell into 2nd marked st, remove marker, join with slip st to first sc of first shell. You now have 8 (10, 11) shells.
- Rnds 11–15 (12–17, 13–19): Repeat Rnd 3. Fasten off.
Finishing
Elegant Fingerless Gloves
Designed by Melody Fulone
Fingerless gloves, worked with black in a lacy pattern, make an elegant accessory for special occasions. The gloves are worked in the round from the wrist up, increased for a thumb gusset, and then each finger is worked individually. A wrist edging makes a beautiful finish.
- Finished Measurements: Approximately 7" (18 cm) circumference and 61⁄2" (16.5 cm) from wrist to top of middle finger, unstretched
- Yarn: Patons Stretch Socks, 41% cotton/39% wool/13% nylon/7% elastic, 239 yds (218 m)/1.75 oz (50 g), Color 31041 Black Taffy
- Crochet Hook: US F/5 (3.75 mm) or size you need to obtain correct gauge
- Gauge: 6 V-stitches and 12 rows = 4" (10 cm) in V-stitch pattern
- Other Supplies: Yarn needle
Pattern Essentials
V-st: (Dc, ch 3, dc) in same st or space.
Notes:
- Stretchy yarn makes gloves that will fit a variety of sizes.
- A larger or smaller hook may be used to customize sizing.
Crocheting the Gloves (make 2)
- Chain 36. Chain should measure approximately 7" (18 cm), slightly stretched. Without twisting the chain, join with slip st to form a ring.
- Rnd 1: Ch 1, sc in each ch around, join with slip st in first sc. You now have 36 sc.
- Rnd 2: Ch 6 (counts as dc and ch 3), dc in same st, *ch 1, skip 3 sc, V-st in next st; repeat from * around to last 3 sts, skip last 3 sts, join with sc to 3rd ch of beg ch-6. You now have 9 V-sts.
- Rnd 3: Ch 6, dc in space made by joining sc, *ch 1, V-st in next ch-1 space; repeat from * around, ending join with sc to 3rd ch of beg ch-6.
- Rnd 4 (Increase Rnd): Ch 6, dc in space made by joining sc, ch 1, (V-st, ch 1, V-st) in next ch-1 space (increase made), *ch 1, V-st in next ch-1 space; repeat from * around; sc in 3rd ch of beg ch-6. You now have 10 V-sts.
- Rnd 5: Repeat Rnd 3.
- Rnd 6 (Increase Rnd): Ch 6, dc in space made by joining sc, ch 1, V-st in next ch-1 space, ch 1, increase in next ch-1 space, ch 1, increase in next ch-1 space, *ch 1, V-st in next ch-1 space; repeat from * around, join with sc to 3rd ch of beg ch-6. You now have 12 V-sts.
- Rnd 7: Repeat Rnd 3.
- Rnd 8: Ch 6, dc in space made by joining sc, (ch 1, V-st in next ch-1 space) three times, ch 1, skip 3 V-sts for thumb, V-st in next ch-1 space, *ch 1, V-st in next ch-1 space; repeat from * around, join with sc to 3rd ch of beg ch-6. You now have 10 V-sts.
- Rnds 9–15: Repeat Rnd 3. Fasten off.
- Flatten out glove, centering thumb opening on one side and aligning V-stitches and chain spaces on top edge.
Crocheting the Little Finger
- Rnd 1: With RS facing, skip 1 dc to the left of joining of last rnd, join yarn with slip st in next dc, ch 2, turn; skip next 4 dc, slip st in next dc (corresponding dc on opposite side of glove).
- Rnd 2: Slip st in next ch-3 space, ch 6, dc in same space, (ch 1, V-st in next V-st) two times, ch 1, V-st in next ch-2 space; join with slip st to 3rd ch of beg ch-6. Fasten off.
Crocheting the Ring Finger
- Rnd 1: With RS facing, join yarn with slip st in next dc to the right of where you joined yarn for little finger, ch 2, skip little finger, slip st in next corresponding dc on opposite side of glove, slip st in next 3 ch sts, slip st in next dc, ch 2, skip next 6 V-sts, slip st in next corresponding dc on opposite side of glove.
- Rnd 2: Slip st in next ch-3 space, ch 6, dc in same space, ch 1, V-st in next ch-2 space, ch 1, V-st in next V-st, ch 1, V-st in next ch-2 space, join with slip st to 3rd ch of beg ch-6.
- Rnd 3: Slip st in next ch-3 space, ch 6, dc in same space, *ch 1, V-st in next V-st; repeat from * around, join with slip st to 3rd ch of beg ch-6. Fasten off.
Crocheting the Middle Finger
- Rnd 1: With RS facing, join yarn with slip st in next ch-1 space to the right of where you joined yarn for ring finger, ch 2, skip ring finger, slip st in next corresponding ch-1 space on opposite side of glove, slip st in next dc, slip st in next 3 ch sts, slip st in next dc, ch 2, skip next 4 V-sts, slip st in next corresponding dc on opposite side of glove.
- Rnds 2 and 3: Repeat Rnds 2 and 3 of ring finger.
Crocheting the Index Finger
- Rnd 1: With RS facing, join yarn with slip st in next dc to the right of where you joined yarn for middle finger, ch 2, skip middle finger, slip st in next dc on opposite side of glove, slip st in next ch-3 space.
- Rnd 2: Ch 6, dc in same space, (ch 1, V-st in next V-st) twice, ch 1, V-st in ch-2 space, ch 1, join with slip st to 3rd ch of beg ch-6.
- Rnd 3: Slip st in next ch-3 space, ch 6, dc in same space, *ch 1, V-st in next V-st; repeat from * around, ch 1, join with slip st to 3rd ch of beg ch-6. Fasten off.
Crocheting the Thumb
- With RS facing, join yarn in first V-st of thumb gusset (first V-st of 3 V-sts skipped for thumb gusset).
- Rnd 1: Ch 6, dc in same space, (ch 1, V-st in next V-st) twice, (ch 1, V-st in side of next dc) twice, join with slip st to 3rd ch of beg ch-6.
- Rnds 2 and 3: Slip st in next ch-3 space, ch 6, dc in same space, *ch 1, V-st in next V-st, repeat from * around; join with slip st to 3rd ch of beg ch-6. At the end of Rnd 3, fasten off.
Adding the Wrist Edging
- Rnd 1: Working across opposite side of foundation ch, join yarn in ch at base of any V-st, ch 6, dc in same space, *ch 1, skip next 3 ch sts, V-st in next ch; repeat from * around, join with sc to 3rd ch of beginning ch-6.
- Rnd 2: Ch 6, dc in space formed by joining sc, *ch 1, V-st in next ch-1 space; repeat from * around, join with sc to 3rd ch of beg ch-6.
- Rnd 3: Ch 1, sc in space formed by joining sc, *(ch 1, dc) three times in next ch-3 space, ch 1**, sc in next ch-1 space, ch 1; repeat from * around, ending last repeat at **, join with slip st to first sc. Fasten off. Weave in ends.
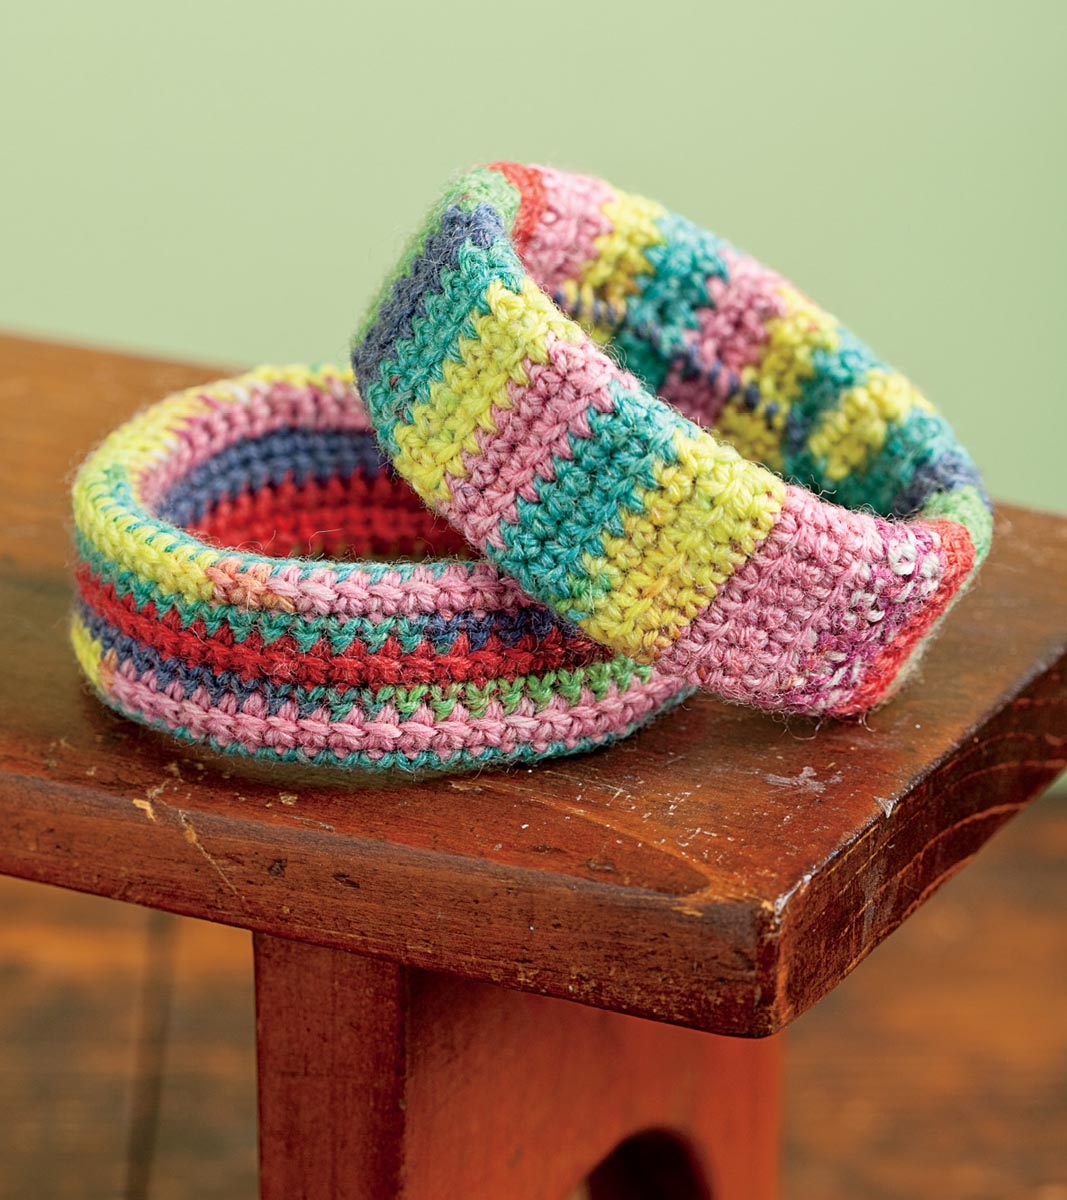
Bangle Bracelets
Designed by Susan Levin
Cover your old bracelets, mailing tubes, or foam can cozies to make these fun-to-wear bangles. Linked double crochet makes a sturdy fabric, and the variegated sock yarn guarantees that every bracelet will be one-of-a-kind. They’re perfect for quick gifts or to personalize every outfit.
- Finished Measurements: 31⁄4" (8.5 cm) in diameter and 11⁄4" (3 cm) wide
- Yarn: Patons Kroy Socks Jacquards, 75% washable wool/25% nylon, 166 yds (152 m)/1.75 oz (50 g), Color 243455 Fern Rose; 1 skein makes 3 bracelets
- Crochet Hook: US D/3 (3.25 mm) or size you need to obtain correct gauge
- Gauge: 24 stitches and 20 rows = 4" (10 cm) in alternating rows of single crochet and linked double crochet
- Other Supplies: Yarn needle, new or vintage bangle bracelet or plastic or cardboard tube with approximately 3" (7.5 cm) diameter and 1" (2.5 cm) (or desired) width. (The bracelets shown were made from 3" (7.5 cm) flexible plastic tubing cut 1" (2.5 cm) wide.)
Pattern Essentials
Ldc (linked double crochet) Ch 3, insert hook in second chain from hook, yo and draw loop through, insert hook into first st in row below, yo and draw loop through, yo and draw loop through first 2 loops on hook, yo and draw loop through remaining 2 loops on hook — first Ldc complete. *Insert hook into horizontal cross bar of Ldc just worked, yo and draw loop through, insert hook into next st in row below, yo and draw loop through, yo and draw loop through first 2 loops on hook, yo and draw loop through remaining 2 loops on hook — next Ldc complete. Repeat from * across row.
Note: To maximize stripes, cut yarn and change colors as desired.
Horizontal Stripe Bracelet
- Chain 16 (or number of stitches needed to snugly cover the girth of your bracelet plus 1).
- Row 1: Sc in 2nd ch from hook and in each ch across, turn. You now have 15 sc.
- Row 2 (RS): Ch 3, Ldc (see page 74) in each sc across, turn.
- Row 3: Ch 1, sc in each Ldc across.
- Repeat Rows 2 and 3 for pattern until strip measures about 1⁄4" (6 mm) less than the circumference of your bracelet. Fasten off leaving a 12" (30.5 cm) tail.
Finishing
- Sew ends together to form a circle. Gently stretch the circle over the bracelet and bring the edges together. Sew the long edges together to completely cover the bracelet. Twist the seam to the center on the inside of the bracelet.
Vertical Stripe Bracelet
- Chain 61 (or number of stitches needed to snugly cover the outer circumference of your bracelet plus 1).
- Row 1: Sc in second ch from hook and in each ch across, turn. You now have 60 sc.
- Row 2 (RS): Ch 3, Ldc in each sc across, turn.
- Row 3: Ch 1, sc in each Ldc across.
- Repeat Rows 2 and 3 for pattern until strip measures about 1⁄4" (6 mm) less than the girth of your bracelet. Fasten off leaving a 12" (30.5 cm) tail.
Finishing
- Finish as for Horizontal Stripe Bracelet above.
One-Skein Doll Wardrobe
Designed by Marcia Sommerkamp
Make any little girl happy with an entire wardrobe for her doll, and it’s all made from a single skein of sock yarn! The sample was done in circus-like colors, but the patterns work equally well with a single color or a handpainted colorway with long repeats.
- Size and Finished Measurements: To fit an 18" (45.5 cm) doll; see individual piece measurements on the following pages
- Yarn: Opal Socken Zirkus, 75% wool/25% nylon, 465 yds (425 m)/3.5 oz (100 g), Color 2005
- Crochet Hooks: US G/6 (4 mm) or size you need to obtain correct gauge and 2 sizes smaller for socks (optional)
- Gauge: 10 stitches and 5 rows = 2" (5 cm) in skirt pattern with larger hook. Note: Gauge may vary with stitch pattern.
- Other Supplies: 1⁄4" (6 mm) elastic cut to fit around doll’s waist, sewing needle and thread for joining elastic
Note: Two options are given for the vest and hat. By omitting the top of the hat, you can make a ski band for the doll that allows a ponytail to be pulled through. For small tots who may have trouble dressing their dolls, make an open-front vest, or make two sides alike for a pullover vest. There’s enough yarn to make both versions.
Crocheting the Skirt
- Finished measurements are approximately 5" (12.5 cm) long and 141⁄2" (37 cm) around before seaming.
- With larger hook, ch 66.
- Row 1 (RS): Sc in 2nd ch from hook, *dc in next ch, sc in next ch; repeat from * across, turn.
- Row 2 (WS): Ch 3 (counts as dc), *sc in next dc, dc in next sc; repeat from * across, turn.
- Row 3: Ch 1, sc in first dc, *dc in next sc, sc in next dc; repeat from * across, ending with last sc in top of ch-3, turn.
- Repeat Rows 2 and 3 six more times, or until piece measures approximately 31⁄2" (9 cm) from beginning.
- Next Row: *(Sc, hdc, dc, hdc, sc) in first st — shell made, skip 1 st, *shell in next st, skip 1 st; repeat from * across. Fasten off, leaving a sewing length.
Crocheting the Waistband
- Row 1: With RS facing, using larger hook, join yarn with slip st in first ch on opposite side of foundation ch, ch 1, sc in each ch across, turn. You now have 65 sts.
- Row 2: Ch 1, BLsc in each st across, turn.
- Rows 3 and 4: Ch 1, sc in each st across, turn.
- Row 5: Ch 1, FLsc in each st across. Fasten off, leaving a length for sewing.
Finishing
- Fold waistband in half to the outside. Sew in place, leaving a small opening to insert the elastic. Thread the elastic through the band and fasten ends together. Sew back seam of skirt and ends of band. Weave in ends.
Crocheting the Hat
- Finished measurements are approximately 11" (28 cm) in circumference and 31⁄2" (9 cm) deep.
- With larger hook, ch 7.
- Row 1: Sc in 2nd ch from hook and each ch across. You now have 6 sc.
- Row 2: Ch 1, BLsc in each sc across, turn.
- Repeat Row 2 for 59 more rows. Holding ends with RS together, sc Row 1 to last row, forming a band. You now have 31 ridges.
- Work 1 sc into the last st of every row, join with slip st to first sc. You now have 60 sts.
Working the Crown
- Rnd 1: Ch 1, sc in each st around, join with slip st to first sc.
- Rnds 2 and 3: Repeat Rnd 1.
- Rnd 4: Ch 1, *sc in next 4 sts, sc2tog; repeat from * around, join with slip st in first sc. You now have 50 sts.
- Rnd 5: Ch 1, *sc in next 3 sts, sc2tog; repeat from * around, join with slip st in first sc. You now have 40 sts.
- Rnd 6: Repeat Rnd 1.
- Rnd 7: Ch 1, *sc in next 2 sts, sc2tog; repeat from * around, join with slip st in first sc. You now have 30 sts.
- Rnd 8: Repeat Rnd 1.
- Rnd 9: Ch 1, *sc in next st, sc2tog; repeat from * around, join with slip st in first sc. You now have 20 sts.
- Rnd 10: Repeat Rnd 1.
- Rnd 11: Ch 1, *sc2tog; repeat from * around, join with slip st in first sc. You now have 10 sts.
- Rnd 12: Repeat Rnd 1.
- Rnd 13: Repeat Rnd 11. You now have 5 sts.
- Fasten off, leaving a 6" (15 cm) tail. Weave tail through remaining stitches and pull tightly to close. Weave in end.
Crocheting the Vest
- Finished measurements are approximately 15" (38 cm) in circumference and 6" (15 cm) long.
Note: Make two back pieces and omit the fronts for a pullover style.
Crocheting the Back Ribbing
- With larger hook, ch 6.
- Row 1: Sc in 2nd ch from hook and in each ch across, turn. You now have 5 sts.
- Row 2: Ch 1, BLsc in each st across, turn.
- Rows 3–34: Repeat Row 2. You now have 17 ridges.
- Holding work with the long edge at top, ch 1, sc in the top of each row across. You now have 34 sts.
Crocheting the Back
- Row 1: Ch 1, *sc in next st, dc in next st; repeat from * across, turn.
- Row 2: Ch 1, *sc in next dc, dc in next sc; repeat from * across, turn.
- Rows 3–10: Repeat Row 2. Piece measures approximately 31⁄2" (9 cm) from bottom of ribbing.
- Row 11: Slip st in first 4 sts, ch 1, *sc in next dc, dc in next sc; repeat from * to last 4 sts, turn, leaving last 4 sts unworked. You now have 26 sts.
- Row 12: Ch 1, *sc in next dc, dc in next sc; repeat from * across, turn.
- Rows 13–17: Repeat Row 12.
- Row 18: Ch 1, (sc in next dc, dc in next sc) four times, slip st in next 10 sts, (sc in next dc, dc in next sc) four times, turn.
- Row 19: Ch 1, (sc in next dc, dc in next sc) four times, turn. You now have 8 sts.
- Rows 20 and 21: Repeat Row 19 two times. Fasten off.
- Skipping 10 slipped stitches in the middle for neck, join yarn in unworked sts of last row.
- Repeat Row 19 three times for other shoulder. Fasten off.
Crocheting the Right Front Ribbing
- With larger hook, ch 6.
- Row 1: Sc in 2nd chain from hook and in each ch across, turn. You now have 5 sts.
- Row 2: Ch 1, BLsc in each st across, turn.
- Rows 3–16: Repeat Row 2. You now have 8 ridges.
- Holding work with the long edge at top, ch 1, sc in the top of each row across. You now have 16 sts.
Crocheting the Right Front Vest
- Row 1 (WS): Ch 1, *sc in next st, dc in next st; repeat from * across, turn.
- Row 2: Ch 1, *sc in next dc, dc in next sc; repeat from * across, turn.
- Rows 3–10: Repeat Row 1. Piece measures approximately 31⁄2" (9 cm) from bottom of ribbing.
- Row 11: Sl st in first 4 sts, ch 1, *sc in next st, dc in next st; repeat from * across. You now have 12 sts.
- Row 12: Ch 1, *sc in next dc, dc in next sc; repeat from * across, turn.
- Row 13: Repeat Row 12.
- Row 14: Ch 1, sc2tog, work in pattern to end, turn. You now have 11 sts.
- Row 15: Ch 1, *sc in next dc, dc in next sc; repeat from * to last 3 sts, sc in next st, sc2tog, turn. You now have 10 sts.
- Row 16: Repeat Row 14. You now have 9 sts.
- Row 17: Repeat Row 15. You now have 8 sts.
- Rows 18–21: Ch 1, *sc in next dc, dc in next sc; repeat from * across, turn. Fasten off.
Crocheting the Left Front Vest
- Make as for right front vest, using the reverse side as RS.
Finishing
- Sew side and shoulder seams.
- Sweater Edging: With RS facing, using larger hook, join yarn at lower right front edge, ch 1, sc evenly spaced up right front, around neck, and down left front, placing 3 sc in each front corner neck st. Fasten off.
- Armhole Edging: With RS facing, using larger hook, join yarn at right underarm, ch 1, sc evenly around armhole, join with slip st in first sc, fasten off. Repeat around left armhole.
Crocheting the Socks
- Finished measurements are approximately 31⁄4" (8.5 cm) long and 4" (10 cm) in circumference.
Note: If you want matching socks, mark where the color repeat begins, and strand the yarn to that spot to begin the second sock.
Working the Toe and Foot
- With smaller hook, ch 24, being careful not to twist chain, join with slip st to form a ring.
- Rnd 1: Ch 1, sc in same ch as join, sc in next 23 ch, join with slip st to first sc. You now have 24 sts.
- Rnds 2–7: Ch 1, sc in each sc around, join with slip st to first sc.
- Rnd 8: Ch 1, *sc in next 3 sc, sc2tog; repeat from * to last 4 sts, sc in each st to end, join with slip st to first sc. You now have 20 sts.
- Rnds 9–11: Repeat Rnd 2.
Working the Heel
- Rnd 12: Ch 2 (counts as dc), dc in next st, hdc in next 2 sts, sc in next 12 sts, hdc in next 2 sts, dc in last 2 sts, join with slip st to top of ch 2.
Note: This is the top of the heel and is at center back of sock.
Working the Leg
- Rnd 13: Ch 1, *sc in next 3 sts, sc2tog; repeat from * around. You now have 16 sts.
- Rnds 14–17: Ch 1, sc in each st around, join with slip st to first sc.
- Rnd 18: Ch 1, (sc2tog) around, join with slip st to first st. You now have 8 sts.
- Rnd 19: Repeat Rnd 14.
- Rnd 20: Repeat Rnd 18. Fasten off, leaving a 6" (15 cm) tail. Draw tail through remaining sts to close and fasten off. Weave in ends.
- If desired, dampen sock and slide on doll, allowing to dry overnight to shape the toe and heel to the individual doll.
Rainbow Doll Ensemble
Designed by Gail Tanquary
This adorable sweater and hat set will fit your daughter‘s favorite 18-inch (45.5 cm) doll — or your own favorite doll! Using only single and double crochet with chain stitches, both pieces are crocheted from the top down.
- Finished Measurements:
- Sweater: approximately 14" (35.5 cm) in circumference
- Hat: approximately 11" (28 cm) in circumference
- Yarn: Crystal Palace Sausalito, 80% merino wool/20% nylon, 198 yds (181 m)/1.75 oz (50 g), Color 8101 Prism
- Crochet Hook: US D/3 (3.25 mm) or size you need to obtain correct gauge
- Gauge: 20 stitches and 10 rows = 4" (10 cm) in double crochet
- Other Supplies: Yarn needle, two 1⁄2" (13 mm) buttons
Pattern Essentials
Shell: (2 dc, ch 2, 2 dc) in 1 stitch or space.
V-st: (Dc, ch 2, dc) in 1 space.
Crocheting the Sweater
- Chain 40.
- Row 1: Dc in 3rd ch from hook and in next 2 ch, shell in next ch, (dc in next 9 ch, shell in next ch) three times, dc in last 4 ch, turn. You now have 6 dc on each front and 13 dc each on sleeves and back.
- Row 2 (RS): Ch 3 (counts as dc here and throughout), *dc in each dc across to next corner ch-2 space, V-st in next corner space; repeat from * three times, dc in each st across, turn. You now have 7 dc on each front and 15 dc each on sleeves and back.
- Row 3: Ch 3, *dc in each dc across to next corner ch-2 space, shell in next corner space; repeat from * three times, dc in each st across, turn. You now have 9 dc on front and 19 dc each on sleeves and back.
- Rows 4–6: Repeat Rows 2 and 3 once more, then Row 2 once more. You now have 13 dc on each front and 27 dc each on sleeves and back at the end of Row 6.
- Row 7: Ch 4 (counts as dc, ch 1 here and throughout), *(skip 1 dc, dc in next dc, ch 1) to corner space, V-st in corner space, dc in next dc, ch 1; repeat from * three times, (skip 1 dc, dc in next dc, ch 1) to last 2 dc, skip 1 dc, dc in last dc. You now have 14 dc on each front and 29 dc each on sleeves and back.
- Row 8: Ch 3, dc in each dc and ch-1 space across to next corner ch-2 space, shell in next corner space; repeat from * three times, dc in each dc and ch-1 space across. You now have 16 dc on each front, 33 dc each on sleeves and back. Fasten off.
Crocheting the Sleeves
- Row 9: With WS facing, join yarn with slip st in first corner space, ch 1, sc in first 3 sts, hdc in next 3 sts, dc in each dc to last 6 dc, hdc in next 3 sts, sc in last 3 sts, turn. You now have 33 sts.
- Rows 10 and 11: Ch 1, sc in first 3 sts, hdc in next 3 sts, dc in each dc to last 6 dc, hdc in next 3 sts, sc in last 3 sts, turn.
- Row 12: Ch 3 (counts as dc), dc in next st, dc2tog, dc in each st across to last 4 sts, dc2tog, dc in last 2 sts, turn. You now have 31 sts.
- Rows 13–16: Repeat Row 12 four times more. You now have 23 sts at the end of Row 16.
- Row 17: Ch 1, sc in next 3 sts, *sc2tog, sc in next 2 sts; repeat from * across, turn. You now have 18 sts.
- Rows 18 and 19: Ch 1, sc in each sc across. Fasten off.
- Work second sleeve in same manner, joining yarn in third corner space with WS facing.
Crocheting the Body
- Row 1: With WS facing, attach yarn to front edge with slip st, ch 3 (counts as dc), dc in each dc to corner space, dc in corner space, skip sleeve sts, dc in next corner space, dc in each dc across back, dc in next corner space, skip sleeve sts, dc in last corner space, dc in each dc to end, turn. You now have 69 sts.
- Row 2: Ch 3 (counts as dc), dc in each dc across, turn.
- Row 3: Ch 3 (counts as dc), dc in next 15 dc, 2 dc in next 2 dc, dc in next 30 dc, 2 dc in next 2 dc, dc in each dc to end, turn. You now have 73 sts.
- Row 4: Ch 3 (counts as dc), dc in each dc across, turn.
Crocheting the Bottom Border
- Row 1: Ch 1, sc in first dc, *ch 3, skip 3 dc, sc in next dc, ch 7, sc in next dc, ch 3, skip 3 dc, sc in next dc; repeat from * across. You now have 8 ch-7 spaces.
- Row 2: Ch 1, sc in first sc, *(6 dc, ch 1, 6 dc) in next ch-7 space, skip next ch-3 space, sc in next sc; repeat from * across. Fasten off.
Crocheting the Buttonhole Band
- Row 1: With RS facing, join yarn with a slip st to last sc above border on right front edge, ch 1, work 24 sc evenly spaced across right front edge, turn.
- Row 2: Ch 1, sc in each sc across, turn.
- Row 3 (Buttonhole Row): Ch 1, sc in first 12 sc, ch 2, skip 2 sc, sc in next 6 sc, ch 2, skip 2 sc, sc in last 2 sc, turn.
- Row 4: Ch 1, sc in each sc and 2 sc in each ch-2 space across, turn.
- Row 5: Ch 1, sc in each sc across. Fasten off.
Crocheting the Button Band
- Row 1: With RS facing, join yarn with a slip st to corner st at top of left front edge, ch 1, work 24 sc evenly spaced across left front edge to base of bottom border, turn.
- Rows 2–5: Ch 1, sc in each sc across, turn.
Crocheting the Neck Band
- Row 1: With RS facing, join yarn with slip st in corner of right front edge,
- Ch 1, sc in each ch around neck, turn.
- Row 2: Ch 1, sc in each sc across. Fasten off.
Finishing
- Sew sleeve seams. Weave in ends. Sew buttons opposite buttonholes.
Crocheting the Hat
- Chain 6, join with slip st in first ch to form ring.
- Rnd 1: Ch 3 (counts as dc), 11 dc in ring, join with slip st to top of ch-3. You now have 12 dc.
- Rnd 2: Ch 3 (counts as dc), dc in same st, 2 dc in each dc around, join with slip st to top of ch-3. You now have 24 dc.
- Rnd 3: Ch 3 (counts as dc), dc in same st, dc in next dc, *2 dc in next dc, dc in next dc; repeat from * around, join with slip st to top of ch-3. You now have 36 dc.
- Rnd 4: Ch 3 (counts as dc), dc in same st, dc in next 2 dc, *2 dc in next dc, dc in next 2 dc; repeat from * around, join with slip st to top of ch-3. You now have 48 dc.
- Rnd 5: Ch 3 (counts as dc), dc in same st, dc in next 3 dc, * 2 dc in next dc, dc in next 3 dc; repeat from * around, join with slip st to top of ch-3. You now have 60 dc.
- Rnd 6: Ch 3 (counts as dc), dc in each dc around, join with slip st to top of ch-3.
- Rnd 7: Ch 4 (counts as dc and ch 1), skip 1 dc, *dc in next dc, ch 1, skip 1 dc; repeat from * around, join with slip st to 3rd ch of ch-4.
- Rnd 8: Ch 3, dc in each dc and ch-1 space around, join with slip st to 3rd ch of ch-4.
- Rnd 9: Ch 3 (counts as dc), dc in each dc around, join with slip st to top of ch-3.
- Rnd 10: Ch 3 (counts as dc), dc in next 13 dc, 2 dc in next dc, (dc in next 14 dc, 2 dc in next dc) three times, join with slip st to top of ch-3. You now have 64 dc.
- Rnd 11: Ch 1, sc in same st, *ch 3, skip 3 dc, sc in next dc, ch 7, sc in next dc, ch 3, skip 3 dc, sc in next dc; repeat from * around, omitting last sc, join with slip st to first sc. You now have 8 ch-7 spaces.
- Rnd 12: Ch 1, sc in same st, *(6 dc, ch 1, 6 dc) in next ch-7 space, skip next ch-3 space, sc in next sc; repeat from * around, omitting last sc, join with slip st to first sc. Fasten off. Weave in ends.
V-Stitch Sundress
Designed by Tamara Del Sonno
This adorable little sundress adjusts to fit — one side is left open and is closed for wearing with the ribbon. Blocking will lengthen and enhance the lacy pattern in the skirt.
- Sizes and Finished Measurements: To fit 6–18 months, 20" (51 cm) chest circumference
- Yarn: South West Trading Company Tofutsies, 50% superwash wool/25% Soysilk/22.5% cotton/2.5% chitin, 465 yds (425 m)/3.5 oz (100 g), Color 937 Pina TOElada
- Crochet Hooks: US B/1 (2.25 mm) or size you need to obtain correct gauge and US C/2 (2.75 mm) (one hook size larger) for chain
- Gauge: 25 stitches and 6 rows = 4" (10 cm) in double crochet; 10 V-stitches and 15 rows = 4" (10 cm) in V-st pattern on smaller hook
- Other Supplies: 1 yd (0.9 m) 1⁄4" (6 mm) ribbon, yarn needle, sewing needle and coordinating thread
Pattern Essentials
Shell: (Dtr, ch 1, dtr) two times in same st.
V-st: (Dc, ch 1, dc) in same st.
Notes:
- Chain with the larger hook, then change to smaller hook to work the dress.
- Work all stitches through the back bump of the chain to create smoothly trimmed edges.
- Count the chain at beginning of a row as a stitch.
Crocheting the Shoulder Straps (make 2)
- Chain 13.
- Row 1: Sc in 2nd ch from hook and in each chain across, turn. You now have 12 sc.
- Row 2: Ch 3 (counts as dc), dc in each st across, turn.
- Repeat Row 2 until piece measures 61⁄2" (16.5 cm) or desired length.
- Last Row: Ch 1, sc in each st across. Do not fasten off.
Adding the Ruffle
- Turn to work along the long side of the strap. Working over the post of each stitch along edge, ch 3 (counts as dc), dc over next row-end dc, *shell over next row-end dc, V-st over next row-end dc; repeat from * across the length of shoulder strap, ending ch 2, sc in last st. Fasten off.
Crocheting the Bodice
- Chain 124.
- Row 1: Hdc in 3rd ch from hook and in each ch across. You now have 123 hdc.
- Row 2: Ch 3 (counts as dc), dc in each hdc across, turn.
- Row 3: Ch 3 (counts as dc), dc in each dc across, turn.
- Rows 4–11: Repeat Row 3.
- Row 12: Ch 2 (counts as hdc), hdc in each dc across, turn.
Crocheting the Skirt
- Row 1: Ch 4 (counts as dc, ch 1 here and throughout), dc in back loop of same st (counts as V-st), V-st in back loop of next hdc, skip 1 hdc, *V-st in back loops of next 2 hdc**, skip next hdc; repeat from * across, ending last repeat at **. You now have 82 V-sts.
- Row 2: Ch 4, dc in center of first V-st (counts as beg V-st), V-st in center of each V-st across, turn.
- Repeat Row 2 until skirt measures 51⁄2" (14 cm) or 1⁄2" (13 mm) less than desired length, ending with WS row.
Adding the Ruffle
- Last Row: Ch 4, dc in center of first V-st, shell in next V-st, *V-st in next V-st, shell in next V-st; repeat from * across. Fasten off.
Finishing
- Weave in ends. Fold the piece in half to shape the dress, overlapping the edges to make the dress the desired size. Using yarn needle and working from top to bottom, weave ribbon through both layers of bodice and skirt to close the dress. Using yarn needle, weave ribbon under and over pairs of dcs in second row of bodice. Adjust to fit, then cut ribbon, leaving 8" (20.5 cm) ends. Tie ends into a bow.
- Sew shoulder straps equally spaced on either side of center front, with ruffles to outside. Try dress on and pin straps at back to fit. Sew straps to WS of back bodice.
French Toast with Maple Sugar Jacket
Designed by Gwen Steege
Variegated yarn is often best shown off when used in small motifs. Here, two motifs alternate in checkerboard fashion on the asymmetrical jacket front. The sleeves and back are worked in single crochet and half double crochet respectively. This is a cropped jacket with three-quarter length sleeves.
- Size and Finished Measurements: To fit 12-month old, 20" (51 cm) chest circumference and 9" (23 cm) long
- Yarn: Kangaroo Dyer’s BFL yarn, 75% superwash Bluefaced Leicester/25% nylon, 464 yds (424 m)/3.5 oz (100 g), French Toast with Maple Syrup
- Crochet Hook: US H/8 (5 mm) or size you need to obtain correct gauge
- Gauge: Each motif = approximately 2" (5 cm) square; 20 stitches and 12 rows in back pattern = 4" (10 cm)
- Other Supplies: Stitch marker, yarn needle, two 3⁄4"–1"/19–25 mm buttons
Crocheting the Fronts
Motif 1
Begin with an adjustable ring (see page 271).
- Rnd 1: Ch 1, 8 sc in ring. You now have 8 sc. Place marker at the first st of the round and move it up as you work the rounds.
- Rnd 2: *BLsc in next sc, 3 BLsc in next sc; repeat from * three times, do not join.
- Rnd 3: *BLsc in next 2 sc, 3 BLsc in next sc, BLsc in next sc; repeat from * three more times.
- Rnd 4: *BLsc in next 3 sc, 3 BLsc in next sc, BL sc in next 2 sc; repeat from * three more times.
- Rnd 5: *BLsc in next 4 sc, 3 BLsc in next sc, BLsc in next 3 sc; repeat from * three more times, join with slip st in next sc.
Motif 2
Begin with an adjustable ring (see page 271).
- Rnd 1: Ch 1, 3 sc into ring, *ch 3, 3 sc into ring; repeat from * two more times, join with dc to first sc.
- Rnd 2: [Ch 3, 2-dc cluster (see page 271), (ch 3, 3-dc cluster [see page 271]) two times] in space made by joining dc, *[3-dc cluster, (ch 3, 3-dc cluster) two times] in next space; repeat from * two more times, join with slip st to first cluster.
- Rnd 3: Ch 1, sc in same st, *3 sc in next space, sc in next st, picot-3, 3 sc in next space, sc in next 2 sts; repeat from * around, omitting last sc, join to first sc. Fasten off.
Note: These motifs are from Edie Eckman’s Beyond the Square Crochet Motifs (Storey, 2008). For the swirly pattern (Motif 1), the designer chose to use the WS out to better contrast with the more open, starlike pattern (Motif 2).
Joining the Motifs
- Arrange the completed motifs in the correct order, following the assembly diagram below. Also, note that the WS of Motif 1 is used as the RS in this garment. (You may, of course, choose to keep the RS facing out.) Working on the WS, whipstitch (see page 275) the motifs together, taking up only the back of the stitches of Motif 1 and only half of each stitch of Motif 2. This results in the “frame” of each motif butting against its neighbor in a slightly three-dimensional fashion. Try to allow the picots to pop forward as little accents on the front of the garment.
Crocheting the Back
- Setup: Working with the RS facing, join yarn at the outside of the left shoulder. Ch 1, work 10 sc evenly spaced across the top of the first motif, work 5 sc evenly spaced across the first half of the next motif, ch 20, work 5 sc evenly spaced across the second half of the middle motif on the right front, work 10 sc evenly spaced across the top of the next motif on the right front. You now have 50 stitches in all: 15 at the outer edge of each shoulder and 20 chain stitches for the back neck.
- Row 1 (WS): Ch 2 (does not count as st here and throughout), hdc in each st and ch across, turn. You now have 50 hdc.
- Row 2 (RS): Ch 2, FLhdc in each st across, turn.
- Row 3: Ch 2, hdc in frontmost loop of each hdc across, turn.
- Repeat Rows 2 and 3 until back measures the same length as front. Fasten off.
Joining the Sides
- Mark the center of sides of fronts and back. Whipstitch the bottom two motifs of each front to the bottom half of the back, taking care to match the centers of the side seams, and leaving the tops open. When joining the motifs, work from the WS and butt the seam without overlap.
Crocheting the Sleeves
- Rnd 1: With RS facing, join yarn at underarm, ch 1, sc 40 sts evenly around the arm opening for the sleeve, do not join, but continue working in the round.
- Rnd 2: Sc in each st around.
- Repeat Rnd 2 until sleeve measures 3⁄4" (19 mm) from beg.
- Next Rnd (Decrease Rnd): *Sc in next 8 sc, sc2tog; repeat from * around. You now have 36 stitches.
- Next Rnds: Sc in each sc around until sleeve measures 2" (5 cm) from beginning.
- Next Rnd (Decrease Rnd): *Sc in next 7 sc, sc2tog; repeat from * around. You now have 32 stitches.
- Next Rnds: Sc in each sc around until sleeve measures 3" (7.5 cm) from beginning.
- Scallop Border: *(Sc, ch 3, 3 dc) in next st, skip 3 sts; repeat from * around; join with slip st to first sc. Fasten off.
Crocheting the Border
- Row 1: With RS facing, join yarn at lower left front corner, ch 1, 2 sc in same st, work 18 sc evenly spaced across lower left front edge, 50 sc across back, and 29 sc across right front to corner, 3 sc in corner st, work sc 37 sc evenly spaced up right front edge, 3 sc in corner st, 37 sc around front and back neck edge, 3 sc in corner st, and 37 sc down left front edge, ending with 1 sc in same st as first sc, join with slip st to first sc. You now have 220 sts.
- Scallop Border: Ch 1, *(sc, ch 3, 3 dc) in next st, skip 3 sts; repeat from * around to the top of the right front; slip st the last dc into the first sc of the neck stitches. Fasten off.
Finishing
- Sew one button at top neck edge and one at the bottom of the first motif on the left front. Corresponding spaces created by skipping 3 stitches on the Scallop Border are used for buttonholes.