ANGULAR AND MOBILE APPS
This chapter explores mobile application development with several toolkits, including Ionic 2, Ionic 2 with NativeScript, Angular with Native Script, and Angular with React Native.
The first part of this chapter discusses Ionic 2. Ionic 2 extends Apache Cordova, which is the open source counterpart to PhoneGap from Adobe. Because Ionic 2 depends on Cordova, you can develop cross-platform hybrid mobile applications. In addition, Ionic 2 uses Angular for the user interface (UI) layer, which is the rationale for its inclusion in this chapter. You will learn how to create a simple Ionic 2 mobile application that displays a list of users. Note that Ionic 2 is the only toolkit in this chapter that relies on a WebView; all the other technologies in this chapter generate cross-platform native mobile applications (i.e., there is no Document Object Model [DOM]).
The second part of this chapter introduces you to NativeScript, which you can combine with Ionic 2 to create native mobile applications. This toolkit generates native applications that do not involve a DOM, which is similar to React Native from Facebook.
The third section combines NativeScript with Angular to create cross-platform native mobile applications.
The fourth section might surprise you: it provides an overview of React Native for developing cross-platform native mobile applications. Although React Native was initially created in conjunction with ReactJS for the UI layer, you can combine React Native with Angular (for the UI layer) to create cross-platform native mobile applications.
The fifth part of this chapter discusses the Angular Mobile Toolkit, which is based on the Angular CLI, so you can use the ng command-line tool to create applications. This toolkit generates mobile applications that are based on Progressive Web Apps (PWAs), which are not discussed in this chapter.
Mobile Development with Ionic 2
Angular is designed to support multiplatform applications, which includes mobile applications. There are also toolkits based on Angular for developing mobile applications. One well-known toolkit is Ionic 2, and its home page is located here:
Ionic 2 is built on top of Angular and leverages the Cordova toolkit. The Ionic framework provides a UI framework that mimics a native UI for creating hybrid mobile applications.
NOTE
Ionic 3 was released as this book went print, and the following link discusses the major changes and new features:
Installation and Project Creation
Install Ionic 2 with the following command:
[sudo] npm install -g ionic cordova
If you already have an older version of Ionic installed and you encounter an error in the preceding step, the following commands might help you resolve the error:
npm uninstall -g ionic
[sudo] npm i -g ionic cordova
Now create an Ionic application with the following command:
ionic start firstIonicProject blank --v2
The name of our project is firstIonicProject, and it’s based on the blank Ionic template. The argument --v2 indicates Ionic 2 (otherwise the default is Ionic 1).
cd firstIonicProject
Start the Ionic server with this command:
ionic serve
You will see the following type of output from the preceding command:
> ionic-hello-world@ ionic:serve firstIonicProject
> ionic-app-scripts serve "--v2" "--address" "0.0.0.0" "--port" "8100" "--livereload-port" "35729"
[13:31:04] ionic-app-scripts 1.1.4
[13:31:04] watch started ...
[13:31:04] build dev started ...
[13:31:04] clean started ...
[13:31:04] clean finished in 1 ms
[13:31:04] copy started ...
[13:31:04] transpile started ...
[13:31:17] transpile finished in 13.07 s
[13:31:17] preprocess started ...
[13:31:17] preprocess finished in 1 ms
[13:31:17] webpack started ...
[13:31:18] copy finished in 14.11 s
[13:31:33] webpack finished in 15.74 s
[13:31:33] sass started ...
[13:31:36] sass finished in 3.17 s
[13:31:36] postprocess started ...
[13:31:36] postprocess finished in 1 ms
[13:31:36] lint started ...
[13:31:36] build dev finished in 32.05 s
[13:31:36] watch ready in 32.18 s
[13:31:36] dev server running: http://localhost:8100/
In addition, a browser session is automatically launched at localhost:8080, where you will see the contents of Figure 8.1.
You can also view a simulation of the application on a mobile device by launching the following command:
ionic serve -l
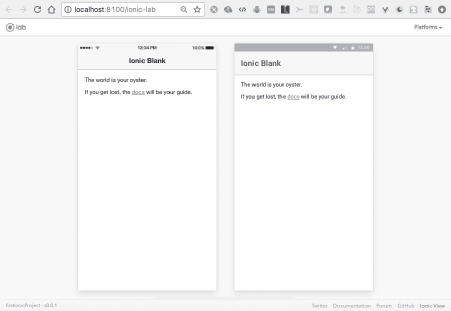
The preceding command launches a browser at localhost:8100 and displays the output on a simulated iPhone and Android device, where the latter display was selected from the drop-down list in the top-right corner).
Figure 8.2 displays the simulated iPhone and Android devices in a browser.
The next section briefly discusses Ionic native mobile applications.
FIGURE 8.1 A minimal Ionic application in a Chrome browser.

FIGURE 8.2 An Ionic app simulated on iOS and Android in a Chrome browser.
The Ionic Native home page is located here:
http://ionicframework.com/docs/v2/native/
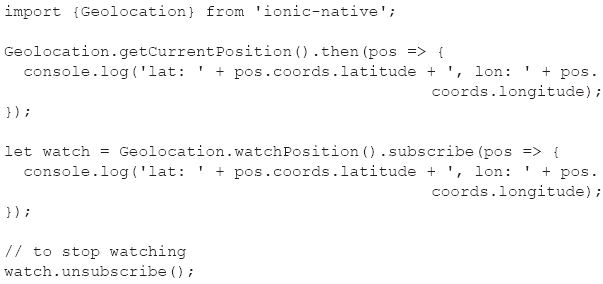
Ionic Native wraps plugin callbacks in a Promise or an Observable, providing a common interface for all plugins and ensuring that native events trigger change detection in Angular. The following code block illustrates how to add Geolocation functionality to an Ionic Native application:
The next section discusses the project structure and the contents of the TypeScript file app.component.ts.
The Project Structure of Ionic Applications
The directory firstProject in the previous section contains the following files and folders:
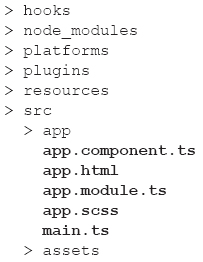
The app/src directory contains familiar TypeScript files that you have seen in code samples in earlier chapters. Listing 8.1 displays the contents of app.component.ts, whose contents are significantly different from Angular Web applications.
LISTING 8.1: app.component.ts
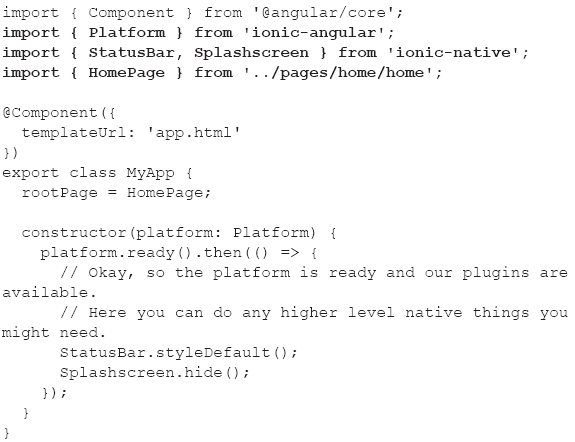
Listing 8.1 starts with a standard import statement, followed by three Ionic-specific import statements. Notice that the @Component decorator does not contain a selector property, which is required in Angular applications. The templateUrl property references the HTML page app.html whose contents are very similar to the Web page index.html in Cordova applications.
Listing 8.1 exports the class MyApp, which initializes the rootPage variable (specific to Ionic), followed by a constructor. If you have worked with Cordova, the ready() method in the constructor probably looks familiar to you. However, in Ionic applications, platform.ready() returns a Promise, and when the latter is resolved, the then() method displays the main screen based on the contents of app.html.
Listing 8.2 displays the contents of app.module.ts, which has a familiar structure (e.g., the @NgModule decorator), along with Ionic-specific contents.
LISTING 8.2: app.module.ts
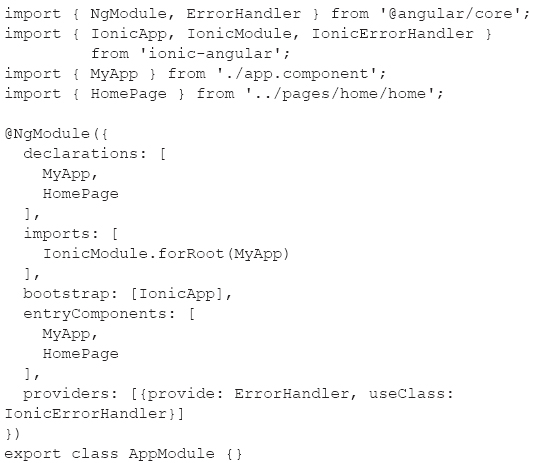
Listing 8.2 imports the MyApp class (shown in Listing 8.1) and the HomePage class (not shown here), both of which are listed in the declarations property. You can read the Ionic documentation to learn about the other components in Listing 8.2.
The next section shows you how to retrieve GitHub user-related information (similar to the sample in Chapter 4) via an Ionic application.
Retrieving GitHub User Data in an Ionic Application

Copy the IonicGithub directory from the companion disc to a convenient location. This application contains the following files that have custom code, all of which are in the src/app subdirectory:
github.ts
app.component.ts
app.html
Listing 8.3 displays the contents of github.ts that defines the custom component GitHubService, which retrieves GitHub-related information about a given user.
LISTING 8.3: github.ts

Listing 8.3 defines and exports the custom class GitHubService, which contains the method getRepos() for retrieving the list of GitHub repositories for a given user. In this application, the user has the hard-coded value ocampesato, which you would replace with an <input> element to accept an arbitrary GitHub user name.
The method getRepos() invokes the get() method of the http instance variable that is instantiated as a private variable in the constructor, and then returns the result of that method’s invocation.
Listing 8.4 displays the contents of app.component.ts that defines and exports the MyApp component that invokes the getRepos() method in the GitHubService class.
LISTING 8.4: app.component.ts

Listing 8.4 modifies the default constructor by adding the variable github, which is a private instance of the GitHubService class (defined in Listing 8.3). The getRepos() method is invoked when users click the button in the HTML Web page. This method subscribes to the Observable that is returned from the getRepos() method of the GitHubService class.
Listing 8.5 displays the contents of app.module.ts that defines and exports the AppModule component.
LISTING 8.5: app.module.ts

Listing 8.5 contains code that is similar to the previous Ionic code sample, with the addition of the import statement for GitHubService and the modified contents of the providers property, both of which are shown in bold.
Listing 8.6 displays the contents of app.html that contains the HTML markup to display the list of repositories for a GitHub user.
LISTING 8.6: app.html
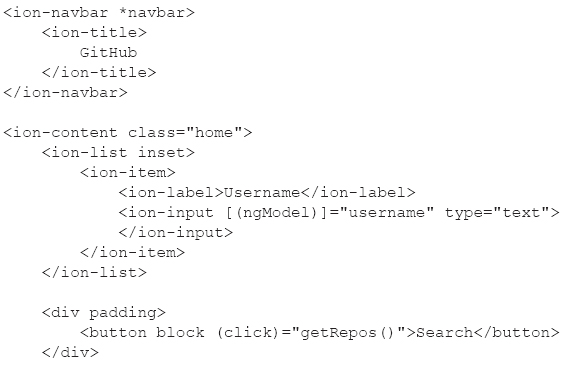
Listing 8.6 contains three sections, the first of which displays the name of the GitHub user that is used to perform a GitHub query. The second section contains a <div> element with a nested <button> element that invokes the getRepos() method when users click this button. The third section contains an Ionic <ion-card> element with an *ngFor directive that iterates through the list of GitHub repositories and displays each repository in its own card-like container.
Figure 8.3 displays the list of repositories of a GitHub user.
The following link describes the differences between PhoneGap, Ionic, Titanium (not discussed in this chapter), and Cordova:
The next option for developing cross-platform native mobile applications is the combination of Ionic 2 and NativeScript. Before looking at a code sample, let’s take a quick detour to learn some basic features of NativeScript, which is the topic of the next section.
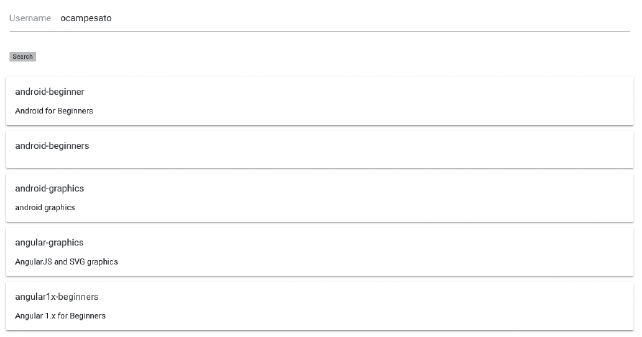
FIGURE 8.3 The list of repositories of a GitHub user.
What Is NativeScript?
NativeScript 2.0 enables you to create native mobile applications for multiple platforms, and its home page is located here:
NativeScript renders UIs with the native platform’s rendering engine (i.e., no WebViews), which results in native-like performance. However, NativeScript generates native applications for Android and iOS, whereas Ionic 2 generates hybrid applications for Android and iOS. Hence, NativeScript is “comparable” to React Native, whereas Ionic 2 is “comparable” to PhoneGap.
NativeScript has the following features:
 Native UI (no WebViews)
 Extensible
 Quick to learn
 Cross-platform
 Backed by Telerik
 Open source (Apache 2 license)
Keep in mind that NativeScript for Angular generates native applications for Android and iOS, whereas Ionic 2 generates hybrid applications for Android and iOS. Hence, the combination of NativeScript and Angular is a “counterpart” to React Native (where the UI layer can be either ReactJS or Angular).
Installation and New Project Creation
Install NativeScript with this command:
[sudo] npm install –g nativescript
After the preceding command has completed, you can create and deploy a NativeScript application by executing the following three commands:
tns create FirstNSProject --template
nativescript-template-tutorial
cd FirstNSProject
tns run android
For simplicity, the FirstNSProject project is based on an existing NativeScript template.
Invoke the following command to deploy to an iOS device:
tns run ios
Figure 8.4 displays the (admittedly trivial) contents of the NativeScript FirstNSProject on an Android device.
A list of NativeScript plugins is located here:
http://plugins.telerik.com/nativescript
In case you’re wondering, the text in Figure 8.4 is specified in the file main-page.xml (in the app subdirectory), whose contents are shown here:
<Page loaded="pageLoaded">
<ActionBar title="My App" class="action-bar"></ActionBar>
<!-- Your UI components go here -->
</Page>
As you can see, NativeScript uses an XML file to define the contents and layout of NativeScript applications.

FIGURE 8.4 A NativeScript application on an Android device.
You can also convert an existing Ionic 2 application to NativeScript:
https://www.thepolyglotdeveloper.com/2016/05/converting-ionic-2-mobile-app-nativescript
Angular and NativeScript
Install NativeScript as described in the previous section, in case you have not already done so, and then perform the following steps:
tns create FirstNSNGProject --template
nativescript-template-ng-tutorial
cd FirstNSNGProject
tns run android
Invoke the following command to deploy a NativeScript-based iOS application to an iOS device:
tns run ios
If you prefer to launch applications in a simulator, invoke one of the following commands:
tns run android --emulator
This concludes the section of the chapter regarding NativeScript. The next section delves into React Native, which is a cross-platform toolkit for generating native mobile applications for Android and iOS.
Working with React Native
React Native is a toolkit developed by Facebook for developing mobile applications, and its home page is located here:
https://facebook.github.io/react-native/
Because this book is about Angular, why does this chapter contain React Native? The answer might surprise you: It’s possible to create native mobile applications using a combination of Angular and React Native, which you will see later in this chapter. Nevertheless, this section might be optional for some readers, and feel free to skip this section.
Another point to keep in mind: React Native development requires at least a basic understanding of ReactJS. In some cases, it’s useful to know how to deploy a mobile application to a device from Xcode and from Android Studio.
Setup Steps for React Native
Before you can create and deploy React Native applications to iOS devices and Android devices, make sure that you have the following hardware and software installed (other versions are supported in Step 1):
1)a MacBook with El Capitan (10.11.4), and Xcode 7.3
2)an iOS device with El Capitan
3)a MacBook with Android Studio 2.x
Next, perform the following setup steps:
4)install the Android SDK, Android NDK, and Java8 on your MacBook
5)set the environment variables ANDROID_HOME, NDK_HOME, and JAVA_HOME
You also need Android 4.x or higher installed on an Android device. Next, install node on your MacBook if you haven’t done so already, and then install React Native on your MacBook with this command:
npm install -g react-native-cli
The following links contain more detailed setup instructions for React Native:
1)https://facebook.github.io/react-native/docs/getting-started.html#content
2)https://facebook.github.io/react-native/docs/android-setup.html
3)https://facebook.github.io/react-native/docs/running-on-device-android.html
The next section shows you how to create and deploy a React Native application to a mobile device.
How to Create a React Native Application
After you have completed the setup steps in the previous sections, create a new React Native project as follows:
1)Navigate to a convenient location.
2)Invoke this command: react-native FirstRNProject.
3)Navigate into the root directory: cd FirstRNProject
Now install the dependencies with this command (which will take a while):
npm install
After the preceding command has completed, you can view the contents of FirstRNProject, which are shown below for your convenience:
android/
index.android.js
index.ios.js
ios/
node_modules/
package.json
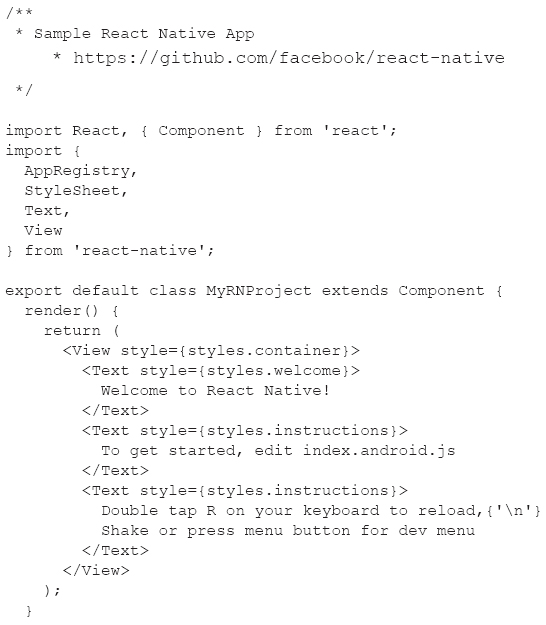
Listing 8.7 displays the contents of index.android.js, which is similar to the contents of index.ios.js.
LISTING 8.7: index.android.ts
AppRegistry.registerComponent('MyRNProject', () => MyRNProject);
Listing 8.7 starts with import statements for various required components, including the StyleSheet component that is needed later in the code. The next section of Listing 8.7 defines the MyRNProject component that contains a render() method, which returns a top-level <View> component. Notice that the <View> component contains three <Text> components that contain plain text strings. The third section of Listing 8.5 defines the variable styles from the StyleSheet component, which in turn defines three properties that are referenced in the three <Text> components.
The final code snippet in Listing 8.7 invokes the registerComponent() method of the AppRegistry component in order to register the custom MyRNProject class: This step is required for React Native applications but not for ReactJS.
Deploying React Native Apps to a Mobile Device
Deploy the native Android application from the previous section to an Android device as follows:
1) adb devices (check that a device is available)
2) cd <top-of-project>
3) react-native run-android
Deploy the native iOS application from the previous section to an iOS device as follows:
1) cd <top-of-project>
2) react-native run-ios
You can refresh the contents of the screen with this command:
command-r
Now that you have completed this introductory section, you are ready to see how to create a mobile application that uses Angular and React Native, which is the topic of the next section.
Angular and React Native
A GitHub repository with code that combines Angular with React Native can be found here:
https://github.com/angular/react-native-renderer
Download the code from the preceding link and perform the following steps (which are listed in the README.md file):
npm install -g gulp react-native-cli typings
npm install
gulp init
gulp start.android (for android)
gulp start.ios (for ios)
NOTE
Make sure that you set JAVA_HOME for Java8 (not Java9) in the command shell where you launch the preceding list of commands.
Listing 8.8 displays the contents of NG2RNGraphics.ts that illustrates how to generate a set of colored circles that follow the path of an Archimedean spiral. Note that the code contains portions of animate.js in the sample/samples/android subdirectory of the GitHub repository.
LISTING 8.8: NG2RNGraphics.ts

Listing 8.8 starts by importing Angular modules as well as a Stylesheet (for cascading style sheet [CSS]-related properties) from react-native. Next, the Component decorator for the Ball class contains a template property that consists of a View component that specifies various attributes, such as the stylesheet, CSS properties, along with the methods moveBall() and endMoveBall() to handle the pan event and end-of-pan events, respectively. The constructor() of the Ball class performs some initialization, and the set methods ensure that the x, y, radius, and color properties have valid values.
The second part of Listing 8.8 contains the Component decorator for the AnimationApp class that initializes the selector property with a custom element and the host property with CSS-related values. In addition, the template property contains an *ngFor statement that iterates through the collection of Ball instances that create the graphics effect.
The AnimationApp class initializes multiple TypeScript variables, followed by a constructor() that contains a loop that populates the TypeScript array balls with circles that follow the path of an Archimedean spiral.
You can make a backup of animation.js in the sample/samples/android subdirectory and replace its contents with NG2RNGraphics.ts, or you can clone the directory and work with a separate project.
Additional documentation for this repository is located here:
http://angular.github.io/react-native-renderer/
Figure 8.5 displays the output from launching the code in Listing 8.8 on an Android device.
React Native versus NativeScript: A High-Level Comparison
Although both of these toolkits enable you to develop native mobile applications, they do have differences. First, NativeScript combines the higher-level functionality of Angular with the lower-level UI elements in NativeScript to create cross-platform applications that have a consistent look and feel to them. On the other hand, React Native enables developers to write platform-agnostic code and simultaneously access the platform-specific UI layer. Second, React attempts to provide an abstraction for business logic, whereas NativeScript provides a more “unified” development experience.
Third, React Native provides rapid deployment and execution via “hot reloading,” which (in some cases) might be superior to NativeScript. Fourth, the use of Angular with NativeScript requires “embracing” an Angular architecture, which is not the case for React. NativeScript and Angular are also separate open source projects, and hence another dependency, whereas React Native handles cross-platform functionality in the React framework.

FIGURE 8.5 Graphics from an Angular and React Native app on an Android device.
These points will assist you in weighing the various trade-offs, in conjunction with your project requirements, to determine the environment that best suits your needs.
Angular Mobile Toolkit
The Angular Mobile Toolkit (AMT) enables you to create Progressive Web Apps, and its home page is located here:
The GitHub link with downloadable code is located here:
https://github.com/angular/mobile-toolkit
The following quote (from the README.md file) is a succinct description of this GitHub repository:
This repo is a series of tools and guides to help build Progressive Web Apps. All guides are currently based on Angular CLI, and all tools should be considered alpha quality. In the future, more guides and recipes to cover different tools and use cases will be added here and on [https://mobile.angular.io].
If you are unfamiliar with Progressive Web Apps (PWAs are discussed very briefly later in this chapter), a good introduction is located here:
The next several sections cover the following topics:
 Creating an AMT project with ng
 Contents of the manifest.webapp file
 Installing the mobile application
 Building the app shell
 Adding offline capabilities via Service Workers
Creating a Mobile Project
Complete the following steps to create a PWA-based mobile application in Angular via the ng command-line utility:
Step 1: Install the Angular CLI as described in Chapter 1.
Step 2: Create a new project with this command:
ng new hello-mobile --mobile
Step 3: Serve the mobile application:
cd hello-mobile
ng serve
Step 4: Navigate to localhost:4200 (usually automatic).
When you invoke ng with the --mobile flag, the ng utility creates a PWA with the following:
 A Web Application Manifest with information for installing your application on the home screen
 A build step to generate an App Shell from the root component
 A Service Worker script to automatically cache your application for fast loading (even without an Internet connection)
Keep in mind that the Service Worker is only installed in production mode, which means either ng serve --prod or ng build --prod.
The manifest.webapp File
The code sample in the previous section contains a Web App Manifest that is automatically generated during project creation. Listing 8.9 displays the contents of the manifest.webapp file in the src subdirectory.
LISTING 8.9: manifest.webapp
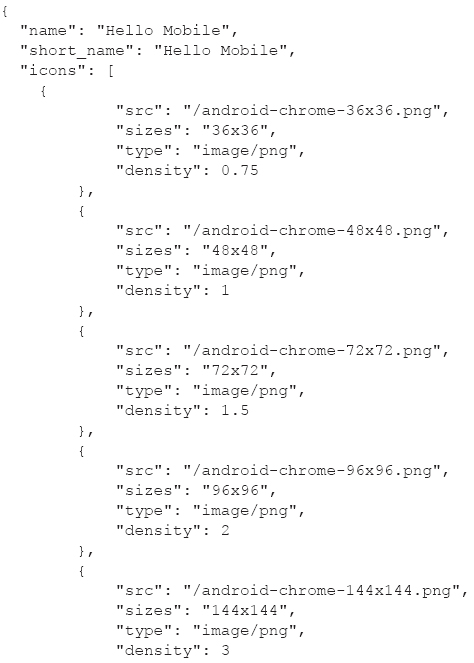
Listing 8.9 contains JavaScript Object Notation (JSON)-based data, the longest of which is the icons property, which is an array consisting of the properties of six PNG files. Listing 8.9 also contains color-related properties, as well as the start_url property (which specifies the HTML Web page index.html).
Navigate to the following GitHub link for information about installing the mobile app, building the app shell, and adding offline capabilities:
Progressive Web Apps (Optional)
Recently, PWAs have gained significant interest in the mobile community. If you are unfamiliar with PWAs, here is a quote from Wikipedia:
Progressive Web App (PWA) is a term used to denote a new software development methodology. Unlike traditional applications, Progressive Web App can be seen as an evolving hybrid of regular web pages (or websites) and a mobile application. This new application life-cycle model combines features offered by most modern browsers with benefits of mobile experience. (https://en.wikipedia.org/wiki/Progressive_web_app)
PWAs are mobile-like native applications that are created from HTML5, CSS3, JavaScript, and Service Workers. PWAs load quickly, can work offline, and support push notifications. An icon for a PWA appears on mobile devices, just like a “regular” native mobile application. However, PWAs are not discoverable in any application store, and depending on your perspective, this can be an advantage (e.g., the publication process is obviated) or a disadvantage (e.g., other people cannot find your PWAs, which might reduce traffic).
Currently, Chrome provides support for PWAs, and potentially other browsers will also support PWAs at some point in the future.
Web Workers and Service Workers
A Service Worker provides the functionality of a Web Worker, along with additional features. You can learn about Service Workers here:
https://developers.google.com/web/fundamentals/getting-started/primers/service-workers?hl=en
Components of a PWA
A PWA often consists of the following files:
 an index.html Web page,
 an app.js file for navigation and UI logic,
 an application shell file, and
 a cache file.
You can search online for blog posts that display the contents of some of the files in the preceding list. In addition, you can peruse an assortment of PWAs at this site:
Other Links
The following link contains a comparison of PWAs and Android:
The following link contains information about Angular and PWAs:
http://www.slideshare.net/ManfredSteyer/progressive-web-apps-with-angular-2
Summary
This chapter showed you a multitude of ways to create mobile applications that involve Angular for the UI layer. First you learned about the Angular Mobile Toolkit, which enables you to create mobile applications with Angular. You also learned how to use the Ionic 2 toolkit to create cross-platform hybrid mobile applications. Then you saw how to combine Ionic 2 with NativeScript to create native mobile applications.
You also saw how to create native mobile applications with Angular and NativeScript. Next, you learned about React Native, which enables you to generate cross-platform native mobile applications with either ReactJS or Angular for the UI layer.