Chapter 1
Implement and monitor an Azure Infrastructure
Working as a Microsoft Azure cloud solutions architect, you will be designing solutions and engaging with IT professionals who will implement your design. So, why does the AZ-303 certification exam require you to know how to deploy and configure resources? As an architect, you must understand how resources are linked to create a solution that meets your customers’ requirements, while adhering to the pillars of great architecture:
■ Cost optimization
■ Operational excellence
■ Performance efficiency
■ Reliability
■ Security
To achieve this requires a deep understanding of how each underlying resource is implemented and configured. The AZ-303 exam expects you to demonstrate this knowledge through hands-on labs, both through the Azure portal and on the command line.
Once your design is implemented and starts to move through the stages of development and testing, you need feedback to ensure that these pillars are maintained. There is little point having a solution in production that is expensive, consistently fails, and is insecure. Monitoring the infrastructure throughout development and testing and into production provides continuous feedback at every stage, and it ensures that your product does not fail or become insecure.
Each resource in Azure can be configured for monitoring to return feedback to centralized locations. The AZ-303 certification exam expects you to demonstrate a solid understanding of monitoring. You must know how to configure your resources for monitoring, how to collate the data, and how it can be visualized to pinpoint possible issues and faults.
The Azure Solution Architect certification is an expert-level title, so you are expected to have at least intermediate-level Azure configuration abilities. You are also expected to have basic scripting skills with the Azure CLI and the Azure PowerShell modules.
Skills covered in this chapter:
Skill 1.1: Implement cloud infrastructure monitoring
Continuously monitoring applications and infrastructure will enable your customers to be timelier in their responses to issues and changes. Responses to alerts generated from a well-monitored system can be automated, meaning in some circumstances, an application can self-heal. There are many monitoring solutions within Azure, each with its own use cases and configurability. As a solution architect, you need an excellent understanding of which monitoring solution fits which use case. This skill looks at some of the monitoring options available to you, what they monitor, and how to configure them.
This skill covers how to:
Monitor security
Your customers’ reputation is linked with the security of their systems; therefore, as an architect, you must know how to design secure systems. This is only one part of the puzzle; you cannot assume that your design is bulletproof. You must also be able to instruct your customers how to monitor systems continuously for potential attacks and mitigate the threats before data becomes at risk.
There are multiple security examinations available for Azure, though for this exam, you need to know the options available to you to monitor security and their high-level use cases.
Azure Security Center
When architecting solutions in Azure, there is a shared responsibility between the customer and Azure to ensure the resources are kept safe. Azure Security Center is an infrastructure security management system designed to help mitigate the security challenges that moving workloads to the cloud brings:
■ Lack of security skills. Your customers might not have the traditional in-house skills and capital needed to secure a complex infrastructure.
■ Increasing attack sophistication. Attacks are becoming more sophisticated, whether your workloads are in the cloud, are on-premises, or are part of a hybrid cloud and on-premises setup.
■ Frequently changing infrastructure. Because of the flexibility of the cloud, architecture can rapidly change, bringing ever-moving attack vectors.
Security center comes in two tiers: Free and Standard:
■ Free tier. The free tier is enabled by default and provides security recommendations on Azure VMs and App services.
■ Standard tier. The standard tier increases monitoring to any cloud VM and hybrid VM workloads. The standard tier also includes some of the most frequently utilized PaaS services, such as data, storage, and containers.
When you activate Security Center for either tier, a monitoring agent is required for most of the security assessments. You can configure Security Center to automatically deploy the Log Analytics Agent onto Azure virtual machines, though PaaS (Platform as a Service) services require no extra configuration. For on-premises and cloud VMs, the Log Analytics Agent must be manually installed. Once the agents are installed and configured, Security Center begins assessing the security state of all your VMs, networks, applications, and data. The Security Center analytics engine analyzes the data returned from the agents to provide a security summary, as displayed in Figure 1-1.

FIGURE 1-1 Security Center Overview blade
Figure 1-1 provides an excellent overview of the Security Center standard tier core features:
■ Policy & Compliance. This section includes the Secure Score, which is a key indicator to how your infrastructure is secured. Security Center assesses resources across your subscriptions and organization for security issues. The Secure Score is an aggregation of identified security issues and their corresponding risk levels. The higher the Security Score, the lower the risk. The compliance section tracks whether regulations for standards such as ISO 27001 and PCI DSS are being followed.
■ Resource Security Hygiene. This section provides resource and network recommendations. Drill through the menus to view recommendations and remediate them to improve your security posture and the Secure Score.
■ Threat Protection. Logs from data and compute resources are passed through algorithms for behavioral analysis, anomaly detection, and integrated threat intelligence to look for possible threats. Alerts are created depending on severity.
The standard tier also includes just-in-time (JIT) access for Azure VMs. With JIT access enabled on a VM, an administrator can request access from an IP range for a specified length of time. If the administrator has the correct RBAC permissions, Azure creates a network rule, and the administrator is granted access. Once the specified time has passed, Azure removes the network rule to revoke access.
Azure Sentinel
Azure Sentinel is a security orchestrated automated response (SOAR) and security information and event management (SIEM) solution. Security Center is used to collect data and detect security vulnerabilities. Azure Sentinel extends beyond this by bringing in tools to help your customers hunt for threats, and then investigate and respond to them—all at enterprise scale:
■ Collects data at cloud scale. Data collected includes other cloud, on-premises, Microsoft 365, and Advanced Threat Protection data.
■ Detect undetected threats. Threats are detected using Microsoft analytics and threat intelligence.
■ Investigate threats with AI. You can hunt for suspicious activities at scale.
■ Respond to incidents. Azure Sentinel includes built-in orchestration and automation of common tasks.
Azure Sentinel requires a Log Analytics workspace when it is enabled and is billed based on the amount of data ingested from the workspace.
Monitor performance
Once the applications your customers have architected go into production, response time is likely to be one of the main KPIs your users are interested in. Performance needs to be monitored so that your customers know about potential issues before the application users do. This section looks at how to configure resources for performance monitoring and how Azure Monitor can use this data to look for performance issues.
Configure diagnostic settings on resources
Azure automatically generates audit and diagnostic information across the platform in the form of platform logs. Platform logs are invaluable to an architect because they contain information generated across different layers of Azure:
■ Activity Log. All write operations (PUT, POST, DELETE) on a resource (the management plane). Tracked at the subscription level, this log contains who made the change, from where a change was made, and when a change was made.
■ Azure Active Directory Log. This is a full audit train and tracking of sign-in activity for Azure Active Directory.
■ Resource Logs. Resource logs are available for operations that were performed within a resource (the data plane). For example, a request on a WebApp or the number of times a logic app has run can both be logged. The resource log detail varies with resource type because each resource delivers a different service.
This information gives an architect a view of what is currently happening on their customers’ application(s) and what happened previously.
Activity Log and Azure Active Directory Log are automatically available to view within the Azure portal. Resource logs must be configured at the resource level through diagnostic settings before they can be viewed. Configuring diagnostic settings has the same generic steps, regardless of the resource type.
Platform as a Service (PaaS)
Follow these steps on a platform as a service (PaaS) resource to enable diagnostic settings:
Navigate to the menu blade for a PaaS resource in the Azure portal. Scroll down to Monitoring and click Diagnostic Settings. The Diagnostic Settings blade opens, which shows a list of settings that can be streamed to other destinations. Click Add Diagnostic Setting to configure data collection.
Clicking Add opens the Diagnostics Setting Configuration blade, as shown in Figure 1-2.

FIGURE 1-2 Configure diagnostic settings
In the Diagnostic Setting Name field, add a unique name for this diagnostic setting at the resource.
Under Category Details, select all categories of data you want to collect:
■ Log. These are the resource logs. The categories of log will differ depending on the resource type chosen. This screenshot is from a Logic App.
■ Metric. Choosing this option will stream numerical metric data in a time series format about this resource.
Under Destination Details, select at least one destination for the chosen categories to stream to:
■ Log Analytics. Check this to stream data to a Log Analytics workspace. For more information about Log Analytics see “Configure a Log Analytics Workspace,” later in this chapter. If Log Analytics is selected, it becomes mandatory to select the Subscription and Log Analytics Workspace, which will receive the data, as shown in Figure 1-2.
■ Archive To A Storage Account. Check this to archive your chosen categories into a storage account; this option is most useful if future auditing of the resource is required. Once you have chosen this option, the Retention (Days) entry point is enabled with a value of 0 for each selected category, as shown previously in Figure 1-2. Edit this number value to set the number of days each category should be retained. If you change this value later, it will only take effect on new logs and metrics stored. Old logs and metrics will continue to be retained for the original retention period. If Archive to Storage Account is selected, a Subscription and Storage Account must be selected from the respective drop-down menus, as shown previously in Figure 1-2.
■ Stream To An Event Hub. Select this option to send diagnostics data to an Event Hub. Sending data to an Event Hub enables streaming of the data outside of Azure to third-party applications, such as security information and event management (SIEM) software. If Stream To An Event Hub is selected, the Subscription and Event Hub Namespace fields must be populated.
Once the diagnostic settings are chosen, click Save at the top left to save the choices. The categories and destinations selected are now displayed on the Diagnostics Settings blade, and data will automatically be sent to the chosen destinations.
Diagnostic settings also can be managed on the command line through PowerShell using the Set-AzDiagnosticSetting cmdlet or the az monitor diagnostic-settings Azure CLI command. For example, to enable specified log categories for an Azure SQL database, execute this command in PowerShell:
Set-AzDiagnosticSetting -Name sqldb112-diagsettings '
-ResourceId $dbResource.ResourceId '
-Category QueryStoreRuntimeStatistics, QueryStoreWaitStatistics, Errors,
 DatabaseWaitStatistics, Deadlocks -Enabled $true '
-StorageAccountId $storageResource.ResourceId '
-WorkspaceId $workspaceResource.ResourceId
Azure Virtual Machines
Azure VMs are not part of PaaS. Instead, they form part of Azure’s Infrastructure as a Service (IaaS) offering, and you manage them. For an Azure VM to log data, the Azure diagnostics extension must be installed. Doing so sets up an Azure Monitor agent on the VM. The diagnostic extension is an Azure VM extension, meaning it can be installed via an ARM template or on the command line. It can also be installed through the Azure portal. The name of the extension differs between operating systems. For Windows, it is the Windows Azure diagnostics extension (WAD); for Linux, it is the Linux diagnostic extension (LAD). To install either extension through the Azure portal, navigate to the Diagnostic Settings menu item of any Azure virtual machine. You will have the option to choose Enable Guest-Level Monitoring if the diagnostic extension has not already been installed. Once installed, tabs for metrics and logging are enabled within the Diagnostic Settings blade. The number of tabs and their configurable contents depend on the operating system of the VM. For a Windows VM, these tabs are displayed:
■ Overview. This is a summary page that shows the options selected in the other tabs.
■ Performance Counters. Choose Basic to pick from groupings of counters to be collected, such as CPU, Memory, and Disk. Choose Custom to pick specific counters.
■ Logs. Choose Basic to pick from groupings of Application, Security, and System logs to be collected, or choose Custom to select specific logs and levels using an XPath expression, IIS Logs, .Net application logs, and event tracing for Windows (ETW) logs can also be selected for collection.
■ Crash Dumps. Collect full or mini dumps for selected processes.
■ Sinks. Optionally, you can send data to Azure Monitor or Application Insights.
■ Agent. If the diagnostics agent is malfunctioning, it can be removed from this tab and can then be reinstalled. You can also edit the Log Level, maximum local disk space (Disk Quota), and Storage Account for the agent.
If you have created a Linux VM, you will see the following tabs:
■ Overview. This is a summary page that displays the options selected from the other tabs.
■ Metrics. Choose Basic to pick from groupings of metrics to be collected, such as Processor, Memory, and Network and their sample rates. If you choose Custom, you can then choose Add New Metric or Delete specific metrics, and you can set individual sample rates.
■ Syslog. On this tab, you can choose which syslog facilities to collect and the severity level at which you want to collect them.
■ Agent. If the diagnostics agent is malfunctioning, it can be removed from this tab, and can then be reinstalled. Also, you can Pick A Storage Account for the agent.
Note Diagnostic Settings and Diagnostics Extension
Not all the services have the Diagnostic Settings menu item in their menu blades. When the Diagnostic Settings option is missing, navigate to the resource group and click Diagnostic Settings. If Diagnostic Settings can be enabled for the service, it will be listed. For example, VPN gateways must be configured in this way. If you are planning to use the Log Analytics extension on a Linux VM, it must be installed before the diagnostic extension.
Create a performance baseline for resources
Baselining resources gives your customers a view of what expected resource behavior looks like. When performance degradation occurs, your customers can use their resource baselines to aid in their analyses and fault resolution.
Azure Monitor collects two main types of data:
■ Metrics. Timeseries and numerical-measured values or counts, such as CPU usage or waits
■ Logs. Events and trace files
The metrics in Azure Monitor form the baseline, giving a timeseries view of your resources. You can see a metrics view for most single resources by choosing the Metrics menu against the resource itself. You can use this to build up a view of how your resource is performing. Here is an example for an Azure VM:
In the Azure portal, navigate to any virtual machine and click Metrics on the Virtual Machine menu blade.
You must now choose the metrics to add to the chart. The scope has already been selected for you—it is the VM. Select a metric from the Metrics menu and then select an aggregation from the Aggregation menu. Click away from the metric, and it will be added to the chart.
To add a new metric, click Add Metric and repeat step 2. Repeat this process until all metrics you require are present on the chart.
Figure 1-3 shows a metrics chart, with the CPU performance for the last 24 hours suggesting this VM might need to be scaled up.

FIGURE 1-3 Metrics chart for VM CPU usage
Once completed, you can choose to add the chart to your Azure portal dashboard by clicking Pin To Dashboard. To navigate to a dashboard page, click the menu icon at the top left of any Azure page, click Dashboard, and choose the name of the dashboard to which you added the chart.
Monitor for unused resources
Because of the flexibility of Azure, it can be easy for your customers to have unused or under-utilized resources hidden within their subscriptions. With pay-by-the-minute or hourly billing, the cost of an unused resource could affect spending considerably. Azure Advisor contains cost recommendations that cover the following:
■ Under utilized VMs. These are VMs that can be downsized or deallocated.
■ Right-sizing database sources. Azure SQL, MySQL, or MariaDB can be downsized.
■ Idle network gateways. These are VNet gateways that have not been used for 90 or more days and could be deleted
■ Reserved VM / PaaS instances. You can buy capacity up front to save costs based on PaaS (Platform as a Service) and VM usage.
The Azure Advisor recommendations are free, and you can access Azure Advisor through the Azure portal:
Search for Azure Advisor in the search resources bar in the Azure portal. Select Azure Advisor in the drop-down menu that opens from the search bar as you type the resource name. The Azure Advisor overview page loads, as shown in Figure 1-4; the Cost summary is shown at the top left.

FIGURE 1-4 Azure Advisor Overview blade
Click the Cost square to drill into the recommendations. Each recommendation is shown as High Impact, Medium Impact, or Low Impact, and the number and type of Impacted Resources are shown at the bottom of each recommendation. Potential yearly cost savings are shown in the top right of the Cost square.
Monitor performance capacity
Azure Monitor can collate data from many different sources through a variety of agents. In a hybrid environment, your customers will need a single view across their organization. To deliver this functionality, your customers will need to combine on-premises workload metrics with those from Azure. The diagnostic agent for VMs will only collect data from Azure VMs; it does not support on-premises VMs.
The Log Analytics Agent will collect data from Azure VMs, on-premises VMs, and VMs managed by System Center Operations Manager (SCOM). The Log Analytics Agent is also referred to as “OMS Linux Agent” or “Microsoft Monitoring Agent (Windows).” The Log Analytics Agent can be installed on an Azure VM from the Virtual Machines section of a Log Analytics workspace. The installation on an on-premises machine requires the agent to be downloaded and installed from the command line.
The VM data collected by the Log Analytics Agent can be viewed in Azure Monitor Log. Azure Monitor Log uses KQL (Kusto Query Language) to create reports on the data using queries. Azure Monitor Log comes with built-in queries to help you get started. To view your data using these queries, log in to the Azure portal and follow these steps:
Search for Monitor in the search resources bar at the top of the Azure portal. (Note that Azure Monitor is listed in the Azure portal as Monitor.) Select Monitor in the drop-down menu that opens from the search bar as you type the resource name.
Choose Logs from left pane. Azure Monitor Logs opens with the Example Queries page. Scroll through the All Queries section, where you can see the list of Azure resources that have example queries.
Scroll to the bottom and choose Other > Memory And CPU Usage. The example KQL is loaded into the query pane. Click Run to execute the query and view results.
Click Select Scope, which is located to the left of Run. Here, you can choose the scope at which your query will run. Select a resource group that contains virtual machines that are sending data to Log Analytics. Click Apply; you are returned to the Query Editor, where the selected scope is now to the left of Select Scope. Click Run; the data returned is restricted to your selected scope, which is the resource group you just selected.
Now alter the KQL by editing it directly. In Figure 1-5, the KQL has been edited from the one selected in Step 3 above. The TimeGenerated > ago(2h) predicate filter has been set to 2 hours ago, and the summarization of values returned— bin(TimeGenerated, 2m)—is grouped to 2 minutes.

FIGURE 1-5 Viewing capacity through Azure Monitor logs
 Exam Tip KQL
It is important to have a basic understanding of the KQL language for the exam, though this can be difficult without access to the infrastructure that is creating data to query. Microsoft provides a tutorial database and a demo log analytics portal. These can be accessed for practice at https://docs.microsoft.com/en-us/azure/data-explorer/kusto/query/tutorial and https://portal.loganalytics.io/demo.
Need More Review? Azure Monitor Logs
The example in Figure 1-5 shows a single use case for Azure Monitor Logs. To learn more about the vast number of services whose data can be mined through logs and metrics, visit https://docs.microsoft.com/en-us/azure/azure-monitor/platform/data-platform-logs.
Visualize diagnostics data using Azure Monitor
Azure Monitor can collate data from many different sources through a variety of agents. Your customers will find the vast amount of data almost impossible to analyze without a graphical representation of the data. You have already seen how Azure Monitor can pin charts to your dashboard, but you can have more visualization capabilities by using Azure Monitor workbooks, which read metrics and logs from Log Analytics to create visualizations of data across multiple sources. Azure Monitor comes pre-loaded with workbook templates, which allow your customers to view insights about their resources, such as identifying VMs with low memory or high-CPU usage or viewing the storage capacity of their storage accounts. All templates can report across a subscription. To view the Performance Analysis workbook template in Azure Monitor, follow these steps:
Search for monitor in the search resources bar at the top of the Azure portal. (Note that Azure Monitor is listed in the Azure portal as Monitor.) Select Monitor in the drop-down menu that opens from the search bar as you type the resource name.
In the Azure Monitor menu, click Workbooks, and from the Gallery under Virtual Machines, click Key Metrics.
Choose the subscription you want to view and the Log Analytics workspace to which your VMs are logging metrics. Choose a Time Range to further filter the data. The workbook visualization loads with the Overview tab selected. The Overview tab displays the CPU utilization for all VMs in the selected subscription.
Click the Key Metrics tab to view the key metrics of CPU, disk, and network usage in a tabular format, as shown in Figure 1-6.

FIGURE 1-6 Key Metrics workbook template showing the CPU, disk, and network usage for virtual machines
Click through the other tabs. The Regions tab displays the highest CPU usage in each Azure region where the subscription contains a virtual machine. The Resource Health tab displays the health of each virtual machine in the subscription. Clicking the virtual machine in the Resource Health tab will drill through to the Resource Health blade of the virtual machine.
Return to the Gallery you navigated to in Step 2 and explore the other Workbooks available for virtual machines.
If your charts do not load, it is because VM insights have not been configured for the VMs. This is also indicated by a red exclamation mark and a Not Onboarded appearing to the right of the Time Range drop-down menu. To configure VM insights, see “Configure logging for workloads,” later in this chapter. Go back to the Gallery to explore the other templates available to you.
Azure Monitor can also send log and metric data to other sources for analysis, such as Power BI, where further sources of data can be combined to create business reporting. Operational dashboards can be created using Grafana. (You can do this by installing the Azure Monitor plugin from within Grafana.) Grafana is an open-source platform primarily used for detecting and triaging operations incidents.
Monitor health and availability
Understanding how to monitor the health of your customers’ application infrastructure is key for detecting potential issues and reducing downtime. Because your customers’ application infrastructure uses Azure services and these services can be affected by service-related downtime, your customers might require alerts if an underlying service becomes unavailable. This section looks at methods to do just that.
Monitor service health
Azure Service Health tracks the health of Azure services across the world, reporting the health of resources in the regions where you are using them. Azure Service Health is a free service that automatically tracks events that can affect resources.
To view Azure Service Health, log in to the Azure portal and search for service health in the search resources bar at the top of the portal. Select the Service Health menu option, which will be shown as an option in the drop-down menu as you type the resource name. The menu options on the left-hand side under Active Events correspond to the type of events, which are tracked in Azure Service Health:
■ Service Issues. Azure services with current problems in your regions
■ Planned Maintenance. Maintenance events that can affect your resources in the future
■ Health Advisories. Notification of depreciation of features or upgrade requirements that you use
■ Security Advisories. Security violations and notifications for Azure services that you are using
Choosing Health History from the Service Health menu lists all historical health events that have happened in the regions you use over a specified time period.
Selecting the Resource Health menu option lists resources by resource type and shows where service issues are affecting your resources. You can click the listed resource to drill down for the resource health history or to read more about a current issue affecting the resource.
Navigating back to the Service Health menu, you can create an alert for Service Health events in Health Alerts. Health Alerts monitors the activity log and sends an alert if Azure issues a Service Health notification. Therefore, diagnostic logs must be configured at the subscription level to include Service Health; otherwise, Health Alerts will not be configured.
Monitor networking
Monitoring network health for IaaS products is performed with Azure Network Watcher. Azure Network Watcher has tools to view metrics, enable logging, and diagnose and monitor resources attached to an Azure Virtual Network (VNet). Azure Network Watcher is automatically activated for a region as soon as a VNet is created in your subscription. To understand the monitoring capabilities of Azure Network Watcher, you need to explore three tools: Network Watcher Topology, Connection Monitor, and Network Performance Monitor.
Topology
Azure Network Watcher topology gives an overview of all VNets and their connected resources within a resource group. To view a topology, open the Azure portal and search for network watcher in the search resources bar at the top of the page, select Network Watcher from the drop-down menu that is displayed as you type the resource name. Topology can be selected in the menu on the left side of the portal in the Network Watcher menu. Select a Subscription and Resource Group that contains at least one VNet. The topology will automatically load, as shown in Figure 1-7.

FIGURE 1-7 Network Watcher Topology for a specified resource group
Figure 1-7 shows two VNets: vnet2vnet-vnet1 and vnet2vnet-vnet2. This is the network topology of the infrastructure created in “Implement VNet-to-VNet connections,” later in this chapter. An additional virtual machine (151-vnet-win) has also been added to the default1 subnet. You can see the mandatory gateway subnets, their VPN Gateways (VNetGW1, VNetGW2) and the connections for each VPN Gateway (VNet1-VNet2 andVNet2-Vnet1).
Connection Monitor
Connection Monitor is generally used to view latency; it can provide the minimum, average, and maximum latency observed over time or at a point in time. This data can be used to monitor whether moving Azure resources to new regions might decrease latency. Connection Monitor can also monitor for topology changes that can affect communication between a VM and an endpoint. If an endpoint becomes unreachable, the Connection Troubleshoot feature of Network Watcher can identify the reason as being DNS resolution, VM capacity, firewall, or routing issues.
Network Performance Monitor
Network Performance Monitor (NPM) monitors network performance between points in your infrastructure. NPM detects network issues and can be configured to generate alerts based on thresholds set for a network link. NPM has the following capabilities:
■ Performance Monitor. Detect network issues across your cloud and hybrid environments
■ Service Connectivity Monitor. Identify bottlenecks and outages between your users and their services
■ ExpressRoute Monitor. Monitor end-to-end connectivity over Azure ExpressRoute
To use Performance Monitor in Azure, at least one VM on your network will require the Log Analytics Agent to be installed. Network Performance Monitor is enabled in Network Watcher.
Need More Review? Network Watcher
To learn more about monitoring IaaS networks using Network Watcher, see https://docs.microsoft.com/en-us/azure/network-watcher/.
Monitor cost
Azure charges your customers for the resources and technologies they use and the data that flows between the resources and their users. In most cases, as soon as a resource is created, your customers will start being charged for the resource. Without controlling and monitoring spend, your customers could be in for a shocking bill at the end of the month! The cost management features of Azure Cost Management and Billing enable your customers to control costs by analyzing spend and receiving alerts based on spend thresholds.
Monitor spend
Azure Cost Management uses budgets to control costs and alert your customers when budgets are about to be breached. When a budget is about to be breached, Cost Management and Billing can raise an alert to enable your customers to act. To create a budget, use Cost Management in the Azure portal, and follow these steps:
Open the Azure portal and search for cost management in the search resources bar at the top of the Azure portal. Select Cost Management + Billing in the drop-down menu that opens as you start to type the resource name.
Select Cost Management in the left-hand menu. The Cost Management menu now loads. Choose Budgets from the Cost Management section of the Cost Management menu.
If you have any budgets, they will be listed on the Budgets blade which is now displayed. Click Add at the top left to add a budget.
The Create Budget tab is opened, which has the configuration sections in the following list. Once you have chosen your options, your budget should appear as shown in Figure 1-8.
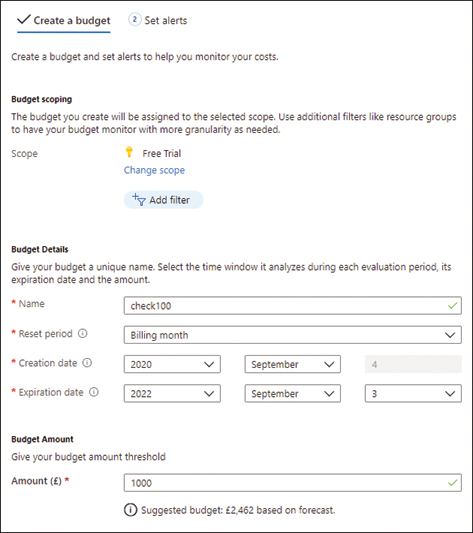
FIGURE 1-8 Creating a budget in Cost Management
■ Scope. You can set a budget at the management group, subscription, or resource group levels. For example, set the Scope to the subscription level.
■ Filter. This is often used to filter to a taxonomic tag, such as a department, to provide cross-organization budgetary views. For this example, do not add a filter.
■ Name. Enter a Name for your budget.
■ Reset Period. Choose the period over which your internal budget period resets. For this example, set the Reset Period to Billing Month.
■ Creation Date. This is the date to start the budget. You can choose options from the start of the current billing month or options that extend into the future. For this example, leave the default setting.
■ Expiration Date. This is when the budget will end. For this example, leave this as the default setting.
■ Budget Amount. The limit you require to be set for the budget. This will be in your subscription currency, which may differ from your local currency. Enter a value that is just above your current spend. Click Next at the bottom of the page.
The Set Alerts tab is now active, which is where you can configure an alert on your budget. For a budget alert, you have the following configuration options:
■ Alert Conditions. Enter the % Of Budget upon which you would like the alert to fire. Your customers will need to set this to a value that will give them time to remediate possible overspend before the limit is breached. For this example, choose 75%. Leave Action Group empty, as you will explore action groups later in this chapter in “Initiate automated responses by using Action Groups.”
■ Alert Recipients. Enter the email addresses of the person(s) who requires this report.
Click Create; the budget is created along with its corresponding alert.
When a cost alert is triggered, the notifications are fired, and an active alert is created for the budget. The alerts can be viewed in the Cost Alerts menu option displayed on the left of Cost Management. In Cost Alerts, you have the option of dismissing the alerts or re-activating a dismissed alert.
Report on spend
Azure Cost Management is also the best place to report on spend. Navigate back to the Cost Management menu in the Azure portal and choose Cost Analysis. The Cost Analysis blade is preconfigured with a summary dashboard of your current and past spend, as shown in Figure 1-9.

FIGURE 1-9 Cost analysis to report on spend in Azure Cost Management
Figure 1-9 shows the spend on the current billing month, with accumulated costs broken down into services, locations, and resource groups. You can change the scope to management group, subscription, or resource group. The ability to filter by tag is considered a best practice, and it is one of the key features of cost analysis. For example, if you tag by department, you can produce an analysis of each department’s spend. Click Download at the top of the page to manually download the chart data or to schedule spend data for extraction to a storage account.
Configure advanced logging
Advanced monitoring in Azure Monitor is done through Insights, which is part of Azure Monitor. Insights provides your customer with a specialized monitoring experience for their applications and services. Insights leverages Azure Monitor Logs which sit on a Log Analytics workspace. Therefore, before you explore Insights, you will need to create and configure a workspace.
Configure a Log Analytics workspace
To create a Log Analytics workspace in the portal, search for log analytics in the search resources bar at the top of the Azure portal. Select Log Analytics Workspaces in the drop-down menu that opens as you type in the resource name. To add and configure a workspace, follow these steps:
Click Add at the top-left of the Workspaces blade. Enter a name for the workspace, choose a resource group, and select the region where you need your workspace to reside. Click Review + Create, and then click Create to create the workspace.
Once created, your new workspace is listed. Click the workspace name to look at the configuration options.
In the left-hand menu under Settings, choose Agents Management. At the top of the page are Windows Servers and Linux Servers tabs. To manually onboard a VM to Log Analytics, you will require the ID and keys from these tabs. You will explore on-boarding VMs in “Configure logging for workloads,” later in this skill.
On the Log Analytics Workspaces menu, choose Advanced Settings. The Data section is where you can configure which counters and log files are collected for your resources. For example, click Data > Windows Performance Counters. The counters available are listed, but until you select Add The Selected Performance Counters, the data will not be collected for any Windows VM connected to this workspace. Once selected, the screen is updated, as shown in Figure 1-10.
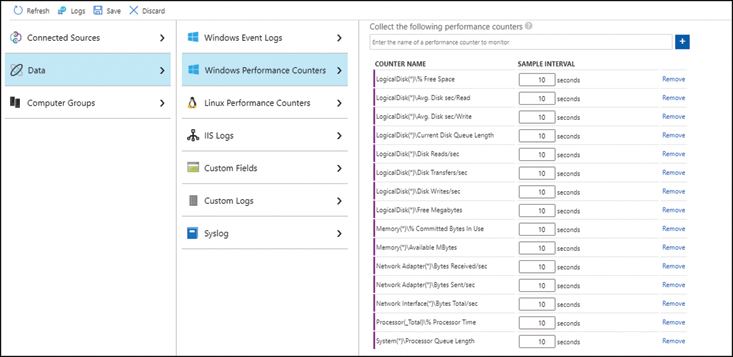
FIGURE 1-10 Configuring the Log Analytics workspace to collect Windows Performance Counters
When the VM Log Analytics Agents refresh their configurations, the agents pick up the new counter configurations and send the selected data back to the Log Analytics workspace.
You will need to repeat this exercise for event logs, Linux performance counters, and other data sources you require.
Staying in the Log Analytics workspace that you have just created, click Virtual Machines in the left-side menu. A table is displayed, which lists the VMs that could be connected to the Log Analytics workspace you have just created. The performance counter configuration you made in steps 3 through 5 will only affect VMs listed as Connected in this table.
Implement and configure Azure Monitor insights, including app insights, networks, and containers
Modern applications hosted within the cloud are often complex, combining multiple PaaS and IaaS services. Monitoring, maintaining, and diagnosing such applications can be an almost impossible task if tools to analyze application data and alert on key metrics are not implemented. Azure Monitor provides Insights, which brings full stack observability across applications and infrastructure, thus enabling deep alerting and diagnostic capabilities. This section looks at the Insights available for applications, networking, and containers in Azure Monitor.
Application Insights
Application insights is an Application Performance Management (APM) service for developers to monitor their live applications. Application insights will automatically detect anomalies across hybrid, on-premises, or public cloud applications where you need to
■ Analyze and address issues and problems that affect your application’s health
■ Improve your application’s development lifecycle
■ Analyze users’ activities to help understand them better
To integrate Application Insights with your applications, you must set up an Application Insights resource in the Azure portal. To do this, navigate to Application Insights in the portal and click Add. Choose a name, resource group, and region to create the resource. Once the resource is created, an Instrumentation Key is available on the Overview page. Your customers give this key to their developers. Developers use a software development kit (SDK) to add an instrumentation package to their applications. The instrumentation package uses the Application Insights instrumentation key to route telemetry to the Application Insights resource for analysis.
Once telemetry is flowing to Application Insights, there are built-in visualizations that allow you to analyze your environment. Figure 1-11 shows two of the visualizations: Application Map and Live Metrics.

FIGURE 1-11 The Application Map and Live Metrics, which is part of Application Insights
Application Map displays an overview of your application, where each node is an application component. The links between nodes are the dependencies. The Application Map shows health KPI and alert statuses on each node, which you can drill into for detailed analyses.
Live Metrics provides a real-time view of your application without having to configure settings, which might affect availability. You can plot metric counters live, and you can drill through to failed requests and exceptions.
Two other commonly used insights are Availability and Failures; example output for both is shown in Figure 1-12.

FIGURE 1-12 Failures and Availability insights
Failures are displayed in the top-left portion of Figure 1-12. Failures are plotted over a time range and are grouped by type. You can click the Successful and Failed buttons under Drill Into to investigate operation, dependency, and exceptions.
Availability must be configured by adding an availability test to the Availability page of Application Insights. You enter the URL of the endpoint you want to be monitored, and Azure tests availability from five different locations. You can also configure the availability test to check the response time for downloading page dependencies, such as images, style sheets, and scripts. Azure plots the responses on the availability page charts, which include latency. You can set up alerts from the availability tests for immediate notification of possible downtime.
Network Insights
Network Insights provides a comprehensive overview of your network inventory without any configuration. You can view the health and metrics for all network resources and identify their dependencies. The following Insights are available through Network Insights:
■ Search And Filtering. You might have thousands of network resources. Viewing the analysis data for a single resource can be tricky. With Search And Filtering, you can enter a single resource name, and the resource along with its dependencies will be returned.
■ Alerts. This shows all alerts generated for the selected resources across all subscriptions.
■ Resource And Health Metric. Grouped by resource type, this is a summary view of the selected components. The summaries are displayed as tiles.
■ Dependency View. Drill through the health and metric tiles to view dependencies and metrics for the chosen resource type, as shown in Figure 1-13 for two VNet gateways in a VNet-to-VNet configuration.

FIGURE 1-13 The dependency view of two VNet gateways in a VNet-to-VNet configuration in Network Insights
Azure Monitor for Containers
When you are architecting solutions with containers, monitoring them is critical. Azure Monitor for containers collects processor and memory metrics from container workloads. The workloads can be deployed on-premises to Kubernetes on Azure Stack, or they can be deployed on Azure Kubernetes Service (AKS), Azure Container Instances (ACI), or other Azure-based, third-party container orchestrators.
When enabled, the Kubernetes Metrics API sends metrics for controllers, nodes, and containers. Container logs are also collected. The metric and log data are sent to a Log Analytics workspace, which is a requirement for Azure Monitor for containers. The method for enabling Azure Monitor for containers differs depending on the service it is to be enabled on. Here is an example command to create an AKS cluster with Azure CLI:
az aks create --resource-group $resourceGroupName --name myAKSCluster --node-count 1
--enable-addons monitoring --generate-ssh-keys
The --enable-addons monitoring option enables Azure Monitor for containers. If you want to use an existing Log Analytics workspace, you must pass it the workspace ID with –workspace-resource-id; otherwise, a Log Analytics workspace will be created for you. You can also enable monitoring on an existing cluster using the following Azure CLI command:
az aks enable-addons --addons monitoring --name myAKSCluster --resource-group
$resourceGroupName
The --workspace-resource-id can be specified to use an existing workspace. Once the metrics and logs are being collected, you can access the data from the AKS cluster’s Insights menu or through the Azure Monitor Containers menu. If you are using Azure Monitor, you will need to select the Monitored Clusters tab at the top of the window and then select the cluster you want to view. The Cluster view is a summary of counters for the cluster, as shown in Figure 1-14.

FIGURE 1-14 The Cluster summary view for AKS in Azure Monitor for containers
In Figure 1-14, the top-left chart shows the Node CPU Utilization % of the cluster. The application running on AKS in this example contains an HTML front end (azure-vote-front) with a Redis instance on the back end (azure-vote-back). To deploy this infrastructure follow the Azure quickstart: https://docs.microsoft.com/en-us/azure/aks/kubernetes-walkthrough. When the application is deployed there is one replica of azure-vote-front which is being stressed by multiple concurrent requests. Across the top of the window are six tabs: What’s New, Cluster, Nodes, Controllers, Containers, and Deployments (Preview). In Figure 1-15, the Nodes tab has been selected. The top node listed in the table in Figure 1-15 is named azure-vote-front. The Trend 95th % column displays a single small green bar; eight red, full-height bars, which suggests a large increase in application traffic.

FIGURE 1-15 Nodes in Azure Monitor for containers
■ The number of replicas for azure-vote-front is increased to ten. This can be seen from the nine listings of azure-vote-front underneath the original node. There is no data for these nodes while the top node in the table is at full capacity. The yellow bars for the new nodes and the original node show the load has been distributed equally between each of the 10 nodes. Looking back to Figure 1-14, the manual scale to 10 azure-vote-front nodes corresponds quite nicely to the bottom-right chart, Active Pod Count. You can also see the increased CPU demand of the 10 nodes displayed on the Node CPU Utilization % chart. Switching back to Figure 1-15, the number of azure-front-end nodes is scaled back to 7, and then shortly afterward, it is scaled to 3. This corresponds to the stop in data of the bottom 3 azure-vote-front nodes in the Trend 95th % column, and then it corresponds to the stop in data for all but the top three nodes. You can also see the increase in stress on the top 3 nodes as the Trend 95th % column bars increase in size and go from yellow to orange to red.
Need More Review? Azure Monitor Insights
Insights is an immense tool; to learn more, visit https://docs.microsoft.com/en-us/azure/azure-monitor/insights/insights-overview.
Configure logging for workloads
When architecting VMs at scale, monitoring their workloads and dependent resources has been historically complex. Azure Monitor for VMs is designed for scale, and it analyzes Windows and Linux VMs and VM scale sets through its health and performance metrics. Azure Monitor for VMs monitors the VMs and application dependencies on workloads that are in Azure, on-premises, or in other clouds.
On-boarding a VM in Azure can be performed one at a time in the Azure portal by navigating to a VM, scrolling down in the Azure Monitor menu to Monitoring, choosing Insights, and clicking Enable. The Azure portal sends a deployment request to the VM to install the Log Analytics and Dependency agents. The Dependency agent is required for mapping dependencies, and Log Analytics agent for collecting performance and log data. Azure Monitor for VMs is designed for monitoring workloads at scale, if you are deploying for hundreds of VMs you will need to automate the task. Azure Policy can be configured to deploy the agents, report on compliance, and remediate non-compliant VMs. For on-premises and other cloud VMs, the agents can be deployed manually or pushed out through a designed state-management tool.
Once the data is collected, it can be viewed in the Insights blade of a single VM, or for a rolled-up aggregated view at the subscription level from within Azure Monitor. To view the aggregated data and explore the output in the Azure portal, follow these steps:
Search for azure monitor in the search resources bar at the top of the Azure portal. Choose Monitor from the drop-down menu that is displayed once you start to type the resource name.
In the Insights menu, click Virtual Machines.
The Getting Started tab for VM Insights is displayed. From this tab, the following configuration options are shown:
■ Monitored. This option shows the machines being monitored by Azure Monitor for VMs. You can choose to view the data at subscription, resource group and single VM level by clicking on the listed names.
■ Not Monitored. This option lists VMs in your subscriptions that are not monitored. From here, you can enable the VMs.
■ Workspace Configuration From here, you can configure the Log Analytics workspaces that have been enabled for Azure Monitor for VMs.
Click the subscription name to view the performance of all enabled VMs. This view includes CPU, memory, network, and disk metrics. Just below the Performance tab are further analysis view tabs; click through these to view the aggregate charts and lists (see image A of Figure 1-16).
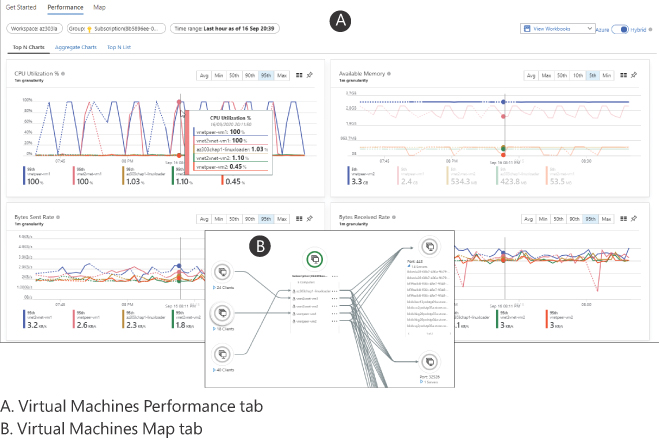
FIGURE 1-16 Azure Monitor for VMs using the Performance and Map tabs
Go back to the Get Started tab and choose a resource group with multiple VMs. Next, click Map to view the dependencies for the application, as shown in the inset (B) portion of Figure 1-16.
Need More Review? Azure Monitor for VMs
To learn more about monitoring workloads at scale, visit https://docs.microsoft.com/en-us/azure/azure-monitor/insights/vminsights-overview.
Initiate automated responses by using Action Groups
Throughout this chapter, alerts have been referenced and set up by specifying single email accounts. For your customers deployments, it is highly unlikely that a single individual will be responsible for an alert or set of alerts. Also, an email might not guarantee a quick enough response to an issue. When you are looking to mitigate slow responses to an alert, you should recommend configuring action groups. An action group is a collection of notifications and automation tasks that are triggered when an alert is fired. You can set up multiple action groups that notify different groups or trigger different responses, depending on the alert. To examine the options available in an action group, follow these steps to create an action group in the Azure portal. Note action groups can also be created on the command line and with an ARM template.
Navigate to azure monitor using the search resources bar at the top of the Azure portal. Choose Monitor from the drop-down menu that is displayed once you start to type the resource name.
Click Alerts in the Monitor menu, and then click Manage Actions at the top of the Alerts blade. The Managed Action blade will open.
If you have any action groups, they will be listed in the Manage Actions blade. Click Add Action Group at the top-right to add a new action.
The Create Action Group configuration page is displayed with the Basics tab open. Click Next: Notifications > at the bottom of the page. Following are the options shown on the Basics tab:
■ Subscription. Choose the subscription into which you want to save the action group.
■ Resource Group. Choose a resource group from the subscription or create a new default resource group for action groups.
■ Action Group Name. This is the name for the action group, and it must be unique within the resource group.
■ Display Name. This is included in email and SMS messages.
The Create Action Group page switches to the Notifications tab. Here, you can configure how users are alerted if the Action Group is triggered:
■ Notification Type. This is the type of notification that will be sent to the receiver. You can choose from:
■ Email Azure Resource Manager Role. Choosing this option emails all subscription members of the role.
■ Email / SMS message / Push / Voice. A push notification will be sent to the Azure app that is linked to an Azure AD account, Voice calls a number, including a land line. There are limits to these actions: 1 SMS every 5 minutes, 1 Voice every 5 minutes, and 100 emails an hour.
■ Name. The name of the notification. It must be unique from other notification names and from action names.
Click Next: Actions > at the bottom of the page.
The Create Action Group page switches to the Actions tab. Here, you can configure automated actions if the Action Group is triggered:
■ Action type. This is the automated action that will be performed when the action group is triggered:
■ ITSM. Automatically log a ticket in a specified IT Service Management (ITSM) software.
■ Logic App. Create a logic flow to automate a response such as posting a message to Microsoft Teams.
■ Secure Webhook / Webhook. This option sends a JSON payload to an external REST API.
■ Azure Automation Runbook. Use this option to create a runbook to run code in response to an alert, such as stopping an Azure VM following a budget breach.
■ Azure Function. Use this option to invoke an Azure function to run in response to an alert, such as starting a VM that has been stopped.
■ Name. The name of the action. It must be unique from other action names and from Notification names.
■ Configure. This option is activated once the Action Type is chosen. Here, you enter the notification details, Webhook URL, Logic App Name or Function App Name. You can also enable the common alert schema, which provides the following functionality:
■ SMS. This creates a consistent template for all alerts.
■ Email. This creates a consistent email template for all alerts.
■ JSON. This creates a consistent JSON schema for integrations to webhooks, logic apps, Azure functions, and automation runbooks.
Once you are happy with the action group configuration, click Review + Create to add the action group.
Configure and manage advanced alerts
Throughout this skill, you have explored how to monitor resources for a wide range of issues and anomalies. The sheer scale of the data that can be produced while monitoring solutions architected in the public and hybrid cloud is vast. This means trying to sift through the data manually to detect problems will be almost impossible or take an unreasonable and expensive amount of labor. Creating alerts based on the underlying metric and log data will automate some of these tasks for your customers.
Collect alerts and metrics across multiple subscriptions
Azure Monitor alerts give you the ability to trigger alerts on resources for a subscription. The alerting experience is unified for the three types of alert: Metric, Log, and Activity Log. For example, you might want to know whenever a VM is stopped in your production subscription, so that you can try to restart it. Follow these directions to create the VM stopped example alert in the Azure portal:
Navigate to Azure Monitor, choose Alerts in the left-side menu. At the top of the page, click New Alert Rule.
The Create Alert Rule blade loads, which allows you to select a subscription, resource group, resource, or set of resources. Choose all virtual machines in your subscription by using the Virtual Machines filter and a single location.
Now, to select all the VMs in the same location, select the subscription (as shown in Figure 1-17). At the bottom right, you can see the available signal types, which are resources within the same location; Metric and Activity Log are both available.

FIGURE 1-17 Select the target scope in unified alerts
Now, change the Filter By Resource Type and Filter By Location to All and select the subscription once more. Note the available signal types is now just Activity Log because Metric cannot be used for alerts across regions. Click Done.
Click Select Condition, which opens the Configure Signal Logic page. The signal types available will depend on the Scope selected in the previous step:
Log. Create a KQL query for data in log analytics; if the query returns rows, then the alert is fired.
Metric. Set a threshold value against a metric, such as “greater than an average of X.” If the threshold is breached, the alert is fired.
Activity Log. If a matching Activity Log type is created in the subscription’s activity log, the alert is fired.
The signal type available at the Subscription level is Activity Log. Enter virtual machine in the search box to filter the data. Scroll down on the same blade and select Deallocate Virtual Machine (Microsoft.ClassicCompute/virtualMachines). Leave Alert Logic set to All. Click Done.
Click Action Group to pick an action group. Recall from the previous section that this is a grouping of notifications and automated responses. For this example, create an action group that emails you.
Enter an Alert Rule Name and Description, and then select a Resource Group to save it to.
Click Create Alert Rule to create the alert rule.
Test the alert by stopping a virtual machine within your selected subscription.
If you need to collect alerts across multiple subscriptions, you can automate the process using ARM templates to deploy an alert configuration to each subscription.
View alerts in Azure Monitor Logs
All alerts that have been triggered, regardless of where they are set up, can be viewed in the unified alerts experience in Azure Monitor. To access this information, navigate to Azure Monitor and click Alerts in the left-hand menu. The Alerts blade is displayed listing all alerts for the last 24 hours. The alerts are grouped by severity. For example, all alerts of severity 0 are grouped into a severity line titled Sev 0. Clicking the line for a severity will drill down to the alerts that are contained within that severity rating. Choosing a specific alert in the detail view gives you the option to change the status of an alert to acknowledged.
A similar view of the data is available through Azure Monitor Logs, within Workbooks. From Azure Monitor, select Workbooks in the left-hand menu. Scroll down in the Workbooks Gallery and select the Alerts workbook template under Azure Resources. A similar view to that of the unified alerts experience is shown. You have the option to filter by Subscriptions, Resource Groups, Resource Types, Resources, Time Range, and State. Clicking a an alert in the Alert Summary list drills through to the Alert Details, as shown in Figure 1-18.

FIGURE 1-18 The Alerts Workbook template for Azure Monitor logs
Skill 1.2: Implement storage accounts
Azure Storage is a managed data store. It is secure, durable, massively scalable, and highly available out of the box. You can configure Azure Storage to withstand a local outage or natural disaster by using replication. Azure Storage can accommodate a vast variety of data use cases across its core services and is accessible worldwide. As an Azure architect, you need to know how a storage account and its core services can be configured to suit your customers’ requirements.
This skill covers how to:
Select storage account options based on a use case
Configuring a storage account during the creation process determines the features that are available for use. This configuration governs which core services, performance tiers, and access tiers are accessible after account creation. Therefore, when architecting storage for your applications, careful consideration must be given to the storage account options.
All storage accounts are encrypted at rest using Microsoft-managed encryption keys and Storage Service Encryption (SSE) for data at rest.
Core services
To explore storage accounts further, it is important to understand the core services available in an Azure Storage and how they can be used:
■ Azure Blobs. Azure blobs are optimized for storing massive amounts of unstructured data—either binary or text based. Azure blobs can be used for images, documents, backup files, streaming video, and audio. Blobs come in three types:
■ Block blobs. Binary and test data, up to 4.7TB.
■ Append blobs. Block blobs that are optimized for appends and are good for logging.
■ Page blobs. Random read/write blobs used for VM VHD files or disks and can be up to 8TB.
■ Azure Files. Server Message Block (SMB)–based fileshare service. Use as a replacement for a traditional on-premises fileshare or share configuration files between multiple Azure workloads. Azure Files can be synchronized to an on-premises server for hybrid fileshare scenarios.
■ Azure Queues. Stores messages of up to 64K. Typically used for first-in first-out (FIFO) asynchronous processing scenarios.
■ Azure Tables. A structured NoSQL data service. It is a key/value store that has a schema-less design, which can be used to hold large amounts of flexible data. (Azure Cosmos DB is recommended for all unstructured flexible data.)
■ Azure Disks. Disks for virtual machines. Although listed as a core service, it is not configurable; instead, it is fully managed by Azure.
Storage account type
The core services available for use depend on the storage account type chosen. The default type for a storage account on creation is General-Purpose V2, which is the Microsoft-recommended storage account type and supports all core services listed in the previous section.
The following Azure CLI command creates a General-purpose V2 account called az303defaultsa.
az storage account create --name az303defaultsa --resource-group $resourceGroupName
To change the storage account type, add the --kind parameter, which has the following options:
■ StorageV2. Also known as General-purpose V2, this is the default for a storage account and the Microsoft-recommended account type. Access to all core services and their associated performance tiers and access tiers is available.
■ Storage. Also known as General-purpose V1, this is provided for legacy support of older deployments. Access to all core services and performance tiers is available but no access tiers are available for selection. It is possible to upgrade from V1 to V2 using the command line.
■ Blob Storage. This is provided for legacy support of blobs. All access tiers are available, but only standard performance is available for selection. Use General-purpose V2 instead of Blob Storage when possible.
■ BlockBlobStorage. Low latency storage for blobs with high transaction rates, premium performance with no access tiers.
■ FileStorage Files only, premium performance and no access tiers. This option can be specifically configured for file related performance enhancements such as IOPS bursting.
The following Azure CLI command creates a BlockBlobStorage account called az303blockblob:
az storage account create --name az303blockblob --resource-group $resourceGroupName
--kind BlockBlobStorage
Access tier
Blobs support three access tiers, Hot, Cool, and Archive. The access tiers are optimized for specific patterns of data usage. These patterns correspond to the frequency of access to the underlying data. This means by selecting your access tier carefully, you can reduce your costs. Examining this further:
■ Hot tier. Highest storage costs, lowest access costs. Used for frequently accessed data and is the default tier.
■ Cool tier. Lower storage costs than hot, higher access costs. Use for data that will be stored “as is” and not accessed for at least 30 days.
■ Archive tier. This is at the blob level only. Lowest storage costs, highest access costs. Only use for data that will remain “as is” that will not be accessed for at least 180 days and can stand high retrieval latency of several hours. Great for long term backups and archival data.
az storage account create --name az303blobaccesstier --resource-group $resourceGroupName
–kind StorageV2 –access-tier hot
The Azure CLI command above creates a General-purpose V2 account called az303blobaccesstier with a Hot access tier.
az storage account create --name az303blobaccesstier --resource-group $resourceGroupName
--kind StorageV2 --access-tier hot
An access tier can be changed at any time using the command line or Azure portal. To change az303blobaccesstier to the Cool tier in Azure CLI, issue the following command:
az storage account update --name az303blobaccesstier --resource-group $resourceGroupName
--kind StorageV2 --access-tier cool
Note Early Deletion Penalty
Changing the tier from Archive or Cool before the respective 180-day or 30-day periods will incur an early deletion penalty equivalent to the remaining days’ cost of the storage.
Exam Tip Azure Storage Configuration
Understanding which core services, access tiers, and performance tiers are available for the storage account types is an important area for this certification. See https://docs.microsoft.com/en-us/azure/storage/common/storage-account-overview#types-of-storage-accounts for further review.
Configure Azure Files and Blob Storage
Once you have chosen your storage account options, you need to set up use case–specific “containers” for your data. These are the Azure Storage core services, as previously listed. The method of creating these containers changes depends on the core service you are configuring. The AZ-303 certification requires you to understand the configuration for Azure Files and Blob Storage.
Azure Files
Azure Files can be configured on the command line and within the Azure portal. Follow these steps to configure Azure Files by executing cmdlets in PowerShell:
Use these cmdlets to create a storage account:
$resourceGroupName = "12storage"
$location="northeurope"
$storageAccountName = "az303fsdemosa"
New-AzResourceGroup -Name $resourceGroupName -Location $location '
    -Tag @{department="development";env="dev"}
$sacc = New-AzStorageAccount '
    -ResourceGroupName $resourceGroupName '
    -Name $storageAccountName '
    -Location $location '
    -Kind StorageV2 '
    -SkuName Standard_LRS '
    -EnableLargeFileShare
These PowerShell cmdlets create a storage account named az303fsdemosa that supports the Azure Files core service. If you compare these cmdlets to the Azure CLI command from the “Access tiers” section, it is somewhat similar except for the -EnableLargeFileShare cmdlet. This cmdlet instructs Azure to enable File shares of more than 5TB in this storage account. The storage account object is stored in a $sacc variable, which enables you to use the storage account context later in your configuration without having to retrieve it again. You will explore storage account contexts in “Manage access keys,” later in this chapter.
Create a fileshare named az303share and set a max size of 1TB using -QuotaGB in this PowerShell cmdlet:
$shareName = "az303share"
New-AzRmStorageShare '
    -StorageAccount $sacc '
    -Name $shareName '
    -QuotaGiB 1024
Note Changing Quotas
Quotas can be changed with Update-AzRmStorageShare.
At this point, you could start uploading files to your share once you have created a folder structure that is called a “directory structure” in Azure Files. Execute the following commands in PowerShell to create a folder named topLevelDir:
$dirName = "topLevelDir"
New-AzStorageDirectory '
    -Context $sacc.Context '
    -ShareName $shareName '
    -Path $dirName
PowerShell returns the URL for the directory, as shown in the following output:
-Directory: https://az303fsdemosa.file.core.windows.net/az303share

Type                  Length     Name
Directory             0          topLevelDir
This URL can be used from inside an application to access the directory from anywhere, providing the application is authenticated and authorized to do so.
You should still have the storage account context in your PowerShell session. You can now use this instead of the directory URL to upload a file to your new directory. Execute this cmdlet to upload a file named file.txt:
"AZ-303 Azure Files share example" | out-file -FilePath "file.txt" -Force
Set-AzStorageFileContent '
   -Context $sacc.Context '
   -ShareName $shareName '
   -Source "file.txt" '
   -Path "$($dirName)\file.txt"
Use the Azure portal to explore the storage account fileshare and check for the file’s existence.
Blob Storage
Blobs are stored in a container; you can think of a container as a grouping of blobs. A container works for blobs in much the same way a folder does for files. As previously discussed, an Azure Storage account can support multiple core services. Therefore, for this example, the az303fsdemosa storage account will be updated to enable blobs to be stored. Follow the steps below— executing the commands in PowerShell—to configure a blob container, upload a file, and further explore the blob configuration options. This example assumes you are continuing from step 4 in the previous section (“Azure Files”) with the storage account context available in the $sacc object. If this is not the case, read the “Manage access keys” section later in this chapter to learn how to obtain the storage account context:
In PowerShell, execute the following cmdlet to create a blob container named images:
$containerName = "images"
New-AzStorageContainer '
    -Name $containerName '
    -Context $sacc.Context '
    -Permission blob
Note the parameter -Permission, which sets the public access level of the blob; there are three values for this parameter:
■ None. This parameter means no public access is allowed; containers with this parameter are private. To use this container, a service must authenticate and be authorized to do so.
■ Blob. This parameter grants read access to the blobs in the container when directly accessed. Container contents or other data cannot be accessed without authentication and authorization.
■ Container. This parameter grants read access to the blobs and the container. The contents of the container can be listed.
You can now use the storage account context to upload files to the container. Execute the following commands in PowerShell to upload a file to the images container created above.
Set-AzStorageBlobContent -File "D:\az303files\uploadTest.jpg" '
 -Container $containerName '
 -Blob "uploadTest.jpg" '
 -Context $sacc.Context
Note Edit the Code Block
You will need to edit this code block to set the -File parameter to an image file that exists on your client. You might also want to change the -Blob parameter so that the file names match after upload.
Open the Azure portal and navigate to the az303fsdemosa storage account. In the Storage Account menu, under Blob Service, choose Containers. Click the Images container name to view the file stored within it.
On the Storage Account menu, click Data Protection. Here, you can configure Blob Soft Delete, which enables a mechanism for recovering accidentally deleted Blobs. The retention policy is between 7 to 365 days. Blob Soft Delete is a storage account–level property that affects all blob containers. To enable Blob Soft Delete using PowerShell, set a retention policy on the storage account object using the following command:
$sacc | Enable-AzStorageDeleteRetentionPolicy -RetentionDays 7
Switch back to the Azure portal and click through the other blob service options to further examine them:
■ Lifecycle Management. This option allows you to set rules to automatically transition blobs through the Cool and Archive tiers to possible deletion after a specified number of days since modification.
■ Custom Domain. Blob storage can be configured to use custom domain names.
■ Azure CDN. This option provides integration to Azure CDN to give consistent latency for access anywhere in the world.
■ Azure Search. This option adds full text search to blobs using Azure Cognitive Search.
Manage access keys
When you create a storage account, Azure also creates two access keys, which can be used to programmatically access the account. For example, in the “Azure Files” section, “context” was mentioned on multiple occasions. An Azure PowerShell context object holds authentication information, which allows you to run PowerShell cmdlets against resources. In the “Azure Files” section, the context is a storage context, which allows you to run storage cmdlets on a storage account resource that requires a context. To retrieve the context for the account in PowerShell, you must first retrieve the access key for the storage account. The context is retrieved using the key. For example, on the az303fsdemosa account used in the “Azure Files” section, you would use this code:
$key1=(Get-AzStorageAccountKey '
    -name $storageAccountName '
    -ResourceGroupName $resourceGroupName '
    ).value[0]
$key1
$ctx = New-AzStorageContext '
-StorageAccountName $storageAccountName '
-StorageAccountKey $key1
$key1 stores the primary access key, and the storage context is in $ctx. The context can be used to manage the storage account configuration and access the stored data.
Microsoft recommends that the access keys be regularly rotated. Rotating the keys helps to keep the storage accounts secure by invalidating old keys. To manually rotate the keys, the following process must be followed:
Alter service connections to use the secondary key.
Rotate the primary key in the Azure portal or on the command line. For example, to rotate key1 for the az303fsdemosa storage account in PowerShell, execute the following commands:
New-AzStorageAccountKey '
  -ResourceGroupName $resourceGroupName '
  -Name $storageAccountName '
  -KeyName key1
Alter service connections to use the primary key again.
Rotate the secondary key using the same method as shown in step2.
The switch between primary and secondary in this process is why Microsoft recommends that only the primary or secondary keys are used by all services by default. Otherwise, connections to storage accounts will be lost when you rotate the keys.
Need More Review? Manage Access Keys
To learn about using Azure Key Vault to manage access keys, see https://docs.microsoft.com/en-us/azure/storage/common/storage-account-keys-manage.
Configure network access to the storage account
The configurable core services are bound endpoints, and each has a unique address based on a well-known URI:
■ Blob. http://<storage-account-name>.blob.core.windows.net
■ File. http://< storage-account-name>.file.core.windows.net
■ Table. http://< storage-account-name>.table.core.windows.net
■ Queue. http://< storage-account-name>.queue.core.windows.net
The endpoints are public, and by default, the storage account is configured to accept all traffic to the public endpoints, even traffic from the Internet. However, you cannot gain access to an endpoint without proper authorization through an access key, shared access signature (SAS) token, or via Azure AD. It is likely that your customers’ use cases will require the public endpoint to be secured to a range of IP addresses or to a specific VNet. This is configured using storage firewalls and virtual networks. You may use the command line or the Azure portal to configure network access. To explore settings in the Azure portal, follow these steps:
Using the Azure portal, search for storage account in the search resources bar. Select Storage Accounts in the drop-down menu that is displayed as you type the resource name into the search. Select 12storage from the storage account list. This step assumes you still have available the storage account you created earlier in this chapter. If not, pick any newly created storage account.
In the Storage Account menu, scroll down and click Firewalls And Virtual Networks to open the blade.
The default configuration of All Networks is selected. As discussed, this means all traffic, even Internet traffic, can access the endpoint. Choose Selected Networks. The configuration options for VNets and the storage account firewall are shown in Figure 1-19.

FIGURE 1-19 Configure the storage account firewall and virtual networks
By choosing Selected Networks, the network rule is now set to “deny,” which means no traffic is allowed access to the storage account private endpoints by default. To allow access to your services, specific rules must be added in the Firewall or Virtual Networks sections of the Firewalls And Virtual Networks blade.
The Firewall section governs which public IP address ranges can be granted access to the storage account. You have the option to configure the following settings:
■ Add Your Client IP Address. The Azure portal picks up your public Internet-facing IP address from your browser. Choosing this option will add your client to the access list. For this demo, leave this option unchecked.
■ Address Range. Individual IP addresses, such as your customers’ static public Internet-facing IP addresses or a range of addresses in CIDR notation, can be added.
Access to the storage account can be secured to specific subnets within a VNet, which further isolates access to your storage account. The VNet can be in a different subscription. From the Virtual Networks section on the same blade, you have the following options:
■ Subscription. This is where you choose the subscription in which your VNet resides.
■ Virtual Networks. This is where you choose a VNet, though only networks within the storage accounts regional pair will be listed.
■ Subnets. This is where you choose the subnets of the chosen VNet that require access.
Click Enable. This will create a service endpoint for storage in the VNet.
Click Add. This allows you to add the VNet and selected subnet for access to the storage account.
The options show in the Exceptions section cover access to Azure services that cannot be isolated through VNet or firewall access rules:
■ Allow Trusted Microsoft Services To Access This Storage Account. Leave this selected to allow logging, back-up services, and specific services granted access by a system managed identity.
■ Allow Read Access To Storage Logging From Any Network. Selecting this allows access logs and tables for storage analytics.
■ Allow Read Access To Storage Metrics From Any Network. Selecting this option allows access metrics for storage analytics.
Once the configuration is complete, click Save.
To test the updated configuration, switch back to PowerShell. Use the cmdlets from the “Manage access keys” section earlier in this chapter to retrieve the context. Now re-run the command to add a blob that we discussed in the “Configure Azure files and Blob Storage” section of this skill:
Set-AzStorageBlobContent -File " D:\az303files\uploadTest.jpg" '
-Container $containerName '
-Blob "uploadTest.png" '
-Context $ctx
Set-AzStorageBlobContent : This request is not authorized to perform this
operation. HTTP Status Code: 403 - HTTP Error Message: This request is not
authorized to perform this operation.
Your public-facing IP address is not part of the access list, so you will receive the 403 error above. Return to the Azure portal and select Add Your Client IP Address and follow the steps in step 4 above and click Save. Wait a short time—on average around a couple of minutes—and then rerun the cmdlet to add a blob. The blob will be added because your IP address is now on the allow list. Complete the same exercise from within a virtual machine that is part of the subnet added in step 5. You should be able to add the blob without error.
Private endpoint
Private endpoints are a relatively recent addition to the configuration options for storage account network access. Private endpoints give VMs on a VNet a private link to securely access the storage account. The traffic between the VM and storage account flows from the client into the VNet’s private endpoint and across the Microsoft backbone to the storage account. This method of access has the following benefits:
■ Block data exfiltration from the VNet by securing traffic to the private link
■ Securely connect on-premises networks to a storage account by using a VPN gateway or ExpressRoute into to the VNet with the private link
■ Configure the storage account firewall to disable all connection to the public endpoint
When you create the private endpoint, you must specify which storage account core service requires access. Azure then creates a private DNS zone that allows the original storage endpoint URL to resolve to the private endpoint address, which is aliased with a privatelink subdomain.
Need More Review? Configure Network Access to the Storage Account
To learn more about configuring network access to a storage account and private endpoints for azure storage, see https://docs.microsoft.com/en-us/azure/storage/common/storage-network-security and https://docs.microsoft.com/en-us/azure/storage/common/storage-private-endpoints.
Implement Shared Access Signatures and access policies
The access key of a storage account grants the holder authorization to all resources on the storage account. This method of authorization is unlikely to follow the principle of least privilege for your use cases. A shared access signature (SAS) for a storage account grants restricted-access, rights-specified services, enabling granular control over how the holder of a SAS can access the data. To explore how SAS is configured for a storage account and see how a SAS is used, follow these steps:
From the Azure portal, enter storage account in the search resources bar and choose Storage Account from the drop-down menu that is displayed as you type the resource name. From the list of storage accounts, select the az303fsdemosa storage account used in the previous sections from the list. If this does not exist, select any other storage account with a blob container and blob.
In the Storage Account menu at the left, select Shared Access Signature from Settings. The Shared Access Signature blade where the SAS can be configured opens to the right. Figure 1-20 shows an example configuration:

FIGURE 1-20 Creating a shared access signature (SAS) in the Azure portal
The configuration shown creates an SAS to access blob containers. Each configuration setting defines the granularity of the authorization:
■ Allowed Services. The core service(s) that the SAS can access.
■ Allowed Resource Types. Access to the API levels under the allowed service:
■ Service. Service-level APIs, such as list containers, queues, tables, or shares.
■ Container. Container-level APIs, such as APIs to create or delete containers, create or delete queues, create or delete tables, or create or delete shares.
■ Object. Object-level APIs, such as Put Blob, Query Entity, Get Messages, Create File, and so on.
■ Allowed Permissions The permissions defined by resource type.
■ Read / Write. Valid for all resource types.
■ Delete. Valid for Container and Object types.
■ Other options. All other options are valid for Object types.
■ Enables Deletion Of Versions. When allowed permission is set to delete (the bullet points above), the SAS grants permission to delete blob versions.
■ Start And Expiry Date/Time. The time boxing for the SAS, the SAS will not work outside of this data range.
■ Allowed IP Addresses. Single addresses or ranges in CIDR notation. Leave blank for any IP address.
■ Allowed protocols. HTTPS or HTTPS and HTTP.
■ Preferred Routing Tier. Basic. If endpoints have been specified in the firewalls and virtual networks configuration for the storage account, you can also select the routing types for the endpoints.
■ Signing Key. The access key used to sign the SAS. Note, if you rotate your keys, your SAS must also be regenerated.
Using the above information and looking at Figure 1-20, you can deduce the access granted by this SAS to the storage account resources. It will grant access to the blob service at the container and object level. The read-level access allows listing of blobs stored in a container and reading of blobs within the container. The Enables Deletion Of Versions checkbox can be ignored because deletion at the object level is not a granted permission. The SAS will be valid from 9 AM on June 12 to 9 AM on June 19 and is accessible over HTTPS.
Click Generate SAS And Connection String as Displayed in Figure 1-20. The SAS token and URL are created and displayed below the Generate SAS And Connection String button. The format of the strings is displayed in Figure 1-21.

FIGURE 1-21 Generated SAS Connection String, SAS Token, and Blob Service SAS URL, as displayed in the Azure portal
If you look at the SAS Token and Blob Service SAS URL in Figure 1-21, the parameters directly after the ? are the options chosen on the SAS creation screen. The large string after &sig= is the digital signature used verify and authorize the access requested.
SAS tokens, URLs, and connect strings can be used by many programming languages through their software development kits (SDKs) to access storage account data. To see this in action, here is the PowerShell output from the “Manage access keys” section from earlier in this chapter, which has been updated to use the SAS token generated from the Azure portal:
$resourceGroupName = "12storage"
$storageAccountName = "az303fsdemosa"
$SASToken = "?sv=2019-10-10&ss=b&srt=co&sp=rx&se=2020-06-19T08:00:00Z&st=2020-06-12T08:0
0:00Z&spr=https&sig=ceDhRXv2uu937OcRaCrtVdrHd1WDy8gLqNboZkqxwxM%3D"
$containerName = "images"

$ctx = New-AzStorageContext '
-StorageAccountName $storageAccountName '
-SasToken $SASToken
Execute the commands above in a PowerShell terminal to set the context using the SAS token passed to the -SasToken parameter. The SAS token grants read access, so it can be used to get a blob from a container. To get the blob, execute the following commands in PowerShell:
Get-AzStorageBlobContent '
    -Container $containerName '
    -Blob "uploadTest.png" '
    -Destination "d:\az303files\" '
    -Context $ctx
     Container Uri: https://az303fsdemosa.blob.core.windows.net/images

Name                            BlobType  Length             ContentType
LastModified                 AccessTier SnapshotTime         IsDeleted
uploadTest.png           BlockBlob 592021        image/png
2020-06-11 23:44:18Z Unknown                                     False
Do not forget to ensure that the client you are running the PowerShell from has network access to the storage account; otherwise, the above cmdlet will error!
If you now tried to execute the add blob cmdlet from the “Configure Azure Files and Blob Storage” section earlier in this chapter, it will error because the SAS token is creating a context that only has read access. To test this, execute the following commands in PowerShell:
Set-AzStorageBlobContent -File "D:\az303files\uploadTestSAS.png" '
-Container $containerName '
-Blob "uploadTestSAS.png" '
-Context $ctx
Set-AzStorageBlobContent : This request is not authorized to perform this operation
using this permission. HTTP Status Code: 403 - HTTP Error Message: This request is not
authorized to perform this operation using this permission.
ErrorCode: AuthorizationPermissionMismatch
ErrorMessage: This request is not authorized to perform this operation using this
permission.
Implement Azure AD authentication for storage
Azure Storage account access tokens and SAS tokens must be shared to be used. Although the shared tokens can be securely stored in Azure Key Vault to minimize risk, there is still the possibility that a token could be stored in source control or transmitted in an insecure manner. This is a possible security vulnerability, and as an Azure architect, it is part of your role to minimize potential security vulnerabilities.
Azure Active Directory (Azure AD) can be used to create a security principal in the form of a user, group, or application. The security principal can be granted permissions to Azure Storage blobs and queues using role-based access control (RBAC). In this model, the security principal is authenticated to Azure AD and an OAuth token is returned. The token is then used to authorize requests against Azure Storage. No credentials are shared with Azure AD authentication; for this reason, Microsoft recommends using Azure AD for authorization against a storage account whenever possible.
Using the example storage account az303fsdemosa that you have been exploring throughout this skill, you can test user principal access. If you no longer have this storage account, substitute the $storageAccountName and $containerName variables for ones that exist in your subscription. For this example, you will need to place a text file into the $containerName variable. The following code snippets use a text tile named storage-az303demo.txt.
Open a PowerShell terminal and log in as the user who created the storage account. Execute the following cmdlets to set the context using Azure AD and try to retrieve the test blob:
$resourceGroupName = "12storage"
$storageAccountName = "az303fsdemosa"
$containerName = "images"

$ctx = New-AzStorageContext '
-StorageAccountName $storageAccountName '
-UseConnectedAccount

Get-AzStorageBlobContent '
    -Container $containerName '
    -Blob "storage-az303demo.txt" '
    -Destination "d:\az303files\" '
    -Context $ctx
Note the -UseConnectedAccount parameter of New-AzStorageContext above. This instructs the cmdlet to use OAuth authentication to retrieve an access token for the logged in account. This OAuth token is then used to get the permissions to the storage account, which becomes part of the storage context.
The Get-AzStorageBlobContent cmdlet will fail with a 403 error—request not authorized. The account you are logged in with created the storage account; it was automatically given the owner role to the storage account. The owner role is for the “management plane” of an Azure resource, and the account has full access to manage the configuration of the storage account. The owner role has no permissions on the “data plane”; therefore, it cannot read, write, update, or delete data. The command line or Azure portal can be used to grant the required permissions through RBAC. Open the Azure portal and follow these steps to grant read permission to the Blob Storage:
In the search resources bar at the top of the portal, enter storage account, then choose Storage Account on the drop-down menu that is displayed as you type the resource name. From the list of storage accounts, select the az303fsdemosa storage account or the account used in the previous section from the list.
Click Access Control (IAM) in the menu. This is where permissions are assigned via RBAC. Click the Role Assignments tab. If you have been following along through this skill, you will see no users listed here. This tab shows all granted role assignments that affect this resource; these can be at the resource level or they can be inherited from a parent scope.
Click Add at the top and choose Add Role Assignment. In the top drop-down menu, choose Storage Blob Data Reader. This will grant read-only permission to the blob service of the storage account. Leave Assign Access To set as Azure AD User, Group Or Service Principal. You can now search for a user, group, or service principal. Find the user, which could not execute the previous PowerShell cmdlet and select it. The Add Role Assignment blade should look as shown in Figure 1-22.

FIGURE 1-22 Assigning the Storage Blob Data Reader Role to an Azure AD user
Click Save at the bottom of the assignment to assign the permission, which will take you back to the Role Assignments list. If you scroll down to the bottom, the Storage Blob Data Reader role has been added.
Switch back to the PowerShell terminal and re-run the cmdlets from the beginning of this section. The Get-AzStorageBlobContent cmdlet no longer errors, and the blob is retrieved.
This example explains how to grant permissions to a user or group, but what about an application? It is more likely that, as an architect, you will be designing a solution where an application is accessing the storage resources. An application requires a service principal or managed identity, which are granted the permissions to access the resource. You can think of a service principal or managed identity as equivalent to a service account in an on-premises Active Directory. Microsoft recommends using a managed identity where possible. The steps below use a combination of Azure CLI and an Azure Function as an example:
Create an Azure function with an HTTP Trigger. For help with this see the “Implement Azure functions” in the “Implement solutions for apps” skill in Chapter 3.
In the Azure portal, search for function app in the search resources bar at the top. Select Function App and click the name of the function you created in step 1.
Select Functions in the left-hand menu and then choose HttpTrigger1 from the function list in the Functions blade.
On the left side, choose Code + Test. Copy the code listed below and paste it into the PowerShell edit replacing the code displayed. Click Save.
using namespace System.Net
# Input bindings are passed in via param block.
param($Request, $TriggerMetadata)
# Write to the Azure Functions log stream.
Write-Host "PowerShell HTTP trigger function processed a request."
$resourceGroupName = "12storage"
$storageAccountName = "az303fsdemosa"
$containerName = "images"
$ctx = New-AzStorageContext '
-StorageAccountName $storageAccountName '
-UseConnectedAccount
$blob = Get-AzStorageBlobContent '
    -Container $containerName '
    -Blob "storage-az303demo.txt" '
    -Context $ctx '
    -Force

$body = $blob.ICloudBlob.DownloadText()
# Associate values to output bindings by calling 'Push-OutputBinding'.
Push-OutputBinding -Name Response -Value ([HttpResponseContext]@{
    StatusCode = [HttpStatusCode]::OK
    Body = $body
})
In the code snippet above, you will see that the middle section is almost identical to the cmdlets executed to read the blob with a user principal. The context is retrieved using -UseConnectedAccount and passed to Get-StorageBlobContent. The destination has been removed so that the Azure Function stores the file in wwwroot. -Force is added so that the file is overwritten each time the function is executed. The text from the blob is extracted to $body, and it is output to the function response. Note this example has been designed for use with a text file.
Click Test/Run > Run to execute the function. It will fail with the following output to the Function log, as shown in Figure 1-23. In this example, the function is not running under an Azure AD account, which means -UseConnectedAccount cannot authenticate and the context is null. A managed identity must be assigned to the Azure Function for authentication.

FIGURE 1-23 Function execution error from null context
To assign an identity, click the function name in the breadcrumb trail at the top of the Azure portal. Scroll down through the menu and click Identity. Leave the tab at System Assigned and change the Status to On. Click Save. The function now has a system-managed identity. A system-managed identity is an identity that follows the lifecycle of the resource it is assigned to; if the resource is deleted, so is the identity. When a managed identity is created on an Azure function, two environment variables are created: MSI_ENDPOINT and MSI_SECRET. Developers can use these within code to retrieve the OAuth token for the managed identity. It is then passed to the Azure resource as part of a request so that the request can be authorized. In this example, Get-NewAzContext wraps this process for you, so it does not have to be specifically coded.
Click Functions in the left menu, select HttpTrigger1 > Code + Test and then run the function again. The error has changed to a 403—authorization error. The function is now retrieving the context of the managed identity, but the identity does not have permission to read the blob.
Assigning RBAC roles to a managed identity is almost identical to that of a user. Navigate to the storage account you are using for this walkthrough—az303fsdemosa. Click Access Control (IAM) in the left menu, and then click Add at the top. Click Add Role Assignment. Under Role, select Storage Blob Data Reader. Under Assign Access, click Function App, which is listed under System Assigned Managed Identity. The name of the function app you have been using for this walkthrough will be listed. Click the function app name; the role assignment blade will look as shown in Figure 1-24. Click Save.

FIGURE 1-24 Assigning read access on a blob service to a system-managed identity
Navigate back to the function app and use the same process as described in step 7 to run the function app again. The code will now execute without error and the contents of the file are displayed in the output window. Note that you will still receive a 403 error if your function app does not have network access to the storage account.
Implement Azure Storage replication
Azure automatically replicates your storage data three times within the datacenter it is stored, protecting against underlying physical hardware failure. There are further high availability options for Azure Storage, each with its own use case:
■ Locally redundant storage (LRS). Azure makes three copies of the storage account and distributes them throughout a single datacenter in your home region. Here, you have protection against the failure of a storage array.
■ Zone-redundant storage (ZRS). Azure makes three copies of the storage account and distributes them across multiple datacenters in your home region. Here, you have protection against datacenter-level failures. Note that only General-Purpose V2 storage accounts can use the ZRS replication option.
■ Geo-redundant storage (GRS). Azure makes three copies of the storage account in the home region, and three copies in a second, paired region. Paired regions are geographically close enough to have high-speed connectivity to reduce or eliminate latency. Here, you have protection against regional failures.
■ Geo-zone-redundant storage (GZRS). Azure creates copies within the availability zones of the primary region and then replicates the data to the secondary region. This is the Microsoft-recommended level of replication encompassing the highest levels of durability, availability, and performance.
■ Read-access geo-redundant storage (RA-GRS). This is the same as GRS with the exception that you can access the storage account in the secondary region; the base URL path is https://<account-name>-secondary.<service>.windows.net.
■ Read-access geo-zone-redundant storage (RA-GZRS). This is the same as RA-GRS, but Azure also copies data across the availability zones of the primary region.
You must also consider cost; the more the data is replicated, the higher the SLA and the higher the cost.
Exam Tip Storage Account Service Level Agreements
It can be beneficial to understand the SLAs for each redundancy type. See https://docs.microsoft.com/en-us/azure/storage/common/storage-redundancy for further review.
The replication type is specified when the storage account is created. In the “Select storage account options based on a use case” section of this chapter, you created a storage account with the Azure CLI. The --sku parameter was omitted; the sku parameter is where the replication type is selected. The sku consists of two parts: the performance level (Standard or Premium) and the replication type (LRS, ZRS, GRS, or RAGRS). Only LRS and ZRS may have a premium performance level. Execute the following command to create a read-access geo-redundant storage account in Azure CLI:
resourceGroupName="12storage"
storageAccountName="az303ragrs"
az storage account create \
    --name $storageAccountName \
    --resource-group $resourceGroupName \
    --kind StorageV2 \
    --sku Standard_RAGRS
The JSON returned by the cmdlet above contains this section:
"secondaryEndpoints": {
   "blob": "https://az303ragrs-secondary.blob.core.windows.net/",
   "dfs": "https://az303ragrs-secondary.dfs.core.windows.net/",
These are URLS (endpoints) for the secondary region.
Need More Review? Data Redundancy
To learn more about data redundancy for storage accounts, visit https://docs.microsoft.com/en-us/azure/storage/common/storage-redundancy.
Implement Azure Storage account failover
Storage accounts configured for geo-replication can be manually failed-over to the secondary endpoints if there is an outage at the primary. You should also recommend that your customers perform test failovers as part of their disaster recovery plans. To initiate a failover, you can use the command line or the Azure portal. Log in to the Azure portal and follow these steps. You will be using the geo-redundant storage account az303ragrs that you created in the previous section:
In the search resources bar at the top of the portal, enter storage account and then choose Storage Account from the drop-down menu that is displayed as you start to type the resource name. From the list of storage accounts, select the az303ragrs storage account or the account used in the previous section (“Implement Azure Storage replication”).
The menu opens at the Overview blade. Look at the Status field which reads: “Primary: Available, Secondary: Available.” The Location field will show the selected paired region. The primary is in the first location; the secondary is in the second.
Scroll down in the menu and click Geo-Replication. The map shows the location of your primary and secondary endpoints. Scroll down to the bottom of the map and click Prepare For Failover. The Failover blade states when the primary and secondary was last synced and that you will lose data after this point. Also, note the paragraph that states when the secondary becomes the primary, the new primary will be converted to locally redundant storage (LRS). You must update the storage account to get back to geo-redundant storage after the Failover. This can be performed using the Azure portal, Azure CLI or PowerShell. Type yes in the Confirm Failover box and click Failover.
Need More Review? Storage Account Failover
To learn more about disaster recovery and failover for storage accounts, visit https://docs.microsoft.com/en-us/azure/storage/common/storage-disaster-recovery-guidance.
Skill 1.3: Implement VMs for Windows and Linux
As an architect, it might seem unusual that a skill for the exam involves implementing and configuring virtual machines (VMs). However, lift-and-shift operations are often a cloud architect’s bread and butter in a large enterprise. This skill will look at the configuration options for a VM and how to design for scale and availability.
This is an expert-level certification, so there is an expectation that your skill set will already include creating Linux and Windows virtual machines in the Azure portal. It is also expected that you possess basic scripting skills in Bash and PowerShell.
This skill covers how to:
Select virtual machine size
It is highly likely that you will encounter many projects as an architect which will involve lifting and shifting on-premises virtual machines (VMs) into the cloud. An essential part of this task is assessing each on-premises VM’s workload and sizing an appropriate VM in Azure. There are many VM sizes available in Azure, and all are optimized for specific workloads. You need to have a good grasp of these optimizations and where to apply them. See Table 1-1.
TABLE 1-1 Virtual machine types and sizes summary
VM Type |
Sizes |
Description and usage |
General Purpose |
A, B, D |
Balanced CPU to Memory. Dev and test applications, medium sized database, and application servers |
Compute optimized |
F |
High CPU-to-memory. Application servers, network appliances, and batch |
Memory optimized |
E, M, DSv2m Dv2 |
High memory-to-CPU. Database servers and large caching / in-memory processes |
Storage optimized |
L |
High disk throughput. For big data, NoSQL and data warehouses |
GPU |
N |
Heavy graphics rendering and machine learning |
High-performance compute |
H A8-11 (will be deprecated 3/2021) |
The highest-power CPUs available. Some sizes can also have Random Direct Memory Access (RDMA) network interfaces. |
The table above provides a broad overview of how the lettering at the start of a VM size denotes the VM’s type. Each letter can have multiple configurations of CPU cores, memory sizes, and storage capacities.
To view the options in the portal, choose to add a virtual machine resource, scroll down to Size, and click Change Size. This will display the options available to you. The size options available to you alter between regions, and you can list the VM sizes available in each location using PowerShell or in this example with the Azure CLI:
az vm list-sizes --location uksouth --output table
The output of the command above lists all the VM sizes available for the given location, –location uksouth. You can use Bash or PowerShell operators to filter your results. For example, issue the following command in PowerShell to show all VMs available in a region with eight cores:
Get-AzVMSize -Location uksouth | Where NumberOfCores -EQ '8'
To create a virtual machine outside the portal, you must specify the size as part of the create command. The Name column from the output of the command above is the value that must be passed into the create command:
az vm create --name vmLinSizeExample \
  --resource-group $resourceGroupName \
  --image UbuntuLTS \
  --size Standard_B1s \
 --generate-ssh-key
If the workload on a VM alters or if it was incorrectly sized on creation, you will need to resize your VM. You can resize a VM while still allocated, but you can only resize it to a size available on the cluster it was created. To check the sizes available to you, execute this command:
az vm list-vm-resize-options --resource-group $resourceGroupName --name vmLinSizeExample
--output table
If the size you require is not listed by az vm list-vm-resize-options but is listed for az vm list-sizes, you must deallocate the VM before resizing. Azure will then re-create the VM in a new cluster:
az vm resize --resource-group $resourceGroupName --name vmLinSizeExample --size
Standard_DS2_v2
Need More Review? Virtual Machine Sizing
To learn about the options available for virtual machine sizing, visit the Microsoft Docs article “Sizes for Linux virtual machines in Azure” at https://docs.microsoft.com/en-us/azure/virtual-machines/linux/sizes. Make sure to explore the description of each type. This page also features a link to more information about Windows virtual machines.
Configure storage for VMs
Virtual machine storage can be managed or unmanaged, though the recommended mode is managed. With a managed disk, the storage account, underlying storage limits, and encryption are taken care of for you.
There are four disk types available in Azure, and each disk type has different limits and therefore, different specific use cases, as shown in Table 1-2.
TABLE 1-2 Disk type
Disk type |
Use case |
Max size |
Max throughput |
Max iops |
Ultra disks |
IO intensive Top-tier databases and transaction-heavy workloads |
65G |
2000MB/s |
160,000 |
Premium SSD |
Production applications Performance workloads |
32G |
900MB/s |
20,000 |
Standard SSD |
Dev and test servers Light-usage applications and web servers |
32G |
750MB/s |
6,000 |
Standard HDD |
Non-critical and backup |
32G |
500MB/s |
2,000 |
The cost for each disk type rises as you move between the different disk types, with ultra disks having the highest cost.
Originally, all Azure VMs were created with unmanaged disks. You can convert the unmanaged disks to managed using the Azure portal or the command line. First, you must deallocate the VM and then convert it. For example, the following command shows how to deallocate a VM in Azure CLI:
az vm deallocate --resource-group $resourceGroupName --name vmLinSizeExample
az vm convert --resource-group $resourceGroupName --name vmLinSizeExample
az vm start --resource-group $resourceGroupName --name vmLinSizeExample
Need More Review? Managed Disks
To learn about managed disks and disk types available to IaaS in Azure, visit the Microsoft Docs article “Introduction to Azure managed disks” at https://docs.microsoft.com/en-us/azure/virtual-machines/linux/managed-disks-overview. We recommend that you review all the Disk Storage Concepts sections and review the SELECT A DISK TYPE FOR IAAS VMS section.
A virtual machine uses disks in three roles: OS Disks, temporary disks, and data disks. OS disks store the files for the selected operating system when the VM was created. OS disks cannot use an ultra disk. However, if you are using ultra disks for your data disks, it is recommended that you use premium SSD for your OS disk. OS disks can also utilize an ephemeral OS disk. The data for ephemeral OS Disks is stored in the local VM’s storage and not in Azure Storage. The local storage provides read and write operations at much lower latency and makes the imaging process faster. Storing the data locally to the host means ephemeral disks incur no cost; however, if an individual VM fails, it is likely that all data on the ephemeral disk will be lost. Ephemeral OS disks are great for stateless applications, where failure of a VM will not affect the application because traffic will be queued or re-routed. An Ephemeral OS disk is chosen in the Azure portal under the Advanced section of the Disks tab on creating a virtual machine in the Azure portal or on the command line. For example, in Azure CLI, use the --ephemeral-os-disk true flag:
az vm create \
 --resource-group $resourceGroupName \
 --name vmEphemOSDisk \
 --image UbuntuLTS \
 --ephemeral-os-disk true \
 --os-disk-caching ReadOnly \
 --admin-username azureadmin \
 --generate-ssh-keys
Need More Review? Ephemeral OS Disks
To learn more about ephemeral OS disks, visit the Microsoft Docs article “Ephemeral OS disks for Azure VMs” at https://docs.microsoft.com/en-us/azure/virtual-machines/windows/ephemeral-os-disks.
Temporary disks contain data that can be lost during a maintenance event or the deallocation of a VM. Therefore, do not put critical data on a temporary disk. Data does, however, persist on a temporary disk following a normal re-boot.
Data disks contain data, web pages, or custom application code. Multiple data disks can be added to a VM; the maximum amount depends on the VM size. You saw the MaxDataDiskCount column when executing the az vm list-sizes command in the “Select a virtual machine size” section, earlier in this chapter. The max data disks figure was also listed in the Azure portal view. Data disks support all the Azure disk types.
It is not mandatory to create data disks when you create a VM unless you have chosen an image that requires data disks. You can add one or more data disks once a VM has been created. To add a data disk, you can use the Azure portal and command line. For example, use this code to attach a data disk in PowerShell:
$diskConfig = New-AzDiskConfig -SkuName Premium_LRS -Location uksouth
-CreateOption Empty -DiskSizeGB 128
$disk1 = New-AzDisk -DiskName dataDisk1 -Disk $diskConfig -ResourceGroupName
resourceGroupName
$vm = Get-AzVM -Name vmName -ResourceGroupName resourceGroupName
$vm = Add-AzVMDataDisk -VM $vm -Name dataDisk1 -CreateOption Attach
-ManagedDiskId $disk1.Id -Lun 1
Update-AzVM -VM $vm -ResourceGroupName resourceGroupName
Note the -CreateOption Empty parameter on the first line for New-AzDiskConfig. This parameter creates a new empty disk to attach to your VM. Empty disks need to be initialized once attached by using disk management on Windows or partition and mount commands on Linux. Custom script extensions can be used to automate this task on scale.
The -CreateOption parameter also takes Upload as an input. The Upload option is used to create a disk configuration in Azure Storage and then upload a VHD directly into it. Uploads can be for on-premises disks or for copying disks between regions. Note, VHDX files must be converted to VHD first. The final value for -CreateOption is FromImage. You build your custom VM, prepare it for generalization with sysprep, and then use the resultant image to create one or more Azure VMs.
Need More Review? Adding Disks
To learn more about adding disks, visit the Microsoft Docs article “Add a disk to a Linux VM” at https://docs.microsoft.com/en-us/azure/virtual-machines/linux/add-disk. Also, we recommend that you review all pages from the Manage Storage section of the How-to guides in the Virtual Machine documentation.
Configure Azure Disk Encryption
Azure protects customers from the unlikely event of an attacker gaining access to physical media by encrypting data at rest. By default, disks are encrypted at rest with server-side encryption (SSE) using Microsoft-managed keys. The automatic and transparent nature of the disk encryption means that no changes are required to the application code to make use of it. The encryption by SSE is FIPS 140-2–compliant; however, for some use cases, this might not fit your compliance and regulatory requirements. If a VHD is copied from the storage account it is in, it will be decrypted. The possibility of decryption outside the storage boundary is why Azure Security Center will flag VMs that have not had Azure Disk Encryption (ADE) enabled.
ADE is performed at the VM operating system level, which adds an extra layer of security for the VM. The BitLocker (Windows) and DM-Crypt (Linux) features of an operating system provide volume encryption of the OS and data disks. Because this is an operating system feature, not all operating system versions are supported. Azure Disk Encryption uses a Data Encryption Key (DEK) to encrypt the data; you then have the option of using a key encryption key (KEK) to encrypt the DEK for added security. Encrypting the DEK with a KEK is known as “envelope encryption.” The DEK and the KEK must be stored in Azure Key Vault, which means the OS must have access to the key vault.
Azure Disk Encryption is performed on virtual machines that have already been created. Encryption can only be performed from the command line. Follow the steps below to encrypt the disks on an existing Windows VM $vmName using Azure CLI:
Perform a snapshot of the VM disks to be encrypted; this is done for restore purposes in case of an error during encryption. You can also run this command to verify Azure Disk Encryption is not enabled on the VM:
resourceGroupName="az303chap1_3-rg"
location="uksouth"
vmName="ade-vm"
vaultName="ade-vk"
keyName="ade-kek"

az vm encryption show --resource-group $resourceGroupName --name $vmName
Azure Disk Encryption is not enabled
Create a key vault using the following command . This key vault must be in the same region as the VMs you want to encrypt. Note the –enabled-for-encryption parameter, which enables the key vault for disk encryption; without this, the encryption in step 3 will fail.
az vm encryption enable --resource-group $resourceGroupName --name $vmName
--disk-encryption-keyvault $vaultName
Encrypt the VM using this command, which creates the DEK for you in the specified key vault set: –disk-encryption-keyvault $vaultName. Note the –volume-type ALL parameter. ALL instructs the encryption process to encrypt all OS and data disks. You can also replace ALL with OS or DATA to encrypt only those types.
az vm encryption enable --resource-group $resourceGroupName --name $vmName
--disk-encryption-keyvault $vaultName --volume-type ALL
Check the status of disk encryption on the VM once more. If you scroll through the JSON output from the following command, you can see the encryption status of each disk as EncryptionState/encrypted as displayed in Figure 1-25.
az vm encryption show --resource-group $resourceGroupName --name $vmName

FIGURE 1-25 Verify disks are encrypted in Azure CLI
To check that the OS disk is encrypted from within the VM, RDP into the VM and open Windows Explorer. Click This PC in the left navigation pane. The padlocks on the C: and D: drive verify they are protected by BitLocker, as shown in Figure 1-26.

FIGURE 1-26 Verify disks are protected by BitLocker in Windows Explorer
The first three steps above are the minimum required to encrypt a VM with Azure Disk Encryption. To explore the encryption process in step 3 further, you can display all the secrets that are now stored in the keyvault $vaultName by using the following command in Azure CLI; the output is shown in Figure 1-27:
az keyvault secret list --vault-name $vaultName

FIGURE 1-27 Azure Key Vault secret following disk encryption
If you look about halfway down in the output in Figure 1-27, you can see the line "contentType":" "BEK". BEK stands for BitLocker encryption key. The BEK is the data encryption key (DEK), as described at the beginning of this section. When the encryption command was issued, Azure created the BEK automatically and stored the key in the key vault. If more than one volume existed for the VM, a BEK would have been created for each one.
If you must use your own encryption keys for regulatory purposes, you will need to encrypt the generated BEK with a key encryption key (KEK). To encrypt with your own KEK, you must import your key into the key vault and then re-issue the encryption command, as shown in this Azure CLI command:
az keyvault key import --name $keyName --vault-name $vaultName --pem-file ./keys/ade-
kek.pem --pem-password $password
az vm encryption enable --resource-group $resourceGroupName --name $vmName --disk-
encryption-keyvault $vaultName --volume-type ALL --key-encryption-key $keyName
Re-run the command from above Figure 1-25 to check the encryption status again:
az vm encryption show --resource-group $resourceGroupName --name $vmName
Note the addition of the keyEncryptionKey section, detailing where the KEK is stored.
Need More Review? Azure Disk Encryption
To learn more about configuring Azure Disk Encryption, visit the Microsoft Docs article “Azure Disk Encryption for Virtual Machines” at https://docs.microsoft.com/en-us/azure/security/fundamentals/azure-disk-encryption-vms-vmss.
Configure High Availability
So far in this skill you have been exploring configurations on a single VM. A single VM in Azure carries an SLA of 99.9 percent but only when Premium SSD or ultra disks are used for all OS and data disks. If Premium SSDs are not used, the VM has no SLA. An SLA is a service-level agreement, which is the minimum amount of time that Microsoft guarantees a service will be available.
An SLA of 99.9 percent guarantees that the downtime on a single VM will be no more than 43 minutes a month. This may not seem like a lot of time, but what if it was during a customer’s peak trading hour of the month? Using single VMs for an application introduces a single point of failure. There are three situations in which an Azure VM could be affected:
■ Planned maintenance. VMs must be updated to ensure reliability, performance, and security. When updates require reboot of a VM, you are contacted to choose a maintenance window via Azure Planned Maintenance.
■ Unplanned hardware maintenance. Azure predicts that underlying hardware is about to fail and live-migrates the affected VMs to healthy hardware. A live-migrate pauses the VM so network connections, memory, and file access are maintained, but performance is likely to be reduced at some point in the migration.
■ Unexpected downtime. This is when hardware or physical infrastructure fails without warning. This can be network, disk, or other rack-level failure. When Azure detects unexpected downtime, Azure migrates the VM and reboots it to heal it; the reboot causes downtime. Downtime will also occur in the unlikely event of an entire datacenter outage.
As an architect, you must design to remove single points of failure, which can be achieved by architecting highly available (HA) solutions. To architect a highly available VM-based solution in Azure, you need to understand availability zones and availability sets.
Availability sets
Availability sets in Azure are used to mitigate the effects of a rack-level hardware failure and scheduled maintenance on VMs. When you place your VMs into an availability set, Azure distributes the workload across multiple update domains and fault domains. An update domain is a logical group of underlying hardware that can be rebooted or undergo maintenance at the same time. When patches are rolled out, only one update domain will be affected at a time. A fault domain is a physical section of the datacenter; each section has its own network, power, and cooling infrastructure. If a hardware failure occurs on a fault domain, only some of the VMs in your availability set are affected. The logical and physical concepts of how fault and update domains enable high availability are displayed in Figure 1-28.

FIGURE 1-28 Availability set update and fault domain examples
Each of the three examples in Figure 1-28 represents an Azure datacenter distributed into update domains (UD) and across fault domains (FD) for an availability set. In Example 1, the operation is normal and the VMs are distributed into the default of three fault domains and five update domains. You may have a maximum of three fault domains, though update domains can be increased to 20. When the number of VMs in the set goes beyond five, Azure will sequentially increase the VMs in each update domain by one. UD 0 will increase to two VMs, UD 1 will increase to two VMs, and so on. For these examples, assume there is one VM in each of the five update domains.
Example 2 in Figure 1-28 represents a planned maintenance event. Azure starts the patching process by patching and rebooting UD 4. Azure repeats the patch and reboot process on each update domain in turn. If you have five VMs in your availability set, four VMs are available at every point in the patching process.
Example 3 in Figure 1-28 represents a hardware failure on FD 2. Update domains UD 3 and UD 4 go down, but UD 0, UD 1, and UD 2 are available, which is three VMs. If a planned maintenance event occurs while the VMs in UD 3 and UD 4 are moved and healed, two VMs are available.
Using availability sets ensures that at least one VM will be available during a planned or unplanned maintenance event. This increases the SLA for VMs within an availability set to 99.95 percent or about 22 minutes of downtime a month. To configure an availability set for VMs, you start by creating the availability set. In the portal, type availability set in the search resources bar at the top of the portal, choose Availability Sets when the drop-down menu is displayed as you type the resource name. Once the Availability Sets screen loads, click Add. Figure 1-29 shows an example of a completed Create Availability Set page.
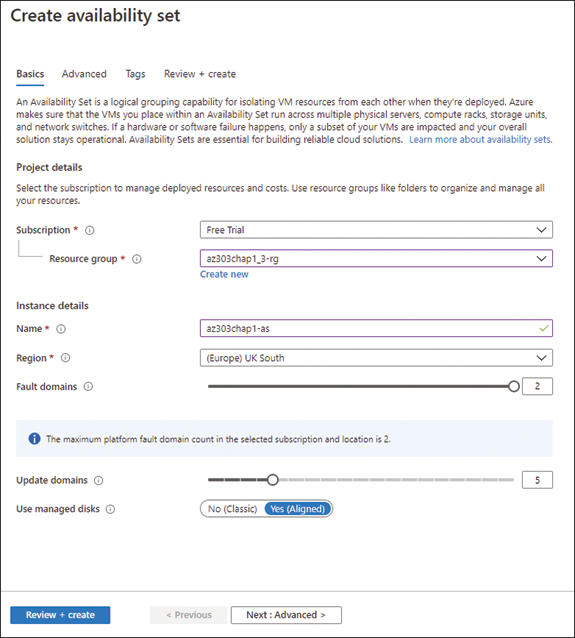
FIGURE 1-29 A completed availability set creation page
For a virtual machine to be added to an availability set, it must exist in the same region as the availability set. Looking at Figure 1-29 you can also see the warning reading: The Maximum Platform Fault Domain Count In The Selected Subscription And Location Is 2. This is caused because the region—UK South—only provides two fault domains. Changing this to another region, such as West Europe, would allow three domains. You can query the max fault domain count for a region from the command line. If you set the Use Managed Disks option to Yes (Aligned), the VM disks will be distributed across storage fault domains, preventing single points of failure for your VM’s disks. If you do not utilize managed disks, you will need to manually create a storage account for every VM in an availability set.
Once the availability set is created, you can assign VMs in the portal or on the command line; for example, in Azure CLI, you specify the --availability-set parameter, as shown below:
az vm create \
     --resource-group $resourceGroup \
     --name $vmNamei \
     --availability-set az303chap1-ag \
     --size Standard_DS1_v2  \
     --vnet-name $vnetName \
     --subnet $subnetName \
     --image UbuntuLTS \
     --admin-username azureuser \
     --generate-ssh-keys
You can only add a VM to an availability set on creation of the VM. If you need to assign a VM to an availability set after creation, the VM must be deleted and re-created. Once your availability set is created and VMs have been deployed, you add a load balancer to distribute traffic between available VMs.
If the solution you are creating is for a multi-tier application, you must create an availability set for each tier when architecting for high availability.
Availability zones
An availability zone is made up of one or more datacenters, each zone having its own networking, power, and cooling. The zones are physically separated, so using availability zones will protect you from datacenter failures. Each availability zone has a fault and update domain, and these work in the same way as described for availability sets. Note, you cannot combine availability sets and availability zones. Availability zones are not available in every region, and not every VM SKU is available in an availability zone. You can check what is available on the command line. For example, in Azure CLI, you would execute this command:
az vm list-skus -l uksouth --zone --output tsv
The --zone parameter on az vm list-skus will list VMs that are available for use in an availability zone. If you switched the location above to uknorth, no SKUs would be listed. At the time of this writing, uknorth has no availability zones. To add a VM to an availability zone, you specify the zone as part of the VM configuration; for example, you could execute this command in PowerShell with the -Zone parameter:
New-AzVMConfig -VMName $vmName -VMSize Standard_DS1_v2 -Zone 2
To achieve 99.99 percent SLA for an availability zone, you must also ensure that network connectivity and storage for the VM is within the same zone. If the add VM process is creating managed disks and the -Zone parameter is set, the storage will be automatically placed in the correct zone.
If your solution requires high availability across regions, availability zones will not be adequate. You will need to architect a multi-region solution with traffic being balanced across the regions. An example of a multi-region architecture is shown in Figure 1-30.

FIGURE 1-30 Multi-region high availability for IaaS with a web front end
Exam Tip Azure VM SLAs
Have a good understanding of the SLA percentages for a single instance VM, VMs in an availability set and VMs across availability zones.
Need More Review? High Availability for Virtual Machines
To learn about the availability configurations available to virtual machines, visit the Microsoft Docs article “Manage the availability of Windows virtual machines in Azure” at https://docs.microsoft.com/en-gb/azure/virtual-machines/windows/manage-availability.
Deploy and Configure Scale Sets
An historical issue with on-premises datacenter configuration is having to purchase hardware in advance to deal with future predicted load. A virtual machine scale set (VMSS) in Azure enables you to deploy a set of load-balanced and identical VMs. These VMs can be scaled vertically or horizontally to meet demand. The load balancer distributes the incoming workload across the scale set VMs. If the load balancer’s health probe detects that a VM is not responding, the load balancer stops sending traffic to that VM. A scale set can bring a level of redundancy, and the distribution of the load might aid with application performance. To add a VM scale set, you can use the Azure portal or command line. For example, to add a scale set in Azure CLI, execute the following commands:
az vmss create \
  --resource-group $resourceGroupName \
  --name myScaleSet \
  --image UbuntuLTS \
  --upgrade-policy-mode automatic \
  --admin-username $adminUser \
  --generate-ssh-keys
The az vmss create command above adds a VM scale set for Ubuntu-based VMs. Note you can use the --zones parameter to place a scale set across a zone or zones to increase availability. You may also use custom images in a scale set; these must be VMs that are deallocated and generalized first.
Once you have added a scale set, you can use the Azure portal to explore the scale set settings. At the top of the portal, enter scale set in the resources search bar and press Enter. Select your scale set, click Instances in the menu blade, and notice there two instances have been created. An instance is a VM in a scale set. By default, the az vmss create command has two VMs and a load balancer. You can also specify an existing load balancer or application gateway when creating a scale set. In this example, the load balancer is created automatically with no routing rules, so you must add them. For example, in Azure CLI, this command will route HTTP traffic to the VMs:
az network lb rule create \
  --resource-group $resourceGroupName \
  --name myLoadBalancerRuleWeb \
  --lb-name myScaleSetLB \
  --backend-pool-name myScaleSetLBBEPool \
  --backend-port 80 \
  --frontend-ip-name loadBalancerFrontEnd \
  --frontend-port 80 \
  --protocol tcp
You must also add a health probe to the load balancer if you need to check the underlying VMs for availability.
Switch back to the Azure portal and open the Instances blade. Select an instance and look at the Overview blade. VMs in a scale set have no public IP address. If maintenance is required for an instance, a jumpbox must be configured to RDP or SSH into the instance. Go back to the scale set blade and click Scaling. The default setting for scaling is Manual, but in the Azure portal, you can drag the slider up or down to scale the number of instances in or out. To perform scaling on the command line, such as in Azure CLI, run az vmss scale and specify the --new-capacity parameter, as shown here:
az vmss scale --name myScaleSet --new-capacity 3 --resource-group $resourceGroupName
Autoscaling is the real power in scale sets. Switch back to the Azure portal and click Custom Autoscale in the Scaling blade. The default scale condition is displayed; scroll to the bottom and click Add A Scale Condition. Multiple conditions can be added. Figure 1-31 shows examples of scale conditions for predictable and unpredictable loads.

FIGURE 1-31 Predicted and Unpredictable load-scale conditions
The example predictable load scale condition in Figure 1-31 is shown on the left. The Scale Mode is set to Scale To A Specific Instance Count and the Instance Count can scale out to a specific instance count of 3. The Schedule is set to Repeat Specific Days and Repeat Every is set to Friday. Lastly, the Start Time and End Time are 09:00 and 11:00, respectively.
The unpredictable load scale condition in Figure 1-31 appears on the right. The Scale Mode is set to Scale Based On A Metric. The first metric rule is set to Increase Count By 1 and (Average) CPU Credits Consumed > 70 (the average CPU load across all instances is greater than 70 percent for at least 10 minutes). The second metric rule is set to Decrease Count By 1 and (Average) Percentage CPU < 40 (the average CPU load across all instances is less than 40 percent for 10 minutes). Instance Limits ensure the scale condition does not go beyond 5 instances.
Scaling in and scaling out is not limited to VM instance metrics; click Add A Rule in a scale set condition and see that Storage and Service Bus queues are available under Metric Source. Therefore, if the queues to your VMSS are large, you can scale out to reduce the queue.
While still in the Scale Rule panel, scroll down to Actions. This is where you can increase or decrease your instances.
Need More Review? Virtual Machine Scale Sets
To learn about virtual machine scale sets, visit the Microsoft Docs article “Virtual Machine Scale Sets documentation” at https://docs.microsoft.com/en-us/azure/virtual-machine-scale-sets/.
Implement Azure Dedicated Hosts
The VMs you have looked at so far in this skill have all been running on an underlying shared physical infrastructure. You have little control over where your VM has been placed, beyond specifying a region or availability zone. You have no control over whose workloads you are sharing the infrastructure with. In many use cases, this is not an issue, though some regulatory and compliance requirements must have isolated physical infrastructure. Azure Dedicated Hosts address these requirements by providing the following features:
■ Single tenant physical servers. Only VMs you choose are placed on your host(s). This is achieved by hardware isolation at the physical server level.
■ Control over maintenance events. This allows you to choose the maintenance windows for your host(s).
■ Azure hybrid benefit. You can bring your own Windows Server and SQL licenses to reduce costs.
Azure Dedicated Hosts are grouped within a host group. When creating a host group, you can specify how many fault domains to use. If you specify more than one fault domain, you choose which fault domain a host is added into. The virtual machines automatically pick up this fault domain from the host. This feature is why availability sets are not supported in Azure Dedicated Hosts. In a host group, you have the option to specify an availability zone. You must create multiple host groups across availability zones if you require high availability across zones. A host requires the choice of a SKU-size family from the VM series and hardware generations supported in your host group’s region.
When a VM is added to an Azure Dedicated Host, it must match the host region and size family. Existing VMs can be added, though they must meet the same requirements and be stopped/deallocated first.
Need More Review? Azure Dedicated Hosts
To learn about deploying Azure Dedicated Hosts in the portal, visit the Microsoft Docs article “Deploy VMs to dedicated hosts using the portal” at https://docs.microsoft.com/en-us/azure/virtual-machines/windows/dedicated-hosts-portal.
Skill 1.4: Automate deployment and configuration of resources
The speed of business has become much faster, and organizations are deploying changes and solutions to the cloud using agile methodologies. As an architect, you need to understand how to automate the deployment of your solutions, ensuring that the underlying infrastructure is reliable from the first to the nth time it is deployed. These deployments leverage Infrastructure as Code (IaC). In Azure, IaC is performed using an Azure Resource Manager (ARM) template, which is that a JSON (Javascript Object Notation)–based structure in which you declare what the end state of your resources will be in JSON.
Once a solution has been deployed, it might require some configuration. This can also be scripted and is known as “Configuration as Code.” Configuration as Code aids configuration drift, where a server configuration alters over time because of manual interventions. In this section, you will explore using ARM templates for deployment and configuration and using an Azure automation runbook for state configuration.
This skill covers how to:
Need More Review? ARM Templates
To learn about ARM templates, visit the Microsoft Docs article at https://docs.microsoft.com/en-us/azure/azure-resource-manager/templates/.
Save a deployment as an Azure Resource Manager template
The Azure portal provides the ability to export deployments to an ARM template. This can be especially useful when you are first starting out with ARM templates. You can export an environment you are used to working with and then explore the exported JSON. The Azure portal has two ways to export a template:
■ From a resource or resource group. Generates an ARM template based on an existing resource or resource group.
■ Before a deployment or from a historical deployment. Extracts the ARM template used for a deployment.
Exporting from a specific resource is, in the main, the same process regardless of the resource. In the Azure portal, click any resource, scroll down in the resource menu blade to Settings, and then choose Export Template, which brings up the Export Template blade, as shown in Figure 1-32.
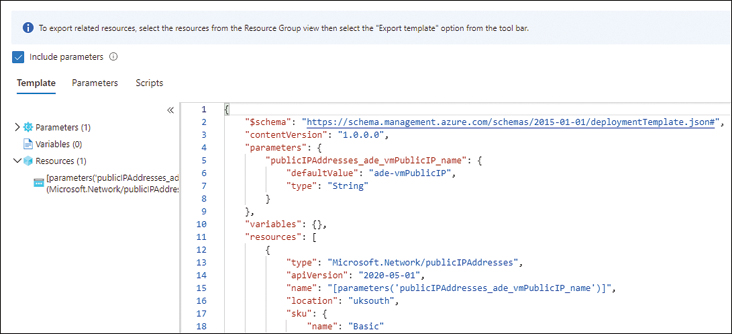
FIGURE 1-32 Exporting a template from a resource in the Azure portal
Figure 1-32 shows an example of a single resource export. It is the public IP of a domain controller referred to in Skill 1.7 of this book. As shown in Figure 1-32, the Export Template blade shows the following options:
■ Download. Downloads a zipped copy of the template.
■ Add To Library. Saves the template to a library for later use. The template library is discussed in the section “Manage a template from a library” further on in this chapter.
■ Deploy. Deploys the template as displayed in the editor.
■ Include Parameters. Includes the parameters section of the template. If this option is not selected, the parameters section becomes an empty object—{}.
■ Template Structure. The left side of the bottom pane defines the outline of the JSON structure of the template.
■ Template Editor. The right side of the bottom pane enables live editing of the export.
Click Download. The resulting zip file contains two JSON files: The template.json file contains the definition of your resource(s), and the parameters.json file is used to pass in parameters to the template.json file for a deployment.
Exporting a resource group is similar, as the screenshot in Figure 1-33 shows.

FIGURE 1-33 Selecting resources to export from a resource group in the Azure portal
Clicking the Export Template link at the top right will export all the resources from your resource group unless you specifically select the resources you want to export.
Modify Azure Resource Manager template
ARM templates are JSON files, and they can be modified with any text editor and stored alongside your company’s code in source control. Microsoft’s cross-platform source code editor, Visual Studio Code (VS Code), has some excellent extensions to assist with editing ARM templates. (See https://docs.microsoft.com/en-us/azure/azure-resource-manager/templates/use-vs-code-to-create-template.) Using the editor is not part of the exam, but the extensions will make it easier to see the key sections of an ARM template and to learn how to modify those sections.
To get started modifying a template, you can export a template from the portal as discussed in the previous section. Also, the Azure ARM Quickstart Template GitHub repository has hundreds of ready-built templates to help with learning ARM. The complexity of these templates ranges from smaller single resource templates to large templates containing best-practice, multi-tier architectures with built-in security, compliance, resiliency, and redundancy. The 100-level templates are the introductory templates. (See https://github.com/Azure/azure-quickstart-templates/tree/master/100-blank-template.) Copy the contents of the azuredeploy.json file into VS Code as shown in Figure 1-34.

FIGURE 1-34 Blank ARM template structure
The blank ARM template shown in Figure 1-34 shows a clear view of the template structure:
■ $schema (required). This is the location of the JSON schema definition for an ARM template. This does not change unless the schema is upgraded.
■ contentVersion (required). This is used for source control and can be any format.
■ Parameters. Parameters are passed into the template to customize deployment.
■ Variables. Variables are values calculated from parameters, other variables or resources in the template and then used in the deployment.
■ Resources (required). The resources for the deployment must be defined.
■ Outputs. These are the outputs from resource deployments, such as an IP address or service endpoint.
The blank template can be deployed to Azure; it won’t do anything, but it is a valid template.
Figure 1-35 displays an adapted version of the 101-storage-account-create quick start template from the GitHub repository. The template has been separated out across the next four images so that you can clearly see the structure defined above.

FIGURE 1-35 ARM template parameters
Figure 1-35 shows the parameters section of the template; each parameter is defined in a slightly different way:
Each parameter has a name; the first one is storageAccountName. This name is how the parameter will be referenced in the template.
metadata can be set throughout the ARM template; in most cases, it is ignored. For a parameter, setting metadata with the name description can be seen during deployment and is mainly used as a help mechanism.
allowedValues uses a drop-down menu configuration. Only the values specified in allowedValues can be chosen.
defaultValue, if specified, means a value does not have to be passed to the parameter it is specified against when the template is deployed. For the parameters above, storage-AccountName must always be supplied when the template is deployed as there is no defaultValue.
The next template section (see Figure 1-36) defines a variable.

FIGURE 1-36 Defining a variable in an ARM template
In Figure 1-36, parameters('storageAccountName') is an example of how to use a parameter in an ARM template; it will return the value entered for the storageAccountName parameter. ARM templates have many built-in functions available. For example, concat is a string function that concatenates two strings. In the example above, it is concatenating the storageAccountName to another function that returns a unique string that is based on the resource group.
The resources section is normally the most involved; Figure 1-37 shows a single resource—a storage account.

FIGURE 1-37 Storage account definition for a resource
Every resource deployed requires the following properties:
■ type. This sets the type of resource. It is the namespace of the resource provider, which in this case, is something like Microsoft.Storage/storageAccounts, Microsoft.Compute/virtualMachines, or Microsoft.Network/virtualNetworks.
■ apiVersion. This is the REST API version used to create the resource. Every provider has its own API version.
■ Name. This is the resource name.
Most resources also require a location. In Figure 1-37, you can also see the storageAccountType parameter being used for the SKU. This is a good use case for allowedValues because SKUs are defined by Microsoft and therefore, have a fixed set of values. Another good use case for this is to limit the SKUs available for a virtual machine.
The outputs section of this template is empty.
Exam Tip Arm Templates
You will be expected to be able to read and understand ARM templates and their JSON structures. Use the 101 quick-start templates for frequently used resources, such as virtual machines, networking, and storage, to build your knowledge.
Evaluate location of new resources
ARM template values can be extended using expressions. An ARM template expression is evaluated at runtime and often contains a function. In Figure 1-37, we used an expression to create the unique account name: [reference(variables('uniqueAccountName')).primaryEndpoints]", which can only be evaluated at runtime. Until runtime, the template does not know what the resourceGroup() function will return.
The output section of the ARM template described in the previous section could have contained an expression to be evaluated. For a storage account, you might want to return the created endpoints, as shown in Figure 1-38.

FIGURE 1-38 Outputting information for a newly created resource from an ARM template
The code shown in Figure 1-38 would have returned the following JSON output if it had been given a parameter of az303arm for storageAccountName:
    "outputs": {
      "endPoints": {
        "type": "Object",
        "value": {
          "blob": "https://az303armfrslx5kksdvcu.blob.core.windows.net/",
          "dfs": "https://az303armfrslx5kksdvcu.dfs.core.windows.net/",
          "file": "https://az303armfrslx5kksdvcu.file.core.windows.net/",
          "queue": "https://az303armfrslx5kksdvcu.queue.core.windows.net/",
          "table": "https://az303armfrslx5kksdvcu.table.core.windows.net/",
          "web": "https://az303armfrslx5kksdvcu.z33.web.core.windows.net/"
        }
      }
    },
Another common expression is to use the built-in function of resourceGroup() to return the location of the resource group to which the ARM template is being deployed. As previously shown in Figure 1-35, the definition for the location parameter would change to include the expression shown in Figure 1-39.

FIGURE 1-39 Evaluating the resource location within the template
The .location property returns the location of the supplied resource group. All resources within the template use this parameter, which ensures all resources are in the same location. Having all resources in the same location as the resource group they belong to enforces best practice.
Deploy from a template
Now that you have configured a template, it is time to deploy your resources into Azure. There are a few options for this, and in this section, we will explore the most widely used options: Azure portal, PowerShell, and Azure CLI.
An ARM template can be deployed to multiple scopes, tenants, management groups, subscriptions, and resource groups. The first three scopes are generally used for Azure policy and RBAC deployments. The resource group deployment is how most resources are deployed and is the focus of the exam. A resource group deployment requires an existing resource group to deploy to; you can explore deploying to a resource group by using the Azure portal:
Note ARM Template for Walkthrough
Each of the deployments in this example utilizes the 101-simple-vm-windows template from Azure Quickstart templates (https://github.com/Azure/azure-quickstart-templates/tree/master/101-vm-simple-windows). This template was, at the time of writing, built by a Microsoft employee. However, not all of them are, so verify what you are deploying.
In the Azure portal enter deploy in the field at the top of the Azure portal. Choose Deploy A Custom Template from the top in the drop-down that is displayed as you type the resource name.
Custom template deployment allows you to paste your template into the Build Your Own Template In The Editor; create resources from Common Templates, or Load A GitHub Quickstart Template. Choose Load A GitHub Quickstart Template. Filter for the text “simple” and select 101-vm-simple-windows. Click Select Template.
Note the Custom Deployment screen (Figure 1-40) looks very similar to the portal screens for adding any resource. If you open the azuredeploy.json file from the 101-vm-simple-windows quickstart repository and compare the parameters, each parameter in azuredeploy.json has an input box on this page. The empty input boxes correspond to the parameters with no defaultValue. Select the 2016-Datacenter drop-down menu; the options available to you are the allowedValues defined for the parameter.
Enter appropriate values for the virtual machine deployment and select Review + Create. Finally, click Create. Your virtual machine is deployed.

FIGURE 1-40 Deploying the 101-vm-simple-windows ARM template in the Azure portal
As an architect who wants to utilize IaC to speed up your deployments via automation, you are unlikely to be using the Azure portal to deploy your resources. This is where deployment scripted in PowerShell or the Azure CLI comes in. You will need a resource group and you will need to set your parameters. Parameters can be passed directly to the template on the command line with the Azure CLl, as shown in the following code:
#!/bin/bash

resourceGroupName="az303chap1_4-rg"
deploymentName="simpleWinVM"
templateUri="https://raw.githubusercontent.com/Azure/azure-quickstart-templates/
master/101-vm-simple-windows/azuredeploy.json"
adminUsername="adminuser"
adminPassword="secretP@ssw0rd"
dnsLabelPrefix="az303depvm"

az deployment group create --resource-group $resourceGroupName \
--name $deploymentName \
--template-uri $templateUri \
--parameters "adminUsername=$adminUsername" \
             "adminPassword=$adminPassword" \
             "dnsLabelPrefix=$dnsLabelPrefix"
Figure 1-41 shows the code block above being executed through VS Code:

FIGURE 1-41 Deploying 101-vm-simple-windows with the Azure CLI
The parameters in Figure 1-41 are set so that only those with no default value are passed to the template. Note the templateUri argument is taking the URL for the azuredeploy.json file straight from GitHub. The templateUri argument uses raw.githubusercontent.com, which passes the raw content of the file; without this change to the URL, the template will error.
If you recall exporting a resource from the previous section entitled “Save a deployment as an Azure Resource Manager template,” the zip file contained a parameters.json file. This file is used to pass parameters to the template on deployment. It is referenced as part of the deployment command for Azure CLI and in the example shown in Figure 1-42, using PowerShell.

FIGURE 1-42 Deploying a local template with PowerShell
In Figure 1-42, the code on the right shows the PowerShell script, and the terminal winow below shows the command to call the script. The template and template parameters are stored locally, so the TemplateFile argument is used instead of the URI. For this example, the 101-vm-simple-windows azuredeploy.json and azuredeploy.parameters.json have been copied to the directory from which the script is being run. Note the -Mode parameter; an ARM template that is run against a resource group that already has resources can run in two modes:
■ Incremental. This is the default mode in which all resources that exist in the resource group but not in the template remain. Resources specified in the template are created or updated.
■ Complete. All resources in the resource group are deleted and re-created.
The mode is defined as complete. When this PowerShell script is run, all resources in the defined resource group are deleted and re-created from scratch. This could be quite a destructive move, so PowerShell will ask if you are sure, though you can bypass this check with the -Force option.
On the left-hand side of Figure 1-42, you can see the parameters file that is being passed in by the PowerShell command. The top three parameters are the same as passed directly in the previous example from Figure 1-41 with Azure CLI. In the example in Figure 1-42, there is a fourth parameter, vmSize, which has a defaultValue within the ARM template. Specifying a parameter in the parameters file will override a defaultValue in the ARM template.
Exam Tip Arm Template Deployment
You will be expected to understand how to execute deployments from the portal and command line. Having a good grasp of the options around these deployments could be beneficial.
Configure a virtual disk template
The Azure portal marketplace has many operating system images; however, these might not always be the best starting point for building your VMs in Azure. You might need to create your own base image or migrate a base image from on-premises. There are many ways to accomplish this, such as to azcopy a virtual disk (VHD) of the image to Azure Storage and reference it as part of an ARM template. To reference a VHD in an ARM template, the storageProfile must be set to point to the VHD. Look at the storageProfile for the Azure Quickstart template 101-vm-simple-linux as shown in Figure 1-43:

FIGURE 1-43 ARM template storageProfile for a managed operating system disk
Figure 1-43 shows the definition for a managed disk. The osDisk section means the disk will be created from an image and managed by Azure in Standard_LRS storage, which is set in the variable osDiskType at the top of the ARM template. The imageReference section determines which image will be used for the disk.
Configuring the ARM template to use a copy of a VHD from Azure Storage changes the storageProfile section to that shown in Figure 1-44.

FIGURE 1-44 ARM template storageProfile for an unmanaged VHD
The osDisk section (Figure 1-44) has expanded because this is an unmanaged disk. The template now sets the name of the managed disk as osType (Set to linux in the parameters) and the caching mechanism. The key part in this section is the image; this is where the VHD will be copied from. The vhdUrl is passed as a parameter, which is the full URL to the VHD in Azure Storage. There is no imageReference section; the operating system is already on the VHD, so it does not need to be selected. The vhd section defines where the new VHD will be stored. It is set in the variables section and is a storage account in the same region as the VM.
Manage a template library
The Azure portal has a template library where you can store and deploy templates. Open the Azure portal and search for templates in the resource name search box at the top of the Azure portal. Choose Templates from the drop-down menu that is displayed as you type the resource name and press Enter. The page that loads is the Template Library. Follow these steps to explore the library functionality:
Click Add at the top left. This process will add a template to the library. Enter a Name and Description (both of which are mandatory). Click OK. You can now build a template up from scratch in the editor on the right of the add page or paste in your own. Paste in a copy of azuredeploy.json from https://github.com/Azure/azure-quickstart-templates/blob/master/101-vm-simple-linux/azuredeploy.json. Click OK, then click ADD.
Your template is now stored in the portal. Click the name of the stored template in the portal. Note, you may need to click Refresh at the top of the Templates page to see the new template in the list.
As shown in Figure 1-45, the following options are available:
■ Edit. Edit the template in the online editor or paste another version over the top. The template description can also be edited, though the name is fixed.
■ Delete. Delete the template.
■ Share. RBAC for the selected template.
■ Deploy. Opens the template in the Custom Deployment window. See “Deploy from a template,” earlier in this chapter, for more information.
■ View Template. Opens a read-only view of the template.

FIGURE 1-45 The Azure portal template library features
Note Template Library
Managing a template library is part of the exam specification. However, when saving a template to the library, the previous version is overwritten. Therefore, the library is not version controlled. As an architect, you should recommend the best practice, which is version control for storing Infrastructure as Code (IaC).
Create and execute an automation runbook
Azure automation enables the automation and configuration of on-premises and cloud environments. Azure automation works across Windows and Linux, delivering a consistent way to deploy, configure, and manage resources. Azure automation has three main capabilities:
■ Configuration management. You can manage configurations using PowerShell desired state configuration (DSC), update configuration, or stop configuration drift by applying configurations pulled from Azure.
■ Update management. You can orchestrate update installation via maintenance windows.
■ Process automation. You can automate time consuming, frequent, and sometimes error-prone tasks via runbooks.
An automation runbook is used for process automation. The runbook can be created with PowerShell or Python, or it can be created graphically through drag and drop in the Azure portal. A runbook can execute in Azure or on-premises on a hybrid runbook worker. On execution of the runbook, Azure automation creates a job that runs the logic as defined in the runbook.
Before an automation runbook can be created or executed, an automation account must be created. This can be performed on the command line, or as shown in this example, it can be created in the Azure portal:
In the Azure portal, search for automation in the resource name search bar at the top of the Azure portal and click Automation Accounts.
Click Add to add an Automation Account. Figure 1-46 shows the Add Automation Account screen where you can set the configuration options for the account:
■ Name. This is the name for the Automation Account.
■ Resource Group. This is the resource group where the Automation Account resides.
■ Location. This is the location of the automation account.
■ Create An Azure Run As Account. When set to Yes, this option creates a service principal, which has the Contributor role at the subscription level. This is used to access and manage resources. For this example, leave this set to Yes.
FIGURE 1-46 Add Automation Account
Once you have selected the appropriate values, clicking Create will create the automation account. You are returned to the Automation Accounts page.
Refresh the Automation Accounts page, and you will see the newly created account in the list. To add a runbook to the Automation Account, click the automation account name. The screen that loads is the Automation Account menu. Scroll down and click Runbooks. The runbooks listed were automatically created when you added the automation account. To add a runbook, click Create A Runbook and fill in the following parameters:
■ Name. This is the name of the runbook; for this example, enter cleanDevResources.
■ Runbook Type. From the drop-down menu, you can choose PowerShell, Python 2, Graphical, or Workflow-Based types. For this example, choose PowerShell.
■ Description. You have the option to enter a description for the nature of the runbook.
Click OK.
The runbook will open using the editor you chose under Runbook Type. In this case, we are using PowerShell. You can write your PowerShell script online or you can paste in the script from another editor. The use case for a runbook is process automation. The example PowerShell in the Runbook from Figure 1-47 deletes all resources in resource groups with a specific tag. This process could be used to clean up development resources at the end of a day.
FIGURE 1-47 PowerShell script to delete all resource groups with a given tag
The code listing for this example is below:
$conn = "AzureRunAsConnection"
try
{
    # Get the connection "AzureRunAsConnection "
    $sPConnection=Get-AutomationConnection -Name $conn

    Connect-AzAccount '
        -ServicePrincipal '
        -Tenant $sPConnection.TenantId '
        -ApplicationId $sPConnection.ApplicationId '
        -CertificateThumbprint $sPConnection.CertificateThumbprint
}
catch {
    if (!$sPConnection)
    {
        $ErrorMsg = "$conn not found."
        throw $ErrorMsg
    } else{
        Write-Error -Message $_.Exception
        throw $_.Exception
    }
}

# Set the tag for AZ303 Chapter 1 resource removal
$rgTag = "az303chap1"
$toCleanResources = (Get-AzResourceGroup -Tag @{ Usage=$rgTag })

Foreach ($resourceGroup in $toCleanResources) {
    Write-Host "==> $($resourceGroup.ResourceGroupName) is for az303chap1. Deleting     it..."
    Remove-AzResourceGroup -Name $resourceGroup.ResourceGroupName -Force
}
Once the script has been added, click Save. Select Test Pane at the top of the screen, which runs the edited version of the runbook to test the results. This is useful if you are not ready to publish your runbook. Publishing a runbook overwrites the live copy. Click Start to start the test.
In this example, the runbook will error; PowerShell does not recognize Connect-AzAccount. This is because the automation account has the Legacy AzureRM PowerShell modules loaded by default, but not the Az modules. You must load the Az modules; to do this, return to the Automation Account menu blade and choose Modules. The modules that are loaded by default are displayed on the Modules blade. In this example, only the AzureRM modules are available. Click Browse Gallery, search for Az, choose Az.Accounts, and click Import. Next, choose Browse Gallery, search for Az, and choose Az.Resources. (You must do this because the PowerShell in the example runbook uses cmdlets from both modules.)
Once the modules show as imported in the Modules blade, go back to the Runbook blade and select cleanDevResources, the runbook name from step 4 above. Click Edit > Test pane > Start to test the runbook once more. The runbook should now run correctly.
The runbook has been verified as functioning, so now select Publish to make the runbook available to run. You are returned to the runbook blade for cleanDevResources. There are three ways to run a runbook:
■ Manually. Choosing Start at the top of the runbook page will run the runbook.
■ Webhook. Triggers the runbook by HTTP POST to a URL.
■ Schedule. Schedules the runbook to execute.
The use case for this example is to delete developer resources at the end of the day. Therefore, click Schedules on the Runbook menu blade, and then choose Add A Schedule to add a schedule for the runbook, which opens the Schedule Runbook page, as shown in Figure 1-48.

FIGURE 1-48 Scheduling a runbook in the Azure portal
You can set the following options: Starts, Recurrence, Recur Every, and Set Expiration. In the example shown in Figure 1-48, the runbook is set to run every night at 8 PM. The runbook will be created when you click Create.
Need More Review? Azure Automation
To learn about Azure Automation in the portal, visit the Microsoft Docs article “An introduction to Azure Automation” at https://docs.microsoft.com/en-us/azure/automation/automation-intro. In particular, you should read the Desired State Configuration sections.
Skill 1.5: Implement virtual networking
Because AZ-303 is an expert certification, you are expected to already possess knowledge on how VNets are used to enable secure communication between resources in Azure. Also, you are expected to know how to create and maintain VNets and understand CIDR notation. This skill requires you to understand how to connect VNets to build out your private network within Azure, as well as the requirements that drive each method of connection.
This skill covers how to:
Implement VNet-to-VNet connections
When encrypted traffic is listed as a security or compliance requirement for communication across a VNets in a virtual network, you will need to implement a VNet-to-VNet VPN gateway connection. When a VNet-to-VNet connection is created, it is like a site-to-site VPN connection; all traffic between the VNets flows over a secure IPsec/IKE tunnel. The tunnel is created between two public IP addresses that are dynamically assigned to the VPN gateways on creation. Figure 1-49 shows a diagram of an example implementation for VNet-to-VNet connections.

FIGURE 1-49 VNet-to-VNet connections across subscriptions and regions
Only one VPN gateway is permitted per VNet. However, a VPN Gateway may connect to multiple VNets and Site-to-Site VPNs. VNet-to-VNet connections can be across regions and subscriptions. In Figure 1-49, VNet 3 is in West US and is part of Subscription 2. VNet 3 is also connected to VNet 2 in East US, which is part of Subscription 1. In order to connect two VNets, there must be no crossover in the address ranges of the subnets.
Follow these steps to set up the connection for VNet 1 and VNet 2 within the same subscription but across regions.
Create two Linux Azure Virtual Machines (VMs)—one in VNet 1 and one in VNet 2 with address spaces, as shown in Figure 1-49. Ensure the VM in VNet 1 is in a subnet of 10.1.0.0/24, and VNet 2 is in a subnet of 10.2.0.0/24. This will ensure there is no overlap in existing subnets, which is a requirement of VPN gateway design. Ensure the VM in VNet 1 has a public IP address. To assist with creating this architecture, use the Azure QuickStart ARM template at https://github.com/Azure/azure-quickstart-templates/tree/master/101-vm-sshkey. You will need to edit the address and subnet prefixes accordingly.
Sign in to the Azure portal, and in the resource name search bar at the top, type virtual network gateway. Select Virtual Network Gateway from the drop-down menu that is displayed as you type the resource name. The Virtual Network Gateways page opens. Click Add to create a virtual network gateway.
As shown in Figure 1-49, create the VPN Gateway for VNet1 using the following values:
■ Subscription. Select the same subscription used to create the VNets and VMs in Step 1.
■ Resource Group. This is automatically filled when the VNet is selected.
■ Name. This is a unique name for the VPN gateway; for this example, enter VNet1GW.
■ Region. Select the region used for VNet 1; in Figure 1-49, this is West US.
■ Gateway Type. For a VPN gateway, this must be VPN.
■ VPN Type. Choose Route-Based. Route-based VPNs encrypt all traffic that passes through the VPN, whereas choosing Policy-Based encrypts some traffic as defined by the policy.
■ SKU. Choose Basic. SKUs for a VPN gateway differ by workloads, throughputs, features, and SLAs. (The higher the throughput, the higher the cost.)
■ Basic. Intended for proof of concept (POC) or development workloads.
■ VpnGw1-3. Supports BGP, up to 30 site-to-site VPN connections, and up to 10 gigabits per second (Gbps) throughput for the Gw3 SKU when combined with Generation 2.
■ VpnGw1-3AZ. These SKUs have the same feature set as VPNGw1-3, but they are availability-zone aware.
■ Generation. Choose Generation 1. The combination of Generation and SKU support various throughputs. A Basic SKU is only supported by Generation 1.
■ Virtual Network. Choose VNet 1. It should be listed as available if you selected the correct Region in Step 3d.
■ Gateway Subnet Address Range. This will be automatically populated once the virtual network is selected. The subnet range is populated with /24; however, Microsoft recommends a /27 or /26 range, but no smaller than a /28 range. Enter 10.1.1.0/27.
■ Public IP Address. Choose this option to create a new Public IP address.
■ Public IP Address Name. Enter a unique name; in this case, use VNet1GW-ip.
■ Enable Active-Active Mode. Leave this option set to Disabled. Active-Active mode is used for highly available VNet-to-VNet connectivity.
■ Configure BGP ASN. Leave this option set to Disabled. Border Gateway Protocol (BGP) is used to exchange routing information between two or more networks.
■ Click Review + Create. Once the validation has passed, click Create. The validation process can take some time.
While VNet1GW is being created, follow the same steps to create a VNet named VNet2GW. Once more, select to add A VPN Gateway in the portal using the same directions from step 2. Using Figure 1-49 as a guide, enter the setup required for VNet2GW:
■ Subscription. Select the same subscription used to create the VNets and VMs in Step 1.
■ Resource Group. This is automatically filled when the VNet is selected.
■ Name. This is a unique name for the VPN gateway; for this example, enter VNet2GW.
■ Region. In Figure 1-49, this is East US.
■ Gateway Type. Choose VPN.
■ VPN Type. Choose Route-Based.
■ SKU. Choose Basic.
■ Generation. Choose Generation 1.
■ Virtual Network. Choose VNet2.
■ Gateway Subnet Address Range. Enter 10.2.1.0/27.
■ Public IP Address. Choose to create a new public IP address.
■ Public IP Address Name. Enter a unique name for the Public IP address; for this example, enter VNet2GW-ip.
■ Enable Active-Active Mode. Leave this set to Disabled.
■ Configure BGP ASN. Leave this set to Disabled.
Click Review + Create. Once the validation has passed, click Create.
Once the two VPN gateways are created, they must be connected to each other before a tunnel can be created and traffic can flow. Navigate back to Virtual Network Gateways by entering Virtual Network Gateway in the resource name search box at the top of the Azure portal, then select Virtual Network Gateways in the drop-down menu that opens as you start to type. The Virtual Network Gateways page opens, and the two new VPN gateways will be listed. Click the name given to the first VPN gateway you created; in this example, it is VNet1GW. On the VNet1GW menu blade, click Connections > Add to start creating the connection. Fill in these options:
■ Name. Enter a unique name for the connection; for this example, enter VNet1-VNet2.
■ Connection Type. Leave this set as VNet-To-VNet. The other two options cover on-premises to Azure solutions.
■ Second Virtual Network Gateway. Select VNet2GW.
■ Shared Key (PSK). This is a random string of letters and numbers used to encrypt the connection.
■ IKE Protocol. Leave this set as IKEv2 for VNet-to-VNet. IKEv1 can be required for some on-premises site-to-site connections.
Click OK to add the connection.
You must now create a second connection from VNet2 to VNet1 using the process outlined in step 6, this time choosing VNetGW2.
Navigate to the Connections menu option on VNet1GW. Check that the Status of both connections is Connected. This can take a short while. Once both are connected, the connection is ready to test.
SSH to the VM in VNet 1 with the public IP address. You should now be able to ping the virtual machine in VNet 2. If you used the ARM template in Step 1 of this guide, port 22 will be open to VNet 2 to test SSH between the two VMs. This is a key point: Network Security Groups (NSGs) defined at the network interface (NIC) or subnet will still come into play across a VNet-to-VNet connection. Therefore, you might need to configure NSG rules to allow your traffic to flow.
Note VPN Gateway Connections
The Azure portal may only be used to create connections between VPN gateways in the same subscription. To connect two VPN gateways in different subscriptions, use PowerShell; see https://docs.microsoft.com/en-us/azure/vpn-gateway/vpn-gateway-vnet-vnet-rm-ps. Also, you can use Azure CLI; see https://docs.microsoft.com/en-us/azure/vpn-gateway/vpn-gateway-howto-vnet-vnet-resource-manager-portal.
Implement VNet peering
Running two VPN gateways to connect VNets can be quite costly, as each VPN gateway is billed hourly along with egress traffic. The VPN gateway connections also limit the bandwidth available, as all traffic must flow through the gateway. VNet peering is equivalent to a VNet-to-VNet connection using VPN gateways because peering also enables resource communication between VNets. However, with a VNet peering, the traffic is routed through private IP addresses on the Azure backbone. This means VNet peering offers a lower latency, higher bandwidth option when compared to VNet-to-VNet using VPN gateways. When the peering is within the same region, the latency is the same as that within a single VNet. VNet peering is also a lower-cost option, as no VPN gateway costs are accrued; only ingress and egress fees are accrued. VNet peering can also connect VNets across Azure regions; this is known as Global VNet peering.
Figure 1-50 shows a common architecture pattern (a hub-and-spoke network topology) made available to an Azure architect by implementing VNet peering.
FIGURE 1-50 VNet peering to create a hub-and-spoke network topology
In a hub-and-spoke topology, the hub is a VNet, and it is the central point; the hub contains the connection to your on-premises network. The connection from on-premises to the hub can be via an ExpressRoute or VPN gateway. A hub is often used to group shared services that can be used by more than one workload, such as DNS or a security appliance (NVA).
Each spoke connects to the hub by VNet peering; a spoke can be in a different subscription from the hub. Peering across multiple subscriptions can be used to overcome subscription limits. Peering isolates workloads. As shown in Figure 1-50, if Spoke 1 was for your development department and Spoke 2 was for your production department, they would be isolated and could be managed separately. Configuring spokes in this way enables another architectural practice—the separation of concerns. Figure 1-50 shows how the spokes can communicate with the hub to use shared services but not with each other.
To see part of this topology in action, work through the following steps in the Azure portal to create a VNet peering between two VNets:
Create two Linux Azure Virtual Machines (VMs), one in each of the following VNet and subnet configurations:
■ VNet1: 10.3.0.0/24 – subnet 10.3.0.0/16
■ VNet2: 10.4.0.0/24 – subnet 10.4.0.0/16
This setup ensures there is no overlap in existing VNet address spaces, which is a requirement of VNet peering. Make sure the VM in VNet1 has a public IP address. To assist with creating this architecture, use the Azure QuickStart ARM template at https://github.com/Azure/azure-quickstart-templates/tree/master/101-vm-sshkey. You will need to edit the address and subnet prefixes accordingly.
In the Azure portal, search for vnet in the search bar at the top and select Virtual Networks in the drop-down menu that is displayed when you start typing VNet. In the list of virtual networks displayed on the Virtual Networks page, select VNet1.
You can now configure VNet1; on the menu blade on the left of the Overview blade that is opened, scroll down, select Peerings, and click Add. You must now enter the following peering configuration settings:
■ Name Of The Peering From VNet1 To Remote Virtual Network. Enter a name for your peering; in this example, enter Vnet1peerVNet2.
■ Virtual Network Deployment Model. Choose Resource Manager. In step 1, you created a new VNet using ARM or the portal; in this step, you are creating the Resource Manager model.
■ I Know My Resource ID. Leave this unselected. If you know the resource ID of the VNet you are peering to, you can select this box and enter the ID instead of selecting the Subscription and Virtual Network.
■ Subscription. Select the subscription in which you created VNet2.
■ Virtual Network. Select VNet2.
■ Name Of The Peering From VNet1 To VNet2. Enter Vnet2peerVNet1.
■ Configure Virtual Network Access Settings. Leave both switches set to Enabled. This allows traffic to flow between the two VNets.
■ Configure Forwarded Traffic Settings. Leave both switches set to Disabled. This blocks traffic that does not originate from within the VNet being peered to from entering the VNet from which the peering originates. This is how traffic is isolated in the spokes.
■ Allow Gateway Transit. Select this option if the VNet being peered from contains a VPN gateway and you want to use it.
Click OK to create the peering.
When you click OK, you are returned to the Peerings blade in the portal. Once the Peering Status of the peering you just created shows Connected, you are ready to test the connection.
SSH to the VM in VNet 1 with the public IP address. You should now be able to ping the virtual machine in VNet 2. If you used the ARM template in step 1 of this guide, port 22 will be open to VNet 2 to test SSH between the two VMs. This is a key point: Network Security Groups (NSGs) defined at the network interface (NIC) or subnet will still come into play across a VNet-to-VNet connection. Therefore, you might need to configure the NSG rules to allow your traffic to flow.
Skill 1.6: Implement Azure Active Directory
Azure Active Directory (Azure AD) is Microsoft’s cloud-based access management and identity platform. At a basic level, Azure AD signs users into Microsoft 365, Azure portal, and many other Microsoft SaaS applications. Azure AD can also sign in users to apps you have created on-premises and in the cloud.
This skill covers how to:
The first time a user from your organization signs up for a Microsoft SaaS service, an instance of Azure AD is created for your organization. An instance of Azure AD is called an Azure tenant. An Azure tenant has a one-to-many relationship with Azure subscriptions.
Azure AD comes in three tiers, and the features discussed in this skill might require the use of the two premium tiers, as shown in Table 1-3.
TABLE 1-3 Azure ad tier feature summary
|
Free |
Premium P1 |
Premium P2 |
Custom domains |
Yes |
Yes |
Yes |
Guest users |
Yes |
Yes |
Yes |
Multiple directories |
Yes |
Yes |
Yes |
Multifactor Authentication (MFA) |
Yes (For admins) |
Yes |
Yes |
Conditional Access (with MFA) |
|
Yes |
Yes |
Self Service Password Reset—cloud and hybrid users |
|
Yes |
Yes |
Guest access reviews |
|
|
Yes |
Azure Identity Protection |
|
|
Yes |
Privileged Identity Management |
|
|
Yes |
Exam Tip Heading Here
Knowing which of the features described throughout this skill are free, P1, and P2 features will be beneficial.
As an architect, you need to have an excellent grasp of the features of Azure AD and how they can be configured. In this skill, you will explore these configurations.
Add custom domains
When an organization’s Azure tenant is created, it is assigned a public DNS name in the format tenantname.onmicrosoft.com. The tenantname is generally the organization’s domain name; for example, contoso.com would become contoso.onmicrosoft.com. Even though your organization’s domain name is part of the public DNS name, it is not one that your employees or your customers will recognize as part of your brand. To associate your domain with your Azure tenant, you will need to add a custom domain name. You can add a custom domain name in the Azure portal. Follow these steps to try it out:
Log in to the Azure portal and search for azure active directory in the resources search bar at the top. Select Azure Active Directory in the search results that are displayed in the drop-down menu as you type the resource name. Now click Custom Domain Names in the menu on the left of the Azure Active Directory page. This lists the domain names associated with your Azure tenant. You will see the tenantname.onmicrosoft.com listed.
Select Add Custom Domain at the top of the Custom Domain Names page. You will be asked to enter a domain name. This domain name must be one you already own through a domain registrar; an example is shown in Figure 1-51. Click Add domain.
The settings required to verify your domain are now shown. You must add either the TXT or MX record to the DNS zone file. If you do not have access to your registrar, you can choose Share These Settings Via Email. You must use the exact values so that Microsoft can verify that you own the domain. An example is shown in Figure 1-51. Once the DNS record is added at the registrar, click Verify.
The Verification Succeeded page should appear as shown in Figure 1-51. If you receive an error you may need to wait for the DNS record changes to propagate before trying once more. If you want this newly added domain to be the default when new users are added, click Make Primary at the top of the verification successful page. Your domain is now listed in the Custom Domain Names page in the Azure portal.

FIGURE 1-51 The steps to create a custom domain
Manage multiple directories
Azure AD is a multitenant environment. Each tenant can have multiple subscriptions and multiple domains, but tenants may have only one directory. A directory is the Azure AD service, which can have one or more domains. A directory may be assigned multiple subscriptions, but it can never be associated with more than one tenant. This one-to-one relationship between a tenant and a directory can lead to confusion with the words “tenant” and “directory” being used interchangeably without explanation in documentation and in the Azure portal.
You can have multiple directories and an identity can have permissions to access multiple directories. Each directory is independent of another, including administrative access to specific directories. If you are an administrator in one directory, you will not have administrator privileges in another directory unless is it granted. You might use multiple directories to separate your live directory from a test directory that is used to explore new features or configurations.
To create a new directory, you will need to create a new tenant and search for azure active directory in the resource name search bar at the top of the Azure portal. Select Azure Active Directory in the drop-down menu that is displayed as you type the resource name. After entering Azure Active Directory, Overview is displayed by default on the menu blade. At the top of Overview, click Create A Tenant. You are taken to the Create A Tenant page. Leave the Directory Type option at its default setting of Azure Active Directory and click the Configuration tab. The Configuration of the directory is displayed, as shown in Figure 1-52.

FIGURE 1-52 Configuring a new tenant
Enter your Organization Name and an Initial Domain Name. Note the domain name is tacked onto .onmicrosoft.com, as described in “Add custom domains” earlier in this chapter. The Datacenter Location setting has added importance if user information in this directory is subject to local legislation, so the Country/Region selection should reflect this. Click Review + Create to create the new tenant.
Your logged-in identity has created the new tenant and therefore a new directory. Azure has also automatically assigned your identity Global Administrator rights for the new directory as the identity that created the tenant. To access the new directory, you will need to switch to it. Navigate to Azure Active Directory Overview blade and click Switch Tenant at the top. This opens the Switch Tenant blade, which gives you the option to switch to a new tenant by clicking on it, or to set tenants as favorites.
You can also switch directories by clicking on your identity’s avatar in the top right of the portal and choosing Switch Directory. This opens the Directory + Subscription blade, which has the following options:
■ Select a directory to switch to
■ Set a default Azure AD directory
■ Set favorite directories, making them easier to find if you manage multiple Azure AD tenants
Implement self-service password reset
Any architect who has worked his or her way through a support desk will know that calls to reset user passwords on-premises can be quite time consuming. It is estimated that password reset accounts for 20 percent of an organization’s IT spend. When architecting solutions for the number of users who could be given access to a cloud application, you will want users to reset their own passwords. Self-service password reset (SSPR) enables users to reset their own passwords without having to contact a support function. A user may change his or her password with any tier of Azure AD. However, using SSPR requires a premium tier or for a trial to be activated. Once a premium tier has been activated, follow these steps to enable SSPR within the Azure portal:
Search for Azure Active Directory in the resource name search bar at the top of the Azure portal. Note on the Overview page, the Tenant is now Azure AD Premium P1 or P2. Click Password Reset on the menu blade.
The Self-Service Password Reset Enabled option is to the default None setting. No users in the directory can utilize SSPR. If you switch this to Selected, administrators can specify which user group(s) can use SSPR. If you choose All, SSPR will be enabled for all users in the directory.
Click Save.
Once SSPR is now enabled, Azure will assign defaults to the SSPR configuration. As an architect you need to understand how the defaults affect your users’ experiences. In the Password Reset menu blade, choose Authentication Methods.
Note that Email and Mobile Phone are selected because they are the authentication methods that will be available to your users. Also, you can choose Mobile App or Office Phone, and you can set up Security Questions. Now click Registration. The slider for Require Users To Register Before Signing In was set to Yes when SSPR was enabled. This setting forces users to set up SSPR for themselves on their first log-ins. The Number Of Days Before Users Are Asked To Re-confirm Their Authentication Information setting has defaulted to 180 days. This is the number of days before the user is asked to reconfirm his or her SSPR information. Click Notifications. The Notify Users On Password Resets has defaults to Yes. This setting will send an email to users when they reset their own passwords. If you choose to Notify all admins when other admins reset their password? an email will be sent to all admins when an admin resets his or her own password.
The final option on the Password Reset menu is On-Premises Integration. This is used in conjunction with hybrid identities. You will explore this in “Skill 1.7: Implement and manage hybrid identities.”
Note SSPR and Azure AD Premium
Azure AD Premium is required for user SSPR. By default, administrators are enabled for SSPR on all Azure AD tiers.
Your users may set up self-service password reset through the My Apps portal. To see the SSPR process, add a new user to the directory in which you just enabled SSPR. Ensure the user has a usage location set, which is a requirement for a Azure AD Premium license assignment. Assign a Premium AD license to the user and use the new user to log in to the My Apps portal (https://myapps.microsoft.com). Now, follow these steps (which also are the steps you would communicate to your users):
In the top-right corner of the My Apps portal, click the avatar and then choose Profile > Set Up Self-Service Password Reset.
You have the option to set up a phone number or email address for password reset. Choose Set It Up Now next to Authentication Phone Is Not Configured to set up phone-based password reset.
Choose the country where your phone is registered and enter your telephone number.
Click Text Me or Call Me to choose a verification method.
Microsoft will text or call you with a verification code, depending on the method chosen in Step 4. Enter this verification code in the box next to Verify, and then click Verify.
Optionally, you can choose to verify an email address. Your users only need to use one of the verification methods that they choose.
Click Finish.
Note MY Apps Portal
Microsoft have released new My Apps portal which can be accessed through (https://myapplications.microsoft.com). SSPR is accessed using View Account which can be accessed through the user’s avatar in the myapplications portal. The password reset is as described above as the new portal redirects the user to the same pages.
When your users log in to an application secured by Azure AD, they will now see a Forgotten My Password under the Password field. If the user has completed the set-up steps above and has been assigned a premium license, the user will be able to reset his or her own password. The steps for the resetting a password are shown in Figure 1-53.
Need More Review? Self-Service Password Reset (SSPR)
To learn about enabling and deploying self-service password reset, visit the Microsoft Docs article “How it works: Azure AD self-service password reset” at https://docs.microsoft.com/en-us/azure/active-directory/authentication/concept-sspr-howitworks. For further reading, you should also review the Password Reset sections.
Note SSPR and Browser Caching
If the changes to the Azure AD tier and license assignments are not being picked up by your users, it is likely that your browser is caching old tokens. Clear your history and try again.
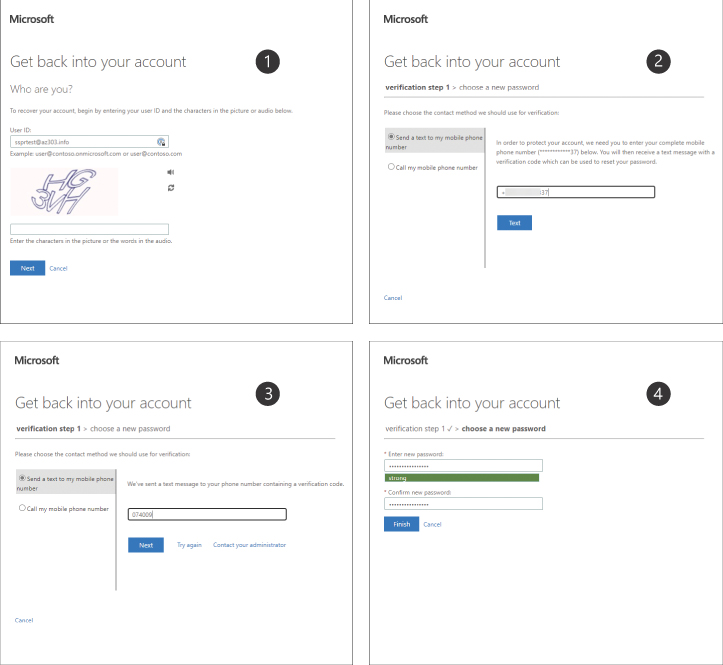
FIGURE 1-53 User self-service password reset steps
The user’s log in is copied to the User ID field. The user must enter the CAPTCHA text. Click Next.
Password reset for a telephone number was enabled in the previous section. The user can choose to be called or to be sent a verification code via text. If email verification had also been enabled, you would see an option for that. Leave this set as Send A Text and enter the telephone number that was previously verified. Click Text.
Microsoft sends a verification code; enter it in the box and click Next.
The user is now able to choose a new password. The user will click Finish once the password reset is complete.
Exam Tip SSPR
Be sure to have a good grasp of SSPR Authentication methods, registration, and notifications.
Configure user accounts for MFA
Your users live in a multi-platform, multi-device world. They can connect to applications on and off your organization’s network with phones, tablets, and PCs—often from multiple platforms. This flexibility means that using passwords is no longer enough to secure your users’ accounts. Azure multifactor authentication (MFA) provides an extra layer of security in the form of a secondary authentication method known as two-step verification. This secondary method requires the user to provide “something they have,” which is often in the form of a token provided by SMS or an authenticator app.
As an architect, you need to know how to enable MFA in Azure AD and how to configure MFA settings for your use case. There are four main ways to enable MFA for a user in Azure AD:
■ Enable by changing state. Users must perform MFA every time they log in.
■ Enable by security defaults. Security settings preconfigured by Microsoft, including MFA.
■ Enable by conditional access policy. This a more flexible, and two-step is required for certain conditions. This method requires premium Azure AD licenses.
■ Enable by Azure AD Identity Protection. Two-step is required based on sign in risk. This method requires premium P2 Azure AD licenses.
In this section, you will look at the enable by changing state and enable by security defaults methods. The others are covered later in this skill. Note that the enable by changing state method is also known as “per-user MFA.” To enable per-user MFA, navigate to the top of the Azure portal and search for Azure Active Directory in the resource name search bar at the top of the Azure portal. Select Azure Active Directory from the drop-down menu that is displayed as you type the name of the resource, and then follow these steps to configure per-user MFA by changing the state of a user:
Azure AD opens with Overview selected in the Azure Active Directory menu. Click Users.
Toward the top of the All Users blade is the User Management menu. Click the ellipses to the right of this menu and choose Multi-Factor Authentication.
Select the users for whom you want to enable MFA. If there are many users for whom you need enable or disable MFA at the same time, you can use the Bulk Update function to upload a CSV file of users to enable/disable, as shown in Figure 1-54.

FIGURE 1-54 Enabling MFA for end users
In the Quick Steps section, click Enable and then click Enable Multi-Factor Auth in the popup.
You are taken back to the user list; the Multi-Factor Auth Status for the users you enabled is now set to Enabled. There are three user states for MFA:
■ Disabled. MFA has not been enabled.
■ Enabled. MFA is enabled, but the user has not registered.
■ Enforced. MFA is enabled, and the user has registered.
MFA is now configured, and at the enabled user’s next log in, he or she will be required to register for MFA.
Using the method described above for changing a user’s state to administer MFA has some drawbacks. If you study Figure 1-54, you can that this screen has not been integrated with the Azure portal. Therefore, the administrative experience is different, which can be confusing. The missing integration to the Azure portal also means that you cannot use role-based access control to grant access to administer per-user MFA. Only global administrators can access per-user MFA, and this is unlikely to adhere to the principle of least privilege in most organizations. Enabling per-user MFA also enables app passwords, which are a legacy form of authentication where the app password is securely stored on the device using the app. App passwords are used for legacy apps that cannot support MFA, where the app returns the app password to the Microsoft cloud service and MFA is bypassed. Microsoft does not recommend the use of app passwords to access cloud services because they can be difficult to track and ultimately revoke.
■ If your organization does not have premium-tier Azure AD licenses and per-user MFA does not fit your organization’s requirements, you also have the option to use the enable by security defaults method. Microsoft has created a set of preconfigured security settings to protect organizations against attacks such as phishing, password spray, and replay. These settings are grouped with the security defaults:
■ All privileged access Azure AD administrators must perform MFA on every log in. This includes the following administrative roles: Global, SharePoint, Exchange, Conditional Access, Security, Helpdesk, Billing, User, and Authentication.
■ All users must register for MFA. MFA for non-administrative users is performed when necessary, such as accessing a service through a new device, or when the user’s refresh token expires.
■ MFA is required for any user accessing the Azure Resource Manager API through the Azure portal, PowerShell, or CLI.
■ Legacy authentication protocols such as app passwords are blocked.
Once enabled, all the security defaults listed above are applied automatically to the tenant, and you cannot choose a subset of them. The defaults are fully managed by Microsoft, which means they might also be subject to change.
To enable security defaults, navigate to the top of the Azure portal and search for azure active directory in the resource name search bar at the top of the page. Select Azure Active Directory from the drop-down menu that is displayed as you type the name of the resource and follow these steps to enable security defaults:
Azure AD opens with Overview selected in the Azure Active Directory menu. From the same menu, click Properties.
At the bottom of the Properties page, click Manage Security Defaults. The Enable Security Defaults blade appears.
On the Enable Security Defaults blade, enable Enable Security Defaults by moving the slider control to Yes and click Save.
Note Security Defaults
If your tenant was created after October 2019, security defaults might already be enabled for your tenant. Security defaults cannot be enabled if your tenant has at least one conditional access policy enabled. See “Implement Conditional Access including MFA,” later in this chapter for information on conditional access policies.
Need More Review? Azure Multi-Factor Authentication
To learn about enabling and deploying Azure Multi-Factor Authentication, visit the Microsoft Docs article “What are security defaults” at https://docs.microsoft.com/en-us/azure/active-directory/fundamentals/concept-fundamentals-security-defaults and “Configure Azure Multi-Factor Authentication settings” at https://docs.microsoft.com/en-us/azure/active-directory/authentication/howto-mfa-mfasettings. Note the second article is also recommended for the next four sections.
Configure fraud alerts
If a user account that is protected by MFA is accessed fraudulently, users will be contacted via their verification methods, even though they did not initiate the access. This allows users to know that the fraudulent log-in attempt is occurring. By configuring fraud alerts, you enable the users to report fraudulent attempts automatically and to lock their accounts to prevent further access attempts. To configure fraud alerts, open the Azure portal and follow these steps:
Search for azure active directory in the resource name search box at the top of the portal and press enter to select Azure Active Directory from the drop-down menu that is displayed when you type the resource name.
Click Security in the menu blade and then click MFA in the Security blade. Click Fraud Alert in the MFA blade.
The Fraud Alert blade opens, as shown in Figure 1-55. To enable fraud alerts, set Allow Users To Submit Fraud Alerts to On.
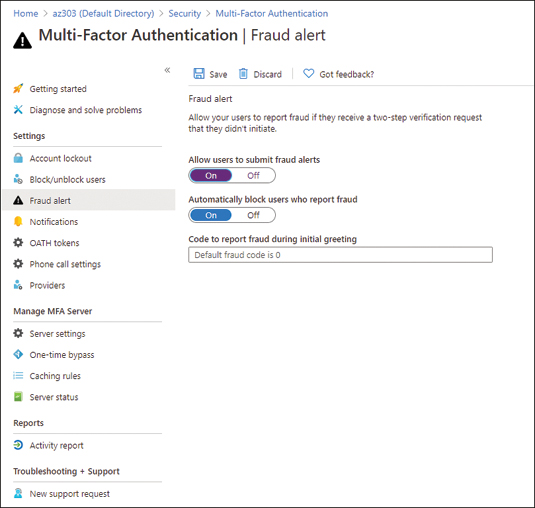
FIGURE 1-55 Enabling fraud alerts for MFA in the Azure portal
Automatically Block Users Who Report Fraud is set to On by default. This will block the user’s account for 90 days or until an admin can unblock it.
Code To Report Fraud During Initial Greeting is set to 0 by default. This enables users who use call verification to report fraud.
Click Save at the top of the Fraud Alert page. Fraud alerts are now configured.
The fraud alert can be triggered by the user when using the Authenticator App (see “Configure verification methods,” later in this chapter) or via call verification. If a user’s account is blocked by triggering a fraud alert, an administrator needs to unblock the user before he or she can log in again. To unblock a user, follow these steps:
Search for azure active directory in the resource name search bar at the top of the portal and press Enter to select Azure Active Directory.
Click Security in the Menu blade, and then click MFA in the Security blade. In the MFA blade, click Block/Unblock Users. A list of blocked users is shown in Figure 1-56.

FIGURE 1-56 Unblocking a user whose log in was blocked after triggering a fraud alert
Click Unblock, enter a Reason For Unblocking, and click OK. The user is now unblocked.
If a user triggers a fraud alert, an email notification is sent to all email addresses that have been added to the Notifications configuration section of the Multi-Factor Authentication page. This section is located under the Security menu item for Azure Active Directory.
Configure bypass options
Two-step verification relies heavily on the user being able to receive the code notification via SMS messages or phone calls. These notifications might not be possible, for example, if one of your organization’s facilities is underground or the user has lost his or her phone. In this instance, you need to recommend a secure way to bypass MFA. In Azure MFA, this is achieved with a one-time bypass that allows an administrator to set up a short window during which a user can log in with just his or her password. To see this feature in action, follow these steps in the Azure portal:
Search for Azure Active Directory in the resource name search box at the top of the portal and press Enter to select Azure Active Directory.
Click Security in the menu blade and then click MFA in the Security blade. Click One-Time Bypass in the MFA blade.
Note that Default One-Time Bypass Seconds is set to 300, which means each user gets 5 minutes to complete his or her log in.
Click Add.
In the User field, add the user’s email address that is being used for the log in. You can override the bypass time in the Seconds box (possibly to something shorter). Under Reason, provide a reason for the bypass, such as “Working underground.”
Click OK. The user who was given a one-time bypass is added to the Bypassed Users list, as shown in Figure 1-57.

FIGURE 1-57 The One-Time Bypass blade
Note that an administrator can also cancel the request before the time expires, as shown in Figure 1-57.
Configure trusted IPs
Throughout the last three sections, you have been exploring the configuration of Azure MFA by using the enable by changing state method. This method requires a user to two-step verify for every log-in they perform. If a user is logging in from a workstation within your organization’s intranet, it is highly likely that this is a valid access attempt. If you configure a trusted IP for this location, two-step verification will be bypassed for every log-in initiated from that IP. To enable trusted IPs using Azure MFA service settings, work through the following steps in the Azure portal:
Search for azure active directory in the resource name search box at the top of the portal and press Enter to select Azure Active Directory.
Click Users in the menu blade, and then click the ellipses in the top menu. Click Multi-Factor Authentication in the drop-down menu.
The Multi-Factor Authentication page opens on the Users tab. Click the Service Settings tab to open the Service Settings page, as shown in Figure 1-58.
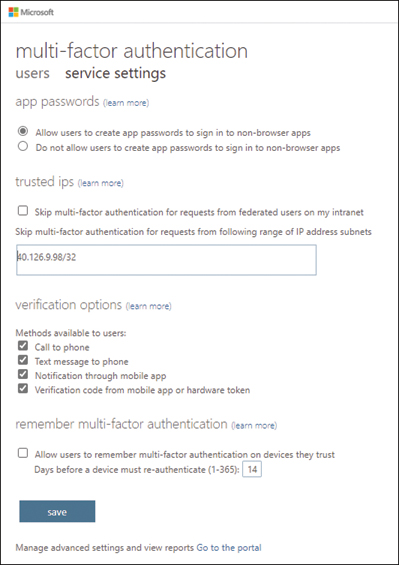
FIGURE 1-58 Configuring Trusted IPs for MFA on the Service Settings page
In the Trusted IPs box add the IP address or address range using CIDR notation. The example in Figure 1-58 sets just a single IP address. The Skip Multi-Factor Authentication For Requests From Federated Users Originating From My Intranet is for organizations utilizing single sign-on (SSO) through Active Directory Federation Services (ADFS).
Click Save, and then click Close on the Updates Successful screen. Trusted IP is now configured.
Note Trusted IPs
This method of trusted IPs only supports IPv4.
Exam Tip MFA and Trusted IPs
This method of configuring trusted IPs is not the method recommended by Microsoft. The recommended configuration is covered in the section, “Implement Conditional Access including MFA,” later in this chapter. Therefore, if a question involves trusted IPs, it is likely regarding Conditional Access.
Configure verification methods
So far in this skill, you have seen SMS and phone calls as the main methods for the second part of two-step verification. These are the defaults given to users when they register for MFA. There are however, four methods of verification available to a user:
■ Call to phone. An automated phone call. The user presses # on the keypad to verify the log in.
■ Text message to phone. Sends a verification code in a text message. The user enters the code into the log-in screen when prompted to verify the log-in.
■ Notification through mobile app. Sends a push notification to the Microsoft Authenticator app on the user’s mobile. The user chooses Verify in the notification.
■ Verification code from mobile app or hardware token. An OATH code is generated on the Microsoft Authenticator app every 30 seconds. The user enters this code into the log-in screen when prompted to verify the log in.
By default, all four verification methods are available to a user when MFA is enabled. However, a user must choose to specifically enable use of the Microsoft Authenticator app through the My Apps portal. To see how this process works, add a user to Azure AD and use this user’s credentials to log in to the My Apps portal (https://myapplication.microsoft.com). Now follow these instructions within My Apps:
Click on the avatar at the top right and then select View account.
The Profile page is displayed for the logged in user. Click Additional Security Verification in the top-right Security Info widget.
The user will be asked to sign in again as an extra security measure.
The user can set up their preferred method of verification at the top of the page. In the How Would You Like To Respond section, the user can select from the verification methods that have been enabled for MFA.
Once the user has completed their choices, click Save, and they will be asked to log in and verify once more to save the changes.
To configure the verification methods available to a user, follow these steps in the Azure portal:
Search for azure active directory in the resource name search bar at the top of the portal and press Enter to select Azure Active Directory.
Click Users in the menu blade and then click the ellipses in the top menu. Click Multi-Factor Authentication in the drop-down menu.
The Multi-Factor Authentication page is opened to the Users tab. Click Service Settings to open the Service Settings page.
The Verification Options box on the Service Settings tab shows the available verification methods. Select or deselect the options as required.
Click Save and then click Close on the Updates Successful screen. The updated verification methods are now configured.
Implement and manage guest accounts
Azure AD brings guest access to your tenant with Azure AD business-to-business (B2B) collaboration. Through Azure AD B2B, access to services and applications can be securely shared. The external users do not have to be part of an Azure AD; they can use their own identity solutions, which means there is no overhead for your organization’s IT teams. Adding guest users to your Azure AD is done by invitation through Azure portal. To explore how this works, follow these steps:
Search for azure active directory in the resource name search bar at the top of the portal and press Enter to select Azure Active Directory.
In the Azure AD menu blade, click Users > New Guest User.
You may now enter the guest user’s information:
■ Name. The first and last name of the guest user.
■ Email Address (Required). The email address of the guest user. This is where the invite is sent to.
■ Personal Message. Include a personal welcome message to the guest user.
■ Groups. You can add the guest user to any existing Azure AD groups.
■ Directory Role. Direct assignment of administrative permissions if required.
Once you are happy that the guest credentials are correct, click Invite.
You are taken back to the list of all users in your tenant. Look at the row for the guest user you just added. The User Type is set to Guest and the Source is set to Invited User, as you can see in Figure 1-59. In this example, the invited guest user is az303.guest@protonmail.com. In the Source column shown in Figure 1-60, a value of Invited User is displayed, which shows that the user has not yet accepted the invitation and logged in.
The user receives an invite email with a Get Started link. The user logs in with the credentials for the Microsoft Account of the same username or is prompted to create a new account.
The user must grant the directory access to read a minimal amount of the user’s data, as shown in Figure 1-59. Once the user clicks Accept, the account is added to the directory.

FIGURE 1-59 Review permissions for a user accepting an invitation to be a guest
■ The user’s Source will now be listed as Microsoft Account. An example of this is shown in Figure 1-60 for the az303.b2b@gmail.com user.
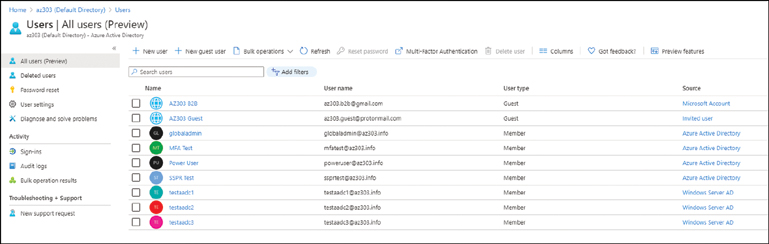
FIGURE 1-60 Guest user source types from Azure AD
Note B2B Federation
In the previous procedure, step 6 requires the guest user to have a Microsoft Account to log in. It is possible to federate your Azure AD to Google or other external providers through Direct federation(preview), which enables the user to have the same username and password. This set up is beyond the scope of the exam, though it is something to be aware of.
Managing guests within Azure AD can be performed with Azure AD access reviews. Access reviews are a part of Identity Governance, which is a set of features that are part of the paid Azure AD Premium P2 SKU. Azure AD Access reviews cover group memberships and applications. Role and resource-based access reviews are part of Azure AD Privileged Identity Management (PIM).
Azure AD access reviews ensure that each user reviewed still requires their access. This is done by asking the user or a decision maker if the access is still appropriate. Because the review is performed over an Azure AD group or application, access reviews are not just for guest access. The user who creates the access review must be assigned a Premium P2 license and be a Global Administrator.
To explore Azure AD access reviews to manage guest users, walk through the following process in the Azure portal. Note for this walkthrough, an Azure AD group has already been created containing two guest users:
Search for azure active directory in the resource name search box at the top of the portal and press Enter to select Azure Active Directory. Click Identity Governance in the Azure Active Directory menu, which opens the Identity Governance menu.
In the Identity Governance menu, the Access Reviews section might be unavailable. To enable Access Reviews, you must click Onboard on the Identity Governance menu. If you have more than one directory with Premium P2 licenses, you can choose the directory to onboard. Click Onboard Now to allow the use of access reviews in the selected directory. Note if you do not onboard, you will receive a message stating that you do not have access to create an access review and to contact your global administrator.
Go back to the Azure portal and click Identity Governance in the menu blade.
The Getting Started blade opens. On the right of this blade, click Create An Access Review. The options for creating an access review are shown in Figure 1-61.
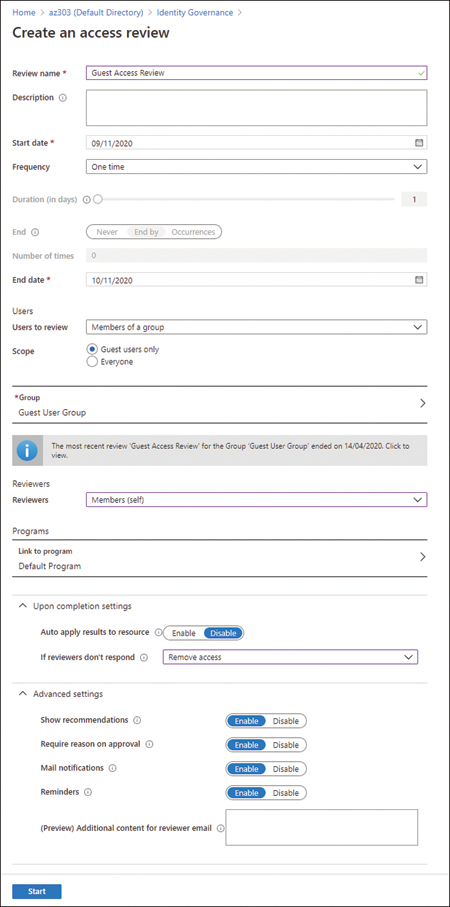
FIGURE 1-61 Creating a guest-management access review
■ Review name. Mandatory name for the review.
■ Description. A brief description of the review.
■ Start Date. Mandatory start date of the review.
■ Frequency. You can choose between One-Time, Weekly, Monthly, Quarterly, or Yearly reviews. Choose One-Time.
■ Duration And End. If the frequency is not yearly, choose when to end a repeating review.
■ Users To Review. Assigned to an application or members of a group. For this explanation choose Members Of A Group.
■ Scope. This is key for managing guest users; you can choose from all users in the group or application, or you can just choose guest users. Choose Guest Users Only.
■ Group. Choose the group to review. If Users To Review had been set to Assigned To Application, an application name selector would appear instead. Select the Azure AD group you created for this walkthrough and choose some guest users. If you had created a review for this group previously, a banner stating this is displayed underneath the group, as shown in Figure 1-61.
■ Reviewers. Drop-down menu of choices:
■ Group Owners. The owner of the group who reviews on behalf of the members.
■ Selected Users. Users selected from within the group.
■ Members (Self). The group members themselves.
Choose Members(Self). This will trigger an email to the users in the group to review their own access.
■ Programs. Allows you to create programs to collect data for specific compliance requirements. Leave this set to the default setting.
■ Upon Completion Settings. Options for automated actions on the completion of a review:
■ Auto Apply Results To Resource. If a review comes back that a user no longer requires access, it will be automatically removed.
■ If Reviewers Don’t Respond. You can choose to remove or approve access, or you can leave your access settings as is. Choose Remove Access.
Once you have set up the access review options, click Start. You are returned to the Access Reviews blade, and your new review will be listed as Not Started. You can click the listed access review to edit the settings, to delete it, or to view the status of each user’s review.
The access review will remain shown as Not Started until the start date is reached. The Review Status will change to Initializing as Azure sends out review notification emails to those selected as reviewers. Once the notifications are sent, the status shifts to Active.
When the notification email is received, you will see a Review Access link. When you click the link, the user or selected reviewer logs in and can review his or her access or the access of others in the group. If the review is a self-review, the user is asked whether he or she still requires access to the group or application. The user chooses Yes or No and fills in a reason for why the access is needed, which is reflected in the access review Results, as shown in Figure 1-62.

FIGURE 1-62 Reviewing the access review results in Azure portal
In this example, the az303.guest user has selected that he or she no longer requires access and has been automatically denied access based on the selection. The az303.b2b user has not logged in for 30 days, therefore, access would been automatically denied. If the az303.b2b user responds within the review period stating they still require access, access is restored.
Note Conditional Access
Microsoft recommends using conditional access with MFA for a B2B user log in. This can be performed by choosing All Guest Users in the Assignments section. For more details, see “Configure verification methods,” earlier in this chapter.
Configure Azure AD Identity Protection
Microsoft deals with millions of logins from Azure AD, Microsoft Accounts, and Xbox every day. Machine learning provides risk scores for each log in, and these risk signals are fed into Azure AD Identity Protection to provide three key reports:
■ Risky Users. The probability that the account has been compromised.
■ Risky Sign-Ins. The probability that the sign-in was not authorized by the account owner.
■ Risk Detections. This is displayed when a P2 license is not available to show that either of the above two risks have been triggered.
Azure AD Identity Protection provides real-time data in the form of a security overview in the Azure portal. To access the Security Overview, navigate to Azure AD > Security > Identity Protect in the portal, as shown in Figure 1-63.

FIGURE 1-63 Identity Protection overview summary from the Azure portal
This is a new tenant with a scarce amount of data. The documentation states that Azure AD takes approximately 14 days of initial learning to build a model of your user’s behavior. The top chart in Figure 1-63 displays the users who have been identified as risky. The bottom chart shows the number of risky sign-ins per day. This information can also be accessed via Microsoft Graph Azure AD Identity Protection APIs.
From the Identity Protection menu blade, scroll down to Notify. Here, you can configure two types of email notification:
■ Users At Risk Detected. Set one or more admins (all global admins added by default), to receive an email alert based on Low, Medium, or High alert risk level.
■ Weekly Digest Email. This is a summary of at-risk users, suspicious activities and detected vulnerabilities.
The users at-risk email contains a link to the risky users report; an administrator can access this report directly at Azure AD > Security > Identity Protection > Risky Users. As shown in Figure 1-64, the report shows a list of risky users, as well as their risk states and levels.

FIGURE 1-64 The risky users report from Azure AD Identification Protection
Note that in Figure 1-64, the actions that can be performed directly from the report: Reset Password, Confirm User Compromised, and Dismiss User Risk. These enable you to provide feedback on the risk assessments to Azure AD Identity Protection.
At the top of the Azure AD Identity Protection menu blade in Azure portal, there are three default policies that can be enabled to support Identity Protection:
■ User Risk Policy. This is dependent on the user’s risk level (Low, Medium, or High). The risk level for a User Risk Policy is the condition. You can choose to either block or allow access based on the condition. If you are allowing access, you have the option to enforce MFA.
■ Sign-In Risk Policy. This is dependent on the user’s sign-in risk level (Low, Medium, or High). The risk level for a Sign-in Risk Policy is the condition. You can choose to either block or allow access based on the condition. If you are allowing access, you have the option to enforce MFA.
■ MFA registration policy. When enabled, this policy forces the selected users or groups to use Azure AD multifactor authentication.
Each of these policies can be set for a subset of users, for groups, or for all users. These policies have limited customization. If you need more control, you can use a conditional access policy. Conditional access policies are covered in the next section.
Implement Conditional Access including MFA
Until now, our discussion of MFA configuration has concentrated on MFA that is enabled per user by changing the user’s state, or against a specific feature such as sign-in risk. This can be inflexible because it requires a second verification step being forced at every log in, regardless of the risk level of the information being accessed. Conditional Access gives you a framework to architect an access strategy for the apps and resources your organization uses, tailoring it to meet the resource access needs of your organization.
Conditional access is a P2 Premium Azure AD feature, which can be found in the Azure Active Directory under the Security section of the Azure AD menu blade. When you look at conditional access the first time, you will see that a set of policies are displayed. These are the baseline policies; they are legacy policies and should be ignored. You should create your policies from scratch.
Conditional access is highly configurable. To see how configurable, the following example looks at setting up conditional MFA. The use case for this example is: “If a log-in from a user in a specific group is outside the head office, an MFA, a domain joined machine, or a compliant device from Microsoft Intune is required.” You will explore the other conditional access options available on each blade.
Note Conditional Access
If you still have per-user MFA configured from the previous section, you will need to disable it. Conditional Access is overridden by per user MFA.
In this example, before creating a conditional access policy, you must first create a named location to simulate your head office. In the Conditional Access menu blade in the portal, click Named Locations and then follow these steps:
Click Add Named Location.
Enter a Name for the location; for this example, enter Head Office.
Select Mark As A Trusted Location, which will automatically lower sign-in risk for users who are logging in from this location. You will explore this later in this section.
In the IP Ranges field, enter the CIDR notation for the IP address you are currently using. Click Create.
The named location is created and is ready to be selected in the conditional access policy. To create the policy, stay in the Azure portal and select Conditional Access in the Security menu blade. Follow this walkthrough to create the use-case policy and explore the options on the blades, as shown as Figure 1-65.

FIGURE 1-65 The Conditional Access blades for assignments in the Azure portal
Click New Policy; the first blade in Figure 1-65 is displayed with each section set to 0 selections.
Click Users And Groups. In this blade (see Figure 1-65), the users to be included or excluded are displayed. For the example, the use case is: “Include users who are part of a specific group.” Click Select Users And Groups to select the group. Click Done.
Click Cloud Apps Or Actions. Here, Microsoft apps, such as Microsoft 365, your own applications, or third-party applications that have been integrated with Azure AD can be selected. The use case states, “any log in” and does not refer to specific applications, so select all cloud apps and click Done.
Click Conditions. Information about the login conditions being used is passed in from Azure:
■ Sign-in risk. Filter to Low, Medium, or High (as described earlier in this chapter in “Configure Azure AD Identity Protection.” For this example, leave Configure set to No.
■ Device platforms. Include or exclude based on the operating system type: Android, iOS, Windows, or macOS. For this example, leave Configure set to No.
■ Location. Include or exclude named and/or trusted locations. Part of the use case is to exclude the head office. Set the Location to exclude Head Office. (You created the head office location in the previous set of steps.)
■ Client Apps (Preview). Include or exclude based on the type of client application being used for the login. For this example, leave Configure set to No.
■ Device State. You can choose to exclude domain-joined or Microsoft Intune devices that are marked as compliant. For this example, leave Configure set to No.
Multiple conditions can be combined to filter to a specific set of circumstances. Click Done.
On the New blade, you now need to configure the access controls and click Grant. Block Access and Grant Access radio buttons appear at the top of the Grant blade, as shown in Figure 1-66. The use case is to grant access to a user outside the head office if he or she passes MFA or has a compliant device. To configure the Grant policy settings to meet this use case, you will need to set the following:
■ Require Multi-Factor Authentication. Requires a user to perform multifactor authentication. Select this checkbox to meet the use case requirement of “require MFA.”
■ Require Device To Be Marked As Compliant. Requires the user’s device to meet Microsoft Intune–configured compliance requirements. Select this checkbox to meet the use case requirement of “a compliant device from Microsoft Intune.”
■ Require Hybrid Azure AD Joined Device. Select this checkbox to meet the use case requirement of “a domain joined device.”
■ Require Approved Client App. Requires the application the user is accessing to be one of the Microsoft approved client apps. Leave this checkbox unchecked, as it is not part of the use case requirement.
■ Require App Protection Policy. Requires the application the user is accessing to have an enforced app protection policy. Leave this checkbox unselected, as it is not part of the use case requirement.

FIGURE 1-66 The Grant blade for creating a conditional access policy
The use case states that only one of the controls needs to be met; therefore, set Multiple Controls to Require One Of The Selected Controls. Click Select.
Click Session. This limits the access within specified Microsoft 365 applications. This is not required for the use case. Close the Session blade.
The use case requirement is now fulfilled; click Create to create the access policy.
The new policy is listed in the Policies blade. To test the policy, log in to My Applications (https://myapplications.microsoft.com) from the IP address set in the named location. You will need to perform this log in as one of the users who is part of the group selected in step 2 of this walkthrough. You are logged in correctly because this simulates logging in from the head office.
Now try logging in from your phone on mobile data; you will be asked to verify using MFA because conditional access flags the login as coming from outside the office.
To help troubleshoot conditional access policies, click the What If button on the Conditional Access blade. Here, you can see which conditional access policies will apply under various conditions.
Need More Review? Conditional Access
To learn about implementing conditional access, including MFA, visit the Microsoft Docs article “Conditional Access documentation” at https://docs.microsoft.com/en-us/azure/active-directory/conditional-access/.
Skill 1.7: Implement and manage hybrid identities
Most organizations will have an on-premises identity solution in which applications span on-premises and in the cloud resources. Managing the users who access these apps can be challenging. As an architect you need to look to solutions that allow your users to have one set of credentials regardless of where their applications are housed. The identity solutions from Microsoft have cloud-based and on-premises capabilities. This creates a hybrid identity, which is a single common identity for authentication and authorization across locations. Active Directory on Windows Server is Microsoft’s on-premises identity provider. The identities within Active Directory can be synchronized to Azure AD using Azure AD Connect, which creates a common identity for authentication and authorization to all resources, across all locations.
This skill covers how to:
The walkthroughs in this skill require a domain controller so that a synchronization can be set up from Active Directory to Azure AD. If you have no prior experience working with Azure AD Connect, we recommend that you set up an environment to work through the process. This might seem daunting, but at a high level, it can be achieved in Azure with three steps:
Purchase a domain name and follow the instructions in Skill 1.6 to add a custom domain name and make it the primary domain in your Azure AD tenant.
Use the Azure Quick Start template to create a domain controller in Azure (https://github.com/Azure/azure-quickstart-templates/tree/master/active-directory-new-domain). Click Deploy To Azure and then use the following parameters:
■ Basics. Enter a resource group name and choose a location.
■ Settings. Choose an admin username and password. For Domain Name, enter the domain name you purchased in step 1. For DNS Prefix, enter something that will be unique. Leave everything else set to the defaults.
Click Purchase.
Once deployed, RDP to the load balancer’s public IP. Log in as the admin user you created in step 2. Server Manager will open automatically. Click Tools > Active Directory Users And Computers and create some users. You might want to create a new organizational unit (OU) in which you can place your test users when you explore Azure AD Connect filtering in the next section. Make sure one of the users is an Enterprise Admin.
Your domain controller in Azure will act as if it were on-premises.
Install and configure Azure AD Connect
Azure AD Connect is a tool that provides synchronization of identity data from on-premises domain controllers to Azure AD. It is a lightweight agent that can be installed on Windows Server 2012 or above. Azure AD Connect can even be installed on the domain controller itself, though this is not the best practice. Azure AD Connect works over a standard internet connection, and you do not need to set up a site-to-site VPN or Express Route. To explore the setup further, follow these steps:
Open the Azure portal, search for azure active directory in the resource name search bar at the top of the portal, and press Enter to select Azure Active Directory. Click Azure AD Connect in the menu blade. On the Azure AD Connect blade, click Download Azure AD Connect; this is the Azure AD Connect Agent. Copy the downloaded AzureADConnect.msi file to the server you will be installing from. For this walkthrough, you will be installing onto the domain controller.
Double click the AzureADConnect.msi file that you just copied to the server to start the installation. Agree to the license terms and click Continue.
The default installation of Express Settings is displayed in Figure 1-67. This process is automatic and will install Azure AD Connect using defaults. Click Customize, which will give you full control over the installation process, including the synchronization method.

FIGURE 1-67 The automatic install process for Express Settings in Azure AD Connect
The Required Components screen provides you with a choice to use previously installed components. Leave these set to their default settings (not selected). Click Install. The required components will now install.
■ Custom Install Location. Choose where the Azure AD Connect agent files will be installed.
■ Existing SQL Server. You can specify a database server to house the Azure AD Connect database if you already have an SQL installation.
■ Service Account. You may already have a service account set up, though it will require the Log on as a service permission and that you are a system administrator on your chosen SQL server.
■ Custom Sync Groups. Local groups to the server.
The User Sign-In screen lists the synchronization options available, as shown in Figure 1-68. You will explore these in “Identity synchronization options,” later in this chapter. Leave Password Hash Synchronization enabled. The Enabling Single Sign-On setting will also be explored in “Configure Single Sign-On,” later in this chapter. For now, don’t click this option. Click Next.

FIGURE 1-68 Choosing the sign-in method for users in Azure AD Connect
The connection to Azure AD requires global administrator credentials. Enter these credentials and click Next.
The Connect To Azure AD screen allows you to choose which directory type you want to connect. Choose the forest and click Add Directory, as shown in Figure 1-69. You now need to create an account with permissions to periodically synchronize your Active Directory. Under Select Account Option, leave Create New AD Account selected and enter enterprise admin credentials. This process is shown in Figure 1-69. Click OK.

FIGURE 1-69 Azure AD Connect directory connect and enterprise admin log in
You are returned to the Connect Your Directories screen, as shown in Figure 1-70. The directory you just added is listed under Configured Directories. Click Next.
Azure AD Connect will now list the UPN Suffixes from your on-premises Active Directory, as displayed in Figure 1-70. For a user to log in without error, the custom domain in Azure AD must match a UPN suffix in the on-premises environment. You cannot use the tenant’s default *.onmicrosoft.com domain name. When a UPN Suffix and Azure AD Domain match, it is marked as Verified in the Azure AD Domain column (see Figure 1-70).
In the past, many Active Directories were set up with .local as the domain. If your Active Directory is set up this way, you must add a UPN suffix to your forest, which must match the custom domain in Azure AD. This might also mean the selector for User Principal Name (UPN) is incorrect. The UPN will be taken as the username for the Azure log in. The UPN must have a suffix as verified in the list in Figure 1-70; otherwise, your users will not be able to log in. If the Active Directory UPN Suffix and Azure AD Domain do not match—for example, from a historical .local domain—you might need to use a different attribute, such as email address, for your user principal name. Click Next.

FIGURE 1-70 Azure AD Connect Sign-In Configuration verification
You may now choose which parts of your directory to synchronize. The default is to select all domains and OUs. However, you should filter for two reasons:
■ You do not want to waste expensive Azure AD licenses on non-user accounts.
■ You do not want to synchronize high-privilege accounts or service accounts to Azure AD unless necessary.
Choose Sync Selected Domains And OUs, and then select the OUs where your users reside, as shown in Figure 1-71. Click Next.

FIGURE 1-71 Azure AD Connect Domain And OU Filtering
On the Uniquely Identifying Your Users screen, click Next to continue. By default, Azure AD Connect uses the UPN attribute to identify your local AD accounts individually. In larger organizations that plan to synchronize users across AD domains and forests, you might need to choose another AD schema attribute to resolve account name conflicts.
Filter Users And Devices is used for a piloting phase of Azure AD Connect. If you want to pilot a subset of users, create a group in your on-premises AD and enter the group name at this point. Leave this selection set to Synchronize All Users And Devices. Click Next.
On the Optional Features screen, click Next. You will explore these features in the next four sections of this skill.
The Ready To Configure screen shown in Figure 1-72 displays the synchronization that has been set up on your server. Choosing Start The Synchronization Process When Configuration Completes will start synchronization as soon as the configuration is complete.
If you select Enable Staging Mode: When Selected, Synchronization Will Not Export Any Data To AD or Azure AD, changes to Azure AD Connect will be imported and synchronized, but they will not be exported to Azure AD. This means you can preview your changes before making your synchronization live. Once installed, to leave staging mode, you will need to edit your Azure AD Connect configuration and turn off staging mode, which will start synchronization. Click Install. Azure AD Connect will now install and start to synchronize your users to Azure AD.
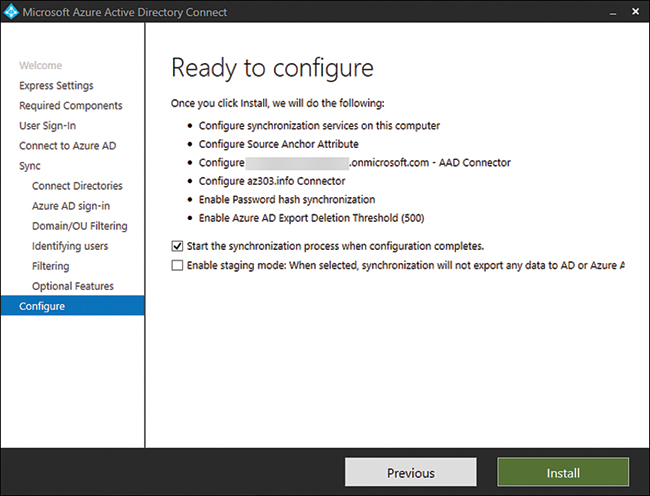
FIGURE 1-72 Azure AD Connect Ready To Configure
You can now verify your users have synchronized to Azure AD by switching to the Azure portal. Search for azure active directory in the resource name search bar at the top of the portal. After clicking Users in the menu blade, you should now see your users listed, as shown in Figure 1-73. In the Source column, synchronized users are shown with Windows Server AD.

FIGURE 1-73 Synchronized users are identified with Windows Server AD.
Click any of the users who have synchronized from an on-premises Active Directory. You can see from Figure 1-74 that most of the detail cannot be edited because it is unavailable. Only items that are used in the cloud are available, such as Usage Location. The Windows Server Active Directory is the master directory. If edits are to be made, they must be made on-premises.

FIGURE 1-74 Only cloud items are editable.
Exam Tip User Privileges for Azure AD Connect
You might be required to explain the types of user privileges that are required to set up Azure AD Connect (global administrator and enterprise administrator).
Need More Review? Install AD Connect
To learn about installing Azure AD Connect, visit the Microsoft Docs article “Custom installation of Azure AD Connect” at https://docs.microsoft.com/en-us/azure/active-directory/hybrid/how-to-connect-install-custom.
Identity synchronization options
In the previous section, you learned how to install and configure Azure AD Connect. You set Password Hash Synchronization as the synchronization option. However, there were five other options available. Each of these options has different advantages and therefore, different use cases. As an architect, you need to understand when each option should be used.
■ Do Not Configure. Users can sign in using a federated sign-in that is not managed by Azure AD connect. These sign-ins do not use the same password, just the same username. This should be chosen when a third-party federation server is already in place.
■ Password Hash Synchronization. Users can sign into Office 365 and other Microsoft cloud services using the same password they use on-premises. Azure AD Connect synchronizes a hash of the password to Azure AD, and authentication occurs within the cloud. This method should only be used when storing a user’s password hash in the cloud complies with your organization’s compliance requirements. It is also important to remember that because Azure AD performs the authentication, not all Active Directory policies will be followed. For example, if an account has been expired but the account is still active, Azure AD will still authenticate. Password hash synchronization supports seamless single sign-on.
■ Pass-Through Authentication. Users can sign in to Microsoft cloud services with their own passwords. However, with pass-through authentication, the authentication happens in the on-premises Active Directory. The key benefit of pass-through authentication is that no passwords are stored in the cloud, which can be a compliance requirement for many organizations. Because the authentication happens at the on-premises Active Directory, the AD security and password policies can also be enforced.
■ Federation With AD FS. Federation is a collection of domains that have established trust between them. Trust can contain authentication and authorization. Historically, federation was used to establish trust between organizations for shared resources. Azure AD can federate with on-premises AD FS, allowing users to use their own passwords and use single sign-on (SSO). Federation with AD FS authenticates against the on-premises AD FS server, so no passwords or password hashes are stored in the cloud. AD FS with Azure AD Connect should be used when third-party applications require it and when AD FS is already in use.
■ Federation With PingFederate. This is a third-party alternative to AD FS. This option should be selected for businesses that already use PingFederate for token-based SSO.
![]() Exam Tip AD FS
Exam Tip AD FS
Microsoft recommends that customers move from Federation with AD FS to Pass-through Authentication with seamless SSO where possible. Keep this in mind if you are asked about password methods in the cloud and single sign-on.
Configure and manage password sync and password writeback
With Azure AD self-service password reset enabled, users can unlock their accounts and update their passwords from cloud-based applications. If these users are members of your on-premises Active Directory that is being synchronized using Azure AD Connect to Azure AD, your users might find that their passwords are out of sync.
Password writeback is a feature of Azure AD Connect that writes back password changes in real-time to an on-premises directory. Password writeback is supported by password hash synchronization, pass-through authentication, and ADFS. Password writeback does not require any firewall changes; it uses an Azure service bus relay through the Azure AD Connect communication channel.
Password writeback is a paid feature requiring at least a premium P1 license to be assigned to your users in Azure AD. Password write back must be configured in the on-premises Active Directory and within Azure AD. To configure the on-premises Active Directory, follow these steps through an RDP session to the server to which you will need to sign in as a domain administrator:
Open Azure AD Connect, which has already been installed and click Configure > View Current Configuration. The current Azure AD Connect settings are shown in Figure 1-75.

FIGURE 1-75 Current Azure AD Connect synchronization set up
Note the Account shown at the top right. This is the service account created by Azure AD Connect for the synchronization process. This account needs to have the following permissions added to it for password writeback:
■ Reset password
■ Write permissions on lockoutTime
■ Write permissions on pwdLastSet
■ Extended rights for Unexpire Password on either
■ The root object of each domain in that forest
■ The user organizational units (OUs) you want to be in scope for SSPR
Open Active Directory Users And Computers. Under View at the top, choose Advanced Features. Right-click the root of the domain and choose Properties.
Click the Security tab at the top and then click Advanced. Click Add. The first three permissions should be listed in the Access column of the Permissions Entry pane for the account noted in step 2. The account name from Figure 1-75 should be selected in the Principal. If any are missing, add them.
The last permission listed in Step 2 is achieved by setting Minimum Password Age to 0 in Group Policy. Open Server Manager, click Tools in the top right, and then click Group Policy Management.
Edit the relevant policy for the OU scope of your users. Minimum Password Age is found by selecting ComputerConfiguration > Policies > WindowsSettings > Security Settings > Account Policies. Click OK, close Group Policy Management, and execute gpupdate /force on the command line to force the policy update.
Switch back to Azure AD Connect and click Previous > Customize Synchronization Options. Enter the credentials for a global administrator and click Next.
Click Next twice to get to the Optional Features page. Select Password Writeback, as shown in Figure 1-76, click Next, and then click Configure.
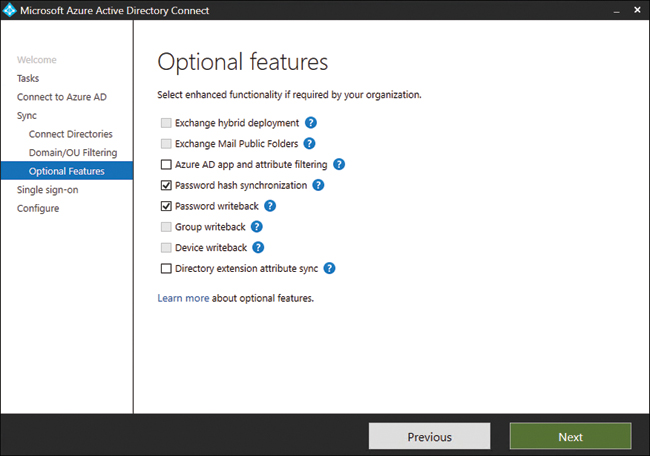
FIGURE 1-76 Selecting Password Writeback on the Azure AD Connect Optional Features
Azure AD Connect will now enable password writeback and configure the appropriate services on the on-premises server.
The final part is to configure self-service password reset (SSPR) to write password changes back to the domain controller. It is assumed that SSPR has already been configured, but if you haven’t enabled it, see “Implement self-service password reset” earlier in this chapter. To configure password writeback with SSPR, sign in to the Azure portal as a global administrator:
Open the Azure portal and search for azure active directory in the search resources box at the top of the portal. Press Enter to select Azure Active Directory and then select Password Reset in the menu blade.
Select On-premises Integration on the Password Reset menu blade. The previous steps 1 to 8 of the last section of enabling password writeback has set Write Back Passwords To Your On-Premises Directory? to Yes. The Your On-Premises Client Is Up And Running message is shown in Figure 1-77.
Optionally, you can change the Allow Users To Unlock Accounts Without Resetting Their Password? setting to No.
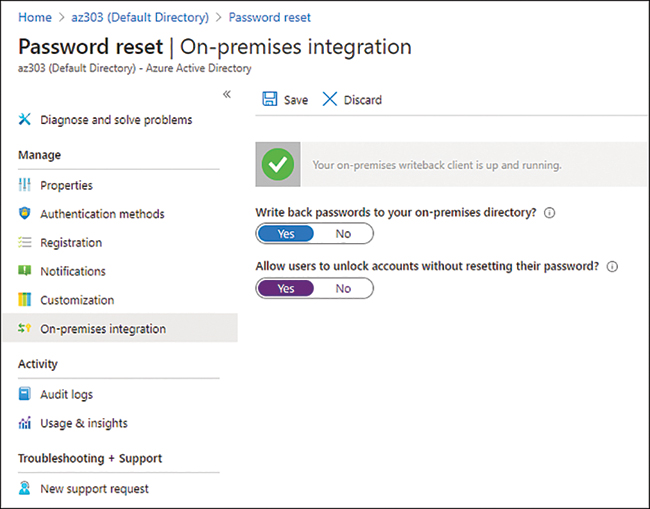
FIGURE 1-77 Enabling password writeback for Azure AD SSPR
Click Save.
Password writeback is now enabled. You can test this by resetting a user’s password using My Apps (https://myapps.microsoft.com) and then logging the user in to a server or workstation on your domain.
Need More Review? Configure Password Writeback
To learn about configuring password sync and writeback, visit the Microsoft Docs article “Tutorial: Enable Azure Active Directory self-service password reset writeback to an on-premises environment” at https://docs.microsoft.com/en-us/azure/active-directory/authentication/concept-sspr-writeback.
Configure Single Sign-On
Your users may now use the same credentials across on-premises and cloud applications; however, they must enter their credentials on every log-in. Azure AD seamless single sign-on (Azure AD seamless SSO) is a feature of Azure AD that automatically signs a user in to their cloud applications without the user having to type the password.
Azure AD Seamless SSO is enabled through a setting in Azure AD Connect. When enabled, a computer account named AZUREADSSOACC is created on the on-premises Active Directory. This computer account represents Azure AD, and the accounts password is securely stored with Azure AD. When users enter their usernames at an Azure AD sign-in page, a JavaScript script runs in the background for the user to access AZUREADSSOACC. The on-premises Active Directory returns a Kerberos ticket to the browser, which is encrypted with the accounts secret. The Kerberos ticket is securely passed to Azure AD, which decrypts the ticket. The Kerberos ticket includes the identity of the user signed in to the device. Azure AD evaluates the ticket and returns an authentication token back to the application or prompts for MFA. On success, the user is signed in to the application.
Azure AD seamless SSO requires the device the user is logged in to to be domain-joined. It also required the sign-in method to be password hash synchronization or pass-through authentication. Azure AD seamless SSO does not support ADFS.
To enable Azure AD seamless SSO on an already installed and configured Azure AD Connect, follow these steps:
RDP to the server where Azure AD Connect is installed. Open Azure AD Connect and click Configure.
Click Change User Sign-In on the Additional Tasks page. Enter the credentials for an Azure AD global administrator account. Click Next.
The User Sign-In page is displayed, which is identical to that shown in Figure 1-68 in “Configure and manage password sync and password writeback.” Select Enable Single Sign-On. Note Enable Single Sign-On is only available if Password Hash Synchronization or Pass-Through Authentication are selected, as these are the supported options. Click Next.
The Enable Single Sign-On page appears, as shown in Figure 1-78. Click Enter Credentials and enter the credentials for a user with domain admin privileges. Click OK. These credentials will be used to configure Active Directory for single sign-on.
You are returned to the Enable Single Sign-On page. Enter Credentials should now be selected. Click Next, and then click Configure.
FIGURE 1-78 Entering domain administrator credentials to Enable Single Sign-On in Active Directory for Azure AD Connect.
Azure AD Seamless SSO is now enabled. To verify this switch to the Azure portal, search for azure active directory in the search resources bar at the top of the portal. In the menu blade select Azure AD Connect. The Azure AD Connect page should now display that Seamless single sign-on is Enabled as shown in Figure 1-79.

FIGURE 1-79 Verifying Seamless single sign-on is enabled for on-premises in Azure AD.
Although Azure Seamless SSO is now enabled, if you logged in as one of your users on a domain-joined device, you will still be asked for the password. This is because of the Kerberos ticket; a browser will not send the ticket to a cloud endpoint unless it is part of the user’s intranet zone. This means that the ticket is being generated correctly, but it is not getting to Azure AD to be evaluated. To allow the ticket to be passed to Azure AD, you need to add the endpoint to each user’s intranet zone. Also, you to need to allow the JavaScript that returns the Kerberos token permission to send it to the Azure AD endpoint. To achieve this, you need to edit the group policy on the on-premises domain controller, which also means you can gradually roll out this feature. To edit the group policy, do the following on your domain controller:
Open Server Manager, click Tools at the top right and click Group Policy Management.
Edit the appropriate policy for your users. Browse to User Configuration > Policy > Administrative Templates > Windows Components > Internet Explorer > Internet Control Panel > Security Page. Then select Site To Zone Assignment List.
Enable the policy, and then click Show in the Zone Assignments. Set the following:
■ Value name – https://autologon.microsoftazuread-sso.com
■ Value – 1
Click OK, then OK once more.
Staying in the policy editor, browse to User Configuration > Policy > Administrative Templates > Windows Components > Internet Explorer > Internet Control Panel > Security Page > Intranet Zone, and then select Allow Updates To Status Bar Via Script.
Enable the policy and then click OK.
To determine that Azure AD Seamless SSO is functioning correctly, you can log in to (http://myapps.microsoft.com). Make sure you have cleared your browser cache and that you run gpupdate in a command prompt first. If the steps in this section have been followed correctly, you will only need to enter your username but not your password. Instead, you will see the Trying To Sign You In page before you are signed in to MyApps.
If you have set up a test domain controller in Azure for this Skill, you could add a Windows 10 VM to your virtual network and domain join it to your domain controller. You will then be able to complete this test.
Use Azure AD Connect Health
Now that you have configured Azure AD Connect, you need to ensure that the service is reliable. Azure AD Connect Health monitors your Azure AD Connect identity synchronization and uses agents to record the metrics. If you are using password hash synchronization or pass-through authentication, the agent is installed as part of Azure AD Connect. If you are using ADFS, you will need to download an agent from Azure AD. The metrics returned to Azure AD Connect Health are displayed as dashboard components in the Azure AD Connect Health portal. These dashboard components cover usage, performance, and alerts. Azure AD Connect Health is a Premium Azure AD feature, so it requires a purchased SKU.
You can explore the features of Azure AD Connect Health in the Azure portal. Search for azure active directory in the resource name search bar at the top of the portal and press Enter. You will enter Azure Active Directory on the Overview blade. At the top of the overview blade is the Azure AD Connect Health dashboard widget, which provides a quick summary of whether your Azure AD Connect synchronization is healthy. Click the widget, and the Azure AD Connect blade opens. At the bottom, click Azure AD Connect Health in the Health And Analytics section.
Click Sync Errors in the Azure AD Connect Health menu blade. Doing so displays dashboard widget summaries of sync errors from Azure AD Connect, such as attribute duplicates and data mismatches. If errors are listed here, you can click the widget and drill in to investigate further.
Now click Sync Services in the Azure AD Connect Health menu blade. Sync services lists services that are synchronizing on this Azure AD tenant. The Status column displays whether the service is healthy or unhealthy, as shown in Figure 1-80. Clicking the service line will drill into the servers that make up the service, as displayed in Figure 1-80.

FIGURE 1-80 Azure AD Connect Health sync services metrics
Following is a brief overview of the numbered dashboard widget from Figure 1-80:
Sync services from Azure AD Health Connect.
This is a list of servers connected to the service via Azure AD Connect. The list shows whether the synchronization from the servers is healthy. Selecting a listed VM will display a drilled-in view, which is shown on the right in Figure 1-80.
This is shown when drilled through from selecting tile 2. This is a list of all alerts and the export status of the last export from an on-premises Active Directory to Azure AD.
Drilled in from selecting the second tile. By default, this is the latency of the export from an on-premises Active Directory to Azure AD. You can click this chart and edit it to show other connectors. Note the lack of metric points during the night hours on April 13. This shows an unhealthy synchronization during this time period. This was simulated by deallocating the domain controller.
Current alerts from the connected servers. Click the Alerts widget to drill for more information, as shown in Figure 1-81.

FIGURE 1-81 Azure AD Connect Health Sync Alerts
Click an alert to see the full details of the alert and suggested links to help fix the issue. At the top of the Azure Active Directory Connect (Syncs) Alerts page is a Notification Settings link (see Figure 1-81). By default, alerts are emailed to all global admins. Click this link to configure the notification settings.
Chapter summary
■ Azure Security Center and Azure Sentinel give you the ability to monitor the security of your infrastructure.
■ You can implement Log Analytics as a centralized store for your services logging and metrics. You can report from Log Analytics using Workbooks, KQL, and Metrics Explorer through Azure Monitor.
■ Azure Monitor for insights should be used when you require deep insights into the performance of VMs, applications, networks, and containers.
■ Azure Storage can be configured to provide multiple levels of data backup and high availability of data. Azure Storage should be secured using Azure AD authentication where possible.
■ Azure Storage has limits to the amount of IOPS each account can provide. Therefore, when configuring storage for VMs you should check the required IOPS and spread disks across storage accounts where required.
■ Virtual network peering allows communication between networks in Azure without need for a VPN with global VNet peering connecting VNets across regions. When encrypted communications are required between networks in Azure you should consider a VNet-to-VNet VPN.
■ Hybrid identities give your users a common user identity for authentication and authorization both in the cloud and on-premises. If you are looking to use single sign on with hybrid identities but cannot store passwords in the cloud, look to use pass-through authentication.
■ Azure AD Identity Protection is an Azure AD Premium P2 feature that uses Microsoft’s Intelligent Security Graph to detect potential vulnerabilities with your user identities.
■ Use multifactor authentication to prevent malicious actors from accessing accounts by using a second factor of authentication. When implementing multifactor authentication, use conditional access to meet best practice requirements.
■ Infrastructure as Code using Azure ARM templates gives you the ability to automate your infrastructure deployments, thus making them repeatable. When deploying resources using infrastructure as code to store your secrets in Azure Key Vault.
Thought experiment
In this thought experiment, demonstrate your skills and knowledge of the topics covered in this chapter. You can find the answers to thought experiment questions in the next section, “Thought experiment answers.”
You are an Azure solutions architect hired by Wide World Importers to help with a “lift-and-shift” migration of their on-premises VMs into Azure. Wide World Importers currently has no infrastructure in any private cloud; however, it does have enterprise-wide Microsoft 365 usage. During discussions with Wide World Importers, the following items are identified as requirements:
Workloads running in the cloud must be isolated so that communication is private to each workload. The workloads will be managed from a central point. Five of the workloads have identical infrastructure which backs the development process of Wide World Importers’ smart inventory tracking application. These workloads must be removed and re-created with minimum effort.
Wide World Importers has been receiving reports that the users of their .Net-based smart inventory tracking application have been experiencing frequent downtime and exceptions. The developers of the smart inventory tracking application are struggling to find a resolution.
Single sign-on is used for internal application authentication. This requirement must be carried forward, but credential security is a concern.
Admin-level users in Azure need to use strong passwords and another level of authentication. All the admins are smartphone users. All internal application users that are not based in the office must use more than one method of authentication on login.
Considering the discovered requirements, answer the following questions:
1. What would you recommend for deployment of the infrastructure and isolation of communication?
2. Which monitoring tool would be best suited for assisting the developers in troubleshooting their application exceptions and tracking availability?
3. What solution will address Wide World Importers’ credential concerns while continuing to provide single sign-on capabilities?
4. How can the administrative and user account security requirements be met?
Thought experiment answers
This section contains the solution to the thought experiment for this chapter. Please keep in mind there might be other ways to achieve the desired result. Each answer explains why the answer is correct.
1. It is best practice to deploy infrastructure to Azure using infrastructure as code (IaC). Azure resource manager (ARM) templates are the recommended method of deploying to Azure using IaC. An ARM template can be reused for multiple environments using parameters, which meets the criteria for being reusable with minimal effort. VNets isolate network traffic within Azure. By implementing VNet peering using a hub-and-spoke topology, Wide World Importers can isolate workload traffic while maintaining a central hub for maintenance.
2. The key points here are the singular use of the word tool and the types of issues the developers need assistance to rectify. Application Insights is an application performance management (APM) service which analyzes an application in real time. Application Insights supports dotnet, which means the developers can use it for application instrumentation to view the exceptions. Application insights also includes application availability tracking and alerting, enabling development and operations teams to respond to events faster.
3. There was a small clue here in the summary at the top of the previous page. If Wide World Importers already use Microsoft 365, it is possible Azure AD Connect is already being used to synchronize user identities to Azure AD. Azure AD Connect with pass-through authentication provides seamless single sign-on capability. With pass-through authentication, no passwords are stored in the cloud, which addresses Wide World Importers credential security concerns.
4. Azure AD comes with multifactor authentication (MFA) capability for Azure admins. However, conditional access policies are the Microsoft-recommended way of implementing MFA. Conditional access policies can be used to fulfill both the admin and out-of-office user requirements for Wide World Importers. Conditional access requires a Premium P1 Azure AD tier; therefore, Wide World Importers’ AD licenses might need to be upgraded.