PARYS

A RIVER RUNS THROUGH IT
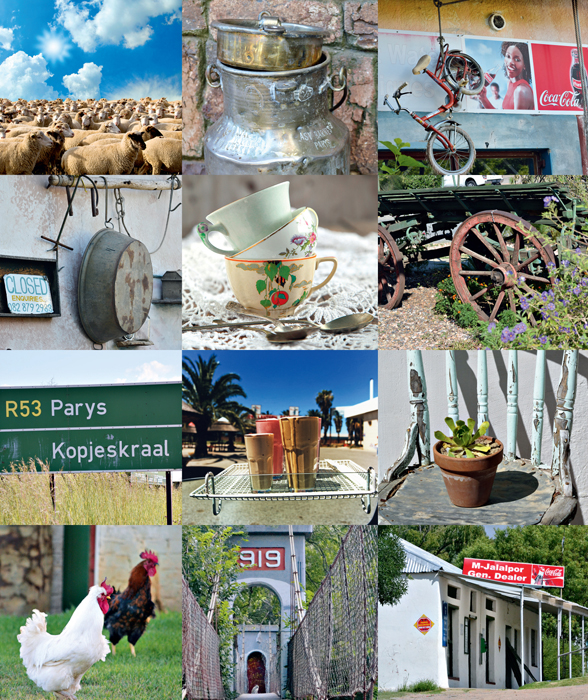
My brother and I had the most wonderful childhood in the Free State town of Parys. When I think of our early years, I see us riding our bikes through the streets of the old, sleepy town, in tune with the rhythm of the mighty Vaal River. We spent a great deal of time swimming in its cool waters, catching tadpoles and playing along its banks.
Life was slow and easy, and mostly revolved around food. Before the days of television or video, we had to entertain ourselves. Weekends were filled with parties, drinking, Sunday luncheons, church bazaars and school sports events.
My mother was always involved somehow. If it was not the sports day or police club dance, then the local high school would ask her to help out with the desserts for the matric dance. She would spend all week making ice creams and fridge tarts and then on the morning of the dance she would get a couple of strong men to load the chest freezer and generator onto the back of the bakkie. Mita, our domestic worker, would spend the morning running from the kitchen to the garage to fill the freezer as the ice creams came off the production line.
As evening approached, my mom and dad would sit on the stoep, sipping on a few whiskeys, waiting for the school to call. When the last roast beef and Yorkshire pudding was served, the telephone would ring, signalling that it was time for my mom to depart. The blue Nissan bakkie would make its way up to the school and then pull up beside the school hall where throngs of waiting standard nines would line up to collect their table’s desserts.
I believe that life remains largely unchanged for the inhabitants of this town, founded in 1870 and named after Paris, a city on the banks of the Seine, along whose waters I have strolled many times. Who would have thought?
Marmite tart
In summer, the willow trees on the banks of the Vaal would bow to the mighty river, their branches hanging over the waters. I played for hours amongst those trees, slipping into the cool water and watching the barn swallows nesting under the bridge. My most treasured memory from my childhood is sitting in my Ouma Engela’s kitchen with a cup of tea and a slice of warm, salty Marmite tart, our feet still muddy from the river. I have all my grandmother’s cookery books, which is where I found this treasure written in her familiar handwriting.
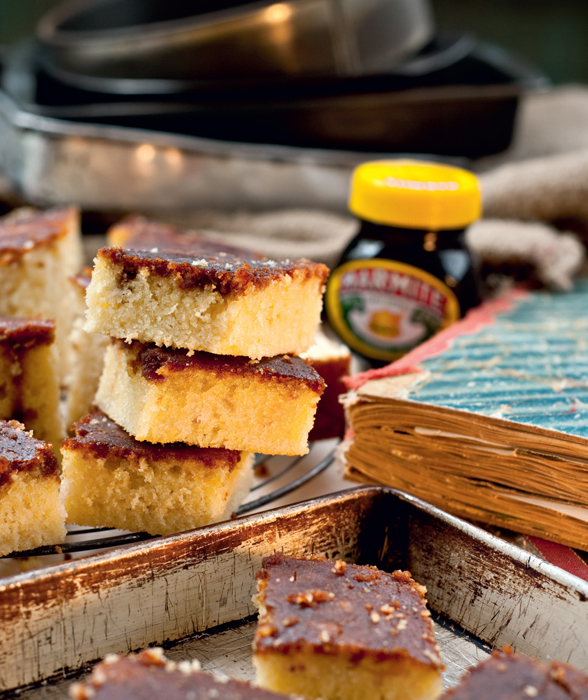
- 200 g salted butter
- 80 ml (1⁄3 C) castor sugar
- 1 egg
- 375 ml (11⁄2 C) cake flour
- 15 ml (1 Tbsp) baking powder
- 2.5 ml (1⁄2 tsp) salt
- 250 ml (1 C) milk
- 45 ml (3 Tbsp) Marmite
- Preheat the oven to 200 °C. Grease a 22 cm square ovenproof dish.
- Cream 100 g of the butter with the sugar until light and fluffy. Add the egg, beating well to incorporate. Sift the flour, baking powder and salt together. Add the dry ingredients to the creamed mixture, alternating with the milk until everything has been combined. Turn the batter into the prepared dish and bake for 25–30 minutes or until a skewer inserted into the centre comes out clean.
- Melt the remaining butter and the Marmite together in a small saucepan over low heat. Remove the tart from the oven and pour over the melted butter and Marmite mixture.
- This tart can be served hot or cold.
Makes 1 small tart.
TIPS
• Make sure you use castor sugar, not regular sugar because the secret of this tart is the fine texture.
• Use only salted butter and not margarine. It makes all the difference.
Slow-roasted shoulder of lamb with rosemary, garlic and aïoli
Sunday lunch in Parys was always a big event, especially in winter. We lived on a farm, aptly named Lazy River Sheep Farm. I am not sure how my father came to choose this name, but it seemed oddly fitting as Sunday was always a day for lying around, reading newspapers and eating!

COOKING TIMES FOR LAMB
Roasting: 10–15 minutes at 230 °C, then 15 minutes for every 500 g
Slow-roasting: 25 minutes at 160 °C, then 25 minutes for every 500 g
- 5 sprigs fresh rosemary
- 75 ml (5 Tbsp) good quality
- olive oil
- 6 cloves garlic, peeled
- 10 ml (2 tsp) whole black peppercorns
- 5 ml (1 tsp) sea salt
- 1.5 kg shoulder of lamb, trimmed
- 1 large white onion, sliced
- 2 cloves garlic, crushed
- 1 fresh bay leaf
- 5 large potatoes, peeled and sliced 1 cm thick
- 500 ml (2 C) hot chicken stock made from a stock cube
Aïoli
- 2 cloves garlic, crushed
- 30 ml (2 Tbsp) good quality
- olive oil
- Salt and freshly ground
- black pepper
- 250 ml (1 C) finely chopped
- fresh parsley
- Preheat the oven to 160 °C. Grease a roasting pan large enough to hold the shoulder of lamb and all the potatoes.
- Roughly crush two sprigs of rosemary with 45 ml (3 Tbsp) of the olive oil, the cloves of garlic, peppercorns and salt using a mortar and pestle to release all the oils in the herbs. Use your hands to rub the mixture all over the lamb.
- Heat the remaining olive oil in a large frying pan over medium heat and sauté the onion and crushed garlic for about 3 minutes. Add the bay leaf and potato slices and cook for a few minutes to release the starch. The potatoes should still be raw. Season well and transfer to the prepared roasting pan.
- Pour the hot stock over the potatoes. Place the remaining sprigs of rosemary on top of the potatoes. Place the lamb directly on top of the rosemary. Cover with baking paper first, then with foil. Seal tightly to prevent steam from escaping. Place in the oven for 21⁄2 hours or until the meat is tender. Remove the foil and baking paper. Increase the oven temperature to 190 °C and roast for an extra 15 minutes or until the lamb is golden brown. Leave to rest for 10 minutes before carving.
- To make the aïoli, place the garlic in a small bowl. Gradually whisk in the oil in a steady stream until emulsified. Season to taste and stir in the parsley.
Serves 4.
Chocolate profiteroles
Profiteroles are sometimes known by their American name, cream puffs. These delicate choux buns are filled with whipped cream and dipped in chocolate. South Africans have the habit of calling anything made from choux pastry an éclair, which is actually a cigar-shaped choux pastry filled with custard and coated in fondant icing.
When I was growing up we had a big yellow dog named Cilla. She was somewhat of a legend in town, where she was better known as the ‘dustbin dief’. There was always a function my mother was roped into catering for and one such Sunday morning Cilla managed to polish off 100 cream-filled pastries before church. I can’t describe here what happened next, but I can tell you that Emile Mandelstam had no dessert at his christening!
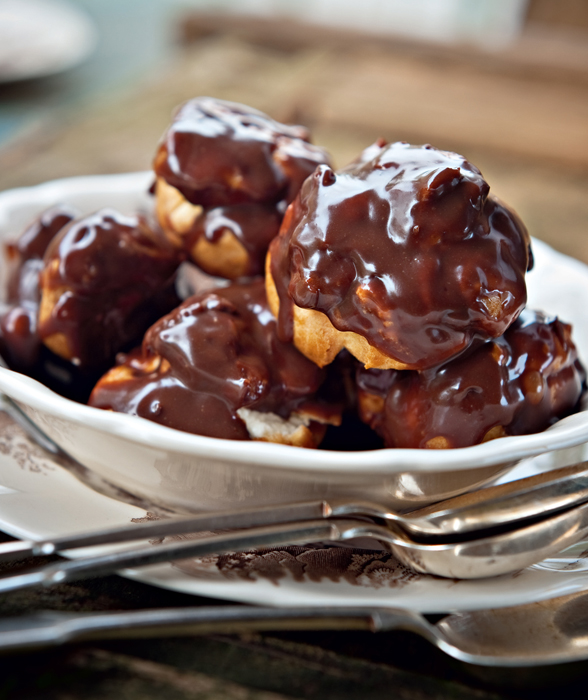
- 250 ml (1 C) water
- 100 g unsalted butter
- 250 ml (1 C) cake flour
- 2.5 ml (1⁄2 tsp) salt
- 4 extra-large eggs, at room temperature
To finish
- 375–500 ml (11⁄2–2 C) fresh cream, depending on the size of the puffs
- 10 ml (2 tsp) vanilla essence
- 25 ml (11⁄2 Tbsp) castor sugar
- 100 g dark or milk chocolate, melted
- Preheat the oven to 220 °C. Grease two large baking trays very well with butter.
- Bring the water and butter to the boil in a medium saucepan. Add all the flour and salt in one go. Stir quickly with a wooden spoon until the mixture comes away from the sides of the saucepan and does not stick to the bottom. Remove from the heat and leave to cool for 10 minutes.
- Add the eggs to the flour mixture, one at a time, beating vigorously with a wooden spoon to incorporate the egg after each addition. The final mixture should hold small peaks and be firm and glossy. Leave to cool.
- Drop teaspoonfuls of the mixture onto the prepared baking trays, spacing them evenly apart. Remember they will puff up so make sure you leave at least 4 cm in between. You can also pipe long cigar shapes from a piping bag fitted with a plain nozzle.
- Sprinkle the baking trays with a little water to create steam and help the choux pastry rise. Bake for 20 minutes. Remove from the oven and quickly cut a tiny slit near the base of each puff to release the steam. Switch off the oven, return the trays to the oven and leave for 5–10 minutes. Remove from the oven and leave to cool completely on a wire rack.
- To finish, whip the cream and then add the vanilla essence and sugar. Spoon the cream into a large piping bag fitted with a plain or open star nozzle. Insert the nozzle into the slit in the puffs that you made earlier to release the steam. Fill the choux puffs or buns. Dip into melted chocolate and leave to set and harden on a wire rack.
Makes about 25 medium profiteroles.
TIPS
• Unfilled choux puffs or éclair buns can be frozen for up to four weeks. Bring frozen buns to room temperature before crisping up in the oven at 180 °C for 5 minutes. Cool and fill. Alternatively, unfilled buns keep well in an airtight container for up to two weeks.
• When assembling choux pastry buns, always fill the pastry with the cream or custard first and then dip the pastry into the melted chocolate, not the other way around.
• It is important to make a little slit in the cooked choux pastry as soon as it comes out of the oven to release the steam, then return the pastry to the oven to ‘dry it out’ for 5–10 minutes. Many recipes do not give instructions for this, leaving the choux pastry to become soft and almost soggy as it cools down. Switch off the oven before returning the pastry to the oven to dry.
• Ideally, when making the pastry, all four eggs should be added. However, at times the mixture becomes saturated and cannot absorb all the egg. This depends on the moisture content of the flour and the size of the eggs.
• If the buns fall flat during baking it is because the mixture was too slack or you did not beat the eggs vigorously enough.
Chicken liver pâté with whiskey and green peppercorns
I first started making this pâté recipe when I was attending Silwood Kitchen School of Cookery. For a time during my studies I cooked at the Laborie restaurant in Paarl and it may have been there that I came across this pâté. Over the years the recipe has changed somewhat and today I use whiskey to flavour the liver and also add green peppercorns. It is truly a wonderful pâté, but very rich. It is excellent for functions because you can make the pâté ahead of time and freeze it.
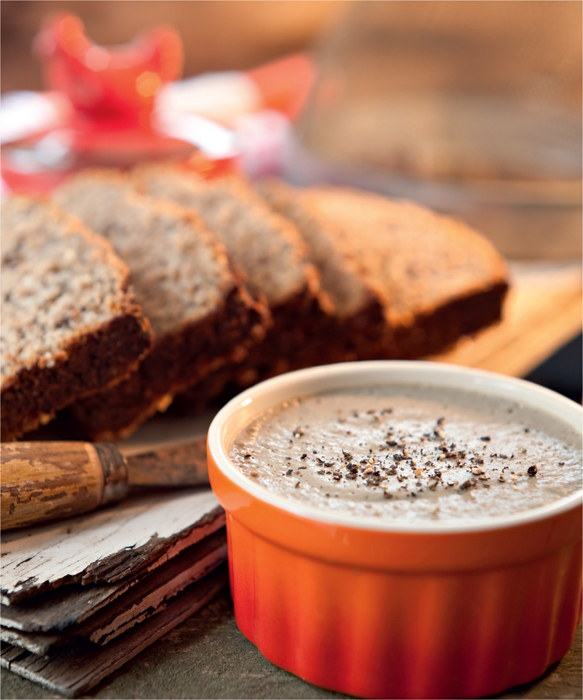
- 500 g chicken livers
- 250 g salted butter
- 1 large white onion
- 2 cloves garlic, crushed
- salt to taste
- 5 ml (1 tsp) crushed dried green peppercorns
- 60 ml (1⁄4 C) whiskey, port or brandy
- 5 ml (1 tsp) mustard powder
- 2.5 ml (1⁄2 tsp) ground allspice
- Wash and clean the chicken livers, removing the membranes and any hard bits. Heat 50 g of the butter in a large saucepan, then sauté the onion, garlic and chicken livers until cooked but the livers are still pink inside. Do not overcook the livers at this stage because they will become bitter. Remove from the heat and season well with salt and green peppercorns. Stir in the whiskey, mustard powder and allspice.
- Place the chicken liver mixture in a food processor or use a hand-held blender and blend with the remaining butter until smooth. Spoon the mixture into a medium-sized pâté dish or individual ceramic ramekins, cover with plastic wrap and refrigerate until firm.
- Serve with the farmhouse seed loaf (see page 19) or Melba toast.
Makes 1 medium pâté dish.
TIPS
• This pâté freezes beautifully. Cover with plastic wrap and then foil and freeze for up to three months.
• This recipe can be doubled up if you need larger quantities. Make ahead of time and freeze. Do not be tempted to use margarine; butter is the only way to go!
Farmhouse seed loaf
I fell in love with Cape seed loaf while studying for my Cordon Bleu qualification in Rondebosch in the late 1980s. Rarely did you go for a meal in the Cape and not get a basket of warm seed bread on the table. Here is my version.
- 750 ml (3 C) brown bread flour, sifted
- 5 ml (1 tsp) salt
- 1 × 10 g packet instant dry yeast
- 250 ml (1 C) digestive bran
- 125 ml (1⁄2 C) wheat germ
- 125 ml (1⁄2 C) linseed
- 125 ml (1⁄2 C) sesame seeds
- 125 ml (1⁄2 C) sunflower seeds
- 125 ml (1⁄2 C) canola oil
- 60 ml (1⁄4 C) honey
- 500 ml (2 C) warm water
- Poppy seeds to sprinkle (optional)
- Preheat the oven to 200 °C. Grease a 12 × 23 cm loaf tin.
- Combine all the dry ingredients in a large bowl. Make a well in the centre. Combine the oil, honey and warm water. Pour the liquid into the centre of the dry mixture and mix well. The dough should be a little sticky.
- Place the dough into the prepared loaf tin. Sprinkle a few poppy seeds on top, if using, and press down slightly so that they stick to the dough. Leave in a warm place for about 1 hour to prove and double in size.
- Bake for 20 minutes. Lower the oven temperature to 180 °C and continue baking for another 30 minutes or until done. Leave to cool for a few minutes in the tin before turning out on a wire rack to cool completely.
Makes 1 medium loaf or 2 small loaves.
TIPS
• Make two loaves at a time and freeze one. Never double up on recipes when baking, rather make the recipe twice. Baking is a science and can easily flop if you take short cuts.
• Bread is done when it produces a hollow sound when rapped on the top with your knuckles.
Chilli jam
My mother is the longest running supporter of the Sunday Times newspaper and I think it was one Sunday when I found this recipe amongst all those pages littered with scandal. My love of chilli started with this recipe. I was still at school and fascinated that you could make jam out of chillies. Over the years I have made it hundreds of times with both green and red chillies.
HOW TO STERILISE A GLASS JAR
Wash the jar with hot, soapy water. Dry with a clean tea towel and immediately place the jar on the bottom shelf of the oven for about 20 minutes at 110 °C. Alternatively, bring a large saucepan of water to the boil, add your jars and lids, and sterilise for about 15 minutes. Use kitchen tongs to remove the jars and lids from the boiling water. Place the empty jars upside down on a clean tea towel to drain further. Fill with hot jam and seal with the lid.
- 400 g large red or green chillies
- 400 g onions, quartered
- 500 ml (2 C) white sugar
- 250 ml (1 C) water
- Salt to taste
- 10 ml (2 tsp) cayenne pepper
- 1 small lemon, quartered
- Place the chillies and onions in a food processor and pulse the blade until the chilli and onions are chopped. Do not process the chillies too much; they should be roughly chopped.
- Place all the ingredients in a medium saucepan and bring to the boil. Cook, uncovered, for 10–15 minutes or until the mixture is thick. Remove from the heat, discard the lemon and pour the jam into warm sterilised jars. Seal immediately. Allow to cool completely before refrigerating. The jam will keep for up to a month in the fridge.
Makes 1 medium jar.
TIPS
• The ‘heat’ of any chilli is in the membrane and seeds, which can be discarded for milder dishes. Wear rubber gloves when working with large quantities of chillies and don’t rub your eyes.
• It’s best to weigh the onions for this recipe as you need equal amounts of chilli and onion.
• The recipe can easily be doubled or halved.
Witblits marmalade
My parents owned a grapefruit farm for many years in Limpopo. Every season we exported large quantities of Star Ruby pink grapefruit to Japan. When the last crates were finally packed my father would turn his talents to making witblits, a homemade alcoholic brew strong enough to refuel a space shuttle. One year I found myself making grapefruit marmalade and ran out of whiskey on the farm. The witblits larder was raided and thus witblits marmalade was born. Now I can’t make marmalade without it!
DID YOU KNOW?
Witblits and mampoer are two different things. Witblits is made only from grapes whereas mampoer can be distilled from all other fruits. The closest thing to witblits that is available commercially is the Italian equivalent of grappa. For this recipe you can substitute whiskey, grappa or mampoer for witblits.
- 3 Star Ruby pink grapefruit
- 1 litre (4 C) water
- 1.5 kg (71⁄2 C) sugar
- 60 ml (1⁄4 C) witblits or mampoer
- Roughly chop the whole unpeeled grapefruit, including the pips, into large chunks. Use the food processor to process the grapefruit until finely chopped. It may be necessary to do this in two batches. Remove and combine the chopped fruit and water in a large saucepan. Bring to the boil and cook for 30–40 minutes or until soft.
- Remove from heat and leave to stand for 5 hours or preferably overnight. Transfer the fruit to a large, clean saucepan. Add the sugar and heat gently while slowly stirring until the sugar has dissolved. Bring to the boil and cook without stirring for 20 minutes or until the sugar thermometer has reached 105 °C.
- Alternatively, drop a teaspoonful of the mixture onto a cold saucer with a little water on it that has been in the fridge. If you press the mixture with your finger it should gel slightly and wrinkle up. The marmalade is then ready. Remove from the heat and leave to stand for about 10 minutes, then stir in the alcohol and pour into warm sterilised jars. Seal immediately. Store in a cool, dark place.
Makes 31⁄2 large jars.
TIPS
• This is a much easier way of making marmalade than spending hours slicing peel. Simply chop the fruit roughly and process the whole grapefruit in your food processor until fine. The mixture is then cooked to soften the skin and release the pectin before adding sugar and turning the whole lot into marmalade. Use any variety of grapefruit.
• Pectin content determines how well jam sets. Pectin is found in the pith and pips of grapefruit. Usually if the content is low it helps to add fruit such as chopped apple or quince that has been tied up in a muslin cloth. Discard once the jam is cooked.
• To make marmalade the traditional way, separate the peel from the pith, slice finely and then cook it until soft. This is then added to the sugar and fruit. The pith is responsible for the bitterness, so the more you leave on the peel, the more bitter your marmalade will be. Leave the marmalade to stand for 10 minutes before bottling to allow the peel to settle and be evenly distributed. Give it a good stir before you bottle, but never while it is cooking as it will cause the mixture to turn dark.
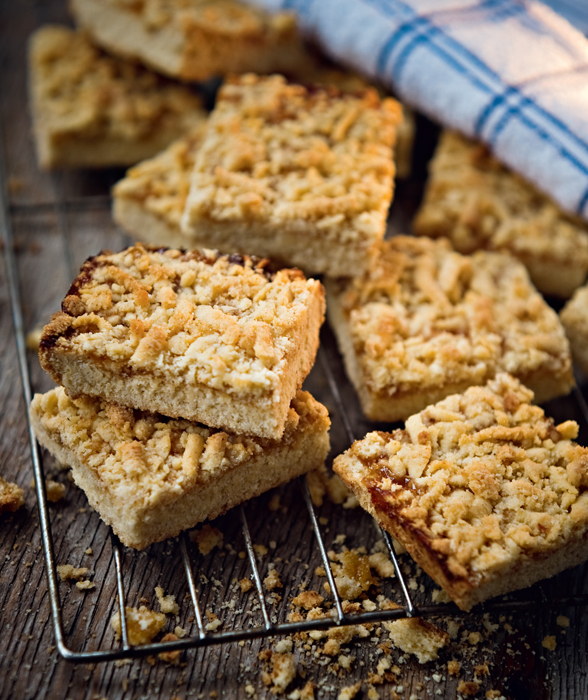
Jam squares
My mother baked these for us on a regular basis. She would faithfully fill a five-litre bucket with an assortment of biscuits each holiday and take it with us wherever we went. The bucket regularly fell over on the beach, but my mother would just calmly scoop the biscuits back up and put the lid on. One Christmas Cilla, our dog, knocked the lid off the barrel of biscuits in the back of the 4 × 4 and reduced the mother lode by half. I was secretly relieved not to have to eat all those sandy biscuits.
- 125 g salted butter, at room temperature
- 125 ml (1⁄2 C) castor sugar
- 1 extra-large egg
- 500 ml (2 C) cake flour
- 10 ml (2 tsp) baking powder
- 2.5 ml (1⁄2 tsp) salt
- smooth apricot jam to spread
- Preheat the oven to 180 °C. Grease a 20–22 cm square baking dish.
- Cream the butter and sugar together until light and fluffy. Add the egg and beat well. Sift the flour, baking powder and salt together. Combine the dry ingredients with the creamed mixture until a soft dough is formed. Shape into a ball and cut in half.
- Cover one half with plastic wrap and place in the freezer for 20 minutes. Take the remaining dough and press into the prepared baking dish. Spread with jam. Remove the semi-frozen dough from the freezer and grate it over the jam to cover.
- Bake for 25–30 minutes or until golden brown. Remove from the oven, leave to cool for a few minutes then cut it into equal squares. Remove the squares from the dish and leave to cool completely on a wire rack.
Makes about 24 squares.
TIPS
• This recipe can easily be doubled to make 48 squares.
• Never take short cuts when baking, always have all the ingredients at room temperature before you start and set the oven to the correct temperature before you mix the cake. Never put a cake into an oven that is only heating up.
• Invest in good quality bakeware because using inferior products will produce inferior results.
• Measure the ingredients for baking with military precision! Don’t guess. Invest in a good scale, set of stainless steel measuring cups, spoons and a timer.
Black mamba cake
Gordon Howard (from Ladysmith) married my childhood friend Tracey Lamb on the banks of the Vaal River one sleepy Saturday afternoon in October. Usually a man of few words, upon walking into the kitchen, he took one look at this cake and said it looked like a big black mamba. Years later this cake still does the rounds in Ladysmith. It was his mother’s recipe and with the family’s blessing I have adapted it from a simple white sponge into a chocolate masterpiece, a little more fitting of a mighty black mamba!
DID YOU KNOW?
Never grease the cake tin for sponge and chiffon cakes because the batter needs to cling to the side of the tin in order to rise. Greasing the tin will also cause the egg white base to deflate. Also don’t use a nonstick tin for these cakes because the sides are too slippery for the foam batter.
- 60 ml (1⁄4 C) cocoa powder
- 80 ml (1⁄3 C) boiling water
- 215 ml (3⁄4 C + 11⁄2 Tbsp) cake flour
- 125 ml (1⁄2 C) sugar
- 2.5 ml (1⁄2 tsp) salt
- 7.5 ml (11⁄2 tsp) baking powder
- 60 ml (1⁄4 C) canola oil
- 4 eggs, separated, at room temperature
- 5 ml (1 tsp) vanilla essence
- 80 ml (1⁄3 C) castor sugar
To assemble
- 60 ml (1⁄4 C) brandy, old Brown sherry or kirsch liqueur (optional)
- 1 × 425 g can pitted black cherries, drained (or the same weight fresh cherries) or
- 250 g fresh strawberries
- 250 ml (1 C) fresh cream
- 5 ml (1 tsp) vanilla essence
- 10 ml (2 tsp) castor sugar
Topping
- 2 × 100 g Bar One® chocolate
- 60 ml (1⁄4 C) fresh cream, at room temperature
- Preheat the oven to 180 °C.
- Mix the cocoa powder and boiling water until smooth. Set aside to cool. Sift the flour, sugar, salt and baking powder into a large bowl. Make a well in the centre and add the cooled cocoa, oil, egg yolks and vanilla essence. Beat well until smooth. Whisk the eggs whites and castor sugar until thick. Gradually pour the cocoa batter over the egg whites, fold in gently but do not stir. Turn the mixture into an ungreased 25 cm diameter cake ring tin, or chiffon cake tin, and bake for 30 minutes.
- Remove from oven, immediately turn the cake tin upside down and leave it to cool completely in the upside down position on a wire rack.
- Carefully pry the cake from the tin and sprinkle with the alcohol.
- In the meantime, make the topping. Gently heat the chocolates and cream in a small saucepan over low heat, stirring continuously until the chocolate has melted. Remove from the heat and set aside to cool completely.
- To assemble, slice the cooled cake in half horizontally. Cover the bottom layer with cherries. Whip the cream, vanilla essence and sugar until thick. Spoon the cream over the top of the cherries and replace the top layer of the cake. Pour the cooled topping over the top of the cake and decorate with cherries or strawberries and mint. This cake is best eaten the day it is made as it does not keep well.
Makes 1 large cake.
HOW TO MAKE YOUR OWN BAKING POWDER
Using a ratio of 2:1, mix 10 ml (2 tsp) cream of tartar and 5 ml (1 tsp) bicarbonate of soda to give you the same power as 15 ml (1 Tbsp) baking powder. Use immediately.
Milky bar ice cream
Milky bar ice cream is my absolute favourite. It has a soft texture and, unlike regular homemade ice creams, you only freeze it once, making it more like a frozen chocolate mousse. My mother has been making this ice cream for years and her now-famous frozen desserts have graced more than one buffet in Parys.
- 250 g white chocolate
- 60 ml (1⁄4 C) milk
- 3 ml (1⁄2 tsp) vanilla essence
- 4 large eggs, separated
- 60 ml (1⁄4 C) sugar
- 250 ml (1 C) fresh cream
- Place the white chocolate and milk together in a double boiler or heatproof bowl suspended over a saucepan of simmering water. Do not allow any steam to escape and come into contact with the chocolate and cream mixture. Melt and stir until smooth. Alternatively, melt the chocolate in the microwave on high for 1 minute, stirring frequently.
- Once the chocolate has melted, stir in the vanilla essence. Remove from the heat and set aside.
- Beat the egg yolks and sugar until very pale and thick and at ribbon stage (see page 52). Slowly add 15 ml (1 Tbsp) of the egg mixture to the chocolate mixture and mix well. This is done to prevent the mixture from splitting when you add the chocolate. Slowly add the remainder of the chocolate mixture to the egg yolks and whisk until smooth. Beat the egg whites until stiff but not dry, then fold them into the chocolate and egg yolk mixture.
- Whisk the cream lightly, not too stiff, making sure it has the same consistency as the egg, chocolate and egg white mixture. Fold the cream into the mixture.
- Spoon mixture into a freezerproof dish or empty ice-cream container, cover with plastic wrap and freeze overnight.
Serves 6–8.
VARIATIONS
- Use milk or dark chocolate instead of white chocolate, and add 15 ml (1 Tbsp) orange liqueur to the egg mixture, not the melted chocolate, or it will harden instantly. Proceed as per the recipe.
- To make a frozen chocolate mousse cake, set the mixture in a loose-bottomed springform tin lined with a circle of baking paper at the bottom to allow for easy removal. Serve with fresh fruit and cream.


