Chapter 3
Creating Items
IN THIS CHAPTER
 Creating boxes, lines, and arrows
 Using the Bézier Pen tool
 Formatting frames and lines
 Flowing text along text paths
 Converting text to outlines
 Using ShapeMaker for shapes
 Converting PDF, EPS, or Illustrator files to native QuarkXPress items
 Converting objects from InDesign, Microsoft Office, and other apps to native QuarkXPress items
QuarkXPress calls the building blocks of a page — boxes and lines, for example —items. If an item has something inside it, such as text or a picture, QuarkXPress calls this material content. To create a layout, you usually draw a few text boxes and picture boxes, and then insert text and pictures into those boxes.
In this chapter, you find out how to create all the essential items that you can use in a layout in QuarkXPress. The chapter introduces you to working with the tools that enable you to create text boxes, picture boxes, lines, and tables, and text paths for your text. You also see how to go beyond the basic shapes by working with Bézier lines and shapes, converting live text to boxes (containers), making arrows, and using the powerful ShapeMaker to generate beautiful, complex shapes.
Plus, QuarkXPress has the unique capability to convert objects from other applications and manipulate them exactly as if they were created in QuarkXPress! You can copy and paste anything from Microsoft Word, Excel, PowerPoint, and other Office apps, or even entire pages from Adobe InDesign or Illustrator, and then use the powerful tools in QuarkXPress to customize those items to match your corporate brand. You can also convert a PDF file from any application into native QuarkXPress items — an unprecedented feature for a page layout application. In this chapter, you learn how to import content from all these places, with some tips for improving the process.
Using the Item and Content Tools
The basic types of items that comprise a layout in QuarkXPress are the following:
- Boxes: Text boxes, picture boxes, and no-content boxes, which are useful for creating decorative items. Boxes can take any imaginable shape, from rectangular to wavy.
- Lines: Simple lines, arrows, and paths for text. Lines can be straight or Bézier (flexible).
- Groups: Sets of items that have been stuck together so that they behave like a single item.
- Tables: Can contain both text and pictures.
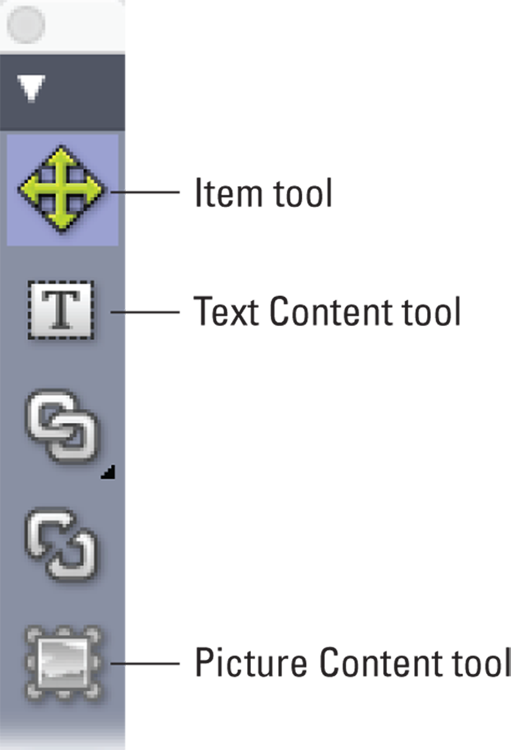
The tools for creating all these items are (not surprisingly) in the Tools palette, shown in Figure 3-1. (For an overview of all the palettes in QuarkXPress, see Chapter 2.) In fact, the principles of item and content are so basic to QuarkXPress that almost all the tools in the Tools palette are dedicated to making or adjusting items and their content. For example:
- The Item tool lets you move, resize, rotate, reshape, cut, copy, and paste items.
- The Text Content tool lets you create rectangular text boxes, as well as select text in text boxes or on text paths.
- The Picture Content tool lets you create rectangular picture boxes, manipulate pictures in picture boxes, and cut, copy, and paste pictures in picture boxes.
I tell you about the Picture Content tool in the upcoming section, and explain the Item, Text Content, and other tools in the Tools palette in this and other chapters as they become relevant to the tasks being explained.
Creating Boxes
Boxes in QuarkXPress can have any shape that you want to give them, and there are three kinds:
- Text box: This type of box is a container for text. You can optionally link text boxes together so that a story flows from one to the next, as shown in Figure 3-2.
- Picture box: This box serves as a container for a picture, illustration, or PDF.
- “No-content” box: This is just what it sounds like: An empty box, which is often used to create an area of color or a multicolor blend.
 If you accidentally make a text box when you need a picture box (or vice versa), don’t worry — you can easily change it. One way is to select the box, choose Item ⇒ Content, and then choose Picture, Text, or None. Another way is to ignore what kind of box it is and import whatever you want into it. For example, if you import a picture into a text box, it becomes a picture box; if you import text into a picture box, it becomes a text box.
As you might guess, you use different tools to create different types of boxes, as follows:
- Rectangular Text box: Click and drag with the Text Content tool.
- Rectangular Picture box: Click and drag with the Picture Content tool.
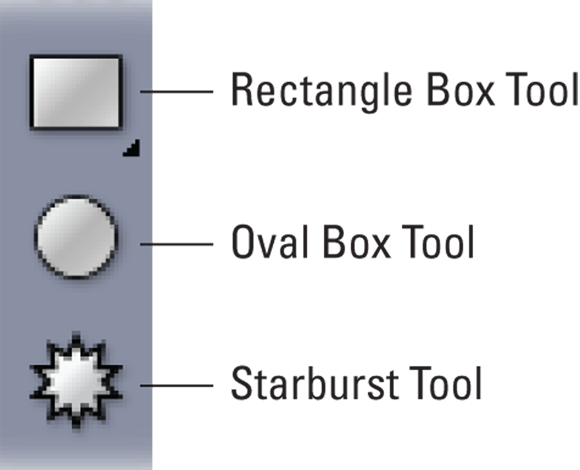
- “No-content” box: Click and drag with the Rectangle Box tool, the Oval Box tool, or the Starburst tool (depending on what shape you want), as shown in Figure 3-3.
 You can also create a square with the Rectangle Box tool, or a circle with the Oval tool, by holding down the Shift key while creating the item. For extra fun, hold down the Option (Mac) or Alt (Windows) key along with the Shift key to draw the square or circle out from its center! This is handy when you want to draw a box or circle around another item.
 You can use the no-content Rectangle, Oval, and Starburst box tools to create a text box or picture box in those shapes. To make a text box, press T as you draw one of these boxes, or choose Item ⇒ Content ⇒ Text after creating it. To make a Picture box, press R as you draw a no-content box, or choose Item ⇒ Content ⇒ Picture after creating it.
That’s all there is to creating rectangular and oval boxes! In later sections, you learn to create boxes with infinite shapes, including how to convert text to shapes you can fill and distort.
Creating Lines and Arrows
The second most common shape in most layouts is a line. In QuarkXPress, you can format lines with an almost infinite variety of stripes, dashes, and dots, and if you apply an arrowhead to a line, you get an arrow. Read on to learn how to create and format lines and arrows.
Creating lines
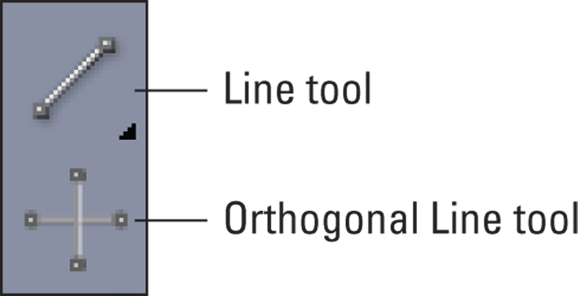
The Tools palette contains four tools for creating lines: two for straight lines and two for curvy lines. I tell you how to create curvy lines later in this chapter, in the “Building Bézier boxes and lines” section, but you’re in the right place to find out how to create a straight line, which you do by using one of these two tools, shown in Figure 3-4:
- Line tool: Produces a straight line at any angle. To use the Line tool, click and hold the mouse button, drag, and release the mouse to create a line. To constrain the angle to perfectly horizontal, perfectly vertical, or 45-degree lines, hold down the Shift key while drawing the line.
- Orthogonal Line tool: Produces only a vertical or horizontal straight line and lines at a 45-degree angle.
Chances are, you’ll want to do more with your lines than simply plunk them down on your layout, so keep reading for more details about working with lines.
Changing line attributes
To change the line thickness, style, color, or transparency, or to change the line to an arrow, you can use either the Style menu or the controls in the Home (Mac) or Classic (Windows) tab of the Measurements palette, as shown in Figure 3-5. The following sections give you the details.
Changing line width
From the Measurements palette, you can change the line width in three ways:
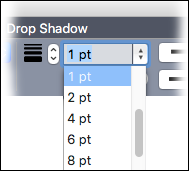
- Click the up or down arrow on the left of the Line Width field (see Figure 3-6). Each click changes the width to the next preset size.
- Click the Line Width field and type in a new width. To use inches, centimeters, or millimeters instead of points, enter the unit after the number. For example, enter .25” for .25 inches, 1cm for 1 centimeter, or 5mm for 5 millimeters. QuarkXPress converts the value to points when you leave the Line Width field.
- Click the up or down arrows on the right end of the Line Width field and choose a preset width from the menu that appears.
 One of the width presets is Hairline, but it’s best to avoid that one because its printed width varies with the output device. On a PostScript imagesetter, for example, the width is .125 pt; other printers usually print a hairline as the thinnest line they can print.
 Instead of using the Measurements palette, you can choose preset line attributes from the Style menu. However, you can’t enter your own values as you can when you’re working in the Measurements palette.
Changing line style
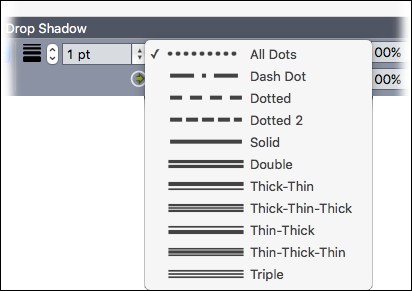
QuarkXPress offers several time-tested line styles, and you can add new ones by choosing Edit ⇒ Dashes & Stripes. If you choose a dotted or dashed style, you can customize the color and opacity of the spaces between the dots or dashes (the “gap”) with the controls that appear at the right of the controls that you use to set the color and opacity of the solid dots or dashes, as shown in Figure 3-7.
Creating an arrow
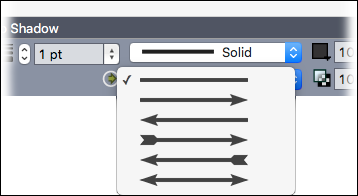
To make an arrow, choose a style from the Line Arrowheads control shown in Figure 3-8. Note that some have tail feathers and others don’t, and the last one has an arrowhead at both ends!
Building Bézier Boxes and Lines
When you want to create a box or line that’s more complex than a simple rectangle, oval, or starburst, you enter the realm of the Bézier path. (Pierre Bézier was an engineer at the French automaker Renault who patented and popularized a way to control smooth curves.) If you’ve used the Pen tool in Adobe Illustrator or Photoshop, you already understand Bézier paths. If not, read on — it takes some practice and a relaxed mind to grasp how to use Bézier tools, so don’t be surprised if you feel a little frustrated at first.
Understanding Bézier shapes
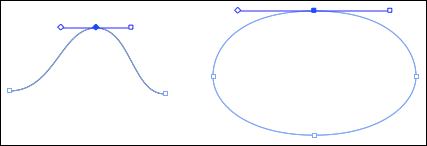
A Bézier shape (or path) consists of line segments, points, and curve handles. Line segments connect at points. Handles are attached to the points and control the shape of the line segments going into and out of the points. Figure 3-9 shows an example of a Bézier path and shape.
Here’s a breakdown of the terms used to describe the various parts of a Bézier shape:
- Point: A point connects two line segments. QuarkXPress has three kinds of points: corner, smooth, and symmetrical, as shown in Figure 3-10:
- Corner point: Connects two straight lines, a straight line and a curved line, or two curved lines that connect at a corner. When connecting curved lines, a corner point's curve handles can be moved independently to form a sharp transition between the two segments.
- Smooth point: Connects two curved lines to form a continuous curve. The curve handles always make a straight line through the point, but they can be lengthened independently.
- Symmetrical point: As with a smooth point, a symmetrical point connects two curved lines to form a continuous curve. However, the curve handles are always equidistant from the point.
- Curve handles: Extend from both sides of a point and control a curve's shape.
- Line segments: Straight or curved line sections connecting two points.
Drawing a Bézier box
To draw a Bézier box, follow these steps
- Activate the Bézier Pen tool in the Tools palette and then click to drop the first point anywhere on the page.
- Move the pointer to where you want the next point.
-
Click to create additional points and line segments.
To create a straight line and corner point, click without dragging. To create a curved line segment and smooth point, click and drag where you want the next point positioned. A point with two curve handles appears, and you can control the curve's shape by dragging a curve handle. To create a point that connects a curve to a straight segment, press Option (Mac) or Alt (Windows) while dragging a smooth point. This creates a curved segment and corner point.
- To edit the Bézier shape while you are still drawing it, do the following:
- To add a point to an existing segment: Click the segment where you want the point to be.
- To delete a point from the shape while you are drawing it: Click the point.
-
To complete the box, close the path by positioning the mouse pointer over the beginning of the path; then click when the pointer changes to the Close Box pointer.
The Close Box pointer looks like a pen nib with a tiny diamond at its bottom right, as shown in Figure 3-11.
 When any of the drawing tools are active, you can temporarily switch to the Select Point tool by pressing Command (Mac) or Ctrl (Windows). When the Select Point tool is active, you can temporarily switch to the Item tool by pressing Command-Option (Mac) or Ctrl+Alt (Windows).
Using the Pen tools
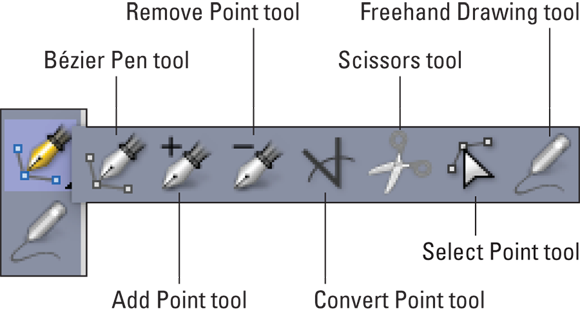
Each Pen tool (see Figure 3-12) has a different purpose. Here’s what each one does:
- Bézier Pen: This is the main tool for creating Bézier lines and boxes. To constrain its angle to 45 degrees, press and hold Shift while drawing. To adjust or edit a Bézier path, use the tools described next.
- Add Point: Adds a point to an existing line segment. Adding a point to a regular (non-Bézier) content box automatically turns the content box into a Bézier item.
- Remove Point: Removes a point from a path.
- Convert Point: Automatically converts corner points to curve points, and curve points to corner points. Click and drag to change the position of a point, the curve of a curved-line segment, or the position of a straight-line segment. Click a rectangular box or straight line to convert it to a Bézier box or line.
- Scissors: Cuts an item into separate paths. You can use the Scissors tool to cut the outline of a box and turn it into a line, or to cut a line or text path into two. When you cut a picture box, it is converted to a Bézier line and its content is removed. When you cut a text box, it is converted to a text path. When you cut a text path, it is converted into two linked text paths.
- Select Point: Selects curves or points so that you can move them or delete them. Shift-click to select multiple points. Hold down Option (Mac) or Alt (Windows) and click a point to make it symmetrical.
Using the magic Freehand Drawing tool
If you can’t get the hang of using the Pen tools, try the Freehand Drawing tool, which creates a smooth curve as you drag your mouse around the page. If you finish a drawing by ending on the beginning point, the drawing becomes a box; otherwise it remains a line. To automatically close a freehand drawing with a straight-line segment, press Option (Mac) or Alt (Windows) before you release the mouse button.
Editing Bézier shapes
QuarkXPress gives you several different ways to edit the shape of a Bézier shape, including choosing one of the standard QuarkXPress shapes from the Item menu and using the Select Point tool or Bézier Pen tool in the Tools palette. I describe these three techniques in the next sections.
Changing a Bézier shape to a standard shape
To change the shape to a standard rectangle, oval, or line, choose Item ⇒ Shape and choose the desired shape from the Shape menu.
Editing with the Select Point tool
To select curves or points so that you can move or delete them, use the Select Point tool, shown in Figure 3-12. Shift-click to select multiple points. Hold down Option (Mac) or Alt (Windows) and click a point to make it symmetrical.
Editing with the Bézier Pen tool
- To add a point to a Bézier box while working with the Bézier Pen tool, click a line segment or use the Add Point tool.
- To remove a point from a Bézier box while working with the Bézier Pen tool, click the point or use the Remove Point tool.
- To convert a point to another kind of point while working with the Bézier Pen tool, Option-click (Mac) or Alt-click (Windows) the point or use the Convert Point tool.
- To move a point or change the shape of a line segment while working with the Bézier Pen tool, hold down Command (Mac) or Ctrl (Windows) and drag the point or line segment.
 To pan the layout while a Pen tool is selected, press Shift+Spacebar and then click and drag.
Converting an existing box or line to Bézier
Now that you’re all hot about making and editing Bézier shapes, here’s a trick to converting an existing box or line so that you can reshape it with the Pen tools: With the item selected, choose Item ⇒ Shape. If your item is a box, choose the shape from the Shape submenu that looks like a painter’s palette. If your item is a line, choose the curvy line. After that, you can use any of the Pen tools to reshape your item to infinity and beyond.
 You can also convert a regular box or line into a Bézier item with either of two Pen tools: Just click a line segment with the Add Point or Convert Point tool.
Applying Frames, Dashes, and Stripes
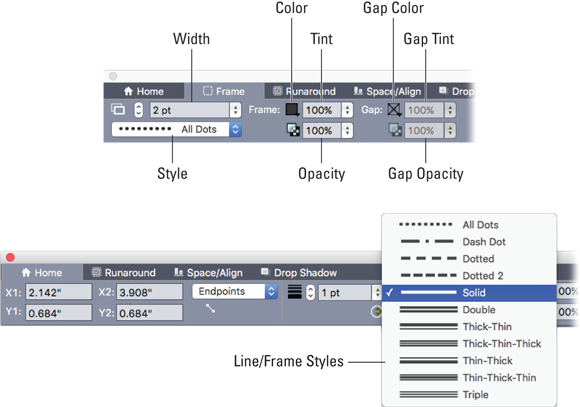
In QuarkXPress, a frame is a decorative border that you can place around any kind of box. Frames and lines have the same choices for style, width, color, and opacity — the only difference is where you access them:
- To access frame controls for an active box, click the Frame tab of the Measurements palette.
- To access attribute controls for an active line, click the Home/Classic tab of the Measurements palette.
Use the controls in Figure 3-13 to specify style, width, color, and opacity. If the frame or line style contains gaps, you can also specify gap color and opacity.
 When applying a “Scotch rule” style (any of the thick-and-thin combinations), be sure to choose a width that’s wide enough to be clearly seen when printed. Try a minimum of 6 points for a double line and 9 points for a triple line.
 Frames always extend from the edge of a box to the inside of the box unless you reverse this behavior in the Framing Preferences. (The purpose of this behavior is to keep boxes aligned regardless of whether they have a frame.) To change the frame position to Outside, choose QuarkXPress ⇒ Preferences (Mac) or Edit ⇒ Preferences (Windows) and scroll down to the Print Layout or Digital Layout section (depending on whether you’re working on a Print or Digital layout). In the Layout section, go to the General section and locate the Inside and Outside radio buttons next to Framing. When you select one of these radio buttons, you get the following:
- Inside: The frame on a picture box overlaps the picture, and the frame on a text box insets the text farther into the box.
- Outside: The frame is placed outside the box, increasing the box's width and height.
 You can create your own frame styles by choosing Edit ⇒ Dashes and Stripes.
Creating Text Paths
When you want a string of text to follow a line or a shape, you add that text to a text path. You can adjust the following: how text rides the path; the attributes of the text (font, color, size and so forth); and the attributes of the path.
To add text to a line or path, double-click the line or path with the Text Content tool. Then either begin typing or paste in any text you previously copied to the Clipboard. You can format the text using any of the controls in the Measurements palette.
 To convert a selected box (of any shape) to a text path, first change its content to text by choosing Item ⇒ Content ⇒ Text. Then choose Item ⇒ Shape and choose the squiggly line icon to convert the box to a path.
To control the starting point of the text, use the usual text formatting techniques such as left indent, tabs, or spaces.
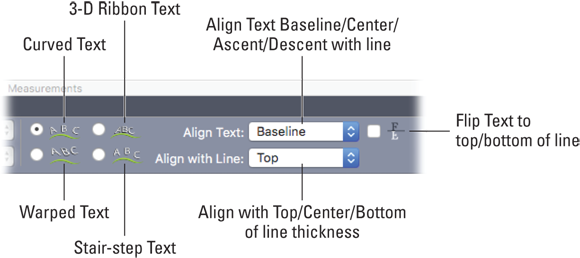
To control how the text rides the path, select the path and then use the controls in either the Text Box tab of the Measurements palette (Mac) or the Text Path tab of the Measurements palette (Windows). Using the controls shown in Figure 3-14, you can make the text bend along the path in four different ways, flip it to the other side of the path (good for running text inside the path), and control where the text sits vertically on the path.
 If (for some strange reason) you want text to flow from a text path to other text paths, text boxes, or text cells in a table, you can use the Text Linking tools, as explained in Chapter 8.
Converting Text to Outlines for Special Effects
The text formatting controls in the Measurements palette are fantastic, but there are some effects you can’t create on live text, such as filling text with a picture or a color blend (gradient), or reshaping the outline of an individual character. To achieve these effects, you need to convert the text to Bézier boxes, which you can easily do by following these steps:
- Select the character or characters you want to convert.
- Choose Item ⇒ Text to Boxes and one of these options from its submenu:
- Unanchored: To convert selected text to unanchored Bézier boxes, choose Unanchored. The text is copied, converted to boxes, and placed lower on the page.
- Anchored: To convert selected text to anchored Bézier boxes, choose Anchored. This option converts the text to boxes and replaces the text with anchored boxes within the story. (For more on anchored items, see Chapter 14.) This technique is handy when you want to convert a small amount of text, such as a drop cap, and keep it within the flow of text.
- Convert Entire Box: To convert all the characters in a text box or multiple text boxes to unanchored Bézier boxes, choose Convert Entire Box. This option removes the text from its box, converts each line to a merged set of boxes, and places each merged set in the same location on the page as the original lines of text. The original text box (now empty) remains below the converted text.
After your text is converted to Bézier boxes, you can treat them exactly like other boxes: Fill them with pictures or color blends, use the Pen tools to reshape them, and so on.
 If you paste or import a picture into the converted text, the entire string of text acts as a combined mask for the picture. If you want to put a different picture in each letter, separate them by choosing Item ⇒ Split ⇒ Outside Paths or Item ⇒ Split ⇒ All Paths. Splitting “outside paths” maintains the counters (holes) in the letters, to see through them to whatever is behind. Splitting “all paths” unmerges the holes from their surrounding letters, causing them to be shapes on top of the letters.
 After you convert text to boxes, it is no longer editable as text — you can’t type new letters to replace old ones. Those original letters have been converted into boxes shaped like the original letters.
Using ShapeMaker to Generate Boxes and Lines
If you’ve absorbed the many techniques in this chapter for creating and editing the shape of boxes, you may be thinking “This is all very complicated if all I want is a triangle, a rectangle with just two rounded corners, or a spiral-shaped text path.” And you would be absolutely correct! That’s why QuarkXPress includes ShapeMaker, which automatically creates complex geometrical boxes and lines for you.
 If you select an existing box or line before launching ShapeMaker, you can apply all the magic in ShapeMaker to that box or line. Otherwise, ShapeMaker creates a new box or line for you.
ShapeMaker’s many controls are beyond the scope of this book, but they are explained completely in A Guide to QuarkXPress 2016 at (http://www.quark.com/Support/Documentation/QuarkXPress/2016.aspx). However, to get you started, this chapter covers the basics.
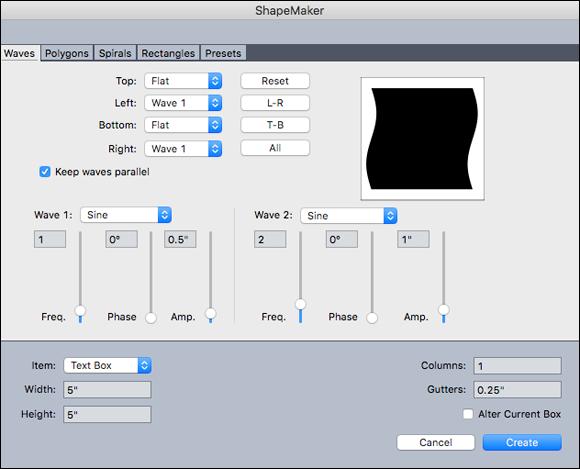
To launch ShapeMaker, choose Utilities ⇒ ShapeMaker. The dialog box shown in Figure 3-15 appears.
The tabs at the top of the ShapeMaker dialog box let you switch to the different shape-making options (waves, polygons, spirals, and rectangles) as well as a Presets tab for creating and managing preprogrammed shapes that you commonly make. You can start with these preset shapes and modify as you like. The shape preview in each tab is live, and as you make changes to the controls, the shape reflects those changes.
The bottom area of the dialog box is the same on all the tabs and contains these controls:
- Item: Lets you choose whether you want to create a text box, picture box, no-content box, text path, or rule path (line).
- Width and Height: Let you enter a width and height for the box or path.
- Columns and Gutters: When you select Text Box from the Item menu, these fields let you specify how many columns you want in the text box and how wide the gutters between them should be.
- Lines and Spacing: When you select Text Path is selected from the Item menu, you can specify how many lines to create and how much space you want between them.
- Alter Current Box: If a box is selected when you choose Utilities ⇒ ShapeMaker, ShapeMaker updates that box instead of creating a new box.
Creating shapes from scratch
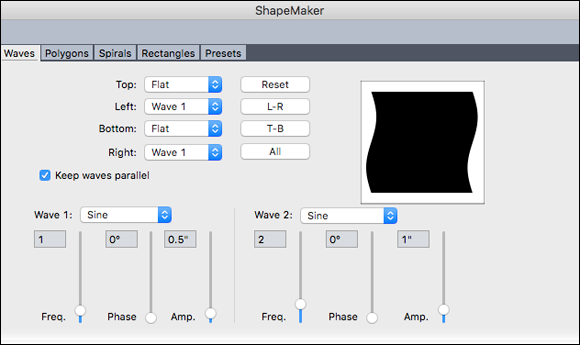
As mentioned previously, the ShapeMaker dialog box provides tabs for creating waves, polygons, spirals, and rectangles. On the Waves tab, you create boxes with wavy sides by choosing from drop-down menus how you want the top, bottom, left, and right sides of the box to appear. The buttons to the right of the drop-down menus let you reset or apply shapes to various combinations of sides.
Figure 3-16 shows the Waves tab in the ShapeMaker dialog box.
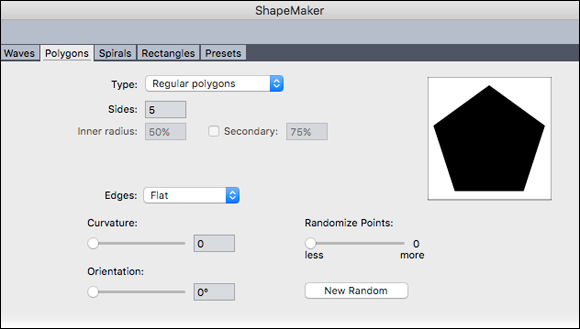
The Polygons tab lets you create boxes with multiple straight sides, as shown in Figure 3-17. The settings on this tab require you to choose what type of polygon you want (polygon, star, polygram, spirogram, golden rectangle, and double square) and then set parameters for that shape. The Golden Rectangle shape is particularly useful when you want to create a rectangle based on the golden mean. Even if you don’t know what a golden mean is, it’s fun to play around with the options in the Polygons tab!
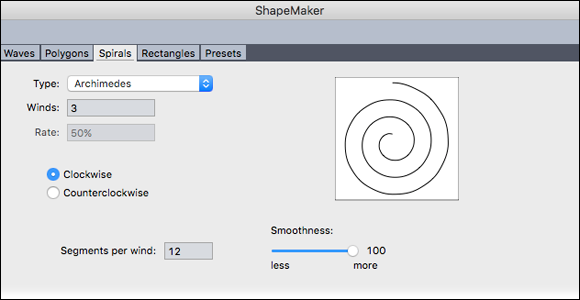
The Spirals tab lets you create spiral lines, as shown in Figure 3-18. Among the options in the Type drop-down menu are Archimedes (for a uniform distance between arms) and Golden, which you can use to create your own snail or nautilus shell. To make the resulting spiral be a path you can add text to, choose Text Path from the Item menu.
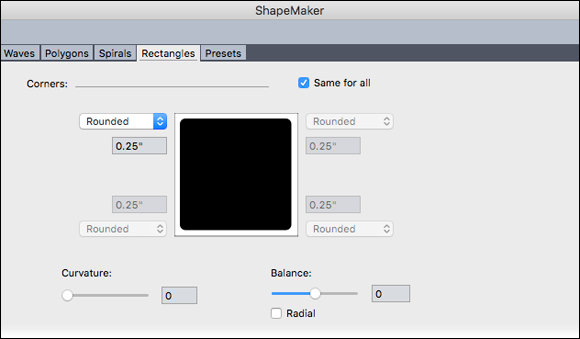
The Rectangles tab lets you create rectangular boxes with customized corners, as show in Figure 3-19. The drop-down menu lets you choose a corner type (Normal, Rounded, Beveled, Concave, Pointed, or Inset) and a diameter for the corner effect. If you want to create a rectangle that has fewer than four rounded corners, use ShapeMaker — it’s far easier than trying to draw one with the Pen tool or trying to combine shapes with the Item ⇒ Merge Or Split Paths menu item.
Working with shapes found on the Presets tab
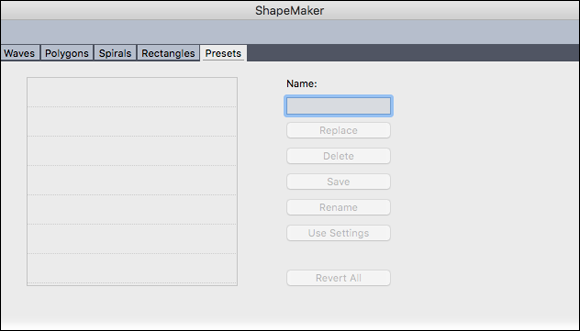
The Presets tab lets you save and manage combinations of settings you want to use again later, as shown in Figure 3-20 below. To create and use your own preset, first make all the changes you want to save in each of the tabbed areas. (Your preset will store all the settings in all the tabs.) Then you can do the following:
- To store all the settings in all the tabs: Type a name in the Name field and click Save. A named preset is added to the list on the left, with (oddly) an image of the shape from the last tab you were looking at.
- To load a set of saved settings: Select it in the list on the left, click Use Settings, and then click any tab to use those saved settings.
- To replace the settings in a preset with the settings currently in the ShapeMaker tabs: Select the preset and click Replace.
- To delete a preset: Select it and click Delete.
- To rename a preset: Select it and click Rename.
- To restore all tabs to the settings they had when you opened the ShapeMaker dialog box: Click Revert All.
Converting PDF, EPS, or Adobe Illustrator Files to Native QuarkXPress Items
Here’s one of the most exciting developments in QuarkXPress: If you already have a document in PDF, EPS, or Adobe Illustrator format, QuarkXPress 2016 can convert all its objects to native QuarkXPress items for you in just a few seconds. You can then work with those items just as you can with any other items in QuarkXPress. To convert entire files from another format into QuarkXPress items, follow these steps:
- If the PDF, EPS, or AI file is already in a picture box on your QuarkXPress page, select it; if not, choose File ⇒ Import.
-
Navigate to the file you want to import and click Open; and if the file is a multipage PDF, choose the page you want to import.
QuarkXPress creates a new picture box containing the file.
- With the new picture box selected, choose Style ⇒ Convert to Native Objects (or right-click and choose Convert to Native Objects).
-
In the Convert to Native Objects dialog box, select the Retain Source Picture Box check box if you want to keep the original picture box as well as make a converted copy.
QuarkXPress converts the pictures, text, shapes, and lines in that file to native QuarkXPress items. If some of the items overlap in unexpected ways, try deselecting the other two options in that dialog box (Ignore Soft Masks and Ignore Transparent Blend Modes) and then convert again.
-
To edit individual items, choose Item ⇒ Ungroup.
If you have many items, you may need to repeat the Item ⇒ Ungroup command, or choose Item ⇒ Ungroup All to ungroup all groups within groups.
You don’t have to convert an entire document. If you import the file into a QuarkXPress picture box and crop it, only the area showing in the box is converted. (See Chapter 13 to learn all about importing and cropping pictures.)
I can’t overstate the usefulness of this capability. Designers often work with charts, graphs, and PowerPoint slides that almost never use the correct colors or fonts for a company’s brand. Conveniently, when you convert these items to native items in QuarkXPress 2016, their colors are added to the Colors palette, where you can replace them all at one time with your brand-approved colors. The text in these graphics is also converted to native QuarkXPress text, so you can easily format it to match the brand by using style sheets.
After they’ve been converted, vector graphics become native QuarkXPress items and Adobe Illustrator paths become QuarkXPress paths with the exact same Bézier anchor points as in Illustrator. You can then use the Bézier (pen) tools in QuarkXPress to adjust them. (See “Building Bézier Boxes and Lines,” earlier in this chapter, to learn about using Beziér paths.)
Here’s a time-saving use for these conversions: Publications almost always receive advertisements in PDF format, and after they’re converted to native QuarkXPress items, the publication can update prices, dates, and colors inside the ad. That capability has never existed in a page layout program before.
Also, publishers who import charts or maps now have a unique trick available to use. After converting to native QuarkXPress items, you can resize the chart or map without changing the size of the text within it. The Scale feature (choose Item ⇒ Scale to use it) in QuarkXPress lets you choose which attributes to scale, as described in Chapter 4.
Product labels and packaging are another good candidate for conversion. Many packaging designers use Adobe Illustrator and provide art to their clients in native Illustrator or PDF format. But if you’re more comfortable in QuarkXPress, you can convert the art to native QuarkXPress items and easily update them. (Plus, the onscreen preview in QuarkXPress is much more clear and accurate than Illustrator’s!)
To convert your QuarkXPress layout back to Adobe Illustrator, export it in PDF format (File ⇒ Export ⇒ Layout as PDF) and then open the PDF in Illustrator. However, do this only if absolutely necessary, because Illustrator won’t recognize your QuarkXPress layers, and many items will break into smaller parts, making editing very difficult.
 QuarkXPress currently imports only one page at a time from a PDF file. If you want to import multiple pages simultaneously, try PDF Importer XT from
 www.creationauts.com. This $20 XTension lets you choose which pages to import from a PDF: selected pages, or only the even or odd pages. When importing the PDF, the XTension creates a new QuarkXPress page for each page in the PDF and optionally converts its objects to native QuarkXPress items.
 If you don’t want to invest in the PDF Importer XTension mentioned in the preceding tip, you can still import multiple pages of a PDF simultaneously. The trick requires Adobe Acrobat and using the ImageGrid utility in QuarkXPress, using the steps that follow:
-
Open the PDF in Acrobat and find where Acrobat lets you extract multiple pages as separate PDF files.
The location is different in each version of Acrobat, so look for the area containing the Pages tools and then look for Extract.
-
After extracting all the pages as separate PDFs, rename the first nine so that the number in their filename has a 0 before it (for example, change 1 to 01, 2 to 02, and so on).
That way the pages are imported in the correct order.
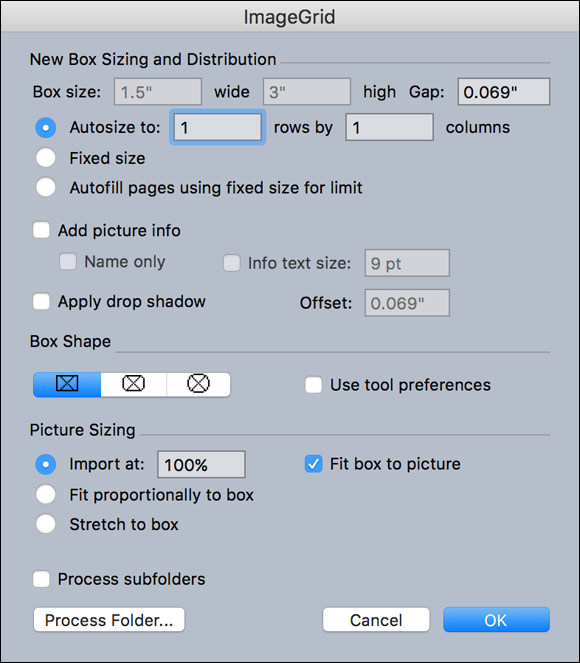
- In QuarkXPress choose Utilities ⇒ ImageGrid to open the ImageGrid dialog box.
- In the ImageGrid dialog box, select the Autosize To radio button and enter 1 into both the rows and columns fields, as shown in Figure 3-21.
- Click the Process Folder button in the ImageGrid dialog box and choose the folder that contains your separate PDF page files.
- Watch while QuarkXPress builds a new page for each PDF file and imports the PDF into a picture box on it.
- (Optional) Select the picture box on each page and choose Style ⇒ Convert to Native Objects to convert the PDF to native QuarkXPress items.
Converting Objects from InDesign, Microsoft Office, and Other Apps to Native QuarkXPress Items
You can copy objects from many other applications and paste them into QuarkXPress as native QuarkXPress items, including Adobe InDesign, Illustrator, CorelDRAW, Affinity Designer, Word, Excel, PowerPoint, and Apple Pages. And yes, you can successfully convert an entire InDesign page to QuarkXPress. Here’s how:
-
Copy the items in their original application.
Copying the items places them on your computer’s clipboard.
-
Switch to QuarkXPress and choose Edit ⇒ Paste as Native Objects (or right-click and choose Paste as Native Objects).
QuarkXPress converts the pictures, text, shapes, and lines in that file to native QuarkXPress items. If some of the items overlap in unexpected ways, try deselecting the two options in that dialog box (Ignore Soft Masks and Ignore Transparent Blend Modes) and then convert again.
The original objects are converted to a group of QuarkXPress items.
-
To edit individual items, choose Item ⇒ Ungroup.
If you have many items, you may need to repeat Item ⇒ Ungroup, or choose Item ⇒ Ungroup All to ungroup all groups within groups.
This capability to convert objects from other applications opens a whole new world of graphic possibilities. For the first time, you can use the Smart Art tools in Microsoft Office applications to create flowcharts and then fine-tune them in QuarkXPress. Same for charts and graphs in Illustrator, CorelDraw, or Microsoft Office. This capability could fundamentally change the relationship between corporate chart producers and page layout artists, because now a page layout artist can customize the charts created elsewhere without having to master the goofy appearance tools in Microsoft products.
 For Windows users: When copying objects from some applications, you may get a better result if you copy them as a PDF file into the Windows Clipboard, with the most prominent example being Adobe InDesign. So make sure that you select the Copy PDF to Clipboard check box in the Clipboard Handling section of InDesign’s preferences before attempting to copy objects from InDesign and pasting them as native objects in QuarkXPress.
 If you get only an image when you choose Paste as Native Objects in QuarkXPress (instead of an editable object), the application you’re copying from may be copying its objects only as images, and therefore QuarkXPress cannot paste them as items. To work around this problem, export the page from the original application as a PDF file and then import that PDF file into QuarkXPress, at which point you then convert to native items as described in the preceding section. This process will typically give you the items you want.
 Creating boxes, lines, and arrows
 Using the Bézier Pen tool
 Formatting frames and lines
 Flowing text along text paths
 Converting text to outlines
 Using ShapeMaker for shapes
 Converting PDF, EPS, or Illustrator files to native QuarkXPress items
 Converting objects from InDesign, Microsoft Office, and other apps to native QuarkXPress items

 If you accidentally make a text box when you need a picture box (or vice versa), don’t worry — you can easily change it. One way is to select the box, choose Item ⇒ Content, and then choose Picture, Text, or None. Another way is to ignore what kind of box it is and import whatever you want into it. For example, if you import a picture into a text box, it becomes a picture box; if you import text into a picture box, it becomes a text box.

 Instead of using the Measurements palette, you can choose preset line attributes from the Style menu. However, you can’t enter your own values as you can when you’re working in the Measurements palette.


 When applying a “Scotch rule” style (any of the thick-and-thin combinations), be sure to choose a width that’s wide enough to be clearly seen when printed. Try a minimum of 6 points for a double line and 9 points for a triple line.