Making and Using Master Pages
If your layout consists of just one or two pages, you can ignore master pages entirely. But if you’re using QuarkXPress to publish a newsletter, magazine, book, catalog, or other multipage document, master pages are essential to your pagination happiness.
You may think of a master page as a template for pages, but it’s more than that. For example, if you change a master page at any time, your change on the master page ripples throughout your document, affecting every layout page based on that master page. Also, automatic page numbers on a master page will update on layout pages as you add, remove, and rearrange your layout pages.
The most common uses for a master page include headers, footers, background images or colors, and page numbers — any items you want to appear on many pages. If your layout has facing pages (left and right pages of a spread), you can use different content on each side. And your layout isn’t limited to just one master page: You can apply different master pages to any combination of layout pages.
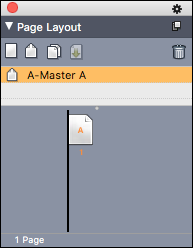
When you create a new layout, you automatically generate a master page from the page size, margins, and columns that you choose in the New Layout dialog box. To add content to the master page, or to change its page size, margins, and columns, you need to display the master page instead of a layout page. A layout’s master pages (used and unused) are listed in the Page Layout palette, just above the layout pages, as shown in Figure 5-1.
The master page that is automatically generated when you create the layout is named “A-Master A.” In Figure 5-1, the A that you see superimposed on the page 1 icon indicates that this master page was applied to it. Double-click the master page icon to display the master page for editing in the project window.
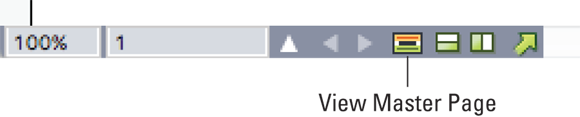
 The easiest way to display the master page being used by the current layout page is to click the View Master Page button at the bottom left of the project window, as shown in Figure 5-2. When the master page is displaying, you can click that button again to switch back to your layout page. Another way is to choose Page ⇒ Display ⇒ your master page name.
The master page is exactly like a document page, with a few special features:
- Items that you add to a master page display on every layout page that is based on that master page.
- All items on the master page are stacked behind the items that you create on the layout page.
- A master page can have an automatic text box, which allows text to flow from page to page, and can create new pages as you add text to the chain of linked text boxes.
To control where the new automatic pages are added, open QuarkXPress Preferences, choose Print Layout ⇒ General, and then click the Auto Page Insertion drop-down menu, shown in Figure 5-3. Your choices are Off, End of Story, End of Section, and End of Document. By default, the insertion is set to End of Story, which places your new pages immediately after the page containing the last text box in your current text chain. If your layout is divided into sections (see “Creating a section,” later in this chapter), you can choose End of Section instead. End of Document really should be labeled End of Layout instead, because it adds new pages at the end of your current layout.
The two most common items on a master page are an automatic text box and a text box for an automatic page number.
Creating an automatic text box
Automatic text boxes are most often used in books and other long documents. When an automatic text box is on the master page, QuarkXPress automatically adds new pages as needed whenever long text is imported or typed into a text box. This makes it easy to start with just a few pages and then let QuarkXPress add more as the text gets longer.
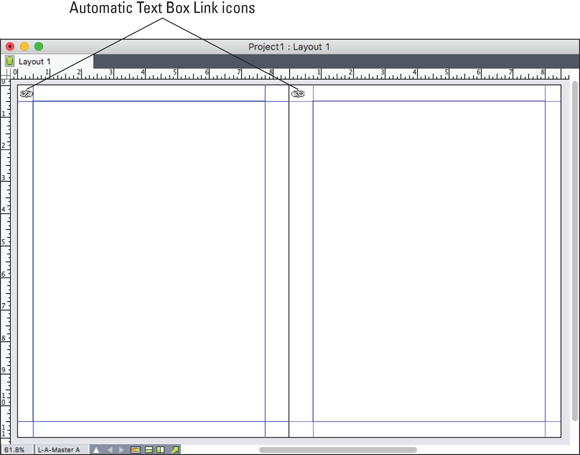
With the master page displayed, notice the link icon at the top left of each page (or each page in the spread, if your layout includes facing pages). If the link is broken, that means you didn’t enable the Automatic Text Box check box in the New Layout or New Project dialog box when you created your layout. If the link is unbroken, you did enable the Automatic Text Box check box and it’s already set up, as shown in Figure 5-4.
To verify that your master page is set up with an automatic text box, open the Tools palette, click the Text Linking tool, and then click the text box on the master page. If it’s an automatic text box, an arrow appears that connects the link icon to the text box.
If the link icon is broken, you need to create the automatic text box by following these steps:
- In the Tools palette, click the Text Content tool, and drag it to create a text box within the margins of the page.
-
In the Tools palette, click the Text Linking tool.
Your cursor changes to a chain link icon.
-
Click the broken link icon and then click the text box.
An arrow appears that connects the link icon to the text box. Click a blank part of the page to end the linking process.
- If your layout has facing pages, repeat the process with the other page in the spread.
 You can create multiple automatic text boxes on a master page that link to each other. For example, if you want two columns of text with one longer than the other, you need two text boxes. To link the first box to the second box, click the Text Linking tool and then click the first box. Next, click the second box. Text on layout pages then flows from the previous page into the first text box and continues into the second text box. Text that overflows from the second box then flows into the first box on the next page.
Creating an automatic page number
Not all your layouts need page numbers, but at least some certainly will, and you may as well make placing and changing them as easy as possible. Just follow these steps to create a new text box and place page numbers in your document automatically:
-
In the Tools palette, click the Text Content tool to activate it.
Your cursor changes to an I-beam.
-
Click and drag to create a text box near the top or bottom of each master page.
You can position the box on the outside edge of each page, or in the center — whichever design you prefer.
- With the Text Content tool still active, click one of the text boxes to select it.
-
Choose Utilities ⇒ Insert Character ⇒ Special ⇒ Current Box Page #.
A character appears that will display as the current page number in layout pages. On the master page, it displays as <#>.
- Format and justify the character any way you like.
Creating a new master page
Most longer documents have multiple sections. For example, a book may have front matter, chapters, appendices, and an index. A magazine may have different page layouts for each section or article. Although QuarkXPress creates your first master page for you, you can create new master pages that have different text box arrangements, page number locations, running headers and footers, or even picture boxes that you want to appear on every page.
You create new master pages in the Page Layout palette. To create a new single-page master page, drag the Blank Single Page icon from the top of the Page Layout palette into the master page area just below it. If your layout was created with the Facing Pages check box enabled, you can also create facing-page master pages by dragging the Blank Facing Page icon from the top of the Page Layout palette into the master page area. Either way, a new master page displays in the palette and is named one letter after the newest existing master page (for example, after “A-Master A” comes “B-Master B”).
Duplicating a master page
If you have a master page that you like, but want to change some of it and make a new master page, you can duplicate it and then make your changes. To do so, click the master page in the Page Layout palette and then click the Duplicate button just above it or choose Duplicate from the Page Layout palette menu. When the new master page appears in the palette, double-click its icon to display it in the project window for editing.
Converting a layout page to a master page
QuarkXPress doesn’t let you convert a layout page into a master page, but you can work around this limitation by using the Paste In Place feature. To do so, follow these steps:
-
Select all the items on the layout page that you want to use on the master page.
One way to select all the items is to click the Item tool in the Tools palette and choose Edit ⇒ Select All.
- Choosing Edit ⇒ Copy to copy the items to the Clipboard.
-
Create a new blank master page or switch to an empty master page and choose Edit ⇒ Paste In Place.
The items you copied from the layout page are pasted into the exact same position on the master page.
Deleting a master page
To delete a master page, click it in the Page Layout palette and then either click the trash can icon at the top right of the palette or choose Delete from the Page Layout palette menu. Any layout pages that are based on that master page keep all their current items but are no longer associated with a master page.
Changing the name of a master page
As lovely and elegant as “A-Master A” is, you can change the name of any master page to something more meaningful to you. To change the name of a master page, double-click its name in the Page Layout palette to highlight it and type a new name. Always keep the letter-and-hyphen structure at the front of the name, because the letters before the hyphen (up to three) display on the page icons in the Page Layout palette. For example, use “A-Front Matter” or “BDY-Body Page.”
Adding new layout pages
As you work with your document, you may be continually adding or deleting pages. Here are the two quickest ways to add new pages to your layout:
- Choose Page ⇒ Insert from the system menu bar or Insert Pages from the Page Layout palette menu.
- In the Page Layout palette, press Option (Mac) or Alt (Windows) and then drag a master page or blank page icon from the top part to the desired location in the bottom part where the page icons are.
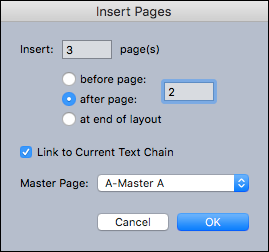
Either way, the Insert Pages dialog box, shown in Figure 5-5, displays. Enter the number of new pages you want, where they should go, and what master page to base them on. If a text box is currently selected on your existing layout page, and the master page has an automatic text box on it, the Link to Current Text Chain check box is available. If you enable that check box, the text boxes on your new pages are linked to the selected text box.
Deleting layout pages
To delete one or more layout pages, select them in the Page Layout palette and then either click the trash can icon at the top right of the palette or choose Delete Pages from the Page Layout palette menu. Nothing to it!
 To understand what happens when a text box on the deleted page is linked to a text box on a page you’re not deleting, see the section in Chapter 8 about linking text boxes.
Moving layout pages
You have several ways to move one or more layout pages to a different position in the flow of pages. First, select any pages you want to move in the Page Layout palette and then do one of the following:
- Drag the page or pages to a new location in the Page Layout palette. Arrows and page icons appear to let you know where your page(s) will land.
-
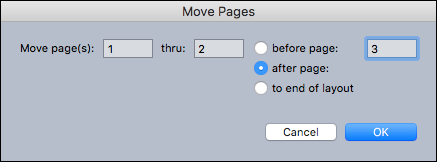
Choose either Page ⇒ Move Pages or Move Pages from the Page Layout palette menu. The Move Pages dialog box, shown in Figure 5-6, appears.
Oddly, the Before Page: and After Page: options share the same field for a page number, so don’t be confused by the fact that the “after page:” option doesn’t seem to have its own number field.
Moving pages in a facing-pages layout is fraught with peril. To be safe, move only even numbers of pages, and move them to the same relative left-right position from which they came. For example, if you move a selection of four pages that starts with a right-facing page, be sure to move that set of pages so that the first page you move remains as a right-facing page. Otherwise, your master page items can get scrambled.
Applying a different master page to a layout page
When setting up a layout that uses multiple master pages, you sometimes need to change the master page that a layout page is based on. For example, you may have created several new layout pages and mistakenly based them on the wrong master page. Or, there may be no master page assigned to a layout page because when you created the page, you based it on a Blank Single Page or Blank Facing Page instead of a master page. (See the “Adding new layout pages” section, earlier in this chapter, for details on how to add new pages.)
To apply a master page to a layout page, do one of these things in the Page Layout palette:
- Drag a master page from the top part of the palette onto a layout page in the bottom part.
- Select the target page or pages in the bottom part of the palette, then press Option/Alt and click the desired master page in the top part of the palette.
Either way, the layout page(s) will receive all the items from the master page.
Changing master page items
When you change an item on a master page, that change is automatically copied to any layout pages that are based on that master page. However, unless you locked an item on a master page (by choosing Item ⇒ Lock ⇒ Position or Item ⇒ Lock ⇒ Story — or both), you can change the position and text of that item on a layout page.
If you change the position or text of a master page item on a layout page, the changes you made to the item on the layout page override similar changes you may subsequently make on the master page. For example, if you change the font in a text box on a layout page, and then change the font to something else on the master page, your layout page will keep the font that you used there. Or, if you move an item on a layout page and then move that item somewhere else on the master page, the item on the layout page will not change its position to match the master page.
To force the changes made on a master page to apply to the items on a layout page, drag the master page in the Page Layout palette onto a layout page icon in the bottom part. When you do this, one of two things will happen, depending on a setting in QuarkXPress Preferences (to get to the setting, open QuarkXPress Preferences by choosing QuarkXPress ⇒ Preferences on a Mac or Edit ⇒ Preferences in Windows and then scroll down to Print Layout and click General):
- If Master Page Items is set to Keep Changes, the changed item is left as it is but is no longer linked with the master page, and a copy of the item from the master page is added.
- If Master Page Items is set to Delete Changes, the changed item is deleted and replaced with a copy of the item from the master page.
 Working with master pages