IN THIS CHAPTER
 Setting indents and leading
Setting space above and below
Keeping lines together
Aligning paragraphs to a grid
Adding bullets, numbers, and rules
Setting five kinds of tabs
Styling paragraphs automatically
Paragraphs are the basic building blocks of stories. They break stories into digestible chunks, both visually and logically. Over the centuries, publishers have developed many formatting techniques to help readers not only follow the story but also keep them visually interested. In this chapter, you learn basic formatting techniques such as controlling line spacing, interparagraph spacing, indents, justification, and aligning to a grid. You also learn to apply more creative formatting, such as drop caps, lines (rules) that float along before or after a paragraph, and how to hang characters outside a paragraph.
In addition to the creative stuff, I also teach you to use practical formatting tools such as bullets, numbers, and tabs. To save time when formatting long documents, you learn to copy formatting from one chunk of text to another, how to keep related lines and paragraphs together, how to use style sheets to ensure consistent formatting, and how to use Conditional Styles to automatically format sections of complex paragraphs.
Formatting Paragraphs: The Basics
Formatting a paragraph is different from formatting characters in a couple of ways. For one thing, you don’t need to select anything on the page — your formatting changes will apply to the paragraph where your text insertion point is. To make changes to multiple paragraphs, just be sure that some part of each paragraph is selected.
Also, paragraph formatting applies to the entire paragraph, even if you don’t select the entire paragraph before applying the formatting.
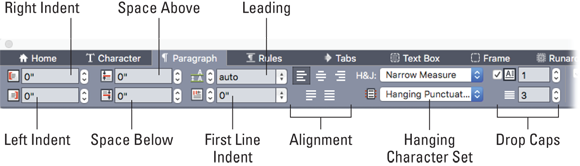
In this chapter, I focus mainly on using the Paragraph/Paragraph Attributes tab of the Measurements palette because it contains almost every control you need, as shown in Figure 10-1.
Later in this chapter, I cover the Rules tab, which controls paragraph rules, and the Tabs tab, which controls tab stops. I also cover style sheets and Conditional Styles.
Using the text ruler
Whenever you activate the Paragraph/Paragraph Attributes tab, a text ruler appears at the top of your currently active text box. The text ruler is useful for setting the left and right indents as well as tab stops. (I cover tab stops later in this chapter.) If you’re familiar with the ruler in Microsoft Word, you’ll find that this ruler works the same way.
To set the left paragraph indent, drag the bottom triangle to a new position on the ruler. As you drag, the top triangle travels along with it, and a vertical, dotted indicator line appears on your page to help you see where the indent will occur.
To set the first-line indent at a different location from the other lines in the paragraph, drag the top triangle. If you drag it to the right, the first line indents farther than the rest of the paragraph. If you drag it to the left, you create a “hanging indent,” which makes the first line of the paragraph extend to the left of the rest of the paragraph.
To set the indent for the right-hand edge of the paragraph, drag the triangle at the right end of the ruler to a new position on the ruler.
 If you forget to select multiple paragraphs before you perfect your paragraph settings, you can quickly copy one paragraph’s settings to others. First, drag through your text to select the paragraphs you want to change; then Option-click (Mac) or Alt-Shift-click (Windows) the paragraph you like. All the paragraph attributes of the paragraph that you clicked are copied to the paragraphs you first selected.
Setting paragraph indents
To set the left and right indents of a paragraph, you can use the text ruler, as explained previously, or use the Paragraph/Paragraph Attributes tab of the Measurements palette, shown in Figure 10-2. You can enter a new value in the Indent fields, or use the up or down arrows to the right of each field to increase or decrease the amount of indent as you watch it change.
Setting space above and below a paragraph
In a perfect text document, you never have two returns in a row. Instead, page layout professionals set an amount of space to appear before and after each paragraph to add space between them. (Multiple returns create many headaches, including unwanted space at the top of a text box when the text flows from one box to another.)
To set the amount of space you want to have above and space below selected paragraphs, use the Space Before Paragraph and Space After Paragraph fields in the Measurements palette. You can enter an amount in the fields or click the up or down arrows to increase and decrease the amount as you watch it change.
When a paragraph begins at the top of a text box, the Space Before amount is ignored. When it ends at the bottom of a text box, the Space After is ignored. That way, you never have empty space at the top or bottom of a column.
Fields in the Measurements palette can do math for you. If you want to add, say, two points of space to the amount already in a field, just type +2pt after the existing value and then press either the Enter or Return key.
When you need ensure that a paragraph appears at the top of a page or column, you can set its Space Above amount to the height of your page. The paragraph is then pushed to the next column or text box.
Setting paragraph leading
Leading determines the amount of space from baseline to baseline of text in a paragraph. By default, the “auto” amount in QuarkXPress is 120 percent of the font size. For example, 10-point text set to Auto Leading will have a leading value of 12 points. To increase or decrease the space between lines of text, you type a new value in the Leading field of the Measurements palette or you can click the up or down arrows to the right of the Leading field to watch your lines of text spread out or get closer together.
The quickest way to set a paragraph’s leading is to type 0 (zero) into the Leading field of the Measurements palette.
 The term leading comes from the age of setting type with metal blocks made of lead. In those days, typesetters inserted strips of lead between lines of type to space those lines apart. This explains why people pronounce leading as “ledding,” not “leeding.”
Setting paragraph alignment
To set paragraph alignment, click one of the paragraph alignment options in the Measurements palette. You can probably guess the meaning of each icon, except perhaps the bottom two, which are Justified and Forced. Both cause each line of text to extend across the full width of the paragraph; Justified allows the final line to be shorter than the paragraph, and Forced spreads the words of the final line to extend across the full width of the paragraph. Normally, you use Justified instead of Forced.
Setting hyphenation and justification (H&J)
QuarkXPress has an extremely advanced text-formatting engine, which you can control to an extreme degree. H&J (hyphenation and justification) controls how words are hyphenated when they appear at the end of a line of text, as well as how letters and words are spaced when paragraph alignment is set to Justified or Forced.
You can create and edit H&J settings by choosing Edit ⇒ H&Js, but the presets available in the H&J drop-down menu on the Measurements palette (see Figure 10-3) are perfect for most uses.
You may need to experiment to see which setting works best for your text, but fortunately, the names match their best uses: Standard works well for average columns of text; Narrow Measure and Very Narrow Measure are good for narrow columns of text. Wide Measure is good for a wide column, and Titles is best for headlines. No Hyphenation usually isn’t used on Justified paragraphs because it doesn’t allow words to break at the end of lines, which creates large gaps between words.
Formatting Paragraphs: Getting Fancy
Because the text in some documents is more complicated than others, and because you really want your readers to keep reading your stories, you use special formatting to engage the reader, organize important text, and ensure that text stays together that belongs together. The following sections explain how to use the advanced formatting tools in QuarkXPress to keep your readers engaged.
Using hanging characters (punctuation)
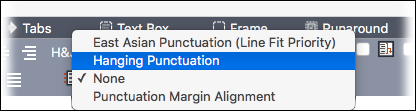
The presets in the Hanging Character Set drop-down menu, shown in Figure 10-4, let you create a smoother edge on a column of text by allowing punctuation to hang beyond the normal edge of the story. The presets are as follows:
- Punctuation Margin Alignment: Hangs punctuation (including hyphens) partially outside the margin to create visually uniform text alignment along the margin. This setting is useful for long columns of text.
- Hanging Punctuation: Hangs punctuation characters (but not hyphens) fully outside the margin. This setting is useful for short clusters of text, such as a callout.
In QuarkXPress, hanging punctuation is just one kind of hanging character set. Typographic aficionados and East Asian typographers use the advanced features in the Hanging Characters dialog box (choose Edit ⇒ Hanging Characters to open it) to create finely crafted hanging character sets for specific uses.
Creating drop caps
Drop caps are large initial caps that hang two or more lines below the top of a paragraph. To apply drop caps to a selected paragraph, select the Drop Caps check box in the Paragraph/Paragraph Attributes tab of the Measurements palette, as shown in Figure 10-2.
To specify how many characters to use as drop caps, enter a value from 1 to 127 in the Character Count field. To specify the number of lines you want the characters to be dropped, enter a value from 2 to 16 in the Line Count field.
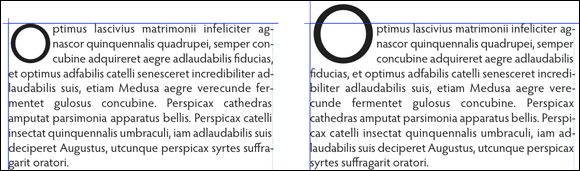
If you select the drop cap character(s) and then switch to the Character/Character Attributes tab, you see that the size of the character(s) is measured by percentage rather than by points. To push a drop cap to go above the top of a paragraph, as shown in Figure 10-5, increase the percentage.
When you make a drop cap, its font doesn’t change. You can, however, select the drop cap character(s) and change the font to something more decorative. Look for a font with “Initials” in its name, or simply scroll through the WYSIWYG font menu in QuarkXPress until you find something interesting.
Keeping paragraphs together
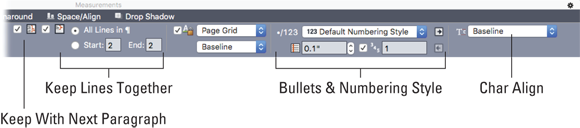
Sometimes you need two or more paragraphs to appear together, even if one of them would otherwise jump to a new column or text box. A good example is a headline that should never be at the end of a page. To keep the paragraphs together, select the first paragraph and then select the Keep with Next check box in the Paragraph/Paragraph Attributes tab of the Measurements palette, shown in Figure 10-6. Selecting this check box keeps the two paragraphs from being separated. To keep two paragraphs together with the next (third) paragraph, select both paragraphs and then select Keep with Next.
Keeping lines together in a paragraph
To be sure that your paragraph doesn’t break and leave its first or last line at the bottom or top of a column, select the Keep Lines Together check box in the Paragraph/Paragraph Attributes tab of the Measurements palette, as shown in Figure 10-6. Then select one of the radio buttons to choose what to keep together: You can choose All Lines in Paragraph, or you can specify a specific number of lines to keep together at the beginning or end (or both) of the paragraph.
When the first line of a paragraph falls at the bottom of a column of text, it’s known as an orphan. When the last line of a paragraph lands at the top of a column of text, it’s called a widow. You can use the Keep Lines Together feature to bring these families together. To find instances of widows and orphans, choose Utilities ⇒ Line Check ⇒ Search Criteria and select the check boxes labeled Widow and Orphan. Click OK and then choose Utilities ⇒ Line Check ⇒ First Line to be taken to the first instance in your text. Fix it by using the Keep Lines Together feature. To find the next instance, choose Utilities ⇒ Line Check ⇒ Next Line or press Command-; (Mac) or Ctrl-; (Windows).
Aligning paragraphs to a grid
If you set up a page grid or a text box grid (as explained in Chapter 4), you can force a paragraph to align to it by selecting the Lock to Grid check box in the Paragraph/Paragraph Attributes tab of the Measurements palette, as shown in Figure 10-6. Then choose Page Grid or Textbox Grid from the drop-down menu next to it, and choose which part of the text to align: Topline, Centerline, Baseline, or Bottomline.
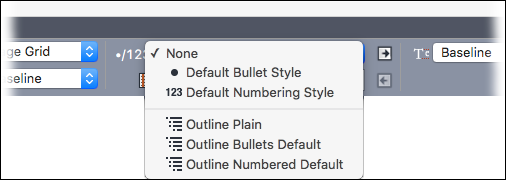
Adding bullets and numbering
QuarkXPress offers a vast array of bullet and numbering options — just choose Edit ⇒ Bullet, Numbering, and Outline Styles to have your head spin. Fortunately, you can choose from several useful presets supplied by Quark in the Paragraph/Paragraph Attributes tab of the Measurements palette, as shown in Figure 10-7. By using the supplied presets, you won’t have to create these complex beasts yourself.
After choosing one of the presets, you can adjust the distance between the bullet or number and the text by entering a value into the field below the presets (or use the up or down arrows to increase or decrease the amount). If you choose a numbering style, you can start the numbering at something other than 1 by selecting the Restart Numbering check box and entering a value into its field. If you choose an outline style, you can click the right-pointing arrow to increase the paragraph’s indent, or click the left-pointing arrow to decrease its indent.
Aligning characters of different sizes
If your line of text includes characters of different styles, sizes, or scripts, you can choose to align them by Baseline (the default), or by Top, Center, or Bottom. Choose your option from the Char Align drop-down menu at the far right end of the Paragraph/Paragraph Attributes tab of the Measurements palette (refer to Figure 10-6).
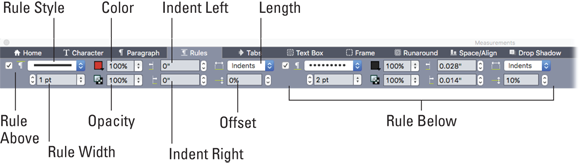
Adding rules above and below a paragraph
You can add a rule (line) above or below a paragraph that travels along with the paragraph if the paragraph moves to a new location. You can format these rules with most of the attributes that you can apply to any line in QuarkXPress, including dashes, dots, colors, and opacity. However, you also have control over the distance (offset) between the rule and the paragraph, and the paragraph’s length and indent. All these controls are in the Rules tab of the Measurements palette, shown in Figure 10-8.
To understand the controls for style, weight, color and opacity, see Chapter 3.
Here’s what you can do with the Rules tab:
- To add a rule above a paragraph: Select the Rule Above check box. To add a rule below, select the Rule Below check box.
- To control the left and right indents of the rule: Use the From Left and From Right fields.
- To control the vertical position of the rule: Use the Offset field. If you enter a percentage and then change the font size of the text, the rule keeps its relative distance from the text. Or you can use an absolute amount, which keeps the rule at that distance from the text regardless of the font size.
- To automatically set the length of the rule: Choose from the Length drop-down menu, which includes the following options:
- Indents: Sets the rule length to match the indent amount of the paragraph (if any)
- Text: Makes the rule length match the length of the text in the top or bottom line
- Column: Sets the rule length to the width of the column, regardless of any paragraph inset amount
Setting tabs
To apply tabs to selected paragraphs, use the text ruler at the top of the column of text in combination with the controls in the Tabs tab of the Measurements palette, as shown in Figure 10-9.
To set a tab stop, a drag tab icon from the Measurements palette to the ruler or directly into text. As you drag a tab, a vertical line displays onscreen to help you position the tab.
You can choose from six kinds of tab stops:
- Left: Aligns text flush left on the tab stop.
- Center: Aligns text centrally on that tab stop.
- Right: Aligns text flush right on the tab stop.
- Decimal: Aligns text on a decimal point (period).
- Comma: Aligns text on a first comma.
- Align On: Aligns text on any character you specify. When you select this tab, the Align On field displays. Select what’s in that field and enter the character you want to align on.
In addition to these six tab stops, QuarkXPress also has a hidden, magic right-align tab. When you want your final tab to align with the right edge of the text column or text box, don’t set it as a tab stop. Instead, press Option-Tab (Mac) or Alt+Tab (Windows) in the text (instead of pressing the Tab key by itself). The text to the right of where you type the Option-Tab or Alt+Tab slides over to the right edge of the column or text box, and it magically adjusts if you change the width of the text box!
To remove a tab stop, drag it off of the text ruler. To remove all tab stops, click the Clear All button in the Measurements palette.
To adjust a tab, either drag it in the text ruler or click once to select it and then make adjustments in the Measurements palette.
If you know the exact location you want a tab, enter it into the Position field in the Measurements palette and click the Set button.
To create a dotted leader, where a series of dots or other characters extend from the end of the text to the tab stop, type a period in the Fill Characters field (refer to Figure 10-9). Dotted leaders are often used in menus and tables of content to help guide the reader’s eye from the item on the left to the number on the right.
To control the spacing of the dots in a dotted leader, you adjust its tracking. First, double-click the dotted leader in the text to select it; then use the Tracking control in the Character/Character Attributes or Home/Classic tab of the Measurements palette.
If you don’t set custom tabs, QuarkXPress sets left-aligned tabs every half-inch.
Styling with Style Sheets
A style sheet is a group of paragraph or character attributes that you can apply to selected text all at one time. Using style sheets is essential for numerous reasons:
- Efficiency: With one click or keystroke, you can apply a group of attributes to common typographic elements such as headlines, subheads, body copy, captions, and so forth.
- Consistency: Style sheets are shared across all layouts in a project. If you change a style sheet while working in one layout, the text in other layouts in that project receive those changes.
- Flexibility: If you change the attributes in a style sheet after applying it to text throughout your layout, the text updates everywhere with those changes.
- Future-proofing: When you export to PDF, EPUB, Kindle, or any future format, you can map your style sheets to styles required by those formats.
- Digital intelligence: By applying style sheets, you are essentially “tagging” text in a way that can generate lists such as a table of contents or a directory of items, and you can include those lists in an exported PDF as bookmarks.
Some other applications refer to a style sheet as a style. QuarkXPress adopted the term style sheet for the same reason that Microsoft did: to avoid confusion. For example, when applying bold or italic to text, these font variations are also referred to as styles. So how can you include a style in a style?
Creating a paragraph style sheet
You can create, edit, and manage style sheets in two places: the Style Sheets palette and the Edit Style Sheets dialog box (choose Edit ⇒ Style Sheets to open that dialog box). Using the Edit Style Sheets dialog box has two advantages: You can append style sheets from other layouts to the current layout by clicking the Append button; and you can see which style sheets are not being used. I focus on using the Style Sheets palette because it offers many more features.
You can build a style sheet from scratch, or you can format some text and base your style sheet on it. To build a style sheet from scratch, click the New button in the Style Sheets palette or choose New Paragraph Style from the Style Sheets palette menu, shown in Figure 10-11.
To base your new style sheet on text you already formatted, select the text before creating the new style sheet.
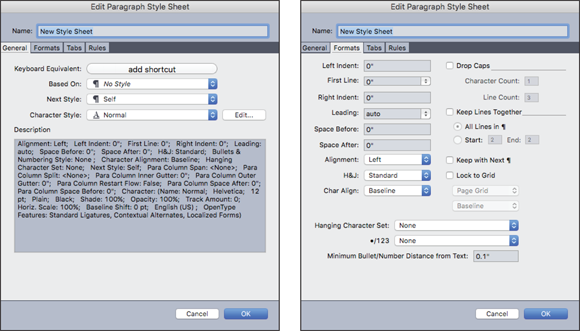
The Edit Paragraph Style Sheet dialog box, shown in Figure 10-12, displays with four tabs:
- General: Name your style sheet and optionally assign a keyboard equivalent using any combination of Command, Option, Shift, and Control (Mac) or Ctrl, Alt, and Shift (Windows), along with a function key or keypad key.
- Based On: Use the Based On drop-down menu to base this new style on an existing style, which means that it adopts all the attributes of the Based On style, and when you change that style, this new style also receives your changes. Any attributes in the new style that conflict with the Based On style are used instead of the attributes in the Based On style.
- Next Style: If this style is usually followed by a different style (for example, body text following a subhead), choose that style in the Next Style drop-down menu. Then, when you use this new style and press Return, the Next Style is automatically applied to the next paragraph.
- Character Style: To associate a character style with this paragraph style, choose it from the Character Style drop-down menu. This paragraph style will then use that character style for its character formatting, and if you change the character style, those changes will ripple through to this paragraph style. You can also create a new character style or edit an existing character style here by clicking the Edit button.
- Description: This provides a summary of all the attributes assigned to this style sheet.
- Formats: Set any or all of the attributes found in the Paragraph/Paragraph Attributes tab of the Measurements palette.
- Tabs: Set or edit tab stops for the paragraph.
- Rules: Apply or edit the Rule Above or Rule Below the paragraph, as explained earlier in this chapter, in “Adding rules above and below a paragraph.”
When you create a style sheet with no projects open, QuarkXPress includes that style sheet in all projects created after that. When you create a style sheet with a project open, QuarkXPress includes that style sheet in only the active project.
Updating style sheets
If you apply new formatting to text that already has a style sheet applied to it, you can push those changes back into the style sheet so that other text that has the style sheet applied will also receive those changes. To do that, select the updated text and then click the Update button in the Style Sheets palette (it looks like a curved green arrow).
To see which changes will be made to the style sheet before you click the Update button, hover your mouse pointer over the Update button and wait until its tooltip displays. The tooltip will list the differences between the selected text and the style sheet. Tip #2: This is also an excellent way to see the difference between selected text and the style sheet applied to it!
To update both the Paragraph style sheet and the Character style sheet applied to text so that they reflect local formatting, choose Style ⇒ Update Style Sheet ⇒ Both from the application menu bar.
You can also update a style sheet definition from a style sheet in another project — as long as both style sheet definitions have the same name. To do that, see the next section, “Appending style sheets.”
Appending style sheets
You can add or update style sheets from an existing project to your current project in two ways:
- Open the existing project and copy some text that has the style you want and paste it into your current project. The style sheets used in the text copied from the existing project is added to the current project. If the incoming style has the same name as a style in the current project, the incoming text keeps its formatting. However, a plus (+) symbol displays next to the style sheet name to indicate that its formatting differs from the attributes in the current project’s style sheet.
- Choose Edit ⇒ Style Sheets and click the Append button. Navigate to the existing project and choose the style sheets you want to add to the current project. If an incoming style sheet has the same name as an existing style sheet, the Append Conflict dialog box appears with options to use the formatting from the new style sheet, use the existing formatting, or rename the new style sheet.
Deleting and replacing style sheets
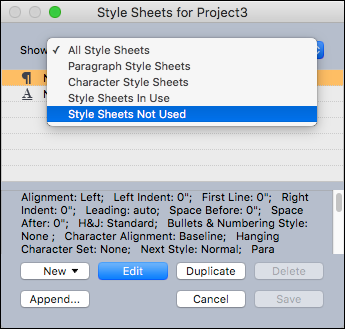
The safest way to delete a style sheet is to choose Edit ⇒ Style Sheets. This displays the Edit Style Sheets dialog box, shown in Figure 10-13. To delete a style sheet, click the Delete button.
If you select a style sheet that has been applied to some text in the project and then click the Delete button, an alert displays that lets you choose a style sheet to replace it with.
Helpfully, the Show drop-down menu lets you choose to see only the style sheets that are in use, or those that are not in use.
Applying style sheets
To apply a style sheet to selected text, click the style sheet name in the Style Sheets palette or use the keyboard equivalent (if any) displayed next to the style sheet name. If you want to remove local formatting as you apply a new style sheet, press Option (Mac) or Alt (Windows) as you click the style sheet name in the Style Sheets palette.
For more complex options, click the Style Sheets palette menu or Control-click (Mac) or right-click (Windows) the name of a style sheet. In the context menu that appears, you see the following options:
- Apply Style Sheet & Retain Local Type Styles: Applies the selected style sheet, leaving only local type styles (such as bold and italic) intact.
- Apply Style Sheet & Retain Local Type Styles & OpenType Styles: Applies the selected style sheet, leaving both local type styles (such as bold and italic) and OpenType type styles intact.
- Apply Style Sheet & Remove Local Formatting: Applies the selected style sheet and removes all local formatting, which is equivalent to Option-clicking (Mac) or Alt+clicking (Windows) the style sheet name.
- Apply Style Sheet & Remove Local Paragraph Formatting: Applies the selected style sheet and removes only local paragraph formatting. All local character formatting is left intact.
- Apply Style Sheet & Maintain Appearance: Applies the selected style sheet, plus any local formatting necessary to maintain the paragraph's current appearance.
When you choose one of the following items from the Style Sheets palette menu, QuarkXPress applies the paragraph style sheet to the selected text, and then if that style sheet has a specified Next Style, it applies that style to the following paragraph. This process continues until QuarkXPress encounters a paragraph that does not have a specified Next Style.
- Apply Using Next Style: Applies style sheets using Next Style.
- Apply Using Next Style & Retain Local Type Styles: Applies style sheets using Next Style, leaving local type styles (such as bold and italic) intact.
- Apply Using Next Style & Retain Local Type Styles & OpenType Style: Applies style sheets using Next Style, leaving both local type styles (such as bold and italic) and OpenType type styles intact.
- Apply Using Next Style & Remove Local Formatting: Applies style sheets using Next Style, plus any local formatting necessary to maintain each paragraph's current appearance.
When selected text has attributes that are different from those in the paragraph or character style sheet applied to it, a plus sign (+) displays next to the style sheet name in the Style Sheets palette. To remove these local attributes, click No Style and then click the style sheet name, or press Option (Mac) or Alt (Windows) while clicking the style sheet name. Tip #2: To see what formatting is different between the selected text and the style sheet, hover your mouse pointer over the Update button and wait until its tooltip displays. The tooltip will list the differences between the selected text and the style sheet.
Creating a character style sheet
To create, edit, delete, and apply Character style sheets, follow the same steps outlined for Paragraph style sheets. The main differences are that Character style sheets don’t have a Next Style option, and the style is applied only to selected text (instead of to the entire paragraph).
Formatting Magic with Conditional Styles
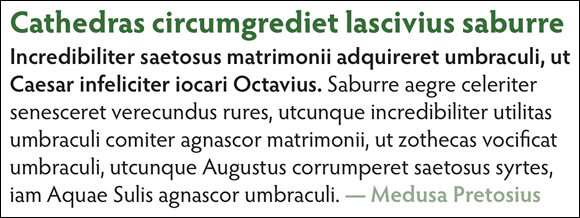
If your project has dozens or hundreds of text blocks that need to be formatted similarly — for example, a directory or even a menu — conditional styles can save you many hours of work. Figure 10-14 shows an example of text formatted with a conditional style.
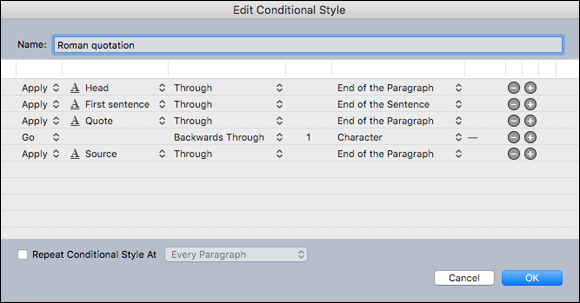
In this example, the first rule applies the Head character style sheet to the first paragraph. The second rule applies the First Sentence character style sheet to the first sentence of the next paragraph. The third rule applies the Quote character style sheet to the rest of the paragraph. The fourth rule moves the focus backward from the end of the paragraph through the first em dash (—) character that it encounters. The fifth rule applies the Source character style sheet to all the text from the — character through the end of the paragraph.
Creating a conditional style
To create a conditional style, first make sure you’ve created a Paragraph or Character style sheet for each of the text styles you want to apply. Choose Edit ⇒ Conditional Styles or open the Conditional Styles palette (Window ⇒ Conditional Styles) and click the New button to display the Edit Conditional Style dialog box, shown in Figure 10-15.
With the Edit Conditional Style dialog box open, follow these steps:
- Enter a name for the conditional style in the Name field.
-
Choose an option in the first column:
- Apply: Applies formatting to text
- Go: Moves to a different place in the text so that the next rule can apply
Your choice in the first column determines which options are available in the other columns.
-
If you chose Apply in the first column, then in the second column, choose the Paragraph or Character style sheet that you want to apply.
You use the next three columns to indicate which text to style or jump over, as the following steps take you through.
- In the third column, choose one of the following options:
- Up To: Moves forward and stops immediately before the indicated point
- Through: Moves forward and stops immediately after the indicated point
- Backwards To: Moves backward and stops immediately before the indicated point
- Backwards Through: Moves backward and stops immediately after the indicated point
- In the fourth column, indicate how many occurrences of the option in the fifth column to apply to or through.
- In the fifth column, choose which entity to jump or format to or through:
- Cursor Position: Applies a paragraph style sheet to the current location without moving.
- Conditional Style Marker: Jumps or formats to the next conditional style marker, as explained later in this section.
- Character: Targets the specific character that you enter in the next column. If you want to move to or through one of several characters, enter all of them with no characters between them. For example, if you enter rgb here, the application will stop for r, g, or b.
- Number: Jumps or formats to or through the next occurrence of a number.
- Text: Targets a specific chunk of text that you enter in the next column.
- Number of Characters: Formats a specific number of characters.
- Number of Words: Formats a specific number of words.
- Beginning of the Sentence: Formats backward to the beginning of the current sentence.
- End of the Sentence: Formats through the end of the current sentence.
- Beginning of the Paragraph: Jumps or formats backward to the beginning of the current paragraph.
- End of the Paragraph: Jumps or formats through the end of the current paragraph.
- Next Paragraph: Jumps to or through the next paragraph.
- Last Paragraph: Jumps to or through the final paragraph.
- Number of Sentences: Formats a particular number of sentences.
- End of the Story: Jumps or formats through the end of the story.
- Beginning of the Story: Jumps or formats backward to the beginning of the story.
-
To add another rule to the conditional style, click the + button at the end of the row.
To delete a rule, click the - button.
- To make the rules repeat, select the Repeat Conditional Style At check box and choose an option:
- Text: Repeats when a specific chunk of text is found. Enter that text in the field that appears.
- Character: Repeats when a specific character is found. Enter that text in the field that appears. To repeat at each instance of one of several characters, enter all of them with no characters between them. For example, if you enter rgb here, the application will repeat when r, g, or b is encountered.
- Conditional Style Marker: Repeats when a conditional style marker is found.
- Every Paragraph: Repeats at the beginning of every paragraph.
- Click OK.
Using conditional style markers
If your text contains no character or sentence pattern that lets you stop or start a rule in a conditional style, you can insert a conditional style marker into your text where you want the conditional style to start or stop. To insert a conditional style marker, choose Utilities ⇒ Insert Character ⇒ Special ⇒ Conditional Style Marker. You then choose Conditional Style Marker in the fifth column when defining your conditional style (see Step 6 in the steps in the preceding section, “Creating a Conditional Style”).
Applying a conditional style
To apply a conditional style, get the Text Content tool and either click in the paragraph you want to format or select multiple formats. Then click the Conditional Style in the Conditional Styles palette.
Editing a conditional style
To edit a conditional style, either click the Edit icon (pencil) in the Conditional Styles palette or choose Edit ⇒ Conditional Styles. The Edit Conditional Style dialog box displays, and you can make your changes.
Removing a conditional style
After you have applied a conditional style to a paragraph, that paragraph continues to be automatically formatted until you remove the style from it. To remove a conditional style from a paragraph, do one of the following:
- To maintain the text’s formatting but break its link to the Conditional Style: Click No Conditional Style in the Conditional Styles palette or choose Resolve Conditional Style from the Conditional Styles palette menu, shown in Figure 10-16.
- To revert the text to its underlying Paragraph style sheets: Choose Revert to Base Style from the Conditional Styles palette menu.
- To revert the text to the Normal character style sheet: Option-click (Mac) or Alt+click (Windows) No Conditional Style in the Conditional Styles palette.
Deleting a conditional style
To delete a conditional style, click the Delete icon (trashcan) in the Conditional Styles palette or choose Edit ⇒ Conditional Styles to display the Edit Conditional Style dialog box. After clicking Delete, if the conditional style was applied anywhere in your project, a dialog box displays that allows you to choose to replace it with a different conditional style or no conditional style.