Clean Up Your Mac
Over time, most computers accumulate clutter, including outdated software, forgotten downloads, and obsolete files. Not only can this clutter make files harder to find, it can also cause problems when you upgrade to Catalina—incompatibilities may show up, or you may run out of disk space, for example.
In this chapter, I suggest that you install some software updates and delete files you don’t need anymore. I also show you how to check your disk for errors that could cause problems with Catalina.
Because you’ll be making so many changes, you should first make a complete backup—so if you skipped Back Up Your Disk, go back and follow those steps now. After you’ve cleaned up your Mac, restarted, and verified that everything is working properly, you should Update Your Duplicate so that it’ll be closer to the state of your disk when you upgrade to Catalina. And some people should Consider Disabling Encryption.
Update Your Third-Party Software
Every major upgrade to the Mac operating system results in software compatibility problems, where some apps work poorly or won’t launch. Most of us will have to update at least a few apps to make them work correctly under Catalina. If history is any indication, some incompatible apps won’t be updated right away, and a few might never be. But many developers work hard to ensure that their software is ready for each new version of macOS, and “Catalina-compatible” software updates have already been appearing for months.
Check for 32-Bit Apps
When Mojave was released in 2018, users began to notice that upon launching certain apps, the following alert would occasionally appear: “‘App name’ is not optimized for your Mac and needs to be updated.” What that meant is that the app in question was a 32-bit app, and although it could still work under Mojave, Apple was warning you (and the app’s developer) that it won’t work under Catalina, which requires 64-bit apps.
As a user, you don’t need to know or care about the technical details differentiating 32-bit apps from 64-bit apps. What is relevant, however, is that converting a 32-bit app into a 64-bit app can be a big undertaking for a developer. For some apps—especially those that are older, free, or open-source—that effort might simply not be worth it to the developer. So there’s an excellent chance that one or more apps you use regularly won’t work under Catalina, and some of them may never work on any future version of macOS.
Thus, before you upgrade to Catalina, you should find out which of your apps are still 32-bit apps and then, depending on what you learn, decide on appropriate steps.
Find Your 32-Bit Apps
There are several techniques you can use to identify which of your apps are 32-bit and therefore need to be upgraded or replaced. One way is to open System Information (in /Applications/Utilities), select Applications in the sidebar (under Software), wait a few moments while the app examines your disk, and then look in the “64-Bit (Intel)” column of the table. Apps with “No” in that column won’t run under Catalina.
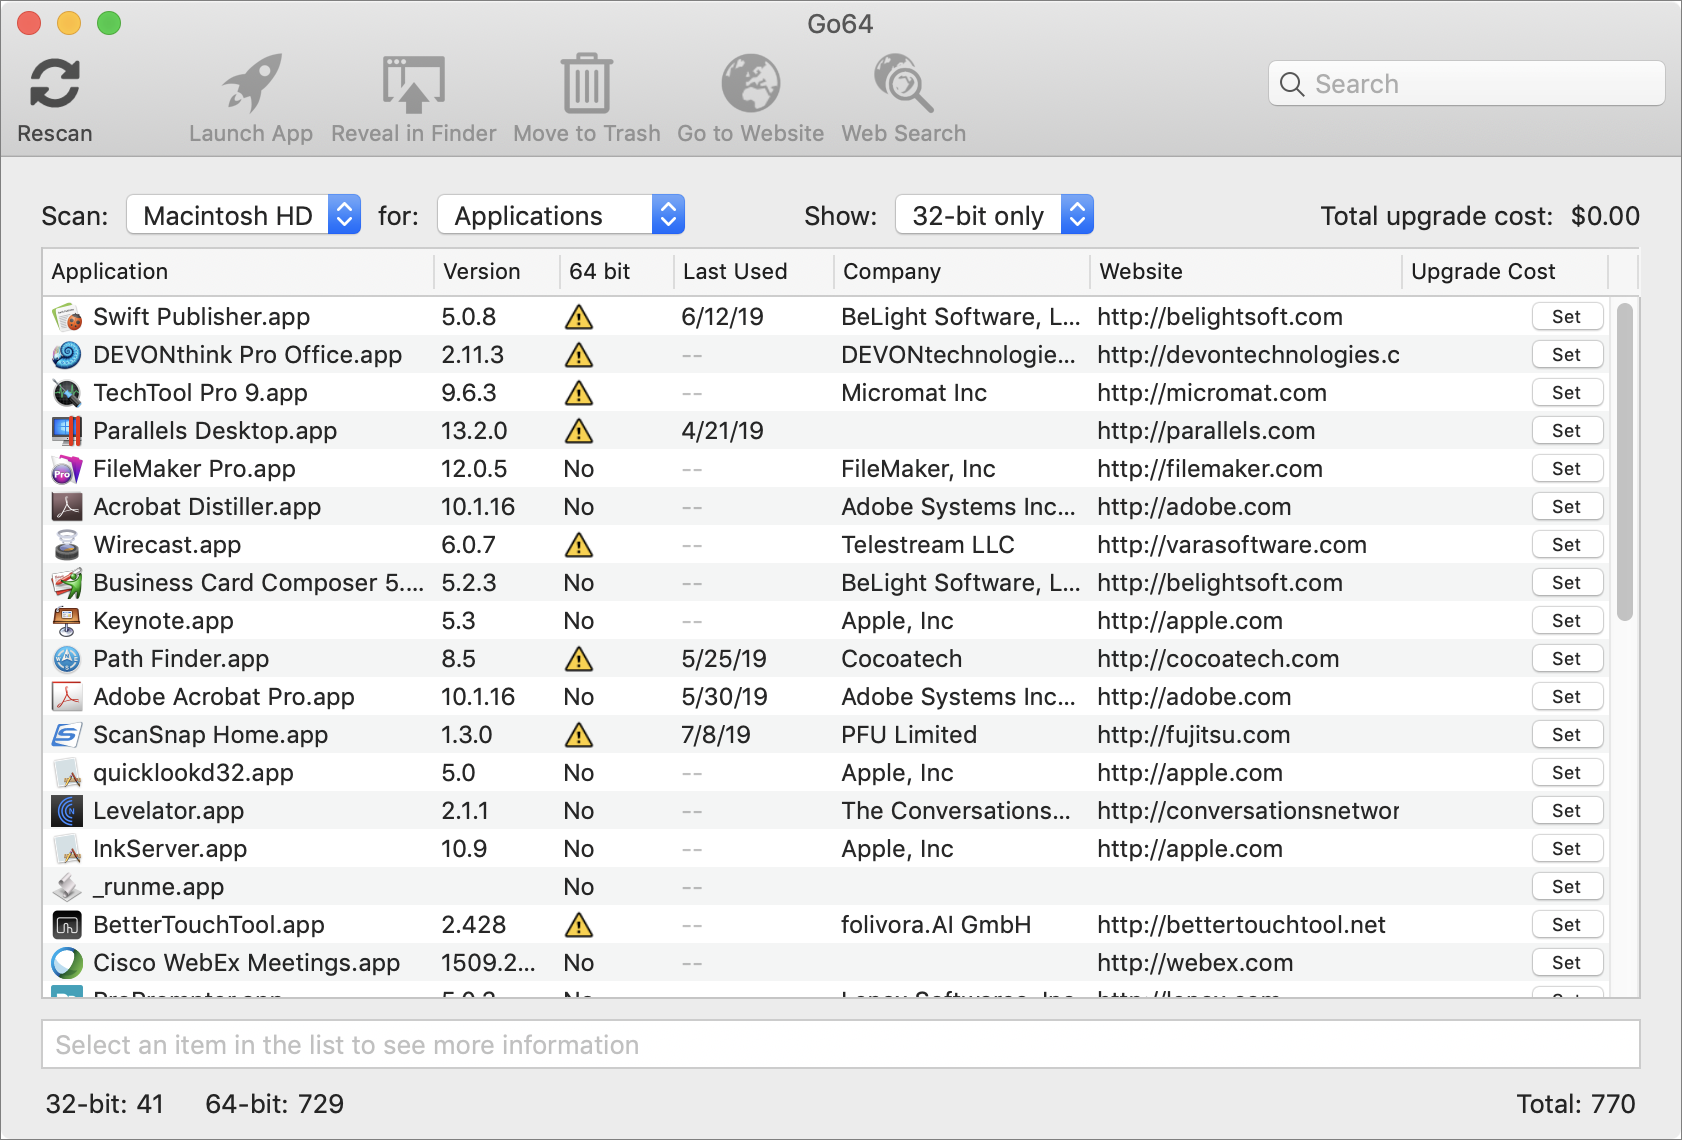
But there’s a better way: download the free Go64 app by St. Clair Software (developers of Default Folder X and other highly regarded Mac apps). Open the app and click OK. After a few seconds, it lists all your 32-bit apps (including those, marked with an alert ![]() icon, which contain one or more 32-bit components), along with helpful information like the date you last used each one and a link to each developer (Figure 4). You can also manually fill in upgrade costs, to help you estimate how expensive it will be to use Catalina.
icon, which contain one or more 32-bit components), along with helpful information like the date you last used each one and a link to each developer (Figure 4). You can also manually fill in upgrade costs, to help you estimate how expensive it will be to use Catalina.

Handle Your 32-Bit Apps
Once you’ve identified which apps won’t run under Catalina, you have several options, and you may go down different paths for different apps:
Uninstall: If a 32-bit app is one you never use and don’t expect to need in the future, just get rid of it—drag it to the Trash or use an uninstaller app such as CleanMyMac X.
Upgrade: If the developer already offers a newer, 64-bit version of the app, the best course of action is to install that before installing Catalina. Of course, not all 64-bit app upgrades are free, and in some cases moving to the latest version of an app may require not only a fee but the loss of features, moving to a subscription model, or other changes you dislike. All I can say is: I feel your pain. If upgrading an app is a nonstarter, consider the other options below.
Replace: Sometimes the best way forward is sideways. If an app you use isn’t 64-bit, or if the upgrade is impractical, there could be a different app that meets the same need. For example, if you’re using an old, 32-bit version of Adobe Acrobat Pro and don’t want to pay to upgrade to a newer, 64-bit version, you may find that an alternative PDF editing app such as PDFpenPro meets your needs. Of course, this will require research and testing, and what works for one person may not work for the next.
Use a virtual machine: Parallels Desktop and VMware Fusion are most commonly used to run Windows on a Mac. But they also permit you to install older (or newer) versions of macOS as a guest operating system. This method (which I use frequently, and with good results) effectively allows you to run multiple versions of macOS at once, and to switch back and forth without rebooting. It does require a fair amount of RAM and disk space, however.
Use a separate boot volume: If your SSD or hard disk is already formatted as APFS, it’s a quick and painless process to add a new volume inside your APFS container (see Upgrading to or from the Catalina Beta), and install Catalina onto that volume. Then you can reboot your Mac from either your current volume or the new volume whenever you want to switch operating systems. The downside, however, is that sharing apps and data across operating systems sometimes poses challenges (which, alas, I can’t get into in this book), while replicating all your data across volumes would double your disk space usage.
Delay or skip using Catalina: The final option, which is appropriate only for those who spend most of their days using 32-bit apps with no current upgrade or replacement path, is to stick with Mojave (or whichever version of macOS you’re using), and not upgrade to Catalina (or a newer version of macOS) until new versions of your apps, or suitable substitutes, appear.
Personally, I’ve used most of these strategies. I deleted a few apps, upgraded others, replaced a couple, and use a virtual machine (still running Mojave) for the rest—at least for now.
Update Other Apps
The Catalina installer looks for, and disables, certain types of incompatible software—but there’s no guarantee it will find everything (and I should note that it does not remove 32-bit apps—they’ll still be present, they just won’t work). Given the choice, you’re usually better off upgrading third-party software before you install a new version of your operating system. In cases where low-level incompatibilities exist, especially with things like drivers, preference panes, and kernel extensions, you can save yourself grief by preventing, rather than fixing, the problem.
Apple built an update mechanism into the App Store, so any apps you downloaded from the App Store can also be updated there—and App Store updates are free. To check for and apply App Store updates:
Open the App Store app by choosing Apple > App Store. (In Mavericks or earlier, choose Apple > Software Update.)
Click Updates in the toolbar to display a list of available updates.
To update a single app, click the Update button next to it. Or, to update all the listed apps at once, click Update All.
If prompted to do so, enter your Apple ID and password, and click Sign In.
The App Store downloads and installs the updates automatically.
Software that doesn’t come from the App Store must use a separate update mechanism. Happily, most modern apps contain some sort of update feature. Unhappily, they don’t all work the same way. Some check for updates every time they’re launched, or on a fixed schedule, while others check only on demand; of those that do check automatically, not all have this feature turned on initially. Some programs can download and install new versions of themselves automatically, while others download a disk image and expect you to open it and run the installer yourself; still others do nothing but open a webpage with links to updates you can download manually.
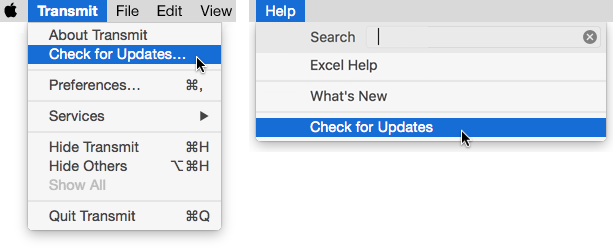
For now, do the following. In each non–App Store program that you use frequently, look for a Check for Updates command (the wording may vary). Such commands (Figure 5) usually appear in the application menu, the Help menu, or the Preferences window.

While you’re at it, check each app’s Preferences dialog for a checkbox that enables scheduled updates, and if you can choose how often to check, choose the most frequent option. That way, even if an update isn’t available now, you’ll be informed as soon as the next update becomes available and you launch the app.
If you’ve installed any Unix software on the command line, that will need to be updated too—and, in some cases, relocated. Unfortunately, much software of this sort is compiled specially for each version of macOS, so those updates—unlike most software updates—are better performed after you upgrade to Catalina. See Final Software Advice, later, for details.
Review Your iTunes Configuration
I mentioned earlier that Catalina no longer includes an app called iTunes, but instead splits the features previously offered by iTunes into several new apps (including Music, Podcasts, and TV). For most people, the transition to these new apps will be seamless, as the Catalina installer will move the media files from their old locations to the new locations used by each respective app. (For details on the new locations, see Kirk McElhearn’s article Locations of Media Files in macOS Catalina.)
If you left your iTunes media in its default location (~/Music/iTunes/iTunes Media), everything should work just as you expect. However, if you stored some or all of your iTunes media on an external disk, you could encounter a gotcha, because the Catalina installer will attempt to move podcasts and audiobooks into locations within your home folder on your startup volume. If you have lots of podcast and/or audiobook content and very little room on your startup volume, this copying process may fail, with unpredictable results. (To check on the location of your media, open iTunes, go to iTunes > Preferences > Advanced, and look under “iTunes Media folder location.”)
Similarly, if you use the TuneSpan app to store just a portion of your iTunes media on an external disk, it’s likely that the new Catalina media apps will be unable to find that “spanned” content, and so far, I’ve seen no sign of a Catalina-compatible update to TuneSpan.
Unfortunately, as of publication time, I don’t know how to solve or work around these problems (other than copying everything back to your startup volume, assuming it even has enough space). I hope to learn more before the Catalina release, and if I do, I’ll include that information here in version 1.1 of this book.
De-Clutter Your Disk
Over time, your disk accumulates obsolete, extraneous, or otherwise useless apps and files, often called cruft—hacker slang for digital detritus. Removing cruft increases the disk space available for Catalina (see Free Disk Space) and reduces the chance of software conflicts.
Determining which files you need and which you can toss may be quite a task. My advice is not to worry about removing every last obsolete file. However, you should at least go through your ~/Downloads folder (and any other location where you may store downloads) and delete large files you no longer need, and then take a quick spin through your /Applications folder, the /Applications/Utilities subfolder, and the System Preferences app to remind yourself of anything you’ve installed over the past year but never use.
A better way to declutter your disk is to use a utility that can safely uninstall software, purge your disk of unneeded resource files, and identify old and large files you may be able to do without. The tool I prefer for these sorts of tasks is CleanMyMac X (read my review of the previous version in TidBITS for details), although there are numerous alternatives.
Whether you delete things manually or with the help of an app, be sure to empty the Trash (choose Finder > Empty Trash) afterward to recover the disk space that the files occupied.
If you’d like extensive, detailed advice on how to do a more thorough spring cleaning, as well as ongoing steps you can take to keep your Mac humming, see my book Take Control of Maintaining Your Mac.
Run Disk Utility
Over time, your disk can develop errors without manifesting obvious symptoms at first; such errors could interfere with installing Catalina or cause your Mac to misbehave afterward. You can nip many such problems in the bud with a simple procedure that looks for, and fixes, common disk errors that can crop up without your knowledge.
Use Disk Utility in El Capitan or Later
If your Mac is running El Capitan or later, follow these steps:
Launch Disk Utility (in
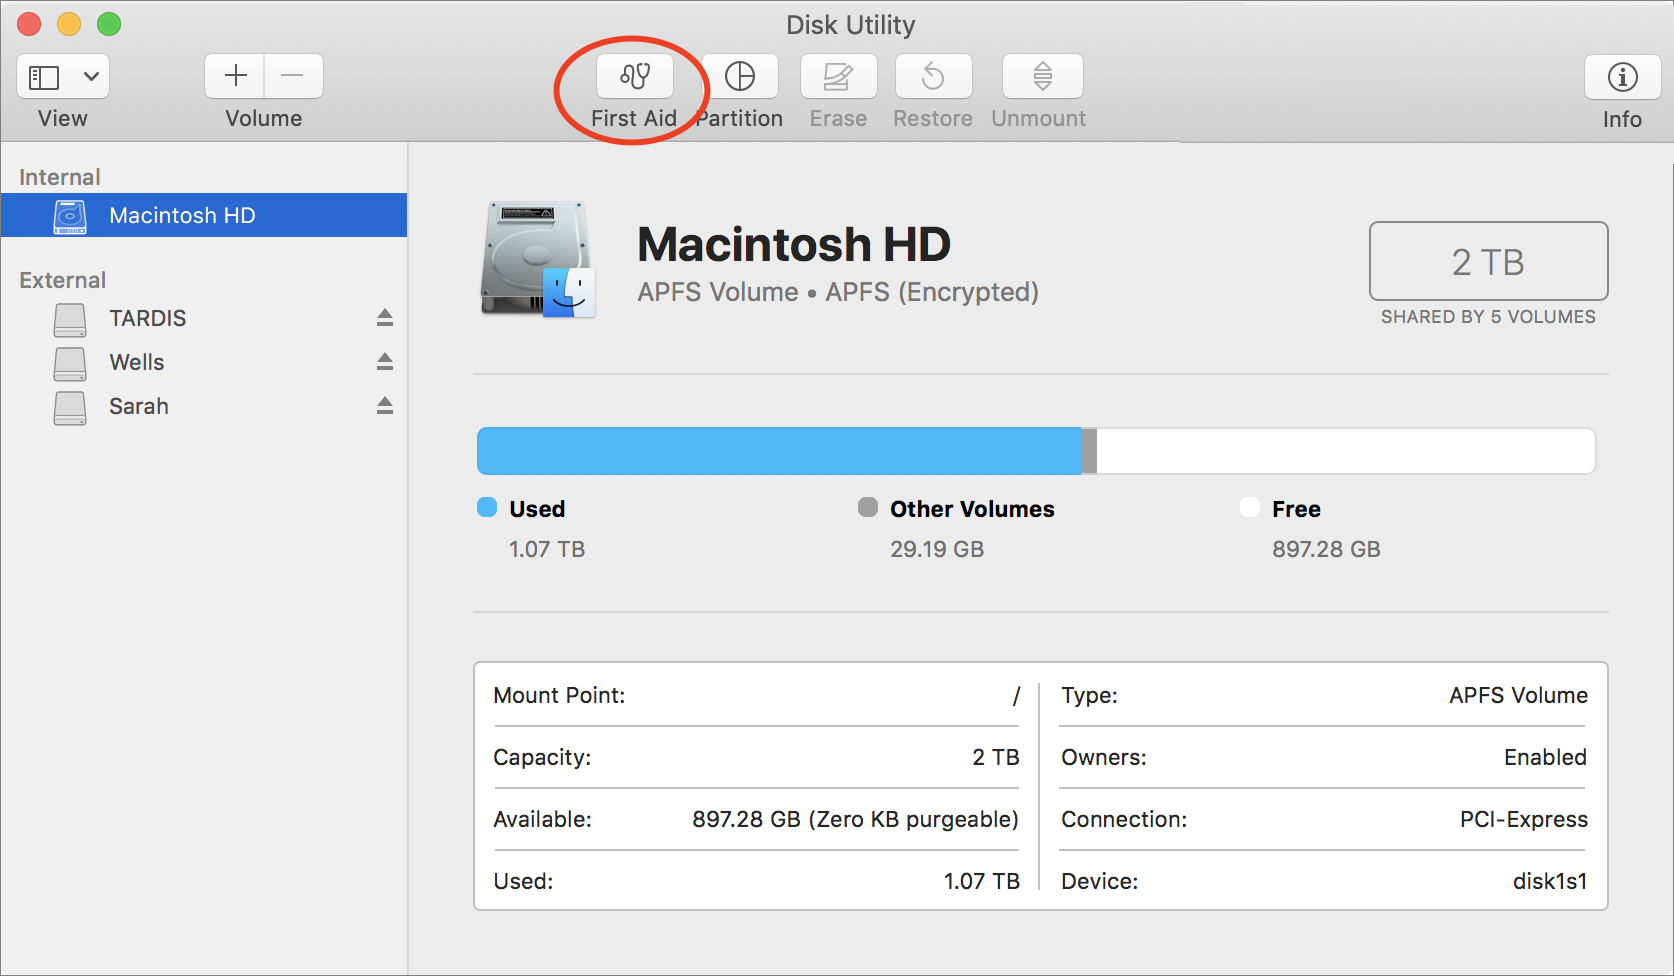
/Applications/Utilities).In the list on the left, select your startup volume (if it isn’t already selected; Figure 6).

Figure 6: In Disk Utility, select a disk and then click First Aid (circled). Click First Aid on the toolbar, and then click Run. Disk Utility checks your disk and repairs it if necessary. (Depending on your version of macOS, you may also see an alert notifying you that your Mac will be frozen while the First Aid process runs.)
When First Aid is finished, click Done and quit Disk Utility.
Use Disk Utility in Yosemite or Earlier
In Yosemite or earlier, Disk Utility can’t repair the volume you booted from, so you’ll have to use a different procedure that requires a secondary startup volume. Follow these steps:
Start up your Mac from media other than your regular startup volume that also contains Disk Utility. This could be, for example:
A bootable duplicate of your startup disk stored on an external hard drive or a second internal drive
A Mac OS X installation DVD or CD
A USB Software Reinstall Drive
The hidden Recovery HD volume on a Mac running 10.7 Lion or later, which enables OS X Recovery (choose Apple > Restart and immediately press and hold ⌘-R to start in OS X Recovery)
Run Disk Utility:
If you’re running from a bootable duplicate, you can find Disk Utility in
/Applications/Utilities.If you’re running from a Mac OS X installation disc or USB Software Reinstall Drive, click through the language selection screen and then choose Utilities > Disk Utility.
If you’re using OS X Recovery, click through the language selection screen if it appears, select Disk Utility, and click Continue.
At the left, select your regular startup volume (the one to repair, not the one from which you’re currently booted).
On the First Aid pane to the right, click Repair Disk.
Disk Utility looks for common errors and repairs them if possible. Ordinarily, it displays a message saying that repairs were completed or that no repairs were necessary.
Quit Disk Utility.
Restart your Mac:
If you find yourself within the installer, quit the installer too; then, click Startup Disk, select your main disk, and click Restart.
Otherwise, choose Apple > Restart.
If Disk Utility encounters a serious problem that it cannot solve, you may need to use a commercial repair tool such as TechTool Pro 11, which most experts recommend as their top pick—or restore your entire disk from a bootable duplicate or other full backup. Alternatively, you could erase your entire disk (after updating your duplicate one last time) and start over from scratch with Catalina, transferring all your apps and personal files from your duplicate after the installation, as I describe in Plan B: Clean Install.
Update Your Duplicate
Now that your disk is updated with the latest software, cleansed of space-hogging residue, and verified as functioning properly, you should update your duplicate so it reflects the latest and greatest state of your disk. To do so, repeat the steps in Create a Duplicate. With Carbon Copy Cloner (and most other backup software), updating a duplicate is much quicker than creating one from scratch, because only the files changed since the last duplicate are copied.
Consider Disabling Encryption
If your Mac has FileVault enabled, you need not disable it—when you upgrade to Catalina, it will still be active at the end of the process (and if your disk was previously formatted using HFS Plus, it will automatically switch to the new encryption method built into APFS—see Learn About APFS).
However, if you’re using third-party software to encrypt your whole disk—I’m thinking of products like Check Point Endpoint Full Disk Encryption and Symantec Endpoint Encryption—check with the developer before you upgrade to Catalina to confirm that the version you’re already using is compatible. If not, or if you’re unsure, the safest course of action is to disable the encryption before upgrading. Thereafter, you can either re-encrypt your disk with the same product or switch to FileVault.