![]()
BACKSTORY
Pre-1914 History
At the opening of the twentieth century, Great Britain was the world’s leading naval power, and the Royal Navy enjoyed a considerable reputation both at home and abroad. The greater part of this reputation was founded in its long history and its success in Britain’s wars with France a century before. In the intervening years, however, the Royal Navy had not been involved in any major fleet actions, and technology had moved forward at a considerable pace. This situation had generated two substantial problems. First, the fleet, while an efficient peacetime organization that was more than capable of dealing with police duties and minor conflicts, lacked the extensive experience of war that had made Nelson’s fleet such a formidable adversary. Second, the nature of fleets had changed so radically that while history still provided a guide to the essential nature of naval strategy, naval tactics had to be adjusted to accommodate the improved mobility and weapons of modern warships.
The period from the introduction of Britain’s first oceangoing ironclad, the Warrior of 1860, until the end of the 1880s saw a rapid evolution in warship design that produced a considerable variety of types that in turn made the development of a homogenous fleet impracticable. In the space of thirty years wood construction gave way to iron and then steel, sail power to steam machinery, and muzzle-loading guns to breechloaders. Warships increased in size and speed, along with their powers of offense and defense, and a steady stream of innovation saw the introduction of improved armor, torpedoes, torpedo boats, quick-firing guns, machine guns, and electric and hydraulic power supplies. Warship design stabilized during the decade from 1894 to 1904, and a considerable expansion of the construction programs to meet the two-power standard (a navy equal to the next two largest—France and Russia) gave the Royal Navy a fleet that greatly outnumbered any of its potential rivals. This period was not, however, without its innovations, which included the introduction of the torpedo-boat destroyer in 1893, face-hardened all-steel armor (which led to the reintroduction of the armored cruiser), gyrostabilized torpedoes (which increased effective range and provided a large part of the initial impetus for the development of long-range gunnery), and the initial stages of the installation of wireless communication.
The new century brought new problems for the continuance of Britain’s naval supremacy. The expansion of the navies of the United States, Japan, and Germany threatened to undermine the two-power standard at a time when the cost of maintaining the fleet was placing a heavy burden on the national economy. The two first-named countries did not pose any immediate threat to peace, but the planned expansion of the German fleet was clearly intended to challenge Britain’s assumed command of the seas and, in a more general sense, upset the balance of power in Europe. Initially circumstance served to favor the British, the danger of conflict with a combination of naval powers being considerably reduced by the Entente Cordiale with France in 1904 and the reduction of Russian naval power during the Russo-Japanese War of 1904–1905. These, together with the signing of the Anglo-Japanese alliance in 1902, allowed for a considerable reduction in ships on foreign stations, principally in the Mediterranean and Far East, and for a concentration of the fleet in home waters. This concentration served as both an economic measure and as a counter to the threat from Germany, the former rapidly giving way in importance to the latter.
At the same time the navy was subjected to major reforms under the direction of Admiral Sir John Fisher (First Sea Lord, 1904–10). These were intended to both improve the efficiency of the Royal Navy and to reduce costs; they included improvements in the training of officers, the nucleus-crew system, and the wholesale scrapping of obsolete warships. There was also a major change in warship development, with the introduction of the all-big-gun battleship and armored cruiser (Dreadnought and the Indomitable class, respectively). What has become known as the Dreadnought Revolution was again built around economy, especially as the construction program could be reduced while other naval powers considered their replies. The possibility of Germany reconsidering its intentions may well have crossed some British minds, but in the event that nation rose to the challenge, precipitating a naval race between Berlin and London. Ultimately the challenge failed, Britain abandoning attempts at economy and answering every increase in German construction with larger programs of its own. In the process the two-power standard was abandoned in favor of a 1.6:1 ratio between the British and German dreadnought fleets.
On the outbreak of war in 1914 the Royal Navy’s Grand Fleet consisted almost entirely of ships completed within the previous ten years, the bulk (dreadnoughts and their associated ships) within the last seven years. It was in many ways an untried weapon. The most recent fleet actions had been fought in the Russo-Japanese war between predreadnoughts, and although these had provided some lessons, mainly in regard to the dangers of mines and torpedoes and to the possibilities of long-range gunnery, much new technology had been introduced in the meantime that had major implications for the employment and tactics of the fleet. Critical among these were the introduction of submarines and aircraft, long-range gunnery, and long-range “heater” torpedoes. It remained to be seen how well peacetime plans and exercises would translate into war conditions.
Mission
The primary roles of the Royal Navy were defensive—the protection of seaborne trade and the prevention of invasion of Britain or the colonies and dominions of its worldwide empire. Traditionally, these roles had been met by the strategy of commanding sea communications with superior force and blockading the enemy fleet in harbor—either to prevent the latter’s passage to sea or to be in a position to intercept it when it did so.
In 1914 the import/export trade was critical to the British economy. The country was not self-sufficient; it imported well over 50 percent of its foodstuffs, while industry was dependent on large amounts of imported raw materials, particularly iron ore and oil. The importance of trade was reflected in the size of the empire’s merchant marine, whose gross tonnage represented 45 percent of the world’s shipping. On the outbreak of war the eastern entrance to the Channel was quickly closed and Britain’s premier fleet—the Grand Fleet—was already in position guarding the northern exits to the Atlantic. This greatly limited the ability of Germany to send out raiding cruisers or armed merchantmen to attack British shipping, the majority of the disruption caused in this way came from enemy ships that were already abroad when war broke out. Even then, the vast size of the British merchant fleet meant that the losses were economically insignificant. The only real impact resulted from the disruption of regular trade and a disproportionate number of warships required to patrol the trade routes.
As for defense against invasion, the only area of vulnerability was the east coast of England, and although this danger exercised the minds of the naval and military authorities, it was more imagined than real. The coast was vulnerable, due to the concentration of Britain’s main fleet in the north, but any attempt at invasion, even given a successful landing, would have certainly failed. In the event the only attacks made were a few “tip-and-run” naval bombardments of towns on the east coast.
The Royal Navy’s primary offensive roles were to support the army and to deny the seas to enemy trade. The former was mainly a case of defending troop transport and supply shipping to and off foreign shores, and general support, including bombardment operations in coastal areas. In the case of trade it proved fairly easy to eliminate the passage of the German merchant marine, but it remained possible for goods to reach Germany in neutral ships and via neutral countries. Although few ships could evade the blockade, its overall effectiveness was compromised by the difficulty of determining whether goods bound for neutral countries would ultimately end up in Germany, as well as by problems in defining “contraband” goods. This problem was exacerbated by a reluctance to antagonize the neutral countries concerned—primarily the United States, the Netherlands, Denmark, and Sweden.
ORGANIZATION
Command Structure
Administration
The Royal Navy was directed centrally from the Admiralty in London. The Admiralty controlled shore establishments and fleet commands covering everything from general policy to supply and training. Compared with the past, its ability to direct the movements of ships and fleets had improved considerably with the advent of wireless communication and wireless intelligence—interception and decoding of enemy signals and direction finding (D/F). This greatly enhanced centralized information gathering, which, combined with the ability to communicate rapidly on a worldwide basis, made the Admiralty the logical center of strategic control. This control should have been limited to ordering ships to sea, with outline instructions as to the objects of their movements and information on possible enemy intentions, leaving subsequent events to the discretion of the commander on the spot. However, this was not always the case, and early in the war the Admiralty’s interference at the local level led to some dangerous decisions; in particular, it was a contributory factor in the loss of a large part of the South America Squadron to the German East Asiatic Squadron off Coronel in November 1914. Moreover, the supply of intelligence to ships at sea was often handled badly, particularly during the battle of Jutland in 1916.
Control of the navy (including the Royal Marines) was the responsibility of the Board of Admiralty, which in August 1914 consisted of:
• The First Lord, political head of the board and a member of the cabinet, providing the link between the government and the navy
• The First Sea Lord, senior naval member of the board and naval advisor to the government
• The Second Sea Lord, responsible for personnel
• The Third Sea Lord and Controller, responsible for material, with superintendence of the departments of the Director of Naval Construction (DNC), Director of Naval Ordnance (DNO), Engineer in Chief (EinC), Director of Naval Equipment (DNE) and Director of Air Department (DAD)
• The Fourth Sea Lord, responsible for stores and their transport.
In addition to the above there were three other political posts: the Civil Lord, to oversee civil establishment staff, naval works, buildings, dockyards, and marine schools, charitable funds, and Greenwich Hospital; the Additional Civil Lord, for naval contracts and dockyard business; and the Parliamentary and Financial Secretary, to control financial matters. Finally, there was the Permanent Secretary—a civil servant of considerable power, responsible for Admiralty correspondence and head of the Admiralty Secretariat. Reporting to the board members were various Admiralty departments, both naval and civilian, most with their own directors.
A Fifth Sea Lord was added in January 1917 to serve as Chief of Naval Air Services. A reorganization in May 1917 produced increased representation for the Naval Staff (see below), and removed the term “Controller” from the Third Sea Lord’s title making it a separate political appointment, with the primary function of overseeing the shipbuilding industry. The new post was terminated in June 1918, at which time the Third Sea Lord regained his full title. A Deputy First Sea Lord was added to the board in September 1917 and in January 1918 a Second, Third, and Fourth Civil Lord; all these posts were terminated shortly after the war ended.
In 1912 the Admiralty set up the Admiralty War Staff, an advisory organization to prepare war plans and gather intelligence. It was composed of three divisions—the existing departments of Intelligence and Mobilization and a new Operations Division—and was headed by a chief of staff, under the supervision of the First Sea Lord. A Trade Division was added on the outbreak of war to deal with the blockade of Germany and the defense of British shipping, and in December 1916 an Anti-Submarine Division and a Signals Section were also added.
Expansion of the staff progressed steadily through the war; its increasing importance and size were formalized in May 1917 with a change of name to “Naval Staff” and the placing of the First Sea Lord at its head as CNS (Chief of Naval Staff), which had the effect of moving it beyond its previous advisory status. The original staff chiefs became the DCNS (deputy chief) and ACNS (assistant chief), both of whom had seats on the board. Several more divisions were added between this time and the end of the war. In their final wartime configuration the departments of Intelligence and Training and Staff Duties reported direct to the First Sea Lord, the foreign section of the Operations Division direct to the Deputy First Sea Lord. The remaining divisions were split between those covering home waters under the DCNS (Plans, Operations [Home], Air and Signals) and trade protection under the ACNS (Trade, Antisubmarine, Mercantile Movements, and Minesweeping).
Organization: Fleet Organization and Order of Battle
The organization of the British Fleet underwent several changes during the years preceding the outbreak of war that were primarily intended to concentrate its main force in home waters and minimize running costs. In 1912 a major reorganization established a Home Fleet on three levels of readiness. The 1st Fleet consisted of the most modern ships of the navy, all of which were fully manned; it included all three dreadnought battle squadrons (1st, 2nd, and 4th BS) and one predreadnought battle squadron (3rd BS—relocated to Rosyth in 1914 and to Sheerness in 1916, when it ceased to be part of the Grand Fleet), together with most of the modern cruisers and destroyers. The 1st Fleet was redesignated as the Grand Fleet on the outbreak of war and shifted its base to Scapa Flow, with the exception of two destroyer flotillas and their attendant light cruisers, which were based at Harwich. Although part of the Grand Fleet, the Harwich Force generally operated as an independent command.
The 2nd Fleet was composed of two predreadnought battle squadrons (5th and 6th) and two cruiser squadrons, whose ships had nucleus crews (60 percent of complement) but could be brought to full complement rapidly. The battleships and one of the cruiser squadrons formed the Channel Fleet, based at Portland, while the second cruiser squadron was temporarily transferred to the Grand Fleet as a substitute for the 4th Cruiser Squadron, which had been detached to the West Indies before the outbreak of war.
The 3rd Fleet, in effect the Reserve Fleet, contained the Royal Navy’s older ships. On the outbreak of war preference was given to manning its five cruiser squadrons for patrol and trade-protection duties in home waters and the Atlantic. Its battleships (7th and 8th BS) were mainly employed in subsidiary roles, usually as guard ships at various ports, although a few operated for a short period with the Channel Fleet during the passage of the British Expeditionary Force (BEF) to France and several were later transferred to the Mediterranean. (See tables 4.1 and 4.2.)
Table 4.1 Strength of British Royal and Dominion Navies
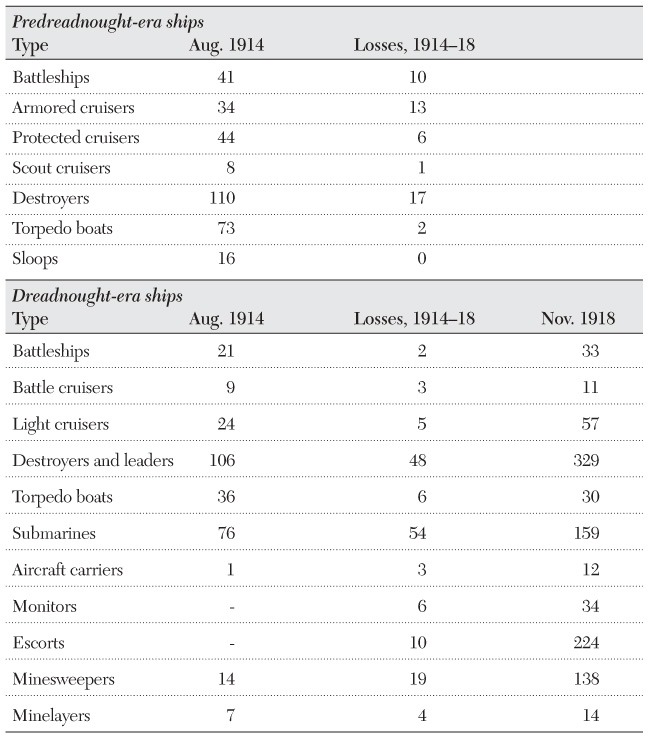
Notes: The above covers only ships built for naval service and does not include merchant conversions with the exceptions of aircraft carriers and minelayers. The minelayers and minesweepers listed for 1914 are respectively old cruisers and old torpedo gunboats converted to their new roles within the dreadnought era. The minelayers listed for 1918 do not included fleet cruisers, destroyers, or submarines adapted for minelaying.
In addition to the above, the waters around the coasts of the United Kingdom were provided with flotilla craft defense, in the form of Patrol Flotillas and Local Defence Flotillas (LDFs). The former, under the Admiral of Patrols, consisted of middle-aged destroyers and torpedo boats, with their attached light cruisers, based in the Humber, Forth, and the Tyne, as well as at Dover. The Dover Patrol soon became a separate command, in recognition of its strategic importance in protecting the supply route to France and maintaining the blockade of the Dover Straits.
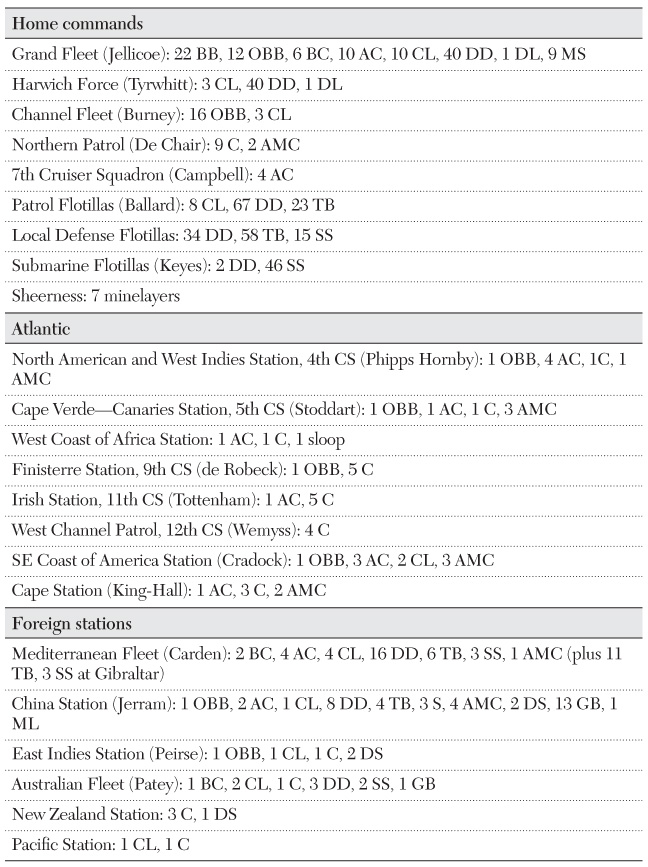
Table 4.2 Royal Navy Order of Battle, 10 September 1914
Home commands |
Grand Fleet (Jellicoe): 22 BB, 12 OBB, 6 BC, 10 AC, 10 CL, 40 DD, 1 DL, 9 MS |
Harwich Force (Tyrwhitt): 3 CL, 40 DD, 1 DL |
Channel Fleet (Burney): 16 OBB, 3 CL |
Northern Patrol (De Chair): 9 C, 2 AMC |
7th Cruiser Squadron (Campbell): 4 AC |
Patrol Flotillas (Ballard): 8 CL, 67 DD, 23 TB |
Local Defense Flotillas: 34 DD, 58 TB, 15 SS |
Submarine Flotillas (Keyes): 2 DD, 46 SS |
Sheerness: 7 minelayers |
Atlantic |
North American and West Indies Station, 4th CS (Phipps Hornby): 1 OBB, 4 AC, 1C, 1 AMC |
Cape Verde—Canaries Station, 5th CS (Stoddart): 1 OBB, 1 AC, 1 C, 3 AMC |
West Coast of Africa Station: 1 AC, 1 C, 1 sloop |
Finisterre Station, 9th CS (de Robeck): 1 OBB, 5 C |
Irish Station, 11th CS (Tottenham): 1 AC, 5 C |
West Channel Patrol, 12th CS (Wemyss): 4 C |
SE Coast of America Station (Cradock): 1 OBB, 3 AC, 2 CL, 3 AMC |
Cape Station (King-Hall): 1 AC, 3 C, 2 AMC |
Foreign stations |
Mediterranean Fleet (Carden): 2 BC, 4 AC, 4 CL, 16 DD, 6 TB, 3 SS, 1 AMC (plus 11 TB, 3 SS at Gibraltar) |
China Station (Jerram): 1 OBB, 2 AC, 1 CL, 8 DD, 4 TB, 3 S, 4 AMC, 2 DS, 13 GB, 1 ML |
East Indies Station (Peirse): 1 OBB, 1 CL, 1 C, 2 DS |
Australian Fleet (Patey): 1 BC, 2 CL, 1 C, 3 DD, 2 SS, 1 GB |
New Zealand Station: 3 C, 1 DS |
Pacific Station: 1 CL, 1 C |
The LDFs, intended for the close support of naval bases, employed the oldest of the destroyers, torpedo boats, and submarines. The largest of these forces defended Portsmouth, Devonport, and the Nore, but smaller groups were provided for Pembroke, Queenstown in Ireland, and the Clyde. There was also an LDF at Gibraltar. As the war progressed both the patrol flotillas and LDFs were expanded to include other ports and bases, eventually providing the core of the escort-force organization for the defense of trade and the war against the U-boat.
The entire Home Fleet was under a single commander in chief, but after the outbreak of war the new C in C, Admiral Sir John Jellicoe, was effectively limited to controlling the main forces operating in northern waters and the North Sea—the Grand Fleet, the Harwich Force, and the Northern Patrol—the majority of the 2nd and 3rd Fleets being dispersed to duties too distant for effective control from Scapa Flow.
The battleships of the fleet were nominally grouped into battle squadrons of eight ships grouped in two divisions, with a vice admiral in overall command and a rear admiral for the second division. The Grand Fleet battle cruisers were initially formed into a single battle cruiser squadron (1st BCS) under Rear Admiral David Beatty, who was given the acting rank of vice admiral (he was promoted permanently to vice admiral in August 1915). On the outbreak of war 1st BCS consisted of four ships, but by early 1915 Beatty’s command had increased to three squadrons of three ships each (1st, 2nd, and 3rd BCS—each commanded by a rear admiral), plus Beatty’s flagship, Lion, which, like Iron Duke, was an independent command. In February 1915 this force, now based at Rosyth, was redesignated by the Admiralty as the Battlecruiser Fleet, although it remained an integral part of the Grand Fleet. Its separate existence at Rosyth increased its sense of nominal independence. On becoming First Sea Lord at the end of 1916, Jellicoe, as one of his first acts, changed its title to the Battlecruiser Force.
The cruisers too were organized into squadrons, usually of four ships under a rear admiral, or, for most of the light cruiser squadrons, a commodore. There were originally three LCSs, and, light cruisers being faster than the older cruisers, all the squadrons were transferred to Rosyth with the battle cruisers. Additional LCSs were formed and allocated to the battle fleet as new construction allowed.
The destroyer flotillas of the Grand Fleet nominally consisted of twenty ships each, with a light cruiser or a flotilla leader for the flotilla commander. The latter was normally a captain (D), but the Harwich Force was under Commodore (T) Reginald Tyrwhitt, whose rank reflected his original role as senior commander of all 1st Fleet flotillas. (The “[D]” indicated command of destroyers, “[T]” command of fleet torpedo craft.) Initially there were two flotillas with the battle fleet, but these steadily increased in number as new construction became available.
The prewar cutbacks on foreign stations in favor of home waters had substantially reduced the number of ships operating abroad. This even applied to the Mediterranean Fleet, regarded as the most prestigious of Britain’s foreign commands and second in importance only to the Home Fleet. Its area of command included the Suez Canal and the Red Sea. In 1905 it included eight battleships based at Malta and could if required call on a similar number from the Atlantic Fleet, based at Gibraltar. By August 1914 the Atlantic Fleet no longer existed, and the Mediterranean Fleet had been reduced to three battle cruisers (2nd BCS), two cruiser squadrons, and a destroyer flotilla. All these ships were fairly modern and would have been valuable additions to the Grand Fleet, but Britain was unwilling to entirely abandon the Mediterranean to French control, despite the Entente Cordiale. Early in 1915 the fleet was reinforced, mainly with predreadnoughts, for operations against Turkey in the eastern Mediterranean and later to support the Italian navy against Austria in the Adriatic.
The remaining foreign stations had, after a few months of excitement pursuing German warships and raiders and dealing with German colonies, a relatively quiet war. In August 1914 these were as follows:
• The China Station, based at Hong Kong
• The Australia Station, under the control of the newly formed Royal Australian Navy (RAN), with its principal base at Sydney
• The New Zealand Station, based at Auckland
• The East Indies Station, with bases at Aden, Bombay, Colombo, and Singapore
• The Cape Station, at Simonstown, South Africa
• The North America and West Indies Station, with its main bases at Halifax and Bermuda.
With the exception of the Mediterranean, the strength of the above stations varied little during the war apart from their few battleships, which all transferred to the eastern Mediterranean in 1915. Most of the stations were commanded by a rear admiral, but that of China had a vice admiral, as he could in theory become C in C of an Eastern Fleet, combining the forces of the China, East Indies, Australia, and New Zealand Stations.
Other stations, which normally had little more than token presences, were the South East Coast of America (the western Atlantic from Brazil southward), the South America Station (the Pacific coast of South America south of Ecuador), and the Pacific Station (the area north of the New Zealand and South America Stations). Shortly after the outbreak of war the single light cruiser on the South East Coast of America Station was joined by the predreadnought Canopus, three armored cruisers, and a second light cruiser. This force was to guard the valuable trade routes in the area in case the German East Asiatic Squadron took its most likely (and actual) route home across the Pacific and around Cape Horn. For similar reasons a new West Africa Station was created that extended from the Gold Coast to Angola and covered the coasts of the German colonies of Cameroon and Togoland (German West Africa).
Apart from the main force of the Royal Navy, the Dominions of Australia and Canada had opted to create their own naval forces, an arrangement formalized in 1911 with the creation of the Royal Australian Navy and Royal Canadian Navy (RCN). Both were intended for home defense but were expected to come under the control of the Royal Navy in wartime. The Australian force was the larger, and its flagship (the battle cruiser Australia) transferred to the Grand Fleet in 1915, followed in 1917 by two of Australia’s modern light cruisers. Australia’s four destroyers joined the Mediterranean Fleet in 1917. Its service was otherwise in the Far East, Pacific, and the North America and West Indies stations. The Canadian force was limited to two old cruisers and a few small craft and was not developed to any appreciable extent until the 1920s.
Communications
Communication at sea was provided by wireless (W/T), flag signals, and signal lamps. W/T was well established prewar and continued to develop as the war progressed. However, the primary means of intership communication during the day remained flags, because they were quick (wireless signals were relatively slow, due to shipboard paperwork and the need to code and decode messages) and because the general practice was to maintain wireless silence at sea. The latter was not, of course, necessary once contact with the enemy had been made, and much use was made of W/T during the battle of Jutland, an episode that revealed several weaknesses of method—primarily inadequate and ambiguous reporting of the enemy. Signal lamps were employed to repeat signals, especially when poor visibility or distance made it unlikely that a flag signal could be read. They were also employed at night, and Jutland revealed another weakness in that when a German ship made note of a British recognition signal it relayed this to other enemy ships, information that considerably aided them in their encounters with British ships during the night. In the later years of the war several innovations were introduced to assist intership communication for concentration of fire—that is, two or more ships firing on a single target. These included range indicators operated from control positions, bearing scales painted on turrets, and dedicated fire-control W/T sets.
Worldwide communications, which were not always fully reliable in the early years of the war, were greatly improved with the provision of higher-power transmitters and more numerous W/T stations. However, signals between shore stations and ships in home waters were normally transmitted on relatively low power to reduce the chance of enemy interception.
Intelligence
The Naval Intelligence Division (NID) became part of the Admiralty War Staff in 1912. Its main functions were intelligence gathering; assessment of foreign navies and of their plans and intentions; and, in the case of potential enemies, developing strategies to counter those intentions. Information was obtained by various means, primarily from naval attachés, consuls, and port visits by British warships, but also from the study of the naval legislation and programs of foreign governments, the effect of naval pressure groups (such as the German Navy League), and the events reported and opinions expressed in newspaper and magazine articles. There was also some covert work, involving agents noting such things as activity in dockyards and the strengths of port and coast defenses. The Admiralty also obtained secret documents, including plans of the battle cruiser Seydlitz, reports of German fleet gunnery practice in the Baltic during 1912–13, and the 1914 tactical orders for the High Seas Fleet. The latter was used by Jellicoe when formulating the intended tactical deployment of the Grand Fleet.
The primary intelligence source for the British throughout the war was the wireless communications of German ships, submarines, and shore bases—specifically through the interception and decryption of wireless messages and the location of enemy vessels at sea by wireless D/F. In August 1914 the Admiralty had only one station, Stockton on the northeast coast of England, dedicated to interception of German wireless messages. This was quickly expanded by the employment of W/T stations belonging to the Post Office, the Marconi Company, and a few amateur wireless enthusiasts. The provision of D/F came later, with a network of direction-finding stations covering the North Sea established during 1915–16; this network was followed by a similar arrangement in Ireland to cover the area west of the British Isles, a network that proved invaluable both in tracking enemy surface ships and U-boats.
In August 1914 the navy organized a decryption center to deal with incoming coded messages. This was Room 40OB (Room 40 Old Building), largely manned by civilians. Recruiting was initially from the teaching staffs at Osborne and Dartmouth Colleges, later from the universities and individuals possessed of the required skills—especially mathematicians and German speakers. However good this setup was, it would not have been of the inestimable value that it was to be but for the fact that the Admiralty had by the end of 1914 obtained copies of all three of the German navy’s primary code books. The first was recovered from the German merchantman Hobart at Melbourne by the RAN, the second by the Russians from the German cruiser Magdeberg (which ran ashore on the coast of Estonia), and the third from a steel box jettisoned by the sinking German destroyer S 119 in October and trawled up from the seabed by a British trawler in November. The British were thus served well by fortune, if less so by failures to use the intelligence gained to its best effect during the first years of war.
The constant decoding and monitoring of German wireless traffic eventually gave the staff of 40OB considerable insight into enemy intentions, but it was not until after Jutland that this pool of acquired knowledge was effectively employed or, for that matter, acknowledged. Information was filtered out through the Operations Division, whose personnel, being naval rather than civilian, considered themselves the best people to analyze the information received and, if necessary, to determine whether it was necessary to pass it on to the commanders in the field. This situation was not helped by the fact that the information forwarded was often limited in both its distribution and content. This came to a head at the time of Jutland, when the serious deficiency of the information sent to Jellicoe and Beatty was a contributory factor in Jellicoe’s erroneous assumption of the German fleet’s course during the night.
A change in methods after Jutland created a system of greater integration and cooperation between the departments concerned. The staff of 40OB was allowed greater freedom to analyze information and issue reports. Detailed and more frequent communications regarding enemy movements and possible intentions were sent to senior commanders afloat, which allowed them to better utilize the information available. The improvement was timely, as the dissemination of wireless intelligence during the critical campaign against the U-boats in the last two years of war was to be a vital component in the campaign’s favorable outcome.
Infrastructure
Bases
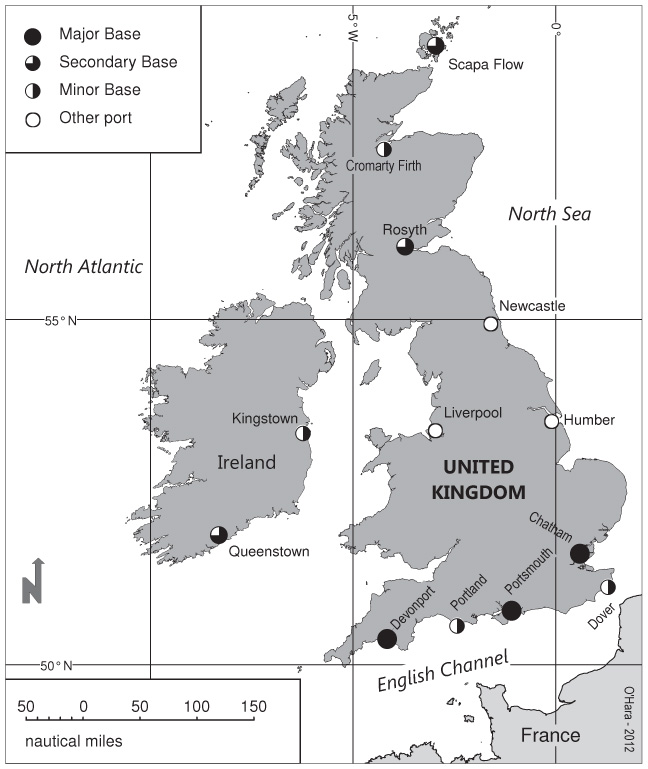
Prewar, all the Royal Navy’s primary bases in home waters were located in southern England—at Devonport, Portsmouth, and Chatham. All these were Royal Dockyards, with substantial construction, docking, repair, base, and supply facilities, together with several of the experimental and training facilities. The establishment of the main fleet base at Scapa Flow initially required ships to sail down the west coast for repair and their annual refit. This created problems with maintaining fleet strength, lengthened the time a ship was absent from the fleet for such reasons, and required careful management to ensure that the number of ships undergoing such work simultaneously was kept to a minimum. The first step in reducing these detachments was the establishment of a repair base, with a floating dock, at Invergordon in the Cromarty Firth; it was operational before the end of 1914. The base was provided with a second floating dock in 1916. Use was also made of commercial docks, especially those on the Tyne. The need for a northern repair facility had been realized as early as 1903, when it was proposed to build a new dockyard at Rosyth, but construction did not begin until 1909. Owing to various delays and difficulties, this did not become usable until early 1916 and was not fully complete until November 1917. (See map 4.1.)
In the Mediterranean the base and dockyard facilities were located at Malta and Gibraltar. These were inconveniently distant for the convenience of ships operating in the Aegean against the Turks, so Alexandria in Egypt was used as a naval base during the war; it also provided a single floating dock, which could take cruisers and smaller vessels. There was also a small floating dock at Port Said. In addition, an advanced base was created at Mudros, on the Greek island of Lemnos, for the Dardanelles operation. It continued in use throughout the war, many of its facilities being provided by depot, repair, and supply ships. The great need for and organization of this base provided the inspiration for the Mobile Naval Base organization that would be developed between the wars.
Industry
Britain had a large industrial base that included a considerable number of well-established shipbuilding, marine machinery, and armament companies. In addition to the commercial companies, the Royal Dockyards were efficient warship builders, though they subcontracted machinery and armament, while many of the primary commercial yards could provide machinery and often armament as well. Apart from the regular warship builders, several companies that normally constructed only merchant ships were employed during the war to build escorts and minesweepers. The shipbuilding industry rose to the challenge of the extensive war construction programs, but it could not entirely meet the demands for new ships, particularly destroyers, a situation that became serious with the need to greatly increase the numbers of escorts and merchant vessels as a result of the unrestricted U-boat campaign.
The principal private gun, gun mounting, and armor suppliers were the EOC (Elswick Ordnance Company—part of Armstrong Whitworth), VSM (Vickers Sons and Maxim) at Barrow, Beardmore at Parkhead (Glasgow), COW (Coventry Ordnance Works—which did not manufacture armor), and, for armor only, John Brown (Clydebank) and Cammell Laird (Birkenhead). In addition to the commercial firms, the RGF (Royal Gun Factory) at Woolwich manufactured guns for the Admiralty.
The EOC, VSM, and Cammell Laird also supplied projectiles, although the two leading producers were the Sheffield firms of Hadfield and Firth. As there were few major naval engagements, there was a relatively low demand for new supplies of armor-piercing shell until the post-Jutland production of improved versions began in 1917. It was, however, necessary to increase the reserve of high-explosive (HE) shell, and to meet this demand several companies expanded their existing plants.
Torpedoes were manufactured by the Whitehead Factory in Weymouth and the newly constructed RNTF (Royal Navy Torpedo Factory) in Greenock. Shortly after the outbreak of war the Whitehead Factory was taken under Admiralty administration. In 1915 the Admiralty, with some assistance from Vickers and Armstrong, constructed a new factory, at Caton Moor, near Lancaster, to increase torpedo production. As Caton Engineering it manufactured torpedoes from late 1916 until closure in 1919.
The manufacture of explosives, both HE and propellants, was split between trade and the government factory at Waltham Abbey. In 1915 the Admiralty decided to build its own factory for the production of gun propellant. The resulting RNCF (Royal Navy Cordite Factory) at Holten Heath, in Devon, started production in January 1916. In full production the RNCF was making about four hundred tons of cordite a month, compared with the approximately 1,800 tons from commercial companies. The war raised serious concerns about quality control of trade-manufactured cordite following losses of ships to magazine explosion both in action and in harbor—the latter indicating the likelihood of spontaneous ignition. It should be noted, however, that these losses, especially those in action, could be laid at the door of other contributory factors or a combination thereof. Problems were also encountered with the HE known as Lyddite employed in the majority of APC shells, as its sensitivity caused premature detonation on impact with armor. This problem was overcome in the new heavy APC shell supplied to the fleet in 1918 by the use of a new mixture known as Shellite, which was to remain in use until after World War II.
Shipping and Trade Protection
The Royal Navy had few supply problems and had little use for replenishment at sea, due to its worldwide store and refueling depots, combined with the fact that most of its wartime operations did not involve extended periods at sea. Coal was almost entirely carried in chartered colliers, but the oilers that supplied the ships of the fleet were Admiralty-owned vessels of the Royal Fleet Auxiliary (RFA). The navy also employed a considerable number of supply vessels, the majority taken up from trade during the war, although not all were under direct control of the Admiralty. In general the only causes of concern were the losses in merchant ships, in particular ocean tankers, created by the unrestricted U-boat campaign.
Despite the fact that escorted convoys of merchantmen had been successfully employed in the days of sail, the general attitude in 1914 was that this was not practical for a modern war, the main argument being that convoying would cause serious and damaging restrictions to the flow of trade due to the large numbers of ships involved. Instead, the trade routes were to be patrolled by cruisers that could both be directed and keep in touch with each other with wireless communications. This policy was justifiable in relation to surface raiders, given their limited effect. Greater problems were caused by German warships that found themselves in foreign waters on the outbreak of war than by any specific raider sent out from home, and most of those already at sea were intercepted and destroyed during the war’s first few months.
It was realized prewar that Britain’s trade was vulnerable to submarine attack, but it was considered that international law, which required the safe removal of crew and passengers, would prevent this from becoming a serious problem. Some foresaw, however, that Germany would find it difficult to resist the considerable gains to be had by ignoring the rules. This expectation was fulfilled in February 1915, when Germany declared the waters around the British Isles a war zone in which all ships, including neutrals but excepting passenger vessels, were liable to be sunk without warning. The subsequent U-boat war was to some extent intermittent, as Germany adjusted its campaign in the face of neutral protests, but the general trend was toward ever-increasing losses in the flow of trade in both home waters and in the Mediterranean.
Up to mid-1916, shipping losses, while serious, could be absorbed, but increases in the number of operational U-boats and in the aggressiveness of their campaign saw the loss of over 1.5 million tons of shipping during the five months from September 1916 to January 1917. In February 1917 Germany introduced a completely unrestricted war on trade, and losses immediately increased to well over a half million tons per month—an unacceptable rate in both imports and ships. The answer was the introduction of convoys, which had been in partial use for trade with Scandinavia from the end of 1916 and for the cross-Channel coal trade (at French request) from February 1916. The Admiralty, nevertheless, resisted the implementation of wholesale convoying until April 1917, when a conference, instigated by Beatty, recommended a full convoy system for the North Sea trade with Scandinavia.
The recommendation was accepted, and its success so weakened the Admiralty’s position that it was finally agreed to introduce ocean convoys on a trial basis. Two experimental ocean convoys that sailed in May, one from America and one from Gibraltar, lost no ships. Four that sailed from America in June were equally successful. After this the convoy system expanded rapidly to include both outward- and homeward-bound ships. During July 1917–November 1918, 610 homeward and 537 outward Atlantic convoys lost only 167 merchantmen from a total of 16,994—less than 1 percent. Overall shipping losses began to fall significantly toward the end of 1917, and the majority that did occur were vessels not in convoy. The methods finally developed for organizing and operating the convoy system were highly successful and provided the pattern for that adopted on the outbreak of the Second World War.
Personnel
Demographics
In mid-August 1914 the personnel of the Royal Navy and Royal Marines numbered just over 200,000, compared with 146,000 a month before. This included 174,000 in the Royal Navy, of which just over 11,000 were officers, and 25,000 Royal Marines. Thirty percent, a little under 50,000 men, were from the naval reserves—the Royal Fleet Reserve, Royal Navy Reserve (RNR), Royal Navy Volunteer Reserve (RNVR), and the Marine Reserve. The Fleet Reserve was made up of ex–service personnel, the RNR mainly from merchant navy officers and seamen; RNVR personnel came from all walks of life, although many had sea experience. A special section of the RNR, designated the trawler section, or RNR(T), was created prewar for men from the British fishing fleet, whose skilled seamanship and knowledge of the waters around the British Isles was recognized as an invaluable asset. Their main employment was to man the trawlers requisitioned for naval service, but they also saw service in other auxiliary and patrol craft.
The marines were divided between the Royal Marine Artillery (RMA) and the Royal Marine Light Infantry (RMLI). The marines afloat were mostly in the fleet’s larger ships and served to man some of the ships’ guns. They also provided buglers and bands, wardroom servants, and security forces (performing sentry/guard duty, not police duties, which were the province of the petty officers of the Regulating Branch).
A Women’s Royal Navy Service was begun in November 1917 to provide shore-based domestic services and release men to other duties. It was disbanded in 1919.
By the end of the war the personnel numbers had doubled to 407,000. War losses amounted to 2,074 officers and 20,337 men killed in action, plus 400 officers and 11,443 men lost from other causes. The Royal Navy Division, which spent the war fighting ashore, seeing action at Gallipoli and on the western front, lost a further 8,590 men. (See table 4.3.)
Table 4.3 Royal Navy and Royal Marine Personnel, 1914–18
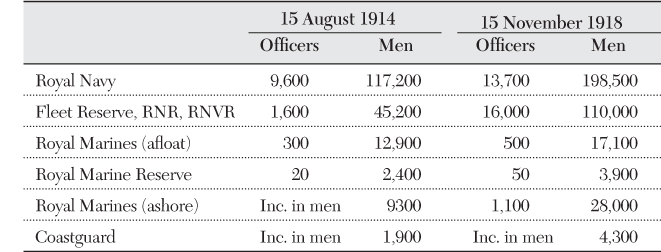
Note: 74,400 of those in service in November 1918 were HO (hostilities only). Numbers are rounded to nearest hundred.
Peacetime officer training began with two years at Royal Navy (RN) College Osborne, on the Isle of Wight, followed by two years at RN College Dartmouth, in Devonshire—the latter including sea experience on board training cruisers. Cadets who opted for careers in engineering transferred to RN College Keyham, near Devonport. The colleges were modeled on the fee-paying English public-school system, with cadets starting at thirteen and a half years of age. From the colleges the cadets joined the fleet as midshipmen and after three to four years were promoted to acting sublieutenants and thereafter, on satisfactory completion of examinations, sublieutenants. This was followed by advanced courses at the RN College, in Greenwich, and at various specialist training establishments before promotion to lieutenant. After a year at this rank an officer could elect to specialize in gunnery, torpedoes, navigation, or signals, which involved intensive training courses and more examinations but provided the best routes to promotion. Those who did not choose to specialize remained “general service” officers.
Enlisted men followed similar paths but naturally with shorter and much less academically demanding training periods. Boys joined at the age of fifteen and underwent about one year’s training in seamanship prior to being selected for gunnery, wireless, or signals training. The main boys’ training establishments were at Harwich (HMS Ganges) and Devonport (HMS Impregnable). On leaving the training establishment boys were sent to sea as first-class boys, boy signalers, or telegraphist boys, to continue their training and education until promotion to ordinary seamen, ordinary signaler, or ordinary telegraphist on reaching age eighteen. The training period for the engineering branch was much longer, at around four years, and took place in specialist schools. Boy artificers went either to HMS Fisgard, at Portsmouth, or HMS Indus, at Devonport, while training for mechanicians was provided at Chatham, in HMS Tenedos.
The war brought a substantial reduction in training periods in order to fulfill the manning requirements of the fleet. Compensation was obtained by increased training within the fleet—especially the Grand Fleet, where certain officers were appointed as acting schoolmasters. In December 1915 Admiral Jellicoe requested and obtained the appointment of an experienced schoolmaster to each of the battle and battle cruiser squadrons—an arrangement expanded during 1916 to include every ship of light-cruiser size and larger.
Surface Warfare
Doctrine
The primary British strategy was the containment of the High Seas Fleet within the confines of the North Sea, where, it was hoped, it would be brought to battle by the Grand Fleet. It was established well before 1914 that close blockade of the enemy coast would not be feasible in the face of submarines and mine warfare, and the alternative “distant blockade” was adopted. For this purpose the Grand Fleet was stationed at Scapa Flow, where it guarded the northern exits to the Atlantic and supported the Northern Patrol in the interception of merchantmen bound for enemy ports. It was hoped that the strangling of German seaborne trade would force the German fleet to seek battle, but this proved optimistic, given the limitations involved in controlling neutral shipping.
With the fleet based so far north there were concerns about enemy invasion of, or raids on, the east coast, concerns that generated demands for a greater presence in more southerly bases. In general these demands were resisted, but the bombardment of Scarborough and Hartlepool by German battle cruisers on 16 December 1914 resulted in the Admiralty ordering the battle cruisers to be based at Rosyth. The intended tactics for a fleet action involved employing what was regarded as the Grand Fleet’s overwhelming firepower and superior fire control at long range and then closing to decisive range as the enemy’s strength was reduced. This confidence in gunnery superiority was shattered at Jutland in 1916, which revealed many problems with British methods and equipment and, in several important respects, the superiority of German ones.
Ships
Prewar ships can be divided between vessels of the predreadnought and dreadnought eras, reflecting broadly the effects on design initiated by Admiral John Fisher. The older vessels date approximately from the decade 1894–1904. The dreadnought-era ships can be broadly differentiated from the earlier vessels by their steam-turbine propulsion, higher speeds, and, in the case of battleships, uniform armaments.
Battleships
The earlier predreadnought battleships (twenty-eight ships completed during 1895–1904) mounted four 12-inch, twelve 6-inch, and sixteen 12-pounder guns and displaced 12,000–15,000 tons. In the eight ships of the King Edward VII class (17,500 tons) completed during 1905–1906 an intermediate battery of four 9.2-inch was added; in the final two ships, known as the Lord Nelson class (16,500 tons), the entire secondary battery consisted of guns of this caliber. Maximum speeds varied from 17.5 knots in the earliest ships to nineteen knots in the last. There were also two ex-Chilean ships (Swiftsure and Triumph, 11,800 tons, four 10-inch, fourteen 7.5-inch, twenty knots), purchased in 1903 while under construction.
The dreadnought battleship classes readily divide into three groups differentiated by the caliber of their main-armament guns. The first ten mounted ten 12-inch guns in twin turrets, three on the centerline and two in wing positions. The only other offensive gun armament was an anti–torpedo boat battery of 4-inch guns (12-pounder in Dreadnought). All had a design speed of twenty-one knots (the dates in the list below are those of the ship’s completion).
1 Dreadnought (1907) |
17,900 tons |
3 Bellerophon class (1909) |
18,600 tons |
3 St. Vincent class (1910) |
19,250 tons |
1 Neptune (1911) |
19,900 tons |
2 Colossus (1911) |
20,000 tons. |
The next twelve dreadnoughts were armed with ten 13.5-inch guns in centerline twin turrets. In the last four of this group the anti–torpedo boat battery was increased to 6-inch caliber. All had a design speed of twenty-one knots.
4 Orion class (1912) |
22,500 tons |
4 King George V (1912–13) |
23,000 tons |
4 Iron Duke class (1914) |
26,400 tons. |
Each of the final two classes consisted of five ships, each ship armed with eight 15-inch guns mounted in twin turrets, two forward and two aft. All were prewar designs, but none completed until after the outbreak of war. The first was the Queen Elizabeth–class fast battleships of 27,500 tons (completed 1915–16), which adopted oil-fired boilers and had sufficient power for a design speed of twenty-five knots. Due to additions during construction they completed well above their design weight, and in practice they could not make much over twenty-four knots. They were followed by the 25,750-ton ships of the Royal Sovereign class, completed during 1916–17, whose design reverted to coal/oil-fired boilers and a speed of 21.5 knots. However, during construction they were modified for oil fuel only, which increased speed to twenty-three knots. Three battleships under construction for foreign navies in British yards were requisitioned shortly after the outbreak of war. Two, intended for Turkey, were completed in 1914 as Agincourt (fourteen 12-inch guns) and Erin (ten 13.5-inch guns); one, intended for Chile, was completed in 1915 as Canada (ten 14-inch guns).
Cruisers
Armored cruisers replaced the earlier first-class protected cruisers at the end of the 1890s—both groups representing the largest ships of the cruiser class. In the later armored cruisers, turret-mounted guns of increased caliber gradually superseded the casemate 6-inch guns of the earlier ships. This culminated in the three all-big-gun armored cruisers of the Indomitable class (17,250 tons, eight 12-inch guns, twenty-five knots), initiated at the same time as Dreadnought but not completed until 1908. These were the first of Fisher’s battle cruisers—a classification that became official only in 1911. Although Fisher, who had a strong belief in speed and gun power at the expense of protection, favored the type, he appears to have had little support in perpetuating it until Germany began to build similar ships. This stimulus produced the Indefatigable (18,750 tons), completed in 1911, effectively a repeat of the Invincible and an inadequate reply to German construction, which tended toward the fast battleship rather than the armored cruiser. This was possibly excusable for Indefatigable, given the initial lack of knowledge of the German design at the time, but less so for her two sisters—Australia (for the RAN) and New Zealand, whose construction began later. The next four ships—Lion, Princess Royal, Queen Mary, and Tiger, completed during 1912–14—were armed with eight 13.5-inch guns, the last-named also adopting the 6-inch-gun secondary battery. They were better protected and faster at twenty-eight knots but still showed weaknesses in their armor arrangements.
Further battle-cruiser construction halted with the introduction of the Queen Elizabeth class but began again with the return of Fisher as First Sea Lord in 1914. His war construction program included Renown and Repulse (26,500 tons, six 15-inch, 31.5 knots—little more than larger, faster versions of Invincible with 15-inch guns) and the bizarre Courageous and Glorious (18,600 tons, four 15-inch, thirty-one knots) and Furious (19,500 tons, two 18-inch, 31.5 knots). These last three were originally designated “large light cruisers.” Their function is far from clear, although Fisher insisted they were built for proposed operations in the Baltic. Postwar, they were all converted to aircraft carriers—Furious being partially modified for this role before completion in 1917.
Fisher advocated a fleet that consisted almost exclusively of large, preferably fast, armored ships and flotilla vessels, and during his original period as First Sea Lord (1904–10) he showed little interest in the development of second- and third-class cruisers. No such ships were laid down from early 1904 until 1909, apart from two scout cruisers intended to support destroyer flotillas. However, demands from the fleet for cruisers of greater speed than the aging second-class cruisers initiated the construction of the seventeen second-class cruisers of the Town classes. In 1913 all these ships, including the scouts and the older second- and third-class cruisers, were redesignated as “light cruisers,” while first-class protected cruisers became simply “cruisers.”
Although the “Towns” proved to be excellent fleet cruisers, it was the scouts that formed the basis of future cruiser development. This began with the Arethusa class, whose eight ships were improved versions of the three Active-class scout cruisers of the 1910–11 program with oil-fired boilers, increased speed and high-tensile steel side protection built into the hull structure. They were followed by the early C classes, constructed during 1913–16 as repeats of Arethusa but with both 6-inch guns mounted aft. The first eight (the Caroline class) were designed with three funnels, like the Arethusa class, but two (Calliope and Champion) were experimentally fitted with geared turbines and had two funnels rather than three (a feature repeated in all later C- and D-class ships). In the later years of the war the Arethusa- and early C-class ships (except Centaur and Concord) were rearmed, initially receiving a third 6-inch gun in place of two 4-inch during 1916–17 and, in the C group only, a fourth 6-inch in place of the remaining 4-inch (low-angle) guns in 1918. All these ships also had their torpedo armament doubled to four twin tubes as a result of experience at Jutland.
The first of the later C classes (Caledon class) were modified versions of Centaur but, following successful trials in Calliope, were fitted with four-shaft geared-turbine machinery. The last two groups, the Ceres and Carlisle classes, adopted an improved gun layout, having the second 6-inch gun mounted in B position (superfiring over A, the forwardmost position) rather than abaft the bridge. These were followed by the D, or Danae, class, in which displacement was increased to accommodate a sixth 6-inch gun and a larger torpedo armament. The last ships of the series, the 7,300-ton, thirty-three-knot E class, were not laid down until late 1918 (two completed 1926, one canceled).
The majority of the above mentioned war-construction cruisers were primarily intended for fleet operations in the North Sea. There was, however, a perceived need for some fast, modern ships to operate on ocean trade routes against raiding cruisers. Design work on these ships began in 1915, and the resulting four ships of the Hawkins class (9,750 tons, seven 7.5-inch guns, thirty knots) were constructed during 1916–25. Only one (Cavendish) completed during the war, and she was modified during construction to serve as an aircraft carrier (see below). (See table 4.4.)
Destroyers
The navy’s older destroyers were twenty-seven-knot (A, B, and C classes) and thirty-knot (D class) vessels of 280–400 tons, with turtle-back forecastles, constructed during 1893–1903. Being constructed by a variety of builders to a basic Admiralty specification, they varied considerably in detail, especially machinery and funnel arrangements, but all were armed with one 12-pounder and four 3-pounder guns and mounted two single torpedo tubes. These were followed by the larger E class, which introduced the raised forecastle that became standard in all subsequent British destroyers. These were slower but more seaworthy vessels, capable of maintaining speed with the fleet in any reasonable weather conditions. Progress at this point deviated briefly with the arrival of Fisher as First Sea Lord, who, following his standard penchant for high speed, initiated the design of the F-class destroyers and the destroyer leader Swift, both employing oil-fired boilers—neither design proving particularly successful. At the same time, Fisher initiated the design of thirty-six small (240-ton), twenty-six-knot coastal destroyers of appearance similar to the old turtle-back destroyers and armed with two 12-pounders and three 18-inch torpedo tubes; these vessels were subsequently reclassified as torpedo boats.
Prewar construction returned to more moderate vessels with the coal-fired G class, which provided the basis for the following oil-fired H-to-M-class designs. The need for command vessels for the increased numbers of destroyers and a demand for vessels of higher speed than the scout cruisers resulted in the construction of the seven Lightfoot-class destroyer leaders—essentially enlarged destroyers with additional accommodation for the flotilla commander and his staff. Six repeats of this design (the Parker class) followed during the war, while a further four vessels of this type (Botha class) under construction in British yards for Chile were requisitioned upon the outbreak of war.
Table 4.4 Particulars of British Light Cruisers, 1905–18
Notes: Numbers in parenthesis refer to number of ships in class.
The Town classes and Centaur and Concord of the early C class were fitted with broadside submerged torpedo tubes; all other light cruisers were fitted with above-water tubes.
* Actually four subclasses of two vessels each. All had their 12-pounder guns replaced by nine 4-inch during 1911–12.
** Including two RAN ships. A third RAN ship (Brisbane) was built in Australia and completed in 1916.
*** Building in UK for Chili and taken over by Admiralty on outbreak of war.
**** Consisted of four subclasses. The last two ships, Centaur and Concord, were fitted with a uniform main armament of five 6-inch guns to improve their capability in engaging both cruisers and destroyers.
***** Consisted of three subclasses.
† A fourth unit (Adelaide) was built in Australia but did not complete until 1922.
†† Four further ships were canceled at the end of the war.
The Emergency War Programs included the construction of ninety-seven repeats of the M class, fifty-five of the R class, and sixty-nine S class. All were of generally similar design, except that the R and S classes were fitted with geared turbines and were faster. In 1916 work began on the design of a new leader similar to, but smaller than, the Lightfoot, which resulted in the five V leaders. They differed from the earlier ships in having geared turbines and superimposed gun arrangements forward as well as aft. False concerns that the German navy was introducing larger destroyers resulted in this design being repeated in twenty-five V-class destroyers. The V-class was again repeated in the W class, which differed only in having two triple torpedo tubes instead of twins (postwar, the V class were also fitted with triple tubes). The V and W classes proved to be one of the best destroyer designs of the time and served as a pattern for future British vessels of the type. The last of the wartime destroyers, of the Modified W class, were enlarged Ws with four 4.7-inch guns, but none of these were completed before the end of the war. (See table 4.5.)
Other Naval Types
The navy developed specialized coast-bombardment vessels, designated as monitors, whose main employment was in the eastern Mediterranean and off the coast of Belgium. Fourteen large and nineteen small monitors were completed in 1915. Purpose-built patrol vessels consisted of the P-boats and the Kil class. The forty-four P-boats (six hundred tons, one 4-inch gun, two 14-inch torpedo tubes, twenty knots) built during 1915–18 were designed as patrol and antisubmarine vessels for coastal waters. Their low silhouettes and fair speed gave them a passable chance of ramming a submarine on the surface, for which they had a strengthened stem (used successfully against four U-boats). A further twenty, the PC boats (690 tons, one 4-inch, two 12-pounder guns), were modified to resemble merchantmen and completed as Q-ships in 1917–19. The Kil class “double-ended” patrol gunboats were ordered in large numbers, but only a few became operational. The Admiralty took into service a very large number of merchant vessels to serve as auxiliary war vessels. The largest of these were sixty-seven AMCs, most of which were acquired in 1914–15, to supplement the older cruisers in trade protection and patrol work. The smaller vessels included yachts and paddle steamers, but by far the largest number came from the British fishing fleets—trawlers, drifters, and whalers, which among other duties served as patrol, escort, and antisubmarine vessels and as minesweepers. The number of trawlers that could be taken into service was limited by the detrimental effect on commercial fishing capacity caused by these requisitions, worsened by war losses and the paucity of new construction (by the end of 1916 over 70 percent of British trawlers were in naval service). To make up the shortage and provide vessels for the postwar fishing fleet, the Admiralty began its own program of construction—completing 540 “Admiralty trawlers” by the end of the war. In order to preserve it, the remaining trawler fleet was taken over by the government in 1917, thereafter nominally operating under the white ensign but continuing its commercial activity.
Table 4.5 Particulars of British Destroyers and Leaders, 1903–18
* The later ships of this class were larger and were fitted with two 4-inch guns in place of two of the 12-pounders.
** Six units of this design were completed for the RAN during 1910–15. They differed from the RN ships in having one 4-inch and three 12-pounder guns and three 18-inch torpedo tubes.
*** V Leaders are included with the V-class destroyers.
On the outbreak of war a large number of privately owned motorboats were taken into service as inshore patrol vessels. These having proved their value, the Admiralty ordered 550 motor launches from Elco in the United States; all had been delivered by the end of 1916. They were capable of nineteen knots, and their standard armament was one light gun and depth charges. They were employed for patrols, antisubmarine duties, and inshore minesweeping. Further development of coastal craft began in 1916, with the completion of thirteen coastal motorboats (CMBs). These stepped-hull, hydroplaning boats were forty-foot, twenty-five-knot vessels, armed with a single 18-inch torpedo (launched over the stern from a trough) and machine guns. A further twenty-two completed in 1918 were fitted with more powerful engines, for a speed of thirty-six knots. A larger, fifty-five-foot class followed capable of thirty-six to forty-one knots (depending on engine fitted), with depth charges added to their armament. Six completed in 1917 and fifty in 1918; some carried two torpedoes, while others were fitted for minelaying.
Weapon Systems
Surface Gunnery
The majority of guns were of wire-wound construction, a technique originally developed to save weight but in time showing less advantage as metallurgical developments improved the quality of steel. Guns were either BL (breechloading, employing bag charges) or QF (quick-firing, with cartridge cases). All guns above 6-inch and the majority of those of 4-inch to 6-inch caliber were BL, with screw breechblocks. The older, medium-caliber QF guns of the 1890s also had screw breechblocks, but light guns were fitted with sliding breechblocks, as were the modern 4-inch and smaller QF guns. Apart from the heavy guns, most mountings were single, but a triple 4-inch was introduced in the Renown and Courageous classes.
Until 1910 capital ships were consistently fitted with 12-inch guns firing 850-pound projectiles. Improved performance was obtained by increased length, from 35 calibers in the Mk VIII of the Majestic-class predreadnoughts to the 50-caliber Mk XI high-velocity gun of the St. Vincent class. The latter proved a disappointment, and to increase hitting power the alternative of increasing caliber and reducing velocity was adopted in the 13.5-inch gun, firing a 1,250-pound projectile (increased in later versions to 1,400 pounds). The success of this weapon, which had a low wear rate and good accuracy, set the pattern for the following 15-inch gun (1,920-pound projectile), which proved to be one of the best-performing heavy guns of the period. Unfortunately, the armor-piercing shell for all heavy-caliber guns was insufficiently developed and lacked strength, which, combined with an oversensitive filler and inadequate fuse, reduced its effectiveness in oblique impact with armor. This problem revealed itself at Jutland, and subsequent investigation resulted in the development of a very effective armor piercing shell; this was in supply by 1918, and over 15,000 new shells had been supplied to the Grand Fleet by the end of the war.
Antiaircraft Gunnery
The development of antiaircraft (AA) guns began prewar, with the introduction of 3-inch QF and 2-pounder pom-poms—the latter mostly fitted in destroyers and smaller craft. To increase numbers, old 3-pounder and 6-pounder QF guns were converted to high-angle fire and widely distributed through the fleet, later supplemented by a purpose-built 3-pounder. By the end of the war most of the larger ships of the fleet had one or two 3-inch or 4-inch AA guns.
Torpedoes
Substantial advances in torpedo design occurred during 1909–10, with the introduction of the long-range heater torpedo, the angled gyro for submerged tubes (which allowed torpedoes to change direction after launch), and an increase of size from eighteen to twenty-one inches. In 1914 the latest torpedoes were provided with two speed settings—three thousand yards at forty knots or six thousand yards at twenty-eight knots for the 18-inch, and for the 21-inch, 4,500 yards at forty-five knots or ten thousand yards at twenty-eight knots for the 21-inch (although these figures varied slightly depending on the weapon’s mark and subtype). In 1915 Jellicoe requested that 21-inch torpedoes be provided with an extreme-range setting; this need was met in 1916 with the introduction of torpedoes with their low-speed setting altered to 14,000–15,000 yards at twenty-three or twenty-five knots and, in battleships and battle cruisers only, 17,000–18,000 yards at eighteen to twenty-one knots for conditions of high visibility. The former was later redefined as a “medium speed,” while the latter retained the ER (extreme range) designation. British warships fired 778 torpedoes during the war, of which 575 were fired by submarines—517 at naval and 58 at merchant vessels, obtaining 106 hits (76 sinkings). Destroyers sank ten ships for 134 torpedoes fired (thirty-two hits), cruisers two for thirty-six fired (seven hits), and CMBs one for twenty-three fired (six hits).
Submarine Warfare
Offensive
Doctrine
During the latter part of the nineteenth century the Admiralty discouraged the development of submarines, convinced that in time such craft could seriously threaten its own surface fleet. Once it was realized that this policy could no longer be sustained, it ordered five U.S.-designed Holland boats from Vickers, which completed during 1902–1903. By the outbreak of war seventy-six submarines were in service—a larger number than possessed by any other naval power. Fifty-nine of these craft (which included two constructed for the RCN) were coastal types of the A, B, and C classes, and sixteen (including two constructed for the RAN) more modern, longer-range patrol (or “oversea”) submarines of the D and E classes. A further 137 submarines were completed during the war. Fifty-four were lost—thirty-five to enemy action or unknown causes, eleven to accidents, friendly fire, or stranding, and the remainder deliberately destroyed (seven at Helsingfors in April 1918 to avoid capture and one blown up during the attack on Zeebrugge in April 1918).
In August 1914 the majority of the coastal boats were stationed on the east and south coasts of Britain to provide harbor defense and coastal patrols. Three of the B class were stationed at Gibraltar and three at Malta—all later transferred to Venice to operate with the Italian navy. The patrol submarines were stationed at Harwich for offensive operations into the southern North Sea and patrols into the Helgoland Bight, operations that were continued throughout the war. Home waters were to remain the main area of operation, but the navy’s submarines also saw service in the Dardanelles and Sea of Marmora, against Turkey; in the Adriatic, cooperating with the Italian navy; and in the Baltic. Unlike the German U-boats, their primary targets were normally warships, mainly because there were very few opportunities to attack trade.
The main successes achieved by submarines against naval targets were sinkings of U-boats—fifteen in home waters, one west of Cape St. Vincent in the Atlantic, and one in the Adriatic. British submarines also accounted for three German cruisers and two old Turkish predreadnoughts. Although less successful in this respect than the German U-boats, they did manage to damage a number of dreadnoughts, something that the U-boats failed to do in their operations against the Grand Fleet—although it should be noted that the British had more opportunity, given that U-boats were primarily concentrated against trade.
Boats/Weapons
The early coastal submarines of the A to C classes were larger versions of the U.S. Holland boats to an improved design by Vickers. Surface propulsion was provided by petrol engines, and like all subsequent coastal types, they were of single-hull construction with internal ballast tanks and mounted all their torpedo tubes in the bow (except the F class, which also had a stern tube). The first of the patrol type were saddle-tank designs, the Ds introducing a stern tube and diesel engines (first tried experimentally in A13) and the Es beam tubes (one firing to port and one to starboard), while the modified E9 class added a second bow tube. Six of the Es completed during 1916–17 were fitted for minelaying, the beam tubes being omitted and vertical tubes for twenty mines fitted in the saddle tanks.
Vickers’ contractual arrangement with the Admiralty gave it a virtual monopoly of submarine construction for several years, and it built the majority of the prewar boats of the A to E classes, apart from a few constructed under license by Chatham Dockyard. This monopoly ended in 1913, but before this date the Admiralty had invested in the construction of double-hull boats of foreign design that did not infringe the Vickers agreement. The primary purpose was to increase the number of builders with experience in submarine construction, given that the existing arrangement severely limited capacity, together with a desire to investigate the qualities of the double-hull type. The coastal boats built to foreign design were the Italian (Laurenti) S class and the French (Laubeuf) W class; all six were transferred to the Italian navy in 1915.
Requirements for double-hull coastal and patrol submarines were laid down by the Submarine Committee in 1912. From these Vickers designed the V class and Nautilus, while the Admiralty produced the F class. The Nautilus, begun in 1913, had a substantial torpedo armament of two bow, four broadside, and two stern tubes, but Vickers found it impossible to accommodate the twenty-knot surface speed desired by the committee. Nautilus did not complete until 1917, due to delays in producing her high-power diesel engines, and was not employed operationally. The Swordfish, based on a Laurenti design and representing a second attempt to achieve high speed, employed steam turbines; she proved a failure and was converted into a surface patrol vessel in 1917.
War construction of patrol submarines was split between saddle-tank (E and L) and double-hull (G and J) boats, while the H class and the R class reverted to single-hull design. The Ls were essentially enlarged Es with a higher speed, greater endurance, and no stern tube; the later vessels of the class had 21-inch bow tubes (five of the Ls were fitted as minelayers, sixteen mines replacing the beam tubes). The Gs, originally part of a program aimed at increasing the number of patrol submarines, were double-hull variations of the E but each with a 21-inch stern tube. The J class boats were the largest and fastest of the conventional submarines, the increased power being provided by three sets of diesels driving three shafts in place of the more conventional two. The torpedo tubes were arranged as in the E class, except for the omission of the stern tube.
The original H-class boats were of U.S. design. Ordered from Bethlehem Steel late in 1914, the first ten were to be built in Canada with U.S.-supplied material, while the second ten were to go to the Fore River Yard in Massachusetts for delivery postwar. Only four of the Fore River boats were delivered (in 1918), of which two were transferred to the RCN. Utilizing the same design the Admiralty ordered in 1917 from British yards an enlarged version (H21 class) that substituted 21-inch torpedo tubes for the 18-inch but was otherwise generally similar.
The remaining war construction could best be described as specials—the steam-powered K-class submarines (intended to work in conjunction with the Grand Fleet), the R-class antisubmarine boats (hunter/killers, in modern terminology), and the submarine monitor M1. The last-named was fitted with a single 12-inch gun that could be fired on the surface or, for a single round, with the boat at periscope depth. The general idea was that the gun could be employed either as a supplement to the torpedo in attacks against surface vessels or for shore bombardment, but the opportunity to use it never arose. (See table 4.6.)
Antisubmarine Doctrine
At the opening of the war, antisubmarine tactics were largely passive. Jellicoe kept his fleet at sea for most of the time while the defenses of Scapa Flow were sufficiently improved to prevent the entry of U-boats into his base. At sea the fleet relied on speed and zigzagging (as also became standard practice for convoys) to reduce the chances of a submarine’s obtaining a good attack position. These methods, together with maintaining a lookout for torpedo tracks and periscopes, continued throughout the war. Destroyers were positioned to screen the battle fleet, but without a means of attacking a submerged U-boat (apart from ramming, which required a high degree of luck), they served only to spoil a submarine’s chance of attack.
Table 4.6 Particulars of British Submarines, 1903–18
Note: A number of vessels in the above sequence of numbers for the H21 and L9 classes were canceled postwar. Gun armaments varied considerably; several (including all the coastal types) carried none, but the standard in patrol submarines was a single 12-pounder or 3-inch. Some of the Js and all the Ls were fitted with 4-inch guns, and the Ks one 3-inch and one 4-inch.
* A13 did not complete until 1908. The earlier A1–4, which differed slightly from the later boats were taken out of service before 1914.
** Increased to 10 x 18-inch during construction by the addition of a twin mounting in the superstructure.
*** Two sister boats were completed postwar and a third canceled.
More direct means of dealing with U-boats began with the laying of minefields off their bases in the southern North Sea and along their expected routes, especially in the areas off the Flanders coast and the Helgoland Bight. In addition, the Dover Straits were heavily patrolled by auxiliary warships and closed off with a mined net barrage between the Goodwin Sands and a position west of Dunkirk, as well as, from late 1917, a deep minefield between Folkestone and Cap Gris Nez. These barriers claimed several U-boats, but nonetheless, submarines regularly passed through them to attack shipping in the Channel and beyond. The U-boats had a relatively safer but longer route to the Irish Sea and western approaches, that of passing around Scotland, but the distance involved reduced their period on station. An attempt to close the northern route began in March 1918 with an extensive Anglo-American mining project known as the Northern Barrage. This involved laying a minefield from Orkney to Norway; the center section, by U.S. minelayers, gave coverage from the surface to a depth of two hundred feet, while the eastern and western ends were British-laid deep minefields (allowing the passage of surface ships) that were to be continuously patrolled in order to force submarines to pass through them submerged. By the end of October 1918, 56,033 American and 15,093 British mines had been laid, but the barrage claimed few U-boats (most estimates give six as possible). In addition to the Northern Barrage, the Helgoland Bight minefields were substantially extended during 1917–18 (the total number of British mines laid in this area during 1914–18 was 42,899, most in the last two years of war). Channels were constantly being cleared through these fields by German minesweepers and were just as regularly closed off by further minelaying, so U-boats often took the safer route through the Kattegat, which again reduced their time on patrol. In fact, the disruption to U-boat operations caused by North Sea minefields was of greater value than the direct losses they caused.
Other antisubmarine measures included:
Table 4.7 British Warship Losses to Submarines, 1914–18
Type |
Home waters/Atlantic |
Mediterranean |
Predreadnoughts |
2 |
3 |
Cruisers |
8 |
0 |
Flotilla leader |
1 |
0 |
Destroyers |
4 |
3 |
Torpedo boats |
2 |
0 |
Submarines |
3 |
1 |
Torpedo gunboat |
1 |
0 |
Sloops |
7 |
4 |
Monitors |
1 |
0 |
Seaplane carrier |
1 |
0 |
Minelayers |
1 |
0 |
Armed merchant cruisers |
11 |
0 |
Armed boarding vessels |
5 |
4 |

Note: Auxiliary and coastal craft are not included. The higher loss rates for AMCs, ABVs, and sloops relates to their employment in trade protection. The cruiser losses include three (Aboukir, Cressy, and Hogue) sunk on the same day in September 1914 due to a combination of being inexcusably placed in harm’s way and badly handled when attacked.
• Submarine patrols: British submarines sank during 1916–18 nineteen U-boats, of which seventeen were torpedoed and two lost in minefields. Two of the torpedoed U-boats were lost to old submarines towed by decoy trawlers—U-boats being in the habit of sinking trawlers with gunfire.
• Aircraft patrols: Airplanes and airships searched for submarines from coastal air bases. Mostly this served for intelligence on enemy movements, but forcing a submarine to dive also had value. Although the aircraft carried bombs, only one U-boat was sunk by this means. In addition, convoys were provided with a wider area of observation from escorting airships and kite balloons flown from destroyers.
• Q-ships: Converted merchant vessels (and some naval escorts designed to look like merchantmen) were employed as decoys to tempt U-boats to the surface, where they could be engaged by a hidden armament. They sank eleven U-boats during 1915–17.
• Dazzle painting: Employed on both merchant ships and warships during 1917–18, this technique was intended to increase the difficulty of estimating a ship’s course and speed. These were critical factors for submarines, which tended to keep periscope observation to a minimum to avoid detection. A related development on this theme was the construction of some escort vessels as “double-ended” ships with central, symmetrical superstructures and the same hull profiles at stem and stern (often with false bow waves painted aft).
• Arming of merchant ships: As this would have made ships legitimate targets for sinking without warning, it was not begun until February 1915. Progress was initially slow, due to the limited availability of weapons, but by the end of 1916 over 1,300 merchantmen had been fitted with guns, by the end of the war over four thousand.
• Patrol concentrations: These involved swamping a large area with antisubmarine craft at times when intelligence had indicated the likely passage of U-boats through that area. This was intended to force the enemy to submerge and, ideally, exhaust his batteries so that he could be attacked on returning to the surface. (See table 4.7.)
Antisubmarine Weapons
Overall, mines produced the greatest losses to U-boats during 1914–18, accounting for about forty-eight (excluding a further ten lost to German mines), but for a given period the most effective offensive antisubmarine weapon proved to be the depth charge. In 1918, with supply and tactics well established, they accounted for twenty-two U-boats, compared with eighteen sunk by mines. They were supplied to light cruisers, destroyers, escort vessels, and coastal craft; they were initially simply dropped over the stern from racks, but by mid-1917 depth-charge throwers had been introduced. There were also towed explosive devices: the explosive paravane, which was difficult to operate, unpopular, and achieved little; and the explosive sweep, which was employed mainly by auxiliary patrol vessels and accounted for only three submarines.
Experiments with hydrophones, developed from prewar sound-signaling apparatus, to detect the engine and propeller noises of submarines produced a system that was employed as both a static defense and on board ships. In the former case, the hydrophones were laid in arrays on the seabed in coastal areas, with a shore-based listening post. In addition to warning and tracking functions, these stations were often used in conjunction with controlled minefields. Apart from those around the coasts of Britain, listening stations were established in Italy and at Malta. The shipboard use of hydrophones was at first hampered by the need for the vessel in which they were fitted to be stopped, due to the excessive noise created when moving. This problem was solved by the adoption of towed units, and this in turn led to their use by airships and seaplanes, from which the hydrophone was lowered into the sea (although seaplanes had to alight on the surface). A much-improved ultrasonic detector was developed during the war but was not brought to completion until shortly after the war ended—this was Asdic, which was to become the standard submarine-detection device of the future.
Mine Warfare
Doctrine
Mine development was neglected prewar, and the standard Elia mine in use in 1914 had a firing mechanism that often malfunctioned. To improve matters the Admiralty purchased Carbonit mines from Russia, eventually producing a reliable home-manufactured type by copying the essential features of the German horned mine. Early problems with both quality and numbers limited most minelaying to defense fields, but from early 1917 there was greater emphasis on offensive minelaying, this activity being reflected in the number of vessels adapted for the purpose during this period. Britain also developed the first magnetic mine—the M sinker, which was employed primarily on the U-boat routes off the coast of Belgium. The central section of the Northern Barrage employed U.S. antenna mines.
Mine and Patrol Vessels
At the instigation of Admiral Fisher, the early war-construction programs included many minesweeping and small patrol vessels. War-construction minesweepers belonged to the Flower, Racehorse, Ascot, and Hunt classes. Over seventy of the Flower class were ordered in 1915, a further twelve in January 1916, and twenty-eight in January 1917. They proved adaptable for escort service, and the last two groups were built for this purpose—the 1917 ships being constructed to resemble merchantmen, in order to blend with their charges or to serve as Q-ships. The Racehorse class minesweepers were “double-ended” ships, while the thirty-two of the Ascot class were paddle steamers ordered during 1915–17. The Hunt class consisted of over a hundred vessels, but only fifty-two were completed before the end of the war.
Minelayers
The RN had no purpose-built minelayers, all such vessels being either modified warships or merchant vessels. Seven old second-class cruisers were converted prewar, but no other warships were adapted for this purpose until 1917, except for destroyer leader Abdiel, completed in 1916 for service with the Grand Fleet (two of her sisters were similarly modified in 1918). During 1917–18 the old first-class cruisers Ariadne and Amphitrite, the predreadnought London, the battle cruiser Courageous (temporarily), eleven light cruisers, and fourteen destroyers were adapted for minelaying. Ten merchant vessels were converted to minelayers, most during 1915, together with sixteen trawlers during 1915–18.
Amphibious Warfare
The navy was involved in only two amphibious operations of any note. The first was support to the landings in Gallipoli, which began in April 1915 following an abortive attempt to force a passage to Constantinople through the Dardanelles with ships alone. British and French warships provided a bombardment force and guarded the beachheads. The campaign proved a costly failure, with 205,000 British and 47,000 French casualties and the loss of three predreadnought battleships. In contrast, all Allied personnel were evacuated in December 1915 without a single casualty.
Troops were landed on the Gallipoli Peninsula from a variety of craft, including a converted collier (River Clyde) that was run ashore to allow troops to disembark rapidly from specially fitted ramps. Specially constructed landing craft arrived later in the campaign—160-ton X lighters, driven by oil engines, and small Y “dumb,” or non-self-propelled, lighters (a few were powered by small outboard engines). The construction of X lighters continued through 1916, the type providing general service in the transport of troops and stores, especially in Mesopotamia. The navy also built three 2,500-ton pontoons intended to land troops, guns, and tanks as part of an invasion of Belgium in combination with a land advance by the army planned for mid-1917. The latter (the third battle of Ypres) failed, and the whole operation was canceled.
The second amphibious operation of note was the attack on Zeebrugge on 23 April 1918. This was a night raid in which the Royal Marines were to suppress the outer harbor defenses while three old cruisers were sunk across the mouth of the canal that linked the U-boat base at Brugge with the North Sea. The assault was well executed and resulted in the awarding of eight Victoria Crosses, but the blockships were not sunk to best effect, and U-boats were able to get past them only a few days after the attack. In addition, secondary attacks on Ostende failed completely.
Aviation
The Admiralty began to show a serious interest in aviation in 1909. In April 1912, following the recommendation of the Aerial Sub-Committee of the Committee of Imperial Defence, the Royal Flying Corp (RFC) was formed, with both military and naval wings that shared resources but were effectively under separate control. Shortly after this an Air Department was added to the Admiralty’s organization. The separation of the two air services was recognized in July 1914, when the naval wing officially became the RNAS (Royal Naval Air Service). It survived until 1 April 1918, when it was combined with the RFC to become a completely separate third service—the Royal Air Force (RAF).
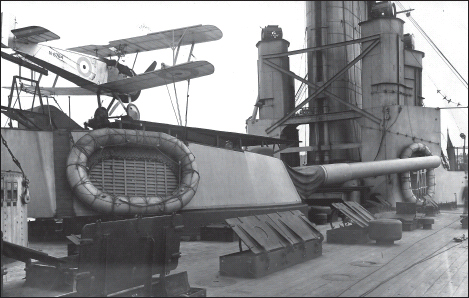
In August 1914 the RNAS had ninety-three land and seaplanes and six airships, while its personnel consisted of 138 officers and 589 men. By the end of March 1918 this force had increased to 2,949 airplanes (of which about a third were seaplanes), 5,378 officers, and 49,688 men. The majority of the air personnel transferred to the RAF, but the Admiralty retained control of its airships until the end of 1919. In November 1918 the RAF aircraft on naval flying duties numbered a little over 1,700; the naval airship service included 103 airships, 580 officers, and 6,534 men.
Shortly after the outbreak of war two RNAS squadrons transferred to France to support the Naval Brigade. This presence was retained throughout the war and was substantially increased in late 1916 to provide additional support to the RFC in covering military operations on the western front. In the early months of the war these squadrons pioneered strategic bombing, conducting the first air raids on Germany (against the zeppelin sheds at Düsseldorf and Friedrichshafen) and the first night bombing raid (against Ostende), while one of their aircraft was the first to destroy a zeppelin (Z9, at Düsseldorf). The RNAS also had the task of home defense against air attack until early 1916, when the RFC assumed this responsibility.
In the maritime war the major part of the air resources of the RNAS was employed from coastal stations in home waters. Land planes, seaplanes, flying boats, and airships continually patrolled in search of enemy warships, U-boats, minefields, and zeppelins. Air patrols did not produce much in direct action against enemy assets, but they proved extremely valuable in exerting a deterrent effect, reporting enemy vessels, gathering intelligence on enemy movements, and in the later years of the war providing air escorts for convoys. Naval aircraft also served in coastal operations off Belgium; in the assaults on the Dardanelles and Gallipoli; in the Aegean, Adriatic, and Red Seas; in Palestine; and East and Central Africa. Their activities included spotting for naval bombardments, bombing, and carrying out reconnaissance and aerial photography of enemy positions.
The idea of employing aircraft with the fleet was conceived early but developed slowly due to the difficulties of operating from the open sea. Early aircraft were comparatively light structures, and initially the only suitable aircraft were seaplanes, whose floats reduced their performance compared with land planes. Even the main advantage that they possessed—that they could be launched and recovered from the sea—was limited by the need for the ships carrying them to stop (making them vulnerable to attack and compromising their operation in conjunction with a fleet) and by the requirement of moderate sea conditions. In 1917 the development of shipboard aircraft moved toward employing wheeled aircraft launched from ramps and flight decks.
The principal roles initially envisaged for fleet aviation were reconnaissance and sea-launched attacks on coastal positions. On Christmas Day 1914, three seaplane carriers launched an air attack against the airship sheds at Cuxhaven. The attack failed in both its primary object and a secondary one—the hope that the attack would draw out the German fleet—but nevertheless demonstrated the potential of naval airpower. Further sea-launched raids on enemy airship bases were attempted in 1916, but it was not until a raid on the Tondern airship sheds by aircraft from HMS Furious in July 1918 that such an operation succeeded: both airship sheds were set alight, and the zeppelins L54 and L60 were destroyed.
Given their small size, the bombs of the era were unlikely to achieve a great deal in attacks on armored ships. The weapon that had the most potential in this respect was the air-launched torpedo, first tried in July 1914, when a 14-inch torpedo was dropped from a Short Folder seaplane. In August 1915 a Short 184 seaplane was the first aircraft to torpedo a ship from the air—a grounded Turkish supply vessel. Two more Turkish vessels were torpedoed by aircraft a few days later; one did not sink, though it became a total loss, while the second, a tug, was torpedoed when the aircraft was afloat rather than in the air. These isolated events served to demonstrate both the potential and the shortcomings of employing aerial torpedoes—not least the fact that the aircraft involved could barely take off with the weight of a torpedo. Toward the end of 1916, work began on the world’s first torpedo bomber, the prototype of which appeared in June 1917. This became the Sopwith Cuckoo, a land plane suitable for operation from an aircraft carrier. The first operational squadron was allocated to the carrier Argus in October 1918 and began working up for a planned torpedo attack on the ships of the High Seas Fleet in harbor. It was intended to make this attack in 1919, but the end of the war intervened.
The initial impetus for fitting takeoff platforms to fighting ships was to provide improved reconnaissance capability and a means of dealing with zeppelins. Land planes were essential in this latter role, not simply because of their superior performance in comparison to seaplanes (especially a higher rate of climb) but because they required a shorter takeoff run. The problem of recovery was solved by the adoption of air bags that could be inflated by compressed air shortly before landing, but that of having to stop to recover aircraft remained (if necessary, the aircraft could be picked up by a destroyer or abandoned). The first takeoff platform in a fighting ship was fitted over the forecastle of the cruiser Yarmouth in June 1917. (Four cruisers of the Harwich force were fitted with flying-off ramps in 1915, but these achieved little and were soon removed.) Shortly after, her aircraft succeeded in shooting down zeppelin L23, and, with the encouragement of this singular—and as it turned out, only—success, a further twenty-one light cruisers were fitted with platforms by the end of 1918.
The next step was the fitting of flying-off platforms to capital ships, beginning with the battle cruiser Repulse, which successfully launched aircraft from ramps fitted to the roofs of her B and Y (the latter the aftmost) turrets in October 1917. By the end of the war a further ten battle cruisers and twenty-five battleships had been fitted with two turret ramps each. The provisional outfit in each ship was one fighter and one reconnaissance aircraft. At the end of 1918, 103 aircraft were allocated to the fighting ships of the Grand Fleet. In March 1918 serious work began on developing aircraft spotting for the battle fleet, but this had not been advanced to a fully workable system before the war ended—not least because of the difficulties of communication. Aerial spotting for guns had in fact started earlier, from kite balloons, which, being tethered to ships, did not suffer the same communication problem. They were first used from kite-balloon ships during the Dardanelles and Gallipoli campaigns in April–July 1915, spotting for ships bombarding Turkish positions. During 1917–18 kite balloons were installed in sixteen battleships, four battle cruisers, five light cruisers, and twelve destroyers of the Grand Fleet. Although their primary role was spotting, they were also intended for observation of enemy movement in a fleet action and could provide general observation for a cruising fleet. However, the latter role was limited by the fact that being visible from some distance, they might give advanced warning of the fleet’s approach.
Another mode of operating aircraft with the fleet employed a high-speed (hard-chine), fifty-eight-foot lighter that could be towed by a destroyer. These were originally introduced in 1917 to extend the range of flying boats by towing them out into the North Sea. In 1918 a number of these craft were fitted with flying-off ramps for fighters and, under tow by a destroyer, accompanied various raiding operations. They achieved one success—a Sopwith Camel flown from a lighter on 10 August 1918 shot down zeppelin L53 during a sweep by the Harwich Force toward Helgoland.
In the development of aircraft and seaplane carriers, experiments in operating aircraft from ships began in 1912, with seaplanes being launched from temporary takeoff ramps built over the forecastles of a few predreadnoughts. In the following year the old cruiser Hermes was converted into the navy’s first seaplane carrier. Fitted with a flying-off ramp over her forecastle and canvas hangars fore and aft, she was sunk by U 27 shortly after the outbreak of war. The shortfall was made up by converting fast passenger ferries into seaplane carriers—three in 1914, two in 1915, one in 1916, and two in 1917. All these vessels had a similar configuration—a hangar aft for seaplanes and a flying-off ramp forward for wheeled aircraft (except for the first three, which had a second hangar forward and no ramp). There were also two ex-German merchant ships operated as seaplane carriers in the eastern Mediterranean during 1915–17.
The development of more capable aviation vessels began with the 7,450-ton Ark Royal, a cargo vessel purchased in May 1914 while under construction and completed as a seaplane carrier/aircraft depot ship in December. The next project involved the conversion of the 20,000-ton ex–Cunard liner Campania into a seaplane carrier for operation with the Grand Fleet. She was purchased by the Admiralty in November 1914 and entered service in April 1915 with a 165-foot flying-off platform forward and two hangars for ten to twelve aircraft. In 1916 the flying-off platform was extended aft to 245 feet by splitting the forward funnel into two uptakes. The thirty-one-knot hybrid battle cruiser Furious was completed in July 1917, with a 228-foot takeoff deck forward, to meet the need for a high-speed aircraft carrier to operate with the Grand Fleet. During 1917–18 she was further modified to accommodate a 284-foot landing deck between her funnel and the stern. A similar but smaller-scale arrangement was adopted for the conversion of the cruiser Cavendish, completed as the Vindictive in September 1918 with a 106-foot flying-off platform forward and a 193-foot landing platform aft.
Experience with Furious pointed to the need for carriers with clear, full-length flight decks. The first of these was Argus, converted during 1917–18 from an incomplete Italian liner. She had a 550-foot flight deck and no bridge structure, apart from a small, retractable pilothouse. Her 350-by-68-foot hangar was served by two aircraft lifts and could accommodate twenty aircraft. She did not complete until September 1918 and was too late to take an active part in the war. Two more carriers were begun during the war but did not enter service until the 1920s. Both showed the configuration generally adopted for the majority of later carriers, with full-length flight decks and starboard “island” superstructures. The first was the 21,000-ton Eagle, converted from an incomplete battleship originally building for Chile, and the second the 10,850-ton Hermes—the first aircraft carrier to be designed as such from the outset.
WAR EXPERIENCE AND EVOLUTION
Wartime Evolution
At the commencement of war the population of Britain saw little reason to doubt the navy’s supremacy at sea or its ability to continue its glorious traditions. However, the confidently expected new Trafalgar failed to materialize, and a series of failures and inconclusive engagements eroded the high regard generally held for the service’s commanders, ships, and equipment. In part this resulted from a limited understanding of the nature of the naval war and the fact that the navy was undergoing a learning process in the conduct of modern warfare. There were nevertheless less excusable examples of poor judgment and arrogance that slowed this process—most seriously in the late introduction of ocean convoys due to the inadequate methods adopted to evaluate their likely success, combined with general resistance to policy change.
In the first few months of war the navy lost one dreadnought (Audacious), nine cruisers (two at the battle of Coronel), and in the Mediterranean failed to prevent the battle cruiser Goeben and the cruiser Breslau from escaping to Constantinople—one of the factors that encouraged Turkey to enter the war. On the plus side, the navy raided the Helgoland Bight in August, sinking several German ships without loss, and avenged Coronel at the battle of the Falklands in December. However, these were little more than minor actions, and they revealed further problems: the Helgoland Raid succeeded only in spite of poor Admiralty planning, while the Falkland Island battle involved an excessive expenditure of ammunition. The following year was little better: at the battle of Dogger Bank the German battle cruisers escaped from Beatty, with the loss of one armored cruiser, while the Dardanelles operation and the following Gallipoli campaign proved costly failures. Finally, in mid-1916, the one major fleet engagement of the war, the battle of Jutland, produced more losses in ships and men to the British than to the German fleet, no victory for either side, and no change in the strategic situation.
The main fleets did not meet again, and it is not difficult to see that a feeling developed, not least within the fleet itself, that the Grand Fleet was contributing little to the war compared with the sacrifices being made by the army on the western front. While this had some validity in terms of “sacrifice,” it was far from correct in terms of strategy.
The Grand Fleet, in its distant northern bases, was there to contain the High Seas Fleet and support the blockade, and in the overall strategic sense it was completely successful in achieving these objects. It was essentially achieved by stalemate—the High Seas Fleet did not wish to engage the full strength of the Grand Fleet and failed in its attempts to draw its enemy into U-boat traps or intercept detached squadrons in the hope of redressing the balance and making a fleet engagement more equitable. At the same time the Grand Fleet, despite several attempts to do so, failed to develop any strategy that would lure the High Seas Fleet to sea. The Admiralty was subjected to much criticism, especially from its own younger officers, for its lack of initiative, but these criticisms seldom suggested any practical means of overcoming the stalemate, and it is difficult to see, with one notable exception, what could have been done to draw out the German fleet. The one exception was the blockade, whose strangulation of German trade should in theory have brought out the fleet in an attempt to break it. Unfortunately, the blockade did not become fully effective until after the United States entered the war, and by the time it was causing severe problems to Germany the High Seas Fleet’s ability to fight had been greatly reduced by internal dissension. In this respect the Grand Fleet had something of an advantage over its elusive enemy, in that the morale of its men remained high through the end of the war.
The greatest challenge the navy faced was not, however, the High Seas Fleet but the unrestricted U-boat campaign, which could easily have brought about a British collapse. Its response to that challenge was also its greatest success and represented a true victory in keeping with its traditions—albeit without the great battle-fleet action expected by the public and so desired by the men of the Grand Fleet.
Summary and Assessment
One of the major problems of the North Sea strategy was that the High Seas Fleet could choose its moment to emerge and would almost certainly do so when at maximum strength. The Grand Fleet, on the other hand, had to be constantly ready to meet any challenge and viewed reductions in fleet strength with great concern. This was a particularly difficult problem in the early months of war but eased progressively as new ships joined and earlier problems diminished—principally the detachment of battle cruisers on trade-protection duties, the need to send ships to southern dockyards, and problems with ship’s condensers. The early battles of the war were limited in the lessons they provided, and these in some cases were not quite as valuable as they appeared at the time—principally the perceived need to conserve ammunition in the opening stages of action (as a result of the Falkland battle) and the desire for rapid fire (from the battle of Dogger Bank). It was Jutland that provided the most important lessons in regard to fleet action and warship design. This battle saw the loss of three battle cruisers and an armored cruiser to magazine explosions, which were the main causes of the higher number of British ships and men lost during the battle. These explosions—and the fact that other ships had come close to suffering the same fate—led to a tightening of ammunition-handling procedures and improvements in the isolation of magazines and ammunition supply. The losses suffered at Jutland also brought into question the level of armor protection provided for British capital ships, especially battle cruisers.
The arrival of a U.S. squadron of battleships at Scapa Flow in 1917 to join the Grand Fleet as the 6th Battle Squadron gave it absolute battleship preponderance, but there remained considerable concern about the relative strength in battle cruisers and destroyers to the end of the war. The battle cruisers were not only considered insufficient in number but substantially inferior to their German opposite numbers. In the case of destroyers it was simply a perceived lack of numbers, especially as there was no guarantee that those attached to the Grand Fleet would be available in the case of a fleet action, given that several were likely to be absent escorting convoys or covering raids or minelaying operations. Other ships of the Grand Fleet were also likely to be dispersed as close or distant cover, and these were open to attack by superior enemy raiding forces.
These considerations, together with the need to provide capital ships with new shells, magazine isolation, and improved protection to magazines and turret roofs, resulted in a change in policy. This change was initiated by Beatty at an Admiralty Conference in January 1918 at which it was concluded that action with the High Seas Fleet was something best avoided until fleet strength improved and the technical changes had been effected. This change simply resulted in the abandonment of enticement schemes; it did not mean that the Grand Fleet would not engage the High Seas Fleet if it put to sea. The enemy fleet did in fact sortie once more, in April 1918, to cover a raid on the Scandinavian convoy route by its battle cruisers. Fortunately, there were no convoys at sea at the time, and, less fortunately, the German fleet retired before the Grand Fleet could reach an interception position.
While the battle squadrons spent the last two years of war patrolling, exercising, and occasionally providing distant cover for light-force operations, the smaller ships of the fleet were very active. Regular raids took place into the area to the north of Helgoland and into the Skagerrak against enemy patrol vessels, minesweepers, and aircraft, together with numerous assignments covering and escorting convoys and minelaying operations. In general, the commanders of the navy’s light forces fought with distinction and showed greater ability to adapt to modern war than the more senior officers of the battle squadrons. In part this was due to greater opportunity, but they were also younger and less imbued with the deference to seniority and rigid adherence to accepted methods that had marked the Victorian age. This showed particularly in the balance of British-German destroyer engagements in the North Sea and English Channel, where the losses on each side were relatively equal despite the generally held view that German flotilla craft were superior in speed, armament, training, and doctrine.
Beyond the North Sea, the navy maintained its hold on the sea communications with Great Britain’s worldwide empire with relatively little difficulty, primarily because the German navy, with the exception of its U-boats, had little opportunity to cause serious problems. It was also a relatively simple matter to contain the Ottoman fleet (most importantly the Goeben) in the Dardanelles and to support the Italian navy in containing the Austro-Hungarians in the Adriatic.
At the outbreak of war the Royal Navy had the advantage of a large, modern fleet that represented a substantial investment of the nation’s wealth. There was, however, considerable scope for improvement in correcting areas of neglect, while other problem areas were revealed by war experience, particularly in relation to ammunition, fire control, and signaling. Solutions to the many difficulties that arose were found in the construction of new types of ships and the introduction of a considerable amount of new equipment and improved munitions. Great progress was made in the development of naval airpower, antisubmarine weapons, fire control, bombardment, and minesweeping equipment (both for sweepers and self-defense). Much of this, especially airpower and submarine detection, was only just reaching maturity in 1918 and had only a limited chance to show its full potential. More importantly, the navy learned and adapted, albeit somewhat slowly at first, and emerged from the war with a well-developed understanding of the methods and ships required for modern warfare. In its junior ranks were men of experience who would serve it well in the next war.