We’re not done covering the Nikon Z6’s options yet. There are three more menus to deal with. These include the Setup menu (which deals with adjustments that are generally outside the actual shooting experience, such as formatting a memory card, adjusting the time, or checking your battery); the Retouch menu (which enables you to fine-tune the appearance of images by trimming, adding filter effects, or removing red-eye); and the My Menu/Recent Menu system, which can help you set up a customized menu that contains only the entries you want, or your most recently accessed entries.
Setup Menu Options
There is a long list of entries in the orange-brown coded Setup menu. The first page of entries is shown in Figure 13.1. All the Setup menu options let you make additional adjustments on how your camera behaves before or during your shooting session, as differentiated from the Photo Shooting menu, which adjusts how the pictures are actually taken.
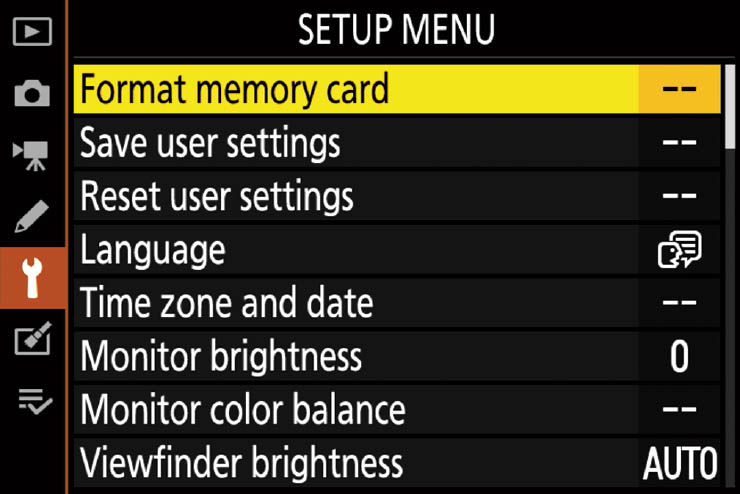
Figure 13.1 The Setup menu allows you to adjust how the Z6 behaves.
Your choices include:
- Format Memory Card
- Save User Settings
- Reset User Settings
- Language
- Time Zone and Date
- Monitor Brightness
- Monitor Color Balance
- Viewfinder Brightness
- Viewfinder Color Balance
- Control Panel Brightness
- Limit Monitor Mode Selection
- Information Display
- AF Fine-Tune
- Non-CPU Lens Data
- Clean Image Sensor
- Image Dust Off Reference Photo
- Image Comment
- Copyright Information
- Beep Options
- Touch Controls
- HDMI
- Location Data
- Wireless Remote (WR) Options
- Assign remote (WR) Fn Button
- Airplane mode
- Connect to Smart Device
- Connect to PC
- Wireless Transmitter (WT-7)
- Conformity Marking
- Battery Info
- Slot Empty Release Lock
- Save/Load Settings
- Reset All Settings
- Firmware Version
Format Memory Card
Options: Yes, No
My preference: N/A
I recommend using this menu entry to reformat your memory card after each shoot. Although you can move files from the memory card to your computer, creating a blank card, or delete files using the Playback menu’s Delete feature, both of those options can leave behind stray files (such as those that have been marked as Hidden or Protected). Format removes those files completely and beyond retrieval (unless you use a special utility program) and establishes a spanking-new fresh file system on the card. All the file allocation table (FAT or exFAT) pointers (which tell the camera and your computer’s operating system where all the images reside) are reset, efficiently pointing where they are supposed to on a blank card.
Save User Settings
Options: Save to U1, Save to U2, Save to U3
My preference: N/A
User settings are groups of camera shooting settings that the Z6 stores in one of three memory “slots,” labeled U1, U2, and U3. Set up your camera with the settings you want to be able to recall, and save them using this menu entry. Then rotate the mode dial to the U1, U2, or U3 position when you want to access them.
Available settings include:
- Shutter speed in S and M modes
- Aperture in A and M modes
- Flexible Program settings in P mode
- Exposure and flash compensation
- Metering, Autofocus, and AF-area modes
- Flash mode
- Focus point
- Bracketing settings
- Most adjustments in Photo Shooting, Movie Shooting, and Custom Settings menus, except for those listed next
The settings you cannot save include:
Photo Shooting Menu:
- Storage Folder
- Choose Image Area
- Manage Picture Control
- Multiple Exposure
- Interval Timer Shooting
- Time-lapse movie
- Focus-shift shooting
Movie Shooting Menu:
- Choose Image Area
- Manage Picture Control
Follow these steps to store your settings:
- 1. Choose mode. Rotate the mode dial to the shooting mode you’d like to store, such as P, A, S, or M.
- 2. Adjust settings. Enter the settings you want to store on the camera, using the camera controls, Photo Shooting, and Custom Settings menus. (Setup menu entries cannot be saved.)
- 3. Select Save User Settings. Navigate to this entry in the Setup menu.
- 4. Choose memory register. Choose Save to U1, Save to U2, or Save to U3 and press the right directional button.
- 5. Save. Choose Save Setting on the confirmation screen, or Cancel to abort.
Reset User Settings
Options: Reset U1, Reset U2, Reset U3
My preference: N/A
You can return the settings stored in the U1, U2, or U3 registers to their factory default values using this menu entry. Simply select the entry, choose Reset U1, Reset U2, or Reset U3, and press the right directional button. Press OK to confirm.
Language
Options: In the Americas: English, Spanish, French, Portuguese
My preference: English, of course, but steadily improving in Spanish
Nikon’s thrown us a curveball in the language option department. Instead of the couple dozen languages offered in most other Nikon cameras, Z6 bodies sold in North and South America offer only the official languages on those continents. The change was either done “for user convenience” (which is rarely true), or to prevent gray market imports from one area of the world to another.
If you’d like to see your menus and prompts in German, Japanese, or some other language, you’ll need to buy a camera built for Europe or Asia, respectively. One potential (but theoretical) fix might be to install the firmware updates available from Nikon websites in, say, Germany or Japan (Version 1.01 for the Z6 was available about a month after the camera started shipping), but it would be wise to check with Nikon first to make sure that’s even possible and/or won’t munge your camera.
This change won’t impact a large number of us, but for expats who want to use their native tongue, it’s an inconvenience, at best.
Time Zone and Date
Options: Time Zone, Date and Time, Sync with Smart Device, Date Format, Daylight Saving Time (Default: Off)
My preference: N/A
Use this menu entry to adjust the Z6’s internal clock. Your options include:
- Time zone. A small map will pop up on the setting screen and you can choose your local time zone. I sometimes forget to change the time zone when I travel (especially when going to Europe), so my pictures are all time-stamped incorrectly. I like to use the time stamp to recall exactly when a photo was taken, so keeping this setting correct is important.
- Date and time. Use this setting to enter the exact year, month, day, hour, minute, and second.
- Sync with Smart Device. When enabled, the Z6 will adjust its clock to the time specified by your smartphone or tablet when either is linked to the camera. Since the date/time information of the device is constantly updated by its cellular system, it’s likely to be highly accurate. (See the Location Data entry described later in this chapter.)
- Date format. Choose from Y/M/D (year/month/day), M/D/Y (month/day/year), or D/M/Y (day/month/year) formats.
- Daylight saving time. Use this to turn daylight saving time On or Off. Because the date on which DST goes into effect each year has been changed from time to time, if you turn this feature on you may need to monitor your camera to make sure DST has been implemented correctly.
Monitor Brightness
Options: –5 to +5 (Default: 0)
My preference: N/A
Choose this menu option and a screen appears allowing you to specify brightness (see Figure 13.2). Use the multi selector up/down keys to adjust the brightness to a comfortable viewing level. Under the lighting conditions that exist when you make this adjustment, you should be able to see all 10 swatches from black to white. If the two left-end swatches blend together, the brightness has been set too low. If the two whitest swatches on the right end of the strip blend together, the brightness is too high. Brighter settings use more battery power, but can allow you to view an image on the monitor outdoors in bright sunlight. When you have the brightness you want, press OK to lock it in and return to the menu. Although the Z6 has a great viewfinder, you’ll still find yourself using the monitor for both preview and review functions. I often tilt the LCD upward when shooting from low perspectives, so I don’t have to crouch or kneel, or tilt it forward when I am holding the camera overhead, for a periscope view.
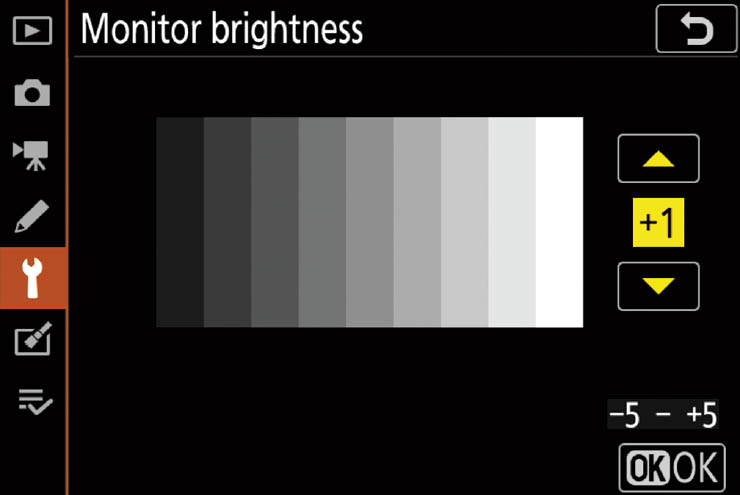
Figure 13.2 Choose to adjust brightness.
Monitor Color Balance
Options: Adjust color balance
My preference: N/A
This entry allows you to adjust the color balance of the LCD monitor using an image residing on your memory card. An adjustment screen, like the one shown in Figure 13.3, appears. The large thumbnail image at upper left will be the last photograph taken, or, if you are using Playback mode, the last photograph viewed. You can also press the Zoom Out button (located next to the lower-right corner of the monitor) to select an image on your memory card from a thumbnail list.

Figure 13.3 Fine-tune monitor color balance.
Use the multi selector directional buttons to bias the monitor hue along the blue/amber (left/right buttons) and/or green/magenta (up/down buttons) axes. The grayscale tone strip above helps you judge the neutrality of your selected balance settings. Press OK to confirm your adjustment. Note that changing the monitor color balance has no effect on the color balance of the photos you take.
Viewfinder Brightness
Options: Auto (default); Manual: –5 to +5
My preference: N/A
You can also adjust the brightness for the electronic viewfinder. Unlike the monitor brightness adjustment, the Viewfinder option includes an Auto setting that will modify brightness based on ambient light conditions. In Manual mode, while peering through the viewfinder at the grayscale patches, you can brighten/darken the display using the same plus/minus 5 range. Use the multi selector up/down keys to adjust the brightness to a comfortable viewing level. When you have the brightness you want, press OK to lock it in and return to the menu.
Viewfinder Color Balance
Options: Adjust color balance
My preference: N/A
This is the first entry in the next page of the Setup menu. (See Figure 13.4.) Viewfinder color balance is adjusted using the same procedure described above for Monitor Color Balance, while looking through the viewfinder window.
Control Panel Brightness
Options: Auto (default); Manual: 1–7; Off
My preference: Auto
The monochrome control panel on the top surface of the Z6 is a welcome addition; you can view important information from above the camera, say, when shooting with the Z6 mounted on a tripod. The light-on-dark lettering is easy to see. Select Auto to allow the camera to choose brightness based on the ambient illumination, or Off to disable it entirely. With the Manual setting, you can specify a brightness level from 1 to 7.
Limit Monitor Mode Selection
Options: Enable/Disable: Automatic Display Switch, Viewfinder Only, Monitor Only, Prioritize Viewfinder; Default: Enable All
My preference: Enable All
One of my favorite Z6 features is the ability to use the electronic viewfinder for tasks that, on a digital SLR, require looking at the LCD monitor. For example, I can keep the camera up to my eye and make menu adjustments and review images I’ve shot in Playback mode—even under the brightest daylight conditions.
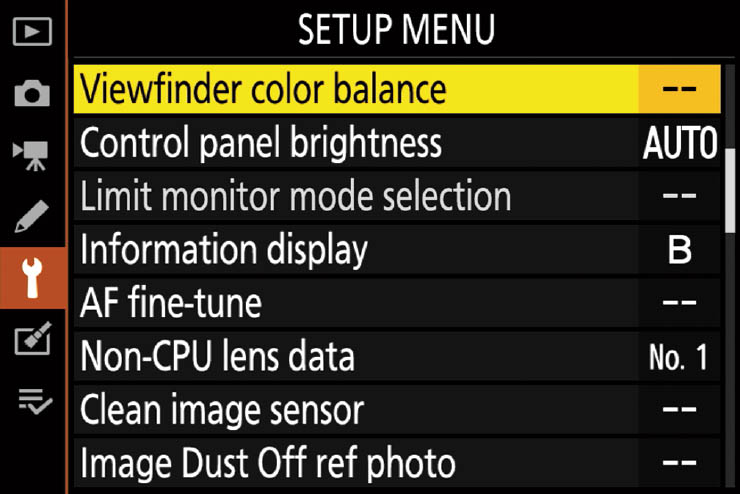
Figure 13.4 The second page of the Setup menu.
This menu item lets you choose which monitor viewing modes are available when you press the monitor mode button (located on the left side of the Z6’s “pentaprism” hump). Pressing the button repeatedly cycles among the options you’ve enabled. At least one must be enabled (you cannot disable all of them). Your options are as follows:
- Automatic display switch. The active display always switches from the monitor to the viewfinder when you place your eye up to the viewfinder (or when anything else comes in proximity to the sensor located above the viewfinder window). When you remove your eye from the EVF, the display switches to the LCD monitor. This is often the most convenient mode. However, you may encounter unwanted switching if something other than your eye comes within roughly two inches of the sensor. For example, if you’ve swiveled the monitor and are using the touch screen, a finger may switch the display.
- Viewfinder Only. The monitor is disabled and the viewfinder is used exclusively for shooting, navigating menus, or image playback. This is my preferred mode in dark venues—especially concerts—where an illuminated LCD can distract or annoy others. I can access most camera features with the menus and viewfinder, so, for example, I don’t need to fumble with my fingers to locate the ISO or Exposure Compensation direct access buttons. I also use Viewfinder Only outdoors when the monitor washes out or is difficult to view.
- Monitor Only. The viewfinder is disabled, and display is directed to the LCD monitor only. This is my choice when I’m composing and shooting using the monitor—say for macro photography or other scenes shot with the camera at waist level or lower, or mounted on a tripod. I don’t want the eye sensor to switch to the EVF as I work, so I switch to the Monitor Only setting.
- Prioritize Viewfinder. With this option, when you’re shooting pictures, the display is directed to the viewfinder exclusively; it turns on when you move your eye to the EVF, and turns off when you remove your eye. That saves more than a little power, especially if there are intervals when you are not taking photos at all, but don’t want to turn off the Z6. (The sensor and the electronic viewfinder or sensor can always be active when the camera is powered up, in contrast to digital SLRs that are, effectively, in a low-power mode until you start using the exposure meters, autofocus mechanism, or LCD monitor.)
When you’re reviewing images in Playback mode, while capturing movies, or when menus are displayed, the monitor will turn on when you remove your eye from the viewfinder.
Information Display
Options: Manual: Dark on Light (B) (default), Light on Dark (W)
My preference: Light on Dark
This menu entry refers to the shooting information screen that appears as you cycle through the various displays by pressing the DISP button. You can set this display to dark lettering on a light background (which you may prefer in dim locations) or light lettering on a dark background (which is often the best choice for viewing the monitor in daylight). I prefer the light-on-dark color scheme; if ambient light is really bright, I use the viewfinder instead of the monitor anyway.
AF Fine-Tune
Options: AF Fine-Tune On/Off (default: Off), Saved Value, Default, List Saved Values
My preference: N/A
Troubled by lenses that don’t focus exactly where they should, producing back focus or front focus problems? No need to send your lens and/or camera into Nikon for servicing. The Nikon Z6 allows you to fine-tune focus for up to 30 different lenses. Best of all, it works perfectly with both Z-mount and F-mount lenses (using the FTZ adapter).
You’ll probably never need to use this feature, but if you do, it’s priceless. To fine-tune your lenses, first perform some tests to see just how much fine-tuning is required. The only problem I’ve run into is that with some lenses, particularly short focal length lenses, using large negative values (0 to –20) to move the focal point closer to the camera sometimes results in being unable to focus to infinity. If you run into that, you may be better off sending the lens to Nikon so they can recalibrate the focus for you.
This menu option has four choices, shown at left in Figure 13.5:
- AF fine tune (On/Off). Enable/disable application of your AF fine-tuning changes.
- Saved value. View or enter an adjustment for the lens currently mounted on your camera. (See Figure 13.5, right.)
- Default. Set the default value to be applied to lenses that haven’t been recalibrated. You’d use this if your Z6 has a certain amount of front or back focus problems with all lenses. Use with caution, as it affects every CPU lens that you use.
- List saved values. View and delete tuning values you’ve saved.

Figure 13.5 The autofocus of lenses can be adjusted here.
Because the adjustments made with the AF Fine-Tune setting are potentially so dangerous to your focusing health, I’m not even going to provide an overview in this chapter. (Knowing just enough to hurt yourself can be a real possibility.) Instead, you’ll find a thorough discussion of using this feature in Chapter 7, which deals with lens issues.
Non-CPU Lens Data
Options: Lens number, Focal Length (mm), Maximum aperture
My preference: N/A
This is an odd entry, as it contributes absolutely nothing to the operation of your camera, other than enabling it to embed the focal length and maximum aperture available of some older manual focus lenses in the EXIF data embedded in your image file.
One of the best accessories for the Z6 is the FTZ adapter, which makes it easy to mount Nikon F-mount lenses to the Z6. It gives you four types of functionality in PSAM modes:
- AF-S, AF-P, and AF-I lenses, plus AF-S/AF-I teleconverters. These retain all their features, including autofocus and autoexposure.
- AF and AF-D lenses. You must focus these optics manually, but with AF-D lenses the electronic rangefinder will assist in determining correct focus. Peaking Highlights (described in Chapter 12) works with either type. You can adjust the aperture electronically and use Aperture-priority autoexposure.
- AI-P and all lenses with a CPU chip. You get manual focus only (with Peaking Highlights) and Aperture-priority exposure.
- AI, AI-S, and Series E lenses. Manual focus and manual exposure only, but you can use this menu entry to specify the maximum aperture and focal length of the lens (zoom focal length ranges are not supported). That information will be included in the EXIF metadata, but not the actual aperture used to take the photo. You may also be able to mount and use non-AI F-mount lenses (pre-1977), but may have mechanical interference problems.
For AI, AI-S, and Series E lenses, you’ll need to specify lens focal length data and maximum aperture. The Nikon Z6 allows defining up to 20 different lenses, and you can choose any of them with a quick trip to this menu entry (or to the equivalent menu item in My Menu, described later in this chapter), or using a button defined for this feature, as described for Custom Setting f2 in Chapter 12.
To enter this information, follow these steps using the screen shown in Figure 13.6. Note that you can configure the lens’s information even if the lens is not mounted on the Z6.
- 1. Choose Non-CPU lens data from the Setup menu.
- 2. Highlight Lens Number and press the multi selector left/right buttons to choose a number. If you are defining several lenses, I recommend numbering them in order of increasing focal length, or, if you prefer, in order of frequency of use.

Figure 13.6 You can enter focal length and maximum aperture of up to 20 manual focus lenses.
- 3. Scroll down to Focal Length (mm) and use the multi selector left/right buttons to choose a focal length between 6mm and 4000mm.
- 4. Scroll down to Maximum Aperture and use the multi selector left/right buttons to choose a maximum f/stop between f/1.2 and f/22.
- 5. Choose Done. You can now select the lens number using a button you define for the function.
Clean Image Sensor
Options: Clean Now; Automatic Cleaning: Clean at Shutdown (default), Cleaning Off
My preference: Clean at Shutdown
This entry gives you some control over the Nikon Z6’s automatic sensor cleaning feature, which removes dust through a vibration cycle that shakes the sensor until dust, presumably, falls off. If you happen to take a picture and notice an artifact in an area that contains little detail (such as the sky or a blank wall), you can access this menu choice, place the camera with its base downward, and choose Clean Now. A Cleaning Sensor message now appears, and the dust you noticed has probably been shaken off.
You can also tell the Z6 when you’d like it to perform automatic cleaning without specific instructions from you. Select from:
- Clean Now. Triggers the dust-shaking cycle immediately. For best results, remove the lens and point the camera downward so the dust can fall outside the camera body.
- Automatic Cleaning: Clean at shutdown. This removes any dust that may have accumulated since the camera has been turned on, say, from dust infiltration while changing lenses.
- Automatic Cleaning Off. No automatic dust removal will be performed. Use this to preserve battery power, or if you prefer to use automatic dust removal only when you explicitly want to apply it.
Image Dust Off Ref Photo
Options: Start, Clean Sensor and Then Start
My preference: N/A
This menu choice, lets you “take a picture” of any dust or other particles that may be adhering to your sensor. The Z6 will then append information about the location of this dust to your photos, so that the Image Dust Off option in Capture NX-D can be used to mask the dust in the NEF image. It does not work with small- or medium-sized NEF (RAW) images.
To use this feature, select Image Dust Off Ref Photo, choose either Start or Clean Sensor and Then Start, and then press OK. If directed to do so, the camera will first perform a self-cleaning operation by applying ultrasonic vibration to the top layer of the sensor. I recommend doing this—you might as well capture your reference photo with a sensor that is as clean as possible.
Then, a screen will appear asking you to take a photo of a bright featureless white object 10cm (about four inches) from the lens. Nikon recommends using a lens with a focal length of at least 50mm. If you’re using a zoom lens, zoom to the longest focal length. Note that the dust-off information can be applied to all your images, not just those taken with the lens used to capture the reference photo.
Point the Z6 at a solid white card and press the shutter release. If the reference object is too dark or light, you may be asked to try again with a different object. An image with the extension .ndf will be created, and can be used by Nikon Capture NX-D as a reference photo if the “dust off” picture is placed in the same folder as an image to be processed for dust removal.
Image Comment
Options: Attach Comment, Input Comment
My preference: N/A
This is the first entry on the next page of the Setup menu. (See Figure 13.7.) The Image Comment is your opportunity to add a copyright notice, personal information about yourself (including contact info), or even a description of where the image was taken (e.g., Browns Super Bowl 2020), although text entry with the Nikon Z6 is a bit too clumsy (even when using the touch screen) for doing a lot of individual annotation of your photos. (But you still might want to change the comment each time, say, you change cities during your travels.) The embedded comments can be read by many software programs, including Nikon ViewNX-i or Capture NX-D.
The standard text-entry screen described in Chapter 2 can be used to enter your comment, with up to 36 characters available. For the copyright symbol, embed a lowercase “c” within opening and closing parentheses: (c). You can input the comment, turn attachment of the comment On or Off using the Attach Comment entry, and select Done when you’re finished working with comments. If your fingers are too fat for typing on the touch screen or you find typing with a cursor too tedious, you can enter your comment in Nikon Capture NX-D and upload it to the camera through a USB cable.

Figure 13.7 The third page of the Setup menu.
Copyright Information
Options: Attach Copyright Information, Artist, Copyright
My preference: N/A
This is an expansion of the Image Comment capability, allowing you to specify the name of the “artist” (photographer), and enter copyright information. Use the standard Nikon text-entry screen described earlier. Highlight the Attach Copyright Information option and press the right multi selector button to mark/unmark it to control whether your copyright data is embedded in each photo as taken. The touch screen comes in useful for this input, as well.
Beep Options
Options: Beep On, Beep Off (default), Volume, Pitch
My preference: Beep Off
The Nikon Z6’s internal beeper provides a (usually) superfluous chirp to signify various functions, such as the countdown of your camera’s self-timer, the termination of time-lapse recording, or autofocus confirmation in AF-S mode (unless you’ve selected release-priority in Custom Setting a2). You can (and probably should) switch it off if you want to avoid the beep because it’s annoying, impolite, distracting (at a concert or museum), or undesired for any other reason. Note that the beeper is automatically squelched if you’ve activated Silent Photography in the Photo Shooting menu. Choose this menu entry, and select one of the following:
- Beep On/Off. Enable or disable the beeper.
- Volume. Select values of 1 (soft) through 3 (loud). A quarter-note icon appears in the monochrome control panel and the shooting information display.
- Pitch. Select High for a high-pitched beep, or Low for a deeper tone.
Touch Controls
Options: Enable (default), Disable touch controls, Full-frame playback flicks
My preference: N/A
This entry allows you to specify whether LCD monitor touch controls are enabled or disabled, and whether to use left/right or right/left flicks to advance to the next image during full frame playback. I described touch controls in Chapter 2.
HDMI
Options: Output Resolution (default: Auto); Advanced: Output Range, External Recording Control, Output Data Depth, N-Log Setting, View Assist
My preference: N/A
This entry deals with the Nikon Z6’s High-Definition Multimedia Interface (HDMI) video connection. The port allows you to play back your camera’s images on HDTV or HD monitors using a type C cable, such as the HDMI cable HC-E1, which Nikon does not provide to you, but which is readily available from third parties. I use HDMI playback for slide shows. I also captured most of the screenshot images in this book using the HDMI output and a video frame grabber. Before you link up you’ll want to choose from the following options:
- Output Resolution. Select Auto and the camera will sense the correct output resolution to use. Auto will be applied (even if you select another resolution) when the HDMI port is used to display the camera’s image during movie capture, and movie playback. That limitation can be a problem; the camera may not be able to detect the required resolution in Auto mode. My BlackMagic Intensity Shuttle, for example, requires using the 1080i setting. It displays output from my Z6 at that setting in still mode, but when I change to movie mode the camera switches to Auto and the HDMI output is no longer available.
If you want to use a different resolution under other circumstances (say, when you’re viewing still images), you can choose Auto, plus specific formats including 480p (640 × 480 progressive scan); 576p (720 × 576 progressive scan); 720p (1280 × 720 progressive scan); 1080p (1920 × 1080 progressive scan); or 1080i (1920 × 1080 interlaced scan). A 4K output option 2160p (3840 × 2160 progressive scan) is also available, and should be used only with a 4K-compatible device.
Note: HDMI output is disabled when your movie resolution/frame rate is 1920 × 1080 120/100p, or when operating the camera using SnapBridge or Camera Control 2.
- Advanced. This cryptic entry leads you to a screen where you can select more parameters:
- Output Range. Choose Auto (the default, and the best choice under most circumstances); Limited Range; or Full Range. In most cases, the camera will be able to determine the output range of your HDMI device. If not, Limited Range uses settings of 16 to 235, clipping off the darkest (0–16) and brightest (235–255) portions of the image. Use Limited Range if you’re plagued with reduced detail in the shadows of your image. Full Range may be your choice if shadows are washed out or excessively bright. It accepts video signals with the full range from 0 to 255.
- External Recording Control. When enabled, this option allows you to use the camera controls to stop and start recording when connected to an external recorder (favored by serious videographers). The recorder must support the Atomos Open Protocol, used by the popular Atomos Shogun, Sumo, and Ninja recorders. When active, an STBY (Standby) or REC (Recording) icon appears on the monitor. To keep the camera display and HDMI output from timing out, choose Custom Setting c3: Power Off Delay and set Standby Timer to Unlimited.
- Output Data Depth. Select from 8-bit or 10-bit output. Ordinarily, you should leave this setting at 8-bit. The 10-bit option is only compatible with certain external recorders (such as those from Atomos), and is required for using the N-Log setting (described next). You’ll find more information in Chapter 14.
- N-Log Setting. The default is Off. If you’ve set data depth to 10 bits, you can choose On (cannot record to card) to use N-log, an extended dynamic range format. It produces “flat”-looking footage that can be corrected using video-editing software to provide a much wider range of tones. The chief limitation is that your video cannot be saved to the Z6’s memory card; it must be output to an external recorder like the Atomos Ninja V. In addition, your ISO sensitivity settings are limited. I’ll explain N-Log in more detail in Chapter 14.
- View Assist. As mentioned above, N-Log video cannot be saved on your memory card, and the Z6’s displays do not provide a live preview of the footage being recorded, unless you set View Assist to On here. Most of the time, you can leave this setting at Off, because you’ll be viewing your video on the external recorder’s screen. Select On if you want to have the Z6 display the live image.
Location Data
Options: Standby Timer (default: Enable), Position, Set Clock from Satellite (default: Yes)
My preference: N/A
This menu entry has options for using GPS information. You can supply the Z6 with location information from your smartphone or tablet using the SnapBridge app installed on your device. You can also clip the Nikon GP-1/GP1a Global Positioning System (GPS) accessory onto your camera’s accessory shoe and plug it into the remote/device port. It has four options, none of which turn GPS features on or off, despite the misleading “Enable” and “Disable” nomenclature (what you’re enabling and disabling is the automatic exposure meter turn-off):
- Standby Timer. This setting is useful when you have an external GPS receiver connected to the camera. Choose Enable to reduce battery drain by turning off exposure meters while using the GP-1/1a after the time specified in Custom Setting c3: Power off Delay: Standby Timer has elapsed. When the meters turn off, the GP-1/1a becomes inactive and must reacquire at least three satellite signals before it can begin recording GPS data once more. Setting to Disable causes exposure meters to remain on, so that GPS data can be recorded at any time, despite increased battery drain.
- Position. This is an information display, rather than a selectable option. It appears when the GP-1/1a is connected and receiving satellite positioning data. It shows the latitude, longitude, altitude, and Coordinated Universal Time (UTC) values. (See Figure 13.8.)
- Set Clock From Satellite. Choose Yes to allow the camera to update its internal clock from information provided by the GPS device when attached. No disables this updating feature. You might want to avoid updating the clock if you’re traveling and want all the basic date/time information embedded in your image files to reflect the settings back home, rather than the date and time where your pictures are taken. Note that if the GPS device is active when shooting, the local date and time will be embedded in the GPS portion of the EXIF data.
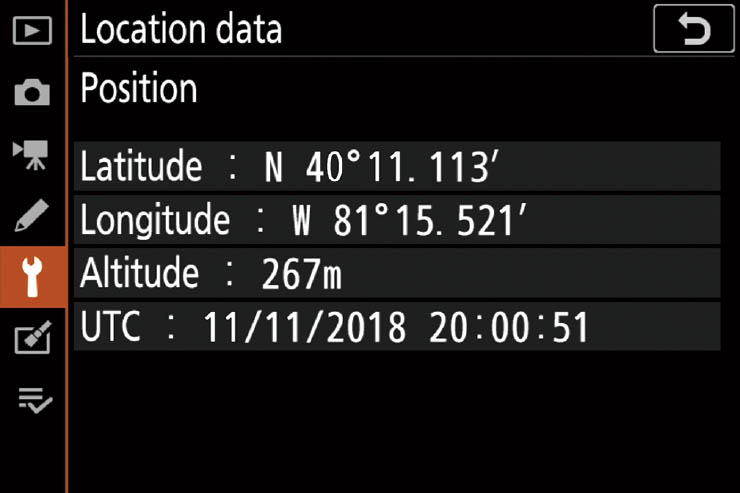
Figure 13.8 Position data is displayed when a GPS device is active and linked to satellites.
Wireless Remote (WR) Options
Options: LED lamp: On (default), Off; Link mode: Pair (default), PIN
My preference: N/A
This option, which is grayed out unless the WR-R10 transmitter is plugged into the remote/accessory port on the Z6, allows you to make several settings for the Nikon WR-10 radio remote control. The system consists of the WR-T10 transmitter, shown at bottom in Figure 13.9, and the WR-R10 receiver, which is attached to the camera (see Figure 13.9, top). The set, which allows triggering cameras and compatible electronic flash units (such as the SB-5000), has a practical range of about 66 feet, and costs about $200. (If you use one WR-R10 receiver as an intermediate master and a second on the camera, range extends to 164 feet.) A single transmitter can be used to control multiple cameras that have a receiver installed.
The system is also compatible with the WR-1, a sophisticated transceiver with a much longer (roughly 400 foot) range, 15 channels, and additional features such as more sophisticated camera group control (to fire multiple cameras simultaneously). It also costs a great deal more, at around $650.
To use the WR-R10, insert the receiver into the remote/accessory port. Make sure the transmitter and receiver are using the same channel (15, 10, or 5), and then pair them by pressing the gray pairing buttons indicated by green circles in Figure 13.9, simultaneously. The LEDs on top of the receiver will alternate red and green to show that pairing has taken place; thereafter, the receiver’s green LED will flash to indicate there is a connection.
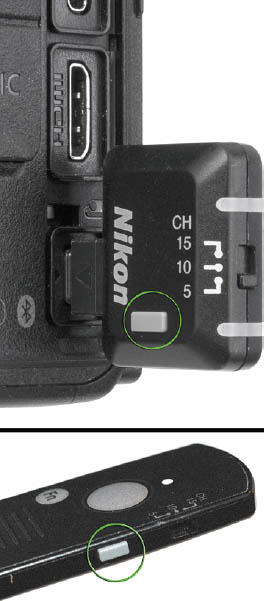
Figure 13.9 Press the Pairing buttons on the WR-R10 receiver and WR-T10 transmitter simultaneously.

TIP
While useful as a remote control, my favorite feature of the WR-10 radio control system is the ability to use the transmitter’s function button to activate some other feature on the camera, such as autoexposure/autofocus lock. I’ll explain those options in the next section.
This menu entry has two options, which most Z6 owners may never need to use:
- LED lamp. You can enable or disable this lamp. I sometimes turn the blinking lamp off when I am working in dark environments and don’t want to distract others around me—or make them aware that I am taking stealth photos with a remote control. Disabling the LEDs also saves power, but you’ll have no operational feedback when they’re off.
- Link mode. You can choose whether the transmitter and receiver are linked using pairing (the usual procedure) or through a PIN, which is possible when working with the Nikon SB-5000 flash (or any radio-controlled flash Nikon may introduce after this book is written). If you’re using the WR-1 transceiver, you must use pairing as the link mode.
Assign Remote (WR) Fn Button
Options: Preview, FV Lock, AE/AF lock, AE lock only, AE lock (Reset on release), AF lock only, AF-ON, Flash enable/disable, +RAW, None (default)
My preference: AF-ON
Radio remote control is cool, but I really like the WR-10 system’s ability to trigger any of nine different features on the camera, using the transmitter’s Fn button. I most often use the button to start autofocus on the Z6 using the AF-ON behavior. You might love the ability to tell the camera to add an NEF (RAW) picture to the JPEG image you’ve specified for that one picture, then switch back to JPEG-only mode.
Select Assign Remote (WR) Fn Button, and then choose from: Preview, FV Lock, AE/AF lock, AE lock only, AE lock (Reset on release), AF lock only, AF-ON, Flash enable/disable, +RAW, or None.
Airplane Mode
Options: Enable, Disable (default)
My preference: Enable
This is the first entry on the next page of the Setup menu (see Figure 13.10). Like the Airplane Mode on your smartphone or tablet, this option turns off the Z6’s Wi-Fi and Bluetooth capabilities. I enable the feature any time I am not planning to use Bluetooth, Wi-Fi, or GPS, because it saves a lot of power.
Connect to Smart Device
Options: Pairing, Select to Send (Bluetooth), Wi-Fi Connection, Send While Off
My preference: N/A
Use this entry to set up your SnapBridge or Wi-Fi connection to your smartphone, tablet, or computer. Wi-Fi, Bluetooth, and your Z6’s other connectivity options were covered in detail in Chapter 6, and the instructions for setting up your smart device won’t be repeated here.
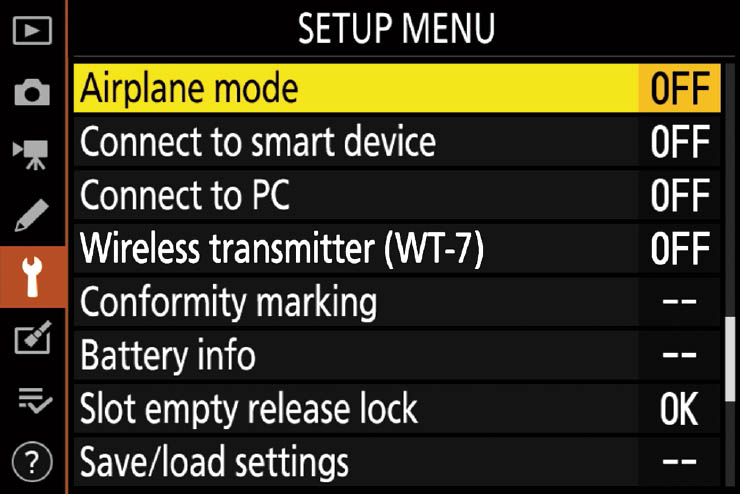
Figure 13.10 The next page of the Setup menu.
Connect to PC
Options: On, Off (default)
My preference: N/A
You can instruct your Z6 to automatically upload new still photos (but not movies) to your smart device or computer when the camera and device are linked. If they are not connected, the Z6 will mark a maximum of 1,000 photos and upload them the next time a wireless connection is made. As I noted in Chapter 6, the Nikon Network Guide contains detailed information on using this advanced feature.
Wireless Transmitter (WT-7)
Options: Network Settings, Current Settings, Reset Connection Settings
My preference: N/A
This entry allows you to configure wireless local area network (LAN) settings. You’ll find instructions for setting up this expensive accessory in the manual furnished with the WT-7 transmitter.
Conformity Marking
Options: Display only. No selections.
My preference: N/A
This entry does nothing but display the various international standards with which the Z6 complies. It’s included here because Nikon can easily update the listing during a firmware upgrade. The alternative might be to print new labels (like the one with the serial number of the camera located behind the tilting LCD monitor on the Z6) each time a change is made.
Battery Info
Options: None. This screen is purely informational.
My preference: N/A
When invoked, you can see the following information:
- Charge. The current battery level, shown as a percentage from 100 to 0 percent.
- No. of shots. This shows the number of actuations with the current battery since it was last recharged. This number can be larger than the number of photos taken, because other functions, such as white balance presetting, can cause the shutter to be tripped.
- Battery Age. Eventually, a battery will no longer accept a charge as well as it did when it was new, and must be replaced. This indicator shows when a battery is considered new (0); has begun to degrade slightly (1,2,3); or has reached the end of its charging life and is ready for replacement (4). Batteries charged at temperatures lower than 41 degrees F may display an impaired charging life temporarily, but return to their true “health” when recharged above 68 degrees F.
Slot Empty Release Lock
Options: Release Locked, Enable Release (default)
My preference: Release Locked
This option gives you the ability to snap off “pictures” without a memory card installed—or to lock the camera shutter release if that is the case. It is sometimes called play mode, because you can experiment with your camera’s features or even hand your Z6 to a friend to let them fool around, without any danger of pictures actually being taken.
Back in our film days, we’d sometimes finish a roll, rewind the film back into its cassette surreptitiously, and then hand the camera to a child to take a few pictures—without actually wasting any film. It’s hard to waste digital film, but “shoot without card” mode is still appreciated by some, especially camera vendors who want to be able to demo a camera at a store or trade show, but don’t want to have to equip each and every demonstrator model with a memory card. Choose Enable Release to activate “play” mode or Release Locked to disable it.
The pictures you actually “take” are displayed on the LCD monitor with the legend “Demo” superimposed on the screen, and they are, of course, not saved. Note that if you are using the optional Camera Control Pro 2 software to record photos from a USB-tethered Z6 directly to a computer, no memory card is required to unlock the shutter even if Release Locked has been selected.
Save/Load Settings
Options: Save Settings, Load Settings
My preference: N/A
You can store many camera settings to your memory card in a file named NCSETxxx, and then reload them later using this menu item. This is a good way to archive your favorite camera settings for the Playback menu, all Photo/Movie Shooting menus, Custom Settings menu, the Setup menu settings, and all My Menu items. You can restore your settings if you’ve messed them up, or save multiple sets of settings to multiple memory cards. If you own more than one Z6, this is a handy way to share settings between them. You can save only one group of settings at a time to a particular card (always in the Primary slot); the default NCSETUPK cannot be changed. Well, it can be changed in your computer, but if you do, the Z6 will not be able to find it on the memory card. If you want to save multiple settings, simply use multiple memory cards.
Note that storing/restoration is an all-or-nothing proposition. When you select Save Settings, all your current settings are stored on the memory card; choose Load Settings, and the camera’s current settings are replaced with the values stored on the memory card.
The following settings are saved:
- Playback. Playback display options; Image review; After delete; After burst, show; Rotate tall.
- Photo Shooting menu. File naming, Choose image area, Image quality, Image size, NEF (RAW) recording, ISO sensitivity settings, White balance, Set Picture Control (Custom controls are saved as Auto), Color space, Active D-Lighting, Long exposure NR, High ISO NR, Vignette control, Diffraction compensation, Auto distortion control, Flicker reduction shooting, Metering, Flash control, Flash mode, Flash compensation, Focus mode, AF-area mode, Vibration reduction, Auto bracketing, Silent photography.
- Movie Shooting. File naming, Choose image area, Frame size/frame rate, Movie Quality, Movie file type, ISO sensitivity settings, White Balance, Set Picture Control (Custom controls saved as Auto), Active D-Lighting, Vignette control, Diffraction compensation, Auto distortion control, Flicker reduction, Metering, Focus mode, AF-area mode, Vibration reduction, Electronic VR, Microphone sensitivity, Attenuator, Frequency Response, Wind noise reduction, Headphone volume, Timecode (except Timecode origin).
- Custom Settings menu. All Custom Settings except d3.
- Setup menu. Language, Time zone and date (except Date and Time), Information display, Non-CPU lens data, Clean image sensor, Image Comment, Copyright information, Beep options, Touch controls, HDMI, Location Data (except Position), Wireless Remote Options, Assign Remote Fn button, Slot empty release lock.
- My Menu/Recent Settings. All My Menu entries, All recent settings, Active tab.
Reset All Settings
Options: Reset, Do Not Reset
My preference: N/A
This entry and the next are the sole residents of the last page of the Setup menu, and not shown in a separate figure. This one resets all settings, including Copyright Information, and other user-generated settings, except Language and Time Zone and Date. You should save your current settings to a memory card before using this entry, just to be safe. This command requires use of a confirmation screen to make sure you don’t remove your settings accidentally.
Firmware Version
Options: Display only. No selections.
My preference: N/A
You can see the current firmware release in use in the menu listing.
Retouch Menu
The Retouch menu contains the post-processing options you can apply to your images after you’ve taken a photo. When reviewing an image, press the i button, and select Retouch from the menu that pops up to jump directly to this menu and begin processing that image.
- NEF (RAW) Processing
- Trim
- Resize
- D-Lighting
- Red-Eye Correction
- Straighten
- Distortion Control
- Perspective Control
- Image Overlay
- Trim Movie
- Side-by-Side Comparison
The Retouch menu (see Figure 13.11) is most useful when you want to create a modified copy of an image on the spot, for immediate printing or e-mailing without first importing into your computer for more extensive editing. You can also use it to create a JPEG version of an image in the camera when you are shooting RAW-only photos. You can retouch images that have already been processed by the Retouch menu, except for copies created with the Image Overlay and Trim Movie > Choose start/end point options. You may notice some quality loss when applying more than one retouch option.
Important exceptions: Note that Image Overlay can only be accessed from this menu; it is not available from the i menu during image playback. Conversely, Side-by-Side Comparison is not available from the Retouch menu; you must invoke it during Playback by pressing the i button, and choosing it from i menu.
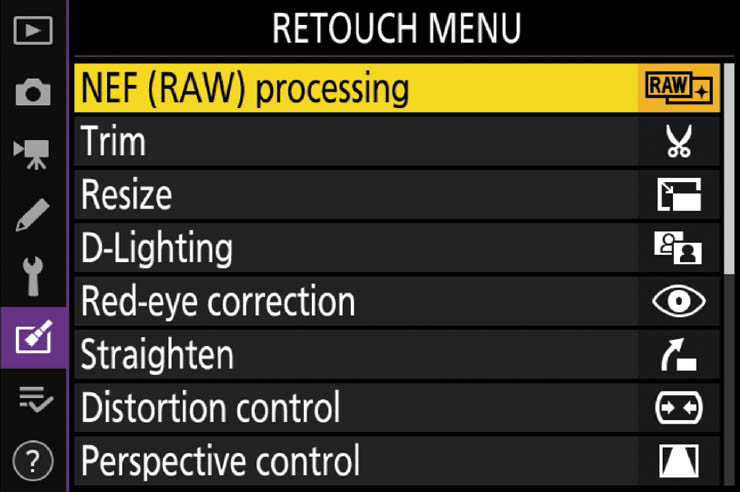
Figure 13.11 The Retouch menu allows simple in-camera editing.
To create a retouched copy of an image:
- 1. Select an image. For most of the retouching options, you have two ways of selecting an image:
- When accessing during Playback. Press the i button, choose Retouch from the screen that pops up, press the right directional button, and then select the retouching option you want to use from the Retouch menu.
- When entering using the MENU button. Navigate to the Retouch menu and select the option you want to use. You’ll be presented either with the standard Z6 image selection thumbnails, or options you can select before selecting an image to process. I’ll note your options with each entry that follows.
- 2. Choose image retouching option. From the Retouch menu, select the option you want from those available and press the multi selector right button. The Nikon Z6’s standard image selection screen appears. Scroll among the images as usual with the left/right multi selector buttons, press the Zoom In button to examine a highlighted image more closely, and press OK to choose that image.
Note: If you elect to work on an image that has been captured in dual NEF+JPEG format, only the NEF (RAW) image will be retouched. If you have an image on your memory card that was recorded by a different model camera, the Z6 may not be able to display or retouch the image.
- 3. Manipulate image. Work with the options available from that particular Retouch menu feature and press OK to create the modified copy, or Playback to cancel your changes. Keep in mind that if the delay for Menus that you’ve specified in Custom Setting c3: Power Off Delay expires, the Z6 will exit the menu screen and any unsaved changes canceled. You may want to select a longer power off delay for Menus.
- 4. View copy. A retouched JPEG image will be the same size and quality as the original, except for copies created using the NEF (RAW) Processing, Trim, and Resize options. Resized or Cropped copies created from NEF and TIFF images are always saved as JPEG Fine images. During review, retouched copies are overlaid with a paint brush icon in their upper-left corner.
DOUBLE DUTY
Once you’ve retouched an image using one of the Retouch menu’s entries, you can apply most of the remaining options to the manipulated copy (except for those produced by Trim Movie). Any that are not available will be grayed out. That said, it’s probably not a good idea to retouch a retouched copy, as you’ll lose some image quality each time.
NEF (RAW) Processing
Options: Image Quality (Fine*, Fine, Normal*, Normal, Basic*, or Basic), Image Size (Large, Medium, or Small), White Balance, Exposure Compensation, Set Picture Control, High ISO Noise Reduction, Color Space, Vignette Control, Active D-Lighting, and Diffraction Compensation
My preference: N/A
Use this tool to create a JPEG version of any image saved in a RAW version. You can select from among several parameters to “process” your new JPEG copy right in the camera.
- 1. Choose a RAW image. There are two ways to select an image: from the NEF (RAW Processing) entry in the Retouch menu, and by highlighting an NEF image during Playback and then pressing the i button. Choose one method and follow either Step 2a or Step 2b.
- 2a. From the Retouch menu. A selection options screen appears, offering three choices. Once you’ve made your selections, you’ll be taken to the NEF processing screen shown in Figure 13.12.
- Select Images. The standard Z6 image selection thumbnail screen showing only NEF files appears. Navigate among them. Press and hold the Zoom In button to temporarily enlarge a thumbnail to full screen. Press the Zoom Out/Index button to select a highlighted image. When you’re done selecting, press OK to confirm.
- Select Date. All NEF images taken on a certain date will be selected and processed.
- Select All Images. All NEF images on your memory card will be selected and processed.
- 2b. During Playback. Select an NEF (RAW) image during playback. Press the i button and choose Retouch. You’ll be whisked immediately to the NEF (RAW) Processing entry of the Retouch menu (as shown earlier in Figure 13.11). Press the right directional button to proceed to the processing screen (Figure 13.12), and only the single image you were reviewing will be processed.
- 3. In the NEF (RAW) processing screen you can use the multi selector up/down keys to select from ten different attributes of the RAW image information to apply to the JPEG copies made of your selected image(s). Choose Image Quality (Fine, Normal, or Basic, plus * versions of each), Image Size (Large, Medium, or Small), White Balance, Exposure Compensation, Set Picture Control, High ISO Noise Reduction, Color Space, Vignette Control, D-Lighting, and Diffraction Compensation.

Figure 13.12 Adjust the parameters and then save your JPEG copy from a RAW original file.
- 4. Press the Zoom In button to magnify the image temporarily while the button is held down.
- 5. Press the Playback button if you change your mind, to exit from the processing screen.
- 6. When all parameters are set, highlight EXE (for Execute) and press OK. The Z6 will create a JPEG file for each of the selected images with the settings you’ve specified, and show an Image Saved message on the monitor when finished.
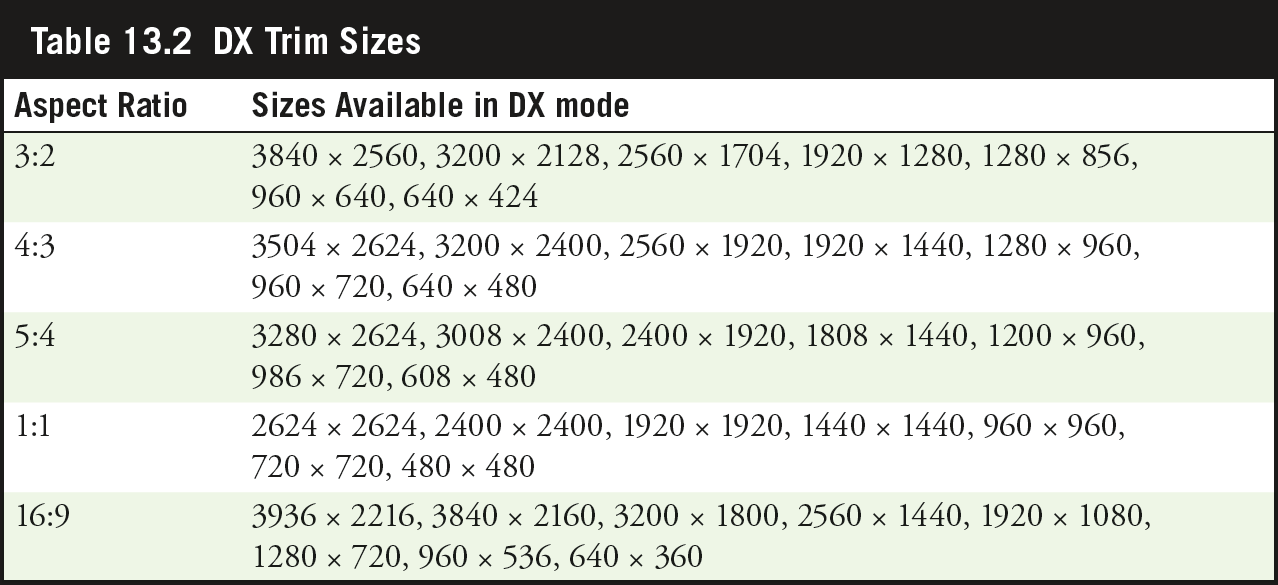
Trim
Options: Various sizes
My preference: N/A
This option creates copies in specific sizes based on the final size you select, chosen from among 1:1, 3:2, 4:3, 5:4, and 16:9 aspect ratios (proportions). You can use this feature to create smaller versions of a picture for e-mailing without the need to first transfer the image to your own computer. If you’re traveling, create your smaller copy here, insert the memory card in a card reader at an Internet café, your library’s public computers, or some other computer, and e-mail the reduced-size version. Just follow these steps:
- 1. Select your photo. Choose Trim from the Retouch menu. You’ll be shown the standard Nikon Z6 image selection screen. Scroll among the photos using the multi selector left/right buttons, and press OK when the image you want to trim is highlighted. While selecting, you can temporarily enlarge the highlighted image by pressing the Zoom In button.
- 2. Choose your aspect ratio. Rotate the main command dial to change from 3:2, 4:3, 5:4, 1:1, and 16:9 aspect ratios. These proportions happen to correspond to the proportions of common print sizes, including the two most popular sizes: 4 × 6 inches (3:2) and 8 × 10 inches (5:4).
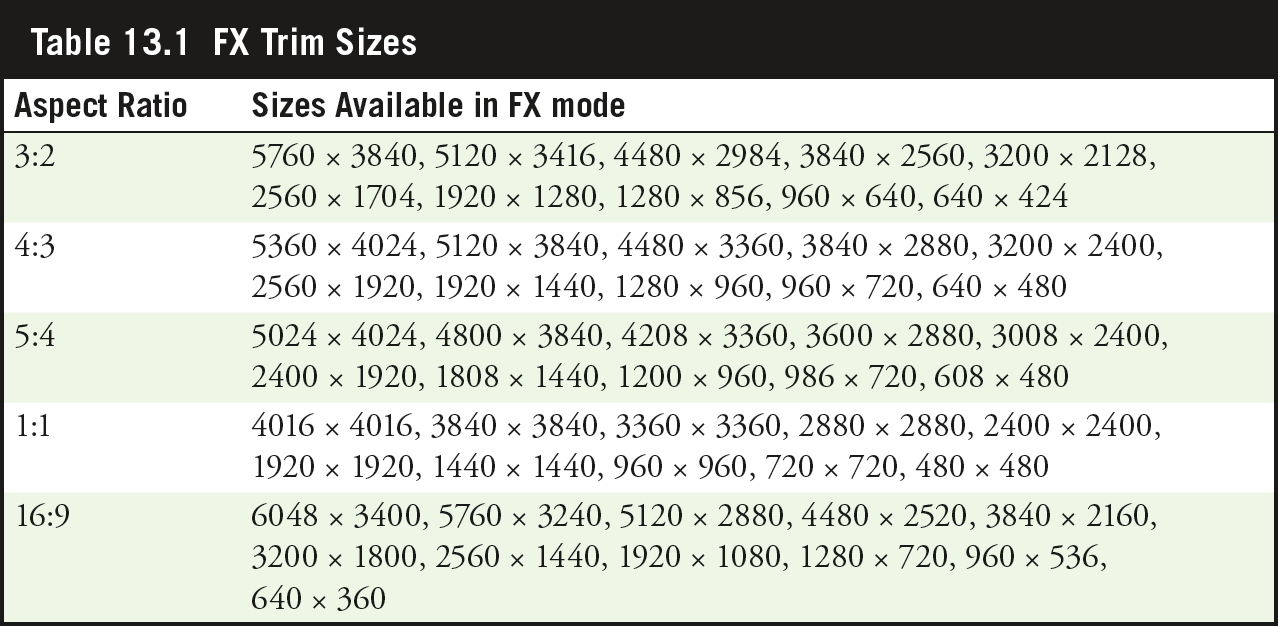
- 3. Crop in on your photo. Press the Zoom In button to crop in on your picture. The pixel dimensions of the cropped image at the selected proportions will be displayed in the upper-left corner (see Figure 13.13) as you zoom. The trim sizes vary depending on the Image Size and Aspect Ratio selected. Sizes available for FX and DX modes are shown in Tables 13.1 and 13.2. The current framed size is outlined in yellow within an inset image in the lower-right corner.
- 4. Move cropped area within the image. Use the multi selector left/right and up/down buttons to relocate the yellow cropping border within the frame.
- 5. Save the cropped image. Press OK to save a copy of the image using the current crop and size, or press the Playback button to exit without creating a copy. Copies created from JPEG Fine, Normal, or Standard have the same Image Quality setting as the original; copies made from RAW files or any RAW+JPEG setting will use JPEG Fine compression. Note that you may not be able to zoom in on a cropped image during Playback once it has been saved.

Figure 13.13 The Trim feature of the Retouch menu allows in-camera cropping.
Resize
Options: Select Image, Choose Size
My preference: N/A
This option creates smaller copies of the selected images. It can be applied while viewing a single image in full-size mode (just press the i button while viewing a photo), or accessed from the Retouch menu (especially useful if you’d like to select and resize multiple images). You might want smaller images to post on a website, or send by e-mail.
- 1. Select image. If accessing from the Retouch menu, you can choose to select multiple images; if you are reviewing an image during Playback and access using the i menu, only the image you were viewing will be processed.
- 2. Choose size. Next, select the size for the finished copy, from 2304 × 1536 (3.5MB), 1920 × 1280 (2.5MB), 1280 × 856 (1.1MB), or 960 × 640 (0.6 megabytes).
- 3. Confirm. Press OK to create your copy. Note that, as with Trim, you may not be able to zoom in on a resized image during Playback once it has been saved.
D-Lighting
Options: High, Normal, Low
My preference: N/A
This option brightens the shadows of pictures that have already been taken. Once you’ve selected your photo for modification, you’ll be shown side-by-side images with the unaltered version on the left, and your adjusted version on the right. Press the multi selector’s left/right buttons to choose from High, Normal, or Low corrections. (See Figure 13.14.) Press the Zoom In button to magnify the image. When you’re happy with the corrected image on the right, compared to the original on the left, press OK to save the copy to your memory card.
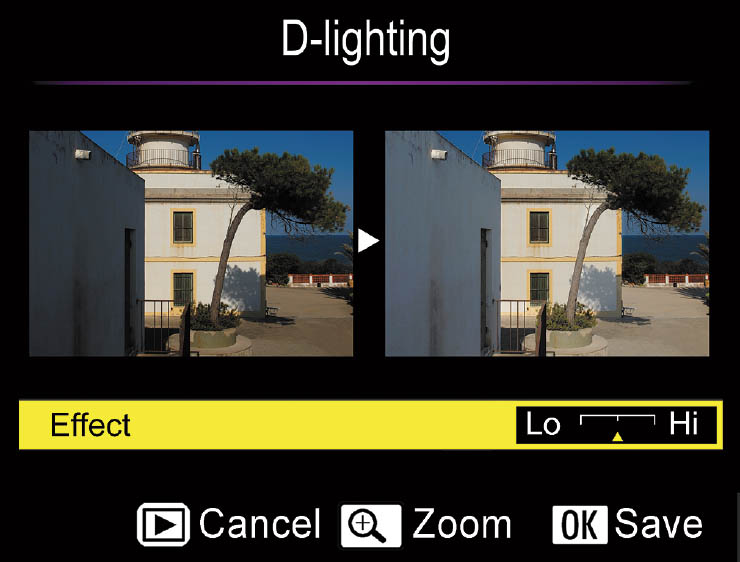
Figure 13.14 An image with dark shadows can be improved with post-shot D-Lighting.
Red-Eye Correction
Options: No setting. Use function as required.
My preference: N/A
This Retouch menu tool can be used to attempt to remove the residual red-eye look that remains after applying the Nikon Z6’s other remedies, such as the red-eye reduction feature of your external flash. (You can use the red-eye tools found in most image editors, as well.)
Your Nikon Z6 has a marginally effective red-eye reduction flash mode. Unfortunately, your camera is unable, on its own, to totally eliminate the red-eye effects that occur when an electronic flash (or, rarely, illumination from other sources) bounces off the retinas of the eye and into the camera lens. Animals seem to suffer from yellow or green glowing pupils, instead; the effect is equally undesirable. The effect is worst under low-light conditions (exactly when you might be using a flash) as the pupils expand to allow more light to reach the retinas. The best you can hope for is to reduce or minimize the red-eye effect.
The best way to truly eliminate red-eye is to raise the external flash up off the camera so its illumination approaches the eye from an angle that won’t reflect directly back to the retina and into the lens. If your image still displays red-eye effects, you can use the Retouch menu to make a copy with red-eye reduced further. First, select a picture that was taken with flash (non-flash pictures won’t be available for selection). After you’ve selected the picture to process, press OK. The image will be displayed on the monitor. You can magnify the image with the Zoom In button, scroll around the zoomed image with the multi selector buttons, and zoom out with the Zoom Out button. While zoomed, you can cancel the zoom by pressing the OK button.
When you are finished examining the image, press OK again. The Z6 will look for red-eye, and, if detected, create a copy that has been processed to reduce the effect. If no red-eye is found, a copy is not created.
Straighten
Options: Rotation
My preference: N/A
Use this to create a corrected copy of a crooked image, rotated by up to five degrees, in increments of one-quarter of a degree. Use the right directional button to rotate clockwise, and the left directional button to rotate counterclockwise. The amount of your correction will be visible on the display. Press OK to make a corrected copy, or the Playback button to exit without saving a copy. Note that you will lose some picture information during this process, as the Z6 must trim the edges of the rotated image to produce the rectangular final image.
Distortion Control
Options: Auto, Manual
My preference: N/A
This option produces a copy with reduced barrel distortion (a bowing out effect) or pincushion distortion (an inward-bending effect), both of these forms of peripheral distortion are most noticeable at the edges of a photo. You can select Auto to let the Z6 make this correction, or use Manual to make the fix yourself visually. Use the right directional button to reduce barrel distortion (bowing outward of lines at the edges) and the left directional button to reduce pincushion distortion (which produces lines bowing inward). In both cases, some of the edges of the photo will be cropped out of your image. Press OK to make a corrected copy, or the Playback button to exit without saving a copy. Note that Auto cannot be used with images exposed using the Auto Distortion Control feature described earlier in this chapter.
Perspective Control
Options: Adjust tilt
My preference: N/A
This option lets you adjust the perspective of an image, reducing the falling-back effect produced when the camera is tilted to take in the top of a tall subject, such as a building (see Figure 13.15). Use the multi selector buttons to “tilt” the image in various directions and visually correct the distortion.
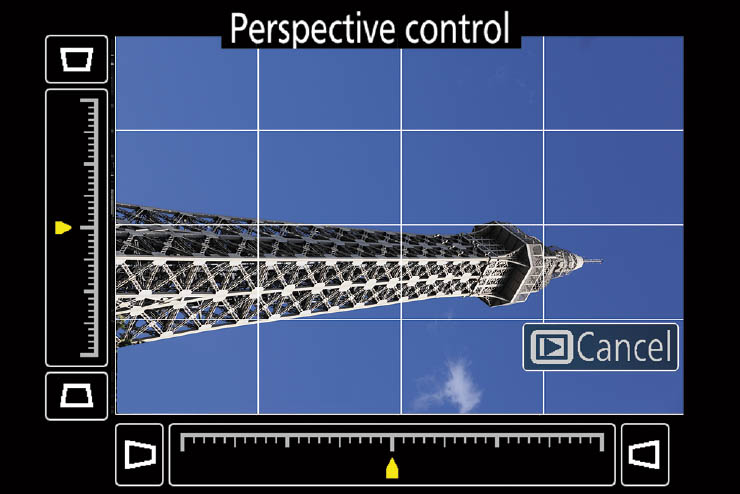
Figure 13.15 Perspective Control lets you fix “falling-back” distortion when photographing tall subjects.
Image Overlay
Options: Combine two RAW photos
My preference: N/A
This feature, and the next two, are on the last page of the Retouch menu (not shown in a figure). It allows you to combine two RAW photos (only NEF files can be used) in a composite image that Nikon claims is better than a “double exposure” created in an image-editing application, because the overlays are made using RAW data. To produce this composite image, follow these steps:
- 1. Choose Image Overlay. A screen will be displayed, with the Image 1 box highlighted.
- 2. Press OK and the Nikon Z6’s image selection screen appears. Choose the first image for the overlay and press OK. You can press and hold the Zoom In button to view the thumbnail as a full-frame image. Note that only Large NEF (RAW) files with the same image area and bit depth can be selected. Small and Medium NEF (RAW) images are not available, nor can you combine FX/DX or 12-bit/14-bit images.
- 3. Press the multi selector right button to highlight the Image 2 box, and press OK to produce the image selection screen. Choose the second image for the overlay.
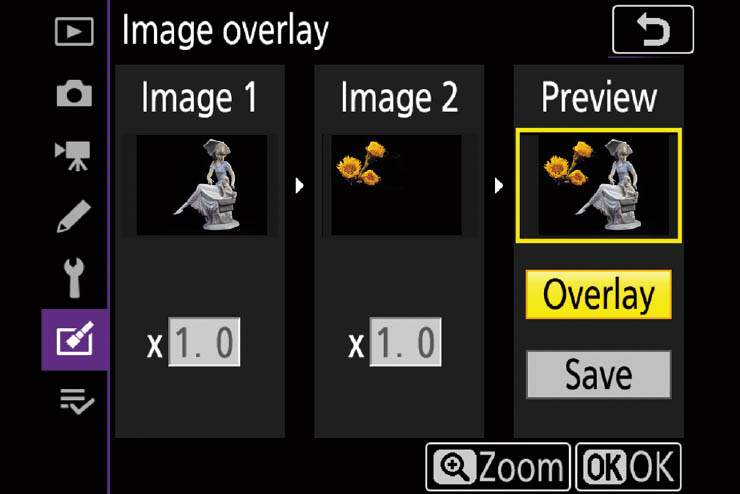
Figure 13.16 Overlay two RAW images to produce a “double exposure.”
- 4. By highlighting either the Image 1 or Image 2 boxes and pressing the multi selector up/down buttons, you can adjust the “gain,” or how much of the final image will be “exposed” from the selected picture. You can choose from X0.5 (half-exposure) to X2.0 (twice the exposure) for each image. The default value is 1.0 for each, so that each image will contribute equally to the final exposure.
- 5. Use the multi selector right button to highlight the Preview box and view the combined picture. (See Figure 13.16.) Press the Zoom In button to enlarge the view.
- 6. When you’re ready to store your composite copy, press the multi selector down button when the Preview box is highlighted to select Save, and press OK. The combined image is stored in JPEG * format on the memory card and displayed full frame for your review.
Trim Movie
Options: Choose Start/End Point, Save Selected Frame
My preference: N/A
You can do limited editing of movies in the camera (actually, just modest trimming), choosing a start point, end point, and also storing a selected frame as a still image. I’ll show you how to edit movies using this capability in Chapter 14.
Side-by-Side Comparison
Options: Examine pair of images
My preference: N/A
Use this option to compare a retouched photo side-by-side with the original from which it was derived. It is available only when one or more retouched images exist on your memory card to compare. Don’t look for Side-by-Side Comparison in the Retouch menu. It doesn’t appear there. You can invoke this option only by viewing an image during Playback and pressing the i button and choosing Retouch from the menu that pops up.
To use Side-by-Side Comparison:
- 1. Press the Playback button and review images in full-frame mode until you encounter either a source image that has been retouched or the retouched copy of that image that you want to compare. A retouched copy will have the retouching icon displayed in the upper-left corner. It doesn’t matter which you choose, but you must select either an original image that has been retouched or a retouched copy of it. Then, press the i button, highlight Retouch, press the right directional button, and then scroll down to Side-By-Side comparison in the Retouch menu that appears.
- 2. The original and retouched image will appear next to each other, with the retouching options you’ve used shown as a label above the images. Note that the source image will not be displayed if the retouched copy was generated from an image that was marked as Protected, or which has been deleted.
- 3. Highlight the original or the copy with the multi selector left/right buttons, and press the Zoom In button to magnify the image to examine it more closely.
- 4. If you have created more than one copy of an original image, select the retouched version shown, and press the multi selector up/down buttons to view the other retouched copies. The up/down buttons will also let you view the other image used to create an Image Overlay copy.
- 5. When done comparing, press the Playback button to exit.
Using My Menu
The last menu in the Z6’s main menu screen has two versions: Recent Settings and My Menu. The default mode is Recent Settings, which simply shows an ever-changing roster of the 20 menu items you used most recently. You’ll probably find it more useful to activate the My Menu option instead, which contains only those menu items that you deposit there extracted from the Playback, Photo Shooting, Movie Shooting, Custom Settings, Setup, and Retouch menus, based on your own decisions on which you use most. Remember that the Z6 always returns to the last menu and menu entry accessed when you press the MENU button. So, you can set up My Menu (see Figure 13.17) to include just the items accessed most frequently, and (as long as you haven’t used another menu) jump to those items instantly by pressing the MENU button.
Switching back and forth is easy. The My Menu and Recent Settings menus each has a menu choice called Choose Tab. Highlight that entry and press the right multi selector button to view a screen that allows you to activate either the My Menu or Recent Settings menu. Press OK to confirm.
I tend to include frequently used functions that aren’t available using direct access buttons in My Menu. For example, I include High ISO NR, Long Exp. NR, and Battery Info there, because I may want to turn noise reduction on or off, or check the status of my battery during shooting. I don’t include ISO or WB changes in My Menu, even though they are available in the menu system, because I can quickly change those values by pressing their dedicated buttons (the ISO and Fn1 buttons, respectively) and rotating the main and sub-command dials.
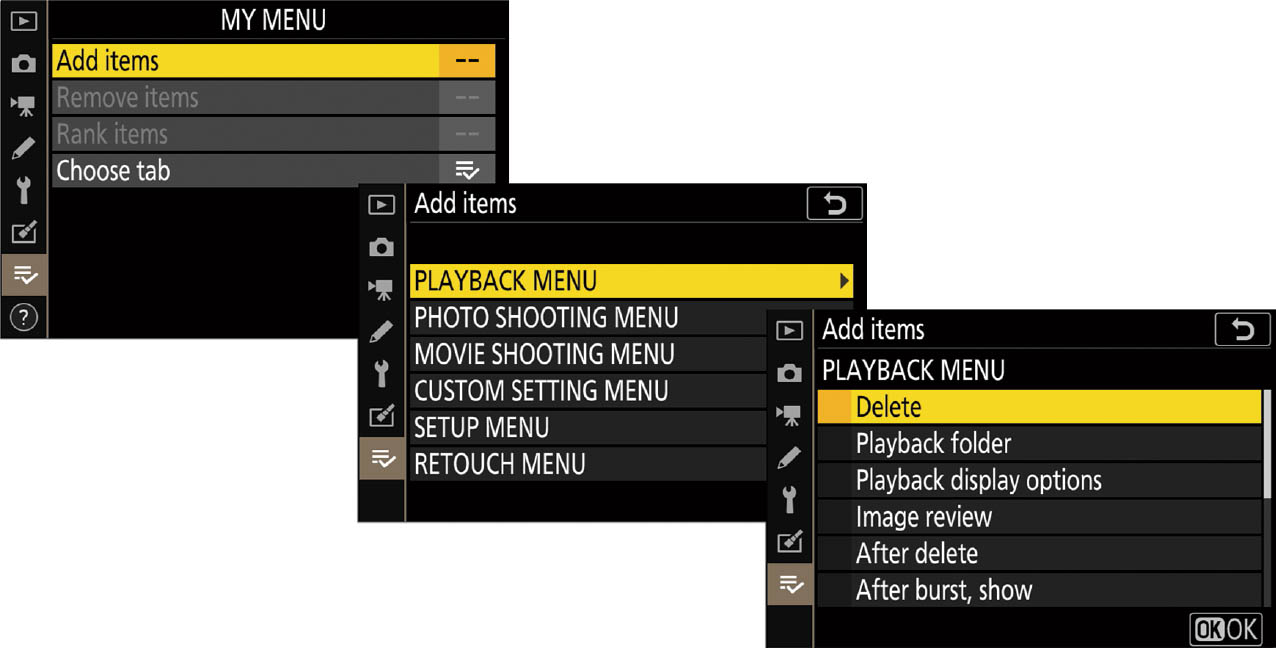
Figure 13.17 You can include your favorite menu items in the fast-access My Menu.
You can add or subtract entries on My Menu at any time, and re-order (or rank) the entries so the ones you access most often are shown at the top of the list. Here’s all you need to know to work with My Menu. To add entries to My Menu:
- 1. Select My Menu and choose Add Items.
- 2. A list of the available menus will appear (Playback, Photo Shooting, Movie Shooting, Custom Settings, Setup, and Retouch menus). Highlight one and press the multi selector’s right button.
- 3. Within the selected menu, choose the menu item you want to add and press OK.
- 4. The label Choose Position appears at the top of the My Menu screen. Use the up/down buttons to select a rank among the entries, and press OK to confirm and add the new item.
- 5. Repeat steps 1–4 if you want to add more entries to My Menu.
To reorder the menu listings:
- 1. Within the My Menu screen, choose Rank Items.
- 2. Use the up/down buttons to select the item to be moved, and press OK.
- 3. Use the up/down buttons to relocate the selected item and press OK.
- 4. Repeat steps 2–3 to move additional entries.
To remove entries from the list, you can simply press the Trash button while an item is highlighted in the My Menu screen. To remove multiple items, follow these steps:
- 1. Within the My Menu screen, choose Remove Items.
- 2. A list with check boxes next to the menu items appears. Scroll down to an item you want to remove and press the multi selector right button to mark its box. If you change your mind, highlight the item and press the right button again to unmark the box.
- 3. When finished, highlight Done and press the OK button.
- 4. Press OK to confirm the deletion.