Shooting movies is as easy a flipping a switch—the Photo mode/Movie mode switch located to the right of the viewfinder. If you’re looking for no-fuss, casual video, after you’ve selected Movie mode, just rotate the mode dial to the green Auto position and press the red Movie button located on top of the Z6, just southwest of the shutter release button. Capture will start; press the Movie button again to stop recording. That’s all there is to grabbing good video clips.
But if you want to go beyond “good” to “excellent,” you’ll want to read this chapter and the next one, which will introduce you to the full range of the Z6’s sophisticated movie-making capabilities. While I listed and briefly described all the options in the camera’s Movie Shooting menu in Chapter 11, there’s a great deal more to learn and put into practice.
Quick Start Checklist
The following is a list of things to keep in mind as you improve your movie-making skills and take your video work to the next level. Some of these items are recaps of information you learned about still photo shooting; others are of special concern for movie-making. Even if you decide to just skim through this chapter for now, and come back for more after you’ve explored movie-making, you should at least read this section before you begin your epic documentary or feature production.
- Stills, too. You can take a cropped high-resolution still photograph, even while you’re shooting a movie clip, by pressing the shutter release all the way down. You won’t miss a still shot because you’re shooting video, nor will your video be interrupted. The still image is cropped to the 16:9 movie aspect ratio, and saved in the same resolution as your movie frame size, using the JPEG * quality setting. That gives you a 1920 × 1080 (2 MP) image in HD mode and a 3840 × 2160 (8 MP) image in UHD (4K) mode.
If you’ve chosen a Continuous release mode only one photograph will be taken each time you press the shutter-release button during movie capture. Up to 50 different shots can be captured while shooting one movie.
- No flash. While you can shoot still photos while capturing video, you cannot use flash when the selector switch is set to the Movie position.
- Exposure compensation. When shooting movies, exposure compensation is available in plus/minus 3 EV steps in 1/3 EV increments. (Remember that still photos offer plus/minus 5 EV steps.)
- Size matters. Individual movie files can be up to 4GB in size (this will vary according to the resolution you select), and no more than 29 minutes, 59 seconds in length. A single movie may consist of as many as eight separate files, each 4GB in size. The actual number of files and their length varies depending on the frame size and frame rate you’ve selected. The speed and capacity of your memory card may provide additional restrictions on size or length.
- Use the right card. You’ll want to use a fast XQD card if possible. If you insist on using a slower card the recording may stop after a minute or two, given that full HD can require a transfer rate of 28 Mbps; 56 Mbps in High Quality format; and 144 Mbps when shooting 4K video. In any case, choose a memory card with at least 32GB capacity. While some older XQD cards are available in 16 GB sizes, they are likely to be too slow for the High Quality setting.
I’ve standardized on 64GB Sony XQD Series G memory cards when I’m shooting movies; one of these cards will hold at least three to six hours of video, and have the world’s fastest transfer rates (at least, as I write this) of 440MB/second read and 400MB/second write speeds. However, in any case, the camera cannot shoot a continuous movie scene for more than about 29 minutes. You can start shooting the next clip right away, though, missing only about 30 seconds of the action. Of course, that assumes there’s enough space on your memory card and adequate battery power.
- Carry extra cards. You’re probably used to shooting still photographs. It’s easy to estimate how much of your memory card’s capacity you’ve already consumed, and how much is left, based on the shots remaining indicator on the Z6’s LCD monitor and viewfinder displays. Video usage is a bit of a different animal. While the camera does show how much space you have remaining for a clip as you shoot, it’s often difficult to make the connection to the remaining capacity of your memory card. It’s necessary to make a trip to the Movie Shooting menu to see exactly how much space you have left. So, the best practice is to carry along many more cards than you think you need. I stuff two 64GB XQD cards in my camera bag—enough for 6 hours of video each—but always carry along five 32GB cards as backup.
- Add an external mic. For the best sound quality, and to avoid picking up the sound of the autofocus or zoom motor, get an external stereo mic. I’ll have more advice about capturing sound and describe specific types of microphones in Chapter 15.
- Minimize zooming. While it’s great to be able to use the zoom for filling the frame with a distant subject, think twice before zooming. Unless you are using an external mic, the sound of the zoom ring rotating will be picked up and it will be audible when you play a movie. Any more than the occasional minor zoom will be very distracting to friends who watch your videos. And digital zoom will degrade image quality. Don’t use the digital zoom if quality is more important than recording a specific subject such as a famous movie star far from a distance.
- Use a fully charged battery. A fresh battery will allow about 85 minutes of capture at normal (non-Winter) temperatures, but that can be shorter if there are many focus adjustments. Individual clips can be no longer than about 29 minutes, however.
- Keep it cool. Video quality can suffer terribly when the imaging sensor gets hot so keep the camera in a cool place. When shooting on hot days especially, the sensor can get hot quicker than usual; when there’s a risk of overheating, the camera will stop recording and it will shut down about five seconds later. Give it time to cool down before using it again.
- Just Press the Movie button. You don’t have to hold it down. Press it again when you’re done to stop recording.
Lean, Mean, Movie Machine
The Z6 is an awesome video camera, one of the best ever offered by the company that introduced the first movie-making capabilities in an interchangeable-lens still camera—the Nikon D90—in 2008. And how far we’ve come since then! The D90 captured monaural movies using manual focus at a fixed 24 frames per second for up to five whole minutes at 1280 × 720p (standard HD) resolution. If you dropped down to coarse 640 × 424 and 320 × 216 frame sizes, you could shoot a clip as long as 20 minutes.
Your Z6, on the other hand, is packed with features that owners of many dedicated video camcorders only dreamed about a few years ago. I’ll explain all the features in detail later in this chapter and the next, but you should check out this list if you want an overview:
- Full HD capture. You can record full high-definition video with 1920 × 1080 resolution at 60, 30, 25, and 24 progressive scan frame rates using the full sensor. If you want some extra telephoto “reach” from video captured using only the DX (APS-C/Super 35) area of the sensor, you can select those rates plus additional frames-per-second options of 120/100p and 50p. I’ll explain frame rates and other parameters later in this chapter.
- 4K video capture. Ultra High Definition (UHD) video capture (3840 × 2160 resolution) is available at 30, 25, and 24 progressive scan rates, with both full-frame and APS-C/Super 35 crops.
- Slow-motion video. You can shoot Full HD video clips up to three minutes in length, slowed down by a factor of 4X and 5X, allowing you to analyze your golf swing, or shoot lifeguards running in Baywatch slow motion.
- Zebra stripe highlight display. Highlights overexposed (by a factor you can specify) can be shown with a zebra-stripe overlay. I showed you how to set the parameters for this option in Chapter 12.
- Phase detection AF. Fast, continuous autofocus is essential for capturing smooth movie clips, so the Z6 uses its PDAF pixels in both 4K and HD video modes.
- Focus Peaking for Manual Focus. In-focus objects can be indicated by color outlines in the display. You can find more information on this, and an illustration, in Chapter 12.
- IBIS and Electronic VR. Shoot SteadyCam hand-held shots without SteadyCam hardware, thanks to the Z6’s in-body image stabilization (which shifts the sensor itself to compensate for motion) and an extra electronic VR mode that shifts the image pixels around to reduce blur from camera motion. I’ll explain how electronic VR operates in more detail later in this chapter.
- Easy AF point placement. Use the touch screen or the sub-selector joystick to locate the active focus point accurately during capture.
- Output to an external video recorder. The Z6 is perfect for use with an external monitor, like the affordable Atomos Ninja V ($695). It can output “clean” video through the HDMI port (more on that later) so you store your clips on an external device while previewing and viewing your movies on a large, bright screen.
- 10-bit N-log capture. As I’ll explain shortly, N-log is a type of gamma adjustment, which allows capturing as much useful tonal information as possible, thanks to the non-linear way in which humans perceive light and color. In plain English, N-log allows the Z6 to squeeze as much of the original scene’s dynamic range as possible into the video file, producing a “flat”-looking, low-contrast image that can be processed during editing to create a rich, full-range video. Nikon has added a “View Assist” function available from the HDMI entry in the Setup menu that allows you to view a “corrected” version in the camera, before actual processing (called grading) has taken place.
- Timecode. Your video can include embedded timecodes, which are numeric codes that can be used to synchronize, log, and identify media. I introduced the Timecode option in Chapter 11.
- Customization. You can select separate settings for still photo and movie shooting modes, in the Photo Shooting and Movie Shooting menus, allowing you to customize the operation of your Z6 for each mode.
Capturing Video
In the Movie Shooting menus (see Figure 14.1), you can make the following choices, also described in Chapter 11, along with a description of the various options each entry offers. I won’t repeat that information here. Many of these entries are like those for still photography in the Photo Shooting menu.
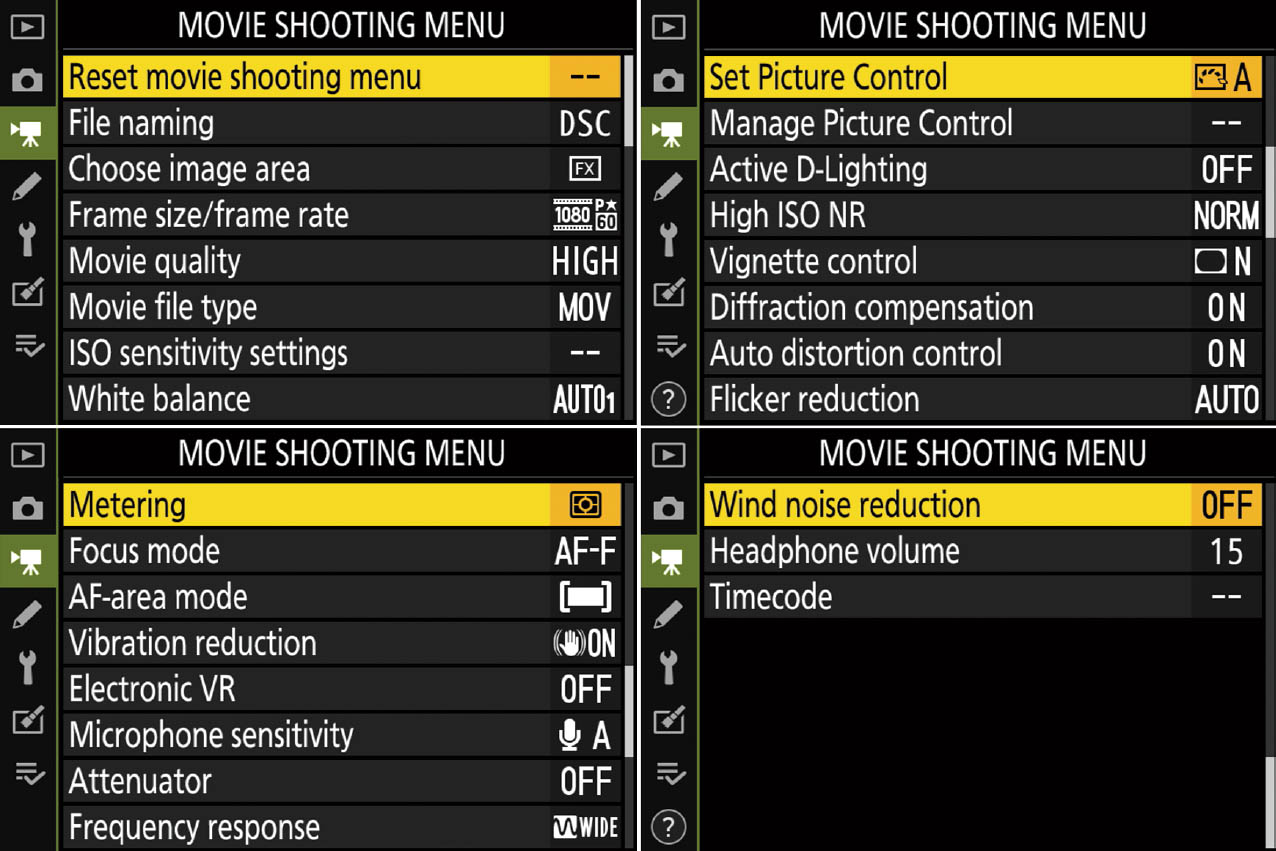
Figure 14.1 Movie Shooting menu.
- File Naming. I recommend using a different substitution in Movie mode for the default DSC characters in file names created for movie files. I use NZ6 for still photos and MOV for video files. The limitations and instructions are the same as for the File Naming entry in the Photo Shooting menu, as described in Chapter 11.
- Choose Image Area. This entry determines image area used when shooting movies. It provides two variations: FX and DX, which allow you to capture movies using what Nikon calls “FX-based movie format” and “DX-based movie format.” The latter carves a 16:9 (HDTV) proportioned area from the full-frame view, as shown within the yellow box at top in Figure 14.2. Within the video arena, DX/APS-C movies are usually referred to as APS-C/Super 35, the latter being a common term for that video cropped format. Fortunately, the Z6 doesn’t use a mask to mark off the cropped area. Instead, it helpfully enlarges the captured portion to fill the frame, as seen at bottom right in the figure. The normal FX-format view is shown at bottom left.

Figure 14.2 FX-based and DX-based movie formats.
USING DX LENSES
If you use the FTZ adapter to mount a lens that the camera recognizes as a DX/APS-C lens, the Z6 will switch to DX-based movie format automatically (without the need to specify FX or DX with the Choose Image Area entry, which is grayed out, in any case). As in still photo mode, you cannot force the camera to use the DX lens as if it were a full-frame optic. Remember that the Z6 may or may not detect APS-C (DX) lenses from third-party manufacturers.
When Electronic VR is selected using the i button menu or Movie Shooting menu, the Z6 provides a slight additional crop (to allow adjusting the frame to compensate for camera movement). Slow-motion movies are always cropped, as I’ll explain shortly.
- Frame Size/Frame Rate. Here you can select any of 10 different video formats for conventional movies, plus three additional settings for slow-motion video. The conventional settings provide 4K video at 3840 × 2160 resolution at 30/25/24 frames per second; Full HD at 1920 × 1080 resolution at 60/50/30/25/24 frames per second; or Standard HD at 1280 × 720 resolution at 60/50 frames per second. As I explained earlier, 50/25 fps are used for PAL video systems overseas, while the other frame rates are compatible with the NTSC system used in the USA, Japan, and some other areas. See the section that follows for slow-motion video frame rates.
WHAT FRAME RATE: 24 fps or 30/60/120 fps?
Even intermediate movie shooters can be confused by the choice between 24 fps and 30/60/120 fps, especially since those are only nominal figures (with the Z6, the 24 fps setting yields 23.976 frames per second; 30 fps gives you 29.97 actual “frames” per second; 60 fps yields 59.94; while 120p yields 119.88 fps). The difference lies in the two “worlds” of motion images, film and video. The standard frame rate for motion picture film is 24 fps, while the video rate, at least in the United States, Japan, and other places using the NTSC standard, is 30 fps (60 interlaced fields per second). Most computer video-editing software can handle either type, and convert between them. The choice between 24 fps and 30 fps is determined by what you plan to do with your video. Your camera can also shoot at 25/50/100 fps for use with PAL systems, which don’t use NTSC standards.
The short explanation is that, for technical reasons I won’t go into here, shooting at 24 fps gives your movie a “film” look, excellent for showing fine detail. (I’ll have more to say about that later in this chapter.)
However, if your clip has moving subjects, or you pan the camera, 24 fps can produce a jerky effect called “judder.” A 30/60/120 fps rate produces a home-video look that some feel is less desirable, but which is smoother and less jittery when displayed on an electronic monitor. I suggest you try both and use the frame rate that best suits your tastes and video-editing software.
- Movie Quality. Select High Quality or Normal Quality. Your choice affects the sharpness/detail in your image and the maximum bit rate that can be sustained and length of the movies you can record. If you have fast memory cards and will be displaying your video at larger sizes, you’ll want to use High Quality, which is my preference. Note that 4K video can only be captured using the High Quality setting; the Movie Quality entry is grayed out when you’ve specified UHD capture. It’s usually possible to convert a video into a lower-resolution version in a movie-editing program.
- Movie File Type. As I described in Chapter 11, you can choose MOV or MP4 file types. MOV is the preferred file type for Macintosh devices (but is also compatible with Windows), while MP4 is a more widely adopted standard compatible with Macs and PCs. Movie-editing software can convert back and forth between either.
- ISO Sensitivity Settings (for Movies). Like the ISO settings in the Photo Shooting menu, as explained in Chapter 11, this version allows you to select a fixed ISO setting for Manual exposure mode, from ISO 100 to ISO 51200, plus Hi 0.3, 0.7, Hi 1, and Hi 2. That allows you greater control over the ISO used. When shooting movies in P, A, or S exposure modes, Auto ISO sensitivity is always used. However, if you want to use Auto ISO in Manual exposure mode, you can turn it on or off here, and specify the maximum ISO that will be selected automatically, from ISO 100 to Hi 2.0.
- White Balance. Here you can select the white balance used to shoot movies. You can choose:
- Same As Photo Settings. The Z6 will use whatever white balance setting you’ve specified in the Photo Shooting menu.
- Any of the other white balance options. The selection will apply only to video. The white balance of movie clips isn’t easy to adjust, so you will usually want to set a specific white balance in this menu entry, or opt for Auto white balance. I usually keep this setting the same as selected for still photos.
- Set Picture Control. You can specify Same as Photo Settings, or independently specify a Picture Control to be used only when shooting movies. The procedures for selecting and modifying a Picture Control in this menu entry is otherwise the same as described in Chapter 11. However, of special note here is the Flat Picture Control (available in both still and movie modes), which produces a dull, washed-out rendition. Why would you want that? Flat captures a wider dynamic range than other Picture Control modes, including Standard, giving you a better “raw” video image to fine-tune in your video-editing software, using your program’s video color grading functions. Grading is used to adjust contrast, color, saturation, detail, black level, and white point, and is especially powerful when used with relatively flat images, like those produced by the Flat Picture Control, or with N-log gamma. As I’ve mentioned, I’ll explain N-log in more detail later.
- Manage Picture Control. This entry includes the Save/Edit, Rename, Delete, and Load/Save options that operate the same as the corresponding control in the Photo Shooting menu, described in Chapter 11. You can make a copy of a Picture Control, save an edited copy, rename or remove a style, or retrieve a Picture Control from a memory card.
- Active D-Lighting. You can choose Same as Photo Settings, Extra High, High, Normal, Low, or Off.
- High ISO NR. Movie shooting doesn’t involve long exposures, so the Movie Shooting menu includes only a High ISO Noise Reduction entry. You can set it to High, Normal, Low, or Off. See the entry for this feature under Photo Shooting menu, earlier in Chapter 11.
- Vignette Control/Diffraction Compensation/Auto Distortion Control. These three all operate the same as for still photo shooting, and were described in Chapter 11.
- Flicker Reduction. Choose Auto, or select either 50Hz or 60Hz, as described in Chapter 11.
- Metering. Only Matrix, Center-weighted, and Highlight-weighted metering, as described in Chapter 4, are available. Spot metering is not available in Movie mode.
- Focus Mode. In addition to AF-S, AF-C, and Manual focus, Full-time AF (AF-F) is available in Movie mode. Unlike AF-S or AF-C, the AF-F autofocus mode doesn’t need to be activated by pressing the shutter release or AF-ON button; AF-F functions as its name suggests: it is active at all times when you’re in Movie mode. While power consumption is greater, there is less of a lag in achieving sharp focus once you begin video capture.
- AF-Area Mode. Only Single-Point AF, Wide-Area AF (Small), Wide-Area AF (Large), and Auto-Area AF are available. Pinpoint AF is not available in Movie mode.
- Vibration reduction. This menu entry controls the Z6’s built-in body image stabilization. You can choose Same as Photo Settings, On (Normal), Sport, or Off.
- Electronic VR. As I said earlier in this chapter and in Chapter 11, this electronic form of image stabilization does not shift the sensor’s carrier mechanism, as IBIS does. Instead, the electronic version crops the video frame slightly, and shifts the entire frame up, down, left, right, or diagonally enough to counter some camera movement in the x and y directions. This feature is not available with frame rates 1920 × 1080 100/120p or when shooting Slo-Mo. A “waving hand” indicator appears at the right side of the display when Electronic VR is active. Maximum sensitivity for movie shooting is fixed at ISO 25600. Keep in mind that, because of the cropping, the angle of view is reduced slightly, producing a slight focal length “multiplier” effect.
- Microphone Sensitivity. This entry has three options that control your Z6’s built-in microphone or any external microphone you attach. You can choose Auto Sensitivity, Manual Sensitivity to set recording levels yourself (with a handy volume meter on screen showing the current ambient sound levels), or turn the microphone off entirely if you’re planning to record silent video, use another sound recording source, or add sound in post-production. (See Figure 14.3.)
- Attenuator. Enable this feature to minimize audio distortion from background sounds when capturing video in loud environments.
- Frequency response. Select from Wide Range frequency response to record a broad range of sounds, or Vocal Range to optimize audio recording for vocals. You’ll find an entire section on recording sound in Chapter 15.
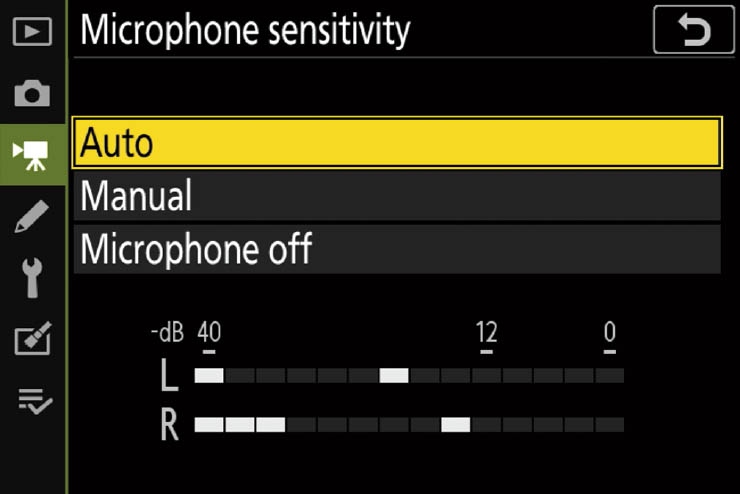
Figure 14.3 Microphone sensitivity can be set manually, using the Z6’s audio meter as a reference.
- Wind Noise Reduction. Wind blowing across your microphone can be distracting. This setting reduces wind noise (and may also affect other sounds; so, use it carefully) for the built-in microphones only. Your external microphone, like the Nikon ME-1, may have its own wind noise reduction filter on/off switch.
- Headphone volume. You can set a volume from 1 to 30; the default is 15.
- Timecode. As I’ve noted in several places in this book, including Chapter 11, advanced video editing and other software-oriented topics, such as Photoshop, are generally beyond the scope of this book. In any case, using timecodes is a fairly advanced procedure, and those who use them don’t need instruction from me.
However, the ability to embed timecodes in video is a new and highly useful feature for Nikon interchangeable-lens cameras. As I said in Chapter 11, where all the timecode options are described, they provide precise hour:minute:second:frame markers that allow identifying and synchronizing frames and audio. The time code system includes a provision for “dropping” frames to ensure that the fractional frame rate of captured video (remember that a 24 fps setting actually yields 23.976 frames per second while 30 fps capture gives you 29.97 actual “frames” per second) can be matched up with actual time spans.
- Time-Lapse Movie. This corresponds to still photo mode’s interval timer shooting, and, in fact, is located in the Photo Shooting menu instead of the Movie Shooting menu. It allows shooting video clips instead of still photographs (or a series of still photographs). The Z6 automatically creates a silent time-lapse movie at the frame resolution and rate you’ve selected in the Movie Shooting menu. The options for time-lapse photography are explained in Chapter 11 and the procedure described in detail in Chapter 6.
Slow-Motion Movies
Slow-motion video is a cool feature that allows you to reduce the apparent playback speed of your movies by 4X or 5X, so you can analyze movement, or apply the effect to your next video involving fast-moving superheroes or those intrepid Baywatch lifeguards.
In the Frame/Size/Frame Rate entry of the Movie Shooting menu, you have the option of scrolling down to select 1920 × 1080 settings at either 30/25p × 4 (slow-mo) or 24p × 5 (slow-mo) (both NTSC). Video intended for use in PAL countries can select 25p × 4 and 24p × 5 instead.
In slow-motion mode, the Z6 records Normal Quality video in DX-based (cropped) format, at 120/100 frames per second (NTSC/PAL) for up to no more than three minutes. When 120/100 fps video is viewed at 30/25 frames per second, the clip takes four times as long to play back; at 24 fps, the clip requires 5X the normal time. As a result, a three-minute clip will stretch to fill 12 minutes when shot at 30/25 fps, or 15 minutes at 24 fps. You can analyze your golf swing or add a slo-mo effect to your movies. While the three-minute capture rate may seem like a limitation, how often do you really want to watch 12 to 15 minutes of slow-motion “action?”
Shooting Your Movie
By this time, you’re ready to capture some video. To shoot your movies, follow these steps:
- 1. Plug in the microphone. If you want to use an external monaural or stereo microphone with a 3.5mm stereo mini plug, attach it to the microphone jack on the left side of the camera.
- 2. Choose an exposure mode. Select Program, Shutter-priority, Aperture-priority, or Manual exposure. The Z6 uses Matrix metering based on readings from the sensor itself to determine exposure.
- 3. Adjust exposure. The adjustments you can make depend on the exposure mode you select. You’ll find more about exposure in the section that follows this one.
- Program/Shutter-priority. Adjust only exposure compensation by pressing the EV button on top of the camera and rotating the main command dial. The screen image will brighten and darken as you make adjustments. Shutter speed and ISO sensitivity are selected for you by the Z6.
- Aperture-priority. You can change the f/stop by rotating the sub-command dial, and adjust exposure compensation with the EV button and the main command dial. Shutter speed and ISO sensitivity are selected for you by the Z6.
- Manual exposure. The main command dial changes the shutter speed (from 1/25th to 1/4,000th second), and the sub-command dial adjusts the aperture. Press the ISO button and rotate the main command dial to change the ISO sensitivity.
- 4. Enable movie recording. Activate movie recording by rotating the Photo/Movie switch to the Movie position.
- 5. Choose a focus and AF-area mode. Select from autofocus or manual focus with the i menu or Fn2 button. Then choose AF-S or AF-F. Select an AF-area mode.
- 6. Set audio level. Use the Microphone Sensitivity entry in the Movie Shooting menu to specify audio recording level, using Auto Sensitivity to allow the Z6 to set the volume, or Manual Sensitivity to adjust using an audio meter (seen at the bottom of Figure 14.3). You can also turn off audio to record a silent movie, say, if you plan to add a voice-over track, music, or other audio in post-production using your video-editing software.
- 7. Start/Stop recording. Press the red-dotted movie recording button to lock in focus and begin capture. Press again to stop recording. The LCD monitor display as you’re capturing video looks like Figure 14.4. The viewfinder display has the same information, arranged slightly differently, and not overlaid on the image area. You can press the DISP button to increase or decrease the amount of information overlaid on the screen during movie recording.
- 8. No flash. You can’t use electronic flash during movie recording, but you can use the built-in LED movie light on the Nikon SB-500 unit.

Figure 14.4 The LCD monitor display during movie capture.
Using the i Button
The i button, which is so useful in Photo mode, also offers real-time adjustment of parameters and controls while you capture your video. These are not only important for fine-tuning your movies as you capture them, but allow for some special tools that veteran videographers will know and love, but which may be new to still photographers. Here’s a description of the useful options that pop up when you press the i button. (See Figure 14.5.) Many of these are also available in the Movie Shooting menu as explained in Chapter 11. I’ll point out which settings are those you might want to use during actual capture. As I described in Chapter 12, there is a Custom Setting g1: Customize i button menu entry that allows you to swap out and change Movie mode i menu items.
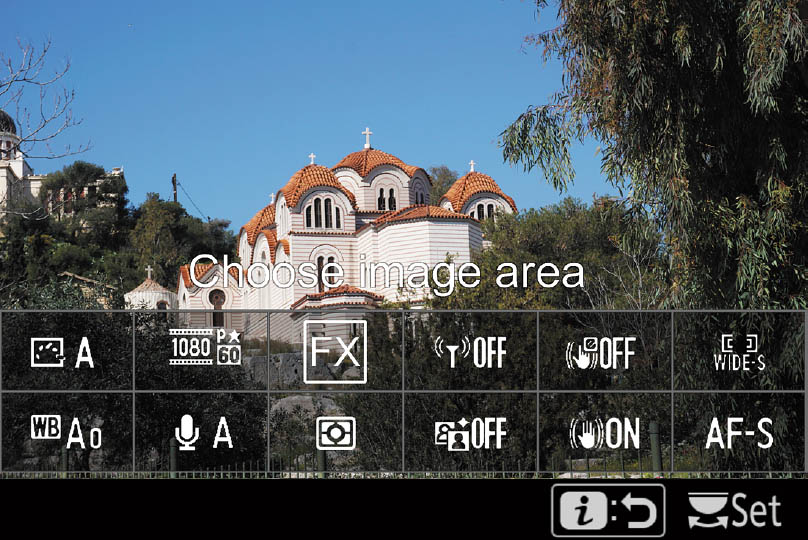
Figure 14.5 i button options.
- Picture Control. You can use any of the Picture Controls described in Chapter 11 in Movie mode, and specify them here.
- Frame size/rate and Image Quality. Select your frame size/rate here and choose High or Normal quality.
- Choose image area. You can select the image area for movie mode, as described earlier in this chapter.
- Wi-Fi Connection. Control your wireless connection here (or, if you prefer, substitute a function you find more useful).
- Electronic VR. Turn it on or off.
- AF-area mode. Choose from among the available modes.
- White balance. Set your white balance for movie shooting here.
- Microphone sensitivity. It’s useful to be able to use the i menu while shooting video to adjust the sensitivity of your microphone on the fly. As this adjustment controls both the built-in and optional external stereo microphones, you might find yourself needing to make your mic more sensitive or less sensitive as the ambient sound conditions change. For example, if you were capturing a clip with only background sound (no vocals) and someone started using a jackhammer a block away, you might want to reduce microphone sensitivity to minimize the clamor.
- Metering mode. Select Matrix, Center-weighted, or Highlight-weighted. Remember that Spot is not available when shooting movies.
- Active D-Lighting. The same Very High to Low and Off settings available in the Movie Shooting menu can be chosen here.
- Vibration reduction. You can turn in-body image stabilization on and off.
- Focus mode. Choose AF-S, AF-C, AF-F, or Manual focus.
Stop That!
You might think that setting your Z6 to a faster shutter speed will help give you sharper video frames. But the choice of a shutter speed for movie making is a bit more complicated than that. First, you can’t select the shutter speed at all for your movies when you’re using Auto, P, S, or A exposure modes. You can select a shutter speed only if you switch to Manual exposure. Here’s how it works:
- Program and Shutter-priority modes. The Z6 selects the shutter speed (such as 1/30th second) and ISO sensitivity appropriate for your lighting conditions. Your only exposure adjustment option is to press the EV button and add/subtract exposure compensation. As you might guess, P and S modes are not the best choices for those who want to shoot creatively.
- Aperture-priority mode. This is the mode to use when you want to put selective focus to work by choosing an aperture that will provide more, or less, depth-of-field. In A mode, you can select any f/stop available with your lens, and the Z6 will choose a shutter speed and ISO setting to suit. Generally, if you choose a large aperture, the camera will lower the ISO sensitivity as much as it can, to allow sticking with a shutter speed of 1/30th second. It will then select shorter shutter speeds, if necessary, under very bright illumination. My Z6 has jumped up to 1/200th second outdoors under bright daylight when I try to shoot at f/1.8 or f/1.4. In A mode, you can still add or subtract exposure compensation.
- Manual exposure mode. In this mode, you have control of aperture, shutter speed (from 1/25th second all the way up to 1/8,000th second), and ISO—even if your settings result in video that is completely washed out, or entirely black. Because video capture is in the range of 24 to 60 frames per second, you can’t select a shutter speed that is longer than the frame interval. That is, if your video mode is 1920 × 1080 at 30 fps, you can’t choose a shutter speed longer than 1/30th second.
SEMI-MANUAL EXPOSURE?
The ISO Sensitivity Settings entry in the Movie Shooting menu allows you to enable a feature called Auto ISO Control (Mode M). When activated, the Z6 will attempt to adjust the ISO setting to provide the correct exposure based on the current shutter speed, aperture, and exposure compensation values you’ve specified. That means you can select a suitable shutter speed (subject to the recommendations described next), and an f/stop, and the Z6 will effectively provide you with autoexposure in Manual exposure mode.
So, how do you select an appropriate shutter speed? As you might guess, it’s almost always best to leave the shutter speed at 1/30th second, and allow the overall exposure to be adjusted by varying the aperture and/or ISO sensitivity. We don’t normally stare at a video frame for longer than 1/30th or 1/24th second, so while the shakiness of the camera can be disruptive (and often corrected by VR), if there is a bit of blur in our subjects from movement, we tend not to notice. Each frame flashes by in the blink of an eye, so to speak, so a shutter speed of 1/30th second works a lot better in video than it does when shooting stills.
Higher shutter speeds introduce problems of their own. If you shoot a video frame using a shutter speed of 1/200th second, the actual moment in time that’s captured represents only about 12 percent of the 1/30th second of elapsed time in that frame. Yet, when played back, that frame occupies the full 1/30th of a second, with 88 percent of that time filled by stretching the original image to fill it. The result is often a choppy/jumpy image, and one that may appear to be too sharp.
The reason for that is more social imprinting than scientific: we’ve all grown up accustomed to seeing the look of Hollywood productions that, by convention, were shot using a shutter speed that’s half the reciprocal of the frame rate (that is, 1/48th second for a 24 fps movie). Movie cameras use a rotary shutter (achieving that 1/48th second exposure by using a 180-degree shutter “angle”), but the effect on our visual expectations is the same. For the most “film-like” appearance, use 24 fps and 1/60th second shutter speed.
Faster shutter speeds do have some specialized uses for motion analysis, especially where individual frames are studied. The rest of the time, 1/30th or 1/60th of a second will suffice. If the reason you needed a higher shutter speed was to obtain the correct exposure, use a slower ISO setting, or a neutral-density filter to cut down on the amount of light passing through the lens.
A good rule of thumb when shooting progressive video (as opposed to interlaced video, which is not offered by the Z6) is to use 1/60th second or slower when shooting at 24 fps; 1/60th second or slower at 30 fps; and 1/126th second or slower at 60 fps.
Viewing Your Movies
Once you’ve finished recording your movies, they are available for review. Film clips show up during picture review, the same as still photos, but they are differentiated by a movie camera icon overlay and “Play” prompt. Press the multi selector center button to start playback. During playback, you can perform the following functions:
- Pause. Press the multi selector down button to pause the clip during playback. Press the multi selector center button to resume playback.
- Rewind/Advance. Press the left/right multi selector buttons to rewind or advance (respectively). Press once for 2X speed, twice for 8X speed, or three times for 16X speed. Hold down the left/right buttons to move to the end or beginning of the clip.
- Start Slo-Mo playback. Press the down button while the movie is paused to play back in slow motion.
- Skip 10 seconds. Rotate the main command dial to skip ahead or back in 10-second increments.
- Skip to index. Rotate the sub-command dial to skip to the next or previous index marker. If there are no indices saved, the command dial moves to the last or first frame of the clip. Movies with indices are indicated by a “paddle” icon at the top of the screen during playback.
- Change volume. Press the Zoom In and Zoom Out buttons to increase/decrease volume.
- Trim movie/Save frame. Press the i button and follow the steps in the next section.
- Exit Playback. Press the multi selector up button or the Playback button to exit playback.
- Return to shooting mode. Press the Movie button to return to shooting mode.
- View menus. Press the MENU button to interrupt playback to access menus.
Trimming Your Movies
In-camera editing is limited to trimming the beginning or end from a clip, and the clip must be at least two seconds long. For more advanced editing, you’ll need an application capable of editing AVI movie clips. Google “AVI Editor” to locate any of the hundreds of free video editors available, or use a commercial product like Corel Video Studio, Adobe Premiere Elements, or Pinnacle Studio. These will let you combine several clips into one movie, add titles, special effects, and transitions between scenes.
In-camera editing/trimming can be done from the Retouch menu, or during Playback. The procedure is the same. To do in-camera editing/trimming, follow these steps:
- 1. Start movie clip. Use the Playback button to start image review, and press the multi selector center button to start playback when you see a clip you want to edit. It will begin playing. Then follow the instructions beginning with Step 2.
Or, you can access the Edit Movie choice in the Retouch menu when you see the clip on the screen that you want to edit.
- 2. Activate edit. To remove video from the beginning of a clip, view the movie until you reach the first frame you want to keep, and then press the down button to pause. The movie progress bar at the bottom left of the screen will show the current position in the movie. You can move back and forth frame by frame while the video is paused by pressing the left/right buttons or rotating the main or sub-command dials.
- 3. Trim move. To trim video from the end of a clip, watch the movie until you reach the last frame you want to keep and then press the down button to pause. You can jump to the next saved index point in the clip by rotating the main command dial.
- 4. Select start/end point. When the video is paused, press the i button to show the movie edit options, and select Choose Start/End Point (see Figure 14.6). You’ll be asked whether the current frame should be the start or end point. Highlight your choice and press OK again.
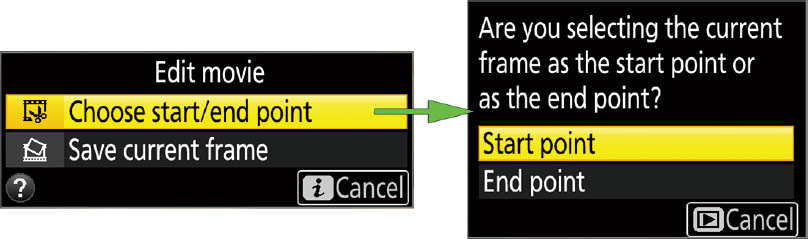
Figure 14.6 Choose editing options from this menu.
- 5. Resume playback. Press the multi selector center button to start or resume playback. (See Figure 14.7 for the viewfinder display; the LCD monitor display is similar.) You can use the Pause, Rewind, Advance, and Single frame controls plus the main control dial (to jump to the next saved index point) as described previously to move around within your clip. Note that your trimmed movie must be at least two seconds long.
- 6. Confirm trim. A Proceed? prompt appears. Choose Yes or No, and press OK.
- 7. Save movie. You have four choices when saving the trimmed movie:
- Save As New File. The trimmed clip will be stored as a new file, and the original movie preserved.
- Overwrite Existing File. The trimmed clip replaces the original movie on your memory card. Use this option with caution, as you’ll be unable to restore your unedited clip.
- Cancel. Return to the editing mode.
- Preview. View the trimmed version. You can then save as a new file, overwrite, or cancel. You’ll see a Saving Movie message and a green progress bar as the Z6 stores the trimmed clip to your memory card. Storage takes some time, and you don’t want to interrupt it to avoid losing your saved clip. So, make sure your camera has a fully charged battery before you start to edit a clip.

Figure 14.7 Edit your movie.
Saving a Frame
You can store any frame from one of your movies as a JPEG still, using the resolution of the current video format. Just follow these steps:
- 1. Pause your movie at the frame you want to save by pressing the down button.
- 2. Press the i button and choose Save Selected Frame.
- 3. Press the up button to save a still copy of the selected frame.
- 4. Choose Proceed and press OK to confirm.
- 5. Your frame will be stored on the memory card.