Chapter 2
BASIC BENDS
A knot used to join the ends of two ropes is called a bend. The knots you will find in this chapter will join cordage small and large, similar and different—a skill that you will find useful in many endeavors.
When a bend joins the ends of two ropes, it is to provide more length or make a needed connection. A bend should be considered a temporary join, except in the case of small cordage such as twine or fishing line. You may need a bend to repair a broken rope (keeping in mind that rope is weaker at the knot). You can use a bend to join electrical cords. When the ends are plugged in, they will not pull out if there is tension on the cord.
Before working with electrical cords, be sure the electric current to them is turned off.
When used to join the ends of a single rope, a bend makes a circle of rope called a “strop” or “sling.” A closed circle of rope can be used for hitching or lifting, such as the Barrel Sling described in Chapter 4.
Bends are characterized by having two standing ends and two running ends. When tightened down, leave enough length of running end to provide security against the ends slipping back through the knot. Depending on the knot, the length of the running end can be anywhere from a few to several times the diameter of the rope. If extra security is desired, the running ends can even be tied around the standing ends of the opposite rope. You can use anything from a Half Hitch to a Triple Overhand Knot for this purpose.
Bends vary in how easily they are untied after being under strain. Since ease of untying may or may not be desirable depending on your circumstances, you want to keep this property in mind when you choose your bend. Knots like the Water Knot or the Fisherman’s Knot can be very difficult to untie, especially in twine. The Zeppelin Bend can be untied easily even after being subjected to great strain.
It often happens that the ropes you want to join will be of different size or material. Take great care because most bends have very little security when they are not tied with two identical ropes. There are two ways of dealing with this. One is to use a knot that is somewhat suited for ropes of different sizes, such as the Sheet Bend or the Double Sheet Bend, and the other is to treat the join as if it were a hitch.
The Sheet Bend is commonly used when a rope of larger size is tied to a smaller one. In this case, the larger cord is the one that is bent into a U-shape, as you’ll see in the instructions for tying the Sheet Bend later in this chapter. If the size difference is too large, however, this knot will be insecure. To help the join handle a bigger size difference, you can use a Double Sheet Bend. These knots are also popular for ropes that are of different material. For each circumstance, you must tie and test your join to determine its suitability.
When the size difference of the ropes to be joined is significant, you may not want to tie them together at all, but connect them with loops or hitches. A rope can also be tied to a larger rope with a hitch just as if it were a pole. This is made easier if there is a loop at the end of the larger rope to which a smaller rope can be attached with almost any hitch. A loop can also be tied in each end so that they interlock. The Bowline Bend is such a join and if the loop knots themselves are secure, this join is secure regardless of the differences of the two ropes.
INTERLOCKING OVERHAND BENDS
A type of joining knot worth learning is the Interlocking Overhand Bend. In this type of knot, the end of each rope forms an Overhand Knot, and they are intertwined. Out of the many different joining knots that can be made from Interlocking Overhand Knots, four are shown in this chapter: Ashley’s Bend, Hunter’s Bend, Zeppelin Bend, and Butterfly Bend. These are all excellent bends, each with its own properties and tying methods.
There are two approaches to tying Interlocking Overhand Knots. One is to tie an Overhand Knot in one end, and then tie an Overhand in the other end while threading this end through the first Overhand. The other method is to ignore the fact that the ends make an Overhand Knot, and just intertwine both ends as needed to make the knot. This is illustrated for each of these four knots in this chapter, along with a figure showing the overhand structure of each.
You should try a number of the knots in this chapter before deciding which ones best serve your needs. Some work better with smaller or larger cordage, some tie more quickly and easily than others, and some are easier to untie. In some, the running ends lead out the side of the knot. In others, they lie along the standing parts. While some will be fun to tie, others may be too cumbersome. Whatever your preferences, the only way you will find out what you like is by trying out all these bends.
ASHLEY’S BEND
This knot is named after Clifford W. Ashley, who first introduced it in his book, The Ashley Book of Knots.
STEP 1 Take the first cord and make a crossing turn.

STEP 2 Take the second cord and use it to lace another crossing turn through the first cord.

STEP 3 Form the final tuck by bringing both running ends through the center together.

STEP 4 Tighten down the cord, forming Ashley’s Bend.
Ashley’s Bend is very strong and secure when used to join similar ropes. It does not slip even when brought under severe shock loads, but can be untied easily when desired.
BACKING UP BEND
You can make a bend more secure by tying down the running ends. Backing Up is a good method for bends like the Surgeon’s Bend, where running ends exit parallel to the standing parts.
Tie down the running ends of a Surgeon’s Bend (see further) with a Half Hitch (see Chapter 4) on each side.

This extra tie-off can also be an Overhand Knot. When you make bends with climbing rope, you may also consider using Triple Overhand Knots (see Chapter 1) as a backup—the extra tie-off will make the knot safer and will keep the running ends of the knot from waving around.
BOWLINE BEND
If it happens that two ropes that need to be joined are greatly dissimilar in size or material—or both—a bend may not be a safe and secure solution. Instead, what you can do is join the two ropes by forming two loops. If a loop is tied in one end, and a loop is tied in the other end so that it passes through the first one, then together they make a bend. If both loops are Bowlines, then the result is called a Bowline Bend.

Here are two interlocking Bowline Loops.
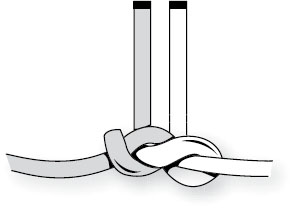
BUTTERFLY BEND
Also called the Straight Bend, this knot has the same form as the Butterfly Loop (see Chapter 3), and can even be tied the same way if the ends are attached.
STEP 1 Place two ropes side by side—one on the right and one on the left—and cross the running ends, forming loops.
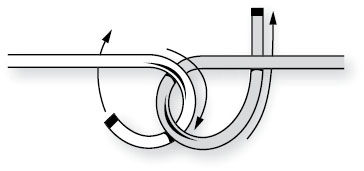
STEP 2 Use the right-side cord’s running end to make a second loop.
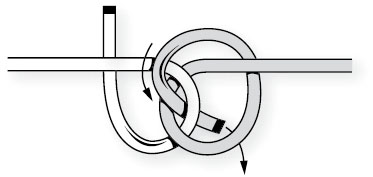
STEP 3 Use the left-side cord’s running end to make its second loop as well.
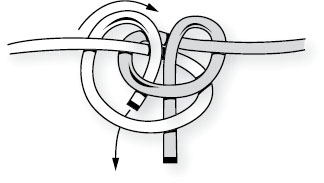
STEP 4 Tighten down the knot by pulling apart the two standing parts and tugging down the running ends.
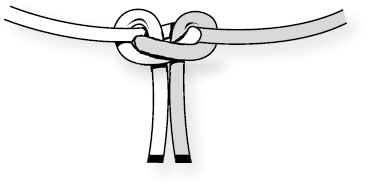
You can also tie the Butterfly Bend by tucking both ends at once, holding one in each hand. It is quicker than it sounds. Use the Butterfly Bend to tie similar materials. It is strong, secure, and unties easily.
CARRICK BEND
The Carrick Bend is traditionally used on large ropes, such as ships’ hawsers. When it has been under strain and perhaps wet, it is loosened by striking the outer bights of the knot with something blunt, like a wooden fid (an object like a marlinespike).
STEP 1 Lay down two ropes, one on the left and one on the right. Use the running end of the rope on the right to make a crossing turn. Take the other rope and move its running end in an over-and-under pattern through the right-hand rope.

STEP 2 Finish the tuck.
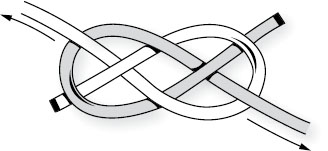
STEP 3 Pull on both standing ends, and take slack out with the running ends as well.

Because of its symmetrical shape before it is tightened down, the Carrick Bend is also tied for many decorative applications.
DOUBLE SHEET BEND
Another version of the Sheet Bend is the Double Sheet Bend, which you may prefer for use with two ropes that come in different sizes, or if you require a more secure bend.
STEP 1 Start by making a Sheet Bend (see further). Pass the running end around the knot again to tuck under its standing part a second time, making two wraps.

STEP 2 Tighten the Double Sheet Bend.

The Double Sheet Bend can be used to tie a rope to a clothlike material or the top of a sack, if the flat material is used as the end that is folded over.
HUNTER’S BEND
Although most knots don’t result in publicity, this knot did when Dr. Richard Hunter brought it to public attention, leading to the formation of the International Guild of Knot Tyers in 1982. Today, this knot is also called the Rigger’s Bend.
STEP 1 Start by placing the two ropes together, with the running ends facing opposite directions.
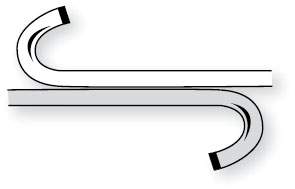
STEP 2 Use both ropes to make a crossing turn.

STEP 3 Tuck the running ends through the turn in opposite directions.

STEP 4 Tighten by taking out slack with both the standing parts and the running ends.

If you use two identical ropes to tie the Hunter’s Bend, it will hold well and securely. Another benefit of this knot is that it unties readily.
OVERHAND BEND
The Overhand Bend is quick to tie and is best used with small cordage like thread or string. It is secure, but makes a connection that is only half as strong as the material it is tied in.
STEP 1 Place two ends of the cord or two cords next to each other, and use the double cord to tie an Overhand Knot.

STEP 2 Tighten by pulling the standing parts in opposite directions.
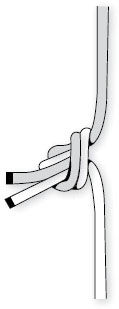
The Overhand Bend is also tied as a decorative way to combine a couple of loose ends. It can also be used to gather a large number of strands by just laying them all together and tying an Overhand Knot with all of them, though this use would be more like a binding knot in function.
SHEET BEND
The Sheet Bend is widely used and is of the same structure as the Bowline Bend (see previous), but with the leads performing a different function. Consider the two ropes you need to join for this bend. If one of the ropes is larger, it should be used for the end that is folded over double.
STEP 1 Take two pieces of rope. Take the rope on the left and make a loop, with the running end facing upward. Then, take the rope on the right and move the running end up between the loop and around the back of the other rope.

STEP 2 Continue the tuck by moving the running end down and through the loop, under itself.
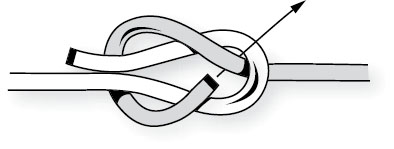
STEP 3 Tighten the bend by pulling the slack out of the running end, and then pulling on the standing parts.

If the size difference between the two ropes is too much, or if the tying materials are slippery, the Double Sheet Bend (see previous) may provide more security.
SLIPPED SHEET BEND
This bend is a modified version of the Sheet Bend (see previous). In this particular bend, the last tuck is made with a bight instead of a single running end.
STEP 1 Follow Step 1 for tying the Sheet Bend. As you move to Step 2, double up the running end and use the bight to move through the loop and under itself.
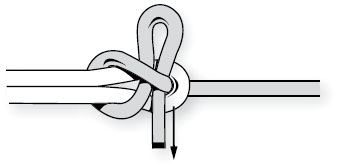
STEP 2 You can also tie a Slipped Bend by taking an extra turn around the knot before tucking the bight.
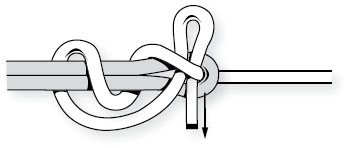
The Slipped Sheet Bend is at least as secure as the regular Sheet Bend, but with the added convenience of having quick release. The alternate slipknot shown in Step 2 can be useful when there is a larger difference in rope sizes.
SURGEON’S BEND
When the Surgeon’s Knot is used to join two ropes, it can be called the Surgeon’s Bend. (To learn how to tie a Surgeon’s Knot, see Chapter 10.)
STEP 1 Start by passing one rope’s running end over the other, making two passes.
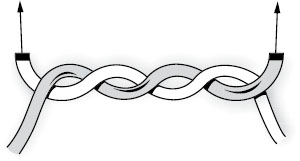
STEP 2 Pull up the two running ends and pass one over the other, making a half knot.
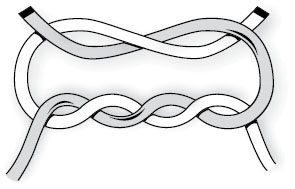
When tightened down, this bend has a unique low-profile shape, which you can see in the previous illustration of the Backing Up Bend. The Surgeon’s Bend is secure in most materials, and relatively easy to untie.
WATER KNOT
The Water Knot is a strong knot that holds well with straps or flat webbing.
STEP 1 Tie an Overhand Knot in the end of one rope, then take a second rope and trace it through the knot in the opposite direction.
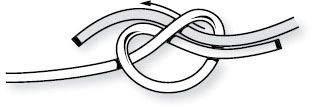
STEP 2 Continue tracing along the reverse path until both ropes form the Overhand Knot.
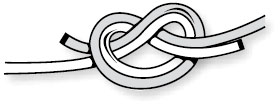
STEP 3 Tighten the knot by pulling on both ends.

The Water Knot is difficult to untie after being under strain. If you use flat material to tie this knot, be careful that the straps don’t make a twist inside the knot, but that they lay down flat together, as in Step 3.
ZEPPELIN BEND
The Zeppelin Bend, also known as the Rosendahl Bend, is a good sailing bend to learn.
STEP 1 To start, place two ropes together and use one of the running ends to make a loop as shown in the illustration.
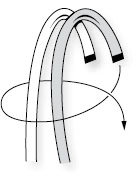
STEP 2 Next, separate the standing parts, moving one of them (the one at the end of the rope that did not form the loop) under the looped running end and over the other running end.

STEP 3 Use the same rope’s running end to make the final tuck.
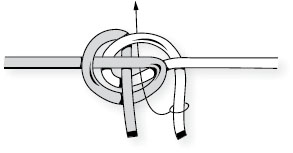
STEP 4 Tighten down the knot, leaving short running ends to stick out perpendicular to the ropes.
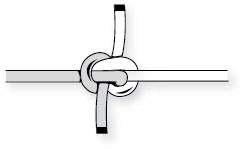
The Zeppelin Bend is very strong and secure when used to join similar ropes. It unties easily even after being under great strain.
INTERLOCKING OVERHAND BENDS
Four of the bends in this chapter—Ashley’s Bend, Butterfly Bend, Hunter’s Bend, and Zeppelin Bend—consist of Interlocking Overhand Knots. Although each of these knots can be tied without reference to their overhand structures, they are illustrated here for the sake of the completeness of these very superb bends. As you can see in the following illustration, an Overhand Knot has three internal openings that can interlock with other knots. Making an Overhand Knot at the end of one rope and then interlacing another Overhand through it can tie any of these bends.
A right-handed Overhand Knot

Hunter’s Bend

Ashley’s Bend
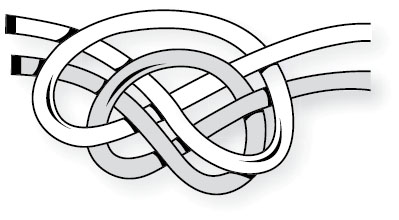
Zeppelin Bend

Butterfly Bend
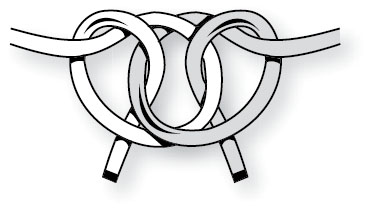
Can you see the Interlocking Overhand Knots in each one of these bends?