Introduction
Active Directory is a database of users, groups, computers, printers, and other objects. Windows uses Active Directory to organize the objects together into domains and larger forests. These are managed by domain controllers. Common platforms for domain controllers include Windows Server 2008 R2, Windows Server 2012, Windows Server 2012 R2, and Windows Server 2016.
This chapter introduces Active Directory, beginning with the process to install Active Directory components on Windows servers and promote them to domain controllers. Test domains are developed that not only include Windows systems but incorporate Linux systems using PowerBroker Open. Active Directory relies on Windows DNS, which can interact with BIND DNS servers. PowerShell scripts can be used to manage a domain; the chapter demonstrates a script to add domain users. Groups and organizational units allow domain administrators to delegate authority and apply group policy. The chapter includes an example of a group policy that restricts the directories in which users can run executable programs.
Installation
The process to configure a Windows server as the first domain controller for a domain is similar, whether the server runs Windows Server 2008 R2, 2012, 2012 R2, or 2016. In this example, no existing infrastructure is assumed present - no existing domain, no forest, and no existing DNS servers. Active Directory is installed first. When complete, the system is promoted to a domain controller, installing DNS in the process.
Installation on Windows Server 2012 and Later
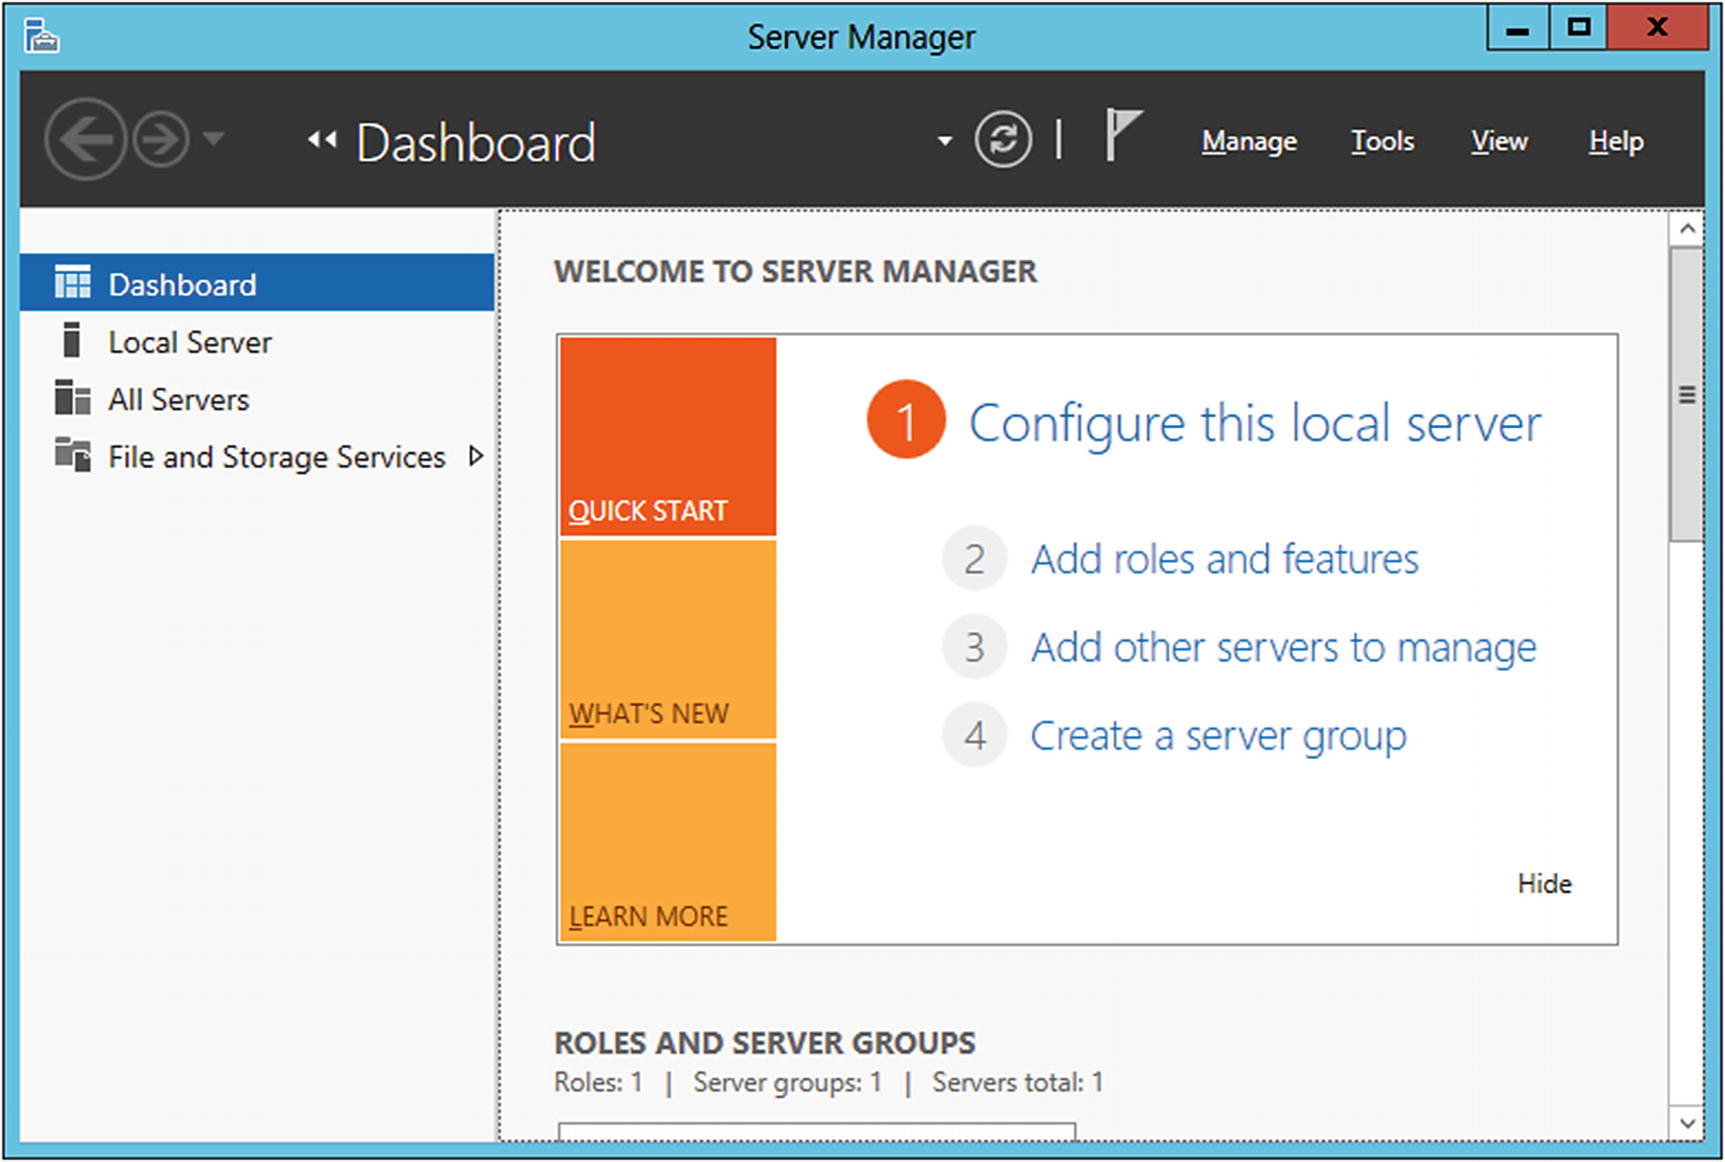
Windows Server 2012 R2 Server Manager

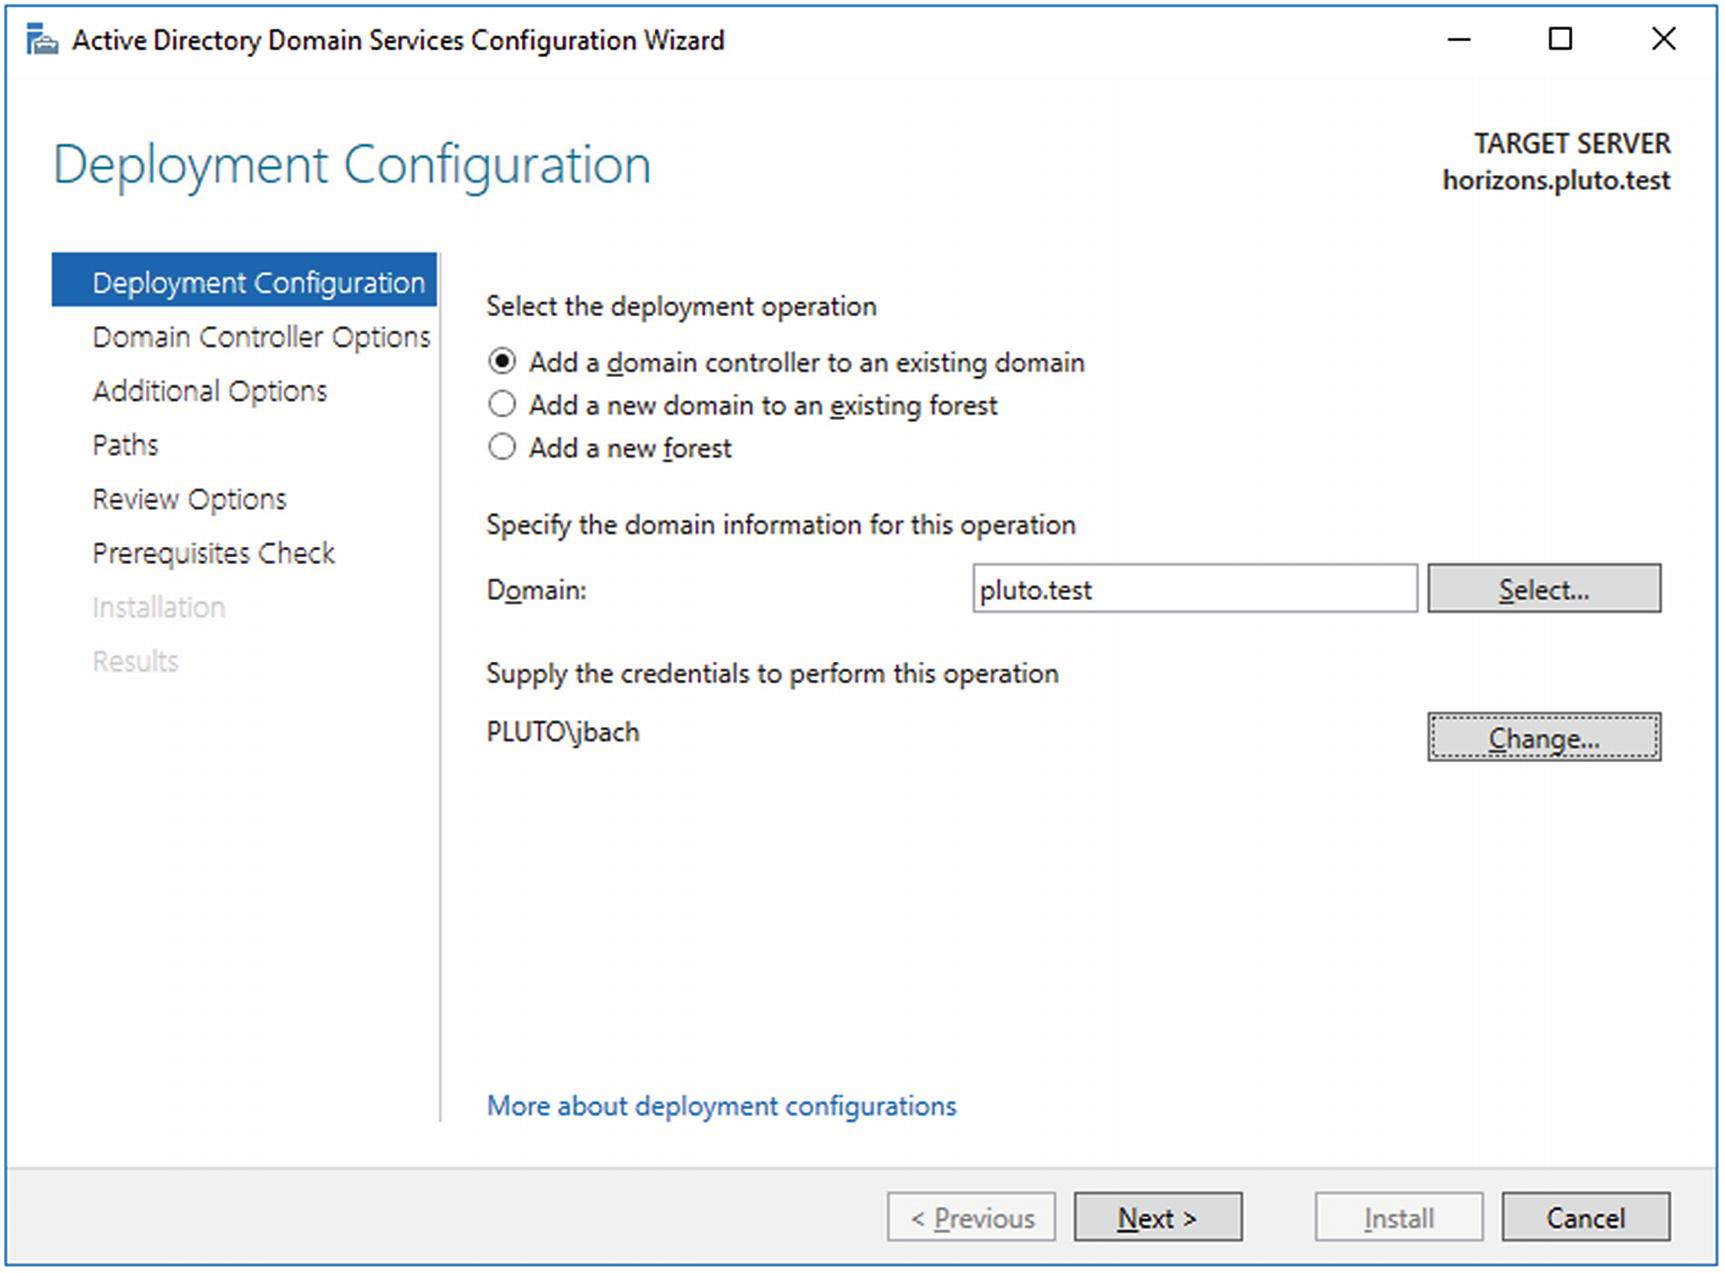
Windows Server 2012 R2 Active Directory Domain Services Configuration Wizard
From the wizard, select the option to add a new forest. In this example, the server is named cassini.saturn.test, and the root domain name is corp.saturn.test.
When selecting the name for the domain, do not use the top-level domain name .example. Windows Server 2012, 2012 R2, and 2016 are unable to create DNS forward zones for this namespace; they report the name as invalid. These systems are also unable to create conditional forwarders to the .example domain. This problem does not occur on Windows Server 2008 R2.
Select the functional level of the forest and the domain. Servers older than the functional level of the forest cannot join the forest, and servers older than the functional level of the domain cannot join the domain. Because the intent of this example is to replicate servers as deployed between 2011 and 2017, Windows Server 2012 is a reasonable choice as the functional level for both the forest and the domain. The functional level of a domain can be changed after the domain has been created. From Server Manager, navigate Tools ➤ Active Directory Domains and Trusts. Select the domain, right-click, and select Raise domain functional level.
Directory Services Restore Mode (DSRM) is one of the options when booting a domain controller in safe mode. Since a system in restore mode does not have access to the Active Directory database, the DSRM password is used to authenticate the user logging in at the terminal. This password should be kept secure; a user with this password and physical access to the system has complete access to the Active Directory database.
Because this example does not assume an existing DNS structure, the domain controller needs to add DNS capabilities; this is marked for installation by default. As the wizard continues, a warning box appears saying, “A delegation for this DNS server cannot be created because the authoritative parent zone cannot be found or it does not run Windows DNS server.” During the DNS server installation process, the server tries to contact DNS servers for the parent zone and set up a delegation for the new server. In this example, there is no parent DNS server, so this message is expected.
The wizard continues and presents a candidate NetBIOS name for the domain. NetBIOS names are 15 characters or less, and they are usually capitalized.
The Active Directory data file (ntds.dit), the log file (edb.log), and other working files are stored in the database directory or the log file directory; in both cases the default is C:\Windows\NTDS. Group policy files and various scripts are stored in the SYSVOL folder, by default in the directory C:\Windows\SYSVOL.
The wizard reviews the options and checks prerequisites. Two warnings are expected. One refers to the already noted inability to create a delegation zone on the parent DNS server; the second points out that the weaker cryptography algorithms are disallowed. Press the install button to complete the promotion of the server to a domain controller. The system reboots during the installation.

Changing the DNS suffix on a Windows Server 2012 R2 system
Installation on Windows Server 2008 R2
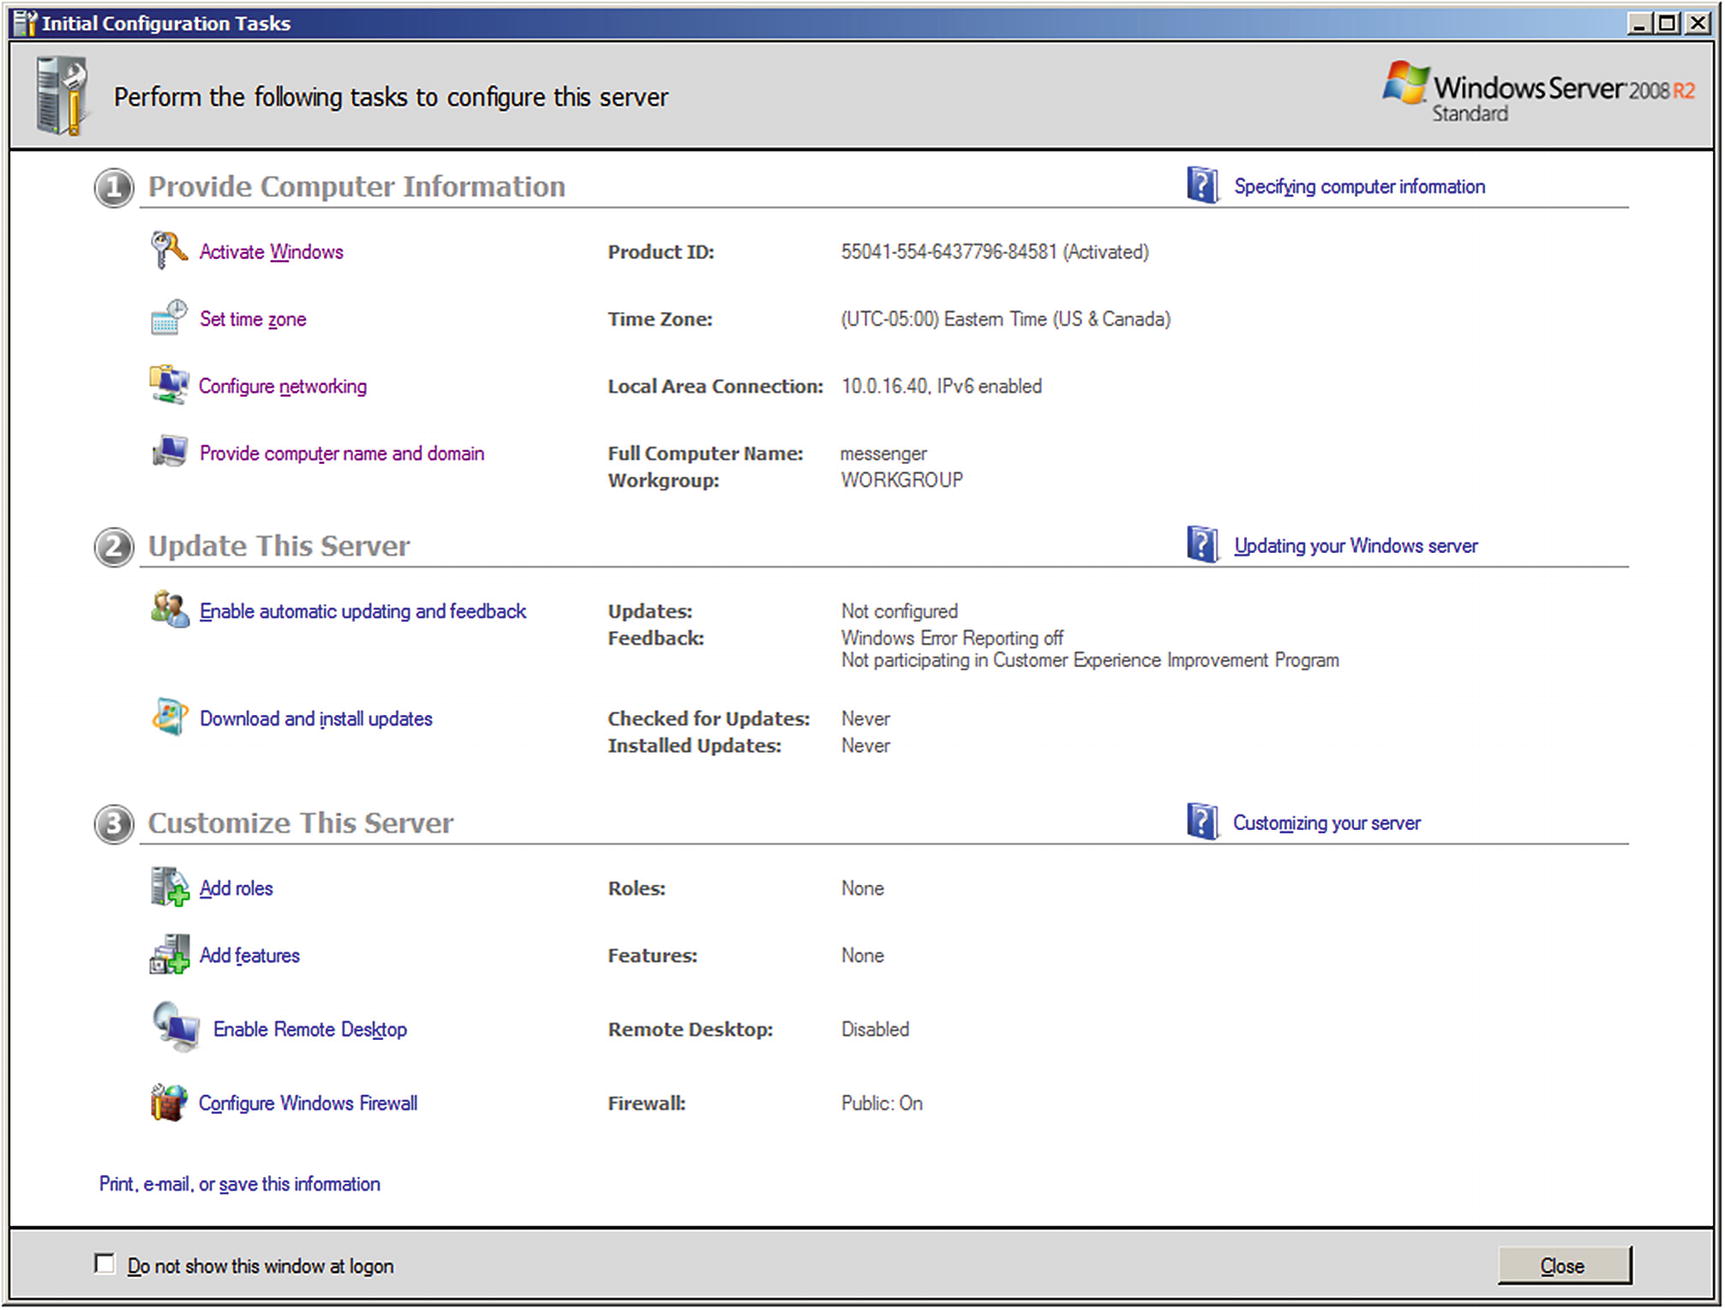
Windows Server 2008 R2 Initial Configuration Tasks
Once the installation completes, the wizard tells the user that the Active Directory Domain Services Installation Wizard (dcpromo.exe) needs to be run. This is in the form of a clickable hyperlink; the program can also be run directly from the Run menu or an Administrator command prompt.
The Active Directory Domain Services Wizard functions in much the same way as it does for Server 2012 and later. One caveat is that a Windows 2008 system with a static IPv4 address and a dynamically assigned IPv6 address warns the user that a dynamically assigned address is present on the system.
Windows DNS
Windows Server uses DNS Manager to manage its DNS server. To launch it on Windows Server 2012, or later, from Server Manager select Tools, then navigate to DNS. It is also available directly from the Start Menu on Windows Server 2012; on Windows Server 2016, 2012 R2, and 2008 R2, it can be found by navigating the Start Menu to Administrative Tools.
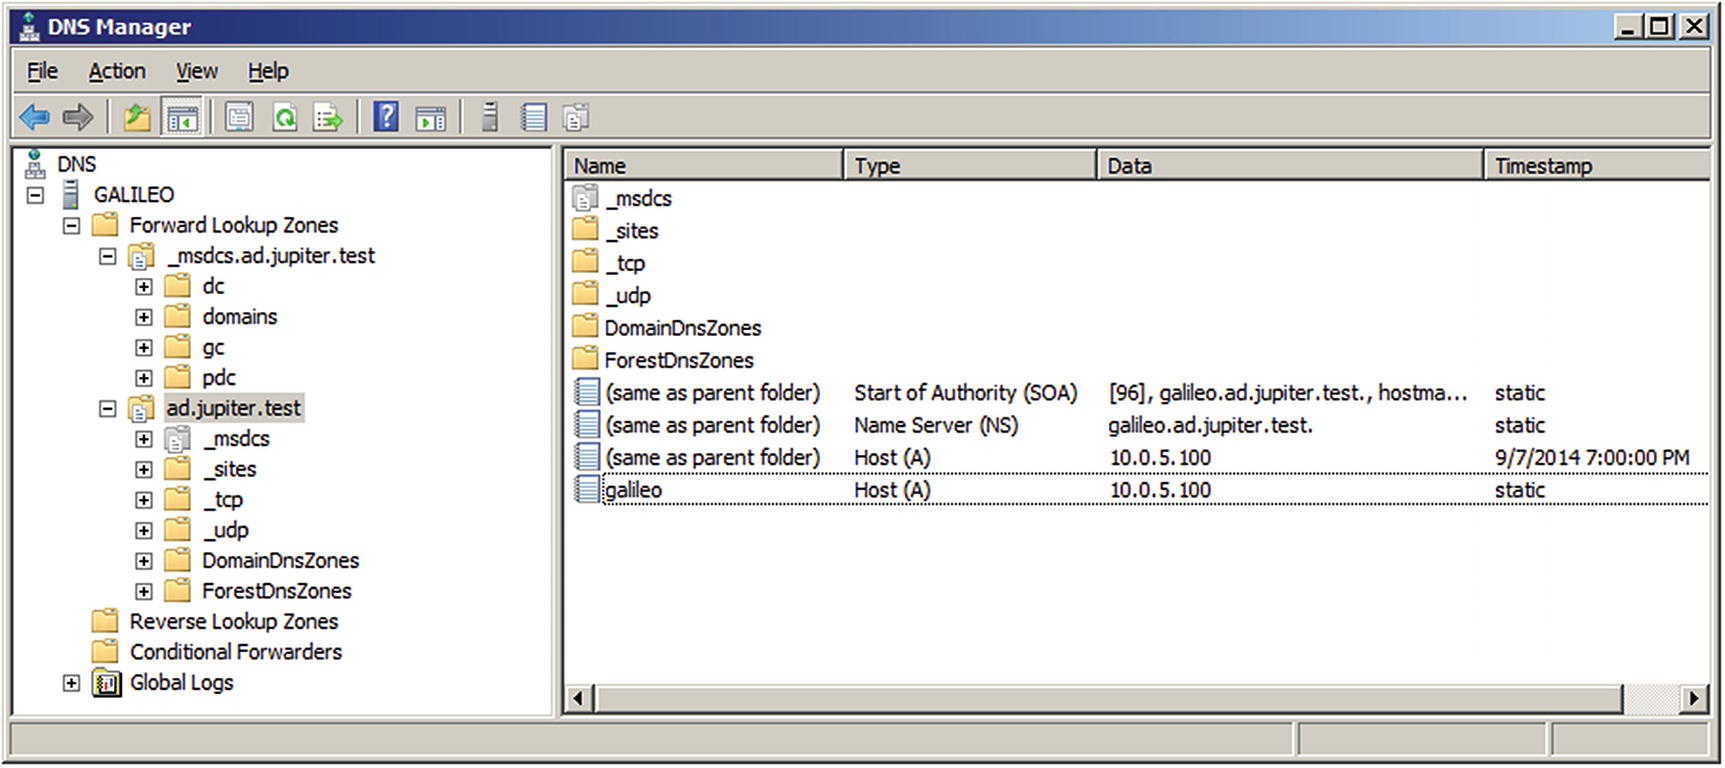
DNS Manager on Windows Server 2008 R2
The first forward lookup zone, _msdcs.ad.jupiter.test, contains service location records (SRV) that provide information about the domain. For example, navigate _msdcs.ad.jupiter.test ➤ dc ➤ _tcp ➤ _ldap to locate a SRV record that indicates that the LDAP service is running on port TCP/389 on the server galileo.ad.jupiter.test.
The second forward lookup zone provides records for the namespace; in this example, this is ad.jupiter.test. It includes similar service location records, organized by Active Directory site, protocol (TCP/UDP), domain, and forest. It also includes the start of authority (SOA), nameserver (NS), and address records for the namespace.
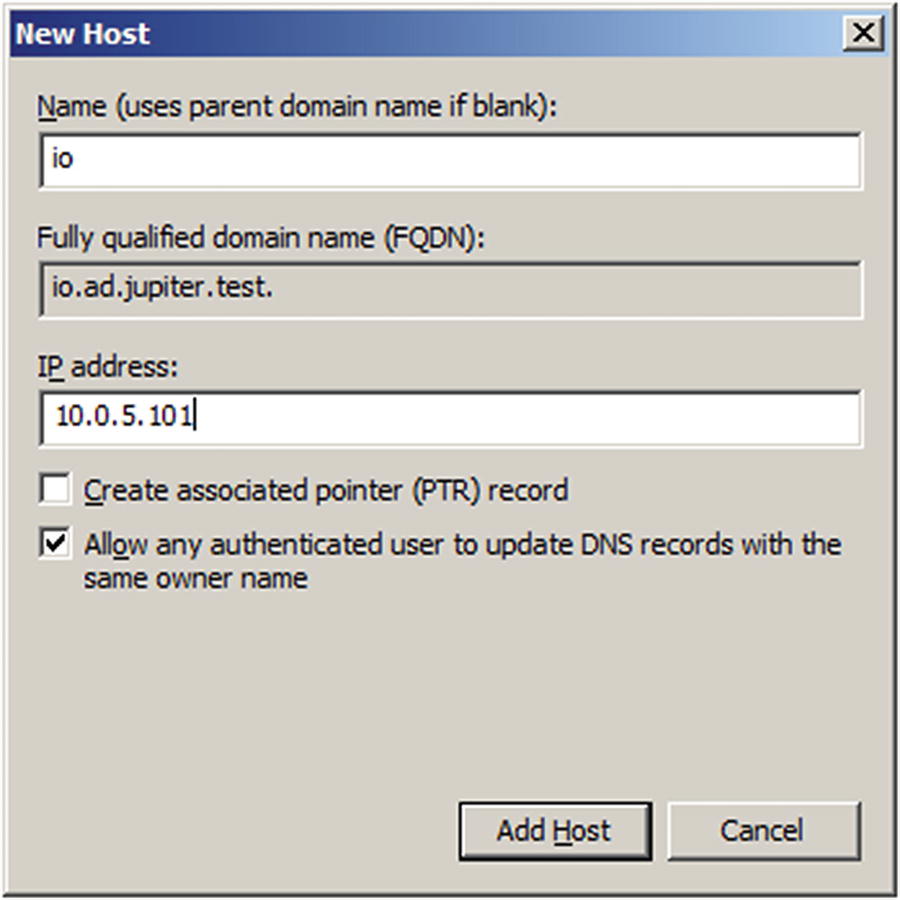
Adding a new host on Windows Server 2008 R2
The user can add both the forward zone A record and the reverse zone PTR record in one step. However, if this is done immediately after the server is configured, it fails. Although the DNS server installation correctly configured its forward zone, it does not configure the reverse zone. Right-click on the Reverse Lookup Zone from the navigation pane in DNS Manager, then select New Zone to launch the New Zone Wizard (Figure 6-7). Create a primary zone storing the result in Active Directory. Choose where it should be replicated - to all DNS servers in the forest or all DNS servers in the domain. Specify the network for the reverse zone, either through the ID or the zone name.
Windows Server, by default, allows for secure dynamic updates for DNS zones integrated with Active Directory; systems can then update their own DNS record, and DHCP servers can update PTR records.

Creating a reverse lookup zone in Windows Server 2008 R2
Scripting Windows DNS
Sample file dns_data.txt with DNS data for a network
Windows batch script DNS.bat to read a text file and add entries to a Windows DNS server
The host name in the %%j variable and the last octet of the IP address, in the %%i variable, are passed to dnscmd. This is a command-line utility for managing DNS servers on Windows. The /RecordAdd switch is used to add new records to a DNS zone. The first argument is the name of the zone, and the second is the name of the record to be added. The /CreatePTR switch is used so that both the forward zone and reverse zone entries are made. The command concludes with the type of record - an A address record, and its value, the IP address of the host. More information about the syntax of dnscmd is available by running it from the command line with the /? switch.
DNS Configuration
A Windows DNS server can forward requests to different servers, either on a per-zone basis or for all unknown requests. It can use stub zones or be configured as a slave to use data from other servers; it can also use recursion. Windows servers include a robust logging system.
Conditional Forwarding and Server Forwarding
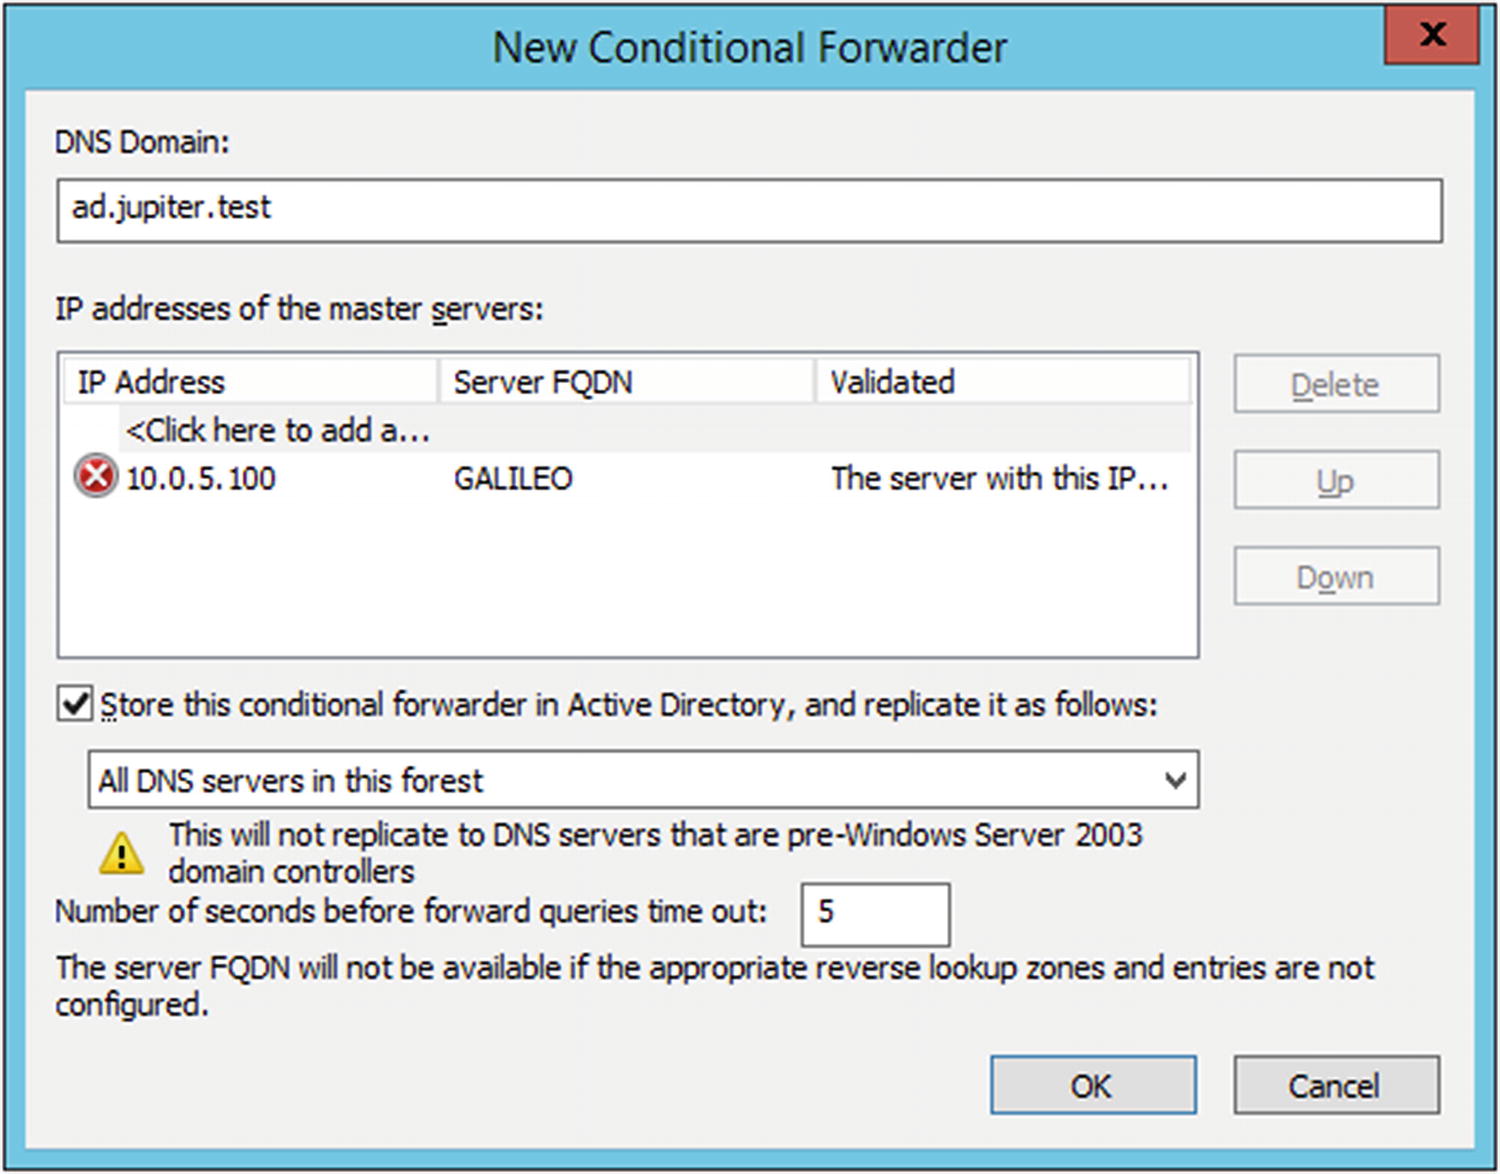
To forward requests for a DNS domain to a different server, from DNS Manager, select Conditional Forwarders in the navigation pane, then right-click and select New Conditional Forwarder (Figure 6-8). Enter the name of the DNS domain to be forwarded, and choose the IP address to receive the forwarded requests.
The server may initially be unable to validate the server, as seen in Figure 6-8. Once the forwarder is in place, from the navigation pane, right-click on the forwarder, select Properties, then Edit. The server is listed as validated.
Setting up a new conditional forwarder in Windows Server 2012 R2
Windows uses server-level forwarding for DNS domains not explicitly provided with a conditional forwarder. From the navigation pane of the DNS Manager (Figure 6-5), right-click on the name of the server, then select Properties. From the Forwarders tab, select one or more forwarders; these are used for queries that the server cannot answer. If none of the forwarders can answer the query, the server may use the root hints; this is the default behavior.
The root hints file can be updated from the Root Hints tab on the same Properties dialog box. The root hints file itself is located on the server in C:\Windows\System32\Dns\Cache.dns and can be replaced with an updated copy from http://www.iana.org/domains/root/files .
Recursion

The properties dialog box for the DNS Server on Windows Server 2016
DNS Logging
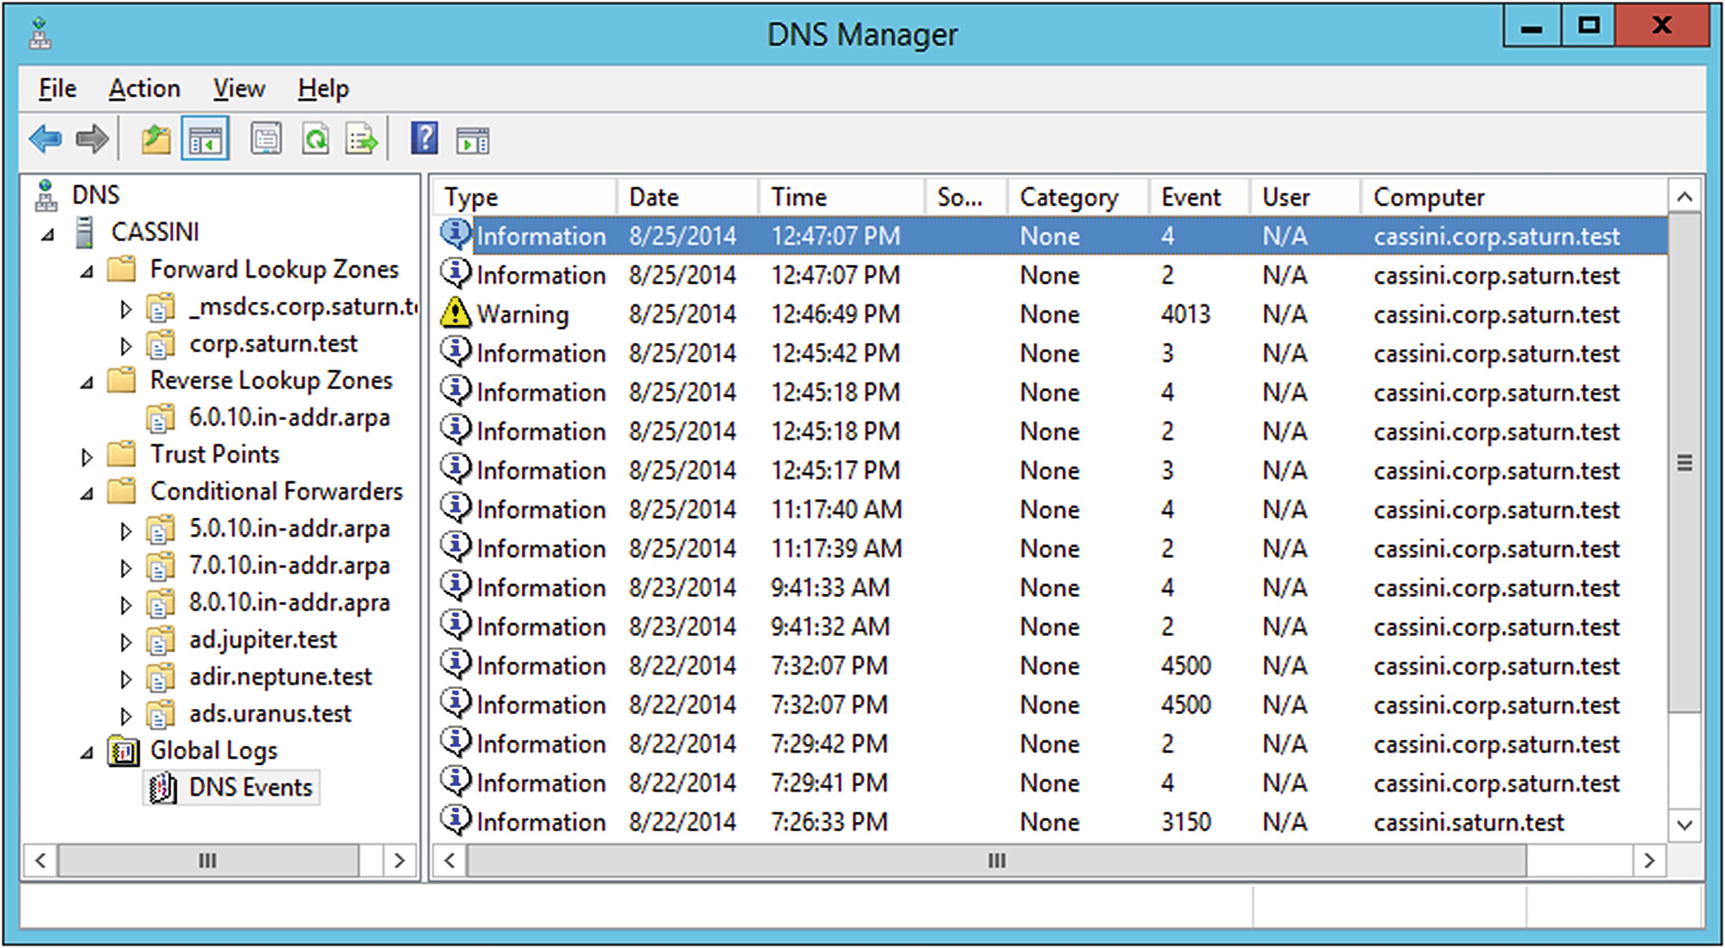
Viewing DNS logs in DNS Manager on Windows Server 2012 R2
Zone Properties
To change other settings for a zone, right-click the zone inside DNS Manager, then select Properties (Figure 6-11). The Start of Authority (SOA) tab allows the user to update the timing settings: refresh interval, retry interval, TTL, and expiration. The serial number can be manually set or simply incremented. The Zone Transfers tab on the same dialog box allows the user to control zone transfers. By default, zone transfers are prohibited; this can be overridden and zone transfers permitted to a list of known servers or to any server.
Stub Zones and Slave Zones

The Name Servers tab in the zone properties dialog box on Windows Server 2012 R2
On the Windows master, from DNS Manager, right-click on the zone to bring up the zone properties dialog box. From the Zone Transfer tab, be sure that the Windows server allows zone transfers to the BIND slave nameserver.
Because of the complexity of the DNS entries for a domain controller, it is difficult to set up a BIND master for an Active Directory installation. A Windows Server acting as a stand-alone DNS server (without Active Directory) can easily be configured as a slave to a BIND DNS server (or another Windows DNS server for that matter). To do so, create a new zone, specifying the type as a secondary zone. Provide the name of the zone and the IP addresses of one or more master servers.
Managing a Windows Domain
The key benefit of an Active Directory structure is the ability to manage computers and users. With a domain controller built, the next steps are to add these computers and users to the domain.
Adding Systems
Before adding a new system to a domain, ensure that the system is on the network, that it is using the DNS server provided by Active Directory, and that it can reach the Active Directory domain controller. It is simplest if the system to be added to the domain already has a DNS entry in the DNS server.
Adding Windows Systems to a Windows Domain
Windows systems can be added to a Windows domain without additional software. The process of joining the domain is like the method used to set the system’s domain name. Start the Control Panel on the system; navigate System and Security ➤ System; then from the Computer name domain and workgroup setting section, select Change Settings. On the resulting System Properties dialog box (Figure 6-13), use the option to rename the computer or change its domain or workgroup. Provide the domain name. A dialog box appears asking for an account name and password on the domain; provide the credentials. Once the system authenticates, the user is welcomed to the domain; the system then needs to be restarted.
Adding OpenSuSE Systems to a Windows Domain
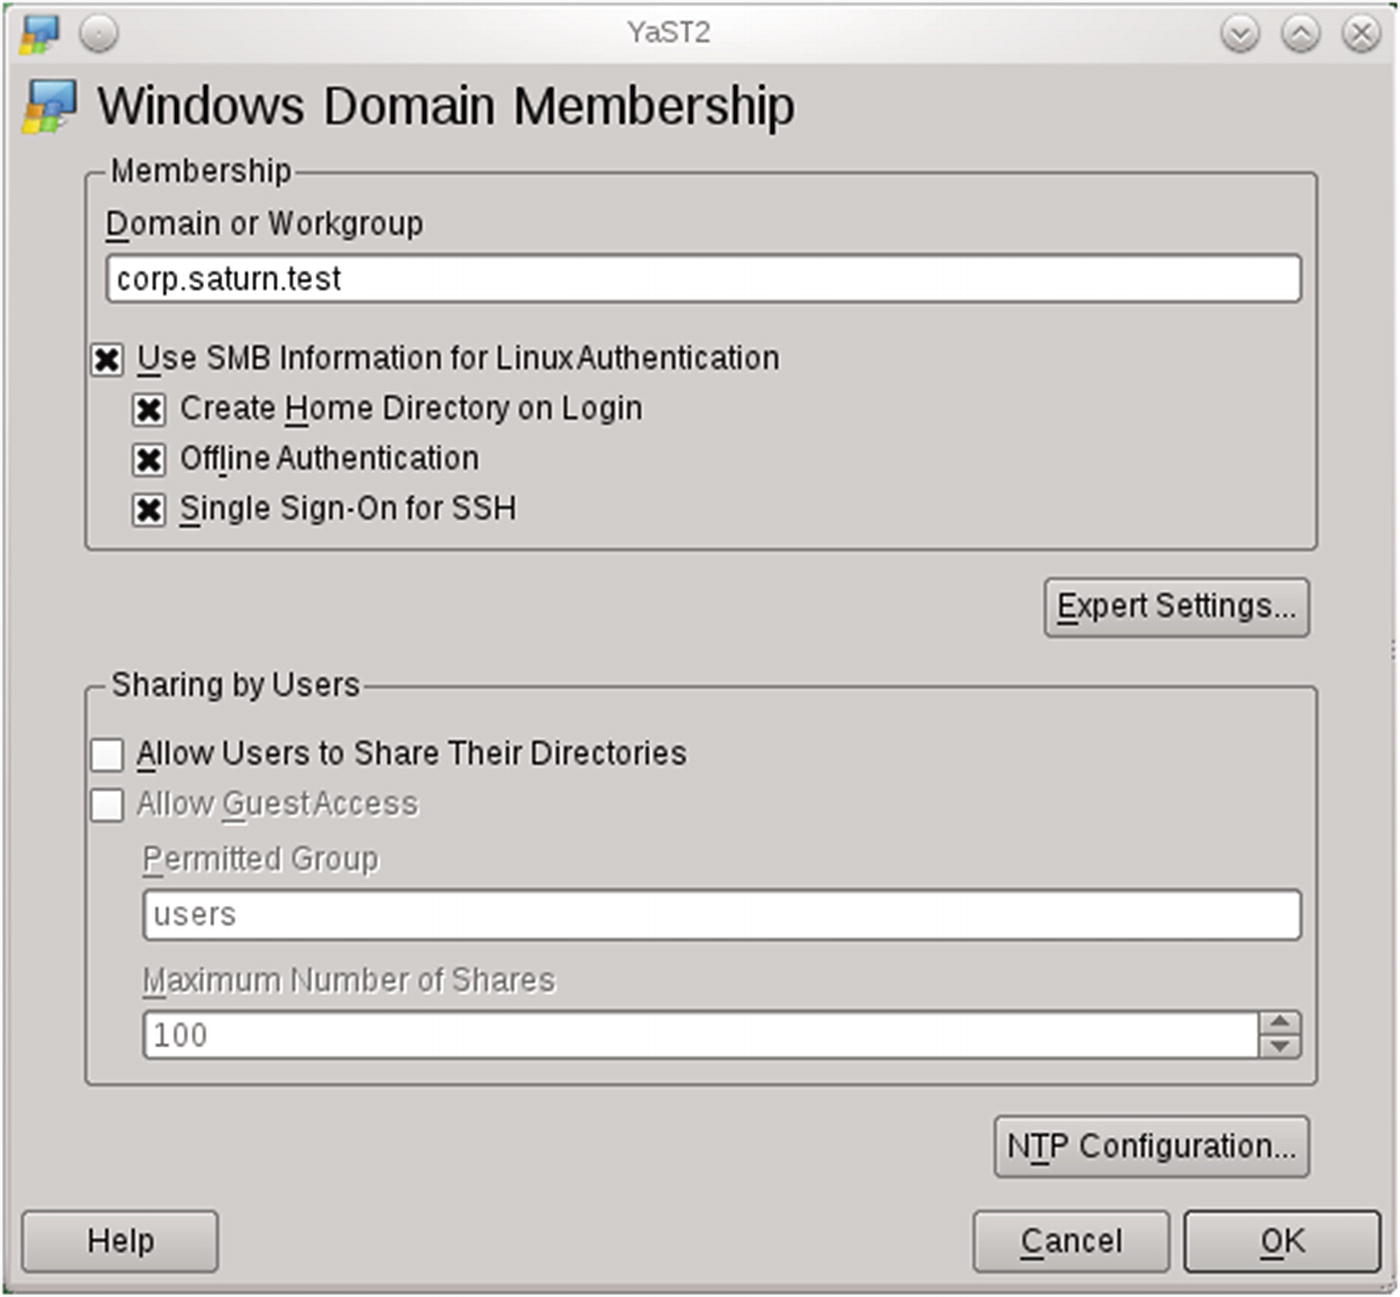
The Windows Domain Membership configuration module from YaST on OpenSuSE 11.4
If additional software packages are necessary, these will be downloaded and installed. When this completes, the user is prompted to provide the username and password for a domain user. When these are provided, the system is joined to the domain.
Adding Linux Systems to a Windows Domain Using PowerBroker Open
It is possible to add CentOS, Mint, and Ubuntu systems to a Windows domain. One way to do so is to install and configure Samba, but this is somewhat complex.
The open source tool PowerBroker Open ( https://github.com/BeyondTrust/pbis-open/wiki ) simplifies the process considerably. Start by downloading an appropriate version and package ( https://github.com/BeyondTrust/pbis-open/releases ); for Mint or Ubuntu systems, it is a .deb file, while for a CentOS system it is an .rpm file. Different versions are available for different architectures (x86 or x86_64). Run the file (as root) to start the installer.
The installation process with other distributions is similar.
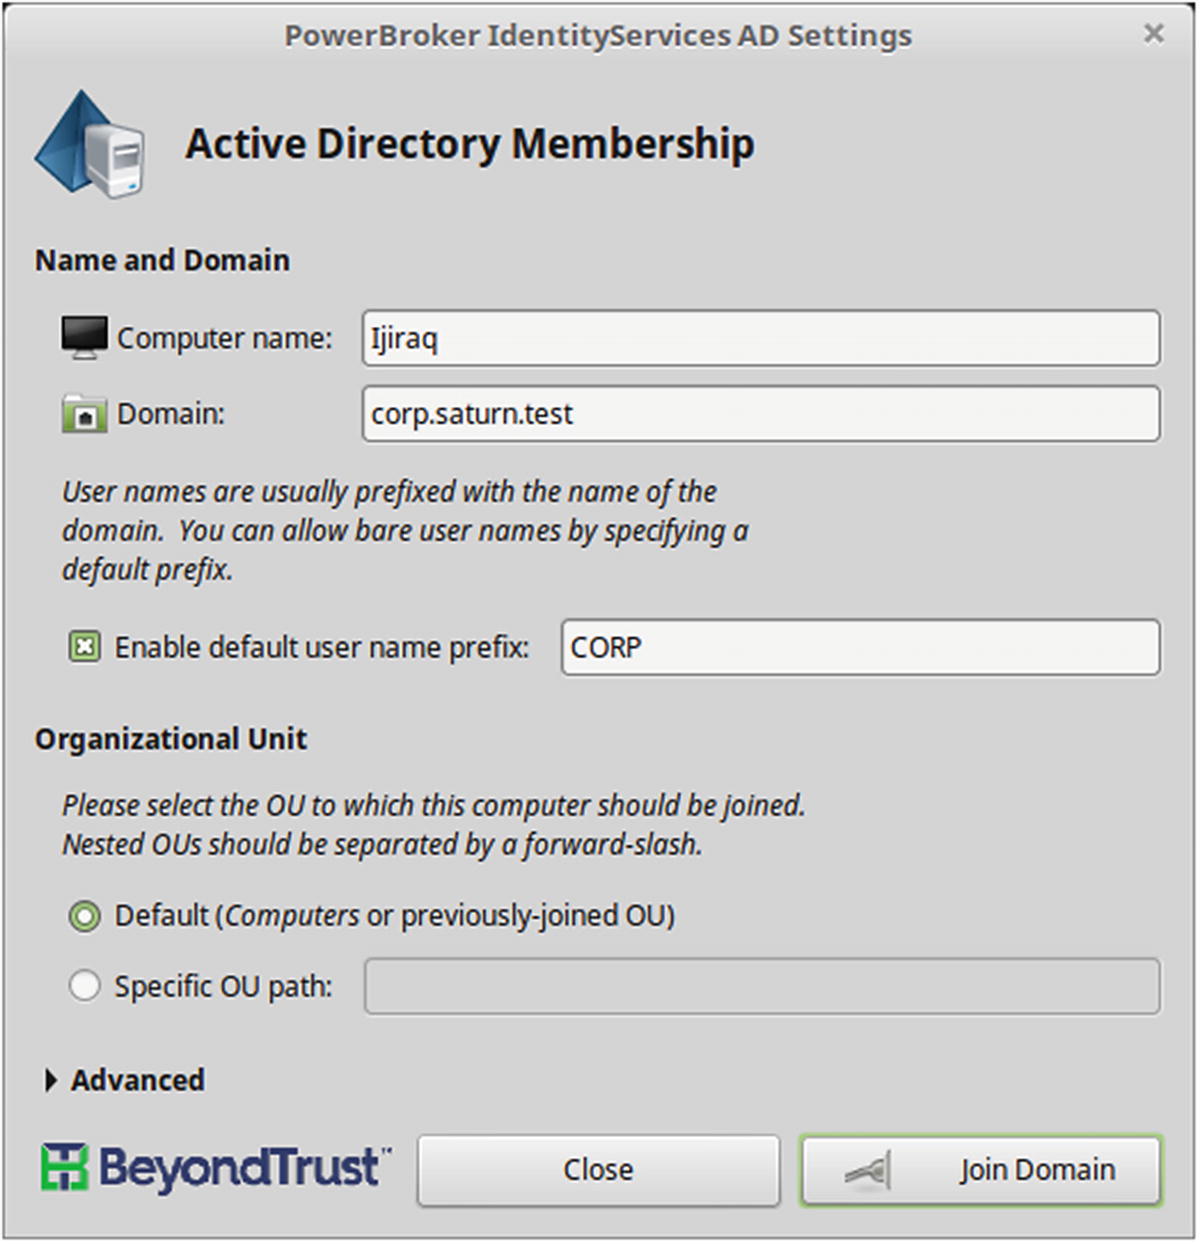
The graphical tool to join a domain from Power Broker Open 8.5.3.293 shown on Mint 18.1
After the domain is selected, the graphical tool asks the user for credentials with administrative privileges on the Windows domain. When the system is joined to the domain, a restart is required.
When referring to a domain user, the proper syntax on a Linux system is domain\username; however when this is used on the command line, the backslash needs to be escaped, hence the double backslash on the command line.
Other useful pbis commands include pbis enum-users, which lists the Active Directory users on the systems; and pbis status, which provides details of the domain.
This line allows all members of the group corp\domain^admins privileges to use sudo.
Log out, then log in as the user corp\administrator or some other domain administrator. Verify that the Bash prompt is set correctly, and this user can use sudo to perform system administration tasks.
Adding Users
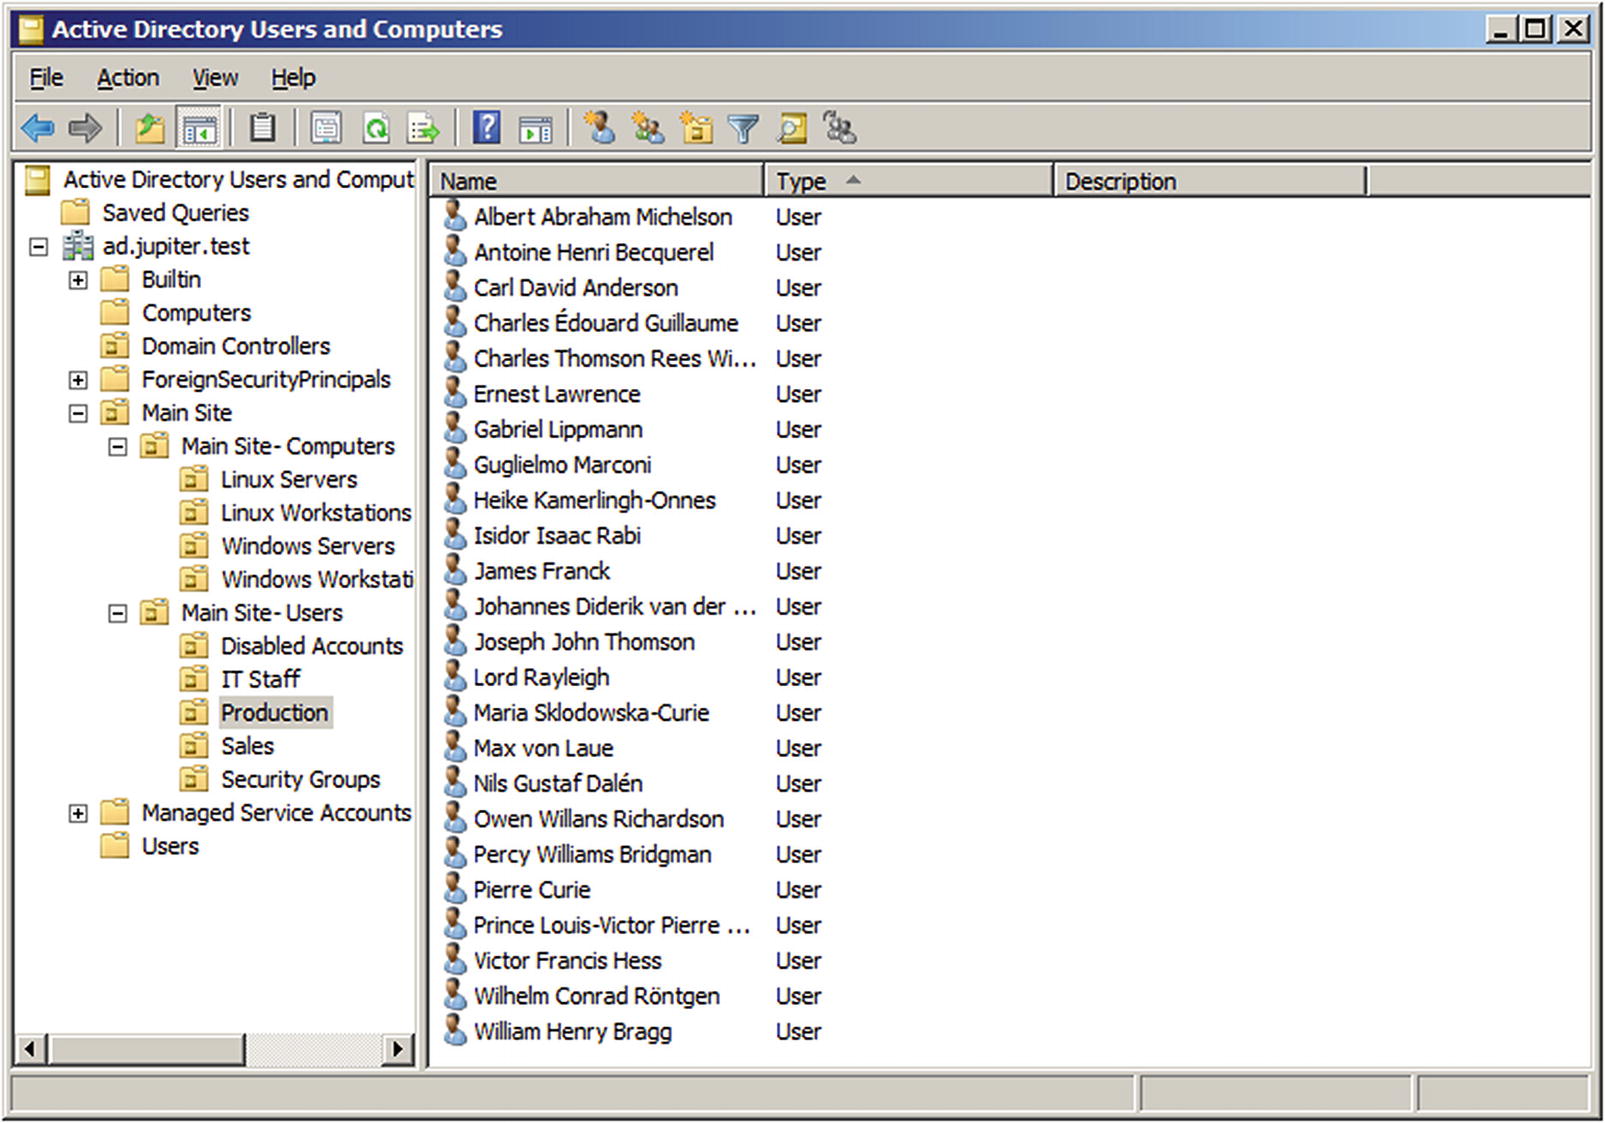
Users and computers in the domain can be managed with the tool Active Directory Users and Computers (Figure 6-14). On a Windows Server 2008 R2 system, launch the tool from the Start Menu, navigating Start ➤ Administrative Tools ➤ Active Directory Users and Computers. For Windows Server 2012 or later from Server Manager (Figure 6-1) select Tools, then Active Directory Users and Computers. On Windows Server 2012, it is also available directly from the Start Menu, while on Windows Server 2012 R2 or 2016, it is available from the Administrative Tools entry on the Start Menu. The tool can also be started from a terminal with dsa.msc.

Active Directory Users and Computers on Windows Server 2012 R2
There are several default security groups present. The Domain Users group contains the users on the domain. Users in the Domain Admins group have administrator-level access on domain controllers, domain servers, and domain workstations; members of the Enterprise Admins can administer all the domains in the forest.
Not every group listed under users refer to people; there is a group for domain computers and a group for domain controllers.
To add a new user, from the navigation pane in the Active Directory Users and Computers right-click on users; select New, then User. Enter the name of the user and an account name; then choose a password for the new user. By default, the user must change the password at their next logon.
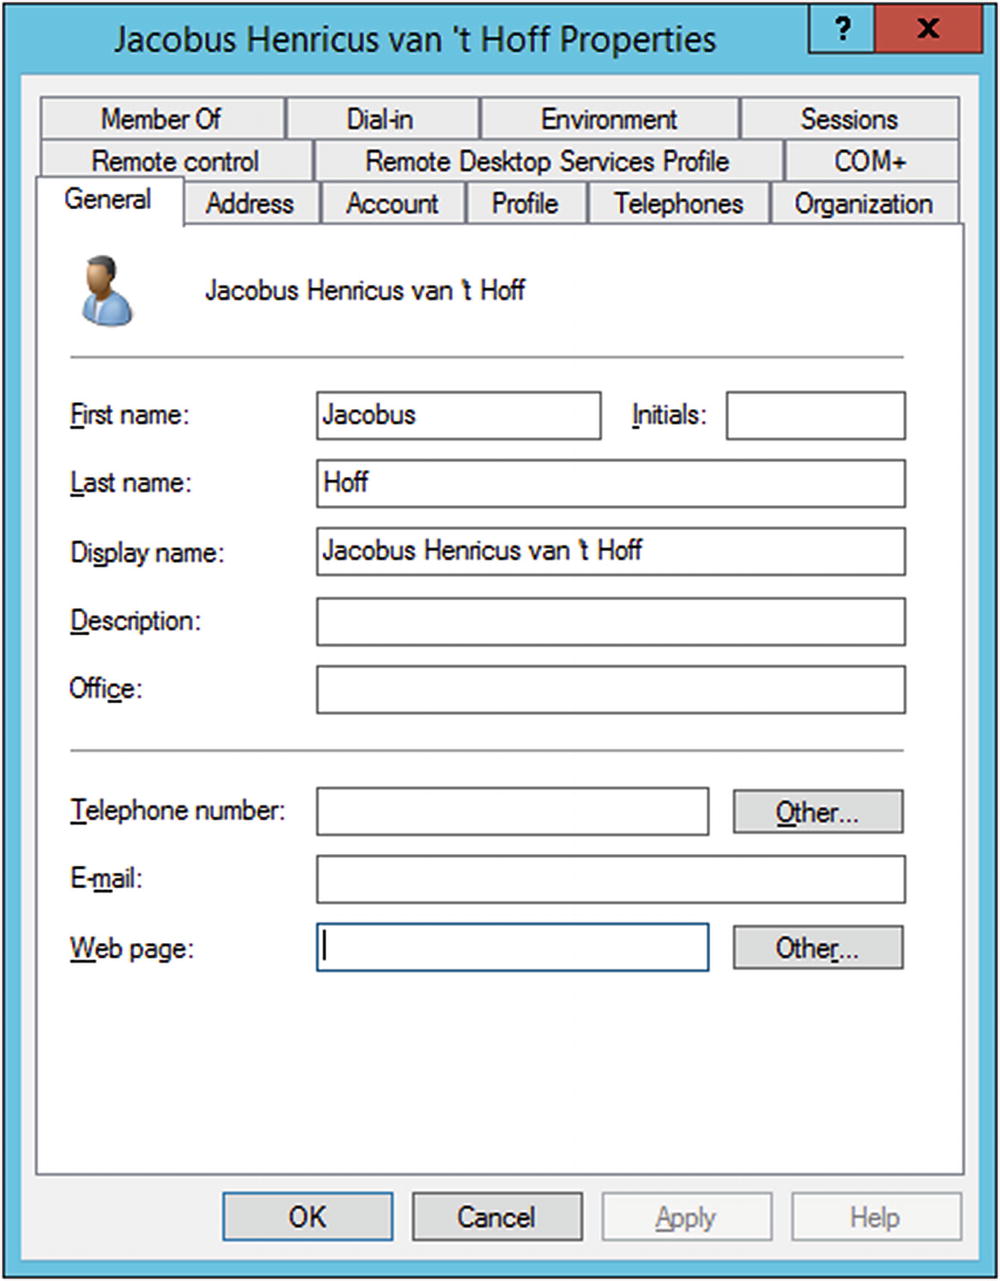
Properties of a user on Windows Server 2012 R2
Scripting and PowerShell
Although the graphical process works well when adding a single user, adding many users is better handled with a script. PowerShell includes an Integrated Scripting Environment (ISE); this is installed by Default on Windows Server 2012 and later but is an additional feature on Windows Server 2008 R2. To install it, navigate the Start Menu through Administrative Tools ➤ Server Manager. From Server Manager, expand the navigation pane for the server, right-click on Features, then select Add Features. From the resulting menu, select Windows PowerShell Integrated Scripting Environment (ISE) and install.

Windows PowerShell ISE on Windows Server 2016, showing the script pane (CTRL+R) and the commands add-on
The “Hello World” PowerShell script Testing.ps1
There is no need for a print statement or an echo statement; putting a string alone on a line causes it to be printed when the PowerShell script is run. Save the result as say “Testing.ps1”. The script can be executed directly from the PowerShell ISE by pressing F5.
In this mode, local scripts can be run, but scripts downloaded remotely must be signed. This is the default policy on Windows Server 2012 R2 and Windows Server 2016. With this change, the Hello World script runs as expected.
The file Users.txt, which contains a list of user names to be added to a domain
The PowerShell script useradd.ps1 to read a file of user names and create the corresponding user in Active Directory
The script begins by using Get-Content to read the file Users.txt into the array $nameslist. It then loops through each name in the list, pulling out the first name, the last name, and building a username formed by taking the first letter of the first name and appending it to the last name, all in lower case.
Returning to the script, provided a backtick is the last character on a line, the command is continued over the subsequent line; this makes the result much easier to read. PowerShell also continues a line when it cannot be complete at that point: for example, if a line contains an open parenthesis and a following line contains the closing parenthesis.
By default, PowerShell on Windows Server 2008 R2 does not load the New-ADUser cmdlet.
Organizing a Domain
In Active Directory, an organizational unit (OU) is a container for users, groups, and/or computers. OUs can be created around roles, around geography, around the structure of the company/organization, or around any other convenient set of distinctions.
- Main Site
- Main Site- Computers
Linux Servers
Linux Workstations
Windows Servers
Windows Workstations
- Main Site- Users
Disabled Accounts
IT Staff
Production
Sales
Security Groups
OU structure implemented in Windows Server 2008 R2
When creating an OU, the checkbox “Protect container from accidental deletion” is enabled by default. To delete a protected OU, start Active Directory Users and Computers; from the main menu, navigate View ➤ Advanced Features. This shows additional elements in the navigation pane. Right-click on the OU that is to be deleted, then select Properties. From the Object tab, uncheck the box that protects the object from accidental deletion. The OU can then be deleted by right-clicking on it and selecting Delete.
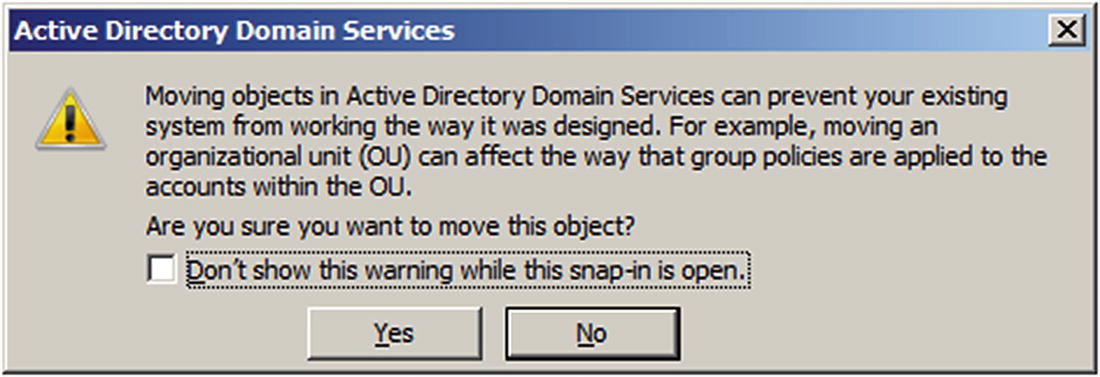
Warning box from moving objects in Active Directory, from Windows Server 2008 R2
Groups and Delegation
A user or computer can only be a member of a single OU; however, they can be part of multiple groups. Groups come in two types: distribution groups, primarily used for email distribution lists; and security groups, used to manage permissions and rights.
To demonstrate the power of groups, create a new group in the Security Groups OU created earlier. To do so, right-click on the OU, select New ➤ Group. Provide the name of the group, say Sales Admins. There are three options for the scope of the group: domain local, global, and universal; select the default global scope. For the group type, select Security.
To add users to the newly created group, select a user from Active Directory Users and Computers, then right-click; select Add to a group and provide the group name.
Create, delete, and manage user accounts
Reset user passwords and force password change at the next logon
Modify the membership of a group
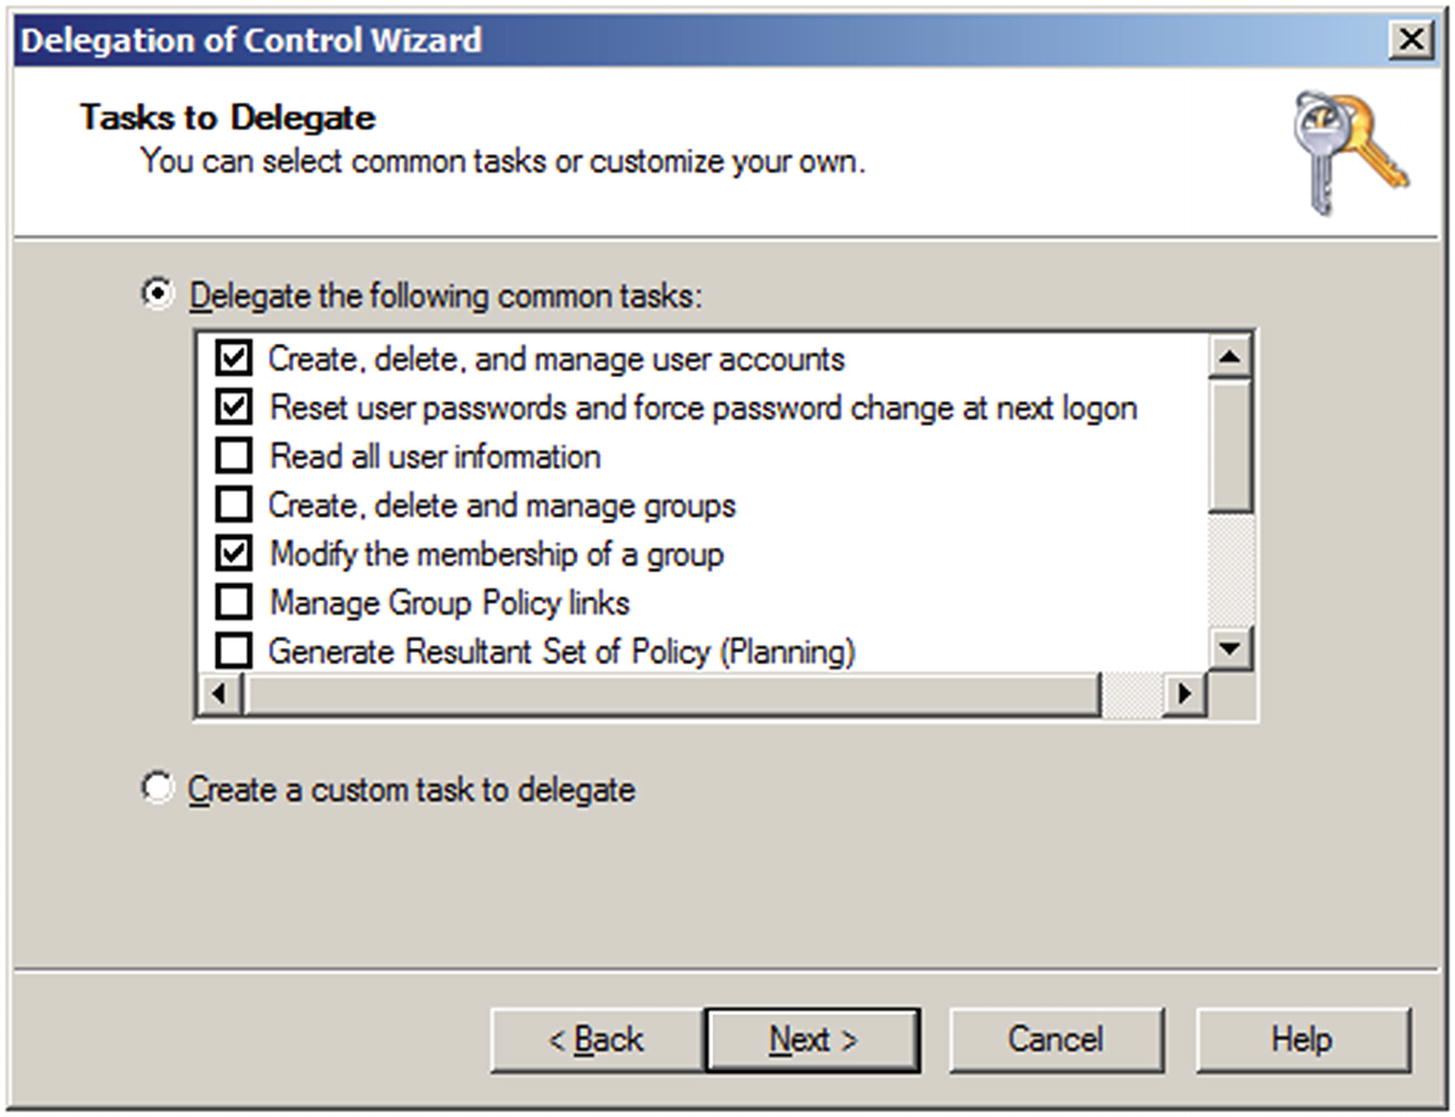
The Delegation of Control Wizard on Windows Server 2008 R2
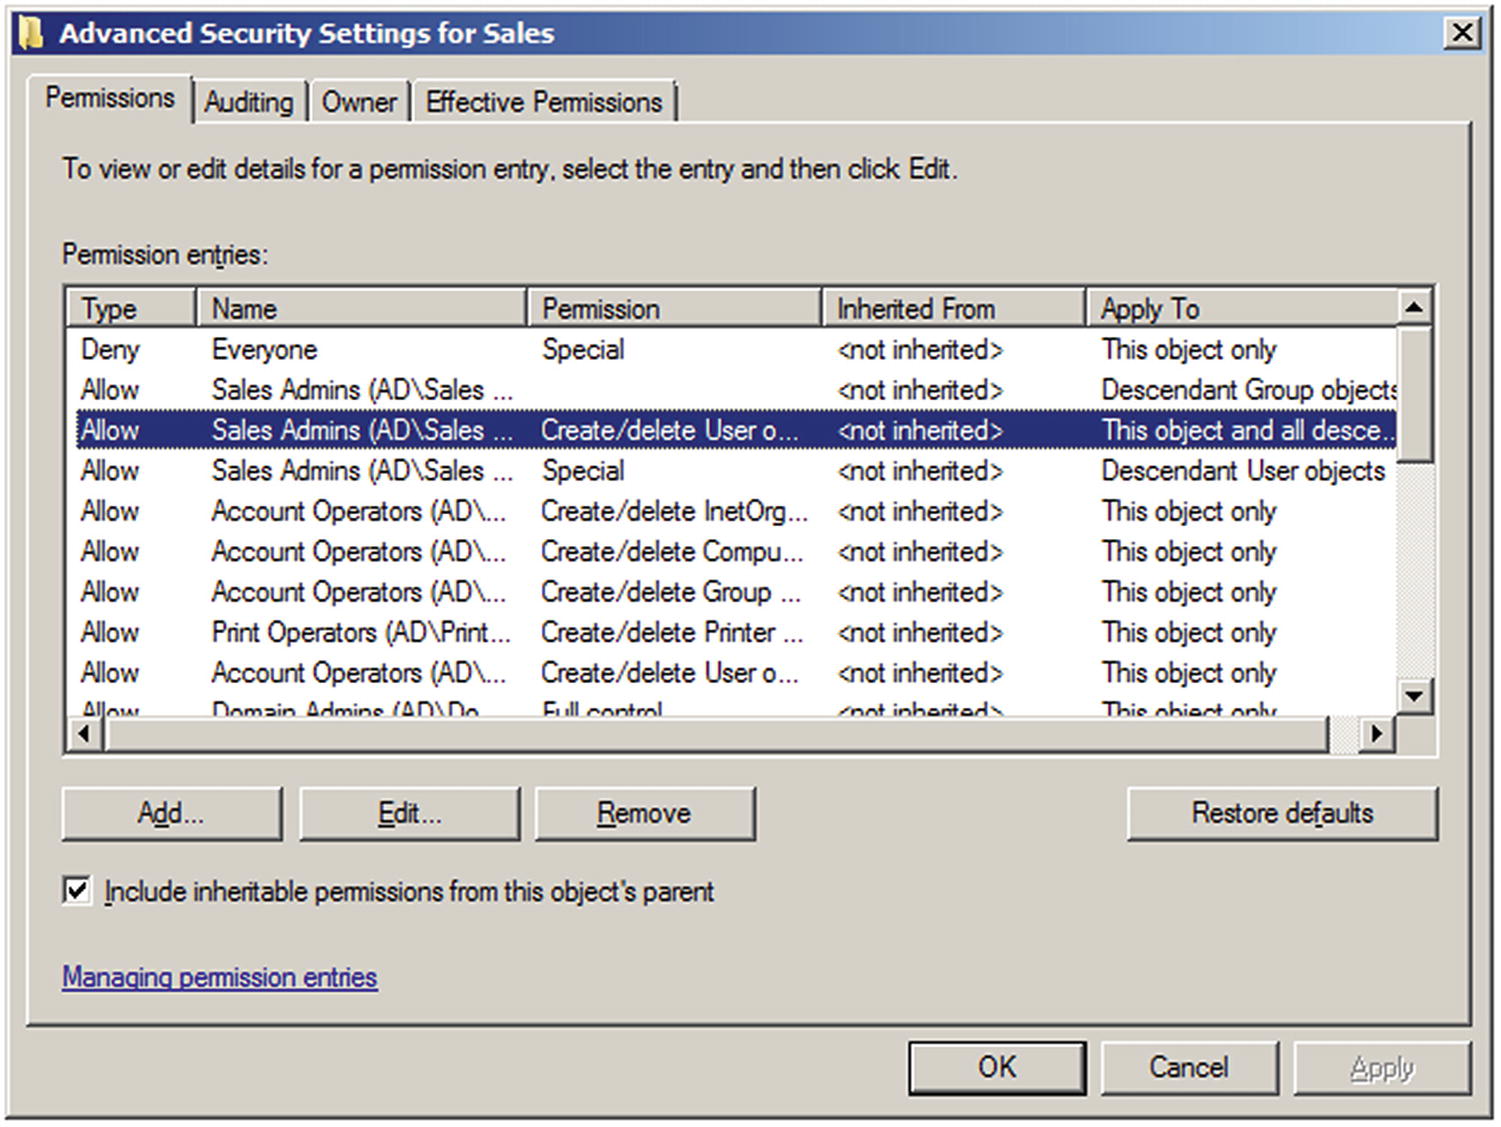
Advanced Security Settings for the OU Sales, showing the authority delegated to members of the Sales Admins group, on Windows Server 2008 R2
Remote Server Administration Tools
Once the Delegation of Control wizard completes, the members of the Sales Admins group have these additional privileges, but it is not clear how these are to be exercised. Domain members that are not domain administrators do not have privileges to log on locally to the domain controller, so how can the members of this group perform administrative activities?
On Windows 7 systems, once the tool is installed, its components must be enabled. From the Control Panel, navigate Programs ➤ Turn Windows features on or off under Programs and Features. From the Windows Features dialog box, select remote administration snap-ins and tools. Administrative tools are not shown on the Start Menu for all users; this is done on a per-user basis. Right-click the Start Menu; select Properties. On the Start Menu tab, click Customize. From the Customize Start Menu dialog box, scroll down to System Administrative Tools and select Display on the All Programs menu and the Start menu. Click OK.
On Windows 8 or 8.1, the components are enabled automatically and an entry for Administrative tools placed in the Start Menu. That item may not be visible though, until the user right-clicks on the Windows 8 Start Menu and selects All apps.
On Windows 10, the Windows Update service must be running to install Remote Server Installation Tools; if it was disabled during setup to prevent automatic installation of updates (cf. Chapter 1) it needs to be enabled. The components appear in the Start Menu in the group Windows Administrative Tools.
If a member of the Sales Admins group is logged on to a domain workstation, they can use the Active Directory Users and Computers tool installed on that workstation to make allowed changes using the same interface that a domain administrator might use on a domain controller.
Group Policy
Group policies are used to create and enforce different policies, including security-related policies. Group policies are either local to the machine or are based on Active Directory. To view the local group policy settings on a system, run the program gpedit.msc as an administrator; this can be run either from the command line or from the run box.
Local group policies
Site-linked policies
Domain-linked policies
OU-linked policies
In the case of overlapping policies, whichever is written last is the one that is applied. When multiple policies are assigned at the same level, they are executed as they appear in the graphical interface in reverse order, from the last to the first. In general, it is best to work on group policies at the site, domain, or OU level. Local group policies would need to be manually replicated on individual machines and do not take advantage of the ability to use Active Directory to manage many systems at once.
The core tool for group policy is the Group Policy Management tool (Figure 6-21). It is available from Server Manager; in Windows Server 2008 R2 it is listed as a feature, while in Windows Server 2012 or later it is available in the tools list. Group Policy Management can also be launched from the Start menu, under administrative tools.
To view a group policy, from the Group Policy Management tool, expand the navigation pane through Group Policy Management ➤ Forest: [Your Forest name] ➤ Domains ➤ [Your Domain Name] ➤ Group Policy Objects. There are two pre-built policies, named “Default Domain Controllers Policy” and “Default Domain Policy.” Select the Default Domain Policy, and view the Setting Tab. By default, the user is prompted with a warning stating that content within this application is being blocked by the Internet Explorer Enhanced Security Configuration.2
This policy sets, for example, the password requirements and lockout thresholds that are applied to the domain.
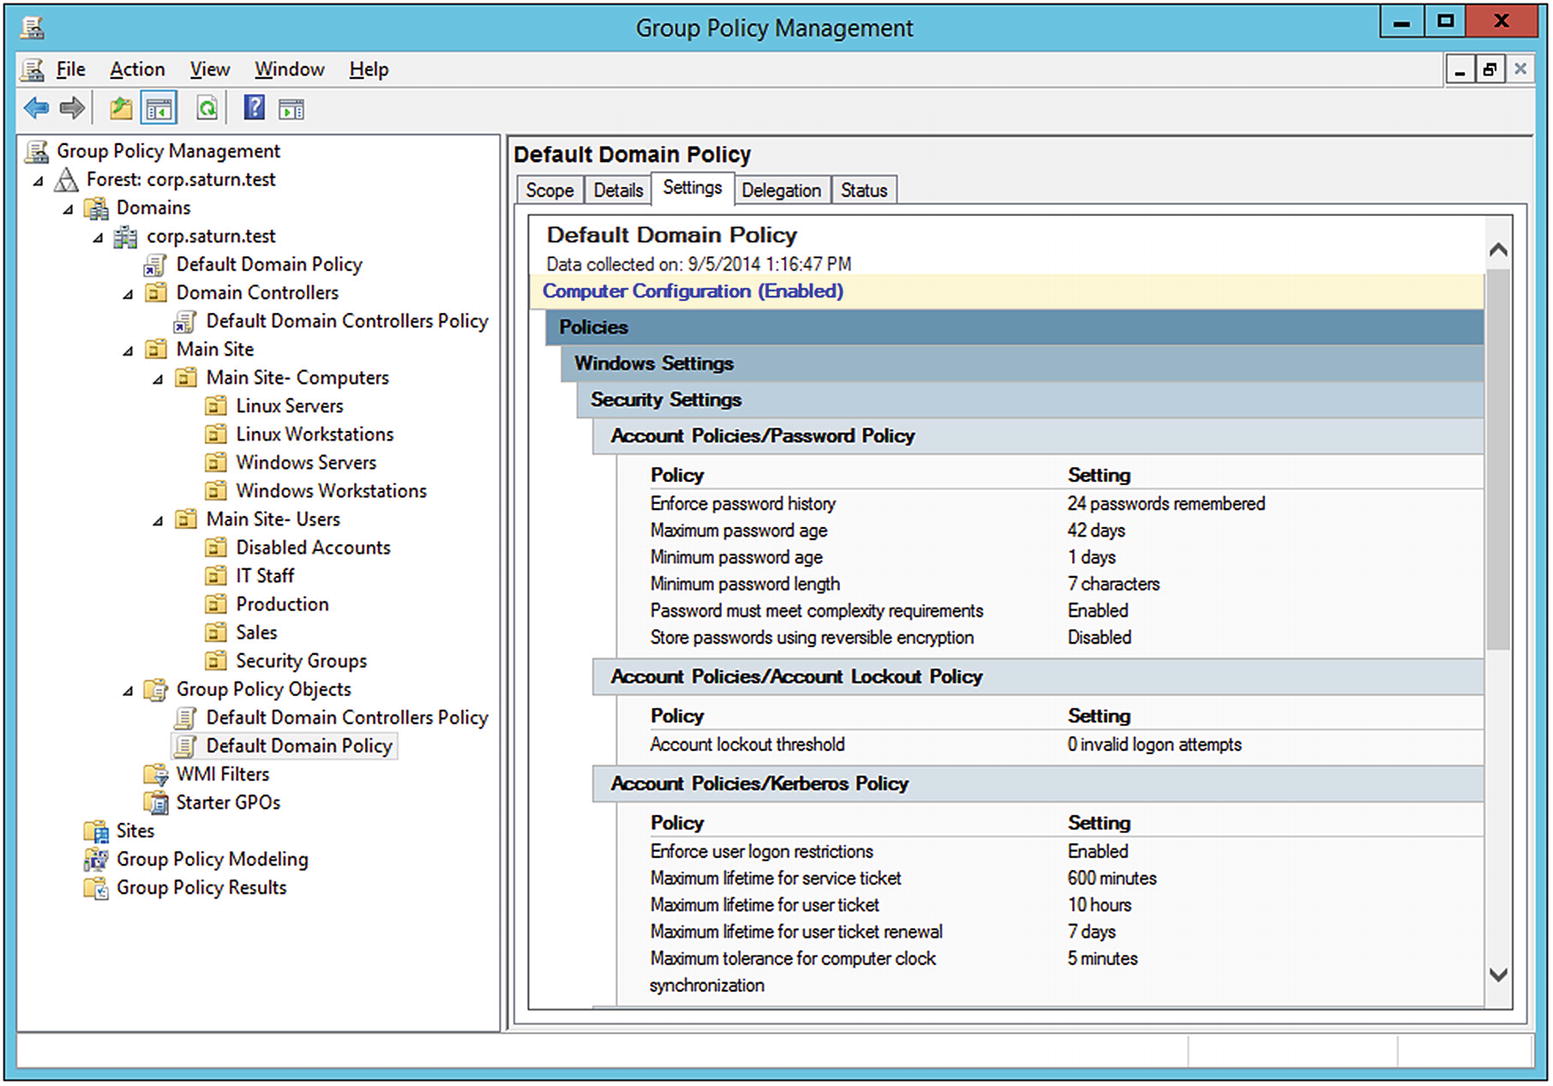
The Group Policy Management Tool on Windows Server 2012 R2, viewing the settings for the default domain policy
Group policy objects (GPOs) are pulled by clients from the server. This happens on a regular basis, but it is not immediate. Group policy settings can be updated manually on a single system by running the command gpupdate from a command prompt on that system. Systems also update their GPO settings on user login, so if a domain user logs out and then logs back on, then any new policy settings will be applied.
Group Policy Example: Directory Creation
Group policy can be used to configure the system and accounts in a wide range of ways. For example, it is possible to use group policy to automatically create a directory on the desktop for each user who logs in, say the directory %USERPROFILE%\Desktop\Tools.
To create a new group policy object, right-click on Group Policy Objects in the navigation pane, then select New. Give the new GPO a descriptive name: say “Desktop Tools Directory.” Because policies can be quite complex, an organization may create template policies, called starter GPOs, which can be used as the basis of a new policy; this is not necessary in this example.

The New Folders Dialog Box from the Group Policy Management Editor, on Windows Server 2012 R2
This completes the specification of the rule. The Group Policy Management Editor does not contain an option to save the rule; it is automatic. Once the rule’s options are set, quit the editor.
Although the rule has been created, it has not been applied to any members of the domain. Earlier in the chapter, organizational units were created with computers in one OU, subdivided by system type; and users in a second OU, subdivided by role. To apply this policy to the members in an OU, right-click on an OU, say Main Site- Users, then select Link an Existing GPO. Choose the newly created GPO from the list. At this point, the GPO is applied to the users in that OU.
Group Policy Example: Software Restriction Policies
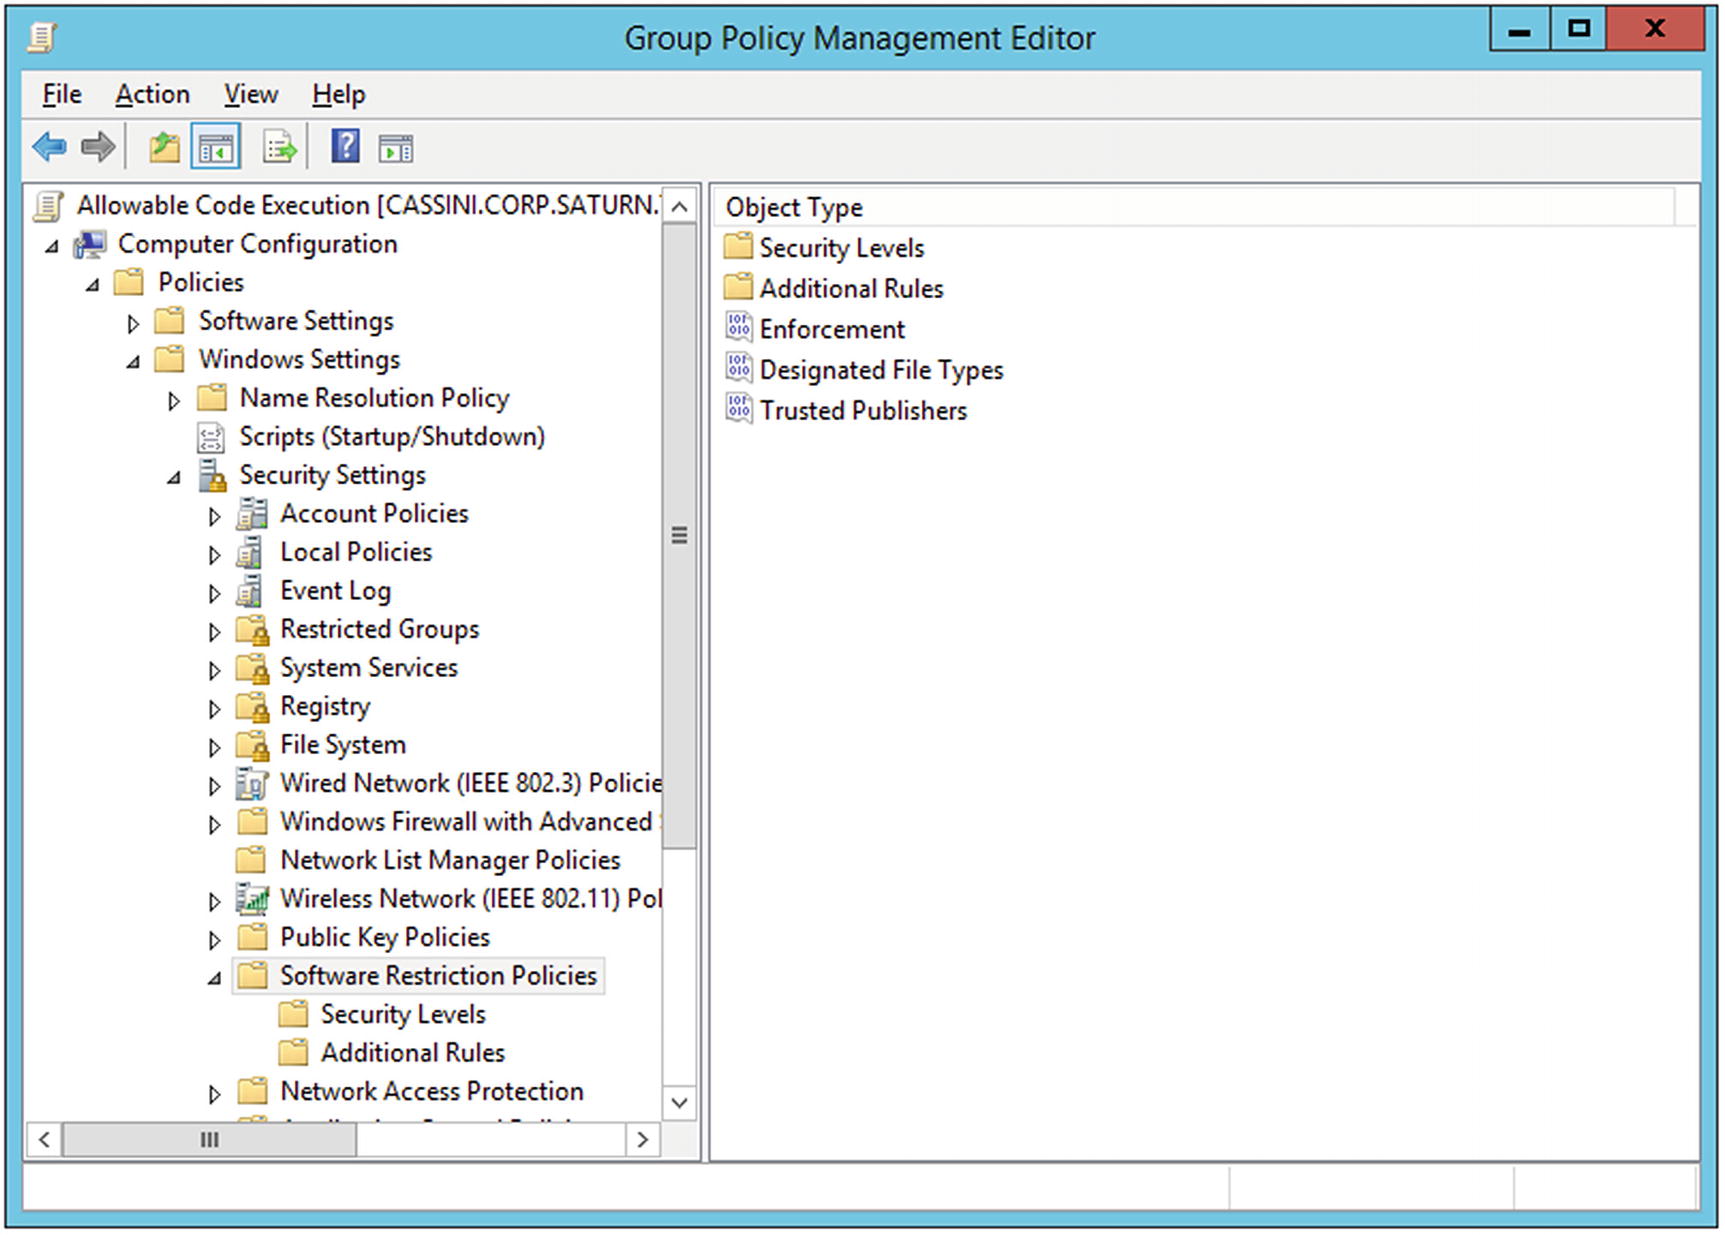
Group policy can be used to enforce security settings. For example, it is possible to limit users so that they can only execute programs from defined directories. Create a new GPO with the name Allowable Code Execution and edit it. From the navigation pane in the Group Policy Management Editor (Figure 6-23), navigate Computer Configuration ➤ Policies ➤ Windows Settings ➤ Security Settings ➤ Software Restriction Policies, then right-click and select New Software Restriction Policies.
Select Security Levels; three are available - Unrestricted, Basic User, and Disallowed. These are the allowable default policies, and the default security level is set to be Unrestricted. Double-click on Disallowed and choose Set as Default. In this setting, without an explicit allow rule allowing program execution, no program can run. When the setting is changed, the user is warned that the new setting is more restrictive than it was previously and could result in programs failing to run.
Group Policy Management Editor for the Allowable Code Execution Policy using software Restriction Policies, on Windows Server 2012 R2
To allow a user to run programs of their own choosing, add the directory %USERPROFILE%\Desktop\Tools and set permissions on it to be unrestricted; this is the directory the previous group policy automatically creates.
Return to Software Restriction Policies in the Group Policy Management Editor; select Enforcement. The resulting dialog allows the user to select how the restriction policies should be implemented. Apply the policies to all software files and to all users.
The collection of designated file types is used to determine what the policy considers to be an executable file. By default, shortcuts are considered executable files, meaning that they no longer function unless located in a permitted directory. As this is probably too restrictive, select the LNK file type, and remove it from the list; this allows links to function as expected.
This informs the users on iapetus that the system will shut down in 600 seconds or in 10 minutes.
When the system reboots, standard programs like Internet Explorer, Paint, or Calculator all work as expected. However, if a user tries to run a program from elsewhere, it is blocked with a message that varies slightly depending on the version of Windows. If the program is copied into the directory Desktop\Tools, however, it can run.
Group Policy Example: Windows Defender
Another useful security-related group policy controls Windows Defender, the antivirus tool from Microsoft. If the policy Computer Configuration ➤ Policies ➤ Administrative Templates ➤ Windows Components ➤ Windows Defender ➤ Turn Off Windows Defender is set to enabled, then Windows Defender will be disabled. Setting it to disabled or leaving it unconfigured means that Windows Defender will run.
Adding a Second Domain Controller
Because of the importance of the domain controller to an organization, a domain should never have just one domain controller. To add a second domain controller, start with another Windows server; set the hostname and IP address for the system and join it to the domain.
Adding a second Windows Server 2016 as a domain controller
Replication ensures that changes made on one domain controller are replicated to all others; this can be verified by inspection on the new domain controller.
Notes and References
Windows Server 2012 Inside Out, William Stanek. Microsoft Press, January 2013.
Mastering Windows Server 2012 R2, Mark Minasi, Kevin Greene, Christian Booth, Robert Butler, John McCabe, Robert Panek, Michael Rice, and Stefan Roth. Sybex, December 2013.
Not only do these books cover Windows Server 2012, they contrast the behavior of Windows Server 2012 with Windows Server 2008.
Installing Active Directory
NetBIOS names actually have 16 characters, but on Windows systems the last character is reserved for the resource type ( http://technet.microsoft.com/en-us/library/cc779578.aspx ). The NetBIOS specification allows for case-sensitive names ( http://msdn.microsoft.com/en-us/library/dd891456.aspx ), but in practice NetBIOS names are capitalized. The NetBIOS name should be a truncated version of the host name; if not, applications may break ( https://docs.microsoft.com/en-us/windows/desktop/SysInfo/computer-names ). See also Microsoft KB 909264 ( https://support.microsoft.com/en-us/help/909264/naming-conventions-in-active-directory-for-computers-domains-sites-and ) for naming conventions.
During testing, you may be tempted to use the same top-level name for the root domain name of different domains. For example you may want to name the first domain ad.neptune.test and the second domain ad.saturn.test. This may lead to trouble, as both systems want the same NetBIOS name- AD. If both systems are together on the same network, a NetBIOS name collision results. The solution is to also use different top-level names - say ad.neptune.test and corp.saturn.test.
The inability Windows Server 2012 and later to use the top-level domain .example appears to conflict with RFC 6761 ( http://tools.ietf.org/html/rfc6761 ); section 6.5 explicitly states that “Authoritative DNS servers SHOULD NOT recognize example names as special.”
Details of the file structure for Active Directory domain controllers can be found in Chapter 24 of Windows 2012 Server Inside and Out.
DNS
For more detail on the different kinds of Active Directory records in DNS, check out Chapter 22 of Windows Server 2012 Inside Out or Chapter 6 of Mastering Windows Server 2012 R2.
The discussion of DNS, both here and in Chapter 4 is superficial. A deeper understanding requires knowing much more about delegation and recursion. The security problems of DNS are well known, and many are solved with DNSSEC, which is not even mentioned. Sorry - there isn’t room.
A nice place to learn more about batch scripting is available at Wikibooks, at http://en.wikibooks.org/wiki/Windows_Batch_Scripting . Microsoft TechNet has a summary of the various Windows command-line tools (including dnscmd) at https://technet.microsoft.com/en-us/library/cc754340.aspx .
Managing a Domain
When building a domain on a test network, you may create only the administrator account on the domain controller, and the Windows system may only have the local administrator account. When the Windows system is joined to the domain, attempts to log in as the domain administrator may be interpreted as an attempt to log in as the local administrator. To specify the domain account, be sure to use the account name domainname\administrator. To specify the local account, be sure to use the account name <name of local system>\administrator.
PowerShell
PowerShell is worth a book in its own right; a good starting place is at the Microsoft Scripting Center at http://technet.microsoft.com/en-us/scriptcenter/powershell.aspx . More information about PowerShell execution policies can be found at http://technet.microsoft.com/en-us/library/hh847748.aspx .
A good place to learn more about cmdlets in PowerShell is on the Microsoft Developer Network at http://msdn.microsoft.com/en-us/library/ms714395.aspx . Specifics about the New-ADUser cmdlet can be found at http://technet.microsoft.com/en-us/library/ee617253.aspx or http://technet.microsoft.com/en-us/library/hh852238.aspx .
PowerShell 2.0: Windows 7 SP1, Windows Server 2008 R2
PowerShell 3.0: Windows 8, Windows Server 2012
PowerShell 4.0: Windows 8.1, Windows Server 2012 R2
PowerShell 5.0: Windows 10-1507, Windows 10-1511
PowerShell 5.1: Windows 10-1607, Windows 10-1709, Windows Server 2016
Organizing a Domain
Another option for managing which applications can run on a system is AppLocker. Unfortunately, AppLocker is not available for most versions of Windows, including Home Premium and Professional; see http://technet.microsoft.com/en-us/library/ee424382.aspx . Device Guard, which can be used only with Windows 10 or Windows Server 2016, can provide even more security for applications that can run on the system; see https://technet.microsoft.com/en-us/itpro/windows/keep-secure/device-guard-deployment-guide . Even these more restrictive policies can be bypassed though; see https://enigma0x3.net/2016/11/17/bypassing-application-whitelisting-by-using-dnx-exe .
Windows servers run several services on a range of ports. Microsoft maintains a list of the port requirements for Windows Server systems at http://technet.microsoft.com/en-us/library/dd772723.aspx . See also https://msdn.microsoft.com/en-us/library/cc875824.aspx . A domain controller can often be identified on an NMap scan by the ports it uses. For example, Kerberos authentication uses TCP/88 and UDP/88, while TCP/389 is used for LDAP queries.