© Mike O'Leary 2019
Mike O'LearyCyber Operationshttps://doi.org/10.1007/978-1-4842-4294-0_7

7. Remote Windows Management

Mike O’Leary1 
(1)
Towson, MD, USA
 

Introduction

Windows allows users on one system to access and manage other systems through a range of mechanisms. Many common tools and commands allow the user to specify the target as a remote system. Some of these commands run over Server Message Block (SMB), other commands use Remote Procedure Calls (RPC), while another option is Windows Remote Management (WinRM). These require different services running on the target and different firewall settings for proper communication.

Windows Management Instrumentation (WMI) provides an interface to many of the operating system’s core components. Although WMI has been included in Microsoft Windows for many years, only in the last few years have the security implications of WMI become commonly known. WMI can be used to query the state of the system or to start/stop processes or services. WMI has the concept of events, allowing an administrator to automatically run programs or scripts in response to activities that take place on the system.

Windows servers can be built and run without a graphical user interface (GUI) and managed remotely.

Managing Systems Remotely

Microsoft provides tools that can be used to manage Windows systems remotely; these tools are particularly useful in a domain. One set of tools uses Server Message Block (SMB) and provides access to the file system, including remote file access and manipulation, as well as control over local users and the registry. The second set of tools uses Remote Procedure Calls (RPC) to interact with the remote system. Administrators can use RPC to control services, logs, and scheduled tasks on the remote system; they can also be used to obtain a shell on the remote system. Windows Remote Management (WinRM) can also be used to obtain a shell on a remote system; WinRM also provides a direct interface to Windows Management Instrumentation (WMI).

Server Message Block (SMB)

Server Message Block (SMB) can be accessed across the network in more than one way. The simplest way is directly over TCP, in which case it uses TCP/445. SMB can also be accessed via NetBIOS over TCP/IP. In this latter case, name services are provided on TCP/137 and UDP/137, datagram services on UDP/138, and data on TCP/139.

SMB Firewall Rules

To use SMB, the host’s firewall must allow the connection. One approach is to allow access over TCP/445. This can be done one host at a time, but on a domain, it is better handled through group policy. To do so, create a new group policy object and edit it. Navigate Computer Configuration ➤ Policies ➤ Windows Settings ➤ Security Settings ➤ Windows Firewall with Advanced Security ➤ Windows Firewall with Advanced Security1 ➤ Inbound Rules. Right-click to create a new rule; this results in a dialog box like Figure 7-1. From the New Inbound Rule Wizard, choose the “Port” option, and specify TCP/445. For the action, select “Allow the Connection,” configure the profile, and provide a name for the Firewall rule. Apply the policy to one or more OUs containing computers in the domain. The resulting firewall rule will be visible on the firewall settings on the domain members.

Another option is to use one of the predefined rules. There is a predefined rule entitled “File and Printer Sharing.” This rule opens more than just what is needed for SMB. In addition to TCP/445, this rule opens UDP/137, UDP/138, and TCP/139. It also opens the dynamic ports needed for RPC, it permits ICMP Echo Requests on IPv4 and IPv6, and it opens TCP/5355 for Link-Local Multicast Name Resolution for the local subnet.
../images/333712_2_En_7_Chapter/333712_2_En_7_Fig1_HTML.jpg
Figure 7-1

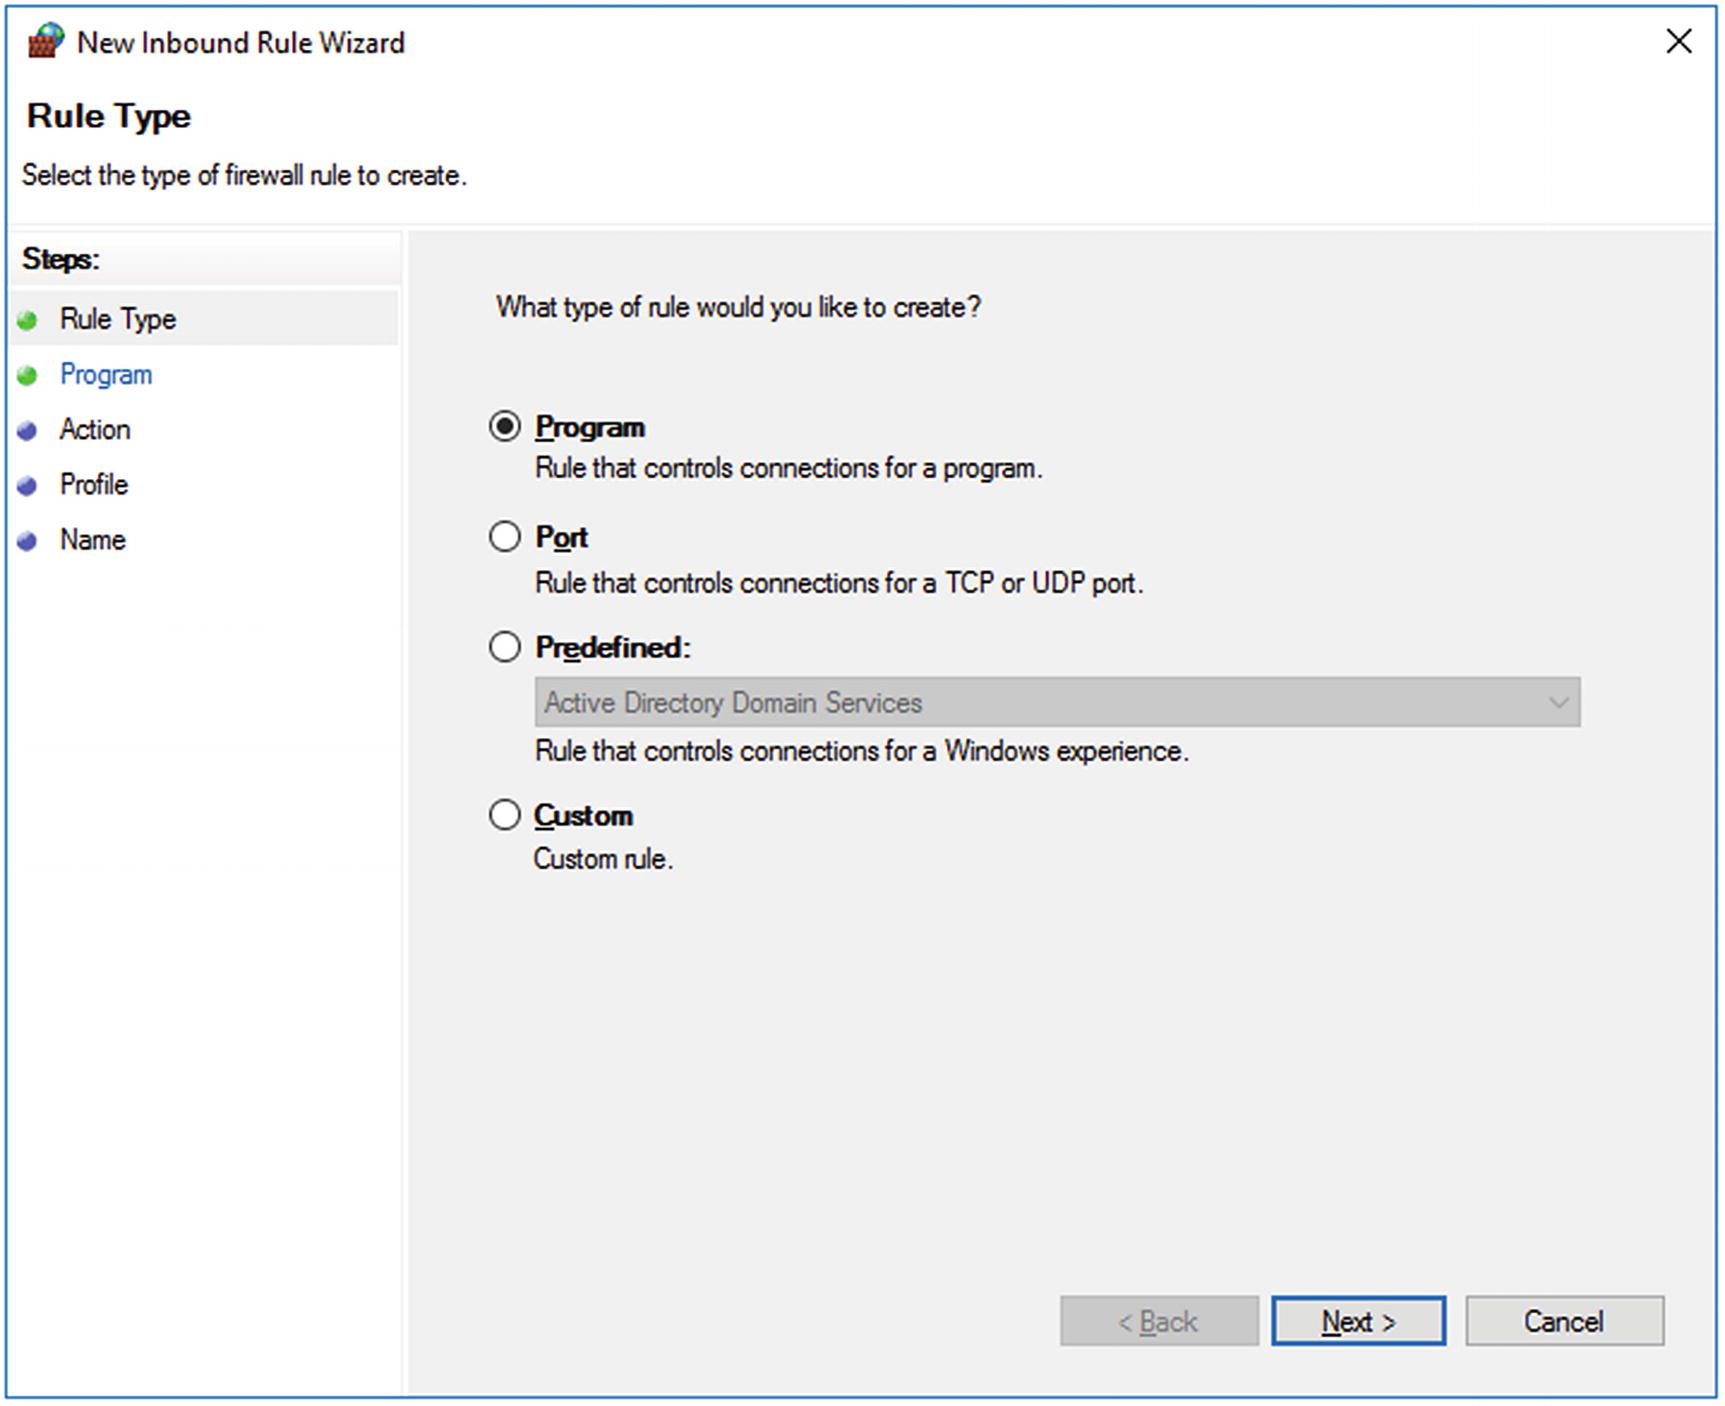
The New Inbound Rule Wizard for Windows Firewall with Advanced Security, shown on Windows Server 2016

Remote File Access

Once the SMB firewall rules have been applied, a domain administrator on any system in the domain can use SMB to the view the files on another domain system. This is possible because Windows systems include an administrative file share for each drive on the system. For the C: drive, the share has the name C$. For example, to see the files on the domain member drake, the domain administrator can use dir.
C:\Users\jbach>dir \\drake\c$
 Volume in drive \\drake\c$ has no label.
 Volume Serial Number is 7AA4-C1BA
 Directory of \\drake\c$
07/16/2016  01:27 AM                24 autoexec.bat
07/16/2016  01:27 AM                10 config.sys
07/16/2016  01:29 AM    <DIR>          PerfLogs
02/12/2017  09:13 AM    <DIR>          Program Files
03/05/2017  01:04 PM    <DIR>          SysinternalsSuite
03/24/2017  05:34 PM    <DIR>          Users
01/22/2017  08:49 PM    <DIR>          Windows
               2 File(s)             34 bytes
               5 Dir(s)  24,460,091,392 bytes free
The same approach works in PowerShell.
PS C:\Users\jbach> ls \\drake\c$
    Directory: \\drake\c$
Mode                LastWriteTime         Length Name
----                -------------         ------ ----
d-----        7/16/2016   1:29 AM                PerfLogs
d-r---        2/12/2017   8:13 AM                Program Files
d-----         3/5/2017  12:04 PM                SysinternalsSuite
d-r---        3/24/2017   5:34 PM                Users
d-----        1/22/2017   7:49 PM                Windows
-a----        7/16/2016   1:27 AM             24 autoexec.bat
-a----        7/16/2016   1:27 AM             10 config.sys
A domain administrator can copy files from one system to another.
C:\Users\jbach>copy \\drake\c$\autoexec.bat c:\Users\jbach\Desktop
        1 file(s) copied.

These locations can be accessed with File Explorer through the address bar.

Drive Mapping

The domain administrator can map a drive letter (say H:) to a remote administrative share with a command like net use; then the files on the remote system can be accessed like a shared drive.
C:\Users\jbach>net use h: \\drake\c$
The command completed successfully.
C:\Users\jbach>h:
H:\>dir
 Volume in drive H has no label.
 Volume Serial Number is 7AA4-C1BA
 Directory of H:\
07/16/2016  01:27 AM                24 autoexec.bat
07/16/2016  01:27 AM                10 config.sys
07/16/2016  01:29 AM    <DIR>          PerfLogs
02/12/2017  09:13 AM    <DIR>          Program Files
03/05/2017  01:04 PM    <DIR>          SysinternalsSuite
03/24/2017  05:34 PM    <DIR>          Users
01/22/2017  08:49 PM    <DIR>          Windows
               2 File(s)             34 bytes
               5 Dir(s)  24,431,251,456 bytes free
This shared drive is visible throughout Windows; for example, it will appear in the list of devices and drives in File Explorer. To see all the shared drives, the domain administrator can run the net use command.
H:\>net use
New connections will be remembered.
Status       Local     Remote                    Network
---------------------------------------------------------------------------
             E:        \\vboxsrv\Downloads       VirtualBox Shared Folders
OK           H:        \\drake\c$                Microsoft Windows Network
The command completed successfully.
The drive mapping will be re-created if the domain administrator logs off then logs back on, even if the system is rebooted. The drive mapping can be removed with net use.
C:\Users\jbach>net use h: /delete
h: was deleted successfully.

Managing Users and Groups

Provided SMB is accessible, a domain administrator can manage the local users and groups on a remote domain member through the Microsoft Management Console (MMC). From the Run menu or from a command prompt, start MMC with the command mmc.exe. Select File ➤ Add/Remove Snap-In. From the list, select Local Users and Groups, then Add. Instead of connecting to the local computer, provide the name of the target computer. The result looks like Figure 7-2.
../images/333712_2_En_7_Chapter/333712_2_En_7_Fig2_HTML.jpg
Figure 7-2

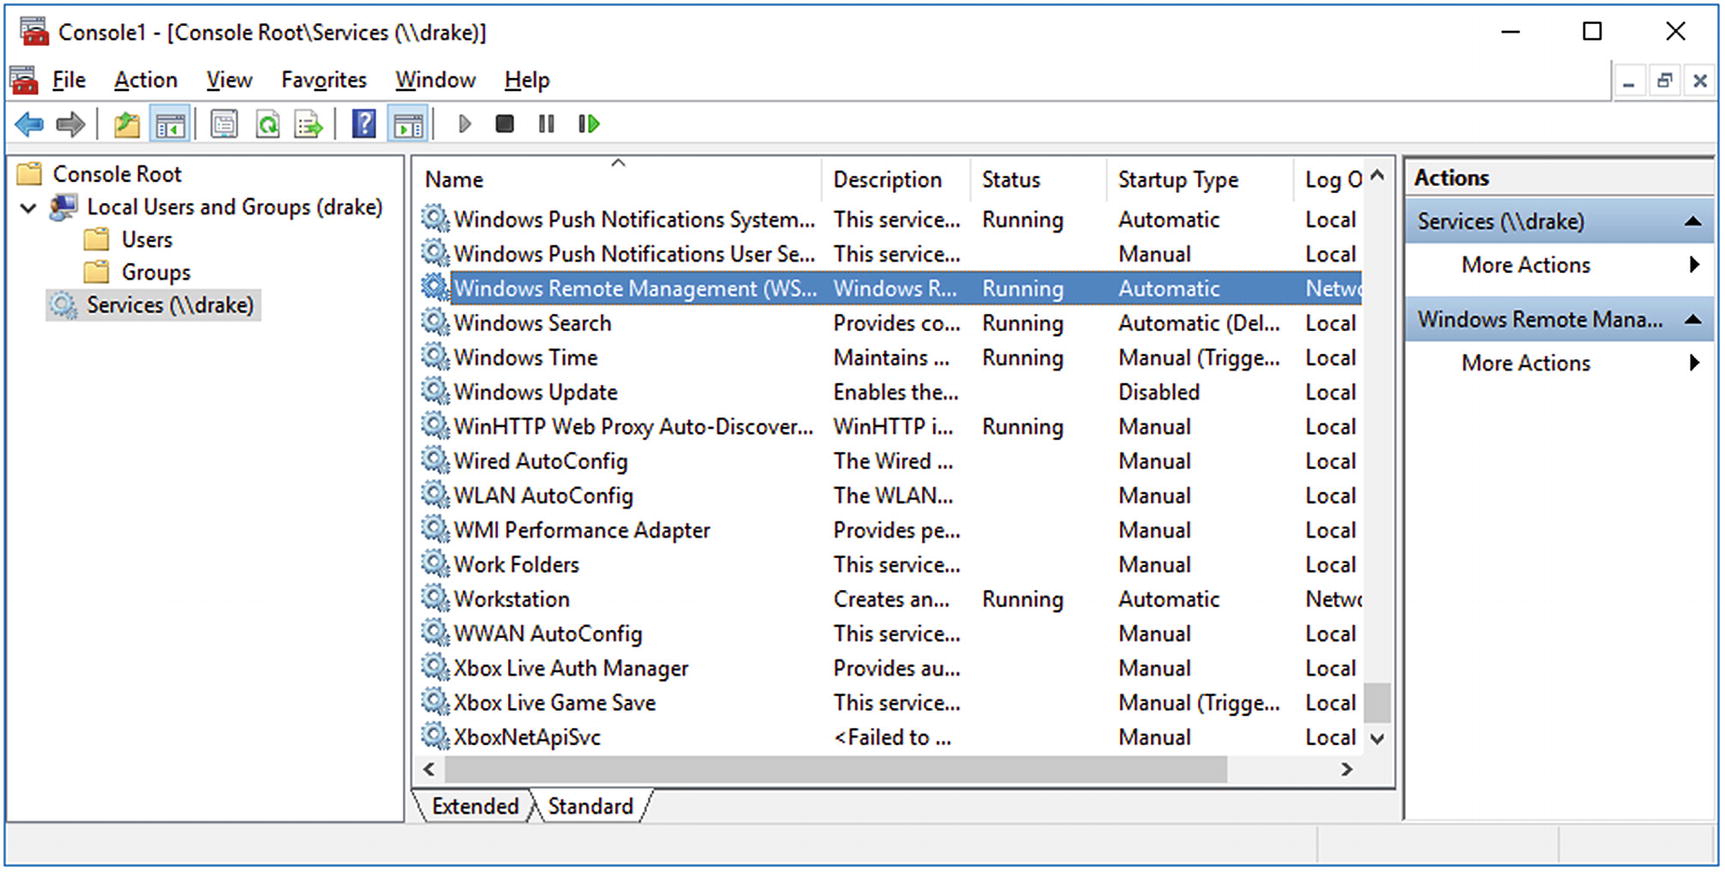
Using MMC as a domain administrator to manage services and the local users and groups on the remote domain member drake. Screenshot from Windows 10-1511.

The domain administrator can add a new domain user from the command line with the command net user.
C:\Users\jbach>net user lkilmister * /add /domain
Type a password for the user:
Retype the password to confirm:
The request will be processed at a domain controller for domain pluto.test.
The command completed successfully.
That user can be made a domain administrator with the command net group.
C:\Users\jbach>net group "Domain Admins" lkilmister /add /domain
The request will be processed at a domain controller for domain pluto.test.
The command completed successfully.

Services

Provided SMB is accessible, a domain administrator can manage the services running on a remote system using MMC (Figure 7-2). For the snap-in, select Services, then provide the name of the remote system.

Services can also be managed remotely via the command-line tool sc.
C:\Users\jbach>sc \\edgeworth queryex remoteregistry
SERVICE_NAME: remoteregistry
    TYPE               : 20  WIN32_SHARE_PROCESS
    STATE              : 1  STOPPED
    WIN32_EXIT_CODE    : 0  (0x0)
    SERVICE_EXIT_CODE  : 0  (0x0)
    CHECKPOINT         : 0x0
    WAIT_HINT          : 0x0
    PID                : 0
    FLAGS              :
C:\Users\jbach>sc \\edgeworth start remoteregistry
SERVICE_NAME: remoteregistry
    TYPE               : 20  WIN32_SHARE_PROCESS
    STATE              : 2  START_PENDING
                            (NOT_STOPPABLE, NOT_PAUSABLE, IGNORES_SHUTDOWN)
    WIN32_EXIT_CODE    : 0  (0x0)
    SERVICE_EXIT_CODE  : 0  (0x0)
    CHECKPOINT         : 0x0
    WAIT_HINT          : 0x7d0
    PID                : 3044
    FLAGS              :

Services can also be managed remotely in both fashions if SMB is not accessible, provided RPC is accessible instead.

Registry

It is possible to use SMB to manage the registry on a remote system. To do so, the remote system must be running the Remote Registry service. This can be enabled on an individual basis using the Services snap-in to MMC or by using sc. It can also be enabled through group policy. In the latter case, create and edit a group policy. Navigate Computer Configuration ➤ Policies ➤ Windows Settings ➤ Security Settings ➤ System Services. Select Remote Registry, and define the policy setting to Automatic. To view or modify the registry values on a remote system, launch regedit.exe; from the File menu, select Connect Network Registry, and select the remote system (Figure 7-3).
../images/333712_2_En_7_Chapter/333712_2_En_7_Fig3_HTML.jpg
Figure 7-3

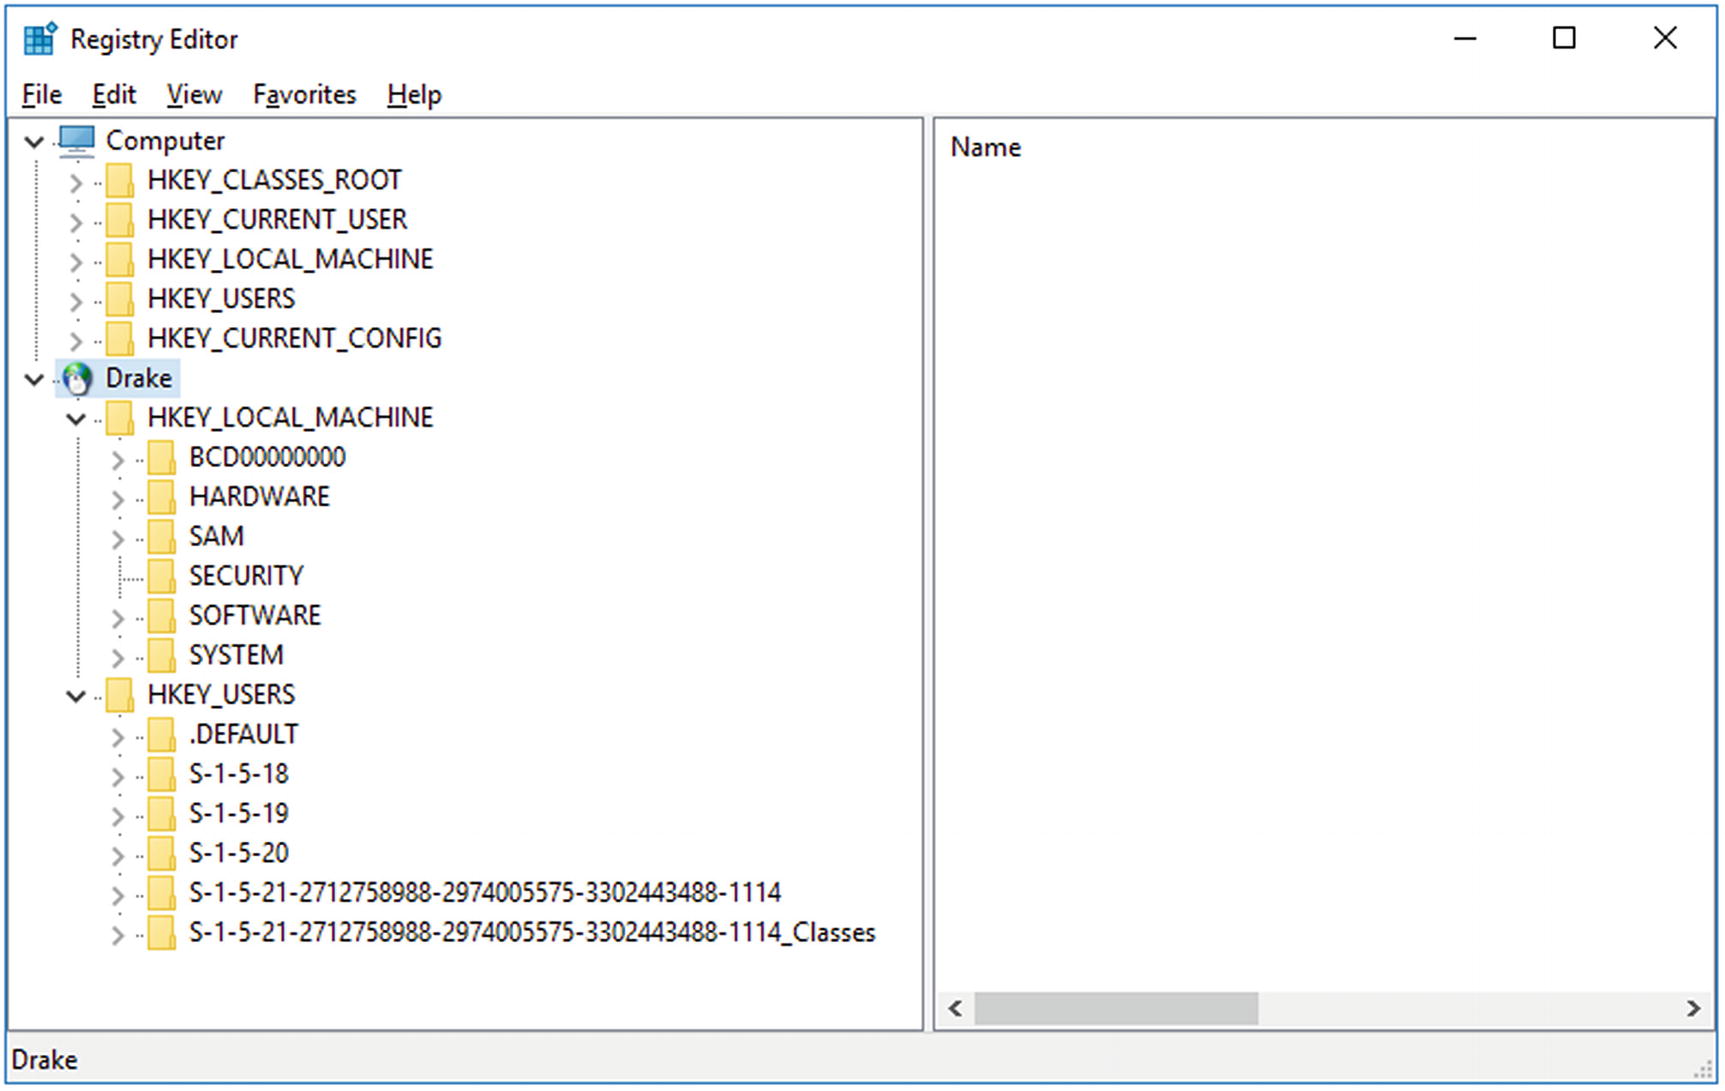
Using the registry editor to connect to the remote system Drake. Screenshot from Windows 10-1511.

Remote Procedure Calls (RPC)

Remote Procedure Calls (RPC) are a way a client can ask a remote target to execute a command. When a client makes a remote procedure call of a target, first the client contacts the target’s endpoint mapper; the target returns the services available and the ports that the services are using. On Windows systems, the default port for the endpoint mapper is TCP/135.

When the client is informed of the port on which the desired service is running, the client contacts that service on that port and makes the request. On older Windows systems like Windows 2000, Windows XP, and Windows Server 2003, the RPC services use ports between TCP/1025 and TCP/5000. On modern Windows systems, including all the ones described in this text, the RPC services use ports between TCP/49152 and TCP/65535. It is not the case that the same service always uses the same port.

RPC Firewall Rules

The use of a dynamic port range makes it more challenging to configure a traditional firewall to control access to RPC services. However, Windows Firewall with Advanced Security can be configured to control access to RPC services, and it can control the service(s) that may be contacted.

An administrator can create firewall rules that allow connections to any RPC service. To do so on a domain, create a new group policy and edit it; then navigate Computer Configuration ➤ Policies ➤ Windows Settings ➤ Security Settings ➤ Windows Firewall with Advanced Security ➤ Windows Firewall with Advanced Security2➤ Inbound Rules.

Two inbound rules need to be added. For the first, from the New Inbound Rule Wizard, select Custom, then select All Programs. On the Protocols and Ports step, for the Protocol Type choose TCP, but for the Local Port select RPC Endpoint Mapper. Adjust the scope as desired, allow the connection, and choose an appropriate domain. Give the rule a name, say “RPC Endpoint Mapper (Custom, via Group Policy).”

For the second rule, from the New Inbound Rule Wizard, select Custom, then select All Programs. On the Protocols and Ports step, for the Protocol Type choose TCP, but for the Local Port select RPC Dynamic Ports. Adjust the scope as desired, allow the connection, and choose an appropriate domain. Give the rule a name, say “RPC Dynamic Ports (Custom, via Group Policy).”

Scheduled Tasks

A domain administrator can use RPC to manage the scheduled tasks on a remote system; one way to do so is via MMC through the Task Scheduler snap-in (Figure 7-4). Another option is to use the command line; for example, to see the scheduled tasks on the remote system drake, a domain administrator can run
C:\Users\jbach>schtasks /query /s drake
Folder: \
TaskName                                 Next Run Time          Status
======================================== ====================== ===========
OneDrive Standalone Update Task v2       4/30/2018 12:08:44 AM  Ready
OneDrive Standalone Update Task-S-1-5-21 4/29/2018 10:54:38 AM  Ready
OneDrive Standalone Update Task-S-1-5-21 4/29/2018 6:15:05 PM   Ready
... Output Deleted ...
../images/333712_2_En_7_Chapter/333712_2_En_7_Fig4_HTML.jpg
Figure 7-4

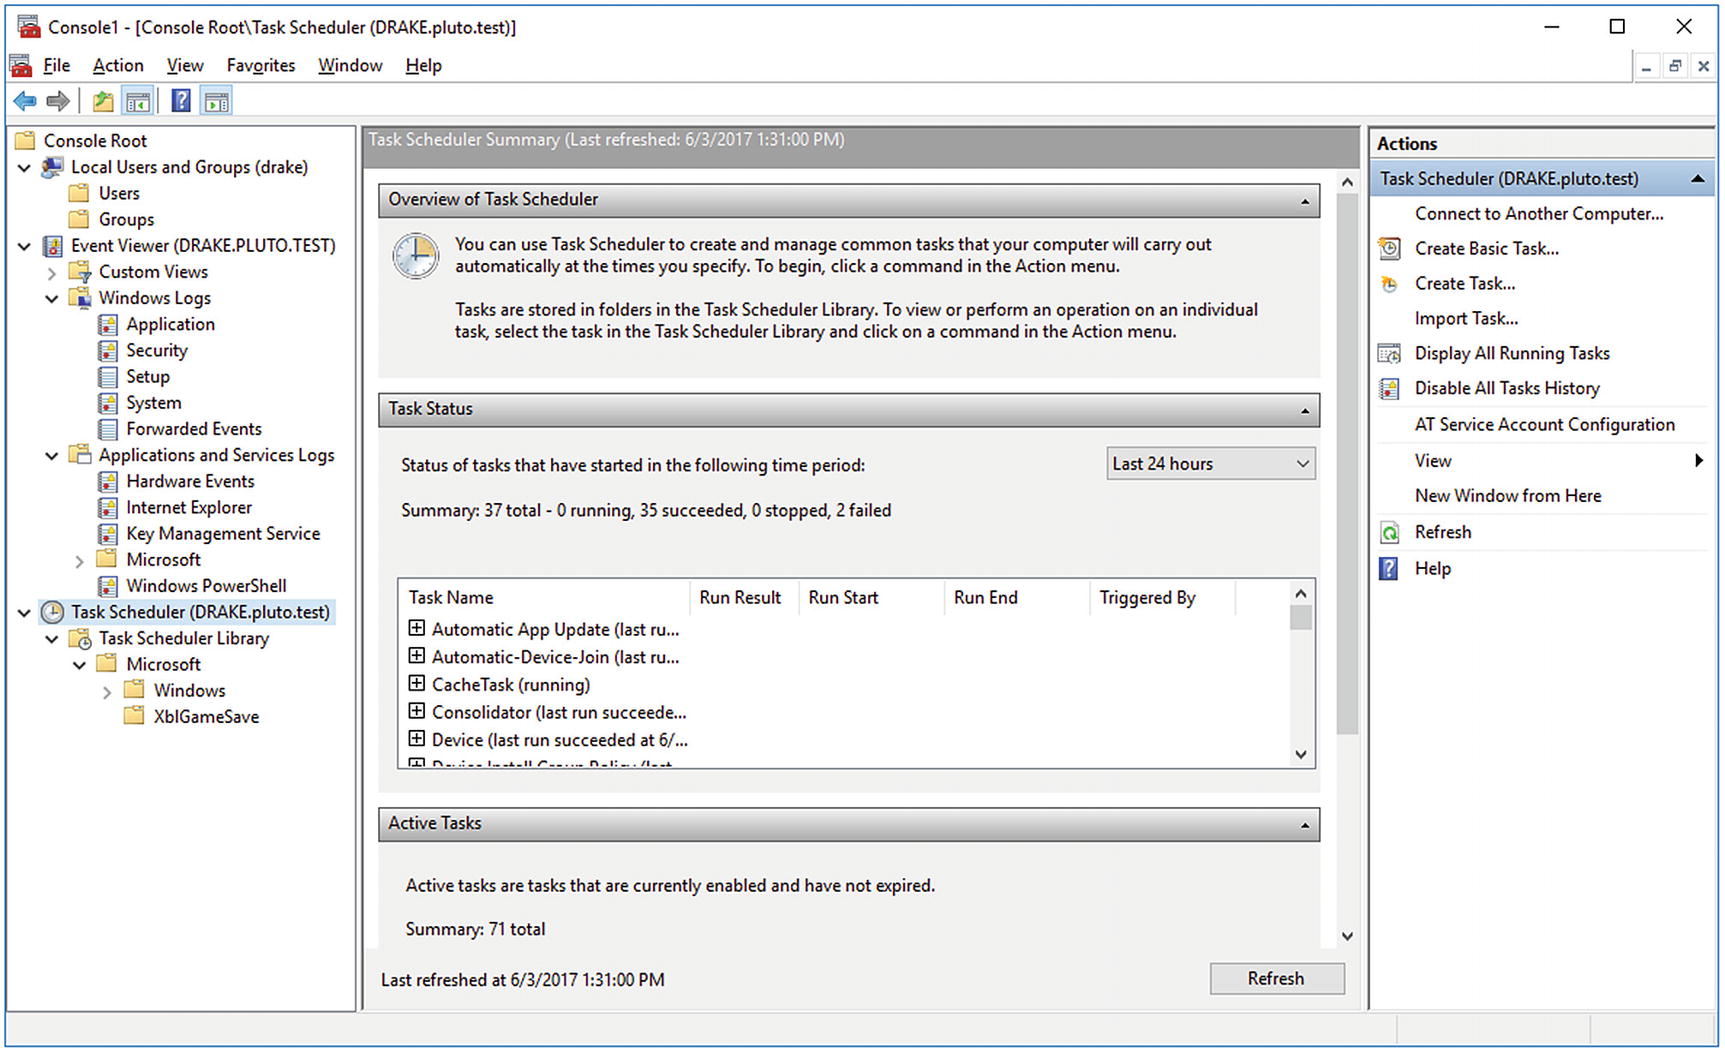
MMC with three remote connections to the system drake.pluto.test: one for local users and groups, one for Windows Event Viewer, and one for task scheduler. Shown on Windows 10-1607.

Event Logs

If a system allows RPC, it is possible to use MMC to view the Event Logs on a remote system. Launch MMC, and from the File menu select Add/Remove Snap-In. Choose Event Viewer and specify the remote computer (Figure 7-4).

Managing the Firewall Remotely

The Windows firewall itself can be managed remotely, provided the proper RPC rules are allowed. To do so on a domain, create or edit a group policy object and navigate Computer Configuration ➤ Policies ➤ Windows Settings ➤ Security Settings ➤ Windows Firewall with Advanced Security ➤ Windows Firewall with Advanced Security➤ Inbound Rules. Create a new rule and select the predefined option Windows Firewall Remote Management.

The firewall on the system can then be managed using MMC by selecting Add/Remove Snap-In and selecting Windows Firewall with Advanced Security.

Sysinternals Tools

Many of the SysInternals tools (cf. Chapter 3) can be run against remote systems. Some tools use SMB, others use RPC, and others can use either. Many require the remote registry service to be running on the target.

For example, the tool psservice lists the running services with detailed information provided for each service.
c:\Program Files\SysinternalsSuite>psservice \\drake query remoteregistry
PsService v2.25 - Service information and configuration utility
Copyright (C) 2001-2010 Mark Russinovich
Sysinternals - www.sysinternals.com
SERVICE_NAME: RemoteRegistry
DISPLAY_NAME: Remote Registry
Enables remote users to modify registry settings on this computer. If this service is stopped, the registry can be modified only by users on this computer. If this service is disabled, any services that explicitly depend on it will fail to start.
        TYPE              : 20 WIN32_SHARE_PROCESS
        STATE             : 4  RUNNING
                               (STOPPABLE,NOT_PAUSABLE,IGNORES_SHUTDOWN)
        WIN32_EXIT_CODE   : 0  (0x0)
        SERVICE_EXIT_CODE : 0  (0x0)
        CHECKPOINT        : 0x0
        WAIT_HINT         : 0 ms
The tool psloglist can be used to parse the event logs on a system. For example, to see the last log entry in the security log on drake, an administrator can run
c:\Program Files\SysinternalsSuite>psloglist \\drake -n 1  Security
PsLoglist v2.71 - local and remote event log viewer
Copyright (C) 2000-2009 Mark Russinovich
Sysinternals - www.sysinternals.com
Security log on \\drake:
[3875] Microsoft-Windows-Security-Auditing
   Type:     SUCCESS AUDIT
   Computer: drake.pluto.test
   Time:     3/25/2017 1:23:52 PM   ID:       4634
An account was logged off.
  Subject:
     Security ID:            S-1-5-21-2712758988-2974005575-3302443488-1103
     Account Name:           jbach
     Account Domain:         PLUTO
     Logon ID:               0x28dad1
  Logon Type:                   3
  This event is generated when a logon session is destroyed. It may be positively correlated with a logon event using the Logon ID value. Logon IDs are only unique between reboots on the same computer.
To see the users logged on to a remote system, the administrator can run
c:\Program Files\SysinternalsSuite>psloggedon \\drake
PsLoggedon v1.35 - See who's logged on
Copyright (C) 2000-2016 Mark Russinovich
Sysinternals - www.sysinternals.com
Users logged on locally:
     <unknown time>             PLUTO\jbach
     3/25/2017 10:46:46 AM      PLUTO\advorak
Users logged on via resource shares:
     3/25/2017 1:44:38 PM       PLUTO\jbach
The processes running on the remote system can also be viewed with pslist provided remote registry access is permitted. If pslist is run with the /t flag, the processes are shown in their tree structure, making the parent processes much more obvious.
c:\Program Files\SysinternalsSuite>pslist \\drake /t
PsList v1.4 - Process information lister
Copyright (C) 2000-2016 Mark Russinovich
Sysinternals - www.sysinternals.com
Process information for drake:
Name                             Pid Pri Thd  Hnd      VM      WS    Priv
Idle                               0   0   1    0       0       8       0
  System                           4   8 103  874    1568      44      40
    smss                         276  11   2   51   38264     808     224
    Memory Compression          1840   8  12    0   38656   16980      84
csrss                            352  13   9  244   71004    3072     764
wininit                          424  13   1   89   69984    3956     728
  services                       536   9   8  280   68904    8008    2736
... Output Deleted ...

The corresponding program to kill a remote process is pskill.

General information about the remote system is available through psinfo.

Psexec

One of the most useful tools for a domain administrator is psexec. This tool allows the domain administrator to run arbitrary commands on remote hosts and return the results. To enable psexec, the remote system needs to allow access to SMB. If the system does not also allow access to RPC, the tool will run but with noticeable delays.

As an example, a domain administrator that wants to see the network configuration of a remote system can run
c:\Program Files\SysinternalsSuite>psexec \\drake ipconfig
PsExec v2.2 - Execute processes remotely
Copyright (C) 2001-2016 Mark Russinovich
Sysinternals - www.sysinternals.com
Windows IP Configuration
Ethernet adapter Ethernet:
   Connection-specific DNS Suffix  . :
   Link-local IPv6 Address . . . . . : fe80::6856:c178:8ae1:7c15%5
   IPv4 Address. . . . . . . . . . . : 10.0.15.204
   Subnet Mask . . . . . . . . . . . : 255.255.0.0
   Default Gateway . . . . . . . . . : 10.0.0.1
Tunnel adapter Reusable ISATAP Interface {46805C69-4BA7-4DD7-9C3B-B470E82EADA4}:
   Media State . . . . . . . . . . . : Media disconnected
   Connection-specific DNS Suffix  . :
ipconfig exited on drake with error code 0.

Here the error code 0 indicates that the command completed successfully.

By running cmd on the remote system, the user obtains a remote interactive shell on the target.
c:\Program Files\SysinternalsSuite>hostname
brinton
c:\Program Files\SysinternalsSuite>psexec \\drake cmd
PsExec v2.2 - Execute processes remotely
Copyright (C) 2001-2016 Mark Russinovich
Sysinternals - www.sysinternals.com
Microsoft Windows [Version 10.0.14393]
(c) 2016 Microsoft Corporation. All rights reserved.
C:\Windows\system32>hostname
Drake

Exit the remote shell with the command exit or by pressing CTRL+C.

Note that the Sysinternals suite does not need to be present on the remote system; it only needs to be present on the local system.

Windows Remote Management (WinRM)

Windows Remote Management (WinRM) is an implementation of the WS-Management protocol. It allows for the remote management of a system, including a tool that behaves similarly to psexec.

Enabling WinRM; Firewall Rules

Windows Remote Management is a separate service that must be enabled on each host. By default, it listens on TCP/5985, though it can also use TCP/5986. WinRM can be configured through the command line on individual hosts, but it is simpler to do so via group policy for the entire domain. To do so, create a new group policy object and edit it.
  • Navigate Computer Configuration ➤ Policies ➤ Windows Settings ➤ Security Settings ➤ System Services. Select the Windows Remote Management Service (WS-Management) and configure it to start up automatically.

  • Navigate Computer Configuration ➤ Preferences ➤ Control Panel Settings ➤ Services. Configure a new Service (Figure 7-5). Choose the WinRM service, set startup to Automatic, and the service action to Start Service. Under the recovery tab, configure the computer to restart the service if it fails.
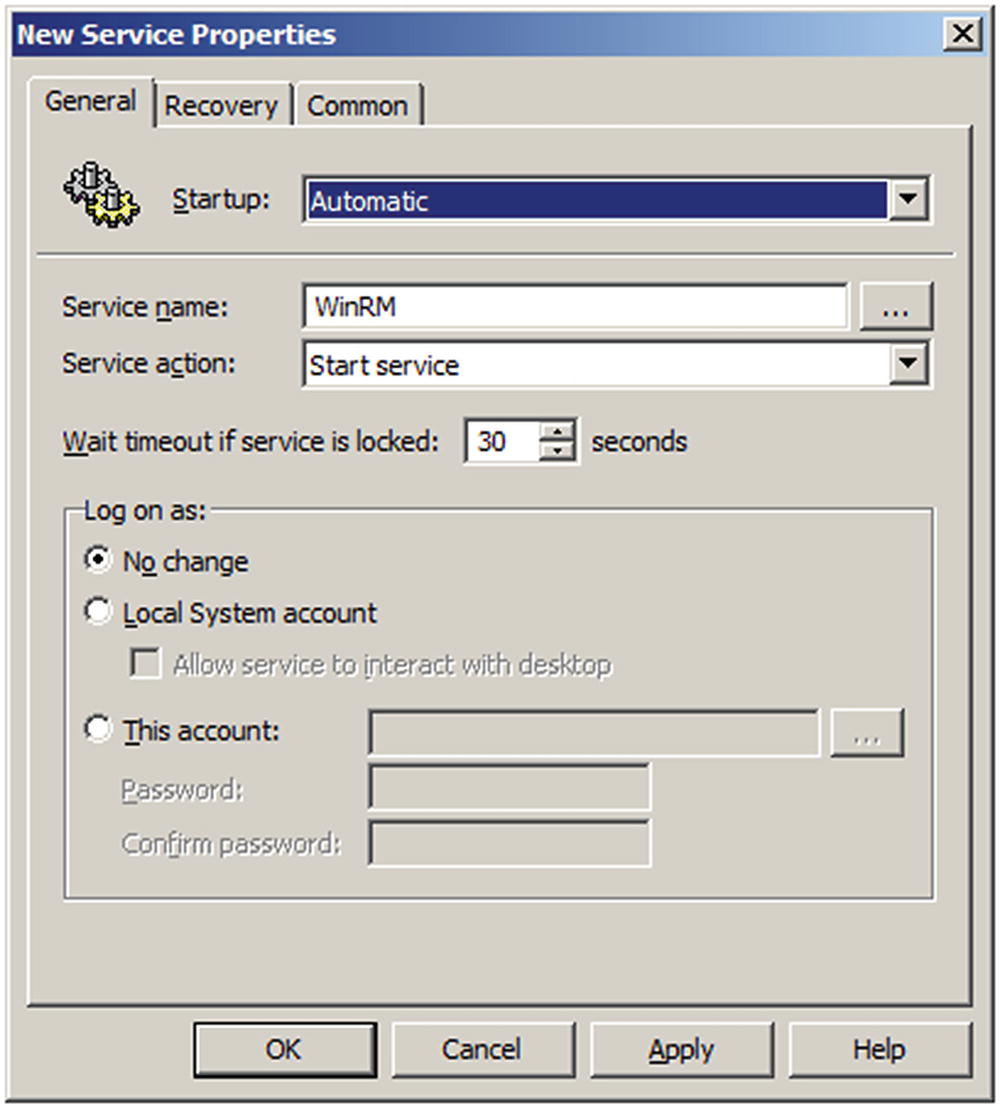
    ../images/333712_2_En_7_Chapter/333712_2_En_7_Fig5_HTML.jpg
    Figure 7-5

    Configuring the WinRM service properties in the Group Policy Editor on Windows Server 2008 R2

  • Navigate Computer Configuration ➤ Policies ➤ Administrative Templates ➤ Windows Components ➤ Windows Remote Management ➤ WinRM Service. On Windows Server 2012 or later, select the option “Allow remote server management through WinRM.” On Windows Server 2008 R2, select the option “Allow automatic configuration of listeners.” Enable it and configure the IPv4 and IPv6 filters as appropriate. Note that if the filters are left blank, the service will not listen on any address.

  • Navigate Computer Configuration ➤ Policies ➤ Windows Settings ➤ Security Settings ➤ Windows Firewall with Advanced Security ➤ Windows Firewall with Advanced Security ➤ Inbound Rules. Create a new rule; from the list of predefined rules select Windows Remote Management. This allows traffic on TCP/5985.

Winrs

Once WinRM is running on a remote system, it is possible to use it to execute a command remotely using the tool winrs. For example, to run ipconfig on the remote system named drake, a domain administrator runs
C:\Users\jbach>winrs -r:drake ipconfig
Windows IP Configuration
Ethernet adapter Ethernet:
   Connection-specific DNS Suffix  . :
   Link-local IPv6 Address . . . . . : fe80::6856:c178:8ae1:7c15%5
   IPv4 Address. . . . . . . . . . . : 10.0.15.204
   Subnet Mask . . . . . . . . . . . : 255.255.0.0
   Default Gateway . . . . . . . . . : 10.0.0.1
Tunnel adapter Reusable ISATAP Interface {46805C69-4BA7-4DD7-9C3B-B470E82EADA4}:
   Media State . . . . . . . . . . . : Media disconnected
   Connection-specific DNS Suffix  . :
It is also possible to obtain a fully interactive remote shell by choosing cmd.exe as the remote command to run.
C:\Users\jbach>winrs -r:drake cmd.exe
Microsoft Windows [Version 10.0.14393]
(c) 2016 Microsoft Corporation. All rights reserved.
C:\Users\jbach>hostname
hostname
drake

The remote shell is closed by the exit command.

PowerShell

If WinRM is enabled on the remote system, it is also possible to use PowerShell commands directly on the remote system.
PS C:\Windows\system32> Enter-PSSession drake
[drake]: PS C:\Users\srevin\Documents> ipconfig
Windows IP Configuration
Ethernet adapter Ethernet:
   Connection-specific DNS Suffix  . :
   Link-local IPv6 Address . . . . . : fe80::6856:c178:8ae1:7c15%5
   IPv4 Address. . . . . . . . . . . : 10.0.15.204
   Subnet Mask . . . . . . . . . . . : 255.255.0.0
   Default Gateway . . . . . . . . . : 10.0.0.1
Tunnel adapter Reusable ISATAP Interface {46805C69-4BA7-4DD7-9C3B-B470E82EADA4}:
   Media State . . . . . . . . . . . : Media disconnected
   Connection-specific DNS Suffix
[drake]: PS C:\Users\srevin\Documents> hostname
drake

Although WinRM uses HTTP as its transport protocol, the transferred data is encrypted. It is possible to configure WinRM to use HTTPS as its transport protocol; in this case, it runs by default over TCP/5986.

WinRM can do more than execute commands on a remote system. It has access to a great deal of information provided by WMI - Windows Management Instrumentation.

Windows Management Instrumentation (WMI)

Windows Management Instrumentation (WMI) is an implementation of Web-Based Enterprise Management (WBEM). The WMI service accesses data stored using the Common Information Model (CIM). Not only does this record data about the system’s hardware and software, it also tracks the current state of the system, including its running processes and services. Administrators can use WMI to query the state of the system and its processes. WMI can also be used to control the system; for example, it can be used to start and stop processes. WMI allows administrators to define events that are fired when a defined state occurs on the system; and consumers, which are programs or scripts that are run when an event is fired.

WMI Structure

WMI is organized around a collection of WMI namespaces. One way to view the collection of WMI namespaces on a system is to launch MMC and add the WMI Control snap-in. Right-click on WMI Control in the navigation pane and select Properties; the security tab (Figure 7-6) shows the structure of WMI.
../images/333712_2_En_7_Chapter/333712_2_En_7_Fig6_HTML.jpg
Figure 7-6

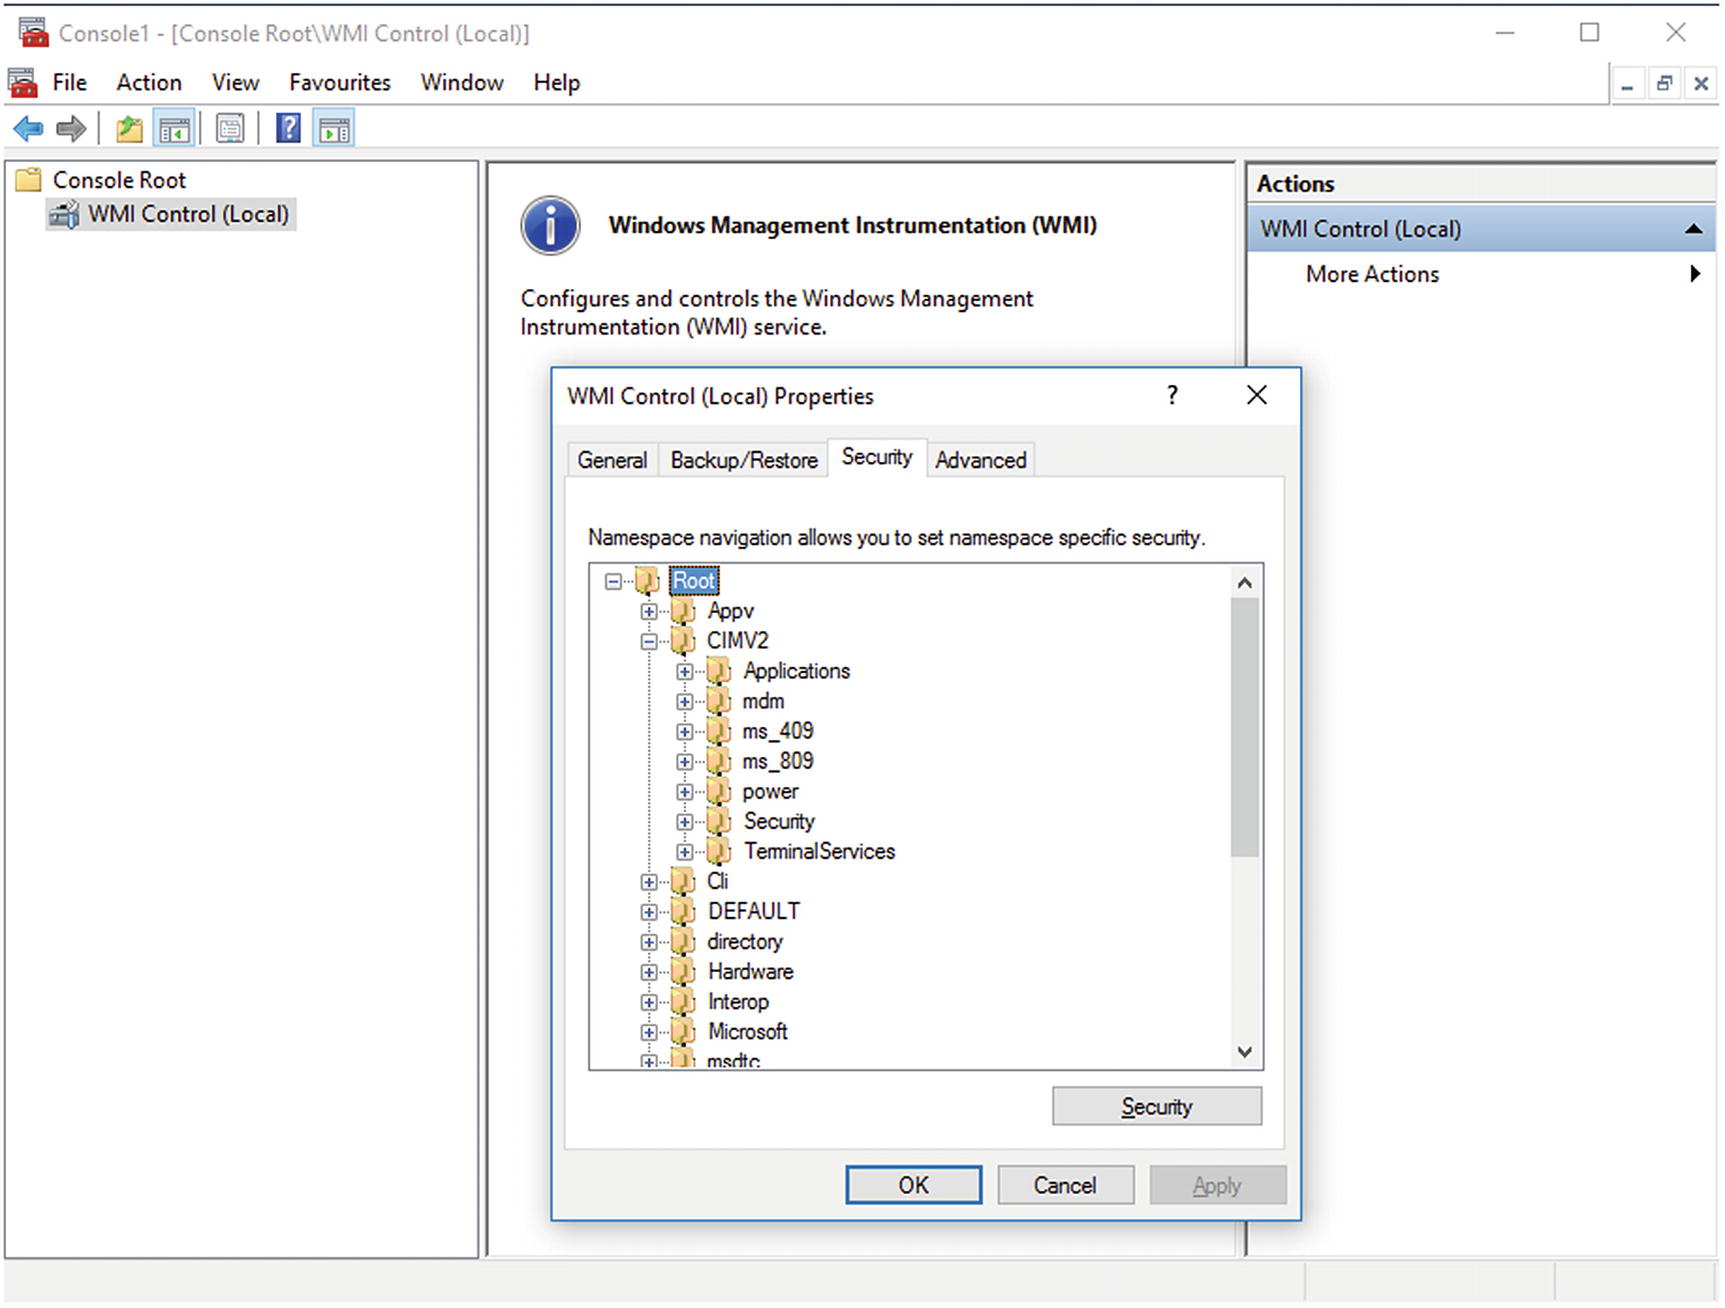
Using MMC to view the available WMI namespaces. Shown on Windows 10-1607.

A much better tool to explore WMI is WMI Explorer. The current version (2.2.79) is available from SAPIEN Technologies at https://www.sapien.com/software/wmiexplorer and has a 45-day trial, while version 2.0.0, including its source code, is available from https://github.com/vinaypamnani/wmie2/releases .

The database for WMI is broken into namespaces. The most important namespace is \root\cimv2; however, the namespaces \root\SecurityCenter2 and \root\subscription are also significant. A namespace may possess sub-namespaces, like \root\cimv2\applications. Inside a namespace are classes; on a Windows 10-1511 system, for example, the namespace \root\cimv2 has 418 different classes. Inside a class are one or more instances. Instances can have properties, which store data about the instance; and methods, which allow actions to take place on that instance.

Consider Figure 7-7, which shows WMI Explorer 2.0.0 on a Windows 10-1511 system showing the namespaces available on the system (named Brinton). The class Win32_Account is selected from the namespace \root\cimv2; this class contains information about the accounts on the system. One instance is selected, for the domain user PLUTO\gmahler, and the right side of the tool shows properties of that user, including its SID, whether the account is locked out, whether its password expires, and much more.
../images/333712_2_En_7_Chapter/333712_2_En_7_Fig7_HTML.jpg
Figure 7-7

Running WMI Explorer 2.0 on Windows 10-1511, showing the class \root\cimv2\Win32_Account, and the instance corresponding to the domain user PLUTO\gmahler

The permanent objects in the WMI database are stored on the system by default in the file C:\Windows\System32\wbem\Repository\OBJECTS.DATA. Configuration information for WMI is stored in the registry in HKEY_LOCAL_MACHINE\SOFTWARE\Microsoft\WBEM and in the WMI database itself at \root\Cimv2\Win32_WMISetting.

Using WinRM to Query WMI

There are several tools that can be used to query WMI; these include PowerShell and the program wmic. So long as the Windows Remote Management service is running on the target, another good choice is winrm.

Using WinRM to Enumerate WMI Data

For example, to get the instances and properties for the instances from the class Win32_Account in the namespace root\cimv2, a user can use winrm with the enumerate operation.
C:\Users\jbach>winrm enumerate wmi/root/cimv2/Win32_Account
Win32_Group
  Caption = BRINTON\Access Control Assistance Operators
  Description = Members of this group can remotely query authorization
                 attributes and permissions for resources on this computer.
  Domain = BRINTON
  InstallDate = null
  LocalAccount = true
  Name = Access Control Assistance Operators
  SID = S-1-5-32-579
  SIDType = 4
  Status = OK
Win32_Group
  Caption = BRINTON\Administrators
  Description = Administrators have complete and unrestricted access to the
                 computer/domain
  Domain = BRINTON
... Output Deleted ...

The enumerate operation can be abbreviated simply to e, and the namespace wmi/root/cimv2 can be abbreviated to wmicimv2.

The result of this command are the accounts and groups on the system, including local and domain accounts.

These requests can be made of remote systems as well. Suppose that a domain administrator wishes to see the services on the remote system named drake. Provided drake is running Windows Remote Management and provided the proper port in the firewall is open (TCP/5985), the administrator can run the command
C:\Users\jbach>winrm e wmicimv2/Win32_Service -r:drake
Win32_Service
  AcceptPause = false
  AcceptStop = false
  Caption = AllJoyn Router Service
  CheckPoint = 0
  CreationClassName = Win32_Service
  DelayedAutoStart = false
  Description = Routes AllJoyn messages for the local AllJoyn clients. If
                 this service is stopped the AllJoyn clients that do not
                 have their own bundled routers will be unable to run.
  DesktopInteract = false
  DisplayName = AllJoyn Router Service
  ErrorControl = Normal
  ExitCode = 1077
  InstallDate = null
  Name = AJRouter
  PathName = C:\Windows\system32\svchost.exe -k
               LocalServiceNetworkRestricted
  ProcessId = 0
  ServiceSpecificExitCode = 0
  ServiceType = Share Process
  Started = false
  StartMode = Manual
  StartName = NT AUTHORITY\LocalService
  State = Stopped
  Status = OK
  SystemCreationClassName = Win32_ComputerSystem
  SystemName = DRAKE
  TagId = 0
  WaitHint = 0
Win32_Service
  AcceptPause = false
  AcceptStop = false
  Caption = Application Layer Gateway Service
... Output Deleted ...

WMI Explorer can also connect to a remote system by selecting the remote hostname in the computer box. Unlike WinRM, when WMI Explorer connects to a remote system, it uses RPC (TCP/135 and a higher numbered dynamic TCP port) instead of the fixed TCP/5985 used by WinRM.

Windows Query Language (WQL)

Careful examination of Figure 7-7 shows that the data shown seems to be from the SQL-like query SELECT * FROM Win32_UserAccount WHERE Domain="PLUTO" AND Name="gmahler". In fact, WMI uses WQL (WMI Query Language), which is a subset of ANSI SQL. There are three general types of queries in WQL: data queries, schema queries, and event queries. Data queries are the most common and are used to read or set data values. Schema queries provide information about the structure of WMI itself, while event queries are used to track activities that occur on the system.

WinRM can be used to execute WQL queries against local or remote systems. For example, to find the processes on the remote system drake, a domain administrator can run
C:\Users\jbach>winrm e wmicimv2/* -r:drake -Filter:"Select * from Win32_Process"
Win32_Process
  Caption = System Idle Process
  CommandLine = null
  CreationClassName = Win32_Process
  CreationDate
      Datetime = 2017-04-13T19:15:30.036354-07:00
  CSCreationClassName = Win32_ComputerSystem
  CSName = DRAKE
  Description = System Idle Process
  ExecutablePath = null
  ExecutionState = null
  Handle = 0
  HandleCount = 0
  InstallDate = null
  KernelModeTime = 48864687500
  MaximumWorkingSetSize = null
  MinimumWorkingSetSize = null
  Name = System Idle Process
  OSCreationClassName = Win32_OperatingSystem
  OSName = Microsoft Windows 10 Pro|C:\Windows|\Device\Harddisk0\Partition2
  OtherOperationCount = 0
  OtherTransferCount = 0
  PageFaults = 1
  PageFileUsage = 0
  ParentProcessId = 0
  PeakPageFileUsage = 0
  PeakVirtualSize = 0
  PeakWorkingSetSize = 8
  Priority = 0
  PrivatePageCount = 0
  ProcessId = 0
... Output Deleted ...
Win32_Process
  Caption = System
  CommandLine = null
  CreationClassName = Win32_Process
  CreationDate
      Datetime = 2017-04-13T19:15:30.036354-07:00
  CSCreationClassName = Win32_ComputerSystem
... Output Deleted ...

The WQL query is passed as a filter to an enumerate query over all the namespaces in wmi/root/cimv2 rather than in a particular namespace.

As another example, if the administrator needs to determine whether Notepad is running on the remote system drake, they can run a more targeted query.
C:\Users\jbach>winrm e wmicimv2/* -r:drake -Filter:"Select Caption,CommandLine,ExecutablePath,ProcessID FROM Win32_Process WHERE Caption LIKE \"%notepad%\""
XmlFragment
    Caption = notepad++.exe
    CommandLine = "C:\Program Files\Notepad++\notepad++.exe"
    ExecutablePath = C:\Program Files\Notepad++\notepad++.exe
    ProcessId = 5892

Here the WQL operator LIKE is used to see if the string is present in the result. Wildcards in the name are denoted with ‘%’. Because the object of the LIKE operator is a string, it is enclosed in quotes, and because the WQL query is already in quotes, these inner quotes are escaped.

Similarly, to find the status of the Remote Registry service on the remote system drake, the domain administrator can run
C:\Users\jbach>winrm e wmicimv2/* -r:drake -Filter:"Select Name,Description,PathName,Started,StartMode,State,Status FROM Win32_Service WHERE Name=\"RemoteRegistry\""
XmlFragment
    Description = Enables remote users to modify registry settings on this computer. If this service is stopped, the registry can be modified only by users on this computer. If this service is disabled, any services that explicitly depend on it will fail to start.
    Name = RemoteRegistry
    PathName = C:\Windows\system32\svchost.exe -k localService
    Started = true
    StartMode = Auto
    State = Running
    Status = OK

Using WinRM to Set WMI Values

The enumerate operation and the related get operation show the properties of an instance of a class. However, it is also possible to change the values of parameters using the set operation. For example, if the domain administrator wants to stop the Remote Registry service, it can be done with the command
C:\Users\jbach>winrm set wmicimv2/Win32_Service?Name=RemoteRegistry @{State="Stopped"} -r:drake
Win32_Service
    AcceptPause = false
    AcceptStop = true
    Caption = Remote Registry
    CheckPoint = 3
    CreationClassName = Win32_Service
    DelayedAutoStart = null
    Description = Enables remote users to modify registry settings on this computer. If this service is stopped, the registry can be modified only by users on this computer. If this service is disabled, any services that explicitly depend on it will fail to start.
    DesktopInteract = false
    DisplayName = Remote Registry
    ErrorControl = Normal
    ExitCode = 1066
    InstallDate = null
    Name = RemoteRegistry
    PathName = C:\Windows\system32\svchost.exe -k localService
    ProcessId = 1040
    ServiceSpecificExitCode = 0
    ServiceType = Share Process
    Started = true
    StartMode = Auto
    StartName = NT AUTHORITY\LocalService
    State = Stop Pending
    Status = Degraded
    SystemCreationClassName = Win32_ComputerSystem
    SystemName = DRAKE
    TagId = 0
    WaitHint = 3000

To change the state of an instance, a set query is made for the class while the particular instance to be changed is determined by using the ? operator. The property that is to be changed is indicated with the @ symbol, and the braces enclose the name and new value of the property.

A subsequent check shows that the service has, in fact, stopped.
C:\Users\jbach>winrm e wmicimv2/* -r:drake -Filter:"Select Name,PathName,Started,StartMode,State,Status from Win32_Service WHERE Name=\"RemoteRegistry\""
XmlFragment
    Name = RemoteRegistry
    PathName = C:\Windows\system32\svchost.exe -k localService
    Started = false
    StartMode = Auto
    State = Stopped
    Status = OK

Using WinRM to Invoke WMI Methods

Another way to change the state of a WMI object is to use one of its available methods. Some, though not all, WMI instances have methods. The methods available to an instance of a WMI namespace can be found, for example, by examining the instance in WMI Explorer. Figure 7-7 shows that instances of the Win32_Account class have no associated methods.

On the other hand, the Win32_Service class has 12 methods, including one aptly named StartService. To start the remote registry service on the remote system drake, an administrator can run the following.
C:\Users\jbach>winrm invoke startservice wmicimv2/Win32_Service?Name=RemoteRegistry -r:drake
startservice_OUTPUT
    ReturnValue = 0

To use the method, the administrator uses winrm with the invoke operation and the name of the method. As before, the particular instance of the class is specified using the ? operator.

The administrator can verify that the state of the service has changed via another WMI query.
C:\Users\jbach>winrm e wmicimv2/* -r:drake -Filter:"Select Name,PathName,Started,StartMode,State,Status from Win32_Service WHERE Name=\"RemoteRegistry\""
XmlFragment
    Name = RemoteRegistry
    PathName = C:\Windows\system32\svchost.exe -k localService
    Started = true
    StartMode = Auto
    State = Running
    Status = OK
As another example, the class Win32_Process has seven methods; the create method can be used to start a new process, even on the remote system drake.
C:\Users\jbach>winrm invoke create wmicimv2/Win32_Process @{CommandLine="C:\Program Files\Notepad++\notepad++.exe"} -r:drake
create_OUTPUT
    ProcessId = 5172
    ReturnValue = 0

The syntax here is like the syntax for the set operation. The invoke operation requires a command line; this is specified via the @ symbol and enclosed in braces.

Because the user jbach is on a remote system, there is no associated desktop for that user. Consequently, even though the program notepad++.exe starts and runs, it does not appear on the desktop for a user logged in locally on the remote system drake.

The remote process can be terminated as well. Doing so requires knowledge of the PID of the process; however, this was provided as the output from the command that created the process.
C:\Users\jbach>winrm invoke terminate wmicimv2/Win32_Process?Handle=5172
-r:drake
terminate_OUTPUT
    ReturnValue = 0
The examples so far have focused on the namespace \root\cimv2; however, there are other namespaces with useful information. For example, one can determine the antivirus solution deployed on a remote host with the command
C:\Users\jbach>winrm e wmi/root/SecurityCenter2/AntiVirusProduct -r:drake
AntiVirusProduct
    displayName = Windows Defender
    instanceGuid = {D68DDC3A-831F-4fae-9E44-DA132C1ACF46}
    pathToSignedProductExe = %ProgramFiles%\Windows Defender\MSASCui.exe
    pathToSignedReportingExe = %ProgramFiles%\Windows Defender\MsMpeng.exe
    productState = 393472
    timestamp = Sat, 04 Feb 2017 22:49:39 GMT

A list of interesting WMI classes is provided in the Notes and References.

Creating a WMI Namespace and Class

An administrator may decide to create a custom WMI namespace and class and populate the class with instances. One way to do so is to create a .mof file and compile it with the command mofcomp.exe. For example, consider Listing 7-1, named example.mof
// Example of a MOF file to create a namespace and two instances in WMI
#pragma namespace ("\\\\drake\\Root\\ExampleNamespace")
class ExampleClass
{
        [Key] uint64 Id;
        string ExampleString;
        string ExampleArray [];
};
instance of ExampleClass
{
        Id = 1;
        ExampleString = "This is the data from Instance 1";
        ExampleArray = {"Instance 1A", "Instance 1B"};
};
instance of ExampleClass
{
        Id = 2;
        ExampleString = "This is the data from Instance 2";
        ExampleArray = {"Instance 2A", "Instance 2B"};
};
Listing 7-1

Example.mof

This file begins with a comment, then specifies the name of the namespace to be used. If this were to be created on the local system, the administrator would use a line like
#pragma namespace ("\\\\.\\Root\\ExampleNamespace")

In Listing 7-1, the administrator is specifying the name of the remote host (drake) for the namespace, named ExampleNamespace.

The code continues with the definition of a class, named ExampleClass. This class has three variables; the first, named ID, is a 64-bit unsigned integer and is used as the key for the class. The class also contains the string named ExampleString and an array of strings, named ExampleArray.

Two instances of the class are generated; each provides the values for each of the class variables.

To store the result in the namespace, the domain administrator runs mofcomp.exe, specifying the file.
C:\Users\jbach>mofcomp Desktop\example.mof
Microsoft (R) MOF Compiler Version 10.0.10586.0
Copyright (c) Microsoft Corp. 1997-2006. All rights reserved.
Parsing MOF file: Desktop\example.mof
MOF file has been successfully parsed
Storing data in the repository...
WARNING: File Desktop\example.mof does not contain #PRAGMA AUTORECOVER.
If the WMI repository is rebuilt in the future, the contents of this MOF file will not be included in the new WMI repository.
To include this MOF file when the WMI Repository is automatically reconstructed, place the #PRAGMA AUTORECOVER statement on the first line of the MOF file.
Done!
Because Example.mof specifies a namespace on a different host, the remote system is contacted using RPC. Once the process completes, the data can be viewed on the remote system.
C:\Users\jbach>winrm e wmi/root/ExampleNamespace/ExampleClass -r:drake
ExampleClass
    ExampleArray = Instance 2A, Instance 2B
    ExampleString = This is the data from Instance 2
    Id = 2
ExampleClass
    ExampleArray = Instance 1A, Instance 1B
    ExampleString = This is the data from Instance 1
    Id = 1

Because this information is stored using WMI, it does not appear directly in the file system on drake, save through its presence in the WMI database itself.

Once created, the data in an instance can be updated.
C:\Users\jbach>winrm set wmi/root/ExampleNamespace/ExampleClass?Id=2 @{ExampleString="Updated Example"} -r:drake
ExampleClass
    ExampleArray = Instance 2A, Instance 2B
    ExampleString = Updated Example
    Id = 2
C:\Users\jbach>winrm e wmi/root/ExampleNamespace/ExampleClass -r:drake
ExampleClass
    ExampleArray = Instance 2A, Instance 2B
    ExampleString = Updated Example
    Id = 2
ExampleClass
    ExampleArray = Instance 1A, Instance 1B
    ExampleString = This is the data from Instance 1
    Id = 1
The administrator can delete an instance of the data stored in the WMI database with the delete command.
C:\Users\jbach>winrm delete wmi/root/ExampleNamespace/ExampleClass?Id=1
-r:drake
C:\Users\jbach>winrm e wmi/root/ExampleNamespace/ExampleClass -r:drake
ExampleClass
    ExampleArray = Instance 2A, Instance 2B
    ExampleString = This is the data from Instance 2
    Id = 2
To delete the complete namespace, as well as all classes and instances, the administrator can create a file like delete.mof shown in Listing 7-2.
#pragma namespace("\\\\drake\\Root")
#pragma deleteinstance
    ("__Namespace.Name='ExampleNamespace'", FAIL)
Listing 7-2

Delete.mof

When this is compiled using mofcomp, the specified namespace is deleted on the remote system drake; no warnings are given.
C:\Users\jbach>mofcomp Desktop\delete.mof

WMI Events

An administrator can use WMI to define events and to define consumers, which are actions that take place when the event occurs.

WQL Schema Queries

The WQL queries presented so far have been data queries. Schema queries ask for information about the structure of WMI itself; for example, to identify the classes in the namespace \root\cimv2 with “Process” in the class name, one can use winrm to execute the following WQL query.
C:\Users\jbach>winrm e wmicimv2/* -Filter:"SELECT * from Meta_Class WHERE __CLASS LIKE \"%Process\""
CIM_Process
    Caption = null
    CreationClassName = null
    CreationDate = null
    CSCreationClassName = null
    CSName = null
    Description = null
... Output Deleted ...

This is a schema query because it is a query for the object Meta_Class. Schema queries can only be made for *, but they can be filtered with a WHERE clause. Here __CLASS is a system property that provides the name of the class.

A more interesting schema query finds the events; this can be done through winrm with a query like
C:\Users\jbach>winrm e wmicimv2/* -Filter:"SELECT * FROM Meta_Class WHERE __This ISA \"__Event\""
__Event
    TIME_CREATED = null
__ExtrinsicEvent
    TIME_CREATED = null
Win32_DeviceChangeEvent
    EventType = null
    TIME_CREATED = null
... Output Deleted ...

System classes start with two underscores and are present in all namespaces. The events from system classes are called intrinsic events, while non-system ones are called extrinsic events.

WMI events fire when particular activities occur, for example the extrinsic event \root\cimv2\Win32_VolumeChangeEvent fires if a USB drive is added or removed from the system.

WMI Consumer Example: USB Connections

To use the information from an event, it must be connected to a consumer. Some useful consumers are \root\subscription\CommandLineEventConsumer, \root\subscription\LogFileEventConsumer, and \root\subscription\ActiveScriptEventConsumer. These consumers allow a command-line program to be run, a log entry to be made, or a script to be run in response to an event. As an example, consider Listing 7-3, which uses VBScript to record information to a file whenever a USB device is plugged into the system.
#pragma namespace ("\\\\.\\root\\subscription")
instance of __EventFilter as $Filter
{
    Name = "USB";
    Query = "SELECT * FROM Win32_VolumeChangeEvent WHERE EventType = 2";
    QueryLanguage = "WQL";
    EventNamespace = "root\\cimv2";
};
instance of ActiveScriptEventConsumer as $Consumer
{
    Name = "USB";
    ScriptingEngine = "VBScript";
    ScriptText =
        "Dim file_obj, file\n"
        "Set file_obj = CreateObject(\"Scripting.FileSystemObject\")\n"
        "Set file = file_obj.OpenTextFile(\"C:\\LogUSB.txt\",8, true)\n"
                "file.WriteLine(\"New drive recognized \" & Now)\n"
                "file.WriteLine(\"  Drive Name: \" & TargetEvent.DriveName)\n"
                "file.Close\n";
};
instance of __FilterToConsumerBinding
{
    Filter = $Filter;
    Consumer = $Consumer;
};
Listing 7-3

The script usb.mof that uses VBScript to record information in a file every time a USB device is inserted into the system.

The script is compiled on the system using mofcomp.
C:\Users\jbach>mofcomp Desktop\usb.mof
The script begins with an event filter named “USB,” which is the name of the resulting instance; this instance can be found in \root\subscription.
C:\Users\jbach>winrm e wmi/root/subscription/* -Filter:"Select Name,Query from __EventFilter where Name=\"USB\""
XmlFragment
    Name = USB
    Query = SELECT * FROM Win32_VolumeChangeEvent WHERE EventType = 2

The WQL query in the filter in Listing 7-3 is an example of an event query, which fires whenever a local device is added or removed from the system. The EventType is a characteristic of this event; its value is 1 for a configuration change, 2 for the arrival of a device, 3 for the removal of a device, and 4 for the docking of the system.3

Next, Listing 7-3 contains an instance of the ActiveScriptEventConsumer class. Like the event, the name of the instance is set to “USB” and can be used to find the instance in the WMI database.
C:\Users\jbach>winrm e wmi/root/subscription/* -Filter:"SELECT name, scriptingengine from ActiveScriptEventConsumer WHERE name=\"USB\""
XmlFragment
    Name = USB
    ScriptingEngine = VBScript

The code in the ScriptText variable in Listing 7-3 is recognizable as VBScript; however, the script is enclosed in quotation marks with manually included newlines. Note the implied string concatenation and the need to escape quotes when used inside the script. The VBScript creates and opens a file in the file system (C:\LogUSB.txt), then it writes to that file. Because the script is called in response to an extrinsic event, it has access to the underlying event; this includes access to the DriveName variable, which can then be used in the script.

The script concludes with a __FilterToConsumer binding, which instructs the system to launch the consumer whenever the event occurs.

Then whenever a USB device is inserted, the file C:\LogUSB.txt is updated.
New drive recognized 4/15/2017 3:32:49 PM
  Drive Name: E:
New drive recognized 4/15/2017 4:04:22 PM
  Drive Name: E:

WMI Consumer Example: PowerShell Start or Stop

As a second example, it is possible to launch a script whenever a process is started or stopped. Consider the script in Listing 7-4 that updates a log file whenever PowerShell is started or stopped.
#pragma namespace ("\\\\.\\root\\subscription")
instance of ActiveScriptEventConsumer as $ConsStart
{
  Name = "PowerShellStarted2";
  ScriptingEngine = "VBScript";
  ScriptText =
    "Dim file_obj, file\n"
    "Set file_obj = CreateObject(\"Scripting.FileSystemObject\")\n"
    "Set file = file_obj.OpenTextFile(\"C:\\LogProcess.txt\",8, true)\n"
        "file.WriteLine(\"PowerShell Started \" & Now)\n"
        "file.WriteLine(\"  PID \" & TargetEvent.ProcessID)\n"
        "file.WriteLine(\"  Parent PID \" & TargetEvent.ParentProcessID)\n"
        "file.Close\n";
};
instance of ActiveScriptEventConsumer as $ConsStop
{
  Name = "PowerShellStopped2";
  ScriptingEngine = "VBScript";
  ScriptText =
    "Dim file_obj, file\n"
    "Set file_obj = CreateObject(\"Scripting.FileSystemObject\")\n"
     "Set file = file_obj.OpenTextFile(\"C:\\LogProcess.txt\",8, true)\n"
       "file.WriteLine(\"PowerShell Stopped \" & Now)\n"
       "file.WriteLine(\"  PID \" & TargetEvent.ProcessID)\n"
       "file.WriteLine(\"  Parent PID \" & TargetEvent.ParentProcessID)\n"
       "file.Close\n";
};
instance of __EventFilter as $FiltStart
{
  Name = "StartFilterProcess";
  Query = "SELECT * FROM Win32_ProcessStartTrace "
    "WHERE ProcessName LIKE \"%powershell%\"";
  QueryLanguage = "WQL";
  EventNamespace = "root\\cimv2";
};
instance of __EventFilter as $FiltStop
{
  Name = "StopFilterProcess";
  Query = "SELECT * FROM Win32_ProcessStopTrace "
    "WHERE ProcessName LIKE \"%powershell%\"";
  QueryLanguage = "WQL";
  EventNamespace = "root\\cimv2";
};
instance of __FilterToConsumerBinding
{
  Filter = $FiltStart;
  Consumer = $ConsStart;
};
instance of __FilterToConsumerBinding
{
  Filter = $FiltStop;
  Consumer = $ConsStop;
};
Listing 7-4

The script PSTrace.mof that tracks when PowerShell is started or stopped

Listing 7-4 is like Listing 7-3, but it contains two sets of filters, consumers, and bindings: one for when PowerShell starts, and one for when it stops. The event filter uses root\cimv2\Win32_ProcessStartTrace to detect when the process starts and root\cimv2\Win32_ProcessStopTrace to detect when it ends. Further, because PowerShell can be run as the stand-alone executable powershell.exe or through the integrated editor powershell_ise.exe, the event query looks only to see if the string “powershell” appears in the process name.

Compile the script using mofcomp. When this is done, the file C:\LogProcess.txt will begin to record PowerShell use on the system with lines like
PowerShell Started 4/29/2018 6:42:09 PM
  PID 2224
  Parent PID 1368
PowerShell Stopped 4/29/2018 6:42:19 PM
  PID 2224
  Parent PID 0

WMI Consumer Example: User Logon/Logoff

Although there are many extrinsic events, including ones that fire on changes in the registry or when the system shuts down, not every interesting action has an existing extrinsic event. Since most activities that occur on the system also make corresponding changes in the WMI database, another approach is to look for changes in that database. Consider the script in Listing 7-5.
#pragma namespace ("\\\\.\\root\\subscription")
instance of __EventFilter as $Filter
{
  Name = "LogonFilter";
    Query = "SELECT * FROM __InstanceCreationEvent WITHIN 15"
              "WHERE TargetInstance ISA \"Win32_LogonSession\" ";
  QueryLanguage = "WQL";
  EventNamespace = "root\\cimv2";
};
instance of ActiveScriptEventConsumer as $Consumer
{
  Name = "LogonConsumer";
  ScriptingEngine = "VBScript";
  ScriptText =
    "Dim file_obj, file\n"
    "Set file_obj = CreateObject(\"Scripting.FileSystemObject\")\n"
    "Set file = file_obj.OpenTextFile(\"C:\\Logon.txt\",8, true)\n"
    "file.WriteLine(\"Logon Session \" & Now)\n"
    "file.WriteLine(\"   Authentication: \" "
                  "& TargetEvent.TargetInstance.AuthenticationPackage )\n"
    "file.WriteLine(\"   Caption: \" "
                  "& TargetEvent.TargetInstance.Caption )\n"
    "file.WriteLine(\"   Description: \" "
                  "& TargetEvent.TargetInstance.Description )\n"
    "file.WriteLine(\"   LogonID: \" "
                  "& TargetEvent.TargetInstance.LogonID )\n"
    "file.WriteLine(\"   LogonType: \" "
                  "& TargetEvent.TargetInstance.LogonType )\n"
    "file.WriteLine(\"   Name: \" "
                  "& TargetEvent.TargetInstance.Name )\n"
    "file.WriteLine(\"   Status: \" "
                  "& TargetEvent.TargetInstance.Status )\n"
// This completes writing the available data
    "file.Close\n";
};
instance of __FilterToConsumerBinding
{
  Filter = $Filter;
  Consumer = $Consumer;
};
Listing 7-5

A script that records when users log on to a system

Like the previous scripts, this uses VBScript as the consumer; in this case, the script takes the data available in an instance of the class root\cimv2\LogonSession and writes it to the file C:\Logon.txt.

The major difference is in the event filter; it uses the system class __InstanceCreationEvent, which reports additions to the WMI database. Unlike the extrinsic events seen previously, this intrinsic event does not fire but instead is polled. The query in the script looks for changes in the WMI database every 15 seconds that are caused by changes in the Win32_LogonSession class. This change also results in a change to the consumer; instead of using TargetEvent, it must use TargetEvent.TargetInstance to access the data from the actual event. Finally, because this is polled, it is possible to miss an event because the change is made and then unmade within the polling time. If the polling time is shortened though, then the system consumes additional resources checking for these events.

When this script is compiled and installed with mofcomp.exe, the file C:\logon.txt will start recording logons. However, a check of the data shows little of value. The logon time, type,4 and authentication method are present, as well as a LogonID, but little else.
Logon Session 4/29/2018 6:52:43 PM
   Authentication: Kerberos
   Caption:
   Description:
   LogonID: 1058548
   LogonType: 2
   Name:
   Status:

It would be useful to correlate the LogonID with the details of the corresponding user. This can be done with an additional WQL query, using associators. The WQL statement ASSOCIATORS OF returns the instances associated with a source. In the case at hand, the administrator would like the instances of Win32_Account that are associated with the given LogonID.

Return to Listing 7-5, and in place of the comment indicating that this completes writing the available data, add the following before the file.Close line (Listing 7-6).
  "Set WMIService = GetObject(\"winmgmts:!\\\\.\\root\\cimv2\")\n"
    "Set UserData = WMIService.ExecQuery(\"ASSOCIATORS OF "
            "{Win32_LogonSession.LogonID=\" "
            " & TargetEvent.TargetInstance.LogonID & \"} "
            "WHERE ResultClass=Win32_UserAccount\")\n"
    "For Each obj in UserData\n"
      "file.WriteLine(\"   Account Type: \" & obj.AccountType )\n"
      "file.WriteLine(\"   Caption: \" & obj.Caption )\n"
      "file.WriteLine(\"   Domain: \" & obj.Domain )\n"
      "file.WriteLine(\"   SID: \" & obj.SID )\n"
      "file.WriteLine(\"   Full Name: \" & obj.FullName )\n"
      "file.WriteLine(\"   Name: \" & obj.Name )\n"
    "Next \n"
Listing 7-6

Addition to Listing 7-5

The updated script now uses VBScript to execute a WMI query that returns the associators of the LogonID that are instances of Win32_UserAccount. The script then includes the data from the account as well in the log file. When the script is complete and compiled with mofcomp.exe, a typical entry in the file C:\Logon.txt is
Logon Session 4/29/2018 7:07:30 PM
   Authentication: Kerberos
   Caption:
   Description:
   LogonID: 1247919
   LogonType: 3
   Name:
   Status:
   Account Type: 512
   Caption: PLUTO\jbach
   Domain: PLUTO
   SID: S-1-5-21-2712758988-2974005575-3302443488-1103
   Full Name: Johann Sebastian Bach
   Name: jbach

This provides much more useful information.

Using wmic to Interact with WMI

A user can use winrm to interact with WMI, but only if the WinRM service is running. It is possible to interact with WMI without using WinRM. One option is to the command-line tool wmic. Help for wmic is provided by the command wmic /? or the command wmic /?:full.

Using wmic to Enumerate WMI Data

As an example of the use of wmic, consider the command
C:\Users\jbach>wmic useraccount list
AccountType Description          Disabled Domain FullName InstallDate LocalAccountLockout   Name            PasswordChangeable PasswordExpires  PasswordRequiredSID                                           SIDType  Status
512         Built-in account     TRUE     BRINTON                     TRUE            for administering             the computer/domainFALSE    Administrator   TRUE               FALSE            TRUE              S-1-5-21-3478959905-1979217705-488103399-500  1        Degraded
... Output Deleted ...
This is comparable to an enumerate operation in winrm and shows WMI data about the users on the system. Rather than use the name of the class, the command uses a wmic alias; a list of wmic aliases is provided in the Notes and References section. The information provided by wmic can be shortened with the command
C:\Users\jbach>wmic useraccount list brief
AccountType  Caption       Domain  FullName               Name            SID
... Output Deleted ...
512          PLUTO\jbach  PLUTO    Johann Sebastian Bach  jbach           S-1-5-21-2712758988-2974005575-3302443488-1103
... Output Deleted ...
Rather than using an alias, an administrator can access a location in the WMI database by specifying the full class name with the path argument. For example, the administrator can run
C:\Users\jbach>wmic service list
... Output Deleted ...
or
C:\Users\jbach>wmic path Win32_Service
... Output Deleted ...
A domain administrator can use wmic against remote systems by specifying the /node option; for example, to see the processes running on the remote system drake, run the command
C:\Users\jbach>wmic /node:drake process list brief
HandleCount  Name                 Priority  ProcessId  ThreadCount  Working
0            System Idle Process  0         0          1            8192
901          System               8         4          82           61440
51           smss.exe             11        264        3            888832
245          csrss.exe            13        356        9            3555328
... Output Deleted ...

When wmic is used to connect to WMI on a remote system, it uses RPC, beginning with TCP/135 then a high numbered port. This is how tools like WMI Explorer and mofcomp.exe connect to a remote system, but this is different than WinRM, which uses TCP/5985.

It is possible to refine a request made using WMIC.
C:\Users\jbach>wmic /node:drake process where name="MicrosoftEdge.exe" list brief
HandleCount  Name               Priority  ProcessId  ThreadCount  WorkingSetSize
743          MicrosoftEdge.exe  8         4484       27           50712576
It is also possible to get just portions of the available data.
C:\Users\jbach>wmic /node:drake process where name="MicrosoftEdge.exe" get ProcessID
ProcessId
4484

Using wmic to Invoke WMI Methods

The administrator can use wmic to call WMI methods. As an example, to terminate the Microsoft Edge process running on the remote system drake, the administrator can run
C:\Users\jbach>wmic /node:drake process where name="MicrosoftEdge.exe" call terminate
Executing (\\DRAKE\ROOT\CIMV2:Win32_Process.Handle="4484")->terminate()
Method execution successful.
Out Parameters:
instance of __PARAMETERS
{
        ReturnValue = 0;
};
The same approach can be used to create a process.
C:\Users\jbach>wmic process call create "C:\Program Files\npp.7.3.3.bin\notepad++.exe"
Executing (Win32_Process)->Create()
Method execution successful.
Out Parameters:
instance of __PARAMETERS
{
        ProcessId = 1860;
        ReturnValue = 0;
};
By default, wmic uses the namespace /root/cimv2, but this is can be changed. For example, suppose that the domain administrator wants to delete an event filter created using mofcomp.exe. These are in the namespace /root/subscription, so the administrator runs (from an elevated command prompt) the command
C:\Windows\system32>wmic /namespace:"\\root\subscription" PATH __EventFilter WHERE Name="EventFilter" DELETE
Deleting instance \\BRINTON\ROOT\subscription:__EventFilter.Name="EventFilter"
Instance deletion successful.

Using PowerShell to Interact with WMI

Another option for interacting with WMI is through PowerShell. For example, to find the accounts on a system, the administrator can use Get-WMIObject.
PS C:\Users\jbach> Get-WmiObject -Class Win32_Account
Caption                                       Domain  Name
-------                                       ------  ----
BRINTON\Access Control Assistance Operators   BRINTON Access Control Assistance
                                                      Operators
BRINTON\Administrators                        BRINTON Administrators
BRINTON\Backup Operators                      BRINTON Backup Operators
... Output Deleted ...
Another option is the related cmdlet Get-CimInstance.
PS C:\Users\jbach> Get-CimInstance Win32_Account
SID           Name                                    Caption
---           ----                                    -------
S-1-5-32-579  Access Control Assistance Operators     BRINTON\Access Con...
S-1-5-32-544  Administrators                          BRINTON\Administra...
S-1-5-32-551  Backup Operators                        BRINTON\Backup Ope...
... Output Deleted ...
PowerShell can be run against remote systems, by specifying the ComputerName.
PS C:\Users\jbach> Get-WmiObject -Class Win32_Process -ComputerName drake
__GENUS                    : 2
__CLASS                    : Win32_Process
__SUPERCLASS               : CIM_Process
__DYNASTY                  : CIM_ManagedSystemElement
__RELPATH                  : Win32_Process.Handle="0"
__PROPERTY_COUNT           : 45
__DERIVATION               : {CIM_Process, CIM_LogicalElement,
                              CIM_ManagedSystemElement}
__SERVER                   : DRAKE
__NAMESPACE                : root\cimv2
__PATH                     : \\DRAKE\root\cimv2:Win32_Process.Handle="0"
Caption                    : System Idle Process
... Output Deleted ...
PS C:\Users\jbach> Get-CimInstance Win32_Process -ComputerName drake
ProcessId Name                HandleCount WorkingSetSize VirtualSize PSComp
--------- ----                ----------- -------------- ----------- ------
0         System Idle Process  0           8192           0           drake
4         System               922         61440          1605632     drake
264       smss.exe             51          909312         39444480    drake
356       csrss.exe            235         3538944        72708096    drake
428       wininit.exe          88          4263936        71372800    drake
... Output Deleted ...

There are important differences between these two commands beyond the differences in the output format. The cmdlet Get-WmiObject is the older version and part of the original PowerShell 1.0. When run against a remote computer, Get-WmiObject uses RPC. This was superseded by Get-CimInstance in PowerShell 3.0. which was released with Windows 8 and Windows Server 2012. When run against a remote target, Get-CimInstance uses WinRM running on TCP/5985. The Get-CimInstance cmdlets also fail if the remote target is running PowerShell 2.0, like Windows 7.

Both approaches can be used to run WQL queries.
PS C:\Users\jbach> Get-WmiObject -ComputerName drake -Query "Select * from Win32_Service WHERE Name=`"RemoteRegistry`""
ExitCode  : 0
Name      : RemoteRegistry
ProcessId : 0
StartMode : Auto
State     : Stopped
Status    : OK
PS C:\Users\jbach> Get-CimInstance -ComputerName drake -Query "Select * from Win32_Service WHERE Name=`"RemoteRegistry`""
ProcessId Name           StartMode State   Status ExitCode PSComputerName
--------- ----           --------- -----   ------ -------- --------------
0         RemoteRegistry Auto      Stopped OK     0        drake
Because PowerShell is a programming language, the results of these commands can be stored and passed as arguments. For example, an administrator can find the instances of Microsoft Edge processes on a remote system, store them, and then pass them to a method to terminate them and so kill the processes.
PS C:\Users\jbach> $edge = Get-WmiObject -ComputerName drake -Class Win32_Process -Filter "Name=`"MicrosoftEdge.exe`""
PS C:\Users\jbach> $edge | Invoke-WmiMethod -Name terminate
__GENUS          : 2
__CLASS          : __PARAMETERS
__SUPERCLASS     :
__DYNASTY        : __PARAMETERS
__RELPATH        :
__PROPERTY_COUNT : 1
__DERIVATION     : {}
__SERVER         :
__NAMESPACE      :
__PATH           :
ReturnValue      : 0
PSComputerName   :
The process using the CIM methods is similar.
PS C:\Users\jbach> $edge = Get-CimInstance -ComputerName drake -Class Win32_Process -Filter "Name=`"MicrosoftEdge.exe`""
PS C:\Users\jbach> $edge | Invoke-CimMethod -Name terminate
ReturnValue PSComputerName
----------- --------------
          0 drake
In the examples so far, the namespace has been the default /root/cimv2; this can be changed. For example, to delete a filter to consumer binding, which is stored in \root\subscription, an administrator can run (from an elevated PowerShell prompt)
PS C:\Windows\system32> $fcbinding = Get-WmiObject -Namespace root\subscription -Class __FilterToConsumerBinding | where Consumer -eq \\.\root\subscription:ActiveScriptEventConsumer.Name=`"LogonConsumer`"
PS C:\Windows\system32> $fcbinding | Remove-WmiObject

Using Other Languages to Interact with WMI

It is possible to interact with WMI in a wide variety of languages. The older (2012) tool, WMI Code Creator is available for download at https://www.microsoft.com/en-us/download/details.aspx?id=8572 and can generate code in C#, VB.NET, and VBScript. A more modern starting point is WMIGen (Figure 7-8), a program available from http://www.robvanderwoude.com/wmigen.php that can generate code in C, C++, C#, Delphi, F#, Java, Jscript, KiXtart, Perl, Python, Ruby, VB.NET, and VBScript.
../images/333712_2_En_7_Chapter/333712_2_En_7_Fig8_HTML.jpg
Figure 7-8

WMIGen 10.0, seen on Windows 10-1607

Using Linux to Interact with WMI

Because languages like Python work on Linux systems as well as Windows systems, it is possible to manage WMI from a Linux system. One way to do so is with Python Impacket, available from https://github.com/CoreSecurity/impacket . On an Ubuntu system, for example, this can be installed with the command
jmaxwell@elpis:$ sudo apt install python-impacket

The tool includes several scripts as examples. On recent systems like Ubuntu 16.04 and Kali, there are two particularly useful scripts located in the documentation directory, usually /usr/share/doc/python-impacket/examples.

The first useful script is wmiquery.py. Provided the user has domain administrator credentials, they can connect to a remote system and execute WQL queries.
root@kali-2016-2-u:/usr/share/doc/python-impacket/examples# ./wmiquery.py gmahler@10.0.15.204
Impacket v0.9.15 - Copyright 2002-2016 Core Security Technologies
Password:<enter password here>
[!] Press help for extra shell commands
WQL> SELECT Caption,CommandLine,ProcessID FROM Win32_Process WHERE Name LIKE "%notepad%"
| Caption | CommandLine | ProcessId |
| notepad++.exe | "C:\Program Files\Notepad++\notepad++.exe"  | 3144 |
The second useful script is wmiexec.py, which lets the user connect to the remote system and obtain a shell.
root@kali-2016-2-u:/usr/share/doc/python-impacket/examples# ./wmiexec.py gmahler@10.0.15.204
Impacket v0.9.15 - Copyright 2002-2016 Core Security Technologies
Password: <enter password here>
[*] SMBv3.0 dialect used
[!] Launching semi-interactive shell - Careful what you execute
[!] Press help for extra shell commands
C:\>whoami
pluto\gmahler

The script wmiexec.py uses both SMB and RPC, while wmiquery.py uses RPC.

Windows Server Without a GUI

Windows Servers can be installed and run without a graphical user interface (GUI).

Installation Without a GUI

One of the options available when installing Windows Server is to do so without the GUI. On Windows Server 2012 this is called a Server Core installation. On Windows Server 2016 an installation without a graphical user interface is the default; the version with a graphical user interface is called the Desktop Experience (Figure 7-9).
../images/333712_2_En_7_Chapter/333712_2_En_7_Fig9_HTML.jpg
Figure 7-9

Installing Windows Server. On the left is Windows Server 2012, which includes the option for a Server Core Installation. On the right is Windows Server 2016, which includes the option for the Desktop Experience.

The operating system installation process is like the process for systems with a GUI. Once it is complete, the administrator is promoted to create the password for the local administrator user. On Windows Server 2016, the user is presented with a command prompt that states
Enter new credentials for Administrator or hit ESC to cancel
New password :
Confirm password :

The administrator uses the up and down arrow buttons to move between the new password and the confirmed password.5

Adding or Removing the GUI

Windows Server 2012 introduced the ability to convert a server to/from a server core installation. This feature remains in Windows Server 2012 R2 but was removed in Windows Server 2016. Windows Server 2012 and 2012 R2 include a minimal graphical interface in the feature Graphical Management Tools and Infrastructure, and the full graphical interface in the feature Server Graphical Shell.

One way to remove the GUI on Windows Server 2012 or 2012 R2 is from the Server Manager (Figure 6-1). Select Manage, then Remove Roles and Features. From Features, unselect Graphical Management Tools and Infrastructure and unselect Server Graphical Shell (Figure 7-10). Reboot the system to complete the removal of the GUI.
../images/333712_2_En_7_Chapter/333712_2_En_7_Fig10_HTML.jpg
Figure 7-10

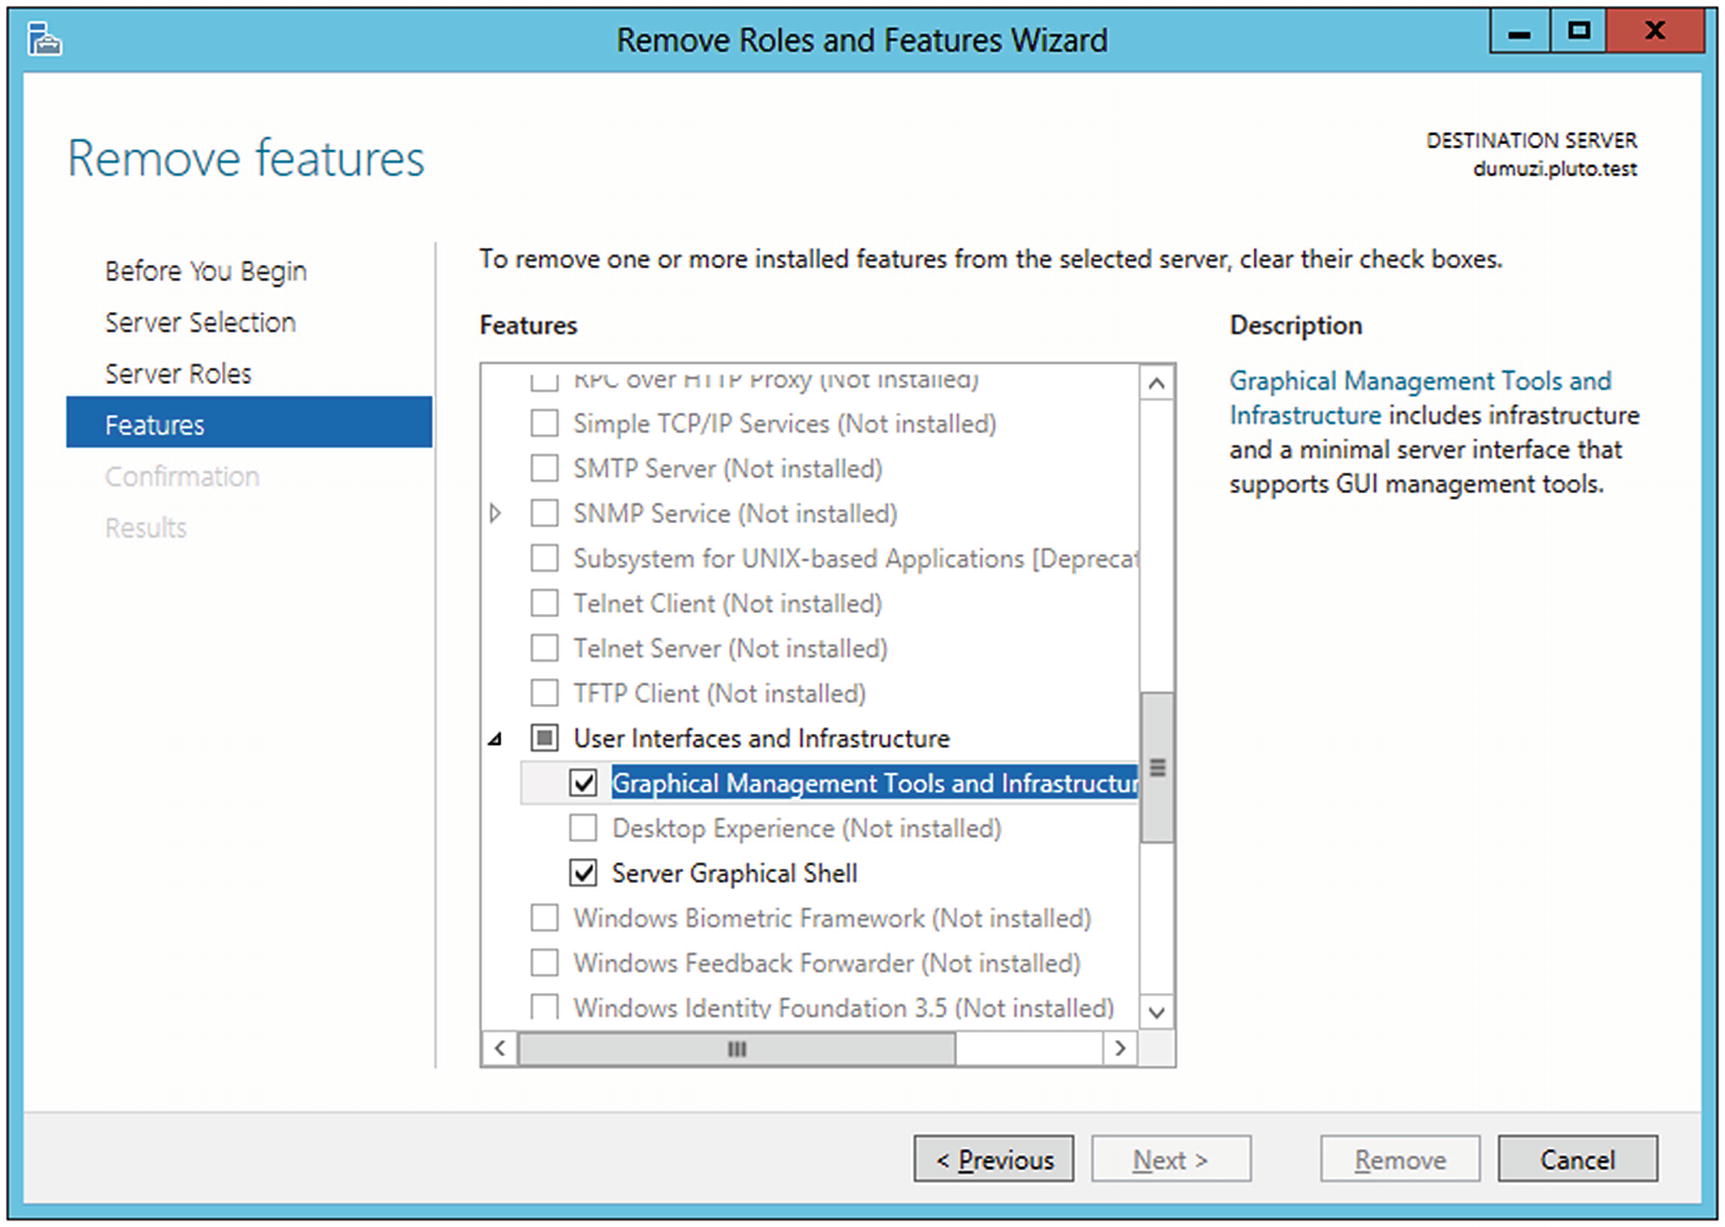
Windows Server 2012, before removing Graphical Management Tools and the Server Graphical Shell

It is possible to add the GUI back in the same fashion, although Server Manager is no longer available locally.6 Another way is to use PowerShell from the administrator prompt to add the feature, then reboot the system.
C:\Users\jbach>powershell
Windows PowerShell
Copyright (C) 2012 Microsoft Corporation. All rights reserved.
PS C:\Users\jbach> Add-WindowsFeature Server-Gui-Shell
Success Restart Needed Exit Code      Feature Result
------- -------------- ---------      --------------
True    Yes            SuccessRest... {Graphical Management Tools and ...
WARNING: You must restart this server to finish the installation process.
WARNING: Windows automatic updating is not enabled. To ensure that your
newly-installed role or feature is automatically updated, turn on Windows
Update.
PS C:\Users\jbach> shutdown /r /t 0
PowerShell can also be used instead of Server Manager to remove the GUI; this can be done with the command7
PS C:\Windows\system32> Remove-WindowsFeature Server-Gui-Mgmt-Infra
Success Restart Needed Exit Code      Feature Result
------- -------------- ---------      --------------
True    Yes            SuccessRest... {Windows PowerShell ISE, Graphica ...
WARNING: You must restart this server to finish the removal process.

Configuring a Server Without a GUI

Once the initial installation of a Windows Server without a GUI is complete, some common tasks need to take place. These include configuring the network settings, setting the hostname, and joining an existing Windows domain. These can be done through the command sconfig (Figure 7-11). This tool allows the administrator to set these values through a menu-driven process entirely from the command line.
../images/333712_2_En_7_Chapter/333712_2_En_7_Fig11_HTML.jpg
Figure 7-11

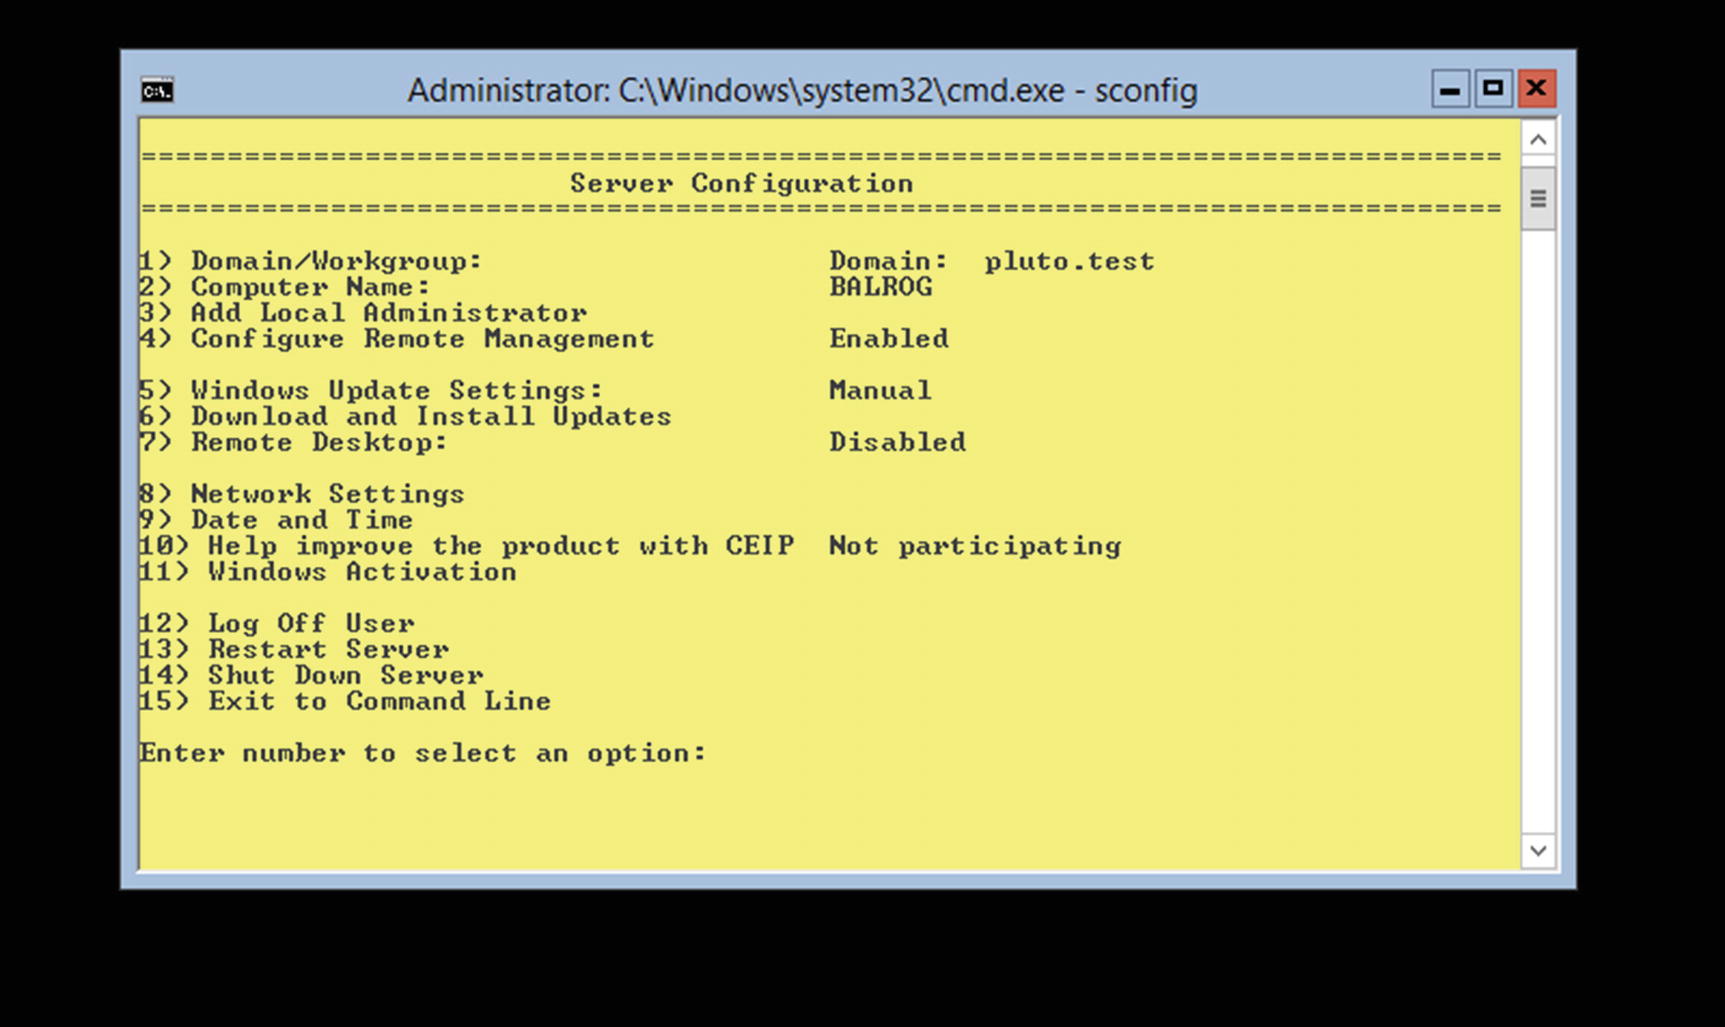
Running sconfig on Windows Server 2012 without a GUI. Note the black background and the absence of features like the taskbar or start menu.

The sconfig tool varies slightly between versions of Windows Server.

Managing the Firewall

It is possible to manage a Windows Server without a GUI remotely, both with graphical and command-line tools, either from another server or from a workstation. To do so, the appropriate ports need to be permitted by the firewall. Windows provides the command-line tool netsh to manage the firewall.
C:\Users\jbach>netsh /?
Usage: netsh [-a AliasFile] [-c Context] [-r RemoteMachine] [-u [DomainName\]UserName] [-p Password | *]
             [Command | -f ScriptFile]
The following commands are available:
Commands in this context:
?              - Displays a list of commands.
add            - Adds a configuration entry to a list of entries.
advfirewall    - Changes to the `netsh advfirewall' context.
branchcache    - Changes to the `netsh branchcache' context.
bridge         - Changes to the `netsh bridge' context.
delete         - Deletes a configuration entry from a list of entries.
dhcpclient     - Changes to the `netsh dhcpclient' context.
dnsclient      - Changes to the `netsh dnsclient' context.
dump           - Displays a configuration script.
exec           - Runs a script file.
firewall       - Changes to the `netsh firewall' context.
help           - Displays a list of commands.
http           - Changes to the `netsh http' context.
interface      - Changes to the `netsh interface' context.
ipsec          - Changes to the `netsh ipsec' context.
ipsecdosprotection - Changes to the `netsh ipsecdosprotection' context.
lan            - Changes to the `netsh lan' context.
namespace      - Changes to the `netsh namespace' context.
netio          - Changes to the `netsh netio' context.
ras            - Changes to the `netsh ras' context.
rpc            - Changes to the `netsh rpc' context.
set            - Updates configuration settings.
show           - Displays information.
trace          - Changes to the `netsh trace' context.
wfp            - Changes to the `netsh wfp' context.
winhttp        - Changes to the `netsh winhttp' context.
winsock        - Changes to the `netsh winsock' context.
The following sub-contexts are available:
 advfirewall branchcache bridge dhcpclient dnsclient firewall http interface ipsec ipsecdosprotection lan namespace netio ras rpc trace wfp winhttp winsock
To view help for a command, type the command, followed by a space, and then
type ?.
For example, suppose that the administrator of a Windows Server 2012 Core system wants to see the firewall rules on that system. From the system, these can be viewed with the command
C:\Users\jbach>netsh advfirewall firewall show rule name="all" | more
Rule Name:          File and Printer Sharing over SMBDirect (iWARP-In)
----------------------------------------------------------------------
Enabled:            No
Direction:          In
Profiles:           Domain,Private,Public
Grouping:           File and Printer Sharing over SMBDirect
LocalIP:            Any
RemoteIP:           Any
Protocol:           TCP
LocalPort:          5445
RemotePort:         Any
Edge traversal:     No
Action:             Allow
Rule Name:          Windows Management Instrumentation (ASync-In)
----------------------------------------------------------------------
Enabled:            No
Direction:          In
Profiles:           Domain,Private,Public
Grouping:           Windows Management Instrumentation (WMI)
... Output Deleted ...

Configuring the Firewall to Allow SMB

To use SMB tools, including remote file access, drive mappings, and management of local users and groups, the system must allow connections on TCP/445. By default, the initial installation of Windows Server blocks these connections.
C:\Users\jbach>netsh advfirewall firewall show rule name="File and Printer Sharing (SMB-In)"
Rule Name:          File and Printer Sharing (SMB-In)
----------------------------------------------------------------------
Enabled:            No
Direction:          In
Profiles:           Domain,Private,Public
Grouping:           File and Printer Sharing
LocalIP:            Any
RemoteIP:           Any
Protocol:           TCP
LocalPort:          445
RemotePort:         Any
Edge traversal:     No
Action:             Allow
Ok.
These connections can be allowed by enabling this rule.
C:\Users\jbach>netsh advfirewall firewall set rule name="File and Printer Sharing (SMB-In)" new enable=yes
Updated 1 rule(s).
Ok.

This now allows the use of RPC-based tools, including drive mapping, services, and local users and groups (Figure 7-2). If the remote registry service is running, the administrator can also manage the registry remotely.

Configuring the Firewall to Allow RPC

The command line can also be used to allow RPC traffic through the firewall; this allows an administrator to remotely manage the event logs, scheduled tasks, processes, or services on the remote system using graphical tools.

There are predefined rules to allow RPC traffic for selected services. Rather than use these predefined rules for individual services, it is possible to set up custom firewall rules that permit RPC traffic in general. To permit connections to the endpoint mapper TCP/135, the administrator can create a rule with the command
C:\Users\jbach>netsh advfirewall firewall add rule name="CUSTOM RPC EPMAP" dir=in action=allow protocol=TCP localport=RPC-EPMap
Ok.
To allow traffic to the dynamically chosen RPC ports, the administrator can create the rule
C:\Users\jbach>netsh advfirewall firewall add rule name="CUSTOM RPC" dir=in action=allow protocol=TCP localport=RPC
Ok.

With these firewall rules in place, the administrator can use graphical tools remotely like Event Viewer and Task Scheduler (Figure 7-4).

If both SMB and RPC traffic are permitted, the administrator can use Sysinternals tools like psservice, pslist, and psexec.

To manage the firewall remotely using RPC, two additional rules can be enabled.
C:\Users\jbach>netsh advfirewall firewall set rule name="Windows Firewall Remote Management (RPC)" new enable=yes
Updated 1 rule(s).
Ok.
C:\Users\jbach>netsh advfirewall firewall set rule name="Windows Firewall Remote Management (RPC-EPMAP)" new enable=yes
Updated 1 rule(s).
Ok.

Allowing Windows Remote Management via the Command Line

The Windows Remote Management Service is started by default on Windows Server 2012 and later.
C:\Users\jbach>sc queryex winrm
SERVICE_NAME: winrm
        TYPE               : 20  WIN32_SHARE_PROCESS
        STATE              : 4  RUNNING
                                (STOPPABLE, NOT_PAUSABLE, ACCEPTS_SHUTDOWN)
        WIN32_EXIT_CODE    : 0  (0x0)
        SERVICE_EXIT_CODE  : 0  (0x0)
        CHECKPOINT         : 0x0
        WAIT_HINT          : 0x0
        PID                : 860
        FLAGS              :

If it is not started, the service can be started with the command sc start winrm and configured to start on subsequent boots with sc config winrm start=auto. The state of the Windows Remote Management system can also be configured from sconfig (Figure 7-11).

By default, the firewall also allows traffic to the service.
C:\Users\jbach>netsh advfirewall firewall show rule name="Windows Remote Management (HTTP-In)"
Rule Name:          Windows Remote Management (HTTP-In)
----------------------------------------------------------------------
Enabled:            Yes
Direction:          In
Profiles:           Public
Grouping:           Windows Remote Management
LocalIP:            Any
RemoteIP:           LocalSubnet
Protocol:           TCP
LocalPort:          5985
RemotePort:         Any
Edge traversal:     No
Action:             Allow
Rule Name:          Windows Remote Management (HTTP-In)
----------------------------------------------------------------------
Enabled:            Yes
Direction:          In
Profiles:           Domain,Private
Grouping:           Windows Remote Management
LocalIP:            Any
RemoteIP:           Any
Protocol:           TCP
LocalPort:          5985
RemotePort:         Any
Edge traversal:     No
Action:             Allow
Ok.

Together these allow a remote user to make remote connections to the system using either winrs or the PowerShell command Enter-PSSession.

On Windows Server 2008 R2, some additional work needs to be done. From the sconfig tool (Figure 7-11), select Configure Remote Management, then enable Windows PowerShell; this may require a system reboot. When this is complete, return to sconfig, again select Configure Remote Management, and select Allow Server Remote Management.

Server Manager

Server Manager can be used to manage systems remotely. Server Manager is included in the Remote Server Administration tools, so an Administrator can manage servers from a workstation without needing to log in to a server from the console.

Windows Server 2012 and Later

Windows Server 2012 and later use version 3.0 of the Windows Remote Management System. These can be managed remotely by Server Manager on Windows Server 2012 or later as well as by Windows 8 or later.

Launch Server Manager, then from the Dashboard select Add other servers to Manage (Figure 6-1). The administrator can select the additional server by specifying its name from Active Directory or from DNS. Once the server is managed, the administrator can add roles and features to the remote system from Server Manager by navigating Manage Add Roles and Features, then selecting the remote server from the server pool.

To configure a remote server as a domain controller, proceed as in Chapter 6 to select Active Directory Domain Services as the role, and choose the remote server as the destination server. Once the role is added, the user will be informed that configuration for Active Directory Domain Services is required. From the notification, select the option to promote the server to a domain controller. This launches the Active Directory Domain Services Configuration Wizard (Figure 6-2) which can be used to complete the process.

The tools provided by Server Manager can be used on the remote systems.

Windows Server 2008 R2

Windows Server 2008 R2 uses version 2.0 of the Windows Remote Management System and cannot be managed by any system using version 3.0. It can be managed remotely by Server Manager from Windows Server 2008 R2 as well as by Windows 7.

Although Server Manager on Windows 7 can be used to manage the roles and features on a Remote Windows Server 2008 R2 installation (Figure 7-12), it cannot be used to add or remove roles and features. One way this can be done is from the command line. The command oclist shows the available optional components.
C:\Users\jbach>oclist
Use the listed update names with Ocsetup.exe to install/uninstall a server role or optional feature.
Adding or removing the Active Directory role with OCSetup.exe is not supported. It can leave your server in an unstable state. Always use DCPromo to install or uninstall Active Directory.
===========================================================================
Microsoft-Windows-ServerCore-Package
Not Installed:BitLocker
Not Installed:BitLocker-RemoteAdminTool
Not Installed:CertificateServices
Not Installed:ClientForNFS-Base
Not Installed:CoreFileServer
Not Installed:DFSN-Server
Not Installed:DFSR-Infrastructure-ServerEdition
Not Installed:DHCPServerCore
Not Installed:DNS-Server-Core-Role
... Output Deleted ...
These optional components can be added with ocsetup. For example, to configure a Windows Server 2008 R2 system to act as a DNS server, from the command prompt on the server, run
C:\Users\jbach>start /w ocsetup DNS-Server-Core-Role
The start command is needed so that ocsetup runs in a separate window, and the /w switch requires the command to complete before returning to the command prompt. Details on this process can be found at https://technet.microsoft.com/en-us/library/dd673656.aspx .
../images/333712_2_En_7_Chapter/333712_2_En_7_Fig12_HTML.jpg
Figure 7-12

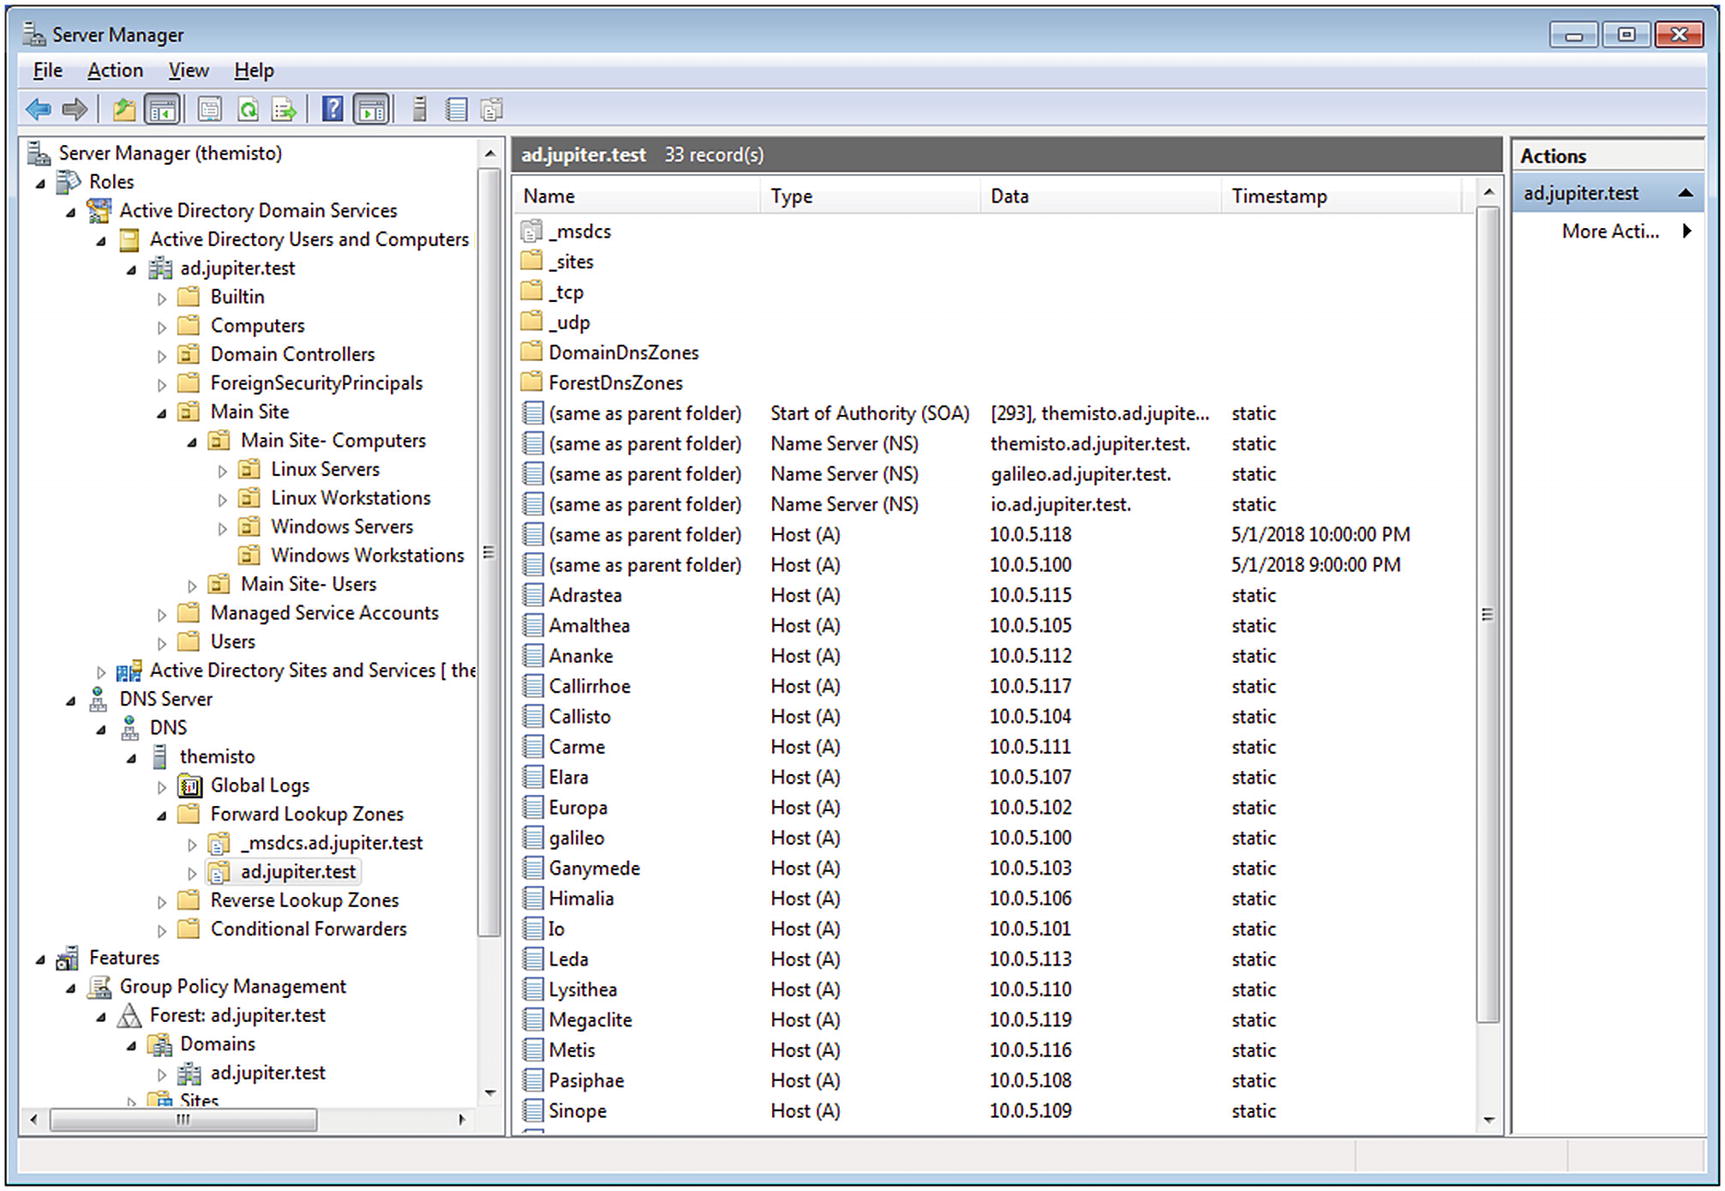
Server Manager running on Windows 7 SP1 connected to the remote server themisto, which has been promoted to a domain controller and had the DNS role installed

To configure Windows Server 2008 R2 Core as a domain controller, the administrator does not need to add the Active Directory role. Instead, the administrator runs dcpromo from the command line, specifying the domain configuration. This can be done with an answer file, or directly from the command line.

For example, suppose that the domain ad.jupiter.test exists with the domain administrator aeinstein, and that the administrator wants to add the Windows Server 2008 R2 Core system as another domain controller on this domain. The administrator can then run
C:\Users\aeinstein>dcpromo /unattend /CreateOrJoin:join /ReplicaDomainDNSName=ad.jupiter.test /ReplicaOrNewDomain:Replica/UserDomain:ad.jupiter.test /Username:aeinstein
/password:* /InstallDNS:yes /ConfirmGC:Yes /SafeModeAdminPassword:password1!
Checking if Active Directory Domain Services binaries are installed...
Warning: CreateOrJoin and TreeOrChild are deprecated, although they are still supported.  Consider using ReplicaOrNewDomain and NewDomain instead.
Active Directory Domain Services Setup
Validating environment and parameters...
A delegation for this DNS server cannot be created because the authoritative parent zone cannot be found or it does not run Windows DNS server. If you are integrating with an existing DNS infrastructure, you should manually create a delegation to this DNS server in the parent zone to ensure reliable name resolution from outside the domain "ad.jupiter.test". Otherwise, no action is required.
----------------------------------------
The following actions will be performed:
Configure this server as an additional Active Directory domain controller for the domain "ad.jupiter.test".
Site:
Additional Options:
  Read-only domain controller: "No"
  Global catalog: Yes
  DNS Server: Yes
Update DNS Delegation: No
Source domain controller: any writable domain controller
Database folder: C:\Windows\NTDS
Log file folder: C:\Windows\NTDS
SYSVOL folder: C:\Windows\SYSVOL
... Ouput Deleted ...

For more information about this process, see https://support.microsoft.com/en-us/help/947034/how-to-use-unattended-mode-to-install-and-remove-active-directory-doma.

Notes and References

For the benefit of the reader, some of the more interesting WMI classes, events, and subscription classes are summarized.

Useful WMI Classes

This list of interesting WMI classes includes the name of the class, its WinRM alias, its wmic alias (if it has one), the instances it typically has, along with some interesting properties and methods (if any). This list is not exhaustive.
  • WMI Class: root\cimv2\Win32_Account
    • WinRM alias: wmi/root/cimv2/Win32_Account

    • wmic alias: useraccount

    • Instances: One for each account or group on the local system or on the domain.

    • Properties: Information about the account, including name, domain, SID, status, and lockout status.

    • Methods: None

  • WMI Class: root\cimv2\Win32_BIOS
    • WinRM alias: wmi/root/cimv2/Win32_BIOS

    • wmic alias: bios

    • Instances: One

    • Properties: Information about the BIOS of the system, including its name and version. The BIOS may indicate that the system is a virtual machine by considering the manufacturer or the SMBIOSBIOSVersion property.

    • Methods: None

  • WMI Class: root\cimv2\Win32_BootConfiguration
    • WinRM alias: wmi/root/cimv2/Win32_BootConfiguration

    • wmic alias: bootconfig

    • Instances: One

    • Properties: Information about the boot configuration, including the location of the Windows directory and the last drive on the system.

    • Methods: None

  • WMI Class: root\cimv2\Win32_ComputerSystem
    • WinRM alias: wmi/root/cimv2/Win32_ComputerSystem

    • wmic alias: computersystem

    • Instances: One

    • Properties: Information about the system, including hostname, whether it is part of a domain (including the name of that domain), as well as the primary owner of the system. The property model may be used to determine if the system is a virtual machine.

    • Methods: There are methods to rename the system, as well as to join or unjoin a domain or workgroup.

  • WMI Class: root\cimv2\Win32_Desktop
    • WinRM alias: wmi/root/cimv2/Win32_Desktop

    • wmic alias: desktop

    • Instances: One for each desktop, including the default; one for system; and one for any logged-in user.

    • Properties: General information about the desktop, including the wallpaper.

    • Methods: None

  • WMI Class: root\cimv2\Win32_Directory
    • WinRM alias: wmi/root/cimv2/Win32_Directory

    • wmic alias: None

    • Instances: One for each directory on the system, including network shared drives.

    • Properties: Data about the directory, including its name, creation data, drive, file type, status, and whether it is writeable and/or encrypted.

    • Methods: None

  • WMI Class: root\cimv2\Win32_Environment
    • WinRM alias: wmi/root/cimv2/Win32_Environment

    • wmic alias: environment

    • Instances: One for each environment variable

    • Properties: Properties of the environment variable, including its name, status, value. and whether it is a system variable.

    • Methods: None

  • WMI Class: \root\cimv2\Win32_Group
    • WinRM alias: wmi/root/cimv2/Win32_Group

    • wmic alias: group

    • Instances: One for each group on the local system or the domain.

    • Properties: Name, caption, and SID for each group.

    • Methods: Rename the group.

  • WMI Class: \root\cimv2\Win32_GroupInDomain
    • WinRM alias: wmi/root/cimv2/Win32_Group

    • wmic alias: None

    • Instances: One for each case where a user is a member of a group.

    • Properties: The user and the group that has the user as a member.

    • Methods: None

  • WMI Class: \root\cimv2\Win32_IP4RouteTable
    • WinRM alias: wmi/root/cimv2/Win32_IP4RouteTable

    • wmic alias: None

    • Instances: One for each IPv4 route destination

    • Properties: Properties of the network route, including the destination, netmask, and next hop.

    • Methods: None

  • WMI Class: \root\cimv2\Win32_LoggedOnUser
    • WinRM alias: wmi/root/cimv2/Win32_LoggedOnUser

    • wmic alias: None

    • Instances: One for each logged-on user. Administrative privileges are needed to see all the instances.

    • Properties: The logon name, domain, and logon ID.

    • Methods: None

  • WMI Class: \root\cimv2\Win32_LogOnSession
    • WinRM alias: wmi/root/cimv2/Win32_LogOnSession

    • wmic alias: logon

    • Instances: One for each logon event. Administrative privileges are needed to see all the instances.

    • Properties: The logon ID, the logon time, and the authentication method. It does not include the user.

    • Methods: None

  • WMI Class: \root\cimv2\Win32_NetworkAdapter
    • WinRM alias: wmi/root/cimv2/Win32_NetworkAdapter

    • wmic alias: None

    • Instances: One for each network adapter.

    • Properties: Adapter name, type of connection, MAC address, speed, and the time it was last reset.

    • Methods: An adapter can be enabled, disabled, or reset; the power state can also be set.

  • WMI Class: \root\cimv2\Win32_NetworkLoginProfile
    • WinRM alias: wmi/root/cimv2/Win32_NetworkLoginProfile

    • wmic alias: None

    • Instances: One for each user that has logged on to the system.

    • Properties: Account name, the last time the user logged on, the number of times the user logged on, the password age, the password’s expiration, and the user ID. Administrative privileges are needed to see all the instances.

    • Methods: None

  • WMI Class: \root\cimv2\Win32_NTEventLogFile
    • WinRM alias: wmi/root/cimv2/Win32_NTEventLogFile

    • wmic alias: None

    • Instances: One for each of the Windows system logs. Without administrative privileges, no information is provided about the security log.

    • Properties: The log name, the number of records it has, the file containing the data, its maximum size, the overwrite policy, the time of the last access, the time of its last modification, and whether is readable or writeable.

    • Methods: Back up, copy, clear, delete, compress, uncompress or rename the log.

  • WMI Class: \root\cimv2\Win32_NTLogEvent
    • WinRM alias: wmi/root/cimv2/Win32_NTLogEvent

    • wmic alias: None

    • Instances: One for each entry in any of the Windows system logs. Without administrative privileges, no information is provided from the security log.

    • Properties: The log file, computer name, the time the log entry was generated, the time the log entry was written, the type, and the message.

    • Methods: None

  • WMI Class: \root\cimv2\Win32_OperatingSystem
    • WinRM alias: wmi/root/cimv2/Win32_OperatingSystem

    • wmic alias: os

    • Instances: One

    • Properties: Operating system name, version, build number, install date, serial number, last boot time, system directory, and Windows directory.

    • Methods: Set the date/time of the system, shut down the system, and reboot the system.

  • WMI Class: \root\cimv2\Win32_Process
    • WinRM alias: wmi/root/cimv2/Win32_Process

    • wmic alias: process

    • Instances: One for each process running on the system.

    • Properties: Name, PID, when the process was started, and the command line used to start the process.

    • Methods: Create a new process, terminate an existing process, query the properties of the process, set its priority, or attach a debugger.

  • WMI Class: \root\cimv2\Win32_QuickFixEngineering
    • WinRM alias: wmi/root/cimv2/Win32_QuickFixEngineering

    • wmic alias: qfe

    • Instances: Each hotfix that it installed on the system generates an instance.

    • Properties: The hotfix ID, caption, a description, the user that installed the hotfix, and the date that the hotfix was installed are recorded.

    • Methods: None

  • WMI Class: \root\cimv2\Win32_Service
    • WinRM alias: wmi/root/cimv2/Win32_Service

    • wmic alias: service

    • Instances: One for each service on the system.

    • Properties: Service name; its caption; the binary for the service; the account name used to run the service; its state; whether it is started, and if it is started, its PID.

    • Methods: Create, delete, start, pause, or stop a service.

  • WMI Class: \root\cimv2\Win32_Share
    • WinRM alias: wmi/root/cimv2/Win32_Share

    • wmic alias: share

    • Instances: One for each share on the system.

    • Properties: Name, caption, description, path, and status of the share.

    • Methods: Create, delete shares.

  • WMI Class: \root\cimv2\Win32_StartupCommand
    • WinRM alias: wmi/root/cimv2/Win32_StartupCommand

    • wmic alias: startup

    • Instances: One for each startup command, including those in the registry located in HKLM\SOFTWARE\Microsoft\Windows\CurrentVersion\Run or HKLM\SOFTWARE\Microsoft\Windows\CurrentVersion\RunServices.

    • Properties: The command, its name, its caption and description, the user that runs the startup command, and the location where the startup command lies in the file system.

    • Methods: None

  • WMI Class: \root\cimv2\Win32_Volume
    • WinRM alias: wmi/root/cimv2/Win32_Volume

    • Wmic alias: volume

    • Instance: One for each drive connected to the system, including network shares.

    • Properties: Many, including the device ID, its file system, and its caption (drive letter).

    • Methods: Many, including methods to mount or dismount the disk, to run utilities like defrag or chkdisk, to set the power state, and the ability to reset the disk.

  • WMI Class: \root\default\StdRegProv
    • WinRM alias: wmi/root/default/StdRegProv

    • Instances: None

    • Properties: None

    • Methods: Creating, enumerating, or deleting registry keys; getting or setting registry values.

  • WMI Class: \root\SecurityCenter2
    • WinRM alias: wmi/root/SecurityCenter2/AntiVirusProduct

    • wmic alias: None

    • Instances: One for each antivirus product installed on the system.

    • Properties: These include the name, and the path to the executable of the antivirus product.

    • Methods: None

Note that for WinRM aliases, the combination wmi/root/cimv2 can be abbreviated to wmicimv2.

Useful WMI Events

There are several interesting WMI events; these include the following:
  • \root\cimv2\Win32_DeviceChangeEvent
    • Occurs when a device is added, removed, or modified; this includes changes in hardware or newly mapped devices or drives, including network drives.

    • Includes the time and event type.

  • \root\cimv2\Win32_VolumeChangeEvent
    • Occurs when a local drive is added, removed, or modified; this does not include network drives.

    • Includes the time, drive name, and event type.

  • \root\cimv2\Win32_ProcessStartTrace
    • Occurs when a new process is started.

    • Includes the process ID, process name, parent process ID, SID, session ID, and the time.

  • \root\cimv2\Win32_ProcessStopTrace
    • Occurs when a process is stopped.

    • Includes the process ID, process name, parent process ID, SID, session ID, exit status, and time.

  • \root\cimv2\RegistryKeyChangeEvent
    • Occurs when a registry key is changed.

    • Includes the hive and the key path.

    • Does not track changes to HKEY_CLASSES_ROOT or HKEY_CURRENT_USER.

  • \root\cimv2\RegistryTreeChangeEvent
    • Occurs when a registry key and subkeys are changed.

    • Includes the hive and the registry key that contains the subkeys.

    • Does not track changes to HKEY_CLASSES_ROOT or HKEY_CURRENT_USER.

  • \root\cimv2\RegistryValueChangeEvent
    • Occurs when a single value of a key is changed.

    • Includes the hive, key path, and the value.

    • Does not track changes to HKEY_CLASSES_ROOT or HKEY_CURRENT_USER.

  • \root\cimv2\Win32_ComputerShutdownEvent
    • Occurs when the computer begins to shut down, restart, or a user logs off.

    • Includes the time, and the type - logoff or shutdown/reboot.

  • __InstanceCreationEvent
    • Occurs whenever a new instance is added to the namespace.

    • Includes the time and the object being added.

  • __InstanceDeletionEvent
    • Occurs whenever a new instance is deleted from the namespace.

    • Includes the time and the object being added.

Useful WMI Subscription Classes

Interesting WMI subscription classes include the following:
  • \root\subscription\ActiveScriptEventConsumer

  • \root\subscription\CommandLineEventConsumer

  • \root\subscription\LogFileEventConsumer

  • \root\subscription\NTEventLogEventConsumer

  • \root\subscription\SMTPEventConsumer

References

The firewall rule proposed in the text to allow remote RPC calls can be tightened by choosing the program or service to which they apply. There are several predefined rules for RPC available in the New Inbound Rule Wizard that can be used for particular services. The advantage of the approach in the text is that only the one rule is needed for all the various examples, rather than separate rules for each service. At the same time, separate rules would allow for tighter control over what passes through the firewall.

For more information about WinRM and winrs, the reader is best served by Microsoft’s documentation. For WinRM, try https://docs.microsoft.com/en-us/windows/desktop/WinRM/portal while for winrs, try https://technet.microsoft.com/en-us/library/hh875630(v=ws.11).aspx . To configure WinRM to listen over HTTPS, try https://blogs.technet.microsoft.com/meamcs/2012/02/24/how-to-force-winrm-to-listen-interfaces-over-https/.

The book Windows Command Line Administration Instant Reference by John Paul Mueller (Sybex, 2010) has nice material that covers the wmic command-line tool.

Another nice introduction to WMI and MOF is https://www.codeproject.com/Articles/27914/WMI-MOF-Basics .

There are many WMI scripts available for download at https://gallery.technet.microsoft.com/scriptcenter/site/search?f%5B0%5D.Type=Tag&f%5B0%5D.Value=WMI.

For more about the difference between the WMI PowerShell cmdlets and the CIM cmdlets, see https://blogs.msdn.microsoft.com/powershell/2012/08/24/introduction-to-cim-cmdlets/ .

For more information about how to add or remove the GUI on Windows Server 2012 or 2012 R2, try https://blogs.technet.microsoft.com/gbanin/2012/12/11/converting-a-server-with-a-gui-to-or-from-server-core/ or https://blogs.technet.microsoft.com/heyscriptingguy/2013/01/25/use-powershell-to-remove-the-gui-on-windows-server-2012/ .

The announcement that Windows Server 2016 does not support adding or removing the GUI was made at, for example, https://cloudblogs.microsoft.com/windowsserver/2017/04/05/switching-between-windows-server-2016-server-core-and-desktop-experience/ .