Chapter 2. Visual Studio 2005
In Chapter 1, you learned that you can create your C# applications using Notepad. In this chapter, you’ll learn why you never will. Microsoft developed Visual Studio 2005 to facilitate the creation of Windows and web applications. You will find that this Integrated Development Environment (IDE) is a very powerful tool that will greatly simplify your work.
Visual Studio 2005 offers many advantages to the .NET developer, among them:
A modern interface, using a tabbed document metaphor for code and layout screens, and dockable toolbars and information windows.
Convenient access to multiple design and code windows (this will make more sense when you are creating web applications, as shown in Chapter 19).
WYSIWYG (What You See Is What You Get) visual design of Windows and Web Forms.
Code completion, which allows you to enter code with fewer errors and less typing.
IntelliSense, which displays tips for every method, providing the return type and the types of all the parameters.
Dynamic, context-sensitive help, which allows you to view topics and samples relevant to the code you are writing at the moment. You can also search the complete SDK library from within the IDE.
Immediate flagging of syntax errors, which allows you to fix problems as they are entered.
A Start Page, which provides easy access to new and existing projects.
The same code editor for all .NET languages, which shortens the learning curve. Each language can have specialized aspects, but all languages benefit from shared features, such as incremental search, code outlining, collapsing text, line numbering, and color-coded keywords.
An HTML editor, which provides both Design and HTML views that update each other in real time.
A Solution Explorer, which displays in outline form all the files comprising your solution.
An integrated debugger, which allows you to step through code, observe program runtime behavior, and set breakpoints, even across multiple languages and multiple processes.
Customization capability, which allows you to set user preferences for IDE appearance and behavior.
Integrated support for source control software.
A built-in task list.
Ability to modify your controls’ properties, either declaratively or through a properties window.
Ability to integrate custom controls that you create or purchase from a third party.
Rapid and easy deployment, including the ability to copy an entire web site development project from one machine to another.
Ability to integrate third-party tools into Visual Studio.
Ability to program extensions to Visual Studio.
Ability to rename methods, properties, etc. and have them renamed automatically throughout the program.
In addition, Microsoft has added these new features to VS2005:
Support for all three coding models: inline, code-behind, and mixed inline and code-behind.
Access to web sites through the filesystem, FTP, IIS, or Front Page Server Extensions. (You no longer need to install IIS on the developer’s machine, because a built-in web server is provided.)
Full support for look-and-feel features, such as skins, themes, and master pages.
A Server Explorer, which allows you to log on to servers that you have network access to, access the data and services on those servers, drag and drop data sources onto controls, and perform a variety of other chores.
Ability to import and export user preferences.
Integrated build and compile support.
Ability to drag and drop controls onto your web page, either in design mode or in HTML mode.
Visual Studio 2005 is a highly useful tool that can save you hours of repetitive tasks. It is also a large and complex program, so it is impossible in this chapter to explore every nook and cranny. Instead, this chapter will lay the foundation for understanding and using Visual Studio 2005, and will point out some of the nastier traps you might run into along the way.
Before You Read Further
This chapter has a lot of information in it, and you won’t need all of it all at once. In fact, much of the information will not even apply to console applications, but will be valuable when you are ready to create Windows or web applications.
Many readers like to skim this chapter the first time through, and then come back for the details later. But it is your book, you paid for it (you did pay for it, didn’t you?), and so you are free to read the entire chapter, take notes as you go, skip it entirely, or otherwise use it to your best advantage.
Whether or not you read this chapter, I do strongly recommend you spend time (lots and lots of time) exploring Visual Studio in detail. You will forever be surprised at how much is in there and how much you can set it up to behave as you want; it is your principal development tool. Ignoring Visual Studio would be like a race car driver never looking under the hood. In time, you not only want to know how to change the oil, but you also want to understand how the valves work and why the linkage sticks.
Start Page
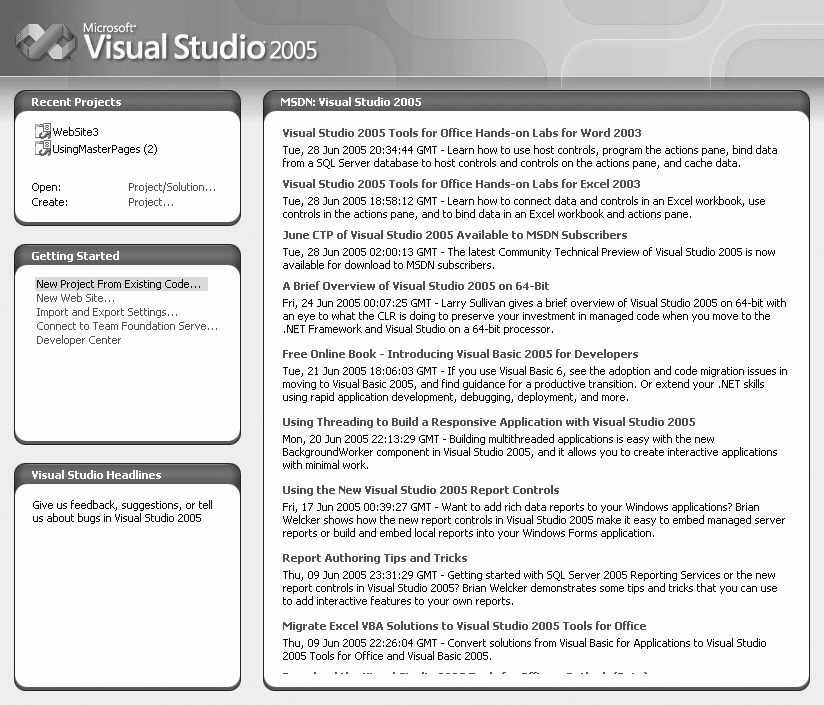
The Start Page is the first thing you see when you open Visual Studio 2005 (unless you configure it otherwise). From here, you can create new projects or open a project you worked on in a previous session. You can also find out what is new in .NET, access .NET newsgroups and web sites, search for help online, download useful code, or adjust Visual Studio 2005 to your personal requirements. Figure 2-1 shows a typical Start Page.
The Start Page includes a list of recent projects (clicking on one will open it), along with the ability to open any project on your computer or to create a new one. The Getting Started box provides links to features and helpful sites, and the large box on the right contains useful articles from MSDN online.
Projects and Solutions
A C# program is built from source files, which are text files containing the code you write. Source code files are named with the .cs extension. The HelloWorld.cs file you created in Chapter 1 is an example.
A typical Visual Studio 2005 application can have a number of other files (such as assembly information files, references, icons, data connections, and more). Visual Studio 2005 organizes these files into a container called a project.
Visual Studio 2005 provides two types of containers for your source code, folders, files, and related material: the project and the solution. A project is a set of files that work together to create an executable program (.exe) or a dynamic link library (.dll). Large, complex projects may contain multiple .dll files.
A solution is a set of related projects, although it may also have just one project. Each time you create a new project, Visual Studio 2005 either adds it to an existing solution or creates a new solution.
Solutions are defined within a file named for the solution, and have the extension .sln. The .sln file contains metadata, which is basically information about the data. The metadata describes the projects that compose the solution and information about building the solution.
Tip
Visual Studio 2005 also creates a file with the same base name as the .sln file, but with the filename extension .sou (such as mySolution.sln and mySolution.sou). The .sou file contains metadata used to customize the IDE.
There are a number of ways to open an existing solution. The simplest way is to select Open Project from the Start menu (which opens a project and its enclosing solution). Alternatively, you can open a solution in Visual Studio 2005 just by double-clicking the .sln file in Windows Explorer.
Typically, the build process results in the contents of a project being compiled into an executable (.exe) file or a dynamic link library (.dll) file. This book focuses on creating executable files.
Tip
The metadata describing the project is contained in a separate file named after the project with the extension .csproj. The project file contains version information, build settings, and references to other source files to include as part of the project.
Note that the metadata for the program you are creating is a different thing entirely, and is contained within the executable (.exe) or the DLL. What we are discussing here is metadata used by Visual Studio.
Web Sites
You can create many types of projects in Visual Studio 2005, including:
Console Application
Windows Application
Windows Service
Windows Control Libray
Web Control Library
Class Library
Pocket PC templates
SmartPhone templates
Windows CE templates
Crystal Reports Windows Application
SQL Server Project
Word and Excel Document and Template
Screen Saver
Web applications are notable in their absence from the list of projects you can create. Web applications do not use projects, just solutions.
A typical .NET web application is comprised of many items: content files (such as .aspx files), source files (such as .cs files), assemblies (such as .exe and .dll files) and assembly information files, data sources (such as .mdb files), references, and icons, as well as miscellaneous other files and folders. Visual Studio 2005 organizes these items into a folder that represents the web site. The web site folder is housed in a solution. When you create a new web site, Visual Studio 2005 automatically creates the solution.
Templates
When you create a new project, you get the New Project dialog box, shown in Figure 2-2.
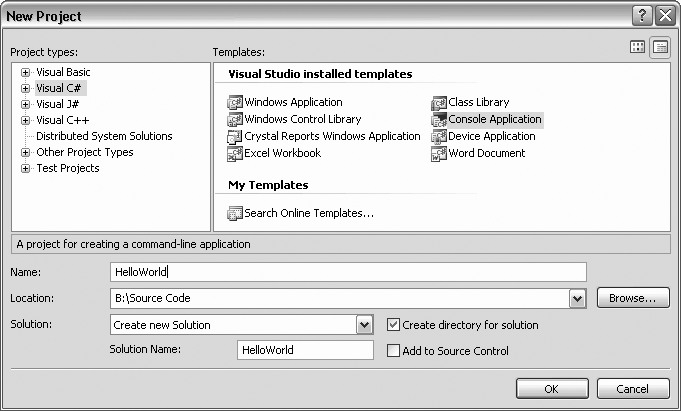
In the New Project dialog, you select the project type (in the left-hand pane) and the template (in the right). There are a variety of templates for each project type. A template is a file that Visual Studio 2005 uses to set up the initial state of your project.
For the examples in this book, you’ll always choose Visual C# for the project type, and in most cases, you’ll choose Console Application as the template. Specify the name of the directory in which your project will be stored in the Location Box and name your project in the Name box.
Inside the Integrated Development Environment
The Visual Studio 2005 Integrated Development Environment (IDE) is centered around an editor. An editor is much like a word processor, except that it produces simple text (that is, text with no formatting, such as bold and italics). All source code files are simple text files.
The Visual Studio 2005 IDE also provides support for building Graphical User Interfaces (GUIs ) , which are integral to Windows and web projects. The following pages introduce some of the key features of the IDE.
The IDE is a Multiple Document Interface (MDI ) application. There is a main window, and within the main window are a number of smaller windows. The central window is the text editing window. Figure 2-3 shows the basic layout.
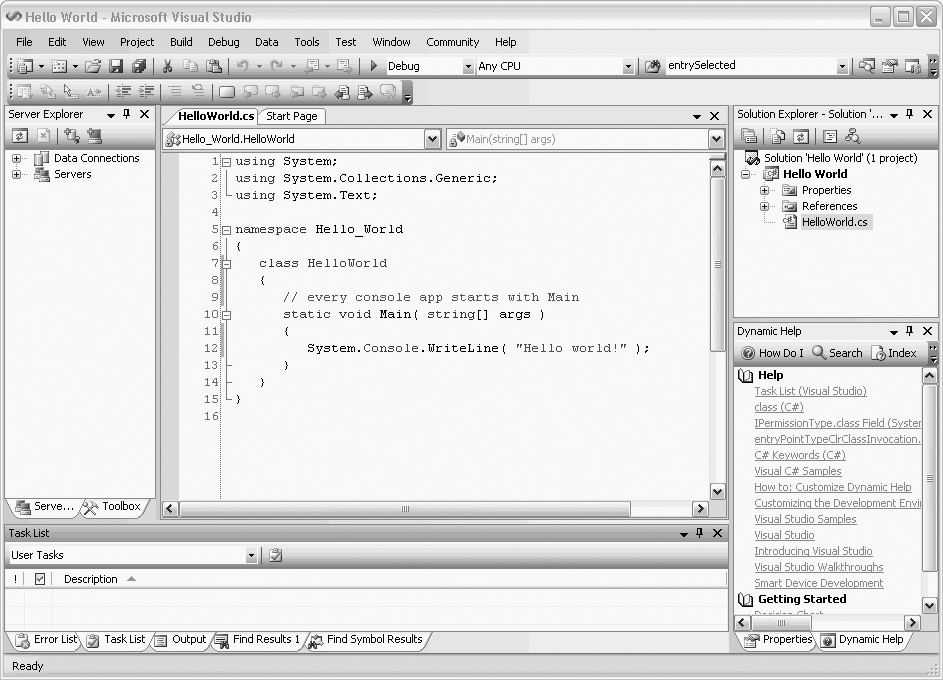
To the left of the editing window are a number of tabbed windows that contain tools used when creating Windows and web applications. To the right of the editing window are both stacked and tabbed windows. Shown on top is the Solution Explorer , which allows you to examine and manipulate the files in the solution. Below the Solution Explorer are two tabbed windows: Dynamic Help and Properties . The Properties window is used extensively when creating web and Windows desktop applications. Dynamic help will examine what you are doing and offer help on related topics.
At the bottom of the IDE are five tabbed windows: Error List , Task List , Output , Find Results , and Find Symbol Results .
All of these windows, plus the Toolbox, are resizable and dockable. They can be resized by placing the mouse cursor over the edge you want to move. The cursor will change to a double-arrow resizing cursor, at which point you can drag the window edge one way or the other.
Right-clicking on the title bar of a dockable window pops up a menu with five mutually exclusive check items:
- Floating
The window will not dock when dragged against the edge of the Visual Studio 2005 window. The floating window can be placed anywhere on the desktop, even outside the Visual Studio 2005 window.
- Dockable
The window can be dragged and docked along any side of the Visual Studio 2005 window, as you’ll see later in the chapter.
- Tabbed Document
The window occupies the work surface, with a set of tabs for navigation.
- Auto Hide
The window will disappear, indicated only by a tab, when the cursor is not over the window. It will reappear when the cursor is over the tab. A pushpin in the upper-right corner of the window will be pointing down when Auto Hide is turned off and pointing sideways when it is turned on.
- Hide
The window disappears. To see the window again (to unhide it), use the View main menu item.
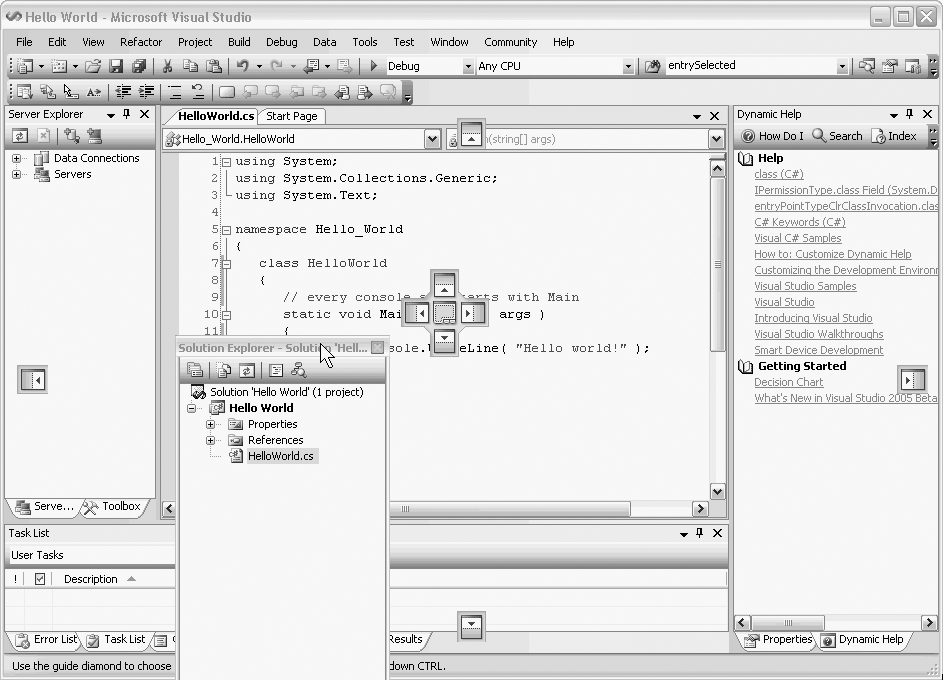
If you click the title bar of a window and drag it, it floats free. You can now place it where you want. Visual Studio 2005 provides guides to help you with locating the window. To see this at work, grab the Solution Explorer and pull it free of its current position. As you move about, the IDE positioning indicators appear, as shown in Figure 2-4.
As you click on each positioning indicator, a shadow appears to show you where the window would go if you release the mouse. Notice in the center of the editing window that there is a cluster of five indicators. If you choose the center square, the window will be tabbed with the current window. To put the Solution Explorer back where it belongs, hover over the Dynamic Help window; a five-part indicator will appear, and you can select the upper indicator to place Solution Explorer above the tabbed set of Properties and Dynamic Help.
You can also double-click on either the title bar or the tab to dock and undock the window. Double-clicking on the title while docked undocks the entire group. Double-clicking on the tab just undocks the one window, leaving the rest of the group docked.
Building and Running
You can run your application at any time by selecting either Start or Start Without Debugging from the Debug menu , or you can accomplish the same results by pressing either F5 or Ctrl-F5, respectively. You can also start the program by clicking the Start icon (▸) on the Standard toolbar.
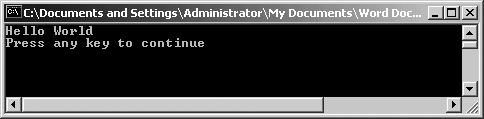
For console applications , the advantage of running the program with Ctrl-F5 is that Visual Studio 2005 will open your application in a console window, display its results, and then add a line to press a key when you are ready, as shown in Figure 2-5. This keeps the window open until you’ve seen the results and pressed a key, at which point the window will close.
The program can be built (that is, the .exe and .dll files can be generated) by selecting a command under the Build menu . You have the option of building the entire solution or only the currently selected project.
Menus and Toolbars
The menus provide access to many of the commands and capabilities of Visual Studio 2005. The more commonly used menu commands are duplicated with toolbar buttons for ease of use.
The menus and toolbars are context-sensitive (the available selection is dependent on what part of the IDE is currently selected, and what activities are expected or allowed). For example, if the current active window is a code-editing window for a console window, the top-level menu commands are: File , Edit , View, Refactor, Project, Build, Debug, Data, Tools, Test, Window, Community, and Help.
Many of the menu items have keyboard shortcuts, listed adjacent to the menu item itself. These are comprised of one or more keys (referred to as a chord), pressed simultaneously. Shortcut keys can be a huge productivity boost, because you can perform common tasks quickly, without removing your hands from the keyboard.
The following sections describe some of the more important menu items and their submenus, focusing on those aspects that are interesting and different from common Windows commands.
File Menu
The File menu provides access to a number of file-, project-, and solution-related commands. Many of these commands are content-sensitive.
As in most Windows applications, the New menu item creates new items to be worked on by the application.
Edit Menu
The Edit menu contains the text editing and searching commands that one would expect, but also includes commands useful in editing code. The most useful are discussed next.
Cycle Clipboard Ring
The Clipboard Ring is like copy-and-paste on steroids. You can copy a number of different selections to the Windows clipboard, using the Edit → Cut (Ctrl-X) or Edit → Copy (Ctrl-C) commands. Then use Ctrl-Shift-V to cycle through all the selections, allowing you to paste the correct one when it comes around.
Tip
Visual Studio Hot Keys can be changed systematically or individually; the ones referred to here and throughout this book are the “standard keys” used when programming in C#. Your mileage may vary.
This submenu item is context-sensitive and is visible only when editing a code window.
Find and Replace
Visual Studio 2005 includes a number of advanced Find and Replace options that you’ll use frequently. The most common ones are discussed in this section.
Quick Find and Quick Replace . These are just slightly jazzed names for slightly jazzed versions of the typical Find and Replace. You can access Quick Find with Ctrl-F, and Quick Replace with Ctrl-H. Both commands call essentially the same dialog boxes, switchable by a tab at the top of the dialog box, as shown in Figure 2-6.
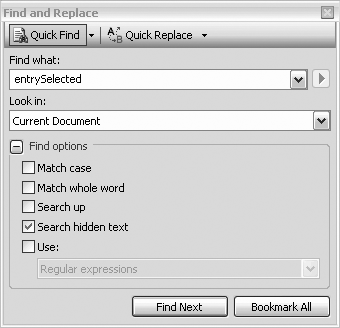
The search string defaults to the text currently selected in the code window, or, if nothing is selected, to the text immediately after the current cursor location.
The Look in: drop-down offers the choice of the Current Document, All Open Documents, the Current Project, and the current method.
Search options can be expanded or collapsed by clicking on the plus/minus button next to Find Options. By default, Search hidden text is checked, which allows the search to include code sections currently collapsed in the code window. The Use checkbox allows the use of either regular expressions or wildcards .
Tip
Regular expressions are a language unto themselves, expressly designed for incredibly powerful and sophisticated searches. A full explanation of regular expressions is beyond the scope of this book. For a complete discussion of regular expressions, see the SDK documentation or Mastering Regular Expressions, Second Edition, by Jeffrey E. F. Friedl (O’Reilly, 2002).
If the Use checkbox is checked, then the Expression Builder button to the right of the Find what textbox becomes enabled, providing a very handy way to insert valid regular expression or wildcard characters.
Once a search string has been entered in the Find what: text box, the Find Next button becomes enabled. In Quick Find mode, there is also a Bookmark All button, which finds all occurrences of the search string and places a bookmark (described below) next to the code.
In Quick Replace mode, there is also a Replace with text box, and buttons for replacing either a single occurrence or all occurrences of the search string.
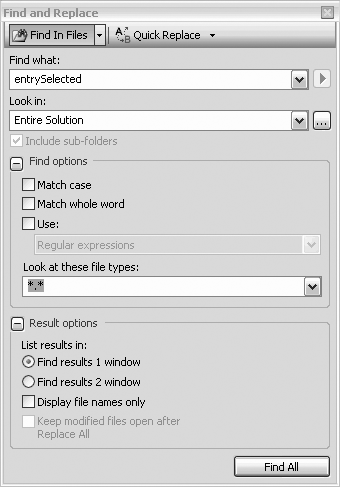
Find in Files . Find in Files (Ctrl-Shift-F) is a very powerful search utility that finds text strings anywhere in a directory or in subdirectories (subfolders). It presents the dialog box shown in Figure 2-7. Checkboxes present several self-explanatory options, including the ability to search using either wildcards or regular expressions.
Find Symbol . Clicking the Find Symbol command (Alt-F12) will bring up the Find Symbol dialog box , which allows you to search for symbols (such as namespaces, classes, and interfaces) and their members (such as properties, methods, events, and variables). It also allows you to search in external components for which the source code is not available.
The search results will be displayed in a window labeled Find Symbol Results. From there, you can move to each location in the code by double-clicking on each result.
Go To ...
This command brings up the Go To Line dialog box, which allows you to enter a line number and immediately go to that line. It is context-sensitive and is visible only when editing a text window.
Find All References
This is somewhat similar to Find Symbol under Find and Replace, except that rather than searching for any symbol, it only allows searches for methods that are referenced elsewhere in the project.
Insert File As Text ...
This command allows you to insert the contents of any file into your source code, as though you had typed it in. It is context-sensitive and is visible only when editing a text window.
A standard file-browsing dialog box is presented for searching for the file to be inserted. The default file extension will correspond to the project language, but you can search for any file with any extension.
Advanced
The Advanced command is context-sensitive and is visible only when editing a code window. It has many submenu items. These include commands for:
Creating or removing tabs in a selection (converting spaces to tabs and vice versa)
Forcing selected text to uppercase or lowercase
Deleting horizontal whitespace
Viewing whitespace (making tabs and space characters visible on the screen)
Toggling word wrap
Commenting and uncommenting blocks of text
Increasing and decreasing line indenting
Incremental searching (see the next section, "Incremental search“)
Incremental search
Incremental search allows you to search an editing window by entering the search string character by character. As each character is entered, the cursor moves to the first occurrence of matching text.
To use incremental search in a window, select the command on the Advanced submenu, or press Ctrl-I. The cursor icon will change to a binocular with an arrow indicating the direction of search. Begin typing the text string to search for.
The case sensitivity of an incremental search will come from the previous Find, Replace, Find in Files, or Replace in Files search (described earlier).
The search will proceed downward and left to right from the current location. To search backward, use Ctrl-Shift-I.
The key combinations listed in Table 2-1 apply to incremental searching.
Bookmarks
Bookmarks are useful for marking spots in your code and easily navigating from marked spot to marked spot. There are several context-sensitive commands on the Bookmarks submenu (listed in Table 2-2). Note that, unless you add the item to the task list, bookmarks are lost when you close the file, although they are saved when you close the solution (so long as the file was still open).
Command | Description |
Toggle Bookmark | Place or remove a bookmark at the current line. When a bookmark is set, a blue rectangular icon will appear in the column along the left edge of the code window. |
Enable/Disable | Enables or disables the checkboxes for all bookmarks in the Bookmarks window (does not remove bookmarks). |
Previous Bookmark | Move to the previous bookmark. |
Next Bookmark | Move to the next bookmark. |
Clear | Remove bookmark. |
Previous Bookmark in Folder | Move to the previous bookmark in the folder. |
Next Bookmark in Folder | Move to the next bookmark in the folder. |
Previous Bookmark in Document | Move to the previous bookmark in the current document. |
Next Bookmark in Document | Move to the next bookmark in the current document. |
Add Task List Shortcut | Add an entry to the Task List (described later in the "View Menu" section) for the current line. When a task list entry is set, a curved arrow icon appears in the column along the left edge of the code window. |
This menu item only appears when a code window is the current window.
Outlining
Visual Studio 2005 allows you to outline, or collapse and expand, sections of your code to make it easier to view the overall structure. When a section is collapsed, it appears with a plus sign in a box along the left edge of the code window. Clicking on the plus sign expands the region.
You can nest the outlined regions, so that one section can contain one or more other collapsed sections. There are several commands to facilitate outlining (shown in Table 2-3).
Command | Description |
Hide Selection | Collapses currently selected text. |
Toggle Outlining Expansion | Reverses the current outlining state of the innermost section in which the cursor lies. |
Toggle All Outlining | Sets all sections to the same outlining state. If some sections are expanded and some collapsed, then all become collapsed. |
Stop Outlining | Expands all sections. Removes the outlining symbols from view. |
Stop Hiding Current | Removes outlining information for currently selected section. |
Collapse to Definitions | Automatically creates sections for each procedure in the code window and collapses them all. |
Start Automatic Outlining | Restarts automatic outlining after it has been stopped. |
The default behavior of outlining can be set using the Tools → Options menu item. Go to Text Editor, and then the specific language for which you want to set the options. The outlining options can be set for VB.NET under Basic → VB Specific, for Visual Basic 2005 under Visual Basic 2005 → Formatting, and for C++ under C/C++ → Formatting.
IntelliSense
Microsoft IntelliSense technology makes the lives of programmers much easier. It has real-time, context-sensitive help available, which appears right under your cursor. Code completion automatically completes your thoughts for you, drastically reducing your typing. Drop-down-lists provide all methods and properties possible in the current context, available at a keystroke or mouse click.
Unlike previous versions of Visual Studio, IntelliSense now works in all code windows, including not only the Visual Basic 2005 code-behind files, but also within both server- (i.e., script) and client-side (i.e., HTML) code in content files.
The default IntelliSense features can be configured by going to Tools → Options and then the language-specific pages under Text Editor.
Most of the IntelliSense features appear as you type inside a code window, or allow the mouse to hover over a portion of the code. In addition, the Edit → IntelliSense menu item offers numerous commands, the most important of which are shown in Table 2-4.
Command | Description |
List Members | Displays a list of all possible members available for the current context. Keystrokes incrementally search the list. Press any key to insert the highlighted selection into your code; that key becomes the next character after the inserted name. Use the Tab key to select without entering any additional characters. This can also be accessed by right-clicking and selecting List Member from the context-sensitive menu. |
Parameter Info | Displays a list of number, names, and types of parameters required for a method, sub, function, or attribute. |
Quick Info | Displays the complete declaration for any identifier (such as a variable name or class name) in your code. This is also enabled by hovering the mouse cursor over any identifier. |
Complete Word | Automatically completes the typing of any identifier once you type in enough characters to uniquely identify it. This only works if the identifier is being entered in a valid location in the code. |
Insert Snippet | Displays a selection of code
snippets to insert, such as the complete syntax for a
|
Surround With | Displays a selection of code snippets to surround a block of code, such as a class declaration. |
The member list presents itself when you type a dot operator following any class or member name.
Every member of the class is listed, and each member’s type is indicated by an icon. There are icons for methods, fields, properties, events, and so forth. In addition, each icon may have a second icon overlaid to indicate the accessibility of the member: public, private, protected, and so on. If there is no accessibility icon, then the member is public.
Tip
If the member list does not appear, make sure that you have
added all the necessary using
statements.
Two of the subcommands under the IntelliSense menu item,
Insert Snippet and Surround With, tap into a great feature to reduce
typing and minimize errors: code
snippets . A code snippet is a chunk of code that replaces an
alias. A short alias is replaced with a much longer code snippet.
For example, the alias switch
would be replaced with:
    switch ( switch_on )
    {
       default:
    }
with the expression switch_on highlighted in yellow and the
cursor in place, ready to type in your own expression. In fact, all
the editable fields will be highlighted, and you can use the Tab key
to navigate through them, or Shift-Tab to go backwards. Any changes
made to the editable field are immediately propagated to all the
instances of that field in the code snippet. Press Enter or Esc to
end the field editing and return to normal editing.
To do a straight alias replacement, either select Insert Snippet from the menu, or more easily, press Ctrl-K, Ctrl-X. Alternatively, just type an alias in the code window and an IntelliSense menu will pop up with a list of aliases, with the current one highlighted.
Alternatively, a code snippet can surround highlighted lines
of code, say with a for
construct. To surround lines of code with a code snippet construct,
highlight the code, then either select Surround With from the menu,
or press Ctrl-K, Ctrl-S.
View Menu
The View menu is a context-sensitive menu that provides access to the myriad of windows available in the Visual Studio 2005 IDE. You will probably keep many of these windows open all the time; others you will use rarely, if at all.
The View menu is context-sensitive. For example, with an ASP.NET content file on the work surface, the first three menu items will be Code, Designer, and Markup, while the Code and Designer menu items will be omitted if looking at a code-behind file.
When the application is running, a number of other windows, primarily used for debugging, become visible or available. These windows are accessed via the Debug → Windows menu item, not from the View menu item.
Visual Studio 2005 can store several different window layouts. In particular, it remembers a completely different set of open windows during debug sessions than it does during normal editing. These layouts are stored per-user, not per-project or per-solution.
Class View
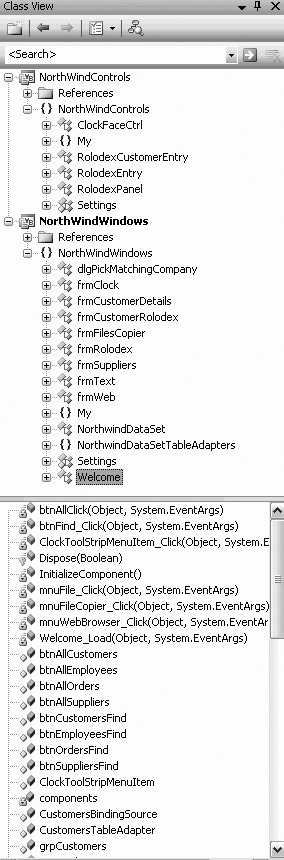
The Class View (Ctrl-Shift-C) shows all the classes in the solution in a hierarchical manner. A typical Class View, somewhat expanded, is shown in Figure 2-8.
As with the Solution Explorer, any item in the class view can be right-clicked, which exposes a pop-up menu with a number of context-sensitive menu items. This can provide a convenient way to sort the display of classes in a project or solution, or to add a method, property, or field to a class.
The button on the left above the class list allows for sorting the classes listed, either alphabetically, by type, by access, or grouped by type. Clicking on the button itself sorts by the current sort mode, while clicking on the down arrow next to it presents the other sort buttons and changes the sort mode.
The button on the right above the class list allows you to create virtual folders for organizing the classes listed. These folders are saved as part of the solution in the .suo file.
These folders are virtual (that is, they are illusory). They are only used for viewing the list. As such, they have no effect on the actual items. Items copied to the folder are not physically moved, and if the folders are deleted, the items in them are not lost. Note that if you rename or delete an object from the code that is in a folder, you may need to manually drag the item into the folder again to clear the error node.
Error List
The Error List window (Ctrl-W, Ctrl-E), which is available in all editor views, displays errors, warnings, and messages generated as you edit and compile your project. Syntax errors flagged by IntelliSense are displayed here, as well as deployment errors. Double-clicking on an error in this list will open the offending file and move the cursor to the error location.
Output
The Output window (Ctrl-Alt-O) displays status messages from the IDE, such as build progress. The Output window can be set to display by default when a build starts by going to Tools → Options → Projects and Solutions → General and checking “Show Output window when build starts.”
This window is available in all editor views.
Properties
The Properties window (F4) displays all the properties for the currently selected item. Some of the properties (such as Font) may have subproperties, indicated by a plus sign next to their entries in the window. The property values on the right side of the window are editable.
One thing that can be confusing is that certain items have more than one set of properties. For example, a Form content file can show two different sets of properties, depending on whether you select the source file in the Solution Explorer or the form as shown in the Design view.
A typical Properties window is shown in Figure 2-9.
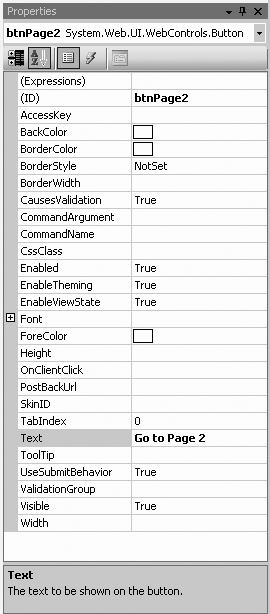
The name and type of the current object is displayed in the field at the top of the window. In Figure 2-9, it is an object named btnPage2 of type Button, contained in the System.Web.UI.WebControls namespace.
Most properties can be edited in place in the Properties window. The Font property has subproperties that may be set directly in the window by clicking on the plus sign to expand its subproperties, and then editing the subproperties in place.
The Properties window has several buttons just below the name and type of the object. The first two buttons on the left toggle the list by category or alphabetically. The next two buttons from the left toggle between displaying properties for the selected item and displaying events for the selected item. The rightmost button displays property pages for the object, if there are any.
Tip
Some objects have both a Properties window and property pages. The property pages display additional properties not shown in the Properties window.
The box below the list of properties displays a brief description of the selected property.
Task List
In large applications, keeping a to-do list can be quite helpful. Visual Studio 2005 provides this functionality with the Task List window .
Toolbox
The Toolbox command (Ctrl-Alt-X) displays the toolbox if it is not currently displayed. If it is currently displayed, nothing happens—it does not toggle the display. To hide the toolbox, click on the X in the toolbox title bar.
Other windows
There are several other windows that have been relegated to a submenu called Other Windows. These include:
- Bookmark window (Ctrl-K, Ctrl-W)
The Bookmark window displays bookmarks you create to allow you to return to a specific spot in your code quickly.
- Command window (Ctrl-Alt-A)
The Command window is used to enter commands directly.
- Document Outline (Ctrl-Alt-T)
The Document Outline displays the hierarchical structure of a web page or user control, including directives, script blocks, HTML elements, and server controls.
- Macro Explorer (Alt-F8)
Visual Studio 2005 offers the ability to automate repetitive chores with macros. A macro is a set of instructions written in VB.NET, either created manually or recorded by the IDE, saved in a file. The Macro Explorer is the one of the main tools for viewing, managing, and executing macros. It provides access into the Macro IDE.
- Object Browser (Ctrl-Alt-J)
The Object Browser is a tool for examining objects (such as namespaces, classes, and interfaces), and their members (such as methods, properties, variables, and events).
- Resource View (Ctrl-Shift-E)
This window displays the resource files included in the project . Resources are nonexecutable data deployed with an application, such as icons and graphics, culture-specific text messages, and persisted data objects.
- Server Explorer (Ctrl-Alt-S)
The Server Explorer allows you to access any server to which you have network access.
Refactor Menu
Refactoring is the process of taking code duplicated in various parts of your program and extracting them out to a callable method. This is an advanced procedure, so you won’t see any refactoring in this book.
Tip
For details on refactoring, we highly recommend the book Refactoring: Improving the Design of Existing Code, by Fowler, et al. (Addison Wesley, 1999).
The Refactor menu item is available when you’re looking at a code window for a web page, user control, or language source code file. It is also available from context menus when right-clicking on an identifier in a Class View, Object Browser, or Solution Explorer window.
The refactoring menu items will modify your code—for example, extracting common code to a method and then calling that method in the place from which it was extracted.
Project Menu
The Project menu provides functionality related to project management. It is only visible when the solution is selected in the Solution Explorer. All of the functionality exposed by the Project menu is also available in the Solution Explorer, by right-clicking on the solution.
Build Menu
The Build menu offers menu items for building the current project (highlighted in Solution Explorer) or the solution. It also exposes the Configuration Manager for configuring the build process.
Debug Menu
The Debug menu allows you to start an application with or without debugging, set breakpoints in the code, and control the debugging session.
Data Menu
This context-sensitive menu is visible only when in design mode when creating, for example, web applications.
Format Menu
The Format menu is visible only in design mode when creating, for example, web applications; further, the commands under it are context-sensitive to the control(s) currently selected.
Tools Menu
The Tools menu presents commands accessing a wide range of functionality, ranging from connecting to databases to accessing external tools to setting IDE options. Some of the more useful commands are described in the following sections.
Connect To Device
The Connect To Device command brings up a dialog box that allows you to connect to either a physical mobile device or an emulator.
Connect To Database
The Connect To Database command default brings up the dialog box that allows you to select a server, log in to that server, and connect to the database on the server. Microsoft SQL Server is the default database (surprise!), but the Change button allows you to connect to any number of other databases, including any for which there are Oracle or ODBC providers.
Code Snippets Manager
The Code Snippets Manager command (Ctrl-K, Ctrl-B) brings up the Code Snippets Manager dialog box, which allows you to maintain the code snippets (described previously in the "IntelliSense" section). This dialog box allows you to add or remove code snippets for any of the supported languages. You can also import code snippets and search online for code snippets.
Choose Toolbox Items
This command brings up the Choose Toolbox dialog box , allowing you to add COM components and custom controls. The details of doing so are beyond the scope of this book, but are covered in full in Programming ASP.NET by Jesse Liberty and Dan Hurwitz (O’Reilly, 2005).
External Tools
Depending on the options selected at the time Visual Studio 2005 was installed on your machine, you may have one or more external tools available on the Tools menu. These might include tools such as Create GUID or Dotfuscator Community Edition. (Use of these tools is beyond the scope of this book.)
The Tools → External Tools ... command allows you to add additional external tools to the Tools menu. When selected, you are presented with the External Tools dialog box. This dialog box has fields for the tool title, the command to execute the tool, any arguments and the initial directory, as well as several checkboxes for different behaviors.
Performance Tools
This menu item exposes a wizard for benchmarking and tuning performance , as well as a command for starting a new performance session.
Window Menu
The Window menu is a standard Windows application Window command. It displays a list of all the currently open windows, allowing you to bring any window to the foreground by clicking on it. Note that all the file windows currently displayed in the IDE also have tabs along the top edge of the work surface, below the toolbars (unless you have selected MDI mode in Tools → Options → Environment → General), and windows can be selected by clicking on a tab.
Summary
Visual Studio 2005 is a powerful tool with many features, to make writing programs easier.
The Start Page provides an overview of your programming environment, and a list of recent projects.
A solution is a set of related projects, and a project is a set of related code files and associated resources such as images, and so on.
Visual Studio 2005 has a number of templates that allow you to create particular types of projects, such as windows or web applications.
Among other things, Visual Studio 2005 provides “what you see is what you get” (WSYWYG) support for building, testing, and debugging graphical user interfaces (GUI).
Every window in Visual Studio 2005 can be resized and moved.
To run your application, select Start or Start Without Debugging, or press F5 or Ctrl-F5.
The Clipboard Ring can hold a number of different selections that you can cycle through.
The Find and Replace feature lets you locate text strings in the current file or other files, using normal text or regular expressions.
Bookmarks enable you to mark spots in your code so you can easily find them later.
IntelliSense saves you keystrokes and can help you discover methods and required arguments by (for example) listing possible completions to what you’re typing.
The Properties window displays properties for the currently selected item.
Quiz
- Question 2–1.
What is the difference between a project and a solution?
- Question 2–2.
How do you move windows in the IDE?
- Question 2–3.
What does the pushpin do on a window?
- Question 2–4.
What is the difference between pressing F5 and Ctrl-F5 from within Visual Studio 2005?
- Question 2–5.
What is the Clipboard Ring?
- Question 2–6.
How do you retrieve items from the clipboard ring?
- Question 2–7.
What is “Find Symbol” for?
- Question 2–8.
What are bookmarks?
- Question 2–9.
What is IntelliSense?
- Question 2–10.
What is a code snippet?
Exercise
- Exercise 2-1.
Insert a bookmark before the
Console.Writeline( )statement in Hello World. Navigate away from it and then use the bookmarks menu item to return to it.- Exercise 2-2.
Undock the Solution Explorer window from the right side of the IDE and move it to the left. Leave it there if you like, or move it back.
- Exercise 2-3.
Insert a code snippet for a
forloop from the Edit → Intellisense menu into your Hello World program. (It won’t do anything for now; you’ll learn aboutforloops in Chapter 4.)