Chapter 19. Programming ASP.NET Applications
In the previous chapter, you saw how to use C# to create Windows applications; in this chapter, you’ll see how to use C# to create applications for the Web.
The .NET technology for building web applications (and dynamic web
sites) is ASP. NET 2.0, which provides a rich collection of types for
building web applications in its System.Web and System.Web.UI namespaces. There is a great deal
to learn about ASP.NET, but much of it is language-independent. ASP.NET
offers a rich suite of controls and related tools, including tools to
validate data, display dates, present advertisements, interact with users,
and so forth. Most of these require no coding whatsoever.
Tip
For more on the details of ASP.NET, please see Programming ASP.NET, Third Edition, by Jesse Liberty and Dan Hurwitz (O’Reilly, 2005).
The role of the C# programmer in ASP.NET development is to write the event handlers that respond to user interaction. Many of the event handlers will either add data to a database or retrieve data and make it available to the controls.
With Web Forms , the application is deployed to a web server, and users interact with the application through a standard browser.
Understanding Web Forms
Web Forms bring Rapid Application Development (RAD ) techniques (such as those used in Windows Forms) to the development of web applications. As with Windows Forms, you drag-and-drop controls onto a form and write the supporting code either inline or in code-behind pages.
Tip
ASP.NET 2.0 Web Forms are the successor to the enormously successful ASP.NET 1.x Web Forms, which in turn were the successor to ASP pages.
The goal of ASP.NET 2.0 was to reduce the amount of coding by 70 percent compared to ASP 1.x. This means that web programming is increasingly declarative rather than programmatic—that is, you declare controls on your Web Form rather than writing (and rewriting) boiler-plate code.
You still have the option of writing code (you can always write code), but for the vast majority of web programming, you’ll write a lot less code with ASP.NET 2.0 than you did with 1.x.
Web Forms implement a programming model in which web pages are dynamically generated on a web server for delivery to a browser over the Internet. With Web Forms, you create an ASPX page with more or less static content consisting of HTML and Web Controls, and you write C# code to add additional dynamic content. The C# code runs on the server, and the data produced is integrated with the declared objects on your page to create an HTML page that is sent to the browser.
There are three critical points to pick up from the previous paragraph, and which you should keep in mind for this entire chapter:
Web pages can have both HTML and Web Controls (described later).
All processing is done on the server (you can have client-side processing with scripting languages, but that isn’t part of ASP.NET).
If you use ASP.NET Web Controls, what the browser sees is just HTML (there is an exception to this; with those browsers that Microsoft defines as “uplevel,” some script may be sent as well).
In short, Web Forms are designed to be viewed through any browser, with the server generating the correct browser-compliant HTML. Just as with Windows Forms, you can create Web Forms in Notepad (or another editor of your choice) rather than in Visual Studio, but it makes no sense to do so and we will continue to use Visual Studio 2005 to enhance productivity and reduce errors.
Web Forms divide the user interface into two parts: the visual part or user interface (UI), and the logic that lies behind it. This is very similar to developing Windows Forms, as shown in Chapter 18. This is called code separation ; all examples in this book use code separation, though it is possible to write the C# code in the same file with the user interface.
Tip
In Version 2.0 of ASP.NET, Visual Studio takes advantage of partial classes, allowing the code-separation page to be far simpler than it was in 1.x. Because the code-separation and declarative pages are part of the same class, there is no longer a need to have protected variables to reference the controls of the page, and the designer can hide its initialization code in a separate file.
The UI page is stored in a file with the extension .aspx. When you run the form, the server
generates HTML sent to the client browser. This code uses the rich Web
Forms types found in the System.Web and System.Web.UI namespaces of the .NET Framework
Class Library (FCL ).
With Visual Studio, Web Forms programming couldn’t be simpler: open a form, drag some controls onto it, and write the code to handle events . Presto! You’ve written a web application.
On the other hand, even with Visual Studio, writing a robust and complete web application can be a daunting task; Web Forms offer a very rich UI and the number and complexity of Web Controls have greatly multiplied in recent years. User expectations about the look and feel of web applications have risen accordingly.
In addition, web applications are inherently distributed. Typically, the client will not be in the same building as the server. For most web applications, you must take network latency, bandwidth, and network server performance into account when creating the UI; a round trip from client to host might take a few seconds.
Web Form Events
Web Forms are event-driven. An
event represents the idea that “something
happened.” An event is generated (or raised) when
the user clicks a button, or selects from a ListBox, or otherwise interacts with the UI.
Events can also be generated by the system starting or finishing work.
For example, open a file for reading, and the system raises an event
when the file has been read into memory.
The method that responds to the event is called the event handler. Event handlers are written in C# and are associated with controls in the HTML page through control attributes.
By convention, ASP.NET event handlers return void and take two parameters. The first
parameter represents the object raising the event. The second, called
the event argument, contains information specific
to the event, if any. For most events, the event argument is of type
EventArgs, which has no members and
serves as a placeholder and as the base class for more specialized
objects that provide properties needed by the event handler.
In web applications, most events are handled on the server and, therefore, require a round trip. ASP.NET supports only a limited set of events, such as button clicks and text changes. These are events that the user might expect to cause a significant change, as opposed to Windows events (such as mouse-over) that might happen many times during a single user-driven task.
Postback Versus Non-Postback Events
Postback events are those that cause the form to be sent (or posted) to the server and then to be returned to the browser (typically with updated data) The user’s experience is that the page is updated after a brief delay.
A button click, for example, causes the page to be sent to the browser, the event handlers are run, and then the same page is sent back to the browser.
To avoid this round trip to the server happening too frequently, many events such as changing the text in a textbox or clicking a checkbox are non-postback events. When these events fire, the form is not posted back, but the event is saved by the control, and handled the next time the page is posted back.
State
The web does not maintain state. By design, it is a stateless environment. That means that the server would normally have no idea that a second post from a given user has any association with previous posts by that same user. That is fine if all you have are one or two pages that are information only, with no interaction, but it is obviously limiting if you want to create an interactive application.
ASP.NET solves this problem by maintaining three types of state: view state, session state, and application state:
- View state
Maintains the value of controls (what you’ve filled into text boxes, which choices you’ve made in lists) when you post a page to the server. There was a time you had to write code to do this, but it is now done for you in an efficient and reliable manner.
- Session state
Creates an artificial “connection” with the application, simulating the idea of an ongoing session for an individual user within a single application. This is so natural, you hardly notice it. You go to a site, and as you interact with it, remembers your input and responds accordingly, just like working with a desktop application. Sessions typically end by “timing out” after about 20 minutes of inactivity; but in most cases, this is invisible to the user.
- Application state
Preserves values across users within a given web application. Application state is beyond the scope of this chapter.
Creating a Web Form
To create the simple Web Form that will be used in the next example, start up Visual Studio .NET and select File → New Web Site . In the New Web Site menu , choose C# as your language, and choose ASP.NET Web Site as the template to use. Finally, locate your web site somewhere on your disk (at the bottom of the dialog), as shown in Figure 19-1.
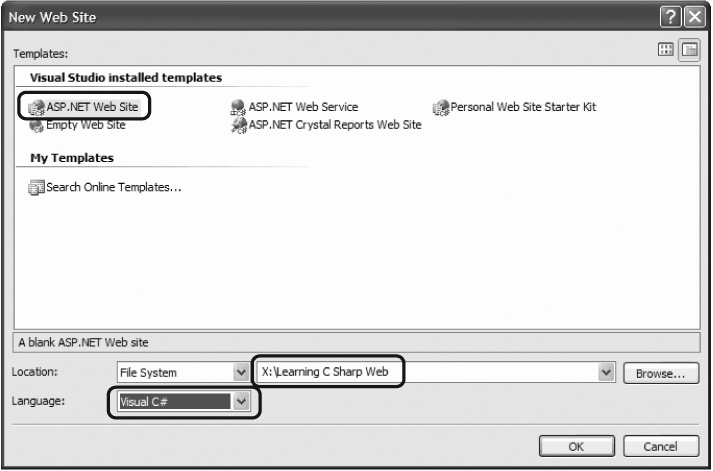
Visual Studio creates a folder named Learning C Sharp Web in the directory you’ve indicated, and within that directory, it creates your Default.aspx page (for the User interface), Default.aspx.cs (for your code), and a Data directory (currently empty, but often used to hold data files).
Code-Behind Files
Code-behind is the default coding model used by Visual Studio 2005. When a new web site is created, Visual Studio automatically creates two files: the content file, with a default name, such as Default.aspx, and a code-behind file with a matching name, such as Default.aspx.cs (assuming you are using C# as your programming language). If you change the name of the content file (highly recommended), the code-behind file will automatically assume the new name.
Tip
ASP.NET 1.1 programmers take note: the
code-behind model for ASP. NET has changed. In Versions 1.0, the
code-behind file defined a class that derived from Page. This code-behind class contained
instance variables for all the controls on the page, with explicit
event binding using delegates and the .aspx page derived from the code-behind
class.
In Version 2.0, ASP.NET generates a single class from the combined .aspx page and partial class definitions in the code-behind file.
ASP.NET can infer the control instances and derive event bindings from the markup during compilation; thus, the new code-behind file includes only the application code you need, such as event handlers, and doesn’t need to include instance variables or explicit event binding. The new code-behind files are simpler, easier to maintain, and always in sync with the .aspx page.
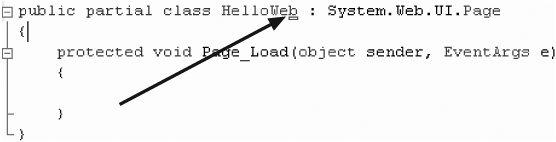
Let’s take a closer look at the .aspx and code-behind files that Visual Studio creates. Start by renaming Default.aspx to HelloWeb.aspx. To do this, close Default.aspx, and then right-click its name in the Solution Explorer. Choose Rename and enter the name HelloWeb.aspx. That renames the file, but not the class. To rename the class, right-click the .aspx page and choose View Code in the code page, then rename the class from _Default to HelloWeb. You’ll see a small line next to the name, as shown in Figure 19-2.
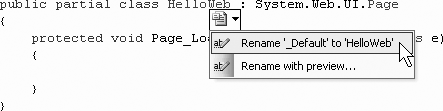
Click it and you’ll open the smart tag that allows you to rename the class. Click Rename “_default” to “HelloWeb,” and Visual Studio ensures that every occurrence of _Default is replaced with its new name, as shown in Figure 19-3.
You will be warned that references in “markup” will not be changed. This means that you must manually update the name of the class in the .aspx file:
    <%@ Page Language="C#" AutoEventWireup="true"
    CodeFile="HelloWeb.aspx.cs"Inherits="HelloWeb" %>
Within the HTML view of HelloWeb.aspx, you see an HTML form tag within the body of the page, like
this:
<form id="Form1" runat="server">
This tag specifies the form to use for your page. Web Forms
assumes that you need at least one form to manage the user
interaction, and creates one when you open a project. The attribute
runat="server" within the form tag is the key to the
server-side magic. Any tag that includes this attribute is
considered a server-side control to be executed
by the ASP.NET framework on the server. Visual Studio has placed
div tags in the form to facilitate
placing your controls and text.
Look for the title tag and
change it to “Hello Web”—it makes the browser window look nicer, as
you’ll see in just a moment.
Having created an empty Web Form, the first thing you might want
to do is add some text to the page. By switching to HTML view, you can
add script and HTML directly to the file just as you could with
classic ASP. Adding the following line to the body segment of the HTML
page (between the opening and closing div tags) will cause it to display a
greeting and the current local time:
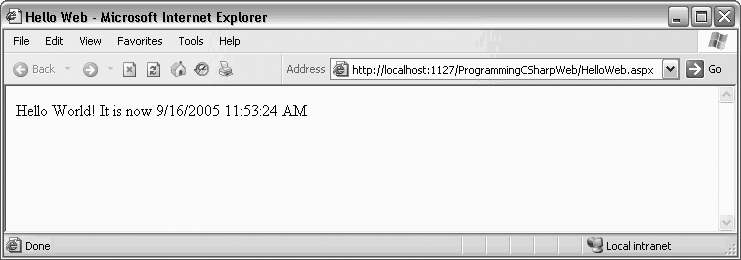
Hello World! It is now <% = DateTime.Now.ToString( ) %>
The <% and %> marks surround snippets of C# code.
The = sign immediately following
the opening tag causes ASP.NET to display the value, just like a call
to Response.Write( )—that is, it
writes directly to the HTML page. You could just as easily write the
line as:
    Hello World! It is now
    <% Response.Write(DateTime.Now.ToString(  )); %>
Run the page by pressing F5 (or save it and navigate to it in your browser). You should see the string printed to the browser, as in Figure 19-4.
Enabling Debugging
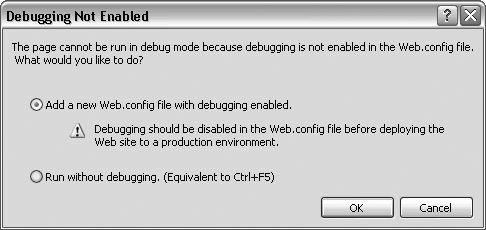
When you press F5, you begin the debugger. It’s likely that Visual Studio will notice that you don’t have a Web.config file for this application (which is required for debugging), and the Debugging Not Enabled dialog box will appear, as shown in Figure 19-5.
The default in this dialog box is to modify (and if needed, create) the Web.config file. Go ahead, and press OK to enable debugging for your application.
Adding Controls
You can add Server Controls to a Web Form in three ways:
by writing HTML into the HTML page, by dragging controls from the toolbox to the Design page, or by
pro-grammatically adding them at runtime. For example, suppose you want to use
buttons to let the user choose one of three shippers provided in the
Northwind database. You can write the following HTML within the <div> elements, in the HTML window:
    <div>
     <asp:RadioButton GroupName="Shipper" id="Speedy"
       text = "Speedy Express" Checked="True" runat="server" />
     <asp:RadioButton GroupName="Shipper" id="United"
       text = "United Package" runat="server"/>
     <asp:RadioButton GroupName="Shipper" id="Federal"
       text = "Federal Shipping" runat="server" />
    </div>
The asp tags declare
server-side ASP.NET controls that are replaced with normal HTML when the
server processes the page. When you run the application, the browser
displays three radio buttons in a button group; pressing one deselects
the others.
You can create the same effect more easily by dragging three buttons from the Visual Studio toolbox onto the Form, or, to make life even easier, follow these steps:
Switch to Design view.
Drag a RadioButtonList control from the toolbox onto the form.
Click on the control’s the smart tag to open it.
Choose Edit Items to open theListItem Collection Editor dialog box.
Click Add three times to add three radio buttons.
Tip
You could instead click on Choose a Data Source and bind to a collection, perhaps one you’ve obtained from a database.
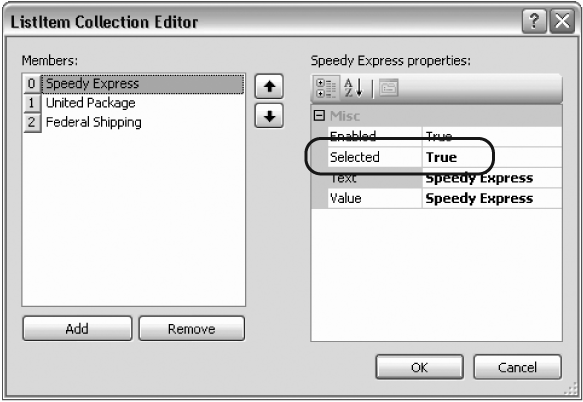
Each radio button is given the default name ListItem, but you may edit its text and value in the ListItem properties, where you can also decide which of the radio buttons is selected, as shown in Figure 19-6.
Tip
You can add controls to a page in one of two modes. The default
mode is FlowLayout. With FlowLayout, the controls are added to the
form from top to bottom, as in a Microsoft Word document. The
alternative is GridLayout, in which
the controls are arranged in the browser using absolute positioning
(x- and y-coordinates).
To change from Grid to Layout or back, change the pageLayout property of the document in
Visual Studio .NET. You can improve the look of your radio button list
by changing properties in the Properties window, including the font,
colors, number of columns, repeat direction (vertical is the default),
and so forth.
Click OK to close the editor and then switch back and forth between the Design and Source tabs to see the effect of your changes, as shown in Figure 19-7.
I’ve numbered a few areas of interest in Figure 19-7. Number 1 shows the RadioButtonList control in the toolbox. Number 2 shows the smart tag on the RadioButtonList control on the form. Number 3 shows that you are looking at the properties of the RadioButtonList control, which has been named RadioButtonList1 for you by Visual Studio 2005 (but of course, you are free to change that in the Properties window), and Number 4 shows that the current RepeatDirection property is set to Vertical (setting it to horizontal will lay out the radio buttons horizontally).
Server Controls
Web Forms offer two types of Server Controls. The first is
server -side HTML controls . These are HTML controls that you tag with the attribute
runat=Server. Although these work, we
won’t spend time on them in this chapter.
Instead, we will focus on ASP.NET Server Controls[13] that Microsoft designed to augment and replace the standard HTML controls. Server Controls provide a more consistent object model and more consistently named attributes. For example, with traditional and server-side HTML controls, input is not handled consistently:
    <input type="radio">
    <input type="checkbox">
    <input type="button"><input type="text"><textarea>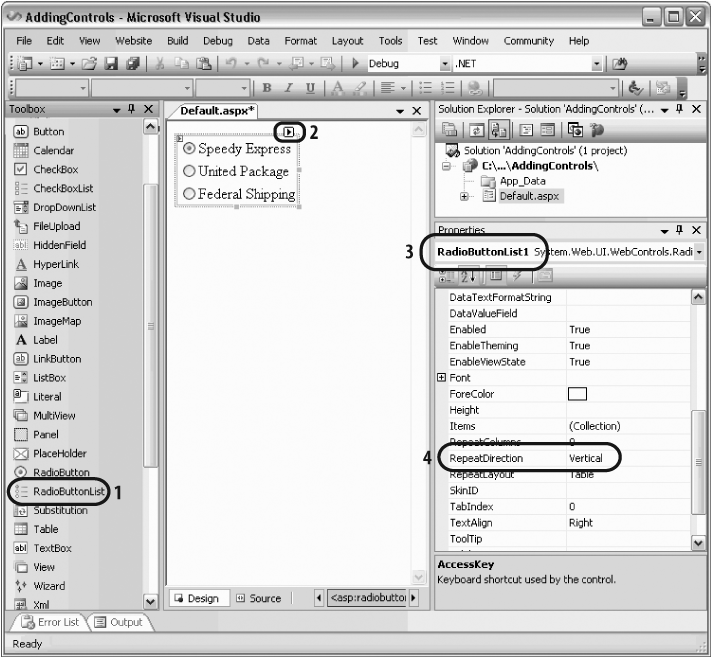
Each input type behaves differently and takes different attributes, and text is handled with different types of controls depending on whether you want a single line or multi-line input. The Server Controls try to use attributes consistently. The Server Controls that correspond to the preceding HTML Server Controls are as follows:
    <asp:RadioButton>
    <asp:CheckBox>
    <asp:Button><asp:TextBox rows="1"><asp:TextBox rows="5">
When you use the Server Controls, ASP.NET translates them into ordinary HTML before sending the page back to the browser. What is seen on the browser is always industry-standard HTML and will run on virtually any browser by any manufacturer.
Data Binding
Various technologies have offered programmers the opportunity to bind controls to data so that as the data was modified, the controls responded automatically. Generally speaking, they made for great demos, but were of limited use to real programmers writing commercial applications. They tended to constrain the developer with severe limitations in how the control looked and performed. It came down to this: “If you want to do what we expect, it is wicked easy, but if you want to do anything else, may the Gods be kind.”
The ASP.NET designers set out to provide a suite of robust data-bound controls, which simplify display and modification of data, sacrificing neither performance nor control over the UI. In Version 2.0, they have expanded the list of bindable controls and provided even more out-of-the-box functionality.
In the previous section, you hard-coded radio buttons onto a form, one for each of three shippers in the Northwind database. That can’t be the best way to do it; if you change the shippers in the database, you have to go back and rewire the controls. This section shows you how to create these controls dynamically, binding them to data from the database.
Create a new web site called DisplayShippers and drag a RadioButtonList onto the form. Click on the smart tag, and then click on Choose Data Source .... The Choose Data Source dialog opens, as shown in Figure 19-8.
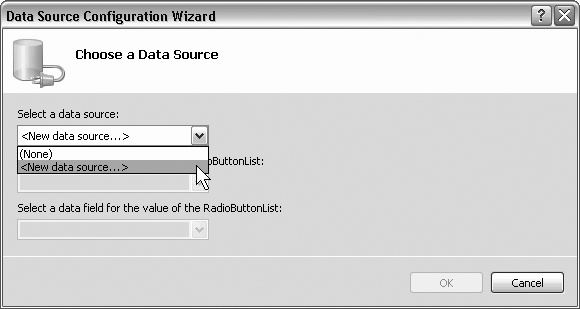
Drop down the Select a data source menu and choose <New Data Source>. You are prompted to choose a data source from the datatypes on your machine. Select Database, (you can specify a name, or use the default name of SqlDataSource1). Click OK and the Configure Data Source dialog box opens.
Choose New Connection to configure a new data source, and the Add Connection dialog box opens, offering you an opportunity to pick a server and to use either Windows or database authorization. Fill in the required information, and choose Northwind as your database name. Be sure to test the connection, as shown in Figure 19-9.

When you click OK, you’ll return to the Configure Data Source dialog. You can examine the connection string if you’d like or just press Next to go on to the next step, where you are asked if you’d like to save this connection in the application configuration file. Click Yes and give it a name without spaces, such as NorthwindConnectionString.
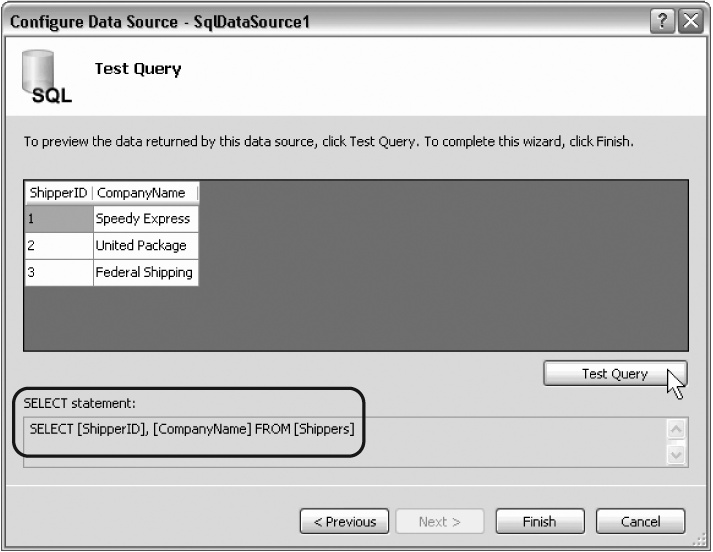
The next step is to specify either a stored procedure or SQL statement to use for your query, or to build your query by picking the table or view and then the columns you want, as shown in Figure 19-10.

When you click Next, you are brought to a dialog in which you can test the results of your query, which you can examine as shown circled in Figure 19-11.
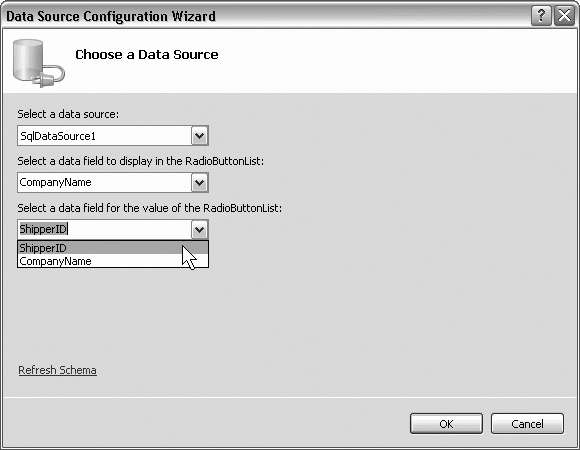
When you click Finish, the data source is created. You are returned to the Data Source Configuration Wizard, where you will make three choices:
The data source to use (in this case, you have only one)
The data field to display in the radio button list
The data field to use for the value
These choices are shown in Figure 19-12.
The distinction between the display field and the data field allows you to display the company name in the radio button list, but retrieve the actual shipper ID when processing the user’s request. Run the application (accept the offered Web.config file as previously) and note that the radio button list is dynamically populated with the three values from the database table.
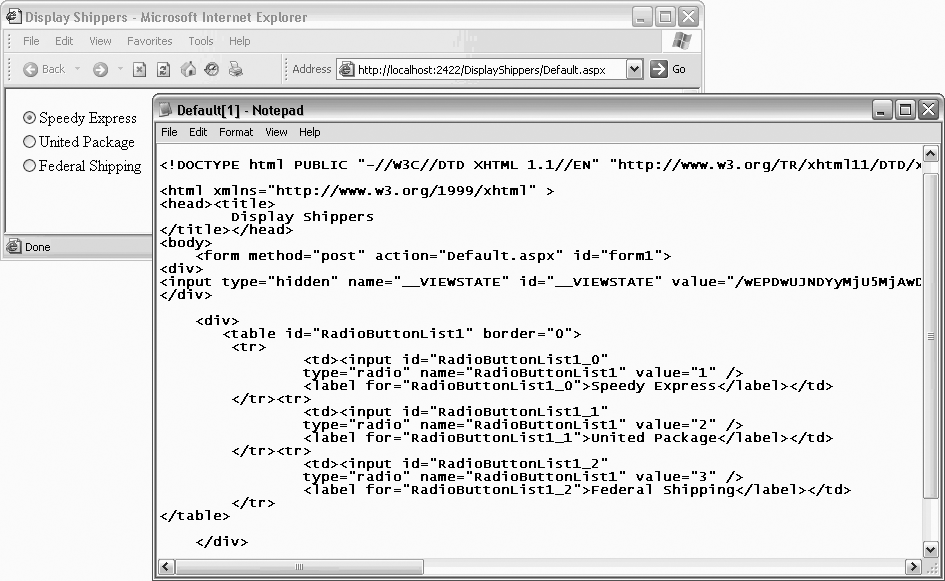
Before moving on, there are a few things to notice. When you press F5 to run this application, it appears in a web browser, and the radio buttons come up as expected. Choose View → Source and you’ll see that what is being sent to the browser is simple HTML, as shown in Figure 19-13.
Notice that the HTML has no RadioButtonList; it has a table, with cells,
within which are standard HTML input objects and
labels. ASP.NET has translated the developer controls to HTML understandable by any browser.
Adding Controls and Events
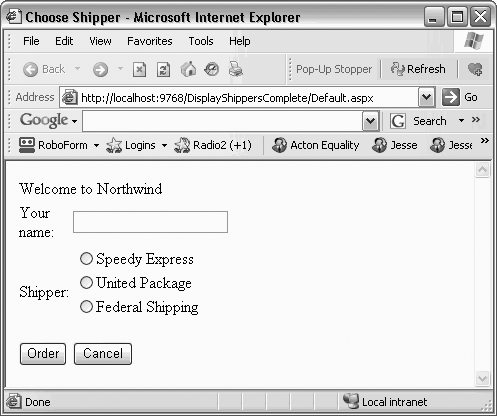
By adding just a few more controls, you can create a complete form with which users can interact. You will do this by adding a more appropriate greeting (“Welcome to Northwind”), a text box to accept the name of the user, two new buttons (Order and Cancel), and text that provides feedback to the user. Figure 19-14 shows the form.
This form won’t win any awards for design, but its use will illustrate a number of key points about Web Forms. Example 19-1 is the complete HTML for the .aspx file.
<%@ Page AutoEventWireup="true" CodeFile="Default.aspx.cs"
Inherits="_Default" Language="C#" %>

<!DOCTYPE html PUBLIC "-//W3C//DTD XHTML 1.1//EN"
"http://www.w3.org/TR/xhtml11/DTD/xhtml11.dtd">
<html xmlns="http://www.w3.org/1999/xhtml">
<head id="Head1" runat="server">  <title>Choose Shipper</title>
</head>
<body>
  <form id="form1" runat="server">
    <table style="width: 166px; height: 33px">
      <tr>
        <td colspan="2" style="height: 20px">
          Welcome to Northwind
        </td>
      </tr>
      <tr>
        <td>Your name:</td>
        <td><asp:TextBox ID="txtName" runat="server" /></td>
      </tr>
      <tr>
        <td>Shipper:</td>
        <td>
          <asp:RadioButtonList ID="RadioButtonList1" runat="server"
            DataSourceID="SqlDataSource1"
            DataTextField="CompanyName" DataValueField="ShipperID">
          </asp:RadioButtonList>

          <asp:SqlDataSource ID="SqlDataSource1" runat="server"
          ConnectionString="<%$ ConnectionStrings:NorthwindConnectionString %>"
          SelectCommand="SELECT [ShipperID], [CompanyName]FROM [Shippers]" />
          <br />
        </td>
      </tr>
      <tr>
        <td><asp:Button ID="btnOrder" runat="server" Text="Order" /></td>
        <td><asp:Button ID="btnCancel" runat="server" Text="Cancel" /></td>
      </tr>
      <tr>
        <td colspan="2"><asp:Label ID="lblMsg" runat="server" /></td>
      </tr>
    </table>
  </form>
</body>
</html>
When the user clicks the Order button, you’ll check that the user
has filled in his name, and you’ll also provide feedback on which
shipper was chosen. Remember, at design time, you can’t know the name of
the shipper (this is obtained from the database), so you’ll have to ask
the ListBox for the chosen name (and
ID).
To accomplish all of this, switch to Design mode and double-click
the Order button. Visual Studio will put you in the code-behind page,
and will create an event handler for the button’s Click event.
You add the event-handling code, setting the text of the label to
pick up the text from the text box and the text and value from the
RadioButtonList:
    protected void btnOrder_Click( object sender, EventArgs e )
    {
       lblMsg.Text = "Thank you " +
          txtName.Text.Trim(  ) +
          ". You chose " +
          rblShippers.SelectedItem.Text.ToString(  ) +
          " whose ID is " +
          rblShippers.SelectedValue.ToString(  );
    }
When you run this program, you’ll notice that none of the radio
buttons are selected. Binding the list did not specify which one is the
default. There are a number of ways around this, but the simplest is to
override the OnLoad event and set the
first radio button to be selected.
Return to the Shipper.aspx.cs
and type protected override. You
will see a scrolling list of all the overrideable methods, properties,
etc. Start typing the first letters of OnLoad, as shown in Figure 19-15.
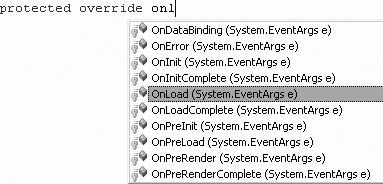
When OnLoad is highlighted, press Tab to accept the method. The
stub for the overridden method is created, but its default body throws
the NotImplementedException.
Delete the exception and replace it with this code:
rblShippers.SelectedIndex = 0;
This selects the first radio button in the RadioButtonList. The problem with this
solution is subtle. If you run the application, you’ll see that the
first button is selected, but if you choose the second (or third) button
and click OK, you’ll find that the first button is reset. You can’t seem
to choose any but the first selection. This is because each time the
page is loaded, the OnLoad event is
run, and in that event handler, you are (re-)setting the selected
index.
The fact is that you only want to set this button the first time the page is selected, not when it is posted back to the browser as a result of the OK button being clicked.
To solve this, wrap the setting in an if statement that tests if the page has been
posted back:
protected override void OnLoad( EventArgs e )
{if ( !IsPostBack )
{
rblShippers.SelectedIndex = 0;
}
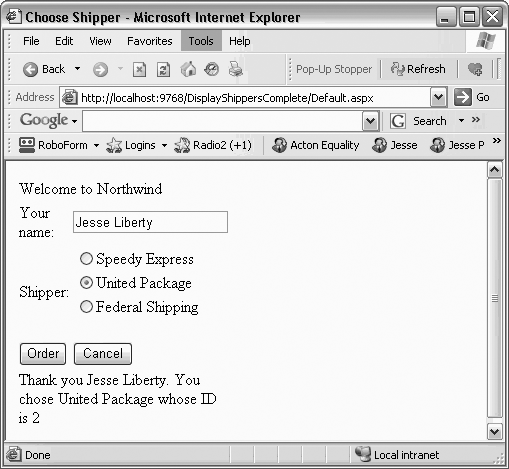
}When you run the page, the IsPostBack property is checked. The first time
the page is posted, this value is false and the radio button is set. If
you click a radio button and then click OK, the page is sent to the
server for processing (where the btnOrder_Click handler is run), and then the
page is posted back to the user. This time, the IsPostBack property is true, and thus the code
within the if statement isn’t run,
and the user’s choice is preserved, as shown in Figure 19-16.
The complete code-behind form is shown in Example 19-2.
using System;
using System.Data;
using System.Configuration;
using System.Web;
using System.Web.Security;
using System.Web.UI;
using System.Web.UI.WebControls;
using System.Web.UI.WebControls.WebParts;
using System.Web.UI.HtmlControls;
public partial class _Default : System.Web.UI.Page
{

    protected void Page_Load(object sender, EventArgs e)
    {

    }protected void btnOrder_Click( object sender, EventArgs e )
   {
      lblMsg.Text = "Thank you " +
         txtName.Text.Trim(  ) +
         ". You chose " +
         rblShippers.SelectedItem.Text.ToString(  ) +
         " whose ID is " +
         rblShippers.SelectedValue.ToString(  );
   }

   protected override void OnLoad( EventArgs e )
   {
      if ( !IsPostBack )
      {
         rblShippers.SelectedIndex = 0;
      }
   }
}
Summary
.NET uses ASP.NET 2.0 for building web applications. In ASP.NET development, the C# programmer’s job is to write the event handlers that respond to the user. Many of these events involve interaction with data.
As with Windows Forms, Visual Studio 2005 provides a visual design area where you can drag and drop controls onto the form surface.
The C# code for ASP.NET Web Forms runs on the server, not on the client. The server typically delivers only HTML to the browser.
Web Forms separate the visual part of the program from the logic. The interface is stored in a file with an .aspx extension. The logic, also called the code-behind file, is stored in a .cs file.
Like Windows Forms, Web Forms are event-driven and use the same system of delegates and events as Windows Forms do.
A postback event is one that causes the form to be sent to the server where event-handling code is run, and then the page is recreated and returned to the browser.
A non-postback event is one that does not force a postback. Non-postback events are handled when the next postback event is fired.
View state encodes the value of each control during the round trip to the server, so that the page delivered back to the browser retains these values.
Session state is used to maintain values across pages during a user’s session.
ASP.NET provides a set of data-bound controls that enable the controls to respond automatically as the data is changed.
Quiz
- Question 19–1
What are the two most significant and commonly used namespaces for ASP.NET?
- Question 19–2
Where does ASP.NET code run?
- Question 19–3
How do you ensure that a radio button selection or checkbox selection will be immediately posted to the server?
- Question 19–4
What is view state?
- Question 19–5
If you rename your class, all references to the class name will be updated, except that you will be warned that the reference in “markup” will not be changed. What does this mean?
- Question 19–6
If you click F5 to run your program, you may see a dialog box saying that debugging is not enabled. What should you do?
- Question 19–7
What are the three ways to add Server Controls to your form?
- Question 19–8
What property must every Server Control have?
- Question 19–9
Which control is used to enable data binding from a database to controls on a Web Form?
- Question 19–10
When you create an
<ASP:RadioButtonList>with<ASP:RadioButton>controls in it, what is sent to the browser?- Question 19–11
How do you ensure that an action you want to take happens only the first time the page is shown, and does not happen if the user clicks a button or takes another action to post the page back to the server for processing?
Exercises
- Exercise 19-1
Create a web application that displays the words “Hello” and has a button that changes the display to “Goodbye.”
- Exercise 19-2
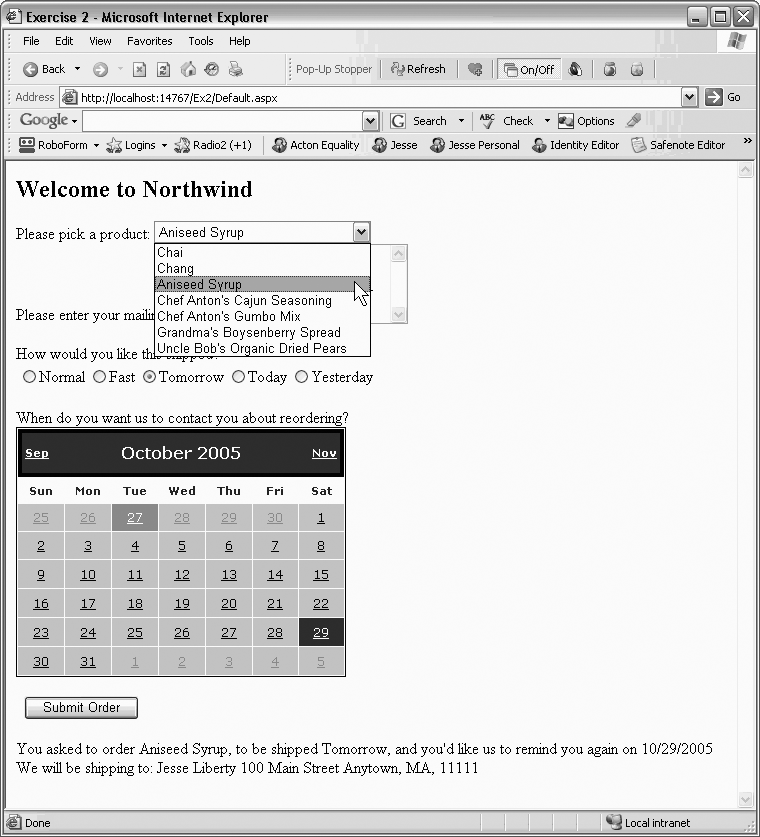
Create a web application that presents an order form that lets the user enter information through various controls such as buttons, checkboxes, radio buttons, and lets the user pick a date, as shown in Figure 19-17.
- Exercise 19-3
Modify the second exercise to populate the radio buttons and the contents of drop downs from tables in the Northwind database, as shown in Figure 19-18.