
The NOLS Rationing System
Bulk Ration Planning Steps
Ration Planning Worksheet
Breakfast
Dinner
Cheese
Trail Foods
Baking Items
Sugar and Powdered Fruit Drinks
Soups, Bases, Dried Vegetables, and Desserts
Milk, Eggs, Margarine, and Cocoa
Meats and Meat Substitutes
Spices
Liquids
Baking
Winter Food, Nutrition, and Cooking 157
Food and Nutrition
Cooking in the Cold
Favorite Outdoor Recipes from NOLS 158
Food Choices
In the Home
Menu Plan
Packing the Food
Rehydrating One-Pot Meals
Meals and Snacks
More Recipes from the Backpack Gourmet - No Dehydration Required 165
Animals as Potential Food Sources 167
Insects
Worms
Crustaceans
Mollusks
Fish
Amphibians
Reptiles
Birds
Mammals
Animal Food Sources: Arctic and Subarctic Regions 170
Fish
Sea Ice Animals
Animal Food Sources: The Seashore 171
Plants
Plankton
Barnacles
Turtles
Fish
Cooking and Preserving Wild Meat 173
Cooking Methods
Food Preservaion
Improvised Cooking and Eating Utensils 174
Claudia Pearson
Each year, approximately 3,000 students spend between fourteen and ninety-four days in the backcountry on NOLS courses. How does NOLS plan meals for so many people over such a long period? Each course is divided into cook groups of two to four individuals, and each cook group is given a wide selection of bulk foods and spices. They decide what to cook with the help of NOLS Cookery and other knowledgeable peers or instructors. There are no set menus. Students learn how to cook in the field through experience.
We call this method NOLS bulk rationing and have found that it works well for our multi-week expeditions. Smaller groups going out for shorter lengths of time—five days or less—might want to consider menu planning instead. With menu planning, all meals are determined in advance, and the food is bought accordingly.
In this chapter from NOLS Cookery, we have provided the tools you need to plan rations on your own. Successful ration planning takes both effort and experience, and, as many of you already know, it can be challenging and time-consuming. Critical factors to consider when planning for an expedition are the availability, versatility, cost, and palatability of foods desired. Happy campers must be well fed and hydrated. Plan on as much variety as possible, ask your trip members for their input, and organize most of the food ahead of time to ensure ease of preparation once in the field. Our goal has always been to please each student and instructor just once on any expedition. That leaves quite a safety margin!
If you have always used menu planning, bulk rationing may be a difficult concept to grasp at first, but the rewards can be great once you’ve mastered the basics. Planning and packing become easier. Complicated lists and menu schedules are eliminated. You’ll have greater freedom in the field to prepare meals that suit your mood and the demands of the day. Cooking becomes more creative and flexible when you carry a “backcountry pantry” in your pack.
Factors to consider when ration planning:
• Group size
• Duration of trip
• Purpose of trip
• Exertion level
• Weather
• Altitude
• Individual appetites
• Food preferences within the group
• Nutritional balance
• Expense and availability
• Spoilage and ease of packaging
• Weight
• Possible dietary limitations of group members
The first step in planning food for an expedition using the NOLS bulk rationing method is to calculate the total amount of food that will be needed during the trip. To do this, determine how many pounds (of food) per person per day (ppppd) you expect to use. This amount depends on everything from the intensity and duration of the trip to the ages and sizes of the participants. Charts and worksheets are included in this chapter to help you determine this figure.
Once you have figured out the total poundage, break it down into different food groups to get specific amounts. NOLS issues a combination of heavier “grocery store” foods and lighter dehydrated items.
Freeze-dried meals available at backpacking and sporting goods stores are lightweight and quick to cook, but they are often bland and expensive. If you decide to purchase freeze-dried foods, be forewarned that the suggested serving sizes should be doubled for most appetites. And beware, they tend to be high in salt. Freeze-dried food used in conjunction with staples can provide variety and save weight.
You can find many tasty, lightweight, nutritious, and inexpensive options at your local supermarket, natural foods store, or specialty market. Food dryers are a wonderful addition to any kitchen. They are available in most hardware, discount, or kitchen supply stores. A large variety of homegrown or store-bought fresh vegetables, fruits, and meats can be dried, providing tasty, affordable, and nutritious additions to a backpacker’s menu. There are many books available on drying and dehydrating foods at the local library. You can even dry foods in your own oven.
Make note of the food preferences and allergies within your group, and avoid letting your personal likes and dislikes influence your choices. Variety is important and will help keep morale up. Balance expensive and less expensive items by using a predetermined budget.
Step 1: Determine the amount of food per person per day (ppppd), using the following guidelines:
• 1.5 ppppd is appropriate for hot days and warm nights. This amount works well when base camping (camping in one location for the duration of the trip) and is good for short trips (three to five days) when fresh veggies, canned goods, and/or fresh fish supplement the ration. An excellent amount for trips with children and for leisure days, 1.5 pounds equates to roughly 2,500 to 3,000 calories per person per day.
• 1.75 to 2 ppppd works well when you expect warm or cool days and nights or when hiking with full packs. If you are planning a long trip of more than seven to ten days, you might want to plan on 2 ppppd for later in the ration period, since appetites usually kick in after a few days in the mountains. For moderate to active workdays, 1.75 to 2 pounds is ideal and gives you roughly 3,000 to 3,500 calories per person.
• 2 to 2.25 ppppd is good for hiking or skiing with full packs during the cool days and cold nights of early spring, late fall, or winter. If you are planning a long trip of more than seven to ten days, you might want to plan on 2.25 ppppd for later in the ration period. Two to 2.25 pounds per day is ideal for heavy workdays and cold temperatures. It gives you roughly 3,500 to 4,500 calories per person per day.
• 2.5 ppppd is good for cold days and extremely cold nights, such as in midwinter, when you are skiing with full packs or sleds in mountain environments. Used for extremely strenuous workdays and very cold temperatures, 2.5 pounds gives you roughly 4,000 to 5,000 calories per person per day.
Step 2: Figure the total amount of food needed for the trip. The formula is: Number of people? number of days? ppppd. For example, for four people on an eight-day trip at 1.75 ppppd, the total amount of food needed would equal 56 pounds.
Step 3: Break the total poundage into food groups. The chart on the next page lists the breakdown of the poundage of different foods per person per day. Added together, these numbers (known as category multipliers) should equal the pounds per person per day selected in step 1. They have proved effective in planning NOLS rations for many years. (See chart 1)
Step 4: Calculate the total pounds of each food category needed for the trip. Using the example from step 2 of four people on an eight-day trip at 1.75 ppppd and the category multipliers from the table in step 3, the calculations would be as shown in chart 2.
Step 5: Round the numbers up or down within categories (see the last column of the table in step 4) and make substitutions, depending on individual preferences. For instance, if you don’t want to bake, you can take that poundage (approximately 4 pounds in the example) and add it to another category such as breakfast or dinner. If you don’t eat cheese, you can take some of that cheese weight (approximately 7 pounds in this example) and add it to the trail food category, where you can replace it with nuts and/or nut butters (sesame, peanut, tahini, almond). The important thing to remember is to make exchanges with similar types of foods to maintain the balance among carbohydrates, proteins, and fats. If you make changes, the adjusted totals should still equal the amount determined in step 2.
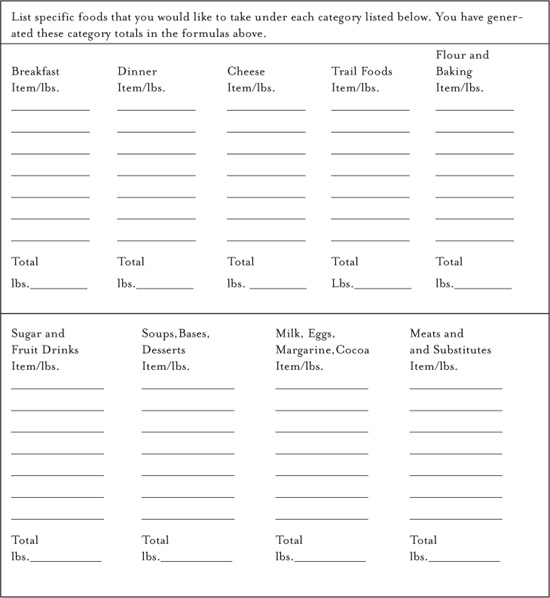
The following worksheet can be used to plan your own ration.
If you have already chosen your pounds per person per day (ppppd), you are ready to fill in the worksheet.
Take the number of days × number of people × ppppd to find the total weight for the chosen ration period.

At NOLS, we issue spice kits, tea bags, base packs, canned goods, fresh vegetables, toilet paper, matches, and soap (liquid or bar), in addition to the total weight planned for each ration. Make sure you include your choice of these items for your personal trips.
—From NOLS Cookery
CHART 1
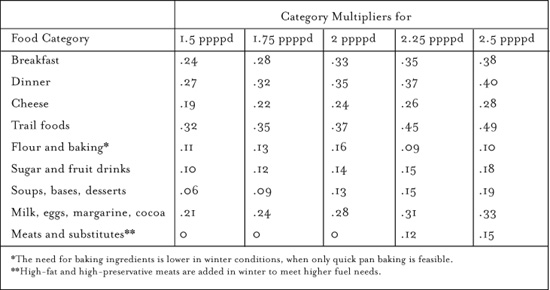
CHART 2
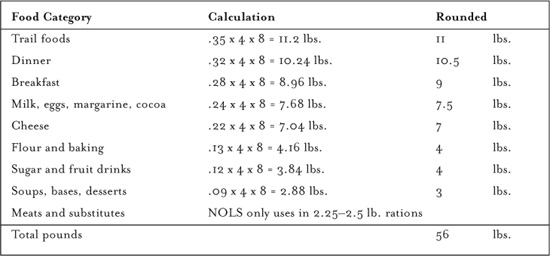
CHART 3
CHART 4
Claudia Pearson
Note: Items marked with an asterisk are available through mail-order from NOLS Rocky Mountain Rations Department, 502 Lincoln Street Lander, Wyoming 82520; 307-332-1419.
Cereals are a good source of carbohydrates and are high in protein when mixed with milk. Adding margarine or nuts to cereals provides fats and additional protein.
• Cream of Wheat, Rice, or Rye; oatmeal; hominy grits. Hot cereals are available in many forms: regular or instant, in bulk or individual packets. Some cereals come presweetened; others can be mixed with sugar, dried fruits, nuts, milk, and margarine for breakfast. Cereals such as oatmeal can be used in baked goods or in casseroles for dinner meals. Grits should be cooked and allowed to sit for a while before serving. They can then be refried and served with hot sauce or picante, lots of cheese, and pepper.
• Couscous. Couscous is available in two types: the whole wheat version, which is less processed and is a light brown color, or the more refined and traditional version, which is yellow. Both types cook fast and can be hydrated and eaten right out of your camp cup. Couscous can be mixed with sweetener, dried fruits, and nuts for a hot breakfast or combined with cheese and veggies for a tasty dinner.
• Hash-brown potatoes—dried or shredded.* Hash browns make an excellent breakfast or dinner. They are best served in fried form with cheese and seasonings, or with bacon or sausage for a hearty winter meal.
• Granola or muesli. Many varieties of granola and muesli are available commercially, or you can make your own. Granola and muesli make a good breakfast served hot or cold. They can also be used as a trail food or an ingredient in dessert crusts or can be added to baked goods or cookies.
• Cold cereals. Cold cereals can be used for breakfast, as a snack food, or as ingredients in desserts or baked goods. (The bulky nature of some cereals can be a problem for packing, however.)
• Pancake mix/baking mix. Make your own baking mix or use a quick add-water-only commercial brand.
• Bagels, English muffins, muffins, coffee cake, quick breads. Bread products are available commercially, or you can make your own. They are great for breakfast, trail foods, and dinner.
Pasta, grains, and potatoes are good sources of carbohydrates. The addition of beans or dairy products to these items makes complete proteins, and cheese and margarine provide added protein and fats.
• Pasta. Pastas are made from white and whole grain flours and come in a wide variety of shapes and colors. Pasta is a popular dinner food that can be used in many recipes from soups to casseroles.
• Instant beans. Pinto and black beans are available dried or refried in most big grocery stores or natural food shops. Beans are great with tortillas or rice or in combination with pasta. Leftovers make good dips or spreads with crackers or tortillas.
• Instant lentils. Lentils are good with rice, in soups, or to make vegetarian burgers. They are available in most natural food stores.
• Falafel. Instant falafel can be mixed with water, formed into patties, and fried as a veggie burger served with rice or bread. It is very spicy!
• Barley. Quick-cooking barley is a good ingredient in soups or mixed with various grains for a main meal.
• Hummus. Hummus makes an excellent dip or spread with crackers or pita bread.
• Couscous. Excellent as a main dish for breakfast or dinner. Couscous is very versatile.
• Bulgur. Bulgur is nice in soups or mixed with other grains. Bulgur is the main ingredient in tabouli, a popular cold Lebanese salad. It can be used in many ways, from baked goods to breakfast.
• Instant potato pearls or flakes.* Instant potatoes make a good thickener for soups and gravies. They are also excellent served alone or as an addition to a main meal. Cooked with cheese, margarine, and a cup-of-soup packet, instant potatoes make a quick mini-meal. They can also be used for a savory breakfast or mixed with flour to make potato pancakes.
• Rice—white, brown, parboiled. Rice is a versatile mainstay and is available in many varieties. Instant rice cooks the fastest and mixes well with lentils or beans.
• Textured vegetable protein. Textured vegetable protein is made from soybeans mixed with other ingredients to make a veggie burger or chili mix. It is a good source of protein for vegetarians.
• Tortillas, pita breads, bagels, biscuits, flat breads. These products are great additions to main meals or as ready-to-eat snacks for the trail. However, they can be bulky and are perishable.
Cheese is a good source of protein and fats. Farmer, jack, cheddar, Swiss, mozzarella, and Parmesan are popular varieties. In winter, cube all cheeses for easy melting. Purchase cheese in vacuum-sealed blocks and open one at a time to ensure freshness. Also, individually wrapped cheese sticks are a great idea for quick trail snacks—kids love them!
Trail food consists of high-calorie, tasty foods that are easy to eat while hiking on the trail. Nuts and seeds contain protein and fats, and dried fruits, crackers, and energy bars provide carbohydrates and fiber.
• Nuts. Nuts are available in most big grocery stores or natural food outlets. They are an expensive but concentrated form of calories. Roasted and salted nuts and seeds taste great but can go rancid quickly without refrigeration. Raw forms can be bland and chewy but perk up nicely when dry roasted and salted prior to eating. Nuts are a nice ingredient for main dishes or in baked goods. Choose from the many varieties available, use nut mixes, or try products such as gorp—a mix of nuts, fruits, and candy.
• Seeds—roasted or raw. Pumpkin, sunflower, sesame, and piñon seeds are popular and can be eaten plain or added to breakfasts, dinners, and baked goods.
• Dried fruits. Dried fruits are an expensive but concentrated form of calories easily found in grocery and natural food stores. For trips that require large quantities of trail food, try purchasing fresh fruit at a fraction of the cost and drying it on your own using a food dryer. This system also works well for vegetables such as tomatoes, zucchini, and mushrooms. Dried fruit options include individual fruits and berries, mixed fruit combinations, and fruit leathers.
• Crackers. Crackers come in countless varieties and are available everywhere. Pack them in plastic containers with peel-off lids for protection. Occasional crunchy foods are usually welcome on long trips. Crackers are great for dips and spreadables such as cheese and nut butters and hummus. Choose from flavored and shaped crackers, melba toasts, bagel chips, pretzels, and croutons.
• Corn nuts and soy nuts. Corn nuts and soy nuts are salty, crunchy, and cheap, with a strong flavor. But you need to be careful with them—they can break teeth. Soybeans are an excellent form of protein.
• Cookies. Cookies come in various types and flavors. Fig Newtons, fruit bars, animal crackers, granola bars, and Pop Tarts hold up well in a backpack.
• Energy bars. Numerous varieties of energy and high-protein bars such as Power, Luna, Clif, Pemmican, Balance, and Tiger’s Milk—to name a few—are available for quick pick-me-ups or meal replacement. Make sure that they are edible in cold weather conditions—don’t break a tooth!
• Candy. Backpacking favorites include candy bars, chocolate- or yogurt-covered nuts and fruits, and wrapped hard candies (remove wrappers as you bag them to prevent litter).
• Powdered eggs.* Whole powdered eggs are useful for baking or in quiches and omelets. They are less appealing for use as scrambled eggs. Powdered eggs lighten up many recipes.
• Flours/meal. Choose from white, whole wheat, and other flours; cornmeal and tortilla mixes such as masa harina (flour) or mast trego (corn); and various commercial baking, biscuit, muffin, and pancake mixes.
• Brown and white sugar (brown is less likely to be confused with other foods).
• Lemonade (pink or yellow).
• Mixes such as Tang, apple cider, and Gatorade.
• Jell-O gelatin (makes a great hot drink).
• Teas—bags or instant powder varieties.
• Presweetened Kool-Aid and Crystal Light are great weight savers, but watch the aspartame—it can cause headaches.
• Soups
—Cup-of-soups: Many varieties of cup-of-soup are available. They can be added to potato pearls and cheese cubes to make a quick hot meal.
—Ramen soups: Ramen soups are tasty and nutritious when mixed with canned meats or cheeses to make a complete meal. They have a high fat content because the noodles are fried before being dried. Ramen is quick and easy to make.
—Bulk or individual soup bases such as chicken, beef, veggie, and miso are good for seasoning. Adding broths to cooking water can help extend the life of your spice kit.
• Bases / broth packets / broth cubes
—Tomato base*: Complete tomato product in powdered form.
—Packaged sauce and seasoning mixes: Some choices are white, cheese, spaghetti, chili, pesto, and Alfredo sauces and gravies. Sauce packets are great to use with pasta.
• Dried vegetables.* Dried veggies are an excellent way to add color and texture to colorless entrees. Mixed vegetables, green and red bell peppers, peas, and carrots are all used at NOLS. They are not included in the ration weights because they are issued in very small quantities and go a long way.
• Desserts. Desserts are high in carbohy drates, easy to digest, and, when milk products are added, good sources of protein. The easiest option is to buy pre-made dessert mixes that require only water.
—Cheesecake mix: Grape Nuts, granola, or graham crackers make good crusts.
—Brownie mix: Great scrambled for quick gratification or used as an ingredient for fudge and specialty cakes.
—Gingerbread mix: Excellent added to flour for coffee cakes and pancakes.
—Carrot cake mix: Many mixes come with cream cheese frosting.
—Instant pudding or gelatin mixes.
Milk and eggs are good sources of complete proteins. Cocoa has milk and sugar as ingredients. Margarine is a good source of fat.
• Powdered milk. Adding cold water works best.
• Soy milk. Soy milk is now available for vegetarians. At NOLS, we use Souvex Better than Milk brand. Many varieties are available, but taste test before your trip to make sure that you like it. You can combine chocolate and vanilla flavors to use as a cocoa replacement or use them separately. Carob flavor is also available.
• Powdered eggs. Whole powdered eggs.
• Margarine. Any kind of margarine works well. Beware of freeze or melt conditions and package accordingly. Squeeze tubes and containers with resealable peel-off lids work well but can open under pressure. Keep packaging easy, convenient, and tight.
• Cocoa. Instant bulk cocoa is a popular hot drink. You can stretch it by adding powdered milk.
• Flavored coffee drinks. These are popular with adults. They can be added to hot milk and cocoa for variety.
• Coffee. Many people like to carry grounds and use a coffee sock as a filter. Others use paper filters and cones or make Cowboy Coffee. Instant coffee works well in winter conditions, when convenience is so important. Whatever your morning ritual, choose the form that works best for your group. Coffee is not a standard ration item at NOLS because of its diuretic effect.
Meat, soybean products, and nut butters are all excellent sources of fat and protein for the high energy demands of winter environments.
• Sliced pepperoni, cooked bacon bits (real), and sausage crumbles. These are all good for winter because they can withstand freeze-thaw conditions, are precooked, and are very flavorful.
• Beef jerky. Jerky is lightweight and tasty but does not have the high fat content that the meats listed above have.
• Tempeh. This is a soybean product that takes on the texture of meat and is used by many NOLS instructors as a meat or cheese replacement. It is perishable and must be watched for freshness. Tempeh is available in many flavors and can be used on short trips or as a meat replacement in the winter. It’s best to cube the tempeh prior to using it on winter trips.
• Nut butters. These are commonly used to replace cheese and meat for vegetarians in the winter months. They are high in fat and protein and work well in winter conditions. Cashew, sesame, almond, and sunflower butters along with dried raisins and dates are a great alternative to meats and cheeses if you choose not to eat animal products and want to stay warm.
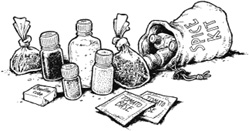
A spice kit is an important part of any cooking expedition. But remember that not everyone has the same tastes, so proceed with caution. Your spice kit might include the following:
• Salt. Used to add flavor to a flat-tasting meal.
• Pepper. Enhances most main dishes; tends to be a little hot.
• Garlic powder. Flavoring for breads, main dishes, soups, and sauces.
• Chili powder. Hot and spicy; good for Mexican dishes.
• Curry. Can be hot and spicy; used in Middle Eastern dishes.
• Cinnamon. Great for sweet breads, desserts, and hot drinks.
• Spike. Lemon-salt flavor appeals to many palates; great in cheesy casseroles or sprinkled on tortillas.
• Oregano. Good for Italian tomato sauces or casserole garnish.
• Basil. Used in tomato or white sauces.
• Baking powder. A quick leavening agent.
• Baking yeast. Great for breads, rolls, and pizza.
• Cumin powder. Used in rice or Mexican bean dishes.
• Powdered mustard. Good for white sauces or in grain and cheese casseroles.
• Dill weed. Excellent in soups, breads, muffins, or with fish.
• Cayenne. Very hot and spicy; used in sauces.
• Oil. Good for sautéing or frying.
• Vinegar. Great for salad dressings, picante sauce, and other sauces.
• Soy sauce. Good over grains or in white sauces.
• Vanilla. Good for sweet baked goods, desserts, hot cereals, and drinks.
• Tabasco/hot sauce. A condiment for grains, pastas, and soups.
—From NOLS Cookery
Claudia Pearson
The first thing to do once you have assembled all your food is to repackage it. Cardboard, paper, foil, and cans are all excess weight and potential litter.
At NOLS, we use two-ply clear plastic bags to package almost all our food. We purchase commercial bags that can be lightly tied in a knot. Plastic bags are lightweight and reusable and allow you to see what’s inside. Use a permanent marker to identify contents if you’re packing your own food.
We use small plastic bottles with screw-on lids for spices, and widemouthed Nalgene containers for honey, peanut butter, and margarine. Other possible food containers include Ziploc bags, freezer bags, Seal-a-Meal bags, Tupperware, and squeeze tubes.
If you are using a meal planning system, you may want to package each day’s meals together or pack breakfasts, lunches, and dinners together by meal type. Label with a permanent marker and include recipe instructions.
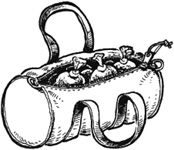
Repackaged food in zippered carrying bag.
Always be careful when packaging food to avoid any chance of contamination by soap, stove fuel, or a leaking lighter. Try to keep the food above these items in your pack. Heavy items such as food should generally be high and close to your body, unless you’ll be hiking through boulder fields or deadfall. In these conditions, carry most of the weight lower, for better balance when jumping or twisting.
—From NOLS Cookery
Claudia Pearson
At NOLS, we have learned to produce gourmet meals with a minimum of cooking utensils. Each student has a bowl, a mug (usually an insulated 12- or 20-ounce cup with a lid), and a spoon. Each cook group is issued one or two (2- or 4-quart) nesting stainless-steel pots, one nonstick or 12-inch fry pan with a flat lid and no plastic parts, one spatula, one large spoon, one collapsible 6-quart or 1 ½- to 2 ½- gallon water jug or water bag, and pliers/pot grips. Optional luxuries include a small cheese grater, a small whisk for blending sauces, and a 4-inch metal strainer.
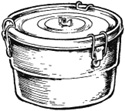
Stainless-steel pot.

“Dromedary”-style water bag.

Spatula.

Pliers.

Large spoon.

Strainer.

Grater.
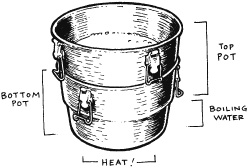
Nesting pots/double boiler.* (4-qt. inside 4-qt. or 2-qt. inside 2-qt.)
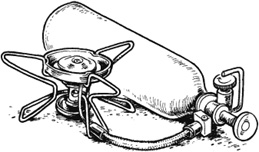
Stove.
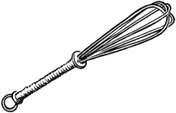
Mini-whisk.
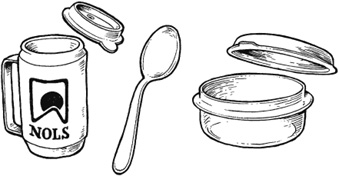
NOLS cup, spoon, and bowl.
There are a number of excellent backpacking stoves on the market today. The most practical ones use white gas. However, white gas (Coleman fuel) is not always available in foreign countries. If this is a concern, interchangeable parts are available for some stoves that allow you to use kerosene. At NOLS, we use mainly Mountain Safety Research (MSR) Whisper Lite Internationale 600 stoves. These stoves are lightweight, east to repair, relatively inexpensive, and reliable.
Have a clear understanding of how your stove works before you leave home. Carry the parts and tools necessary to repair it in an emergency. Keep it clean and dry, and clean the orifice after each use.
Locate your stove on a level surface protected from the wind and away from any vegetation. Watch out for sand and dirt that can clog the orifice or fuel line. If you are traveling in an area where it is impossible to get out of the sand or where you will be in snow, consider taking a stove pad or a piece of fire cloth to cook on. Position the stove with the on-off valve accessible. Keep the area clear of all burnable materials.
Because of the potential for flare-ups and carbon monoxide poisoning, we do not recommend using stoves inside a tent.
Store fuel in fuel bottles, and use funnels or pouring spouts to fill your stove. Fill stoves away from your cooking area and any open flames. Stoves should be filled after each use once they’re cool. You never know when you’ll have to start one in a hurry.
Figuring fuel amounts: During the summer with the Whisper Lites, we expect to use ⅓liter of fuel per stove per day (based on a three-person cook group). Example: 1 stove × 8 days × ⅓ = 2⅔ liters. During the winter, if you’ll be melting snow for water (or if you’ll be at altitudes over 10,000 feet), plan on ¾ liter per stove per day, then round up the total to the next highest liter (based on a three-person cook group). If you round up your fuel amounts, you will have enough to run a small lantern—which is a definite plus during the long nights of winter.
Depressurizing a stove: The purpose of depres-surizing your stove is to provide a low-output flame that is good for baking and simmering. This procedure must be done with utmost caution. First, follow the normal lighting process to heat up the stove. Then turn it off and blow out the flame—make sure that it is completely out. Carefully loosen the pump from the bottle (a ½ to ¾ turn) to relieve pressure. It will hiss. Be careful to avoid gas spray on you or your food. Retighten the pump, pump twice, and light. You will need to pump occasionally to keep the stove going, but for the most part it will maintain a fairly consistent low flame.
—From NOLS Cookery
Claudia Pearson
Campfires used to be a necessity in the back-country; now they are usually a luxury. The growing number of backcountry travelers has resulted in the depletion of firewood in many areas, and the abuse of fire has caused everything from scarring to wildfires. Abuse is the key word here. Built properly, campfires can still be an enjoyable part of backcountry camping and cooking, but the decision to build one should never be made automatically or lightly. Regulations, ecological conditions, weather, skill, use level, and firewood availability should be considered when making the decision.
In a heavily used area, the best site for a fire is in an existing fire ring. In a pristine area, use Leave No Trace fire techniques. These techniques enable you to enjoy a fire without leaving any evidence. One quick, minimum-impact method in sandy areas is a shallow pit fire. Scrape a depression several inches deep in a dry streambed, sandbar, or beach—any place with exposed soil that contains no decomposing organic material (mineral soil)—and build your fire in the depression. Never excavate a fire pit in vegetation. Research has shown that fire pits dug in sod are still evident years later. Avoid environmental damage by using stoves and existing fire rings.
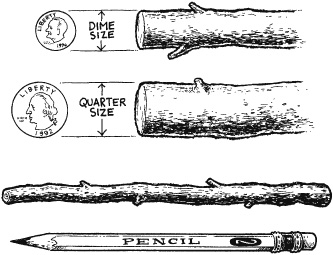
The best widths and lengths of wood to use for a cooking fire.
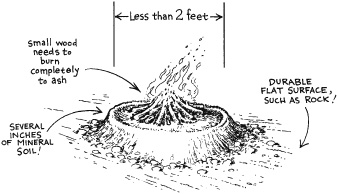
A platform or mound of mineral soil can also be used for a Leave No Trace fire. Simply pile up mineral soil into a flat-topped platform 6 to 8 inches thick and about 2 feet across and build your fire on top. The platform insulates the ground and prevents scarring. Where do you find mineral soil? Uprooted trees, sandy areas near streambeds, or exposed soil near boulder areas are all excellent sources. A tarp or fire cloth laid under the soil facilitates cleanup. Finally, portable fire pans, such as metal oil-drain pans or backyard barbecue grills, allow you to enjoy small fires with virtually no impact. The pan should be lined with mineral soil or propped up on small rocks to protect the surface underneath from heat.
The best firewood is small in diameter (1 to 2 inches), lying loose on the ground, and not attached to downed or standing timer. Small-diameter wood is easier to burn to ash and is less critical to the ecosystem. Gather wood from a wide area; do not denude the immediate surroundings. Collect only enough for a small fire.
Be sure to allow yourself enough time for thorough cleanup and camouflaging of the site. Regardless of whether you used an established fire ring or constructed a fire in a pristine area, burn all the wood down to cold ash. Crush any remaining charcoal. If the ash is cool enough to sift your fingers through, your fire is out. Scatter the remains and any leftover firewood far from the site.
If you constructed a mound fire, after scattering the leftover ash and small bits of charcoal, return the soil to where you found it. If the mound was built on a rock, rinse the rock off. When using a shallow pit, disperse the ash and fill in the pit with the excavated soil. Finally, camouflage the area to match the surroundings. This allows others to enjoy the same site later. Leaving no trace means leaving your cook site as clean as you found it (or cleaner) for the benefit of future campers.
You can use coals from your campfire to create a backcountry Dutch oven for baking. Set a baking pan on a flat bed of coals, and shovel coals onto the lid in an even layer for even cooking. The coals should feel very hot but not quite burn when you hold your hand 6 inches away for 8 seconds. They can be cooled by spreading them out or sprinkling them with sand. The coals on the top should be hotter than those on the bottom. Replenish coals as they go dead.
Be careful when you check the progress of your baked goods. It’s safest to scrape all the coals off the lid before you peek. Don’t peek too often (unless you smell burning), because the escaped heat cuts efficiency. Always wear an expendable pair of gloves—or better yet, a pair of oven mitts—when baking over an open fire.
It is also possible to bake on the stove. A great way to do this is to use a low flame (see page 006) under the baking pan and build a small fire with twigs on the lid. This is called a “twiggy” fire and demands a similar level of care as a larger fire (regulations, wind, wood replenishment, and so forth). For this method to work, you need a baking pan with a flat lid and no plastic parts. Bake slowly over a very low flame (offset the pan so that more than just the center gets heat), rotating the pan every few minutes to cook evenly. You can balance the pan on a flat rock to cook the outside edges. Another technique is to flip bake. This method works best with stiff breads and cakes and when you have a fairly heavy-gauge lid for the baking pan. Make sure you grease and flour the pan thoroughly, including the inside of the lid. When the dough is firm and cooked most of the way through, loosen the edges with a spatula and then flip the bread or cake onto the lid. Place the lid directly on the stove to finish cooking the top. You can also flip the entire baked good in the pan to cook both sides. This works especially well with biscuits, bread, or brownies.
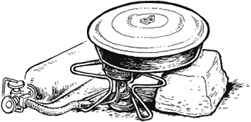
Use a rock to balance your pan in order to cook around the edges.
Other baking tips:
• Fill the pan only half full, since baked goods rise.
• The best backcountry baking pans are lightweight, have nonstick surfaces, and are of a relatively heavy gauge to distribute the often intense heat of fires and portable stoves.
• The pan should never be filled to the point that ingredients touch the lid, or they’ll burn.
• Rotate the pan every few minutes to ensure even baking. This is called the “round the clock” method.
• You can use a frying pan turned upside down for rolling dough. Take a clean plastic bag, split it in half long-ways, and cover the pan with it, dusting with flour to prevent sticking. Improvise a rolling pin from a water bottle or a fishing rod case wrapped in clean plastic bags.
—From NOLS Cookery
Buck Tilton and John Gookin
The value of food—as a source of power and warmth—is measured by its nutritional value. Nutrition is a somewhat imprecise science, but everyone agrees that a shortage of nutrients can cause energy slumps that bring early fatigue, lassitude, mind-numbness, and a predisposition for injury. Start every winter trip by planning to eat a nutritionally sound diet, balancing the best foods with what is practical to carry into the wild.
The most important element of good nutrition is water. Beyond this, there are three sources of energizing foods: carbohydrates, fats, and, to some extent, proteins. Although all foods must be digested into simple compounds before they can be burned for power, carbohydrate (sugars and starches) are digested most quickly and easily. Simple carbohydrates (simple sugars, such as granulated sugar, brown sugar honey, and molasses) are small molecular units that break down very fast, entering the bloodstream soon after you eat them. You get an energy boost right away, but most sugars are burned so quickly that energy levels can suddenly fall below your starting point if all you eat is simple carbohydrates. Therefore, complex carbohydrates (strings of simple sugars called starches, such as pasta, grains, fruits, and starchy vegetables) need to be a major portion of your winter diet. Being a more complex molecular unit, starches break down more slowly, providing power for the long haul. Simple sugars, in other words, are like kindling for a fire, and starches are the big, fat logs.
Fat is so important that your body will manufacture it from carbohydrates and proteins if you run short. Fats (cheese, nuts, butter, peanut butter, meat) break down very slowly in the digestive process, so more time is required for them to provide energy. That’s a good thing when you need a steady source of energy over an extended period, such as long nights in the sleeping bag. But if you’re used to eating a low-fat diet, add fats slowly to allow your digestive system to adjust.
Proteins are made up of amino acids, and amino acids are the basic substance of human tissue. Proteins (meat, milk products, eggs, cheese, seeds, nuts, whole grains) are not a primary energy source, but your body will use them if nothing else is available or if you exercise for a long time. But because tissue is continually lost and replaced (and new tissue is built after you exercise), proteins are essential. All the amino acids are synthesized by your body, except for eight, which have to be eaten. A “complete protein” has all eight of these amino acids.
If you eat a variety of foods from all three sources, and enough of it, you’ll get not only the nutrition you need but also the vitamins and minerals necessary for health and performance in the cold. For more information, consult the NOLS Nutrition Field Guide.
Here are some more tips for planning your winter menu:
• Apart from basic nutrition, the single most important factor in cold-weather food consumption is eating food you enjoy.
• Your cold tolerance will improve if you eat a high-fat snack (about one-third of the calories from fat) every couple of hours. In fact, your blood sugar will stay sufficiently high if you eat a full breakfast and a full dinner and snack throughout the day’s activities. Food and drink every hour helps to maintain warmth and strength. Another snack just before bedtime will help keep you warm while you sleep.
• Spoilage is not a problem on winter trips, because the cold temperature preserves the food. The biggest problem will be keeping food unfrozen. Wrap the food bag in your pack inside extra clothing for insulation. Keep snacks handy (and thawed) in a pocket near your body.
• Cut your cheese, meats, and butter into chunks before leaving home. Even if they freeze solid, you will still have manageable pieces.
• Think simple. You’ll be cold and tired, so quick, one-pot meals will be more appealing. For recipes and abundant information on food and nutrition, consult NOLS Cookery.
Cooking in winter takes much more time and fuel than it does in summer—partly due to the colder air, and partly due to the fact that you might be melting snow for most of your water. Whether you construct an elaborate snow kitchen or simply fire up the stove in the lee of your tent, here are some guidelines:
• Cook in the open. Although you can, with adequate ventilation, cook in the vestibule of a tent or under a tarp, deadly carbon monoxide can build up quickly in an enclosed space, so cooking in the open is strongly recommended.
• Use a stove pad to keep the stove from melting into the snow underneath, and use pot pads (pieces of closed-cell foam work well) to avoid setting pots directly in the snow. (If you do set a pot in the snow, remember to brush the snow off the bottom before setting the pot back on the stove, or risk extinguishing your stove.)
• Warm, dry lighters work much better than cold, wet ones, so keep several spares in your clothes pockets, where they’ll be warm, dry, and easy to find. Electric lighters are more reliable than flint lighters.
• Conserve as much fuel as possible by using wind-screens, windbreaks, and reflector shields for the stove; using lids for pots; and never letting a pot of water reach a full, rolling boil.
• Don’t let the stove get icy overnight or between meals. Keep it well covered, preferably in a bag, when you’re not using it.
• Be very careful when refilling the stove. Wear light gloves, because the evaporation of fuel from your skin can cause frostbite.
• Keep your kitchen well organized to prevent time-wasting searches for small items lost in the snow.
Edited by Claudia Pearson
HASH BROWNS WITH CHEESE
(serves 2)
1 ½cups hash browns hot water
4 to 5 Tbs. margarine
1 Tbs. onion, rehydrated or fresh, finely chopped
(optional)
½ cup cheese cubes or grated cheese
salt and pepper to taste
Put hash browns into a saucepan. Cover with 1 inch of hot water and rehydrate for 15 minutes. Drain off excess water. Melt margarine in a hot fry pan. Add hash browns and onions. Cook, flipping occasionally, until crisp and browned. Stir in or cover with cheese and remove from heat. Cover and allow to sit until cheese is melted. Salt and pepper to taste. Good with hot sauce or picante.
Variation: Add ham or bacon bits to hash browns and cook as above.
EGGS McGULCH
(serves 1)
2 heaping Tbs. powdered egg
1 Tbs. powdered milk
1 Tbs. flour
½ cup water
salt, pepper, and other spices to taste
margarine
1 bagel, sliced
cheese: cream, jack, or cheddar
salsa or ketchup
In a bowl, mix egg, milk, and flour together and slowly add water, stirring constantly to avoid clumping. Pour mixture into a heated fry pan with a little bit of margarine, and stir constantly to avoid burning. Remove from heat when eggs reach a scrambled consistency. Add spices to taste. Spread margarine on bagel and toast in fry pan. Spread cream cheese, or place sliced cheese, on bagel; top with cooked eggs and salsa or ketchup. Makes one hearty breakfast sandwich.
Variations: Add fresh or rehydrated onions, green and red peppers, or cooked meat to eggs.
OUR FAMOUS FRIED MACS
(serves 2 to 4)
handful of dried vegetables
1 lb. (4 cups) macaroni or any pasta
4 to 6 cups water
fresh or dried garlic
spices to taste, such as salt, pepper, soy sauce, oregano, basil
oil or margarine
cheese (any kind), cubed
Add vegetables to cold water and bring to a boil. Add pasta, bring back to a boil, remove from heat, and cover. In another pan, sauté garlic and spices in oil or margarine and then add cooked, drained pasta. Stir and fry for 5 to 10 minutes. Add cubed cheese and fry until desired consistency. Top with Parmesan or salsa for added flavor.
Variations: Use other types of pasta, but be aware that spinach fettucine and egg noodles require constant heat while cooking to avoid mushiness. You can also add canned meats such as tuna or chicken or fresh meats such as pepperoni, cooked bacon, or sausage to this meal for added flavor and calories.
Hint: The smaller the cheese chunks, the faster the cheese will melt. Grated cheese works the best!
DONNA ORR’S GADO-GADO SPAGHETTI
(serves 2 to 3)
Current NOLS employee and previous co-author of NOLS Cookery Donna Orr gets the award for the most popular recipe with this dish. A spicy peanut butter sauce makes it a treat either hot or cold.
½ lb. (2 cups) spaghetti or 2 packages ramen noodles
4 cups water
3 Tbs. + 1 tsp. oil
2 Tbs. sunflower seeds
1 Tbs. dried onion, rehydrated
½ Tbs. or one packet broth
3 Tbs. brown sugar
1 tsp. garlic
½ tsp. black pepper (optional)
½ tsp. hot sauce (optional)
½ tsp. spike (optional)
¾ cup water, or more as needed
3 Tbs. vinegar
3 Tbs. soy sauce
3 Tbs. peanut butter
sliced green or wild onions, if available
Break pasta in half and put into boiling unsalted water to which 1 tsp. of oil has been added. Cook until done; drain immediately. In a fry pan, heat 3 Tbs. oil and add the sunflower seeds and rehydrated onions. Cook and stir over medium heat for 2 minutes. Add the broth with the brown sugar, garlic, other spices if desired, and ¾ cup water. Add the vinegar and soy sauce. Add peanut butter and stir. Do not burn! To eat this hot, heat the sauce thoroughly and pour over hot spaghetti.
This dish can have a fairly salty taste. Cut back or eliminate the broth if you are concerned about saltiness. The recipe is best cold, and it loses some of its saltiness as it sits. Mix sauce and spaghetti, cool quickly, and serve chilled. If available, sliced green or wild onions as a garnish add to the flavor.
Variation: Fresh vegetables such as broccoli, onions, and cabbage, chopped and sautéed lightly and mixed into the sauce, make a tasty addition.
MARY HOWLEY RYAN’S FANTASTIC BULGUR PILAF
(serves 4)
Contributed by our nutritionist. This vegetarian version is geared toward backcountry cuisine. It can be made as a main or side dish with many possibilities for variation.
1 cup bulgur wheat
1 cup boiled water
vegetarian soup base (bouillon cubes, powdered broth/stock, etc.; chicken-flavored varieties work well)
1 tsp. curry powder
1 tsp. soy sauce (or more to taste)
½ tsp. honey or other sweetener (e.g., brown sugar or maple syrup)
½ cup dried fruit, chopped
½ cup nuts and seeds
Place bulgur in large pot or bowl. Boil water and mix in soup base. Pour over bulgur and add curry powder, soy sauce, honey, fruit, and nuts. Mix well. Set aside in cool area for at least ½ hour (the longer it sits, the softer the pilaf).
Variations:
• Add canned chicken, fresh fish, cooked lentils, or sliced jerky for more protein.
• Season with hot sauce, Thai chili garlic sauce, fresh or powdered garlic, coconut, coconut milk, Garam Masala spice, or fresh herbs.
MEAL-IN-A-MUG
(serves 1)
This is popular when cold weather camping because there are no pots to clean!
12 to 16 oz. boiling water
2 packages of cup-of-soup
2 to 3 Tbs. potato pearls
2 Tbs. cubed cheese (cheddar or jack)
2 Tbs. cubed meat (e.g., summer sausage, ham, pepperoni, cooked bacon)
hot sauce to taste
Empty packages of cup-of-soup into a 20-oz. mug (any kind will do, but the favorites are cream of chicken and chicken noodle). Pour in boiling water and stir. Add potato pearls to thicken to desired consistency. Add cheese and meat and mix well. Stir well. For a little zing, top with hot sauce.
Hint: Potato pearls also make great thickeners in just about everything except cocoa.
TARTER’S TASTY TATERS
(serves 3 to 4)
½ lb. potato pearls
black pepper, salt, garlic powder, hot sauce, chili powder
¾ lb. refried beans or instant black beans
3 Tbs. margarine
⅓ lb. Grape Nuts
¾ lb. cheddar cheese
Boil 8 cups water. Use enough of it to hydrate potato pearls in a pot, spicing to taste with pepper, salt, garlic, hot sauce, and chili power. Then use leftover water to cook beans. In fry pan, melt margarine and add ⅔ of the Grape Nuts. Fry until coated with margarine and then pat into a crust on the bottom of the fry pan. Cover the crust with a layer of sliced cheddar. Scoop in potato pearls and flatten on top of crust. Pour beans on top of the layer of pearls. Cover beans with a layer of cheddar cheese. Sprinkle the remaining Grape Nuts on top of the cheese and sprinkle everything with a dash of chili powder for color. Bake the casserole until the cheese on top has started to melt and bubble (about 10 to 15 minutes).
Hint: It is safest to put the fry pan on top of the Whisper Lite windscreen so as not to burn the bottom layer of Grape Nuts.
LISAGNA WHIZNUT VARIATION
(serves 3)
Named for current NOLS instructor Lisa Jaeger and John Whisnant, an instructor in the 1970s.
½ lb. pasta (shells, spirals, or macaroni works best)
2 broth packs
fresh onion slices and a couple cloves garlic, or 1 heaping Tbs. dried onion and 1 Tbs. garlic powder
1 can tomato paste or ½ cup dried tomato powder
spices: ½ tsp. salt, 2 heaping tsp. oregano, 2 heaping tsp. basil, ½ tsp. black pepper, 1 tsp. vinegar
4 rounded serving spoons flour
2 heaping tsp. baking power
1 rounded Tbs. powdered eggs
1 rounded Tbs. powdered milk
¾ to 1 lb. cheese
Cook pasta in salt water or with two broth packs. Sauté onions and garlic in fry pan with oil or margarine. In a bowl, mix about 2 cups water and the tomato paste or powder. To this sauce, add the spices (Hint: Be sure to season tomato sauce to taste before layering it over pasta. A bit of sugar can reduce the pungent tomato flavor.) In a separate container, mix flour, baking powder, eggs, and milk with approximately 2 ½ cups cold water. Mix to pancake batter consistency and pour over cooked, drained pasta. Stir and taste. Make sure that the pasta does not taste too bland. Layer thin slices of cheese on the bottom of the fry pan. Pour pasta mixture into fry pan over cheese slices. Spread tomato sauce over the pasta and cover with more thin slices of cheese. Sprinkle with oregano and cover. Bake over stove with twiggy fire for 20 minutes or until brown and bubbly on top. Be careful to rotate the pan over the bottom heat source so as not to burn the casserole.
Variations: Experiment with spices, add meat, or pour the flour batter over the pasta instead of mixing it in.
MEXICAN GRITS AND CHEESE CASSEROLE
(serves 4 to 6)
5 cups water
1 ½cups grits
2 tsp. salt
5 Tbs. powdered egg
½ cup water
2 tsp. chili powder
1 tsp. cumin (optional)
hot sauce to taste
4 to 6 Tbs. margarine or bacon grease
1 ½ cups cheese, grated or diced small
Bring 5 cups water to a boil. Stir in grits and salt. Cook, stirring, until thickened. Mix egg with ½ cup water. Add to grits with spices, hot sauce, margarine, and most of cheese. Pour into a greased frying pan. Cover with remaining cheese. Bake, covered, over low heat 30 to 45 minutes. Serve garnished with Grape Nuts for crunch and more hot sauce.
Hint: Grits need to sit covered for 15 minutes to solidify.
(makes about 1 cup)
The test panel gave this a rave review.
1 Tbs. dried onion
1 Tbs. dried green and red peppers
1 cup water (½hot and ½ cold)
2 Tbs. tomato base
dash garlic powder
¼ tsp. hot sauce or cayenne (to taste)
1 tsp. each vinegar and brown sugar (optional, but adds good flavor)
dash black pepper
Rehydrate onions and peppers in ½ cup hot water. Add tomato base and stir until well mixed. Add remaining ingredients and ½ cup cold water. Mix well. You can thin this out more if you wish. Serve cold over nachos, main dishes, potato-cheese patties, or bean and lentil dishes.
FRY BREAD
(serves 2)
2 tsp. yeast
1 tsp. salt
¾cup warm water
1 tsp. sugar
1 ¾ to 2 cups flour (a mix of white and whole wheat is good)
oil for frying
Mix all ingredients except flour and oil. Let stand 5 minutes. Add flour and knead until smooth. Let rise. Heat oil in fry pan. Flatten dough into a fat tortilla ½ inch thick. Fry bread on both sides. Serve with a spread of honey or brown sugar, margarine, and cinnamon. How much oil you use for frying determines that crust and texture of this bread. Real fry bread uses a lot of oil, but it is not necessary. You can cut down on fat calories by just oiling the pan. If you double this recipe, cook half at a time.
Variation: For Indian fry bread, mix bread as above and use immediately without allowing it to rise.
BASIC BISCUITS
(makes 10 to 12)
2 cups baking mix (see page 154)
4 Tbs. margarine
½ to ¾ cup water
Cut margarine into baking mix using spoon edges. Add enough water to form a stiff dough. Knead in bowl about a dozen times. Pinch off enough dough for desired size biscuit; pat into shape. Bake in covered fry pan, using a twiggy fire, for about 15 to 20 minutes or until done. As an alternative to baking, fry in melted margarine until both sides are browned. Cover and cook on low heat about 8 to 10 minutes. Good served with margarine and a white sauce.
Variations:
• Cheesy biscuits: Add ½ tsp. garlic powder and some rehydrated onions to dough. Form into balls and pull apart into halves. Insert a piece of cheese and pinch halves back together. Bake as above
• Fruit and nut biscuits: Mix together 1 Tbs. margarine, 1 Tbs. brown sugar, and ⅓ cup chopped mixed fruits and nuts, and insert into biscuits using the method just described.
CROWNS À LA SIERRA
(makes 8 to 10)
This recipe was an instant hit!
2 cups baking mix (see page 154)
½ cup brown sugar
1 tsp. nutmeg or cinnamon
3 heaping Tbs. margarine
½ to ¾ cup water filling (see below)
Mix dry ingredients. Cut in margarine. Add water to make a stiff dough. Pinch off dough and roll into balls. Bake in fry pan, using a twiggy fire, for 5 minutes, then indent middle with a spoon and continue baking until brown, about 15 to 20 minutes more. Just before serving, fill depression in center with filling.
Filling:
½cup nuts and chopped fruit (a good combination is raisins, chopped walnuts, and chopped apricots)
3 Tbs. honey or brown sugar (with sugar, add 1 Tbs. water)
1 heaping Tbs. margarine
dash of salt
½ tsp. cinnamon or nutmeg
Mix together and cook over low heat a few minutes until smooth.
CHAPPATIES
(makes 4 5-inch flat breads)
½ cup flour (whole wheat is more authentic, but white is okay too)
½cup cornmeal
pinch salt
½cup water
margarine for frying
toppings: sliced cheese, bacon bits, chopped wild onions, cayenne to Tabasco
Mix all ingredients except margarine and toppings. Form in very thin patties and fry in lightly greased pan until golden brown. After they are turned, add desired toppings; cover pan to help cheese melt.
Variation: Combine 1 cup whole wheat flour, ¼ tsp. salt, 1 Tbs. margarine, ¼ cup water. Proceed as for making chappaties.
SCRAMBLED BROWNIES OR GINGERBREAD
This dessert earned its name because it never seems to make the “baked” stage.
2 cups brownie mix or gingerbread mix
6 Tbs. water (more if batter is dry)
Mix together. Spread in oiled fry pan. Cover and cook on low heat about 15 minutes until product is done on top. Scrape out of pan with a spatula. Let sit a few minutes before eating so it can stiffen. This is an alternative to baking with a twiggy fire. The end product is chewy and gooey.
Variation: Add chopped nuts, dried fruits, or chocolate chips to the mix before cooking.
NO-BAKE ESKIMO COOKIES
(makes about 16 cookies)
1 cup oatmeal (instant or regular)
6 Tbs. margarine
6 Tbs. brown sugar
3 Tbs. cocoa mix
½ tsp. vanilla
½ Tbs. water
Mix all ingredients together. Form into walnut-sized balls. Eat immediately or let sit in a cool place.
Variation: Roll in a combination of 1 Tbs. powdered milk and 1 Tbs. brown sugar, or in coconut.
NO-BAKE POWERHOUSE COOKIES
(makes 20 to 24 cookies)
Our taste testers loved these!
1 cup brown sugar
¼ cup margarine
3 Tbs. powdered milk
4 Tbs. water
1 cup oatmeal
1 cup peanut butter
½ cup nuts
¼ cup chocolate or carob chips
½ tsp. vanilla
Mix sugar, margarine, powdered milk, and water in a pan. Bring to a boil. Reduce heat and boil 3 minutes, stirring constantly to prevent scorching. Remove from heat and stir in remaining ingredients. Drop by spoonfuls onto a flat surface such as a pan lid. Let sit for about 10 minutes to set. In hot weather, they might not set as well.
—From NOLS Cookery
Linda Frederick Yaffe
The ancient art of food dehydration is wonderfully basic. Heat and air circulation remove most of the water content from the food. This lack of water keeps microorganisms from living and growing. After many years of home-drying complete backpack meals, I have never lost food to spoilage. Follow the simple instructions . . . and you will enjoy the same success. Dehydration is especially suited to backpacking. Not only does drying forestall spoilage, it transforms bulky, heavy food into compact, featherweight meals.
Dehydration costs less than any other method of food preservation. It requires no chemicals. Complete meals can be dried year-round in any weather, at your convenience. Take advantage of each season’s bounty, using the finest fresh ingredients available, or use good-quality canned or frozen meat, fish, fruit, or vegetables. Home-dried meals can be stored for several years. It’s easy to keep a ready supply of home-dried dinners on hand for carefully planned extended treks, as well as last-minute weekend escapes.
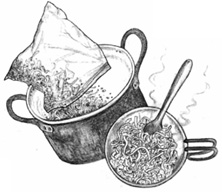
Creating home-dried one-pot meals is this simple.
Creating home-dried one-pot meals is this simple: Cook your dinner at home, slicing, grating, or dicing the ingredients into small pieces. Spread the cooked meal on covered dehydrator trays and dry until the food looks and feels completely dry. In the field, cover the food with water, boil, stir, and serve with pleasure.
You don’t have to settle for someone else’s idea of a good hot dinner. When you make your own convenience meals, you are in control: more salt or less salt, high fat or low fat, meat or meatless—the decision is yours. You can use your choice of diary, soy, or rice milk or cheese in any of these recipes. Like it hot? Add more jalapeños. Can’t eat sugar? Use a substitute. Liberate yourself from one-size-fits-all commercial meals. You enjoy good meals at home; while backpacking, you need those same good-tasting, varied, nutritionally balanced meals more than ever. Some backpackers short-change themselves. They eat the same tired instant mashed potatoes or ramen noodles day after day. Varied, nutritionally balanced meals not only give you energy on the trail, but also keep your mind focused and make you feel happy and satisfied.
A high-quality electric food dehydrator with fan, heat source, and thermostat is the best food investment a backpacker can make. If you do not own a dehydrator, borrow one from a friend or relative. Try some of the recipes in this book. You will learn how simple it is to create your own one-pot meals. The dehydrator, not you, does the work.
A top-of-the-line dehydrator will pay for itself, compared to the price of commercially dried meals, during a one-week trip for a family of four. Air circulation is more important than heat when you are drying food, so be sure to choose a dehydrator with a fan as well as a heat source and a thermostat. Bargain dehydrators that lack a fan simply don’t work. They will steam—not dry—your food. Either of the following brands of electric food dehydrators are recommended for decades of carefree home drying: Excalibur Products [6083 Power Inn Road, Sacramento, CA 95824, (800) 875-4254] or Nesco American Harvest [4064 Peavey Road, Chaska, MN 55318, (800) 288-4545].
All of the one-pot dehydrated meals in this book serve four hungry backpackers—two cups or more per serving when rehydrated. The four large portions indicated in these recipes will fit comfortably in typical home food dehydrators without crowding. To cook these big, full-sized backpacking portions of food, you will need to use large cooking pots at home. Here are some suggested home kitchen basics:
Dutch oven, at least three-quart capacity
Large ovenproof skillet, at least 10 ½-inch diameter
Soup and pasta pot, at least five-quart capacity
Colander to drain pasta, fruits, and vegetables
Casserole dish, at least four-quart capacity, ten by thirteen inches
Baking sheets, both flat and rimmed
Blender or food processor to speed chopping
Wire whisk for effortless lump-free sauces
Time-saving tip: Prepare extra food, enjoy some for dinner tonight, and dehydrate the rest.
Choose a one-pot complete meal recipe from this book. Cook your meal at home, just as though you are preparing tonight’s dinner. If you choose a meal such as spaghetti, simply prepare a spaghetti sauce—your choice of beef, seafood, or vegetarian. Then boil the pasta al dente (cooked but still firm). Toss together the sauce and the drained pasta, and put the whole dish, freshly cooked and still warm, into the dehydrator. While preparing the food, chop, grate, dice, or slice the ingredients into small pieces. These will dehydrate much faster and more successfully than large pieces of food.
Virtually all cooked foods are safe and easy to dry at home. Two uncooked foods that should never be dried at home are eggs and milk. When cooked, these foods dehydrate safely. Many of the recipes in this book contain cooked eggs and milk. To avoid the risk of salmonella contamination, buy commercially dried powdered eggs. They are readily available everywhere as whole eggs, egg whites, or egg substitutes for home cooking, baking, or emergencies. Dry milk is also readily available commercially as instant or regular, high or low fat, or buttermilk.
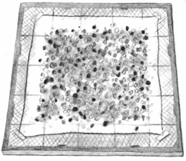
Cover mesh dehydrator trays.
While the food is cooking, cover your mesh dehydrator trays with plastic wrap or ovenproof parchment paper. If you use plastic wrap, buy a brand made from 100 percent polyethylene. Leave about an inch of space between the wrap or paper and the edge of the trays; this will allow more air circulation. To keep the covering from shifting, you can anchor the corners with tape. If your dehydrator has solid fruit leather trays or tray covers, you do not need to use any other covering. The wrap, paper, solid trays, or tray covers simply keep liquid foods such as soups, stews, or casseroles from leaking through the mesh of the dehydrator trays.
Preheat the dehydrator for ten minutes.
Spread the warm, cooked meal evenly in a thin layer on the dehydrator trays and put time in the dehydrator. Overloaded trays dry slowly. All of the one-pot recipes in this book—which make four serving them each—fit comfortably into a typical home dehydrator. For highest quality and food safety, speedy drying is best.
The meal will be completely dry in four to six hours. While your meal is drying, check it several times. To check the food and speed its drying, first wash your hands and dry them. Then pull out one tray at a time and turn and crumble the food on the tray, breaking up large pieces of food with your hands. This will ensure fast, even drying. If you are unable to check and turn the food during the drying process, a good dehydrator will successfully dry your meal anyway; drying will simply take a few hours longer. It is nearly impossible to overdry or otherwise ruin your home-dried meals using an electric dehydrator with a heat source and fan. If necessary, you can put the food in the dehydrator, leave the house, go to work for eight hours, and then turn off the dehydrator when you get home.
The recipes in this book contain some fat; backpackers need fat for fuel. However, too much fat will retard drying and could decrease the shelf life of your dried meal. While preparing your meals, carefully trim the fat from meats. Avoid excessive amounts of high-fat cheese, oil, or butter. Some especially fatty foods, such as bacon, can appear greasy during the drying process. If fat glistens on the food, simply blot it with paper towels, then return the trays to the dehydrator.
Drying times indicated in each recipe will vary due to your dehydrator and the fat and moisture content of your ingredients. The food is dry when it looks and feels dry. To test for dryness, choose a large piece of food from the dehydrator tray. Examine it and crumble it in your hand. If you notice any moisture, return the trays to the dehydrator and dry the food a bit longer. Don’t worry about overdrying these meals; they are nearly foolproof.
When beans are fully dry, they feel hard and dry and can crumble into powder when crushed in your hand. Strands of spaghetti will feel dry but still slightly pliable. Meats should feel hard and leathery. Vegetables will feel hard and crisp. Fruit should be bendable and dry with no moist spots.
When the food looks and feels dry, turn off and unplug the dehydrator. Let the food rest in the dehydrator for several hours or overnight. This will let your food completely cool and release the last bits of moisture. The next day, your meal is ready to store.
If you use an electric oven, remove the top heating element or place an empty baking sheet on the oven’s top shelf. Whether your oven is electric or gas, use the coolest part of the oven.
To successfully dehydrate food in an oven, you need to keep the temperature low. Turn your oven to its lowest setting, usually 140 to 150 degrees Fahrenheit. Notoriously inaccurate home ovens often run 25 to 50 degrees hotter than the oven’s temperature dial indicates. An oven thermometer is helpful; set it next to the drying food to keep the temperature within the 140 to 150 degree range. If the temperature rises above 150 degrees, turn off the oven for a while.
The accurate and stable Taylor Classic Oven Guide Thermometer, model 5921, can be obtained from Kitchen Etc. [32 Industrial Drive, Exeter, NH 03833, (800) 232-4070, www.cheftools.com].
Air circulation is essential. Prop open the oven door a few inches while the food is drying. For increased air circulation, place an electric fan just outside the oven door; aim the airflow over the food.
Spread your one-pot meals in a thin layer on oiled, rimmed baking sheets. Check, shift, and crumble the food frequently while it is drying. The food around the edges of the baking sheets will dry much faster than the food in the center; protect it from scorching by checking it often.
As with an electric dehydrator, oven-dried food is dry when it looks and feels dry and crisp. Let the food cool completely for several hours or overnight before storing it.
Bag each meal in small, sturdy plastic bags. Bag the meals according to your backpack needs. If you have dried four servings and will be backpacking in a party of two people, split the meals and store two servings per bag. If a dried meal remains high in volume after dehydration, compact it. Crush the dried meal with your hands as you pour it into the storage bag. Squeeze as much air as possible from the bag, then seal it. Double-bag the meal in a second bag; in between the two bags, place a tiny label made from a small scrap of paper with the name of the recipe, the date it was dried, how many people it will serve, and directions for rehydrating the meal. This label will tell all members of your party what the bag contains and how to prepare the meal in the field.
For best quality, store your meals in individual meal-sized bags. Avoid packing many servings of food into a single large bag that must be opened repeatedly during a long trek. Each time you open the bag, you will expose the food to air and moisture, increasing the chance of spoilage.
Store the meals in a cool, dark, dry place. Protect them from exposure to air, light, and moisture by putting the individually bagged meals into a large black plastic bag. The black bag can then be stored in a cool, dark, dry room, but, for best quality, store the meals in your refrigerator for up to two years, or in your freezer for three years. They take up little space and will be fresh and handy to throw into your pack for an unexpected weekend trip.
When you’re ready to backpack, store the meals bagged in black plastic in the cool, dark, dry interior of your pack. Home-dried one-pot meals make perfect cached food for longdistance treks, since their shelf life is long.
The plastic wrap, ovenproof parchment paper, and all plastic food bags can be washed, dried, and reused many times before you recycle them. After each use, wash them in warm, soapy water; then rinse and dry them well.
If you have ever run out of food while backpacking, forgotten a crucial item (where’s the coffee?), or conversely, grumbled as you packed out five pounds of unneeded food, a menu plan will make your trip smoother. Take a few minutes to write a menu plan before you leave home. A successful trip means walking out of the wilderness carrying no food except your small emergency supply.
While planning your trip at home, draw a grid menu plan, showing three meals plus two snacks per day, and an extra snack per day for very cold weather camping. Include all of your foods and beverages, plus one extra emergency dinner and snack for each member of the party. Writing a menu plan gives you an overview of your trip. You can plan for variety: beans one night, chicken the next. Plan a soothing cheese and noodle dish the night after a jazzy, spicy dish. Serve a hot breakfast in between days of cold cereal. At the bottom of your menu grid, list the total number of servings of multiple items, such as total servings of granola, coffee, tea, cocoa, cheese, crackers, dried fruit, energy bars, and lemonade mix.
Measure all servings of food. Never guess how much you will need. Using your menu plan as a guide, sit down at a table with plenty of small plastic bags and measuring cups and spoons. Carefully measure each portion into the bags. If you are backpacking for ten days or fewer, you may want to label each meal—breakfast #1, lunch #1, and dinner #1—with large-print, easy-to-read slips of paper. After you have labeled the individual meals in small bags, place them into four large plastic bags labeled breakfast, lunch, dinner, and snacks. If you are traveling in bear country and will need to hang (counterbalance) your food from a tree, take along fifty feet of nylon cord and two large nylon bags with drawstrings that can be counterbalanced from a tree limb.
To pack fragile foods, such as crackers or cookies, use waxed milk cartons or cardboard oatmeal boxes. Keep a supply of clean quart and half-gallon cartons on hand. Wash and dry the waxed cartons. Pack individual servings of fragile foods in plastic bags; then pack them tightly into the cartons. Label the cartons, and bag them in larger plastic bags. When the cartons are empty, they can be flattened and used as insulated seating during the rest of your trip while you are packing them out.
These meals are ready to eat fast. Have your stove set up and ready to light. Keep a container of treated water handy. Have your pot and lid, spoons, serving cups, and home-dried meal ready. It’s time for dinner.
Pour the home-dried meal into the pot. Cover the food with treated water. No measuring is necessary; simply cover soups or stews with plenty of water (one to two inches above the surface of the dried food in the pot), and more solid dishes such as pasta, quiches, or casseroles with barely enough water to cover (just above the surface of the dried food in the pot). Put the lid on the pot.
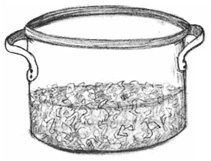
Cover pasta, quiches, or casseroles with water just above the level of food in pot.
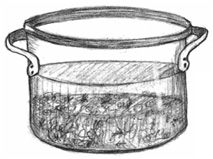
Cover soups or stews with water one to two inches above level of food in pot.
Light your stove. Place the pot of food on the stove. After a minute, check and stir the food. When it begins to bubble, stir until the food is fully boiling and the ingredients have softened. Turn off the stove and remove the pot. Serve and enjoy your meal.
If, while heating your meal, you find you have used too little water, simply add a bit more treated water and bring it to a full boil. If you have used a little too much water, enjoy the extra broth, or simply boil the meal a few minutes longer to reduce the extra water.
BEEF JERKY
4 servings
Weight 1 dried serving = 1.5 ounces
This is easy and delicious.
1. Place in freezer until partially frozen: 1 pound lean flank or round steak
2. Remove and discard fat.
3. Slice the meat into ¼-inch-thick strips.
4. Mix together in a large, shallow glass casserole dish:
3 tablespoons tamari soy sauce
3 tablespoons Worcestershire sauce
1 tablespoon liquid smoke
1 tablespoon chili powder
1 teaspoon hot sauce
2 cloves garlic, minced
5. Marinate the strips in the sauce, stirring to coat, for 3 minutes.
6. Oil mesh dehydrator trays. Lay the strips directly on uncovered mesh trays.
7. Dehydrate for 6 hours at 145 degrees [F], turning the strips once while drying.
8. When completely cool, store in refrigerator or freezer in individual serving-sized bags prior to your trip.
Variation: Leftover cooked chicken or turkey makes tasty, slightly chewy jerky. Slice the cooked meat as thin as possible, trimming away every bit of fat, and follow the above recipe for Beef Jerky. Pork, cooked or not, is not suitable for jerky.
SPRING STRAWBERRY LEATHER
32 servings
Weight 1 dried serving = 0.5 ounce
This is the essence of strawberry flavor.
1. Wash, rubbing off seeds, then core and drain in a colander:
3 pounds (10 cups) ripe fresh strawberries
Purée the strawberries in a blender or food processor, along with:
½ cup white corn syrup
½ teaspoon ground ginger
2. Oil covered dehydrator trays with vegetable oil. Pour the purée onto the trays in even 8-inch-diameter circles.
3. Dehydrate at 135 degrees [F] for 7 to 10 hours, or until firm but leathery.
4. Roll up the leather while it is still warm; then cut each roll into 4 pieces. Let cool completely before storing in individual serving sized bags.
Fruit Leather Variations
Try the following fruits:
Unpeeled apricots, peaches, pears, or plums peeled nectarines or pineapple
Use 10 cups of fresh fruit. Choose one fruit or a combination of several fruits. Purée the fruit along with a small amount of honey, sugar, or corn syrup, plus spice to taste.
For additional variety, sprinkle over the fruit leather before putting it into the dehydrator:
any variety finely chopped nuts
flaked coconut
any variety hulled seeds
granola cereal
BANANA CHIPS
Weight 1 dried serving (1 banana) = 1.5 ounces
1. Lightly oil uncovered mesh dehydrator trays with vegetable oil.
2. Peel, then cut into ⅛- to ¼-inch-thick slices:
ripe bananas
Place in a single layer directly on mesh dehydrator trays. Two bananas will fill three dehydrator trays.
3. Dehydrate at 145 degrees [F] for 5 hours, or until firm and leathery.
4. Let cool completely before storing in individual serving-sized bags.
HASH BROWNS WITH EGGS AND SAUSAGE
Serves 4
Weight 1 dried serving = 5 ounces
Enjoy this complete breakfast in only 3 minutes from pack to plate.
1. Grate, then drain in a colander, pressing out moisture:
10 medium baking potatoes (about 4 ½ pounds), scrubbed but not peeled
2 large onions
2. Heat a Dutch oven over medium heat, then add:
2 tablespoons olive oil
When the oil is hot, add the potatoes and onion, pressing them into the pan and stirring occasionally, for 10 minutes.
3. Stir in:
10 ounces beef, pork, turkey, or soy sausage, minced
1 teaspoon salt
1 teaspoon freshly ground black pepper
Reduce heat to very low, cover, and cook for 10 minutes, stirring occasionally.
4. Preheat oven to 350 degrees [F]. Oil a 10-by-13-inch casserole dish.
5. Stir into the potato mixture:
8 eggs, beaten
½ cup finely grated Parmesan cheese
Spread the mixture in the casserole dish. Bake for 20 minutes, or until golden brown.
6. Spread on covered dehydrator trays and dehydrate for 4 ½ hours at 145 degrees [F].
7. To rehydrate, cover with water ½inch above level of food in pot, boil, stir, and serve.
BEAN AND PASTA SOUP
Serves 4
Weight 1 dried serving = 5.5 ounces
1. Cook, then drain in a colander:
10 ounces vermicelli pasta, broken in thirds
Return pasta to pot and set aside.
2. Heat a Dutch oven over medium-low heat.
Add:
1 tablespoon olive oil
When the oil is hot, add:
1 onion, minced
1 large baking potato, scrubbed but not peeled, grated
1 teaspoon minced fresh rosemary or ½ teaspoon dried rosemary
Cook, stirring occasionally, for 7 minutes.
3. Add:
14 ounces canned peeled Italian plum tomatoes, crushed
15 ounces canned kidney beans, rinsed and drained
3 cups any variety stock
1 teaspoon salt
½ teaspoon freshly ground black pepper
Cook 5 minutes longer, then stir in the cooked pasta.
4. Spread on covered dehydrator trays and dehydrate for 6 hours at 145 degrees [F].
5. To rehydrate, cover with water 1 inch above level of food in pot, boil, stir, and serve.
QUICK CLAM CHOWDER
Serves 4
Weight 1 dried serving = 4.5 ounces
1. Heat a Dutch oven over medium-low heat.
Add:
2 tablespoons olive oil
When the oil is hot, add and cook for 8 minutes:
1 onion, minced
2 cloves garlic, minced
4 stalks celery, diced
2. Add, bring to a boil, then simmer, covered, 30 minutes longer, stirring occasionally:
5 medium baking potatoes (about 2 ½ pounds), scrubbed but not peeled, diced
19 ½ ounces canned minced clams
3 cups chicken broth, clam juice, or vegetable stock
1 Whole bay leaf
3. Remove bay leaf. Stir in:
12 ounces canned evaporated milk
1 teaspoon salt
¼ teaspoon freshly ground black pepper
4. Spread on covered dehydrator trays and dehydrate for 7 hours at 145 degrees [F].
5. To rehydrate, barely cover with water. Stir while bringing to a boil; then serve.
QUICK BEEF STEW
Serves 4
Weight 1 dried serving = 4.5 ounces
1. Heat a Dutch oven over medium heat. Add:
1 tablespoon olive oil
When the oil is hot, add and cook, stirring, for 4 minutes, or until light brown:
1 pound lean ground round or ground turkey
1 onion, minced
1 carrot, grated
3 cups any variety stock
28 ounces canned crushed tomatoes
1 whole bay leaf
1 teaspoon minced fresh thyme or ½ teaspoon dried thyme
1 teaspoon salt
1 teaspoon chili powder
15 ounces canned small white beans, rinsed and drained
¾ cup whole wheat couscous
Reduce heat and simmer, covered, for 12 minutes.
3. Spread on covered dehydrator trays and dehydrate for 5 ½ hours at 145 degrees [F].
4. To rehydrate, cover with water 1 inch above level of food in pot, boil, stir, and serve.
TURKEY CHILI
Serves 4
Weight 1 dried serving = 4 ounces
1. Heat a Dutch oven over medium heat. Add:
1 tablespoon olive oil
When the oil is hot, add and cook, stirring, for 5 minutes:
1 onion, minced
1 bell pepper, minced
2 cloves garlic, minced
2. Add and stir 3 minutes longer:
1 pound uncooked ground turkey or diced roasted turkey
1 tablespoon chili powder
1 teaspoon ground cumin
3. Stir in and bring to a boil:
28 ounces canned crushed tomatoes
3 cups any variety stock or water
½ cups whole wheat couscous
½ teaspoon salt
¼ teaspoon cayenne pepper
Reduce heat and simmer, covered, for 10 minutes.
4. Remove from heat and stir in:
½ cup finely grated Parmesan or Romano cheese
5. Spread on covered dehydrator trays and dehydrate for 6 hours at 145 degrees [F].
6. To rehydrate, cover with water 1 ½ inches above level of food in pot, boil, stir, and serve.
SIERRA SPAGHETTI
Serves 4
Weight 1 dried serving = 6 ounces
This is high in protein and full of flavor.
1. Heat a Dutch oven or large skillet over medium heat. Add:
2 tablespoons olive oil
When the oil is hot, add and sauté for 10 minutes:
1 onion, diced
10 fresh mushrooms, diced
4 cloves garlic, minced
2. Add and cook for 5 minutes, stirring occasionally:
3 ½ cups spaghetti sauce
4 ½ ounces canned chopped ripe (black) olives
15 ounces canned small white beans, rinsed and drained
1 teaspoon crushed red pepper flakes
½ teaspoon dried oregano
3. Cook, then drain in a colander:
12 ounces linguini pasta, broken in thirds
Place pasta back in pot. Add the sauce and stir well.
4. Spread on covered dehydrator trays and dehydrate for 6 hours at 145 degrees [F].
5. To rehydrate, cover with water ½ inch above level of food in pot, boil, stir, and serve.
LAZY LASAGNA
Serves 4
Weight 1 dried serving = 5 ounces
Quick to assemble, this lasagna features your choice of beef, turkey, or tofu.
1. Heat a large skillet or Dutch oven over medium-low heat. Add:
1 tablespoon olive oil
When the oil is hot, add, stirring, for 3 minutes:
1 onion, minced
4 cloves garlic, minced
Add and cook, stirring, 5 minutes longer:
1 pound ground beef or turkey, or crumbled tofu
2. Reduce heat to low and add:
5 cups spaghetti sauce
½ teaspoon crushed red pepper flakes
Simmer for 5 minutes stirring occasionally
3. Preheat oven to 350 degrees [F]. Oil a 10-by-13-inch casserole dish.
4. Have ready:
9 sheets of uncooked oven-ready lasagna noodles
5. Finely grate:
8 ounces (1 cup) mozzarella cheese
8 ounces (1 cup) Parmesan cheese
6. Layer the ingredients in the casserole dish in the following order:
¼ of the sauce, 3 of the sheets of noodles, ⅓ of the grated mozzarella, and ⅓ of the grated Parmesan.
Repeat, using all the ingredients and topping the casserole with the last ¼ of the sauce.
7. Cover and bake for 30 minutes; then uncover and bake 10 minutes longer. Let stand outside the oven for 10 minutes.
8. Use a spatula to break up the noodles and spread on covered dehydrator trays.
9. Dehydrate for 5 ½ hours at 145 degrees [F].
10. To rehydrate, cover with water just above level of food in pot, boil, stir, and serve.
TORTILLA CHIP CASSEROLE
Serves 4
Weight 1 dried serving = 7 ounces
1. Bring to a boil in a large saucepan:
1 cup any variety stock
¼ teaspoon salt
Add:
1 zucchini, diced
1 bell pepper, minced
1 onion, minced
3 cloves garlic, minced
Reduce heat and simmer for 5 minutes, or until just tender.
2. Preheat oven to 350 degrees [F]. Oil a 10-by-13-inch casserole dish.
3. Have ready:
18 ounces blue corn (or other variety) tortilla chips, slightly crushed
3½ cups spaghetti sauce
1 ¼ cups grated Monterey Jack cheese
4. Layer the ingredients in the casserole dish in the following order:
⅓ of the spaghetti sauce, ½ of the chips placed in an even layer, ½ of the cheese, and ½ of the vegetables.
Repeat, using all of the ingredients and topping the casserole with the last ⅓ of the spaghetti sauce.
5. Spread over the casserole:
¼ cup salsa, mild, medium, or hot
Pour over the casserole:
½ cup any variety stock
6. Bake, covered, for 25 minutes.
7. Spread on covered dehydrator trays and dehydrate for 5 ½ hours at 145 degrees [F].
8. To rehydrate, cover with water just above level of food in pot, boil, stir, and serve.
SHRIMP JAMBALAYA
Serves 4
Weight 1 dried serving = 4.5 ounces
1. Place in a saucepan:
1½ cups quinoa, rinsed and drained
2 ¾ cups water
Bring to a boil; then reduce heat and simmer for 20 minutes or until tender and translucent. Set aside.
2. Heat a Dutch oven over medium-low heat. Add:
2 tablespoons olive oil
When the oil is hot, add and stir for 10 minutes:
1 onion, minced
1 bell pepper, minced
10 fresh mushrooms, minced
3. Stir in, bring to a boil, then simmer 5 minutes longer:
28 ounces canned crushed tomatoes
15 ounces canned small white beans, drained
8 ounces uncooked shelled, deveined shrimp, minced
2 teaspoons minced fresh thyme or 1 teaspoon dried thyme
½ teaspoon salt
¼ teaspoon cayenne pepper
4. Add the quinoa to the shrimp mixture and blend.
5. Spread on covered dehydrator trays and dehydrate for 6 hours at 145 degrees [F].
6. To rehydrate, cover with water just above level of food in pot, boil, stir, and serve.
SAUCY TUNA
Serves 4
Weight 1 dried serving = 6 ounces
This is very easy to make and very tasty.
1. Cook, then drain in a colander:
12 ounces vermicelli pasta, broken in thirds
Return the pasta to the pot and set aside.
2. Heat a large skillet over medium-low heat; then add:
When the oil is hot, add and cook, stirring, for 5 minutes:
1 onion, minced
4 cloves garlic, minced
Add and cook 3 minutes longer:
28 ounces canned crushed tomatoes
4 ounces canned diced green chilies
12 ounces water-packed canned tuna, drained
½teaspoon salt
3. Stir together the drained pasta and sauce. Stir in:
⅓cup finely grated Parmesan cheese.
4. Spread on covered dehydrator trays and dehydrate for 5 ½ hours at 145 degrees [F].
5. To rehydrate, cover with water ½ inch above level of food in pot, boil, stir, and serve.
POTATO SOUP PARMESAN
Serves 4
Weight 1 dried serving = 3.5 ounces
1. Cut into quarters and place in a large saucepan:
4 medium baking potatoes (about 2 pounds), peeled
1 onion, peeled
Cover with:
6 cups any variety stock or water
Bring to a boil. Stir in:
1 cup TVP (textured vegetable protein)
Reduce heat and simmer, covered, for 20 minutes.
2. Mash the potato mixture along with the stock in the saucepan using a potato masher or fork. Stir in:
12 ounces canned evaporated milk
1 ½teaspoons salt
1 teaspoon freshly ground black pepper
3. Remove from heat and let cool for 1 minute. Stir in:
½cup finely grated Parmesan cheese
4. Spread on covered dehydrator trays and dehydrate for 6 ½ hours at 145 degrees [F].
5. To rehydrate, cover with water ½ inch above level of food in pot, boil, stir, and serve.
—From Backpack Gourmet
Linda Frederick Yaffe
SPICED MIXED NUTS
8 servings
Weight 1 serving (½ cup) = 4 ounces
These will keep for six weeks.
1. Toast in a large skillet over low heat for 3 minutes:
¼ cup sesame seed
Add:
2 tablespoons sesame oil
½ cup packed brown sugar
½ teaspoon crushed red pepper flakes (hot) or ½ teaspoon paprika (mild)
Cook for 5 minutes, stirring occasionally.
2. Add and cook 3 minutes longer, or until brown and fragrant:
4 cups unsalted mixed nuts
1 tablespoon soy sauce
½ teaspoon liquid smoke
3. Turn out onto a large baking sheet to cool completely before storing.
HONEY NUT GRANOLA
18 servings
Weight 1 serving = 4 ounces
This is a satisfying, ready-to-eat breakfast.
1. Toast in a large skillet over medium heat, stirring frequently, until light brown:
2 cups whole wheat flour
1 cup wheat germ
1 cup flaked coconut
1 cup brewer’s yeast (high-protein dried unleavened yeast)
2. Preheat oven to 350 degrees [F].
3. Heat gently in a saucepan until warm:
½ cup canola oil
1 cup honey
1 cup packed brown sugar
½ cup apple juice
4. Mix together in a 10-by-13-inch casserole dish:
7 cups rolled oats
½ cup hulled sunflower seeds
2 cups any variety chopped nuts
5. Pour the flour and honey mixtures over the oat mixture in the casserole dish. Mix well.
6. Bake for 15 minutes, stir; then bake 15 minutes longer. Turn off the oven. Stir the granola; then let it stand in the oven with the door closed for 2 hours.
7. Cool completely; then double-bag and store in the freezer until ready to use.
8. Before camping, package individual servings of granola in 6 ½-inch-square plastic sandwich bags. Place in each bag:
¾ cup granola
2 tablespoons instant dry milk
1 tablespoon any variety chopped dried fruit
To serve, pour one bag of granola mixture into a cup. Fill cup with cool treated water, stir, and enjoy.
SWEET MORNING GRANOLA
20 servings
Weight 1 serving = 4 ounces
1. Heat a large skillet over medium-low heat. Toast in the skillet, stirring frequently, for 8 minutes:
2 cups whole wheat flour
1 cup wheat germ
1 cup flaked coconut
½ cup sesame seeds
2. Preheat oven to 350 degrees.
3. Heat gently in a saucepan until warm:
1 cup peanut butter
½ cup canola oil
½ cup honey
¾ cup brown sugar
1 tablespoon vanilla extract
4. Mix together in a 10-by-13-inch casserole dish:
8 cups rolled oats
1 cup any variety chopped nuts
5. Pour the browned flour and peanut butter mixtures over the oat mixture. Combine thoroughly.
6. Bake for 15 minutes, stir; then bake 10 minutes longer. Turn off the heat. Stir the granola; then let it stand in the oven with the door closed for 2 hours.
7. Cool completely; then double-bag and store in the freezer until ready to use.
8. Before camping, package individual servings of granola in 6 ½-inch-square plastic sandwich bags. Place in each bag:
¾ cup granola
2 tablespoons instant dry milk
1 tablespoon any variety chopped dried fruit
To serve, pour one bag of granola mixture into a cup. Fill cup with cool treated water, stir, and enjoy.
GRANOLA BARS
8 servings
Weight 1 serving (1 bar) = 4.5 ounces
1. Toast in a skillet over low heat for 3 minutes, stirring frequently, until light brown:
1 cup any variety nuts, chopped
1 cup shredded coconut
Set aside.
2. Mix together in a large bowl:
2 cups rolled oats
1 cup whole wheat flour
1 cup graham cracker crumbs (5 whole crackers)
Cut in:
½ cup chilled butter or margarine
Stir in the toasted nuts and coconut and:
½ cup honey
½ cup packed brown sugar
3. Preheat oven to 275 degrees [F]. Oil a 10-by-6-inch pan.
4. Pat the mixture firmly into the pan. Bake for 50 minutes or until light brown.
5. Cut into 8 bars while still warm; then let them cool completely in the pan on a wire rack.
6. Store in individual serving-sized bags.
INDIAN HEAVEN SNACKS
20 servings
Weight 1 serving (3 balls) = 3 ounces
No baking is needed to make these high-energy treats. They will keep fresh for more than a month.
1. Toast in a small skillet until lightly browned:
½ cup sesame seeds
Set aside.
2. Bring to a boil in a large skillet over medium heat:
½ cup packed brown sugar
½ cup honey
2 tablespoons canola oil
½ cup water
Reduce heat and simmer for 2 minutes.
3. Remove from heat. Stir in and mix thoroughly:
½cup whole wheat flour
2 ½ cups rolled oats
½ cup wheat germ
1 ½cups any variety finely chopped nuts
4. Roll into balls the size of small walnuts; then roll them in the toasted sesame seeds.
5. Set on plates, cover, and chill in refrigerator for several hours, or until they are firm. Store in individual serving-sized bags at room temperature.
PUMA BARS
8 servings
Weight 1 serving (1 bar) = 4 ounces
1. Preheat oven to 350 degrees [F]. Oil a 10-by-6-inch baking pan.
2. Heat in a large, heavy saucepan over medium heat:
⅓ cup canola oil
When the oil is hot, add:
⅔ cup pecan pieces
Cook, stirring, for 3 minutes, or until light brown. Remove from heat.
3. Add and beat well:
1 ¼ cups packed brown sugar
1 ¼ teaspoons vanilla extract
2 eggs
¾ cup whole wheat flour
¼ cup unbleached white flour
2 tablespoons wheat germ
1 teaspoon baking powder
1 cup butterscotch morsels
4. Pour into pan and bake for 18 minutes, or until just set. Cool completely on a wire rack before cutting into 8 bars. Store bars in individual serving-sized bags.
KAREN’S OATMEAL BREAKFAST CAKE
16 servings
Weight 1 serving = 4 ounces
1. Stir together in a large, heatproof bowl:
1 cup rolled oats
½ cup canola oil
1 cup honey
1 ⅓ cups boiling water
Let cool for 20 minutes.
2. Preheat oven to 350 degrees [F]. Oil a 10-by-13-inch casserole dish.
3. Add to the oat mixture:
2 eggs
¾cup yogurt
½cup packed brown sugar
1 ½cups whole wheat flour
2 tablespoons toasted wheat germ
2 tablespoons brewer’s yeast
2 tablespoons instant dry milk
2 teaspoons ground cinnamon
1 teaspoon baking powder
½ teaspoon baking soda
1 cup any variety nuts, finely chopped
Beat well.
4. Pour the batter into the prepared dish.
5. Bake for 25 minutes, or until toothpick inserted in center comes out clean.
6. Let cool completely before cutting into 16 servings. Store servings in individual bags.
MULTIGRAIN SUNFLOWER ROLLS
8 servings
Weight 1 serving (2 rolls) = 4 ounces
These rolls will keep for a week.
1. Place in a heavy bowl:
1 ½ cups rolled oats
2 tablespoons packed brown sugar
1 tablespoon canola oil
1 tablespoon dark molasses
⅛ teaspoon salt
2. Add:
1 ½ cups boiling water
Stir; then cool for 20 minutes.
3. Mix together in a cup:
¾cup very warm water
2 tablespoons (2 packages) active dry yeast
Let stand for 20 minutes; then stir the yeast into the oat mixture.
4. Stir and knead in gradually:
1 cup whole wheat flour
1 cup unbleached white flour
½ cup rye flour
½cup gluten flour
¼cup hulled sunflower seeds
5. Cover and let rise in a warm place for 45 minutes, or until doubled in bulk.
6. Oil a baking sheet. Divide dough into 16 pieces. Shape into rolls and place them on the baking sheet. Let rise for 20 minutes.
7. Preheat oven to 350 degrees [F].
8. Bake rolls for 15 minutes. Let cool completely on wire racks before storing them in individual serving-sized bags.
BAKED POTATO CHIPS
2 servings
Weight 1 dried serving (1 potato) = 2 ounces
These are easy to make and delightfully not greasy.
1. Preheat oven to 350 degrees [F].
2. Lightly oil two large baking sheets.
3. Cut into 1/16-inch-thick slices:
2 large baking potatoes, scrubbed but not peeled
Place the slices in a single layer on the baking sheets. Sprinkle them with:
½ teaspoon salt
¼ teaspoon ground white pepper
4. Bake for 20 to 30 minutes, or until golden brown, turning them once while baking.
5. Let cool completely before storing them in individual serving-sized bags.
Variation: Spicy Potato Chips
Along with the salt and pepper, sprinkle the potato slices with:
⅛ teaspoon cayenne pepper
¼ teaspoon chili powder
—From Backpack Gourmet
Claudia Pearson
Leaving no trace in the kitchen starts before you leave town. Part of planning ahead and preparing involves repackaging your food to minimize potential litter as well as to lighten your load. With proper meal planning and careful cooking (no burning), you can eliminate most leftovers. But if you do end up with extra cooked food, use discretion and eat it at another meal or carry it out. Don’t count on digging a hole or using a fire to dispose of kitchen waste or non-burnable trash such as Styrofoam or aluminum. Trash has no place in the back-country. Pack out what you packed in.
Certain waste—including waste water from cooking and washing—cannot be packed out. This water should be scattered widely, at least 200 feet away from any water source and far away from campsites. Remove all food particles from the water before disposing of it (a small strainer is good for this), and pack them out with your trash. One exception to this is fish guts. In some parts of Wyoming, the recommended procedure for disposing of fish parts is to toss them back into the same water source from which they came. This helps to prevent the spread of whirling disease. Be sure to toss the viscera into deep (and, if possible, moving) water to help scatter the parts. For other parts of the country, check with local game and fish experts for recommendations. And remember, ask permission to hunt and fish on private property.
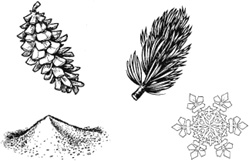
Natural scrubbers for cleaning can be pinecones, pine needles, sand, or snow.
At NOLS, we use soap only for washing hands before food preparation. We clean the dishes with nature’s scrub brushes—sand, pinecones, snow, pine needles, and bunches of grass—and give them a good rinse with boiling water just prior to eating. With this method, no soapy dishwater is added to the environment, and it also avoids stomach upsets caused by soap residue on the dishes. However, if you want to use soap, carry a small bottle of biodegradable soap and use a few drops for cleaning. Do your dishes at least 200 feet away from any water source to prevent contaminating the water. Remember, even biodegradable soap is a foreign chemical in aquatic environments and should be used sparingly and far away from water sources.
—From NOLS Cookery
Linda Frederick Yaffe
When loading your backpack each morning of your trip, put that day’s snacks in an easy-to-reach outside pack pocket. Store that day’s lunch near the top of the pack for easy midday access. Stow all of the rest of your food deep in the cool, dark interior of your pack.
Arriving at a possible campsite, take a few minutes to examine the area before you unpack. Choose a sleeping area; then choose a safe, protected cooking area that is at least 100 feet from your sleeping area, preferably downwind. Pick a third area for dining that is 100 feet away from your cooking and sleeping areas. Find a fourth area well away from the other three for food storage. When you travel in bear country, you will be glad you are carrying home-dried one-pot meals; since they are not cooked in the field, but merely heated, they create little odor. Nothing attracts a bear more than odiferous fresh foods such as bacon cooking on an open fire. Eliminating cooking and open fires makes your campsite far less noticeable to wild creatures.
Keep your camp spotless. Never leave food or garbage unattended unless it is properly stored. The most secure method of storage is portable bearproof aluminum containers, available for sale or rent from camping stores and national parks. Some popular backcountry campsites are equipped with stationary bearproof lockers. Before you pack in, check with the rangers about the availability of lockers and ask about recent bear problems. Violation of food storage regulations can result in huge fines, injury to campers, and might cause a trouble-some bear to be destroyed.
In bear country, you will find trees. These trees can be used to counterbalance your food. Find a lone tree limb that is seventeen to twenty feet off the ground. It must be healthy and strong enough to support your bags of food but not thick enough to hold a young bear. Divide all of your food and all other odiferous items (toothpaste, soap, scented lotions, garbage) into two sturdy nylon bags of roughly equal weight. Tie a rock to the end of a fifty-foot length of nylon cord. Throw the rock over your chosen tree limb, then remove the rock and tie the first food bag to the end of the cord. Pull the first bag all the way up to the limb. Tie the second bag to the cord, as high as you can reach. Tie a big loop or two of cord hanging from the second bag. Use the entire cord so no end is dangling. Using a long downed branch or your walking stick, push the second bag up so that the two bags are hanging side by side. The bags should hang twelve to fifteen feet above the ground. When you are ready to retrieve the bags, hook the loop of cord with your stick and gently pull the bags down.
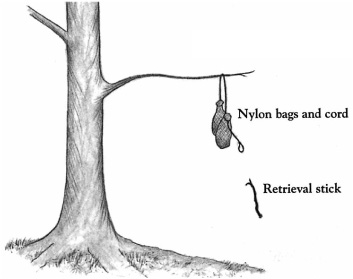
Counterbalance food.
When camped at the edge of or above the treeline, where trees are stunted and signs of bears are nil, cache your food well away from your tent, cooking, and dining areas. Bag your backpack in a large plastic bag and cache it a few feet off the ground on a boulder. Weight the pack with rocks. This may keep bears from seeing or smelling the food. Whichever food storage method you choose, keep your food well away from your sleeping area.
—From Backpack Gourmet
Greg Davenport
One of the biggest problems with long-term survival is meeting your nutritional requirements. Many backcountry enthusiasts focus on meat as their main source of food and often overlook all the other supplies Mother Nature has to provide. The ideal diet has five basic food groups:
Carbohydrates: easily digested food that provides rapid energy; most often found in fruits, vegetables, and whole grains.
Fats: slowly digested food that provides long lasting energy that is normally utilized once the carbohydrates are gone; most often found in butter, cheese, oils, nuts, eggs, and animal fats. In cold environments it isn’t uncommon for the natives to eat fats before bed, believing they will help keep them warm throughout the night.
Protein: helps with the building of body cells; most often found in fish, meat, poultry, and blood.
Vitamins: provide no calories but aid in the body’s daily function and growth. Vitamins occur in most foods and when you maintain a well-balanced diet you will rarely become depleted.
Minerals: provide no calories but aid with building and repairing the skeletal system and regulating the body’s normal growth. Like vitamins these needs are met when a well-balanced diet is followed. In addition to food, minerals are often present in our water.
The five major food groups and a sixth “use sparingly group” make up your basic dietary regimen:
• Fats, oils, and sweets—use sparingly.
• Milk and cheese group—two to three servings a day.
• Meat, poultry, fish, dry beans, eggs, and nuts group—two to three servings a day.
• Vegetable group—three to five servings a day.
• Fruit group—two to four servings a day.
• Bread, cereal, rice, and pasta group—six to eleven servings a day.
No one group is more important than the other—you need them all for good health. A healthy diet begins with plenty of grains, generous amounts of vegetables and fruits, and a smaller amount of meats and dairy products.
—From Wilderness Living
U.S. Army
Unless you have the chance to take large game, concentrate your efforts on the smaller animals, due to their abundance. The smaller animal species are also easier to prepare. You must not know all the animal species that are suitable as food. Relatively few are poisonous, and they make a smaller list to remember. What is important is to learn the habits and behavioral patterns of classes of animals. For example, animals that are excellent choices for trapping, those that inhabit a particular range and occupy a den or nest, those that have somewhat fixed feeding areas, and those that have trails leading from one area to another. Larger, herding animals, such as elk or caribou, roam vast areas and are somewhat more difficult to trap. Also, you must understand the food choices of a particular species.
You can, with relatively few exceptions, eat anything that crawls, swims, walks, or flies. The first obstacle is overcoming your natural aversion to a particular food source. Historically, people in starvation situations have resorted to eating everything imaginable for nourishment. A person who ignores an otherwise healthy food source due to a personal bias, or because he feels it is unappetizing, is risking his own survival. Although it may prove difficult at first, a survivor must eat what is available to maintain his health.
The most abundant life-form on earth, insects are easily caught. Insects provide 65 to 80 percent protein compared to 20 percent for beef. This fact makes insects an important, if not overly appetizing, food source. Insects to avoid include all adults that sting or bite, hairy or brightly colored insects, and caterpillars and insects that have a pungent odor. Also avoid spiders and common disease carriers such as ticks, flies, and mosquitoes.
Rotting logs lying on the ground are excellent places to look for a variety of insects including ants, termites, beetles, and grubs, which are beetle larvae. Do not overlook insect nests on or in the ground. Grassy areas, such as fields, are good areas to search because the insects are easily seen. Stones, boards, or other materials lying on the ground provide the insects with good nesting sites. Check these sites. Insect larvae are also edible. Insects such as beetles and grasshoppers that have a hard outer shell will have parasites. Cook them before eating. Remove any wings and barbed legs also. You can eat most insects raw. The taste varies from one species to another. Wood grubs are bland, while some species of ants store honey in their bodies, giving them a sweet taste. You can grind a collection of insects into a paste. You can mix them with edible vegetation. You can cook them to improve their taste.
Worms (Annelidea) are an excellent protein source. Dig for them in damp humus soil or watch for them on the ground after a rain. After capturing them, drop them into clean, potable water for a few minutes. The worms will naturally purge or wash themselves out, after which you can eat them raw.
Freshwater shrimp range in size from 0.25 centimeter up to 2.5 centimeters. They can form rather large colonies in mats of floating algae or in mud bottoms of ponds and lakes.
Crayfish are akin to marine lobsters and crabs. You can distinguish them by their hard exoskeleton and five pairs of legs, the front pair having oversized pincers. Crayfish are active at night, but you can locate them in the daytime by looking under and around stones in streams. You can also find them by looking in the soft mud near the chimneylike breathing holes of their nests. You can catch crayfish by tying bits of offal or internal organs to a string. When the crayfish grabs the bait, pull it to shore before it has a chance to release the bait.
You find saltwater lobsters, crabs, and shrimp from the surf’s edge out to water 10 meters deep. Shrimp may come to a light at night where you can scoop them up with a net. You can catch lobsters and crabs with a baited trap or a baited hook. Crabs will come to bait placed at the edge of the surf, where you can trap or net them. Lobsters and crabs are nocturnal and caught best at night.
This class includes octopuses and freshwater and saltwater shellfish such as snails, clams, mussels, bivalves, barnacles, periwinkles, chitons, and sea urchins. You find bivalves similar to our freshwater mussel and terrestrial and aquatic snails worldwide under all water conditions.
EDIBLE MOLLUSKS
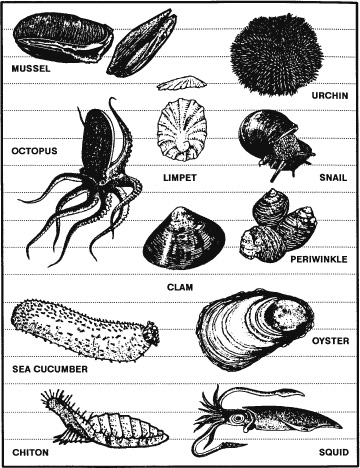
River snails or freshwater periwinkles are plentiful in rivers, streams, and lakes of northern coniferous forests. These snails may be pencil point or globular in shape.
In fresh water, look for mollusks in the shallows, especially in water with a sandy or muddy bottom. Look for the narrow trails they leave in the mud or for the dark elliptical slit of their open valves.
Near the sea, look in the tidal pools and the wet sand. Rocks along beaches or extending as reefs into deeper water often bear clinging shellfish. Snails and limpets cling to rocks and seaweed from the low water mark upward. Large snails, called chitons, adhere tightly to rocks above the surf line.
Mussels usually form dense colonies in rock pools, on logs, or at the base of boulders.
Steam, boil, or bake mollusks in the shell.
They make excellent stews in combination with greens and tubers.
Fish represent a good source of protein and fat. They offer some distinct advantages to the survivor or evader. They are usually more abundant than mammal wildlife, and the ways to get them are silent. To be successful at catching fish, you must know their habits. For instance, fish tend to feed heavily before a storm. Fish are not likely to feed after a storm when the water is muddy and swollen. Light often attracts fish at night. When there is a heavy current, fish will rest in places where there is an eddy, such as near rocks. Fish will also gather where there are deep pools, under overhanging brush, and in and around submerged foliage, logs, or other objects that offer them shelter.
There are no poisonous freshwater fish. However, the catfish species has sharp, needlelike protrusions on its dorsal fins and barbels. These can inflict painful puncture wounds that quickly become infected.
Cook all freshwater fish to kill parasites. Also cook saltwater fish caught within a reef or within the influence of a freshwater source as a precaution. Any marine life obtained farther out in the sea will not contain parasites because of the saltwater environment. You can eat these raw.
Certain saltwater species of fish have poisonous flesh. In some species the poison occurs seasonally; in others, it is permanent. Examples of poisonous saltwater fish are the porcupine fish, triggerfish, cowfish, thorn fish, oilfish, red snapper, jack, and puffer. The barracuda, while not actually poisonous itself, may transmit ciguatera (fish poisoning) if eaten raw.
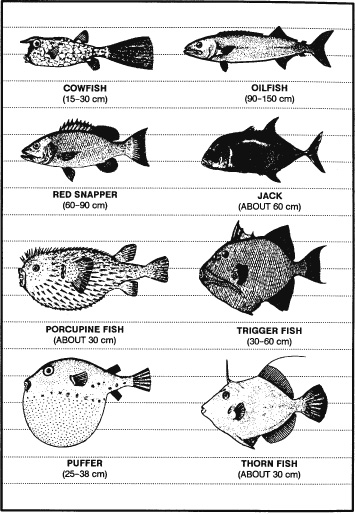
Frogs and salamanders are easily found around bodies of fresh water. Frogs seldom move from the safety of the water’s edge. At the first sign of danger, they plunge into the water and bury themselves in the mud and debris. There are few poisonous species of frogs. Avoid any brightly colored frog or one that has a distinct “X” mark on its back. Do not confuse toads with frogs. You normally find toads in drier environments. Several species of toads secrete a poisonous substance through their skin as a defense against attack. Therefore, to avoid poisoning, do not handle or eat toads.
Salamanders are nocturnal. The best time to catch them is at night using a light. They can range in size from a few centimeters to well over 60 centimeters in length. Look in water around rocks and mud banks for salamanders.
Reptiles are a good protein source and relatively easy to catch. You should cook them, but in an emergency, you can eat them raw. Their raw flesh may transmit parasites, but because reptiles are cold-blooded, they do not carry the blood diseases of the warm-blooded animals.
The box turtle is a commonly encountered turtle that you should not eat. It feeds on poisonous mushrooms and may build up a highly toxic poison in its flesh. Cooking does not destroy this toxin. Avoid the hawks-bill turtle, found in the Atlantic Ocean, because of its poisonous thorax gland. Poisonous snakes, alligators, crocodiles, and large sea turtles present obvious hazards to the survivor.
All species of birds are edible, although the flavor will vary considerably. You may skin fish-eating birds to improve their taste. As with any wild animal, you must understand birds’ common habits to have a realistic chance of capturing them. You can take pigeons, as well as some other species, from their roost at night by hand. During the nesting season, some species will not leave the nest even when approached. Knowing where and when the birds nest makes catching them easier. Birds tend to have regular flyways going from the roost to a feeding area, to water, and so forth. Careful observation should reveal where these flyways are and indicate good areas for catching birds in nets stretched across the flyways. Roosting sites and waterholes are some of the most promising areas for trapping or snaring.
Nesting birds present another food source—eggs. Remove all but two or three eggs from the clutch, marking the ones that you leave. The bird will continue to lay more eggs to fill the clutch. Continue removing the fresh eggs, leaving the ones you marked.
Mammals are excellent protein sources and, for Americans, the most tasty food source. There are some drawbacks to obtaining mammals. In a hostile environment, the enemy may detect any traps or snares placed on land. The amount of injury an animal can inflict is in direct proportion to its size. All mammals have teeth and nearly all will bite in self-defense. Even a squirrel can inflict a serious wound and any bite presents a serious risk of infection. Also, a mother can be extremely aggressive in defense of her young. Any animal with no route of escape will fight when cornered.

All mammals are edible; however, the polar bear and bearded seal have toxic levels of vitamin A in their livers. The platypus, native to Australia and Tasmania, is an egg-laying, semi-aquatic mammal that has poisonous glands. Scavenging mammals, such as the opossum, may carry diseases.
—From Survival (Field Manual 21-76)
U.S. Army
There are several sources of food in the arctic and subarctic regions. The type of food—fish, animal, fowl, or plant—and the ease in obtaining it depend on the time of the year and your location.
During the summer months, you can easily get fish and other water life from coastal waters, streams, rivers, and lakes.
The North Atlantic and North Pacific coastal waters are rich in seafood. You can easily find crawfish, snails, clams, oysters, and king crab. In areas where there is a great difference between the high and low tide water levels, you can easily find shellfish at low tide. Dig in the sand on the tidal flats. Look in tidal pools and on offshore reefs. In areas where there is a small difference between the high- and low-tide water levels, storm waves often wash shellfish onto the beaches.
The eggs of the spiny sea urchin that lives in the waters around the Aleutian Islands and southern Alaska are excellent food. Look for the sea urchins in tidal pools. Break the shell by placing it between two stones. The eggs are bright yellow in color.
Most northern fish and fish eggs are edible. Exceptions are the meat of the arctic shark and the eggs of the sculpins.
The bivalves, such as clams and mussels, are usually more palatable than spiral-shelled seafood, such as snails.
The sea cucumber is another edible sea animal. Inside its body are five long white muscles that taste much like clam meat.
In early summer, smelt spawn in the beach surf. Sometimes you can scoop them up with your hands.
You can often find herring eggs on the seaweed in midsummer. Kelp, the long ribbonlike seaweed, and other smaller seaweed that grow among offshore rocks are also edible.
You find polar bears in practically all arctic coastal regions, but rarely inland. Avoid them if possible. They are the most dangerous of all bears. They are tireless, clever hunters with good sight and an extraordinary sense of smell. If you must kill one for food, approach it cautiously. Aim for the brain; a bullet elsewhere will rarely kill one. Always cook polar bear meat before eating it.
Earless seal meat is some of the best meat available. You need considerable skill, however, to get close enough to an earless seal to kill it. In spring, seals often bask on the ice beside their breathing holes. They raise their heads about every 30 seconds, however, to look for their enemy, the polar bear.
To approach a seal, do as the Eskimos do—stay downwind from it, cautiously moving closer while it sleeps. If it moves, stop and imitate its movements by lying flat on the ice, raising your head up and down, and wriggling your body slightly. Approach the seal with your body sideways to it and your arms close to your body so that you look as much like another seal as possible. The ice at the edge of the breathing hole is usually smooth and at an incline, so the least movement of the seal may cause it to slide into the water. Therefore, try to get within 22 to 45 meters of the seal and kill it instantly (aim for the brain). Try to reach the seal before it slips into the water. In winter, a dead seal will usually float, but it is difficult to retrieve from the water.
Keep the seal blubber and skin from coming into contact with any scratch or broken skin you may have. You could get “spekk-finger,” that is, a reaction that causes the hands to become badly swollen.
Keep in mind that where there are seals, there are usually polar bears, and polar bears have stalked and killed seal hunters.
You can find porcupines in southern subarctic regions where there are trees. Porcupines feed on bark; if you find tree limbs stripped bare, you are likely to find porcupines in the area.
Ptarmigans, owls, Canadian jays, grouse, and ravens are the only birds that remain in the arctic during the winter. They are scarce north of the tree line. Ptarmigans and owls are as good for food as any game bird. Ravens are too thin to be worth the effort it takes to catch them. Ptarmigans, which change color to blend with their surroundings, are hard to spot. Rock ptarmigans travel in pairs and you can easily approach them. Willow ptarmigans live among willow clumps in bottomlands. They gather in large flocks and you can easily snare them. During the summer months all arctic birds have a 2- to 3-week molting period during which they cannot fly and are easy to catch. Use one of the techniques described in Chapter 8 to catch them.
Skin and butcher game while it is still warm. If you do not have time to skin the game, at least remove its entrails, musk glands, and genitals before storing. If time allows, cut the meat into usable pieces and freeze each separately so that you can use the pieces as needed. Leave the fat on all animals except seals. During the winter, game freezes quickly if left in the open. During the summer, you can store it in underground ice holes.
—From Survival (Field Manual 21-76)
U.S. Army
Obtaining food along a seashore should not present a problem.
There is a great variety of animal life that can supply your need for food in this type of survival situation.
Mussels, limpets, clams, sea snails, octopuses, squids, and sea slugs are all edible. Shellfish will usually supply most of the protein eaten by coastal survivors. Avoid the blue-ringed octopus and cone shells. Also beware of “red tides” that make mollusks poisonous. Apply the edibility test on each species before eating.
Coastal worms are generally edible, but it is better to use them for fish bait. Avoid bristle worms that look like fuzzy caterpillars. Also avoid tubeworms that have sharp-edged tubes. Arrowworms, alias amphioxus, are not true worms. You find them in the sand and are excellent either fresh or dried.
These animals are seldom dangerous to man and are an excellent food source. The pincers of larger crabs or lobsters can crush a man’s finger. Many species have spines on their shells, making it preferable to wear gloves when catching them. Barnacles can cause scrapes or cuts and are difficult to detach from their anchor, but the larger species are an excellent food source.
These are common and can cause painful injuries when stepped on or touched. They are also a good source of food. Handle them with gloves, and remove all spines.
This animal is an important food source in the Indo-Pacific regions. Use them whole after evisceration or remove the five muscular strips that run the length of its body. Eat them smoked, pickled, or cooked.
—From Survival (Field Manual 21-76)
Greg Davenport
Illustrations by Steven A. Davenport
You should be able to procure enough food while at sea to sustain your life for an extended period of time. As long as water is available, chow down.
Seaweed, which is easily found in all oceans, is a good source of protein, fiber, vitamins, and minerals. Although a small percentage of the slender-branching seaweeds can cause an upset stomach, most are edible. The broad-leaved seaweed, which looks like lettuce leaf, is not know to cause irritation and can often be found floating in the ocean. These floating islands of seaweed also provide a haven for small fish and crabs, which can be easily dislodged with a good shake. Seaweed should be rinsed, as long as you have enough freshwater, and may be eaten raw or dried until crisp.

Broad-leaved seaweed.
Plankton is a term used for an assortment of marine and freshwater organisms that drift on or near the surface of the water. Since these organisms are too small to swim, their movement depends largely on tides, currents, and winds. Although plankton is more common near land, it can be found anywhere. There are three types of plankton:
• Phytoplankton—microscopic plants and bacteria
• Zooplankton—microscopic animals
• Macrozooplankton—larger fish eggs and larvae and pelagic invertebrates
All types of plankton are high in protein, carbohydrates, and fats and should not be overlooked as a food Source. Since they are located close to the water’s surface, catching plankton is as simple as towing a net behind the raft. For beat results, the net should be moving faster than the current. Plankton has a grayish pastelike appearance and, depending on the source, can take on a multitude of flavors. It can be eaten fresh or dried and crushed. Crushing is a good option if a lot of spines are noted in the fresh plankton.
During warm seasons, various forms of phytoplankton produce toxins (secondary to their rapid reproduction and large numbers) that lead to a change in water color called “red tide.” The toxins are harmful to both marine and human life, and many are quite potent and can be potentially fatal. In most instances, it is safe to eat fish, crabs, and shrimp during a red tide as long as you didn’t find the fish sick or dead and you only eat the meat (fillet or muscle). Shellfish (oysters, clams, mussels, whelks, scallops, etc.) accumulate red tide toxins in their tissues. Do not eat these during or within a month of red tide. Ingesting these toxins can lead to paralytic shellfish poisoning, which can be a life-threatening illness. Better safe than sorry: Avoid eating fish or shellfish during red tide.
Given enough time, barnacles will appear on the bottom of your raft. Although they have a shelllike covering and look like mollusks, barnacles are crustaceans (related to lobsters, crabs, and shrimp). Newborn barnacles feed on plankton and in their larval stage look like tiny shrimp. As they grow, they let the currents carry them while they look for a place to build their shell-like home. If the life raft seems suitable, and it will, the barnacle secures itself to the surface using a self-made glue-like substance and then builds its home. Since they attach to the bottom of the raft, they are difficult to harvest and could actually result in raft damage. The best way to avoid this is to float sheet plastic around the raft. Barnacles will attach to the plastic, which makes them much easier to access. The plastic will also serve as a shark rub, reducing any potential problems related to sharks rubbing up against the side of the raft.
Turtles are found in water throughout the temperate and tropic regions of the world. Of the more than 250 species of marine turtles, only about 5 are considered poisonous. Although the cause of their potentially fatal poison is unknown, many believe it is related to their ingestion of poisonous marine algae. Poisonous turtles are primarily found in the tropical and subtropical seas, especially in the warmer months. Almost 50 percent of those who eat this poison will die, and there is no way to tell if a turtle is poisonous or not. If you decide to throw caution to the wind and eat a turtle, never eat the liver since it has a high concentration of vitamin A, which poses a risk to you. The smaller turtles can be clubbed or perhaps caught with fishing line. To eat the turtle, you must remove the shell, which can be done from its belly side. Don’t discard the shell as it will provide for many improvising needs.
Because fish are commonly found in almost all sources of water, you should put out lines to catch them. Be sure you have an assortment of fishing tackle in your survival kit.
Most fish are edible, but not all are! As a general rule, deep-water fish are usually not poisonous. However, you can catch toxic fish in deep water, so you have no guarantee. To help decrease your chances of ingesting a poisonous fish, know these basic rules:
1. Fish with poisonous flesh commonly have bodies with a boxed or round appearance, hard shell-like skin, and bony plates or spines. They also often have small parrot-like mouths, small gills, and small or absent belly fins. (See illustration.)
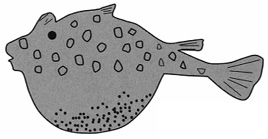
Puffer fish are poisonous.
2. Barracuda and red snapper have been known to carry ciguatera, which although poisonous to humans is usually not fatal. It is caused by eating fish that have accumulated these toxins through their diet. Fish that live around shallow waters or lagoons pose the greatest risk. The toxins originate from several dinoflagellate (algae) species, which are known to cause red tides.
3. Avoid fish that have slimy bodies, bad odor, suspicious color (gills should be pink and scales pronounced), and flesh that remains indented after being pressed on.
4. Do not eat fish organs as many are poisonous.
5. Avoid fish during or around red tide!
—From Surviving Coastal and Open Water
Greg Davenport
Illustrations by Steven Davenport and Ken Davenport
In addition to killing parasites and bacteria, cooking your food can make it more palatable. There are many different ways to prepare game, and some are better than others from a nutritional standpoint. Boiling is best, but only if you drink the broth, which contains many of the nutrients that are cooked out of the food. Fried foods taste great, but frying is probably the worst way to cook something, as a lot of nutrients are lost during the process.
Boiling is the best cooking method. If a container is not available, it may be necessary to improvise one. You might use a rock with a bowl-shaped center, but avoid rocks with high moisture content, as they may explode. A thick, hollowed-out piece of wood that can be suspended over the fire may also serve as a container. If your container cannot be suspended over the fire, stone boiling is another option. Use a hot bed of coals to heat up numerous stones. Get them really hot. Set your container of food and water close to your bed of hot stones, and add rocks to it until the water begins to boil. To keep the water boiling, cover the top with bark or another improvised lid, and keep it covered except when removing or adding stones. Don’t expect a rolling rapid boil with this process, but a steady slow bubbling should occur.
Baking is the next preferred method of preparing meat to eat. There are several methods you can use to bake game.
MUD BAKING
When mud baking, you do not need to scale, skin, or pluck the fish or bird in advance since scales, skin, and feathers will come off the game when the dried mud is removed. Use mud that has a clay texture to it, and tightly seal the fish or bird in it. The tighter the seal, the better it will hold the juices and prevent the meat from drying out. A medium-size bird or trout will usually cook in about fifteen to twenty minutes, depending on the temperature of your coals.
LEAF BAKING
Wrapping your meat in a nonpoisonous green leaf and placing it on a hot bed of coals will protect, season, and cook the meat. When baking mussels and clams, seaweed is often used; when the shells open they’re done. Avoid plants that have a bitter taste.
UNDERGROUND BAKING
Underground baking is a good method of cooking larger meals since the dirt will hold the oven’s heat. Dig a hole slightly larger than the meal you intend to cook; it needs to be big enough for your food, the base of rocks, and the covering. Line the bottom and sides with rocks, avoiding rocks with high moisture content, which may explode. Start a fire over them. To heat rocks that will be used on top of your food, place enough green branches over the hole to support another layer of rocks, leaving a space to add fuel to the fire. Once the green branches burn through and a hot bed of coals is present, remove the fallen rocks. Place green twigs onto the coals, followed by a layer of wetted green grass or nonpoisonous leaves. Add your meat and vegetables, and cover them with more wet grass or leaves, a thin layer of soil, and the extra hot rocks. The hole is then covered with dirt. Small meals will cook in one to two hours; large meals in five to six hours or perhaps days.
Place a flat rock on or next to the fire. Avoid rocks with high moisture content, as they may explode. Let it get hot, and cook on it as you would a frying pan.
Broiling is ideal for cooking small game over hot coals. Before cooking the animal, sear its flesh with the flames from the fire. This will help keep the juices, containing vital nutrients, inside the animal. Next, run a nonpoisonous skewer—a branch that is small, straight, and strong—along the underside of the animal’s backbone. Suspend the animal over the coals, using any means available.
If possible, keep all animals alive until ready to consume. This ensures that the meat stays fresh. A small rodent or rabbit may attract big game, so be sure to protect it from becoming a coyote’s meal instead of yours. This doesn’t apply, of course, if your are using the rodent for bait.
To sun-dry meat, you hang long, thin strips in the sun. To keep it out of other animals’ reach, run snare wire or line between two trees. If using snare wire, skewer the line through the top of each piece of meat before attaching it to the second tree. If using other line, hang it first and then drape the strips of meat over it. For best results, the meat should not touch its other side or another piece. It may take one to multiple days to dry, depending on the humidity and temperature. You’ll know it is done when the meat is dark and brittle.
Smoke long, thin strips of meat in a smoker constructed using the following guidelines.
Build a 6-foot-tall tripod from three poles lashed together.
Attach snare wire or line around the three poles in a tiered fashion so that the lowest point is at least 2 feet above the ground.
If using snare wire, skewer it through the top of each slice of meat before extending it around the inside of the next pole. If using other line, hang it first and then drape the strips of meat over it. For best results, the meat should not touch its other side or another piece.
Cover the outer aspect of the tripod with any available material, such as a poncho. Avoid contact between the outer covering and the meat. For proper ventilation, leave a small opening at the top of the tripod.
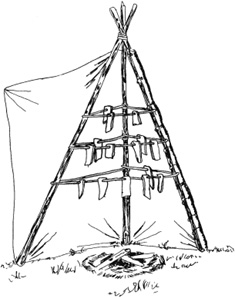
A smoker is a quick, efficient method of meat preservation.
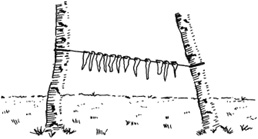
Sun drying meat is an effective method of preserving it for later consumption.
Gather an armload of green deciduous wood, such as alder, willow, or aspen. Prepare it by either breaking the branches into smaller pieces or cutting the bigger pieces into chips.
Build a fire next to the tripod. Once a good bed of coals develops, transfer them to the ground in the center of the smoker. Continue transferring coals as needed.
To smoke the meat, place small pieces or chips of green wood on the hot coals. Once the green wood begins to heat up, it should create a smoke. Since an actual fire will destroy the smoking process, monitor the wood to ensure that it doesn’t flame up. If it does, put it out, but try to avoid disturbing the bed of coals too much. Keep adding chips until the meat is dark and brittle, about twenty-four to forty-eight hours. At this point it is done.
—From Wilderness Survival
U.S. Army
Do not eat fish that appears spoiled. Cooking does not ensure that spoiled fish will be edible. Signs of spoilage are—
• Sunken eyes.
• Peculiar odor.
• Suspicious color. (Gills should be red to pink. Scales should be a pronounced shade of gray, not faded.)
• Dents stay in the fish’s flesh after pressing it with your thumb.
• Slimy, rather than moist or wet body.
• Sharp or peppery taste.
Eating spoiled or rotten fish may cause diarrhea, nausea, cramps, vomiting, itching, paralysis, or a metallic taste in the mouth. These symptoms appear suddenly, one to six hours after eating. Induce vomiting if symptoms appear.
Fish spoils quickly after death, especially on a hot day. Prepare fish for eating as soon as possible after catching it. Cut out the gills and large blood vessels that lie near the spine. Gut fish that is more than 10 centimeters long. Scale or skin the fish.
You can impale a whole fish on a stick and cook it over an open fire. However, boiling the fish with the skin on is the best way to get the most food value. The fats and oil are under the skin and, by boiling, you can save the juices for broth. You can use any of the methods used to cook plant food to cook fish. Pack fish into a ball of clay and bury it in the coals of a fire until the clay hardens. Break open the clay ball to get to the cooked fish. Fish is done when the meat flakes off. If you plan to keep the fish for later, smoke or fry it. To prepare fish for smoking, cut off the head and remove the backbone.
—From Survival (Field Manual 21-76)
U.S. Army
Many materials may be used to make equipment for the cooking, eating, and storing of food.
Use wood, bone, horn, bark, or other similar material to make bowls. To make wooden bowls, use a hollowed out piece of wood that will hold your food and enough water to cook it in. Hang the wooden container over the fire and add hot rocks to the water and food. Remove the rocks as they cool and add more hot rocks until your food is cooked.
You can also use this method with containers made of bark or leaves. However, these containers will burn above the waterline unless you keep them moist or keep the fire low.
A section of bamboo works very well, if you cut out a section between two sealed joints.
Carve forks, knives, and spoons from nonresinous woods so that you do not get a wood resin aftertaste or do not taint the food. Nonresinous woods include oak, birch, and other hardwood trees.
Note: Do not use those trees that secrete a syrup or resinlike liquid on the bark or when cut.
You can make pots from turtle shells or wood. As described with bowls, using hot rocks in a hollowed out piece of wood is very effective. Bamboo is the best wood for making cooking containers.
To use turtle shells, first thoroughly boil the upper portion of the shell. Then use it to heat food and water over a flame.
Make water bottles from the stomachs of larger animals. Thoroughly flush the stomach out with water, then tie off the bottom. Leave the top open, with some means of fastening it closed.
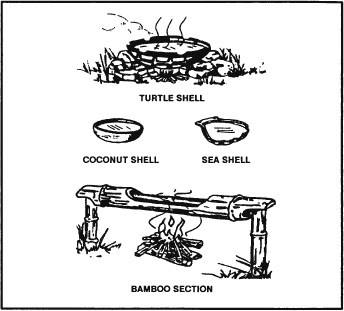
Containers for boiling food.
—From Survival (Field Manual 21-76)