
The Basics of Shelter Design
Emergency Tarp Shelters
Emergency Natural Shelters
Wickiup
Wigwam
Increasing Insulation
Check for Unwelcome Guests
Three-Pole Parachute Tepee
One-Pole Parachute Tepee
No-Pole Parachute Tepee
Parachute Hammock
Field-Expedient Lean-To
Swamp Bed
Natural Shelters
Beach Shade Shelter
Expedient Cold-Weather Shelters 250
Snow Cave Shelter
Snow Trench Shelter
Snow Block and Parchute Shelter
Snow House or Igloo
Lean-To Shelter
Fallen Tree Shelter
Thermal A-Frame
Snow Cave
Igloo
Molded Dome
Survival Tips
Digloos
Quinzhees
Maintaining Your Snow Shelter
Guidelines for Winter Shelters 254
Site and Shelter Selection: General Guidelines
Tent
Bivouac Bag
Poncho or Tarp
Emergency All-Weather Blanket
Anchors
Sleeping Bag
Fleece or Quilted Blanket
Sleeping Pad
Campsite Selection
Tents
Tarps
Sleeping and Waking Up Warm
Maintaining Warmth in the Morning
“Leave No Trace” Campsite Selection 259
Log Cabins and Sod Shelters 259
Log Cabin (without Notches)
Sod Shelter
The Fire Pit
U.S. Army
When you are in a survival situation and realize that shelter is a high priority, start looking for shelter as soon as possible. As you do so, remember what you will need at the site. Two requisites are—
• It must contain material to make the type of shelter you need.
• It must be large enough and level enough for you to lie down comfortably.
When you consider these requisites, however, you cannot ignore your tactical situation or your safety. You must also consider whether the site—
• Provides concealment from enemy observation.
• Has camouflaged escape routes.
• Is suitable for signaling, if necessary.
• Provides protection against wild animals and rocks and dead trees that might fall.
• Is free from insects, reptiles, and poisonous plants.
You must also remember the problems that could arise in your environment. For instance—
• Avoid flash flood areas in foothills.
• Avoid avalanche or rockslide areas in mountainous terrain.
• Avoid sites near bodies of water that are below the high water mark.
In some areas, the season of the year has a strong bearing on the site you select. Ideal sites for a shelter differ in winter and summer. During cold winter months you will want a site that will protect you from the cold and wind, but will have a source of fuel and water. During summer months in the same area you will want a source of water, but you will want the site to be almost insect free.
When considering shelter site selection, use the word BLISS as a guide.
B — Blend in with the surroundings.
L — Low silhouette.
I — Irregular shape.
S — Small.
S — Secluded location.
—From Survival (Field Manual 21-76)
Greg Davenport
Illustrations by Steven Davenport and Ken Davenport
The environment, materials on hand, and the amount of time available will determine the type of shelter you choose. Regardless of type, you should construct your shelter so that it is safe and durable.
Ridge and other supporting poles need to be sturdy, wrist diameter, destubbed (surface made smooth), and long enough to create the desired shelter size. The ridgepole is the main beam—it supports all other structures. Supporting poles often rest on the ridgepole (at a 90-degree angle). Support poles need to be cut so they don’t extend beyond the ridgepole. In addition, these poles should be capped using tarp, bark, or other roofing material. Poles that extend beyond the ridgepole allow moisture to track down into the shelter. If using a tarp, support poles may or may not be needed. For nontarp shelters, you can increase the strength of the overall structure by weaving sapling-sized branches between the supporting poles (at 90 degrees).
In order to withstand the elements (wind, rain, heat, and cold) make sure shelter’s roof and walls have a 45- to 60-degree pitch. Tarps, boughs, bark, sod, or ground covering is used to create the roof.
When building your shelter, various lashings may be needed to hold the structure together. Two are listed below.
SHEAR LASH
This lash is best used when making a bipod or tripod structure. Lay the poles side by side, attach the line to one of the poles (a clove hitch will work), run the line around all the poles three times (called a wrap). Next, run the line two times between each of the parallel poles (called a frap). It should go around and over the wrap. Make sure to pull it snug each time. Finish by tying another clove hitch.
SQUARE LASH
The square lash is used to join poles at right angles. As with the shear lash, start with a clove hitch. Wrap the line, in a box pattern, over and under the poles, alternating between each pole. After you have done this three times, tightly run several fraps between the two poles and over the preceding wrap. Pull it snug, and finish with a clove hitch.

The square lash secures two perpendicular poles together.

The shear lash attaches several parallel poles together.
The ideal solution to drainage problems is to build your shelter so that it sits slightly higher than the surrounding ground. However, if this is not possible, it will only take you a few minutes to dig a trench around your shelter and the benefit will make it a worthwhile process. The small trench should fall directly below the roof’s ends and follow the ground’s natural pitch until the water is directed far away from your home. This design works similar to the gutters on a modern home. The trench collects the water, and via a small slope that extends from one end to another, it directs the water away from the house.
A bed is necessary to protect you from the cold, hard ground. If a commercial sleeping pad is unavailable, bedding may be prepared using natural materials such as dry leaves, grasses, ferns, boughs, dry moss, or cattail down. For optimal insulation from the ground, the bed should have a loft of at least 18 inches.
An emergency shelter can be made using a tarp, poncho, blanket, or other similar item. The exact type of shelter you build will depend on the environment, available materials, and time. Whatever you choose, it must meet basic camp and design criteria already outlined. Tarp layers, line attachments, and how to safely pound an improvised stake into the ground are a few items unique to building a tarp shelter.
If you have two tarps, adding a rain fly (second tarp) over the first increases insulation and decreases potential misting during hard rains.
If you use line, attach it to the tarp’s grommet or a makeshift button created from rock, grass, or other malleable substance that will not tear or cut the tarp. To create a makeshift button, ball up the material inside a corner of the tarp and secure it with a slipknot. You can fasten the shelter piece to the ground by tying the free end of the line to vegetation, rocks, big logs, or an improvised stake.
If using an improvised stake, make sure to pound it into the ground so it is learning away from the tarp at a 90-degree angle to the wrinkles in the material. To avoid breaking your hand when pounding the stake into the ground, hold the stake so that your palm is facing up. Holding it this way allows a missed strike to hit the forgiving palm verses the unforgiving back of the hand.
Various options for building an emergency tarp shelter are outlined here. Don’t limit yourself to these options. Each situation is different. There might be a time when combining a tarp and natural material is the best choice. As long as you meet the basics of shelter design, you should be okay.
The A-tent is most often used in the warm temperate and snow environments. To construct, tightly secure a ridgeline or ridgepole 3 to 4 feet above the ground and between two trees approximately 7 feet apart. When using a ridgepole, secure it in place using a square lash so that it spans at least 6 inches beyond each tree. Drape the tarp over the stretched line (or pole) and use trees, boulders, tent poles, twigs, or stakes to tightly secure its sides at a 45- to 60-degree angle to the ground.
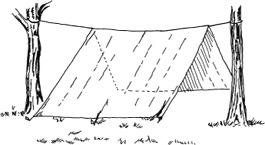
Tarp A-tent.
An A-frame is most often used in the warm temperate and snow environments. Find a tree with a forked branch about 3 to 4 feet high on the trunk of a tree. Break away any other branches that pose a safety threat or interfere with the construction of your A-frame. Place your ridgepole into the forked branch, forming a 30-degree angle between the pole and the ground. The ridgepole should be 12 to 15 feet long and the diameter of your wrist. If you are unable to find a tree with a forked branch, lash the ridgepole to the tree. Other options include finding a fallen tree that forms an appropriate 30-degree angle between the tree and ground or laying a strong ridgepole against a 3- to 4-foot-high stump. Drape the tarp over the pole and using trees, boulders, tent poles, or twigs tightly secure both sides of the tarp at a 45- to 60-degree angle to the ground. For best results you’ll most likely need to use line and attach it to the tarp with a makeshift button.
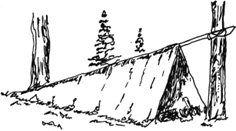
Tarp A-frame.
Like the A-tent and A-frame, a lean-to is most often used in the warm, temperate and snow environments. To construct, find two trees about 7 feet apart with forked branches 4 to 5 feet high on the trunk. Break away any other branches that pose a safety threat or interfere with the construction of your lean-to. Place a ridgepole (a fallen tree that is approximately 10 feet long and the diameter of your wrist) into the forked branches. If unable to find two trees with forked branches, lash the ridgepole to the trees. Another option is to tie a line tightly between the two trees and use it in the same fashion as you would the pole. Lay three or more support poles across the ridgepole at a 45- to 60-degree angle to the ground. Support poles need to be about 10 feet long and placed 1 to 2 feet apart. (If using a line instead of the ridgepole, you may elect not to use support poles.) Drape the tarp over the support poles, and attach the top to the ridgepole. Tightly secure the tarp over the support poles and to the ground using lines, rocks, logs, or another stabilizing method. You may elect to draw the excess tarp underneath the shelter, providing a ground cloth in which to sleep on.
If you have a life raft and a tarp, you can make a quick and easy to lean-to on a sandy shore beyond the reach of high tide. To construct, bury approximately one-fifth of the raft while it is perpendicular to the ground, attach a tarp to the top of the raft, and secure the tarp to the ground forming a 45- to 60-degree angle between the tarp and the ground.
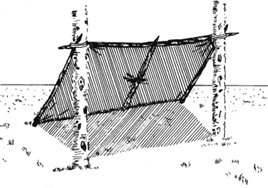
Tarp lean-to.
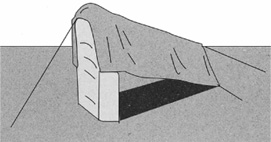
Improvised lean-to using a life raft and tarp.
A natural shelter is composed of materials that are procured from the wilderness. The exact type of shelter you build will depend on the environment, available materials, and time. Whatever you choose, it must meet basic camp and design criteria already outlined. A natural shelter must have a well-designed and well-crafted roof and walls.
The framework must be strong enough to support the roof and wall weight (which is often substantial). Without a tarp, the wall angle is one of the keys to a shelter that repels moisture. Make sure it has a 45- to 60-degree pitch. Make sure to cut the support poles so they don’t extend beyond the ridgepole, and cap them using bark or other roofing material. Uncut and uncapped poles allow moisture to track down into the shelter. For nontarp shelters, you can increase the strength of the overall structure by weaving sapling-sized branches between the supporting poles (at 90 degrees).
Roofs created using boughs, bark, or sodlike material need to be layered, from bottom to top, so that the upper piece overlaps the bottom. Overlapping the material creates a shingle-type roof that prevents moisture from entering the shelter. If you have enough ground covering or snow is available, throw about 18 inches on top of the existing roof. This added material greatly increases the insulating quality of your shelter. Using snow, however, should only be done in a climate with temperatures below freezing. Make sure to ventilate any shelter that is completely enclosed.
Various options for building an emergency natural shelter are outlined here. As with a tarp shelter, don’t limit yourself to these options. Each situation is different. There might be a time when combining a tarp and natural material is the best choice. As long as you meet the basics of shelter design, you should be okay.
A tree pit shelter is a quick immediate-action shelter used in most forested environments. The optimal tree will have multiple lower branches—like a Douglas or grand fir—that protect its base from the snow, rain, and sun. Pine and deciduous trees provide little protection and are not a good choice. In snow environments, the snow level rises around the tree, creating an excellent source of insulation for your shelter. To make a tree pit, remove any lower dead branches and snow from the tree’s base, making an area big enough for you and your equipment. If snow is present, dig until you reach bare ground, and remove obstructive branches, which can be used for added overhead cover to protect you from the elements.
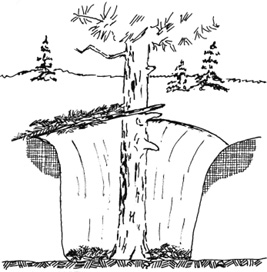
Tree pit.
An A-frame is most often used in the warm temperate and snow environments. The A-frame’s basic design is covered under tarp shelters. Unlike the tarp shelter, however, the A-frame built using only natural materials requires support poles and roofing material. Lay support poles across the ridgepole, on both sides, at a 60-degree angle to the ground. Support poles need to be long enough to extend above the ridgepole slightly, and they should be placed approximately 1 to 1½ feet apart. Crisscross small branches into the support poles. Cover the framework with any available grass, moss, boughs, and so forth. The material is placed in a layered fashion, starting at the bottom. If snow is available, throw at least 8 inches (you may add more but this is the minimum) over the top of the shelter. Cover the door opening with your pack or similar item. When using snow, don’t allow the temperature inside your shelter to rise above 32 degrees or the snow will stat to melt.
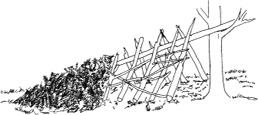
Natural A-frame.
A lean-to is most often used in the warm temperate and snow environments. The lean-to’s basic design is covered under tarp shelters. Unlike the tarp shelter, however, the lean-to built using only natural materials requires additional support poles and roofing material. Lay several support poles across the ridgepole at a 45- to 60-degree angle to the ground. Support poles need to be long enough to provide this angle and yet barely extend beyond the top of the ridgepole. Weave small saplings into and perpendicular to the support poles. Cover the entire shelter with 12 to 18 inches of boughs, bark, duff, and snow in that order (depending on availability of resources). The material should be placed in a layered fashion starting at the bottom. If snow is available, throw a minimum of 8 inches on top of the shelter. The lean-to allows you to build a fire in front of the shelter as long as the fire is safely spaced away from you and your gear. To help heat your shelter, build a fire reflector behind the fire. In cold climates create an opposing lean-to by making a front wall in the same fashion as the back wall. Be sure to incorporate the sides into the framework and leave enough room for a small doorway on either side. The doorway can be covered with your pack or a snow block when needed. For an opposing lean-to make a vent hole in top if you plan to have a small fire inside. As always, when using snow, don’t let the temperature inside your shelter go above 32 degrees Fahrenheit or the snow will start to melt.
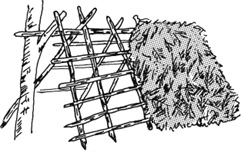
Opposing lean-to.
A hobo shelter is used in the temperate oceanic environments, where a more stable long-term shelter is necessary. To construct one, you will need to find several pieces of driftwood or boards that have washed ashore. Next locate a sand dune beyond the reach of high tide, and on the land side of the dune, dig a rectangular space big enough for you and your equipment. Place the removed sand close by so that you can use it later. Gather as much driftwood and boards as you can find, and using any available line, build a strong frame inside the rectangular dugout. Create a roof and walls by attaching driftwood and boards to the frame, leaving a doorway. If your wood supply is limited, don’t place support walls at the back or on the two sides of the structure. Some sand may fall into the shelter, but the design will still meet your needs. If you have a poncho or tarp that’s not necessary for meeting your other needs, consider placing it over the roof. Insulate the shelter by covering the roof with 6 to 8 inches of sand.
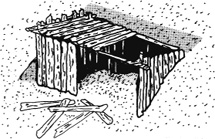
Hobo shelter.
A cave is the ultimate natural shelter. With very little effort it can provide protection from the various elements. However, caves are not without risk. Some of these risks include, but are not limited to, animals, rodents, reptiles, and insects; bad air; slippery slopes, rocks, and crevasses; floods or high-water issues; and combustible gases (most common in caves with excessive bat droppings). When using a cave as a shelter, follow some basic rules:
1. Never light a fire inside a small cave. It may use up oxygen or cause an explosion if there are enough bat droppings present. Fires should be lit near the entrance to the cave, where adequate ventilation is available.
2. To avoid slipping into crevasses, getting lost, or breathing bad gases, never venture too far into the cave.
3. Make sure the entrance is above high tide.
4. Be constantly aware of water movement within a cave. If the cave appears to be prone to flooding, look for another shelter.
5. Never enter or use old mines as a shelter. The risk is not worth it. Collapsing passages and vertical mine shafts are just a few of the potential dangers.
6. If possible, use a cave where the entrance is facing the sun (a south entrance if north of the equator; north entrance if south of the equator).
These huts are used in tropical regions, swamps, or areas that have excessive amounts of rain. The elevated bed and floor provide protection from the moist or water-covered ground while the overhead roof keeps you dry. To construct a small tropical hut, pound four poles (8 to 12 feet long) 8 to 12 inches into the ground at each of the shelter’s four corners. Tap dirt around them to make them more secure. Create the floor by lashing a strong pole 2 feet off the ground on each side of the shelter so that the poles connect to form a square or rectangle. Next, create a solid platform by laying additional poles on top of and perpendicular to the side poles. Make sure that all the poles are strong enough to support your weight. Finish the floor by using moss, grass, leaves, or branches.
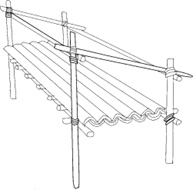
Tropical hut.
The create the roof, use the same support poles that you used to build the floor. A lean-to roof is quick and easy. Attach two support poles to the front and back of the shelter so that they are horizontal to the ground and perpendicular to the shelter’s sides. The front support pole should be higher than the back support pole so that a 45- to 60-degree downward angle forms when the roof poles are placed. Lay roof poles on top of and perpendicular to the roof’s support poles and lash them in place. Cover the roof with tarp, large overlapping leaves (placed shingle-style), or other appropriate shingling material.
If time or materials are an issue, building a triangular platform is another option. This can be done by pounding poles in the ground (as above) or by using three trees that form a triangle. In both scenarios, the triangle sides need to be at least 7 feet long.
If you take shelter in a cave, build a wall at the cave entrance by leaning support poles against it and covering them with natural materials. Be sure to leave an area large enough to build a fire and provide adequate ventilation within the shelter.
—From Wilderness Survival
Greg Davenport
Illustrations by Steven Davenport and Ken Davenport
The wickiup shelter can be used anywhere that poles, brush, leaves, and grass can be found. The wickiup is not an ideal shelter during prolonged rains, but if the insulation material is heaped on thick, it will provide adequate protection from most elements.
Gather three strong 10- to 15-foot poles, and connect them together at the top with a shear lash. If any of the poles has a fork at the top, it may not be necessary to lash them together. Spread the poles out to form a tripod; a 60-degree angle is optimal. They will be able to stand without support. Fill in the sides with additional poles by leaning them against the top of the tripod. Don’t discard shorter poles; they can be used in the final stages of this process. Leave a small entrance that can later be covered with man-made or improvised materials. For immediate use, cover the shelter with brush, leaves, reeds, bark, or similar materials.
For additional protection, layer on roofing materials in the following manner: Working from bottom to top, cover the framework with grass and/or plant stalks. Next, cover it, from bottom to top, with mulch and/or dirt. To hold this material in place, lay poles around and on top of the wickiup. Leave a vent hole at the top if you plan to have fires inside the shelter. The roofing options described for the wigwam may also be used to roof a wickiup.
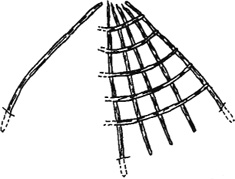
Wickiup framework.
The wigwam may be a viable option in some desert regions, depending on availability of materials. The wigwam’s greatest asset is the space and headroom provided by its vertical walls. This dome-type shelter provides protection from all directions and has a low wind profile. The following instructions are for a wigwam with a 10-foot floor space, providing enough room for several people and their equipment.
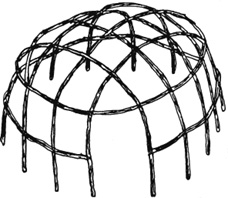
Wigwam framework.
Cut twenty-four saplings that are 10 to 15 feet long and 2 inches in diameter. Willow and maple work best, but any sapling will do. If unable to use the saplings the day you cut them, store them so they are bent into a U shape. With a stick or your foot, mark a 10-foot circle where you intend to place the shelter. Using the circle as your guide, evenly place the saplings around it. Make holes for the saplings by pounding a solid wooden stake into the ground and the removing it. Then bury the large end of each sapling 6 to 10 inches into the ground, and tap dirt around it to help hold it in place. Next, create the basic framework by bending opposing saplings together, overlapping by at least 2 feet, and using a shear lash to secure them together. Once completed, the twenty-four poles should create a domelike structure with a center at least 7 feet high. Wrap additional saplings horizontally around the framework. Leave a 3- to 4-foot-high doorway that can later be covered with a hide or other appropriate material. For optimal roofing support, place the horizontal poles 12 to 18 inches apart.
Finally, you need to construct a roof from available natural materials. The ones most commonly used are grass (most common in deserts), mats made from various stalks, birch and elm bark, and wood shingles. Regardless of the material, a wigwam roof is constructed using a shingle design, placing the material from bottom to top, and so that the higher rows overlap those below by about one-third. Leave a vent hole at the top if you plan to have fires inside the shelter.
Although grass can be used as a roofing material, its biggest drawback is the amount of time required to harvest enough to cover a shelter. Ideally, you should collect tall grass that is dry and grew the previous year. Older grass is usually brittle and rotted, and new grass must be dried before used. Separate the grass into small bundles, 1 to 2 inches in diameter, with the root ends together. Place the bundles close to one another. Fold a long piece of cordage in half, and place it about 4 inches down from the top of the first bundle (details on how to make cordage appear on page 469). Tie an overhand knot, slide in another bundle, and repeat. If you run out of line before you reach the end, simply tie another piece to the first and continue the process. At the same time, tie a second line about 3 or 4 inches below the first. This pattern should effectively weave the bundles together, holding them securely in place. Once you have made enough of these grass skirts to cover the shelter, lash them to the framework using proper shingling techniques as you go up the shelter.
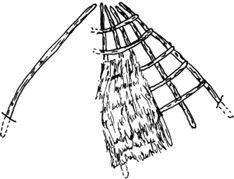
Grass roofing.
A mat made by weaving reeds or the leaves and stalks of cattails, sotol, or yucca together provides a strong covering for most shelters. Like the grass skirts, these mats are made and then attached to the shelter. Begin by laying your material down on the ground side by side. To create a tighter fit, alternate the stalks’ thick and skinny ends. Fold a long piece of cordage in half, and place it about 4 inches down from the top of the first stalk. Tie an overhand knot, slide in another stalk, and repeat. If you run out of line before you reach the end of the mat, simply tie another piece to the first and continue the process. Once the first row is done, perform the same process every 4 inches down the mat until you reach the bottom. This pattern should effectively weave the bundles together, holding them securely in place.
Birch and elm are the most common types of bark used for covering a shelter. Large pieces of bark can easily be cut and stripped from a tree or log. Use a knife to make a rectangular cut from top to bottom, and peel the bark off along the vertical cut. If you experience difficulty removing the bark, beating the area with a log will help release it from the tree. Once the bark is removed, lay it flat on the ground, weight it down with a heavy material such as rocks or wood, and allow it to dry. When dry, the bark can be lashed to the horizontal beams and shingled up the shelter’s framework. For best results, the shingles that are side by side should have a slight overlap. You can sew bark together if the size is not adequate for its intended use. If you don’t have sewing material, you might make a needle from bone or wood or perhaps use cordage and run it through holes created with your knife.
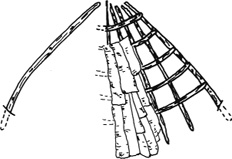
Bark shingles.
Straight-grained woods like cedar are the most commonly used wood roofing material. Where live cedar trees can be found, you will easily find old fallen, dead, and seasoned cedar. Without much difficulty, large half-inch-thick shingles can be removed with a knife, ax, or in some instances, your bare hands. The soft wood can be lashed or nailed to the horizontal beams and shingled up the shelter’s framework. If lashed, you’ll need to make holes in the top of each shingle; use an awllike tool to perform this easy task.
—From Surviving the Desert
Greg Davenport
Creating a second wall inside or out around your shelter will increase its ability to keep you warm or cool. Doing something as easy as tying mats or grass skirts to the interior walls and roof can create the second wall. To make an elaborate insulation wall, drive a row of tall stakes, about 1 foot apart, 6 to 8 inches into the ground and 12 to 18 inches from the shelter wall. Then weave willow branches or similar material between and perpendicular to the stakes. Fill in the space between walls with grass, duff, or leaves.
Before getting into a shelter or sleeping bag, check it for small creatures. They find these areas just as comfortable and inviting as you do, and they do not like to share. Odds are they will let you know this if you crawl in without letting them exit first.
—From Surviving the Desert
U.S. Army
When looking for a shelter site, keep in mind the type of shelter (protection) you need. However, you must also consider—
• How much time and effort you need to build the shelter.
• If the shelter will adequately protect you from the elements (sun, wind, rain, snow).
• If you have the tools to build it. If not, can you make improvised tools?
• If you have the type and amount of materials needed to build it.
To answer these questions, you need to know how to make various types of shelters and what materials you need to make them.
If you have a parachute and three poles and the tactical situation allows, make a parachute tepee. It is easy and takes very little time to make this tepee. It provides protection from the elements and can act as a signaling device by enhancing a small amount of light from a fire or candle. It is large enough to hold several people and their equipment and to allow sleeping, cooking, and storing firewood.
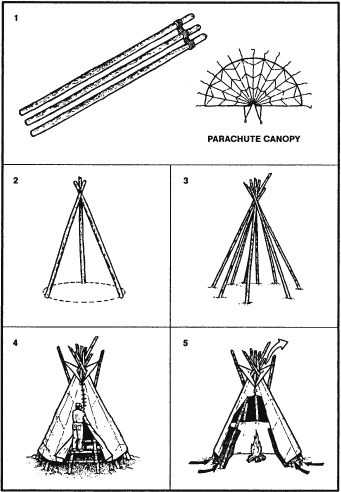
Three-pole parachute tepee.
You can make this tepee using parts of or a whole personnel main or reserve parachute canopy. If using a standard personnel parachute, you need three poles 3.5 to 4.5 meters long and about 5 centimeters in diameter. To make this tepee—
• Lay the poles on the ground and lash them together at one end.
• Stand the framework up and spread the poles to form a tripod.
• For more support, place additional poles against the tripod. Five or six additional poles work best, but do not lash them to the tripod.
• Determine the wind direction and locate the entrance 90 degrees or more from the mean wind direction.
• Lay out the parachute on the “backside” or the tripod and locate the bridle loop (nylon web loop) at the top (apex) of the canopy.
• Place the bridle loop over the top of a free-standing pole. Then place the pole back up against the tripod so that the canopy’s apex is at the same height as the lasing on the three poles.
• Wrap the canopy around one side of the tripod. The canopy should be of double thickness, as you are wrapping an entire parachute. You need only wrap half of the tripod, as the remainder of the canopy will encircle the tripod in the opposite direction.
• Construct the entrance by wrapping the folded edges of the canopy around two free-standing poles. You can then place the poles side by side to close the tepee’s entrance.
• Place all extra canopy underneath the tepee poles and inside to create a floor for the shelter.
• Leave a 30- to 50-centimeter opening at the top for ventilation if you intend to have a fire inside the tepee.
You need a 14-gore section (normally) of canopy, stakes, a stout center pole, and inner core and needle to construct this tepee. You cut the suspension lines except for 40- to 45-centimeter lengths at the canopy’s lower lateral band.
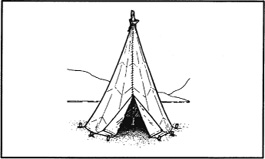
One-pole parachute tepee.
To make this tepee—
• Select a shelter site and scribe a circle about 4 meters in diameter on the ground.
• Stake the parachute material to the ground using the lines remaining at the lower lateral band.
• After deciding where to place the shelter door, emplace a stake and tie the first line (from the lower lateral band) securely to it.
• Stretch the parachute material taut to the next line, emplace a stake on the scribed line, and tie the line to it.
• Continue the staking process until you have tied all the lines.
• Loosely attach the top of the parachute material to the center pole with a suspension line you previously cut and, through trail and error, determine the point at which the parachute material will be pulled tight once the center pole is upright.
• Then securely attach the material to the pole.
• Using a suspension line (or inner core), sew the end gores together leaving 1 or 1.2 meters for a door.
You use the same materials, except for the center pole, as for the one-pole parachute tepee.

No-pole parachute tepee.
To make this tepee—
• Tie a line to the top of parachute material with a previously cut suspension line.
• Throw the line over a tree limb, and tie it to the tree trunk.
• Starting at the opposite side from the door, emplace a stake on the scribed 3.5-to 4.3-meter circle.
• Tie the first line on the lower lateral band.
• Continue emplacing the stakes and tying the lines to them.
• After staking down the material, unfasten the line tied to the tree trunk, tighten the tepee material by pulling on this line, and tie it securely to the tree trunk.
You can make a hammock using 6 to 8 gores of parachute canopy and two trees about 4.5 meters apart.
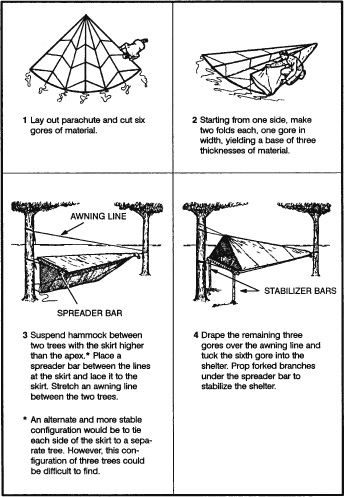
Parachute hammock.
If you are in a wooded area and have enough natural materials, you can make a field-expedient lean-to without the aid of tools or with only a knife. It takes longer to make this type of shelter than it does to make other types, but it will protect you from the elements.
You will need two trees (or upright poles) about 2 meters apart; one pole about 2 meters long and 2.5 centimeters in diameter; five to eight poles about 3 meters long and 2.5 centimeters in diameter for beams; cord or vines for securing the horizontal support to the trees; and other poles, saplings, or vines to crisscross the beams.
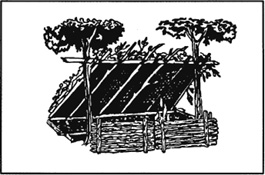
Field-expedient lean-to and fire reflector.
To make this lean-to—
• Tie the 2-meter pole to the two trees at waist to chest height. This is the horizontal support. If a standing tree is not available, construct a bipod using Y-shaped sticks or two tripods.
• Place one end of the beams (3-meter poles) on one side of the horizontal support. As with all lean-to type shelters, be sure to place the lean-to’s backside into the wind.
• Crisscross saplings or vines on the beams.
• Cover the framework with brush, leaves, pine needles, or grass, starting at the bottom and working your way up like shingling.
• Place straw, leaves, pine needles, or grass inside the shelter for bedding.
In cold weather, add to your lean-to’s comfort by building a fire reflector wall. Drive four 1.5-meter-long stakes into the ground to support the wall. Stack green logs on top of one another between the support stakes. Form two rows of stacked logs to create an inner space within the wall that you can fill with dirt. This action not only strengthens the wall but makes it more heat reflective. Bind the top of the support stakes so that the green logs and dirt will stay in place.
With just a little more effort you can have a drying rack. Cut a few 2-centimeter-diameter poles (length depends on the distance between the lean-to’s horizontal support and the top of the fire reflector wall). Lay one end of the poles on the lean-to support and the other end on top of the reflector wall. Place and tie into place smaller sticks across these poles. You now have a place to dry clothes, meat, or fish.
In a marsh or swamp, or any area with standing water or continually wet ground, the swamp bed keeps you out of the water. When selecting such a site, consider the weather, wind, tides, and available materials.
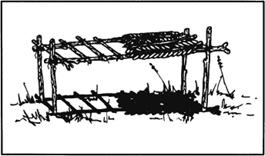
Swamp bed.
To make a swamp bed—
• Look for four trees clustered in a rectangle, or cut four poles (bam-boo is ideal) and drive them firmly into the ground so they form a rectangle. They should be far enough apart and strong enough to support your height and weight, to include equipment.
• Cut two poles that span the width of the rectangle. They, too, must be strong enough to support your weight.
• Secure these two poles to the trees (or poles). Be sure they are high enough above the ground or water to allow for tides and high water.
• Cut additional poles that span the rectangle’s length. Lay them across the two side poles, and secure them.
• Cover the top of the bed frame with board leaves or grass to form a soft sleeping surface.
• Build a fire pad by laying clay, silt, or mud on one corner of the swamp bed and allow it to dry.
Another shelter designed to get you above and out of the water or wet ground uses the same rectangular configuration as the swamp bed. You very simply lay sticks and branches lengthwise on the inside of the trees (or poles) until there is enough material to raise the sleeping surface above the water level.
Do not overlook natural formations that provide shelter. Examples are caves, rocky crevices, clumps of bushes, small depressions, large rocks on leeward sides of hills, large trees with low-hanging limbs, and fallen trees with thick branches. However, when selecting a natural formation—
• Stay away from low ground such as ravines, narrow valleys, or creek beds. Low areas collect the heavy cold air at night and are therefore colder than the surrounding high ground. Thick, brushy, low ground also harbors more insects.
• Check for poisonous snakes, ticks, mites, scorpions, and stinging ants.
• Look for loose rocks, dead limbs, coconuts, or other natural growth than could fall on your shelter.
This shelter protects you from the sun, wind, rain, and heat. It is easy to make using natural materials.

Beach shade shelter.
To make this shelter—
• Find and collect driftwood or other natural material to use as support beams and as a digging tool.
• Select a site that is above the high water mark.
• Scrape or dig out a trench running north to south so that it receives the least amount of sunlight. Make the trench long and wide enough for you to lie down comfortably.
• Mound soil on three sides of the trench. The higher the mound, the more space inside the shelter.
• Lay support beams (driftwood or other natural material) that span the trench on top of the mound to form the framework for a roof.
• Enlarge the shelter’s entrance by digging out more sand in front of it.
• Use natural materials such as grass or leaves to form a bed inside the shelter.
—From Survival (Field Manual 21-76)
U.S. Army
In an arid environment, consider the time, effort, and material needed to make a shelter. If you have material such as poncho, canvas, or a parachute, use it along with such terrain features as rock outcroppings, mounds of sand, or a depression between dunes or rocks to make your shelter.
Using rock outcroppings—
• Anchor one end of your poncho (canvas, parachute, or other material) on the edge of the outcrop using rocks or other weights.
• Extend and anchor the other end of the poncho so it provides the best possible shade.
In a sandy area—
• Build a mound of sand or use the side of a sand dune for one side of the shelter.
• Anchor one end of the material on top of the mound using sand or other weights.
• Extend and anchor the other end of the material so it provides the best possible shade.
Note: If you have enough material, fold it in half and form a 30-centimeter to 45-centimeter airspace between the two halves. This airspace will reduce the temperature under the shelter.
A belowground shelter can reduce the midday heat as much as 16 to 22 degrees C (30 to 40 degrees F). Building it, however, requires more time and effort than for other shelters. Since your physical effort will make you sweat more and increase dehydration, construct it before the heat of the day.
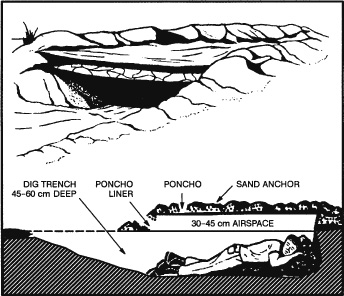
Belowground desert shelter.
To make this shelter—
• Find a low spot or depression between dunes or rocks. If necessary, dig a trench 45 to 60 centimeters deep and long and wide enough for you to lie in comfortably.
• Pile and sand you take from the trench to form a mound around three sides
• On the open end of the trench, dig out more sand so you can get in and out of your shelter easily.
• Cover the trench with your material.
• Secure the material in place using sand, rocks, or other weights.
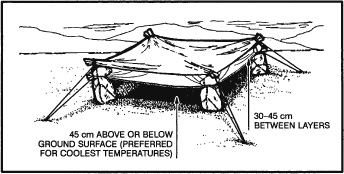
Open desert shelter.
If you have extra material, you can further decrease the midday temperature in the trench by securing the material 30 to 45 centimeters above the other cover. This layering of the material will reduce the inside temperature 11 to 22 degrees C (20 to 40 degrees F).
Another type of belowground shade shelter is of similar construction, except all sides are open to air currents and circulation. For maximum protection, you need a minimum of two layers of parachute material. White is the best color to reflect heat; the innermost layer should be of darker material.
—From Survival (Field Manual 21-76)
U.S. Army
Your environment and the equipment you carry with you will determine the type of shelter you can build. You can build shelters in wooded areas, open country, and barren areas. Wooded areas usually provide the best location, while barren areas have only snow as building material. Wooded areas provide timber for shelter construction, wood for fire, concealment from observation, and protection from the wind.
Note: In extreme cold, do not use metal, such as an aircraft fuselage, for shelter. The metal will conduct away from the shelter what little heat you can generate.
Shelters made from ice or snow usually require tools such as ice axes or saws. You must also expend much time and energy to build such a shelter. Be sure to ventilate an enclosed shelter, especially if you intend to build a fire in it. Always block a shelter’s entrance, if possible, to keep the heat in and the wind out. Use a rucksack or snow block. Construct a shelter no larger than needed. This will reduce the amount of space to heat. A fatal error in cold weather shelter construction is making the shelter so large that it steals body heat rather than saving it. Keep shelter space small.
Never sleep directly on the ground. Lay down some pine boughs, grass, or other insulating material to keep the ground from absorbing your body heat.
Never fall asleep without turning out your stove or lamp. Carbon monoxide poisoning can result from a fire burning in an unventilated shelter. Carbon monoxide is a great danger. It is colorless and odorless. Any time you have an open flame, it may generate carbon monoxide. Always check your ventilation. Even in a ventilated shelter, incomplete combustion can cause carbon monoxide poisoning. Usually, there are no symptoms. Unconsciousness and death can occur without warning. Sometimes, however, pressure at the temples, burning of the eyes, headache, pounding pulse, drowsiness, or nausea may occur. The one characteristic, visible sign of carbon monoxide poisoning is a cherry red coloring in the tissues of the lips, mouth, and inside of the eyelids. Get into fresh air at once if you have any of these symptoms.
There are several types of field-expedient shelters you can quickly build or employ. Many use snow for insulation.
The snow cave shelter is a most effective shelter because of the insulating qualities of snow. Remember that is takes time and energy to build and that you will get wet while building it. First, you need to find a drift about 3 meters deep into which you can dig. While building this shelter, keep the roof arched for strength and to allow melted snow to drain down the sides. Build the sleeping platform higher than the entrance. Separate the sleeping platform from the snow cave’s walls or dig a small trench between the platform and the wall. This platform will prevent the melting snow from wetting you and your equipment. This construction is especially important if you have a good source of heat in the snow cave. Ensure the roof is high enough so that you can sit up on the sleeping platform. Block the entrance with a snow block or other material and use the lower entrance area for cooking. The walls and ceiling should be at least 30 centimeters thick. Install a ventilation shaft. If you do not have a drift large enough to build a snow cave, you can make a variation of it by piling snow into a mound large enough to dig out.
The idea behind this shelter is to get you below the snow and wind level and use the snow’s insulating qualities. If you are in an area of compacted snow, cut snow blocks and use them as overhead cover. If not, you can use a poncho or other material. Build only one entrance and use a snow block or rucksack as a door.
Use snow blocks for the sides and parachute material for overhead cover. If snowfall is heavy, you will have to clear snow from the top at regular intervals to prevent the collapse of the parachute material.
In certain areas, the natives frequently use this type of shelter as hunting and fishing shelters. They are efficient shelters but require some practice to make them properly. Also, you must be in an area that is suitable for cutting snow blocks and have the equipment to cut them (snow saw or knife).
SNOW HOUSES
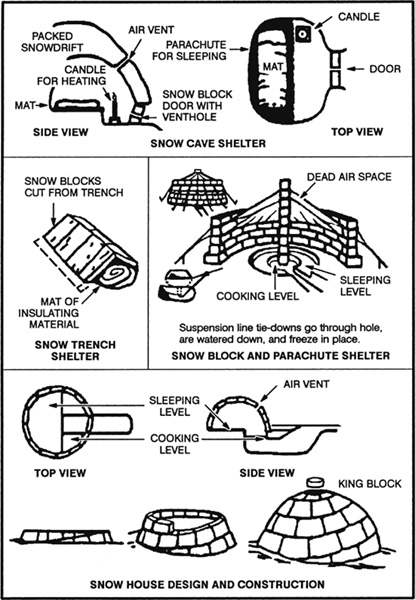
Construct this shelter in the same manner as for other environments; however, pile snow around the sides for insulation.
To build this shelter, find a fallen tree and dig out the snow underneath it. The snow will not be deep under the tree. If you must remove branches from the inside, use them to line the floor.
Fallen tree as shelter.
—From Survival (Field Manual 21-76)
U.S. Army
In open terrain with snow and ice, a snow wall may be constructed for protection form strong winds. Blocks of compact snow or ice are used to form a windbreak.
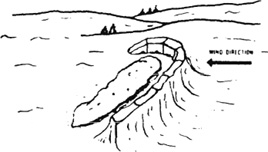
Sleeping behind snow wall.
A snow hole provides shelter quickly. It is constructed by burrowing into a snowdrift or by digging a trench in the snow and making a roof of ponchos and ice or snow-blocks supported by skis, ski poles or snow-shoes. A sled provides excellent insulation for the sleeping bag. Boughs, if available, can be used for covering the roof and for the bed.
—From Basic Cold Weather Manual (Field Manual 31-70)
Greg Davenport
Illustrations by Steven A. Davenport
A thermal A-frame is most often used in the warm temperate and snow environments, where there is an abundance of trees and snow. Find a tree with a forked branch that’s 3 to 4 feet above the base of its trunk after you have dug down to bare ground. Break away any other branches that pose a threat or interfere with the construction of your A-frame. Place a ridgepole (a fallen tree 12 to 15 feet long and the diameter of your wrist) into the forked branch, forming a 30-degree angle between the pole and the ground. If you’re unable to find a tree with a forked branch, lash the ridgepole to the tree. Other options are to locate a fallen tree that’s at an appropriate 30-degree angle to the ground, or to lay a strong ridgepole against a 3- to 4-foot-high stump. Lay support poles across the ridgepole, on both sides, at a 60-degree angle to the ground. Support poles need to be long enough to extend above the ridgepole slightly, and they should be placed approximately 1 to 1½ feet apart. If the support poles end up above the roof material moisture will run down them and into your shelter. Crisscross small branches into the support poles. Cover the framework with any available grass, moss, boughs, and so forth. Place the materials in a layered fashion, starting at the bottom. Finally, throw at least 8 inches (you may add more, but this is the minimum) of snow over the top of the shelter. Cover the door opening with your pack or similar item.
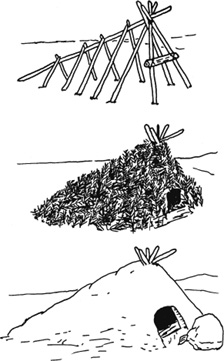
Thermal A-frame.
A snow cave is most often used in warm temperate (winter) and snow environments and is a quick and easily constructed one- or two-man shelter. When using these shelters, the outside temperature must be well below freezing to ensure that the walls of the cave will stay firm and the snow will not melt. Never get the inside temperature above freezing, or the shelter will lose its insulating quality, and you’ll get wet from the subsequent moisture. With this in mind, these shelters are not designed for large groups, since the radiant heat will raise the temperature above freezing, making it a dangerous environment. As a general rule of thumb, if you cannot see your breath, the shelter is too warm. When constructing the cave, use the COLDER principle [see page 287] and take care not to overheat or get wet.
To construct a snow cave, find an area with firm snow at a depth of at least 6 feet (a steep slope such as a snowdrift will suffice, provided there is no risk of an avalanche). Dig an entryway into the slope deep enough to start a tunnel (approximately 3 feet) and wide enough for you to fit into. Since cold air sinks, construct a snow platform 2 to 3 feet above the entryway. It should be flat, level, and large enough for you to comfortably lie down on. Using the entryway as a starting point, hollow out a domed area that is large enough for you and your equipment. To prevent the ceiling from settling or falling in, create a high domed roof. To prevent asphyxiation, make a ventilation hole in the roof. For best results, the hole should be at a 45-degree angle to your sleeping platform (creating an imaginary triangle between the platform, the door, and the hole). If available, insert a stick or pole through the hole so that it can be cleared periodically. To form an A-frame above the trench. For best results, cut one of the first opposing blocks in half lengthwise. This will make it easier to place the additional blocks on—one at a time versus trying to continually lay two against one another. Fill in any gaps with surrounding snow, and cover the doorway.
A quick and easy variation of the snow A-frame shelter can be made when the snow is not wind-packed and a snow cave is not an option. Simply dig a trench as described above, but make one side higher than the other; cover it with a lean-to type framework of branches or similar material; and then add a thick layer of snow as roofing.
An igloo can provide a long-term winter shelter for a small family. This shelter is normally used in areas where the snow is windblown and firmly packed. An igloo that has a diameter of 8 feet is adequate for one person; a diameter of 12 feet can easily house four people. Its construction requires a snow saw or large knife.
Find a windblown snowdrift or field, 2 feet deep, firm enough that it will support your weight with only a slight indent. Draw a circle in the snow that represents the desired igloo size. The marked outline will become the inside diameter of the igloo. Establish a door location, which should be at a 90-degree angle to the wind. Make two parallel lines in the snow that are 30 inches apart and perpendicular to the door entrance. These lines should extend one-third of the way toward the center of the circle and an equal distance away. This area will eventually become your entrance, cooking, and storage area. Since cold air sinks, it also serves as a cold sump for the shelter. Using the two lines as your guide, cut blocks that measure 30 inches long, 15 inches deep, and 8 to 12 inches thick. Start at the outside of the circle and continue until the two parallel lines end (one-third of the way to the center of the circle). Set the blocks aside. In order to finish the shelter, you will need to acquire additional blocks from another location. Once all the blocks are cut, you can begin building the igloo.
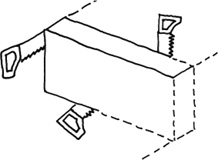
Cutting a snow block.
Start by placing four full-size blocks, side by side, on the outside of the circle. Next, make a diagonal cut that runs from the ground of the second block to the top of the fourth. The fifth and following blocks will be the standard 15-inch height. The slope will provide a spiral effect that makes the construction easier and provides stability to the igloo. Continue adding blocks until the first layer is complete. You may need to add support pillars under the blocks that go over the entrance. As your dome begins to take form, trim the blocks (see illustration) and tilt them slightly inward to increase the contact and stability. In addition, greater stability is obtained if each block placed doesn’t end on the same seam as the one below it (you may need to trim one or two blocks to avoid this).
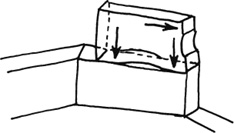
Trimming the blocks for a better ft.
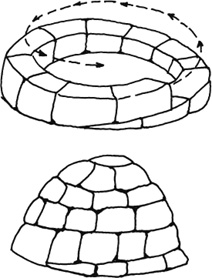
Construction an igloo.
As the dome wall gets higher, you’ll need to work from inside the igloo, exiting through the doorway created when the blocks were cut. The last layers of blocks need to be trimmed at an angle so the key block can be positioned on top. The key, or final, block is the centerpiece. It is round and tapered in from the top toward the shelter.
To finish the igloo, use snow as the mortar to close all weak areas. If you want to increase the insulation quality of the shelter, simply pile more snow around it. Create a roof over the entryway similar to that described for the snow A-frame variation, page 251. If you intend to have a small fire, don’t forget a vent hole, and don’t allow the temperature inside the igloo to get too warm. You should be able to see your breath.
A variation of the snow cave and igloo is a molded dome, used in conditions where the snow is not wind-packed and a snow cave is not an option. Use your gear, boughs, or other material to create a cone that will serve as the foundation to your shelter. Pile snow on top of the cone until you have a dome that is approximately 5 feet high and has at least 3 feet of snow covering the inner core. Smooth the outer surface, and let the snow sit for one to two hours so that it can settle (the time frame depends on your weather conditions). Since 18 inches is an ideal insulating depth for a molded dome, gather multiple 2-foot-long branches and insert them into the dome, pointing toward its center, leaving approximately 6 inches exposed. Decide where you’d like your entryway, and dig a 3-foot-deep entry tunnel. Dig approximately one-third of the way toward the center of the molded dome, or until you reach the core material. Remove the gear, boughs, or other material, and hollow out the inside, using the 2-foot branches you inserted as your guide for inner-wall thickness.
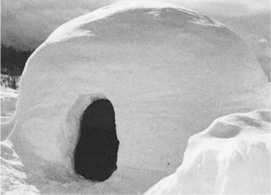
Molded dome.
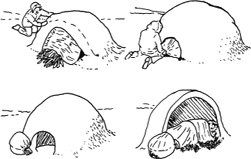
Molded dome.
If the temperature in a shelter made partially or completely of snow exceeds 32 degrees F, it will begin to melt and will get you and your equipment wet. As a general rule of thumb, as long as you can see your breath, the temperature is probably not too high.
If you intend to use any heating device inside an enclosed shelter, make sure to create a vent hole that will allow the CO2 to escape. This is usually placed at a 45-degree angle between the top of the shelter and the shelter’s opening.
Once your shelter is complete, you may elect to add a snow wall on the windward side to decrease the wind’s effects on your site.
In deep snow, you may have to use dead-men to secure your shelter sides in place. Tie one end of a piece of line to the shelter material, and secure its other end to a 1-inch-diameter branch that is about 6 inches long. Pull the attached line at a 90-degree angle to the wrinkles in the shelter’s material and secure the branch in place. To do this, kick a small hole in the snow, jam the line and branch into it, and while holding the branch in place, cover it with snow. These dead-men work great when temperatures are below freezing, but when the sun is out, if the temperature gets above freezing, these anchors may pop free, and your shelter will fail down.
Digging a 6-foot-deep round hole, along with a sitting platform 2 feet up from the bottom, creates a wonderful, wind-blocked area for cooking and community gatherings.
—From Surviving Cold Weather
Buck Tilton and John Gookin
Illustrations by Joan M. Safford
A digloo is a snow cave that can be dug from the top and the side at the same time. The final result is the same: a dome-shaped room accessible via a tunnel. A digloo requires the same depth of snow as a snow cave—a minimum of five to six feet, with ten feet or more being better. The disadvantage of a digloo is the need for snow blocks to cap the hole in the roof. The process of making and setting snow blocks is more complex than the simple digging of a snow cave. The primary advantages of a digloo over a snow cave are that two people can dig at the same time, so the work tends to go faster, and snow doesn’t have to be burrowed into and ferried down a tunnel.
After probing to find an appropriate depth, ski-pack the snow above the building site. An area about six feet square is sufficient for two people. The sleeping chamber will be located below this work-hardened area, and the packed snow provides a foundation for the cap blocks. If the snowpack is relatively shallow, shovel some extra snow on top of the packed platform to raise it. The shoveled snow doesn’t need to be boot-packed, but it should be tamped with a shovel to firm it. This initial packing is best done as soon as you’ve chosen a site. Other parts of construction must wait, since you need to allow time for the packed snow to sinter, making it possible to dig a stable hole.
Unless you’re very far north or south, in the Arctic or Antarctic, you’ll probably need to make a quarry from which to cut blocks. Boot-packing an area about eight feet square will provide ample blocks for a digloo. Just smash the snow up with your boots for a while, and then ski-pack the top smooth. It is easier to cut good blocks out of a quarry with a smooth top. Don’t walk on the quarry after it has been smoothed, or you will crack the snow. This is another job that should be done early, so it can strengthen by sintering. For instance, if you break trail to a snow shelter site the day before you move camp to that site, you can make a quarry that will yield industrial-strength blocks.
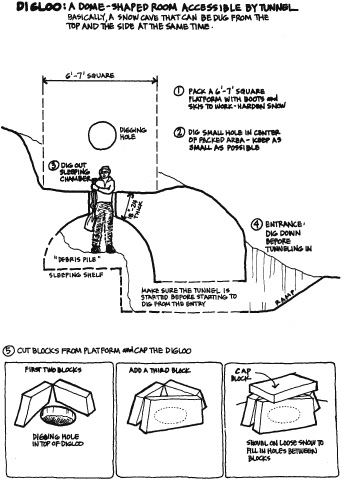
Once it has firmed up—a process that takes at least an hour or two—dig a round hole in the center of the packed area above the future digloo. Make the hole just big enough to sneak the shovel in and out of with the digger standing in it. The smaller the hole, the easier it will be to cap with blocks. Carefully avoid stepping on the hard snow immediately around the hole. If you do plunge into the snow, fill the accidental hole with packed snow, and try not to set a block corner on that weak spot later. (If the snow is too dry to pack into your mistake, you can make a quick-setting “epoxy” with water and snow.) Dig down a couple of feet, and then start digging to the sides, carving an inverted funnel shape in the snow. This will be the sleeping chamber. As the chamber grows, it will become easier to stand in the hole while you dig. Dig to the ground as you widen the bottom of the hole or, in deeper snow, until you have a room the size you want. Basic snow shelter construction principles are important here—the dome shape of the room, the smooth ceiling, and cutting the snow rather than prying out large chunks.
As you pitch snow from the hole, try to create a rough snow wall to remind others to stay off the roof of the digloo. Shape a floor that slopes very slightly toward the intended door. Leave some “debris” inside—snow you’ve dug out for the room—to fill holes that tend to show up in the floor and for finishing touches. When the room is relatively complete, begin to dig toward the tunnel, and the second digger.
The second digger begins about ten feet downhill from the packed area, digging straight down, following the directions for a snow cave. The goal here is a clean face on the uphill side. Then a tunnel is dug uphill, toward where the room is being constructed. The tunnel digger may move faster than the room digger, and a lot of unnecessary energy can be wasted digging the tunnel too far. Estimate the length needed for the tunnel, dig it out, and back off until the room is complete.
When the digger in the room starts to dig toward the tunnel, the tunnel digger can resume digging until both ends of the tunnel are joined. From this point on, the snow can be removed via the tunnel.
On a steep slope, leave enough of the snowpack on the bottom of the tunnel to build large steps. Steps are difficult, if not impossible, to add later.
With the tunnel and room complete, it’s time to cut blocks from the quarry. Blocks can be cut with a snow saw, a wood saw, or, if you’re careful and skillful, a wide shovel. A good block size is about eighteen to twenty inches wide, two feet long, and six inches thick. Square the blocks as much as possible, leaving the corners intact. The work goes faster with bigger blocks, but smaller blocks are easier to handle. If the blocks are too heavy, consider making them thinner rather than narrower and shorter. If one long side of a block is obviously fatter, and thus heavier, than the other side, place the heavier side down for better balance.
Carry the blocks to the edge of the roof of the digloo, and pass them to someone standing inside the hole. Lean the blocks against each other at about a forty-five-degree angle, with their “feet” on top of the packed circle at the edge of the opening. Each block should rest on its corners, not the middle, or it will rock and be unstable. A bit of mitering may help, but don’t try to shape the blocks too much—this often leaves you needing more blocks. The force of the blocks leaning against each other increases their strength over time. If the hole is no more than three feet across, three blocks should be enough. A smaller, lighter block is needed to cap the pyramid. Ideally, this final cap block should fit snugly, with no rocking. You can accomplish this best by setting the cap in place and sawing gently from the inside, mitering the block until it fits snugly. Chink the large holes left in the triangle of blocks by shoveling softer snow from the outside until the cap is sealed. Now you can vent the room and add finishing touches, such as storage shelves and sleeping platforms, as desired.
Many areas do not commonly have adequate snow depth or appropriate snow type to build caves or igloos. In these circumstances, you can build a quinzhee, which is a hollowed-out pile of snow—a pile that you make. This type of snow shelter was traditionally used by the Athabascans on the taiga and is appropriate in the dry snows of the Rockies. You can build a quinzhee with less than two feet of snow on the ground.
Follow the directions given earlier to choose a site for the pile of snow. Determine the quinzhee’s size by drawing a rough circle big enough to house all the intended occupants without touching the walls. For a group of four, you can create a workable circle by rotating a 170 cm ski around a pole placed upright in the center. A large group may choose to build several quinzhees, since smaller snow structures generally have stronger walls. Walk around the rim of the circle to break up the soft snow so that it will harden. This is important, because the walls will be two to three feet thick at the base, and you’ll need firm footing for these walls. Be sure that some of your steps punch all the way to the ground. Not doing this can lead to collapse of the structure while hollowing it out. Be careful not to pack the middle of the circle. That’s the part you’re going to dig out, so you want to leave the snow there as easy to move as possible. You can even throw tightly closed packs and well-protected sleeping bags in the middle as filler, before you start shoveling. If you have a long, slim pole, place it upright in the middle of the area to serve as a guide, telling the digger when the middle of the pile has been reached.
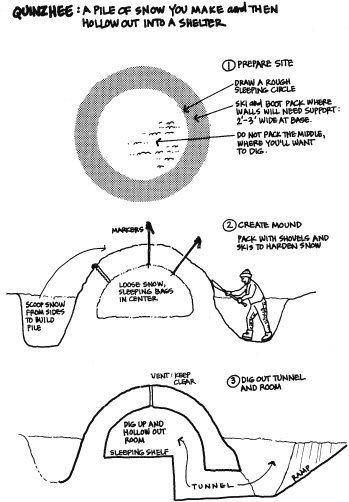
When you start shoveling snow into a pile—the not-so-fun part of construction—throw softer snow where the wall will be, since it will sinter into a stronger uniform density. Toss any chunks of snow into the middle. Chunks have air spaces around them, making them easy to dig out, and using chunks in the wall would leave holes. You can also throw crumbling snow into the middle. It, too, will be easy to dig out later. Keep piling up snow until the mound is large and dome shaped. It should have no points or horizontal flat spots on it, characteristics that create weakness in the walls.
When the pile is large enough, pack the snow on the outside with a ski or the flat of a shovel. This increases the density of the outer wall, and it also shortens the time for sintering to occur. The pile of snow must firm up substantially before you can hollow it out. Sintering happens slowly when the snowpack is cold and quickly when the snow is warm. You can speed up the sintering process by double-packing the walls and roof: pack, add snow, and pack it again. In bitterly cold conditions, it’s best to wait a couple of hours before hollowing. When it’s warm, you can dig almost immediately, although too much rushing increases the risk of collapse. If the snowpack is so warm that it feels wet, don’t build a quinzhee.
After the pile of snow has firmed up adequately, start to tunnel in from the lowest side of the mound. But first, discuss rescue procedures in case the snow collapses on the “mole” digging out the inside. Keep the tunnel as low and as small as possible. You can easily enlarge an entrance, but you can rarely make one smaller. As soon as you’re in a couple of feet, start hollowing out the quinzhee. Once you can kneel and then stand, you’ll get less wet while digging. Many people like to work quickly to the center of the room for a better frame of reference for digging. Be careful to cut the snow and not pry it with the shovel—prying puts unnecessary stress on the still-sintering walls.
From the middle of the mound, dig up, keeping the interior in a dome shape (no flat spots or points). Leave a layer of snow for the floor. And once again, for the most efficient heat-trapping, make the floor higher than the top of the door.
Hollow out the room until you can see a little blue light showing through the snow. If there’s too much bright light coming in the door, have someone block the entrance. Once you see light in an area of the ceiling, dig elsewhere. Once you see light all over the interior of the dome, smooth out the ceiling. Instead of using light to estimate wall thickness, you can use markers, such as ski poles, stuck into the mound before the hollowing-out process. Stick them in about two feet, the approximate wall thickness you want. When you reach the markers from the inside, you can stop digging. Pack the floor by crawling around on it, and then smooth it out as flat as possible. Put a vent in the roof to draw off moisture (as for snow caves), and leave for a while to allow the floor to sinter.
During the hollowing-out process, the snow pile may occasionally settle with a disturbing “whoomp.” The lighter and colder the snow, the more likely this is to happen. Don’t worry—this seldom signals a collapse. However, you may want to dig a bit less aggressively or stop and double-pack the walls before continuing to hollow out the interior.
The larger the quinzhee, the trickier the construction. Larger quinzhee require thicker walls. If you want to house an especially large group, make the snow pile longer instead of wider, sort of a Quonset hut shape. This ovate shape gives full strength to conventional snow walls but allows for virtually infinite expansion lengthwise. With a really long quinzhee, you can tunnel in from both ends and seal one entrance later.
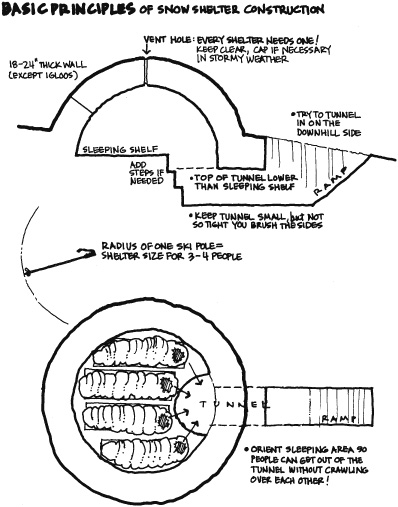
• Keep the vent clear to preserve air flow.
• Do not burn stoves and lanterns that consume oxygen unless they have special hooded ventilation systems.
• Lay out ground cloths and sleeping pads so they overlap and cover cold spots.
• Keep warm items like sleeping bags away from the snow walls.
• Burn a candle for light and a pleasant atmosphere.
• Watch for sagging or other shelter damage, and repair as necessary.
—From NOLS Winter Camping
Buck Tilton and John Gookin
Illustration by Joan M. Safford
Any site for a snow shelter needs to have, in addition to snow, subfreezing temperatures. Avoid building a snow shelter when the temperature allows melting, because the snow will be too weak and too heavy. The conditions that make a site safe and comfortable for a snow shelter are generally the same as those described in the beginning of this chapter. Wind, however, is not as big of a problem with a snow shelter, so a more open spot can be chosen. Specific conditions required for each type of snow shelter are discussed on pages 251 to 252.
Whatever type of shelter you choose, start small and simple. Smaller shelters take less work and, more importantly, tend to be stronger. With the same wall thickness, for instance, a small sphere is stronger than a large sphere, not only because the walls are fatter in relation to the space they enclose, but also because smaller spheres have sharper angles, which makes for stronger structures. The type of shelter you choose also depends on the type of snow:
Drifted snow—snow cave or digloo
Wind slab—igloo
Deep, soft snow—quinzhee
Shallow, soft snow—quinzhee
Wet snow—tent or tarp
—From NOLS Winter Camping
When selecting a campsite, make sure its location allows you to easily meet your other survival needs. The environment, materials on hand, and the amount of time available will determine the type of shelter you choose. The ideal site will meet the following conditions.
Your site should be level and big enough for both you and your equipment. If close to shore, make sure it is above the high-tide mark and at least one dune shoreward beyond the sea.
Position the shelter for a southern exposure if it’s north of the equator or a northern exposure if south of it. This allows for optimal light and heat from the sun throughout the day. Try to position the door so that it faces east, since an east-side opening will allow for the best early-morning sun exposure.
Since wind can wrap over the top of a tent and through its opening, do not place the door in the path of or on the opposite side of the wind’s travel. Instead, position the door 90 degrees to the prevailing wind. Avoid shelter on ridgetops and open areas. When setting up your tent, secure it in place by staking it down. It doesn’t take much of a wind to move or destroy your shelter.
If you are in snow, dig down to bare ground whenever possible. The ground’s radiant heat will help keep you warmer at night.
To avoid having to melt snow or traveling for water, build your shelter 100 feet or so from a stream or lake, if you can find one.
Avoid sites with potential environmental hazards that can wipe out all your hard work in just a matter of seconds. Examples include avalanche slopes; drainage and dry riverbeds with a potential for flash floods; rock formations that might collapse; dead trees that might blow down; overhanging dead limbs; and large animal trails. If you are near bodies of water, stay above the high-tide mark.
During an emergency, make sure your camp is located next to a signal and recovery site.
—From Surviving Coastal and Open Water
Greg Davenport
The majority of tents are made of nylon and held up with aluminum poles. Tents need to be waterproof and breathable—waterproof to prevent moisture from entering from the outside, and breathable to avoid condensation formation on the inside. Nylon is not waterproof, so some manufacturers use a breathable waterproof coating or a breathable laminated waterproof membrane for the tent’s inner wall. Both of these options allow moisture to escape but prevent outside moisture from entering. If an outer wall is used, this is not necessary. To make the outer wall water repellent, a polyurethane coating is often added. Some tents come with UV protection and even have a fire-retardant finish. The tent’s seams will either have a tape weld or require that you apply a seam sealant before its first use. Follow the manufacturer’s recommendations on how to seal the tent’s seams. A tent’s poles need to be durable enough to handle the wind and snow without bending or breaking. For general use, get poles that have a diameter of 8.5 millimeters. For extreme conditions, use a 9-millimeter or greater pole to add more durability to the tent’s frame.
A tent’s size, strength, and weight will all factor into your decision on which one to use. A tradeoff between weight and strength is often foremost in people’s minds. When choosing a tent, you’ll have to decide which is more important: less weight on your back or more durability and comfort in camp. I’d advise against a single-walled tent, unless it has multiple vents that can be opened to prevent inner condensation moisture. A double-walled tent provides a breathable inner wall and an outer waterproof rain fly. Since moisture from inside the tent will escape through the breathable wall and collect on the inside of the rain fly, the two walls should not touch, or the moisture will not escape and condensation will form inside the tent. The ideal rain fly will allow for a small area of protection—between the door and outside—commonly called a vestibule. This area allows for extra storage, boot removal, and cooking. For information on zippers, see page 288.
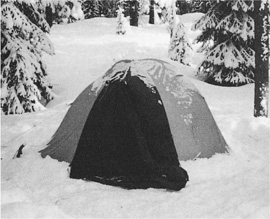
Commercial tent.
Most tents are classified as three-season or four-season tents. There are also combo tents that can be used as either.
Three-season tents are normally lighter and often have see-through mesh panels, which provide ventilation.
Four-season tents are made from solid panels and in general are heavier and stronger. Typically, they have stronger poles and reinforced seams.
Some tents are marketed to be used in either three or four seasons by providing a solid panel that can be zipped shut over the ventilating mesh.
The original concept of bivouac bags was to allow the backpacker or mountaineer an emergency lightweight shelter. However, even though these shelters are made for just one person, many travelers now carry them as their primary three-season shelter. A good bag will be made from a breathable waterproof fabric such as Gore-Tex or Tetra-Tex, with a coated nylon floor. A hoop or flexible wire sewn across the head area, along with nonremovable mosquito netting, is advised for comfort and venting when needed.
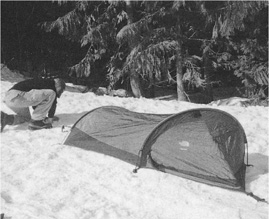
A bivouac.
—From Surviving Cold Weather
Greg Davenport
Illustrations by Steven Davenport and Ken Davenport
A poncho or tarp is a multiuse item that can meet shelter, clothing, signaling, and water procurement needs. Its uses are unlimited, and you should take one along on most outdoor activities. The military ripstop nylon poncho measures 54½ by 60 inches and features a drawstring hood, snap sides, and corner grommets.
Don’t waste your money or risk your life carrying one of those flimsy foil emergency blankets. Instead, carry a durable, waterproof, 10-ounce, 5 by 6-foot all-weather blanket. These blankets are made from a four-ply laminate of clear polyethylene film, a precise vacuum deposition of pure aluminum, a special reinforcing fabric (Astrolar), and a layer of colored polyethylene film. The blanket will reflect and help retain more than 80 percent of the body’s radiant heat. In addition to covering the body, these blankets have a hood and inside hand pockets that aid in maintaining your body heat. When compressed, these blankets take up about twice as much space as the smaller foil design, but the benefits far outweigh the size issue. The all-weather blanket is a multiuse item that can double as an emergency sleeping bag, signal, poncho, or shelter.
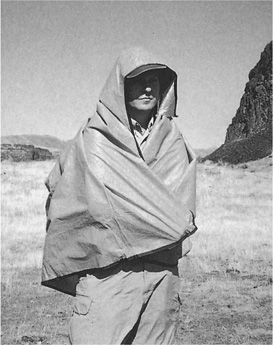
Emergency all-weather blanket.
In desert regions, it may be difficult to drive a stake into the ground or find underbrush necessary to put up a shelter or improvise items to use in your camp. To compensate for these problems, carry along several pieces of 2-foot-square ripstop material and para cord. To make an anchor, attach three or four pieces of 2-foot line to a piece of the material in various locations, and tie the lines’ free ends together with an overhand knot. Attach another line to the overhand knot, and run it to your shelter. Fill the material with sand, and place it so that it holds the shelter in place at the desired location. Use as many anchors as needed to hold the shelter securely.
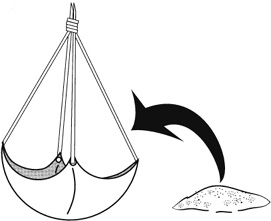
An improvised anchor helps you secure a shelter in place.
Many types of sleeping bags are available, and the type used varies greatly among individuals. There are several basic guidelines you should use when selecting a bag. The ideal bag should be compressible, have an insulated hood, and be lightweight but still keep you warm. Most manufacturers rate their bags as summer, three-season, or winter expedition use and provide a minimum temperature at which the bag will keep you warm. This gross rating is used as a guide and should help you select the bag that best meets your needs. Sleeping bag covers are useful for keeping your bag clean and add an extra layer of insulating air. How well the bag keeps you warm depends on the design, amount and type of insulation and loft, and method of construction. When selecting a bag, don’t forget that deserts can get very cold at night. I’d advise against bags that have a minimum temperature rating higher than 20 degrees F.
Without question, the hooded, tapered mummy style is the bag of choice for all conditions. In cold conditions, the hood can be tightened around your face, leaving a hole big enough for you to breathe through. In warmer conditions, you may elect to leave your head out and use the hooded area as a pillow. The foot of the bag should be somewhat circular and well insulated. Side zippers need good, insulated baffles behind them.
Sleeping bags will use either a down or synthetic insulation material.
DOWN
Down is lightweight, effective, and compressible. A down bag is rated by its fill power in cubic inches per ounce. A rating of 550 is standard, with values increasing over 800. The higher ratings provide greater loft, meaning a warmer bag. The greatest downfall to this insulation is its inability to maintain its loft and insulating value when wet. In a desert climate, this may not be an issue, so down bags are an excellent, albeit expensive, option.
SYNTHETIC INSULATION
Synthetic materials provide a good alternative to down. Their greatest strength is the ability to maintain most of their loft and insulation when wet along with the ability to dry relatively quickly. On the flip side, they are heavier and don’t compress as well as down. Although cheaper than down, they tend to lose loft more quickly over long-term use. Lite loft and Polar-guard are two great examples of synthetic insulation. If you are traveling in a desert area during its rain season, it is best to carry this type of bag.
METHOD OF CONSTRUCTION
Insulation material is normally contained in baffles, tubes created within the bag. There are three basic construction designs for sleeping bags: slant tube, offset quilt, and square box. Each design has its benefits, and the type you choose depends on many factors, including weight, temperature, and compressibility. However, the slant tube and offset quilt are more comfortable and provide better from the ground.

Sleeping bag construction designs.
Understanding the basic bag design is the key to improvising a bag in a time of crisis. I once made a bag using ripstop parachute material, dry leaves, and moss.
A blanket can be used to increase the insulating ability of your lightweight sleeping bag or carried as emergency gear when taking day hikes in the desert.
A fleece blanket is soft, comfortable, and durable, and some say it provides more warmth for its weight than wool. The biggest drawbacks are its inability to repel wind and its lack of compressibility.
This lightweight quilted blanket measures 91 by 60 inches and can be used in emergencies and for general survival needs. The newer lightweight Thinsulate blanket provides superior warmth and can be compressed down 25 percent smaller than its predecessor, which was made from polyester.
A sleeping pad is essential for insulating you from the ground. Most commercial pads are closed-cell or open-cell foam or a combination of the two. Each style has its pros and cons.
These pads provide excellent insulation and durability but are bulky to carry. They may or may not have an outer nylon shell covering.
These pads are often self-inflating, using a high-flow inflation valve. Their ability to compress and rebound makes them ideal when space is a concern. Open-cell foam pads are usually covered with a durable, low-slip polyester fabric.
If you don’t have a pad, you can improvise one using boughs, moss, leaves, or similar dry materials. Made an 18-inch-high mound that is large enough to protect your whole body from the ground.
—From Surviving the Desert
Buck Tilton and John Gookin
Illustrations by Joan M. Safford
One of the most rewarding parts of winter camping is getting to bed down at night in a well-made winter camp. If you’re a camper—winter-wise or not—you already appreciate the value of choosing the perfect spot to set up camp. Beyond a great view in a peaceful place, “perfect” here means safe and comfortable. And in winter, fewer daylight hours mean longer nights, so you’ll be spending more time in camp than you do in other seasons—and thus enjoying your choice of sites longer.
Safety considerations require a careful look around and up. If your campsite is anywhere beneath an avalanche slope, measure the alpha angle—the angle from your site to the highest avalanche starting zone above you. An alpha angle of twenty degrees or higher is too close for comfort. For hard glacial ice, use fifteen degrees. Also look out for “widowmakers,” large dead limbs or whole dead trees that could fall from old age, a load of snow, a high wind, or some combination of factors. Camp away from cliff edges that someone might stumble off of, and avoid cliff bottoms, where sliding rocks or snow could come to rest.
Unless you’re very confident of the weather forecast, you should also evaluate your campsite with respect to a storm. If a blizzard drops a load of snow, will you be able to leave your camp in safety? If nearby slopes, now lightly dusted with snow, become heavily laden, could they become avalanche-prone?
With deep snow cover, the choice of sites becomes, in some respects, easier. You don’t need a flat spot, because you can make one. You don’t need to avoid logs, roots, and rocks, because they’re buried. You don’t need a water source (although a source of liquid water is a major score), because you can melt snow.
Whether the landscape is frozen or not, avoiding human pollution of natural water sources must be a high priority. Winter camps must not leave trash, gear, food, or spilled fuel behind. The snow will eventually go away, but your garbage will remain. Set your camp at least 200 feet (about 70 adult paces) from springs, streams, rivers, ponds, and lakes. In some areas, out of a desperate need to preserve water quality and the overall quality of the wilderness experience, land managers have established regulations that require camps to be located an acceptable distance from water sources.
Wind, often a blessing on a bug-ridden summer day, tends to be a curse in winter. Gusty winds can rattle ice-stiffened tent walls throughout the night, keeping you awake. Windblown snow can bury the door of the tent, and it may find its way through the tiniest opening to drift across your bedroom. If the view from an open ridge is irresistible, hope for a calm night. Better yet, choose a site out of the wind or the possibility of wind. The lee side of a broad ridge may be a good choice, as long as you stay off slopes that could avalanche. A site behind natural windbreaks—a thick stand of trees, a large rock, a rise in the ground—is another possibility, but remember that windbreaks create natural snowdrifts roughly five times longer than the breaks are high. In the open, you can build a windbreak around your shelter.
Choose higher or lower campsites based on the weather and temperature. Calm, cold air sinks, keeping the upper end of a valley slightly warmer than the lower end. On blustery nights, however, higher ground may catch the wind and be colder than lower, protected sites. Always avoid the lowest ground in the area, such as a valley bottom, where the frosty air will settle overnight. If possible, select a site that will catch the early-morning sun, adding many degrees of joy to your own rising. Atop a knoll protected by trees is often an excellent spot.
Unless the snowpack is unusually dense—dense enough to support your weight—you’ll need to ski-pack a platform for your tent. Wearing your skis, walk back and forth over an area about twice the size of the “footprint” of the tent until the snow is firmly packed. The extra space compressed around the tent will come in handy: you can set up the tent more easily, since you won’t have to wear your skis, and you’ll have room to move around outside the tent without putting on your skis.
It’s going to be an hour—more or less—before the snow platform sinters enough to walk on it without skis. Use this time to ski-pack a route to the latrine areas and a water source, and a platform for your snow kitchen.
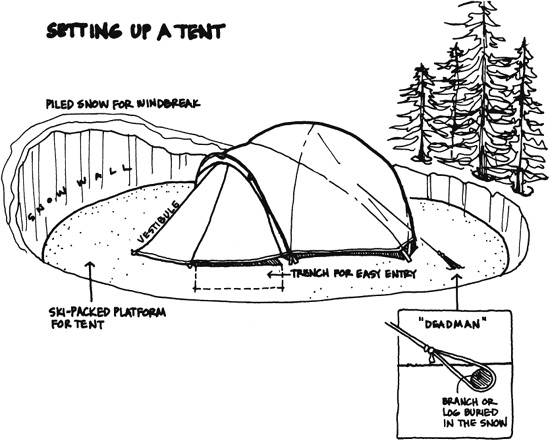
Consider building a snow wall on the windward side of the tent as a windbreak, or all around the tent if the wind doesn’t come steadily from one direction. For maximum effectiveness, the windbreak must be close to the tent. When the winds are severe and a sheltered spot is unobtainable, dig down into the snow a couple of feet before stomping out the tent platform. This will provide some protection from the wind while you’re building the platform and more protection for the tent.
Pitch your tent with a low end toward the wind and the door at a ninety-degree angle to the wind, if possible. High wind or a snow load can put tremendous pressure on the nylon, so pitch the tent as tightly as possible. A tightly pitched tent is at its strongest. Stake the tent out snugly at all possible points. Stretch it tight via the reinforced points that allow taut lines.
Setting stakes in winter requires a particular technique. The stakes need to be pushed deep, and the snow should be allowed to sinter around them. Even then, stakes might melt out over time, and the tent will lose its tautness. You can use skis, poles, and ice axes, if you don’t need them for their intended purposes, as stakes to provide greater stability.
Snow also allows the possibility of staking out the tent with a few deadmen. If possible, use a stick one to two feet long as a deadman. Buried gear—like a stuff sack filled with snow—also works, but it can be hard to dig back out after a night or two of sintering. To set a deadman, tie it with at least a couple of feet of cord to a stakeout point on the tent. The cord should be looped around the deadman, with the knot—a taut-line hitch, ideally—far enough from the deadman that it will be above the snow when placed; this will allow for tightening later on. Stomp aggressively into the snow with your booted foot at the appropriate distance. Set the deadman in the bottom of the stomped hole and fill the hole with snow. Then stomp on the surface to help it set. You should place all of your deadmen and let them sinter before tightening any of them.
If a strong wind whips through camp before the tent is set, the procedure is more problematic. Securely stake out the upwind side of the tent before placing any of the tent poles. If the tent has a fly, it is less likely to become a kite if someone holds on to it while someone else attaches it to the tent. Holding the fly down during a strong wind also helps minimize the tangle of knots in the lines attached to the fly.
Whether you’re using a simple or pyramid-shaped tarp, the differences between tarp camping and tent camping are minimal. First, stomp out a platform and let it work-harden. Hang and secure the tarp at a steep angle—you definitely want the snow to slide off rather than build up. Once the tarp is hung between trees, dig out the snow from underneath to give yourself more living space and protection from wind. If you bevel the sides of the space beneath the tarp, cutting into the snow away from the living space, you can add even more room. Pack the dug-out snow into the spaces around the edges of the trap, especially if it has open ends, to enclose your living space. You’ll end up with a nice room roofed with the tarp.
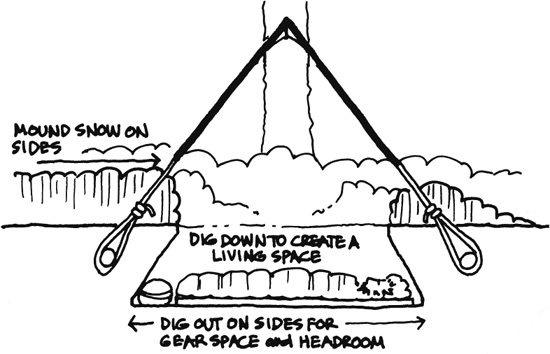
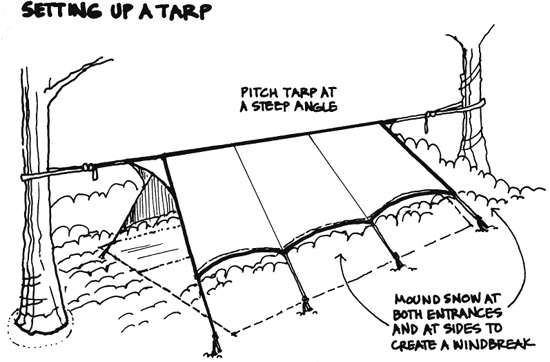
In addition to sleeping in a safe spot, you need to sleep warm. The basic idea, says Shannon Rochelle, NOLS winter camping instructor, is to “enter your bag as warm and dry as you can be.” Here are some tips:
• Eat a hearty dinner, with plenty of fat, and drink lots of fluids before retiring. You need the fuel and fluids to burn during the long, cold night.
• Warm yourself up before you bed down. Go for a walk, ski, shovel some snow, do sit-ups or push-ups. You don’t want to enter your bag sweaty, but you do want to be toasty.
• Before crawling into the shelter, brush the snow off your clothing and boots (some people use a small whisk broom for this job). Don’t take any unnecessary moisture into the shelter.
• Remove your clothing down to the layers you’ll sleep in. The more layers you wear to bed, the better insulated you’ll be. You are seeking a balance, however. Too much clothing compresses the dead air space, reducing your insulation. Too little clothing may let the chill in. And be sure to sleep in loose-fitting clothing: tight clothing reduces circulation.
• Replace any damp layers of clothing with dry layers. Take special care to sleep in dry socks. If your feet tend to get cold, wear down or synthetic booties, or shove your feet into a pile jacket or sweater.
• Sleep in a comfortable cap or a balaclava. The brain will sacrifice the rest of the body to save itself, so don’t give it a reason.
• Place slightly damp clothing in your sleeping bag, near the trunk of your body, to dry overnight.
• Place extra dry layers of clothing inside your sleeping bag, if there’s adequate room. They can also be shaped into a comfy pillow. Put outer layers that you aren’t wearing between you and the ground for insulation. If the outer layers are relatively dry, put them between your sleeping bag and your top sleeping pad. If they’re damp, put them between your sleeping pads.
• To prevent freezing, place leather boots and boot liners in your sleeping bag’s stuff sack (turned inside out), and place the stuff sack between your legs.
• Put a full water bottle and a snack in your sleeping bag in case you need to fire up the internal furnace during the night. Or keep an insulated container of hot, sweet tea or chocolate in your tent. Be sure to distinguish the water bottle from the pee bottle.
• Sleep with your face out to prevent the moisture of respiration from building up in your bag. Wear a scarf around your neck or a neck gaiter rather than cinching up the drawcord of a mummy bag around your head.
• You’ll probably wake up several times during the night, to urinate or just to change position. This is normal in cold weather. Don’t waste energy trying to fight the urge to urinate. Moving around gets your circulation stirred up, generating a bit of heat.
• Do a few sit-ups or stretches while still in your bag. This generates a little body heat before you expose yourself to the cold.
• Dress quickly to prevent loss of body heat. Put on your boots while they and your feet are still warm from the bag. It’s much more efficient to maintain body heat than to generate it.
• Get the stove going, and stoke the internal furnace. There’s nothing like a hot drink and a hot breakfast to ease the stress of the cold. Try to drink at least a quart of liquid. Consider cooking extra food and packing it for a quick lunch.
• Move your stuff outside. Hang clothing that still feels damp on tree limbs or ski poles. Hang your sleeping bag inside out between your skis stuck in the snow. The outside air is generally drier than the air inside the shelter, and the drier the air, the faster your things will dry out.
• If you have a tent, pull the stakes (unless the wind is whipping through camp) and turn the tent on its side to allow the bottom to dry before packing it. Don’t pack or haul any more weight than you need to.
• Use teamwork to help speed up the morning chores: have some people cook while others pack.
—From NOLS Winter Camping
U.S. Department of Agriculture, Forest Service
Choose a campsite away from popular places for more solitude and privacy. Try to camp 200 feet or more from lakes, streams, meadows, and trails when you have a choice. There will be less chance of damage to fragile areas.
Select campsites in your local area that are designated or already well established. This will concentrate impacts in already disturbed places. Try to confine most activities to areas of the site that are already bare.
When camping in pristine places, disperse your activities and use extra care. Space the tents, kitchen, and latrine, and try to avoid repeated traffic over any area. Before leaving camp, naturalize the area by replacing rocks and scattering leaves and twigs around the site.
The best campsites are generally found on ridges, hills, or near canyon walls. These areas provide natural drainage so your camp will not flood. To hide it from view, arrange your campsite around trees, rocks, and shrubs. Beware of hazard trees, avalanche areas, potential hazards from falling rocks, or flash-flood sites.
Never ditch or build trenches around your tent because they can start soil erosion and create lasting scars. Limit your stay to as few nights as possible to avoid waste accumulation and injury to plants. One night in each campsite is best and will make it easier to Leave No Trace! of your visit when you depart.
Remember:
• Select a campsite 200 feet or more from trails, lakes, streams, and wet meadows.
• Hide your campsite from view.
• Don’t dig ditches around the tents.
• Stay as few nights as possible in one place.
• Use designated or already impacted campsites when appropriate.
—From Leave No Trace!: An Outdoor Ethic
Greg Davenport
Illustrations by Steven A. Davenport
A log cabin is a long-term shelter that is most often used in cold and temperate climates. The logs provide a safe, stable, and insulated structure that delivers excellent protection from the elements. These structures can be built with an A-frame or lean-to-style roof. If you are alone and/or resources are limited, however, I recommend a lean-to roof design. When selecting logs to use, make sure the weight is not unmanageable. If alone, a log with a diameter of 6 inches or less is advised. The length of each log depends on your shelter size and on which wall it is going to be used.
Since the logs are not notched you will need to provide a framework that will hold them in place. Gather fourteen strong 8- to 10-foot poles. At each of the four corners bury three of the poles (twelve total poles used) 8 to 12 inches into the ground and tap dirt around them to help hold them in place. Two feet to the left of the front right corner place two more poles. The 2-foot area will become your doorway. Note: All support poles are placed so they can hold the horizontal logs that create the shelter’s wall.
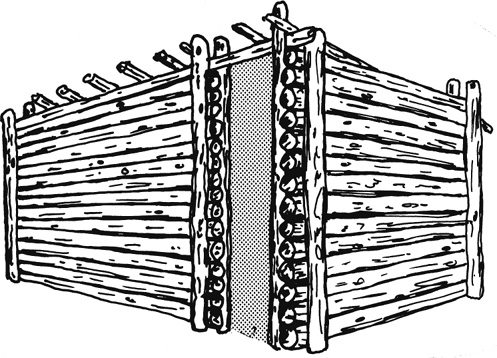
Log cabin shelter.
Building a log cabin that doesn’t use notching requires the use of vertical poles to support the walls.
Once all the support poles are in place, stack the logs between them. Use a moderate amount of straw-and-mud mortar to help hold them in place and seal up any openings.
A straw-and-mud mortar can be made by thoroughly mixing an equal amount of mud with a fibrous material like dry grass, straw, or ferns. Once dry, the mixture acts like extremely strong glue.
The back wall should be about 5 to 6 feet high and the front wall about 7 to 8 feet high. Run a log over the front wall and doorway so the sidewalls support it. Finish the walls by applying generous amounts of mortar inside and out.
Roof the shelter by placing logs side by side (perpendicular to the doorway) until it is covered. Fill in all openings with your mud mortar and cover it with boughs, sod, brush, or duff. If you intend to build a fire inside, make sure you provide an adequate ventilation hole that can be opened and closed. The door can be covered with any appropriate material or you may choose to build a wooden one out of your available resources.
The sod shelter is most common in areas where there is a lack of trees. Sod is soil that has a strong root structure of grass or various vegetation holding it together. Sod can be used to build any number of shelter types—from a sod igloo to a small rectangular house. In most instances the sod is cut into 6- by 18-inch pieces of turf and laid in place like one might use a brick or block of packed snow. The roof will need a support structure stronger than the existing sod walls. Gather four poles that are approximately 10 feet long and vertically bury them 8–12 inches—one at each of the shelter’s four corners. Tap dirt around them to make them more secure. Next, lash a pole to the top of the front two poles and another to the top of the back poles. Use the horizontal poles as the basic support structure for the roof. The roof may consist of poles laid side by side and lashed together, mats, thatching, or sod.
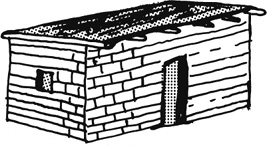
Sod shelter.
Since the shelter you build will become your home, creating an area for fire is important. The fire provides light, heat, cooking, and entertainment. If not used wisely, fire can cause burns and may even kill you. Before lighting any fire in your shelter, ensure there is enough ventilation to allow the smoke to escape and help prevent asphyxiation. A good fire pit is normally placed between the door and the center of the shelter. This location allows the back of the shelter to be used. For best results, dig a 2- to 3-foot circular fire pit that is approximately 8 inches deep and line the bottom and sides with stones. Caution: Be sure not to use stones from riverbeds or those that appear to retain moisture. The stones will hold the fire’s heat, help prevent sparks from flying across the shelter and onto your sleeping mat, and ensure adequate oxygen circulates under the fire. To decrease the smoke within your house, use wood that is less apt to smoke—dry, without bark or lichen, and pitch free.
—From Wilderness Living