Greg Davenport
Illustrations by Steven A. Davenport
Clothing is your first line of defense against the environment. In cold weather, your clothing insulates you, keeping you warm; in hot weather, proper clothing helps keep you cool.
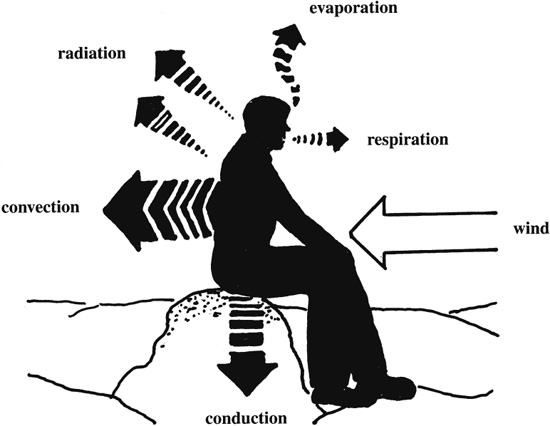
The body is constantly regulating itself in an attempt to keep its thermostat approximately between 97 and 99 degrees F. As heat is lost through radiation, conduction, convection, evaporation, and respiration, you’ll need to adjust your clothing to help maintain your body’s core temperature.
Heat transfers from your body into the environment through the process of radiation. The head, neck, and hands pose the greatest threat for heat loss due to radiation. Increased clothing will slow the process but doesn’t stop it from occurring.
Heat is lost from the body through conduction when it comes in contact with any cold item. This poses a significant problem when clothing is soaking wet, and in such circumstances, you should remove and change the clothes or wring out as much moisture as possible.
Similarly to radiation, convection is a process of heat loss form the body to the surrounding cold air. But unlike radiation, convection would be absent if you were standing completely still and there was absolutely no wind. The wind and your movements cause you to lose heat from convection. Wearing clothes in a loose and layered fashion will help trap the warm air next to your body, which in turn decreases the heat lost from convection and also insulates you from the environment.
Heat is lost through the evaporation process that occurs with perspiration. Monitoring your activity to ensure that you avoid sweating helps. If you are inactive, layered clothing will trap dead air; this will decrease the amount of heat lost through evaporation and actually keep you warmer.
HEAT LOSS

Heat is lost through the normal process of breathing. To decrease the heat lost by breathing in cold air, cover or encircle your mouth with a loose cloth. By doing this, you will trap dead air and allow it to warm up slightly prior to breathing it in.
How well you adjust to heat loss depends on how well your clothes insulate you. Most clothing materials are made of intertwined fibers, which create spaces that trap dead air. Clothes made of down trap air between the feather fibers. As the body loses heat, it is trapped inside the dead air space, and that’s how clothes keep you warm. The clothing you select to take on a trip should not only protect you from cold and wet conditions but also provide the breathability needed to avoid overheating. Winter clothes are made from many materials, both natural and synthetic. When choosing clothing for cold climates, it’s helpful to understand the characteristics of these materials.
COTTON
Cotton has been nicknamed “death cloth,” since it loses almost all of its insulating quality when wet. Wet cotton will absorb many times its weight, has extremely poor wicking qualities, and takes forever to dry.
DOWN
Down is a very good lightweight, natural insulating material. Like cotton, however, down becomes virtually worthless when wet, the feathers clumping together and no longer trapping dead air. The material is best used in dry climates or when you can guarantee it won’t get wet.
WOOL
Wool retains most of its insulating quality when wet. Wool also retains a lot of the moisture, however, making it extremely heavy when wet. Wool is also fairly effective at protecting you from wind, allowing it to be worn as an outer layer. Its main drawbacks are its weight and bulkiness.
POLYESTER AND POLYPROPYLENE
As a wicking layer polyester and polypropylene wick well, maintain their insulating quality when wet, and dry quickly. As an insulating layer, these fabrics are lightweight and compressible. They are not very effective at protecting you from the wind, however, and are best accompanied by an outer shell. Common examples of polyester used for the insulating layer are polyester pile and fleece.
POLARGUARD, HOLLOFIL, AND QUALLOFIL
Although these synthetic fibers are most often used in sleeping bags, they can also be found in heavy parkas. Polarguard is composed of sheets, Hollofil of hollow sheets, and Quallofil of hollow sheets that have holes running through the fibers. Basically, Hollofil and Quallofil took Polarguard one step further by creating more insulating dead air space. As with all synthetic fabrics listed, these materials dry quickly and retain most of their insulation quality when wet.
THINSULATE, MICROLOFT, AND PRIMALOFT
These thin synthetic fibers create an outstanding lightweight insulation material by allowing more layers. Thinsulate is the heaviest of the three and is most often used in clothing. Microloft and Primaloft are extremely lightweight and are an outstanding alternative to the lightweight down sleeping bag, since they retain their insulation quality when wet.
Nylon is a common shell material often used in parkas, rain and wind garments, and mittens. Since nylon is not waterproof, most manufacturers use either special fabrication techniques or treatments to add the feature.
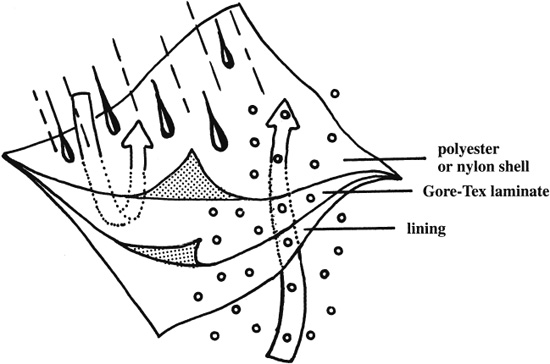
Waterproof breathable nylon.
Polyurethane coatings
These inexpensive lightweight coatings protect from outside moisture, but since they are nonbreathable, they don’t allow inside moisture to escape. Only use this type of outer garment when physical exertion is at a minimum.
Breathable waterproof coatings
When applied to the inside of a nylon shell, this coating leaves billions of microscopic pores that are large enough for inside vapors to escape yet small enough to keep raindrops out. These coats cost more than those with polyurethane, but less than those with a breathable laminated waterproof membrane.
Breathable laminated waterproof membrane
Instead of an inner coating, a separate waterproof and breathable membrane is laminated to the inside of the nylon. The membrane is perforated with millions of microscopic pores that work under the same principle as the waterproof coating. Gore-Tex is the most common example.
In order for the breathable fabrics to be effective, you’ll need to keep the pores free of dirt and sweat. In addition, only wash and dry them in accordance with the tag instructions, as some will be ruined if cleaned wrong. Finally, don’t expect these breathable coats to be perfect. If your heat output is high and you begin to sweat, this moisture cannot escape any more than the rain can get in. To prevent this, you’ll need to wear your clothing in a loose and layered fashion.
An acronym that can help you remember how to care for and wear your clothing is COLDER.
CLEAN
Clothes are made of intertwined fibers that, when clean, trap dead air that works as insulation to keep you warm. If clothes are dirty, they lose their ability to insulate you.
AVOID OVERHEATING
Clothes either absorb or repel sweat, causing them to lose their insulating quality or make you wet. In addition, when you become overheated, you lose valuable body heat through evaporation.
LOOSE AND LAYERED
Clothing that is too tight will constrict circulation and predispose you to frostbite. Wearing multiple layers increases the amount of dead air space surrounding the body. It also allows you to add or remove individual layers of clothing as necessary for the given weather conditions. The ability to take a layer off or add it back when needed allows you to avoid getting too cold or overheating by adapting to the climate and the amount of work you are doing. I normally wear three layers: one that wicks moisture away, an insulating layer, and an outer shell.
Perspiration and moisture wick through this layer, keeping you dry. This is a very important layer, since having wet clothes next to the skin causes twenty-five times greater heat loss than dry ones. Polyester and polypropylene are best for this layer. Cotton is not recommended.
This layer traps warm air next to the body. Multiple insulating layers may work better than one, as additional air is trapped between them. The best fabrics for this layer are wool, polyester pile, compressed polyester fleece, Hollofil, Quallofil, Polarguard, Thinsulate, Microloft, and Primaloft. Down can be used in dry climates or when you’re sure it won’t get wet. Sometimes I wear two middle layers, creating another dead air space and providing a finer ability to adjust my layers.
This layer protects you from wind and precipitation. The ideal shell will protect you from getting wet when exposed to rain or snow but has enough ventilation for body moisture to escape. Best for this layer are waterproof coatings that breathe or laminated waterproof membranes that breathe (Gore-Tex). Headgear and gloves are a must, as one-third to one-half of body heat loss occurs from the head and hands.
DRY
Wet clothes lose their insulating quality. To keep the inner layer dry, avoid sweating. Protect your outer layer from moisture by either avoiding exposure to rain or snow or by wearing proper clothing as described above. If your clothes do become wet, dry them by a fire or in the sun. If it’s below 32 degrees F and you can’t build a fire, let the clothes freeze; once frozen, break the ice out of the clothing. If snow is on your clothes, shake it off; don’t brush it off; as this will force the moisture into the fibers.
EXAMINE
Examine your clothing daily for tears and dirt.
REPAIR
Repair any tears as soon as they occur. This may require a needle and thread, so make sure you pack them.
A parka and rain pants are needed for protection from moisture and wind. They will normally be made from nylon with a polyurethane coating, a waterproof coating that breathes, or a laminated waterproof membrane that breathes (Gore-Tex). In some cases, a parka will come with an insulating garment that can be zipped inside. Besides the material, there are other criteria to consider when choosing these garments:
APPROPRIATE SIZE
These garments should be big enough that you can comfortably add wicking and insulating layers underneath without compromising your movement. In addition, the parka’s lower end should extend beyond your hips to keep moisture away from the top of your pants.
DUAL SEPARATING ZIPPERS
Look for zippers that separate at both ends.
VENTILATION ADJUSTMENT
Parkas should have openings for ventilation in front, at your waist, under your arms, and at your wrist. For rain pants, the openings should be located in the front and along the outside of the lower legs, extending to about mid-calf, making it easier to put on or remove your boots. For females, there are pants available with a zipper that extends down and around the crotch. The added benefit is obvious. These openings can be adjusted with zippers, Velcro, or drawstrings.
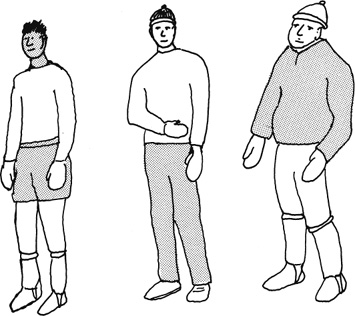
Layers of clothing.
Seams should be taped or well bonded, or they will allow moisture to penetrate through the clothing.
ACCESSIBLE POCKETS
What good is a pocket if you can’t get to it? In addition, make sure the openings have protective rain baffles.
BRIMMED HOOD AND NECK FLAP
A brimmed hood will help channel moisture away from the eyes and face. In addition, a neck flap will help prevent radiant body heat loss from the neck area.
Boots are a very important part of your clothing. Always choose the right type for your needs, and break the boots in before your trip. When selecting boots, consider the type of travel you intend to do. I have four styles that I use, and each serves a different purpose. They are leather, lightweight leather/fabric, plastic, and rubber.
LEATHER BOOTS
Leather boots are ideal all-purpose boots. A stiff upper provides protection for the ankle, and a hard sole will help when kick-stepping and technical climbing. For extreme conditions, you’ll need to treat them with a waterproofing material (read the manufacturer’s directions on how this should be done) and wear a comfortable, protective wool-blend sock. Another popular option in leather boots is an added Thinsulate and Gore-Tex liner, which helps protect your feet from the cold and moist conditions. If you elect to use Thinsulate or Gore-Tex, be sure you follow the manufacturer’s directions explicitly on how to care for and treat the boots. If oils soak through the leather and into the lining, they will nullify their insulating qualities.
LIGHTWEIGHT LEATHER/FABRIC BOOTS
The lightweight leather/fabric boot is a popular fair-weather boot, since it is lighter and dries faster than the leather boot. On the downside, moisture easily soaks through the fabric, these boots provide less stability for your ankle, and on difficult terrain, they are not rigid enough for a good kick-step and not generally hard enough to be worn with crampons or snowshoes.
PLASTIC BOOTS
Plastic waterproof boots are ideal when traveling on hard snow and when conditions require kick-stepping or crampon use for long periods of time. This extremely stiff boot has a removable inner insulating boot that can be quickly dried. Although your feet will get hot and sometimes the liner will get wet from perspiration, the heat will be trapped by the plastic, keeping your feet warm.
RUBBER BOOTS
Rubber boots are most often used for nontechnical extreme cold-weather conditions. They normally have nylon uppers with molded rubber bottoms and removable felt inner boots. As with the plastic boots, the inner boots can be easily removed and dry quickly.
Keeping your boots clean will help them protect you better. For leather and lightweight leather/fabric boots, wash off dirt and debris using a mild soap that doesn’t damage leather. For plastic and rubber boots, wash and dry the liners, and clean all dirt and debris from the outer boots.
Socks need to provide adequate insulation, reduce friction, and wick away and absorb moisture from the skin. Socks most often are made of wool, polyester, nylon, or an acrylic material. Wool tends to dry more slowly than the other materials but is still a great option. Cotton should be avoided, as it loses its insulating qualities when wet. For best results, wear two pairs of socks. The inner sock (often made of polyester) wicks the moisture away from the foot; the outer sock (often a wool blend) provides the insulation that keeps your feet warm. Gore-Tex socks are often worn over the outer pair during extremely wet conditions. Keep your feet dry, and change your socks at least once a day. If any hot spots develop on your feet, immediately apply moleskin before they become blisters.
When traveling in snow or wet conditions, you don’t want moisture to enter your boots over the top cuffs. Full-length gaiters will help prevent this from occurring by covering your lower legs from the boots’ lower laces to just above the calf muscles. Most gaiters are made of Gore-Tex or a similar breathable material that is waterproof yet allows perspiration to escape. Gaiters are often held together with Velcro, snaps, or zippers. If the gaiters have zippers, make sure they are strong and have protective covering flaps.
Since a fair amount of heat is lost from the hands, it is best to keep them covered with gloves or mittens. Gloves encase each individual finger and allow you the dexterity to perform many of your daily tasks. Mittens encase the second through fifth fingers, decreasing your dexterity, but increasing hand warmth from the captured radiant heat. Which you should wear depends on your activity. To get the best of both worlds, I insert my gloved hands inside mittens. I remove just the mittens when I need to work with my hands. My gloves are made from a polyester fleece or a wool-synthetic blend. My mittens are made from a waterproof yet breathable fabric, like Gore-Tex.
Since over 50 percent of your body heat is lost through the head, you’ll need to keep it covered. There are many types of headgear, and your activity and the elements will dictate which one you choose. As a general rule, there are two basic categories: rain hats and insulating hats.
RAIN HAT
A rain hat is often made from nylon or an insulation material with an outer nylon covering. For added waterproof and breathable characteristics, Gore-Tex is often used. For extra protection, choose a hat that has earflaps, which can be used in extreme conditions.
INSULATING HAT
An insulating hat is made from wool, polypropylene, or polyester fleece. The most common styles of these are the watch cap and the balaclava. The balaclava is a great option, since it can cover the head, ears, and neck (front and back side), yet leaves an opening for your face.
Because so much heat is lost through the head, headgear should not be the first thing you take off when you are overheating. Mild adjustments—such as opening the zipper to your coat—will allow for the gradual changes needed to avoid sweating. In cold conditions, headgear should be removed only when other options have not cooled you down enough.
Goggles or sunglasses with side shields that filter out UV wavelengths are a must for travel in snow environments. It doesn’t take long to burn the eyes, and once this occurs, you will have several days of eye pain, along with light sensitivity, tearing, and a foreign body sensation. Since the symptoms of the burn usually don’t show up for four to six hours after the exposure, you can get burned and not even realize it is happening. Once a burn occurs, you’ll need to get out of the light, remove contacts if wearing them, and cover the eyes with a sterile dressing until the light sensitivity subsides. If pain medication is available, you’ll probably need to use it. Once healed, make sure to protect the eyes to prevent another burn. If no goggles or sunglasses are available, improvise by using either a man-made or natural material that covers the eyes, with a narrow horizontal slit for each eye.
Zippers on garments and sleeping bags often break or get stuck. Under mild conditions, this may not present a great problem. In a cold-weather environment, however, you can lose a lot of body heat when you are unable to close a zipper properly. To decrease the odds of zipper problems, your gear should have zippers with a dual separating system (separates at both ends) and teeth made from a material that won’t rust or freeze, such as polyester. Your zippers should also be waterproof. If they don’t have a baffle covering, apply a waterproof coating to the zipper’s backing. The latter option has the advantages of lighter weight and easier access to the zipper.
Ultraviolet (UV) radiation that reflects off snow and ice is very intense, and it can cause painful and potentially debilitating and sunburn during travel in a snow or ice environment. The best way to avoid this problem is to wear protective clothing. For skin that cannot be covered, use a sunscreen or sun-block. These products are available in various sun protection factor (SPF) ratings, which indicate how much longer than normal you can be exposed to UV radiation prior to burning. They work by absorbing the UV radiation. Sunblock reflects the UV radiation and is most often used in sensitive areas where intense exposure might occur, like the ears and nose. You’ll need to constantly reapply these products throughout the day, as their effectiveness is lost over time and due to sweating.
—From Surviving Cold Weather
Greg Davenport
Illustrations by Steven A. Davenport
When carrying an internal frame pack on a trail, organize your gear so that the heavier items are on top and close to your back. This method places most of the pack’s weight on your hips, making it easier to carry. If you’ll be traveling off-trail, organize the pack so that the heavy items are close to the back, from the pack’s top to its bottom. With this method, most of the pack’s weight is carried by your shoulders and your back, allowing you better balance.
The person breaking trail is working harder than anyone else, and this job needs to be switched at regular intervals between the members of a team. If in a team, set your pace distance so that it is comfortable for all members. Remember the COLDER acronym. If you have dropped layers of clothing and are still sweating, you’re going too fast.
When traveling in snow, kick-stepping will not only make your ascent easier, but it will also make it easier for those who are following you. Using the weight of your leg, swing the toe of your boot into the snow, creating a step that supports at least the ball of your foot if going straight up, or at least half of your foot if traversing. If you’re in a group and are leading an ascent using this technique, consider the strides of those who are following you. When going uphill, lean forward until your body is perpendicular to the earth’s natural surface—not that of the hill.
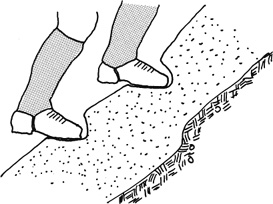
Kick-stepping.
Plunge-stepping is similar to kick-stepping, except that you are going downhill and kicking your heels into the slope rather than your toes. Slightly bend the knees, and lean backward until your body is perpendicular to the ground at the base of the hill—not the hill’s slope.
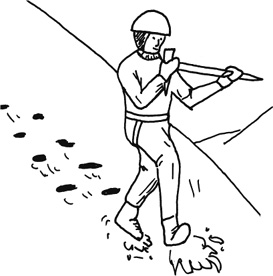
Plunge-stepping.
Traversing, or diagonal climbing, is a quick and easy method for getting up or down a hill. When traversing a hill, it may be necessary to slightly shorten your strides as the grade changes. It’s times like this that an adjustable pole would be nice. This same technique can be used to descend a hill.
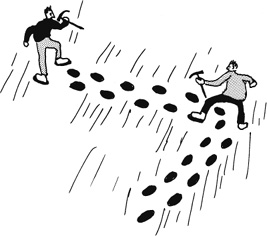
Traversing uphill.
When traveling in mountainous terrain, try to stay high on the ridgeline as much as you can. It is better to travel a little farther than to deal with the constant up-and-down travel associated with frequent elevation changes.
When walking uphill, use a rest step, which is done by locking the knee with each step. This process takes the weight off the muscle, allowing it to rest, and places it on the skeletal system. For best results, you’ll need to take a short pause with each step.
Cornices are usually formed on the downwind, or leeward, side of a ridge. This happens as a result of the wind blowing snow off and over the windward side of a cliff, depositing it on the downwind side. If you are approaching a peak from the windward side, you may not be aware that a cornice exists. Since wind patterns are similar throughout an area, take the time to look at the downwind side of other peaks in your location. Try to identify a cornice in advance, and stay well below its potential fracture line. If you’re unsure whether a cornice exists, keep your elevation well below the peak, going no higher than two-thirds of the way up the ridge. If approaching from the leeward side, look for wavelike formations that extend from the peak, and avoid these areas.
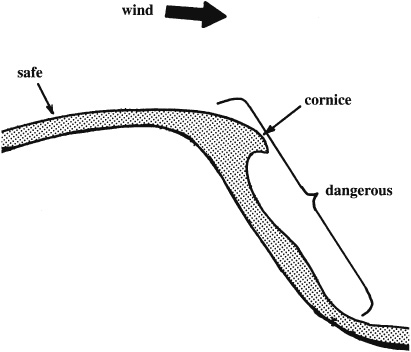
Cornice.
A glacier is basically a snow and ice river that forms over many years. It is created when snow is in a location that doesn’t allow it to melt before the next year’s snowfall. Each year, new layers are added to the top of the glacier, and it loses some of its lower portion as it melts away. The point at which it melts occurs where the glacier is low enough that no new snow can accumulate and the temperatures are high enough to cause melting. Crevasses are cracks in a glacier that result when a glacier stretches or bends too fast. They often run about 100 feet deep. On occasion, low-elevation glaciers will completely fracture at a crevasse, causing an ice avalanche, which can be deadly. These usually occur during late summer and early fall. Unless you have achieved specific training in glacier travel, you should avoid these areas. If no other travel option exists, cross close to the top, where the glacier is more stable.
Crossing a creek is often a problem during the winter. If it’s a small creek, loosen your pack’s shoulder straps, and undo your waistband so you can quickly remove the pack if you fall in. Try to cross at a shaded area where there is a large amount of snow and no water can be seen. Take off your skis or snowshoes, and use a pole to evaluate the snow’s depth and stability before taking each step. Cross one person at a time. For larger creeks where no bridge or road crossing is available, try to find a narrow area where passage is possible (you may need to travel upstream closer to the creek’s origin to find such a place).
Avoid crossing large bodies of ice—the risk associated with breaking through is too high. Always go around a lake. If approaching a river and you have no other choice but to cross, however, cross on the outside of a bend or at a straight stretch where the water is apt to be shallow. Avoid areas that have anything sticking up out of the ice, such as a log, stump, or rock, since radiant heat from the object will have weakened the ice directly next to it.
In snowy conditions, trees and rocks can present problems for the backcountry traveler. Steep-sided wells form around rocks and tree trunks, due to wind and the radiant heat that these objects produce. To avoid falling into these deep air pockets, avoid walking too close to exposed trees and rocks. Also, tree branches hoard snow, which gladly drops down the back of your neck when you pass by. When you have to pass under a tree, either shake the branches first or walk behind someone else.
—From Surviving Cold Weather
U.S. Army
Movement over snow and ice-covered slopes presents its own unique problems. Movement on steeper slopes requires an ice ax, crampons, and the necessary training for this equipment. Personnel will also have to learn how to place solid anchors in snow and ice to protect themselves during these movements if roped. Snow-covered glaciers present crevasse fall hazards even when the slope is relatively flat, requiring personnel to learn unique glacier travel and crevasse rescue techniques.
All the principles of rock climbing, anchor placement, belays, and rope usage…apply to snow and ice climbing as well. This chapter will focus on the additional skills and techniques required to move safely through snow-covered mountains and over glaciated terrain.
…on steep slopes in deep snow, the climber may climb straight up facing the slope. The ice ax shaft, driven directly into the snow, provides a quick and effective self-belay in case of a slip—the deeper the shaft penetrates the snow, the better the anchor. It is usually best, however, to climb snow-covered slopes in a traversing fashion in order to conserve energy, unless there is significant avalanche danger.
The progression from walking on flat terrain to moving on steep terrain is the same as for moving over snow-free terrain. If the snow is packed the sole of the boot will generally hold by kicking steps, even on steep slopes. Where it is difficult to make an effective step will the boot, a cut made with the adze of the ice ax creates an effective step. In these situations crampons should be used for faster and easier movement.
When descending on snow, one can usually come straight downhill, even on steep terrain. Movement downhill should be slow and deliberate with the climber using an even pace. The heels should be kicked vigorously into the snow. The body may be kept erect with the aid of an ice ax, which may be jammed into the snow at each step for additional safety. Here again, crampons or step cutting may be necessary. A technique known as glissading may also be used as an easy method of descent and is covered in detail later in this chapter.
Ice is found in many areas of mountains when snow is present, and during the summer months also where perennial snowpack exists. Many times an ice area will be downslope of a snow-field and sometimes the ice pack itself will be lightly covered with snow. Even if using an ice ax and or crampons, movement will still be difficult without proper training.
—From Military Mountaineering (Field Manual 3-97.61)
Greg Davenport
Illustrations by Steven A. Davenport
When traveling in mountainous regions where snow or ice is present, always take along an ice ax. When not in use, the ice ax should be snugly secured on your pack or carried in one hand—at the balance point—so that it is parallel to the ground, with the pick toward the ground and the spike facing forward. The ice ax should have a long lanyard, the length of your reach plus 6 inches, attached to your wrist.
When self-belaying with an ice ax, the ax is used as an anchor that supports and stops your descent down the hill should you fall. When using the ice ax as a self-belay device, hold it so that the palm is on top of the adze and the thumb and index finger hang—on opposite sides—over the pick. A self-belay hold is employed when the ice ax is used for an anchor and to help with balance.
When going diagonally up a hill, hold the ax perpendicular to the slope’s angle, one hand grasping the head while the other holds the shaft, which is jammed into the snow on the uphill side. Since the ice ax will cross in front of you, make sure the pick doesn’t point toward your body. While the ax is planted in the snow, take one step with each foot, secure and balance yourself, and then pull the ax free. Move it forward on the uphill side, and replant it into the snow.
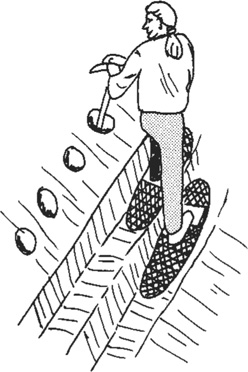
Using an ice ax to go diagonally uphill.
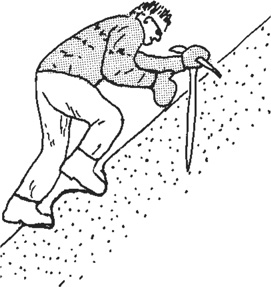
Using an ice ax to go directly uphill.
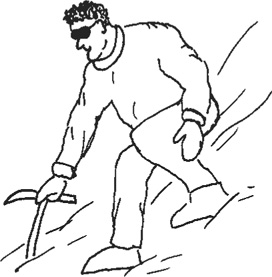
Using an ice ax to go downhill.
When going straight up a hill, always keep the ax on your uphill side, jam its spike deep into the snow’s surface, and take one step with each foot, using a kick step. Once you are secure in your new position, pull the ice ax free and move it uphill, replanting it deep into the snow’s surface, and repeat your two steps. Continue doing this until a belay is no longer needed.
When going straight down a hill, hold the ice ax in one hand on the downhill side with its spike pointing toward the snow’s surface, and use a plunge step. This method keeps the ax ready to be jammed into the snow should you lose your balance. On steep slopes, the ax should be planted firmly into the snow on the downhill side every two steps (one with each foot) and used to help with balance and protection. On a very steep slope, you should face into the slope and, using a kick step, climb down the hill backward. When using this technique, the ax should be kept on the uphill side and continually planted and replanted after every two steps.
—From Surviving Cold Weather
U.S. Army
Movement over snow and ice is almost impossible without an ice ax and or crampons.
Ice Ax. When walking on snow or ice, the ice ax can be used as a third point of contact. When the terrain steepens, there are a number of ways to use the ice ax for snow or ice climbing. Some positions are more effective than others, depending on the intended result. You may find other ways to hold and use the ax, as long the security remains in effect.
Cane Position. The ice ax can be used on gentle slopes as a walking stick or cane. The ax is held by the head with the spike down and the pick facing to the rear in preparation for self-arrest. When moving up or down gentle slopes the ice ax is placed in front as the third point of contact, and the climber moves toward it. When traversing, the ax is held on the uphill side, in preparation for a self-arrest.
Cross Body Position or Port Arms Position. On steeper slopes the ax can be used in the port arms position, or cross body position. It is carried across the chest, upslope hand on the shaft, spike towards the slope. The head of the ax is held away from the slope with the pick to the rear in preparation for self-arrest. Ensure the leash is connected to the upslope hand, which allows the ax to be used in the hammer position on the upslope side of the climber. The spike, in this case, is used as an aid for maintaining balance.
Anchor Position. As the slope continues to steepen, the ax may be used in the anchor position. The head is held in the upslope hand and the pick is driven into the slope. The spike is held in the downhill hand and pulled slightly away from the slope to increase the “bite” of the pick into the ice. If the climber is wearing a harness, the pick can be deeply inserted in the ice or hard snow and the ax leash could be connected to the tie-in point on the harness for an anchor (ensure the ax is placed for the intended direction of pull).
Push-Hold Position. Another variation on steep slopes is the push-hold position. The hand is placed on the shaft of the ax just below the head with the pick forward. The pick is driven into the slope at shoulder height. The hand is placed on top of the ax for use as a handhold.
Dagger Position. The dagger position is used on steep slopes to place a handhold above shoulder height. The hand grasps the head of the ax with the pick forward and the shaft hanging down. The ax is driven into the surface in a stabbing action. The hand is then placed on the ax head for use as a handhold.
Hammer Position. The hammer position will set the pick deepest in any snow or ice condition. The ax is used like a hammer with the pick being driven into the slope. On vertical or near-vertical sections, two axes used in the hammer position will often be required.
Crampons. Walking in crampons is not complicated but it does present difficulties. When walking in crampons, the same principles are used as in mountain walking, except that when a leg is advanced it is swung in a slight are around the fixed foot to avoid locking the crampons or catching them in clothing or flesh. The trousers should be bloused to prevent catching on crampons. All straps should be secured to prevent stepping on them and, potentially, causing a fall. The buckles should be located on the outside of each foot when the crampons are secured to prevent snagging. Remember, when the crampon snags on the pants or boots, a tear or cut usually results, and sometimes involves the skin on your leg and or a serious fall.

Correct and incorrect crampon technique.
Two methods of ascent are used on slopes: traversing and straight up.
A traverse on ice or snow looks much like any mountain walking traverse, except that the ankles are rolled so that the crampons are placed flat on the surface. On snow the points penetrate easily; on ice the foot must be pressed or stamped firmly to obtain maximum penetration. At the turning points of a traverse, direction is changed with the uphill foot as in mountain walking.
A straight up method is for relatively short pitches, since it is more tiring than a traverse. The climber faces directly up the slope and walks straight uphill. As the slope steepens, the herringbone step is used to maintain the flatfoot technique. For short steep pitches, the climber may also face downslope, squatting so the legs almost form a 90-degree angle at the knees, driving the spike of the ice ax into the slope at hip level, and then moving the feet up to the ax. By repeating these steps, the ax and crampon combination can be used to climb short, steep pitches without resorting to step cutting. This method can be tiring. The technique is similar to the crab position used for climbing on slab rock and can also be used for short descents.
A technique known as “front-pointing” may be used for moving straight uphill. It is especially useful on steep terrain, in combination with the ice ax in the push-hold, dagger, or hammer position. Front-pointing is easiest with the use of more rigid mountain boots and rigid crampons. The technique is similar to doing calf raises on the tips of the toes and is much more tiring than flat-footing.
The technique starts with the feet approximately shoulder width apart. When a step is taken the climber places the front points of the crampons into the ice with the toe of the boot pointing straight into the slope.
When the front points have bitten into the ice the heel of the boot is lowered slightly so that the first set of vertical points can also bite. The body is kept erect, with the weight centered over the feet as in climbing on rock.
Vertical Ice. When a climb on ice reaches the 60- to 70-degree angle, two ice axes may be helpful, and will become necessary as the angle approaches 90 degrees. The same basic climbing techniques described on page xxx should be applied. If leashes of the correct length and fit are attached to both axes, it may be possible to hang completely from the axes while moving the feet.
Descending with Crampons and Ice Ax. Whenever possible, descend straight down the fall line. As the slope steepens, gradually turn sideways; on steeper slopes, bend at the waist and knees as if sitting, keeping the feet flat to engage all vertical crampon points and keep the weight over the feet as in descending rock slab. On steep terrain, assume a cross body or port arms position with the ax, and traverse. The crab position or front-pointing may also be used for descending. Regardless of the technique used, always ensure the points of the crampons are inserted in the snow or ice and take short, deliberate steps to minimize the chance of tripping and falling down the slope.
Normal Progression. The use of the ice ax and crampons follows a simple, logical progression. The techniques can be used in any combination, dictated by the terrain and skill of the individual. A typical progression could be as follows:
Crampons. Use crampons in the following situations:
• Walking as on flat ground.
• Herringbone step straight up the slope.
• Traverse with feet flat.
• Backing up the slope (crab position).
• Front-pointing.
Ice Ax. Use the ice ax in these situations:
• Cane position on flat ground.
• Cane position on uphill side as slope steepens.
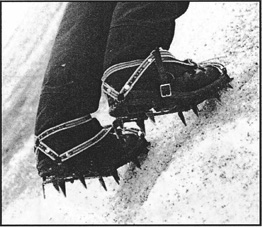
Front-pointing with crampons.
• Port arms position with spike on uphill side.
• Anchor position with pick on uphill side.
• Push-hold position using front-pointing technique.
• Dagger position using front-pointing technique.
• Hammer position using front-pointing technique.
Climbing Sequence. Using most of these positions, a single ax can be “climbed” in steps to move upslope on low-angle to near vertical terrain. Begin by positioning the feet in a secure stance and placing the ax in the hammer position as high as possible. Slowly and carefully move the feet to higher positions alternately, and move the hand up the ax shaft. Repeat this until the hand is on top of the head of the ax. Remove the ax and place it at a higher position and begin again.
Step Cutting. Step cutting is an extremely valuable technique that is a required skill for any military mountaineer. Using cut steps can save valuable time that would be spend in donning crampons for short stretches of ice and can, in some cases, save the weight of the crampons altogether. Steps may also have to be cut by the lead team to enable a unit without proper equipment to negotiate snow- or ice-covered terrain. As units continue to move up areas where steps have been cut they should continue to improve each step. In ascending, steps may be cut straight up the slope, although a traverse will normally be adopted. In descending, a traverse is also the preferred method. When changing direction, a step large enough for both feet and crampons must be made. Once the step is formed, the adze is best used to further shape and clean the step.
Snow. On slopes of firm snow and soft ice, steps may be cut by swinging the ax in a near-vertical plane, using the inside corner of the adze for cutting. The step should be fashioned so that it slopes slightly inward and is big enough to admit the entire foot. Steps used for resting or for turning must be larger.
Ice. Hard ice requires that the pick of the ax be used. Begin by directing a line of blows at right angles to the slope to make a fracture line along the base of the intended step. This technique will reduce the chance of an unwanted fracture in the ice breaking out the entire step. Next, chop above the fracture line to fashion the step. When using the pick it should be given an outward jerk as it is placed to prevent it from sticking in the ice.
Step Cutting in a Traverse. When cutting steps in a traverse, the preferred cutting sequence is to cut one step at an arm’s length from the highest step already cut, then cut one between those two. Cutting ahead one step then cutting an intermediate step keeps all of the steps relatively close to one another and maintains a suitable interval that all personnel can use.
Handholds. If handholds are cut, they should be smaller than footholds, and angled more.
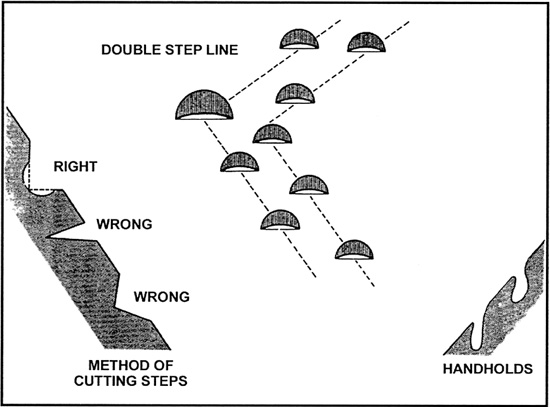
Step cutting and handhold cutting.
Self-Arrest. The large number of climbers injured or killed while climbing on snow and ice can be attributed to two major failings on the part of the climber: climbing unroped, and a lack of knowledge and experience in the techniques necessary to stop, or arrest, a fall. A climber should always carry an ice ax when climbing on steep snow or ice; if a fall occurs, he must retain possession and control of his ice ax if he is to successfully arrest the fall. During movement on steep ice, the ax pick will be in the ice solidly before the body is moved, which should prevent a fall of any significance (this is a self-belay not a self-arrest).
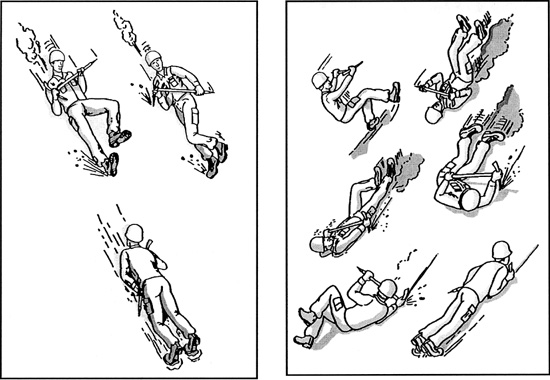
Self-arrest technique.
The toe of the boots may be dug into the slope to help arrest the fall. The ax is held diagonally across the chest, with the head of the ax by one shoulder and the spike near the opposite hip. One hand grasps the head of the ax, with the pick pointed into the slope, while the other hand is on the shaft near the spike, lifting up on it to prevent the spike from digging into the slope.
Note: If crampons are worn, the feet must be raised to prevent the crampons from digging into the snow or ice too quickly. This could cause the climber to tumble and also could severely injure his ankles and legs.
When a fall occurs, the climber should immediately grasp the ax with both hands and hold it firmly as described above. Once sufficient control of the body is attained, the climber drives the pick of the ice ax into the slope, increasing the pressure until the fall is arrested. Raising the spike end of the shaft increases the biting action of the pick. It is critical that control of the ice ax be maintained at all times.
Glissading is the intentional, controlled, rapid descent, or slide of a mountaineer down a steep slope covered with snow. Glissading is similar to skiing, except skis are not used. The same balance and control are necessary, but instead of skis the soles of the feet or the buttocks are used. The only piece of equipment required is the standard ice ax, which serves as the rudder, brake, and guide for the glissade. The two basic methods of glissading are:
Squatting Glissade. The squatting glissade is accomplished by placing the body in a semi-crouched position with both knees bent and the body weight directly over the feet. The ice ax is grasped with one hand on the head, pick, and adze outboard (away from the body), and the other hand on the shaft. The hand on the shaft grips it firmly in a position that allows control as well as the application of downward pressure on the spike of the ax.
Sitting Glissade. Using this method the glissader sits on the snow with the legs flat, and the heels and feet raised and pointed downslope. The ice ax is firmly grasped in the same manner as the squatting glissade, with the exception that the hand on the shaft must be locked against the hip for control. The sitting glissade is slower but easier to control than the squatting glissade.
Safety. A glissade should never be attempted on a slope where the bottom cannot be seen, since drop-offs may exist out of view. Also, a sitting glissade should not be used if the snow cover is thin, as painful injury could result.
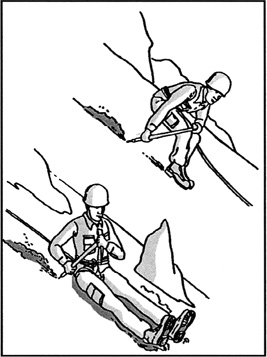
Glissading techniques.
—From Military Mountaineering (Field Manual 3-97.61)
U.S. Army
Ice climbing ratings can have commitment ratings and technical ratings. The numerical ratings are often prefaced with WI (waterfall ice), AI (alpine ice), or M (mixed rock and ice).
Commitment Ratings. Commitment ratings are expressed in Roman numerals.
I—A short, easy climb near the road, with no avalanche hazard and a straightforward descent.
II—A route of one or two pitches within a short distance of rescue assistance, with little objective hazard.
III—A multipitch route at low elevation, or a one-pitch climb with an approach that takes about an hour. The route requires anywhere from a few hours to a long day to complete. The descent may require building rappel anchors, and the route might be prone to avalanche.
IV—A multipitch route at higher elevations; may require several hours of approach on skis or foot. This route is subject to objective hazards, possibly with a hazardous descent.
V—A long climb in a remote setting, requiring all day to complete the climb itself. Requires many rappels off anchors for the descent. This route has sustained exposure to avalanche or other objective hazards.
VI—A long ice climb in an alpine setting, with sustained technical climbing. Only elite climbers will complete it in a day. A difficult and involved approach and descent, with objective hazards everpresent, all in a remote area.
VII—Everything a grade VI has, and more of it. Possibly days to approach the climb, and objective hazards rendering survival as questionable. Difficult physically and mentally.
Technical Ratings. Technical ratings are expressed as Arabic numerals.
1—A frozen lake or stream bed.
2—A pitch with short sections of ice up to 80 degrees; lots of opportunity for protection and good anchors.
3—Sustained ice up to 80 degrees; the ice is usually good, with places to rest, but it requires skill at placing protection and setting anchors.
4—A sustained pitch that is vertical or slightly less than vertical; may have special features such as chandeliers and run-outs between protection.
5—A long, strenuous pitch, possibly 50 meters of 85- to 90-degree ice with few if any rests between anchors. The pitch may be shorter, but on featureless ice. Good skills at placing protection are required.
6—A full 50-meter pitch of dead vertical ice, possibly of poor quality; requires efficiency of movement and ability to place protection while in awkward stances.
7—A full rope length of thin vertical or overhanging ice of dubious adhesion. An extremely tough pitch, physically and mentally, requiring agility and creativity.
8—Simply the hardest ice climbing ever done; extremely bold and gymnastic.
—From Military Mountaineering (Field Manual 3-97.61)
U.S. Army
Movement in mountainous terrain may require travel on glaciers. An understanding of glacier formation and characteristics is necessary to plan safe routes. A glacier is formed by the perennial accumulation of snow and other precipitation in a valley or draw. The accumulated snow eventually turns to ice due to metamorphosis. The “flow” or movement of glaciers is caused by gravity. There are a few different types of glaciers identifiable primarily by their location or activity.
• Valley glacier—resides and flows in a valley.
• Cirque glacier—forms and resides in a bowl.
• Hanging glacier—these are a result of valley or cirque glaciers flowing and or deteriorating. As the movement continues, portions separate and are sometimes left hanging on mountains, ridgelines, or cliffs.
• Piedmont glacier—formed by one or more valley glaciers; spreads out into a large area.
• Retreation glacier—a deteriorating glacier; annual melt of entire glacier exceeds the flow of the ice.
• Surging glacier—annual flow of the ice exceeds the melt; the movement is measurable over a period of time.
This paragraph describes the common characteristics of glaciers, and defines common terminology used in reference to glaciers.
Firn is compacted granular snow that has been on the glacier at least one year. Firn is the building blocks of the ice that makes the glacier.
The accumulation zone is the area that remains snow-covered throughout the year because of year-round snowfall. The snowfall exceeds melt.
The ablation zone is the area where the snow melts off the ice in summer. Melt equals or exceeds snowfall.
The firn line separates the accumulation and ablation zones. As you approach this area, you may see “strips” of snow in the ice. Be cautious, as these could be snow bridges remaining over crevasses. Remember that snow bridges will be weakest lower on the glacier as you enter the accumulation zone. The firn line can change annually.
A bergschrund is a large crevasse at the head of a glacier caused by separation of active (flowing) and inactive (stationary) ice. These will usually be seen at the base of a major incline and can make an ascent on that area difficult.
Glacier cross section.
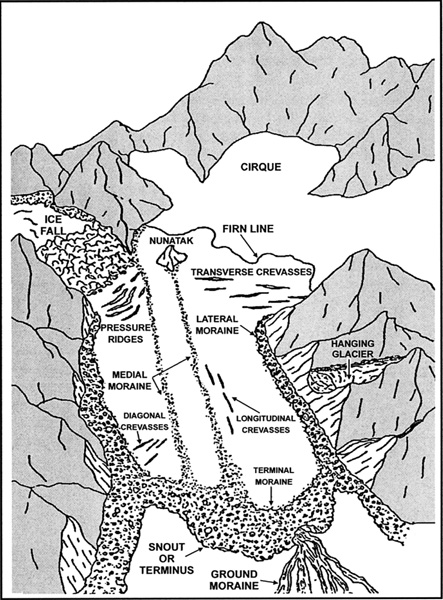
Glacier features.
A moat is a wall formed at the head (start) of the glacier. These are formed by heat reflected from valley wall.
A crevasse is a split or crack in the glacier surface. These are formed when the glacier moves over an irregularity in the bed surface.
A transverse crevasse forms perpendicular to the flow of a glacier. These are normally found where a glacier flows over a slope with a gradient change of 30 degrees or more.
Longitudinal crevasses form parallel to the flow of a glacier. These are normally found where a glacier widens.
Diagonal crevasses form at an angle to the flow of a glacier. These are normally found along the edges where a glacier makes a bend.
A snow bridge is a somewhat supportive structure of snow that covers a crevasse. Most of these are formed by the wind. The strength of a snow bridge depends on the snow itself.
Icefalls are a jumble of crisscross crevasses and large ice towers that are normally found where a glacier flows over a slope with a gradient change of 25 degrees or more.
Seracs are large pinnacles or columns of ice that are normally found in icefalls or hanging glaciers.
Ice avalanches are falling chunks of ice normally occurring near icefalls or hanging glaciers.
The moraine is an accumulation of rock or debris on a glacier caused by rockfall or avalanche of valley walls.
The lateral moraine is formed on sides of glacier.
The medical moraine is in the middle of the glacier. This is also formed as two glaciers come together or as a glacier moves around a central peak.
The terminal moraine is at the base of a glacier and is formed as moraines meet at the snout or terminus of a glacier.
The ground moraine is the rocky debris extending out from the terminus of a glacier. This is formed by the scraping of earth as the glacier grew or surged and exposed as the glacier retreats.
A Nunatak is a rock projection protruding through the glacier as the glacier flows around it.
An ice mill is a hole in the glacier formed by swirling water on the surface. These can be large enough for a human to slip into.
Pressure ridges are wavelike ridges that form on glacier normally after a glacier has flowed over icefalls.
A glacier window is an opening at the snout of the glacier where water runs out of the glacier.
The principle dangers and obstacles to movement in glacial areas are crevasses, icefalls, and ice avalanches. Snow-covered crevasses make movement on a glacier extremely treacherous. In winter, when visibility is poor, the difficulty of recognizing them is increased. Toward the end of the summer, crevasses are widest and covered by the least snow. Crossing snow bridges constitutes the greatest potential danger in movement over glaciers in the summer. On the steep pitch of a glacier, ice flowing over irregularities and cliffs in the underlying valley floor cause the ice to break up into ice blocks and towers, crisscrossed with crevasses. This jumbled cliff of ice is known as an icefall. Icefalls present a major obstacle to safe movement of troops on glaciers.
Moving on glaciers brings about the hazard of falling into a crevasse. Although the crevasses are visible in the ablation zone in the summer, the accumulation zone will still have hidden crevasses. The risk of traveling in the accumulation zone can be managed to an acceptable level when ropes are used for connecting the team members. Crampons and an ice ax are all that is required to safely travel in the ablation zone in the summer.
When conditions warrant, three to four people will tie in to one rope at equal distances from each other. To locate the positions, if three people are on a team, double the rope and one ties into the middle and the other two at the ends. If four people are on a team, form a “z” with the rope and expand the “z” fully, keeping the end and the bight on each “side” of the “z” even. Tie in to the bights and the ends.
Connect to the rope with the appropriate method and attach the Prusik as required. The rope should be kept relatively tight either by Prusik belay or positioning of each person. If the team members need to assemble in one area, use the Prusik to belay each other in.
If a team member falls into a crevasse, the remaining members go into team arrest, assess the situation, and use the necessary technique to remove the person from the crevasse. The simplest and most common method for getting someone out of a crevasse is for the person to climb out while being belayed.
All items should be secured to either the climber or the rope/harness to prevent inadvertent release and loss of necessary items or equipment. Packs should be secured to the rope/harness with webbing or rope. If traveling with a sled in two, secure it not only to a climber to pull it, but connect it to the rope with webbing or rope also.
If marking the route on the glacier is necessary for backtracking or to prevent disorienta-tion in storms or flat-light conditions, use markers that will be noticeable against the white conditions. The first team member can place a new marker when the last team member reaches the previous marker.
The first rule for movement on glaciers is to rope up. A roped team of two, while ideal for rock climbing, is at a disadvantage on a snow-covered glacier. The best combination is a three-man rope team. Generally, the rope team members will move at the same time with the rope fully extended and reasonably tight between individuals, their security being the team arrest. If an individual should break through a snow bridge and fall into a crevasse, the other members immediately perform self-arrest, halting the fall. At points of obvious weakness in the snow bridges, the members decide to belay each other across the crevasse using one of the established belay techniques.
Even with proper training in crevasse rescue techniques, the probability exists that an individual may remain suspended in a crevasse for a fairly lengthy amount of time while trying to get himself out or while awaiting help from his rope team members. Because of this, it is strongly recommended that all personnel wear a seat/chest combination harness, whether improvised or premanufactured.
Rope team members must be able to quickly remove the climbing rope from the harness(es) during a crevasse rescue. The standard practice for connecting to the rope for glacier travel is with a locking carabiner on a figure-eight loop to the harness. This allows quick detachment of the rope for rescue purposes. The appropriate standing part of the rope is then clipped to the chest harness carabiner.
If a rope team consists of only two people, the rope should be divided into thirds, as for a four-person team. The team members tie into the middle positions on the rope, leaving a third of the rope between each team member and a third on each end of the rope. The remaining “thirds” of the rope should be coiled and either carried in the rucksack, attached to the rucksack, or carried over the head and shoulder. This gives each climber an additional length of rope that can be used for crevasse rescue, should one of the men fall through and require another rope. If necessary, this excess end rope can be used to connect to another rope team for safer travel.
Note: The self-arrest technique used by one individual will work to halt the fall of his partner on a two-man rope team; however, the chance of it failing is much greater. Crevasse rescue procedures performed by a two-man rope team, by itself, may be extremely difficult. For safety reasons, movement over a snow-covered glacier by a single two-man team should be avoided wherever possible.
Prusik knots are attached to the climbing rope for all glacier travel. The Prusiks are used as a self-belay technique to maintain a tight rope between individuals, to anchor the climbing rope for crevasse rescue, and for self-rescue in a crevasse fall. The Prusik slings are made from the 7-millimeter by 6-foot and 7-millimeter by 12-foot ropes. The ends of the ropes are tied together, forming endless loops or slings, with double fisherman’s knots. Form the Prusik knot on the rope in front of the climber. An overhand knot can be tied into the sling just below the Prusik to keep equal tension on all the Prusik wraps. Attach this sling to the locking carabiner at the tie in point on the harness.
Note: An ascender can replace a Prusik sling in most situations. However, the weight of an ascender hanging on the rope during movement will become annoying, and it could be stepped on during movement and or climbing.
If an individual should fall into a crevasse, it is essential that he be able to rid himself of his backpack. The weight of the average pack will be enough to hinder the climber during crevasse rescue, or possibly force him into an upside down position while suspended in the crevasse. Before movement, the pack should be attached to the climbing rope with a sling rope or webbing and a carabiner. A fallen climber can immediately drop the pack without losing it. The drop cord length should be minimal to allow the fallen individual to reach the pack after releasing it, if warm clothing is needed. When hanging from the drop cord, the pack should be oriented just as when wearing it (ensure the cord pulls from the top of the pack).
An individual operating in the mountains must appreciate certain limitations in glacier movement imposed by nature.
Additional obstacles in getting onto a glacier may be swift glacier streams, steep terminal or lateral moraines, and difficult mountain terrain bordering the glacier ice. The same obstacles may also have to be overcome in getting on and off a valley glacier at any place along its course.
Further considerations to movement on a glacier are steep sections, heavily crevassed portions, and icefalls, which may be major obstacles to progress. The use of current aerial photographs in conjunction with aerial reconnaissance is a valuable means of gathering advance information about a particular glacier. However, they only supplement, and do not take the place of, on-the-ground reconnaissance conducted from available vantage points.
Open crevasses are obvious, and their presence is an inconvenience rather than a danger to movement. Narrow cracks can be jumped, provided the take off and landing spots are firm and offer good footing. Wider cracks will have to be circumvented unless a solid piece of ice joins into an ice bridge strong enough to support at least the weight of one member of the team. Such ice bridges are often formed in the lower portion of a crevasse, connecting both sides of it.
In the area of the firn line, the zone that divides seasonal melting from permanent falls of snow, large crevasses remain open, though their depths may be clogged with masses of snow. Narrow cracks may be covered. In this zone, the snow, which covers glacier ice, melts more rapidly than that which covers crevasses. The difference between glacier ice and narrow snow-covered cracks is immediately apparent; the covering snow is white, whereas the glacier ice is gray.
Usually the upper part of a glacier is permanently snow covered. The snow surface here will vary in consistency from dry power to consolidated snow. Below this surface cover are found other snow layers that become more crystalline in texture with depth, and gradually turn into glacier ice. It is in this snow-covered upper part of a glacier that crevasses are most difficult to detect, for even wide crevasses may be completely concealed by snow bridges.
now bridges are formed by windblown snow that builds a cornice over the empty interior of the crevasse. As the cornice grows from the windward side, a counter drift is formed on the leeward side. The growth of the leeward portion will be slower than that to the windward so that the juncture of the cornices occurs over the middle of the crevasse only when the contributing winds blow equally from each side. Bridges can also be formed without wind, especially during heavy falls of dry snow. Since cohesion of dry snow depends only on an interlocking of the branches of delicate crystals, such bridges are particularly dangerous during the winter. When warmer weather prevails the snow becomes settled and more compacted, and may form firmer bridges.
Once a crevasse had been completely bridged, its detection is difficult. Bridges are generally slightly concave because of the settling of the snow. This concavity is perceptible in sunshine, but difficult to detect in flat light. If the presence of hidden crevasses is suspected, the leader of a roped team must probe the snow in front of him with the shaft of his ice ax. As long as a firm foundation is encountered, the team may proceed, but should the shaft meet no opposition from an underlying layer of snow, a crevasse is probably present. In such a situation, the prober should probe closer to his position to make sure that he is not standing on the bridge itself. If he is, he should retreat gently from the bridge and determine the width and direction of the crevasse. He should then follow and probe the margin until a more resistant portion of the bridge is reached. When moving parallel to a crevasse, all members of the team should keep well back from the edge and follow parallel but offset courses.
A crevasse should be crossed at right angles to its length. When crossing a bridge that seems sufficiently strong enough to hold a member of the team, the team will generally move at the same time on a tight rope, with each individual prepared to go into self-arrest. If the stability of the snow bridge is under question, they should proceed as follows for a team of three glacier travelers:
The leader and second take up a position at least 10 feet back from the edge. The third goes into a self-belay behind the second and remains on a tight rope.
The second belays the leader across using one of the established belay techniques. The boot-ax belay should be used only if the snow is deep enough for the ax to be inserted up to the head and firm enough to support the possible load. A quick ice ax anchor should be placed for the other belays. Deadman or equalizing anchors should be used when necessary. The leader should move forward, carefully probing the snow and evaluating the strength of the bridge, until he reaches firm snow on the far side of the crevasse. He then continues as far across as possible so number two will have room to get across without number one having to move.
The third assumes the middle person’s belay position. The middle can be belayed across by both the first and last. Once the second is across, he assumes the belay position. Number one moves out on a tight rope and anchors in to a self-belay. Number two belays number three across.
In crossing crevasses, distribute the weight over as wide an area as possible. Do not stamp the snow. Many fragile bridges can be crossed by lying down and crawling to the other side. Skis or snowshoes help distribute the weight nicely.
The simplest and most common method for getting someone out of a crevasse is for the person to climb out while being belayed. Most crevasse falls will be no more than body height into the opening if the rope is kept snug between each person.
To provide a quick means of holding an unexpected breakthrough, the rope is always kept taut. When the leader unexpectedly breaks through, the second and third immediately go into a self-arrest position to arrest the fall. A fall through a snow bridge results either in the person becoming jammed in the surface hole, or in being suspended in the crevasse by the rope. If the leader has fallen only partially through the snow bridge, he is supported by the snow forming the bridge and should not thrash about as this will only enlarge the hole and result in deeper suspension. All movements should be slow and aimed at rolling out of the hole and distributing the weight over the remainder of the bridge. The rope should remain tight at all times and the team arrest positions adjusted to do so. It generally is safer to retain the rucksack, as its bulk often prevents a deeper fall. Should a team member other than the leader experience a partial fall, the rescue procedure will be same as for the leader, only complicated slightly by the position on the rope.
When the person falls into a crevasse, the length of the fall depends upon how quickly the fall is arrested and where in the bridge the break takes place. If the fall occurs close to the near edge of the crevasse, it usually can be checked before the climber has fallen more than 6 feet. However, if the person was almost across, the fall will cause the rope to cut through the bridge, and then even an instantaneous check by the other members will not prevent a deeper fall. The following scenario is an example of the sequence of events that take place after a fall by the leader in a three-person team. (This scenario is for a team of three, each person referred to by position; the leader is number 1.)
Once the fall has been halted by the team arrest, the entire load must be placed on number 2 to allow number 3 to move forward and anchor the rope. Number 3 slowly releases his portion of the load onto number 2, always being prepared to go back into self-arrest should number 2’s position begin to fail.
Once number 2 is confident that he can hold the load, number 3 will proceed to number 2’s position, using the Prusik as a self belay, to anchor the rope. In this way the rope remains reasonably tight between number 2 and number 3. Number 3 must always be prepared to go back into self-arrest should number 2’s position begin to fail.
When number 3 reaches number 2’s position he will establish a bombproof anchor 3 to 10 feet in front of number 2 (on the load side), depending on how close number 2 is to the lip of the crevasse. This could be either a deadman or a two-point equalized anchor, as a minimum.
Number 3 connects the rope to the anchor by tying a Prusik with his long Prusik sling onto the rope leading to number. 1. An overhand knot should be tied into the long Prusik sling to shorten the distance to the anchor, and attached to the anchor with a carabiner. The Prusik knot is adjusted towards the load.
Number 2 can then release the load of number 1 onto the anchor. Number 2 remains connected to the anchor and monitors the anchor.
A fixed loop can be tied into the slack part of the rope, close to number 2, and attached to the anchor (to back up the Prusik knot).
Number 3 remains tied in, but continues forward using a short Prusik as a self-belay. He must now quickly check on the condition of number 1 and decide which rescue technique will be required to retrieve him.
These preliminary procedures must be performed before retrieving the fallen climber. If number 3 should fall through a crevasse, the procedure is the same except that number 1 assumes the role of number 3. Normally, if the middle person should fall through, number 1 would anchor the rope by himself. Number 3 would place the load on number l’s anchor, then anchor his rope and move forward with a Prusik self-belay to determine the condition of number 2.
Snow bridges are usually strongest at the edge of the crevasse, and a fall is most likely to occur some distance away from the edge. In some situations, a crevasse fall will occur at the edge of the snow bridge, on the edge of the ice. If a fall occurs away from the edge, the rope usually cuts deeply into the snow, thus greatly increasing friction for those pulling from above. In order to reduce friction, place padding, such as an ice ax, ski, ski pole, or backpack/rucksack, under the rope and at right angles to the stress. Push the padding forward as far as possible toward the edge of the crevasse, thus relieving the strain on the snow. Ensure the padding is anchored from falling into the crevasse for safety of the fallen climber.
Use of Additional Rope Teams. Another rope team can move forward and assist in pulling the victim out of a crevasse. The assisting rope team should move to a point between the fallen climber and the remaining rope team members. The assisting team can attach to the arresting team’s rope with a Prusik or ascender and both rope teams’ members can all pull simultaneously. If necessary, a belay can be initiated by the fallen climber’s team while the assisting team pulls. The arresting team member closest to the fallen climber should attach the long Prusik to themselves and the rope leading to the fallen climber, and the assisting team can attach their Prusik or ascender between this long Prusik and the arresting them member. As the assisting team pulls, the Prusik belay will be managed by the arresting team member at the long Prusik.
Note: Safety in numbers is obvious for efficient crevasse rescue techniques. Additional rope teams have the necessary equipment to improve the main anchor or establish new ones and the strength to pull a person out even if he is deep in the crevasse. Strength of other rope teams should always be used before establishing more time-consuming and elaborate rescue techniques.
Fixed Rope. If the fallen climber is not injured, he may be able to climb out on a fixed rope. Number 1 clips number 3’s rope to himself. He then climbs out using number 3’s rope as a simple fixed line while number 2 takes up the slack in number 1’s rope through the anchor Prusik for a belay.
Prusik Ascending Technique. There may be times when the remaining members of a rope team can render little assistance to the person in the crevasse. If poor snow conditions make it impossible to construct a strong anchor, the rope team members on top may have to remain in self-arrest. Other times, it may just be easier for the fallen climber to perform a self-rescue. The technique is performed as follows:
The fallen climber removes his pack and lets it hang below from the drop cord.
The individual slides their short Prusik up the climbing rope as far as possible.
The long Prusik is attached to the rope just below the short Prusik. The double fisherman’s knot is spread apart to create a loop large enough for one or both feet. The fallen climber inserts his foot/feet into the loop formed allowing the knot to cinch itself down.
The individual stands in the foot loop, or “stirrup,” of the long sling.
With his weight removed from the short Prusik, it is slid up the rope as far as it will go. The individual then hangs from the short Prusik while he moves the long Prusik up underneath the short Prusik again.
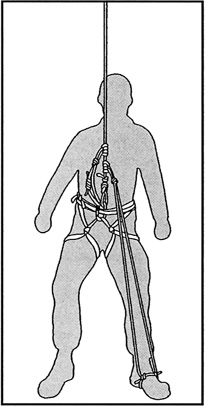
Prusik ascending technique.
The procedure is repeated, alternately moving the Prusiks up the rope, to ascend the rope. Once the crevasse lip is reached, the individual can simply grasp the rope and pull himself over the edge and out of the hole.
Besides being one of the simplest rope ascending techniques, the short Prusik acts as a self-belay and allows the climber to take as long a rest as he wants when sitting in the harness. The rope should be detached from the chest harness carabiner to make the movements less cumbersome. However, it is sometimes desirable to keep the chest harness connected to the rope for additional support. In this case the Prusik knots must be “on top” of the chest harness carabiner so they can be easily slid up the rope without interference from the carabiner. The long Prusik sling can be routed through the chest harness carabiner for additional support when standing up in the stirrup.
Z-Pulley Hauling System. If a fallen climber is injured or unconscious, he will not be able to offer any assistance in the rescue. If additional rope teams are not immediately available, a simple raising system can be rigged to haul the victim out of the crevasse. The Z-pulley hauling system is one of the simplest methods and the one most commonly used in crevasse rescue. The basic Z rig is a “3-to-1” system, providing mechanical advantage to reduce the workload on the individuals operating the haul line. In theory, it would only take about 33 pounds of pull on the haul rope to raise a 100-pound load with this system. In actual field use, some of this mechanical advantage is lost to friction as the rope bends sharply around carabiners and over the crevasse lip. The use of mechanical rescue pulleys can help reduce this friction in the system. The following describes rigging of the system. (This scenario is for a team of three, each person referred to by position; the leader is number 1.)
After the rope team members have arrested and secured number 1 to the anchor, and they have decided to install the Z rig, number 2 will attach himself to the anchor without using the rope and clear the connecting knot used. Number 3 remains connected to the rope.
The slack rope exiting the anchor Prusik is clipped into a separate carabiner attached to the anchor. A pulley can be used here if available.
Number 3 will use number 2’s short Prusik to rig the haul Prusik. He moves toward the crevasse lip (still on his own self-belay) and ties number 2’s short Prusik onto number 1’s rope (load rope) as close to the edge as possible.
Another carabiner (and pulley if available) is clipped into the loop of the haul Prusik and the rope between number 3’s belay Prusik and the anchor is clipped (or attached through the pulley). Number 3’s rope becomes the haul rope.
Number 3 then moves towards the anchor and number 2. Number 2 could help pull if necessary but first would connect to the haul rope with a Prusik just as number 3. If the haul Prusik reaches the anchor before the victim reaches the top, the load is simply placed back on the anchor Prusik and number 3 moves the haul Prusik back toward the edge. The system is now ready for another haul.
NOTES:
1. The Z-pulley adds more load on the anchor due to the mechanical advantage.
The anchor should be monitored for the duration of the rescue.
2. With the “3-to-1” system, the load (fallen climber) will be raised 1 foot for every 3 feet of rope taken up during the haul.
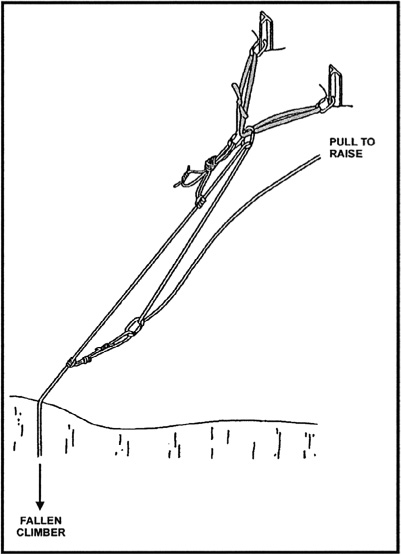
Z-pulley hauling system.
—From Military Mountaineering (Field Manual 3-97.61)
Greg Davenport
Illustrations by Steven A. Davenport
Snowshoes are an outstanding aid when traveling on snow and are especially helpful when carrying a pack. They make travel easier by dispersing your weight over a greater surface area, which in turn eliminates the post-hole effect caused by snow-shoeless feet. Snowshoes are superior to crosscountry skis in snow-covered areas that also have brush or rock obstacles, and they are easier to use than skis for those who are inexperienced. Modern snowshoes are made of an oval-shaped, lightweight, tubular frame that supports a durable decking material. Most bindings are easy to attach to your boots and come with cramponlike metal plates at the toes and heels to aid in traction. The type of snowshoes you’ll need depends on their intended use and your weight. Smaller-style snowshoes allow greater maneuverability, whereas larger ones provide greater flotation.
There are four basic snowshoe designs: Yukon, Beavertail, Bearpaw, and Western.
YUKON
Yukon, or trail, snowshoes are large, measuring on average 40 to 60 inches long and 10 inches wide, with a 6- to- 8-inch toe turnup. They are good shoes for open terrain where deep powder is present. Although you can travel up and down steep slopes, you will have to traverse them. These shoes are often made from wood and have neoprene laced decking.

Yukon snowshoes.
The Beavertail design ranges in size from 9 by 40 inches to 20 by 44 inches. The most popular size appears to be the 12-by-34-inch. These shoes are generally flat, with a large, oval body that supports a long tail. They are decent shoes for kick-stepping but do not perform well when traversing a hill. These shoes are often made from wood and have neoprene laced decking.
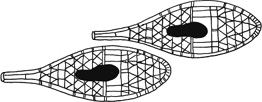
Beavertail snowshoes.
BEARPAW
The Bearpaw design ranges in size from 12 by 24 inches to 19 by 26 inches. The most popular size appears to be the 12-by-28-inch. These flat-toed, short, and wide snowshoes support no tail and are good shoes for kick-stepping but not for open terrain. These shoes are often made from wood and have neoprene laced decking.
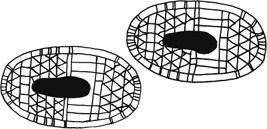
Bearpaw snaowshoes.
WESTERN
The Western design ranges in size from 8 by 22 inches to 9 by 38 inches. These shoes have an aluminum frame and most often use a plastic decking. The tubular aluminum is very strong and light, and the solid plastic decking provides superior flotation compared with lace decking. The Western-style mountaineering snowshoe is a great all-purpose design, which allows travel in all terrains and performs well when ascending or descending slopes.
Atlas Snow-Shoe Company provides the FACT (Flotation, Articulation, Comfort, and Traction) acronym for selecting Western-style snowshoes. These are the basic factors you should consider when purchasing snowshoes.
FLOTATION
A snowshoe’s surface area provides flotation that keeps you from sinking through the snow’s surface. Pick the smallest snowshoes that will support your weight plus the weight of your backpack and gear. As a general rule, however, choose larger snowshoes for dry snow and smaller ones for snow that is wet and dense.
ARTICULATION
Articulation refers to how well snowshoe bindings allow your foot to move once attached. Under ideal circumstances, a binding will limit stepping rotation, allow the ankle freedom of rotation, and minimize heel twist.
Snowshoes should allow your feet to bend—from front to back—in a motion similar to walking. At the same time, the snowshoes’ tips should not hit your shins and the shoes should not drag.
A snowshoe binding should support the foot while still allowing the ankle to naturally rotate from side to side. To accomplish this, bindings need to flex enough to allow the ankle to freely rotate from side to side, keeping it in a neutral position regardless of the terrain.
A snowshoe’s binding should allow for stepping rotation and ankle rotation, while keeping your foot centered—from side to side—regardless of the terrain.
COMFORT
A comfortable binding, like a comfortable boot, should be made for the specific foot, not have any pressure points when snugly attached to the arch and ball of the foot, and be easy to put on and take off.
TRACTION
Unless you intend to snowshoe on perfectly level ground, you’ll need snowshoes that can provide traction when ascending, descending, or traversing a slope. To provide this traction, your snowshoes should have cleats, or crampons, located at the toes, heels, and along the sides.
In a crisis, snowshoes can be improvised from boughs. Use boughs from a tree on which the smaller branches and needles are thick and abundant, such as fir. Cut five to ten boughs that are 4 to 5 feet long each, lash the bases of all the branches together, and loosely tie them around their midpoint. Secure the bough snowshoes to your feet by tying a line around the toe of your boot and the forward third of the boughs.
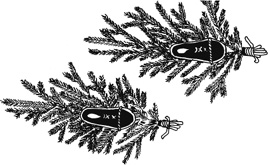
Snoshoes made from boughs.
In general, it won’t take long to learn the art of snowshoeing. Once they are strapped on, just start walking. When on a slope, you should carry an ice ax, on the uphill side, and use it as an anchor and support. An ice ax used for snow-shoeing should extend 2 to 4 inches beyond the ground. This measurement is determined by standing erect while holding the ice ax in one hand (with fingers extended down its shaft) and pointing it straight down toward the ground. An ice ax can be used to help steady you while climbing by providing a third point of contact.
Incorrect heel support.
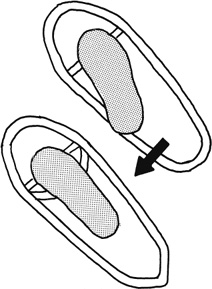
Correct heel support.
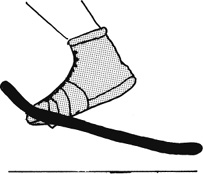
Correct stepping rotation.
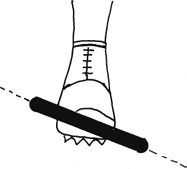
Correct ankle rotation.
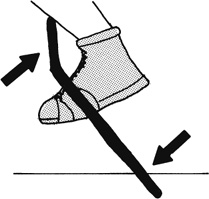
Incorrect stepping rotation.

Incorrect ankle rotation.
Kick-stepping on an ascent can be done with the Western, Bearpaw, and Beavertail style snow-shoes. Use an ice ax as a self-belay to help anchor and balance your movement. To do this, keep it on the uphill side and plant its spike in the snow every two steps.
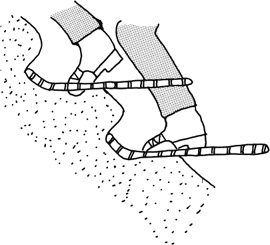
Kick-stepping uphill in snowshoes.
When going down a gradual grade, slightly bend your knees, lean back, and point your toes down so that the snowshoes’ crampons make full contact with the snow’s surface. If the hill is too steep for this technique, either traverse down it or take off your snowshoes and descend by plunge-stepping.
To traverse with snowshoes, create a platform in the side of the hill by edging in, forcing the uphill side of the snowshoe into the slope, at least half of your foot width. As always, if in a group, consider the strides of those following you. It’s times like this that an adjustable pole would be nice. This same technique can be used to come down a hill. All shoe types can be used for this technique. Use an ice ax as a self-belay to help anchor and balance your movement. To do this, keep it on the uphill side and plant its spike in the snow every two steps.
Most snowshoe breaks occur when the shoe is bridged between the ground and a log or similar object. When this happens, the pressure at the middle of the frame is too great, and the shoe breaks. Once the shoe has broken, it will be difficult to travel on until it’s repaired. The best quick and simple fix is to tie a sturdy branch to the broken section so that it extends 3 to 4 inches beyond the break on both sides.
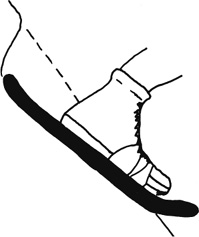
Walking downhill in snowshoes.
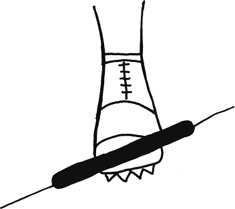
Traversing downhill in snowshoes.
—From Surviving Cold Weather
Greg Davenport
Illustration by Steven A. Davenport
Nordic and mountaineering skis are good tools for snow travel but may not be the best option when carrying heavy backpacks or in a densely forested area. These skis use boot bindings that attach to your toes but leave the heels free. Mountaineering skis are slightly wider and heavier than the Nordic style and use bindings that leave the heels free for uphill travel but allow you to secure them when going downhill. If you intend to use your skis to travel uphill, you’ll need climbing skins. These skins are attached to the bottom of the skis, providing the traction needed for uphill travel. An advanced cross-country skier can go almost anywhere, using skins to conquer uphill challenges and telemarking to descend steeper slopes.
If you intend to travel off-trail, purchase gear that is rated for touring to backcountry use. Cross-country skis allow you to move forward through a kicking and gliding process. While one foot is gliding, with only the toe and heel of the ski making firm contact with the snow, the other ski is kicking; the ski’s center has traction and is making firm contact with the snow while moving backward and propelling you forward. If a ski is too firm in the center, you will have a great glide, but it will also require more work to propel you forward. These skis are best left to the pros. If a ski is too soft in the center, you will have less glide, but it will be easier to propel you forward. Some skis require wax, and others are waxless. Both styles, however, work on the same principle: They are slick at the ends and sticky at the center. On waxless skis, the front and back have little or no pattern, and the center has a tread pattern. If the skis require wax, the ends are waxed with a glide wax and the center with a sticky kick wax. Unless you are an advanced skier, I’d advise using waxless skis. They are easy to use and require little maintenance. You’ll never have to worry about whether you have applied the right wax. A waxless ski, however, is slower than one that uses wax. Nevertheless, it is very versatile, allowing you to use it for a multitude of conditions, excluding ice travel. For backcountry skiing, use skis that are heavier and wider; when on groomed trails, use skis that are light and narrow. To select a ski that will optimize your abilities, you should consider your weight, height, and cross-country skiing ability.
To determine the appropriate ski for your weight, hold the skis upright so that their bases are touching. There will be a gap in the center, caused by the skis’ camber, or slight arching. As a basic rule of thumb, while holding these skis in this position, you should be able to squeeze the camber completely together using both hands. If you can’t, the skis are probably too stiff and should be left for the advanced skier; if you can do it with one hand, they are probably too soft.
HEIGHT AND SKI LENGTH
For general use, when you hold the ski perpendicular to the ground and raise an arm over your head, it should reach your wrist. For back-country use, however, select a ski that reaches to about the top of your head. The shorter ski will provide greater ease of turning and maneuverability between obstacles.
Be sure to buy boots designed for skiing and not skating. The boots need to have toe bars for binding attachment. Buy the boots first, and then select the bindings that will work with them. Most bindings are either step-in or manual styles. To use a step-in binding, you simply insert the toe of your boot into the binding’s forward bar, and press down until it snaps into place. A manual binding requires you to secure a latch over the top of the boot’s toe bar. Bindings should be mounted by a professional.
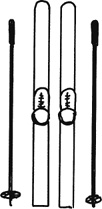
Cross-country skis, boots, and poles.
Your poles should have round baskets at the bottom. For general use, they should be somewhere between armpit and shoulder height. If touring, longer poles are better, but when in treed, mountainous terrain, shorter poles will serve you better. Expandable poles are ideal, since they allow you to change their length as needed for ascents and descents.
A sled allows you to carry more gear than just what fits into your pack and is a great option for long trips. Most commercial sleds come with a cover, waist harness, and support poles that connect the sled to your harness. You can make a similar item by attaching a child’s sled to your pack or waist harness with rope. The benefit of the commercial sled is its rigid poles, which help you control it when traversing or going downhill. You might fashion such support poles by attaching lengths of thick PVC pipe to the sled and your pack or belt.
—From Surviving Cold Weather
U.S. Army
The purpose of ski wax is to provide the ski with necessary climbing and sliding qualities to prevent backslip in various snow conditions. When snow conditions and temperature change, the type and method of application of ski wax will also differ. Before wax can be properly selected and applied, the individual must learn to recognize the different types of snow conditions. It is also valuable to have some knowledge of how ski wax performs in relation to snow.
After snow has fallen on the ground, its crystalline structure is continuously altered by the effects of temperature, wind, and humidity. In very cold weather these changes occur much more slowly than when temperature is near 32°F. Therefore, the most important factor of waxing is the effect that temperature has on the character of the snow and its sliding qualities.
It is important to understand the relation of wax to the holding and sliding capabilities of the snow. For this reason there are specific waxes to use in cross-country skiing under different snow surface conditions.
Proper wax. When the soldier is skiing on the level, or uphill, his body weight gives maximum pressure to the skis. The soft quality of the wax allows the crystal structure of the snow to penetrate the wax under this pressure and thus keep the ski from backslapping. When the pressure is lifted and the ski allowed to slide forward, the penetrating snow crystals will slide free from the surface of the wax reducing friction. Continuous forward motion, as in sliding, keeps the crystals from penetrating the wax.
Wax too soft. When the skis slide poorly, the following condition generally exists: the snow crystals have penetrated into the wax but will not slide free. This causes clogging of the snow on the running surface and may eventually cause ice to form. Under these conditions the soldier will find that even vigorous sliding of the ski will not break the snow loose from the wax surface. Little or no forward slide can be gained.
Wax too hard. When the skis slide well, but backslip on the level and when moving uphill, the following condition exists: the snow crystals are not penetrating the wax. The soldier will find he has excellent sliding when going downhill, but climbing uphill or skiing on level ground is very exhausting because of backslip. This is the primary deterrent to the use of “downhill” waxes for cross-country skiing.
Classification of snow. Snow is classified here into four general types. This classification is intended to assist the soldier in snow identification, choice of wax, and its proper application under these different conditions.
(a) Wet snow. This type of snow is mostly found during the spring, but it may also occur in the fall or late winter, particularly in regions of moderate climate. This type of snow can be readily made into a heavy, solid snowball. In extreme conditions, wet snow will become slushy and contain a maximum amount of water.
(b) Moist snow. This type of snow is generally associated with early winter, but may also occur in midwinter during a sudden warmup period. This type of snow can be made into a snowball, but will not compress as readily or be as heavy as a wet snowball. It will have a tendency to fall apart.
(c) Dry snow. This type of snow is generally associated with winter at its height, but it can occur in late fall as well as in spring, when abnormally low temperatures occur. This snow is light and fluffy. It cannot be compressed into a snowball unless the snow is made moist by holding it in the hand. At extremely low temperatures, such as those found in the far northern regions, this snow is like sand, and has very poor sliding qualities.
(d) New snow. This is snow which is still falling or has recently fallen on the ground, but has not been subject to changes due to the sun or temperature variation. It can be wet, moist, or dry in nature.
Cross-country ski waxes are formulated to provide optimum sliding and climbing characteristics for various types of snow conditions. Each type is labeled with appropriate instructions on its intended use, i.e., wet, moist or dry snow conditions. Since the types of wax vary between manufacturers, no particular types of wax can be prescribed for each classification of snow; however, the instructions on each container specifies the weather conditions and type of snow where performance of the wax is best. Proper application of all waxes is important to achieve desired results whether they be traction or sliding action. As a general rule, the wax that gives the best sliding surface for all types of snow provides an excellent base for application of other waxes. To provide traction, varying amounts, combinations, and methods of application of other waxes are used. When pulling a sled or carrying a heavy load, thicker coats of wax may be required to insure traction.
Whenever possible, the waxing of skis should be done. …. when shelter and heat are available, as the running surface of the ski should be warm and dry to obtain best results. … [S]ki wax should be carried in the pockets, if possible, so that body heat will keep the wax soft and easy to use. If the skis need waxing during the march, the running surfaces are dried as much as possible by the use of paper or dry mittens. Whenever possible, old wax should be removed before rewaxing skis particularly when a different type of wax is being used. …
To apply, cover the running surface with wax. Next, smooth the wax by rubbing it with the hand, using the heel of the palm or the fingers, a waxing cork, or a heated iron. When heat is available, this process can be made easier by warming the wax that has been applied. It is normally best to work progressively on a section at a time, from the ski tip towards the heel. If the waxing is done in a shelter, or heat is used, the skis should be allowed to cool to outside air temperature before being used. Do not place the running surfaces of skis on snow immediately after waxing if heat is used or if waxing is done in a heated room or shelter as the snow may stick and freeze to the running surface. For the same reason protect the running surfaces against wind driven snow. To insure that wax is properly chosen and applied, the skis should be tested before being used. …
…Skins must be checked for…evidence of possible warping and splitting, loss of camber, defective edges, and broken steel edge sections or screws. At the same time bindings must be checked for worn straps, missing rivets and screws, and proper adjustment. Ski poles should be checked to insure that wrist straps, handgrips, baskets, and points are firmly fastened and that no breakage has occurred.
After each day’s use, the skis and the skiing equipment should be checked and necessary repairs made by the individual as follows:
Skis. Remove any snow or ice that has frozen to the ski. This may be done with heat. If heat is not available, this can be done with a mitten, wooden stick, or piece of metal. Check the heels and tips of the skis for cracks. Badly cracked skis must be replaced, as they are weakened and break easily. At the same time, check for and replace defective or missing edges and screws. The condition of ski bottoms is then checked and, if needed, additional pine tar or base wax is applied. The surface waxing for the next day’s march is deferred until snow conditions are determined in the morning or shortly prior to departure. After maintenance of skis is completed, they should be placed indoors, preferably in a ski rack. Under field conditions, skis are placed in an improvised ski rack, planted upright in the snow or stacked.
Bindings. Insure that all straps, buckles, screws and rivets are present and in good condition. Replace parts which are unserviceable. If necessary, readjust the fit of the bindings.
Poles. Check wrist straps, handgrips, shafts, baskets, and points to insure that they are in good condition. Broken parts should be replaced at the first opportunity. Temporary repairs can be made with wire, cord, or tape.
When snow cover is comparatively thin, be careful not to damage the skis while skiing in rocky or stumpy terrain. Sometimes there is water under the snow cover on frozen rivers or lakes. Try to cross them at a dry place; make an improvised hasty bridge from trees or boughs, if time permits. If the skis become wet during a crossing of water, the ice which forms on the skis must be removed after reaching the bank. A long march or sudden change in temperature may require rewaxing of skis during the march. When skis are removed, do not leave them on the snow. It may stick and freeze on the running surface. Remove the snow from the skis and stack them beside the ski tracks or lean the skis against a tree.
—Excerpted from Basic Cold Weather Manual (Field Manual 31-70)
Buck Tilton and John Gookin
Illustrations by Joan M. Safford
With skis on feet, pack on back, and sled in tow, you’re ready to head out on an adventure in the world of the cold and the white. An untracked vastness awaits, silent but alive, and spectacular in ways that only the winter traveler will experience. There are challenges ahead, especially if you lack experience in making those boards strapped to your boots move the way you want them to. What follows here is basic information that should be helpful, but as always, you will learn by doing (again, if at all possible, under the guidance of a good teacher).
The most important thing to remember about backcountry skiing is that you can have a great trip even if you are a poor skier. Beyond basic safety, the critical element, at all levels of ability, is fun. The basic idea of backcountry skiing is to move across the snow with as little effort as possible. Forget those pictures of Olympic cross-country skiers gracefully speeding across the finish line, though. You’re a winter camper, carrying everything you will need for your adventure, crossing many kinds of “wild” snow, and facing a variety of exciting challenges.
Skiing on flat or relatively gentle, rolling terrain is a skill that comes quickly with just a little practice. As you’re moving along, sliding your feet instead of lifting them, you will soon realize that a push or “kick” off of the back ski sends you gliding forward on the front ski. You’ve discovered the simplest technique for ski travel: the kick-and-glide.
To improve your kick-and-glide, stay relaxed, and keep your knees slightly flexed and shoulder-width apart. When you “kick” forward, shift all your weight onto the ski you’re gliding on and then swing your arm and reach forward with the ski pole on the opposite side from the forward ski. You’ll gain a little momentum by pushing with your ski pole, but you should rely primarily on your legs. When the snow is firm, or you’re on a track or trail, you can gain speed by double-poling—reaching forward with both poles to get an extra “umph” out of each push. Bend at the waist, and use the mass of your upper body to add momentum. Keep in mind that this technique requires more energy to maintain.
When it’s time to change direction on flat terrain, just about anything works if it involves picking up a ski and turning it in the new direction. To do an about-face, use a common method known as the kick turn: (1) Stop, and plant your poles slightly behind you, with the pole on the side you’re turning toward between your skis. (2) Lift the ski you’ll turn first, kick it out, and swing it entirely around so that it’s facing in the opposite direction. (3) Bring the offside pole across and plant it farther away from you than usual. (4) Lift the second ski, bring it around, and shift your ski poles into a more normal position. You end up with both skis pointing in the same new direction. The kick turn can be used on just about any terrain (even steep side hills)—as long as you can stop first.
When the terrain gets steeper, you need to shorten your stride and maintain proper balance. The most common mistake made by newcomers is leaning forward on uphill terrain. The center for traction is the center of the ski, under your foot. Leaning forward weights the front of the ski, and you lose traction. Stand up straighter, push down firmly with your heels, keep your stride short (think baby steps), and use your legs as your primary power source (poles are secondary).
At a certain level of steepness, you need to change your technique, or you’ll end up downhill skiing—backward. On firmly packed snow of moderate steepness, you may find the herringbone technique useful. Spread your tips wide, but keep the tails close together, forming a letter V. Roll your knees inward as you climb, digging the inside edges of the skis into the snow. Keep making the letter V again and again as you ascend. Once mastered, the herringbone can get you up short climbs quickly.
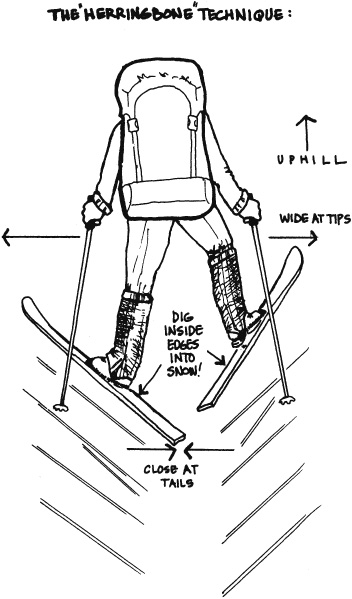
Side-stepping is an easier but slower way to ascend short, steep distances, especially when the snow is soft. Stand side-ways on the slope, keeping your skis perpendicular to the fall line (the route you would take if you were falling down the slope). Dig your edges into the snow by rolling your knees uphill. Step up with the uphill ski, then bring the downhill ski up beside the uphill ski. For better balance and a little push, hold the downhill ski pole at the top of the grip and shorten your grip on the uphill pole.
Another uphill method, particularly useful on long ascents, involves traversing the hillside—skiing back and forth, gaining a little elevation with each pass, and then doing a kick turn and traversing back, until you reach the top. Performing the kick turns while facing downhill (i.e., turning away from the hillside) is much easier than while facing uphill, and the chance of falling is reduced. With skins, you may be able to negotiate the direction changes of a traverse without a kick turn.
If you anticipate skiing uphill in the back-country for more than relatively short distances, skins are a necessary piece of gear . . . You can climb up amazingly steep slopes with skins (far steeper than wax would allow), and you use a lot less energy. Skins that use glue generally require removal of the kick wax. Otherwise, they may “gum up” and come unglued. Glueless skins can be used directly over your kick wax, but they don’t usually glide as well. Because skins in general glide less efficiently than either waxed or waxless skis, most people take them off on flat or downhill terrain.
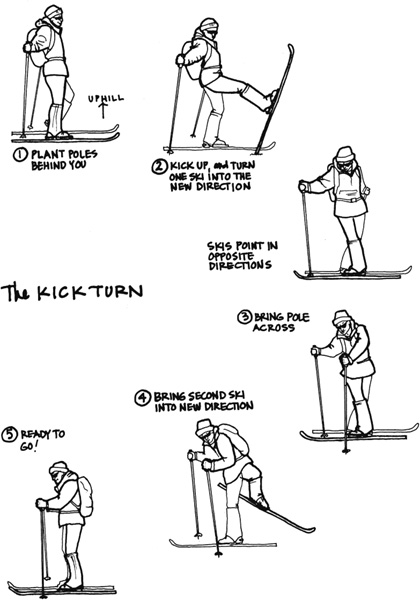
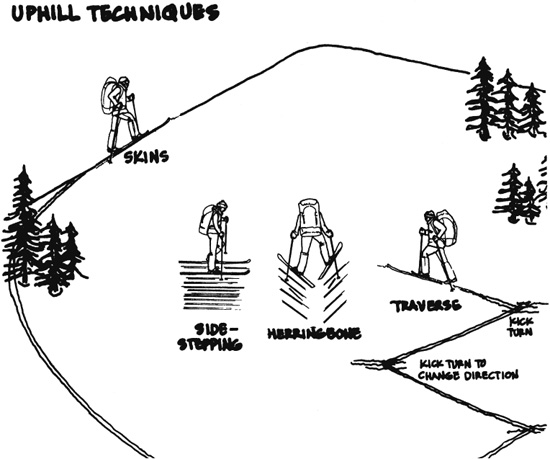
When a downhill run is not too steep, you can just point your skis toward the bottom and go for it. If you feel out of control on the descent, you can always fall—a method of stopping that seldom fails.
With just a bit of practice, you can gain control of a descent on relatively well-packed snow by using the basic snowplow. In the snow-plow, you turn your skis into an inverted V, with the point at the tips and the wide part at the tails. By rolling your knees slightly inward, you slide on the inside edges of the skis, while the outsides of the skis “plow” the snow. By shifting your weight to one ski, you slowly turn in the opposite direction. Weighting the right ski, for instance, turns you to the left. Practice the snowplow without a pack before attempting it with a pack.
For many, the best method of controlling a downhill run is by traversing back and forth across the fall line of the slope, losing a little elevation with each traverse. This is the reverse of the uphill method mentioned earlier.
If it’s just too steep and icy and otherwise scary, you can take off your skis and hike down the hill. The best way to go down a steep snow-field is to plunge your heels hard into the snow with your knees slightly bent, a technique known as plunge-stepping. Bend forward at the waist for more stability. Hike off to the side of the slope to prevent gouging holes in the hillside, leaving a clean field for those who might be more daring or accomplished.
For many, the ultimate backcountry, free-heel skiing experience is mastering the telemark turn. Telemark turns are initiated with the body in a low position on the skis. The downhill ski is pushed forward, the leg on that side is flexed so that the knee is over the toes, and the uphill leg is bent so that the heel comes off the ski far enough to point up at the skier’s hindquarters. Ideally, the skier’s weight remains equally distributed on both legs. When the hips are turned toward the fall line, the skis turn. As the uphill ski becomes the downhill ski, it is turned slightly inward to form a “V” with the other ski, which sharpens the turn. As the turn is completed, reversing the leg positions prepares the skier for the next turn.
When done correctly, the telemark turn is a ferociously lovely maneuver. Learning it involves a lot of practice. You can read about it, but to master the telemark turn, you’ll need a teacher and lot of time on skis. In the words of author and master tele-skier Allen O’Bannon, “All it takes to be able to ski well in the different conditions possible in the backcountry is time skiing the different conditions in the backcountry.”
There are bad ways and good ways to fall. Bad ways include planting your face in the snow and tumbling out of control down a steep incline. The best way to fall is simply to sit down, off to the side, on your buttocks if possible. It hurts less to sit down, and it’s easier to get back up from a sitting position. On steep terrain, try to fall to the uphill side. To get up, shift your body around to the front of your skis, slide one foot back, and stand. On an incline, if your skis are uphill, roll over so they’re on your downhill side. In deep, soft snow, take your poles off and cross them in the snow, forming the letter X. By holding the poles at the cross of the X, you can support your weight while you regain a standing position. If you’re burdened with a heavy pack, you’ll probably have to take it off.
When there is no trail through the snow, someone has to break one, an ambitious and tiring task, especially in the deep stuff. After each step, you have to free your ski from the snow for the next step. This involves kicking and pulling up until the ski breaks free of the snow, then stepping forward. Leaning back a bit while kicking and pulling usually lends power to the attempt to free the ski.
A group will move faster, and stay happier, if the person breaking trail is relieved periodically. As soon as the trailbreaker tires or feels overheated, she or he steps off the trail and rejoins the group as the last person in line. This type of relay keeps a fresh skier in front, full of energy and psychologically supported by the fact that in fifteen to twenty minutes she or he will be replaced.
When the breaking is really tough—such as in deep snow with a thin crust that supports a skier’s weight for a second or two—a group may choose to take turns breaking trail without a pack or sled. One or two skiers move ahead, breaking the trail, then ski back for their packs or sleds, hauling them along a well-groomed track. In some conditions, groups may even choose to break trail one day and move camp down the track the next day.
It’s more difficult skiing with a pack than without one, and only practice can refine your skill. The big difference is that your center of gravity shifts farther back. You have to compensate by developing a good packing system. The load should be balanced so that it rides evenly on your center of gravity. The heavier items ride best close to your body, especially when you’re skiing. Otherwise, you tend to be pulled backward or thrown sideways. Whether you pack the heavy gear high or low depends on personal preference and terrain. Packing the weight high requires less effort to haul but makes you a little more wobbly—not a problem when the terrain is relatively flat and the skiing is easy. Packing the load low makes your job a bit more strenuous but gives you better balance when the going gets rough or steep.
In a well-organized pack, the load is fitted snugly so that it doesn’t shift, throwing you off balance when you least expect it. Everything that you might want on short notice should be readily accessible. You don’t want to have to conduct an extended search for your lunch, camera, parka, or asthma medication. Place small items together in a stuff sack to avoid losing them in the depths of your pack. Items such as your sleeping bag can be buried deep. Nothing with hard edges should be placed where it can jab into your back.
A sled helps to manage the weight and bulk of an extended winter expedition. When skiing with one an important consideration is how you will attach yourself to it. Sometimes, skiers attach their sleds to their packs. This works, but it’s better if the sled is attached separately to your hips, in which case you just point the sled in the direction of travel, hook yourself to it, and put on your pack. This way, the pull is more from the core of your body, and therefore easier. This also allows you to throw off the pack, haul the sled up a steep incline, and return for the pack. Finally, a sled attached directly to your hips is easier to turn.
In open, relatively flat areas, a simple harness system consisting of a couple of towropes tied—or, even better, clipped with carabiners—to the hip belt of your pack will suffice. But the more you need to turn and the steeper the terrain, the more rigid the harness system needs to be to keep the sled from veering back and forth. Rigidity can be supplied by poles, six feet long or so, between you and the sled. You can also create rigid poles for a plastic sled by running two towropes, one from each side of the forward end of the sled, through two lengths of PVC pipe or conduit. (Be careful with PVC in extreme cold, or it will break.) The poles work best in terms of control if they are crossed in the middle, then attached to a well-padded hip belt. The crossover allows you to use natural hip movements to steer the sled into your ski track when you make turns. The crossed poles tend to keep the sled in your track as long as you ski normally.
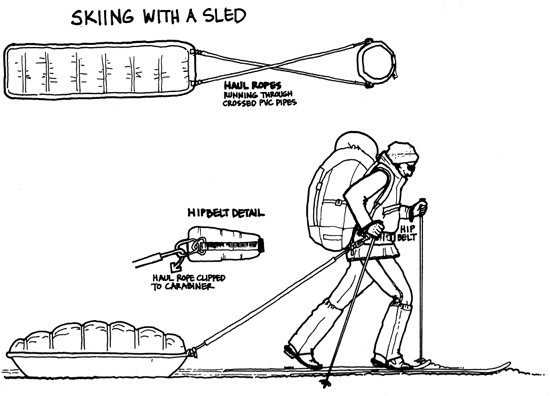
Loading the sled also requires some ingenuity. First, knock off any ice that might be stuck to the bottom (doing this after loading is unnecessarily difficult). Place a duffel bag in the bottom of the sled, and load the heavy items in the middle with the weight spread out evenly on either side. Pack lighter, bulkier items in the front and back. Your shovel can be lashed to the top of the duffel bag, for quick access. Nylon webbing works great for lashing the bag to the sled, and it should hold the load down tightly so that it won’t shift; this also reduces the chance of snagging trees. Keep the lash lines as short and simple as possible, for easy adjustment. Six short straps, for instance, are much easier to handle than one long strap. Rather than threading them around the load and tying knots, use lash straps that are clipped together with quick-release buckles.
On flats and rolling terrain, sled hauling is basically a process of overcoming inertia and keeping it overcome. It usually takes a little jolting pull to start the sled sliding. Once you get going, you can adjust it, if, for instance, you feel it pulling to one side.
Uphills require only a change in effort, primarily in creating long traverses and switchbacks. A well-broken track on the side of a hill may have a small retaining wall that holds the sled in the track. You can also create such a track by slowly and laboriously stomping out a wider-than-usual track. Be sure to have a competent skier up front breaking trail. Despite careful attempts at control, sometimes the sled slips down the slope, so stay attentive and be prepared to stop it. On nasty sidehills, you can put a tether on the back of the sled, so that the person behind you can hold the back up if it starts to slide. If it’s a very steep and unavoidable sidehill, try crossing the slope without your sled to “groom” a track for it. When you make a traverse, turning back to cross the same sidehill again, find an area that is free of trees and not too deep; aim to make more of a U-turn than a kick turn. Seasoned skiers may choose to do an uphill-facing kick turn and then muscle the sled up into a track that now heads off in the opposite direction.
When it comes to downhill runs with a sled, your style is largely determined by your ability to ski. You can race the sled to the bottom and see who wins, or you can let the sled pass you and follow it down. On a wide open slope, some skiers can negotiate slow, gradual turns, keeping the sled somewhat under control. With a long, safe run-out, you may choose to abandon the sled to its own fate and ski down without it. There’s one method that never fails: carrying your skis and walking down with your sled.
Traveling on the flat, frozen surface of a lake can be a lot easier than struggling through nearby snow, but it is not without hazards, even in northern climes, where the ice may be several feet thick. Springs and swirling currents sometimes create thin ice that is difficult to detect until you plunge through. And snow-covered lakes may be covered with surprisingly thin ice because the snow insulates the surface of the water, preventing it from freezing solid enough to support you. When possible, avoid any lakes that you are unsure of. If you are going to cross a frozen lake, keep these tips in mind:
• Keep your skis on. This disperses your weight over a larger area, reducing the chance that you will break through.
• Spots where streams enter and leave lakes are notorious for thin ice.
• Dark areas are sometimes indicators of thin ice.
• Objects sticking out of the ice, such as logs and rocks, sometimes trap and radiate solar energy, creating weak spots.
• Tap the ice ahead of you with your ski pole. A solid “thunk” means thick ice, and a hollow “bonk” indicates thin ice.
• Areas shadowed by trees or cliffs usually provide the thickest ice, because the sun has less time to warm them.
• If you fall through, don’t panic. Spread your arms wide over the edge of the hole, kick your feet vigorously to get them to the surface, and swim up onto the ice, pulling with your arms as you kick.
• If you anticipate crossing frozen lakes often, carry a pair of ice picks on a string around your neck to facilitate climbing back onto the slippery surface if you fall through.
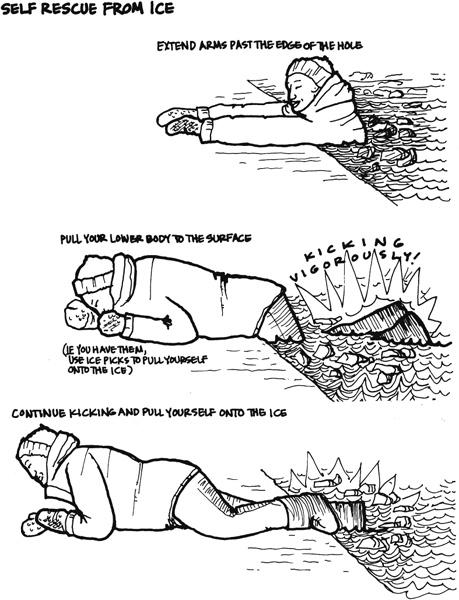
Fast-moving rivers typically fail to freeze solid enough to support your weight, but slow-moving water may provide excellent pathways in the dead of winter. The tips for crossing frozen lakes apply here as well, plus the following:
• Avoid ice over the fastest current, which is easier said than done. The strongest current—and the weakest ice—tends to lie on the outside of bends and where the river drops.
• Wind-scoured ice tends to be weaker than ice in sheltered areas.
• If you think the water is deep enough to submerse you, don’t cross. A breakthrough may cause you to be sucked under the ice.
• Look for braids in the river where the flow separates into two or more narrow channels. These generally offer a few narrow, shallow crossings.
Additionally, if you’re able to determine the depth of the ice, keep in mind the minimum safe depths above.
—From NOLS Winter Camping
U.S. Army
It is more difficult for you to satisfy your basic water, food, and shelter needs in a cold environment than in a warm environment. Even if you have the basic requirements, you must also have adequate protective clothing and the will to survive. The will to survive is as important as the basic needs. There have been incidents when trained and well-equipped individuals have not survived cold weather situations because they lacked the will to live. Conversely, this will has sustained individuals less will-trained and equipped.
There are many different items of cold weather equipment and clothing issued by the U.S. Army today. Specialized units may have access to newer, lightweight gear such as polypropylene underwear, Gore-Tex outerwear and boots, and other special equipment. Remember, however, the older gear will keep you warm as long as you apply a few cold weather principles. If the newer types of clothing are available, use them. If not, then your clothing should be entirely wool, with the possible exception of a windbreaker.
You must not only have enough clothing to protect you from the cold, you must also know how to maximize the warmth you get from it. For example, always keep your head covered. You can lose 40 to 45 percent of body heat from an unprotected head and even more from the unprotected neck, wrist, and ankles. These areas of the body are good radiators of heat and have very little insulating fat. The brain is very susceptible to cold and can stand the least amount of cooling. Because there is much blood circulation in the head, most of which is on the surface, you can lose heat quickly if you do not cover your head.
There are four basic principles to follow to keep warm. An easy way to remember these basic principles is to use the word COLD—
C — Keep clothing clean.
O — Avoid overheating.
L — Wear clothes loose and in layers.
D — Keep clothing dry.
C—Keep clothing clean. This principle is always important for sanitation and comfort. In winter, it is also important from the standpoint of warmth. Clothes matted with dirt and grease lose much of their insulation value. Heat can escape more easily from the body through the clothing’s crushed or filled up air pockets.
O—Avoid overheating. When you get too hot, you sweat and your clothing absorbs the moisture. This affects your warmth in two ways: dampness decreases the insulation quality of clothing, and as sweat evaporates, your body cools. Adjust your clothing so that you do not sweat. Do this by partially opening your parka or jacket, by removing an inner layer of clothing, by removing heavy outer mittens, or by throwing back your parka hood or changing to lighter headgear. The head and hands act as efficient heat dissipaters when overheated.
L—Wear your clothing loose and in layers. Wearing tight clothing and footgear restricts blood circulation and invites cold injury. It also decreases the volume of air trapped between the layers, reducing its insulating value. Several layers of light-weight clothing are better than one equally thick layer of clothing, because the layers have dead-air space between them. The dead-air space provides extra insula tion. Also, layers ofclothing allow you to take off or add clothing layers to prevent excessive sweating or to increase warmth.
D—Keep clothing dry. In cold tempera tures, your inner layers of clothing can become wet from sweat and your outer layer, if not water repellent, can become wet from snow and frost melted by body heat. Wear water repellent outer clothing, if available. It will shed most of the water collected from melting snow and frost. Before entering a heated shelter, brush off the snow and frost. Despite the precautions you take, there will be times when you cannot keep from getting wet. At such times, drying your clothing may become a major problem. On the march, hang your damp mittens and socks on your rucksack. Sometimes in freezing temperatures, the wind and sun will dry this clothing. You can also place damp socks or mittens, unfolded, near your body so that your body heat can dry them. In a campsite, hang damp clothing inside the shelter near the top, using drying lines or improvised racks. You may even be able to dry each item by holding it before an open fire. Dry leather items slowly. If no other means are available for drying your boots, put them between your sleeping bag shell and liner. Your body heat will help to dry the leather.
A heavy, down-lined sleeping bag is a valuable piece of survival gear in cold weather. Ensure the down remains dry. If wet, it loses a lot of its insulation value. If you do not have a sleeping bag, you can make one out of parachute cloth or similar material and natural dry material, such as leaves, pine needles, or moss. Place the dry material between two layers of the material.
Other important survival items are a knife; waterproof matches in a waterproof container, preferably one with a flint attached; a durable compass; map; watch; waterproof ground cloth and cover; flashlight; binoculars; dark glasses; fatty emergency foods; food gathering gear; and signaling items.
Remember, a cold weather environment can be very harsh. Give a good deal of thought to selecting the right equipment for survival in the cold. If unsure of an item you have never used, test it in an “overnight backyard” environment before venturing further. Once you have selected items that are essential for your survival, do not lose them after you enter a cold weather environment.
As a survivor … in an arctic or subarctic region, you will face many obstacles. Your location and the time of the year will determine the types of obstacles and the inherent dangers. You should—
• Avoid traveling during a blizzard.
• Take care when crossing thin ice. Distribute your weight by lying flat and crawling.
• Cross streams when the water level is lowest. Normal freezing and thawing action may cause a stream level to vary as much as 2 to 2.5 meters per day. This variance may occur any time during the day, depending on the distance from a glacier, the temperature, and the terrain. Consider this variation in water level when selecting a campsite near a stream.
• Consider the clear arctic air. It makes estimating distance difficult. You more frequently underestimate than overestimate distances.
• Do not travel in “whiteout” conditions. The lack of contrasting colors makes it impossible to judge the nature of the terrain.
• Always cross a snow bridge at right angles to the obstacle it crosses. Find the strongest part of the bridge by poking ahead of you with a pole or ice axe. Distribute your weight by crawling or by wearing snowshoes or skis.
• Make camp early so that you have plenty of time to build a shelter.
• Consider frozen or unfrozen rivers as avenues of travel. However, some rivers that appear frozen may have soft, open areas that make travel very difficult or may not allow walking, skiing, or sledding.
• Use snowshoes if you are traveling over snow-covered terrain. Snow 30 or more centimeters deep makes traveling difficult. If you do not have snowshoes, make a pair using willow, strips of cloth, leather, or other suitable material.
It is almost impossible to travel in deep snow without snowshoes or skis. Traveling by foot leaves a well-marked trail for any pursuers to follow. If you must travel in deep snow, avoid snow-covered streams. The snow, which acts as an insulator, may have prevented ice from forming over the water. In hilly terrain, avoid areas where avalanches appear possible. Travel in the early morning in areas where there is danger of avalanches. On ridges, snow gathers on the lee side in overhanging piles called cornices. These often extend far out from the ridge and may break loose if stepped on.
—From Survival (Field Manual (21-76)
Greg Davenport
Illustrations by Steven A. Davenport
Statistics have shown that 90 percent of all avalanche victims rescued within five minutes survive, but less than 50 percent are still alive after thirty minutes. These statistics, however, are proving to be far more favorable for individuals who use the AvaLung breathing device. Proper preparation and avalanche rescue knowhow are key to survival, since time is of the utmost importance. Educate yourself through reading and taking avalanche training classes. Learn about conditions, both past and present, where you intend to go: any hazards located in the area, such as slide paths, cornices, or crevasses, and the current weather report and avalanche dangers associated with it. Make sure all members of the group have compatible beacons. Most accidents could have been avoided through proper preparation. Take the time to do it, and if conditions seem questionable, go another day.
This type of avalanche begins at a single point and collects snow as it heads downhill, growing bigger and bigger. A point release avalanche occurs most often in the spring, when new snow falls on a smooth snow surface that was created by repeated thawing, freezing, or rain. The risk is high after heavy snowfall (10 to 12 inches total, or when it has fallen at more than 1 inch per hour).
A slab avalanche is a solid, cohesive layer of snow that slides all at once after breaking free from its bond to an underlying surface. Most avalanche victims are caught in this type of avalanche. These usually occur during or after a winter storm and are often triggered by someone.
Avalanches are usually triggered by humans or conditions related to recent weather changes. Most wilderness areas stay abreast of avalanche conditions and closely monitor the snow’s condition for the potential of slides. In order to pass this information onto the backcountry traveler, the United States Avalanche Danger Descriptors guide was created. This guide provides a color reference to describe current avalanche conditions. This information should be used in addition to your judgment, experience, and knowledge of the area.
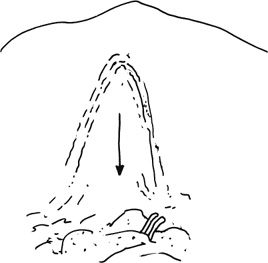
Point release avalanche.

Slab avalanche.
Four factors should be considered when evaluating the potential risk of an avalanche: terrain, snowpack, weather, and the human factor.
A terrain’s potential for an avalanche is based on the angle, aspect, and configuration of the slope.
SLOPE ANGLE
A slope angle between 25 and 60 degrees has the potential to be an avalanche hazard. Most avalanches occur between 30 and 45 degrees. Steeper slopes rarely hold on to snow, and shallow slopes rarely produce enough momentum for the snow to slide. Unless you are highly experienced at measuring these angles, use a clinometer (see page 285).
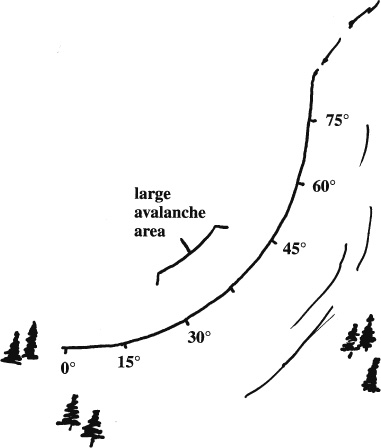
Slope angle.
SLOPE ASPECT
A slope’s aspect describes its position in relation to the sun and wind. In winter, your odds are better when using slopes that have sun exposure, since the snow will normally settle and stabilize faster. In spring and summer, however, the sun-exposed slopes tend to be less stable, and odds favor slopes that had limited sun during the winter. Slopes that directly face the wind tend to be safer than those that don’t since the wind either rids them of new snow or packs it down. Leeward slopes, those sheltered from the wind, collect the snow blown off the windward side, resulting in cornices, deep unconsolidated snow, and wind slabs.
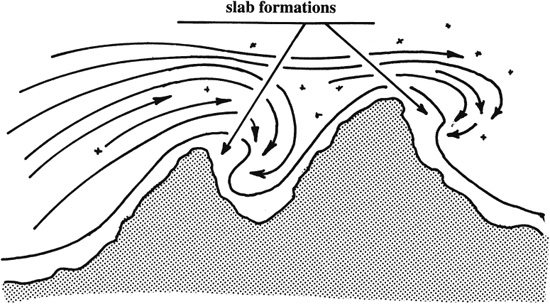
Slope aspect.
SLOPE CONFIGURATION
Does the slope have a convex or concave appearance? Snow on a convex slope is under a great deal of tension and is more prone to release than snow covering a concave slope. A straight, open, and steep slope is an obvious hazard. Trees that are bent down and away from the upward slope and are missing limbs on the uphill side are signs that a major avalanche has traveled through that area.
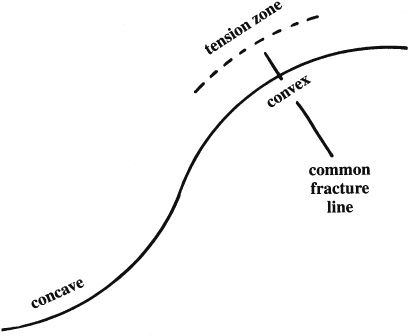
Slope configuration.
A snowpack is created by episodes of intermittent storms, changes in weather, and temperature fluctuations. Through this process, multiple layers of consolidated snow are formed, one on top of the other. New layers may or may not adhere to the underlying layer. Slabs are formed when an upper cohesive layer does not bond with a thin, weak layer that sits underneath it. The stability of a snowpack can be evaluated by doing the Rutschblock test and paying close attention to Mother Nature’s clues. However, it’s important to consider all factors related to potential avalanche hazards.
RUTSCHBLOCK TEST
The Rutschblock test can be used to evaluate the stability of a slope and its potential to slide. In this test, the skier or snowshoer actually stands on a large block of snow to see if it can support his or her weight. The test should be performed on a slope that has similar conditions to the one you intend to approach. Using a shovel or snow saw (improvise if neither is available), cut three sides of a square block—the front and two sides—each about 6 feet long and 3 feet deep, or until the lower weaker layer is exposed. Using a saw, ski, or other improvised device, cut the back wall free of the slope and to the same depth as the other sides. Wearing your skis or snowshoes, step onto the center of the block, from the uphill side. Does the block support your weight? If it does, then safely do a series of jumps to see if the block slides free of the weaker surface. A slope is considered extremely unstable if the test slab breaks free while you are approaching the site, creating it, or simply standing on the block; a slope is considered unstable if the slab breaks free when you’re flexing in preparation for the first jump or during the first jump itself; a slope is considered relatively stable when it takes repeated hard jumps to break the slab free; and a slope is considered stable when the slab doesn’t fail after repeated jumps. Other tests may be used to evaluate a slope’s stability, but they are not as reliable as the Rutschblock test, and it’s difficult to interpret the value of the information they provide. If you are concerned about a slope’s stability, take the time to do the Rutschblock test.
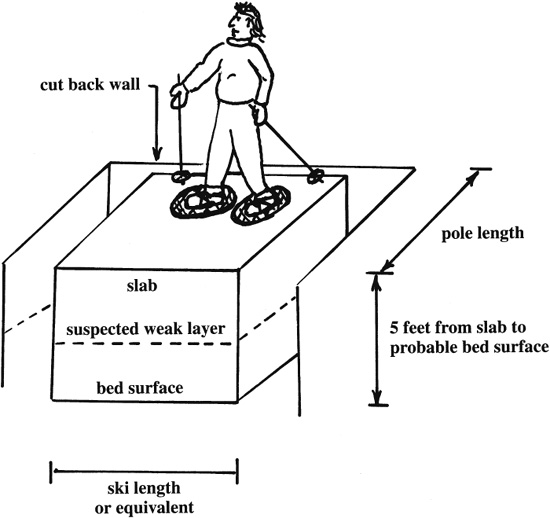
Rutschblock test.
NATURE’S CLUES
Mother Nature provides clues about the snow-pack’s stability. Paying close attention to them will provide additional information about the relative risk associated with your present location.
Recent avalanches on similar slopes
This is probably the best clue you’ll ever get, and it’s advisable to avoid similar slopes.
Shooting cracks
A shooting crack could be a precursor to a slab avalanche. If snow conditions create this effect, avoid avalanche terrain.
Whumping noises
When a snowpack’s weak layer collapses, it makes a whump sound. If you hear this sound, avoid avalanche terrain.
Hollow sounds
A hollow, drumlike sound radiating up from the snowpack may indicate that a weak layer is underneath an upper cohesive layer (slab) of snow. If you hear this sound, avoid avalanche terrain.
Snowfall, rain, wind, and temperatures all affect the bond between layers of snow.
RECENT SNOWFALL OR RAIN
The risk of avalanche is extremely high after a heavy snowfall (10 to 12 inches total, or when it has fallen at more than 1 inch per hour). Rain penetrates the snow and weakens the bond between layers, making it easier for a slab to break free.
WIND
Wind-loaded snow forms slabs on the leeward side of a hill, making it a potential avalanche hazard. Avoid areas where wind loading is a concern. (Also see Slope Aspect, above.)
TEMPERATURES
Warm or cool temperatures can create various conditions that may cause a greater potential for avalanche.
Warm temperatures
If warm temperatures do not occur rapidly, they will increase the density and bond of the snow-pack, making it less prone to avalanche. A rapid warming trend, on the other hand, will weaken the snow, making the bond between layers less stable and more prone to human-triggered slab avalanches.
Depth hoar
Depth hoar is a layer of snow, close to the ground’s surface, created when there is a significant difference in temperature between the snow’s surface and the ground. It is composed of highly faceted snow crystals and cannot support much weight, making it a dangerous underlying layer that rarely bonds to the subsequent layers of snow that cover it. The risk of depth hoar formation is highest during the early season. If present, the potential for an avalanche is extremely high.

Surface hoar is similar to dew and is created on the snow’s surface when cool, cloudless, and calm nights are present. Like depth hoar, it doesn’t bond well with subsequent snow cover, and its weak layer creates a potential avalanche hazard.
All too often, individuals believe that no disaster will ever happen to them. They don’t realize how often people have perished when decisions were based on similar attitudes. Travel decisions should be made on a multitude of factors, including everything discussed to this point. The group’s attitude about the conditions, their goals, and the risks involved should all be considered, along with each member’s technical skills, physical strength, and available equipment. Take the time to think things through. After all, traveling into the backcountry is supposed to be time spent having fun, not fighting for your life.
Sometimes it may be necessary to cross an area that presents an avalanche risk. If this should be the case, try to avoid large, steep, leeward bowls, gullies, and cornices. Choose safer routes, such as ridgetops, valley floors, dense timber, and low-angle slopes. Before starting, remove ski pole straps; undo pack buckles for quick doffing; secure all zippers and openings on your clothing and gear; make sure your avalanche beacon is on and in the transmit mode; identify any safe islands that might be located in your route of travel, such as rocks or trees; and establish an escape route. Once ready, cross one person at a time, with all other members of the group watching. Try to cross at either the top or bottom of the slope; avoid the center, where escape may be impossible.
All members in your group should carry avalanche transceivers with fresh batteries. Before departing the trailhead, check your beacons by doing a walk-by. This is done by having one member’s beacon turned to receive and having each other member walk by with his or her beacon on in the transmit mode. The receiving beacon should have an increased sound and visual signal as each member approaches. Don’t forget to check the receiving beacon also. Once you’ve assured that all transceivers are working properly, turn them all to the transmit mode. If someone becomes buried, all other members of the party then switch to the receive mode to locate the victim.
Each member traveling into avalanche country should also carry a probe, a snow shovel, and an Avalung (described in detail on page xxx).
Always try to avoid avalanche areas and risk. If you decide to enter an avalanche-prone area, however, make sure you have your avalanche gear with you, and that it is operational. Beacons should have been checked in advance, have new batteries, and turned on to transmit. The AvaLung mouthpiece should be located within inches of your mouth, so that you can quickly insert it if needed. If an avalanche occurs, immediately shout to let everyone else know. Insert the AvaLung mouthpiece, and dry to discard gear such as your skis and poles. The exception to discarding gear would be if you can ski to the side and out of danger, or you are wearing items like snowshoes that cannot be quickly taken off. If a safe area is accessible, try to get to it. If you are knocked down, try to stay on top of the surface, using a swimming motion, while heading toward the side of the avalanche. If unable to escape, once the slide begins to slow down, try to get a hand to the surface so it can be seen, and make an air space in front of your face with your other arm. The AvaLung will greatly increase your potential of rescue, and at this point, if you are using one, it’s best to relax and conserve your energy.
Once an avalanche has occurred, the most experienced member of the team should immediately take charge and organize the search. Before doing anything, however, the risk of another avalanche needs to be ruled out, escape routes established, and a lookout assigned. Have all members of the rescue party turn their beacons to the receive mode. If anyone leaves his or her beacon in the transmit mode, you’ll waste time tracking this signal. Mark the last position where the victim was seen, and use this as your starting point. Time is crucial. At this point, no one should be sent for help. Every member of the team should stay and search.

A beacon signal has a cone of silence.
An avalanche rescue has three phases: coarse, fine, and pinpoint. Each phase builds upon the preceding one.
COARSE SEARCH
The coarse search begins by quickly evaluating the snow’s surface for partially covered subjects, discarded gear, or terrain features that may predict the person’s travel route or resting point. Mark the subject’s last known site, along with any other clues, such as found equipment. Trees and rocks are common areas where an individual may become trapped during an avalanche, so probe any that are located in the avalanche’s path. This should be a quick, methodical process. Next, starting just above the subject’s last known location, line up your team members, spacing them approximately 50 feet apart and facing downhill. Have all members turn their beacon volume all the way up and begin a parallel (to one another) downhill search pattern. Rescuers should rotate the beacons left and right and forward and back as they move. This is necessary due to the wire wrap antenna. A signal can be stronger or weaker based on the rescue beacon’s position relative to the subject’s beacon. If only one person was caught in the avalanche, once a signal is obtained, two rescuers should begin the fine search process, and all others should get their digging gear ready. If more than one person was involved, one rescuer should begin a fine search and the other members of the rescue team should continue the coarse search; in this situation, turn off the transmitting beacon once a subject is found.
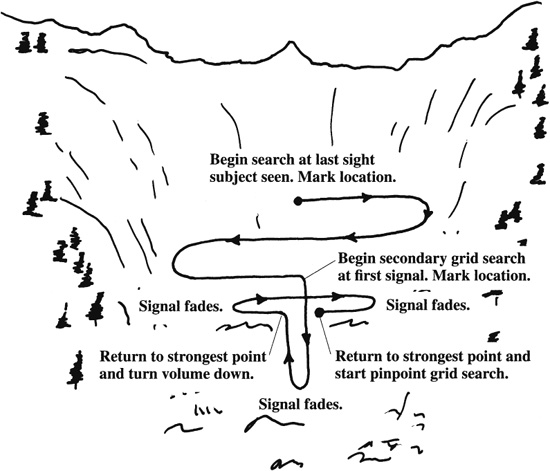
Coarse and fine search for avalanche subject.
FINE SEARCH USING THE BRACKET METHOD
When a signal is picked up, orient the beacon to the strongest signal by rotating it left and right and forward and back. Once the strongest signal is obtained, keep that orientation throughout the search. Walk in a straight line toward the increasing signal, continually reducing the beacon’s volume to the lowest audible level. Keeping the beacon oriented, continue your straight line of travel until the signal fades. Mark this spot. Without changing the beacon’s orientation, turn around and head back the same way you came. When the signal fades, mark the spot. Move to the center of the bracketed line, turn 90 degrees, and walk in a straight line, reducing the volume as you go. As before, once the signal begins to fade, mark the spot, turn around, and retrace your steps, marking where the signal fades. Keep the beacon oriented throughout this process. You now have four fade-out points. Move to the center of this second line, turn 90 degrees, and repeat the process. Continue this process of returning to the center of a line, turning 90 degrees, and marking fade-out points until the distance between these fade-out points is less than 6 feet. You can now move to the pinpoint search.
The cone of silence
A beacon puts out an oval signal that runs up and away on both sides of the antenna, wrapping around the beacon in an oval shape and returning to its base. These centrally connected oval signals create an area called the cone of silence, which is located directly above and below the antenna. If you move through this area, your signal will drop in intensity while in it but become strong again when you reach the other side. For this reason, when doing the bracket search, you should always go a few feet beyond the signal’s weakest point to make sure it doesn’t increase again. If it does, then that is the area you should mark. From there, turn around and travel back the same path, marking the spot where the signal transitions from weak to strong. Go to the center of this line and resume your search as done before, marking the line’s two lowest signal intensities. The newer dual antenna beacons may make this problem obsolete, but for now, it is still an issue.
FINE SEARCH USING THE TANGENTIAL METHOD
The tangential method is an alternative to the bracket method and is faster when used by someone trained in its method. It is not always successful, however, and should thus be learned as an alternative method and not instead of the bracket method. To use it, orient the beacon to the strongest signal by rotating it left and right and forward and back. Keep this orientation throughout the rescue. Travel toward the strongest signal. If the initial signal drops before you have traveled 15 feet, turn around and go in the opposite direction. After going 15 feet, reorient the beacon to its maximum signal intensity, reduce the volume to the lowest audible level, and move 15 feet, toward the signal’s strongest intensity. Repeat this process every 15 feet. Since the beacon signal of the subject has a curve (the cone of silence’s curve), your search will follow the curve.
PINPOINT SEARCH
With your beacon oriented and close to the snow’s surface, begin moving from side to side and front to back, trying to pinpoint the subject’s location. During this process, identify the area where the beacon’s signal produces its highest intensity while the volume is turned to its lowest level. A lot of beacons actually change tone sound when directly over another one. At this point, begin a quick but gentle probe of the area, taking care not to hurt the subject.
Once the subject has been located with the probe, leave it in place as a guide and begin digging. While digging, be careful not to injure the subject. Remove snow from the subject’s mouth and assess his or her status. If rescue breathing or CPR is indicated, begin it immediately. Treat for hypothermia and shock, and evaluate for a head or spinal injury.
If a rescue beacon is not available, begin a probe search. Taking care not to hurt the subject, gently probe at locations where he or she was last seen, at areas where equipment was found (especially the lowest location), and at likely resting spots. If you don’t have a probe, use ski poles or tree branches. After probing likely locations, establish a probe line that starts at the base of the debris and extends up the most likely trajectory.
Don’t be macho and dead! Take the time to evaluate avalanche conditions, and heed the warnings when they are present.
If you must travel into these areas, learn avalanche safety in advance and practice beacon rescue before you begin each trip.
Beacons operate on batteries and are prone to failure from cold soaking and life expectancy. To avoid cold soaking make sure to keep the beacons between your clothing layers. To avoid life expectancy issues, replace batteries before each trip.
—From Surviving Cold Weather
U.S. Army
In a survival situation, you may have to cross a water obstacle. It may be in the form of a river, a stream, a lake, a bog, quicksand, quagmire, or muskeg. Even in the desert, flash floods occur, making streams an obstacle. Whatever it is, you need to know how to cross it safely.
You can apply almost every description to rivers and streams. They may be shallow or deep, slow or fast moving, narrow or wide. Before you try to cross a river or stream, develop a good plan.
Your first step is to look for a high place from which you can get a good view of the river or stream. From this place, you can look for a place to cross. If there is no high place, climb a tree. Good crossing locations include—
• A level stretch where it breaks into several channels. Two or three narrow channels are usually easier to cross than a wide river.
• A shallow bank or sandbar. If possible, select a point upstream from the bank or sandbar so that the current will carry you to it if you lose your footing.
• A course across the river that leads downstream so that you will cross the current at about a 45-degree angle.
The following areas possess potential hazards; avoid them, if possible:
• Obstacles on the opposite side of the river that might hinder your travel. Try to select the spot from which travel will be the safest and easiest.
• A ledge of rocks that crosses the river. This often indicates dangerous rapids or canyons.
• A deep or rapid waterfall or a deep channel. Never try to ford a stream directly above or even close to such hazards.
• Rocky places. You may sustain serious injuries from slipping or falling on rocks. Usually, submerged rocks are very slick, making balance extremely difficult. An occasional rock that breaks the current, however, may help you.
• An estuary of a river. An estuary is normally wide, has strong currents, and is subject to tides. These tides can influence some rivers many kilometers from their mouths. Go back upstream to an easier crossing site.
• Eddies. An eddy can produce a powerful backward pull downstream of the obstruction causing the eddy and pull you under the surface.
The depth of a fordable river or stream is no deterrent if you can keep your footing. In fact, deep water sometimes runs more slowly and is therefore safer than fast-moving shallow water. You can always dry your clothes later, or if necessary, you can make a raft to carry your clothing and equipment across the river.
You must not try to swim or wade across a stream or river when the water is at very low temperatures. This swim could be fatal. Try to make a raft of some type. Wade across if you can get only your feet wet. Dry them vigorously as soon as your reach the other bank.
If necessary, you can safely cross a deep, swift river or rapids. To swim across a deep, swift river, swim with the current, never fight it. Try to keep your body horizontal to the water. This will reduce the danger of being pulled under.
In fast, shallow rapids, lie on your back, feet pointing downstream, finning your hands alongside your hips. This action will increase buoyancy and help your steer away from obstacles. Keep your feet up to avoid getting them bruised or caught by rocks.
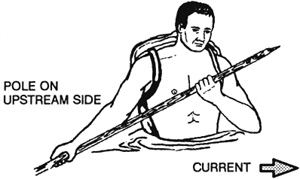
One man crossing swift stream.
In deep rapids, lie on your stomach, head downstream, angling toward the shore whenever you can. Watch for obstacles and be careful of backwater eddies and converging currents, as they often contain dangerous swirls. Converging currents occur where new watercourses enter the river or where water has been diverted around large obstacles such as small islands.
To ford a swift, treacherous stream, apply the following steps:
• Remove your pants and shirt to lessen the water’s pull on you. Keep your footgear on to protect your feet and ankles from rocks. It will also provide you with firmer footing.
• Tie your pants and other articles to the top of your rucksack or in a bundle, if you have no pack. This way, if you have to release your equipment, all your articles will be together. It is easier to find one large pack than to find several small items.
• Carry your pack well up on your shoulders and be sure you can easily remove it, if necessary. Not being able to get a pack off quickly enough can drag even the strongest swimmers under.
• Find a strong pole about 7.5 centimeters in diameter and 2.1 to 2.4 meters long to help you ford the stream. Grasp the pole and plant it firmly on your upstream side to break the current. Plant your feet firmly with each step, and move the pole forward a little downstream from its previous position, but still upstream from you. With your next step, place your foot below the pole. Keep the pole well slanted so that the force of the current keeps the pole against your shoulder.
• Cross the stream so that you will cross the downstream current at a 45-degree angle.
Using this method, you can safely cross currents usually too strong for one person to stand against. Do not concern yourself about your pack’s weight, as the weight will help rather than hinder you in fording the stream.
If there are other people with you, cross the stream together. Ensure that everyone has prepared their pack and clothing as outlined above. Position the heaviest person on the downstream end of the pole and the lightest on the upstream end. In using this method, the upstream person breaks the current, and those below can move with relative ease in the eddy formed by the upstream person. If the upstream person gets temporarily swept off his feet, the others can hold steady while he regains his footing.
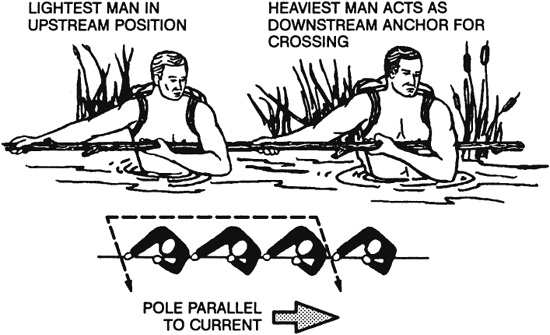
Several men crossing swift stream.
If you have three or more people and a rope available, you can use the technique shown [top right] to across the stream. The length of the rope must be three times the width of the stream.
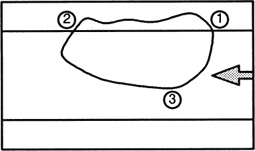
The person crossing is secured to the loop around the chest. The strongest person crosses first. The other two are not tied on — they pay out the rope as it is needed and can stop the person crossing from being washed away.
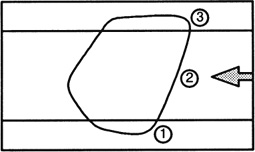
When he reaches the bank, 1unties himself and 2 ties on. No. 2 crosses, controlled by the others. Any number of people can be sent across this way.
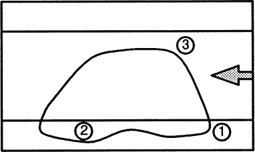
When 2 has reached the bank, 3 ties on and crosses. No.1 takes most of the strain, but 2 is ready in case anything goes wrong.
If you have two ponchos, you can construct a brush raft or an Australian poncho raft. With either of these rafts, you can safely float your equipment across a slow-moving stream or river.
The brush raft, if properly constructed, will support about 115 kilograms (253.5 pounds). To construct it, use ponchos, fresh green brush, two small saplings, and rope or vine as follows.
• Push the hood of each poncho to the inner side and tightly tie off the necks using the drawstrings.
• Attach the ropes or vines at the corner and side grommets of each poncho. Make sure they are long enough to cross to and tie with the others attached at the opposite corner or side.
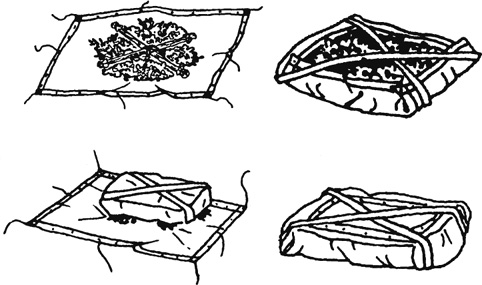
Brush raft.
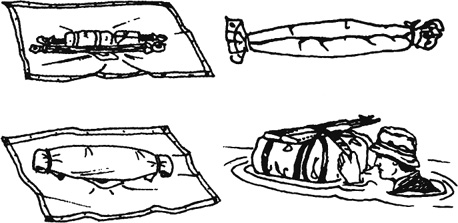
Australian poncho raft.
• Spread one poncho on the ground with the inner side up. Pile fresh, green brush (no thick branches) on the poncho until the brush stack is about 45 centimeters high. Pull the drawstring up through the center of the brush stack.
• Make an X-frame from two small saplings and place it on top of the brush stack. Tie the X-frame securely in place with the poncho drawstring.
• Pile another 45 centimeters of brush on top the X-frame, then compress the brush slightly.
• Pull the poncho sides up around the brush and, using the ropes or vines attached to the coroner or side grommets, tie them diagonally from corner to corner and from side to side.
• Spread the second poncho, inner side up, next to the brush bundle.
• Roll the brush bundle onto the second poncho so that the tied side is down. Tie the second poncho around the brush bundle in the same manner as you tied the first poncho around the brush.
• Place it in the water with the tied side of the second poncho facing up.
If you do not have time to gather brush for a brush raft, you can make an Australian poncho raft. This raft, although more waterproof than the poncho brush raft, will only float about 35 kilograms (6.6 pounds) of equipment. To construct this raft, use two ponchos, two rucksacks, two 1.2-meter poles or branches, and ropes, vines, bootlaces, or comparable material as follows:
• Push the hood of each poncho to the inner side and tightly tie off the necks using the drawstrings.
• Spread one poncho on the ground with the inner side up. Place and center the two 1.2-meter poles on the poncho about 45 centimeters apart.
• Place your rucksacks or packs or other equipment between the poles. Also place other items that you want to keep dry between the poles. Snap the poncho sides together.
• Use your buddy’s help to complete the raft. Hold the snapped portion of the poncho in the air and roll it tightly down to the equipment. Make sure you roll the full width of the poncho.
• Twist the ends of the roll to form pigtails in opposite directions. Fold the pigtails over the bundle and tie them securely in place using ropes, bootlaces, or vines.
• Spread the second poncho on the ground, inner side up. If you need more buoyancy, place some fresh green brush on this poncho.
• Place the equipment bundle, tied side down, on the center of the second poncho. Wrap the second poncho around the equipment bundle following the same procedure you used for wrapping the equipment in the first poncho.
• Tie ropes, bootlaces, vines, or other binding material around the raft about 30 centimeters from the end of each pigtail. Place and secure weapons on top of the raft.
• Tie one end of a rope to an empty canteen and the other end to the raft. This will help you to tow the raft.
Another type of raft is the poncho donut raft. It takes more time to construct than the brush raft or Australian poncho raft, but it is effective. To construct it, use one poncho, small saplings, willow or vines, and rope, bootlaces, or other binding material as follows:
• Make a framework circle by placing several stakes in the ground that roughly outline an inner and outer circle.
• Using young saplings, willow, or vines, construct a donut ring within the circles of stakes.
• Wrap several pieces of cordage around the donut ring about 30 to 60 centimeters apart and tie them securely.
• Push the poncho’s hood to the inner side and tightly tie off the neck using the drawstring. Place the poncho on the ground, inner side up.
• Place the donut ring on the center of the poncho. Wrap the poncho up and over the donut ring and tie off each grommet on the poncho to the ring.
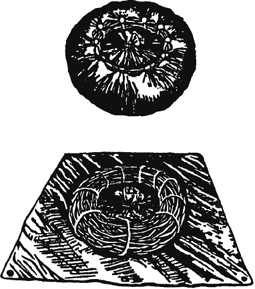
Poncho donut raft.
• Tie one end of a rope to an empty canteen and the other end to the raft. This rope will help you to tow the raft.
When launching any of the above rafts, take care not to puncture or tear it by dragging it on the ground. Before you start to cross the river or stream, let the raft lay on the water a few minutes to ensure that it floats.
If the river is too deep to ford, push the raft in front of you while you are swimming. The design of the above rafts does not allow them to carry a person’s full body weight. Use them as a float to get you and your equipment safely across the river or stream.
Be sure to check the water temperature before trying to cross a river or water obstacle. If the water is extremely cold and you are unable to find a shallow fording place in the river, do not try to ford it. Devise other means for crossing. For instance, you might improvise a bridge by felling a tree over the river. Or you might build a raft large enough to carry you and your equipment. For this, however, you will need an axe, a knife, a rope or vines, and time.
You can make a raft using any dry, dead, standing trees for logs. However, spruce trees found in polar and subpolar regions make the best rafts. A simple method for making a raft is to use pressure bars lashed securely at each end of the raft to hold the logs together. [See page below.]
If the water is warm enough for swimming and you do not have the time or materials to construct one of the poncho-type rafts, you can use various flotation devices to negotiate the water obstacle. Some items you can use for flotation devices are—
• Trousers. Knot each trouser leg at the bottom and close the fly. With both hands, grasp the waistband at the sides and swing the trousers in the air to trap air in each leg. Quickly press the sides of the waistband together and hold it underwater so that the air will not escape. You now have water wings to keep you afloat as you cross the body of water.
Note: Wet the trousers before inflating to trap the air better. You may have to reinflate the trousers several times when crossing a large body of water.
• Empty containers. Lash together empty gas cans, water jugs, ammo cans, boxes, or other items that will trap or hold air. Use them as water wings. Use this type of flotation device only in a slow-moving river or stream.
• Plastic bags and ponchos. Fill two or more plastic bags with air and secure them together at the opening. Use your poncho and roll green vegetation tightly inside it so that you have a roll at least 20 centimeters in diameter. Tie the ends of the roll securely. You can wear it around your waist or across one shoulder and under the opposite arm.
• Logs. Use a stranded drift log if one is available, or find a log near the water to use as a float. Be sure to test the log before starting to cross. Some tree logs, palm for example, will sink even when the wood is dead. Another method is to tie two logs about 60 centimeters apart. Sit between the logs with your back against one and your legs over the other. [See page 313.]
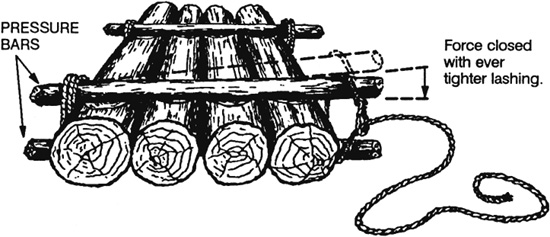
Use of pressure bars.
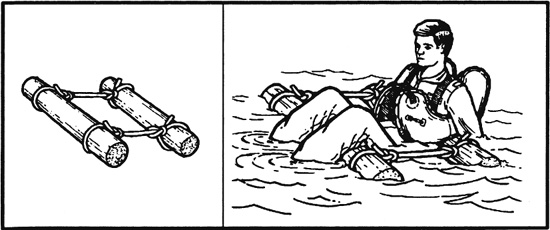
Log flotation.
• Cattails. Gather stalks of cattails and tie them in a bundle 25 centimeters or more in diameter. The many air cells in each stalk cause a stalk to float until it rots. Test the cattail bundle to be sure it will support your weight before trying to cross a body of water.
There are many other flotation devices that you can devise by using some imagination. Just make sure to test the device before trying to use it.
Other water obstacles that you may face are bogs, quagmire, muskeg, or quicksand. Do not try to walk across these. Trying to lift your feet while standing upright will make you sink deeper. Try to bypass these obstacles. If you are unable to bypass them, you may be able to bridge them using logs, branches, or foliage.
A way to cross a bog is to lie face down, with your arms and legs spread. Use a flotation device or form pockets of air in your clothing. Swim or pull your way across moving slowly and trying to keep your body horizontal.
In swamps, the areas that have vegetation are usually firm enough to support your weight. However, vegetation will usually not be present in open mud or water areas. If you are an average swimmer, however, you should have no problem swimming, crawling, or pulling your way through miles of bog or swamp.
Quicksand is a mixture of sand and water that forms a shifting mass. It yields easily to pressure and sucks down and engulfs objects resting on its surface. It varies in depth and is usually localized. Quicksand commonly occurs on flat shores, in silt-choked rivers with shifting watercourses, and near the mouths of large rivers. If you are uncertain whether a sandy area is quicksand, toss a small stone on it. The stone will sink in quicksand. Although quicksand has more suction than mud or muck, you can cross it just as you would cross a bog. Lie face down, spread your arms and legs and move slowly across.
Some water areas you must cross may have underwater and floating plants that will make swimming difficult. However, you can swim through relatively dense vegetation if you remain calm and do not thrash about. Stay as near the surface as possible and use the breaststroke with shallow leg and arm motion. Remove the plants around you as you would clothing. When you get tired, float or swim on your back until you have rested enough to continue with the breaststroke.
The mangrove swamp is another type of obstacle that occurs along tropical coastlines. Mangrove trees or shrubs throw out many prop roots that form dense masses. To get through a mangrove swamp, wait for low tide. If you are on the inland side, look for a narrow grove of trees and work your way seaward through these. You can also try to find the bed of a waterway or creek through the trees and follow it to the sea. If you are on the seaward side, work inland along streams or channels. Be on the lookout for crocodiles that you find along channels and in shallow water. If there are any near you, leave the water and scramble over the mangrove roots. While crossing a mangrove swamp, it is possible to gather food from tidal pools or tree roots.
To cross a large swamp area, construct some type of raft.
—From Survival (Field Manual 21-76)
U.S. Forest Service
Leave No Trace! guidelines help protect the land and lessen the sights and sounds of your visit.
Because most visitors do not live outdoors, they unknowingly violate the Leave No Trace! ethic by:
• Traveling and camping in large groups.
• Traveling off trails or roads, thereby causing scars and soil erosion, and trampling vegetation.
• Leaving campfire scars.
• Leaving human waste and garbage at a campsite.
• Polluting lakes and streams.
• Making loud noises that disturb wildlife and other visitors.
• Wearing brightly colored gear and clothes that make them visible to others in the area (exception: for rescue have a “fluorescent” vest or similar item—include it in your pack).
Lots of planning must go into a back-country trip if it is to be safe and fun. Gathering information from Forest Service, Bureau of Land Management, and National Park Service offices can help. They can provide current maps, firsthand information on trails and campsites, and anything else pertinent to the anticipated trip. Consider the group size, when and where to go, equipment, and food selection when planning a trip.
Group Size: Small groups are ideal in open areas such as deserts, meadows, and above timberline. Plan to travel and camp with fewer than 8-10 people, who can be divided into hiking groups of 2–4 during the day. It also is easier to plan for small groups and to keep them together. Campsites for smaller groups are easier to find and they harmonize better with the environment. Check ahead to see if there is a group size limitation in the area you plan to visit.
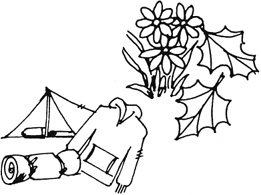
When and Where to Go: To find maximum solitude, avoid back-country trips on holidays and even some weekends. Since many popular trails and wildernesses always seem to be crowded, visit less popular areas. Plan such trips for the spring or fall, or even the winter.
What’s Needed and What’s Not: Brightly colored clothing, packs, and tents should be avoided because they can be seen for long distances and contribute to a crowded feeling. Consider choosing earth-tone colors to lessen the visual impact. Lighten your pack by repacking the food and removing glass and aluminum packing. They do not burn and add extra weight. Check for local restrictions prohibiting cans and bottles. IF YOU PACK IT IN, YOU SHOULD PACK IT OUT. Carry extra trash bags for litter pickup in and around your campsite. They also make great emergency rain gear.
Other suggested equipment is a small trowel or plastic garden shovel for burying human waste and for digging Leave No Trace! firepits. Leave the axe and saw at home, unless you are traveling by horse and need them to cut a trail. Firewood that cannot be broken by hand should be left as part of the natural system.
Be Prepared: Obtain a good map, plan your route, and leave your itinerary with someone at home, in case someone has to search for you. Know what weather conditions to expect in that area at that time of year and come prepared for the extreme temperature, wind, snow, and rain you might be exposed to. A day hike requires minimal survival gear: extra food, a signal mirror, whistle, and warm clothing. A highly visible vest (“fluorescent” orange or red) should be included in your pack for rescue in the event you become lost. Carry extra water in desert areas (a minimum of 2 quarts per day per person).
Remember:
• Plan for small groups.
• Obtain information about the trip ahead of time and plan your route.
• Visit a less popular area.
• Plan an off-season trip if you wish to avoid crowds.
• Select earth-tone colors (clothing and tents) to blend with the environment.
• Repackage food.
• Check on local rules and regulations.
• Filter or boil water.
Trails are an important part of back-country travel. They are designed to get people from one place to another with varying degrees of difficulty. Trails are also designed to drain off water with a minimum amount of soil erosion. Make an effort to stay on the trails no matter how you are traveling.
Switchbacks are the most abused portion of the trail system. A switchback is a reversal in trail direction. Many people shortcut switchbacks and create new trails trying to save time and energy. Cutting switchbacks creates a new scar on the hillside that will cause soil erosion and scarring.
Cross-country: Hiking or riding horses cross-country, off established trails is ok, but remember to stay spread out and off “social trails” that other users have begun. Avoid traveling through meadows and wet areas. They are fragile and will show the effect of footprints or hoofprints and group travel much longer than forested and rocky areas.
Bicycles and motorized vehicles are allowed in some back-country areas but not in wildernesses. To ride them cross-country will create social trails and cause erosion.
The feeling of solitude or adventure is broken when you see ribbons, signs, or even blazed trees that visitors have left to mark a path. Always discuss the planned route with your group members to avoid leaving these markers. If you must mark a route, remove markers before departing.
Remember:
• Stay on designated trails.
• Do not cut switchbacks.
• Plan your route so everyone knows where you plan to be.
• Select rocky or forested areas when traveling cross-country.
• Don’t mark or blaze your cross-country route.
One of the most important components of back-country ethics is to maintain courtesy toward others. It helps everyone enjoy their outdoor experience. Incompatible or competing activities must share limited facilities and areas. Excessive noise, unleashed pets, and damaged surroundings distract from a quality experience in the back country.
Keep the noise level down while traveling on trails. Radios and tape players do not belong in the back country. If your group meets another group, give uphill hikers the right-of-way. When you encounter groups leading or riding livestock, you should step off the trail on the lower side and let them pass. Stand quietly since some horses are spooked easily.
Keeps pets under control at all times. No one wants someone’s pets running through the area and frightening people and wildlife. Some wildernesses prohibit dogs or require them to be on a leash at all times.
Wildflowers, picturesque trees, and unusual rock formations all contribute to the back-country beauty we enjoy. Picking flowers, hacking trees, and chipping rocks disturb the natural ecosystem. Please leave them alone and protect them for others to enjoy. Take nothing but pictures…leave with only fond memories.
—From Leave No Trace! An Outdoor Ethic
Greg Davenport
Illustrations by Steven Davenport and Ken Davenport
Two basic pack designs are used backcountry travelers: internal- and external-frame packs.
The external-frame pack uses a frame that holds the pack away from your back. This is an advantage when traveling in hot weather, but it also makes the pack prone to sudden shifts that can occur without warning and disrupt your balance. An external-frame pack is best when used in extremely hot weather (during nontechnical travel) and when hiking on a trail.
When hiking off-trail, an internal-frame pack is preferable. This pack rides low on the body and close to the back, which allows you better balance as you travel. In hot climates, look for a frame that provides some degree of ventilation between your back and the pack. To do this, some manufacturers use a synthetic open mesh or ridges on the back of the pack that help wick moisture away from the body and allow for better air circulation.
The size of the pack you’ll need depends on its use. For overnight trips, 3,000 to 5,000 cubic inches are sufficient. For long trips, you’ll need 5,000 or more cubic inches. The pack should fit your back’s length and contour, have strong webbing, provide thick shoulder and waist padding, and have external pouches to carry extra water bottles.

An external-frame pack allows better circulation between the pack and your back.
You’ll need a folding pocketknife for the majority of your cutting work and a larger, fixed-blade knife or saw for the bigger projects. I consider the pocketknife one of my most important tools and use it in virtually all of my improvised tasks, including cutting line, improvising shelter, preparing fire, and skinning game. The weakest part of a folding-blade knife is its lock—the part that keeps the blade open and prevents it from closing on your fingers. A good lock will secure the blade tightly to the handle when it is open. I prefer a blade length of 3 inches.
For most big projects, such as cutting dead sage branches or prepping the larger stages of firewood, a large, fixed-blade knife is all you need. Avoid knives that have multiple modifications to the blade that supposedly allow you to do the unimaginable; it’s just a bunch of marketing hype. I prefer a 7- to 9-inch knife blade, with the total length measuring around 15 to 17 inches.
A knife has many uses and is probably one of the most versatile tools you can carry. The potential for injury is high, however, so take every precaution to reduce this risk. Always cut away from yourself and maintain a sharp blade.
The Benchmade knife has a patented axis lock that sets the standard for the folding-blade knife.
The SCOLD acronym—Sharp, Clean, Oiled, Lanyard, and Dry—can help you remember the proper care and use of your knives.
A sharp knife is easier to control and use, decreasing the chances of injury. Two methods of sharpening a knife are outlined below. To establish the best sharpening angle, lay the knife blade flat onto the sharpening stone, then raise the back of the blade up until the distance between it and the stone is equal to the thickness of the blade’s back side. To obtain an even angle, repeat the sharpening procedure on both sides of the blade. Each side should be done the same number of times.
Bill Seigle makes solid performing fixed-blade knives.
PUSH - AND-PULL TECHNIQUE
In a slicing fashion, repeatedly push and pull the knife’s blade across a flat sharpening stone. If a commercial sharpening stone isn’t available, use a flat, gray sandstone (often found in dry riverbeds.) For best results, start with the base of the blade on the long edge of the stone, and pull it across the length of the stone so that when you’re done, its tip has reached the center of the stone.
CIRCULAR TECHNIQUE
In a circular fashion, repeatedly move the knife blade across a circular sharpening stone or gray sandstone. Starting with the base of the blade at the edge of the stone, move the knife in a circular pattern across the stone.
Dirt and sand that get into the folding joint can destroy it and cause it to freeze closed or open, or even break. Dirt and sand can also be harmful to the blade’s steel and can lead to its deterioration. To clean a knife blade, use a rag and wipe it from the backside to avoid cutting yourself. Never run it across your pants or shirt, which would transfer the dirt into the pores of your clothing and risk a cut. Use a twig to help get the cleaning rag into hard-to-reach spots.
Keeping the knife’s blade and joint oiled will help protect them and decrease the chances of rust.
Before using your knife, attach it to your body with a lanyard. To determine the lanyard’s proper length, hole the knife in your hand and fully extend your arm over your head, then add 6 inches. This length allows you full use of the knife and decreases the risk of cuts due to a lanyard that is too short.
Keeping your knife dry is an important part of preventing rust, which can ruin the blade and the joint.
When selecting a stove, consider its weight; the altitude and temperatures of where you are going; the stove’s ease of operation, even in cold or windy conditions; and fuel availability. The two basic styles are canister and liquid fuel. Canister designs use butane, propane, or isobutene cartridges as their fuel source. The most common types of liquid fuels used are white gas and kerosene.
BUTANE OR PROPANE
A canister allows for a no-spill fuel that is ready for immediate maximum output. Butane and propane canisters are available throughout the United States and most of the world. I like these types of stoves due to their ease of use and unmatched performance. Some versions do not perform well in temperatures below freezing, however, and disposal of the used canisters and availability of fuel may sometimes be problems.
WHITE GAS
White gas has a high heat output and is readily available in the United States. Although the fuel quickly evaporates, it is highly flammable if spilled. The stove often does not require priming in order to start.
KEROSENE
Kerosene has a high heat output and is available throughout the world. Unlike white gas, when spilled this fuel evaporates slowly and will not easily ignite. The stove requires priming in order to start.
The exact use of the stove depends upon the manufacturer’s recommendations and the type of fuel you use. As a general rule, a windshield is a must, preheating the stove helps it work better, and a stove that has a pump performs better when pumped up. For safety purposes, don’t use a stove in a tent or enclosed area, except when considered absolutely necessary. If you do, make sure the area is vented and do everything in your power to avoid fuel leaks. Always change canisters and lines, fill the fuel tank, and prime the stove outside of the shelter.
A headlamp has become a great alternative to the old hand-held flashlight. The greatest benefit of a headlamp is that it frees up your hands so that you can use them to meet your other needs. When selecting a headlamp, consider its comfort, battery life, durability, weight, water resistance, and whether it will have a tendency to turn on while in a pack. I prefer the newer style headlamps, which provide a compact profile with the battery pack directly behind the bulb.
Cooking pots are luxury items that can be used to cook food and boil water. Many types are available; the kind you should use depends on your needs. I recommend a cookware set that includes a frying pan that doubles as a lid, several pots, and a pot gripper or handle. Pots are available in four basic materials:
Aluminum: Aluminum is cheap and the most common material used by backpackers. Unless the pan has a nonstick coating on the inside, however, plan on eating scorched food.
Stainless steel: Stainless steel is far more rugged than aluminum but weighs considerably more.
Titanium: Titanium is lighter than aluminum, but the cost may be prohibitive. It has a tendency to blacken your food unless you constantly stir it.
Composite: Composite cooking pots are durable yet lightweight. The inside is made from steel to reduce scorching, and aluminum is used on the outside to decrease weight.
—From Surviving the Desert