
Cecil Kuhne
Illustrations by Cherie Kuhne
The technique for crossing a river is commonly known as the ferry, and there are several types.
In the forward, or upstream, ferry, you point your canoe upstream and, with forward strokes, paddle against the current. Set your canoe at a thirty- to forty-five-degree angle to the current, with the bow pointing toward the shore you wish to travel to. In a tandem canoe, the stern paddler is responsible for setting and maintaining the proper angle to the current.
When you set an angle to the current and paddle forward, the forces applied against your canoe move you across the river. Varying your paddling force and/or the angle to the current will determine your final direction of travel.
The disadvantage to this method is that you have to look over your shoulder to see obstacles downstream.

Upstream Ferry.
The downstream ferry, with the bow of the boat headed downstream, uses the power of the river’s current and a forward stroke to move your boat across the river as you angle the bow toward the opposite bank. The angle is set and maintained by the bow paddler. With the back ferry, the bow is turned downstream as in the downstream ferry, only the paddle stroke is reversed. With the back ferry, you face the obstacle you want to avoid and backpaddle away from it. This technique allows you to see hazards downstream and to slow your speed in the current while moving laterally across the river. Unfortunately, the back ferry uses the much weaker back stroke.

Downstream Ferry.
You must adjust the ferry angle to account for the speed of the current and for how quickly you want to get across the river. To move across the river quickly, you should increase the angle of the canoe so that it is more perpendicular to the current. This increased angle, however, will increase the boat’s speed downstream because there is more surface area to moved by the current.

Ferry Angle.
To slow the downstream speed of the canoe, decrease the angle so that the canoe is more parallel to the current and the surface area of the canoe in the current is decreased. This decreased angle, however, will not allow quick movement across the river.
Remember: The ferry angle is always relative to the current, not the river bank. A canoe may appear to be broadside to the bank, but have a proper ferry angle in relation to the current.
An easy maneuver that can be used to avoid rocks in a slow-moving current is the parallel side slip.
The bow paddler picks the route through the rocks by moving the front of the canoe to the left or right. The stern paddler quickly moves the back of the canoe in the left or right. The stern paddler quickly moves the back of the canoe in the canoe in the same direction, keeping the canoe parallel to the current.
The strokes used for this maneuver are the draw and the pry. The stern paddler counters with strokes opposite to those of the bow paddler. For example, the bow paddler, with a quick pry, points the front of the canoe in the desired direction until the middle of the canoe is past the obstacle. The stern paddler, with a quick draw, then straightens out the canoe so it is parallel to the current again.
The parallel side slip is effective only in a slow-moving current. As the current’s speed increases, you must use a different maneuver. A canoe moving sideways, even slightly, makes a larger target for a rock.
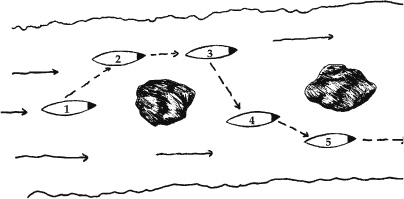
Parallel Side Slip.
Eddies often offer superb resting places in the river, and for this reason they are very useful to canoers. To paddle into an eddy you use a technique known as the eddy-in, and to leave an eddy, you use the peel-out.

Overview of Eddy Turns.
To eddy-in, point your canoe toward the top (upstream end) of the eddy, starting well upstream of the eddy so that the current will not carry you past it. Paddle forward and enter the eddy with good forward momentum.
The moment the bow crosses the eddy line and enters the calm water in the eddy, your canoe will start to spin because of the current differentials. As the canoe spins, you must lean into the turn, (i.e., upstream) to avoid overturning.
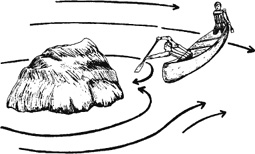
The bow paddler uses a pry, and the stern paddler uses a low brace to enter an eddy.
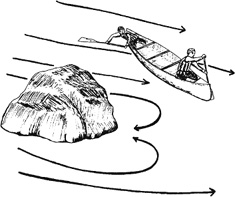
The bow paddler uses a high brace, and the stern paddler uses a forward sweep to enter an eddy.
The peel-out is the method used to leave an eddy. A similar maneuver to the eddy-in, it uses the same techniques of turning on the eddy line.
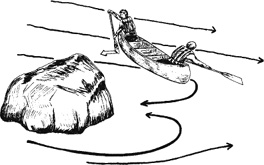
The bow paddler uses a pry, and the stern paddler uses a low brace to leave an eddy.
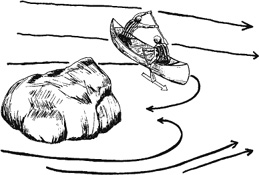
The bow paddler uses a high brace, and the stern paddler uses a forward sweep to leave an eddy.
Paddle upstream in the eddy, and point the canoe so that it will cross the eddy line at a ninety-degree angle. It is important to have enough forward speed to carry you across the eddy line and into the current. Then, you must lean into the turn (i.e., downstream).
—From Paddling Basics: Canoeing
Cecil Kuhne
Illustrations by Cherie Kuhne
Some rivers have rapids strewn with rocks and boulders. These are called boulder gardens or rock gardens. Scout such rapids and plan a careful route through them. Use eddies that form behind rocks to assist your turns and to slow your boat down.
It is best to anticipate upcoming rocks well in advance. If you’re about to broach on a rock and you can’t avoid the collision, lean toward the rock, allowing the current to flow underneath your boat. If you follow your instincts and lean away from the rock, the kayak or canoe could flip, fill with water, and become pinned against the rock. Fortunately, many boulders have a pillow on the upstream side, which tends to push you away from the rock.
After you’ve taken a long, close look at the rapids ahead, either from the boat or from shore, and have decided on your route through the whitewater maze, it’s time for the run—and some fun!
Selecting the proper entry into a set of rapids is very important, because it often determines the rest of the run. The V-shaped tongue at the head of most rapids typically points to the deepest and least obstructed channel. When there’s more than one tongue, the best one will usually be the longest one or the one that drops most quickly.
As you approach the rapids, take one last look at where you’re going. Once you’ve decided on the route, don’t change your mind midstream unless you see something significant that you didn’t spot earlier.
The basic rule is to keep the boat headed directly into the waves of the rapids. This is the most stable position; a boat that’s sideways to the current is much more prone to overturning.
Knowing which holes to avoid is the essence of the art. Slowing your speed downstream is essential, and this is typically accomplished through a series of ferry maneuvers across the river, moving the boat along the deepest and least obstructed channels.
If there are holes you can’t avoid, try to punch through them as hard and fast as you can. This maneuver takes advantage of the current flowing downstream of the hole. Throwing your weight downstream may also help you push through.

Proper Entry into the Tongue.
The ferry maneuver is especially important on a bend in the river. Currents don’t curve with the river’s bends. Instead, they flow in a straight line from the inside of the bend to the outside. The river’s tendency, as a result, is to move a boat to the outside of the bend, where the deepest and fastest current is usually found. The swift currents tend to sweep boaters into cliff walls, large boulders, and downed trees. You need to anticipate this well in advance and begin correcting your course immediately. The back ferry is often the most effective stroke in this situation, since it allows you to see downstream and to slow your course downriver.
It’s best to approach rapids on the inside of a bend, so that you can avoid any obstacles along the outside. Once you’ve determined that the outside is clear, you can move to the deeper and faster current there.

Negotiating a Bend.
A river is generally less intimidating at lower water levels. There may be more obstacles to avoid, but the river is moving more slowly, allowing more time to scout rapids and make decisions. Less volume means reduced power as well, so the river may be more forgiving.
Constant rock dodging can be tiring, however. Load the kayak or canoe lightly so it will be more maneuverable and easier to float over shallows.
To avoid the frustration of coming to a halt in shallow spots, watch ahead for signs of shoals. If the river is clear, a color change may alert you to shallows. Watch the surface of the river and follow the waves. River current favors the high bank and the outside bend.
Large rapids demand special skills. Don’t attempt large-volume rivers until you’re ready for them. The main problem is the incredible force of the current. Scout big-water rapids carefully from shore. Keep a lookout for eddies, which will offer a temporary haven from the rapids around you. If the water’s cold, wear protective clothing.
Once on the river, you have to paddle hard into big waves so that the kayak or canoe doesn’t slide backward. If you get knocked sideways by a powerful wave, correct your position immediately so that the kayak or canoe doesn’t flip.
The greatest danger in high water comes from reversals, which can swell to enormous proportions. If you find yourself in a large hole, head in bow-first and paddle furiously. You’ll need to generate enough speed to push through the wave and power your boat out of the hole. Should you lose momentum, you’ll feel the kayak or canoe sliding backward. Brace hard downstream to keep it upright. You may be able to catch the current below the surface with your paddle, and then propel the beat free. The danger of reversals is that strong back currents can easily trap a swimmer, who is then recirculated until flushed out.
If you’re caught in such a predicament, don’t panic. The recirculating effect ends at the sides of the reversal; try to work your way out toward the sides. If this fails, thrust your paddle below the surface to reach the forward-flowing current.
You may have seen photographs of kayakers jumping waterfalls. This is definitely not recommended. Even experts have suffered neck injuries, leaving them quadriplegics for life. It’s simply not worth the risk.
The art of surfing a river wave is much like riding an ocean swell, except that on a river the waves are stationary and the water moves through them.
Look for waves that are regular in shape and form. Turn your boat to face upstream as you enter the waves, then paddle as hard as you can, straight upstream. When the boat stalls on a wave, you’re surfing. A rudder stroke will keep your boat from slipping sideways.
Wind can be just as much a hazard on a lake as rocks and rapids are on a river. There are a few techniques that will help you deal with windy conditions.
It’s important to know the techniques for paddling into headwinds to keep the kayak or canoe from capsizing. Before crossing open waters, study your map or the horizon for the route that offers the best wind protection and the most possibilities for getting off the water should the wind increase.
To hold a kayak on course while heading into the wind, you need to paddle hard with quick and effective correction strokes. As waves increase in size and speed, the top of the wave curls over in a dangerous condition known as a breaking wave. As a breaking wave approaches, try to turn the bow straight into it. You’ll lose some forward speed, but pushing straight into the waves reduces your chance of capsizing. When whitecaps occur, it is time to get off the lake.
Paddling in crosswinds requires yet another set of tactics. Even in a light crosswind, you may be blown sideways and, as a result, you will arrive downwind of your desired destination. As cross-winds increase, the risk of being rolled over by the waves also increases. To avoid these problems, you need to angle into the waves, known as quartering the waves. Turn the bow into large breaking waves to avoid capsizing.
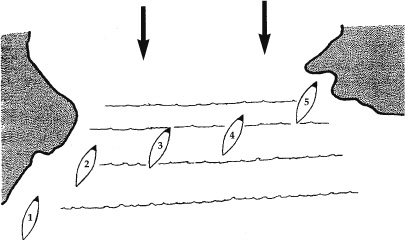
Negotiating Crosswinds.
Paddling in tailwinds may sound simple because the wind is behind you. This may be true in light winds, but as wind and waves increase, tailwinds can become challenging. When a wave comes from behind you, it pushes the stern up. The kayak starts to pick up speed as it surfs down the face of the wave and buries its bow in the wave ahead. As the wave passes under the kayak it may pivot the boat sideways into the trough created between the two waves. If this happens, the kayak can easily capsize. To keep the kayak from turning into the trough, use a strong rudder or draw stroke.
—From Paddling Basics: Kayaking
Wayne Dickert and Jon Rounds
Illustrations by Roberto Sabas
Beginners, especially, should paddle in a group that includes at least one experienced paddler.
In a downriver group, the lead boater should be a strong paddler who, ideally, knows the particular river. But even on unfamiliar water, a skilled boater can run a rapid, then get out and direct the trailing members of the group to the best route through…The last boat in the group, the “sweep boat,” should also have an experienced paddler, and this person must carry rescue gear and a first-aid kit and know how to use them. The least experienced or skilled paddlers should stay between the lead and sweep boats.
Statistics show five factors recur in boating fatalities.
At the scene of fatal boating accidents, PFDs are often found inside a swamped boat or floating beside it. Failure to have a PFD, or to wear it, is a common ingredient in drownings.
Hypothermia caused by immersion in cold water is a leading cause of death in boating accidents. Such accidents often occur in the spring, when the air temperature is warm but the water is still cold, and boaters are not dressed warmly enough. Layered clothing of the right fabrics is essential in cold weather, especially when water is involved.
Inexperienced paddlers with no formal training are more likely to be victims of fatal accidents than trained, experienced paddlers.
Alcohol is a leading contributor to boating fatalities, as it inhibits both coordination and judgment.
Nonswimmers are more frequent drowning victims than swimmers.
Adapted from The American Canoe Association’s Canoe and Kayaking Instruction Manual by Laurie Gullion. Used with permission of Menasha Ridge Press.
When you’re headed downriver and you approach a difficult-looking stretch, remember that you always have two choices: you can run it or carry around it. How can you possibly make this decision without seeing what’s ahead? You can’t. If you come to a blind corner, paddle to shore and get out of the boat to scout ahead. In a straight run, you can rarely see a whole stretch of river from down there at river level in your boat. If no one in your group has run the stretch, paddle to shore and walk downstream along the bank to scout it.
From a vantage point above the river, look at the whole rapid, from top to bottom, and visualize where you will enter and where you will exit. Can you locate the eddies and holes and plot a good route through the rapid? What are the hazards? Is there a way around them? If not, do you have the skills to navigate them?
At this point you have to soberly assess your own skills and how they match up with the challenges. Then answer this basic question: Are you ready for the consequences of running the stretch? If you can’t avoid a big hole that’s likely to flip you, do you have a solid Eskimo roll? Are you confident about doing a wet exit? Do you know what to do if someone throws you a rope?
Such decisions are complicated by the fact that whitewater kayakers, as a group, tend to be risk-takers, a personality profile that may include confidence, optimism, or simply a thrill-seeking defiance of danger. It’s also true that most decisions about whitewater involve uncertainty. But in making such decisions, a veteran boater factors in the worst-case scenario and what he needs to do to survive it.
The very best way to orient yourself to the water is to bring someone who has paddled the route. Otherwise, talk to someone who has or consult guidebooks, maps, local paddling clubs, or paddling shops for river information. In using guidebooks, remember that river ratings are general guidelines that should be supported with more current and local information. You cannot assess the nature of a stretch solely on its difficulty rating. Fifty feet of Class III water is much less challenging than a full mile of it. Also, check the river level on the day of the run. Levels very dramatically with rainfall, drought, or dam releases, and there is no way to know the state of a river on a particular day without checking.
Finally, if you’ll be paddling several miles, check a map to see where roads are in relation to the river, in case you have to pull out and go for help in an emergency.
Flips in moving water are often sudden and followed by a confusion of overturned boats, swimmers, and floating equipment. Though it’s natural to go after the expensive kayak floating toward a falls or the dry bag holding your good camera, every paddler should have the following sequence of rescue priorities fixed in mind: People, Boats, Equipment.
Rescue the swimmer first. If he’s in a non-threatening situation, go for the boat. Often they can be rescued together. But be prepared to abandon the boat if it’s putting you in a dangerous position or if all your attention must be focused on the swimmer. Lastly, retrieve equipment.
As a general rule, if you are thrown from a boat in fast water, immediately roll onto your back and float with your legs downstream, knees slightly bent and feet out of the water. This position lets you fend off rocks with your feet, rather than your head. Never stand up in fast water that is more than ankle-deep. The force of rushing water can shove a lifted foot between rocks so tightly that you can be knocked over and held under. Standing up in fast water is one of the most common causes of ankle and leg injuries—and worse, of drowning—among boaters.
There are three exceptions to the safe swimming position. (1) If you see a route to shore through navigable water, turn over on your stomach and swim aggressively toward it. In some situations, you can stay on your back and backstroke upstream into an eddy (just like back-ferrying in a boat). In any case, there are times when taking action is better than floating into a worse situation. (2) If you’re being swept into a strainer—a downed tree or other obstruction with water flowing through it—turn around and approach it head-first. This position will let you pull yourself up onto the strainer with your arms. If you approach feet-first, the force of the current may drive you into the strainer below the surface and entrap you. (3) If you are about to be swept over a steep vertical drop, ball up: tuck your knees against your chest and wrap your arms around your legs.

If you are ejected from your boat in fast water, it’s usually best to enter the safe swimming position. Float through the rapids on your back with your knees bent and your feet facing downstream.
It’s sometimes advisable to abandon the safe swimming position and swim for shore if there’s a route through relatively safe water, especially if you’re about to be swept into a more dangerous situation downstream. In these instances, roll over on your stomach and swim aggressively for safety.
If you’re ejected from your boat and it is within reach, hand onto it—if you can do so without endangering yourself. Grab the upstream grab loop, and always stay upstream of the boat. If you’re downstream of the boat in a strong current, the boat can push you against an obstruction and pin you there. Don’t get caught between your boat and a rock, and always be ready to let go of the boat if it’s dragging you into a dangerous situation—it can be replaced.
A basic rule of river ethics is that every paddler should be prepared to rescue himself or others. Rope throwing is an essential rescue technique for whitewater paddlers. Every kayak in a group should carry a throw bag and every paddler should be practiced in throwing one. Putting a throw bag where you want it takes a little practice. Before a whitewater trip, each member should spend some time tossing a throw bag at a target. You may get only one shot in a critical situation. If there is only one rope in your group, it should be in the most experienced paddler’s boat.
Two general rules of rope rescue: (1) Never tie a rope to yourself, whether you’re the thrower or the swimmer. You must be able to release the rope if it’s pulling you under. (2) Carry a knife. Cutting a rope may save a life in the case of entanglement.

The rope thrower should be downstream of the swimmer and should throw the rope when the swimmer is still upstream of him.
ROPE-THROWER’S POSITION
When your group approaches a difficult stretch where capsizing is likely, a rope-thrower should be positioned on shore at a spot just downstream of the stretch, one that has solid footing and from which the swimmer can be pulled into calm water or an eddy.
THROW
First yell to the swimmer to get his attention. Then pull a few feet of rope from the throw bag and hold it in your non-throwing hand. When you’re ready to throw, yell “Rope!” and fling the bag toward the swimmer with an underhand or sidearm toss, holding the tag end of the rope with your non-throwing hand. The rope should land a little downstream of the swimmer, so he’s floating toward, not away, from it. In other words, throw long, not short. The swimmer can always grab a rope that goes over him, but a short throw may be out of his reach.
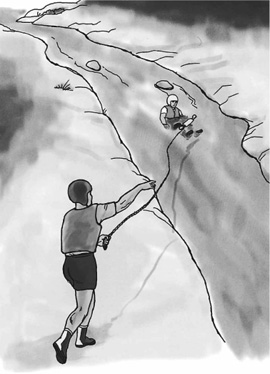
Throw the rope underhand, aimed over the swimmer or just down-stream of him—never short or upstream. You can always pull in some rope if the throw is too long.
BRINGING THE SWIMMER IN
Once the swimmer grabs the rope, brace yourself for his weight by leaning back or sitting down and digging your heels into the ground. Hold on and let the current swing him into shore. Don’t pull the rope out of his hands trying to yank him in.
SWIMMER’S GRIP AND POSITION
If you’re being rescued, hold the thrown rope to your chest once you catch it—never tie or wrap it around any part of your body. Roll over on your back with the rope over your shoulder while being pulled in. If you face forward on your stomach, your face will get the full force of the water your head could be towed under.
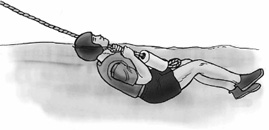
Lie on your back with the rope over your shoulder when being towed to shore.
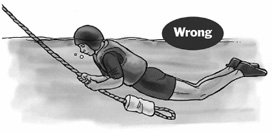
If you are face-down when being towed, your head can be dragged underwater.
When a paddler goes overboard and you’re faced with a rescue decision, remember this lifesaver’s adage. The sequence proceeds from shore-based, to boat-based, to water-based rescue.
Reach.
First try to reach the swimmer while standing on shore.
Throw.
If you can’t reach him, throw him a rope.
Row and Tow.
If you have no rope or he’s too far away to reach with a rope, paddle or row out to him and tow him in.
Go.
The last resort is going into the water after a swimmer, which is the most dangerous option, especially for someone untrained in lifesaving.
—From Basic Kayaking
Greg Davenport
All recreational vessels are required to carry one wearable PFD (Type I, II, III, or V PFD) for each person aboard. Boats 16 feet and longer, except canoes and kayaks, must also carry one throwable PFD (Type IV). All PFD devices must be in good serviceable condition, meet coast guard approval, and fit the intended user. For best results, a PFD should be worn at all times, but if you are not wearing the device, it should be easily accessible and you should know how to put it on quickly in case of an emergency. The throwable device also should be visible and ready for immediate use. Although federal law does not require PFDs on racing shells, rowing sculls, racing canoes, and racing kayaks, state laws vary greatly and may mandate otherwise.
INHERENTLY BUOYANT
Mostly made of foam, this very reliable wearable and throwable PFD comes in all sizes and is made for both swimmers and nonswimmers.
INFLATABLE
This wearable PFD is made for the adult swimmer at least sixteen years old. Its compact design makes it easy to wear and perform routine tasks without getting in the way. To meet coast guard requirements, this PFD must have a full cylinder, and all status indicators on the inflator must be green.
HYBRID
Foam and inflatable combined, this reliable wearable PFD comes in all sizes and is made for both swimmers and nonswimmers.
TYPE I
Type I is created for offshore use and is effective in all waters, including rough seas, or where rescue may be delayed. This extremely buoyant PFD is designed to turn an unconscious wearer face up in the water.
TYPE II
Type II is created for near-shore use and is effective in calm inland waters or where a quick rescue can be expected. This PFD will also turn an unconscious wearer face up in the water, but not as often or with the same ease as type I.
TYPE III
Type III is created for use in calm, inland water where a quick rescue can be expected. The wearer must actively maintain a face-up position and must therefore be conscious for the PFD to work.
TYPE IV
This throwable PFD is for use in calm, inland waters where help is always available. Not intended as a wearable PFD, this device is thrown into the water so that the person overboard can grasp it and be pulled to the vessel.
This special-use PFD comes in many formats depending on the type of activity it was made to be used with. It can be carried instead of another PFD, but only if it is used in accordance with its labeling. Because some of these devices provide hypothermia protection, they make excellent multiuse items.
When purchasing a personal floatation device, be sure it is Coast Guard approved. Try it on. The PFD should fit snuggly to your body yet allow you to freely move your arms. To make sure it fits right, zip it up, tighten down the straps, and raise your arms over your head. Are you able to move them freely while the device is tightened down? Next, have someone raise the PFD straight up your shoulders. If the zipper reaches your nose or higher, get a smaller PFD. If you are able, test the PFD in water to make sure that it keeps your mouth and nose above the waterline when your head is tilted back. The optimal PFD includes pockets and clips capable of storing emergency gear like whistles, mirrors, strobes, and flares.
—From Surviving Coastal and Open Water
Cecil Kuhne
Illustration by Cherie Kuhne
Few pieces of boating gear have progressed more in comfort and safety than the life jacket. The “personal flotation device,” or PFD, as they are called by the Coast Guard, can generally be described by their type.
For safety, you’ll need a Type III or Type V PFD. Type III PFDs, usually shorter and with flotation “ribs” rather than “slabs,” are designed for canoers and kayakers who require more freedom of motion than Type V PFDs allow. The Type V category covers special designs for whitewater, generally with commercial raft passengers in mind. These jackets offer greater flotation and safety than the Type III, but tend to be bulkier and more restrictive. (Incidentally, Type I is the bulky, orange “Mae West” jacket filled with kapok; Type II is the horse-collar version, which is inadequate for river use; and Type IV is a buoyant seat cushion, unsuitable for just about everything.)
When choosing a PFD, favor safety over comfort. PFDs designed for hard-shell kayakers often have extra flotation in the area below the waist, and these can be flipped up for comfort. The amount of flotation you require in a life jacket depends primarily on your body’s own flotation, your experience, and the kind of whitewater you’ll be tackling.

Life Jacket
For easy rivers, a “shortie” Type III offers a good measure of safety and unrestricted motion. In whitewater, a Type V or a high-flotation version of a Type III is better. There should be sufficient buckles and straps to secure the jacket firmly around your body. You’ll want to wear the PFD snugly to keep it from riding up over your head, so make certain your jacket fits well.
Always fasten all buckles, zippers, and waist-ties when you put the life jacket on. Never wear the PFD loose or open in the front, and pull the side straps down snug. This is also important to avoid entangling yourself should the boat overturn. Make a habit, too, of securing your life jacket when you take it off, so the wind doesn’t blow it away.
A good PFD will give you years of protection if treated properly. Don’t use your life jacket as a seat cushion. After each trip, hang the jacket to maintain its shape and prevent it from getting mildew. Clean it often, using a mild soap so as not to harm the interior foam.
—From Paddling Basics: Canoeing
Greg Davenport
A parka and rain pants will protect you from moisture and wind. They are normally made from nylon with a polyurethane coating, a waterproof coating that breathes, or a laminated waterproof membrane that breathes (Gore-Tex). Sometimes, a parka will come with an insulating garment that can be zipped inside. Regardless of which material you choose, your parka and rain paints should meet the following criteria.
These garments should be big enough for you to comfortably add wicking and insulating layers underneath without compromising your movement. The parka’s lower end also should extend beyond your hips to keep moisture away from the top of your pants.
Look for zippers that separate at both ends.
The openings for parkas should be located in front, at your waist, under your arms, and at your wrist. The openings for rain pants should be located in the front and along the outside of the lower legs to about midcalf to make it easier to add or remove boots. Pants for women are available with a zipper that extends down and around the crotch. These openings can be adjusted with zippers, Velcro, or drawstrings.
Seams must be taped or well bonded to prevent moisture from penetrating through the clothing.
What good is a pocket if you can’t access it? Make sure the pocket opening has a protective rain baffle.
A brimmed hood will help channel moisture away from the eyes and face. In addition, a neck flap will help prevent loss of radiant body heat from the neck area.
When deciding whether to wear a wet or dry suit, consider the insulation and protective qualities of the suits. How cold is the water, and how long will you be submersed? Are you in an area where you need to protect your skin? Without an appropriate suit, long submersions in water with temperatures below 98 degrees F will decrease your body’s core temperature, which could lead to hypothermia. The two types of suits available are wet and dry. When deciding which suit to buy, select one that provides the best protection from exposure and skin scrapings. A bright-colored suit is a better signal and preferred to the black versions. Consider a full body suit that has a snug fit without any compromise in arm or leg movement. Make sure the suit fits well and has good seam placement and that its wrist and ankle seals are tight but not too tight as to cut off circulation. Next, consider the thickness of the material. Use the following guide as a general rule of thumb when deciding how thick your suit should be. Recognize that thicker is probably better, and you should always err on the conservative side.
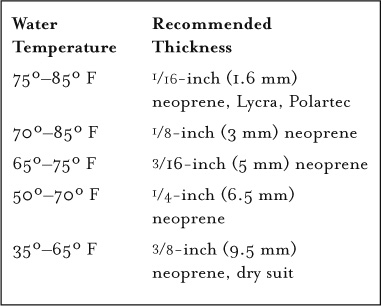
Although some wet suits are used in cold water, most are created for use in cool to warm waters. Mostly made of closed-cell foam called neoprene, the suits come in a variety of thicknesses and are made to fit snuggly to the body. Wet suits keep you warm by decreasing the amount of heat lost from conduction (direct contact) and convection (current movement around the body). Trapped air bubbles in the neoprene help to insulate you from heat loss due to conduction, and a well-fitting suit with minimal inside water flow helps to protect you from heat loss due to convection. A polyester layer next to the skin and an outer jacket that is coated rubber or Gore-Tex will increase the insulation value of your wet suit. Because a full-body wet suit is too restrictive in the arms for some, they use a farmer john’s suit (a full wet suit with no arms) instead. These suits are mostly appropriate in places with mild to moderate weather conditions most of the time.
Dry suits were originally created for use in cold water, but they may also be worn in places with mild to moderate temperatures. These watertight suits are made of foam neoprene, coated rubber, or Gore-Tex. Because neoprene and coated rubber don’t allow body heat and moisture to escape, you will get wet from the inside. Gore-Tex, on the other hand, allows body moisture (radiant heat), not droplets of sweat, to escape while it still protects you from outside moisture. All of the options provide little to no insulation value, so to keep warm, you will need to wear an inner wicking layer and a middle insulation layer under the dry suit. The seals at the wrist, ankles, and neck of the suit must be extremely tight but not too tight to cut off your circulation. Some dry suits come with boots and hoods as part of the garment. Once you have the suit on, you will need to burp the suit to expel all of its excess inner air.
Most immersion suits are full-body type V flotation devices designed to handle prolonged exposure to cold water and provide face-up flotation. These brightly colored suits often have built-in buoyancy support, adjustable spray shields, reflective tape, hoods, booties, gloves, and inflatable head rests. Adult suits are sold as one size fits all and can be worn by a person weighing anywhere from 110 to 330 pounds. Suits should be inspected at least once a year and placed in an area that you can quickly access should an emergency occur. Because time is of the essence in an emergency when you need to put on an immersion suit, the USCG recommends that you practice until you can get the suit on in sixty seconds or less.
Since more than 50 percent of your body heat is lost through your head, you must keep it covered. There are many styles of headgear, and your activity and the elements will dictate which style you choose. As a general rule, there are two basic types of headgear: rain hat and insulating hat.
A rain hat is often made from nylon or an insulation material with an outer nylon covering. For added waterproof and breathable characteristics, Gore-Tex is often used. For added protection in extreme conditions, choose a hat with earflaps. These hats perform best when worn while in the vessel or on shore.
An insulating hat is made from wool, polypropylene, polyester fleece, or neoprene. The most common styles are the watch cap, the balaclava, and the neoprene hood or hooded vest. The balaclava is a great option in the vessel or on shore since it covers the head, ears, and neck yet leaves an opening for your face. Neoprene hoods and hooded vests are good choices for water wear.
Since so much heat is lost through the head, headgear should not be the first thing you take off when you are overheating. Mild adjustments, such as opening the zipper to your coat, will allow for the gradual changes you need to avoid sweating. In cold conditions, headgear should only be removed when other options have not cooled you down enough.
Since a fair amount of heat is lost from the hands, you should keep them covered. Gloves encase each individual finger and allow you the dexterity to perform many of your daily tasks. Mittens, which encase the fingers together, decrease your dexterity but increase hand warmth from the captured radiant heat. Which type you decide to wear will depend on your activity. I often will wear gloves when working with my hands, and then when not working, I will insert the gloved hand inside a mitten. My gloves are made from a polyester fleece or a wool/synthetic blend. My mittens are made from a waterproof yet breathable fabric, such as Gore-Tex. When in the water, I often will wear neoprene gloves.
Boots, a very important part of your clothing, should fit your needs and be broken in before your trip. When selecting boots, consider the type of travel you intend to do. I have four styles of boots, each of which serves a different purpose. They are made of leather, lightweight leather/fabric, rubber, and neoprene.
Leather boots are the ideal all-purpose boot. Under extreme conditions, you will need to treat them with a waterproofing material (read the manufacturer’s directions on how this should be done) and wear a comfortable, protective wool-blend sock. Another popular option in leather boots is the added Thinsulate and Gore-Tex liner, which help to protect your feet from cold and moist conditions. If you decide to use Thinsulate or Gore-Tex, be sure to follow the manufacturer’s directions explicitly on how to care for and treat the boots. If oils soak through the leather and into the lining, the insulating qualities of the boots will be nullified. Although leather makes a good boot for on shore, it might not be the best option for on a deck or in a kayak.
The lightweight boot is a popular fair-weather boot because it is lighter and dries faster than the leather boot. On the downside, moisture easily soaks through the fabric and creates less stability for your ankle. Depending on the style of boot sole, it may or may not be a good option for deck or kayak use.
Rubber boots are most often used for extreme cold-weather conditions. They normally have nylon uppers with molded rubber bottoms. The felt inner boot can be easily removed and dries quickly. These boots perform well on a deck but tend to be too bulky for kayak use.
Neoprene booties that are made for kayaking are a good option to wear both in the kayak and on the deck. They have the insulation qualities of neoprene, boast a rigid sole, and provide good support when walking.
Keeping your boots clean will help them protect you better. For leather and lightweight leather/fabric boots, wash off dirt and debris using a mild soap that doesn’t damage leather. For rubber and neoprene boots, wash and dry the liners and clean all dirt and debris from the outer boots. If you decide to waterproof the leather boot, check with the manufacturer on its recommendations for what to use.
Socks need to provide adequate insulation, reduce friction, and wick away and absorb moisture from the skin. Most socks are made of wool, polyester, nylon, or an acrylic material. Wool tends to dry slower than the other materials but its still a great option. Cotton should be avoided because it collapses when wet and loses its insulation qualities. For best results, wear two pairs of socks. The inner sock (often made of polyester) wicks moisture away from the foot; the outer sock (often a wool-blend material) provides insulation to keep your feet warm. During extremely wet conditions, Gore-Tex socks are often worn over the outer pair of socks. Regardless of which sock you decide to wear, be sure to keep your feet dry and change your socks at least once a day. Immediately apply moleskin to any hot spots that develop on your feet before they become blisters.
Goggles or sunglasses with side shields that filter out UV wavelengths are a must while traveling in open water. It doesn’t take long to burn the eyes, and once this happens, you will have several days of eye pain along with light sensitivity, tearing, and a foreign body sensation. Since the symptoms of the burn usually don’t show up until four to six hours after the exposure, you will get burned and not even realize it is happening. Once a burn occurs, you must get out of the light, remove contacts if you are wearing them, and cover the eyes with a sterile dressing until the light sensitivity subsides. If pain medication is available, you will probably need to use it. Once healed, be sure to protect the eyes to prevent another burn. If you do not have goggles or sunglasses, improvise some by using either a manmade a natural material to cover the eyes and provide a narrow horizontal slit for each eye.
Zippers often break or get stuck on garments and sleeping bags. While this may not present a great problem under mild conditions, you can lose a lot of body heat when you are unable to use a zipper properly in a wet and cold-weather environment. To decrease the odds of this occurring, make sure your gear has a zipper with a dual separating system (separates at both ends) and teeth made from a material, such as polyester, which won’t rust or freeze. To waterproof your zippers, either use a baffle covering or apply a waterproof coating to the zipper’s backing. The waterproof coating allows for lighter weight and easier access to the zipper.
Ultraviolet (UV) radiation that reflects off of the water is very intense. The best way to avoid debilitating and painful sunburn during travel into a hot or cold, wet environment is to wear protective clothing. For skin that cannot be covered, use a sunscreen or sunblock. Sunscreens are available in various sun protection factor (SPF) ratings, which indicate how much longer than normal you can be exposed to UV radiation before burning. Sunscreens work by absorbing the UV radiation. Sunblock reflects the UV radiation and is most often used in sensitive areas such as the ears and nose, where intense exposure might occur. Regardless of what you use, you will need to constantly reapply it throughout the day as its effectiveness is lost over time and due to sweating.
—From Surviving Coastal and Open Water
Greg Davenport
Illustrations by Steven A. Davenport
The coast guard has established minimum standards for recreational vessels and associated safety equipment. These standards require most equipment to meet coast guard-approval guidelines for performance and construction.
If you are a recreational boater, you should have a buoyant apparatus, an inflatable buoyant apparatus, or a life raft.
A buoyant apparatus is a quick-response life-saving device that comes in a variety of shapes, sizes, and styles. Its rigid double-sided reversible design allows for rapid manual launching—with minimal preparation—during a crisis. A buoyant apparatus can be used as a lifeline during a rescue or to keep you afloat in case your vessel is sinking. Often rectangular in shape, the apparatus has either a solid platform or a solid outer ring with a central compartment that can be used to keep gear afloat. Lifelines attached to the outside of the apparatus are designed so that someone immersed in the water can hold on to them to stay afloat.
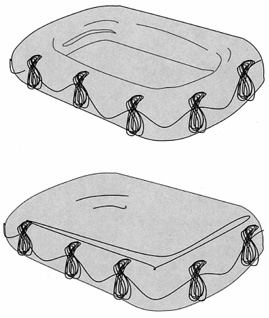
Buoyant apparatus.
Although better than a buoyant apparatus, an inflatable buoyant apparatus falls short of a life raft. The inflatable buoyant apparatus is intended for use aboard vessels operating close to shore. This device comes in various shapes and sizes, and unlike a buoyancy apparatus, it will support you and a varying number of occupants out of the water. Normally these devices have only one buoyancy tube and do not have an inflatable floor or canopy. Like a life raft, they can be stored in a valise or hard deck-mount type of container.
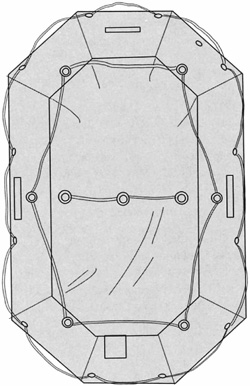
Inflatable buoyant apparatus.
The inflatable life raft is an extremely important lifesaving device that all boats should have. Life rafts vary greatly from manufacturer to manufacturer and from one style to another. Take the time to become familiar with the raft you carry before it is time to use it. Since your raft is packed, ask your vendor or servicing representative to demonstrate how to inflate your particular raft. You should also make sure to have the raft serviced in accordance with the manufacturer’s recommendations. When purchasing a life raft, consider the following.
SIZE AND SHAPE
Inflatable life rafts, which must be coast guard approved, come in round, oval, octagonal, or boat shapes. Raft capacities normally range from four to twenty-six people. The type and size of raft you choose for your vessel will depend on many factors: Are you staying close to the coastline? Are you heading into international waters? How many people will be on board the vessel, and what is their experience?
INFLATION TUBES
The ideal raft will have two separate inflation tubes (buoyancy tubes) located on its outer edge. For increased stability and decreased tube bending, tubes need to be at least 12 inches in diameter when inflated. A cylinder of carbon dioxide (CO2) alone or in combination with nitrogen is used to inflate the raft. The cylinder is normally attached to the bottom of the raft and can be activated by sharply pulling the line, usually a 100-foot-long operating cord, attached to it.
PRESSURE RELIEF VALVES
Most rafts have a pressure relief valve located in the inflation tubes that allows excess gas to escape. The valves will also allow air to escape during warm days when the gas in the tube expands. On the flip side, in the evening when cooler temperatures cause the air to contract, you may have to manually pump more air into the chambers. While it is normal for pressure relief valves to hiss while gas escapes right after the raft is inflated, this process should last only a few minutes. On occasion, pressure relief valves will fail and continue to leak gas. If that happens, you will have to plug the valve using one of the plugs in your life raft repair kit.
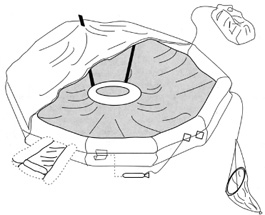
Life raft.
RAFT FLOOR
Most life rafts have a double floor that can be inflated with a hand pump. In cold weather, inflating the floor will keep you warmer by creating an insulating dead air space between you and the cold water. In hot weather, however, keeping the floor deflated allows the cooler seawater to keep you cool.
ARCHES
Most rafts have an inflatable arch, and some have two or three. The arches support a canopy that can be used to protect you from rain, wind, and sun.
STABILIZERS
A life raft is stabilized by its ballasts and sea anchor. Ballasts are water pockets located under the life raft that allow seawater inside when the raft is launched. In addition to stabilizing the raft by making it less likely to capsize, the ballasts also help slow the raft’s drift. The number and size of ballasts on a raft vary from one manufacturer to another. Like the ballasts, a sea anchor is used to help stabilize the raft, especially in rough seas when waves are coming from the same direction as the wind. Make sure the anchor is made of a strong durable material and is big enough to make a difference in rough water. Refer to chapter 12 for further details on how to use a sea anchor.
SURVIVAL KIT
USCG-approved life rafts provide a survival kit. Be sure to check its contents and talk to your vendor about adding any other materials when the raft is packed or serviced. For more details on life raft survival kits, refer to page 350.
LIFE RAFT STORAGE
If your life raft is kept in a canister, it will probably sit on a cradle that is secured on top of the open deck. The greatest benefit of this storage method is easy access. Another benefit to this system is that the canister will float free of the vessel in case it would sink before you can manually launch the raft. The canister is made of two compartments that create a watertight seal when combined. The two compartments are held together by bands that break when the raft is inflated. Holes on the bottom of the canister allow condensation drainage and air circulation, and the words “this side up” on the top of the container will help you make sure the holes are down. Tie-down straps, which often are used to secure a container to the cradle, support a hydrostatic release that can be kicked to free the canister from the cradle. Other releases are used, so be sure to familiarize yourself with your system. Often, a cleat is located near the cradle and can be used to tie a retaining line when manually launching the raft. Since most inflation lanyards separate from the raft when activated, don’t mistake them for a retaining line. Life rafts that are stored in a valise are often stowed below deck and out of the way. During an emergency, these rafts must be brought to the surface for launching.
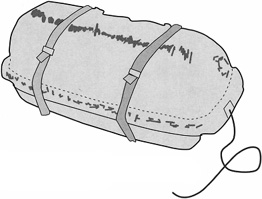
Life rafts are often stored in a canister that sits on a cradle located on the deck.
LIFE RAFT PADDLES
Life raft paddles come in many designs, and the exact type of paddle you have will depend on your life raft. While these paddles are helpful near land, when trying to make landfall, and when moving away from a sinking vessel, they are seldom used otherwise. This is because paddling a raft uses up precious energy that should be conserved during a life-threatening situation. If you decide to move the raft by paddling, pull in the sea anchors, empty the ballast pockets, and place one paddler at each side of the raft.
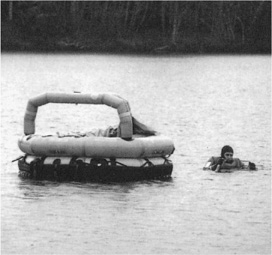
A smaller life raft without the canopy.
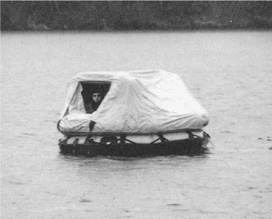
The same raft with the canopy up.
If your life raft would develop a hole, you would be glad you packed a repair kit. Don’t be fooled into thinking that a kit containing rubber tube patches and cement will fix your problem. Not only do these patches require a dry work area and are only useful for extremely small holes, but you cannot completely inflate the raft until the patch has had twenty-four hours to dry. If you do decide to use these patches, be sure to cut the patch at least 1 inch larger than the hole it is covering. Next, apply cement to both the patch and the area around the hole, and allow both to completely dry before applying a second coat to both. Once the second coating reaches a tacky texture, press the patch on the hole. Do not completely inflate the raft until the patch has had twenty-four hours to dry.
A better way to seal raft holes is to carry raft repair clamps. Unlike the patches, clamps provide an immediate fix to your problem. Repair clamps come in small, medium, and large sizes (3, 5, and 8 inches), allowing you to choose the size that best fits the needed repair. The clamp is made of two pieces of convex metal, with outer rubber edges, that are connected by a post and wing nut that run through the center of each. When using a clamp, loop its cord around your wrist to prevent the accidental loss of the clamp overboard. Next, get the clamp wet so that it will be easier to insert inside the hole. Push the clamp’s bottom plate through the hole, and pull it up against the inner surface of the tube. If the hole is too small, enlarge it enough so that the clamp barely slides through. Next, slide the top part of the clamp over the bottom portion and adjust the clamp so that it completely covers the hole. Holding the clamp in place, screw the wing nut tight, and either wrap the wire around the nut or break it off.
Another item to consider packing in case you need to repair raft leaks is a roll of sail-mending tape or duct tape. Sail-mending and duct tape are effective for sealing small leaks that occur above the waterline. Not all sail-mending and duct tape brands are the same, so make sure the one you select sticks when wet. Leaks can also occur at pressure release and topping valves. Be sure to know whether your raft has a plug for these devices and to carry several spares of each in case one is lost.
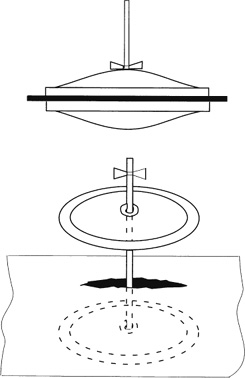
Raft repair clamps are ideal for sealing a hole in your raft.
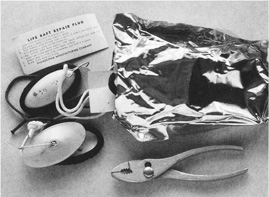
Life raft repair clamps.
An abandon-ship bag is simply a survival and first-aid kit that floats. The contents of each kit will depend upon many variables, including your sport, the length of your outing, and the time of year. These bags are great for storing emergency gear and should be placed in an easily accessible location. You should also tie a lanyard line to the bag’s D-ring with a carabiner at the other end that could easily be attached to your raft or PFD harness. While most commercial abandon-ship bags will float, only the more expensive dry bags are waterproof. The Landfall Navigation Abandon Ship Dri-Bag, the leader in this arena, can keep approximately 100 pounds of gear afloat and dry. The bag is 21 inches wide and 13.5 inches tall with 3/16-inch-thick closed-cell foam padding covering its bottom and sides. Its exterior is made from heavily reinforced 1,000-denier Antron nylon cloth, and its interior is welded polyurethane-coated 420-denier nylon. Its zipper provides a positive seal and extends 4.5 inches down the sides. The bag’s handles are made of heavy-duty webbing and come with two stainless steel D-rings for attaching such items as a float-free automatic strobe.
The ReliefBand Device has been approved by the Food and Drug Administration as a treatment for nausea and vomiting related to motion sickness. Worn like a wristwatch, the device emits an electrical signal on the underside of the wrist that somehow interferes with the nerves that cause nausea. The band has five settings that allow you to adjust it to the amount of relief you need for your nausea. The best part about using the ReliefBand is avoiding the drowsiness caused by oral antiseasickness medications.
The bilge is that part of a vessel that sits below the waterline. Given time, most vessels will get water in this area, and the bilge pump allows you to easily remove the water from your boat. These pumps come in manual and electric options. Before deciding on a pump, consider your vessel and how it might be used. Be sure the pump you choose will meet your needs. If you decide to get an electric pump, carry a manual backup just in case it stops working.
—From Surviving Coastal and Open Water
Elizabeth P. Lawlor
Illustrations by Pat Archer
Will the moon be out tonight? Will it be a full moon, a half moon, or just a thin sliver of a moon? What time will the moon rise? Will there be a high tide this morning or this afternoon? Will the high tide be a regular high tide or a spring tide? These may seem like strange and unimportant questions in an age when our attention is more likely to be riveted on Monday night football, the ever present “impending world crisis” on the evening news, elections, the Olympics, and TV specials. Except for a few evening strollers or coastal fishermen, hardly anyone notices the moon or the tide.
PHASES OF THE MOON: POSITIONS AND APPEARANCES

Our grandfathers could probably answer questions about the moon and the tides, and so could their grandfathers back a hundred generations. Until very recently, the phases of the moon and the ebb and flow of the tide were an important part of daily life for mankind. For farming and hunting peoples, the passage of the moon through its phases marked off the year like a monthly calendar in the sky. The moon signaled the time to plant and to hunt, the time to fish and to harvest. The moon was a source of myth and legend. The moon marked important religious events like Easter, Passover, and Ramadan.
The question “What time is high tide?” is as important today as it was in days past for those who live near the sea and draw their living from it and for those who enjoy catching an occasional seafood meal. Certain species of fish and crabs can be caught on the turn of the tide, while others are best caught at high tide. Before the advent of rail transport, highway systems, trucks, cars, buses, and planes, when the sea was the highway for all kinds of transport, the tides regulated the arrival and departure of people and goods.
Our ancestors not only routinely knew the current phase of the moon and the times of the local tides, they also understood that the questions we started with about the moon and the tides were related. They knew that when there was a full moon, the high tide was extra high and the low tide was extra low. They knew that the tides followed the lunar calendar, so that by knowing the phase of the moon, they could predict the time and height of tomorrow’s tides. Many of the old clocks displayed the phase of the moon as well as the time of day. For many people today, this knowledge is lost. Did you know that the moon rises about fifty minutes later each day according to our twenty-four-hour solar clocks? Did you know that if there is a high tide this morning, the high tide tomorrow morning will be about fifty minutes later than it was today?
Ancient peoples had difficulty making sense of the connections between the moon and the tides. Three hundred years ago, Sir Isaac Newton gave us our modern understanding of tides by explaining that gravity is a force, a pull, exerted by every object on every other object. Huge objects exert huge pulling forces on each other. These forces keep the speeding planets in orbit around the sun and keep the moving moon in orbit around the earth. There is a balanced between the attractive forces and the outward forces produced by the forward motion of the orbiting bodies. According to these ideas of Newton, the tides in the oceans of the earth result from the pull exerted on the earth’s oceans by the moon and the sun. On the side of the earth facing the moon, this gravitational attraction pulls up a mound of water about half a yard high. This mound points toward the moon. As the earth spins one turn every twenty-four hours, this mound, or high tide, also circles the earth. This should give every point on the oceans one high tide each day. However, we know that many places have two high tides every day. This happens because our moon is so large that its pull on earth causes both moon and earth to whip around a point that is not at the center of the earth but offset about three thousand miles toward the moon. This whipping action causes a second tidal bulge in the oceans on exactly the opposite side of the earth from the gravitational tidal bulge. Presto, two high tides occur every day. The second high tide, caused by this whipping action, is lower than the high tide caused by the moon’s gravitational attraction.
This explanation is based only on the fact that the earth rotates, or spins, and the explanation makes it seem that the high tides should arrive at the same time every day. However, we must also remember that the moon is not standing still in space. The moon is moving rapidly at about two thousand miles per hour, orbiting the spinning earth once every twenty-seven and one-half days. This fact causes the high tides to operate on the moon’s schedule, which is about fifty minutes later every day for a given point on the earth. For example, if on some clear evening you see the moon rising like an enormous yellow orb on the eastern horizon, mark down the time. Then look in the same spot the following evening for Old Man Moon. You will find that moonrise is about fifty minutes later than it was the first evening. Since we have two high tides each day, there must be about twelve hours and twenty-five minutes between them.
There is another interesting thing about the tides that needs an explanation. During the lunar month of about twenty-nine and one-half days, there are two higher-than-usual high tides called spring tides, which occur at full moon and at new moon. There are also two lower-than-usual high tides called neap tides, which occur at the first and third quarters of the lunar cycle. The spring tides are called this because the extrahigh water level at that time looks as though the water is “springing” from the earth. Spring tides have nothing to do with the spring season of the year. They are caused by the relative positions of the earth, sun, and moon, when they are lined up. The word neap, which comes from the German word for napping, is used to describe those tides in which there is very little movement of water. The water is “taking a snooze” at neap high tide.
Newton comes to the rescue here also. This spring-neap cycle is due to the gravitational attraction of the sun on the earth and its waters. The sun also exerts a gravitational pull on earth, causing a 46 percent smaller tidal bulge in the oceans. This does not result in another set of high tides; instead, it causes a tide that adds to, or reinforces, the moon tide when moon, earth, and sun are lined up. This additive tide is spring tide. When earth, moon, and sun are at right angles in space, then the smaller sun tide partially cancels the moon tide, resulting in neap tide.
That might seem to be whole story of the tides, a complete explanation; however, the story is complicated by the weird shapes of the solid parts of the earth’s surface. In New York City there is approximately a five-foot difference between low and high tides, while Rockport, Maine, has a ten-foot tidal range, and the Bay of Fundy boasts a more-than-thirty-foot tide. The very uneven coastline causes these variations. Almost anywhere you travel, you will find strange things about local tides if you ask a fisherman or someone who lives on the shore. Most places have two high tides per day, but some communities, like Pensacola, Florida, on the Gulf of Mexico, have only one high tide per day, and San Francisco has one big high tide and one little high tide every day. These strange effects are also due to the way the land masses interact with tidal movements.
It may seem odd, but far out at sea, the effects of the tide cause a bulge in the surface of the ocean, which people on ships cannot notice. For a few hours each day, the ship is half a yard closer to the moon, and then six hours later, half a yard farther from the moon. When the tidal bulge reaches shallow water, there may be a great rush of water into the bays, sounds, and estuaries. These tidal currents can be very powerful, and they move gigantic quantities of water in a daily rhythm. Man has dreamed of using this movement of water to produce useful power. This is done now on a small scale, but the harmful ecological effects of using this power on a large scale may outweigh the potential savings in oil and coal.
Since every aspect of planet earth is intimately associated with living things, the tides have an important life-related role. With each rise of the tide, nutrients generated in the oceans are brought into bays, into estuaries, and even into the smallest of tidal creeks. Similarly, the falling tide carries with it food matter originating in marshlands, mud flats, and rivers. The churning associated with tidal shifts moves this food material vertically as well as horizontally. The beat of life in the intertidal zone is directed by tidal motion.
When you think of it, there is no aspect of planet earth that is not intimately bound up with the teeming miracle of life. Even the ancient partnership between the earth and the moon provides a kind of life pulse that goes on and on. We are all part of this pulsating rhythm, part of this eternal beat.
1. The Uneven Coming and Going of the Tide.
The amount of horizontal rise in tidal water follows a fairly regular pattern. In the first hour, the tide will rise only very slightly; during the second hour, it will move quite noticeably; and during the third hour (at half tide), the rate is at its maximum. Then the amount of rise each hour decreases until the sixth hour, when its rise is again hardly noticeable. The falling tide shows the same pattern: the tide falls slowly at first, then more rapidly, and then slowly again.
2. Sources for Tide Charts.
Tide charts are published by the National Oceanographic and Atmospheric Administration of the United States Department of Commerce (NOAA). You can request these tables from the United States Government Printing Office, North Capitol and H Streets, N.W., Washington, D.C. 20401 (202-275-2051) These same charts and brief excerpts from them are often available in marine supply stores, bait shops, coastal book stores, hardware stores, banks, marine insurance offices, and other unexpected places. Some of these tables have more information than others, so check them out carefully.

Two high tides daily.

Spring tide: earth between sun and moon.

Neap tide.

Spring tide: moon between earth and sun.
There are two high tides and two low tides in a twenty-four-hour period. This tidal pattern is called semidiurnal, and it occurs on the Atlantic and Pacific coasts of the United States.
—From Discover Nature at the Seashore
Greg Davenport
Illustrations by Steven A. Davenport
Charts provide several navigational aids that help mariners avoid hazards and identify their position. These aids consist of lighthouses, buoys, and markers.
Since the visibility of light increases with height, lighthouses provide an exceptional marker that can be seen from a great distance. They help mariners with navigation and to avoid dangerous areas. In addition to light, lighthouses often have fog-signaling and radio-beacon equipment.

A lighthouse helps mariners avoid obstacles.
Buoys are anchored floating markers that help vessels avoid dangers and navigate in and out of channels. Buoys come in several shapes and colors, which help identify their purpose.
Buoys located on the right side of a channel—leading in from seaward—will be painted red and support even numbers that decrease as you move seaward. If a light is used, it will be red. Nun-shaped buoys (buoys with a cone-shaped top) are used when the buoys aren’t lit.

Cans and bouys located on the left side of a channel leading in from seaward.

Nuns are buoys located on the right side of a channel leading in from seaward.
Buoys located on the left side of a channel—leading in from seaward—will be painted green and support odd numbers that decrease as you move seaward. If a light is used, it will be green. Can-shaped buoys (buoys with a cylinder shape) are used when the buoys aren’t lit.
Buoys located at a junction or midchannel can be either nuns or cans and may or may not have numbers on them. Junction buoys are painted with horizontal red and green stripes, and midchannel buoys are painted with horizontal red and white strips. If a light is used, it will be white.
Day markers are small signs held in place by poles. During daylight hours, these markers help vessels avoid dangers and navigate in and out of channels. Markers come in several shapes and colors, which help identify their purpose.

Triangular day markers are located on the right side of a channel leading in from seaward.
Markers located on the right side of a channel—leading in from seaward—will be triangular-shaped, painted red, and support even numbers that decrease as you move seaward.

Square day markers are located on the left side of a channel leading in from seaward.
Markers located on the left side of a channel—leading in from seaward—will be square-shaped, painted green, and support odd numbers that decrease as you move seaward.
Markers located midchannel will be in the shape of an octagon.

Midchannel markers have an octagonal shape.
—From Surviving Coastal and Open Water
Greg Davenport
Illustrations by Steven A. Davenport
When someone goes overboard, hypothermia and drowning are his or her biggest threats, and a rapid recovery from the water is often the key to the person’s survival. How quickly and successfully a person is recovered hinges on the training and experience of the crew and the person in the water. While training is important to a successful outcome, time is also critical, especially in cold water where hypothermia will quickly set in. The following guidelines can be used as a general rule to determine the average survivable time in cold water. It should be noted, however, that this guideline was established using young, healthy individuals and is probably overly optimistic.
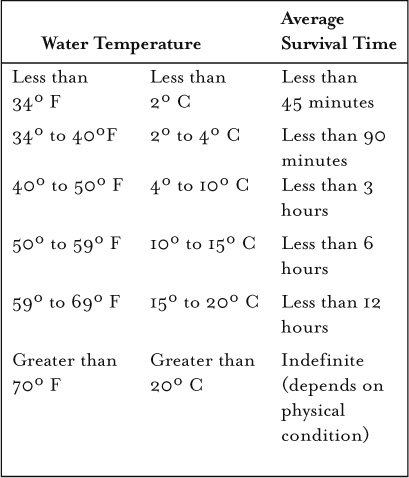
Hypothermia, the result of an abnormally low body temperature, occurs when body heat is lost due to radiation, conduction, evaporation, convection, and respiration. While in cold water, the body loses heat twenty-five times faster than it would while in a similar air temperature. Signs and symptoms of hypothermia include uncontrollable shivering, slurred speech, abnormal behavior, fatigue and drowsiness, decreased hand and body coordination, and a weakened respiration and pulse.
If you find yourself in the water, most likely the seas will be cold and rough. Not only is it doubtful that you can swim to your vessel, but the heat you would lose trying to could hasten a hypothermic state. Your best bet is to signal the vessel, use the techniques outlined here, and wait for the vessel to pick you up. Hopefully you will be dressed appropriately for the conditions and will be wearing a life jacket. As quickly as you can, try to get out of the water by getting back aboard your vessel, in a life raft, or on top of debris. Since approximately 50 percent of your body heat is lost from the head, make every effort to keep your head dry and above the waterline. If you are unable get out of the water, use the following method to increase your chances of survival.
HELP position.
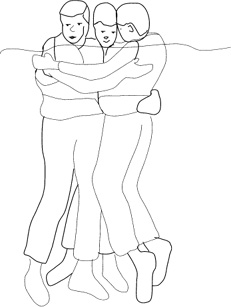
Group huddle to retain body heat.
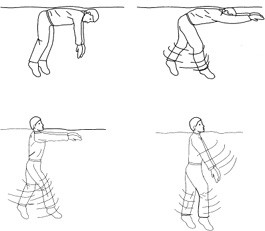
In warm water, drownproofing is an excellent option for staying afloat.
In cold water, try to insulate your head, neck, sides, and groin, which are areas of high heat loss, by assuming the Heat-Escape-Lessening Position (HELP). To do this, hold your upper arms against your sides and cross your lower arms across your chest. At the same time, keep your legs close together with ankles crossed and pull your knees to your chest. Be sure to keep your head above the waterline. If there are other persons in the water, face each other in a huddle, making as much body contact as possible. Exercising while surviving in cold water is not recommended as this actually hastens the loss of body heat due to convection.
If for some unforeseen reason you should end up in the water without a life jacket, your biggest concern will be to prevent drowning. In cold water, this can create a dilemma as moving hastens heat loss, but if you do not move, you will drown. As best you can, keep your head dry and tread water to stay afloat. You will actually expend less energy doing this than if you perform the popular floating technique called drownproofing.
In warm water, however, drownproofing decreases the amount of energy lost when compared to treading water or swimming. The maneuver, which uses the lungs for buoyancy, can increase you chances of survival in warm water significantly. Practice the following steps of drownproofing before you need to use it in an emergency:
Resting position: Take a deep breath and go limp with your face in the water. The back of your head and back should be parallel with the surface of the water.
Preparing to exhale: When it is time to take another breath, slowly lift your arms to shoulder height and separate your legs into a scissors-type position.
Exhale: This step is done immediately once the arms are up and the legs are separated. Raise your head just high enough to get your mouth out of the water and exhale.
Inhale: Once you have exhaled, slowly press your arms down and bring your legs together while inhaling.
Return to rest position: Resume the resting position by relaxing your arms, allowing your legs to dangle, and placing your face back down into the water.
Within 20 seconds, a vessel moving at 5 knots will be 168 feet away from the person who fell overboard. At 10 knots, the vessel will be 336 feet away. When someone goes overboard, immediate action by the remaining crew is vital to a successful rescue. The crew should take the following steps immediately upon seeing someone fall overboard:
1. Sound an alarm. Immediately begin yelling “man overboard” along with his or her position in relation to the vessel. For example, if on the right side of the vessel, yell “man overboard, starboard side!” On the left side, yell “man overboard, port side!” In front of the vessel, yell “man overboard at the bow!” and at the rear of the vessel, yell “man overboard at the stern!”
2. Mark the spot. During daylight hours, immediately throw a ring buoy or similar item toward the person, and if possible, drop a smoke float that will mark the spot where the person fell overboard. During darkness, immediately throw a life preserver or buoy ring with water lights and keep the vessel’s searchlight fixed on the subject. If you have a GPS, mark your position.
3. Position the vessel. The pilot of the vessel should immediately begin maneuvering the stern side away from the subject.
4. Post a lookout. Post a lookout whose only job is to keep the subject in sight and provide a direction guide to the crew by extending an arm and pointing toward the subject. This job is crucial since even small waves will make it hard to see a bobbing head. The person who witnessed the fall is usually the best suited for this task.
Steps 2 through 4 require teamwork and should occur simultaneously. Try to practice before an actual emergency occurs.
5. Remove obstacles. Retrieve or cut free any outlying gear that interferes with how the vessel moves.
6. Vessel approach. As long as the person is still in sight, circle your vessel so that it points into the wind, which allows you to better control boat speed and position. Keep the propeller away from the person in the water. Note that this approach may not be practical for all conditions, and your situation may dictate otherwise.
7. Retrieval. Retrieving someone who has fallen overboard may be the most difficult part of this process. How successful a recovery is depends on the subject’s physical condition, the number and experience of the crew members, and the type of vessel and its recovery gear. Once the vessel is alongside the subject, disengage the propeller by placing the engine in neutral. Use whatever line and equipment are available to reach the person in the water and have him or her secure the line around his or her body. Lifting the person out of the water will take exceptional skill and strength since his or her water weight will make the person extremely heavy. However, no one should enter the water unless all other options fail or don’t appear to be safe. If someone must enter the water to help retrieve the subject, then that person should be secured to the vessel and wear either an antiexposure suit in cold water or a PFD in warm water.

Expanding square search pattern.
8. First aid. Treat the patient for cold injuries.
9. What if. If more than a few minutes have passed since you sounded the “man overboard” signal and the person is not in sight, you should notify the U.S. Coast Guard of your situation. The coast guard will want to know how many people are on board, your location, any identifying features of the vessel, and what the crisis is (see page 357 on contacting the Coast Guard).
10. Search pattern. If you cannot see the subject, begin a search pattern. The search pattern starts at the last known position of the person who is overboard and follows an ever-expanding square shape. Continue this search process until the subject is rescued or until the USCG arrives.
11. Use the alert call Pan-Pan to notify other vessels that you have a man overboard. The Pan-Pan call will alert others and allow you to notify them on how you intend to maneuver in the area.
Most overboard falls occur when someone is moving, standing, or leaning over the edge of a vessel. Other potential causes include poor visibility, rapid accelerations or sharp turns, large waves, and slippery surfaces. To avoid an overboard incident, use handrails, always be aware of ground obstacles, wear a lifeline when working near the edge of the vessel, and never horse around when on the deck.
—From Surviving Coastal and Open Water
Greg Davenport
Illustrations by Steven A. Davenport
At the first sign of a potential problem, establish communication with the U.S. Coast Guard. Don’t wait until it is too late. The coast guard can provide valuable advice on improvising methods that can delay or stop a vessel from sinking. In addition, they often deliver fuel, dewater pumps, and other necessary survival items.
The key to successfully abandoning ship is proper preparation and practice. Become familiar with the abandon-ship process and your gear before a crisis occurs. Such preparation helps to control anxiety in this stressful situation. Also make sure that those on board know the abandon-ship procedure and can step in should you be unable to take charge. Leadership both on board the vessel and in the life raft plays an important role in ensuring the survival of a crew. Once the decision has been made to abandon ship and the alarm has been sounded, follow the steps below.
Broadcast a Mayday on channel 16 VHF or 2182-kHz SSB using MAYDAY, MAYDAY, MAYDAY. Repeat your vessel name and call sign three times. State your present location three times (give latitude and longitude if you can, along with a distance and direction from a known point), the nature of the distress, and the number of people on board. Repeat this process until you either get a response or are forced to leave your vessel.
If you have time and your wardrobe allows, dress in layers that will wick moisture away from your body, insulate you even when wet, and provide a degree of waterproofing. (See page 346 on clothing.) If you have a hat and gloves, put them on.
A life jacket is a must. If you have to tread water without a life jacket, your body will lose 35 percent more heat than it would if you were wearing a life jacket. While a life jacket is important, in cold climates you are better off with a buoyant survival suit (immersion suit). If you have one, put it on.
Grab the abandon-ship bag, survival and first-aid kits (if separate), portable radio, EPIRB, and cell phone, if you have one. If you have extra time, take along navigation gear, food and water, medicines, blankets, line, and anything else you think you might need. However, do not delay launching the life raft to gather these extra items.
If a canister raft, release the tie-down straps by pressing on the hydrostatic release or pelican hook. Holing the canister or valise pack in the upright position, carry it to the lee (downwind) side of the vessel. Don’t roll the canister. Depending on your system—be sure to know it in advance—you will need to tie the operating cord (painter/lanyard) to the vessel above the weak link. Be sure to do this before launching the raft. To do this, pull several feet of the painter line from the canister, and attach it to the vessel so that the weak link is beyond the knot. The weak link needs to be between the knot and the free end. Bypassing the weak link ensures a strong connection between the vessel and the life raft. The weak link is only useful during a float-free launch (see below). Leaving the bands in place, two members of the crew should throw the canister overboard. Once the life raft and canister are in the water, pull on the painter (operating cord). You may need to pull out the line until you feel resistance and then give it a sharp tug. Keep the line free of tangles. The bands will release the two halves of the container, and the life raft will inflate. Never inflate the raft on the vessel since the container halves could fly off and cause harm or the raft could become jammed between separate areas of the vessel. For now, leave the operating cord attached to the vessel.
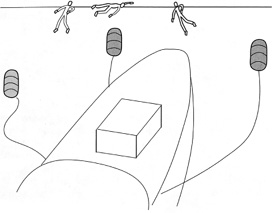
Free-floating container will rise to the surface.
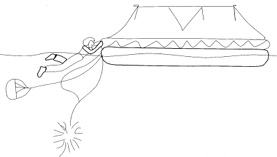
As the raft inflates and the vessel sinks, the painter cord will break, freeing the raft.
If you are unable to deploy the raft before your vessel sinks, you may still be in luck as long as your raft is in a canister stored on the vessel’s cradle and the painter has been attached to the vessel. The hydrostatic release on the raft is set to automatically release when it reaches a depth of 10 to 15 feet. The freed container will rise to the surface, and the ship will pull on the canister’s bands, causing them to part and triggering the inflation of the raft. Within approximately thirty seconds, the life raft should be fully inflated and ready to board. In time, the raft’s buoyancy and the sinking ship will reach a point where the weak link (located where the painter is attached to the cradle) will break, thus freeing the raft from the vessel.
When boarding the raft, try to keep dry. You may be able to board directly from a ladder, line, or net. If the distance is short, you might want to jump into the canopy entrance. Some rafts allow this and some don’t, so check with your vendor. If you do jump, land on the balls of your feet so that you don’t fall backward into the water. Also stretch out your arms so that you land with your chest against the inflated canopy arch to decrease the chance of injuring others already on board the raft.
If you must enter the water to board the raft, do so as close to the raft as you can. Also, jump from the lowest point and hold on to the painter (line) so that you are not swept away. The line can also guide you over to the raft. To board the raft from the water, place your feet on the boarding ladder, grab the handholds or internal lifelines, and pull yourself into the raft headfirst. Life boat canopies are known to tear, so you should not use them to pull yourself into the raft. If someone is injured or needs help getting into the raft, two people can pull that person on board using the following technique:
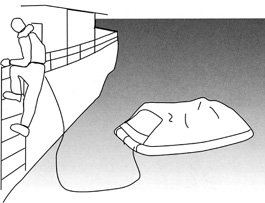
Whenever possible use a ladder to board the raft.
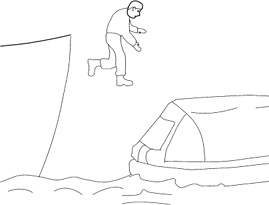
Jump into the canopy opening only when other options are not available.
1. Place your knee that is away from the center of the door on the top of the buoyancy tube.
2. Turn the person in the water so that his or her back is toward the life raft door.
3. Grab the subject’s life jacket with your hand that is closest to the center of the door.
4. With your other hand, grab the subject’s upper arm (each rescuer should take an arm) and then push the individual slightly down before pulling him or her up and over the buoyancy tubes and into the life raft.
5. While pulling the person up, fall to one side on the raft’s floor and allow the subject to fall between you and the other rescuer.
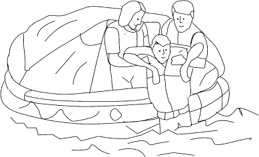
Pulling someone aboard the life raft.
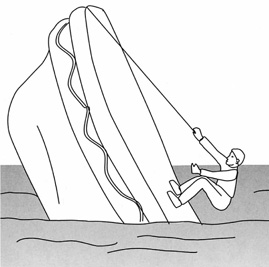
Flipping an overturned life raft.
If the life raft deploys upside down, one person can right the raft as long as it is done before the canopy fills with seawater. Find the raft’s CO2 cylinder, which is typically marked with the words “RIGHT HERE.” Flipping the raft over from this position ensures that the CO2 cylinder does not hit you and possibly knock you out. If there are strong winds, try to get the canister side of the raft on the downwind side, which will make the raft easier to turn. The bottom of the raft will have righting straps. Grab the straps and pull yourself—kicking your feet may help—up and onto the raft. Next, stand on the edge next to the cylinder, and pull on the righting straps while leaning back. If the raft lands on top of you, swim face up until you clear its edge. If you need to catch your breath during this time, simply create an air pocket by pushing your arms and head upwards against the floor of the raft. If the canopy of the capsized raft has filled with seawater, it may take two people to right the raft.
Remove the knife that should be included in your raft, and cut the operating cord to free the life raft from the sinking ship. Keep the knife sheathed until needed, and immediately sheath it after each use. If the vessel is on fire, paddle away from it. If the vessel remains afloat, however, stay as close to the boat as long as you can. Rescue will start at that location.
Once you are away from the sinking vessel, let out the sea anchor, which will help stabilize the life raft and make it less prone to tipping over in rough seas.
Any life-threatening injuries, such as airway, bleeding, circulation, and shock, should be treated immediately. In cold water, treat and prevent hypothermia. Other injuries should be attended to once all life-threatening problems are treated. Avoid dehydration by taking seasickness pills.
Review the contents of your abandon-ship bag, survival kit, and medical kit, and take the time to tie everything, including the paddles, to the raft.
Make sure you know how to use the signals before you need them. If the EPIRB has not been activated, do so now. If you were able to take the VHF radio on board the raft, transmit another Mayday. If you have a cell phone, try to reach someone. Post a lookout, sweep the horizon with your signal mirror, and familiarize yourself and your crew with the signals and how they should be used. For signaling information, refer to chapter 11.
Bail out any water in the raft, inflate the floor, and put up the canopy if you have one. Wring out wet clothes, and try to empty water out of immersion suits.
Life rafts normally come equipped with a survival manual. Read it. You may find some helpful information.
U.S. Coast Guard
If you are involved in a ship casualty and are forced to abandon, your survival procedure should be preplanned, thereby increasing your chances for a successful rescue. Records show that ship sinkings, even in the worst cases, usually require at least 15 to 30 minutes for the vessel to fully submerge. This affords valuable time for preparation. Here are some sound pointers for you to remember in a situation of this type:
Put on as much warm clothing as possible, making sure to cover head, neck, hands and feet.
If an immersion (exposure) suit is available put it on over the warm clothing.
If the immersion (exposure) suit does not have inherent flotation, put on a lifejacket and be sure to secure it correctly.
All persons who know that are likely to be affected by seasickness should, before or immediately after boarding the survival craft, take some recommended preventive tablets or medicine in a dose recommended by the manufacturer. The incapacitation caused by seasickness interferes with your survival chances; the vomiting removes precious body fluid while seasickness in general makes you more prone to hypothermia.
Avoid entering the water if possible. Board davit-launched survival craft on the embarkation deck. If davit-launched survival craft are not available, use overside ladders, or if necessary lower yourself by means or a rope or fire hose.
Unless it is unavoidable do not jump from higher than 5 meters (16.4 feet) into the water. Try to minimize the shock of sudden cold immersion. Rather than jumping into the cold water, try to lower yourself gradually. A sudden plunge into the cold water can cause rapid death or an uncontrollable rise in breathing rate may result in an intake of water into the lungs. On occasions it may be necessary to jump into the water; if so, you should keep your elbow at your sides, cover your nose and mouth with one hand while holding the wrist or elbow firmly with the other hand. One should not jump into the water astern of the liferaft lest there is any remaining headway on the ship.
Once in the water, whether accidentally or by ship abandonment, orientate yourself and try to locate the ship, lifeboats, liferafts, other survivors or other floating objects. If you were unable to prepare yourself before entering the water, button up clothing now. In cold water you may experience violent shivering and great pain. These are natural body reflexes that are not dangerous. You do, however, need to take action as quickly as possible before you lose full use of your hands; button up clothing, turn on signal lights, locate whistle, etc.
While afloat in the water, do not attempt to swim unless it is to reach a nearby craft, a fellow survivor, or a floating object on which you can lean or climb. Unnecessary swimming will “pump” out any warm water between your body and the layers of clothing, thereby increasing the rate of the body-heat loss. In addition, unnecessary movements of your arms and legs send warm blood from the inner core to the outer layer of the body. This results in a very rapid heat loss. Hence it is most important to remain as still as possible in the water, however painful it may be. Remember, pain will not kill you, but heat loss will!
The body position you assume in the water is also very important in conserving heat. Float as still as possible with your legs together, elbows close to your side and arms folded across the front across the front of your lifejacket. This position minimizes the exposure of the body surface to the cold water. Try to keep your head and neck out of the water. Another heat conserving position is to huddle closely to one or more persons afloat, making as much body contact as possible. You must be wearing a lifevest to be able to hold these positions in the water.
Try to board a lifeboat, raft, or other floating platform or object as soon as possible in order to shorten your immersion time. It is always better to get out of the water than it is to stay in.
Remember, you lose body heat many times faster in water than in air. Since the effectiveness of your insulation is seriously reduced by water soaking, you must now try to shield yourself from wind to avoid a wind-chill effect (convective cooling). If you manage to climb aboard a lifeboat, shielding can be accomplished with the aid of a canvas cover or tarpaulin, or an unused garment. Huddling close to the other occupants of the lifeboat or raft will also conserve body heat.
Do not use “drownproofing” in cold water. “Drownproofing” is a technique whereby you relax in the water and allow your head to submerge between breaths. It is an energy saving procedure to use in warm water when you are not wearing a life vest. However, the head and neck are high heat loss areas and must be kept above the water. That is why it is even more important to wear a lifevest in cold water. If you are not wearing a vest, tread the water only as much as necessary to keep your head out of the water.
Keep a positive attitude about your survival and rescue. This will improve your chance of extending your survival time until rescue comes. Your will to live does make a difference!
—From A Pocket Guide to Cold Water Survival
U.S. Army
Perhaps the most difficult survival situation to be in is sea survival. Short- or long-term survival depends upon rations and equipment available and your ingenuity. You must be resourceful to survive.
Water covers about 75 percent of the earth’s surface, with about 70 percent being oceans and seas. You can assume that you will sometime cross vast expanses of water. There is always the chance that the plane or ship you are on will become crippled by such hazards as storms, collision, fire, or war.
As a survivor on the open sea, you will face waves and wind. You may also face extreme heat or cold. To keep these environmental hazards from becoming serious problems, take precautionary measures as soon as possible. Use the available resources to protect yourself from the elements and from heat or extreme cold and humidity.
Protecting yourself from the elements meets only one of your basic needs. You must also be able to obtain water and food. Satisfying these three basic needs will help prevent serious physical and psychological problems. However, you must know how to treat health problems that may result from your situation.
Your survival at sea depends upon—
• Your knowledge of and ability to use the available survival equipment.
• Your special skills and ability to apply them to cope with the hazards you face.
• Your will to live.
When you board a ship or aircraft, find out what survival equipment is on board, where it is stowed, and what it contains. For instance, how many life preservers and lifeboats or rafts are on board? Where are they located? What type of survival equipment do they have? How much food, water, and medicine do they contain? How many people are they designed to support?
If you are responsible for other personnel on board, make sure you know where they are and they know where you arr.
If you are in an aircraft that goes down at sea, take the following actions once you clear the aircraft. Whether you are in the water or in a raft—
• Get clear and upwind of the aircraft as soon as possible, but stay in the vicinity until the aircraft sinks.
• Get clear of fuel-covered water in case the fuel ignites.
• Try to find other survivors.
A search for survivors usually takes place around the entire area of and near the crash site. Missing personal may be unconscious and floating low in the water
The best technique for rescuing personnel from the water is to throw them a life preserver attached to a line. Another is to send a swimmer (rescuer) from the raft with a line attached to a flotation device that will support the rescuer’s weight. This device will help conserve a rescuer’s energy while recovering the survivor. The least acceptable technique is to send an attached swimmer without flotation devices to retrieve a survivor. In all cases, the rescuer wears a life preserver. A rescuer should not underestimate the strength of a panic-stricken person in the water. A careful approach can prevent injury to the rescuer.
When the rescuer approaches a survivor in trouble from behind, there is little danger the survivor will kick, scratch, or grab him. The rescuer swims to a point directly behind the survivor and grasps the life preserver’s backstrap. The rescuer uses the sidestroke to drag the survivor to the raft.
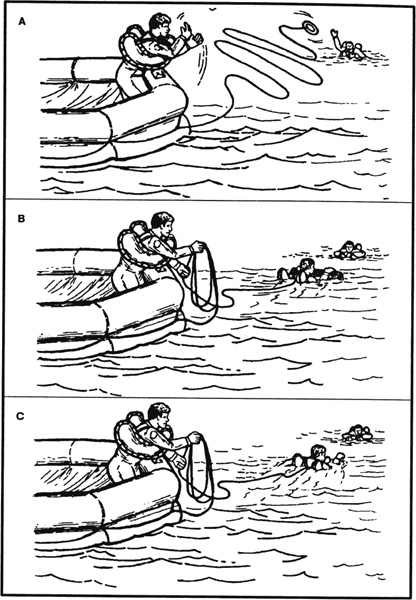
If you are in the water, make you way to a raft. If no rafts are available, try to find a large piece of floating debris to cling to. Relax; a person who know how to relax in ocean water is in very little danger of drowning. The body’s natural buoyancy will keep at least the top of the head above water, but some movement is needed to keep the face above water.
Floating on your back takes the least energy. Lie on your back in the water, spread your arms and legs, and arch your back. By controlling your breathing in and out, your face will always be out of the water and you may even sleep in this position for short periods. Your head will be partially submerged, but you face will be above water. If you cannot float on your back or if the sea it too rough, float facedown in the water.
The following are the best swimming strokes during a survival situation:
• Dog paddle. This stroke is excellent when clothed or wearing a life jacket. Although slow in speed, it requires very little energy.
• Breaststroke. Use this stroke to swim underwater, through oil or debris, or in rough seas. It is probably the best stroke for long-range swimming: it allows you to conserve your energy and maintain a reasonable speed.
• Sidestroke. It is a good relief stroke because you use only one arm to maintain momentum and buoyancy.
• Backstroke. This stroke is also an excel lent relief stroke. It relieves the muscles that you use for other strokes. Use it if an underwater explosion is likely.
If you are in an area where surface oil is burning—
• Discard your shoes and buoyant life preserver.
Note: If you have an uninflated life preserver, keep it.
• Cover your nose, mouth, and eyes and quickly go underwater.
• Swim underwater as far as possible before surfacing to breathe.
• Before surfacing to breathe and while still underwater, use your hands to push burning fluid away from the area where you wish to surface. Once an area is clear of burning liquid, you can surface and take a few breathes. Try to face downwind before inhaling.
• Submerge feet first and continue as above until clear of the flames.
If you are in oil-covered water that is free of fire, hold your head high to keep the oil out of your eyes. Attach your life preserver to your wrist and then use it as a raft.
1. Float upright in the water and take a deep breath.
2. Lower your face into the water (keeping your mouth closed) and bring your arms forward to rest at water level.
FLOATING POSITIONS
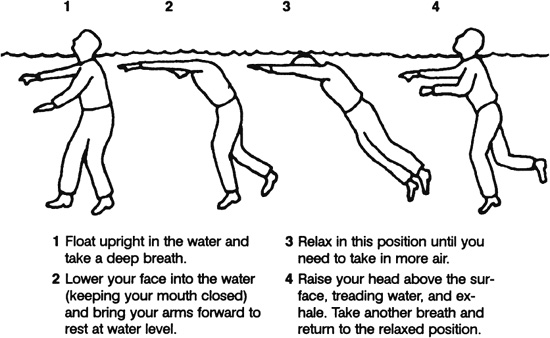
3. Relax in this position until you need to take in more air.
4. Raise your head above the surface, treading water, and exhale. Take another breath and return to the relaxed position.
If you have a life preserver, you can stay afloat for an indefinite period. In this case, use the “HELP” body position: Heat Escaping Lessening Posture (HELP). Remain still and assume the fetal position to help you retain body heat. You lose about 50 percent of your body heat through your head. Therefore, keep your head out of the water. Other areas of high heat loss are the neck, the sides, and the groin.
If you are in a raft—
• Check the physical condition of all on board. Give first aid if necessary. Take seasickness pills if available. The best way to take these pills is to place them under the tongue and let them dissolve. There are also suppositories or injections against seasickness. Vomiting, whether from seasickness or other causes, increases the danger of dehydration.
• Try to salvage all floating equipment—rations; canteens, thermos jugs, and other containers; clothing; seat cushions; parachutes; and anything else that will be useful to you. Secure the salvaged items in or to your raft. Make sure the items have no sharp edges that can puncture the raft.
• If there are other rafts, lash the rafts together so they are about 7.5 meters apart. Be ready to draw them closer together if you see or hear an aircraft. It is easier for an aircrew to spot rafts that are close together rather than scattered.
• Remember, rescue at sea is a cooperative effort. Use all available visual or electronic signaling devices to signal and make contact with rescuers. For example, raise a flag or reflecting material on an oar as high as possible to attract attention.
• Locate the emergency radio and get it into operation. Operating instructions are on it. Use the emergency transceiver only when friendly aircraft are likely to be in the area.
• Have other signaling devices ready for instant use. If you are in enemy territory, avoid using a signaling device that will alert the enemy. However, if your situation is desperate, you may have to signal the enemy for rescue if you are to survive.
• Check the raft for inflation, leaks, and points of possible chafing. Make sure the main buoyancy chambers are firm (well rounded) but not overly tight. Check inflation regularly. Air expands with heat; therefore, on hot day, release some air and add air when the weather cools.
• Decontaminate the raft of all fuel. Petroleum will weaken its surfaces and break down its glued joints.
• Throw out the sea anchor, or improvise a drag from the raft’s case, bailing bucket, or a roll of clothing. A sea anchor helps you stay close to your ditching site, making it easier for searchers to find you if you have relayed your location. Without a sea anchor, your raft may drift over 160 kilometers (99.4 miles) in a day, making it much harder to find you. You can adjust the sea anchor to act as a drag to slow down the rate of travel with the current, or as a means to travel with the current. You make this adjustment by opening or closing the sea anchor’s apex. When open, the sea anchor acts as a drag that keeps you in the general area. When closed, it forms a pocket for the current to strike and propels that raft in the current’s direction. Additionally, adjust the sea anchor so that when the raft is on the wave’s crest, the sea anchor is in the wave’s trough.
• Wrap the sea anchor rope with cloth to prevent its chafing the raft. The anchor also helps to keep the raft headed into the wind and waves.
• In stormy water, rig the spray and windshield at once. In a 20-man raft, keep the canopy erected at all times. Keep your raft as dry as possible. Keep it properly balanced. All personnel should stay seated, the heaviest one in the center.
• Calmly consider all aspects of you situation and determine what you and your companions must do to survive. Inventory all equipment, food, and water. Waterproof items that salt water may affect. These include compasses, watches, sextant, matches, and lighters. Ration food and water.
• Assign a duty position to each person: for example, water collector, food collector, lookout, radio operator, signaler, and water bailers.
Note: Lookout duty should not exceed 2 hours. Keep in mind and remind others that cooperation is one of the keys to survival.
• Keep a log. Record the navigator’s last fix, the time of ditching, the names and physical condition of personnel, and the ration schedule. Also record the winds, weather, direction of swells, times of sunrise and sunset, and other navigational data….
• Decide whether to stay in position or to travel. Ask yourself, “How much information was signaled before the accident? Is your position known to rescuers? Do you know it yourself? Is the weather favorable for a search? Are other ships or aircraft likely to pass your present position? How many days supply of food and water do you have?”
If you are in a cold climate—
• Put on an antiexposure suit. If unavailable, put on any extra clothing available. Keep clothes loose and comfortable.
• Take care not to snag the raft with shoes or sharp objects. Keep the repair kit where you can readily reach it.
• Rig a windbreak, spray shield, and canopy.
• Try to keep the floor of the raft dry. Cover it with canvas or cloth for insulation.
• Huddle with others to keep warm, moving enough to keep the blood circulating. Spread an extra tarpaulin, sail, or parachute over the group.
• Give extra rations, if available, to men suffering from exposure to cold.
The greatest problem you face when submerged in cold water is death due to hypothermia. When you are immersed in cold water, hypothermia occurs rapidly due to the decreased insulating quality of wet clothing and the result of water displacing the layer of still air that normally surrounds the body. The rate of heat exchange in water is about 25 times greater than it is in air of the same temperature.
Your best protection against the effects of cold water is to get into the life raft, stay dry, and insulate your body from the cold surface of the bottom of the raft. If these actions are not possible, wearing an antiexposure suit will extend your life expectancy considerably. Remember, keep your head and neck out of the water and well insulated from the cold water’s effects when the temperature is below 19 degrees C. Wearing life preservers increases the predicted survival time as body position in the water increases the chance of survival.
If you are in a hot climate—
• Rig a sunshade or canopy. Leave enough space for ventilation.
• Cover your skin, where possible, to protect it from sunburn. Use sunburn cream, if available, on all exposed skin. Your eyelids, the back of your ears, and the skin under your chin sunburn easily.
—From Survival (Field Manual 21-76)
Greg Davenport
Illustrations by Steven A. Davenport
Once you have identified your position and planned a route, you will want to use a few travel techniques to get from point A to point B. Remember, if you are at sea, you are better off staying close to your distressed vessel… If traveling on open water, head for shipping lanes, land, or rain. Your movement at sea will be influenced by paddles, wind, and current.
Movement in a life raft is influenced by wind and currents, and to some extent you can influence this movement by using paddles, sails, and a sea anchor.
PADDLES
Trying to move a life raft with a paddle is often futile and a waste of energy. Paddles should only be used for steering when approaching shore.
Some rafts come with sails, and for those that don’t, you can improvise one, although a sail is not advisable for a bigger twenty- to twenty-five-man life raft. You cannot sail a raft into the wind, so you should sail about 10 degrees off from the wind’s direction. Sailing a raft does have its risks and thus should not be done unless land is near and the direction of the wind will move you toward land. If these criteria are met, fully inflate the raft, take in the sea anchor, improvise a sail, and use the paddle as a rudder. Stow the sea anchor so that it will deploy in case the raft would capsize. To avoid falling out of the raft, don’t make any sudden movements, stand up, or sit on the raft’s sides. If seas are rough, don’t use a sail, leave the sea anchor out (but keep it away from the bow), and sit low in the raft with everyone’s weight toward the upwind side.
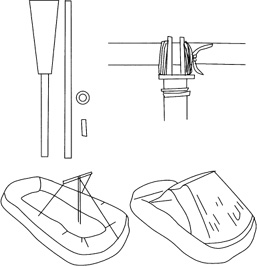
Improvised sail.
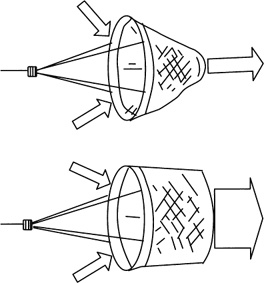
Sea anchor.

Sea anchor deployed.
Improvised square sails can be made using paddles and any other solid panel of material, such as a tarp or blanket. Tie the paddles together using a square lash to form a T, and then secure the paddles upright to the raft with line. If the raft doesn’t have a mast socket, pad the bottom to prevent damage to the raft. You could try using a shoe on top of a protective cloth and insert the mast into the shoe’s heel. If you can, slip the toe of the shoe under the seat to hold it in place. Attach the top of your square sail to the mast, but hold the lower lines in your hand so that you can adjust tension or let go when winds gusts.
SEA ANCHOR
A sea anchor, which will help you control the raft’s movement, may automatically deploy with the raft, or you may need to deploy it once aboard. If you don’t have a sea anchor, improvise one from a duffle bag or bucket. Most sea anchors have an apex that opens and closes and allows you to adjust for the impact of the current on your movement. When the apex is open, the sea anchor acts like a drag and keeps your movement to a minimum. You may decide to do this when you want to stay close to your vessel or within a shipping lane. When the apex is closed, the sea anchor allows the current to push the raft in its direction of movement. Do this when you want to move faster to reach your destination. Some sea anchors come with a trip line that allows you to collapse the sea anchor and makes it easier to vary your speed or pull in the anchor. If you sea anchor does not have a trip line, you can improvise one by attaching a floating line to the outside edge of the sea anchor. The line will need to be long enough to allow the sea anchor to fully open. If you don’t have any floating line, improvise a float and tie the line so that it runs from the sea anchor to the float and then the raft. Make sure that the improvised trip line is rigged in such a way that you avoid getting it tangled in the sea anchor or its line. For best performance, adjust the sea anchor so it is in the wave’s trough when the raft is at the wave’s crest. To prevent damage to the raft, wrap the line of the sea anchor with a cloth or similar material.
Beaching a raft is perhaps the most dangerous part of your journey. Before attempting a surf landing, exhaust all other options first. If no other option is available and you have a chart of the area, take a look at the various shoreline options. What type of bottom contours and makeups (sand, rock, etc.) do you see? Are there any obstacles (man-made or natural) that should be avoided? Avoid coral reefs and rocky cliffs, and try to land on the lee side of the island or at the junction of a stream and the sea. Take time to evaluate the wave’s patterns. Waves usually come in sets, and not all sets are the same. Pick the least threatening approach you can, and begin your approach with the start of a set of gentler waves. To keep control of your vessel, don’t surf the waves.
Before starting your approach to shore, let the sea anchor out, remove the sail, and use your oar to paddle and steer toward the shore. If you are in a large raft with a group, disperse the weight equally on both sides of the raft. When contact is made with the first wave, paddle backward on both sides of the raft to maintain control and prevent the raft from taking off when its front is lifted by the wave. Begin a forward hard paddle as soon as you feel the front of the vessel dropping. This drop Indicates that the wave has passed. As another wave overtakes you, repeat this process.
If the raft capsizes in the surf, grab hold of it and try to ride it in. if you lose the raft and have to swim ashore, use the side- or breast-stroke. If you’re in moderate surf, swim with the wave and dive just below the water before the wave breaks. In high surf, swim toward the shore in the wave’s trough, and submerge just before the next wave starts to overtake you. If an undertow pulls you down, push off the bottom and swim to the surface. As you get closer to the shore, select a landing spot where the waves run up onto shore rather than violently crash upon the beach. Once you enter the breakers, move into a sitting position with your feet forward and about 2 to 3 feet lower than your head. You are better off absorbing the shock of an unexpected reef or rock with your feet than your head.
—From Surviving Coastal and Open Water
You should watch carefully for any signs of land. There are many indicators that land is near.
A fixed cumulus cloud in a clear sky or in a sky where all other clouds are moving often hovers over or slightly downwind from an island.
In the tropics, the reflection of sunlight from shallow lagoons or shelves of coral reefs often causes a greenish tint in the sky.
In the arctic, light-colored reflections on clouds often indicate ice fields or snow-covered land. These reflections are quite different from the dark gray ones caused by open water.
Deep water is dark green or dark blue. Lighter color indicates shallow water, which may mean land is near.
At night, or in fog, mist, or rain, you may detect land by odors and sounds. The musty odor of mangrove swamps and mud flats carry a long way. You hear the roar of surf long before you see the surf. The continued cries of seabirds coming from one direction indicate their roosting place on nearby land.
There usually are more birds near land than over the open sea. The direction from which flocks fly at dawn and to which they fly at dusk may indicate the direction of land. During the day, birds are searching for food and the direction of flight has no significance.
Mirages occur at any latitude, but they are more likely in the tropics, especially during the middle of the day. Be careful not to mistake a mirage for nearby land. A mirage disappears or its appearance and elevation change when viewed from slightly different heights.
You can be able to detect land by the pattern of the waves (refracted) as they approach land. By traveling with the waves and parallel to the slightly turbulent area marked “X” on the illustration, you should reach land.
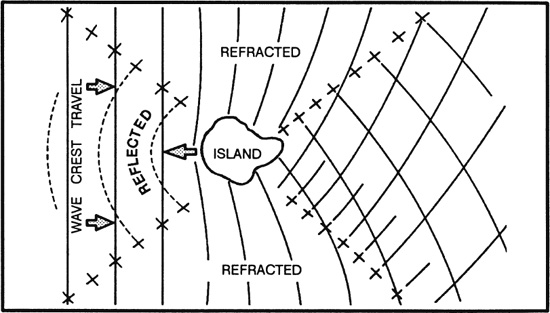
Wave patterns about an island.
Once you have found land, you must get ashore safely. To raft ashore, you can usually use the one-man raft without danger. However, going ashore in a strong surf is dangerous. Take your time. Select your landing point carefully. Try not to land when the sun is low and straight in front of you. Try to land on the lee side of an island or on a point of land jutting out into the water. Keep your eyes open for gaps in the surf line, and head for them. Avoid coral reefs and rocky cliffs. There are no coral reefs near the mouths of freshwater streams. Avoid rip currents or strong tidal currents that may carry you far out to sea. Either signal ashore for help or sail around and look for a sloping beach where the surf is gentle.
If you have to go through the surf to reach shore, take down the mast. Keep your clothes and shoes on to avoid severe cuts. Adjust and inflate your life vest. Trail the sea anchor over the stern using as much line as you have. Use the oars or paddles and constantly adjust the sea anchor to keep a strain on the anchor line. These actions will keep the raft pointed toward shore and prevent the sea from throwing the stern around and capsizing you. Use the oars or paddles to help ride in on the seaward side of a large wave.
The surf may be irregular and velocity may vary, so modify your procedure as conditions demand. A good method of getting through the surf is to have half the men sit on one side of the raft, half on the other, facing away from each other. When a heavy sea bears down, half should row (pull) toward the sea until the crest passes; then the other half should row (pull) toward the shore until the next heavy sea comes along.
Against a strong wind and heavy surf, the raft must have all possible speed to pass rapidly through the oncoming crest to avoid being turned broadside or thrown end over end. If possible, avoid meeting a large wave at the moment it breaks.
If in a medium surf with no wind or offshore wind, keep the raft from passing over a wave so rapidly that it drops suddenly after topping the crest. If the raft turns over in the surf, try to grab hold of it and ride it in.
As the raft nears the beach, ride in on the crest of a large wave. Paddle or row hard and ride in to the beach as far as you can. Do not jump out of the raft until it has grounded, then quickly get out and beach it.
If you have a choice, do not land at night. If you have reason to believe that people live on the shore, lay away from the beach, signal, and wait for the inhabitants to come out and bring you in.
If you encounter sea ice, land only on large, stable floes. Avoid icebergs that may capsize and small floes or those obviously disintegrating. Use oars and hands to keep the raft from rubbing on the edge of the ice. Take the raft out of the water and store it well back from the floe’s edge. You may be able to use it for shelter. Keep the raft inflated and ready for use. Any floe may break up without warning.
If rafting ashore is not possible and you have to swim, wear your shoes and at least one thickness of clothing. Use the sidestroke or breaststroke to conserve strength.
If the surf is moderate, ride in on the back of a small wave by swimming forward with it. Dive to a shallow depth to end the ride just before the wave breaks.
In high surf, swim toward shore in the trough between the between waves. When the seaward wave approaches, face it and submerge. After it passes, work toward shore in the next trough. If caught in the undertow of a large wave, push off the bottom or swim to the surface and proceed toward shore as above.
If must land on a rocky shore, look for a place where the waves rush up onto the rocks. Avoid places where the waves explode with a high, white spray. Swim slowly when making your approach. You will need your strength to hold onto the rocks. You should be fully clothed and where shoes to reduce injury.
After selecting your landing point, advance behind a large wave into the breakers. Face toward shore and take a sitting position with your feet in front, 60 to 90 centimeters (2 or 3 feet) lower than your head. This position will let your feet absorb the shock when you land or strike submerged boulders or reefs. If you do not reach shore behind the wave you picked, swim with your hands only. As the next wave approaches, take a sitting position with your feet forward. Repeat the procedure until you land.
Water is quieter in the lee of a heavy growth of seaweed. Take advantage of such growth. Do not swim through the seaweed; crawl over the top by grasping the vegetation with overhand movements.
Cross a rocky or coral reef as you would land on a rocky shore. Keep your feet close together and your knees slightly bent in a relaxed sitting posture to cushion the blows against the coral.
—From Survival (Field Manual 21-76)
Greg Davenport
Illustration by Steven A. Davenport
A rescue by a surface rescue is often a simple process. In most cases, the rescue craft will direct its approach so that you are on the lee side. The rescue vessel will then drift toward you. To avoid contact with the boat’s propeller, be sure to pull in your sea anchor. Once contact with a rescue vessel is made, follow the guidance of the rescue crew.
A helicopter rescue may not be as simple. Movement caused by waves, wind, and the helicopter itself will make it difficult to stay balanced in the life raft. To avoid losing gear and potential damage to the helicopter’s roto system, secure all gear to the raft. A rescue basket, rescue sling, or stokes litter might be used to hoist you aboard the helicopter, and in most cases a rescue swimmer will be dropped down to help you put on the rescue device.
To avoid potential injury, there are several things you should know. First, the cable coming from the helicopter can have a static charge. Do not touch the cable until it has made contact with your vessel or the water, thus allowing the static electricity to discharge. Second, if a litter or basket is dropped, it normally has a trail line that, once grounded, you can use to stabilize the basket as it gets closer to your vessel. Once the rescue swimmer has secured you to the rescue device, he or she will give vigorous thumbs up to the helicopter crew so it will know to begin the hoist process.
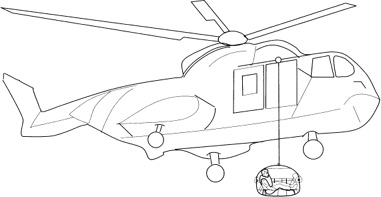
Helicopter rescue.
For survivors who are not injured, the U.S. Coast Guard usually uses a rescue basket, which is simple to use. Once the basket has landed in the water, the rescue swimmer will disconnect the cable, help you climb in, and direct you to sit down with your hands and arms inside. Once the cable is reattached you will be hoisted up to the helicopter door.
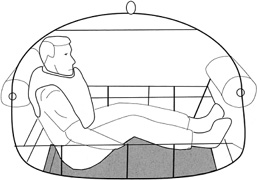
Rescue basket.
A rescue sling (padded loop) is used in other countries and in some isolated rescues by the USCG. Once the sling has been lowered into the water, slip it over your body and under your armpits so that the loop goes around your back. For added security fasten the chest strap that is often affixed to the outside of the sling.

Rescue sling.
A stokes litter is often used for survivors who have serious injuries or illnesses. This device requires that help be available. Once the litter has been lowered to the water, the rescue swimmer will disconnect the cable and straps, remove the blankets, place the survivor inside, cover him or her with the blankets, and refasten the straps and cable. Since the litter is hoisted at a head-up (feet down) angle, it’s important that chest straps are secured under the victims’ arms. Otherwise, he or she could slip out.
—From Surviving Coastal and Open Water