Before Entering the Wilderness 387
The Useful Universe
Telling Time
The Constellations
Navigating without a Map and Compass 394
How a Compass Works
Choosing a Compass
Needle or Magnetic Disc
Housing and Bezel
Base Plate
Sighting Mirror
Lanyard
Declination Adjustment
Global Pivot
Clinometer
Magnifying Glass
Navigating with a Compass Only 400
Reading and Using a Topographic Map 402
Measuring Distances
Reading Contour Lines
Terrain Association
Estimating Steepness
Total Elevation Gain
Magnetic Variation, Longitude, and Latitude 406
Boxing the Needle
Orienting Your Map without a Compass 408
Using the Sun and Stars to Orient Your Map
Using Terrain Association to Orient Your Map
Determining General Direction 409
Triangulating to Determine Your Position 409
Establishing a Field Bearing 410
Using Line of Position to Determine Your Location 410
Determining Your Position by Resection 411
Checking Your Position with an Altimeter
Using Secondary Objectives to Determine Position
Estimating Distance and Travel Time
Finding Your Position with Marine Chart and Compass 413
Determing General Location
Establishing a Magnetic Bearing Using a Chart and Compass Rose
Establishing a Magnetic Bearing with a Marine Compass
Deliberate Offset
What Is GPS?
Who Needs GPS?
Operating a GPS
Choosing the Right GPS
Batteries
What to Do If You Get Lost 417
But What If I Really Do Get Lost?
Searching for a Lost Person 418
Looking for Nearby Land While at Sea
Signals that Attract Rescue
Signals that Pinpoint Your Location
Cellular Phones
Improvised Signals
Helicopter Rescue
Survival Tips
The Need for a Signal
Rules of Signaling
Signals that Attract Rescue
SOS
Ground-to-Air Emergency Code
Body Signals
Panel Signals
Aircraft Acknowledgments
Aircraft Vectoring Procedures
Darren Wells
People generally get truly lost in the wild because they become separated from their party, have inadequate navigation skills, or leave the map and compass behind. People who get into real trouble are those who get truly lost and don’t have the right skills, food, or gear to stay alive until they get found.
A few simple trip-planning steps will make a world of difference. If you’ve taken the following precautions before leaving, you will be less likely to get lost, and much more at ease if you do.
• Know your navigation techniques. Don’t wait until you are five miles into the back-country before learning to read a map and compass. Make sure your navigation skills are always a few notches above where they need to be for the terrain you are in. Practice in city parks or near trailheads before setting out on a multi-day trip.
• Carry essential gear and extra food so that you can spent an unplanned night or two out if an emergency arises.
• For overnight trips, write a travel plan and leave it with a responsible adult. Be sure to include a detailed description of your route and return time.
• Take some time to study your route before the trip. Brief your entire group, so that everyone knows what to expect.
• Have more than one navigator in your group. What happens if the only person who knows how to read a map gets sick or injured?
—From NOLS Wilderness Navigation
Greg Davenport
Don’t Try to Navigate Unless You Know How Navigation is a skill that requires years of practice to become proficient. If you haven’t learned to navigate, you have a greater chance of survival if you stay put and wait for rescuers to find you.
Traveling at Night
If you travel at night, use a sturdy, 7-foot-long walking stick. When walking, keep the stick in front of you to protect your face from branches and to feel for irregularities on the ground.
Learning to Navigate Takes Time
Practice is the key, and you should get lots of it. Knowing how to navigate may even allow you to rescue yourself by walking out.
Never Go into the Wilderness without a Map and Compass, Along with a General Idea of Where you’re Going and Where You Are
Before departing, always establish an emergency heading, to the nearest well-traveled road, that will remain constant no matter where you are.
Never Leave Your Camp or Shelter without a Heading, and Pace Count Back
Otherwise you may not be able to find it when trying to return.
When on a Gross Heading, You Can Use Your Shadow to Maintain a General Direction of Travel
To do this, orient your shadow to the heading you’re taking and keep it there while hiking. Since the sun moves approximately 15 degrees an hour you’ll need to adjust your shadow’s position, related to your heading, every 15 minutes or so.
—From Surviving the Desert and Surviving Cold Weather
Tom Van Holt
Illustrations by Greg Hardin
The east-west arc that the sun travels through the sky each day migrates with the seasons: south in the winter, north in the summer, just like the birds. After the summer solstice (around June 21), the arc moves southward. If you note the place where the sun rises or sets each day, you will see this point slowly creep along the objects on the horizon as the days go by. This is why the shadows in winter become so long, the days so short, and sunset seems forever imminent. It’s worth noting, because this change in our angle to the sun is why we have the four seasons. It’s so easy to observe that it can be seen while commuting or simply stepping outside and observing where the sun is peaking over the roof. In ten days, the motion will become quite apparent.
After the winter solstice (around December 21), the pathway migrates northward to a position higher in the sky. The sun’s rays are striking us more directly and making the temperature increasingly warmer. The sun is the only star you can see move independently in the sky, and this apparent motion doesn’t affect the motion or position of anything else.
This is where every star makes its nightly debut. You may find it easier to use your peripheral vision to pick out fainter stars or bits of color, such as the red of the planet Mars or the yellow of the star Sirius. Why? The optic nerve linking the eyes to the brain connects directly behind the pupil. In doing so, it displaces the light-sensitive cells that line the inside of the eyeball. By looking at objects not quite so directly, you take full advantage of your eyes’ strength.
A useful way to locate objects in the night sky is to use your hand as a ruler. This method has been used for at least three thousand years—it likely will work for you, too. Hold your fist at arm’s length, and sight over the back of your hand. This spans an arc of roughly 10 degrees (one finger is about 2 degrees). With a little practice, you will know exactly the width of your hand. This method is used a great deal in this book, and you will find yourself naturally using it to point things out to others.
You can use the fist method to find the one part of the sky that never appears to move; it is around this point that the entire heavens seem to turn. It hovers above the axis that the Earth spins on, and you can find it with your compass. Face directly north, then sight four fist widths above the horizon (roughly 40 degrees). The star sitting on top of your finger is Polaris, the North Star (see Telling Direction). This is true north. The best compass in the world gives a less honest north than this star. Though not very bright, it has guided people for hundreds of years.
The North Star barely moves and never sets, just as the axle of a wheel can be seen to spin but not change place. There are many more stars that circle tightly around it, and they never set either. These stars, along with Polaris, are known as the circumpolar stars. You will learn to cherish them and the constellations they form as your loyal guides to the sky. They are easy to see and always visible, pointing the way to other stars.
When the stars appear to set, it’s because the Earth is spinning us away from them, eventually taking us back into the blinding rays of the sun. …
As the Earth revolves around the sun, we are able to peek into a new little slice of the universe each night—and another little slice passes from view. We see more and more as we journey along our circular path around the sun, until ultimately we have made a full tour of our arm of the Milky Way galaxy each year, at a speed of 70,000 miles per hour! Our stargazing would be much simpler if there were no sun, for it’s always blinding us to half the view. If we could just shut it off for a day, we could see all the galaxy in just one twenty-four-hour turn of the Earth (by which time, however, we would have frozen to death).
What this revolving around the sun means to the stargazer is that the stars rise four minutes earlier each night. But they never change where they rise, nor do they change in relation to each other. They will advance deeper and earlier into the night, so that a star that had just been rising at 9:00 P.M. is well clear of the horizon at the same time a week later. It then becomes necessary to stay up later and to keep the same ones in view. Eventually they’ll be absent for a few months from our night sky. This is why stars visible at 11:00 P.M. in March can be seen in the same position at 9:00 P.M. in April, 7:00 P.M. in May, and not at all by June. The stars are always there; it’s just that we may not be turned away from the sun so that we can see them at a particular time.
This movement of the Earth—spinning on its axis while moving in a great circle around the sun—is entirely what accounts for the apparent motion of the stars. …
It was the unfailing dependability of the stars in the sky that allowed mankind to emerge from dark caves and build empires. This dependability is just as valuable to us today in discovering the most essential of knowledges: time, location, and direction. …
By night, the simplest way to tell direction is to look at the stars just barely above the horizon. You may have to search a few moments to find a prominent star. To the east, they will be rising. In the west, they will be setting. In the south, they can be seen to move in a flattened, downward-facing arc. This can be observed in only a few minutes. It’s just the opposite in the north, but it’s harder to observe the increasing lack of motion, that characterizes the stars as you look northward (a clue that you’re looking north), and the North Star will not move at all.
The best method for learning direction is the one made popular by the Arabs five hundred years ago: finding the North Star, which resides extremely close to true north. This is only by happy coincidence, not because of any special affinity between it and the Earth. (It deeply impressed our ancestors to see a magnetized object point toward it—no wonder they believed in the influence of the stars.) There is no corresponding star in the Southern Hemisphere, and we are extremely lucky to have this one. This star-marked point is directly above the Earth’s axis and is more accurate than your compass. It’s so dead-on, as a matter of fact, that it can be used to make sure your compass hasn’t become demagnetized.
To locate the North Star, first find the “pointer stars” in the constellation the Big Dipper. It’s shaped like a squarish soup ladle (it really looks like its name) and may be found in any position—upside down, level, on end—in the north. It’s roughly 25 degrees long, and all of its stars are about the same brightness, which is why it’s so easy to find. Using the two stars on the outer edge of the bowl, draw a line out of the bowl. This line will shoot through the North Star, roughly four fist widths above the horizon.
If the Big Dipper and North Star still elude you, you can cheat and use a compass your first time out—but just this once. Follow the red half of the arrow to the horizon, then count up roughly four fist widths. The farther south in the United States you are, the closer it will be to the three fists; the farther north, the closer to five fists. This may give you some indication how the North Star has been used to determine latitude, or your position between the equator and the North Pole. Since the North Star never moves, if you move up or down on the face of the Earth, its position in the sky will appear to go up or down. This is how it’s been used by travelers for thousands of years.

Approximate north can also be found by using the stars in the bold winter constellation Orion the Hunter. A line drawn from the star Saiph (pronounced sife), in the hunter’s left foot, through shimmering red Betelgeuse (bee´-tel-jooz), in his left shoulder, will point approximately north. This particular piece of information is not very useful by itself and may be distracting for the beginner. But together with other direction-finding tools, it will help you develop an instinct for finding your way in the outdoors.
Here in North America, we are well above the equator and are effectively looking down on the plane of the solar system. This is why the path of the sun (the plane of the ecliptic), moon, and all of the planets is always in the south. Their positions on this pathway may range from extreme southeast to extreme southwest, but they’re in the south nonetheless. This gives us several direction finders.
The morning shadows of the sun will point to the northwest. They will then incline to the northeast through the afternoon. These shadows change so slowly that once their angle to your direction of travel has been established, your course need not be checked again for over an hour. Using the sun to find your way is surprisingly useful, especially to a city dweller. The moon can be used in a similar fashion at night. It is helpful to remember that the sun and the moon always move to the right as you face them, from east to west. Because of the southerly position of the plane of the ecliptic, we also know the following:
• The sun is at true south at high noon, and its shadow points toward true north.
• The full moon at its highest point (about midnight) is at true south.
• The quarter moon (what appears as a semicircle) around sunrise or sunset is in the south.
The sun appears to move east to west, so it follows that if you could somehow plot its course, you’d have an east-west line. Drive a stick into the ground or find a shadow of a branch. Mark the tip of the shadow. Half an hour later, mark it again. A line drawn from the first shadow tip through the new one will run approximately east-west. Since the sun always moves to the right, or west, the motion of the sun will tell you which end is which. A perpendicular line through this one will run north-south.
If it’s cloudy day, open a knife and hold it horizontally over a light, even surface, such as a book or a flat rock, with the blade turned vertically as though you were slicing. Turn it until the shadow cast by its edge is narrowest, or the shadow is the same width on either side of the blade. This indicates the direction of the sun. Just because it’s a cloudy day doesn’t change the fact that Earth’s source of light radiates from a single point. Mark each end of the knife on a flat surface. An hour later, place the butt of the knife where it was before, and pivot the knife until once again the shadow of the blade is narrowest. A line draw from tip to tip will go east-west.
Generally speaking, approximate directions are good enough to get you home. Still, it is a fair question: Who can afford to spend an hour waiting for a shadow to move or the sun to peak, only to get your direction once? It’ll just have to be found all over again in a little while, won’t it?
The fact is, your travel direction only needs to be found one time. No matter how hopelessly lost you may be, once you’ve found your line of travel, it’s easy to keep track of it. Simply sight on a distant object along the line of travel and note a landmark where you are now. When you get to the distant object, sight back to your original starting point. A line through this and the onetime distant object (your new location) will allow you to continue along your original bearing.
By themselves, any one of these time-telling techniques might be helpful for telling the time only once, at a moment that is unlikely to serve your needs. Working together, they overlap and reinforce each other so that it is possible to have a reasonably good idea of the time throughout the day and into the night. How nice it would be to live in a world where a reasonably good idea of the time is the biggest hurry we’d ever be in.
Believe it or not, the verdigris sundial that stands so proudly in Aunt Tillie’s flower plot works just as well on a rainy day as on a sunny one. This is because unless you have access to complicated schedules and positional information, it doesn’t work at all. It’s useful only in determining the position of the sun, which can be gauged rather more accurately by looking at the sun itself.
Even high noon on the dial is unlikely to match 12:00 on your watch, owing to daylight saving time and your distance from your time zone’s boundary. Suppose one location is 300 miles west of another, but both are within the Mountain Standard Time Zone. Though both have the same official time, the sun will be overhead at each place at different times. Just because people divide the Earth into full-hour designations doesn’t mean nature does so.
Man’s artificial (but useful) manipulations of the time make it impossible to look at the sky and say, “It’s 6:17, Bob, turn the steaks.” Using solely natural means is most useful in judging how much time has passed, not exactly what time it is. On the other hand, if you know what the local time is when you start using astronomical signs, the sky is a reliable chronometer for both local and natural time.
Because the Earth revolves around the sun, we see each individual star rising and setting four minutes earlier every night. Thus, if you know the time that a given star rose above the horizon, you may dependably subtract four minutes for each day afterward and know the time. Say you saw the star Arcturus rise at 7:44 on Tuesday evening. Then suddenly your watch batteries died! A week later you would know it was 7:16 when you saw it rise again (seven days times four minutes subtracted from 7:44). This is an excellent method for checking the dependability of your watch.
Unfortunately, the sun is so close to the Earth that it cannot reliably be used for so exacting a purpose. Early men initially used the passage of the sun to establish the length of the day and year. In just a few years, however, this would always lead to inconsistencies that had devastating results.
It’s precisely because the stars are so distant that they are so dependable. We cannot see their actual motion, so it is only the motion of the Earth that makes them appear to move, and this we can allow for. For this reason, we’ve come to adopt the sidereal (star) year over the solar (sun) year. It is our position relative to the stars, not the sun, that is now used to measure the year—just as you should set your watch.
But knowing the time only at sunrise and sunset is almost as useful as a broken watch, which is also accurate only twice a day. There are several method that, used together, can keep you on time throughout the day, without a man-made timepiece.
If the moon is present, we may count on its chronic tardiness to tell the time. As well as turning with the stars, it revolves around the Earth. So every night—and day—it delays its appearance onstage by about fifty minutes. To tell where the moon is today compared with yesterday, sight it over a feature such as a tree, saddle, or mountain. When it crosses that same point the next day, it’s roughly fifty minutes later than the day before.
This is the same motion that causes the moon to move across the background of stars at the speed of one moon width every hour, or half a degree. But it’s difficult to judge this, if only because the surrounding stars are overwhelmed by its brightness. It’s best, then, to find two stars that are endpoints for a line running next to the moon, and judge its passage compared to that.
What if there’s a new moon—that is to say, no moon at all? This occurs when the moon is directly between the sun and Earth, and all we can see as its shadow, or nothing. Never fear, for the night sky is the very model for our clocks and watches. Remember how a line drawn through the bowl of the Big Dipper points toward the North? The Big Dipper circles the North Star just as the hour hand circles a clock, and so does this stellar line sweep out the passage of time. The only difference is that the celestial timepiece is on a twenty-four-hour dial, not a mere twelve, and it moves counterclockwise. The same turning of the Earth that inspired man to mark time with round-faced clock is the same motion that makes the starry sky appear to turn as well.
It’s too much to expect, of course, that when our clocks point to 3:00 P.M., the stellar clock would too. But the motion is the same. Suppose you went to bed and saw that the pointer stars pointed straight down, at a watch’s 6:00. When you woke up they had moved counterclockwise, to 2:00. The four “regular” hours are doubled—eight hours have passed since you went to bed, and the sun will be up shortly.
If you have an idea what time the sun has been rising and setting (check the weather section of the newspaper or observe yourself), you know how many hours of daylight there are. So if the sun is a quarter of the way across the sky, simply add a quarter of the hours in the day to the time you know that the sun rose. This will give you a useful, if approximate, time.
People often have a lot of trouble finding the constellations. It’s so difficult to take connect-the-dot pictures of stars on paper and see them in the sky that most can never find anything more than Orion the Hunter and the Big Dipper at best. But the most spectacular constellations really do look exactly like their names: Leo the lion, Scorpio the scorpion, Cygnus the swan, Pegasus the winged horse. And better still, most of them can be found by using simple, ever-present skymarks. …
Winter nights are the best for stargazing. This is the season of the most brilliant constellations, the clearest air, the longest nights, and the most expansive views. But it’s cold! So make yourself comfortable. Take along blankets and hot chocolate. Don’t feel guilty about temporarily retreating to the house or car. If you must turn on a light, mask it in red using tape, tissue paper, or marking pen, so that you can return to stargazing with your night vision intact. Swinging your arms in circles gets the heart pumping and whips blood into the fingertips, an excellent method for retaining the warmth in your hands.
The best time for viewing the Hunters and the Hunted is from the middle of January through April. The Big and Little Bears, since they are among the never-setting circumpolar stars, can be seen year-round. …
… The Big and Little Bears are confined to the very center of the sky, around which everything else revolves, and are never permitted to dip below the horizon and into the seas.
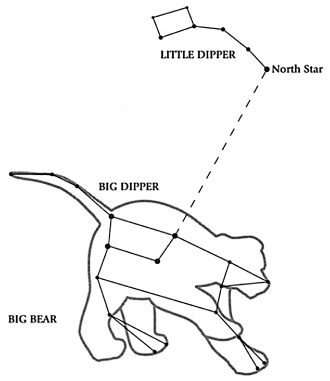
These and all the other stars that are forever above the horizon are known as the circumpolar stars. The Big Dipper forms the tail and hindquarters of the Big Bear. It is easier to find if you first locate the North Star by following the red arrow on your compass to north and going up roughly four fist widths.
Now look for the Big Dipper circling around it. It’s about three fist widths away from the North Star and is two and a half fist widths across. At the time of year that the Hunters and the Hunted are best seen, the Big Dipper either will appear to be pouring from the left to right or will be about level. The stars that make up the rest of the Big Bear are not as bright as those in its dipper part, but they clearly outline a large constellation in the shape of a bear.
The Little Bear is one and the same as the Little Dipper, the North Star being the tip of its tail (or handle). It takes some imagination to see a young cub here, but there’s no problem identifying it as the Little Dipper. It’s important that you are able to find the Big and Little Bears (Dippers), because they are used to find many of the other constellations.
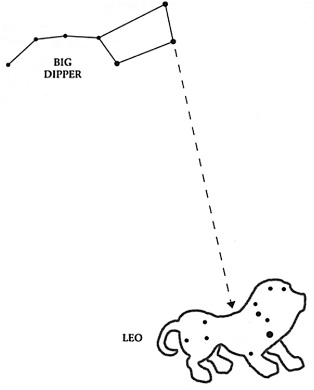
Now take the two stars that complete the far edge of the bowl in the Big Dipper, the ones that point directly to the North Star. Shoot them four fist widths in the opposite direction. This will take you straight to the heart of Leo the lion.
Parallel to and facing the same direction as the Big Bear, Leo is angled to pounce on some unsuspecting varmint. He’s about two and a half fists across and just over a fist from the bright star Regulus in his chest to the top of his head, an area that resembles a backward question mark. …
Now look to the south. See the three bright stars in a row, the width of two outstretched fingers? These form the belt of Orion the Hunter, the most brilliant of all constellations. Now, imagine where a man’s shoulder and legs would be (about two fists from shoulder to thigh), and you’ll find a brighter star at each point. You may notice that the star in his left shoulder, Betelgeuse (bee´-tel-jooz), is red in color. You can even see a faint sword of stars swinging from his belt. …
His two hunting dogs—the Big and Little Dogs—follow him. It is often difficult to see anything but one bright star in each, but those are hard to miss. Sirius (seer´-ee-su), the Dog Star, is the brightest star in the sky and is just over two fists to Orion’s left, on a straight line drawn through his belt. Procyon (pro´-see-on) is the same distance on a line drawn through Orion’s shoulders (drop down a bit toward Sirius). The three stars Betelgeuse, Procyon, and Sirius form what is known as the Winter Triangle.
Orion and his dogs are chasing after the Seven Sisters, or Pleiades (plee -uh-deez), a beautiful but faint cluster of stars also on the line through Orion’s belt, but to the right by four and a half fists. …
… Taurus (tor´-us) the bull is between Orion and the Seven Sisters. This V-shaped constellation appears as only the head and horns of a bull. The bull’s eye can be found midway along the line running from Orion’s belt to the Seven Sisters—you can see its angry red glare.
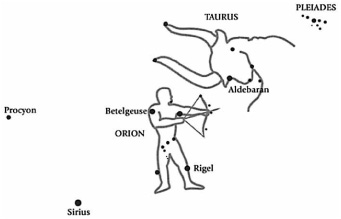
The key to the winter stars is finding the three bright stars in Orion’s belt, in the southern sky. They’re in a straight row the width of one outstretched finger.
(The tips of the horns are a fist and a half above, as though Taurus is crashing down on Orion.). . .
There is another prominent triangle in the sky, the Summer Triangle. You might guess that that’s the best time to look for it, but you’re wrong. (Hah!) The Summer Triangle is best seen in the fall, directly overhead, although it’s visible from midsummer to early winter. There are a few simple clues to finding it. One is to simply look for a large triangle, roughly three fist widths on each side, that is formed by the three brightest stars directly overhead and a little to the west. If you’re in the country, you can see the Milky Way galaxy streaming through the triangle as well.
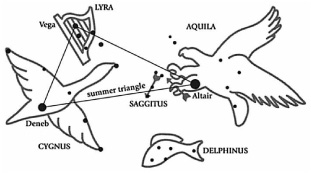
The Summer Triangle. In the fall, three bright stars can be seen directly overhead: Deneb, Altair, and Vega, roughly three fist widths apart from each other.
These three stars are the brightest in their constellations, two of which are the beautiful outlines of birds. The third is a lyre, a type of harp. Accompanying this triangle are two other constellations, an arrow and a dolphin….
Altair (al-tare´) is the bright star in Aquila’s head, and of the stars in the Summer Triangle, it is the one farthest from the Big Dipper. Aquila is two fists long from head to tail and just over two fists from wingtip to wingtip….
… Vega (vay´-guh) is the brightest star in Lyra; actually, it’s a double star. It’s the closest of the three Summer Triangle stars to the line coming from the bowl of the Big Dipper or, if you’re facing north, the leftmost of the two triangle stars that are closest to north. The rest of the constellation is comparatively dim, forming a pretty diamond of four stars under one fist across, pointing toward Altair in Aquila….
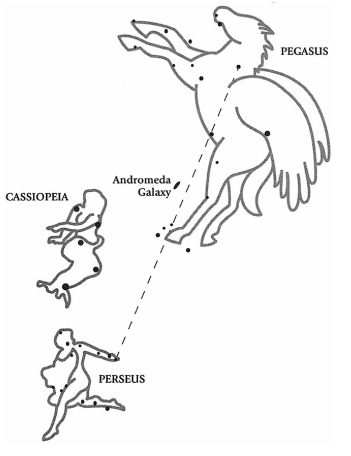
If you continue the line of the Big Dipper’s pointer stars through the North Star, about five fists and a little to the right, you will arrive at Cassiopeia (six fists from the pointer stars) and then Pegasus. Cassiopeia appears as a W of stars one and a half fists wide, opening toward the Big and Little Dippers (Bears). It’s easiest to picture this W as a throne with Cassiopeia seated on it.
Extending the pointer star line another three fists beneath the throne, you will arrive at the Great Square of Pegasus, roughly one fist on each side. This forms his body, and it is possible to see hindlegs, forelegs, neck, and head, all in proportion. The line you have extended strikes him in the belly, and he appears to be galloping to the left if you’re seeing him right side up (facing the south).
Andromeda is one and the same with the hindlegs of Pegasus, and this is the location of the only other galaxy besides our own that we can see with the naked eye, the Andromeda galaxy. If you draw a line from the shoulders of Pegasus through his rear thigh (from one corner of the square to another) and continue it just under five fist widths, you will arrive at the bottom of Perseus. This is a diffuse stream of stars with no clear shape. Though neither Perseus nor Andromeda look much like their names, they are easy to find. Both Cassiopeia and Perseus lie in the trail of the Milky Way.
The constellations of summer are not especially bright, but the warm weather encourages one to lie down on a blanket and comfortably pick them out….
These summer constellations are best seen from mid-June through late September. …
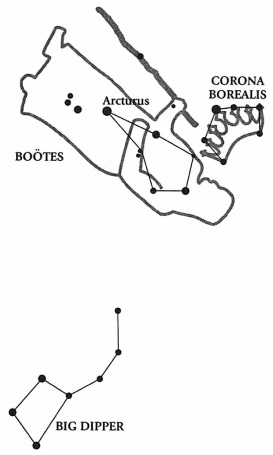
Boötes may easily be found by extending the arch of the Big Dipper’s handle three fists until you find the bright star Arcturus (ark-tur´-us). This is where his legs join his body, which forms an elongated diamond (his torso) two and a half fists long, stretching toward the north.
Coming off Boötes’ right shoulder is a constellation of beautiful simplicity. This is the Corona Borealis (kor-oh´-nuh boar-ee-al -is), or northern crown. …
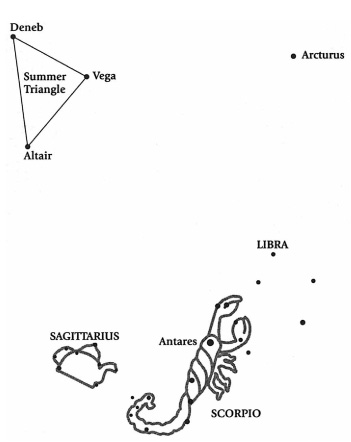
In the south on summer nights, look for the huge scorpion standing on his tail, three fist widths in height.
There is a constellation that bears no resemblance to its name whatsoever, but looks exactly like a teapot. Its stars are those of Sagittarius (sa-ji-tare´-ee-us) ….
Scorpio the scorpion looks just like his name. As Orion, his foe, rules the southern skies of winter, so Scorpio rules the summer. Between his two claws is another constellation of the zodiac, Libra (lee´-bruh), visible only as a box of four fainter stars. All three of these zodiacal constellations appear in a row, Sagittarius-Scorpio-Libra, just above the southern horizon. It may not be possible for people in more northerly latitudes to see them. Sagittarius is one and half fists across, and Scorpio sprawls three fist widths. Libra is only two to three fingers on a side, barely visible as a box within the arc of Scorpio’s claws.
—Excerpted from Stargazing
Elizabeth P. Lawlor
Illustrations by Pat Archer
Star Movement. Every twenty-four hours, the earth rotates counterclockwise on its axis, from west to east. This rotation causes the stars, sun, and moon to appear as though they move in a great arc across the sky from east to west. For observers in the United States, stars and other heavenly bodies that pass near the zenith seem to move in half-circles as they rise, cross the sky, and set. Stars to the south seem to scribe smaller arcs rather than half-circles. Stars to the north, especially those close to the North Star, make circles overhead. The closer the stars are to the poles, the tighter the circles they make (see illustration).
Only those constellations that pass overhead at night are visible to us. In the winter months, these include Gemini, Taurus, Orion, the Great Bear (Ursa Major), the Little Bear (Ursa Minor), Leo, Boötes, and Virgo.
Star Rise. Stars do not rise and cross the sky and set at exactly the same time every night; they rise and set four minutes earlier each night. In fifteen days, they will rise and set an hour earlier, and in thirty days, two hours earlier. As the months go on, those stars that you saw initially in the western sky at about 9 P.M. will not be visible at all; they will cross the sky after sunrise. This is why different constellations are overhead at night at different times throughout the year.
Circumpolar Stars. The circumpolar stars and constellations are those that revolve around Polaris, also known as the North Star or polestar, like spots on a record spinning on a turntable. The illustration represents a time-lapse photo of the path these stars follow when viewed directly overhead. These stars neither rise nor set. They are constantly turning overhead, even when they are hidden from our view by sunlight. In the Southern Hemisphere, there is no visible star located so conveniently. A time-lapse photo in the Southern Hemisphere would also show circular star paths, with a piece of empty sky at the center.
You can see the circumpolar stars from anywhere in North America on a cloudless night. Your location on the earth will determine where in the sky you will see these stars. If you live in Alaska or northern Canada, the circumpolar stars will appear almost directly overhead; if you live in the southern states, these stars will appear close to the horizon. Use the instructions below to find the North Star. Put a camera on a flat spot outdoors on a dark, clear night to make your own star-track photos. The shutter must remain open for at least ten or fifteen minutes. An hour or more is better.
Winter Constellations. Each season of the year has its own set of constellations. With a little practice you will be able to identify these star patterns. You can use the constellations to locate additional stars in the winder sky.
The Big Dipper. Almost everyone recognizes the seven stars conspicuously arranged in the shape of a very large scoop or dipper in the northern sky. This well-known landmark, the Big Dipper, is a good place for you to begin your study of the stars. Although often referred to as a constellation, astronomers call this group of stars an asterism that is within the Great Bear constellation.
Seven major stars form the Big Dipper. Look for the curved handle of the dipper and the four stars that make its bowl. The “pointer stars,” Merak and Dubhe (pronounced “Dubby”), are the two bright stars that form the outer side of the dipper’s bowl. If you draw an imaginary line up (away from the horizon) from them to the nearest star that is moderately bright, you will have reached the North Star. Don’t be surprised that it is not very bright. Polaris is a magnitude 2 star, important but not glamorous.
The North Star has guided navigators throughout the millennia. This is an important star, because the northern end of the earth’s axis is pointed toward it. This places it almost directly above our geographical North Pole. It is an important navigational star, even with today’s high-tech navigational equipment. The other polar constellations turn in a great circle around Polaris, as though it were the hub of a wheel. What do you think the Big Dipper would look like when viewed from the North Pole?
Apparent movement of a star.
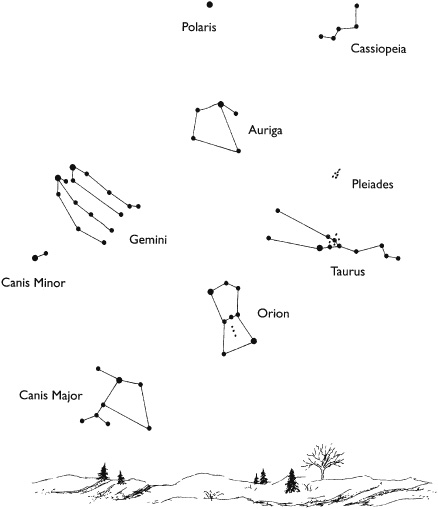
Winter stars and constellations.
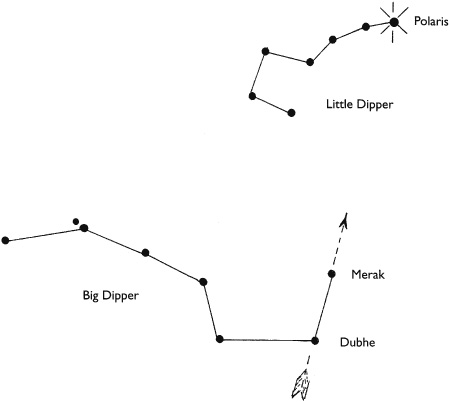
Two stars that point to Polaris, Dubhe and Merak.
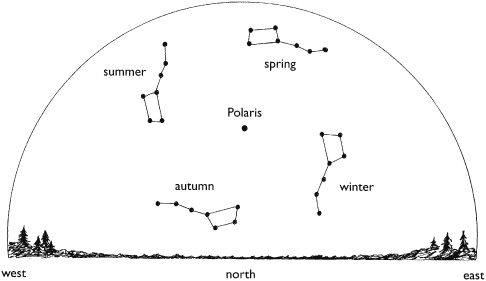
Observing the sky about 9 P.M., you will see that the Big Dipper circles around Polaris from season to season. Winter stars and constellations. Draco, the Dragon.
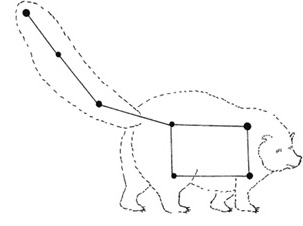
The Little Bear (Ursa Minor).
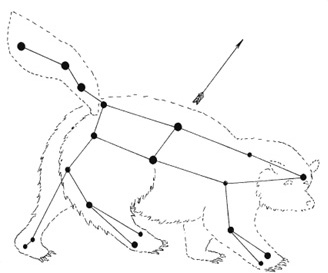
The Great Bear (Ursa Major).
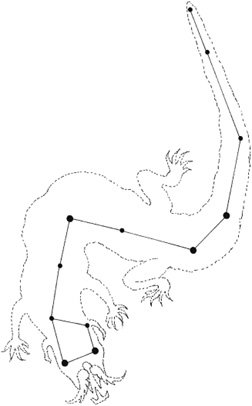
Draco, the Dragon.
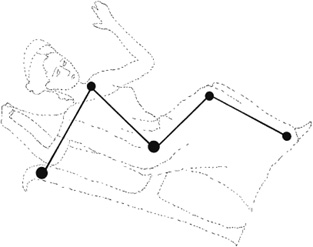
Cassiopeia.
The Pleiades. This cluster of stars, frequently called The Seven Sisters, is part of the constellation Taurus. You can find the cluster if you draw an imaginary line from the star that marks Orion’s left shoulder and pass it through Aldebaran, which is also located in Taurus. Continue the line to the cluster of stars beyond Aldebaran and you will reach the Pleiades. For a special treat, look at them with a pair of binoculars.
The Great Bear (Ursa Major). This circumpolar constellation is made up of the Big Dipper and other stars. After you have located the Big Dipper, look for the stars that form the Great Bear. The handle of the dipper is the bear’s tail, and the bowl of the dipper contributes to the bear’s back. Can you find the bear’s head and front legs? Use the accompanying illustration as a guide, but make your own drawing in your notebook. Don’t forget to identify compass directions in your notes.
The Little Dipper. The stars that form this group are part of a larger constellation called the Little Bear (Ursa Minor). As in the Big Dipper, there are seven stars. Four stars make the bowl, and three form the curved handle. If you follow the line of the handle stars, you will find a small and lonely star. This is the North Star.
Because all the stars of the Little Dipper are small and faint, it is not as easy to find as the Big Dipper. If you remember that the Little Dipper appears as though it were pouring something into the Big Dipper, it is easier to find. Again, don’t confuse this with the Pleiades. In your notebook, make a drawing of this star group. Compare the positions of the dippers with each other at 8 P.M. in January, February, and March. What did you notice?
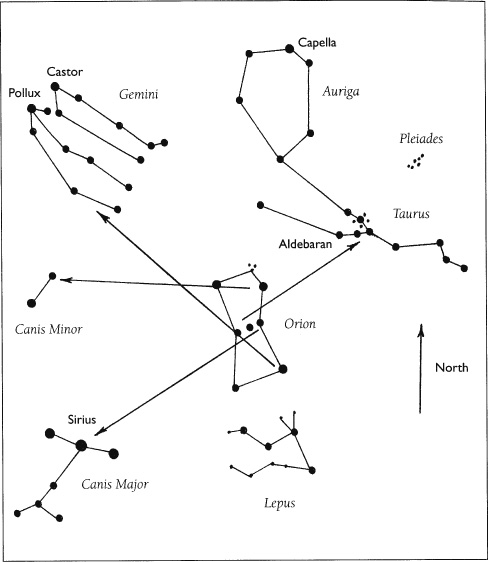
Orion as a guide to the winter sky.
Draco, the Dragon. This is a long, sprawling line of stars that begins with an irregular diamond that forms the dragon’s head. Look for the last two tail stars, which are about ten degrees (one fist width) from the pointers of the Big Dipper. They are of equal brightness and lie between the cups of the Big and Little Dippers. Draw an imaginary line from the tail stars in the direction of the handle of the Big Dipper, making an arc below the Little Dipper, until the line of stars ends at the dragon’s head.
Cassiopeia. The queen’s chair is found on the other side of Polaris from the Big Dipper. Find Alioth, the third star in from the handle of the Big Dipper. Draw a line from Alioth to Polaris. Draw another line of equal length from Polaris to a group of stars of equal brightness that are in the shape of a relaxed upside-down W or an M. You have found Cassiopeia, or Cassiopeia’s Chair, as the constellation is sometimes called.
Cepheus. Look between Draco’s head and Cassiopeia, and you will find Cepheus. It looks like a rectangle wearing a dunce cap. Don’t be discouraged if you have trouble finding Cepheus, because it is not as easy to locate as the other circumpolar constellations.
Orion. Orion, the hunter, seems to consume the southern region of the sky. This constellation is so dominant that we often describe the location of other stars relative to it. Look for the mighty hunter early in the evening. The three bright stars in his belt (magnitude 2) are easy to find. Two widely separated stars above the belt mark his shoulders, and two similarly separated stars below the belt mark his arms and legs. A curving line of stars hanging obliquely from the belt form Orion’s sword. Orion’s sword contains a hazy region called the Orion Nebula. In this area of gas and dust clouds, new stars are forming. You can see the nebula with a pair of binoculars.
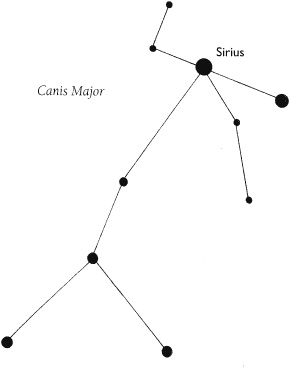
Canis Major.
Betelgeuse is the only bright, orange star in the constellation. To find it, look above and to the left of the belt. It marks Orion’s right shoulder. If you look an equal distance below the belt, you will find another bright star, called Rigel, forming the left foot. These two stars illustrate star evolution. Betelgeuse is an old star burning red like the embers in a tired campfire, and Rigel burns in the blue-white heat of youth.
The stars in the constellation of Orion can help you find your way around the winter sky. Use the map on the next page as a guide to the landmarks.
Canis Major. You can find this constellation by tracing a line southeast from Orion’s belt to Sirius, the Dog Star. Sirius is the brightest star in the constellation, and astronomers say it is the brightest star in the heavens (magnitude-1.6).
Canis Minor. A line drawn west from Betelgeuse to the next bright star will bring you to Procyon. This is usually the only visible star in the constellation Canis Minor. Canis Major and Canis Minor are Orion’s two faithful dogs that follow the hunter across the winter sky.
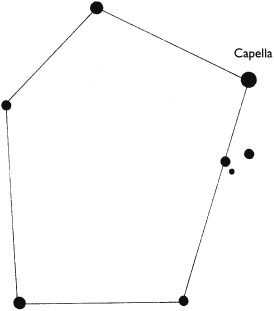
Auriga, the Charioteer.
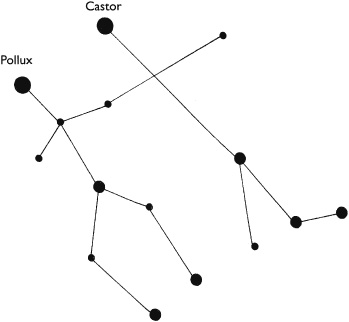
Gemini, the Twins.
Taurus, the Bull. Draw a line northwest of Orion’s belt the same length as the line to Sirius, and you will find a V-shaped group of stars. These are in the constellation Taurus, the bull. Aldebaran is the brightest star in the constellation and burns bright red.
Gemini. A line from Rigel through Betelgeuse will bring you to Castor and Pollux. Look for these matched stars directly overhead. (With the help of larger, more powerful telescopes, astromoners have learned that Castor is really a stellar system made up of seven stars.) Although they appear to be close to each other, they are separated by eleven light-years. Castor is about fourteen light-years farther away from us than Pollux. Pollux is brighter and is the more southerly.
Auriga, the Charioteer. To locate this five-sided constellation, draw a line northward between Betelgeuse and Aldebaran. The brightest star in this group is Capella. It glows a bright yellow.
—From Discover Nature in Winter
U.S. Army
In a survival situation, you will be extremely fortunate if you happen to have a map and compass. If you do have these two pieces of equipment, you will most likely be able to move toward help. If you are not proficient in using a map and compass, you must take the steps to gain this skill.
There are several methods by which you can determine direction by using the sun and the stars. These methods, however, will give you only a general direction. You can come up with a more nearly true direction if you know the terrain of the territory or country.
You must learn all you can about the terrain of the country or territory to which you or your unit may be sent, especially any prominent features or landmarks. This knowledge of the terrain together with using the methods explained below will let you come up with fairly true directions to help you navigate.
The earth’s relationship to the sun can help you to determine direction on earth. The sun always rises in the east and sets in the west, but not exactly due east or due west. There is also some seasonal variation. In the northern hemisphere, the sun will be due south when at its highest point in the sky, or when an object casts no appreciable shadow. In the southern hemisphere, this same noonday sun will mark due north. In the northern hemisphere, shadows will move clockwise. Shadows will move counterclockwise in the southern hemisphere. With practice, you can use shadows to determine both direction and time of day. The shadow methods used for direction finding are the shadow-tip and watch methods.
SHADOW-TIP METHODS
In the first shadow-tip method, find a straight stick 1 meter long, and a level spot free of brush on which the stick will cast a definite shadow.
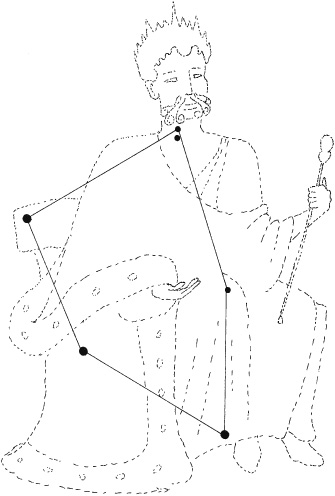
Cepheus.
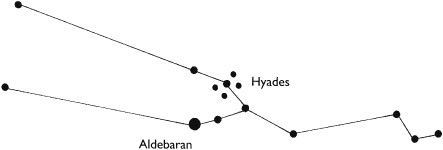
Taurus, the Bull.
This method is simple and accurate and consists of four steps:
Step 1. Place the stick or branch into the ground at a level spot where it will cast a distinctive shadow. Mark the shadow’s tip with a stone, twig, or other means. This first shadow mark is always west—everywhere on earth.
Step 2. Wait 10 to 15 minutes until the shadow tip moves a few centimeters. Mark the shadow tip’s new position in the same way as the first.
Step 3. Draw a straight line through the two marks to obtain an approximate east-west line.
Step 4. Stand with the first mark (west) to your left and the second mark to your right—you are now facing north. This fact is true everywhere on earth.
An alternate method is more accurate but requires more time. Set up your shadow stick and mark the first shadow in the morning. Use a piece of string to draw a clean arc through this mark and around the stick. At midday, the shadow will shrink and disappear. In the afternoon, it will lengthen again and at the point where it touches the arc, make a second mark. Draw a line through the two marks to get an accurate east-west line.
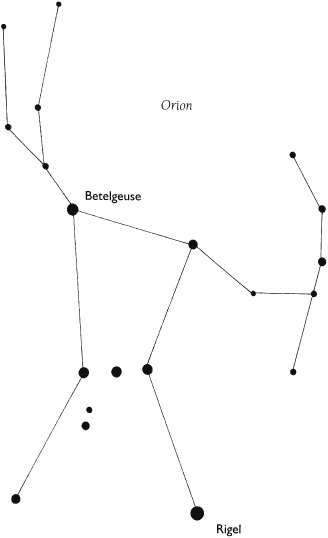
Orion.
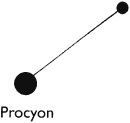
Canis Minor.
THE WATCH METHOD
You can also determine direction using a common or analog watch—one that has hands. The direction will be accurate if you are using true local time, without any changes for daylight savings time. Remember, the further you are from the equator, the more accurate this method will be. If you only have a digital watch, you can overcome this obstacle. Quickly draw a watch on a circle of paper with the correct time on it and use it to determine your direction at that time.
In the northern hemisphere, hold the watch horizontal and point the hour hand at the sun. Bisect the angle between the hour hand and the 12 o’clock mark to get the north-south line. If there is any doubt as to which end of the line is north, remember that the sun rises in the east, sets in the west, and is due south at noon. The sun is in the east before noon and in the west after noon.
Note: If your watch is set on daylight savings time, use the midway point between the hour hand and 1 o’clock to determine the north-south line.
In the southern hemisphere, point the watch’s 12 o’clock mark toward the sun and a midpoint halfway between 12 and the hour hand will give you the north-south line.
Shadow-tip method.
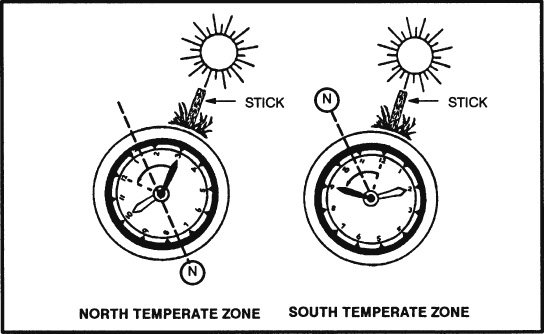
Watch method.
Because the moon has no light of its own, we can only see it when it reflects the sun’s light. As it orbits the earth on its 28-day circuit, the shape of the reflected light varies according to its position. We say there is a new moon or no moon when it is on the opposite side of the earth from the sun. Then, as it moves away from the earth’s shadow, it begins to reflect light from its right side and waxes to become a full moon before waning, or losing shape, to appear as a sliver on the left side. You can use this information to identify direction.
If the moon rises before the sun has set, the illuminated side will be the west. If the moon rises after midnight, the illuminated side will be the east. This obvious discovery provides us with a rough east-west reference during the night.
Your location in the Northern or Southern Hemisphere determines which constellation you use to determine your north or south direction.
THE NORTHERN SKY
The main constellations to learn are the Ursa Major, also known as the Big Dipper or the Plow, and Cassiopeia. Neither of these constellations ever sets. They are always visible on a clear night. Use them to locate Polaris, also known as the polestar or the North Star. The North Star forms part of the Little Dipper handle and can be confused with the Big Dipper. Prevent confusion by using both the Big Dipper and Cassiopeia together. The Big Dipper and Cassiopeia are always directly opposite each other and rotate counterclockwise around Polaris, with Polaris in the center. The Big Dipper is a seven star constellation in the shape of a dipper. The two stars forming the outer lip of this dipper are the “pointer stars” because they point to the North Star. Mentally draw a line from the outer bottom star to the outer top star of the Big Dipper’s bucket. Extend this line about five times the distance between the pointer stars. You will find the North Star along this line.
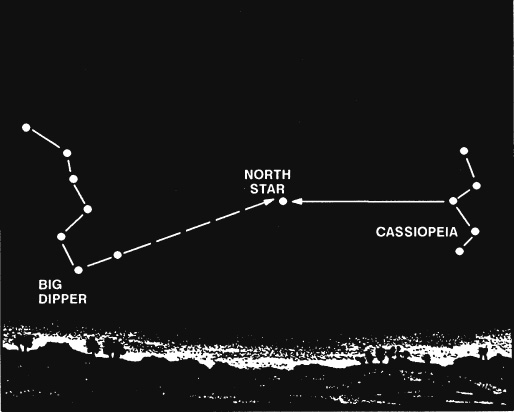
The Big Dipper and Cassiopeia.
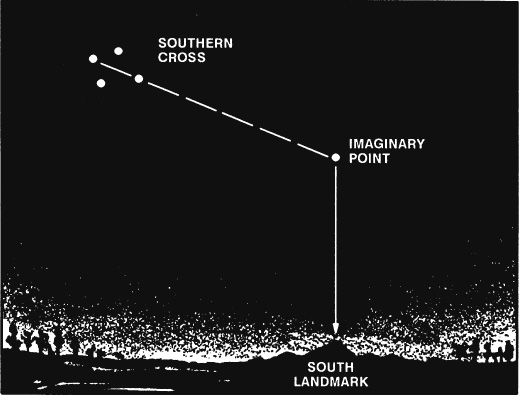
Southern Cross.
Cassiopeia has five stars that form a shape like a “W” on its side. The North Star is straight out from Cassiopeia’s center star.
After locating the North Star, locate the North Pole or true north by drawing and imaginary line directly to the earth.
THE SOUTHERN SKY
Because there is no star bright enough to be easily recognized near the south celestial pole, a constellation known as the Southern Cross is used as a signpost to the South. The Southern Cross or Crux has five stars. Its four brightest stars form a cross that tilts to one side. The two stars that make up the cross’s long axis are the pointer stars. To determine south, imagine a distance five times the distance between these stars and the point where this imaginary line ends is in the general direction of south. Look down to the horizon from this imaginary point and select a landmark to steer by. In a static survival situation, you can fix this location in daylight if you drive stakes in the ground at night to point the way.
You can construct improvised compasses using a piece of ferrous metal that can be needle shaped or a flat double-edged razor blade and a piece of nonmetallic string or long hair from which to suspend it. You can magnetize or polarize the metal by slowly stroking it in one direction on a piece of silk or carefully through your hair using deliberate strokes. You can also polarize metal by stroking it repeatedly at one end with a magnet. Always rub in one direction only. If you have a battery and some electric wire, you can polarize the metal electrically. The wire should be insulated. If not insulated, wrap the metal object in a single, thin strip of paper to prevent contact. The battery must be a minimum of 2 volts. Form a coil with the electric wire and touch its end to the battery’s terminals. Repeatedly insert one end of the metal object in and out of the coil. The needle will become an electromagnet. When suspended from a piece of nonmetallic string, or floated on a small piece of wood in water, it will align itself with a north-south line.
You can construct a more elaborate improvised compass using a sewing needle or thin metallic object, a nonmetallic container (for example, a plastic dip container), its lid with the center cut out and waterproofed, and the silver tip from a pen. To construct this compass, take an ordinary sewing needle and break in half. One half will form your direction pointer and the other will act as the pivot point. Push the portion used as the pivot point through the bottom center of your container; this portion should be flush on the bottom and not interfere with the lid. Attach the center of the other portion (the pointer) of the needle on the pen’s silver tip using glue, tree sap, or melted plastic. Magnetize one end of the pointer and rest it on the pivot point.
The old saying about using moss on a tree to indicate north is not accurate because moss grows completely around some trees. Actually, growth is more lush on the side of the tree facing the south in the Northern Hemisphere and vice versa in the Southern Hemisphere. If there are several felled trees around for comparison, look at the stumps. Growth is more vigorous on the side toward the equator and the tree growth rings will be more widely spaced. On the other hand, the tree growth rings will be closer together on the side toward the poles.
Wind direction may be helpful in some instances where there are prevailing directions and you know what they are.
Recognizing the differences between vegetation and moisture patterns on north- and south-facing slopes can aid in determining direction. In the northern hemisphere, north-facing slopes receive less sun than south-facing slopes and are therefore cooler and damper. In the summer, north-facing slopes retain patches of snow. In the winter, the trees and open areas on south-facing slopes are the first to lose their snow, and ground snowpack is shallower.
—From Survival (Field Manual 21-76)
Darran Wells
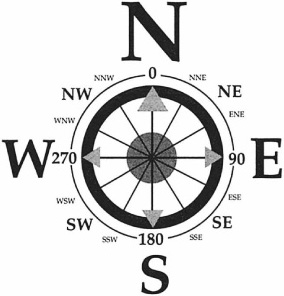
You probably know that the four main cardinal directions are north, south, east, and west. As you can see on the compass rose below, they can be divided into northwest (NW), northeast (NE), southwest (SW), and southeast (SE). And those directions can be further broken down into north-northeast (NNE), east-northeast (ENE), east-southeast (ESE), south-southeast (SSE), south-southwest (SSW), west-southwest (WSW), west-northwest (WNW), and north-northwest (NNW).
—From NOLS Wilderness Navigation
Don Geary
A compass is the basic tool of navigation, and you need to learn to use it before you can expect to travel with any kind of confidence. A compass is not a toy, but a reasonably precise instrument that is invaluable for navigating over land, on the water, or in the air. Learning to use one will enable you not only to navigate, but also to reach predetermined objectives with the confidence that is the true mark of an experienced outdoorsman.
Mastering the compass is not difficult if you understand the basic fundamentals. To begin with, magnetism is the force that makes a compass work. The earth’s surface is covered by an invisible magnetic field, which affects, and is affected by, all other magnetic materials on, above, and below it. Picture the earth’s axis as a very long bar magnet with north and south poles. All magnetic objects on the earth, if allowed to swing freely, will align themselves with this north-south line. A compass needle will align itself along this line no matter where in the world it is placed.
… The compass has a magnetized needle or card that is allowed to swing freely on some type of pivot. A compass card shows, at the very least, the four compass points of north, south, east, and west. Such things as a damping feature, luminous dial, sights, and a magnetic declination adjusting mechanism may be added for various purposes.
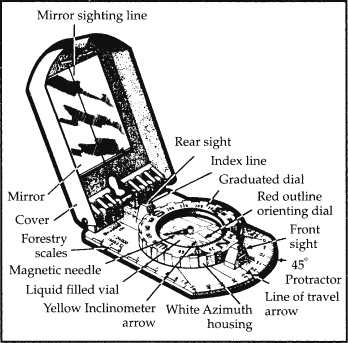
Exploded view of a compass.
A compass needle points to magnetic north, and once north has been established, the direction or bearing to anything in the world can be described by a degree reading. Magnetic north is designated as 0 degrees or 360 degrees. The other cardinal points marked on the compass dial, or rose, are separated by 90 degrees. East is 90 degrees, south is 180 degrees, and west is 270 degrees. Other compass points also have name designations depending on their direction. Northwest, for example, is about 315 degrees and located midway between north and west. North-Northwest is closer to north than west and about 340 degrees. West-Northwest, on the other hand, is closer to west than north and falls at roughly 290 degrees. Other compass points are described in a similar manner—Southwest, for example, is located midway between south and west and is roughly 225 degrees.
The dial on any good compass will be marked in degrees, usually indicated by short lines, called tick marks, every 2, 5, or 10 degrees. A compass without degree readings, or only showing the cardinal compass points, is really useless for navigating.
The degree reading or bearing for an objective changes with the point of view. For example, the corner of a house might have a value of 200 degrees when viewed from the center of a room but a different value when viewed from another room or a point outside the house. Readings of specific objects will change whenever the location of the compass has changed.
When using a topographical map and compass, you need to make some adjustments, because all compasses point to magnetic north but all topo maps are oriented to geographical north. The difference between these two points (about 1,300 miles!) is called magnetic declination. …
Almost any metal object can affect how your compass operates. A belt buckle, handgun, sheath knife or pocketknife, rifle, camera, and binoculars are probably the most common offenders. Natural and unavoidable influences include iron deposits in the earth, lightning storms, high-voltage power lines, and periods of high static electricity in the atmosphere. Even a lit flashlight bulb is a powerful electromagnet that may influence a compass needle or dial. Keep this in mind when traveling in the dark with the aid of a compass and flashlight.
Check for compass interference regularly by watching the action of the compass needle. If your compass needle swings erratically it is being influenced by something other than magnetic north. Even if the compass is equipped with a dampening mechanism or fluid, the action of the needle should not be abrupt. It should swing left and right a few moments before coming to rest.
Probably the best way to determine if your compass is being influenced by other forces is to set it down on a log, the ground, or a rock. It is important that the compass lie flat and that there are no deposits in the area, in a rock for example. (A metal deposit will cause a compass needle to stop abruptly.) Now back a few steps away from the compass and let the needle come to a rest. After a minute or so, slowly move back to the compass, at the same time watching the action of the compass needle. If the needle moves as you approach, something on your person is causing the compass needle to deviate. Remove any metal, such as a metal belt buckle or pocketknife, and try this test again. The things that can affect a compass needle are surprising; even the metal in a ballpoint pen can cause some needle deviation.
There are four basic types of compasses in use today by outdoor travelers: floating dial, fixed dial, cruiser, and orienteering. All of them indicate direction, but their special features are designed for specific uses. Before buying a compass, examine your needs and choose the kind that will do the best job for you.
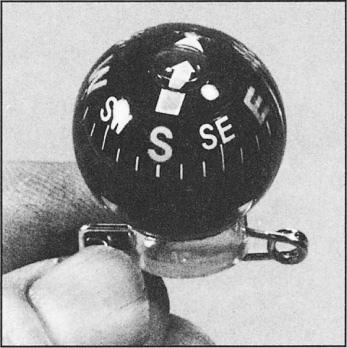
Floating dial compass.
Any compass that has a joined compass card and needle that work as a single unit is a floating dial compass. Floating dial compasses include automobile, aircraft, and boat compasses, as well as military surplus and lensatic compasses.
On a ship, the floating dial compass is set in the center of the cockpit or wheelhouse so that the line on the compass housing runs in the same direction as the keel of the ship. This line, called the lubber line, indicates the direction of travel, as if the ship were an arrow. The compass dial or card is allowed to swing freely, and the direction of travel is read off the card where the lubber line points.
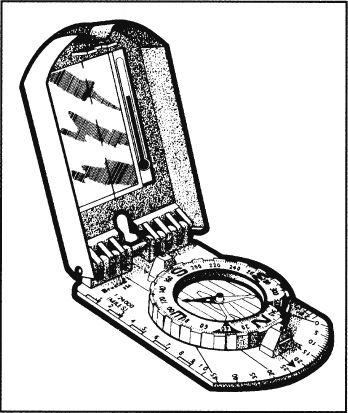
Lensatic compass.
On a lensatic compass, the principle is the same except that a sight is commonly used to pick up an object in the distance. A wire is set into the compass cover, and a V sight is on the other side of the compass housing. An object is sighted in the distance, and the degree reading is noted through a lens below the V sight.
A lensatic compass is not the easiest or quickest to use, because you must hold the compass so that you can see both your objective and the degree reading. This necessitates holding the compass close to your eye, and it leaves a lot of room for error. For this reason, a lensatic compass may not be your best choice for wilderness travel.
Fixed dial compasses are the ones most commonly carried and used by outdoorsmen. They are a poor choice, however, because they are not as accurate or easy to operate as other types of compasses. The popularity of the fixed dial compass undoubtedly lies in its low price. Many outdoorsmen reason that they should carry a compass but do not see why they should pay very much money for one.
A fixed dial compass resembles a pocket-watch with a pop-up cover. Inside are a needle and compass card. Few show more than the major compass points, and even fewer are damped to slow needle travel. There is rarely any sighting device or direction-of-travel arrow, so they are suitable only for showing general direction. Fixed dial compasses are one step above a magnetized needle stuck in a cork and floated in a bowl of water. Their operation is very slow and their accuracy never better than questionable. They make nice prizes in caramel-covered popcorn, but there are infinitely better choices for wilderness route finding.
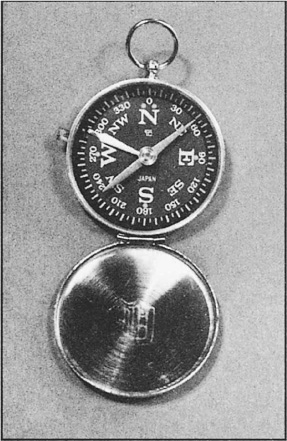
Fixed dial compass.
Cruiser compasses are the most accurate you can buy and are also the most expensive of the handheld compasses. Cruiser compasses are designed for professionals such as timber cruisers, geologists, and survey crews. Prices start at over $100. If you want a quality instrument and are not concerned with price or weight, then a cruiser compass is your best choice. If, however, you are interested only in direction, expressed in degree readings, the lower-priced light-weight orienteering compass would be more suitable. Probably the best cruiser compasses available today are Brunton’s Pocket Transits. Brunton has been making very high-quality compasses for professionals since 1894.
The standard cruiser compass is easy to identify because the compass card is numbered counterclockwise. Other standard features include an adjustment for magnetic declinations (a screw mechanism that moves the compass card left or right as required) and tick marks for each of the 360 degrees on the compass card. On most models, the needle locks in position when the cover is closed; this cuts down on needle wear over the life of the instrument. Several other features commonly built into cruiser compasses are really of interest only to professionals—for example, scales and bubble levels that determine slope incline and elevation and measure both horizontal and vertical angles. Most cruiser compasses are a little too heavy (8 ounces and up) for people concerned about excess weight, such as backpackers. Brunton has recently introduced a lightweight cruiser compass (about 5 ounces), however, with all of the features of heavier units.
The orienteering compass has a needle that operates independently of the card. The compass housing, which has 0- to 360-degree readings stamped in a clockwise direction around the dial, can be turned so that any degree reading is indicated by the direction-of-travel arrow. The direction-of-travel arrow itself is permanently stamped into the base.
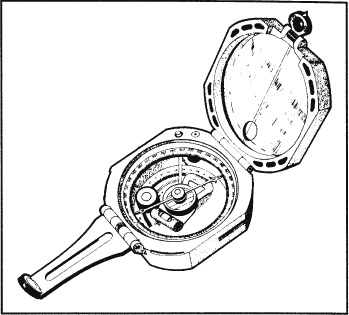
Cruiser compass (Brunton Pocket Transit).
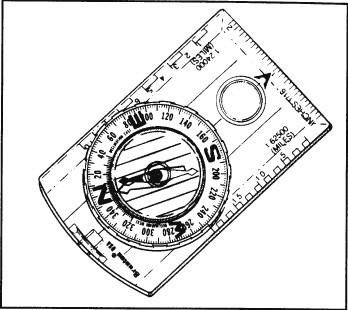
Orienteering compass.
An orienteering compass is the best type for almost any kind of travel in the great outdoors. These familiar-looking compasses are inexpensive, lightweight (less than an ounce), rugged, and dependable. They have a clear plastic base and a rotating degree ring, and are commonly filled with a damping liquid. Orienteering compasses are widely sold in sporting-goods, backpacking-equipment, and even department stores throughout the country. At one time all units were made by the Silva Company, but now several other companies (including Brunton) offer high-quality units as well.
For around $10, you can purchase a good orienteering compass that has all of the features necessary to navigate in the wilds. Usually, however, an adjustment for magnetic declination is not one of the features on an orienteering compass.
An orienteering compass is the simplest to use for following a compass bearing. Point the direction-of-travel arrow at your objective, then turn the compass dial or housing until the needle points to the N symbol (or 0- or 360-degree mark). This is known as orienting the compass to north. The degree reading just above the direction-of-travel arrow is the bearing of the objective. While walking toward the objective, you need only to hold the compass flat and steady, keeping the needle oriented to north, the direction-of-travel arrow will point the way. When you reach this objective, check the compass again and sight to a new objective, with the compass needle oriented to north on the compass housing. Anyone can learn to use an orienteering compass in about twenty minutes. Using this type of compass, you will be surprised at the speed and ease with which you are able to follow a course.
—From Using a Map and Compass
Greg Davenport
Marine compasses are designed especially for vessels in rough seas. Unlike an orienteering compass, a marine compass has numbers on a card that rotates around a fixed needle. The compass card is mounted on a float that sits on a pivot directly above the magnetic needle mechanism. The card is finely balanced, allowing it to float and move constantly as it aligns with magnetic north. Headings are taken from the fixed lubber line located on the body of the compass. If attached to the vessel, the lubber line is aligned with the front of the vessel so that all headings represent the direction of travel. The top of these compasses typically have a hemispherical shape, and the compasses are usually mounted close to the steering apparatus but away from metals that may interfere with their heading. When mounted, compass bowls are kept horizontal by the use of gimbals, which allow the compass to compensate for sea roll.
While an orienteering compass has its scale (0 to 360 degrees) located on the circular housing, which rotates around the arrow seeking magnetic north, a marine compass uses a circular scale located on the compass card. With an orienteering compass, a heading is only established when the circular housing is turned and the north-seeking arrow is boxed (see page 407). With a marine compass, the numbers are simply read below the lubber line (stationary index line).
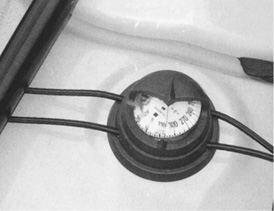
A marine compass mounted on a kayak.
—From Surviving Coastal and Open Water
Darran Wells
Illustrations by Jon Cox
A compass is simply a device that responds to the Earth’s magnetic fields by pointing to magnetic north, which is near Baffin Island, Canada (page 407 for more details). All the plastic, rulers, numbers, and arrows are there to make a compass easier to use, but its essence is its north-pointing magnet. When used properly, it can help you to determine cardinal directions from almost any location on the planet.
The illustrations here and … show compasses with various basic and advanced features. At the very least, your compass must have a needle, bezel, and base plate. If you plan on traveling in the backcountry regularly or if you need a high level of precision (to compete at orienteering, for example), it is well worth investing in a more advanced compass. If you already own a compass, pull it out now and take a look the following parts:
The needle, which is made of magnetized iron, balances on a pivot so that it can swing easily in any direction. The north-seeking end of the needle is red; some have a convenient glow-in-the-dark stripe. Brunton Eclipse compasses use a magnetized disc rather than a standard needle. The disc works precisely the same, but is less likely to snag or stick on the housing. The housing for both needle and disc compasses is filled with a non-freezing damping liquid so that it doesn’t move erratically or freeze in sub-zero temperatures.
The housing is the liquid-dampened case that surrounds the needle. The bezel is the numbered plastic dial around the housing; also called the azimuth ring, it is marked with 360 degrees, usually in 2-degree increments. Engraved into the bottom of the bezel are meridian lines and an orienting arrow. The meridian lines will help you determine declination. On most compasses, the orienting arrow looks like a tiny shed that outlines the needle; it is used to box the needle when determining your bearing or direction of travel. Eclipse compasses feature a blue circle instead of an orienting arrow.
The base plate is the transparent rectangle of plastic that the bezel rests on. It is often marked with rulers or UTM grid readers. There is also usually a “direction-of-travel” arrow that, along with the bezel’s orienting arrow, helps you take and follow bearings. The end of this arrow that is closest to the bezel is called the index line; this is where bearings are read. Eclipse-style compasses feature a magnetized index line to make reading bearings easier and more precise.
Parts of basic disc and needle compasses.
Sighting mirrors are small mirrors that fold over the top of the bezel to close the compass. Compasses with sighting mirrors are sometimes called prismatic compasses. When open they are used to more precisely align the compass with distant objects when taking or following a bearing. The advantage of the mirror is that it allows you to adjust the bezel while sighting a distant object. Tilting the mirror toward you enables you to view the orienting arrow while holding the compass at eye level and an arm’s length away.
This adds a significantly higher level of accuracy when using bearings. When fully opened, sighting mirrors are also handy as a longer straightedge for drawing bearing lines on your map.
This is a fancy name for a cord attached to the base plate. Many lanyards have an adjustable plastic toggle of some sort that can be used to measure distance on a map. While most folks use the toggle and lanyard to wear the compass around their necks when it’s not in use, beware that the lanyard can occasionally catch on very thick brush or climbing gear.
Many compasses feature an adjustable orienting arrow. This allows you to set the declination on your compass so that you do not have to add or subtract in the field while switching between magnetic and true bearings—a welcome convenience after an exhausting day in the mountains. Most compasses with a declination adjustment also have a tiny screwdriver attached to the lanyard for adjusting the declination screw on the back of the bezel.
Ignore this feature unless you are planning to use your compass outside North America. A global pivot allows the needle to tilt vertically in such a way that it is not affected by the Earth’s different magnetic dip zones.
Some compasses have a second free-moving needle attached to the pivot inside the bezel. This non-magnetic arrow is usually black and is used to measure the angle of a slope in the field when the compass is tilted on its side. This is a critical tool for those needing to assess avalanche potential.
Even if your vision is good, it is nice to have a small magnifying glass built in to the base plate for reading tiny names and map features.
—From NOLS Wilderness Navigation
Don Geary
Some features make a compass easier to use or more accurate; others increase the versatility of the instrument. When shopping for a compass, consider only those features that will be an aid to you. For example, a surveyor could use a clinometer, for measuring angles of inclination, on a cruiser compass, but a backpacker or hunter really has no use for this feature. Here are brief descriptions of the most popular—and most useful—features.
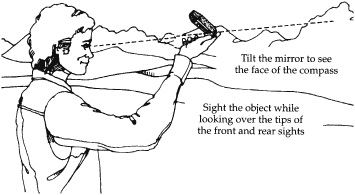
V or rifle sights are used for determining a bearing.
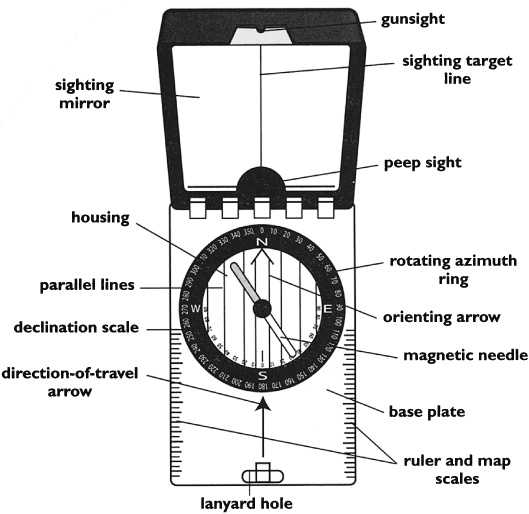
Parts of an advanced compass.
Damping slows down movement of the needle so that it will come to rest more quickly. This saves time when you are taking many readings, such as when following a route. There are three systems for damping a compass needle: induction damping, liquid damping, and needle lock levers.
Induction damping works by magnetic force, dependent on the velocity of the needle. The more the needle swings, the greater the force to dampen the swing. When the needle stops, the magnetic force of the induction damping system also stops, so the damping effect on the compass needle at rest is nil.
The Brunton Company builds induction damping into its line of Pocket Transits. On models with induction damping, there is a magnet mounted on each side of the compass needle, just above the pivot point. Surrounding the center of the pivot point is a tiny copper cup. As the compass needle swings, the magnets set up their own magnetic field inside the cup and help to quickly bring the needle to rest. When the swing of the compass needle stops, the induction damping magnets no longer affect it.
Liquid damping is probably the most common method of slowing down compass needle movement, and nearly all orienteering compasses are liquid damped. Liquid damping is fast and reliable. The liquid commonly has a freezing point of around—40 degrees F, so for most of us, liquid damping will work well. The case of a liquid-damped compass must be well made to prevent damage that could cause the liquid to drain out of the unit. One problem often encountered with liquid-filled compasses is the appearance of a small air bubble inside the case, especially at high elevations. As a rule, unless the air bubble is larger than ¼ inch, there is no cause for alarm. If the air bubble is much larger or does not disappear at lower elevations, return the compass to the manufacturer for a replacement.
Needle lock levers are the third and by far the most frustrating damping system. Old army lensatic compasses have a needle lift lever that works only when the cover is closed. In fact, the lever is activated by closing the cover. Other compasses have a small pin that is depressed to lift the compass needle off the pivot point. To slow down needle travel, you must alternately press and release the lever until the needle comes to rest. Compasses equipped with only a needle lifter for damping can be a chore to use in the field.
People often have assumed that needle quiver indicates compass accuracy. In truth, needle quiver merely means that the needle has not yet come to rest. It may also indicate that the inside of the needle balance point has been worn by the jeweled needle pivot and therefore cannot come to rest. If a compass needle quivers excessively—and it will if not damped in some way—consider buying another compass, as this one will prove quite annoying and will offer questionable accuracy at best.
Sights are built into many compasses for ease in pinpointing an objective. Any compass that does not have some means of sighting an objective will leave a lot to be desired during use in the field. The main types of sights currently in use are lensatic sights, prismatic sights, V or rifle-type sights, and direction-of-travel-arrow sights.
Lensatic sights are found on old military compasses. A lens, which is part of the rear sight, has a twofold purpose: to magnify the compass dial, so that you can determine a degree reading, and to sight the objective. To use a lensatic sight, you line up the notch on top of the lens housing with a wire on the cover of the compass (the front sight) and the objective. A lensatic compass must be held close to the face for sighting and for reading the compass bearing, which can lead to error, especially if the sights are not perfectly aligned.
Prismatic sights are slow to operate. The objective must be lined up between rear and front sights, and then a degree bearing read through the prism part of the rear sight. Prismatic sights can be very accurate when the alignment of the prism is true. Unfortunately, there is little you can do to determine if these sights are, in fact, true. As with lensatic sights, these work best when held relatively close to your eye. Another drawback is that a prismatic sight is difficult to read in low-light conditions.
V or rifle-type sights are offered on several compasses, often in conjunction with a mirrored cover. To use this type, you simply hold the compass at eye level about 12 inches from your face and sight the objective with a V-shaped trough or slot on the compass housing. Once you’ve lined up the objective in the sight, you read the bearing from the mirror cover, where a line crosses the compass card degree readings. Fairly accurate readings, within 2 degrees, are possible with this type of sighting system, but they are not as quick to use as direction-of-travel-arrow sights.
Direction-of-travel-arrow sights are found on orienteering compasses. The arrow is inscribed in the base of the compass, so it cannot be knocked out of alignment. Orienteering compasses with this type of sight are accurate within 2 degrees at a quick glance (within 1 degree with more care), which is generally sufficient for following a compass bearing. The most attractive feature of direction-of-travel-arrow sights is that they are very fast to use—you simply point the arrow at your objective, orient the housing to north, and read the bearing. You can hold the compass anywhere between your chin and your hip, out about 6 inches from your body.
A needle lifter is found on most cruiser compasses. To lift the compass needle off the pivot point when the compass is not in use, a lever is activated when the cover of the compass is closed. Precision surveying instruments should have some means of lifting the compass needle when not in use to prevent wear. On lightweight orienteering compasses, however, a needle lifter is rare. A needle lifter, as mentioned earlier, can also be used to dampen needle movement.
A luminous dial is a handy feature when you are traveling in the dark or in low-light conditions. As a rule, you can charge up a luminous dial by shining a flashlight on it for a few moments, and then it will glow for several hours.
Level indicators use a tiny, round bubble to indicate that the compass is being held flat. Because precise accuracy is dependent, at least in part, on holding a compass level, this feature is important on professional navigating and surveying instruments. Less expensive orienteering compasses will rarely have a level indicator; most users have no problem holding the compass level enough to obtain reasonably accurate readings.
Adjustment Features. A magnetic declination adjustment feature is found on all cruiser compasses and most of the expensive orienteering compasses. This feature adds to the cost of the unit, but is well worth the price if you plan to use the compass with a topographical map. In the extreme eastern and western parts of the United States, magnetic declination can be as great as 22 degrees. Travel is much easier if this deviation is taken care of by an adjustment to the compass rather than by a mental calculation at each reading. Although adding or subtracting the magnetic deviation for a particular part of the country is not difficult, there is always a chance that you might forget to perform the necessary calculation. Failing to take a 20-degree magnetic declination into consideration on a 3-mile hike will steer you more than a mile from your objective. Many people feel that a magnetic declination adjustment feature is well worth the added cost.
A magnifying glass is a common addition to orienteering compasses. It is usually mounted in the flat, clear plastic base and is handy for reading detail on topographical maps, especially the larger-scale (15-minute series) maps.
A compass is useless to you if it is crammed somewhere inside your pack. If your compass is handy, you will use it frequently and become more familiar with its operation. Many compasses come with a special carrying case that can be attached to your belt. If you are backpacking and are using a hip belt, attach the case to your hip belt. An even better way to carry a compass is on a lanyard around your neck. You can tuck the compass into a shirt pocket or allow it to hang when not in use. A compass carried in this manner is always accessible and tough to lose.
—From Using a Map and Compass
Don Geary
In many cases, a compass can be of tremendous value alone—for example, if you are camping and plan a day hike for exploring, fishing, hunting, photographing, or just plain wandering. Before leaving camp, pick out some objective in the distance, say a mountain peak, and note the compass bearing to it. Later, when you want to return to camp, simply reverse the process and calculate your back bearing—a compass heading in reverse. Determine a back bearing as follows: If the bearing is more than 180 degrees, subtract 180 degrees to determine your back bearing; if the bearing is less than 180 degrees, add 180 degrees. If you headed out at 300 degrees, your back bearing is 120 degrees (300 minutes 180).
Whenever you are heading out on a compass bearing and returning on a back bearing, it is imperative that you keep checking your compass to make certain you’re on course. This is not always easy to do, because of detours around fallen trees, boulders, swamps, and other natural obstacles. One way to build a safety cushion into your readings is to deliberately follow a course that will put you left or right of your objective.
For example, let’s assume that you are camped on a river that flows south, and you plan a day hike to a nearby lake for some fishing. You’ve been told that this lake lies about 1 mile due east of the camp, so your bearing will be east (90 degrees) to find the lake and west (270 degrees) to return to camp. You easily find the lake after an hour’s walk, catch some nice trout, and now are ready to return to camp. Following a back bearing of 270 degrees (90 plus 180) should lead directly back to camp. On the hike in, however, you encountered several natural detours that really prevented a straight route. While it would be easy to find the river on which you are camped, you might not know if you should go upstream or down to find camp. By following a compass bearing of about 290 degrees, you can be sure that when you do finally reach the river, camp will be downstream. Thus, deliberate error can help you find the way back if the objective lies on a river, road, or trail.
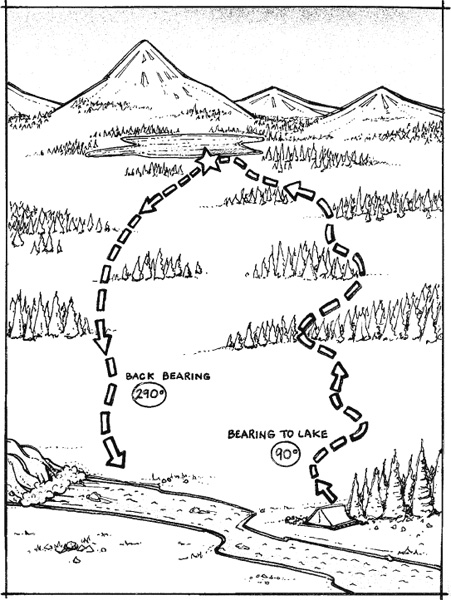
Deliberate error can be used to your advantage when you are trying to reach a distant line (such as a river, trail, or road) and the terrain does not lend itself to a straight line of travel.
Using the back bearing also works well when objectives can be seen for the rips both to and from a given point. This time you are camping on the end of a small lake surrounded by relatively flat forest terrain. In the distance, clearly visible from camp, is a mountain peak on a bearing of 50 degrees. You decide to climb to its summit to see the view from up there. Compass secured around your neck, you head out from camp on a 50-degree compass bearing. Soon the forest is deep, and neither camp nor mountain peak can be seen. Nevertheless, you proceed on a 50-degree bearing and eventually reach the base of the mountain. The view from the top is spectacular—you can see for miles. In fact, you can see the lake.
When it’s time to go back to camp, the formula for determining the back bearing yields 230 degrees (50 plus 180). Trying to hit the camp, however, which is on one end of the lake, may result in missing both the lake and the camp. The lake is large enough that you can use it as an objective instead of the camp. Before descending, you take a bearing on the center of the lake: 240 degrees. Armed with this information, you should be able to make it back to camp quite easily; once you reach the lakeshore, you simply walk to the left until you hit camp.
A compass can also help you set up a more comfortable camp. If your camp faces east, the first warming rays of sun will take the chill off the camp while various morning chores are done. This is especially handy when snow-camping in the winter or at high elevations in the summer, where nights tend to be cold. If you plan to sleep late, as on a rest day, or are camping in hot weather, locate camp on the west side of a hill or facing west to avoid the early warming rays of the sun.
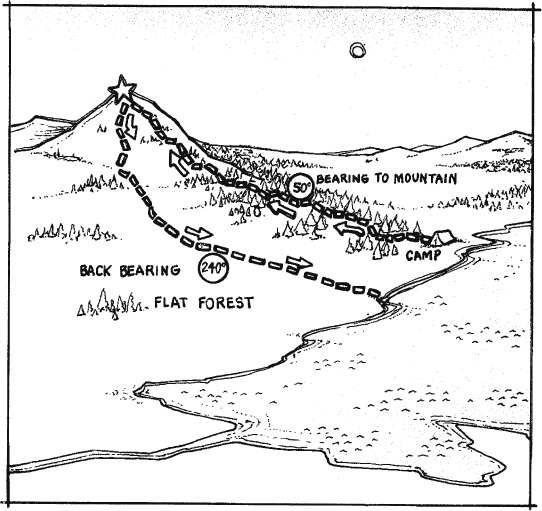
Return by a back bearing of 240 degrees, rather than a true back bearing of 230 degrees. Then when you reach the lake, you know to simply turn left and follow the shoreline back to camp. Traveling in this manner builds some margin for error into your plan, and you can be certain of reaching your objective.
—from Using a Map & Compass
Darran Wells
Most of the maps you have probably seen are called planimetric maps. They show everything in one plane, as if the world is flat. Gas station road maps and atlases are planimetric. Two kinds of planimetric maps suited for planning trips to wilderness areas are recreation and guidebook maps. Recreation maps are printed by government agencies like the Bureau of Land Management and National Park Service for a specific use, such as mountain biking or horse-packing. Guidebook maps are intended to get you to a specific trail or land feature; some feature trail profile maps telling you how long and steep a trail will be. You can use these maps or a roadmap to plan where you will enter the wilderness. And for shorter trips on clearly marked trails, one of these may be all you need.
For trips into the wilderness, however, you will want a topographic map. Topographic maps depict the shape of the land (its topography) with what are known as contour lines. Each contour represents a specific elevation. By developing your ability to read contour lines and match them to features on the land, you can locate yourself in almost any place on earth.
You may not be surprised to learn that there are different kinds of topo maps. The most important distinguishing feature of a topo is its scale. You can find topos in scales from 1:10,000 to 1:100,000 and up. Don’t let the numbers scare you—they simply tell how much the map has been reduced. On a 1:24,000-scale map, one inch on the map represents 24,000 inches (0.4 mile) on land, and one foot equals 24,000 feet (4.5 miles). A large-scale map has a smaller number in its ratio (e.g., 1:24,000). It represents a smaller area and has more details. Large-scale maps are best for hiking, canoeing, or skiing. The smaller the map’s scale, the larger the area it represents, and the more difficult it becomes to use for wilderness travel. (If you were hiking along in the woods for several days, your location wouldn’t change much on a map of the entire United States, for instance.) Topo maps start to become difficult to use for land navigation when the scale gets below 1:100,000 (e.g. 1:250,000). The best scale for learning wilderness navigation is 1:24,000 or 1:25,000. In Alaska, you may be using a 1:63,360 map, where 1 inch equals 1 mile. In Europe and Canada, you will commonly find 1:50,000-scale maps, where 20 millimeters equals a kilometer.
In the U.S., most backcountry travelers use United States Geological Survey quadrangle maps, known as quads. USGS quads are developed from aerial photographs, which are used to determine where the contour lines should appear. The National Geographic Society, among others, produces a series of topo maps that feature shaded areas to give a three-dimensional view. While these “relief” maps help in identifying topography, they are rarely found in large scales.
If you travel in the backcountry often enough, there will come a time when you will need to read your map in the rain. Weatherproofing maps can be as simple or as complicated as you wish to make it. One easy method is to carry your maps in plastic bags with zip tops. Ideally, they will be large enough to allow you to keep two to four folded maps together, for when you are traveling on the margins or corners of the maps. Disposable plastic bags are the lightest, and they are cheap and easy to replace when they get damaged. Use one bag for the map or maps you are traveling on, and another to store the rest of your maps in an accessible place.
There are also several waterproofing laminates and specially designed map cases on the market. The laminates work well, but they make it difficult to write on the map in pencil. Some hikers prefer to use map cases that hang from their neck for easy access. If you’re in a hurry, however, hanging cases can flop around and snag on heavy brush.
—from NOLS Wilderness Navigation
Darran Wells
Illustrations by Jon Cox, except where noted
Open a topo map and lay it out in front of you so that you can see the entire surface. The top of the map always faces north; in fact, on a USGS quad, the lines that make up the side margins are the only ones guaranteed to point
There are various useful tools and pieces of information located along the edges of USGS maps. Look for the following elements on your map:
The name of the quadrangle appears in both the upper and lower corners on the right side. The quad gets its name from a prominent land feature or population center located on the map. If you fold your map as shown in the illustration, you’ll be able to read the name from either side; this makes searching through a pile of maps much easier.
The date the map was created or last revised is located below the name in the bottom right corner. While government agencies work to regularly update these quadrangles, they often cannot keep up with new trails and other features for every inch of North America. In some places, especially developing countries, a map made in the 1940s may be the most recent one available. Pay careful attention to the date of your map. The older the map, the more likely it is that glaciers have receded, ponds have dried up, trails and roads have moved, or things have otherwise changed.
PARTS OF A STANDARD USGS QUAD (U.S. GEOLOGICAL SURVEY)
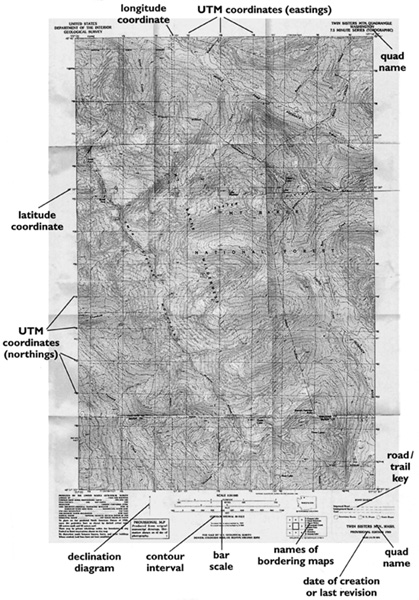
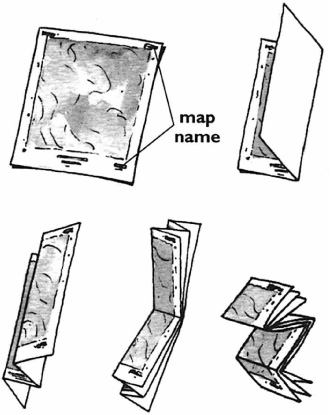
Fold your maps so that the map name can be read from either side.
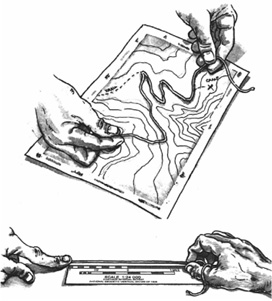
By using a piece of string, you can determine the mileage for even the most winding trails.
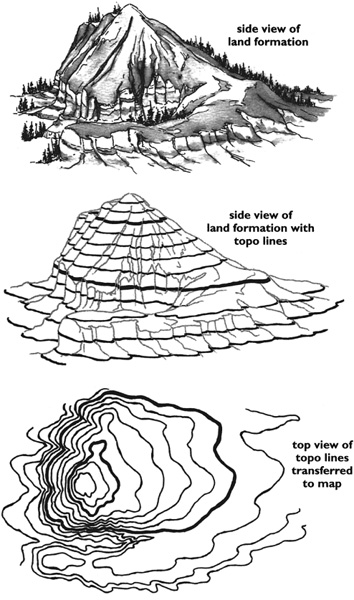
Contour lines allow a two-dimensional map to represent elevation changes. Notice the familiar shape of this particular land formation ? You can achieve a similar effect by making a fist and drawing concentric circles around your knuckles—the view from above is like looking at a topo map.
The bar scale is located along the bottom center of the map. It consists of rulers that give distances in miles, feet, and kilometers.
Below the scale is the contour interval. This is the elevation difference between contour lines. On 1:24,000-scale USGS quads, the contour interval is usually 40 feet (12.19 meters). A contour interval of 50 feet (15.24 meters) or less will make it easier for you to learn to read contour lines. Contour intervals greater than 100 feet (30.48 meters) are rarely useful for foot travel outside very large mountain ranges like the Himalayas.
The declination diagram is located in the lower left. It consists of two vectors that indicate the differences between magnetic north (MN), true north (TN), and grid north (GN). These distinctions are explained in the sections on declination and GPS.
The numbers running along the edges of the map are coordinates. These are useful in giving your precise location over a radio or cell phone (e.g., for a helicopter evacuation) or when you are using GPS. Newer maps will have Universal Transverse Mercator (UTM) grid lines printed across the face of the map to assist in determining your coordinates.
Most quads will also feature a key titled “Highways and Roads” or “Road Classification” in the bottom right. This shows how roads and trails will be represented on the map.
The names of bordering maps appear in parentheses on every side and in the corners of older maps. Newer maps feature a diagram in the lower right showing the names of all the adjoining quads.
USGS maps all use the same color system. Look for examples of the following colors on the map you are using:
White indicates an area that is not forested. There may be snow, sand, boulders, tundra, sagebrush, or the occasional tree—anything other than forest or water. White doesn’t automatically mean easy travel!
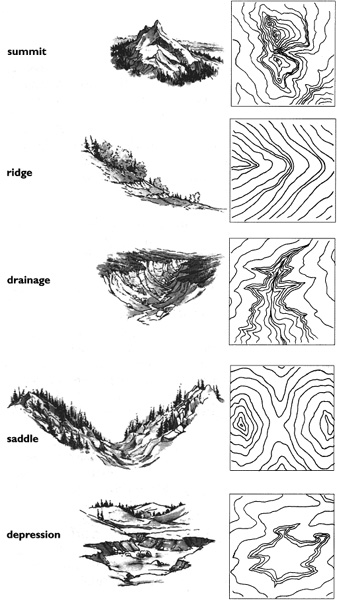
Contour patterns of common topographical features.
Green indicates a forested area, defined by the USGS as having trees dense enough to conceal a platoon (around 40 soldiers) in one acre. The border areas between green and white are often patchy and feature spotty tree coverage.
Blue means water. Solid blue shapes indicate lakes or ponds, while thick, continuous blue lines represent rivers. On older maps, dashed blue lines indicate seasonal streams, which run during the snowmelt in spring and early summer; newer maps use thin, solid lines. White areas covered with tiny blue shrubs and dashes mark seasonal marshes in a clearing. Marshes that are underwater year-round appear on a blue background. Springs show up as tiny blue squig-gles and are often labeled “spring.” Glaciers and permanent snowfields are enclosed by a dashed blue line. Blue is also used for contour lines on glaciers.
Black is used for names and human-made features—trails, dirt roads, boundaries, buildings, bridges, and mines. Black is also used for elevations that have been field-checked.
Red markings are reserved for US land survey lines, trail numbers, and major roads and boundaries. Many older US maps show red, numbered grid lines that are part of a survey system called “township and range.” Today, only foresters and surveyors use this grid system. It can be somewhat helpful in measuring linear distance, however: most (but not all) of these grids are one square mile.
Purple is used for corrections or revisions that have been made to the original version of the map but have not been field-checked. Usually, the revisions will be dated on the bottom of the map.
Brown is reserved for contour lines and their elevations (except on glaciers).
You can measure any distance on a map very accurately using only a string. Strings that do not stretch will work the best. A shoelace, piece of “parachute” cord, or the lanyard on your compass will work fine. Trails, particularly those in the mountains, seldom continue for very long in a perfectly straight line, and rulers, sticks, and fingers can’t give accurate distances for long, winding paths.
To measure the distance between two points:
1. Place your map on a flat surface.
2. Keeping one end of your string on the start point, place the string along your planned route so that it follows it exactly.
3. Pinch the spot in the string where it intersects your destination.
4. Keeping that spot pinched between your fingers, stretch the string out along the scale at the bottom of the map to get your linear distance. You may have to move the string across the scale several times. Keep in mind that 1:24,000-scale quads have a scale that represents 2 miles in total length, but with a “0” in the middle and “1”s on either end.
Reading and understanding contour lines is the essence of map reading. While they may seem like a jumbled mess now, they will soon tell you volumes about the land you are traveling through. Contour lines are imaginary lines that run through areas of equal elevation. If you were to follow the path of one on land, you would be walking at a constant elevation above sea level. The quintessential natural contour line is the shoreline of a lake.
The elevation difference between each line remains the same throughout a given map. This means that you can easily tell how steep an area is by how close together the contour lines are. Where the lines are spread far apart, the land is fairly flat. Where the lines are close together, it is steep. In a very flat area, like a desert, there may be only a few contour lines on the whole map. In a very steep, cliff-filled area, like Washington’s North Cascades, there will be many contour lines crowded together.
Index contours are the heavier brown lines that include elevation numbers. On 1:24,000-scale quads, index lines are 200 feet apart in elevation. Between each pair of index contours are four light-brown lines that do not have elevations marked on them. These are known as intermediate contours, and they are usually 40 feet apart. The distance between any two successive contours is known as the contour interval.
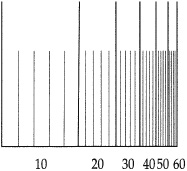
Slope gauge.
Converging contours are contour lines that appear as one thick brown line. When contours converge, they indicate a cliff—vertical or near-vertical terrain. Unless you’re going rock or ice climbing, avoid converging contour lines. Supplementary contours only appear in relatively flat terrain. These are dotted contour lines that mark the interval halfway between two intermediate lines.
The ability to recognize land features by matching them to the contour line patterns on your map (and vice versa) is called terrain association. Terrain association is crucial to navigating with a topographic map. Good navigators are able to look at a map and picture their entire route in their mind’s eye. The best navigators can accurately describe exactly what an entire hiking day may look like to the rest of the folks in their party just by looking at the map. In this way, they can play an essential part in day-to-day planning….
Whether or not you are traveling in truly mountainous terrain, you should think of the land you are traveling on in terms of hills, drainages, and ridges. Being able to identify these three basic features by looking at the contour lines on your map will go a long way toward successful navigation. Try to identify examples of each of them on your map.
A summit or peak is the highest point on any hill or mountain. A small circle surrounded by increasingly larger shapes usually indicates a summit—as they grow larger, elevation drops. Significant summits with verified elevations are often indicated on maps by a benchmark (marked “BM”), triangle, X, or elevation.
A ridge or spur is a relatively narrow area of elevation descending from a summit. It is the topographic opposite of a drainage. A ridge is indicated in contour lines by U shapes with the curve of the U pointing downhill.
A drainage or reentrant is any linear area where water would flow if it were poured on to the surface. There are countless names for the different kinds of drainages depending on their size and location. Gullies, couloirs, valleys, arroyos, crevasses, and canyons are all drainages. Drainages are indicated in contour lines by V shapes, where the apex of the V points uphill.
While mountains do have a general cone shape, their sides are textured by ridges and drainages. If you look at a large aerial photograph of virtually any mountain, you will probably see instances of both descending from the summit. They tend to alternate—ridge, drainage, ridge, drainage, and so on.
A saddle is a low point on a ridge between two summits. The contour lines of a saddle form an hourglass shape. Saddles are usually the easiest route from one side of a chain of hills to the other. There are many different kinds. In glaciated terrain, a saddle between two glaciers is called a col. Very steep and rocky saddles are sometimes called notches. Saddles large enough to drive a car through are called passes.
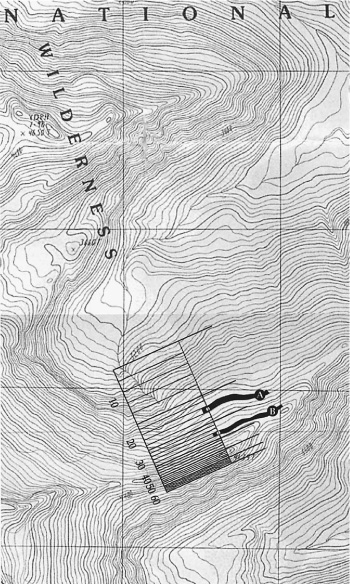
A slope gauge allows you to measure the slope angle at a given point on a topo map. The point along contour “A” has a slope angle of 20 degrees; the point along contour “B” has an angle of 30 degrees.
Once you develop an eye for land features, you will be able to look at a route and easily determine whether it ascends or descends the features it crosses. Until then, you can read the elevations on the index lines. Are the numbers going up or down?
The measurement of a hill’s steepness is called the slope angle. If you are traveling in the mountains, you may need to determine the slope angle to decide whether or not to follow a particular route. An angle from 0 to 5 degrees is fairly easy; you may not even notice that it is slightly inclined. From 5 to 25 degrees, you will certainly know you’re going uphill. Slopes above 15 degrees will take more time to travel upon than flat terrain, which you should factor into your route planning. A 30-degree slope can be a significant challenge, particularly if you are traveling off-trail with a back-pack. In most cases, you do not want to be on a slope above 45 degrees unless you are using a climbing rope. A 90-degree slope, of course, is a vertical wall or cliff.
A warning: On slopes over 30 degrees, you should start to be concerned with falling rocks. The safest way to deal with steep, rocky slopes is to avoid them. If you must ascend one, keep your group close together and follow a zigzag pattern on the way up to minimize the chance of someone knocking rocks down on to those below. And before you even think about climbing a snowy slope of more than 25 degrees, you should learn how to use an ice axe and assess avalanche danger from a trained professional. If in doubt, avoid steep terrain all together.
As you travel in mountainous terrain with your map, you will develop an eye for how steep a hill is by looking at contour lines. The closer the contours are to each other, the steeper the hill. There are several ways to get a more precise idea of how steep a slope may be. The easiest is by using a slope gauge. This navigational tool is designed for a given scale (e.g., 1:24,000) and provides the slope angle for a series of contour lines. Using a slope gauge when you’re starting out will also help develop your eye for contours. You can find one at an outdoor retailer or through the NOLS website, www.nols.edu.
To determine the slope angle using a slope gauge:
1. Make sure the scale of the gauge matches the map scale.
2. Draw a straight line along the route you plan to take up the hill.
3. Move the gauge along the line until a section of the gauge aligns with the contours at the steepest part of your route. The index lines should overlap precisely.
The number indicated on the gauge is the slope angle for that part of the hill.
If you are a math geek or just prefer to have more factors to consider when planning routes, you may be interested in the grade of the slope. If you’ve driven in the mountains, you’ve seen road signs warning of a steep grade. The grade is the change in height of a slope divided by its distance (as the crow flies, not the distance on the ground), rendered as a percentage. For a slope that covers a distance of 400 feet and drops 100 feet, the grade is 25%. A slope 400 feet long and 400 feet high has a grade of 100% (45 degrees). As a general rule, you should avoid slopes where the height is equal to or greater than the distance.
Measuring the elevation you will gain on a particular route before starting out allows you to estimate how much time and energy you will expend. Measuring elevation is as simple as counting contour lines. Be careful, however, not to count the lines where you are losing elevation. While you are learning to identify map features, it may help to double-check by looking at the elevation of each contour line. Are the numbers increasing or decreasing as you travel along your route?
At first, it may be tempting to simply add or subtract the elevation change between your origin and final destination. However, this will not give you an accurate idea of what your travel time may be. It is all those ups and downs you encounter during your hiking day that will slow you down. For example, if you start on the North Rim of the Grand Canyon and want to travel to the South Rim (ending the day at nearly the same elevation), you cannot neglect the close to 1 mile of elevation you will have to regain as you climb back out of the canyon. If you ignored the elevation gain, your travel time would be off by at least six hours—try explaining that mistake to your exhausted hiking partners as you crawl up to camp in the dark! A hike such as this might actually need to be broken into two or three days.
The following guidelines are estimates based on typical speeds for an average party:
• 1,000 feet of elevation gain = 1 mile on flat trail; 200 meters of elevation gain = 1 kilometer on flat trail.
• 2 miles (about 3 kilometers) on flat trail with heavy packs takes approximately 1 hour.
• 1 mile (about 1.5 kilometers) of off-trail travel with heavy packs takes approximately 1 hour.
—From NOLS Wilderness Navigation
Don Geary
On many occasions, a topographical map will be the only navigational tool needed. The most accurate means for the wilderness traveler—and the only way to truly bushwhack—is with both map and compass, but that method is not necessary if your route follows blazed trails. With just the topo, you are left free to observe wildlife, plants, scenery, and just generally enjoy the trip.
Following a marked trail through a wilderness area is quite simple, and its advantages should not be overlooked. In some parts of the country—along the Appalachian Trail in the East, for example—all main trails are marked with metal disks nailed to trees along the route at about eye level. These metal disks are painted a solid color that indicates the particular trail you are following. The trial name or designation is often printed on each marker; in this case, it is very easy to identify the trail if you can find a marker. Trail markers are nailed to both sides of a tree so that they can be seen coming and going, and are spaced about fifty yards apart.
In the West, trails are generally marked in a different manner. More often than not, these trails are marked with an ax blaze cut into the bark of trees along the route. It’s common to find a splash of white paint in some national forest trail systems as well. On heavily used western trails—national forest trails, for example—you’ll usually find signs at trailheads and junctions that give distances to various objectives, such as a large lake or mountain summit.
On many marked trail systems, you almost don’t have to look for trail markers; just follow the well-beaten path. This is especially true when pack animals are commonly used on the trails. The farther you get into the backcountry, however, the less trodden the path and the more valuable the trail markers or ax blazes.
In desert areas, where trees are not available, piles of rocks, called cairns or ducks, are the most common means of marking trails. These markers are usually easy to follow because the piles of stone look unnatural and are easy to spot.
On the trail, a quick glance at the topo will reveal how much distance you’ve traveled: the name of that lake, or pond, or mountain off in the distance; and the best place for your next rest stop. Where trails intersect, the map shows where the new trail came from and where it goes. When I stop for a rest, the first thing I do is to pull out the topo map-not because I’m afraid of getting lost, but because I’m naturally curious. How far is it to Spruce Lake, and how difficult will the trail ahead be compared with the terrain I’ve covered so far? How high is that peak in the distance? What elevation have I reached?
Working with a map in a marked trail will familiarize you with how the actual terrain looks in relation to a topographical map. This skill can be developed only through actual practice, and it can be developed surprisingly fast by traveling with map close at hand. On later trips that lead through true wilderness on unmarked trails, you’ll be better equipped to plan and follow your own route if you have a firm grasp of map-reading skills.
—From Using a Map and Compass
Greg Davenport
Most nautical charts are published by the National Ocean Service (NOS) and use the following standard features.
CHART COLORS
Land areas on charts often have a yellowish or gray tint.
Shallow or shoal waters are often shown in blue, and deep-water areas are shown in white.
Shoal areas are often circled or shaded to give them greater visibility.
Areas that may be submerged at high tide, such as sandbars, mud flats, and marshes, are often shown in green.
Magenta is used for a lot of chart information because it is easier to read under a boat’s red night-lights.
LETTERS AND NUMBERS
Bottom soundings (depth), which are marked in feet, fathoms, or meters throughout the chart, relate to depths at mean low water.
Slanting or italic lettering identifies submerged or floating features with their height at mean high tide.
Upright or Roman lettering is used to identify features that are dry at high water.
LINES TO SHOW CHANNEL LIMITS
The shoreline is represented as a solid line with the land portions shaded.
Land features on charts are often limited to major landmarks that help you with navigation. These include peaks, buildings, radio towers, and other prominent man-made and natural features.
The location of man-made safety markers are labeled with a symbol and brief description. Lighthouses, buoys, and markers help you to avoid shallow water and other dangerous areas (covered on page 355 0f Ch. 9).
Charts have a multitude of symbols that help you navigate the waterways. An inexpensive booklet called Chart No. 1, published by the National Oceanic and Atmospheric Administration (NOAA), and National Image and Mapping Agency (NIMA), provides the most comprehensive review of chart symbols and is well worth the purchase. Take the time to review these symbols in advance of your trip, and learn to recognize their meaning. Knowledge is power.
Exactly how much surface area (water or land) a map represents can be found within its margins and will be shown as either a scale or series relationship.
A scaled map or chart represents the ratio of the map to real life. Here are some common examples of a scale. (An inch is used in this example, but any unit of measurement can be done using the same process.)
1:10,000 to 1:50,000: Extremely detailed maps covering small areas, these charts are often used by backpackers and kayakers who travel in harbors, anchorage areas, and smaller inland waterways.
1:50,000 to 1:150,000: These charts are used by vessels that navigate large bays and harbors and navigate large inland waterways.
1:150,000 to 1:600,000: These charts are used by vessels that navigate beyond the reefs yet within sight of land or navigational aids.
1:600,000 and up: Often called a sailing chart and used by vessels covering large areas of water, these charts cover large surface areas, and their details are limited to larger features.
A series map represents the relationship of the map to the amount of latitude and longitude that is displayed. Here are some common examples:
15-minute series: This map covers 15 minutes of latitude and 15 minutes of longitude.
7.5-minute series: This map covers 7.5 minutes of latitude and 7.5 minutes of longitude. It would take four of these maps to cover the same surface area as one 15-minute series map.
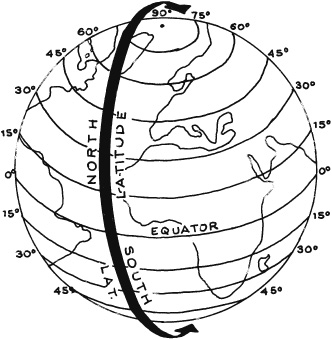
Latitude lines run east/west and are numbered from 0 to 90 degrees north and south of the equator.
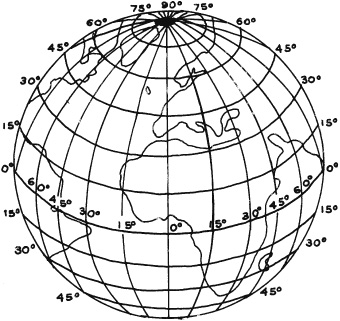
Whenever giving a latitude and longitude intersection, always read the latitude number first.
—From Surviving Coastal and Open Water
Greg Davenport
Illustrations by Steven A. Davenport
The magnetic variation is usually listed at the bottom of a topographic map. An arrow labeled “MN” indicates magnetic north; a second line, with a star at the end, is true north. Maps are set up for true north. This variation, commonly called declination, is valuable in compensating for the difference between true north and magnetic north, which will be your compass heading.
Latitude and longitude lines are imaginary lines that encircle the globe, creating a crisscross grid system. These lines help you identify your location.
LATITUDE LINES
These are east-west-running lines numbered from 0 to 90 degrees north and south of the equator. The 0-degree latitude line runs around the globe at the equator, and from there the numbers rise to north 90 degrees and south 90 degrees. In other words, the equator is 0 degrees latitude, the North Pole is 90 degrees north latitude, and the South Pole is 90 degrees south latitude. Latitude is often noted at the extreme ends of the horizontal map edges.
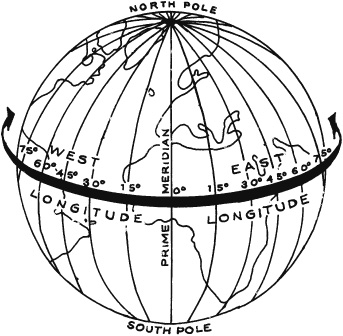
Longitude lines run north/south and are numbered from 0 to 180 degrees east and west of Greenwich England (the prime meridian).

Magnetic variation allows you to adjust the difference between true north and magnetic north.
LONGITUDE LINES
These are north-south-running lines numbered from 0 to 180 degrees east and west of Greenwich, England, the line commonly referred to as the prime meridian. Longitude lines begin at 0 at Greenwich, England, traveling east and west until they meet at the 180th meridian, which is often referred to as the international dateline. The 0 meridian becomes the 180th meridian once it intersects the extreme north and south sections of the globe. Longitude is often noted at the extreme ends of the vertical map edges.
RULES FOR READING LATITUDE AND LONGITUDE
Both latitude and longitude lines are measured in degrees (°), minutes (’), and seconds (”). There are 60 minutes between each degree and 60 seconds between each minute. It’s also important to distinguish north from south when defining your latitude, and east from west for longitude. Whenever giving latitude and longitude coordinates, always read the latitude first.
Latitude: A latitude might read, for example, 45° 30’ 30”. If north of the equator, your latitude would be 45 degrees, 30 minutes, and 30 seconds north latitude; if south of the equator, 45 degrees, 30 minutes, and 30 seconds south latitude. A latitude line will never be over 90 degrees north or south.
Longitude: A longitude might read, for example, 120° 30’ 30”. If east of the prime meridian, your longitude would be 120 degrees, 30 minutes, and 30 seconds east longitude; if west of the prime meridian, 120 degrees, 30 minutes, and 30 seconds west longitude. A longitude line will never be over 180 degrees east or west.
—From Surviving Cold Weather
Darran Wells
Illustrations by Jon Cox
Unless disrupted by magnets nearby, a magnetic compass needle will only ever point to the Earth’s northern magnetic pole. Contrary to popular belief, however, this is not the North Pole. If you’re in North America, magnetic north is currently located in northern Canada, northwest of Baffin Island. To further complicate things, magnetic north moves over time due to changes in the Earth’s molten core. The good news is that it is currently moving only about 5 miles per year, to the northwest. In the United States and Canada, declination may move several degrees east or west over many years before it swings back like a pendulum.
For ease of discussion, let’s just say that your compass needle points to Baffin Island. The only thing you need to know to understand declination is that your compass needle points to Baffin Island instead of the North Pole. Declination is just the angular difference between the two. If you imagine a triangle with you, the North Pole, and Baffin Island as its three corners, the angle at your corner of the triangle would be the declination.
Your declination changes depending on where in North America you happen to be. If you are in Wisconsin, Illinois, or Mississippi, your declination is close to zero, and you may not need to set your declination at all. If you are in Seattle, your declination is about 19 degrees east, while in New York the declination is about 15 degrees west.
To adjust precisely for declination, you must use the declination diagram in the bottom left on your topo map. Ignore the magnetic needle during this process; you are only concerned with adjusting the bezel correctly. Start with the bezel set to north, so that it reads 0 degrees at the index line. Lay the compass over the declination diagram so that the star (representing the North Pole) is under the N on the bezel. Then, holding the base-plate still, rotate the bezel until the orienting arrow is pointing to the “MN” on the diagram.
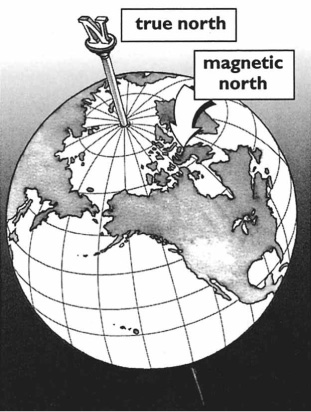
The needle of a compass does not point to the North Pole but to a point near Baffin Island, Canada.
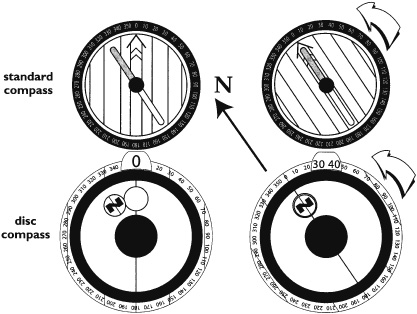
Boxing the needle.
As a rule, if you are east of the 0 degree declination line, you will turn your bezel counter-clockwise; if you are to the west, you will turn it clockwise. Declination is given in degrees east or west. Thus, although your index line will read 341 degrees in Seattle, the declination will be 19 degrees east. Folks with basic compasses may choose to mark their declination with a small, triangular piece of colored tape on the base plate. This is well worth doing if you will be traveling in one general area for an extended period of time, as it will help you to turn the bezel in the right direction. If you are confused about which way to turn the dial, simply place your compass over the declination diagram again.
If you have a compass with a declination adjustment feature, you will probably adjust it by turning the screw on the back of the bezel, perhaps with a tiny screwdriver on your lanyard. Brunton compasses are adjusted by holding the bezel’s azimuth ring while pinching and rotating the needle housing. In either case, the N on the azimuth ring should still be at the index line, while the orienting arrow arrow should point to the correct declination. If your compass features a dial for adjusting declination on the back of the bezel, remember when you turn it over that in the West you are dealing with east declination and vice versa.
Also remember that magnetic north is constantly changing. If your map is more than five years old, the declination may be off a little. For areas in the United States, call the USGS at 1-888-ASK-USGS or visit them on the Web at www.USGS.gov to get the most current declination in the area in which you will be traveling.
After setting your declination, you can use your compass to face true north. You accomplish this by boxing the needle—moving the compass until the magnetic end (the red end) of the needle is outlined by the orienting arrow. There are two ways to box the needle: by holding the base plate still while turning the bezel, and by rotating the entire compass without touching the bezel. Give them both a try.
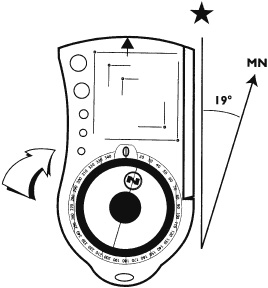
All USGS quads have a declination diagram that will allow you to reconcile magnetic north with true north. Simply place your compass over the diagram, matching the direction-of-travel arrow to true north and the orienting arrow to magnetic north.
The second method is the one you want for finding true north. Set your compass declination to your present location and box the needle by rotating the entire compass. The direction-of-travel arrow on the base plate is now pointing to true north. Pick the compass up and hold it in front of you, perpendicular to your chest, while the needle is boxed and the declination is set. You are now facing true north.
—From NOLS Wilderness Navigation
Greg Davenport
Illustrations by Steven A. Davenport
Orienting the map aligns its features to those of the surrounding terrain. This process is extremely helpful in determining your specific location.
1. Get to high ground. This will help you to evaluate the terrain once the map is oriented.
2. Open the map and place it on a flat, level surface. If possible, protect it from the dirt and moisture with something such as a poncho.
3. Rotate the circular housing on the compass, until the bottom of the direction-of-travel arrow is touching the true north heading. When doing this, you must account for the area’s given declination. Declination is the difference between magnetic north (MN) and true north (*). True north is north as represented on a map, and magnetic north is the compass heading. In other words, a 360-degree map heading—true north—is not necessarily a 360-degree compass heading. This variation is usually depicted on the bottom of most topographic maps. If magnetic north is located west of true north, which is the case for most of the eastern United States, you would add your declination to 360 degrees. The resultant bearing would be the compass heading equivalent to true north at that location. If magnetic north is located east of true north, which is the case for most of the western United States, you would subtract your declination from 360 degrees. The resultant bearing would be the compass heading equivalent to true north at that location.
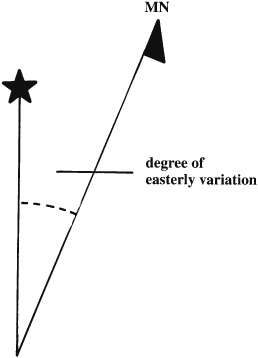
If magnetic north is east of true north, subtract the variation from 360 degrees.
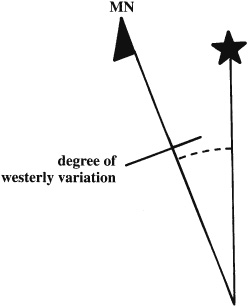
If magnetic north is west of true north, add the variation to 0 degrees.
4. Set the compass on the map, with the edge of the long side resting next to, and parallel to, the left north-south margins (on USGS maps the map’s left edge is a longitude line). Be sure that the direction-of-travel arrow is pointing toward the north end of the map.
5. Holding the compass in place on the map, rotate the map and compass until the floating magnetic needle is inside the etched orienting arrow of the base plate, with the red portion of the needle forward. This is called boxing the needle.
6. Double-check to ensure that the compass is still set for the variation adjustment, and if correct, weigh down the map edges to keep it in place.
7. At this point, the map is oriented to the lay of the land, and the map features should reflect those of the surrounding terrain.
—From Surviving Cold Weather
Darran Wells
Illustrations by Jon Cox
To orient your map, you must turn it so that the cardinal directions on the map match those on land. An oriented map helps you determine your exact location and shows what lies between you and your destination. There are two ways to do this without a compass—using the sun and the stars or using terrain association. It’s recommended that you practice both methods and learn to use them together whenever possible.
You probably learned in grade school that the sun rises in the east and sets in the west. This is in essence true, though as the seasons change, the points where the sun crosses the horizon gradually shift. Nonetheless, you should be able to roughly orient your map using the sun alone, particularly at dawn and dusk.
In the middle of the day, you can use a different technique to determine north. In the northern hemisphere, the sun does not cross directly overhead as it does at the equator. It actually passes just to the south. (This is the reason you find more snow and shade on the north faces of North American mountains.) Because of this, the shadow of a perfectly straight tree points north at mid-day, i.e., the moment exactly halfway between sunrise and sunset for that time of the year—it’s usually between noon and 2:00 P.M. The length of this shadow will vary depending on your location. The farther north of the equator you are, the longer the shadow. At the equator, there is no shadow at all, and in the southern hemisphere, of course, the shadow points south.
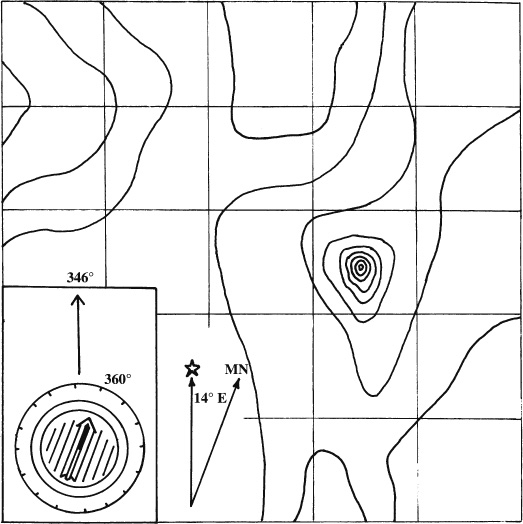
Be sure to account for the magnetic variation when orienting the map with a compass.
You can also find north at night if you can see the stars. In the northern hemisphere, it’s as simple as finding the Big Dipper. Look for the two stars at the end of this familiar constellation, the ones that lie farthest from the handle. They form a straight line that points directly toward Polaris, which is known as the North Star because it always lies directly to the north. On a clear night in the northern hemisphere, you can hardly miss Polaris: it is a bright star that stands alone, and as the night progresses, the other stars will appear to revolve around it. The farther north you are, the higher it will appear in the sky, and the more difficult it will be to tell in which direction it is pointing.
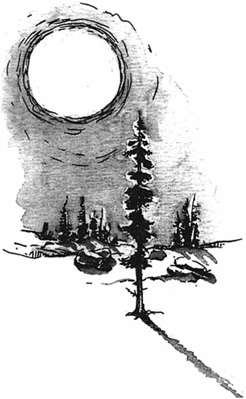
In the northern hemisphere at midday, the shadows of vertical objects will point north.
You can use the Big Dipper to locate Polaris, the North Star.
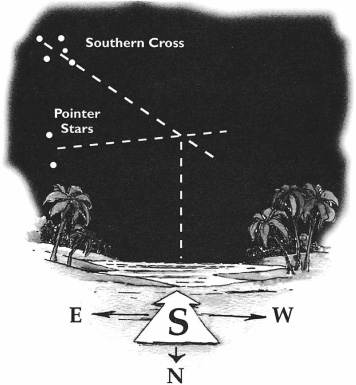
In the southern hemisphere, navigators can use the Southern Cross for guidance.
In the southern hemisphere, Polaris may be too low on the horizon to be seen, and there is no “South Star” over the South Pole. In places such as southern Chile or New Zealand, the Southern Cross is often used for direction. It is a smaller constellation (it is less than half the size of the Big Dipper) and actually looks more like a kite than a cross, because it lacks a bright star in the middle. If you draw an imaginary line along the long beam of the cross and another one from the two “Pointer Stars” near the Cross, the intersection marks true south.
Note: Traveling at night can be a magnificent experience, but it is considerably more difficult and dangerous than traveling during the day. It is the domain of expert navigators. Don’t consider it unless you are in a very safe environment or are with experienced people.
Unfortunately, the sun and stars are not always visible when we need them. While you are learning navigation, you should think of them the way you will come to think of your compass—as a tool to verify that you have oriented your map correctly using terrain association. The first step in terrain association is to locate a nearby terrain feature that is easy to find on your map. Linear features such as trails, ridges, and drainages are best. If you can’t find a land feature that you can match to contour lines, you can’t orient your map with terrain association alone. Next, rotate your map until the shape on the map is aligned with the terrain feature you can see. Then verify that the map is oriented correctly. Take a look around to make sure that the positions of what you see on land match those on the map, and that the cardinal directions correspond to those given by the sun.
—From NOLS Wilderness Navigation
Greg Davenport
Anytime you’re traveling in the wilderness, you should maintain a constant awareness of your general location, focusing on the surrounding terrain and how it relates to the map you are carrying. If you do this throughout your trip, you shouldn’t ever need to use other means of establishing where you are. One way to keep a constant awareness is with dead reckoning. Dead reckoning uses a simple mathematical formula to help you determine you present location:
time × rate = distance
Time refers to the amount of time that has passed since you left the last known location, so keep track of your location throughout the day.
The rate of speed you travel is usually measured in miles per hour on land or knots per hour at sea. In a vehicle, keep aware of your speed. The average backpacker travels at a speed of 1 to 3 miles per hour, depending on the weight carried and terrain covered. Take the time to evaluate your speed using known variables. Consider purchasing an electronic pedometer to measure the distance traveled, and use it to determine your average rate of speed by applying it to the following formula, where time and distance are known:

Once you’ve determined the distance you’ve traveled, apply this to your line of travel (heading) from your starting point to figure out your approximate location.
Adjusting your location (latitude and longitude) can be done based on your direction of travel and the distance traveled. There are several other methods you might use to determine your location and direction of travel.
—From Surviving the Desert
Greg Davenport
Illustrations by Steven A. Davenport
Triangulating is a process of identifying your specific location. For best results, get to high ground with 360 degrees of visibility.
1. Orient the map as outlined above.
2. Positively identify three of the surrounding landmarks, ideally 120 degrees apart, on your map by using the following guidelines:
• Contour: Evaluate the landmark’s contour, translating it into a two-dimensional appearance, and search for a matching contour outline on your map.
• Distance: Determine the distance from your present position to the landmark to be identified. This may be estimated as follows:
From 1 to 3 kilometers (0.62 to 1.86 miles), you should be able to see the individual branches of a tree.
From 3 to 5 kilometers (1.86 to 3.1 miles), you should be able to see individual trees.
From 5 to 8 kilometers 3.1 to 4.97 miles, a group of trees will look like a green plush carpet.
At greater than 8 kilometers (4.97 miles), not only will the trees appear like a green plush carpet, but there will also be a bluish tint to the horizon.
• Elevation: Determine your landmark’s height as compared with that of your location.
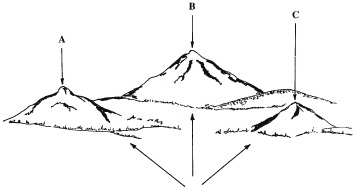
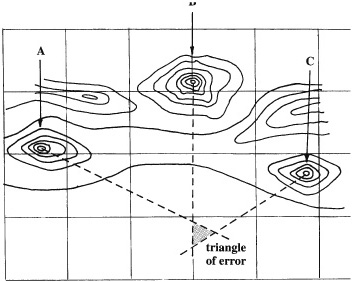
3. Using your compass, point the direction-of-travel arrow at one of the identified landmarks, and then turn the compass housing until the etched orienting arrow boxes the magnetic needle (red end forward). At the point where the direction-of-travel arrow intersects the compass housing, read and record the magnetic bearing. Repeat this process for the other two landmarks.
4. Before working further with the map, ensure that it’s still oriented.
5. Place the front left tip of the long edge of the compass on the identified map landmark, and while keeping the tip in place, rotate the compass until the magnetic needle is boxed (red end forward). Double-check that your compass heading is correct for the landmark being used.
6. Lightly pencil a line from the landmark down, following the left edge of the compass base plate. You may need to extend the line. Repeat this process for the other two landmarks. Each time, double-check the map to ensure that it’s still oriented.
7. Ultimately, a triangle will form where the three lines intersect. Your position should be located within or around the triangle.
8. For final position determination, evaluate the surrounding terrain and how it relates to the triangle displayed on the man.
—From Surviving Cold Weather
Greg Davenport
Illustrations by Steven A. Davenport
Never travel unless you know both your present position and where you intend to go.
ESTABLISHING A FIELD BEARING WITH A MAP AND COMPASS:
1. Orient your map to the lay of the land.
2. Lightly draw a pencil line from your present location to your intended destination.
3. Place the top left edge of the compass on your intended destination.
4. Rotate the compass until the left edge is directly on and parallel to the line you drew.
5. Rotate the compass housing—keeping the base of the compass stationary—until the floating magnetic needle is boxed inside the orienting arrow (red portion of the needle forward).
6. Read the compass heading at the point where the bottom of the direction-of-travel arrow touches the numbers of the circular compass housing. This heading is the field bearing to your intended destination.
ESTABLISHING A FIELD BEARING WITH ONLY A COMPASS:
1. Holding the compass level, point the direction-of-travel arrow directly at your intended destination site.
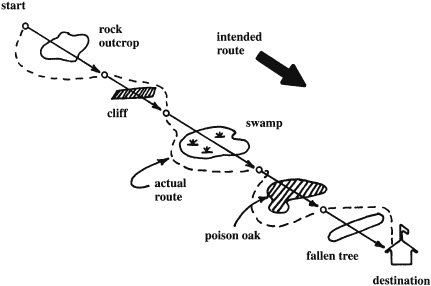
Point-to-point navigation allows you to steer clear of obstacles.
2. Holding the compass in place, turn its housing until the magnetic needle is boxed directly over and inside the orienting arrow (red portion of the needle forward).
3. Read the heading at the point where the bottom of the direction-of-travel arrow touches the numbers of the circular housing. This heading is the field bearing to your intended destination.
DELIBERATE OFFSET
If your destination is a road or waterway, consider a heading with a deliberate offset, using a field heading several degrees to one side of your final location. Since it is very difficult to be precise in wilderness travel, this offset will help you in deciding whether to turn left or right once you intersect the road.
Maintaining a Field Bearing
POINT-TO-POINT NAVIGATION
Pick objects in line with your field bearing. Once one point is reached, recheck your bearing and pick another. This method allows you to steer clear of obstacles.
FOLLOWING THE COMPASS
Holding the compass level, and while keeping the magnetic needle boxed, walk forward in line with the direction-of-travel arrow.
Greg Davenport
A single line of position can be used when at least one prominent land feature can be seen. A prominent land feature includes any easily identified man-made or natural feature. For best results, get to high ground with 360 degrees of visibility.
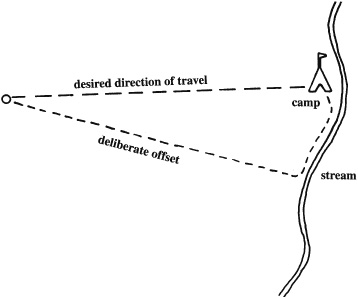
Using a deliberate offset makes it easier to find camp.
1. Orient the map as outlined above.
2. Positively identify the prominent land feature. The following guidelines related to contour, distance, and elevation can help in the identification process.
• Contour. Evaluate the landmark’s contour translating it into a two-dimensional appearance, and search for a matching contour outline on your map.
• Distance. Determine the distance from your present position to the landmark to be identified.
• In treed terrain. From 1 to 3 kilometers (approximately 1 to 2 miles), you should be able to see the individual branches of each tree. From 3 to 5 kilometers (approximately 2 to 3 miles), you should be able to see each individual tree. From 5 to 8 kilometers (approximately 3 to 4 miles), the tree will look like a green plush carpet. At greater than 8 kilometers, not only will the trees appear like a green plush carpet, but there will also be a bluish tint to the horizon.
• In flat, open terrain. In flat, open terrain, you can calculate a gross distance once a prominent landmark becomes visible on the horizon. To apply this formula, you must first calculate how far you are from the viewed horizon. To do this, take the square root of your eye’s height above the ground and multiply it times 1.23 [equation (a)].
Next, apply the same formula to the object’s height above the ground, and add that to the already calculated horizon distance [equation (b)]. The result is a rough estimation of the object’s distance from your present location.
• Elevation. Determine your landmark’s height as compared with that of your location.
3. Using your orienteering compass, point the direction-of-travel arrow at the identi fied landmark, and then turn the compass housing until the etched orienting arrow boxes the magnetic needle (red end forward). At the point where the direction-of-travel arrow intersects the compass housing, read and record the magnetic bearing.
4. Before working further with a topographic map, ensure that it’s still oriented.
5. Place the front left tip of the long edge of the compass (or a straight edge) on the identified map landmark, and while keeping the tip in place, rotate the compass until the magnetic needle is boxed (red end forward). Double-check that your compass heading is correct for the landmark being used.
6. Lightly pencil a line from the landmark down, following the left edge of the compass base plate or straight edge. You may need to extend the line. If you have a protective plastic cover on your map, you can draw on it with grease pencils to avoid exposing the map to moisture and dirt.
7. Your position should be located on or close to the line. For final position determination, evaluate the surrounding terrain and how it relates to your line, along with believed distances to land or light features.
—From Surviving the Desert
Don Geary
If two landmarks can be clearly seen and located on the map, your exact position can be determined by resection. Using the compass alone, determine the bearing to each landmark. Then calculate the back bearings by subtracting 180 degrees if the bearing is more than 180 degrees, or adding 180 degrees if the bearing is less than 180 degrees. For example, you can see several mountain peaks in the distance. On your map, you identify the two highest peaks, A and B (see image on this page). The bearing to peak A is 280 degrees, so the back bearing from that peak to your position is 100 degrees (280 minus 180). The bearing to peak B is 340 degrees, so the back bearing is 160 degrees (340 minus 180). To use resection successfully, you have to read the compass very carefully. Double- or triple-check your calculations just to be on the safe side.
The next step is to draw on your map back-bearing lines from the landmarks. Place the compass on one of the landmarks, and orient it so that the needle points to north and the direction-of-travel arrow points to the back bearing to your position. Draw a line following the back bearing. A clear plastic ruler is handy for drawing resection lines. In an emergency, fold one edge of the map over and use it as a straightedge. Repeat the procedure for the other landmark. The point where the two lines intersect is your approximate position. For the above example, you would place the compass on peak A, with the direction-of-travel arrow set at 100 degrees, and rotate the entire compass until the needle lines up with north. Now draw a straight line from the peak at 100 degrees; the direction-of-travel arrow will indicate this direction. Repeat this procedure for peak B, drawing a straight line on a bearing of 160 degrees.
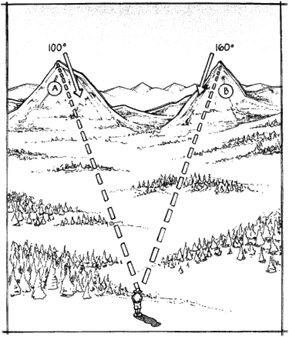
Use resection to determine your position with a map and compass. First locate two prominent landmarks in the distance, and find them on the map. Next, shoot a bearing to these two landmarks. Then calculate a back bearing for each be adding or subtracting 180 degrees. Your position on the map is where the two back-bearing lines intersect.
Resection can be used only when distinguishing landmarks can be clearly seen and located on the topographical map. Choosing prominent or unique landmarks will greatly reduce your chances of error.
—From Using a Map and Compass
Don Geary
You can also check your position by comparing altimeter readings with elevation marks or lines on a topographical map. To do this, however, you must understand how an altimeter operates, have a general idea of your present position, and be able to locate this position on your map. In effect, you’re checking your altimeter with the aid of your topographical map.
An altimeter indicates a given altitude by measuring air pressure. At sea level, air pressure is much higher than at 10,000 feet. The barometric cell inside an altimeter expands in low air pressure and contracts in high air pressure. The expansion or contraction of the barometric cell operates the dial of the instrument.
Altimeters have a tendency to give inaccurate readings when the weather is about to change. For example, if you’re certain that you’re on a mountaintop at 8,000 feet, but your altimeter reads 7,000 feet, it could be because the barometric pressure is rising. Even if you reset your altimeter, the advancing change in weather will affect future readings. Even expensive altimeters tend to give inaccurate readings when the weather is changing. As a result, you have to adjust your altimeter whenever you reach a known elevation. I don’t feel that an altimeter is a worthwhile investment (good ones can easily cost several hundred dollars) for the average outdoorsman. You cannot simply look at your altimeter for an elevation reading, find a corresponding elevation on your topographical map, and assume that that’s where you are.
Accurately determining your position becomes much more difficult when no landmarks can be distinguished. On relatively flat terrain with no high points visible in the distance, in dense forest, or on a cloudy day, resection or line position simply will not be of any value to you. The best you can do is to check your progress against several secondary objectives, and keep track of your direction of travel after you reach each identifiable place. Features such as small streams, cliffs, lakes, and man-made structures serve as good checkpoints. For example, a lake may have a stream entering it at 50 degrees. Provided that there are no other lakes in the vicinity with a stream running in at 50 degrees, this fact can establish your position.
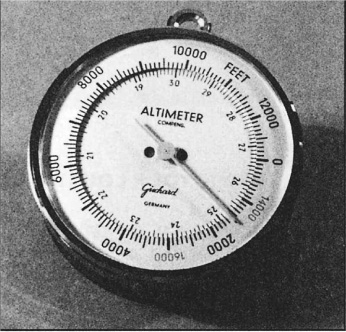
A pocket altimeter.
An entire trip can easily be navigated in this way. A fisherman may be looking for a certain lake in a forest area where the terrain is flat, such as the Adirondack Forest Preserve in upper New York State. He hikes in for one day on a marked trail system and camps at the junction of two marked trails and a stream. He can locate this junction on the map because the Conservation Department has erected a footbridge here. The next morning, he heads off on a compass bearing of 210 degrees for about a half mile and easily finds a small pond. He follows the stream, reaching another small pond and finally a large pond, which was his objective. Using secondary objectives is one trick you can use to check your progress.
When traveling cross-country, use easily identifiable landmarks–in this case, small ponds connected by a stream—as checks on your progress.
—From Using a Map and Compass
Don Geary
Once you know your present position and the location of your objective, it’s a simple matter to calculate your bearing to that objective. Begin by orienting your map to magnetic north. Locate your position, lay your compass on the map over your position, and note the compass bearing to your objective.
The best type of compass for cross-country travel is the orienteering compass. Simply line up the direction-of-travel arrow with your bearing. When the compass is oriented to magnetic north, the direction-of-travel arrow will point out your heading. If you are inexperienced at cross-country travel, keep your compass handy and check it often. Although checks can be less frequent after you develop some course-following skills, it’s a small task to verify your line of travel with a quick check of the compass.
There would be little joy in traveling with one eye on the compass and another on the route. The trick is to pick out landmarks in the distance and on the same heading as your destination. Then you merely have to walk toward it, while taking the terrain into consideration. Let’s say you want to take a shortcut to a jeep trail shown on the map to be about 2 miles away on a compass bearing of 250 degrees. First, set the direction-of-travel arrow at 250 degrees. When the compass is oriented to north, you see that a mountain peak also lies at 250 degrees. As long as you can see that peak, you need not check your compass. Simply walk as straight as the terrain will allow toward the mountain peak, and you should cross the jeep trail in less than an hour.
When walking cross-country with a companion, it’s much easier to stay on a compass bearing. One partner can serve as the landmark. One hiker stands in one spot, and the other walks in the direction of the bearing, compass in hand. The stationary person should help guide the walker and check his progress with his compass. When the walker reaches the limit of the other’s visibility, he stops, and his partner walks to him. Then they can change roles. This technique is ideal for very thick terrain, swamps, marshes, deserts, and anytime visibility is limited or there are no landmarks in the distance.
In open country, both partners can walk at the same time, about 100 yards apart. The front person walks with compass in hand on a predetermined bearing. The rear person follows, periodically checking the accuracy of the lead walker’s heading. Because both hikers are aware of the intended bearing, there is little chance of error.
If there’s no magic mountain on your compass bearing, you must resort to navigating toward intermediate objectives such as boulders, large trees, or anything else in your line of travel. When you reach that point, take out the compass again, orient it, and sight down the direction-of-travel arrow to find another prominent land feature. Because these checkpoints are nearby, there’s the possibility of slight error, but trying to navigate without them can result in having a search party out looking for you.
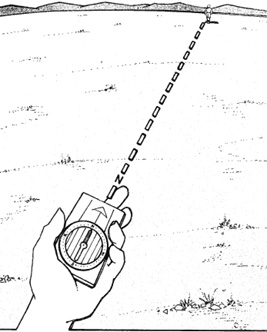
When you are traveling in relatively flat, featureless terrain, use a hiking companion as a compass-bearing aid.
Natural obstacles can often make straight-line travel to a given destination impossible. If your bearing leads you to the edge of a pond, for example, simply sight across it to a prominent land feature that’s in your line of travel, such as a clump of boulders or a large tree; walk around the pond until you reach that point; then head out again on your original course.
Actually, small obstacles are very good checks on your progress. When you plan your route, you should keep an eye out for such obstacles and use them to your advantage. Obviously, large obstacles such as a lake, steep canyon, or cliff should be avoided, but stream junctions, small ponds, or other obstacles that are easy to walk around are good choices. Your route should not be an exercise in detours, but rather as direct a course as possible with built-in, fail-safe checkpoints.
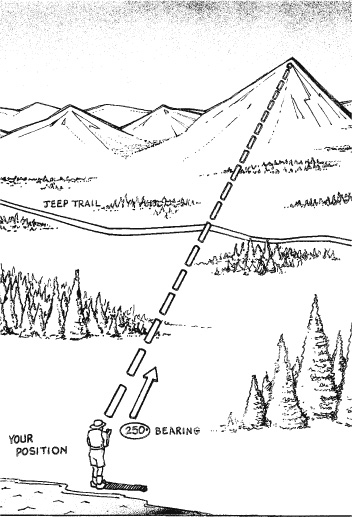
If a prominent and feature such as a mountain lies on a bearing that’s the same as (or close to) the bearing you wish to travel, you can use it as a guide. This will make travel easier, as you can stay on course simply by walking toward the land feature rather than having to check your compass often.
Besides checking the topo, another way to determine the best course of travel is to survey the terrain from a vantage point such as a mountain peak, high ridge line, or other overlook. Even the best eyesight cannot see details in terrain at distances greater than a few hundred yards, so binoculars are a piece of extra equipment worth carrying. Binoculars have many uses on an outdoor trip, and you should consider carrying a pair on every hike. Because they’re an important navigational tool, let’s take a brief look at the basics.
All binoculars have two numbers separated by an × stamped on the lens housing, such as 8×5. The first number is the magnification of the binoculars. If this number is 8, for example, this means that the magnification of these binoculars is eight power, and an object 120 feet away will appear to be only 15 feet away (120 divided by 8).
The second number indicates the diameter in millimeters of the objective lens. Generally, a larger objective lens diameter lets in more light, gives a brighter image, and allows you to see more clearly in low-light conditions, such as at dusk or dawn, or in a dark forest. If the second number is low, as in 8×15, the glasses will be adequate for normal daylight viewing but will be difficult to see through in low light. If the second number is high, as in 8×60, the glasses can almost be considered night binoculars. A good rule of thumb is that a pair of binoculars will be adequate for daylight use if the objective lens diameter is 2½ times its magnification—8×20, for example.
Before starting toward any objective, estimate how long it will take you to get there. If you don’t reach your objective in a reasonable amount of time, look for a landmark or land feature against which your progress can be measured. The amount of time that is “reasonable” depends, of course, on terrain, weather, detours, rest stops, stops to cast a fly or photograph scenery, and many other factors. Experienced wilderness travelers develop an ability to estimate this with a fair degree of accuracy.
As a rule, the average hiker carrying a moderate load and in reasonably sound condition can cover about three miles an hour on a marked and cleared trail. Traveling crosscountry through forest and brush will reduce this pace by about half. Here your pace will be slower because you will have to pick your way through, around, under, and over obstacles such as fallen trees, boulders, swamps, and underbrush. Dense cover and difficult terrain require not only more time, but they also make estimating difficult. Sometimes the ground will be relatively clear and your pace good, and other times heavy growth will slow your progress. In true wilderness, you also tend to be slowed more by your observations of animals, birds, plants, and the landscape.
Some outdoorsmen use a pedometer to measure distance covered. Worn on the belt, a pedometer records the number of steps taken and indicates distance based on how many of the user’s steps equal a quarter mile. All pedometers must be preadjusted to the length of the user’s stride. Most record distances up to 25 miles.
In theory, a pedometer is a handy gadget, but on a wilderness trek, it may not be accurate, as your steps will vary in length over any ground that is not flat. Steep grades shorten your step; downhill slopes lengthen it. Over broken terrain, such as deadfalls or talus slopes, the length of any one step will be different from all others. A pedometer that could automatically adjust for variations in stride length would be very worthwhile, but to my knowledge no such instrument exists. Instead, I measure and estimate distance on a topographical map.
When traveling cross-country with the aid of a map and compass, the important things to keep track of are your general direction of travel and approximately how long you’ve been traveling. Estimating distance covered becomes easier as you develop a feel for how long it takes you to cover a given type of terrain. The more you use a topographical map and compass, the more proficient you’ll become at determining the best route to follow and estimating the time necessary to cover the distance. As you develop navigational skills, you’ll be able to discover true wilderness while always knowing how to find your way back to civilization.
—From Using a Map and Compass
Greg Davenport
If you stay constantly aware, you should be able to determine your general and specific location at all times.
Anytime you’re traveling in the wilderness or at sea, you should maintain a constant awareness of your general location. This awareness keeps you focused on the surrounding terrain and how it relates to the map you are carrying. If you have done this throughout your trip, you will never have to use any other means of establishing where you are. One way to keep a constant awareness is with dead reckoning. Dead reckoning uses a simple math formula to help you find your present location:
Rate × Time = Distance
The rate of speed you have been traveling is usually measured in knots per hour at sea and miles per hour (kilometers per hour) on land. One knot equals a traveling speed that covers one nautical mile per hour. A nautical mile is equal to one minute of latitude—1.852 kilometers or 1.1508 miles or 6,076 feet—and is used as the distance reference in most charts. Note that a nautical mile is not equal to a statute mile, which is used for measurement on land. If your vessel is propelled in a direction by paddling or motor, then you must consider the impact of the current and wind on your rate and adjust the formula accordingly. For our scenario, however, we are using the current and the wind as a means of moving our vessel.
The best way to determine your vessel’s rate of speed is with a chip log, which consists of a heaving line and a heavy object that floats. This object could be improvised from something as simple as a container filled with seawater. Make sure the container weighs enough to prevent the wind from affecting its movement in the water. To build a chip log, attach a line to the container and tie two knots in the line. The first knot should be positioned far enough away from the container so that it meets the water after the container has settled. The second knot should be placed at a premeasured distance from the first. To use, place the container in the water and allow the line to pass through your hands. As the line advances, calculate the time that passes between hand contact with the first knot and second knot. Using this time along with the distance between the two knots, you can calculate your speed with the following formula:

Measurements (speed, heading, etc.) should be taken every hour to ensure accuracy and constant awareness. Applying the result to your dead-reckoning formula helps you determine how far you have traveled. Note that one nautical mile per hour equals 1⅔ feet per second.
If you have kept track of your location throughout the day, time will be related to the amount of time that has passed since leaving the last known location.
For this formula to work, you will need to know your starting point and the heading you took. Apply the answer (distance) to your line of travel (heading) to give you an approximate location. Direction of travel can be calculated by shooting an azimuth off your chip line (once extended and straight) and adding or subtracting 180 degrees.
Adjusting your location (latitude and longitude) can be done based on your direction of travel and the distance traveled. There are several other methods you might use to determine your location and direction of travel.
A line of position is used when either land features can provide an optimal fix or no other features are available. Optimal land features include a road that runs east to west or north to south or two land features that can be visualized in a straight line. For best results on land, go to high ground with 360 degrees of visibility. At sea, try to shoot your headings on features during the height of a wave.
1. Orient the map as outlined above. Note that charts with a compass rose do not need to be oriented; however, all headings must be used with the middle ring of the compass rose in order to skip this step. It is a major error to use the outer ring of the compass rose without orienting the chart.
2. Positively identify the prominent land feature, buoy, or light used to aid with sea navigation.
On charts, land features, buoys, or lights may be shown as symbols, making it relatively easy to identify them.
Lights are described on charts by their behavior, height (at mean high-water tide level), and projected visible range. For example, a chart that lists a light as F1 4sec 20ft 10M is telling you that the light flashes every four seconds, is 20 feet above mean high-water tide level, and has a predicted range of ten nautical miles.
LIGHT BEHAVIOR CHART SYMBOLS
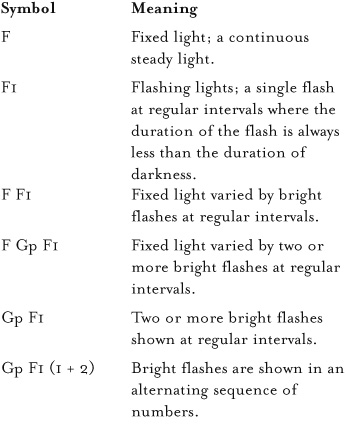
When floating at sea level, the height of the light is probably the single most impor tant factor at how well and far away it can be seen. Charts that list a light’s projected visibility do so based on the brightness of the light. This normal range is calculated using a direct line of sight and doesn’t account for the earth’s curvature. If sitting on the floor of a life raft or deck of a sea kayak, the earth’s curvature will reduce the light’s visible distance.
3. Using your orienteering compass, point the direction-of-travel arrow at one of the identified landmarks, and then turn the compass’s housing until the etched orienting arrow boxes the magnetic needle (red end forward). At the point where the direction-of-travel arrow intersects the compass housing, read and record the magnetic bearing. When using a handheld marine compass, point the front of the compass at the landmark and read the heading under the fixed lubber line; when using a deck-mounted marine compass, point the front of the vessel at the landmark.
4. Before working further with a topographic map, be sure it’s still oriented.
5. For topographical maps, place the front left tip of the long edge of the compass on the identified map landmark, and while keeping the tip in place, rotate the compass until the magnetic needle is boxed (red end forward). For a chart, position your compass so that the desired heading (to the landmark) is under the lubber line, and while holding this posi tion, rotate the chart until an imaginary line (from the left side of the compass’s long edge) crosses the identical heading on the inner circle of the compass rose (magnetic heading). Be sure the imaginary line is drawn backwards and crosses the closest compass rose to your general location. In both instances, double-check that your compass heading is correct for the landmark being used (see step 3).
6. Using a pencil, lightly draw a line from the landmark down, following the left edge of the compass base plate or straightedge. You may need to extend the line. If you have a protec tive plastic cover, grease pencils are an ideal way to avoid exposing the map or chart to moisture and dirt.
7. Your position should be located on or close to the line.
8. For final position determination, evaluate the surrounding terrain and how it relates to your line along with believed distances to land or light features.
Determining a bearing with a chart’s compass rose is a fairly simple process. Draw a line from your present position to your desired destination. Find your heading by identifying where the line crosses or runs parallel to the middle circle on the compass rose. Make sure you read the heading on the side closest to your destination.
For a handheld marine compass, hold your compass so that the lubber line is pointing toward your destination and read the heading beneath it. For deck-mounted marine compasses, simply turn your vessel toward your intended target and read the heading.
If your destination is a road or shore structure, consider a heading with a deliberate offset. In other words, use a heading several degrees to one side of your final location. Since it is very difficult to be precise in wilderness travel, this offset will help you in deciding to turn left or right once you intersect the road.
—From Surviving Coastal and Open Water
Darran Wells
Illustration by Jon Cox
Today, it is foolish to head days-deep into the backcountry without a map and compass—GPS or no GPS. Electronic things, just like motorized things, can and do break. GPS is not a replacement for good map skills or a shortcut to the backcountry. Learn to read a topographic map and use a compass before relying on electronics to tell you where to go. The search-and-rescue stories of GPS users who didn’t have adequate navigation skills or were not even carrying a topo map when they were finally found are adding up. Please, please, please, don’t become one of them. If you really want to become a competent land navigator, use your map and compass to navigate and only use the GPS to track, confirm a tricky location, or mark a waypoint. Whether you have a GPS receiver or not, learn to read the terrain and always bring along your map and compass.
The Global Positioning System is a network of satellites orbiting the earth broadcasting radio signals. A GPS receiver is a small gadget that can read the radio signals from the satellites and determine your location anywhere on earth—truly an amazing bit of technology. While the letters “G-P-S” actually refer to the whole system of satellites, radio towers, and receivers, users commonly refer to the GPS receiver they hold in their hand as “a GPS.”
Because GPS can keep track of time and your location, receivers can use that data to provide you with some important information:
• Your exact coordinates in UTM or latitude/longitude
• Your altitude (though not as accurately as a properly used barometric altimeter)
• Your speed—average, maximum, and current
• Your distance traveled
• Your estimated time of arrival at a known destination
• Your current heading or direction of travel (only while you are moving)
• The bearing to your destination (only while you are moving)
• The bearing to any previous destination—you should be able to retrace your steps at any time using the tracking feature.
Depending on the features of the model you have and how it may integrate with map software, there are a number of other things GPS can do for you, including giving you a real-time display of your location on a digital map.
There is a growing number of handheld and wristtop GPS units available today. This chapter focuses on commonalities between most recreational GPS units and gives non-owners an idea how GPS receivers work. Think of the suggestions here as a supplement to your user’s manual. Yes…you still have to read the manual.
. . . Not every backcountry traveler needs GPS! Whether you should consider getting a GPS depends on where you will be traveling and for what purpose. GPS receivers really come into use during navigation in featureless terrain like oceans, deserts, and polar regions. They also work wonders in low-visibility conditions like traveling at night or in nasty storms.
Here are a few questions to aid your decision: Will you be traveling for extended periods of time in areas where the terrain is difficult to read? What are the consequences of being disoriented in the areas you are planning to visit? Will you be sticking to shorter trips into the mountains or canyons? Do new toys excite you or do they seem like one more thing to lug along or lose? Will you be spending most of your time in the jungle under a dense canopy, or in another environment where GPS may not work very well? Is it important to know your exact speed and distance traveled?
Before getting started, you have to make sure you, your map, and your GPS are speaking the same language. If not, you are headed for some miscommunication and probably some bad directions. Take some time to get your settings correct each time you are heading to a new area.
The Earth is not a perfectly round ball. It actually has an irregular ellipsoid shape, which makes creating an accurate two-dimensional map a fairly complicated event. The map datum is the mathematical model that corresponds to the shape of the Earth. There are more than one hundred sets of map datum made from different mathematical measurements around the Earth, and each map series has its own datum. What all of this means for you is you must always make sure the datum setting in your GPS matches the datum on your map. If you are using the wrong datum for the map you are on, your location may be hundreds of meters off. On a USGS quad, the datum is in the margin at the bottom left hand corner, near the UTM zone. Luckily, most quads use either the World Grid System of 1984 Datum (WGS 84) or the North American Datum of 1927 (NAD 27). By default, GPS receivers use the WGS 84 Datum. A common mistake is to use NAD 27 map data without setting your GPS to that datum, which can direct you up to 800 feet in the wrong direction. Many people also forget to change the datum setting when they travel internationally.
Another setting to check is your position format. Position format is the coordinate system in which you would like the GPS to display your location. You can choose UTM, latitude/longitude, or one of many other options. Unless you are traveling in one of the polar regions, UTM or latitude/longitude will suit your needs. On the position format screen, there may be several options for how to view your latitude and longitude. You can choose degrees, minutes, and seconds (D,M,S); degrees and decimal minutes (D,M.M); or decimal degrees (D.DD). Which option you choose is not nearly as important as knowing how to measure it on your map. Pick the display to which your map ruler is calibrated.
Yet another setting to consider is metric/statute distances. This choice should be based simply on which system you are most comfortable with and what is on your map. Statute distances are given in miles, yards, and feet; metric distances are in kilometers and meters. Generally, it’s best to have your GPS set according to whatever units are displayed on your map.
If all this seems a bit complex, relax—you won’t need to change your settings every time you go out. Unless you’re a jet setter, you’ll probably even be using the same map datum most of the time.
When you turn your GPS on for the first time in a new area, it will take a few minutes to acquire satellite signals. Most units will acquire signals within a minute or so after being turned on, though this process can take up to five minutes if the GPS is in a completely new area or does not have a clear view of the sky. While it will work in most tree cover, it generally won’t work well inside a building or under a very dense tree canopy, like that of a tropical jungle.
Your GPS will give you an estimated degree of accuracy as it acquires and loses satellite signals. With current technology and NAVSTAR satellites, recreational GPS receivers will only be accurate to within about 50 feet. Your GPS may claim to be more accurate, but don’t bet your life on it. When you add in the human error factor, getting within 50 feet of your target is actually quite remarkable. And unless you are literally looking for a needle in a haystack, 50 feet should be as close as you need to get to see your objective. A tent, a pond, a trail junction, a car, a bicycle, and even a baseball are visible from 50 feet in most terrain. If you are navigating with your GPS, it is smart to start to slow down and look for your objective once the GPS says you are within 100 feet.
Once the GPS has acquired signals, it can give you your current position. This is called getting a position fix.
A waypoint (or “landmark,” for some users) is GPS lingo for a specific location that is stored in your GPS. You can have your GPS mark a waypoint at any time, anywhere you have a signal. You can use waypoints to mark your current location, in case you want to return later or track where you’ve been on a map.
There may also be times when you would like to enter the coordinates for a location you have never visited and ask the GPS to direct you to that location. This is how the military sends precision “smart bombs” to their targets and how geocachers locate caches . . . You must first determine the coordinates you would like to enter, which probably means plotting them on your topo map, … though if you have digital map software, getting the coordinates may be as simple as moving the mouse to the location on your screen. If you are using UTM, be sure you’ve entered the correct zone.
The GPS will automatically remember the waypoint and assign it numerical name (001, 002, etc.) unless you rename it. It is wise to give each waypoint a name that will not be confusing later: Car, Camp 1, Fishing Spot 3, Waterfall, and so on. The best names combine something unique about the location with the date.
Once you have waypoints recorded in the GPS, you can ask it to point you directly to any waypoint at any time by using the “Goto” function. The unit will display an arrow that points directly at the waypoint and tell you your current distance from the waypoint.
Remember, however, that you may still have some routefinding to do. The GPS may be telling you that your waypoint is only two miles south of your current location, but it will not tell you that you need to cross a 3,000-foot canyon and swim two massive rivers to get there. As always, the direct route may or may not be the best way to go.
The display arrow does not work like the magnetic needle on your compass. The GPS cannot determine which way it is oriented when it is sitting still. You must be moving for the arrow to be accurate. That means that any time you are routefinding with your GPS, you must be walking and looking at the display screen at the same time.
The advantage of routefinding with a GPS it that it is easy to go around obstacles (like a lake or a big boulder) and get right back on your bearing: the display arrow will always adjust to point directly at your target. Gone is the need to make 90-degree turns and count steps off your bearing.
You can save batteries by using the GPS to get your direction, sighting a landmark with your compass, turning the GPS off, following the bearing with your compass. Stay on the compass bearing until you have another big obstacle to go around and need to change your heading. Remember not to set a bearing with the compass right next to the GPS—the metallic parts and batteries in the GPS will throw off the compass needle! Keep the compass and GPS in separate hands and at least six inches apart.
Most handheld GPS units today feature automatic tracking. This means you can set the GPS to automatically mark points at intervals according to distance or time. All you have to do is leave the GPS on and let it mark points for you. You can then use the “pan track” feature to scroll back in time to any location you have visited. Many units also have a “track-back” feature that enables the GPS to direct you back along your tracks. This means that if you are following a difficult route in low visibility or in an emergency you can ask the GPS to guide you in retracing your steps—think of needing to return to a scarce water source in canyon country, or to base camp when a blizzard hits in the mountains. If you are using digital software, you can even download your tracks on to a topographic map and see exactly where you’ve been.
While using the tracking feature has a number of advantages, if you pass through dense brush while your GPS is tracking, it may drop a few of the tracks due to a weak satellite signal. Tracking also requires a lot more batteries than turning the unit on occasionally to check your current location. If you use tracking, have plenty of extras on hand.
For land navigation alone, the number of GPS units hitting the market is growing rapidly. Like other outdoor toys, they are getting smaller, lighter, more specialized, and easier to use. Which one you buy should depend largely on how you answer these questions:
What is the main activity you will be doing with GPS?
Some models offer specialized features for cycling, running, hunting, fishing, climbing, or geocaching. For athletes, special software is available for monitoring your training. If you plan to use special software, make sure the GPS unit you buy will be compatible with it. As more units hit the market, consumers will need to be careful not to buy one that is so specialized that it can’t meet all their needs.
How much can you spend?
Recreational GPS units range in price from around $80 to $800, depending on features. If you need to save some coin, come up with a list of “must have” features and resist the temptation to buy more than you can afford.
Accuracy is fairly standard for all recreational models without WAAS compatibility; if you do want better-than-average accuracy, you’ll need to pay more for WAAS. Unless you are buying a professional-grade GPS unit (for surveying or GIS integration), more money does not necessarily mean more accuracy.
Do you own a PDA?
If you own a personal digital assistant or PDA (e.g., a Pocket PC or Palm Pilot), you may prefer to add hardware or software that will turn it into a GPS. In fact, some PDAs are already sold with GPS receivers built right in.
Handheld or wristtop?
Where you once wore your watch, you may soon be wearing a wristtop computer. By the time you read this, there will be loads of GPS watches available. The year 2004 saw the Casio “Pathfinder,” the Suunto “X9,” the bulkier Garmin “Forerunner 201,” and GPS watches from Timex bursting onto the market.
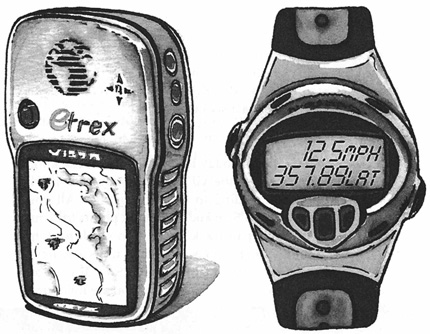
Typical handheld mapping GPS unit and wristwatch GPS (not to scale).
If your “watch” tells you your heart rate, altitude, air temperature, speed, and location along with the time, it’s clearly more than a watch. There are several considerations in deciding whether to choose a wristtop or handheld model. If you’re planning to do any longdistance running, adventure racing, or fast-packing, then size and weight are important, and a wristtop may be the way to go. If you don’t see yourself ever racing along, consider a handheld unit instead of a wristtop—they are generally more user-friendly, with more features and a slightly larger size that makes it easier to manually enter data. If you want to be able to see a digital topo map on your GPS, you will need a handheld unit or a GPS-enabled PDA. Also, if you will be entering waypoints in the field, the tiny buttons on wristtops can be tedious, though you may still be able to enter routes and waypoints into some wristtops by uploading them from your computer. Overall, it’s important to balance ease of use with the need to save weight. Some of the newer handheld units are surprisingly small but still very functional. In 2003 and 2004, NOLS Rocky Mountain used hundreds of Garmin’s handheld “Geko 201” models.
Do you need computer compatibility?
If you’re not a computer person, you might save a few bucks and buy an older GPS that isn’t computer-friendly. If you are, you want to make sure the software and GPS you buy will work with your computer and operating system. Most of the receivers being sold today are designed to interface with a computer—Mac, PC, or both.
Do you need a map display?
While all GPS receivers have some sort of digital screen to display information, not all of them can display maps. All of the wristtop GPS “watches” and the cheaper handhelds with smaller screens will not display maps. As far as digital map displays go, there are three kinds of handheld GPS units suitable for land navigation:
• Those the display digital maps right on the unit
• Those that don’t display digital maps on the unit, but may still link up to your computer
• Those that are actually enhanced PDAs with GPS capabilities.
A map display on your GPS may not be worth the extra size, weight, and cost. Being able to see maps on your GPS screen is pretty cool, but whether you really need it depends in part on what kind of traveling you will be doing. Do you need to go fast and light, or are you setting up a three-week base camp somewhere?
Whatever else you do, make sure you have enough battery power for your entire trip. For most units, that means always carrying at least one spare set. Make sure you know exactly how long a set of batteries will last in your GPS, before heading into the backcountry.
When your GPS is on and operating normally, it is processing satellite signals about every second. Some models will burn through a set of batteries in just three to six hours if the unit is continuously on. But there are several things you can do to make the battery issue less painful:
• Get a GPS unit with a battery saver mode, and learn how to use it with the model you have.
• Don’t actually navigate with the GPS unless you have to. Turn the unit off and travel with your map and compass most of the time. Save the GPS for emergencies or for verifying a difficult-to-read location. Make sure, however, that you practice with it and know how to navigate with it when the time comes.
• Use rechargeable batteries when you can. It is the environmentally smart thing to do, and it will save you some major dough in the long run. While no rechargeables can hold a single charge as long as a regular disposable alkaline, nickel metal hydrides (“NiMH”) stay charged the longest and can be used up to one thousand times. Nickel cadmium (“NiCad”) batteries don’t hold a charge for long and are not worth your money. Rechargeable alkalines are cheaper than NiMH, but won’t stay charged or last as long. For extended trips, buy a lightweight solar recharger panel and attach it to the top of your pack or your tent; Brunton makes excellent rechargers for that purpose.
• If recharging is not an option or you will be in extreme cold, take disposable lithium batteries. While they are considerably more expensive, lithiums are lighter and have the longest single charge of any battery. Some newer models are using non-replaceable lithium-ion batteries similar to those found in cell phones and laptops. Lithium-ions are very convenient around town and are great for short trips. However, if you will be in the backcountry for an extended period of time, be sure that know how long your unit will stay charged and whether you can recharge in the field or not. Remember, without battery power, you’ll be carrying around an expensive, colored rock for the rest of your trip.
—From NOLS Wilderness Navigation
Don Geary
Occasionally, even outdoorsmen who have mastered the basics of map and compass get turned around a bit. If you ever find yourself in such a position, probably the most important thing to remember is to remain clam. Stop walking, sit down, and break out your map and compass. Use resection, line position, or both to determine your position.
Once you’ve determined your position, you can decide on your next course of action. Pick an objective, determine a bearing, and then proceed toward it. Choose clear secondary objectives—prominent land features such as springs, valleys, or ponds—along the route so that you can be positive of your progress.
Occasionally, poor visibility will make this impossible. If the condition seems temporary, it is probably best to wait until you can see distant land features clearly, then walk out on a predetermined course. If poor visibility seems like it will last for more than about eight hours, you must decide if your want to wait that long or move on now and use your map and compass to help you navigate.
With a map and compass, the chances are small that you’ll ever become truly lost in any wilderness area in the continental United States. The more you know about an area before you go into it, the better able you will be to find your way out. Here again, thorough planning can pay off. Before your trip, commit to memory certain facts about the area, such as the approximate location of large rivers, mountain ranges, or other prominent natural features. Also note their relationship to roads and other marks of civilization, as well as the direction of flow of any rivers or streams.
In the event that you feel you are totally lost—which is just about impossible if you’ve been using your map and compass correctly—your best bet is to stay put. This may also be necessary if you become injured. If you’ve left word with responsible folks back in civilization as to where you’ll be wandering and the expected time of your return, it’s fair assumption that they will notify the proper authorities and a search will be initiated. You must have faith that in time you’ll be discovered by a rescue party.
In the meantime, explore the general vicinity. Without wandering very far from your position, try to find a field, meadow, or large body of water. If you can find such a place relocate to this spot so that you will be more visible to an air search party.
Your chances of being spotted are much greater if you can create an unnatural-looking symbol on the ground that can be easily seen from the air. This is also an excellent approach if a member of a hiking party is injured and requires medical attention. One or more members of the party should stay with the injured hiker while one or more of the others go for help. Help most often arrives in a helicopter, so by marking the location, you help the rescue aircraft spot the area much more easily. Know in advance that many federal and state search-and-rescue teams now charge for their time spend locating lost or injured hikers. Even if you never find yourself in a situation where you require some type of assistance from above, someday you may discover another hiker in need of some help. This is reason enough to know some ground-to-air symbols.
A long panel means that you need medical assistance. Two long parallel panels indicate that you require medical supplies. A large X means that you are unable to proceed. An arrow pointing in one direction indicates the route you have headed on. A large triangle means that it is probably safe to land an aircraft in the area. If you need food or water, a large F is the symbol. A large square means that you need a map and compass (shame on you!). VV means that you need firearms and ammunition. N means no, Y means yes, and LL means all is well.
INTERNATIONAL GROUND-TO-AIR SIGNALS
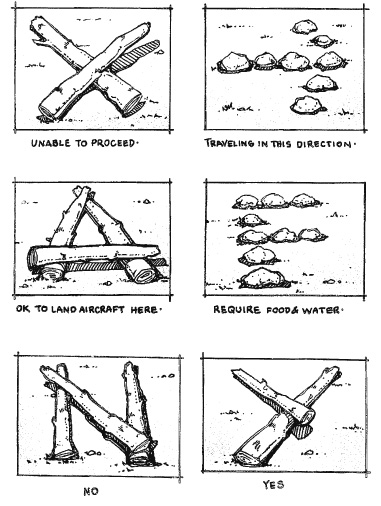
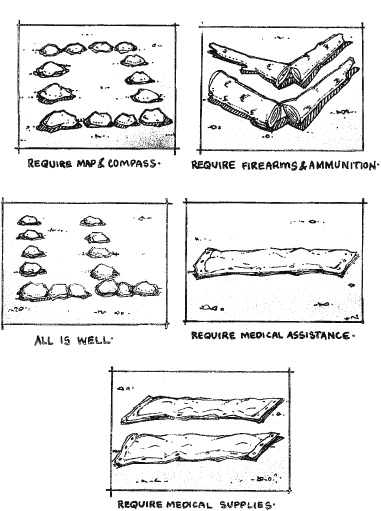
Another way to signal for help is a flare-type distress signal. Several backpacking-equipment companies now sell various signals that are similar to pistols or flares used by seamen except that they are much smaller, less expensive, lighter in weight, and safer. Distress signals are usually self-contained flares with some type of firing mechanism that shoots the flare (commonly brilliant red or international orange) 100 to 150 feet up into the sky. If you’re in trouble and an air search is looking for you, some type of emergency flare might help the searchers locate your position much more quickly.
A strobe light is another means of attracting attention from the air. MPI Outdoor Safety sells a lightweight strobe light that can be seen from up to three miles away. It is powered by one D-cell battery and flashes a 300,000 candlepower strobe for up to sixty hours. This strobe is safe to use and can be quite effective in an emergency situation.
Still another way to attract the attention of aircraft from the ground is with a smoky fire. Pour water on a fire at a time when you think the smoke would be seen from the air.
The universal firearm signal for help is three shots fired at close and equal intervals. Whether or not you decide to carry a firearm, you should know this signal. Although the likelihood of attracting the attention of aircraft with three shots is slim, you may someday hear a series of shots that means someone close to you is in need of help.
If you use the tools of navigation wisely, however, your chances of ever becoming lost are slim.
—From Using a Map and Compass
Darren Wells
Here are some additional tips for staying found:
• Keep everyone in your group involved in the navigation, even if they are not all “experts.” Relying on a single person to do all the navigating for a group is usually a mistake.
• Stop and do map checks when visibility is good. Try to take breaks in areas where you have a good view so you can confirm your location.
• Look for handrails and backstops to ensure you are following your route.
• Keep the group together. If you have to split up, do it according to a plan, and have a contingency plan if one party doesn’t make it back.
• Don’t commit to a route unless you know you will be able to retrace your footsteps or complete the route safely. Keep asking yourself if you could really retrace your steps if you needed to. Never descend something you can’t climb back up or climb something you can’t descend unless you are absolutely sure you want to commit to that route.
• If you’ll be following the same path on the return trip, look over your shoulder on the way out to see what it will look like on the way back.
• Have a designated “sweep” person whose job it is to follow along and make sure there are no stragglers drifting too far behind the rest of the hiking group.
Stop! Do not continue! Cease and desist! Every step in the wrong direction is a step in the wrong direction. Stand still, pull out your maps, take off your pack, and think. The worst thing you can possibly do is speed ahead.
Most lost people have a mental map of where they think they are. But that map is usually wrong. This is why lost people who keep moving tend to move quite far in the wrong direction. You initial efforts toward getting found need to be about finding landmarks to get your head back onto the right map, not moving quickly using your incorrect mental map.
Try not to panic, or you will waste valuable energy that could be used to determine your location. Relax—merely being lost is not an emergency. Even if you are injured, out of food, and alone in a blinding snowstorm, giving up or losing your cool will not do you or anyone else any good. What you do now that you realize you are lost is what is critical to whether this goes from a valuable learning experience to a crisis.
Once you have calmed down, consider retracing your steps. What is the last point at which you knew exactly where you were? How long has it been since you were there? What direction have you been traveling to get to where you are? Can you safely reverse your course?
If there is a clearing or high point nearby where you can get your bearings, consider going there to check the maps. If you have just become separated from your group, there is no shame in yelling. Smart people carry whistles for just such an occasion.
If you can retrace your steps with certainty to the last place where you knew your location (or, if you have become separated, the last place you saw the group), then do so. Use sticks or rocks to make arrows on the trail showing the direction you are traveling. Otherwise, sit tight until you have a plan or until a third party is able to locate you.
If your entire party gets caught near dark while you are lost, stop, set camp, and get some rest. In most cases, the morning sun will go a long way toward helping you get reoriented. In hot climates, travel only during the early morning or late afternoon. In cold climates, if you are without camping gear, you may have to sleep during the day because it will be too cold at night. Stay hydrated. Although it may be unpleasant, most people can go at least a week without food, so make water your first priority.
In a situation where your party is lost for an extended period of time, you may need to search away from your camp for short distances to see if you can get your bearings. Send parties of two or more people if possible. Be sure to mark trees, use flagging tape, or build rock cairns as you go so that you can easily retrace your steps back to your camp. Leave No Trace concerns should always come second to safety concerns.
If you happen to have a satellite phone or cell phone with reception, calling out for search and rescue should be used only as a last resort. Unless someone in your party is in danger of losing their life or a limb, try to get yourselves out. Involving a search team means not just cost and inconvenience but potentially putting other lives at risk. If you are in a situation that warrants calling for outside help, be aware that it can take twenty-four hours or longer to mobilize a significant search team. If you think you do have a true crisis, call immediately.
—From NOLS Wilderness Navigation
Darran Wells
Illustration by Jon Cox
You can avoid having to search for a lost person by having the group agree that you will all stay within sight while you are moving. Also, clear camp boundaries and a designated general area for bathroom use make it less likely that someone will wander too far from camp and get lost. If, however, someone from your group gets separated, there are steps you can take to make locating them easier.
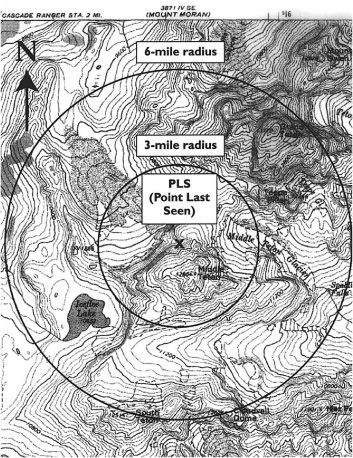
“Point Last Seen” circles help to focus the search for a lost person.
Immediately give a few quick shouts and pause to listen for a response. Often, that’s all it takes to locate someone nearby. If you get no response, mark the spot on the map where the person(s) was last seen—the Point Last Seen (PLS). If the PLS is close (less than a quarter mile) head back right away to that spot, yelling or whistling every minute or so. Otherwise, draw two circles, one with a 3-mile radius around the PLS, another with a 6-mile radius. Half of all lost people are found within the first circle; a full ninety percent are found within the second. Focus your effort within the first circle, then the second one, keeping in mind the following suggestions:
• Set up an area of confinement that “boxes in” the lost person by leaving notes, sleeping bags, or other signals in likely traffic areas like trail intersections, trailheads, etc. Confine quickly and farther than you suspect the lost person may have gone.
• Determine the urgency of the situation by considering the lost person’s age, mental state, wilderness skill level, clothing, food, gear, special medical concerns, weather, and terrain, as well as your own intuition.
• Identify likely areas the separated person might be and mark those on the map as well. Could they be looking for water? Trying to photograph something? Fishing? Did they just make a wrong turn at a recent trail intersection?
• In an area where an accident is possible (steep rocks, river crossings, etc.) search potential accident sites first.
• Look downhill. Rarely do lost people stray uphill. Often, they simply keep descending when they are unsure where to go.
• If you have a large group, break into search teams and set specific meeting times and locations for reuniting. Send one team to the PLS and the rest to other likely areas.
• Have teams travel light and look for clues as well as the missing person.
• Don’t search at night unless there is a true emergency. It is very strenuous and much less efficient.
You may use the method of drawing a circle to help you locate yourself if you become lost. Instead of the PLS, draw a circle around your last known point. How long have you traveled since you were there? The distance you can travel in that time should be the radius of your circle. Have you been going uphill or downhill? In one continuous direction or meandering a bit? What land features can you see that match those in the circle?
In North America, if you are long enough overdue, a search-and-rescue team will eventually be activated to locate your group. Often searches are conducted by both ground and air. An air search is likely if the weather permits—planes and helicopters will not fly in bad weather, and they generally will not fly at night either.
If you are resigned to sitting still and waiting to be rescued, here are some things you should know:
• Big searches in wilderness areas can take days. You will need food, water, and shelter if you are sitting and waiting. Stay organized and plan how you will conserve resources and stay safe and alive during this period.
• You should camp in a visible area—the more open, the better. Try to get to a spot that is easily seen from above.
Large, smoky fires are visible from great distances. Build one and keep it going. But don’t make a bad problem worse by letting it get out of control. Make it visible, but keep it safe and controlled by building it out in the open and away from trees.
• Carry signal mirrors and know how to use them before you need them in an emergency. Have them ready to use before you hear air traffic.
• Geometric patterns are often visible from the air. Triangles, squares, or circles made with rocks, branches, dirt, or extra gear may help. Using brightly colored clothing and gear will also help to get you noticed—blues and reds are the most likely to get a pilot’s attention.
—From NOLS Wilderness Navigation
Greg Davenport
Whether you are stranded at sea or on land, rescue attempts are far more successful when rescuers search for someone who is at their last known location. At sea, you’re better off staying close to your distressed vessel. On land, as long as you are able to meet your survival needs, stay put. When on land, only consider traveling from your present location to another in three situations:
1. Your present location doesn’t have adequate resources to meet such needs as personal protection, sustenance, and signaling.
2. Rescue doesn’t appear to be imminent.
3. You know your location and have the navigational skills to travel to safety.
At sea, stay put unless your vessel is burning or sinking and poses a threat. In that case, cut free of the boat and move away from it as soon as possible. Since resources will be limited, you should travel toward shipping lances, land, or rain.
1. Shipping lanes. These lanes run from continent to continent and tend to have an east-west pattern.
2. Land. Most large land masses are oriented north and south.
3. Rain. Since rain forms from accumulated vapor and wind picks up vapors when traveling over water, following the winds is perhaps the best way to find rain.
Hopefully, you will have an idea of your general location. Knowing how to identify your location to determine a direction of travel and to avoid obstacles requires a good understanding of a compass and map or nautical chart’s nomenclature.
When you are searching for land while stranded at sea, look for the following indicators.
• Cumulus clouds often hover over or slightly downwind from an island.
• The sky will often have a greenish tint close to shallow lagoons or shelves of coral reefs. Look for this tint on the bottoms of clouds.
• The sky will often show a reflection of light on the bottoms of clouds when close to snow or ice-covered land.
• Deep water is often dark, whereas shallow water close to land tends to be a lighter shade.
• You will probably hear the sounds of birds and surf long before seeing the shore.
• Likewise, you will probably smell wood smoke, fruits, and other shore scents long before seeing the shore.
• An increase in the bird population may indicate land, but don’t count on it. But note that birds often fly toward land and their nesting areas at dusk. During day hours, the flight pattern of birds is not reliable since they tend to search for food during this time.
• Winds often blow toward land during the day and out to sea at night. However, unless land is close, the pattern of the wind is not a factor you can rely on.
—From Surviving Coastal and Open Water
Greg Davenport
A properly used signal increases a survivor’s chances of being rescued. A signal has two purposes: to attract rescuers to your whereabouts, and then to help them pinpoint your exact location. When preparing a signal, use the following rules:
• Stay put. Once you realize you’re lost, stay put. Depart only if the area you are in doesn’t meet your survival needs, rescue is not imminent, and you know where you are and have the navigational skills to get to where you want to go. If you are lost or stranded in a car, plane, or ATV, stay with it; the vehicle will serve as a ground-to-air signal. When a search is activated, rescuers will begin looking for you in your last known location. If for some reason you need to move, leave a ground-to-air signal pointing in your direction of travel, along with a note telling rescuers of your plans. If you do move, go to high ground and find a large clearing from which to signal.
• Properly locate your signal site. Your signal site should be close to your camp or shelter, located in a large clearing that has 360-degree visibility, and free of shadows.
• Use one-time-use signals at the appropriate time. Many signals are one-time-use items and thus should be ignited only when you see or hear a potential rescuer and are sure he or she is headed in your direction.
• Know and prepare your signal in advance. Since seconds can mean the difference between life and death; don’t delay in preparing or establishing a signal.
—From Surviving the Desert
Greg Davenport
Illustrations by Steven A. Davenport
During an average year, the U.S. National Park System has around four thousand search-and-rescue operations. Of these, approximately half of the missions involve a seriously injured or ill subject, and in 5 percent of the cases the victim dies. A properly utilized signal increases a survivor’s chances of being rescued. A signal has two purposes: First, it attracts rescuers to your whereabouts; and second, it helps them hone in on your exact location.
The most effective distress signals for attracting attention are aerial flares and parachute flares, because they are moving, spectacular, and cover a large sighting area.
This signal is a one-time-use item and should be used only if a rescue team, aircraft, or a vessel is sighted. As with all pyrotechnic devices, it is flammable and should be handled with caution. Most aerial flares are fired by pulling a chain. In general, you’ll hold the launcher so that the firing end—where the flare comes out—is pointed overhead and skyward, allowing the chain to drop straight down. Make sure the hand holding the launcher is located within the safe area, as detailed on the device you are using. Then, while the flare is pointed skyward, use your free hand to grasp and pull the chain sharply downward. For safe use and best results, hold the flare away from your body and perpendicular to the ground. The average aerial flares will have a 500-foot launch altitude, six-second burn time, and 12,000 candlepower. Under optimal conditions, these flares have been sighted up to 30 miles away. Many aerial flares float and are waterproof, and most have an average size of 1 inch in diameter and about 4 ½ inches long, when collapsed. Some flares are disposable; others allow replacement cartridges. The Orion Star-Tracer and the Sky Blazer XLT aerial flares are two good examples and can be found in most sporting-goods or marine stores.
A parachute flare is simply an aerial flare attached to a parachute. The parachute allows for a longer burn time while the flare floats down to earth. Like the aerial flare, this signal is a one-time-use item and should be used only if a rescue team, aircraft, or a vessel is sighted. It, too, is flammable and should be handled with caution. The Pains Wessex SOLAS Mark 3 parachute flare can reach a height of 1,000 feet and produce a brilliant 30,000 candlepower. The flare’s red light drifts down to earth under a parachute and has a burn time of about forty seconds.
When using an aerial or parachute flare, you need to adjust for any drift from the wind. Since you want the flare to ignite directly overhead, you’ll need to point the flare slightly into the wind. Exactly how much you’ll need to point it into the wind is hard to determine, but usually 5 to 10 degrees will suffice.
Once help is on the way, handheld red signal flares, orange smoke signals, signal mirrors, kites, strobe lights, whistles, and ground-to-air signals serve as beacons to help rescuers pinpoint your position and keep them on course.
This signal is a one-time-use item and should be used only if a rescue team, aircraft, or a vessel is sighted. It is flammable and should be handled with caution. To light one, stand with your back to the wind, and point the flare away from your face and body during and after lighting. Most red signal flares are ignited by removing the cap and striking the ignition button with the cap’s abrasive side. To avoid burns, hold the flare in its safe area, and never hold it overhead. Most devices will burn for two minutes, have a candlepower of 500, and are about 1 inch in diameter by 9 inches long. For increased burn time and candlepower, you might consider getting a handheld marine red signal flare, which average a burn time of three minutes and a 700 candlepower.
This signal also is a one-time-use item and should be used only if a rescue team, aircraft, or a vessel is sighted. It, too, is flammable and should be handled with caution. To light one, stand with your back to the wind, and point the device away from your face and body during and after its lighting. Other than wind, snow, or rain, the biggest problem associated with a smoke signal is that cold air keeps the smoke close to the ground, sometimes dissipating it before it reaches the heights needed to be seen.
SKYBLAZER SMOKE SIGNAL
The SkyBlazer smoke signal is about the size of a 35-millimeter film container and thus is easy to carry. It’s easy to use, and the directions are on the container. Simply remove its seal, pull the chain, and then place it on the ground. The signal lasts for only forty-five seconds under optimal conditions and produces only a small volume of orange smoke. In order to increase the smoke to a more appropriate level, I have used two at once. Note: The SkyBlazer smoke signal is not a handheld device and should be set on the ground once ignited.
ORION HANDHELD ORANGE SMOKE SIGNAL
The Orion signal is bigger than the SkyBlazer. It comes in two sizes: marine and wilderness. The marine signal is about the size of a road flare, and the wilderness signal is half that. The Orion, too, has easy-to-read directions right on the signal. Simply remove the cap, and strike the ignition button with the abrasive part of the cap. To avoid burns, hold the flare in its safe area, and never hold it overhead. These signals put out a lot of smoke and last over sixty seconds. If space permits, this is a far more effective signal than the SkyBlazer. Note: Orion also makes a floating orange smoke signal that lasts for four minutes.
On clear, sunny days, signal mirrors have been seen from as far away as 70 to 100 miles. Although the signal mirror is a great signaling device, it requires practice to become proficient in its use. Most signal mirrors have directions on the back, but the following are general guidelines on how they should be used. Holding the signal mirror between the index finger and thumb of one hand, reflect the sunlight from the mirror onto your other hand. While maintaining the sun’s reflection on your free hand, bring the mirror up to eye level and look through the sighting hole. If done properly, you should see a bright white or orange spot of light in the sighting hole. This is commonly called the aim indicator, or fireball. Holding the mirror close to your eye, slowly turn it until the aim indicator is on your intended target. If you lose sight of the aim indicator, start over. Note: If signaling an aircraft, stop flashing the pilot after you’re certain he’s spotted you, as the flash may impede his vision. On land, slightly wiggle the mirror to add movement to the signal. At sea, hold the mirror steady to contrast the sparkles created by the natural movement of the water. Since the mirror can be seen from great distances, sweep the horizon periodically throughout the day, even if no rescue vehicles are in sight. To avoid obstructive shade, be sure to remove your hat when using a signal mirror.
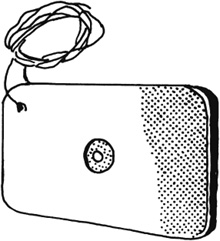
Signal mirror with sighting hole.
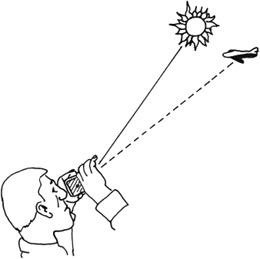
Using a signal mirror
A kite is a highly visible signal that not only attracts attention to your location, but also helps rescuers pinpoint where you are. David Instrument’s Sky-Alert Parafoil Rescue Kite is a good example. The 28-by-38-inch kite files in 5 to 25 knots of wind and requires only about 8 to 10 knots to lift another signaling device such as a strobe or handheld flare. A benefit of this signal is that it can be working for you while you attend to other needs. In addition to providing a great signal, flying the kite can also help alleviate stress.
A strobe light is a device that fits in the palm of your hand and provides an ongoing intermittent flash. ACR Electronics Personal Rescue Strobe is a good example of this. It delivers a bright flash (250,000 peak lumens) at one-second intervals and can run up to eight hours on AA batteries. It is visible for up to 1 nautical mile on a clear night. As with all battery-operated devices, strobe lights are vulnerable to cold, moisture, sand, and heat; protect the strobe from these hazards by any means available.
A whistle will never wear out, and its sound travels father than the screams of the most desperate survivor. Always carry a whistle on your person. If you become lost or separated, immediately begin blowing your whistle in multiple short bursts. Repeat every three to five minutes. If rescue doesn’t appear imminent, go about meeting your other survival needs, stopping periodically throughout the day to blow the whistle. It may alert rescuers to your location, even if you’re unaware of their presence. Strom Whistle’s Storm Safety Whistle is a good example. Its unique design makes it the loudest whistle you can buy, even when soaking wet. It is made from plastic and has easy-to-grip ridges.
A ground-to-air signal is an extremely effective device that allows you to attend to your other needs while continuing to alert potential rescuers of your location. Although you can buy signal panels, I’d suggest purchasing a 3-foot-wide by 18-foot-long piece of lightweight nylon—orange for winter, white for summer. There are three basic signal designs you can construct using the nylon.
V=Need assistance
X=Need medical assistance
↑=Proceed this way
Once you’ve made the appropriate signal design, stake it out so that it holds its form and doesn’t blow away. For optimal effect, follow these guidelines:
Size: The ideal signal will have a ratio of 6:1, with its overall size at least 18 feet long by 3 feet wide.
Contrast: The signal should contrast the surrounding ground cover: orange on snow, white on brown or green.
Angularity: Because nature has no perfect lines, a signal with sharp angles will be more effective.
Shadow: In summer, elevate the signal. In winter, stomp or dig an area around the signal that is approximately 3 feet wide. If the sun is shining, either of these methods will create a shadow, which ultimately increases the signal’s size.
Movement: Setting up a flag next to your signal may create enough movement to catch the attention of a rescue party. It is also advisable to suspend a flag high above your shelter so that it can be seen from all directions by potential rescuers.
Although a cellular phone is a great thing to have, it’s not without limitations and often doesn’t work in remote areas. Do not rely on one as your sole signaling and rescue device. Not only are cell phones limited by their service area, but they are also vulnerable to cold, moisture, sand, and heat. You’ll need to protect the phone from these hazards by any means available.
Many manufactured signals are one-time-use items or are limited by their battery life, and it may be necessary to augment them with an improvised signal. A fire can be as effective as a red flare; an improvised smoke generator works better and lasts longer than an orange smoke signal; an improvised signal mirror can be as useful as a manufactured one; and a ground-to-air signal can be made from materials provided by Mother Nature.
During the night, fire is probably the most effective means of signaling available. One large fire will suffice to alert rescuers to your location; don’t waste time, energy, and wood building three fires in a distress triangle unless rescue is uncertain. If the ground is covered with snow, build the fire on a snow platform to prevent the snow’s moisture from putting out the fire. Prepare the wood or other fuel for ignition prior to use, as described in chapter 6.
Smoke is an effective signal if used on a clear, calm day. If the weather is bad, however, chances are that the smoke will dissipate too quickly to be seen. The rules for a smoke signal are the same as those for a fire signal: You only need one; use a platform in snow environments; and prepare the materials for the signal in advance. To make the smoke contrast against its surroundings, add any of the following materials to your fire:
To contrast snow: Use tires, oil, or fuel to create black smoke.
To contrast darker backgrounds: Use boughs, grass, green leaves, moss, ferns, or even a small amount of water to create white smoke.
In heavy snow or rain, you’ll need to set up your smoke generator in advance and protect it form the moisture. To accomplish this, build an elevated platform by driving two 6-foot-long wrist-diameter branches 3 feet into the snow, at a 10- to 20-degree angle to the ground. For best results, insert the branches in a location where the ground has a 10- to 20-degree slope, creating a level foundation for smoke generator. Next, place multiple wrist-diameter branches on top of and perpendicular to the first two, so that they are touching one another. In the center of this newly created surface, build, but don’t light, a tepee firelay, using a lot of tinder and kindling in the process. Then construct a log-cabin-style firelay around the tepee, using fuel that is thumb-size and larger. Leave a small, quick-access opening that will allow you to reach the tinder when it comes time to light it. Finally, place a heavy bough covering over the top of the whole thing. The bough covering should be thick enough to protect the underlying structure from the snow and rain. When done, the generator should look like a haystack of boughs. Once rescuers have been spotted or appear to be headed in your direction, light the smoke generator, gently picking up and reaching under one side of the boughs. If you should have trouble getting it lit, this is one of the rare circumstances where I’d advise using your red smoke flare as a heat source.
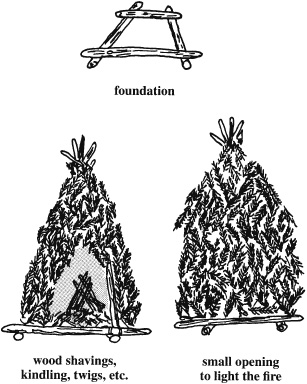
Elevated smoke generator.
A signal mirror can be created from anything shiny, such as a metal container, coin, credit card, watch, jewelry, or belt buckle. Although an improvised signal mirror is a great signaling device, it requires practice to become proficient in its use. To use one, follow these steps. Holding the device between the index finger and thumb of one hand, reflect the sunlight from the mirror onto the palm of your other hand. While keeping the reflection on that hand, create a V between your thumb and index finger. Move the light reflection and your until the rescue aircraft or other rescuer is in the V. At this point, move the reflected light into the V and onto your intended target. (Also see the note under Signal Mirror, page 421.)
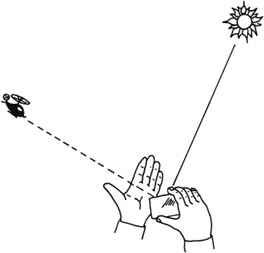
Any shiny reflective material can be used as an improvised signal mirror.
If you haven’t brought along a signal panel, you can improvise one from whatever Mother Nature provides—boughs, bark, snow, logs, or any other material that contrasts with the ground color. See the guidelines under Ground-to-Air Pattern Signal, page 420, for basic guidelines of design and construction.
Helicopter rescues are becoming more frequent as more and more people head into the wilderness. Rescue crews may be civilians, but more often than not, they are either military or Coast Guard. If the helicopter can land, it will. If not, a member of the rescue team will be lowered to your position. At this point, you’ll either be hoisted to the helicopter or moved to a better location while in a harness or basket and dangling from the helicopter. Secure all loose items before the helicopter lands, or they may be blown away or sucked up into the rotors. Once the helicopter has landed, do not approach it until signaled to do so, and only approach from the front side. This will ensure that the pilot can see you and decrease your chances of being injured or killed by the rotor blades.
If you become lost or a member of your team is hurt and unable to be moved, stay put: Only depart if the area you are in doesn’t meet your needs, rescue is not imminent, and you know how to navigate. If you are lost or stranded in a car, plane, or ATV, stay with it. The vehicle will serve as a ground-to-air signal. When a search is activated, rescuers will begin looking for you in your last known location. If for some reason you need to move, leave a ground-to-air signal pointing in your direction of travel, along with a note telling rescuers of your plans. If you do move, go to high ground, and find a large clearing to signal from.
Property locate your signal site: Your signal site should be close to your camp or shelter; located in a large clearing that has 360-degree visibility; and free of shadows.
Use one-time-use signals at the right time: Many signals are one-time-use items and thus should be ignited only when you see or hear a potential rescuer and are sure he or she is headed in your direction.
Since you never know if someone is nearby, blow your whistle every five to ten minutes, and occasionally scan the horizon with your signal mirror. To avoid watching rescuers disappear while still fumbling with your signal, learn how to use them in advance, and make sure they are ready to use before rescue is near. Since seconds can mean the difference between life and death, don’t delay in preparing or establishing a signal.
A strong, silver-and-orange space blanket can serve as an improvised signal. Silver will contrast with the brown or green color of bare ground, and orange will do the same in a snowy environment. To use as a signal, place the space blanket in a clearing, with the appropriate contrasting side up, and weigh down the edges so it won’t blow away. As you meet your other needs, a well-positioned space blanket will alert any potential rescuers to your location. The space blanket should be used as a signal only when not needed to meet other survival needs.
—From Surviving Cold Weather
Greg Davenport
During an average year, the U.S. Coast Guard performs thousands of search-and-rescue missions. Some are successful, while others end without ever finding the lost vessel or passengers. Many factors contribute to a successful search. Leaving a float plan will help give rescuers an idea of where to look. Having signals and knowing how to use them will aid in the process. Although filing a float plan is optional (do it!), carrying visual distress signals is not. Coast guard regulations require visual distress signals (VDSs) on all boats that operate on the high seas, coastal waters (including the Great Lakes), territorial seas, and all waters directly connected to the Great Lakes or the territorial seas up to a point where the waters are less than two miles wide. For boats less than 16 feet, the USCG requires one electric distress light or three combination (day/night) red flares, which are only required to be carried on board when operating between sunset and sunrise. For boats between 16 and 65 feet, the USCG requires one orange distress flag and one electric distress light or three handheld or floating orange smoke signals and one electric distress light combination (day/night) red flares, whether handheld, meteor, or parachute-type. All signals, except for the distress flag and light, must show the words “Coast Guard Approved” and be marked with the service life of the signal. The distress flag and light must carry the manufacturer’s certification that they meet coast guard requirements. I strongly suggest carrying additional signaling devices! You can never have too many.
Although you should always carry a VDS, the USCG does allow exceptions for certain vessels during day operations. (Night signals are required for all vessels from sunset to sunrise.) These vessels include recreational boats less than 16 feet in length, boats participating in organized events, open sailboats less than 26 feet in length not equipped with propulsion machinery, and manually propelled boats.
Correctly using a signal increases a survivor’s chances of being rescued. A signal has two purposes: to alert rescuers to your whereabouts, and to help them hone in on your exact location. The most effective electronic distress signals are your VHF handheld radio and the 406-MHz Emergency Position Indicating Radio Beacon. Aerial flares and parachute flares are the most effective nonelectronic signals because they move, are spectacular, and cover a large sighting area. Once help is on the way, signal mirrors, handheld signal flares, smoke signals, sea/rescue signal streamers, kites, sea marker dye, strobe lights, whistles, and ground-to-air signals serve as beacons to help rescuers pinpoint your position and keep them on course. When preparing a signal, use the following rules.
Once lost, stay put. Only leave if the area you are in doesn’t meet your needs, rescue is not imminent, and you know how to navigate (know where you are and have the skills to get to where you want to go). If you are lost or stranded in a car, plane, or ATV, stay with it. If your distressed vessel doesn’t present a hazard, stay close to it. The vessel or vehicle will serve as a ground-to-air signal, and when a search is activated, rescuers will begin looking for you in your last known location. If you are on land and for some reason you need to move, be sure to leave a ground-to-air signal pointing in your direction of travel along with a note telling rescuers of your plans. If you do move, go to high ground and find a large clearing to signal from.
At sea, your signal site is not often something you can control. On land, however, your signal site should be close to your camp or shelter, located in a large clearing with 360-degree visibility, and be free of shadows.
Many signals may be used just one time and thus should only be ignited when you see or hear a potential rescuer headed in your direction.
Since seconds can make the difference between life and death, don’t delay in preparing or establishing a signal.
Read the instructions for your flare in advance so you will know how to use it when a ship or aircraft is seen. Always fire the signal on the downwind side on your vessel while holding it slightly down and over the water. Never fire it above or inside the raft since burning particles might fall and burn you or damage your raft.
The most effective distress signals for attracting attention are electronic devices. Other options include parachute and aerial flares, both of which cover a large area and attract rescuers with spectacular visual effects and movement.
The VHF radio is a quick and easy way to make a distress call. Because it does not use satellites, it has limits to how far away it can be picked up. Its normal range varies greatly but is estimated to average between 20 and 60 miles. If a repeater is within that 20- to 60-mile range, however, the signal range can increase significantly. Channel 16 is the recognized emergency channel.
Protect your VHF radio from moisture and wind, and consider having a radio that runs on alkaline or lithium batteries rather than rechargeable batteries. However, be sure you have packed multiple replacement batteries in the abandon-ship bag. There are three internationally recognized marine radio signals: Mayday, Pan-Pan, and Security. Mayday, which is used when there is an immediate threat to the loss of your vessel or someone’s life, takes priority over all other calls.
A Mayday call should follow this basic design: Call MAYDAY, MAYDAY, MAYDAY. Repeat your vessel name and call sign three times. State your present location (give latitude and longitude if you can along with a distance and direction from a known point), the nature of the distress, and the number of people on board three times. Repeat this process until you either get a response or are forced to leave your vessel.
A Pan-Pan call is used when a potential threat exists, but at that moment there is no immediate danger to persons or vessel. Security calls are low priority and usually alert vessels to monitor another station for a safety message.
Emergency Position Indicating Radio Beacons (EPIRBs) are well worth the cost, and every vessel should carry one. When activated, these beacons quickly and with great accuracy alert rescuers to your location. The 406-MHz EPIRB is the gold standard and by far outperforms the older rescue beacons, which, if you have them, should be replaced. Once activated, they automatically transmit a signal on two international distress frequencies that will be picked up by military and civilian aircraft. Most of these devices float, but make sure you have a good strong lanyard attached to your EPIRB before you even contemplate putting it in the water. Be sure to register the EPIRB according to the beacon manufacturer’s instructions.
These signals, which may be used just once, should only be used during daylight when an aircraft or a vessel is sighted, close by, and headed in your direction. The sea marker’s yellow/green fluorescent dye comes in various sizes and words by making you appear larger in contrast to the water’s natural color. The dye will last about twenty to thirty minutes in calm seas and less than what when seas are rough. From the air, the dye can be seen from as far as 10 miles away. To use, simply add the powder to the surrounding water. Avoid skin contact with the powder as it is caustic and can burn your skin. On land, the sea marker dye provides excellent contrast to snow, which makes it a great ground-to-air signal.
An option to the marker dye is a sea rescue signal streamer. Unlike the dye, it never runs out and can provide a constant ongoing signal that is easily seen from the air. The orange plastic floating streamer is 40 feet long and comes in various widths.
—From Surviving Coastal and Open Water
U.S. Army
Now that you know how to let people know where you are, you need to know how to give them more information. It is easier to form one symbol than to spell out an entire message. Therefore, learn the codes and symbols that all aircraft pilots understand.
You can use lights or flags to send an SOS—three dots, three dashes, three dots. The SOS is the internationally recognized distress signal in radio Morse code. A dot is a short, sharp pulse; a dash is a longer pulse. Keep repeating the signal. When using flags, hold flags on the left side for dashes and on the right side for dots.
This code is actually five definite, meaningful symbols. Made these symbols a minimum of 1 meter wide and 6 meters long. If you make them larger, keep the same 1:6 ratio. Ensure the signal contrasts greatly with the ground it is on. Place it in an open area easily spotted from the air.
When an aircraft is close enough for the pilot to see you clearly, use body movements or positions to convey a message.
If you have a life raft cover or sail, or a suitable substitute, use the symbols shown to convey a message.
Once the pilot of a fixed-wing aircraft has sighted you, he will normally indicate he has seen you by flying low, moving the plane, and flashing lights as shown. Be ready to relay other messages to the pilot once he acknowledges that he received and understood your first message. Use a radio, if possible, to relay further messages. If no radio is available, use the codes covered in the previous paragraphs.
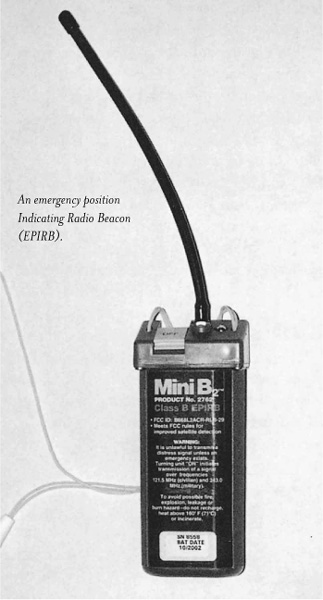
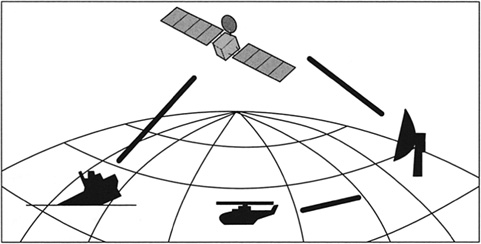
EPIRB transmission.
If you can contact a friendly aircraft with a radio, guide the pilot to your location. Use the following general format to guide the pilot:
• Mayday, Mayday.
• Call sign (if any).
• Name.
• Location.
• Number of survivors.
• Available landing sites.
• Any remarks such as medical aid or other specific types of help needed immediately.
Simply because you have made contact with rescuers does not mean you are safe. Follow instructions and continue to use sound survival and evasion techniques until you are actually rescued.
BODY SIGNALS
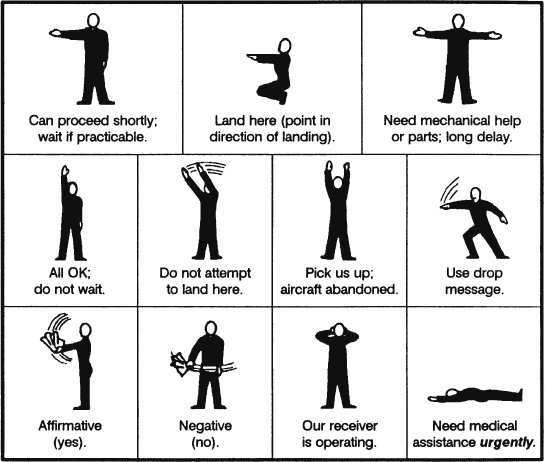
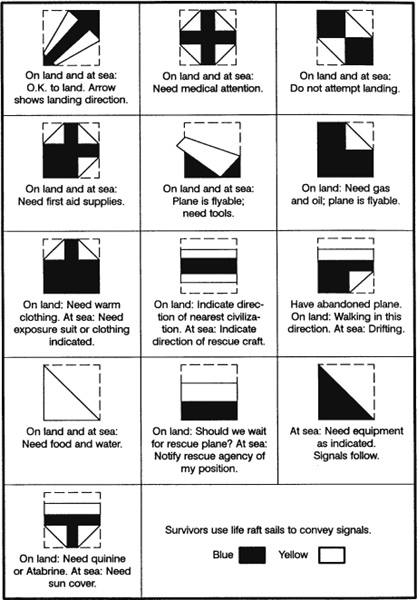
Panel signals.
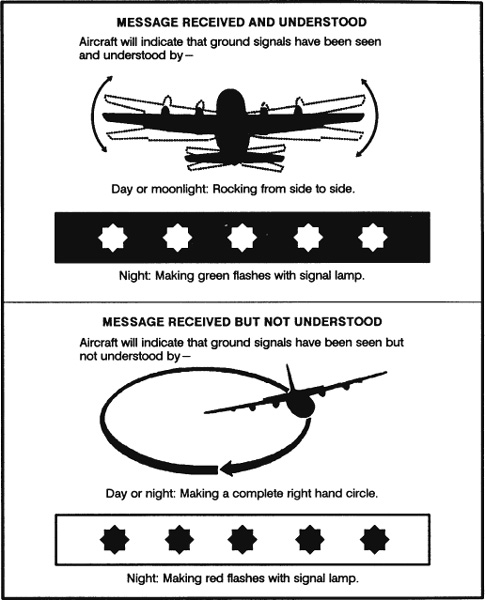
Aircraft acknowledgments.
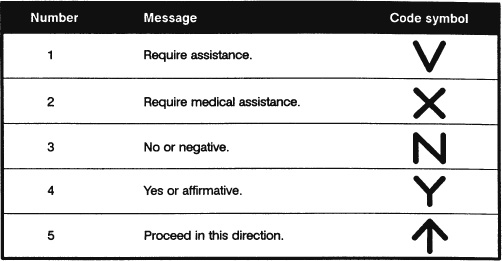
Ground-to-air emergency code (pattern signal).
—From Survival (Field Manual 21-76)