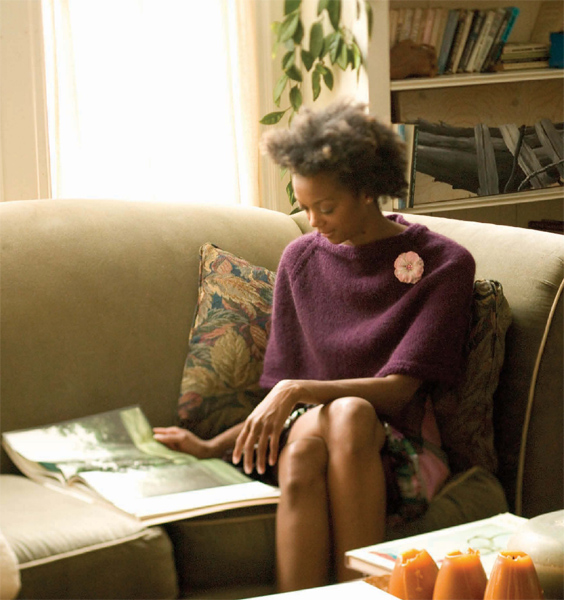
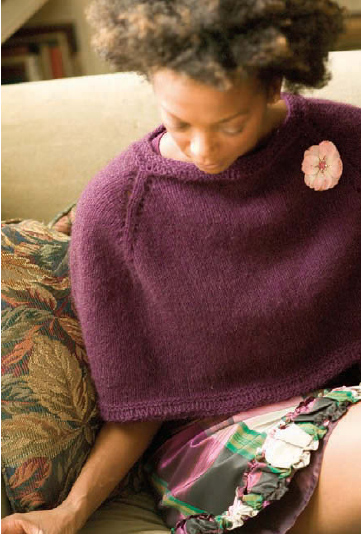
This pattern, the latest addition to Ann Budd’s Grand Plan series of project instructions, features three versions of a capelet worked in one piece from the neck down and shaped with increases along four raglan lines. Presented in easy-to-read chart form, the instructions given here are for three sizes (child, woman’s small/medium, woman’s large), five possible gauges (2, 3, 4, 5, and 6 stitches per inch), and pullover or cardigan variations. By changing the edging, stitch pattern, or increase method, you can get a host of different looks—turn to page 53 for detailed instructions for the capelets shown here.
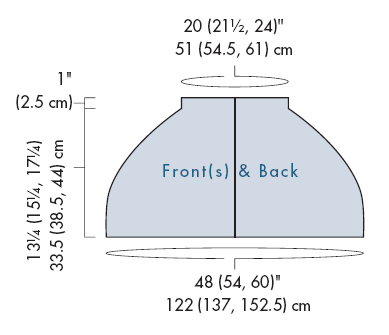
48 (54, 60)" (122 [137, 152.5] cm) circumference at lower edge, 20 (21½, 24)" (51 [54.5, 61] cm) circumference at neck edge, and 13¼ (15¼, 17¼)" (33.5 [38.5, 44] cm) long. Capelets shown measure 54" (137 cm) at lower edge.
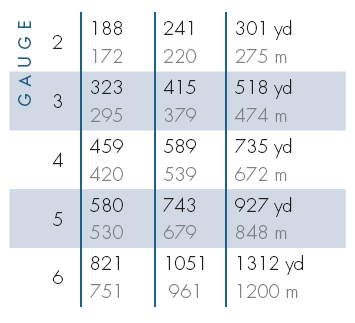
Your choice of yarn: see below left for amounts.
24" and 16" (60-cm and 40-cm) circular (cir) needle in size needed for desired gauge.
Note: 16" (40-cm) cir not required for cardigan version.
Markers (m); tapestry needle; buttons for cardigan (optional).
2, 3, 4, 5, or 6 sts = 1" (2.5 cm).
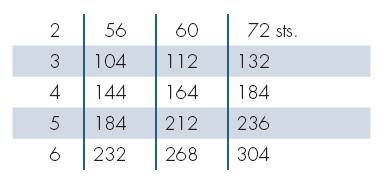
Lower Circumference

Yarn Requirements
With shorter cir needle, CO:
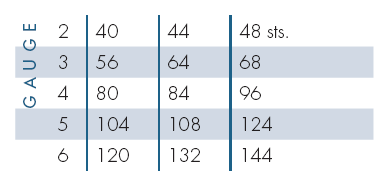
Place marker (pm) and join for working in the rnd, being careful not to twist sts.
Neckband: Work edging of choice until piece measures 1" (2.5 cm) from CO.
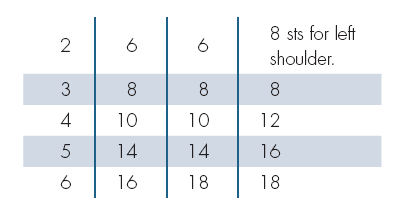
Next rnd: Place 3 additional markers to denote position of raglan lines (original marker denotes left back raglan) as foll:
Work across:
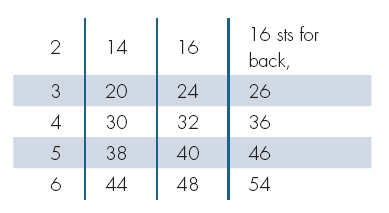
place marker (pm), work across:

pm, work across:

place marker (pm), work across:
Increase for body: Using the inc method of your choice (see page 52), inc 2 sts at each marker every other rnd the foll number of times, changing to longer cir needle when sts become too crowded to fit comfortably on short cir:
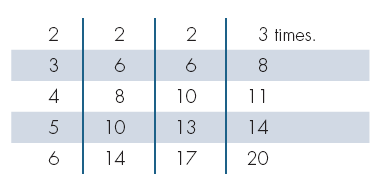
There will be:
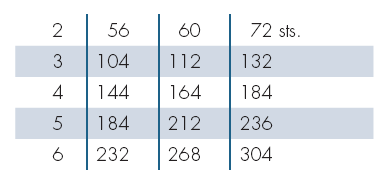
Inc 2 sts at each marker every 4th rnd:

There will be:
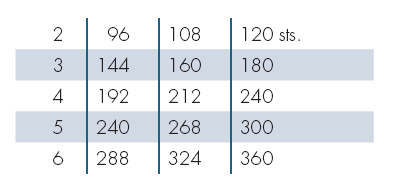
Work even until piece measures 12¼ (14¼, 16¼)" (31 [36, 41.5] cm) from base of neckband, or 1" (2.5 cm) less than total desired length. Work edging of choice for 1" (2.5 cm). BO all sts.
Weave in loose ends. Block to measurements.
With longer cir needle, CO:

Do not join.
Neckband: Working back and forth in rows, work edging of choice until piece measures 1" (2.5 cm) from CO, ending with a WS row.
Next row: Place 4 markers to denote positions of raglan lines as foll:
Work across:
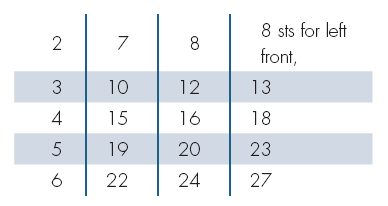
place marker (pm), work across:

pm, work across:
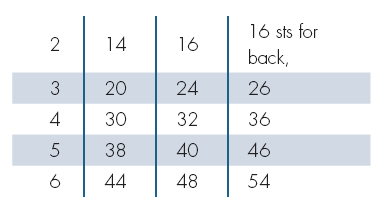
pm, work across:
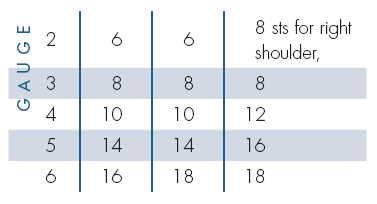
pm, work across:
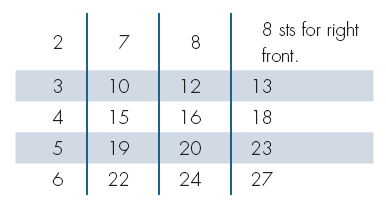
Increase for body: Using the inc method of your choice (see page 52), inc 2 sts at each marker every other rnd the foll number of times, changing to longer cir needle when sts become too crowded to fit comfortably on short cir:
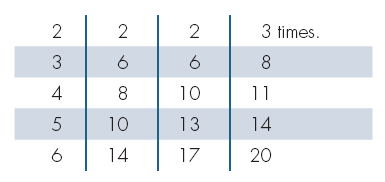
There will be:
Inc 2 sts at each marker every 4th rnd:
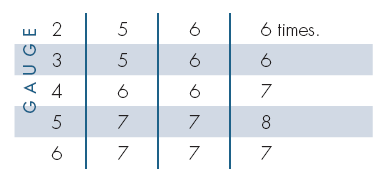
There will be:

Work even until piece measures 12¼ (14¼, 16¼)" (31 [36, 41.5] cm) from base of neckband, or 1" (2.5 cm) less than total desired length. Work edging of choice for 1" (2.5 cm). BO all sts.
Weave in loose ends. Block to measurements.
Button band: With RS facing, pick up and knit about 4 sts for every 5 rows along left front edge. Work edging of choice until band measures about 1" (2.5 cm). BO all sts. Mark placement of desired number of buttons evenly spaced along button band, placing the top button about ½" (1.3 cm) down from neck edge.
Buttonhole band: With RS facing, pick up and knit about 4 sts for every 5 rows along right front edge. Work edging as for button band until band measures about ½" (1.3 cm). Next row: Work buttonholes (yo, k2tog) opposite button markers on button band. Cont even in edging patt until band measures about 1" (2.5 cm). BO all sts.
Sew buttons to button band opposite buttonholes.
Yarnover Increase (YO)
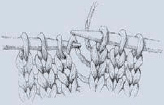
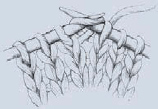
Wrap the working yarn around the needle from front to back (Figure 1), then bring yarn into position to work the next stitch (leave it in back if a knit stitch follows; bring it under the needle to the front if a purl stitch follows).
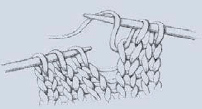

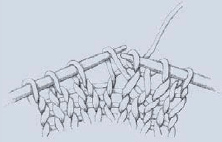
Lifted Increase
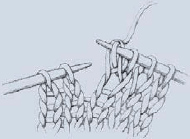
Left Slant: Knit into the back of a stitch (in the “purl bump”) in the row directly below the stitch on the needle (Figure 1). Knit into the stitch on the needle, then slip original stitch off the needle (Figure 2).
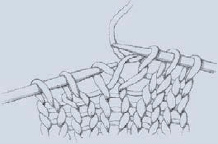
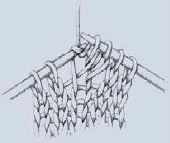
Right Slant: Insert left needle tip into the back of the stitch below the stitch just knitted (Figure 1), then knit this stitch (Figure 2).

Bar Increase (K1f&b)
Knit into a stitch, but leave it on the needle (Figure 1). Knit through the back loop of the same stitch (Figure 2). Slip original stitch off the needle (Figure 3).
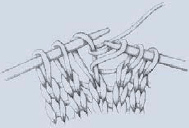
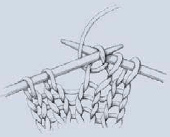
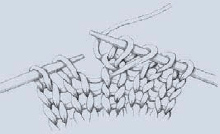
Make 1 (Raised) Increase (M1)
Left Slant: With left needle tip, lift the horizontal strand that lies between the needles from front to back (Figure 1). Knit the lifted strand through the back loop (Figure 2).
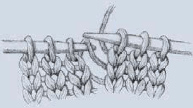
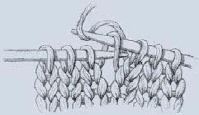
Right Slant: With left needle tip, lift the horizontal strand that lies between the needles from back to front (Figure 1). Knit the lifted strand through the front loop (Figure 2).
