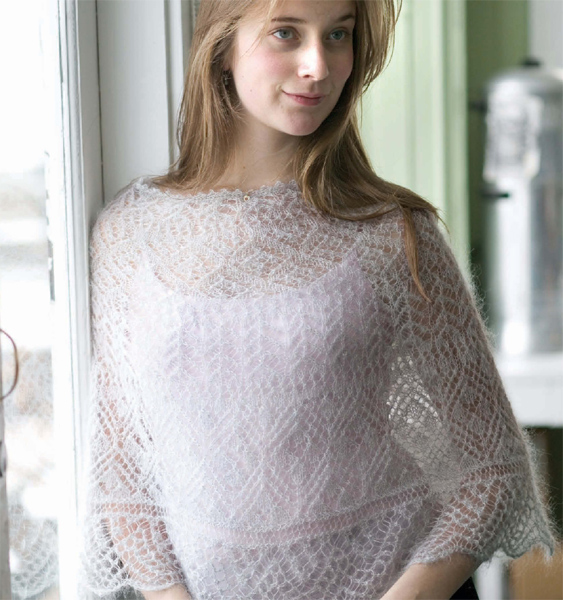
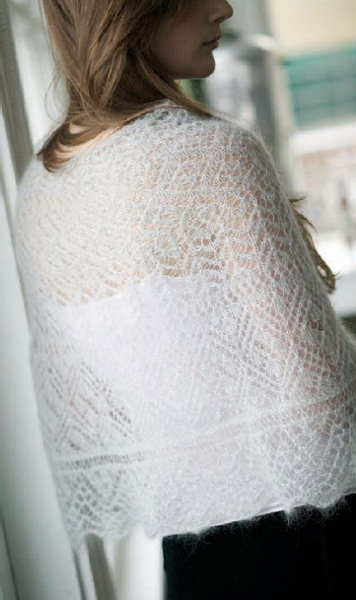
Shirley Paden likes to design projects that combine traditional knitting with contemporary trends. She scouts fashion magazines and consults forecast services to find what’s new in the way of color, silhouette, and design details. Then she finds ways to merge current style with stitch or color patterns rooted in tradition. For this piece, Shirley has chosen a “very now” poncho shape as a vehicle for several “very old” Shetland lace stitches. Worked in a delicate laceweight mohair, the patterns form simple bands that circle this light, airy, and modern wrap.
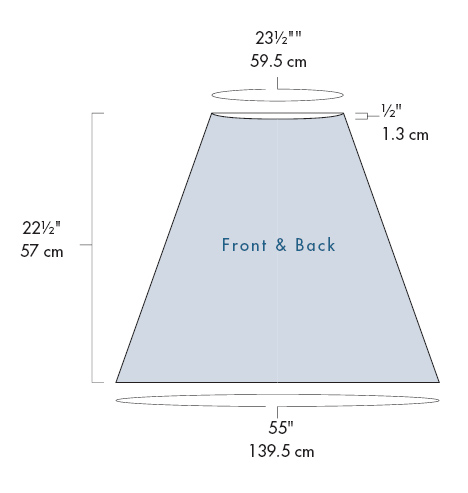
55" (139.5 cm) circumference at lower edge, 23½" (59.5 cm) circumference at neck edge, and 22½" (57 cm) long at deepest scallop points.
About 675 yd (617 m) of fingering-weight (Fine #2) yarn.
We used: Knit One Crochet Too Douceur et Soie (70% baby mohair, 30% silk; 225 yd [205 m]/25 g): #8919 very light gray, 3 balls.
Size 6 (4 mm): 32" (80-cm) and 24" (60-cm) circular (cir). Adjust needle size if necessary to obtain the correct gauge.
Size E/4 (3.5 mm) crochet hook; marker (m); tapestry needle; a few yards (meters) waste yarn for provisional cast-on.
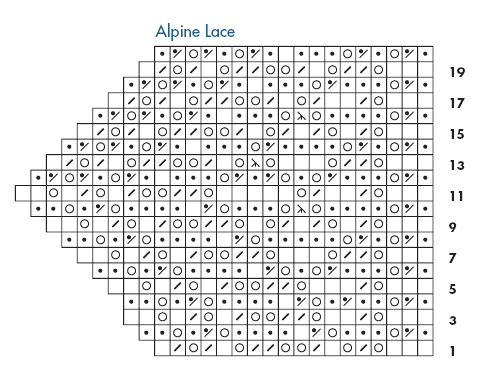
In alpine lace: 18 sts and 20 rows (1 patt rep) = 5" (12.5 cm) wide at deepest scallop point and 2¾" (7 cm) high.
In clover and diamond patt: 28 sts (2 patt reps) and 36 rnds = 5¾" (14.5 cm) wide and 4½" (11.5 cm) high.
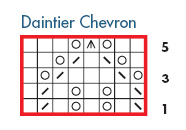
In daintier chevron pattern: 16 sts (2 patt reps) and 20 rnds (4 patt reps) = 3¼" (8.5 cm) wide and 3¼" (8.5 cm) high.
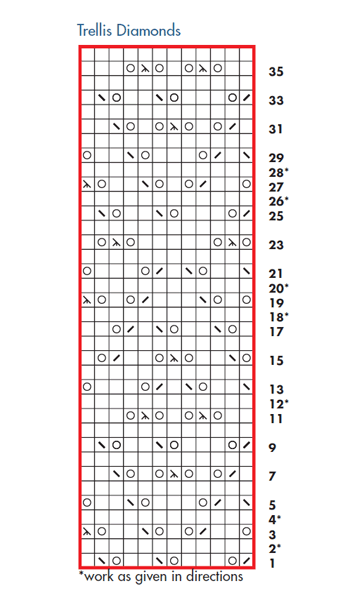
In trellis diamonds pattern: 24 sts (2 patt reps) and 36 rnds = 5¼" (13.5 cm) wide and 4½" (11.5 cm) high.
All gauges given are after blocking.
Lacy Holes Pattern: (even number of sts)
Rnds 1–3: Knit.
Rnd 4: *K2tog, yo; rep from *.
Rnd 5: Knit.
Rnd 6: Rep Rnd 4.
Rnds 7–9: Knit.
Sloped Bind Off: On the row before binding off, do not work the last st of the row. Turn work—1 unworked st on right needle. To bind off, sl first st on left needle to right needle pwise, and pass the unworked st over it to BO 1 st. Cont the rest of the bind off in the usual manner.
Picot Crochet Edging:
Rnd 1: Work 1 sc in each st around.
Rnd 2: Work *1 sc, ch 3, sl st in first st of ch-3, skip 1 st, 1 sc; rep from * to end.
Alpine lace lower border: With waste yarn and crochet hook, ch 20 (see Glossary, page 148, for crochet instructions). With working yarn, cir needle, leaving a tail about 20" (51 cm) long for grafting, and beg with second st from end of chain, pick up and knit 1 st in back loop of each of next 18 chain sts—18 sts. Rep Rows 1–20 of Alpine Lace chart (see page 93) a total of 20 times—18 sts rem; 400 rows alpine lace border; 20 scallops completed; piece should measure about 55" (139.5 cm) long. Do not BO or cut working yarn. Carefully “unzip” waste yarn crochet chain from CO edge, and transfer the 18 live sts from provisional CO to separate needle, being careful to orient the sts on the needle in the usual manner. Hold needles parallel to each other with wrong sides of fabric touching, and with CO tail threaded on a tapestry needle, use the Kitchener st (see Glossary, page 151) to graft the sts tog. Pick-up rnd: Hold alpine lace border with scallops hanging down. With working yarn and RS facing, pick up and knit 238 sts along straight selvedge as foll: *[1 st in each of next 2 sts, skip 1 st, 1 st in next st, skip 1 st] 24 times, [1 st in next st, skip 1 st] 5 times,* [1 st in each of next 2 sts, skip 1 st, 1 st in next st, skip 1 st] 28 times rep from * to * once more—238 sts picked up along 400 selvedge rows. Place marker (pm) and join for working in the rnd. Knit 1 rnd even.
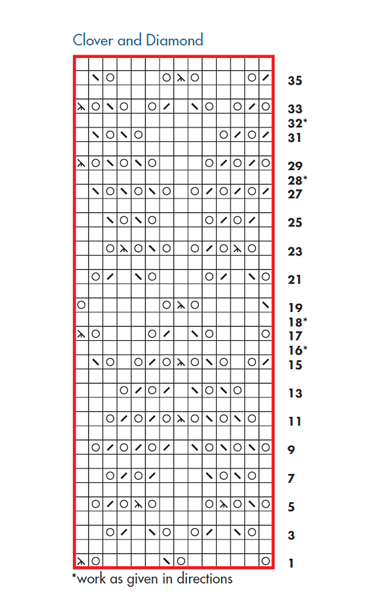
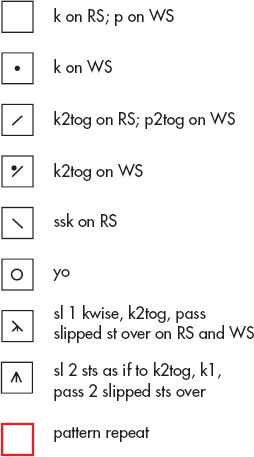
Clover and diamonds section: Change to Clover and Diamonds chart, working rnds marked with an asterisk (*) as foll in order to keep patt properly aligned:
Rnd 16: Knit to end of rnd, remove m, slip the next st to right needle pwise, replace m to indicate new beg of rnd—end-of-rnd marker moved 1 st to the left; slipped st becomes last st of rnd.
Rnd 18: Knit to 1 st before end of rnd, sl 1 pwise, remove m, return slipped st to left needle, replace m—end-of-rnd marker moved 1 st to the right; slipped st becomes first st of rnd.
Rnd 28: Work as for Rnd 16—end-of-rnd marker moved 1 st to the left.
Rnd 32: Work as for Rnd 16—end-of-rnd marker moved 1 st to the left.
Cont in patt until Rnd 36 of chart has been completed—piece should measure about 9½" (24 cm) from deepest scallop point.
Lacy holes and Dec rnd 1: Work Rnds 1 and 2 of lacy holes patt (see Stitch Guide). On Rnd 3 of lacy holes patt, dec 38 sts as foll: *[K4, k2tog] 5 times, [k5, k2tog] 2 times; rep from * 4 more times, [k4, k2tog] 3 times—200 sts rem. Work Rnds 4–9 of lacy holes patt.
Daintier chevron section: Change to Daintier Chevron chart and rep Rnds 1–5 four times total—piece should measure about 13½" (34.5 cm) from deepest scallop point.
Lacy holes and Dec rnd 2: Work Rnds 1 and 2 of lacy holes patt. On Rnd 3 of lacy holes patt, dec 56 sts as foll: *[K1, k2tog] 3 times, [k2, k2tog] 4 times; rep from * 7 more times—144 sts rem. Work Rnds 4–9 of lacy holes patt.

Trellis diamonds section: Change to Trellis Diamonds chart, working rnds marked with an asterisk as foll in order to keep patt properly aligned:
Rnd 2: Knit to end of rnd, remove m, slip the next st to right needle pwise, replace m to indicate new beg of rnd—end-of-rnd marker moved 1 st to the left.
Rnd 4: Knit to 1 st before end of rnd, sl 1 pwise, remove m, return slipped st to left needle, replace m—end-of-rnd marker moved 1 st to the right.
Rnd 12: Work as for Rnd 4—end-of-rnd marker moved 1 st to the right.
Rnd 18: Work as for Rnd 2—end-of-rnd marker moved 1 st to the left.
Rnd 20: Work as for Rnd 4—end-of-rnd marker moved 1 st to the right.
Rnd 26: Work as for Rnd 2—end-of-rnd marker moved 1 st to the left.
Rnd 28: Work as for Rnd 4—end-of-rnd marker moved 1 st to the right.
Cont in patt until Rnd 36 of chart has been completed—piece should measure about 19¼" (49 cm) from deepest scallop point.
Lacy holes and Dec rnd 3: Work Rnds 1 and 2 of lacy holes patt. On Rnd 3 of lacy holes patt, dec 24 sts as foll: *[K4, k2tog] 24 times—120 sts rem. Work Rnds 4–9 of lacy holes patt.
Daintier chevron section: Change to Daintier Chevron chart and rep Rnds 1–5 twice—piece should measure about 22" (56 cm) from deepest scallop point.
Shape front neck: (Rnd 1 of Daintier Chevron patt) Work 15 sts in patt, BO next 30 sts, work to last st in patt—90 sts rem; 1 unworked st at end of row. Working back and forth in rows (odd-numbered chart rows are RS; even-numbered rows are WS), and using the sloped method (see Stitch Guide) BO 15 sts at beg of next 2 rows (Rows 2 and 3 of patt)—60 sts rem. BO rem sts—piece should measure about 22½" (57 cm) from deepest scallop point.
Block to measurements.
Neck: With crochet hook and RS facing, work Rnds 1 and 2 of picot crochet edging (see Stitch Guide) around neck opening. Weave in loose ends.
