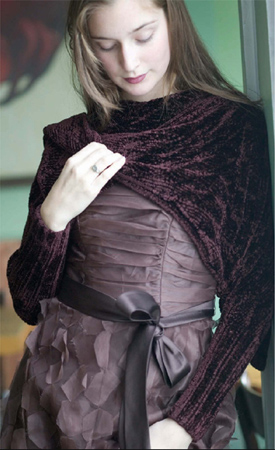
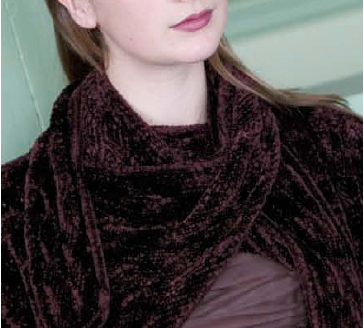
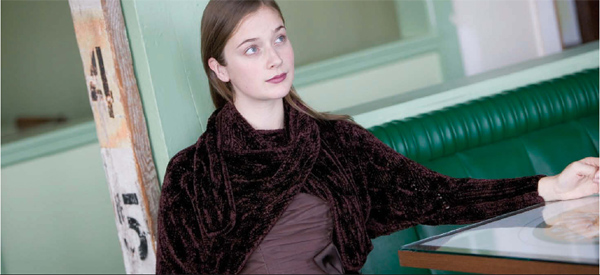
Low-cut evening gowns of the late-nineteenth century were lovely in the opera box, but impractical on chilly nights. Some women kept warm with shawls, but true ladies of fashion preferred short jackets or capes, frequently stitched from cut velvet. Annie Modesitt has adapted the lines of an 1890s evening jacket for her dramatic wrap. To mimic the fabric of the original, she’s used a rayon/wool chenille yarn in a knit/purl texture pattern, then felted it to provide the subtle shimmer of antique velvet. Each front piece extends into a long scarf that can wrap around the neck like a muffler, or tie together in the front for a ballet-style closure. For added authenticity, Annie gives the sleeves the generous proportions of the leg-of-mutton style popular at the turn of the twentieth century.
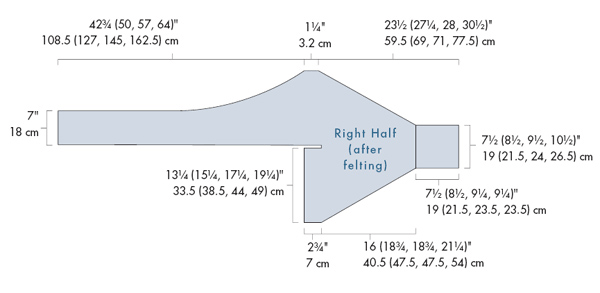
26¼ (30, 30¾, 33¼)" (66.5 [76, 78, 84.5] cm) from center back to end of sleeve, and 13¼ (15¼, 17¼, 19¼)" (33.5 [38.5, 44, 49] cm) long from base of neck to lower edge, after felting. Wrap shown measures 30" (76 cm) from center back to end of sleeve.
About 854 (1037, 1220, 1464) yd (781 [948, 1116, 1339] m) of chunky-weight (Bulky #5) yarn.
We used: Muench Touch Me (72% rayon microfiber, 28% wool; 61 yd [55 m]/50 g): #3628 brown, 14 (17, 20, 24) balls.
Body—Size 7 (4.5 mm): 24" (60-cm) circular (cir). Edging—Size 6 (4 mm): straight. Adjust needle size if necessary to obtain the correct gauge.
Stitch holders; markers (m); tapestry needle.
Before felting: 15 sts and 16 rows = 4" (10 cm) in charted patt on larger needles; after felting: 16 sts and 18 rows = 4" (10 cm) in charted patt on larger needles.
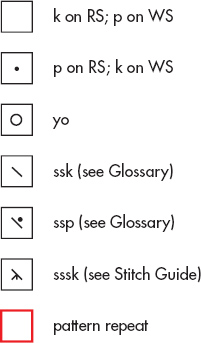
Sl 2, k1, p2sso: Slip 2 sts as if to k2tog, k1, pass 2 slipped sts over—2 sts dec’d.
Sssk: Slip 3 sts individually as if to knit, return slipped sts to left needle and knit them together through their back loops—2 sts dec’d.
Double Knit Slipped Stitch Edge (DKSSE): (worked over 3 sts at each side)
All RS Rows: Work first and last 3 sts of row as foll: K1, sl 1 purlwise (pwise) with yarn in front (wyf), k1.
All WS Rows: Work first and last 3 sts of row as foll: Sl 1 pwise wyf, k1, sl 1 pwise wyf.
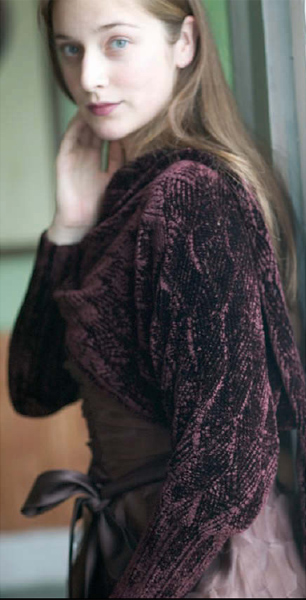
Right sleeve: With smaller needles, CO 30 (34, 38, 42) sts. Next row: (RS) K2, *p2, k2; rep from * to end. Cont in rib as established until piece measures 8 (9, 10, 10)" (20.5 [23, 25.5, 25.5] cm from beg, ending with a WS row; the cuff will shrink to about 7½ (8½, 9¼, 9¼)" (19 [21.5, 23.5, 23.5] cm) long after felting. Change to larger needles. Next row: (RS) K2, *p2, M1 (see Glossary, page 152), k1, M1, k1; rep from * to last 4 sts, p2, k2—42 (48, 54, 60) sts. Next row: (WS) K1f&b (see Glossary, page 152) in each of first 0 (1, 2, 3) st(s), purl to last 0 (1, 2, 3) st(s), k1f&b in each rem st—42 (50, 58, 66) sts. Next row: (RS) K1 (selvedge st), place marker (pm), work Row 1 of Velvet Shrug chart (see page 124) across center 40 (48, 56, 64) sts, pm, k1 (selvedge st). Shape sleeve: Rep Rows 1–24 only for sleeve, slipping markers every row, and at the same time, beg with the next RS row, inc 1 st at beg of the next 64 (72, 80, 88) rows, working inc’d sts in St st until there are enough sts to reposition markers and work new sts in patt (see Notes), then work 1 WS row even to end with Row 18 (2, 10, 18) of chart—106 (122, 138, 154) sts; 104 (120, 136, 152) patt sts between markers; 1 selvedge st at each side after repositioning markers. Work even for 6 (10, 2, 6) more rows to end with Row 24 (12, 12, 24) of chart—72 (84, 84, 96) patt rows completed; piece should measure about 26 (30, 31, 34)" (66 [76, 78.5, 86.5] cm) from beg, and will shrink to about 23½ (27¼, 28, 30½)" (59.5 [69, 71, 77.5] cm) long after felting.
Right back: (RS) Cont in patt (Row 1 [13, 13, 1]) of chart), work across 53 (61, 69, 77) sts and place these sts onto holder to work later for right front tie—held sts represent 1 selvedge st and 6½ (7½, 8½, 9½) patt reps. Work rem 53 (61, 69, 77) sts for back as foll: K4 (uses up the sts of the ½ patt rep), pm, work in patt as established to last st, k1. Next row: (WS) K1, work in patt to marker, k4. Cont as established for 10 more rows, working sts inside marker in patt and sts outside marker in garter st, ending with Row 12 (24, 24, 12) of chart—12 rows completed for back; piece should measure about 3" (7.5 cm) from dividing row for all sizes, which will shrink to about 2¾" (7 cm) after felting. Place all sts on a holder.
Right front tie: Return 53 (61, 69, 77) held front sts onto needle with WS facing. Join yarn ready to work a WS row, and work Row 2 (14, 14, 2) of chart. Next row: (RS) [K1, p1, k1] all in first st (2 sts inc’d in 1 st), yo, slip m, work in established patt to last 4 sts, pm, p1, k3—56 (64, 72, 80) sts; 4 sts outside markers at each side. Next row: (WS) Work WS row of double knit slipped st edge (DKSSE; see Stitch Guide) over first 3 sts, k1, slip m, work in patt over center 48 (56, 64, 72) sts, slip m, k1, work WS row of DKSSE over last 3 sts. Next row: (RS) Work RS row of DKSSE over first 3 sts, p1, slip m, work in patt to next m, slip m, p1, work RS row of DKSSE over last 3 sts. Maintaining sts outside markers as established, work 1 WS row even, ending with Row 6 (18, 18, 6) of chart—piece should measure 1½" (3.8 cm) from divide, before felting. Note: Chart patt continues while shaping the front tie; please read the next section all the way through before proceeding. Work chart Row 7 (19, 19, 7) through Row 24 once, and at the same time, beg with Row 7 (19, 19, 7) of chart, dec 1 st inside first marker (beg of RS rows) every 4 rows—5 (2, 2, 5) sts dec’d; 51 (62, 70, 75) sts rem. Cont in patt, rep Rows 1–24 of chart, and dec 1 st inside first marker every 4 rows 11 (22, 30, 35) more times, ending with Row 19 (15, 23, 19) of chart—40 sts rem for all sizes; 32 marked center sts in patt; 4 sts at each side for edging. Work even until Row 24 has been completed—piece should measure about 16½ (25½, 31½, 40)" (42 [65, 80, 101.5] cm) from beg of tie decreases. Next row: (RS) Maintaining 4 edge sts at each side as established, work Row 25 four times across marked center sts—36 sts rem; 28 marked center sts in patt; 4 edge sts at each side; each 8-st rep has been dec’d to a 7-st rep. Cont edge sts as established, work Row 26 of chart 4 times across marked center sts, then work Row 27 four times across marked center sts—32 sts rem; 24 marked center sts in patt; 4 edge sts at each side; each 7-st rep has been dec’d to a 6-st rep. Work Rows 28–32 of chart even. Rep Rows 33–48 until piece measures about 48 (56, 64, 72)’’ (122 [142, 162.5, 183] cm) from beg of front tie decreases, ending with a WS row; this will shrink to about 42¾ (50, 57, 64)" (108.5 [127, 145, 162.5] cm) after felting. Work I-cord BO across short end of tie as foll:
Row 1: (RS) K3, slip these 3 sts back onto left needle. Do not turn.
Row 2: (still RS) K2, ssk (last of 3 slipped sts tog with 1 st from top edge), slip these 3 sts back onto left needle. Do not turn.
Rep Rows 1 and 2 twenty-four more times—7 sts rem. Slip all sts onto left needle.
Row 3: (still RS) K2, sl 2, k1, p2sso (see Stitch Guide), k2—5 sts rem. Slip sts back onto left needle.
Row 4: (still RS) K1, sl 2, k1, p2sso, k1—3 sts rem. Slip sts back onto left needle.
Row 5: (still RS) Sl 2, k1, p2sso—1 st rem. Break yarn leaving an 8" (20.5 cm) tail, and draw through last st to fasten off.
Use super-soft fibers for projects that will be worn around sensitive skin.
Left sleeve: Work as for right sleeve until sleeve incs have been completed—106 (122, 138, 154) sts; 104 (120, 136, 152) patt sts between markers; 1 selvedge st at each side after repositioning markers. Work even for 6 (10, 2, 6) more rows to end with Row 24 (12, 12, 24) of chart—piece measures same as right sleeve from beg.
Left back: (RS) Cont in patt (Row 1 [13, 13, 1] of chart), work 53 (61, 69, 77) sts for back, place rem 53 (61, 69, 77) sts onto holder to work later for front. Work 53 (61, 69, 77) sts for back as foll: (WS) K4, pm, work in patt as established to last st, k1. Next row: (RS) K1, work in patt to marker, k4. Cont as established for 10 more rows, working sts inside marker in patt, and sts outside marker in garter st, ending with Row 12 (24, 24, 12) of chart—12 rows completed for back; piece should measure about 3" (7.5 cm) from dividing row for all sizes, which will shrink to about 2¾" (7 cm) after felting. Place all sts on a holder.
Left front tie: Return 53 (61, 69, 77) held front sts onto needle with RS facing. Join yarn ready to work a RS row. Next row: (RS; Row 1 [13, 13, 1] of chart) K3, p1, pm, work in established patt to last st, slip m, yo, [k1, p1, k1] all in last st—56 (64, 72, 80) sts; 4 sts outside markers at each side. Next row: (WS) Work WS row of DKSSE over first 3 sts, k1, slip m, work in patt over center 48 (56, 64, 72) sts, slip m, k1, work WS row of DKSSE over last 3 sts. Next row: (RS) Work RS row of DKSSE over first 3 sts, p1, slip m, work in patt to next m, slip m, p1, work RS row of DKSSE over last 3 sts. Maintaining sts outside markers as established, work 3 rows even, ending with Row 6 (18, 18, 6) of chart; piece should measure 1½" (3.8 cm) from divide (before felting). Work chart Row 7 (19, 19, 7) through Row 24 once as for right front tie, and at the same time, beg with Row 7 (19, 19, 7) of chart, dec 1 st inside second marker (end of RS rows) every 4 rows—5 (2, 2, 5) sts dec’d; 51 (62, 70, 75) sts rem. Cont in patt, rep Rows 1–24 of chart, and dec 1 st inside second marker every 4 rows 11 (22, 30, 35) more times, ending with Row 19 (15, 23, 19) of chart—40 sts rem for all sizes; 32 marked center sts in patt; 4 sts at each side for edging. Work even until Row 24 has been completed—piece should measure about 16½ (25½, 31½, 40)" (42 [65, 80, 101.5] cm) from beg of tie decreases. Cont as for right front tie, working Rows 25–32 once—32 sts rem; 24 marked center sts in patt; 4 edge sts at each side. Cont even in patt, rep Rows 33–48 as for right front tie, until piece measures about 48 (56, 64, 72)’’ (122 [142, 162.5, 183] cm) from beg of decreases, ending with a WS row. Work I-cord BO across short end of tie as for right front tie.

Place each set of held back sts on a separate needle. With a third needle and using the three-needle method (see Glossary, page 145), BO sts tog. Weave in loose ends.
Felting: Place garment in a pillow case and wash in a washing machine on a 10- to 12-minute regular cycle with no soap. Place the pillowcase with the wet garment inside in the dryer and tumble dry for about 30 minutes. Remove garment from pillowcase and check the measurements. If piece is about the correct size, lay garment flat, stretch to finished dimensions, and allow to air dry. If it is still a bit too big, return garment to dryer and allow to tumble dry (outside of pillowcase) until completely dry, checking measurements frequently.
