The last thing most people want to do after a hard day’s work is to come home and make dinner. But somebody has to do it and sometimes it has to be Dad. Whereas cooking for family or friends on the weekend is usually more a pleasure than a chore—you have the luxury of taking your time and stretching your culinary limbs by experimenting with a new dish—preparing dinner on a weeknight can be tricky. Let’s say you don’t even get started until 6:00 P.M. Factoring in your family’s various schedules, the preparation time, cooking time, and cleanup, you could be drying the last dish at 9:30 and falling into bed five minutes later. But not if you plan, shop, and map out dinner in advance.
Plan your menus in advance. Dinner is probably the best meal to try to map out on a weekly basis. Then you can do your main course and staple shopping ahead of time, and you’re free to do any preliminary preparations (marinating, defrosting, etc.) as required for each meal. All you’ll need to pick up on your way home from work are some fresh items—like fish or vegetables.
To choose your main courses, think about your family’s favorites and the ways you might alternate meat, chicken, fish, pasta, and soups in your menus. For instance, break up a series of heavy meals with a light pasta dish and a salad, or some fish. And though it seems impossible to determine whether red meat is the key to good health or the bane of our diets, it’s probably best to serve it only a couple of nights a week at most. Once you’ve decided on a main course, the rest of the meal should fall neatly into place. Use the recipe serving suggestions featured in this chapter to help you fill out your menus with vegetables, a starch, and a salad.
Shop ahead. Nothing slows down a cook more than not having the necessary ingredients on hand. While you’re planning your menus, create your shopping list. Also take a moment to check the cupboard to see what staples may need replenishing (see “The Cupboard” on page 23). A well-stocked pantry will not only make your cooking easier, but will also allow you to throw together a last-minute meal when necessary.
Prepare part of the meal beforehand. Starting from scratch when you walk in the door can make cooking dinner seem an insurmountable task, even for the most enthusiastic cook. Taking just ten minutes the night before to ready the ingredients is time well spent. Another reliable time-saver is to wash and dry your salad greens in the morning, or even the night before, and pack them in well-sealed plastic bags, along with some paper towels to absorb moisture.
Prepare ahead and freeze. As you get used to shouldering the responsibility of making dinner, you may find it easier to give up a little time on a free night or the weekend to make a large batch of meatballs or a couple of pans of lasagna for freezing. It’s nice to know that sometimes preparing dinner is merely a matter of remembering to defrost the entrée.

Chicken is an ever-fashionable main course that lends itself to an infinite variety of dishes. You can buy it whole or in parts, with or without bones. No matter the form, chicken will give you lots of protein with less fat and cholesterol and fewer calories than red meat. You can reduce the calories and fat even further by removing the skin before cooking or eating.
Broilers/fryers weigh 2½ to 3½ pounds and are suitable for roasting, broiling, or frying, or for stew and soup. Most chicken parts are cut from this size chicken.
Roasters are larger, more mature birds, weighing between 5 and 7 pounds. These should be used exclusively for roasting, as they are too large for frying or broiling. They can also be stuffed if you desire. You’ll find that roaster parts are generally available at your market; the breasts make for especially delicious eating.
Stewing chickens (aka hens) are 1 year or older and weigh between 4 and 7 pounds. They are tougher than younger chickens but are full of flavor and make excellent soup or stew chickens.
Chicken parts can come in very handy if your kids have strong preferences for white or dark meat. Additionally, since white and dark meats have different cooking times, it’s wise to cook one or the other. Boneless breasts make for quick and easy entrées, and are perfect for stir-fries. Your butcher can debone them.
The basic rule of thumb for chicken and turkey is ¾ pound of meat (with bone) per person. But it’s just as easy to roast two chickens as one, or to add a couple of extra chicken breasts to the pan. You’ll have great leftovers for the next day’s lunch or dinner. Count on 4–6 ounces per person of boneless chicken.
When purchasing poultry, always check the expiration date on the packaging. The chicken should be cooked or properly frozen before that date. If you are not using the chicken right away, remove it from the packaging, rinse under cold water, and pat dry. Then wrap the chicken loosely in foil or plastic wrap and store in the refrigerator for up to 3 days.
To freeze chicken, wrap it in a freezer bag, seal well, label it, and store in the freezer for up to 3 months. Defrost all poultry in the refrigerator, not on the kitchen counter where risk of contamination from the salmonella bacteria is greater. Chicken parts will defrost overnight, a whole chicken in 24 hours. Chicken should be cooked soon after it is defrosted and should not be refrozen.
Roasting is the simplest way to cook a whole chicken. First remove the giblets (they’re usually wrapped in paper inside the cavity) and rinse the chicken well, inside and out, with cold water. Pat it dry and pull off any globs of fat around the cavity. Next, squeeze half an orange or lemon over the skin and rub it inside the cavity. Sprinkle the bird with salt, pepper, and a dash of paprika. Lay a few dots of butter on the back and legs and place the chicken in a roasting pan just large enough to hold it (use a rack if you’ve got one). Roast the chicken on the center rack of a preheated 350°F oven. Cook for 20 minutes per pound (about 1 hour 10 minutes for an average-size broiler/fryer), or until the juices run clear when a thigh joint is pricked with a knife.
Broiling requires more attention than roasting. The chicken should be cut in half or in parts, rubbed with vegetable oil, seasoned with salt and pepper, and arranged in the broiler pan skin side down. Place the broiler pan 6 inches from the heat and broil for 20 minutes. Turn and broil for 20 minutes more. During the last 10 minutes brush the skin with a bit of butter or lime juice to keep it from drying out and turn if it starts to char. Marinating the chicken for several hours before broiling also keeps the meat from drying out.
Frying is the most difficult way to cook chicken. It requires careful monitoring of the temperature of the oil, otherwise the chicken turns into a soggy, greasy mess. There are as many authentic recipes for fried chicken as there are church suppers. The basic procedure calls for dredging (lightly coating) the chicken parts in flour, cornmeal, or seasoned bread crumbs, then frying a few pieces at a time in about ½ inch of hot oil. Have a seasoned cook walk you through it the first time.
Sautéing boneless chicken breasts is quick and easy. Simply flatten the breasts a bit (see box, page 80) and dredge (lightly coat) them in flour or bread crumbs, if desired. Heat the sauté pan over medium heat, add a few tablespoons of oil, and sauté for 3–4 minutes until the underside is a nice medium brown. Turn and sauté for 3 minutes more.
You can shove a chicken in the oven and forget about it for an hour or so and it will come out cooked. But with just a few simple touches, you can truly “roast” a chicken to golden-brown perfection.
Ingredients (serves four)
1 4- to 5-pound chicken
1 lemon
1 small onion, peeled and cut in half
4 tablespoons (½ stick) butter or margarine
1 teaspoon salt
Freshly ground black pepper
1 sprig fresh rosemary or ½ teaspoon dried
Additional salt and pepper
Equipment
11 x 17-inch roasting pan
Roasting rack
4-inch metal skewer
Carving fork
Basting brush
1. Preheat the oven to 400°F.
2. Rinse the chicken inside and out under cold water, and pat dry.
3. Cut the lemon in half. Squeeze one half over the outside of the chicken. Rub the other half inside the cavity of the chicken, squeezing the juice against the bones. Leave that lemon half in the cavity along with the onion halves, 2 tablespoons of the butter, the salt, pepper, and rosemary. Close the cavity by folding the flaps of skin over the opening. Secure them further by threading a 4-inch metal skewer through the skin.
4. Rub the breast side of the chicken with 1 tablespoon butter and place it on the roasting rack in the roasting pan, breast side up. Place the pan on the center rack of your oven.
5. After 30 minutes, turn the bird over to the other side with a carving fork. Rub on the remaining butter and continue roasting for 30 minutes more.
6. Turn the chicken breast side up and brush it with some of the pan juices. Roast it for 10–15 minutes more, until the leg and thigh move freely when jiggled or the juices run clear when the thigh joint is pricked with a knife.
Note
For a smaller (3–4 pound) chicken, roast for 25 minutes on each side and 10 minutes more breast side up.
• Serve with gravy and mashed potatoes, sweet potatoes, or rice.
• Serve steamed or boiled broccoli, glazed carrots, or sautéed zucchini.
Here is an easy way to get crispy chicken without the mess and calories of frying.
Ingredients (serves four)
6 chicken legs
6 chicken thighs
1 cup plain bread crumbs
2 tablespoons coriander
1 tablespoon dried cumin
1 teaspoon onion powder
1 teaspoon garlic powder
1 teaspoon cinnamon
Dash of cayenne pepper
2 large eggs
Equipment
Large roasting pan
Roasting rack
Pie plate
Medium bowl
Aluminum foil
1. Preheat the oven to 375°F. Rinse the chicken pieces under cold water and pat dry with paper towels.
2. Combine the bread crumbs and all the spices in a pie plate and set aside. Beat the eggs in a medium bowl and set aside.
3. Dip each piece of chicken in the egg and let the excess drip off. One by one, lay the chicken pieces in the bread crumbs. Turn each one so the entire outside skin is coated with bread crumbs. Shake gently to remove excess.
4. Line a large roasting pan with aluminum foil and set the rack in the pan. Lay the breaded chicken on the rack and bake for 35–40 minutes, until the chicken is cooked through.
Variation
For chicken breasts, prepare in exactly the same way but bake for only 30–35 minutes.
Serving Suggestions
• Serve with rice pilaf or home fries.
• Serve with steamed spinach or steamed, boiled, or sautéed green beans.
This is a simplified version of a classic Italian dish.
Ingredients (serves four)
2 whole skinless, boneless chicken breasts, split and flattened
2 large eggs
1 cup Italian-style bread crumbs
2 tablespoons olive oil
¼ cup white wine
¼ cup canned chicken broth
Juice of 1 lemon
2 teaspoons capers (optional)
Salt and pepper
Equipment
Large frying pan
Small bowl
Pie plate
Dinner plate
Serving platter
Spatula
1. Rinse the chicken breasts under cold water and pat them dry with paper towels. Beat the eggs lightly in a small bowl.
2. Put the bread crumbs in a pie plate.
3. Dip each chicken breast in the egg and let the excess drip off.
4. Dredge both sides of the breast in the bread crumbs and shake gently to remove the excess. Place the breasts on a plate.
5. Put a large frying pan on high heat and let it get hot, about 30 seconds. Add the oil and chicken breasts. Sauté the chicken for 3–4 minutes, until the bottom is golden brown. Turn and cook for 3 minutes more. Reduce the heat to medium and sauté for 2–3 minutes more, until the chicken is cooked through. Transfer the chicken to a serving platter.
6. Add the wine to the pan and let it simmer and reduce, using a spatula to scrape up any bits of chicken stuck to the pan. Add the broth, lemon juice, and capers, if using. Cook and stir for another 45 seconds, until the liquid thickens slightly. Season with salt and pepper. Pour the sauce over the chicken breasts and serve immediately.
Variation
For Chicken Parmesan, preheat the oven to 350°F. Flatten the chicken breasts only slightly and follow Steps 1–5. When the breasts are brown on both sides, transfer them to a baking sheet. Spoon on a bit of tomato sauce, sprinkle on about a tablespoon of Parmesan, and top with a slice of mozzarella cheese. Bake until the cheese melts and the chicken is cooked, about 10 minutes. Serve over a bed of spaghetti.
Serving Suggestions
• Serve with pasta or wild rice.
• Serve boiled or steamed broccoli.
This is a simple, hearty dish that the kids will love to eat with spaghetti.
Ingredients (serves four)
1 3- to 4-pound chicken, cut into 8 pieces
3 tablespoons olive oil, plus extra for tossing with the spaghetti
1 medium onion, thinly sliced
1 green or red bell pepper, thinly sliced
2 cloves garlic, minced
½ pound sweet Italian sausage, cut into ½-inch pieces
¼ cup dry white wine
1 28-ounce can whole tomatoes, drained and chopped
3 tablespoons tomato paste
1 teaspoon dried basil
1 chicken bouillon cube
1 teaspoon salt
Freshly ground black pepper
¾ pound spaghetti
Equipment
Large frying pan
Large pasta pot
Medium bowl
Large plate
Large platter
Slotted spoon
Spatula
Tongs
1. Rinse the chicken pieces under cold water and pat them dry with paper towels.
2. Place a large frying pan on medium-high heat and let it get hot, about 45 seconds. Add the oil, onion, and bell pepper, and sauté, stirring often, until soft, about 5 minutes. Add the garlic and sauté for 1 minute more. Transfer the vegetables to a medium bowl.
3. Raise the heat to high and add the sausage pieces to the pan. Sauté, stirring often, until the meat is cooked through, about 4 minutes. Use a slotted spoon to transfer the sausage to the bowl with the vegetables and discard the fat in the pan.
4. Return the pan to the burner and when it is very hot, after about 15 seconds, add the chicken pieces and cook until they are brown on all sides, using tongs to turn them. This should take about 5 minutes. Transfer the chicken to a large plate.
5. Add the wine to the pan and use a spatula to scrape up any bits of chicken stuck to the bottom.
6. Return the chicken, sausage, and vegetables to the pan. Add the tomatoes, tomato paste, basil, bouillon cube, salt and pepper. Bring the sauce to a boil, then reduce the heat to low and simmer, partially covered, for 30 minutes, until the chicken is thoroughly cooked. Stir occasionally.
7. While the chicken is simmering, boil the water for the spaghetti. Cook the spaghetti until al dente, then drain it and toss lightly with olive oil.
8. To serve, arrange the spaghetti on a large platter and use a slotted spoon to place the chicken and sausage over the pasta. Pour on enough sauce to flavor the spaghetti well.
Serving Suggestion
Serve with garlic bread and a tossed green salad or a Caesar salad.
Thanks to its high fat and calorie contents, red meat has borne its share of criticism during the past few years. But that doesn’t mean you should give up meat altogether. Instead, try to get in the habit of choosing the leanest cuts, such as eye of round, round tip, top round, tenderloin, and sirloin. Trim excess fat, and prepare small portions. And don’t try to fight the fact that hamburgers are a major feature in most kids’ childhoods.

A 1,000 pound steer = 475 pounds of retail cuts, including 75 lbs. of steaks
Hitching up with a good butcher is the first step toward understanding (and obtaining) good cuts of meat. The second step is understanding that beef is cut from two types of muscle. Meat from muscles that are used infrequently, such as the loin and rib, will be tender. Cuts from more active muscles, such as the leg and shoulder, will be tougher. Tender cuts should be cooked quickly: broiled, roasted, or pan-fried; tougher cuts should be cooked slowly usually stewed or braised.

Whole fillet (or tenderloin) is the most tender and expensive cut of beef. It should be roasted whole in a very hot oven and can be sliced thin for an appetizer or slightly thicker for a main course.

Filet mignons are 1- to 2-inch slices cut from the center part of the whole fillet and are best pan-fried in butter and oil. They can then be topped with herbs or different sauces.

Sirloin steaks are excellent and extremely flavorful cuts taken from the rump end of the loin. They should be broiled or panfried (as long as they are no thicker than 2 inches) and served simply.

Porterhouse steaks are taken from the shoulder end of the loin. They are usually cut thicker than sirloin steaks and are a little more tender as well. These should also be broiled and served simply.

Chuck steaks come from the shoulder and are tougher and fattier than the loin cuts. They can be broiled, but are more commonly used for stews and roasts or ground for hamburgers.

Brisket is taken from under the shoulder. Look for the “first cut” of brisket, sometimes called the “plate,” which is leaner and more flavorful than the second cut. Brisket is ideal for pot roast as it needs long, slow cooking.

Flank steaks are thin, flavorful cuts taken from under the loin. These should be broiled and can be served with any number of sauces, or can be rolled and stuffed with flavorful fillings. Leftover flank steak is also great in sandwiches and salads.

Chopped meat is usually made from chuck, round, or sirloin. Chuck and round make for somewhat juicier—but fattier and more caloric—burgers. Leaner burgers are also very tasty. Hamburgers should be broiled, grilled, or panfried.

Roasts are larger cuts of meat, usually weighing between 3 and 6 pounds. The most succulent are the rib roasts (with bone in), which will yield hefty portions. Other roasts come from the round or rump, which are both in the general vicinity of the tail. The top round and eye round are the most tender of these cuts. Chuck, bottom round, and rump roasts are flavorful but not as tender.

Ribs are fatty and fun and will keep the kids busy at the table. They are easy to cook and can be prepared in a variety of ways.
For boneless steaks, figure on ¼ pound per person. For bone-in cuts and roasts, figure closer to ½ pound per person. For chopped meat, figure on ¼ pound per burger. For ribs, figure 1 pound per person. Leftover steak or roast beef will never go to waste, so don’t hesitate to buy a little more than you need.
A roast will keep in the refrigerator for about 4 or 5 days. Whether storing in the refrigerator or the freezer, always rewrap beef in plastic and foil. Shape hamburger into patties before freezing and wrap individually so you can take out only what you need. Defrost meat in the refrigerator overnight, or in the microwave, removing the foil but leaving the meat in its plastic wrapping. Large roasts can take 2 to 3 days to defrost in the refrigerator. Meat should be cooked soon after it is defrosted and should not be refrozen.
An all-purpose thermometer can take much of the anxiety out of cooking a roast. Avoid the old-fashioned meat thermometer that is placed in the meat before cooking, and get a good-quality instant-read thermometer to use at the end of cooking. Shortly before you think the meat will be done, open the oven and maneuver your meat or poultry so you have access to the thickest part of the roast or the thigh of a chicken or turkey. Insert the point to the center of the roast or thigh, making sure the tip is not touching a bone. Take a reading when the needle stops. Keep in mind that roasts continue cooking for about 10–15 minutes after they’re removed from the oven.

Different roasts have different cooking times depending on tenderness. The time guidelines below are minutes per pound for medium rare. Remember to preheat the oven and let the meat come to room temperature before cooking.

Broiling is the most common way of cooking steaks, chops, and burgers. Thin cuts (1–1½ inches thick) should be cooked 3 inches from the heat. For thicker cuts (1½–2 inches thick), lower the meat to 4–5 inches from the heat, otherwise the outside will burn before the inside is done. Remember, this distance is not how far the rack is from the heat, but how far the actual surface of the meat is from the heat.
Stewing is the cooking of small pieces of meat in a covered pot in enough liquid to cover them. Vegetables and herbs are cooked with the meat to enhance the flavor. Stew meat on top of the stove over low heat or in a 325°F oven for several hours.
Braising is the process of cooking meat slowly in a small amount of liquid, either on top of the stove or in the oven. Cook over low heat on the stove or in a 325°F oven. Cuts such as chuck roast, brisket, and short ribs can all be braised. It’s best to brown the meat first before adding the hot liquid. After adding the liquid and spices, cover the pot tightly. Onions, potatoes, carrots, and celery can also be added to the pot.
Roasting is the proper method for cooking larger (over 2 pounds) pieces of meat. The meat should be arranged, fat side up, on a rack in a roasting pan just large enough to hold it. Using a rack keeps the bottom of the roast from steaming. If there is no fat on the roast, brush it lightly with oil or spread on a thin layer of mustard. Let the meat come to room temperature before putting it in the oven or it will take longer to cook.
Panfrying is another method for cooking thinly cut steaks and burgers. They should be cooked in a small amount of margarine or oil in a preheated pan over medium-high heat. Fry until the bottom is brown, then turn the meat. Choose a pan that holds the meat comfortably. If the pan is too large, the drippings will start smoking before the meat is done. If the pan is too crowded, the meat will steam instead of fry.

Onions are the most frequently listed ingredient in recipes. They are common to all cuisines and are used in both rustic and elegant dishes. For variation, instead of the common yellow onion, try the sweet Vidalia, or substitute another member of the onion family such as shallots, scallions, or leeks. Use red onion for salads or in sandwiches.
Peeling
1. Trim ½ inch from both the stem and root ends of the onion.
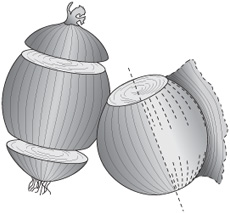
2. Cut through the skin lengthwise and peel it off, taking with it as little of the onion as possible.
Slicing
Using a chef’s knife, cut crosswise in ¼-inch-thick slices.

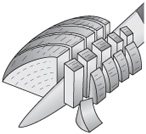
Chopping & Dicing
1. Using a chef’s knife, cut the peeled onion in half lengthwise.

2. Place the flat side down and cut the onion crosswise in ¼-inch-thick slices.

3. Hold the onion firmly together and give a quarter turn; cut in ¼-inch pieces. (It will look like cross-hatching.) For even smaller pieces, continue to chop through.
The many ingredients here all get thrown into one big bowl and are mixed by hand—gooey but efficient.
Ingredients (serves six)
½ cup milk
3 slices whole wheat bread, crusts removed
1 onion, finely chopped
1 red or green bell pepper, minced
½ cup (about 4) scallions, finely chopped
½ pound ground beef
½ pound ground veal
½ pound ground pork
2 large eggs, beaten
½ cup ketchup
½ cup chopped parsley
½ teaspoon nutmeg
¼ cup grated Parmesan
Equipment
Medium bowl
Large bowl
4 x 10-inch loaf pan
Large spatula
1. Preheat the oven to 350°F.
2. Measure the milk into a medium bowl, then add the bread slices and let them soak until you need them.
3. In a large bowl, mix the onion, bell pepper, scallion, the meats, bread and milk, eggs, ketchup, parsley, nutmeg, and cheese, until they are completely combined. You’ll need to use your hands.
4. Transfer the mixture to a 4 x 10-inch loaf pan and pat it down gently.
5. Bake for 50 minutes on the center rack of your oven until the top is a deep brown and the loaf has pulled away from the sides of the pan. Let the meat loaf cool for 5 minutes before removing from the pan and slicing. Use a large spatula to ease the meat loaf out of the pan.
Time-Saver
Assemble the meat loaf a night ahead. Cover the loaf pan tightly with plastic wrap and refrigerate. Add 5 minutes to the baking time if you are putting a cold meat loaf in the oven.
Serving Suggestions
• Serve the classic Blue Plate Special: meat loaf, mashed potatoes, and green beans.
• Or try it with spaghetti tossed with a simple tomato sauce.
• For vegetable accompaniments, consider spinach, carrots, or corn.
• For sandwiches, cut a ¾-inch slice of cold meat loaf, put it between rye or pumpernickel bread, and top with lettuce and mustard, ketchup, barbecue sauce, or mayonnaise.
Still one of the classic American dinners, it’s also one of the simplest to prepare. Roast beef usually needs at least an hour and a half in the oven, so don’t plan on this as a last-minute meal.
Ingredients (serves six)
3–4 pound tied roast beef (see Note)
2 cloves garlic
Equipment
Roasting pan with rack
1. Preheat the oven to 325°F.
2. Set the roasting rack in the roasting pan.
3. Rinse the roast under very cold water and pat it dry with paper towels. Set the roast on the roasting rack.
4. Peel the garlic cloves and cut them into thin slices. Make slits in the top of the meat and insert a slice of garlic in each one.
5. Place the roast on the center rack of your oven and cook for 30 minutes per pound. Let the beef rest for 10 minutes before cutting off the strings and slicing.
Tip
Eye of the round roasts are the juiciest and most tender. Other roasts to look for are top round, bottom round, and rump roast.
Serving Suggestions
• Serve with baked or mashed potatoes.
• Serve steamed asparagus, peas, or glazed carrots.
The roasts in the supermarket should already be tied, which helps them to keep their shape when they are cooked. If not, the butcher will gladly do it for you.
You can assemble a pot roast very quickly, but it must cook for several hours. Since its flavor improves with a day in the refrigerator, you may want to cook the pot roast the night before you plan to serve it. Preparing dinner is then limited to boiling some wide noodles and heating up the meat.
Ingredients (serves six)
3-pound chuck or rump roast or brisket
½ cup unbleached, all-purpose flour
1 tablespoon vegetable oil
3 large onions, sliced
2 cloves garlic, minced
¼ cup white wine
¼ cup ketchup
1 envelope onion soup mix
2 large carrots, cut into 1-inch rounds
1 large potato, cut into eighths
Equipment
Large frying pan or Dutch oven with cover
1. Rinse the roast under very cold water and pat it dry with paper towels.
2. Sprinkle the meat with the flour, then shake off any excess.
3. Place a large frying pan on high heat and let it get very hot, about 45 seconds. Add the vegetable oil and the meat and brown the meat on both sides.
4. Add the onions and garlic to the frying pan, arranging them around the meat. Add ½ cup water and the wine and ketchup to the pan and stir to incorporate. Sprinkle the onion soup mix on top of the meat.
5. When the liquid starts boiling, cover the pan and reduce the heat to low. Simmer the roast for 2½ hours, until the meat is very tender. Periodically spoon some of the sauce over the meat. If the sauce cooks away, add more water, ½ cup at a time.
6. Add the sliced carrots and potato pieces to the pan for the last hour of cooking.
7. To serve, let the roast cool for 10 minutes, then remove it from the pan juices. Slice the meat thinly and on an angle. Serve with the vegetables and pan juices.
Serving Suggestions
• Serve over wide noodles.
• Serve a mixed green salad or corn.
Variation
If you don’t have a large enough frying pan or Dutch oven to cook the pot roast on the stove, you can also cook it in a preheated 325°F oven. After browning the meat in the frying pan (step 3), transfer it to a casserole. Add ½ cup water to the frying pan and, over low heat, scrape up any bits of meat that are stuck to the bottom. Then add the wine, ketchup, and onion soup mix and stir together. Transfer the liquid to the casserole and add the onions, garlic, carrots, and potato. Cover the casserole with foil and bake for 2½ hours, until the meat is tender.
This dish requires a lot of ingredients but not a lot of work. It not only tastes great, but looks very impressive on a platter, with the red tomato sauce complementing the green spinach stuffing. Hearty and rich, this dish will satisfy even the seemingly insatiable appetites of growing teenagers.
Ingredients (serves four)
Olive oil, for greasing the pan
1 10-ounce package frozen chopped spinach
¼ cup grated Parmesan
¼ cup bread crumbs
3 cloves garlic, minced
1 large egg
1 4-ounce jar roasted red bell peppers
1 medium flank steak (1½–2 pounds), butterflied by the butcher
2 ounces sliced prosciutto or Black Forest ham
2 cups Basic Tomato Sauce (page 182) or your favorite store-bought sauce
9 x 16-inch roasting pan
Butcher’s twine or heavy-duty uncoated all-cotton string
Small saucepan
Medium saucepan
Colander
Medium bowl
1. Preheat the oven to 350°F. Lightly grease a 9 x 16-inch roasting pan with olive oil. Cut five 8-inch pieces of butcher’s twine. Set all aside.
2. In a small saucepan, boil the spinach in 2 inches of water until cooked through. Transfer to a colander and rinse with cold water. Take a small clump of spinach and squeeze out the water. Transfer to a bowl and repeat with the rest of the spinach.
3. Add the Parmesan, bread crumbs, garlic, and egg to the spinach, and mix together.
4. Drain the roasted peppers and cut them into ½-inch strips.
5. Lay the flank steak on the work surface and open it up. Arrange a row of prosciutto or ham slices lengthwise down the center. Spread the spinach mixture in an even layer over the prosciutto or ham. Arrange the red pepper strips down the center of the spinach.
6. Roll the meat lengthwise into a long log (like a jelly roll). Slip a piece of string under the center of the meat and tie it relatively tightly in a knot. Repeat down the length of the roll, tying the remaining 4 pieces of string at equal intervals.
7. Place the rolled meat in the roasting pan and roast on the center rack of the oven for 40 minutes, until the top is browned and the meat is cooked but still pink in the center.
8. Remove the pan from the oven and let the meat sit for 5 minutes before slicing.
9. While the meat is resting, heat the tomato sauce in a medium saucepan on medium heat until hot.
10. Cut the meat into 1½-inch slices, arrange them on a platter, and spoon a stream of tomato sauce down the center of the slices. Serve with the remaining sauce on the side.
Serving Suggestions
Serve with pasta or home fries, and snow peas or green beans.
London broil is a good dish to make for a hearty last-minute dinner. It comes from a lean cut of beef, such as the top round, flank, or shoulder. It’s best cooked to medium rare because it dries out if left in the oven much longer.
Ingredients (serves four)
2-pound London broil or flank steak, ¾- to 1-inch thick
1 clove garlic, peeled and cut in half
1 tablespoon vegetable oil
Equipment
Broiler pan
Basting brush
2. Rinse the meat under very cold water and pat it dry with paper towels.
3. Rub both sides of the meat with the cut side of the garlic clove, then lightly brush each side of the meat with the oil.
4. Lay the meat on the broiler pan and broil 2 inches from the flame for 6 minutes. Turn and broil for 5 minutes more.
5. Remove the meat from the oven and let it rest for 5 minutes before slicing.
Tip
London broil is best thinly sliced across the grain and on a slight angle.
Serving Suggestions
• Serve with pasta dressed with a simple herb-and-butter sauce.
• Serve a mixed green salad and steamed or boiled green beans.
By taking advantage of the variety of Asian stir-fry sauces that are now widely available, you can whip up this meal in a flash. To make it even easier for Dad, many supermarkets sell beef that is already sliced.
Ingredients (serves four)
2 cups broccoli florets
2 tablespoons vegetable oil
1 pound sirloin or flank steak, thinly sliced into ½-inch wide strips
1 medium onion, thinly sliced
1 red bell pepper, seeded and cut into strips
¼ cup bottled Asian stir-fry sauce, such as teriyaki or ginger
Equipment
Medium saucepan with lid
Strainer
Paper towels
Large, heavy frying pan or wok
Medium bowl
1. Steam or boil the broccoli in the saucepan in ½ inch of water until it is cooked but still crunchy (about 3 minutes). Drain well and transfer to a double layer of paper towel so the florets will dry a little before stir-frying.
2. Place a large frying pan or wok on high heat and let it get very hot, about 90 seconds. Add the oil and swirl it around so it coats the bottom of the pan. Add the beef and cook, turning and stirring, until the meat loses its pinkness, about 3 minutes. Remove the beef and transfer to a medium bowl.
3. Add the sliced onion and pepper to the pan and cook, stirring continuously until the vegetables soften slightly, about 2 minutes.
4. Add the beef and broccoli to the pan, and stir to heat it through. Add the sauce and stir to lightly coat all the ingredients. Serve immediately.
Serving Suggestion
Serve with white or brown rice, Chinese noodles, or thin pasta.
Mexican food seems to appeal to kids and adults alike. You can get this fun meal ready and on the table in just 2 hours, using a combination of fresh and packaged or canned ingredients. Make all three entrées to serve twelve, or prepare a single entrée for four.
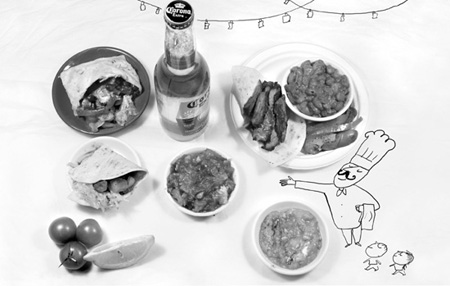
In order to get everything on the table at the same time, enlist the help of a couple of youngsters to assist you during the last 20 minutes or so, when you are sautéing all the meat, assembling the burritos and tacos, and setting the accompaniments on the table.
The Day Before
• Make the ice-cream pie and freeze
Two Hours Before
• Broil the flank steak and cut into slices
• Cut the chicken into strips
• Make the chili for the tacos
• Shred the lettuce, put in a plastic bag, and refrigerate
One Hour Before
• Chop all the plum tomatoes, place in a bowl, and refrigerate
• Chop all the red onion, place in a bowl, and refrigerate
• Slice the yellow onion and refrigerate
• Grate all the cheese, place in a bowl, and refrigerate
• Make the rice
• Remove 16 tortillas from the refrigerator and wrap 8 of them in aluminum foil
• Preheat the oven to 275°F
Just Before Serving
• Sauté the steak, seasonings, and sauce
• Sauté the chicken, seasonings, and sauce
• Put the wrapped tortillas in the preheated oven
• Assemble the burritos and tacos
• Set the steak mixture, grated cheese, and flour tortillas on the table
• Set the rice on the table
The Shopping List
• 2 whole chicken breasts
• ¾ pound boneless sirloin steak
• 1½ pounds shredded Monterey Jack or cheddar cheese
• 1½ pounds (about 10) plum tomatoes
• 1 head Romaine or iceberg lettuce
• 1 green bell pepper
• 1 red bell pepper
• 2 medium red onions
• 1 medium yellow onion
• 3 cloves garlic
• 2 28-ounce cans crushed tomatoes
• 1 12-ounce can red beans
• 1 8-ounce can corn, without sugar
• 2 chicken bouillon cubes
• 16 ounces mild or medium red taco sauce
• 1 4-ounce jar green taco sauce
• 1–3 cups converted rice
• 1 packet taco seasoning mix
• 1 packet chili seasoning mix
• 16 flour tortillas
• 8 taco shells
• vegetable oil
• 1–2 quarts high-quality vanilla ice cream
• 1–2 6-ounce cans frozen lemonade or limeade
• 1–2 store-bought graham cracker pie crusts
To make fajitas, sauté sliced flank steak with sliced onion, bell pepper, and garlic, add sauce and spices, and serve at the table with flour tortillas and grated cheese.
Ingredients (serves four)
8 flour tortillas
¾ pound boneless sirloin steak
2 tablespoons vegetable oil
1 medium yellow onion, thinly sliced
1 red bell pepper, seeded and thinly sliced
3 cloves garlic, minced
¼ cup red taco sauce
¼ cup green taco sauce
½ packet taco seasoning mix
½ pound grated Monterey Jack or cheddar cheese
Equipment
Broiler pan
Large frying pan
Serving bowl
1. Preheat the broiler. Remove the tortillas from the refrigerator and let them come to room temperature while you are preparing the fajitas.
2. Place the steak on a broiler pan. Broil about 3 inches from the heat for 5 minutes. Turn the steak over and broil 4 minutes more until nicely browned. Transfer the steak to a platter and let it cool for about 10 minutes before slicing.
3. Cut the steak into thin slices and set aside on a plate.
4. Put a large frying pan on high heat and let it get very hot, about 1 minute. Add the oil and the sliced onion and bell pepper and sauté, stirring constantly, until soft, about 5 minutes.
5. Add the steak slices and garlic and cook 1 minute more. Stir in the taco sauces and taco seasoning and cook until the mixture is heated through, about 2 minutes. Turn off the heat. Transfer the steak mixture to a serving bowl.
6. Place the tortillas on a dinner plate, and bring them to the table along with the steak mixture and grated cheese. Guests and family can assemble their own fajitas by placing a few tablespoons of steak across the middle of their tortilla, topping with grated cheese, then rolling the whole thing up.
To make this burrito, you sauté sliced chicken, add sauce and spices, then place the filling in a flour tortilla with chopped tomato, onion, shredded lettuce, and grated cheese, and wrap it all up.
Ingredients (serves four)
8 flour tortillas
2 tablespoons vegetable oil
2 whole boneless chicken breasts, cut in half and sliced into ½-inch strips
½ cup canned crushed tomatoes
1 chicken bouillon cube
½ packet taco seasoning mix
¾ pound (about 5) fresh plum tomatoes
1 medium red onion
4 leaves Romaine lettuce or ¼ head iceberg
½ pound Monterey Jack or cheddar cheese, grated
1 6-ounce jar taco sauce
Large frying pan
Medium bowl
4 small bowls
1. Preheat the oven to 275°F. Wrap the tortillas well in aluminum foil and place them in the oven.
2. Put a large frying pan on high heat and let it get very hot, about 1 minute. Add the oil and chicken strips and sauté until the chicken is opaque and just cooked through, about 5 minutes.
3. Add the crushed tomatoes, bouillon cube, and taco seasoning. Cook 2 minutes more, stirring often, until the sauce thickens. Be sure to break up the bouillon cube so it dissolves completely. Turn off the heat and cover the pan.
4. Cut the tomatoes lengthwise into quarters. Cut each quarter into ¼-inch slices and chop the slices roughly. Coarsely chop the onion.
5. Cut the lettuce into ¼-inch slices. Stack these and then cut them in half. Put the chopped tomato, shredded lettuce, chopped onion, and grated cheese in separate bowls.
6. Remove the tortillas from the oven. Open the package and place 2 tortillas on each dinner plate. Spoon 3 tablespoons of the chicken mixture down the center of each tortilla. Top the chicken with about 2 tablespoons each of grated cheese, chopped tomato and onion, and shredded lettuce.
7. Fold the bottom third of each tortilla over the filling. Fold the top third down so it overlaps slightly. Turn each burrito so the folded side faces down on the plate. Top each with taco sauce, if desired, just before serving.
A Mexican feast is never complete without tacos.
Ingredients (serves four)
1 tablespoon corn oil
1 green bell pepper, seeded and coarsely chopped
1 28-ounce can crushed tomatoes
1 packet chili seasoning mix
1 12-ounce can red beans, drained
1 8-ounce can corn, without sugar, drained
¾ pound (about 5) plum tomatoes
4 leaves Romaine lettuce or ¼ head iceberg lettuce
½ pound grated Monterey Jack or cheddar cheese
1 medium red onion
8 store-bought taco shells, warmed, if desired
Equipment
Large frying pan with cover
4 small bowls
1. Put a large frying pan on high heat and let it get hot, about 45 seconds. Add the oil and the bell pepper and sauté, stirring often, until cooked through but still crunchy, about 5 minutes.
2. Add the tomatoes, chili seasoning, and red beans. When the mixture starts boiling, reduce the heat to low, partially cover, and simmer for 20 minutes. Stir the chili occasionally to keep it from sticking to the bottom of the pan.
3. Stir in the corn and cook until heated through. Turn off the heat.
4. Cut the tomatoes lengthwise into quarters, Cut each quarter into ¼-inch slices. Chop these roughly and set aside in a small bowl. Coarsely chop the onion. Put each topping in a bowl.
5. Cut the lettuce into ¼-inch slices. Stack these and then cut them in half. Put the lettuce in a bowl.
6. Place the taco shells on a platter. Fill each with about ¼ cup of the chili mixture. Top with the tomato, lettuce, cheese, and onion.
Dad’s variation on the Cajun recipe, which is made with giblets, this “not so dirty rice” is a perfect accompaniment to a Mexican dinner.
Ingredients (serves four)
1½ cups water
1 cup canned crushed tomatoes
1 chicken bouillon cube
1 cup converted white rice
Equipment
Medium saucepan
1. Bring the water, crushed tomatoes, and bouillon cube to a boil in a medium saucepan. Add the rice. When the liquid returns to a boil, stir once, immediately cover the pan, and reduce the heat to low.
2. Cook the rice for 18 minutes or until the liquid is completely absorbed.
Note
If you are making the entire meal for 12, triple this recipe and use a large saucepan.
A perfect way to cool the palate after a spicy Mexican feast. Make your life easier by preparing this pie in advance, up to 4 days before the dinner.
Ingredients (serves six generously)
1 quart high-quality vanilla ice cream
1 6-ounce can frozen lemonade or limeade (do not dilute)
1 store-bought graham cracker pie crust
Equipment
Food processor or blender
Large bowl
Rubber spatula
1. Let the ice cream soften until it just begins to get runny. In 4 batches purée the ice cream in a food processor until light and creamy, about 15 seconds for each batch. If using a blender, purée the ice cream in 6 batches. Transfer the puréed ice cream to a large bowl.
2. Stir the frozen lemonade or limeade into the puréed ice cream until completely incorporated.
3. Transfer the mixture to the graham cracker crust, smoothing out the top with a rubber spatula. Place the pie in the freezer until ready to use.
4. Remove the pie from the freezer about 5 minutes before you want to serve it to let it soften.
Note
If you are serving the Mexican Feast for 12, make 2 pies.
Lamb chops are my personal favorite food. Thick chops simply grilled to a luscious pink medium rare with a glass of Italian Barolo is the way I like to celebrate special occasions. Other cuts, such as roast leg of lamb and shoulder chops, are both flavorful and easy to prepare.

Whole leg is one of the most popular cuts of lamb and is the basis for many classic dishes. The whole leg comes either bone in and weighs 7–8 pounds, or boneless and weighs 5–6 pounds. Both should be roasted.
Butterflied leg of lamb is a boneless leg that has been trimmed and then opened up and slightly pounded out. Have your butcher do it.

Boneless loin roast, lean, flavorful, and succulent, is one of the premier cuts of meat. The whole loin actually comes in 2 pieces and each should be rolled and tied before roasting.

Loin chops are cut from the loin and include the bone. Chops should be cut thick, about 1½ inches.

Shoulder chops are also very flavorful but are not nearly as lean as loin chops. They are cut thinner and can be either broiled or panfried.
Lamb chunks, which are great for stews or curries, are usually cut from the shoulder, although a friendly butcher might give you some from the leg, which are a bit leaner.

Rack of lamb is cut from the ribs, and while there is not a lot of meat, what there is is divine and expensive!
A whole leg of lamb (bone in or boneless) will serve 8 to 10 people. A rack of lamb serves 2 and a loin roast serves 6 people. Allow 2 lamb chops and 2 shoulder chops per person.
Loin chops To fry, chops should be only 1-inch thick (thinner than those cut for broiling). Measure a scant 2 tablespoons olive oil (for 4 chops) into a large frying pan, place it on high heat, and let it get very hot, about 1 minute. Just when the oil starts smoking, place the chops in the pan so that they aren’t touching. Panfry for 4–5 minutes. Then turn the chops and cook 3–4 minutes more. Don’t let them go too long on the second side as loin chops overcook easily.
Shoulder chops Season with salt, pepper, and garlic powder and prepare as above. Because shoulder chops are streaked with fat, you need very little oil to cook them.
Leg of lamb, bone in Preheat the oven to 400°F. Lightly oil a large roasting pan and rack. On the bottom of the pan, arrange 2 thinly sliced onions, 6 coarsely chopped cloves garlic, and 1 28-ounce can plum tomatoes, drained and coarsely chopped. Set a roasting rack over the vegetables and place the lamb on the rack. Rub the lamb with olive oil, salt, pepper, garlic powder, and rosemary. Roast for about 1 hour 15 minutes. Remove the lamb from the oven and let sit for 10 minutes before slicing. Skim the grease off the surface of the sauce in the roasting pan. Serve the lamb topped with the vegetables and sauce.
Boneless loin roast Preheat the oven to 400°F. Lightly oil a roasting rack and place it in a roasting pan. Place the lamb on the rack and rub the roast with olive oil, salt, pepper, garlic powder, and rosemary. Roast for about 1 hour 10 minutes. Let the meat sit for 10 minutes before carving.
Butterflied leg of lamb Preheat the broiler. Open up the leg and arrange it on a broiler tray with the smooth side down. You can marinate up to 6 hours before cooking. If you haven’t marinated the lamb, rub the top lightly with olive oil and sprinkle on some rosemary. Broil 4 inches from the heat for 6 minutes, then turn the meat and broil 6 minutes more. Lower the rack and broil 6 inches from the heat for 8–10 minutes, then turn and broil 6–8 minutes more. Cut into the meat at its thickest point. If it is pink, it is cooked to medium. The meat will continue cooking for about 10 minutes after it leaves the oven.
Shish kebab Preheat the broiler. Thread 1½- to 2-inch cubes of lamb through metal skewers and arrange the skewers on a broiler tray. If you haven’t marinated the lamb, brush the cubes lightly with olive oil and sprinkle on some rosemary. Broil 4 inches from the heat for 5–6 minutes. Turn them over and broil 5–6 minutes more. The cubes should be browned all over.
Loin chops Preheat the broiler. Arrange the chops on a broiler tray. Broil 1¼-to 1½-inch chops 4 inches from the heat for 7 minutes. Then turn them over and broil 5–6 minutes more. For thicker 2-inch chops, broil 4 inches from the heat for 7 minutes, turn, and broil 4 minutes more. Then lower the chops to 6 inches from the heat and broil for 5 more minutes. The chops should be slightly springy to the touch.
Shoulder chops Broil 4 inches from the heat for 7 minutes. Turn and broil about 5 minutes more.
Loin lamb chops fall into that elite category of foods, like lobster or Porterhouse steaks, that taste best when prepared as simply as possible. Thick chops, broiled medium rare, make for a perfect dinner. This classic red wine sauce, however, is a subtle enhancement and makes them absolutely sublime. The sauce is quite easy to assemble but does take about ½ hour to reduce.
Ingredients (serves four)
2 cups dry red wine
4 shallots, peeled and sliced
1 carrot, cut into 1-inch pieces
1 clove garlic, peeled and crushed
2 sprigs parsley
1 bay leaf
½ teaspoon dried thyme
1 cup homemade or canned chicken or beef stock (see Note)
3 tablespoons butter, cut into ¼-inch pieces
1 teaspoon cornstarch
Salt and pepper
8 loin lamb chops, cut 1¼–1½ inches thick
Sprigs of mint or parsley, for garnish
Equipment
Medium saucepan
Fine-mesh strainer
Small saucepan with cover
Small bowl
Broiler pan
1. Place the wine, shallots, carrot, garlic, parsley, bay leaf, and thyme in a medium saucepan and bring to a boil over high heat. Reduce the heat to medium and simmer, uncovered, until the liquid is reduced to about ⅔ cup, about 15 minutes. Add ¾ cup chicken or beef stock, increase the heat to high, and bring to a boil. Again reduce the heat to medium and simmer, uncovered, until the liquid is reduced to 1 cup, about 10 minutes.
2. Set a fine-mesh strainer in a small saucepan and pour the liquid through it. Set the small saucepan over low heat and stir in the butter, piece by piece. Mix the cornstarch with the remaining ¼ cup stock in a small bowl. Slowly drizzle this into the sauce, stirring continuously. Season with salt and pepper and simmer another 5 minutes, then turn off the heat.
3. Preheat the broiler.
4. Arrange the lamb chops on a broiler pan. Broil the chops 3 inches from the heat for 7 minutes on 1 side. Then turn the chops and broil for 5–6 minutes on the other side, depending on the thickness, for medium rare. For medium, broil 1 minute more on each side.
5. When the chops are done, remove them from the oven and let them sit for 3 minutes. Meanwhile, reheat the sauce over low heat for a few minutes, until it is hot. Spoon a thin layer of sauce over the bottom of each dinner plate and arrange 2 chops on each plate. Garnish with a sprig of mint or parsley.
Serving Suggestions
• Serve with baked potatoes or spaghetti squash.
• Serve asparagus and a mixed green salad.
Do not replace the chicken or beef stock with bouillon cubes for this sauce. The seasonings in the bouillon will become too concentrated and will overpower the sauce.
Time-Saver
The sauce can be made a night ahead. Let it cool before transferring to a plastic container or a small bowl. Lay a piece of plastic wrap directly on the surface of the sauce to keep a crust from forming on the top. Tightly cover the container or bowl before storing in the refrigerator. Add another tablespoon or so of wine or stock when reheating.
Here is an easy and tasty way to prepare the “other” lamb chop. The aroma of the garlic sautéing will probably draw a crowd to the kitchen.
Ingredients (serves four)
1 tablespoon olive oil
8 shoulder lamb chops, trimmed of fat
10 cloves garlic, minced
8 shallots, peeled and finely chopped
1 cup chicken stock or 1 bouillon cube dissolved in 1 cup boiling water
½ cup canned crushed tomatoes
2 tablespoons tomato paste
1 teaspoon dried rosemary
Salt and pepper
Equipment
Large frying pan
Medium baking dish
Aluminum foil
1. Preheat the oven to 350°F.
2. Place a large frying pan on medium-high heat and let it get hot, about 45 seconds. Add the oil and 4 of the chops, and sauté them until they are brown, about 2 minutes. Turn the chops and cook them for 2 minutes more. Transfer the chops to a medium baking dish and brown the remaining 4 chops.
3. Pour out all but a bit of the oil from the frying pan. Return the pan to the stove and lower the heat to medium. Add the garlic and shallots, and sauté, stirring often, until soft, about 3 minutes.
4. Add the chicken stock or bouillon to the pan and simmer until it is reduced by half, about 2 minutes. Add the crushed tomatoes, tomato paste, rosemary, and salt and pepper, and cook until the sauce thickens, about 2 minutes.
5. Pour the sauce over the chops. Cover the baking dish with aluminum foil and place it on the center rack of your oven for 20–25 minutes, until the chops are cooked through.
Serving Suggestions
• Serve with orzo or boiled new potatoes.
• Serve beets, sautéed escarole, or zucchini.
In recent years, farmers have been working to raise pigs that yield leaner pork, and Americans have been rethinking their attitudes toward “the other white meat.” Still, only the loin should be thought of as lean—although who can resist a slab of baby back ribs dripping with barbecue sauce or a succulent slice of glazed smoked ham? Just don’t indulge too often. Instead, expand your repertoire of recipes that call for pork loin.
Uncured pork cuts come from several different parts of the pig, including the shoulder, leg, and loin. But concern yourself primarily with meat from the loin, which is the most lean and comes whole or cut into chops.

Whole boneless loin of pork weighs 2 to 4 pounds and is a great dish to serve to a small crowd of 6 to 8 people.

Loin chops are simply bone-in cuts taken from the loin. These can be pan-fried, broiled, or baked. Because the meat is so lean, loin chops should be cooked quickly over high heat.

Crown roast is a circular arrangement of chops that have been scored, not separated. It is a majestic dish that can easily become the centerpiece at a dinner party for 6 to 8 people. Your butcher can prepare a crown roast for you.

Ribs come in 2 different sizes—country- style and baby back. Country-style have more meat on them. Baby backs are smaller but more succulent.
Cured pork comes in many shapes and sizes, from a small hock to an 8- to 18-pound ham. There are two processes for curing pork: It can be soaked in brine or dry-cured with a mixture of salt, sugar, and spices. After curing, the pork is usually smoked.

Smoked hams come from the hind leg of the hog, and have been both cured and smoked. They usually weigh between 11 and 14 pounds and are very simply cooked.
When buying boneless loin, figure on 6–8 ounces per person. Figure on 1 thickly cut (1½-inch) loin chop per person. A 5-pound crown roast, stuffed, will feed 6 to 8 people. Because there is so much bone on them, buy at least 1 pound of ribs per person.
Store pork the same way you would chicken. Remember to cook refrigerated meat within 2 days of purchase.
Roasting is the proper method for cooking a whole boneless loin or a crown roast. A loin roast can be marinated in many kinds of sauces, including Japanese and barbecue, and then simply roasted in the oven. The loin should be basted frequently with the sauce to help keep it from drying out. Cook either a crown or loin roast in a preheated 350°F oven for 20–22 minutes per pound or until the roast reaches an internal temperature of 150°–160°F on a meat thermometer. Thick chops can also be baked, but brown them first in a frying pan, to make them crispy.
Panfrying is a great way to cook chops, with or without the bone. The chops can be breaded or not, depending on your preference. Thinner chops should be fried over medium-high heat. Thicker chops should be browned quickly in the pan over high heat to get them crispy and seal in the juices. Then add ½ cup apple juice, salt and pepper, reduce heat to low, cover, and simmer for 40 minutes. Thick chops can also be finished in a 350°F oven after browning. Cook for 20–25 minutes.
Arrange the smoked ham, fat side up, in a roasting pan and place it on a low rack of a preheated 350°F oven. Add about an inch of apple juice or cider to the pan and cook for 15–18 minutes per pound. Then take the ham out of the oven and use a serrated knife to trim away the fat and rind. Cover the top of the ham with a sweet glaze, such as one made from 1 cup crushed pineapple mixed with 1 cup orange marmalade, and return it to the oven for 20 minutes or so, until the glaze is set.
Broiling is an excellent method for cooking pork chops. For thin chops, broil 3–4 inches from the heat. For thicker chops (1¼ inches and up), lower the meat to 5 inches from the heat to keep it from drying out. Figure on 3–5 minutes per side, depending on the thickness. You must keep a close eye on the meat or it’s likely to dry out.
Using orange when roasting meats is traditional in the Hunan region of China. Here, the sweetness of the orange mixes with the pungent ginger and sesame to make for a lively sauce.
Ingredients (serves six)
¼ cup orange juice
½ cup white wine
¼ cup honey
¼ cup soy sauce
2 tablespoons sesame oil
1 tablespoon minced fresh ginger or 1 teaspoon dried
½ cup apricot jam
2½- to 3-pound boneless pork loin
Equipment
Medium bowl
Small bowl
Large plastic container
Roasting pan
Meat thermometer
1. Mix together the orange juice, wine, honey, soy sauce, sesame oil, and ginger in a medium bowl. Place the apricot jam in a small bowl.
2. Place the pork loin in a plastic container just large enough to hold it. Pour the marinade over the pork, cover, and refrigerate for 6–12 hours.
3. Preheat the oven to 350°F.
4. Arrange the pork loin in a roasting pan and pour the sauce over it. Place the pan on the center rack of your oven and roast the loin for 1 hour 15 minutes.
5. After 1 hour 15 minutes, remove the roast from the oven. Take 3 tablespoons of pan drippings from the roasting pan and mix it with the jam in the bowl. Spoon the jam mixture over the loin and return it to the oven. Roast for 20–25 minutes more or until the meat reaches a temperature of 150°–160°F on a meat thermometer. Let the roast sit for 10 minutes before cutting into 1-inch slices.
Serving Suggestions
• Serve with white, brown, or wild rice.
• Serve sautéed green beans or broccoli.
Start marinating the chops in the morning, and they’ll be ready to be transformed into a quick and delicious entrée by dinnertime.
Ingredients (serves four)
Marinade
⅓ cup olive oil
Juice of 1 lemon
1 clove garlic, mashed
½ teaspoon dried thyme
½ teaspoon salt
Freshly ground black pepper
4 center-cut loin pork chops, about 1½ inches thick
2 large eggs, lightly beaten
1 cup Italian-style bread crumbs
¼ cup grated Parmesan
2 tablespoons chopped fresh parsley or 1 tablespoon dried
½ teaspoon dried thyme
Salt and pepper
1 tablespoon vegetable oil
Equipment
Large plastic container
Medium shallow bowl
Pie plate
Dinner plate
Large, ovenproof frying pan with cover
1. To marinate the chops, first trim away any excess fat and arrange them in a large plastic container in a single layer. Pour the olive oil and lemon juice over them, then add the garlic and sprinkle on the thyme, salt, and pepper. Turn the chops once so they are completely coated, cover the container, and refrigerate for 2–12 hours.
2. Preheat the oven to 325°F.
3. Remove the chops from the marinade and pat them dry with paper towels.
4. Beat the eggs in a medium bowl. Mix together the bread crumbs, Parmesan, parsley, thyme, and salt and pepper in a pie plate.
5. Dip the pork chops in the eggs and let the excess drip off. Dredge both sides of the chops in the bread crumbs and shake them gently to allow the excess crumbs to fall off. Lay the breaded chops on a dinner plate. (Wash the plate before reusing.)
6. Place a large ovenproof frying pan on medium-high heat and let it get hot, about 45 seconds. Add the vegetable oil and the chops and sauté them until golden brown, about 2 minutes. Turn the chops and cook for 2 minutes more.
7. Cover the pan and move it to the center rack of your oven for 20–25 minutes, until the chops are springy to the touch.
Serving Suggestions
• Serve with bow-tie noodles tossed with olive oil and fresh parsley.
• Serve tomato slices topped with chopped onion, lots of freshly ground black pepper, and a simple vinaigrette.
This classic American casserole, held together with condensed mushroom soup, is guaranteed to warm your cockles on a cold winter night.
Ingredients (serves four)
1 tablespoon butter
1 can condensed mushroom soup
6 medium potatoes, peeled and thinly sliced
6 loin pork chops, about 1-inch thick
1 teaspoon garlic powder
Salt and pepper
½ teaspoon dried thyme
8 x 12-inch baking dish
Small bowl
1. Preheat the oven to 350°F and use the butter to lightly grease a 8 x 12-inch baking dish.
2. In a small bowl, combine the mushroom soup with ½ can of warm water, stirring well. Set aside.
3. Arrange half the sliced potatoes in an even layer over the bottom of the prepared baking dish and season with salt and pepper.
4. Arrange the pork chops in a single layer over the potatoes. Season with the garlic powder and salt and pepper. Sprinkle on the thyme. Arrange the remaining potato slices over the chops.
5. Pour the mushroom soup over the top of the casserole so it almost reaches the level of the second layer of potatoes. If there isn’t enough soup, add a little more water.
6. Bake the casserole, uncovered, on the center rack of the oven for 1 hour or until the potatoes are cooked and the liquid is almost completely absorbed.
Serving Suggestion
Serve with glazed carrots and a simple green salad.
The sublime taste of fresh fish is best shown off in the simplest of preparations. In a hot pan with a little oil or butter, you can sauté a few fillets of sole in 5 minutes. Bay scallops take even less time to sauté. Salmon steaks can be baked in a lightly greased pan, and then need only a dash of salt and pepper and a spritz of lemon to finish them off. More complex sauces can be made for fish as well, but they are by no means a requirement.

The easiest way to ensure that you are buying fresh, high-quality fish is to get it at a busy fish market with lots of turnover. When buying whole fish, look for plump, bright ones with good muscle tone. The eyes should be bright and slightly bulging. Saggy or sunken eyes are a sign of old fish.
Fillets are cut lengthwise from the backbone, so they are boneless. They are skinned and ready to cook.

A steak is a crosscut section of a cleaned, scaled fish cut at least ¾ inch thick from the thickest part of the fish. Fillets and steaks should be moist and firm, and the flesh should be well toned. If it is soft or at all mushy, or if it has a film on the surface, look for something else.

The rule of thumb for serving sizes is 6 ounces of fillet, steak, or whole fish per person. For brook trout, figure one trout per person. For shrimp, get ⅓ pound of medium or large shrimp per person. For jumbo shrimp, judge by number (4 or 5 per person). For lobster, you’ll need at least one 1¼-pounder per person. When buying fillets, check to make sure that they are all of equal thickness. If they are not, oine piece will cook faster than the other and with fish, even 1 minute can mean the difference between succulent and dried out.
With fish, freshness is critical because its flavor and texture break down quickly. It’s important to cook fish the day you buy it.
If you must keep your fish until the next day, follow this procedure: Remove the wrapping and dip the fish in a bowl of ice water with some freshly squeezed lemon juice which helps to slow down aging. Then pat the fish dry, wrap it in plastic, and place it on the bottom (the coldest part) of the refrigerator. If fish develops a mild fishy smell, use it in chowder. If the smell is pronounced and the fish feels filmy, discard it.
Broiling is a good method for cooking fattier fish, such as tuna, swordfish, and salmon, as they are sturdier and can withstand the intense heat. Broiling leaves the fish slightly crusty on the outside, which seals in the juices. Place the fish on a lightly oiled baking sheet. Sprinkle with a few teaspoons of water, lemon juice, or wine to keep it from drying out. Broil 4 inches from the heat. Thick steaks (1–1¾ inches) will need to be turned once after 6–7 minutes. Thinner steaks or fillets needn’t be turned at all. Thin fillets (¾ inch or less), such as flounder or sole, should not be broiled as they will dry out.
Like broiling, panfrying allows the fish to develop a crust on the outside while keeping the inside moist. Panfrying is also suitable for fillets too thin to broil. Before frying, lean fillets can be dipped in milk or a well-beaten egg, and dredged in flour, bread crumbs, or cornmeal to seal in moisture. Steaks cut from fatty fish, such as tuna, salmon, or swordfish, do not need to be coated before cooking. Small whole fish, such as brook trout, can also be panfried and do not need to be coated.
Heat the pan over medium-high heat until it is hot, about 30 seconds. Then add a few tablespoons of olive oil or a combination of olive oil and butter. Gently lay the pieces of fish in the pan, being sure not to crowd them together. Cook half the prescribed time and then turn the fish over. It’s important to use a large spatula to turn a large fillet to keep it from falling apart.
Baking is perhaps the easiest way to cook fish and it gives you the most room for error. Fillets, steaks, and whole fish can all be baked with very good results. Simply arrange the fish in a lightly oiled baking pan and bake in a preheated 400°F oven for 10 minutes per inch of thickness. Whole fish which have been scaled and gutted by the fishmonger can be stuffed with a combination of herbs, sautéed vegetables, nuts, and bread crumbs. Another way to enhance the flavor is to place the fish on a bed of thinly sliced, lightly sautéed vegetables, such as onions, celery, or carrots. Chopped garlic and/or fresh ginger are two of the best herbs for fish. A bit of wine or soy sauce added to the bottom of the pan makes a delicate sauce that can be served over the fish.
Baking in foil is an almost foolproof way of cooking moist fish. Place a 9-inch square of foil on the work surface and lightly oil or butter it. Lay the fish in the center and sprinkle it with salt and pepper and a dot of butter. You can also add a marinade of 1 tablespoon soy sauce, white wine, or broth, and a pinch of chopped scallions, fresh ginger, or garlic. Pull the top and bottom sides of the foil together and fold them down to make a loose package. Then fold the ends securely. Place the foil in a baking pan and bake in the middle of a preheated 400°F oven for 15 minutes per inch of thickness.
Poaching is simply cooking the fish in a small amount of water and lends itself to cooking thin fillets and smaller whole fish. Keep the water just barely simmering. If it boils too rapidly the fish will be tough. Fillets and small whole fish can be poached in a covered sauté pan on top of the stove. Bring ½ inch water to a simmer, add the fillets (in 1 layer) or the whole fish and cover the pan. Increase the heat until the liquid is simmering again, then quickly lower the heat. Start timing now, following the 10-minute-per-inch rule.
A fish poacher enables you to cook large fish because it has an insert that allows you to raise and lower the fish into the hot liquid. Bring a few inches of water to a boil in the bottom of the poacher. Lower the fish into the pan and let the liquid return to a boil. Proceed as above.
The print edition of this book includes charts for Fish Primer.
Please download a PDF of the charts here: workman.com/ebookdownloads
These fatty fish are best for broiling, baking, and grilling. Meatier than flatfish, they can be cut into steaks or thick fillets. Use these fish in chowders and pasta sauces, as they won’t flake and dissolve into the liquid.

These fish are lean and delicate and yield thin fillets that are best poached, cooked in foil, baked whole, or gently sautéed. They cook up quickly and their mild flavor makes them family favorites.

Baking in foil is one of the easiest ways to cook fish. This technique also helps to keep fish moist and flavorful.
Ingredients (serves four)
1 tablespoon butter
4 red snapper fillets, 4–6 ounces each
1 tablespoon lemon juice
1 teaspoon chopped parsley
Salt and pepper
Equipment
Four 9-inch squares of aluminum foil
11 x 17-inch baking sheet
1. Preheat the oven to 375°F.
2. Place four 9-inch squares of aluminum foil on the counter and butter them lightly.
3. Lay 1 fillet in the center of each piece of foil. Sprinkle each fillet with lemon juice, parsley, and salt and pepper.
4. Bring together the top and bottom ends of the foil and fold together, without pressing on the fillets, until you have a neat package. Now fold over the sides, being careful not to press too close to the fish.
5. Arrange the foil packets on the baking sheet and bake for 10 minutes.
6. Slit open the packets with a knife and ease the fish and its juices onto a plate.
Serving Suggestions
• Serve with herbed baked new potatoes.
• Serve steamed snow peas, sugar snap peas, or asparagus.
This is an elegant dish for when Dad wants to show off. The saffron has a sublime flavor and turns the sauce bright yellow, which always intrigues the kids.
½ teaspoon dried saffron threads
1 16-ounce can whole tomatoes, well drained
1 tablespoon butter, plus extra for greasing the aluminum foil
3 shallots, minced
¾ cup white wine
¾ cup heavy cream
4 sole or flounder fillets (about 6 ounces each)
Salt and pepper
4 cups cooked rice, for serving
¼ cup chopped fresh parsley, for garnish
Equipment
9 x 12-inch baking dish
Aluminum foil
Small bowl
Large frying pan
1. Preheat the oven to 350°F. Lightly butter a 9 x 12-inch baking dish as well as a piece of aluminum foil large enough to cover it.
2. Put the saffron threads in a small bowl. Add a few tablespoons warm water and let the threads soften.
3. Chop the tomatoes lengthwise into quarters and then into 1-inch chunks. Set aside.
4. Place a large frying pan on medium heat and add 1 tablespoon butter. When the butter stops sizzling, add the shallots and sauté until soft, about 3 minutes, stirring often. Increase the heat to high. Add the wine and cook until the liquid is reduced by half.
5. Add the cream and the saffron with the water and cook, stirring constantly, until the liquid is reduced by half, about 2 minutes. Add the chopped tomatoes and turn off the heat. Let the sauce sit while you cook the sole.
6. Arrange the sole fillets on the prepared baking dish in a single layer and lightly salt and pepper them. Cover the fish with the prepared aluminum foil, buttered side down. Bake on the center rack of the oven for 7 minutes.
7. A few minutes before the fish is done cooking, reheat the sauce over low heat.
8. Spoon enough cream sauce onto each dinner plate to cover the bottom. Using a spatula, gently place the fish on top of the sauce. Arrange rice around the fish, and garnish with a bit more sauce and the chopped parsley.
This awe-inspiring dish couldn’t be easier to prepare: It’s simply a matter of sprinkling the spices on the salmon steaks and throwing them in the oven. The Cajun flavor enhances the natural taste of the salmon.
Ingredients (serves four)
1 tablespoon onion powder
1 tablespoon garlic powder
1 tablespoon paprika
1 tablespoon chili powder
1 teaspoon dried oregano
½ teaspoon salt
Pinch of cayenne pepper
Vegetable oil, for greasing the baking pan
4 salmon steaks, cut 1 inch thick
2 cups salsa, if serving fish at room temperature
1 lime, cut into quarters
Equipment
Small bowl
9 x 12-inch baking pan
Aluminum foil
1. Preheat the oven to 325°F.
2. Combine all the spices through the cayenne pepper in a small bowl and set aside.
3. Line a 9 x 12-inch baking pan with aluminum foil, then lightly grease the foil with vegetable oil.
4. Sprinkle half the prepared spice mixture over the top of the salmon steaks. Place the steaks, spiced side down, on the aluminum foil-lined baking pan and sprinkle on the remaining spice mixture.
5. Bake the salmon, uncovered, on the center rack of the oven for 12–14 minutes, until the fish flakes when tested with a fork.
6. Serve the fish immediately with wedges of lime, or let it cool about 1 hour and serve at room temperature topped with salsa and garnished with lime wedges.
The sauce of tomatoes and herbs gives this fish a distinctive flavor. Fresh herbs are best with this dish, but if they’re not available, soak the dried herbs overnight in the oil and sun-dried tomatoes.
Ingredients (serves four)
Vegetable oil, for greasing the casserole
4 ounces sun-dried tomatoes in oil
1 clove garlic, mashed
¼ cup parsley leaves
1 teaspoon fresh oregano or ½ teaspoon dried
½ teaspoon fresh or dried rosemary
½ teaspoon salt
2 fillets (1½ pounds) mackerel
Equipment
9 x 14-inch casserole
Blender or food processor
1. Preheat the oven to 375°F. Lightly grease a 9 x 14-inch casserole.
2. Remove the sun-dried tomatoes from the oil and finely chop them. Save the remaining oil.
3. Put the garlic, herbs, salt, and 3 tablespoons of the oil from the tomatoes in a blender or food processor. Blend until just puréed.
4. Lay the fish in the prepared pan. Spread the herb mixture over the fish. Sprinkle on the chopped sun-dried tomatoes.
5. Bake for 12–15 minutes on the middle rack of the oven, until the fish begins to flake.
Serving Suggestions
• Serve with fusilli or radiatore in a light herb sauce.
• Serve mixed greens sprinkled with diced red, yellow, and green bell peppers.
This is a very quick way to cook any fillet of white-meat fish. The Parmesan and garlic add extra zip.
Ingredients (serves four)
½ cup bread crumbs
3 tablespoons Parmesan
1 clove garlic, minced
3 tablespoons finely chopped fresh parsley
Salt and pepper
2 large eggs
4 flounder fillets (4–6 ounces each)
2 tablespoons vegetable oil
1 lemon, cut into wedges
Equipment
Large frying pan
Pie plate
Medium shallow bowl
Dinner plate
Spatula
1. Mix the bread crumbs, Parmesan, garlic, parsley, and salt and pepper in a pie plate. Beat the eggs in a medium shallow bowl.
2. Dip each fillet in the egg and let the excess drain off. Lay both sides of the fillets in the bread crumb mixture and shake gently to release excess crumbs. Lay the breaded fillets on a dinner plate.
3. Place a large frying pan on medium-high heat and let it get hot, about 45 seconds. Add the oil and the fish fillets and cook until they are lightly browned, about 3 minutes. Turn the fillets with a spatula (being careful not to break the fish) and cook the other side for 2 minutes.
4. Lower the heat to medium and cook until the fish flakes, 1–2 minutes more. Lightly season with salt and pepper and a spritz of lemon and serve hot.
Variations
This dish also works with sole, trout, or snapper fillet. For thicker pieces of fish, like mackerel, cod, or scrod, preheat the oven to 350°F. Sauté the fish in an ovenproof frying pan for 2 minutes on each side until lightly browned, then put the pan in the oven and bake until the fish flakes, about 4–6 minutes.
Serving Suggestions
• Serve with garlic bread.
• Serve with endive salad or steamed broccoli.
Shrimp, scallops, lobster, clams, and mussels are the most popular shellfish. Shrimp and scallops have usually been frozen and are defrosted by the fishmonger before selling. They will last a day in your refrigerator, after which they should definitely be cooked. Lobsters, clams, and mussels are sold live. It is best to cook and eat lobster the day it is purchased. Clams and mussels in their shells can be stored in the refrigerator covered with a damp towel for several days.
The print edition of this book includes a chart for Shellfish Primer.
Please download a PDF of this chart here: workman.com/ebookdownloads
Once the shrimp are prepared this dish is easy to make and it will give your kids a little taste of New Orleans.
Ingredients (serves four)
1½ pounds large shrimp
4 tablespoons (½ stick) butter or margarine
2 tablespoons Worcestershire sauce
3 tablespoons ketchup
1 tablespoon Cajun or Creole seasoning
¼ teaspoon cayenne pepper
Juice of 2 lemons
3 cloves garlic, minced
1 bay leaf
Equipment
9 x 11-inch casserole
Medium saucepan
Whisk
1. Preheat the oven to 450°F.
2. Peel and devein the shrimp. Keep refrigerated until ready to use.
3. Melt the butter or margarine in a medium saucepan. Remove from the heat. Whisk in the Worcestershire sauce, ketchup, Cajun seasoning, cayenne pepper, lemon juice, garlic, and bay leaf.
4. Arrange the shrimp in a single layer in a 9 x 11-inch casserole, then pour the butter mixture over the shrimp.
5. Bake on the center rack of your oven for 3 minutes. Turn the shrimp and bake for 2 minutes more.
6. Transfer the shrimp to a serving platter and pour on any remaining sauce.
Serving Suggestions
• Serve with rice or crusty bread to soak up any leftover sauce.
• Serve diced tomato and onion, and corn-on-the-cob.
I like to make this colorful and lively dish on hot summer evenings when I’m tired of barbecuing. It’s light and festive and needs only some rice or thin noodles to accompany it.
Ingredients (serves four)
1 cup chicken broth, plus 1 tablespoon
2 tablespoons soy sauce
1 tablespoon white wine or dry sherry
1 teaspoon sugar
2 teaspoons cornstarch
1 tablespoon oil
1 small red bell pepper, cored, seeded, and cut into ¼-inch strips
1 small red onion, thinly sliced
8–10 ears canned baby corn, patted dry
1 pound scallops (if using sea scallops, cut them in half)
2 cloves garlic, minced
1 tablespoon fresh ginger, minced, or 1 teaspoon ground ginger
½ cup frozen peas, thawed
Equipment
Small bowl
Large, heavy frying pan or wok
1. To make the sauce, in a small bowl stir together the chicken broth, soy sauce, white wine or sherry, and sugar. If using the ground ginger, add it now and stir it into the sauce.
2. In a small bowl, dissolve the cornstarch in the 1 tablespoon broth and set aside.
3. Place a large, heavy frying pan or wok on high heat and let it get very hot, about 90 seconds. Add the oil, bell pepper, onion, and baby corn, and stir-fry until the pepper softens, about 3 minutes. Add the scallops and stir-fry until they begin to get opaque, 3–4 minutes depending on their size. Add the garlic and fresh ginger (if using) and stir-fry 1 minute more.
4. Add the sauce and the frozen peas. As soon as the sauce starts simmering, add the cornstarch mixture and stir to combine. Continue cooking another minute or so until the sauce begins to thicken and a nice glaze begins to form on the vegetables and scallops. Serve immediately.